USER MANUAL WD 3500P KARCHER
natural_image
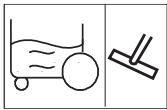
Line drawing of a vacuum cleaner device with control panel and wheels (no text or symbols)
Deutsch ..... 5
English ..... 10
Français ..... 15
Italiano. ..... 20
Nederlands . . 25
Español ..... 30
Português . . . 35
Dansk ..... 40
Norsk ..... 45
Svenska ..... 50
Suomi ..... 55
Ελληνικά. . . . 60
Türkçe ..... 66
Русский ..... 71
Magyar. ..... 77
Čeština ..... 82
Slovenščina . . 87
Polski ..... 92
Românește .. 97
Slovenčina . . 102
Hrvatski .....107
Srpski .....112
Български .. 117
Eesti .....123
Latviešu .....128
Register and win!
www.karcher.com
text_image
Technical diagram of a vacuum cleaner with numbered parts for identification
| 11 12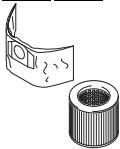 | 13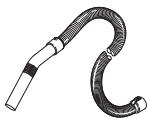 | 14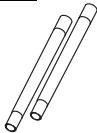 | 15 | 16 | 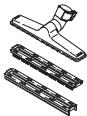 | 17 |
| WD 3.2xx |  | [6Y7S] |  – – |  |  |  |  |
| WD 3.3xx M |  |  |  |  | ○ |  |  |
| WD 3.5xx P |  – – |  – – |  – – |  – – | ○ |  – – |  – – |
text_image
A 1
1.
2.
1.
Jg
1
text_image
A 2
B 1
text_image
B 2
B 3
0 OFF
O
I
1 ON
+ 1 ON
O
OFF
II
O
1 ON
text_image
C 1
2.
3.
A
1.
A
5.
4.
text_image
C 2 + 1 ON
O OFF
1 ON
D 1
E 1
text_image
F 1
F 2
G 1
1.
OPEN
2.
text_image
G 1
3.
4.
6.
CLOSE
5.

WD 3.2xx | WD 3.3xx M | WD 3.5xx P
220 - 240 V / 1\~50, 60 Hz
1200 W
1400 W
10 A
EU: 2100 W
GB: 1800 W
CH: 1100 W
EU: 16 A
GB: 13 A
CH: 10 A
171
10 l
81
H 05VV-F2x0,75
H 05VV-F3G1,5
75 dB(A)
75 dB(A)
75 dB(A)
5,4 kg
5,8 kg
5,7 kg
Inhaltsverzeichnis
Sicherheitshinweise..... DE ... 1
Safety instructions.... EN ... 1
Description of the Appliance. EN ... 2
Operation.... EN ... 3
Maintenance and care..... EN ...4
Troubleshooting..... EN ... 4
Helpline.... EN ... 5
General notes ..... EN ... 5
Technical specifications .... EN ... 5
Dear Customer,

Please read and comply with these original instructions prior to the initial operation of your appliance and store them for later use or subsequent owners.
Proper use
The appliance is intended for use as a Multi-Purpose Vac corresponding to the descriptions given in these operating instructions and the safety notes.
This appliance has been designed for use in private households and is not intended for commercial use.
- Protect the unit from rain. Do not store outside.
- This device may not be used to suck in ash and soot.
Use the Multi-Purpose Vac only with:
- Original filter bag.
- Original spare parts, accessories and special accessories.
The manufacturer is not responsible for any damages that may occur on account of improper use or wrong operations.
Environmental protection

The packaging material can be recycled. Please do not place the packaging for the ordinary refuse for disposal, but are for the proper recycling.

Old appliances contain valuable materials that can be recycled. Please arrange for the proper recycling of old appliances. Please dispose your old appliances using appropriate collection systems.
Disposing the filters and filter bags
Filters and filter bags are made from environment-friendly materials.
They can therefore be disposed off through the normal household garbage provided you have not sucked in substances that are not permitted to be thrown into household garbage.
Notes about the ingredients (REACH)
You will find current information about the ingredients at:
- This device is not intended for use by persons (including children) with reduced physical, sensory or mental abilities or lacking experience and/or knowledge, unless they are supervised by a person responsible for their safety or are instructed by these persons on the use of the device. Children should be supervised, to ensure that they do not play with the device.
- Keep packaging film away from children - risk of suffocation!
- Switch the appliance off after every use and prior to every cleaning/maintenance procedure.
– Risk of fire. Do not vacuum up any burning or glowing objects.
- The appliance may not be used in areas where a risk of explosion is present.
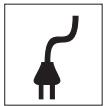
Electrical connection
The appliance may only be connected to alternating current. The voltage must correspond with the type plate on the appliance.
⚠️ Risk of electric shock
Never touch the mains plug and the socket with wet hands.
Do not pull the plug from the socket by pulling on the connecting cable.
Check the power cord with mains plug for damage before every use. If the power cord is damaged, please arrange immediately for the exchange by an authorized customer service or a skilled electrician.
To avoid accidents due to electrical faults we recommend the use of sockets with a line-
side current-limiting circuit breaker (max. 30 mA nominal tripping current).
Caution
Certain materials may produce explosive vapours or mixtures when agitated by the suction air!
Never vacuum up the following materials:
- Explosive or combustible gases, liquids and dust particles (reactive dust particles)
- Reactive metal dust particles (such as aluminium, magnesium, zinc) in combination with highly alkaline or acidic detergents
– Undiluted, strong acids and alkalies
- Organic solvents (such as petrol, paint thinners, acetone, heating oil).
In addition, these substances may cause the appliance materials to corrode.
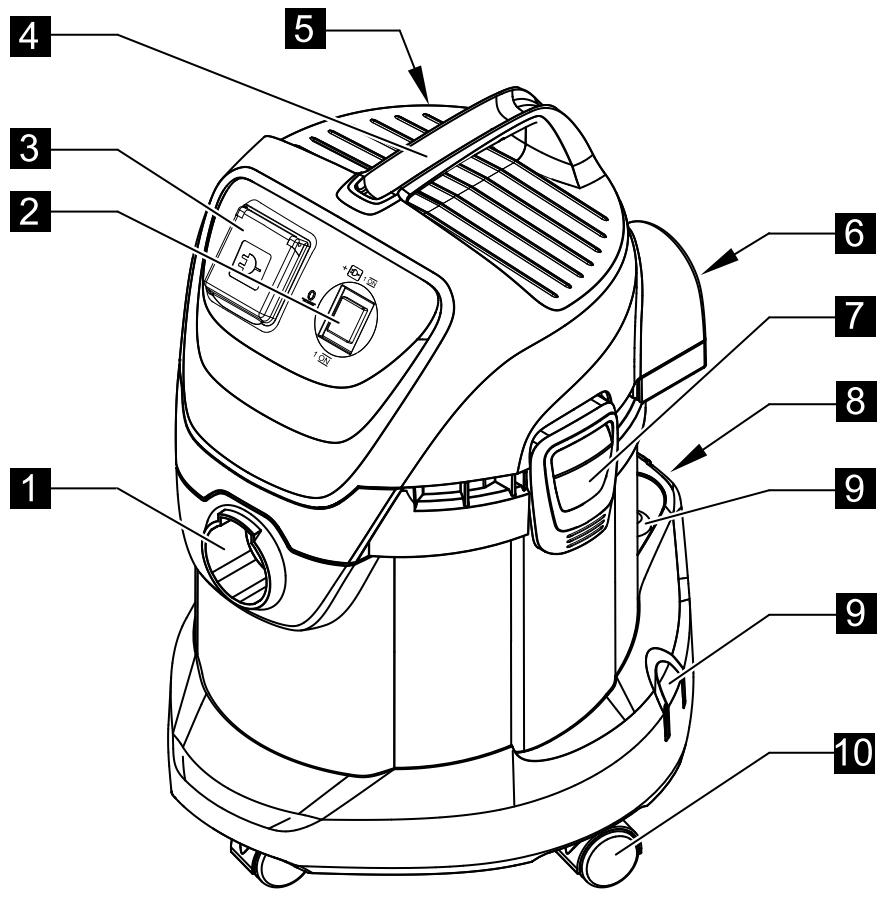
Description of the Appliance
Illustrations on fold-out page!

These operating instructions describe the basic models of the Multi-Purpose Vacs shown on the front cover.
■ The illustrations show the maximum equipment; depending on the model, there are differences in equipment and supplied accessories.
When unpacking the product, make sure that no accessories are missing and that none of the package contents have been damaged. If you detect any transport damages please contact your dealer.
● included in the scope of delivery
○ possible accessories
1
Suction hose connection
→ To connect the suction hose during vacuuming.
(see description / illustration B1)
2
ON/OFF switch for appliance (without built-in socket)
→ Position 1: Suction or blowing
Position 0: Appliance is switched off
2
ON/OFF switch for appliance (with built-in socket)
→ Position I: Suction or blowing
Position II: Automatic vacuuming with connected electric tool
Position 0: Appliance and the connected electric tool are switched off
3
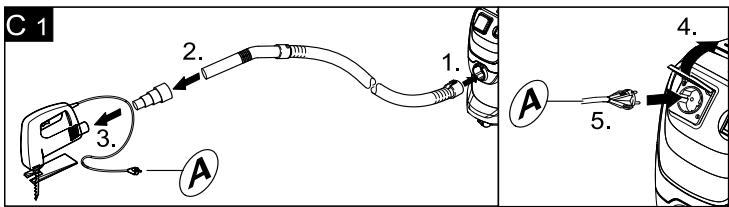
Machine socket
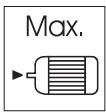
Note: Observe the maximum connected power (see Chapter "Specifications").
→ To connect an electric tool.
(see description / illustration C1)
4
Carrying handle
→ Transport the appliance using the carrying handle.
5
Cable hook
→ To store the mains cable.
(see description / illustration F2)
6
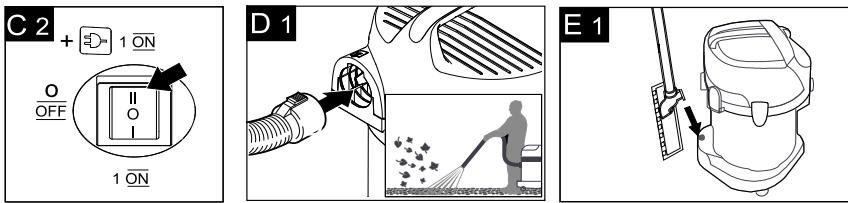
Blowing connection
→ Connect the suction hose to the blower connection, this will activate the blower function.
(see description / illustration D1)
7
Container closure
→ Pull out to open, push in to lock.
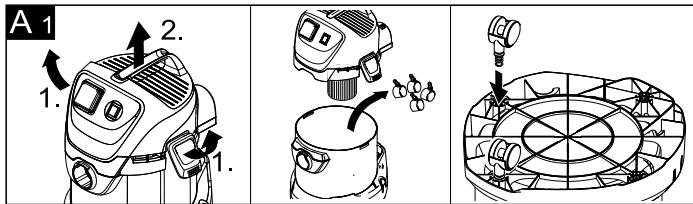
(see description / illustration A1)
8
Parking position
→ To rest the floor nozzle during work interruptions.
(see description / illustration E1)
9
Accessory mount
→ The accessories compartment allows the storage of suction pipes and suction nozzles on the appliance.
(see description / illustration F2)
10
Steering roller
→ The steering rollers are located in the compartment when the appliance is delivered. These must be attached prior to starting up the appliance.
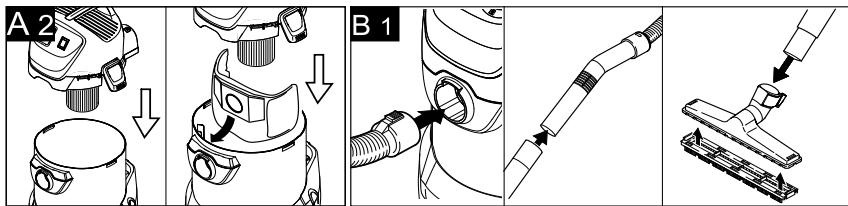
(see description / illustration A1)
11 Filter bag
Note: Do not use a filter bag for wet vacuuming!
→ Recommendation: To vacuum fine dust, use the filter bag.
(see description / illustration A2)
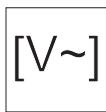
12 Cartridge filter
(already installed in the appliance)
→ The cartridge filter must always be installed - with wet and dry vacuuming.
Note: Let the wet cartridge filter dry prior to using it for dry vacuuming.
(see description / illustration G1)
13 Suction hose with handle
→ Slide the suction hose into the connection, it will lock into place.
(see description / illustration B1)
In order to disconnect it, push down with your thumb and pull the suction hose out.
14 Suction tubes 2 x 0.5 m
→ Connect both suction pipes and connect them to the suction hose.
(see description / illustration B1)
15 Crevice nozzle
→ For edges, joints, heaters and hard to reach locations.
16 Floor nozzle (with inserts)
→ Use the appropriate insert for vacuuming on hard surfaces and carpets.
(see description / illustration B1)
Hard surfaces, wet vacuuming: Use the insert with 2 rubber lips (or with a rubber lip and bristle strips).
Hard surfaces, dry vacuuming: Use the insert with 2 bristles (or with a rubber lip and bristle strips).
Carpets, wet and dry vacuuming: Work without an insert.
17 Adapter
→ To connect the suction hose with an electric tool.
(see description / illustration Ⓞ1)
→ Adapt the adapter to the connection diameter of the electric tool using a knife if necessary.
Operation
△ Always work with an inserted cartridge filter - during wet as well as dry vacuum cleaning!
Before Startup
→ Illustration A 1
Mount loose parts delivered with appli-
ance prior to start-up.
→ Illustration A 2
Recommendation: To vacuum fine dust, use the filter bag.
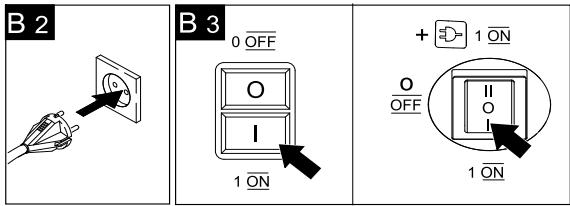
Start up
→ Illustration B 1
Connect accessories.
→ Illustration B 2
Plug in the main plug.
→ Illustration B 3
Turn on the machine.
Dry vacuum cleaning
⚠️ Work only with a dry cartridge filter!
→ Recommendation: To vacuum fine dust, use the filter bag.
(see description / illustration A2)
The filling level of the filter bag depends on the dirt that is sucked in.
The filter bag needs to be replaced more frequently while sucking in fine dust, sand, etc.
Clogged filter bags can burst - therefore make sure to replace the filter bag in a timely manner!
→ Caution: Always use a pre-separator while vacuuming ashes and soot (order no. 2.863-139).
Wet vacuum cleaning
→ Attach the accessories to vacuum moisture or wetness to the suction pipes or directly to the handle.
Caution:
Do not use a filter bag!
Immediately switch the appliance off if foam forms or liquids escape!
Note: If the container is full a float closes the suction opening and the appliance works at a higher speed. Switch off the appliance immediately and empty the container.
→ Adapt the adapter to the connection diameter of the electric tool using a knife if necessary.
→ Illustration C1
Connect the adapter to the handle of the suction hose and connect it to the electric tool connection.
Connect the mains plug of the electric power tool to the vacuum cleaner.
→ Illustration C2
Switch the vacuum cleaner to Position II and start working.
Note: The suction turbine starts with a delay of 0.5 seconds after the electric tool has been switched on. After the electric tool has been switched off, the suction turbine will continue to run for approx. 5 seconds to suck in the remaining dirt from the suction hose.
Blowing function
Cleaning hard to reach locations or, where vacuuming is not possible, like leaves from a gravel bed.
→ Illustration D 1
Connect the suction hose to the blower connection, this will activate the blower function.
Interrupting operation
→ Turn off the appliance.
→ Illustration E1
Hook the floor nozzle into the parking position.
Finish operation
→ Turn off the appliance and disconnect the mains plug.
Empty the container
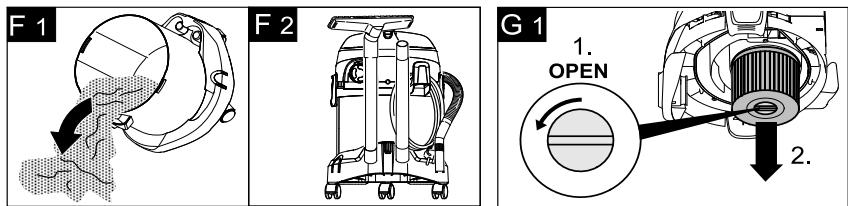
→ Illustration F1
Remove the appliance head and empty the reservoir.
Storing the appliance
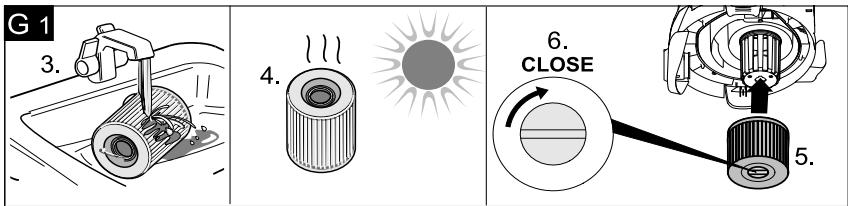
→ Illustration F2
Stow away the mains cable and accessory at the machine. Store the appliance in a dry room.
Maintenance and care
⚠️ Danger
Turn off the appliance and remove the mains plug prior to any care and maintenance work. Repair works may only be performed by the authorized customer service.
Caution
Do not use abrasives, glass or universal cleaners! Never immerse the appliance in water.
→ Clean the appliance and accessory parts made of plastic with a commercial plastic cleaner.
→ If required, rinse the container and accessories with water properly and dry them before reuse.
→ Illustration G 1
Only clean the cartridge filter under running water; do not wipe or brush. Let it dry completely prior to installation.
Troubleshooting
Decreasing cleaning power
If the cleaning power of the appliance deteriorates please check the following:
→ Accessories, suction hose or suction tubes are clogged, please remove the obstruction using a stick.
→ Filter bag is full, install new filter bag.
(see description / illustration A2)
→ Cartridge filter is dirty, knock off dirt from cartridge filter and clean under running water if necessary.
(see description / illustration G1)
→ Replace damaged cartridge filter.
Helpline
Karcher (UK) Limited operate a helpline allowing customers to discuss any problems experienced with our products.
The helpline operates during normal business hours, if you have difficulty getting through, please understand that there are peak periods during the day when our consultants are unable to take all calls coming in. In these circumstances we would ask that you try to contact us again later in the day.
The helpline number is 01295 752200, open from 8.30am to 5.00pm Monday to Friday.
It helps us if you have the model number and data plate details to hand before making your call.
Alternatively you may write or E-mail to the address below:
Karcher (UK) Limited
Karcher House
Beaumont Road
Banbury
Oxon, OX16 1TB
E-mail:
info@karcher.co.uk
General notes
Warranty
The terms of the guarantee applicable in each country have been published by our respective national distributors. We will repair possible faults on your unit free of charge within the warranty period, insofar as the faults are caused by material defects or defective workmanship. Guarantee claims should be addressed to your dealer or the nearest
authorized customer service centre, and supported by documentary evidence of purchase. (See address on the reverse)
Customer Service
Our KÄRCHER branch will be pleased to help you further in the case of questions or faults. (See address on the reverse)
Ordering spare parts and special attachments
At the end of the operating instructions you will find a selected list of spare parts that are often required.
You can procure the spare parts and the attachments from your dealer or your KÄRCHER branch office.
(See address on the reverse)
Technical specifications
The Specifications are listed on page IV. The following is an explanation of the symbols.

Voltage

Output P_nom

Output P_max

Max. connection output of appli-
ance socket

Mains fuse (slow-blow)

Container capacity

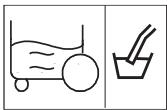
Water intake with handle

Water intake with floor nozzle

Power cord

Sound pressure level (EN 60704-2-1)

Weight (without accessories)
Subject to technical modifications!
Table des matières
Mult stimate client,

6975 Creditview Road Unit #2
Mississauga, Ontario L5N 8E9
1-800-465-4980
CH
Kärcher AG
Industriestraße 16
8108 Dällikon
0844 850 863
CZ
Kärcher spol s r.o.
Modletice č.p. 141
251 01 Ríčany u Prahy
0323 606 014
D
Kärcher Cleaning Systems A.E.
31-33, Nikitara str. &
Konstantinoupoleos str.
13671 Acharnes
210 - 2316 153
H
Kärcher Hungária Kft
Tormásrét ut 2.
2051 Biatorbágy
(023) 530 640
HK
Kärcher Limited
Unit 10, 17/F.
APEC Plaza
49 Hoi Yuen Road
Kwun Tong, Kowloon
(02) 357-5863
|
Kärcher S.p.A.
Via A. Vespucci 19
21013 Gallarate (VA)
848-99 88 77
IRL
Karcher Ltd
C1 Centrepoint Business Park
Oak Road
Dublin 12
(01) 409 7777
KOR
Karcher (Korea) Co. Ltd.
162Gukhoe-daero
(872-2 Sinjeong-Dong)
Seoul, Korea
02-322-6588,A/S.1544-6577
MAL
Karcher Cleaning Systems Sdn. Bhd.
No. 8, Jalan Serindit 2
Bandar Puchong Jaya
47100 Puchong, Selangor
(03) 5882 1148
MEX
Karcher México, SA de CV
Av. Gustavo Baz No. 29-C
Col. Naucalpan Centro
East Tamaki, Auckland
(09) 274-4603
P
NEOPARTS II - Equipamentos, S.A.
Av. Infante D. Henrique, Lote 35
1800-218 Lisboa
21 8558300
PL
Kärcher Sp. zo.o.
UI. Stawowa 140
31-346 Kraków
(012)6397-222
PRC
Kärcher Cleaning Systems Co., Ltd.
Part B, Building 30,
No. 390 Ai Du Road
Shanghai Waigaoquiao 200131
(021)5046-3579
RO
Karcher Romania s.r.l.
Sos. Odaii Nr. 439
013606 Bucureşti
0372709001
RUS
000 «Керхер», ул.
5 Toh Guan Road East
01-00 Freight Links
Express Distripark
Singapore 608831
6897-1811
SK
Kärcher Slovakia, s.r.o.
Beniakova 2
94901 Nitra
037 6555 798
TR
Karcher Servis Ticaret A.S.
5F/6. No.7, Wu-Chuan 1st Rd
Wu-Ku Industrial Zone
Taipei County
(02) 2299-9626
UA
Kärcher Ukraine
Kilzevadoroga, 9
03191, Kyiv
(044) 594 75 75
UAE
Kärcher FZE
P.O. Box 17416
Jebel Ali Free Zone
Dubai, U.A.E.
(04)8861177
USA
Alfred Karcher, Inc
2170 Satellite Blvd
Suite 350
Duluth, GA 30097
678-935-4545;877-527-2437
ZA
Kärcher (Pty.) Limited
144 Kuschke Street
Meadowdale
Edenvale 1614
(011)574-5360

KÄRCHER®
The Ground Truth image displays a single, solid horizontal line. According to Rule 2 (UNDERSCORE & LINE RULES), this is a stylistic or background line, not a placeholder underscore. Therefore, the OCR result must ignore it and output nothing or only meaningful text. The provided OCR content is "____", which consists of four underscores. This is an incorrect interpretation of the line as a placeholder, violating the rule that stylistic lines must be ignored. The OCR has hallucinated underscores where none should exist based on the GT's visual context. Hence, the OCR result is inconsistent with the Ground Truth.
www.karcher.com