WD 2 - Wet and dry vacuum cleaner KARCHER - Free user manual and instructions
Find the device manual for free WD 2 KARCHER in PDF.
User questions about WD 2 KARCHER
0 question about this device. Answer the ones you know or ask your own.
Ask a new question about this device
Download the instructions for your Wet and dry vacuum cleaner in PDF format for free! Find your manual WD 2 - KARCHER and take your electronic device back in hand. On this page are published all the documents necessary for the use of your device. WD 2 by KARCHER.
USER MANUAL WD 2 KARCHER
www.kaercher.com/dealersearch
Technische Daten
Head of Appropriation
71364 Winnenden (Germany)
Tel.: +49 7195 14-0
Fax: +49 7195 14-2212
Winnenden, 2015/10/01
Contents
Proper use. EN 5
Environmental protection. EN 5
Safety EN 5
Scope of delivery. EN 6
Description of the Appliance EN 6
Assembly. EN 6
Start up EN 7
Operation. EN 7
Transport EN 8
Storage EN 8
Care and maintenance EN 9
Troubleshooting. EN 9
Spare parts EN 9
Warranty EN 9
Technical specifications EN 10
EC Declaration of Conformity EN 10

Please read and comply with these original operating instructions and the enclosed safety instructions. Proceed ac
cordingly. Keep both booklets for future reference or subsequent owners.
Proper use
Use this pressure washer for private households only:
for cleaning machines, vehicles, buildings, tools, facades, terraces, gardening tools, etc. by means of a high-pressure water jet (if necessary, with additional cleaning agents).
with accessories, replacement parts and cleaning agents approved by KARCHER. Please observe the information accompanying the cleaning agents.
Environmental protection
Notes about the ingredients (REACH)
You will find current information about the ingredients at:
www.kaercher.com/REACH

The packaging material can be recycled. Please arrange for the environmentally appropriate disposal of the packaging.

Old appliances contain valuable recyclable materials that should be recycled properly. Batteries and accumulators contain substances that must not enter the environment. Please dispose of old devices and batteries or accumulators in an environmentally friendly way.

Cleaning operations which produce oily waste water, e.g. engine washes, underbody washes, may only be carried out using washing stations equipped with an oil separator.

Work with detergents must only be performed on liquid-tight work surfaces with a connection to the sewer system. Do not let release detergent into waters or earth.

The extraction of water from public waters is prohibited in some countries.
Safety
Safety instructions
Prior to the first use of this device, the accompanying "Safety instructions for high-pressure cleaners" must be read.
Hazard levels
DANGER
Pointer to immediate danger, which leads to severe injuries or death.
WARNING
Pointer to a possibly dangerous situation, which can lead to severe injuries or death.
CAUTION
Pointer to a possibly dangerous situation, which can lead to minor injuries.
ATTENTION
Pointer to a possibly dangerous situation, which can lead to property damage.
Symbols on the machine

The appliance must not be directly connected to the public drinking water network.

The high pressure jet must not be directed at persons, animals, live electrical equipment or at the appliance itself.
Protect the appliance against frost.
Safety Devices
CAUTION
Safety installations serve the protection of the user and may not be modified or bypassed.
Appliance switch
The appliance switch prevents unintentional operation of the appliance.
Lock trigger gun
The lock locks the lever of the trigger gun und prevents the accidental start of the device.
Overflow valve with pressure switch
The overflow valve prevents the permissible working pressure from being exceeded.
If the lever on the trigger gun is released, the pressure switch turns off the pump, the high-pressure jet stops. If the lever is pulled the pump is turned on again.
Motor protection switch
The motor protection switch switches off the device if the power consumption is high.
Scope of delivery
The scope of delivery of the device is illustrated on the packaging. Check the content for completeness upon unpacking.
In the event of missing accessories or any transport damage, please contact your dealer.
Additionally required
Fabric-reinforced water hose with commercially available coupling.
Minimum diameter, 1/2 inches (13 mm).
Minimum length 7.5m
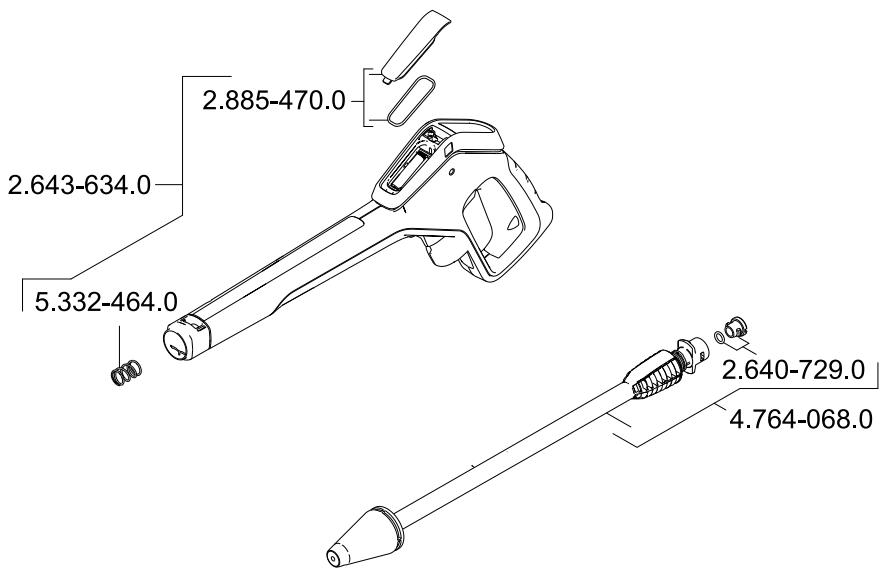
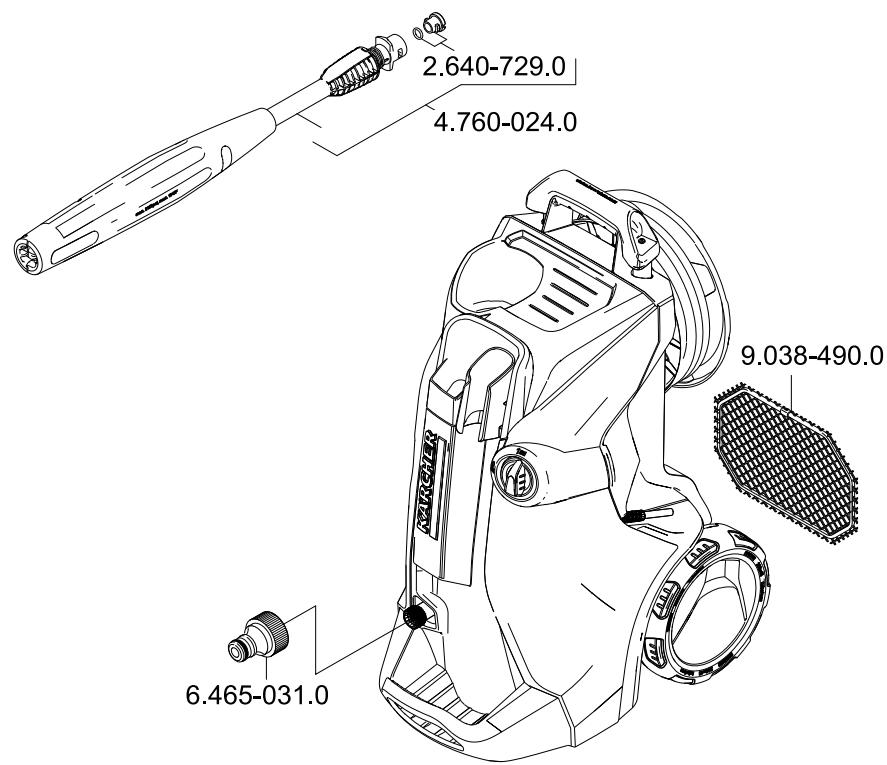
Description of the Appliance
These operating instructions describe the maximum equipment. Depending on the model, there are differences in the scopes of delivery (see packaging).
See fold-out page 4 for illustrations
1 Coupling element for water connection
2 Water connection with integrated sieve
3 High pressure hose
4 Hose guide
5 Storage for spray lances
6 Storage / parking position for trigger gun
7 Connection for Plug 'n' Clean detergent
8 Carrying handle
9 Transport handle, detachable
10 High-pressure hose drum
11 Hand crank for hose drum
12 Appliance switch "0/OFF"/_I/ON"
13 Mains cable with mains plug
14 Accessory compartment
15 Hooks for fastening the net
16 Net for accessory compartment
17 Bearing wheel
18 Base with carrying handle
19 Full Control trigger gun
20 Battery compartment
21 LED pressure indicator
MIX/1-SOFT/2-MEDIUM/3-HARD
22 Battery compartment lock
23 Lock trigger gun
24 Button for detaching the high-pressure hose from the trigger gun
25 Full Control spray lance Vario Power Carrying out the most common cleaning tasks Pressure levels: HARD / MEDIUM / SOFT / MIX
26 Full Control spray lance dirt grinder For strong contaminations Pressure level: HARD
- Optional accessories
27 Plug 'n' Clean detergent bottle with locking lid
** not included in the scope of delivery
28 Water supply hose
Special accessories
Special accessories expand the possibilities of using your appliance. Please contact your KARCHER dealer for further information.
Assembly
See fold-out page 3 for illustrations

Mount loose parts delivered with appliance prior to start-up.
You will need the 2 included screws as well as a Philips screwdriver PH 2.
Installing the base
Illustration A
Insert base.
Insert the included dowels all the way into the holes.
Secure the base with the enclosed screws.
Install storage for spray lances
Illustration B
Hook in storage for spray lances.
Secure the storage for the spray lances by means of two screws.
Install the transport handle
Illustration C
Attach the transport handle.
Secure the transport handle by means of two screws.
Attach the net to the accessory compartment
Illustration D
Hook the net into the hooks shown in the illustration.
Start up
Park the appliance on an even surface.
Illustration E
Put the high-pressure hose through the hose guide from the back.
Illustration F
Push the high pressure hose into the trigger gun until it locks audibly.
Note: Make sure the connection nipple is aligned correctly.
Check the secure connection by pulling on the high pressure hose.
Unwind the high pressure hose from the hose drum.
Insert the mains plug into the socket.
Water supply
For connection values, see type plate/technical data. ATTENTION
Impurities in the water can damage the high-pressure pump and the accessories. For protection, the use of the KARCHER water filter (optional accessory, order no. 4.730-059) is recommended.
Water supply from mains
Observe regulations of water supplier.
ATTENTION
Hose couplings made of metal with aquastop can damage the pump! Please use plastic couplings or KARCHER brass couplings.
Illustration 6
Screw the coupling element to the water connection on the appliance.
Attach the water supply hose to the coupling on the water connection.
Connect the water supply hose to the water supply.
Completely open the water tap.
Drawing in water from open reservoirs
This high-pressure cleaner is suited to work with the KARCHER suction hose with backflow valve (Optional accessory, order no. 2.643-100) to draw in surface water, e.g. from water butts or ponds (see specifications for max. suction height).
Note: With vacuuming operation, the coupling for the water connection is not required.
Fill the suction hose with water.
Screw the suction hose into the water connection of the appliance and insert it into the water source (e.g. rainwater drum).
Bleed the device as follows prior to operation:
Turn on the appliance "I/ON".
Unlock the lever of the trigger gun.
Push the lever of the trigger gun, the device will switch on.
Let the device run (max. 2 minutes) until the water exits the trigger gun without bubbles.
Release the lever of the trigger gun.
Lock the lever of the trigger gun.
Operation
ATTENTION
Dry running of more than 2 minutes leads to damage of the high-pressure pump. If the appliance does not build up pressure within 2 minutes, switch the appliance off and proceed in accordance with the instructions in Chapter "Troubleshooting".
High pressure operation
CAUTION
Keep a distance of at least 30~cm when using the jet for cleaning painted surfaces to avoid damage.
ATTENTION
Car tyres, paint or sensitive surfaces such as wood should not be cleaned with the dirt blaster, as there is a risk of damage.
Select a spray lance suitable for the cleaning task. Illustration H
Push the spray lance into the trigger gun and fasten it by a 90^ rotation.
Turn on the appliance "I/ON".
Unlock the lever of the trigger gun.
Push the lever of the trigger gun, the device will switch on.
Note: Release the lever of the trigger gun; the device will switch off again. High pressure remains in the system.
Full Control spray lance Vario Power
Turn the spray lance until the LED of the required pressure level is on at the pressure indicator of the trigger gun.
Full Control System
The pressure indicator on the trigger gun shows the currently set pressure level during operation with a Full Control spray lance.
Note: The pressure indicator is not significant during operation with the T-Racer and other accessories.
| Pressure level | For example, recommended for | |
| 3 HARD | HARD | Stone terraces made of paving stones or exposed aggregate con-crete, asphalt, metal surfaces, gar-den utensils (wheelbarrow, spade, etc.) |
| 2 MEDIUM | MEDIUM | Motorcar / motorcycle, brick sur-faces, plastered walls, plastic furni-ture |
| 1 SOFT | SOFT | Wooden surfaces, bicycles, sand stone surfaces, rattan furniture |
| MIX | Operation with detergent | |
ATTENTION
The sensitivity of the materials can strongly differ depending on the age and the condition. The so-called recommendations are non-binding.
Operation with detergent
Most KARCHER detergents can be bought ready to use in a Plug'n' Clean detergent bottle.
Note: Detergent can only be added when the device is operated in low pressure mode.
DANGER
When using detergents, the material data safety sheet issued by the detergent manufacturer must be adhered to, especially the instructions regarding personal protective equipment.
Remove the cap of the Plug 'n' Clean detergent bottle.
Illustration 1
- Optional accessories
Push the detergent bottle with the opening pointing downwards into the connection for the Plug 'n' Clean detergent.
Use Vario Power spray lance.
Turn the spray lance towards "MIX" until the the LED "MIX" is on on the pressure indicator of the trigger gun.
Note: This will mix the detergent with the water stream.
Recommended cleaning method
Spray the detergent sparingly on the dry surface and allow it to react, but not to dry.
Spray off loosened dirt with the high pressure jet.
After operation with detergent
Remove the Plug'n' Clean detergent bottle from the intake and close it with the lid.
For storage, put the detergent bottle into the retainer with the cap pointing up.
Interrupting operation
Release the lever of the trigger gun.
Lock the lever of the trigger gun.
Illustration J
Put the trigger gun with the spray lance into the parking position.
During longer breaks (more than 5 minutes), also turn the appliance off using the "0/OFF" switch.
Finish operation
Release the lever of the trigger gun.
Turn off the appliance "0/OFF".
Disconnect the mains plug from the socket.
CAUTION
Only separate the high-pressure hose from the trigger gun or the device when there is no pressure in the system.
Turn off tap.
Press the lever of the trigger gun to release any remaining pressure in the system.
Release the lever of the trigger gun.
Lock the lever of the trigger gun.
ATTENTION
When disconnecting the supply or high pressure hose, warm water may leak from the connections after operation.
Detach the appliance from the water supply.
Transport
CAUTION
Risk of personal injury or damage!
Mind the weight of the appliance during transport.
When transporting by hand
Lift appliance by the carrying handle and carry it.
Pull out the transport handle until it audibly snaps into place.
Pull the appliance by its transport handle.
When transporting in vehicles
Prior to horizontal transport: Remove the Plug'n' Clean detergent bottle from the intake and close it with the lid.
Secure the appliance against shifting and tipping over.
Storage
CAUTION
Risk of personal injury or damage!
Consider the weight of the appliance when storing it.
Storing the Appliance
Park the machine on an even surface.
Detach spray lance from the trigger gun.
Push the disconnect button on the trigger gun and pull the high-pressure hose out of the trigger gun.
Place the trigger gun into the storage for the trigger gun.
Put both spray lances into the storage for the spray lance.
- Dirt grinder spray lance: Nozzle towards the bottom.
- Vario Power spray lance: Nozzle towards the top.
Store the mains connection in the accessory compartment.
CAUTION
Risk of personal injury or damage!
Observe the rotation direction of the hose reel upon coiling up the high-pressure hose.
Coil up the high-pressure hose.
Turn the hose reel in a counter-clockwise direction using the crank handle.
Prior to extended storage periods, as during the winter, also observe the instructions in the Care section.
Frost protection
ATTENTION
Appliances and accessories that are not completely drained can be destroyed by frost. Completely drain appliance and accessories and protect them against frost.
To avoid damage:
Detach the appliance from the water supply.
Detach spray lance from the trigger gun.
Turn on the appliance "I/ON".
Push the lever of the trigger gun until no more water is escaping (approx. 1 min).
Release the lever of the trigger gun.
Lock the lever of the trigger gun.
Turn off the appliance "0/OFF".
Store the appliance and the entire accessories in a frost free room.
Care and maintenance
DANGER
Risk of electric shock.
Prior to all work on the appliance, switch off the appliance and pull the power plug.
Clean the sieve in the water connection
Clean the sieve in the water connection regularly.
Remove coupling from the water connection.
ATTENTION
The sieve must not be damaged.
Illustration K
Pull the sieve out using flat pliers.
Clean the sieve under running water.
Reinsert the sieve into the water connection.
Changing the batteries of the trigger gun
The batteries are depleted if nothing is shown on the display of the trigger gun anymore.
Two batteries or accumulators of the size AAA are required.
Illustration L
Push the locking slide.
Open battery compartment.
Remove the batteries.
Insert new batteries and observe the correct orientation of the terminals.
Close battery compartment.
Dispose of the used batteries according to the local provisions.
Troubleshooting
DANGER
Risk of electric shock. Turn off the appliance and remove the mains plug prior to performing any care and maintenance work.
Repair work and work on the electrical components may only be performed by an authorised customer service.
You can rectify minor faults yourself with the help of the following overview.
If in doubt, please consult the authorized customer service.
Appliance is not running
Push the lever of the trigger gun, the device will switch on.
Check whether the voltage indicated on the type plate corresponds to the voltage of the mains supply.
Check the mains connection cable for damages.
Motor overloaded, the motor circuit breaker has tripped.
Turn off the appliance "0/OFF".
- Allow the device to cool down for one hour.
- Switch on the device and put it into operation again. If the malfunction occurs repeatedly, have the device checked by the customer service.
Appliance does not start, motor hums
Voltage reduction due to weak mains supply or when using an extension cable.
Upon switch-on, push the lever of the trigger gun first and then switch the power switch to "I/ON".
Pressure does not build up in the appliance
Check setting at the spray lance.
Check water supply for adequate delivery rate.
Pull out the sieve in the water connection using flat-nose pliers and clean under running water.
Remove air from appliance before operation. Switch on the appliance without connection the HP hose (max. 2 minutes) and run it until the water discharging from the HP outlet is free of bubbles. Switch off appliance and reconnect HP hose.
Strong pressure fluctuations
Clean high-pressure nozzle: Remove dirt and debris from the nozzle bore, using a needle and rinse through with water from the front.
Check water flow quantity.
Appliance is leaking
Dropwise leakage of the device is normal for technical reasons. If the leakage increases contact the authorized customer service.
No detergent infeed
Use Vario Power spray lance.
Turn the spray lance to "Mix" position.
Check whether the Plug 'n' Clean detergent bottle is placed into the detergent connection facing down.
No pressure indicator on the trigger gun
Check / replace the batteries
Spare parts
Use only original KARCHER spare parts. You will find a list of spare parts at the end of these operating instructions.
Warranty
The warranty terms published by the relevant sales company are applicable in each country. We will repair potential failures of your appliance within the warranty period free of charge, provided that such failure is caused by faulty material or defects in manufacturing. In the event of a warranty claim please contact your dealer or the nearest authorized Customer Service centre. Please submit the proof of purchase.
Addresses can be found under:
www.kaercher.com/dealersearch
Technical specifications
| Electrical connection | |
| Voltage | 230 V |
| 1~50 Hz | |
| Connected load | 1,8 kW |
| Protection class | IP X5 |
| Protective class | I |
| Mains fuse (slow-blow) | 10 A |
| Water connection | |
| Max. feed pressure | 1,2 MPa |
| Max. feed temperature | 40 °C |
| Min. feed volume | 10 l/min |
| Max. Suction height | 0,5 m |
| Performance data | |
| Working pressure | 11 MPa |
| Max. permissible pressure | 13 MPa |
| Water flow rate | 6,3 l/min |
| Max. flow rate | 7,0 l/min |
| Detergent flow rate | 0,3 l/min |
| Recoil force of the trigger gun | 13 N |
| Dimensions and weights | |
| Length | 411 mm |
| Width | 305 mm |
| Height | 584 mm |
| Weight, ready to operate with accesso-ries | 13,3 kg |
| Values determined as per EN 60335-2-79 | |
| Hand-arm vibration value | 3,2 m/s2 |
| Uncertainty K | 0,8 m/s2 |
| Sound pressure level Lpa | 75 dB(A) |
| Uncertainty Kpa | 3 dB(A) |
| Sound power level LWA + Uncertainty Kwa | 90 dB(A) |
Subject to technical changes.
EC Declaration of Conformity
We hereby declare that the machine described below complies with the relevant basic safety and health requirements of the EU Directives, both in its basic design and construction as well as in the version put into circulation by us. This declaration shall cease to be valid if the machine is modified without our prior approval.
Product: High pressure cleaner
Type: 1.324-xxx
Relevant EU Directives
2000/14/EC
2004/108/EC
2006/42/EC (+2009/127/EC)
2011/65/EU
Applied harmonized standards
EN 50581
EN 55014-1: 2006+A1: 2009+A2: 2011
EN 55014-2: 1997+A1: 2001+A2: 2008
EN 60335-1
EN 60335-2-79
EN 61000-3-2: 2014
EN 61000-3-3: 2013
EN 62233: 2008
Applied conformity evaluation method
2000/14/EC: Appendix V
Sound power level dB(A)
Measured: 88
Guaranteed: 90
The undersigned act on behalf and under the power of attorney of the company management.

H.Jenner
CEO

S. Reiser
Head of Approbation
Authorised Documentation Representative
S. Reiser
71364 Winnenden (Germany)
Phone: +49 7195 14-0
Fax: +49 7195 14-2212
Winnenden, 2015/10/01
Table des matieres
www.kaercher.com/REACH

www.kaercher.com/dealersearch
71364 Winnenden (Germany)
Telephone: +49 7195 14-0
Winnenden, 2015/10/01
Indices
www.kaercher.com/REACH

www.kaercher.com/dealersearch
Dati tecnici
2006/42/CE (+2009/127/CE)
2011/65/UE
Head of Appropriation
71364 Winnenden (Germany)
Tel.: +49 7195 14-0
Fax: +49 7195 14-2212
Winnenden, 2015/10/01
Inhoud
www.kaercher.com/dealersearch
Technische gegevens
71364 Winnenden (Germany)
Tel.: +49 7195 14-0
Fax: +49 7195 14-2212
Winnenden, 2015/10/01
www.kaercher.com/REACH

www.kaercher.com/dealersearch
Datasétécnicos
71364 Winnenden (Germany)
Tele.: +49 7195 14-0
Fax: +49 7195 14-2212
Winnenden, 2015/10/01
Indices
www.kaercher.com/REACH

A boa nao atinge a pressao de service
Verificar/trocar as pilhas
Peças sobressentes
www.kaercher.com/dealersearch
Dados技术和
2006/42/CE (+2009/127/CE)
2011/65/UE
Head of Appropriation
71364 Winnenden (Germany)
Tel.: +49 7195 14-0
Fax: +49 7195 14-2212
Winnenden, 2015/10/01
Indholdsfortegnelse
| Bestemmelsesmaessig anvendelse | DA | 5 |
| Miljøbeskyttelse | DA | 5 |
| Sikkerhed | DA | 5 |
| Leveringsomfang | DA | 5 |
| Beskrivelse af apparatet | DA | 6 |
| Montering | DA | 6 |
| Ibrugtagning | DA | 6 |
| Drift | DA | 7 |
| Transport | DA | 7 |
| Opbevaring | DA | 8 |
| Pleje og vedligeholdelse | DA | 8 |
| Hjælp ved fejl | DA | 8 |
| Reservedele | DA | 9 |
| Garanti | DA | 9 |
| Tekniske data | DA | 9 |
| EU-overensstemmelseserklaering | DA | 9 |

12 Hovedafbryder "0/OFF" / "I/ON"
13 Strømledning med netstik
14 Rum til tilbehør
15 Hager for netbefaestigelse
21 LED trykindicator
MIX / 1 - SOFT / 2 - MEDIUM / 3 - HARD
www.kaercher.com/dealersearch
Tekniske data
2006/42/EF (+2009/127/EF)
2011/65/EU
Head of Appropriation
71364 Winnenden (Germany)
TIf.: +49 7195 14-0
Fax: +49 7195 14-2212
Winnenden, 2015/10/01
Innholdsfortegnelse
Forskriftsmessig bruk NO 5
Miljøvern 5
Sikkerhet NO 5
Leveringsomfang. NO 5
Beskrivelse av apparatet. NO 6
Montering 6
Taibruk. NO 6
Drift NO 7
Transport. NO 7
Lagring NO 8
www.kaercher.com/REACH

Materialet émballasjen kan resirkuleres. Kvitt deg med emballasjen på miljøvennlig*Mæt.

12 Apparatabryter "0/OFF" / "I/ON"
13 Strømledning med støpsel
14 Tilbehorsrom
2006/42/EF (+2009/127/EF)
2011/65/EU
Anvende overensstemmende normer
EN 50581
EN 55014-1: 2006+A1: 2009+A2: 2011
EN 55014-2: 1997+A1: 2001+A2: 2008
EN 60335-1
EN 60335-2-79
EN 61000-3-2: 2014
EN 61000-3-3: 2013
EN 62233: 2008
Anvendt metode for samsvarsvurdering
2000/14/EF:Vedlegg V
Lydeffektniva
Malt: 88
Garantert: 90
71364 Winnenden (Germany)
TIf: +49 7195 14-0
Winnenden, 2015/10/01
71364 Winnenden (Germany)
Tel.: +49 7195 14-0
Fax: +49 7195 14-2212
Winnenden, 2015/10/01
Sisallysluettelo
Käytötkoitus FI 5
www.kaercher.com/REACH

www.kaercher.com/dealersearch
Tekniset tiedot
Head of Appropriation
71364 Winnenden (Germany)
Puh.: +49 7195 14-0
Winnenden, 2015/10/01
Nivakac Tepiexouevw
Xpnouφwva με touc kavovioouc . . . EL 5
PpOToaia TepiBaalovtoC EL 5
Aoalειa. EL 5
Σuokεuaσia EL 6
IIepiypaqn ouokueu5. EL 6
Σuvapμoλóynση. EL 6
Evapn 1eitoupyiae. EL 6
Aetoupyia EL 7
Meataopá EL 8
Atohkeuon EL 8
www.kaercher.com/REACH

Ta uliká ouokéuaiaf civai avakukwaiμa. Atnoppiye Tn ouokéuaiae μe oikoIoyIKo tpToTIO.

OIIaIcS OuaKeUcS TpeIXouv IIOAUItJa avakukwaiuA uIiKa, ta OTIOA tha TpTeTie va diAtBeVTa iYia avakkuWOn. OIImuTApicKc KAI OUIoosWpeTu c TpeIXouv UIA, ta OTIOA DE TITPeTTaY iKAATAHouG oTOPEIaALov. AIToppiye TIC TAIcE OuaKeUcS, TIC MTAATAPIE n Touc OuaOwpeUTc E TEPIBaALovtika opToTo.

OepyaiecKaabapiaou, kata tic otioie TpokuTTouv atovepa Tou TEPIEXouv laia, T.x. TAUIO KIVnTnpw, TUAIOU TO kATW MEPOUC TWV ONmuTuV, EITIPETOVTAIO V0e TE LUVNTpia Tou DIA-TEtouv biaxwiptn laiwv.

Oepyaiec me atopputtavtko mtopoovvaekteoavtai ove ouatoateyei etipaveiec eypaoiacs euvdoen oto atoppnua atoppnojbpwikouvepoTo. To atopputtavtko deptetvi va katalnyote otu tovyia udata n 0to edapoc.

H Anyn vepou ato Onmuocie Tnyec Dev EITIPTETai oE opiauevesxwpe.
Aoopaia
YtOBeEeIeIaOoPaeIeIaS
PivatroTnTvprwnxpnanTnsaukeunacutngdelta OTEOTOWOHTOTE TcSauovDeUticKc"YITDBEIGeIC aQaAELC yiauokueKcKaapiaouu uynAnsTreons
Eniπεδα ασφαλειας
KINAYNO
YtObeEIGIgiaAeuaEaTnAteINaUevoKIVsUo,O aTOIOc μTopei va exi wG ouvTeia oBapo ngavaoio rpauaTioio.
PPOEIONOIH
YtOdEiEic yia uia duvntikc etnikivouvn kataaan, n oToia mTopei va exei wS ouveineo oBapo ng avdoio tropauiaiuo.
IPOESXH
YrOeIyia iuaevoxoEvwCtIKivDuvn KaraTaan, n OTOIA mTopei va oynnae ie eaapp taepaumaiu.
PPOOxH
YrOoEiEyniauaovntikaetikivounuKaataaon, n OTOIA mPOeIvaexeiωvTeiaulikesζmuies.
Σμβολασησικεύ

H ouakeuiv 6ev npetvi auvoei ateuoei- ac 0to 0nóio 0kito noiou vepo.

71364 Winnenden (Germany)
Tnλ.: +49 7195 14-0
Φαξ: +49 7195 14-2212
Winnenden, 2015/10/01
icindekiler
www.kaercher.com/REACH

www.kaercher.com/dealersearch
Teknik Bilgiler
71364 Winnenden (Germany)
Tel.: +49 7195 14-0
Winnenden, 2015/10/01
OrnabneHne
IcnoIb3OBAHne no Ha3NaueHIO. RU 5
3aunTaOkpykaIooeIcpebl RU 5
Bé3onacHOCTb RU 5
KOMJIneKT NOCTaBKn. RU 6
Oncanhe np6opa. RU 6
MoHTax 6
Haayano pa60tbl. RU 6
3KcnnyatauR 7
TpaHcnpToPbKa RU 8
Xpahene RU 8
UxOД n TexHnueckoe obcnyKuBaHne. RU 9
Pomoub B cnyae Henoiaok RU 9
3anachbte yactn RU 9
TapaNTna RU 10
TexHHueckne daHHbIe RU 10
3aBHeHne o COOTBeCTBnE EC .RU 10

Perep nepebblm ncoIb3oBaHnem yctpoICTBa Heo6xOdMn IpOceBt HcStOuHyOpInnHaJIbHNo IHCTpyKUIMNo KcKIIpaA
Taunn npunaraembe Myka3aHnna No 6e3oNaChOCTn. Da-nee DeIcTBOBATb B COOTBeTCTBn C HmN. CoxpaHnTb o6e bpouOpbl nDaIbnHeJwero nObn3OBAHNn nnn dncSyDyoUero BnAdeNbua.
IcnoJIb3OBAHne NO Ha3HaYeHNIO
DHaHbIy BbICOKHOaONpHbIy MOIOUm annapat PpeDHa3-HaueH ToIbKO IaI INCNOJIb3OBAHnB YDOMaUHem XO3Y-CTBe:
ДЯМоКиMaSHN, abTOMObUJIeN, CTpoEHnI, INCTpyMeHTOB,ФacAOB, TeppAC, CaDobBx npINaIDJIeKHOCTeN T.D.C NOMOuBIO CTpyN BOBy I NOd BICOKM DabNeHEm (Pnp Heo6XoDMoctN CdoBaeHneHmMoOHux cpeDcTB).
- Pn3TOM pnpMeHHeNIOndEeAT npHaIeJXHOCTN, 3aNaChbYe aactn YuCtTaue cpeCTBa, pa3peUeHHbIe DnI INcNoNb3OBAHNfDPMOn
KARCHER. Yukazan, npinloxehnbe KcHCTaIM CpeDCTbAM, pOJIeXat co6JIIODeHIO.
3aunta okpyxauoien cpebl
Ntpykni no pImeHnIO KOMnoHHTOB (REACH) AktyaIbIbIe CBeDEHnIO KOMNoHEtAX pINBEdeHbI Ha Be-yeJIne no cNeDuOeMy aDcpey:
www.kaercher.com/REACH

YnakoobHbIe MaTePAnbI bOJaTOcT BToPHyH OHepepAb6To. YnakoBdN Oe6xoJMOu YoTHIN3PObaB 6e3 yuepeBa dNk OkpyKaHoue e CpeBd.

OTcIyKINBUNe yctpoiCTBa cOepKat npiroDhbIe
IaNTBTOPIHORIO NcIOJIb3OBAHNUE cHeHbIe MaTePnAbl, KOtOpBie DoJIKhBi NepeDaBtCbHa NapepaBcTKy. BatapeIN AKKymuTApToBc OcEpaKAT BeUeCTBA, KOtOpBie He DoJIKhBi NonactB OkpyKaHOUyO cpDeY. OTCnyKINBUNe yctpoiCTBa, TAKHe Ka batape INI KAKymuTApToB, YtINI3PiPoBaTb COrNaCHO TepeBaOHnIM NO 3auiite OKpyKaHOUe cPeDly.

Pa60bI no OuHCTKe, Bpe3yIbTaTe KOToPbIX o6pa- 3yETc OTXoJraa BODa, COpEpxaAaMaCna, HApNIMep, PpOMBkBa DnBraTetaMoiKa DnHua, DOJIKNbI pOnI3BOJITcB TaTObKHa MoEYbIX PnOIIaDkaK C McNoOTdJeNTeJIeM.

3a6op BObI N3 OTKpbITbIX BOIOeMOB B HeKOTOpbIX CTpaHax He pa3peuhen.

PaObTb C MOUzIMN CpeDCTBAMn DOnJXHbI npoBoaNTbC TOnbKO Ha paObox NOBepXHOCTx, He npoHnuaemBxIg KNUKcTeN, C noDKNIOyHeNEM K6bTOBO KANAHINZaUN. MoUOuNe CpeDCTBa H DoJIKNbI NoNaDaTb B BODoEMbl NnN NOUYB.
Be30nachoctb
Yka3aHnno TExHnke 6e30nacHOCTn
Ipepe IepBbIM NcONb3ObaHnEm DaHnHO yCTpoNCTBa 06a3aTeNbHO IpOoctb npInraeMaBle «Yka3aHn no 6e3oNaCHOCTn DnA BvICOKoHaOpHOro MOUoero anpa-ata».
CTeneHb onaCHOCTN
ONACHOCTb
Yka3aHue omhocumbHo henoepcdmeHH zo3ra- ue onachocmU, komopar npueobum K mJxenbIM yyebam unu K cmePmU.
PENPYNPEXDEHNE
Yka3aHue omhocumelbHo 803MOxHO NomeHuAanbHO onaHou cumyauiu, komopai Moxem npueecmu K mXekblm yeebyam unu k Cmeprn.
OCTOPOXHO
Yka3aHue Hn omeHuaJIbHO onaChyU cumyaUIO, KOMopar moKem npueecMu K nolyuHIO neekuxmpaEM.
BHIMAHHE
Yka3aHue omhocumenbHO 803MOxHO NomeuuaBHO onaHou cumyaquu, Komopar moKem noBleMbapeuBHy uyepe6.
CmBOnblHa npn6ope

3anpeuaemcna npramyo nodknouambyucpoocmo Kmpyobonpooyc numbeooue ooo

He hanaenm b cmpy 00b i nod ebicokum Hanopom Ha IIOeui, XueomhBix, EknIOeHHOe 3neKmpuueckoe obOpdyoeaue uHa camo ycmpoucmeo.
3auiuamb npubop om Mopo3a.
3aunthbyeyctpoicTBA
OCTOPOXHO
3aumhble ycmpoueea cnykam dna 3aumblnlo3oameneu. Buou3meHneue 3aumhbxycmpoe me npu nphebpekenue ume donyckaemc.
Pn6OpHbB bIKIOuataeIb
TnabHb BbIKIOUaTeNb npenrTCTByeT HENpON3BOJbHOH pa6ote annapata.
Ipepyckno klanan npedotbpaaet npebblene He donyctmoro pa6oery daBneHna.
Ecnn bpHar BbICOKHOANOPHORIO NIMCTOTAE OTNYCkAetcN, MaHOMeTpIeCKN BbIKIOHOpaTeBbOTKIIIOuAet HACoC, NOdaa BObl NoD BbICOKM DABLeHneM IpeKpaauTcT.
CtpyHnA Tpy6Ka Full Control Vario Power
→ CtpyHyIO trpy6ky nobopauHbA subt do tex nop, noka Ha hNdkAtope DabNeHn BbICOKHOAnOpHrO NiCTOneta He 3aorpntc SBeToDnOd Tpe6yeMoN CTyNEHn DabNeHn.
CucTeMa Full Control
BoBpEm 3KcPnIyatauHINDnKauaJnaDaBHeHnaBaBcKoHApOHM NtCToJe TnKa3bIbAeT pN POMOoi CTpyHoi TpyKn Full Control Tekyuio 3aadHny CtyneHb DabHeHia.
PnIeMaHne: PnI nKcPiNyatauun C T-Racer i npyIMn pInHaJndJeKHOCTaMn INHdNkAuaN daBHeNHa He HFOpMaTHbHA.
Heo6xOIMbI DBe 6aTapeiKn nnAkkymyIaToppa pa3-Mepa AAA.
PncyHok L
→ HaxkaTb nepeBnKHyU 3acNoHky.
OTKpbIb OTcEK JIA baTapei.
BbHytbakkMynTOpbl.
BCTaBnTb HOBbIe 6aTapei, cOJIIOJa rnpaBnB-HyIO nOJIaRHOCTb.
3aKpbItbOTcEKdIaTaapei.
IcnoIb3OBAHbHeAkkyMylTOpblcndyETYtUN3nPOBaTcOrlaCHOdEChTBUoUMnpDnncAHJAM.
Pomoub B cnyuae HenoJaok
ONACHOCTb
Onachocmb npaxhen mokom. Npeed npoeedeenuem liobxpbabom no yxody u mexhucckomy ocbcnkyuea HIO bIKIOUcHb ycmpoecmo u bInHyb cemeyio Eunky u3 pozemku.
Pemohmheb paobmyu paobmyc anekmpueckumuy3nAmu moeynpoue0bdumc bnoKyo nponHOMoeyHNO cny660 cepucchoao oocnyxueaHn.
He6oJIbIwne HeNCpPABHOCrMoXHO yCTpaHnTb CaMOCTOaTeJIbHO C NOMOUsbIO CNeDyUoJero ONuCAHn.
B cnyae comHeHnCneJyet opaaatbcs B ynoHOMoueHHu CnyK6y cepBvCHOrO 6cnykBaHn.
Ppnbop He pa6oTaET
Hajatb pbHar BbICOKOHAnOpHOro NmCTOneta IN BKJIIOHTb yCTPOINCTBO.
→ПоверъгоооТьгетстбгпЕнанряжени,уkaаанног罗ВзвадоскTo tabluyke,нанряжениИсточиknkaэнКТРОЗHEргИи.
PpOBepntb ceTeBoi Ka6eIb Ha nobpeXdeHna.
Motop neperpyxhen, cpa6oTan 3aunTHbI aBtOMaT 3neKTPODnIRatEn.
BbIKIOuHTb annapat "0/OFF" (O/BbIKJ).
-Даь устpoNTby OCTbITb B TeueHne Ondoro Yaca.
BknOuHTb yctpoCTBO m ChOBa npCTynTb K pa6oTe.
Ecn HnncpabHocTb NOBTOpeTc, nopyuHTb npOBepky yCTPOINCTBa cepBnCHOn cnlyk6e.
Pp6op He BkIIOuaeTcA, DbVraTeB IyDIT
IpaHHe HaprJekHn I3-3a Cna6b 3neKtpocTeu nIin npnncnlo3OBaHN yDnHHnteJI.
→ Пи Вкнючениnpexдб BCero haxaTb pbuGar bblCOKOHANOPOHOrO NICTOJeta,3aTeM yCTaHOBNrBblKTHUaTeIb yctpoIcTBa B nIoJoxHeNe I/ON" (I/BKN).
YnctTae CpeCTBO He BCacbIbAeTc
NcnoIb3ObaTb CtpyHny Tpy6ky VarioPower. NobepHyTb CtpyHny Tpy6ky B noJooKeHne ,Mix
→ Pnobeptb, bctabneha NmOTkpbitaaybTybnkA DnmoJHcero cpecdta Blpa n' Clean BnH3B CoedHHTeNbHbI 3nEMeHT dmoJHcero cpecdTBA.
OTcyTCTByeI INHdNkaCnJaDaBHeHna H BbICOKHaOpHOM NCTOJeTe
→Пюверпь /заменчьбатAPEN
3anaachbIe yactn
Ucnpb3yte ToIbko OpiHnHaBbIe 3aNaChbIe cAuant Cmpb My KARCHER. OnCahme 3anaChbIX Taeeh HaxoDITc B KOHJIe DaHHN IHCTpyKIMNo 0KcPiYtaTAM.
Fapantma
B kaxdoi cTpahe DeIcTByIOT COOTBeCTBENHO rapaHTNtHbIe yCNOBnIA, n3dAHNbIe yONHOMOueHHoI orpAHN3aUme bCbIa HauSe IpnOyKuIN B daHNOT CTApe.Bo3MOxHbIe HeNCnPabHBocTH npBopae B TeueHeIe rapaHTNIHORO cPcKa MbYcTpaHEM 6ecnPaTHo, eCNl pnuHnHa 3aKJIouaETcB DdeEeKtax MaTePnaIOB INI OUsMbKaX npri NsTOrOBNeHIM. B cNyae Bo3NHKnOBeHInr npTeH3N B YeTeHne RApaHTNtHO rCPOkBa6 oBaPaIaTbC, IMe npri Ce6e Yek O NKyIke, B TOpROBy OprAhn3aQIO, npOdaBMyO BAM pNbOpo INI B 6bnXaiWuy yOnlHOMOeHHy CuSyKbY cepBnCHOrO obcnykBAHnA.
ДаТаВыntуСКАОTOБРаЖаETСЯНЗАБОДСКОТаБИЧУЕВЗAKОДИРОВАнHOMВИDE.
Pn3TOMOTdIbHbIeIuΦpblNMeIOT CNeDyUOue 3NaueHne::
Пгимер: 30190
3 roD BbIpycka
0 cToJeTne BbInycka
1 DecTINETNE BbInycka
9 Btopa uippa Mecaa BbInycka
0 nepBra zpa Mecaa BbInycka
TakIM O6pa3OM, B DaHHOM npIMpe KoD 30190 03NaHaeT dAty BbInycka 09 /(2)013.
aDpeca BbI CMOXeTe HauTn Ha Be6-CTpaHnce: www.kaercher.com/dealersearch
TexHHueckne daHHbIe
CoxpaHraETc npaBO Ha BHeceHHe TexHnueeCKNX n3MeHeHn.
3aBHeHne o COOTBeTCTBn EC
HaTcOaIIMMb3aBbIeM,CTHOHKeyKa3aHHbI npi60pNo CBOE KOHeIeNIN KOHCTpyKUInA,tAOke BCoyuIeCTBLeEHOM INoDOnyueHOMHAMIKPnOdaJeICoNHOHNOTBEaueHT COOTBETCTBYOUsm OCHOBHM Tpe6ObaHnAM No 6e3OnaChOCTn INdoPOBbIO cOrnaCHO dIpeKtBam EC.PnBHeceHNn i3MeHeHn,He cOrNaCoBaHbIX C HAMn,DaHHOe 3aBBeHne TepreT CBOIO CuIy.
71364 Winnenden (Germany)
Ten.: +49 7195 14-0
ΦaKc: +49 7195 14-2212
Winnenden, 2015/10/01
Tartalomjegyzék
www.kaercher.com/REACH

71364 Winnenden (Germany)
Tel.: +49 7195 14-0
Fax: +49 7195 14-2212
Winnenden, 2015/10/01
Obsah
www.kaercher.com/REACH

www.kaercher.com/dealersearch
Technické udaje
2006/42/ES (+2009/127/ES)
2011/65/EU
Head of Appropriation
71364 Winnenden (Germany)
Tel.: +49 7195 14-0
Fax: +49 7195 14-2212
Winnenden, 2015/10/01
Vsebinsko kazalo
Namenska uporaba. 5
Varstvo okolja 5
Varmost SL 5
Dobavni obseg 6
Opis naprave. 6
Montaza. 6
Zagon 7
Obratovanje. 7
Transport. 8
Skladišcenje SL 8
www.kaercher.com/REACH

Embalažni materiali so primerni za recikliranje.
Embalazo zavrzite okolju prijazno.

Stare naprave vsebujejo dragocene za recikliranje primerne materiale, ki jih je treba odvesta za pohonovno uporabo. Baterije in akumulatorske baterijvevsebujejo snovi, ki ne smejo priti v okolje. Prosimo, da stare naprave ter baterije ali akumulatorstke baterije zavržete na okolju prijazen naclin.

www.kaercher.com/dealersearch
Tehnični podatki
Zadevne ES-directive:
2000/14/ES
2004/108/ES
2006/42/ES (+2009/127/ES)
2011/65/EU
71364 Winnenden (Germany)
Tel.: +49 7195 14-0
Winnenden, 2015/10/01
Splistresci
www.kaercher.com/REACH

www.kaercher.com/dealersearch
Dane techniczne
2006/42/WE (+2009/127/WE)
2011/65/UE
71364 Winnenden (Germany)
tel.: +49 7195 14-0
faks: +49 7195 14-2212
Winnenden, 2015/10/01
Cuprins
www.kaercher.com/REACH

Transportul in vehicle
Inaintea transportarii in stare ortonalala: Scoatej i flaconul de soltjie de curatat Plug'n'Clean din sup- port si puneti capacul la loc.
Asigurataparatulcontra alunecariisirasturnarii.
Depozitarea
PRECAUTIE
www.kaercher.com/dealersearch
Date tehnice
Directive EG respectate:
2000/14/CE
2004/108/CE
2006/42/CE (+2009 / 127 / CE)
2011/65/UE
Norme armonizate utilize:
EN 50581
EN 55014-1: 2006+A1: 2009+A2: 2011
EN 55014-2: 1997+A1: 2001+A2: 2008
EN 60335-1
EN 60335-2-79
EN 61000-3-2: 2014
EN 61000-3-3: 2013
EN 62233: 2008
71364 Winnenden (Germany)
Tel.: +49 7195 14-0
Fax: +49 7195 14-2212
Winnenden, 2015/10/01
Obsah
www.kaercher.com/dealersearch
Technické udaje
2006/42/ES (+2009/127/ES)
2011/65/EU
2000/14/ES: Priloha V
71364 Winnenden (Germany)
Tel: +49 7195 14-0
Fax: +49 7195 14-2212
Winnenden, 2015/10/01
Pregled sadrzaja
www.kaercher.com/REACH

Materjali ambalaze se mogu reciklari. Ambalažu odložite na otpad u skladu s propisima o ochuvanjukolisha.

Stari uredaji sadrzej vrijedne materijale koji se mogu reciklari te bi ih stoga trebalo predati kao sekundarne sirovine. Primarine i punjive baterije sadrzej tvari koje ne smju dospjeti u okolis. Stare uredaje kao i primarine odnosno punjive baterije odlozite u opstad ekoloski primjereno.

www.kaercher.com/dealersearch
Tehnicki podaci
| Elektrichi prikrljučak | |
| Napon | 230 V1~50 Hz |
| Priključna snaga | 1,8 kW |
| Stupanj zašite | IP X5 |
| Klasa zašite | I |
| Strujna zašita (inertna) | 10 A |
| Priključak za vodu | |
| Dovodni tlak (maks.) | 1,2 MPa |
| Dovodna temperatura (maks.) | 40 °C |
| Dovodni protok (min.) | 10 l/min |
| Maks. usisna visina | 0,5 m |
| Podaci o snazi | |
| Radni tlak | 11 MPa |
| Maks. dozvoljeni tlak | 13 MPa |
| Protok vode | 6,3 l/min |
| Maksimalni protok | 7,0 l/min |
| Protok sredstva za Čišćenje | 0,3 l/min |
| Povratna udarna sila visokotlačne pr-skalice | 13 N |
| Dimenzije i težine | |
| Duljina | 411 mm |
| Širina | 305 mm |
| Visina | 584 mm |
| Težina u stanju pripravnosti za rad, s priborom | 13,3 kg |
| Uvtvržene vrijednosti prema EN 60335-2-79 | |
| Vrijednost vibracije na ruci | 3,2 m/s2 |
| Nepouzdanost K | 0,8 m/s2 |
| Razina zvučnog tlaka LpA | 75 dB(A) |
| Nepouzdanost KpA | 3 dB(A) |
| Razina zvučne snage LwA + nepouzda-nost KwA | 90 dB(A) |
2006/42/EZ (+2009/127/EZ)
2011/65/EU
Primijenjene uskladene norme:
EN 50581
EN 55014-1: 2006+A1: 2009+A2: 2011
EN 55014-2: 1997+A1: 2001+A2: 2008
EN 60335-1
EN 60335-2-79
EN 61000-3-2: 2014
EN 61000-3-3: 2013
EN 62233: 2008
71364 Winnenden (Germany)
Tel.: +49 7195 14-0
Winnenden, 2015/10/01
Pregled sadrzaja
Namensko korišćenje SR 5
Zašitaživotnesredine SR 5
Sigurnost SR 5
Obim isporuke. SR 6
Opis uredaJR
Montaža. SR 6
Stavljanje u pogon. SR 7
Rad SR 7
Transport. SR 8
Skladištenje SR 8
Nega i održavanje SR 9
Otklananjeme mtnji SR 9
Rezervni delovi SR 9
Garancija. 9
Tehnički podaci SR 10
Izjava o usklaedenosti sa propisima EZ . . . . SR 10

Pre prve upotrebe VaSEG uredaja procitajte ovo originalno uptstvo za rad i prilozene sigurnosne napomene i
www.kaercher.com/REACH

Ambalaža se moze ponovo preraditi. Ambalažu odložite u otpad ekoloskiprimereno.

Stari uredaji sadrzej vredne materijale sa sposobnoscu recikliranja i treba ih dostaviti na ponovnu preradu. Primarne i punjve baterije sadrzej materije koje ne smeju dospeti u zivotnu sredinu. Stare uredaje kao i baterije ili akumulatore odlozite u optrad ekoloski primereno.

Radovi na cisćenju kod kojih nastaju uljne otpadne vode, kao što su pranje motora, pranje donjeg dela vozila, smeju da se izvodu samu u perionicama sa separatorom ulja.

S deterdžentima se sme raditi samo na vodonepropusnim radnim povrsinama koje su prikjučene na kanalizazioniysteme. No dozvolite da deterdženti prodru u povrsinske vode ili tlo.

www.kaercher.com/dealersearch
Tehnicki podaci
| Elektrichi prikrljučak | |
| Napon | 230 V1~50 Hz |
| Priključna snaga | 1,8 kW |
| Stepen zašite | IP X5 |
| Klasa zašite | I |
| Mrežni osigurač (inertan) | 10 A |
| Priključak za vodu | |
| Dovodni pritisak (maks.) | 1,2 MPa |
| Dovodna temperatura (maks.) | 40 °C |
| Dovodni protok (min.) | 10 l/min |
| Maks. usisna visina | 0,5 m |
| Podaci o snazi | |
| Radni pritisak | 11 MPa |
| Maks. dozvoljeni pritisak | 13 MPa |
| Protok vode | 6,3 l/min |
| Maksimalni protok | 7,0 l/min |
| Protok sredstva za Čišćenje | 0,3 l/min |
| Povratna udarna sila visokopritsne prskalice | 13 N |
| Dimenzije i težine | |
| Dužina | 411 mm |
| Širina | 305 mm |
| Visina | 584 mm |
| Težina u stanju spremon za rad, sa priborom | 13,3 kg |
| Izračunate vredosti prema EN 60335-2-79 | |
| Vrednost vibracije na ruci | 3,2 m/s2 |
| Nepouzdanost K | 0,8 m/s2 |
| Nivo zvučnog pritiska LpA | 75 dB(A) |
| Nepouzdanost KpA | 3 dB(A) |
| Nivo zvučne snage LwA + nepouzdanost KWA | 90 dB(A) |
Pridrzano pravo na tehnicke promene.
lzjava o uskladenosti sa propisima EZ
Ovim izjavljujemo da ovde opisana mašina po svojoj koncepcjji i načinu izrade, sa svim njenim modelima koje smo izneli na tržiste, odgovara osnovnim zahevima dole navedenih propisa Evropske Zajednice o sigurnosti i zdravstvenoj zašti. Ova izjava prestaje da važi ako se bez naše saglasnosti na mašini izvedu bilo kakve promene.
Proizvod: Urečaj za Čišćenje pod visokim pritiskom
Tip: 1.324-xxx
2006/42/EZ (+2009/127/EZ)
2011/65/EU
Primenjene uskladene norme:
EN 50581
EN 55014-1: 2006+A1: 2009+A2: 2011
EN 55014-2: 1997+A1: 2001+A2: 2008
EN 60335-1
EN 60335-2-79
EN 61000-3-2: 2014
EN 61000-3-3:2013
EN 62233: 2008
71364 Winnenden (Germany)
Tel.: +49 7195 14-0
Winnenden, 2015/10/01
CbDbpxxHne
YnoTepe6a no npedHa3NaueHne BG 5
Ona3BaHe Ha OKoHaTa cpea BG 5
CnryphocT BG 5
Obem Ha doctabkata. BG 6
OncanneHa ypea BG 6
MoHTax BG 6
POMOUII INHIN3npaBHOCTN BG 9
Pe3epBn yactn BG 9
Tapaunra. BG 9
Texnueckn daHHN BG 10
Декларачиа CBOTBETCBHe Ha EO...BG 10

Ppein PpBTO m3non3BaHe na BaAwnu ype npoctete TOBA opmHnHaNo ybTBaHe 3a paObaT npriNooXeHte Yka3aHn
3a 6e3oNaCHOCT. IeTcB7Ite CnopeT JTX. 3aNa3eTe DBeTE KHNKKN, 3a Da Tn M3N0JI3BaTe NIO-KbCHO NIN 3a EBEHTyAnE CneDBAuC O6CTBHeNK.
Ynotpe6a no npedHa3HaueHne
I3noJI3BaIte To3nI ype3a NoUcHbAe NoD BVCOKO HaJIraHaCe MoB B IInuHOTo Cn DOMaKINCTBO:
3a NOUHCTBaHe Ha MaunHH, ABTOMOHN, CTPOI-TeHN KOHCTpyKUHN, IHCTpyMEnHT, Paacn, TpaHNCN ypei n dp. C BOHa CTpy NpD BcOKO HAnHrAe (ako e Heo6xOIMo C do6abKa ha NoOHCTBaUn npenaparu).
cpa3peweHnOT KARCHER npnHaadneKHOCTn, pe3ePBHN qactN nOoHCTBaun npenapATn. Cna3BaIte yka3aHnraTAp, pnpIOxoEHN KbM noOHCTBaUNTe npenapATn.
Ona3BaHe Ha OKoJHaTa CpeDa
Yka3aHn 3a cbCTaBKeTe (REACH)
AkyanHa HcnpMaZna 3a cbctabKIne Ie HamePte Ha:
www.kaercher.com/REACH

OnaKOBbHnHTMeATEpAANI MORatJa cepeuNKnIpaT. MoJr OCTpaHaeBaTe OnaOKBnTe kato OTnApdbU, ona3BaJIk NKoHnHata cpeDa

Ctapnte ypeeni cbdbpxaT ceHHN MaTePnAni, NopJHaeau nHa peuKnIpaHe, KOtO MoRat da 6bDat yNtOpBe6n HOBtOPHO. BatePnte n AkymunpaUte batePn i CbBpTaB eueCTBa, KOtO He 6bBa da nonaD a BoklHata cpeA. Monr OcTpaHraBte cTapnte ypeeni, KaKTo 6batePn nn AkymunpaUte batePn KaTO OTNaBk, ona3BaIKo OKOIHATA cpeA.

Дeиности NO nouHCTBaHeto, РИ KOnTO ce OTeДЯ МьСBA国王DA, CBbPkaaMa Macla, HanPIMep npn MIneHa NdRgAteIi, MnEHa NaIOBHe, MOKeJa CE uN3bPbUba Camo Ha MeTa, KbJETO ca npeDbUdEnH pe3epBoApn 3a cb6bipaHe Ha Macna.

BЯкоCTpaHNe eNo3BOJeHO n3ToBaHeTO Ha BOda OTObSeCTBeHNTe BOHNbaceHn.

Pa6oTata C noocCTBaun npenapatn e no3B0JeHa camo Bbpyx yctOuHBn Ha teUHcTn pa6oTHn NOBbPXOCTN C 3BOD KbM KAHaIIN3aJIyTA 3a MpbCHa Boda. He doynckai Te noocCTBaunte npenapatn da nonadat BbB BoHNTE baceHN nIn noouBata.
Cnyphoct
Yka3aHnna 3a 6e3oNaCHOCT
Ipédi NpBBOHauaHOTO n3nOJ3BaHe Na To3n ypei HnePemehno pOpoTeTe pNIOJOKeHNITE ,Yka3AnHra 3a 6e3-ONaCHOCT 3a ypeDi 3a NoCHTBAHe POD BnCOKO HaNJaRaHe"
CTeneHn Ha onaCHOCT
ONACHOCT
Yka3aHue 3a HenocpeOcm6eHo ap03aHa onaChocm, KOymo eo do mekku menecHu HapaHaeHua unu do CmbpM.
PENEYNPEXDEHNE
Yka3aHue 3a 6b3MOxHa Ona Cha cumyaucu, KoroMo M0xe da dooeede do mekku meenu HapaHaeHua unu do cMbpm.
△ IPEIa3JIbBOCT
Yka3aHue 3a 6b3MoXHa Onacha cumyaucu, Koymo MoKe da doeede do neku HapaHbaHua.
BHIMAHHE
Yka3aHue 3a 6b3MoXHa Onacha cumyaun, KjormoMozKe da doeede do MamepuanHu uemu.
CnmboJIHa ypeJa

YpebM He buaa da ce kknueea Hnncpeo cmeHcKbM o6eemehamaMpexa 3a nu meHa ooda.

He hacoueaime cmpyma nod eucoko Ha- naeahe KbM xopa, kueomHn, akmuho enekmpuuecko oobopyahe unkmb camur ypeo.
Ypeda da ce na3u om 3ampb36aHe.
PpeDn3n npncno6JeHn
△ IPEIa3JIbBOCT
■Рпсншиме писнобени сизхам заацма наnompebumenuиhe buea da sbdamрmonehnu unu 3aoobukanhu.
PpeKbCbaH na ypeDa
IpeKbCBAuT Ha ypea npedOTBpTaBa HnpeHaMepeHTo NyckaHe B EkCnnoataun Ha ypea.
MoHTaX Ha TpaHcNoptHaTa DpbXka
Dnrypa C
TocTaBeTe DpbKkata 3a TpaHcnpTnpaHe.
06e3oNaCeTe npbXkata 3a TpaHcnpTupaHe c Dba 6oJtA.
IocTbAHe Ha MpeXa KbM OTdJeHneTo 3a npHaadJexKHOCTN
D
Okayete MpejkaTb noka3aHaTa Ha n3o6paXeHne-TO Kyka.
Nyckahe B ekcnnoaTaun
NocTaBeTe ypeDa Bbpxy paBHa nobbpxHOCT.
Φnγρa E
BaTePnIne Ca n3pa3xOeHn, aKo Ha nDCnIe Ha nICTo-eta 3a PbYHO pBcKaHe Beue He ce NOKa3Ba HnIo. Heo6XoHmN Ca dBe BaTePn INn AkyMynpaun 6aTePnC pAzmep AAA.
Фигура L
→HaTnCHeTe 3aTbapraunu sh6bp.
→ OTBopTe OTdeneHneTo 3a 6aTePn.
→ ɪЗbaɪdeteakymyntopnte.
IocTaBeTe HOB6aTePmN INpTu TOBa BHIMaBaTe 3a npaBnHToO ueHTpuAHe Ha NOJIocnte.
3aTbopeTe OTdeneHnTo 3a 6aTeepn.
OtctpaHeteI3pa3xODeHNITEaKymyIaTOPn KaTO OTnabk CbrrnaCHO BaINdHIne pa3nope6n.
Pomou npn Heu3npaBHOCTN
ONACHOCT
Onachocm om mokoe ydap. Ipedu eucu k deHocmu no ooppbkama u mexnueckmo obcnyeane u3knouheme yepda u 1s3aedeme umenca.
N3eBpuueHmo HpemOHmu u pa6omama no enekmpuueckume enememu e n03eoneHo camo om cmpaHa ha omopU3upaH cepu3.
Mokete camn da otctpaHnte Dpe6HNte NOBpeN, kaTO cneDbate daDcHNTe no-dony onncanHn.
B cIyuaH ha CbMHeHne ce o6bPheTe KbM OToPn3IpaH cepBn3.
YpeIbT He pa6oTu
→ Hatachete IocTa Ha nIcToIeTa 3a pBHyo npbcka-He, ypeDbT ce BKJIIOUyBa.
→ Поверете дади почehOTO на Тлиовата tabeileKaTa HanpexeHne cBbnaDA с HanpexeHMeTO HaIHTOCHNka HA TOK.
→ПюоверетeЗхранвашияkaбелзаувржданe.
MoTOpBt e npetOBaPen, npeKbCbaCbT3 a 3a uIHTa HA MoTOp Ca e 3aDeHCTBaN.
- Izhknluye te ypea ,0/OFF".
OCTaBete ypeDa da ce oxnaDi eDnH qac.
BknHouTe ypea n OTHOBo rO BBeDeTe B EKcPiOn-ataun.
Ako HeN3npaBnOCTTa HAcTbNba MHOrOKpaTHO, aHraKpauTe CepBn3a C npOBepKa Ha ypea.
YpeBbT He noteTJIa, MToOpbT 6pbMn
Cnadahe Ha HanpexKeHneTo nopadn Cna6a eEnktpuecka Mpeka nn npn n3noi3BaHe Na ydbKnitEn.
→ PNKBrNQBAHToIbPBO HATNCHETe NocTa Ha NICTOteTa 3a pTuHO npBcKaHe, CneI TOBa NOCTaBe TpeKbCbAua Ha yPeDaHa "I/ON".
YpeIbT He DoCTnra HaJraHe
→Поверетен actpoikataHa Tpb6ata 3a pa3npbC-KbaHe.
→Поверетe,Дали поадаанetoHa Вдаесdocta-bTuHOOKONJIYeCTBO.
→ N3ternete uedkata OT bpb3kata 3a kpaHa 3a BODAc nOMOHTa Ha PLOCKN KNEUIN I NOUCHETe NODTeaua BODA.
Ппеди Излорьане урEDA да ce obe3b3dnyш.Вкню悔у有很大�а 3a ралрьскванe и rooctabete Да pa60TN (мakc.2 mHyTN),dokaTO BO-data 3anoHNe Да ИЗИЗА OT NICTOLEТБЗМexyp-eta.Излч悔у有很大и OTOHBpKxete Tpb6a 3a pa3npbCkBaHe.
CnJIH KOJIe6aHnB HaNJaRaHeTo
→ПочuctBaHe NaДиОЗа BИСКОнHAЯнэ:Манхетe 3ambrcBaHnIaTe OTOBpa NaДиOЗаТС nOMOuTa HaИнla ИзПлakнБete CBoDAнРaped.
→Пюоверете дебита на ВODаТa.
YpeBbHe e xepMeTuueH
→ПиncаHa xepMeTNUHOCHT NOФ ФормaturaHa kaKINHa ypeDa e obCyIIOBEHa TeXHNUeCKn. Ппс сINHaПиncаHa xepMeTNUHOCTe ce obbPheTe KbM OTOpH3IpaH cepBn3.
POncTbAaTO CpeDCTBO He Ce 3acMyKBa
IV3non3BaIe Tpb6a 3a pa3npbckBaHe Vario Power.
TpbaTa 3a pa3npbckBaHe da ce 3abptn B noNo-KeHne, Mix".
Поверете, далу бтулкова с почесвашиpenapat Plug'n'Clean e noctabena с отвора надoly виюда за почесвашиpenapat.
Hama nHdNkaZna Ha haJraHaTeo Ha nCTOneta 3a pBHyO npbckaHe
PpOBepeTe/ CMeHeTe 6aTeepnnte
Pe3epBn Yactn
H3nO13BaTte cama op0rHnAHHnepe3epBHNaCTHn HA KARCHER.CmncbKHa nepe3bpHTne aactnue HamepHTe B KpA hNACToRTO YNbTBaHE 3a paObaT.
Fapanzma
Bb BcKa CtpaHa BaxKat rapaHIOHOHHTE yCNOBnA, ny6bnKyyBaHN OT opTm3nPaHATAOT hac nIcTHpNbTyOpck cIpyMa. EBeHTyAnH NOBpeDn Ha BaWn ypeD ue OCTpaHIM B pAMKITHe Na rapaHIOHHN cPCK 6e3nIaH, aKO CE KAcae 3a DeEeKT B MaTePnaJIte IIN npn PnpMBOCTBO. B rapaHIOHne Cnyauy Ce o6bPheTe KbM DcTPhOByo IIN Hai-Bln3KOn OTOpN3nap H cepBn3, KATO npdctabnte kacobata6benkka.
Ampesnhe Hamepnte Ha:
www.kaercher.com/dealersearch
TexHnueckn daHHN
71364 Winnenden (Germany)
Ten.: +49 7195 14-0
ΦaKc: +49 7195 14-2212
Winnenden, 2015/10/01
Sisukord
Seisujala monteerimine
Joonis A
Veevarustus veevargist
www.kaercher.com/dealersearch
Tehnilised andmed
Toode: Korgsurvespesur
Tuup: 1.324-xxx
71364 Winnenden (Germany)
Tel: +49 7195 14-0
Winnenden, 2015/10/01
Satura rādītājs
Noteikumiem atbilsto sa lietosana . LV 5
Vides aizsardziba LV 5
Drošība LV 5
Piegades komplekts LV 6
www.kaercher.com/REACH

lepakojuma materiulus ir iespejams parrstradat atkartoti. Utilizjet iepadokumus videi draudziga veida.

Noliettas ierces satur noderigus materiulus, kurus iespëjams pärstradat un izmantot atkartoti.
www.kaercher.com/dealersearch
Tehniskie datum
71364 Winnenden (Germany)
Tālr.: +49 7195 14-0
Fakss: +49 7195 14-2212
Winnenden, 2015/10/01
Turinys
www.kaercher.com/REACH

Pakotés medziagos gali buti perdirbamos. Pakotés atliekas sutvarkykite tausodami aplinka.

Vandenji siurbkite is atviru rezervuary
www.kaercher.com/dealersearch
Techninial duomenys

S. Reiser
Head of Approbation
Dokumentaci tvarkyi jgaliotas asmuo:
S. Reiser
71364 Winnenden (Germany)
Tel.: +49 7195 14-0
Faksas: +49 7195 14-2212
Winnenden, 2015/10/01
3mict
IpaBnIbHe 3aCTocyBaHHa. UK 5
3axnCT hABKOIIHbOro cepeIOBua. UK 5
Besneka. UK 5
KomnneKT noctaayHna UK 6
Onc npictpoU. UK 6
YcTaHOBKa UK 6
BveeHnBeknnyataio UK 7
Ekcnnyataucj. UK 7
TpaHcnpTyBaHHa UK 8
36epirannn UK 8
Dorra Ta texhihe ocbnyrobyaHHa UK 9
ДономогауВипадкУнелладOK. UK 9
3anachi yactnHn UK 9
Tapaantia UK 10
Texhihi xapaKTeepCTnKi UK 10
3aBaB npn BiDIOBdHicTb EBpOeCbKOro cnIBTOBapNCtBa. UK 10

Pereid nepiHIM BIKOPNCTAHMN pNCTPOIe HEOxidiHO npOHTaTaN daHy opriHANbY iHCTyKUIO 3 ekCNyatauciT Ja do
dani Bka3iBkn 3 63eNeK. HadaJI dIaTIy y BiDnOBiHNOCTO do hnx. 36epiratm obuDbI boOpuyn I naIaNbIwOr BBNOPICTAHNBA OBI dNaeHctynHO Blachnika.
PpabnIbHe 3aCTocyBaHHa
BukopnctOByte ue BOCOHaipnOp OuMUpBaU TINKJ DN PnIBaTHNX UIeJIe:
ДЯ Oчишну Maши, abTomobijib, bdyibeNB, IHCTPMEHtB, facaJB, Tepac, npcaIMGHNS npIaJB Ta iH. CTPMeHEM BOi NID TCKOM (pN He-06xIDHOCT, 3doabaAHNRAM 3aoCBB DnA YUeHHN).
- PnI cybMy 3aCTocyBaHHIO nIiIraIaOTb DOnOMixHE oBnaIHaHnI, 3aNCACTHNI Ta 3aC6bI dJIYuIeHN H, Do3BOIeHI dJIY BIKOpIcTaNHr IpMIOU KARCHER. ByJb NaCKa, cIyIyTe BkA3iBkAMdo 3ac06IB dJIYuIeHNH.
3axnct HABKoJIuHbOro cepeDObuHa
IHCtpykuiz i3 3acToCyBaHHK KomnoHentB (REACH)
AkytaIbhi BIVIOMOTI pIO KOMNOHETN HABeDEHnHa Be6-By3JI 3a aDpeco:O
www.kaercher.com/REACH

TANKBANbH MATEpian NIIaIaIObsc BTOPIHHI nepeo6oi. YnakOBky Heo6xidHO yTNl3yBaTn 6e3 shokdnra DOBkInJha.

Pnctpo, 100 BiDnpaOBAIIN, MiCTb 11HIM MaTepiA, kIOTpIOHO nepeDaBAtn Ha BTOPNHNepepO6y. BatapeTa akymnyTopn MICTb peOBOHN, kHIne NOBIHHN oTpannTyn HABKONHHeCEpeoBOnu. Pnctpo, 100 BiDnpaOBAIIN, Taki Jk BatapeI a60 acMyJrToPn, yTNl3yBatn 3riIDHO 3BMOrAMNIODO 3axNCTy HABKONHbOro cepoDoBnua.

PobOtN 3 OuyiueHH, B kIKNX 3'ABJrEbCBAIpa- zuObaHa BOda 3 BMCTOM MactHJa, HApVKnAd, nPOMBaHn DBnHyHa, MTTT DaHnUa, NOBHNi BIKOHyBaTHCb TIlbKn HA MMnHx MaMdaHnKax 3 BiObipHKoM MaCTHa.

Pobotn 3 MmHmM 3ac6aMn NOBHHi BVKoHyBaTncb TIlbKn Ha pO6OuX NIOUxHax, He npOHKnHX dI pyiINH, 3 BVXoDM y noBvTOy KaHani3aCiIO. MnHi 3aC6oHe NOBnHI nOTpanpIaY u BODoMn a60 rpyHT.

BpaTn Bovy 3 BiDkPntnx BoOIM B DeaKnx KpaIhax 3a6bOpohno.
Be3reka
Ppabunla 6e3neke
Peped nepuIMBVKOPHCTAHNAR DaHORI PnCtPOHO NtPIbHO pOHTATN《Bka3IBK 36Be3NEKN DnI BVCOKOHAnipHORO MmHOro anapTaY),UOdoAaTOBc.
PBeHb He6e3neKu
HEBE3NEKA
Bka3i8ka zuo do He63neKeu, kka 6e3nOcepeHb0 3aapoJyE ma npuz6oDum bo moKkux mpaem yc Cmepi.
△ NONEPEDXEHN
BkajiKa 0do nomenuHo moxnueoi Hebe3neHoi cumayui, 0o Moke npuzecmu do mkaux mpaem Cu cmepi.
OBEPEXHO
Bkazieka 0do o nomeuH No He63neHoI cumyaui, Jka MOKe cnpuHUMo ompumHaNHa neKux mpaB M. YBAFA
Bkasiika zo do moxneoi nomeuio He6e3neuHc cumyaui, zo moke cnpuunmu mamepiabhi 3bumku.
CmboJnHa npicTpoi

Prcmpri He moKHa nioKluOamy Be3nocepeHbO do mpyoBpoBdy 3 numHO odo.

He cnprmoeyame umcmpymh eodu nid eenuKUM muckom Ha niodeu, meapun, yimKHe He enkmpnuhe obadnHa ha cam npucmpiu.
CniD 3axuama npunaed 6iD mopo3y.
3axnchi 3acobn
OBEPEXHO
3axuchi npucpoi cyuyomb n3a zacmy kopcymeayie. 3mHa zaxuchx npucpoie yu hexmyehn HUMU he onyckaemcb.
Bmnaq npncptpo
TOnOBHn Bvmkaa 3anobirae camoBInbHi po60i ana- paTy.
Блokувань Всокohaniphoro nictoleta
Φikcatop 6nokye BaxjIb BVCOKOHanipHoro nictoneta Ta 3axnlae BiD MMOBiBHoro 3anycky npicrpoHO.
PponyckHNI KJIanaH 3 INHeBMaTHNIM BUMNKaueM
Ipepyckn knanan 3anobirae nepeBnuceHHIO donyctmoro pOboOHO TCKy.
KkIO BaxKINB BnCOKOHApHORO nICTONeBIIDNYCkaETbC,MAHOmETPCHNBMIMKAu BIDKNIOHa HAcOC,NOaABoDn iN BnCOKIM TNCOM PnpNIHRAETbCpNHaTCKAHNI H BaxKINb HAcOC 3HOBy BKNIOaETbC.
BmNka3axnctyDbnyHa
YBnAky HAdMipHOI HanpyrBMepexi BmNkau 3axHCTy DnHyHa BiKJIIOUae npCtpii.
KOMJIeKT NOCTaHaHHa
Komnkektaig npinctpo 3a3naheHa ynaKoBci. Ipn po3nakyaBahi npinctpo nepebipTu KOMnkektaio.
Y pa3i Hectaui DoatKoboro 6bnaHnHa a6o yukok-KeHNb,OTPMAHIX NiD Yac TpAHCNOpTyBaHNr, cnI niOBiDOMTe npO CE B TopROBEnbHy oprAhizauHIO, JkA npoda-nan anapat.
IodatkoBO 3HaIo6bTbcra
→ APMOBAHN BOJAHNI ⅢIaHr 3I cTaNapTHOIO MyTOI.
MiHImaJIbHnДiAmEtpr1/2IIOHa (13 MM)
MiHImaIbHa DOBxHa 7,5M
Onc npucTropo
YcBomyNocioHky3ekcnnyatauHabeJeHOOnnc npnCTPOO3MAKcIMaHbHOO KOMnKeTAtcIeO.KOMnKeTAtzIa BIdpi3HReTbc3aJeXHoBId MoJI (DINy.ynakyBaH-H).
PncyHKn DnB. Ha apkyu-Bknaadci 4
1 YactnHa 3'εdHaHHa DnI niDBeDeHHB BOIN
2Пдеведеньови i3 BCTaHOBJIeHM CiTuaCTNM dfIbTpOM
3 Pykab BnCOKOro TnCKy
4 HanpmaHaJlaHaHa
5 36epirahnCTpyMNHOI Tpy6kn
6 Micce dna 36epirahnH / napkybaltne noLOXeHHN BNCOKOHAPHORO nictoTeta
7Пдклоченндя MnIOyOro 3acoby Plug'n'Clean
8 PyuKa
9 Pyka dIra TpaHcnOpTyBaHHa, BntTaycTbca
10 Bapabah dIy IaHry BnCOKOro TnCKy
11 Kpmbounnha pyka dna 6apa6aba 3i 7nHrom
12 TOnOBHm BmMkaU ,0/OFF" / ,I/ON" (O/BIMK. / I/ YBIMK.)
13 MepexeBn KaebIb i3 WTeNCeBHOIO BUNKOHO
14 Micie dIa akcecyapib
15 Rauchn dJy KpinneHHc iTKN
16 Citka dny Biciky dny akcescyapib
17 TpaHcnpTHe KOleco
18 CtiKa 3 pyuKOIO nI nepeHeceHHa
19 Bucokohanipnni nicToJet Full Control
20 BaTapeHnBicik
21 CbITNoIOIOnHa INdMauIg TMCKY
MIX / 1 - SOFT / 2 - MEDIUM / 3 - HARD
22БлokувангиizdaДЯбатapei
23 BnokyBaHHBnCOKoHAnipHoro niCToIeta
24 KhoIIaIyBIDeHNAHN BICOKOHANIPHORO IJHARIA BID BICOKOHANIPHORO NICTOTENA
25 CtpymnHa Tpy6ka Full Control Vario Power Tpy6ka npin3NaeHa InaHnoWupHeiWiX 3aBdAnb 3uWeHneH
CTyneHi Tncky: HARD/MEDIUM/SOFT/MIX
26 CtpymnHa Tpy6ka Full Control ppe3n dIy Bua- neHn6pydy
Дястiknx3a6pydHeNb
CTyniHb TnCKy: HARD
*DdaTkoBepnnaa
27 Плесka 3 МИнМ 3acobom Plug'n'Clean i3anipHOIO KPNUKOHO
** He BXOДNTb ДО KOMПЛЕКТУ NOCTaHaHHa
28 ⅢnHn noaui BOn
CneuaJIbHe DonomixKHe 06JaHaHHa
IdoataKobe 6oNaDaHnHaP03uPiOe MoKINIBOcTi BnKOpCTaHHBaUoro npICrPoIO. IDoataKOBy IHΦopMaio BuMoKeTe OTpMaTn y BaUoro toProBoro areHTa dipMN KARCHER.
YctaHOBka
Pncykn DnB. Ha apkywi-Bklaqci 3

IpeD noyATKOM ekcNYataauii anapay TcAHOBHTOdoHAI He3akpInneHtCAHTHN.
ДяUbOro NOTPI6HITBHTB KOMNNEKTOCTauchnHa, Ta XpectoBA BkpyTka PH 2.
MONTAX ONOPN
PncyHOK A
BCTaHOBnTOnOpy.
BCTaBttnIIO6eJI, 10 DoIaHObC8, BOTbOpnDo ynpy.
→ 3akipiniHOnOPYrBHTAMU,IO BXoJrTB B KOMIIeKT NOCTaAHNA.
36ipka Micya dna 36epirahnna ctpymHHoio Tpy6kn
PncyHok B
→ Habicntu Micue dIa 36epiraHHa cTpyMHHOI TpyKU
3aKpinnt Mice dna 36epiraa HnC TpyMHHO Tpy6kn 3a DOnOMoHO DBox RBHtIB.
BctaHOBHeHH pyKoTKn IJI TpaHCnOpTyBaHH
PucyHOK C
BctaHOBHTn pyKoTky dny TpaHCnOpTyBaHHa.
→ 3akpiINITy pyKoRTKY TnIraTHCnOPTyBaHHa3a DO-nOMOROIO DBOX RHTBtB.
Po3miueHnCITKnHaBicikyDnA kcecyapib
PncyHok D
→ Habicntn ciTy Ha rauKn, Bka3aHi Ha 3o6paXeHHI.
BbeHnBaeknJnyatauio
→ NocTabuTn npucptiHa pibHy nobepxHIO.
Pncyok E
BCTABNTN 33aNy BVCOKOHanipHn IHaHr Upe3 HApabnoy Dny IhaHaRa.
PncyHok F
BCTABNTN BVCOKOHanipHn WnAHy BVNCOKOHanipHn NiCTOJET DO KlaaHn.
Bkaibka: DtmyBaHTnc npAInbHOro p03- mIeHHER 3'6dYBaHbHorO HINHIO.
Ipebeipntu Hadiinictb KpinnneHn, notraHyBwn 3a WJNAHr BVCOKOROTCKY.
Lijikom po3MOtaTn ⅢNaHr BnCOKOro TnCKy 3 6apa-6aHy.
BCTaTe MepeXeBn wTeKep y po3eTky.
IpaBAnHbOu
IotyXhictb DnB. Ha 3BoDcbki TabnHc/ B TexHiHnx DaHnX.
YBARA
Bodhi 3abpydneHnMoXymb cnpuHUMtu nowkoDeHN HACOCY EUCOKOe MUCy ma npunaOa. IJra 3aXucmy padumo ckopucmamcB oDHRum fInbmpom KARCHER (CneiJIbHe npunaOa, Homep dIra 3amoeNeHH 4.730-059).
IopabAHnBaBn3BODOrOHy
IOTPIMYTeB nopa iipnneMCTBa BOJOnOCTaHNNY YBAFA
Ulaheoi Mymu 3 Memany pa3om 3 cuscmeo 3axumy Aquastop moxymb npuzeecmu do nouko0jehnHa haccoy! Heo6xiohO bukopucmoeyamu Ulaheoi Mymu 3 pnaacmacu abo Mymy eupo6huuemeA KARCHER 3 lamyhi.
PncyHok G
→ 3'ENHByaBbHy MyΦTу 3 KOMNKeTу nID'cDHaJIte Do enEMeHTy anapata DnI NODaBaHHa BOni.
BCTABNTIuJHnI pyoJauI BOu B MyfTy BIINO-BIHorHO 36DHaHHa.
PiD'EDHaTN BOdHm UJnAHr DO BOOBOyU.
→ ΠOBHicTIO BiIDKpInTe BOOriHHN KpaH.
IopabAHBBOIN3BIDKPHTNX BOOIMN
Даньн BИСОКOHANIPН MИNHAN apanat 3i BCMOKTYBALHIM SHIaHROM KARCHER TA ZbOPTHIM KIanaHOM (CneJIaJIbHe npnIaIdA, HOMeP 3aMObNEHH.
2.643-100) npn3naheO nIЯ BCMOKtyBaHnR BODn 3 BiKpHTNx p3eBpyapIB, npMIPoM, 3 DOKOK nIry DOUBOI BODn YI CTaKBiB (MaKcIMaJIbHy BVOCOTy BCMOKtyBaHH N.Iy.yo3diI "TexHiHaI"
Ppimitka: Y pexmimi BCMOKtYBaHHB BKNOPCTaHHN 3eHnEHH NJI PIKIIIOUeHH BOH He NOTPI6He.
3anOBHTN BCMOKTyBaJIbHn JIJaHr BOIOK.
→ PnIgRbHNTNt BCMOKTyBaJbnH nJuaHr Do eIeMeH-Ta IoJaHi BOJn Ha npICTpo T a NomiCTTN y DjKepeNo BOJn (hAnpKnAd, y Doouho BoKy).
Nepd noCTKOM pOBoT BnADNTN 3 nPCHTOPO NOBITRA,AK 3a3aHcHo HNxHc:
YBIMKHiTb anapat ,I/ON" (I/YBIMK.).
P036JIOKByaTn BaXJIb BNCOKoHAnipHoro niCTOJeTa.
→ HaTnCHyTN Ha BaxiNb BnCOKOHanipHOro nictOJeTa. PnCTpiYbIMKHeTBcR.
→ 3aianuata npiCtprYyBMxHENHM (He 6JIbI, HIX 2 XBUNHN), POKN 3 BcKoHAnipHOrO niCTOnLaeta No-ue BHXoDMTN BOda 6e3 6ybl5aWOk.
Bidnyctntn Baxinb BucOKoHanipHoro niCToneTa.
3a6nokyBatn BaxinB BnCOKoHaipHOro nictoneTa.
Ekcnnyataia
YBARA
Poboma ecyu npomraom binbwe 2 xunn npueo dmb do buxody 3 na dy hacoc a bucoko mucky. Ja zu npucpi npomraom 2 xunu Hne habupae muck, mo uo o cnd bumkymu ma dimu iiooeiho Ekaiekam, kni npueoarmbc e anai "Donomoa y bunadky Henoiaok".
Pobota nii BnCOKm TnCKOM
OBEPEXHO
Дяларбяану покожени рпу ouшеньсiod 36bebiamu yicmaнь уонамие 30cm iid naokahux noeepxoh.
YBATA
He yucummu aemomobinbhi uhu, nakoapaboee no- kupmmaboo ymuynbe nooeepxhi (Hanpuknad,3 depeu-hu) i3 zacmocyeaehn m ppezdu budaneHH bpydy. ICHy 3aop03 naoukdoeHNH
3aIexHO BID 3aBdaHn 3 OunuEHHn BnOpaTN BiNIObIDHy CTpyMNHy Tpy6ky.
PncyHok H
→ OДЯгТи На ВИСОКОнтіпNTI CTpyMnHNY TPy6kY i 3aФiKCyВaTи II, NOBePHyBUn Ha 90^
→ YBIMKHiTb anapat ,I/ON" (I/YBIMK.).
→ P036IkyBaTHB BaxJIb BucKoHAnipHOrO nictone-Ta.
→ HaTnCHyTN Ha BaxiNb BnCOKOHanipHOro nictOJeTa. PnCTpiYbIMKHETbcra.
Bka3iBkA:JaKIO BaxJIb 3HOby 3BiINbTcB, anapat 3HOBy BMKNHeTcB.CB.NCKI TNC 3aNnuaeTcB C B CNTEMI.
Струинна Трубka Full Control Vario Power
CtpyMNHy Tpy6ky NOpeBtAtn DDTN,doKnHa INdKaToPi TNCy KUOpKoHApHrO NcTOnTe Ha 3aorPbTaCn INdKaTOp BaxaHOrO CTynHeN TNCy.
Cnctema Full Control
Пд Тснлгатацil INdkaцT NCKY ha BICOKOHanipHOMy nictoneti nokaey 3a donomorOу CTyneheBOIpy6k Full Control notoTuHy 3aDAny CTynHb TnCKY.
Ppimitka: PnEeKnnyatauii 3 T-Racer ta iHsIMMa akceCyapamn iHdNkauia TCKy He iHfOpmatNBHa.
PekomehdoBaHMeToOnOuHHeHH
→ P03nnnn HeBeNiky KInbKcTb 3ac06y dny nI-ueHHa Cyxu NoBepxHTo Ta 3aImuHTn diTt (He BnXATn).
→ 3MnIe po3HHeHn 6pyd CTpyMeHem BnCOKOr TnCKy.
Pio60tn 3 MIOUHM 3ac06om
→ BnHrTn PnIaKy 3 aCobm DnIy NuaeHn Plug'n' Clean 3 KpInneHH Ta 3akpn TKnuKOIO.
POMICTHTN PIIIUKY 33acobom dIy YIeHnKpIiKOIO BROPY B McIe DnI 36epirAHn.
PpnnnHHTeeknnyataio
BidnyctnTn BaxJIb BnCOKOHanipHoro nictoTa.
3a6nokyBaTN BaKInB BnCOkOHanipHOro nictOteTa.
PncyHok J
BCTAHOBUN BWCOKOHANIPHN NICTOJETICTPMHNHY Tpy6ky BnapkyBaNbHe nONOXEHNA.
Пд чац трьалимп поев у роботы (ноанад 5хилин) anapat спд вимкати ,0/OFF" (0/BIMK.).
3aikyuHnpo60Tu
BiDnyctTnBaxjIb BVCOKoHanipHoro nicToeta.
BIMKHyTu anapat "0/OFF" (O/BIMK.).
→ BntarHITb MepexHHn 1tEkep 3i tTencenBHOI po-3ETKN.
OBEPEXHO
BiodcHyaamu eucokohanipnui uanae iioe uocokohanipno nicmonema afo npumpo minbku moi, konu ecumemi oicymhmu muck.
→ 3akpnTn BOOpOBiDHN KpaH.
ⅡO63MeHUnTI NtCK B CnCTeMI, HATNCHyTN BaxJIb BnCOKOHApHOro NiCTOneta.
Bidnyctn Baxjnb BnCOKoHaipHoro nictoIeta.
3a5bOKyBaTHBaxKInBvCOKOHAnipHOro nictOneta. YBAZA
Ppu 3nrrmmjxubunbhoao abo bucokoHaniphozo uha-nza iio vac nopomu moze buhukhymu eumik aapyoi eodu 8micux 3'edHNAH.
Biodokpemnt anapaT BiD BOOnOncTaaHHa.
TpaHcnpOpTyBaHHa
OBEPEXHO
He6e3neka mpaem ma nowkoedxhe!
Ipu mpaHcnpmyeAHnHi cnId 3eepHymu yeaay Ha eaay npucmpoio.
TpaHcnpOpTyBaHHBbpyHy
Bucoko niiHn npicpti3a pyky ta nepheceT.
BntaHrHyTn DO KnaZaHHra pyKoArykDn TpaHCnpOpTyBaHHa. Ptinaad TaTgTTn 3a pyKu Dn TpaHCnpOpTyBaHHa.
TpaHcnpOpTyBaHHa TpaHCnOpTHmM 3ac06amN
PapeI TpaHcnpTyBaHHm B roPIm3OHTaBbHOMy nolooKeHHI: BnHrTn pIiKuY 3 MInHM 3ac6oM Plug 'N' Clean 3 KpIINHeH Ta 3akPTn KpIINko.
→ 3aΦiKcYbATn PrnPnaIad BiD 3CyHEnHNa Ta nepeKeiHa-HN.
36epirahnra
OBEPEXHO
He6e3neka mpaem ma nowkoedxeh!
Ipu 36epiiaaHn iapaxoeyama aay npucmpoio.
36epiratnpnctpi
BCTaHOBHTn npncTpiHa pIBHni NOBepxHi.
BID'eHNATCSTyPMHNY Tpy6kBy BID BINCOKHOHApHO- ro nictoneta.
HATUCHNYI PO3MKAANbHy KHOKNy HA BUCOKOHAnipHOMY nICTOJETi I Bd'cHaTn BUCOKOHAnipHNI shaHr BID nICTOENA.
→ POMICTHTN BWCOKOHAnipHn NiCTOnET B Mice dIa 36epirahnn.
→ POMICTI NT CTpyMNHHy Tpy6ky B Micue dIraHHa
- CtpymnHa Tpy6ka φpe3n Дя Видальна Буdu: φорсунka Bнз.
- CtpymnHa TpyKa VarioPower: φopcyHka Bropy.
→ POMICTMMEpeXeBn Ka6eB y BiDcik dIy akce-cyapib.
OBEPEXHO
He6e3neka mpaem ma nowkoxdxeh!
Dompumyeamucn Haprmy6eprmaHna 6apa6ha nla ana nio hac HAMomyaHH BucoKoHaipHOso wanahe.
3MOTaTN BUCOKOHaHipHNIeNaHr.
3a DonOpMOHO KPNBOUINHoi PYKORTKN NOBepatn 6apabdAn darnAMOTyBaHHa INaHa r npOTn rOHNHKOBOI CTPIKN.
PereTpBnAIm 36epirAHm, HapNkIad B3IMKy, cnIdoJATOKO 3BepHyT yBaIy Ha Bka3iBKn B po3dini "Dorjra."
3axnct BiMop03IB
YBAGA
He noBHCmIO eunopoxheni npucmpoi ma oBnaHaHHaMozymb 6ymu noukoDxehi npu diI mOpO3y. TOBHCmIO eunopoxhmu npucmpi ma oBnaHaHHa, a makok 3a-6be3eumu 3axcmtid MOpO3y UoHkyTu noukodKeHb:
Biokpemntn anapaat BiD BOOnoNocTaaHHa.
Bid'ednatn ctpymnHy tpy6ky BiD BucokohanipHoro nictoeta.
→ YbimKhItb anapat ,I/ON" (I/YBIMK.).
HataChyTu iYtpmByBatn BaxjIb BWCOKHaPiPHorO nICToTeT a NOKi HE BNTeE BCRA BOa (6bn3bko 1 XBNJINH).
Bidnyntu Baxinb Bucokohaniphoro nictoleta.
3a6nokyBaTN BaKInB BnCOKoHanipHOro nictOteTa.
BIMKHyTn anapat "0/OFF" (O/BIMK.).
36epiratnpicpi 3 ycima akcecyapammy npimiuenceHHI.
DorlaTatexhuiheo6cnyrobyBaHHa
HEBE3NEKA
He6e3neKa ypaXeHH eIekmpuHm cmpyMOM.
→ Pēpē npoēdeēnHm 6bδ-ρaux pδδim 3 ocbnyoEyēaHnŋ pyncpiu cnid bμmKhymu ma eumayHmu wμmencenby uynk 3 poεmku.
OuichiHnCITKN B iDBeHHi BOH
CITky B niDBeHHi BOH OUYBaTH peryJrApoHO.
3HrTmMyfTy 3 BOdHorO WnHaHy.
YBAGA
Cimky He MoXHa nowkoDxyamu.
PncyHOK K
→ BntraHytn ciTky nlockory64mM.
→ Tomtn ciTky niД npotiyHO BOIOJ.
3HOBy BCTaBttn CiTky B NiDBeDeHHR BOHN.
3amHa 6atapeBncoKoHanipHoro nictoJeta
Kaio Ha nCnpei BnCOKOHanipHoro nictoTa HiOro He BiO6paxaetbca, pecypc 6atapei BmepnAni. Heo6xidno Dbi 6atapei abo akymyIraTopa03mpy AAA.
Pncyok L
→HaTnchTytn nepecyBny 3acniHky.
Bidkpntu Bicik dna 6aapei.
→ BnHrtn akymyTApOpN.
BCTABNTNHOI6aTapei,IOTpPMUOuNCb npabNb-HoI nonpHocTi.
3akpnTn BiDcik dIa6Taapei.
BukopncTaHi akymyIaTOpn cII d yTuNl3yBaTN BiNoBIDHO do diOuHX npunncAhb.
Donomora y Bunaqky Henonaok
HEBE3NEKA
He6e3neka npa3ku cmpyom. Ipep npoeedeHnram 6byb-akx p0bim no 0o2n4y ma mexHCHOMy o6cnyeo eyeanHHIO EUMKhymu npucmpi i buHnmu MEPexeey eunky 3 po3emku.
Pemohmhi p6o6om ma po6om 3 enekmpuHUMU e3y3nAmo moe bukOhyam mInbku ynoBHOaKeHa cnyk-6a cepiechozo ocbnyooyeahnn.
He3nHi yuKoJxHEny Bn MoKeTe BnPabNTn CaOCTIHO 3a DOnOMOrIO HAcTyNHO ORIyD.
YcMHHINBnnaKax,6yNb-JaNCKa,3BepTaIteCsdo KOMnTeHTHOi CnyXbN TeXHiHoi NiITpIMKn.
PpncpiHne npaucOe
HATNCHTNHa BaxiNb BWCOKOHAnipHOro nictOJeTa. PnCTpiyBIMKHTbCra.
PerebipTe BIDnobIDHicTB Hanpyu, BkazHOi y 3aBocbki Ta6bnu, Hanpy3i Dkepena eNeKTpoe-Hepi.
→ Ipebeipnti MepekeBn KaebIb Ha nooKOJKeHHa.
→Диburgипегевантaxesн,сррацовab3axnchn abTomat eNeKtpoDbiryha.
BIMKHytn anapat "0/OFF" (O/BIMK.).
-Дати пистою oxonoHyTu BnpoOobx oDHiiei ro-DHH.
- YBIMKHYTN pnpCTPIA t3HOBy PO3NOaTHPO6Oby. RaIIO HeCnPabNtCB TOBTOpIOeTBc, DopyuHTNIpeBepiKy pnpCTPOO cepBichIN cnyXbi
Anapat He BMnkaTbca, DBNrHy rDntb
IaIHnHa npyurupe3 cna6ky eJeKtpomepexy a60 npn BkOpNCtAHNI noDobxbya.
→ PnB KIIIOHEnHa NcAImpeHed NAtCHuTyN BaxiInB BmCOKHOAnipHO nictoIeta, noITM BCTaHOBHTN BIMKaU pncTpoH BOJIoKeHHeN "I/ON" (/YBMIK).
Ppncpii He npaioe niD TnCKOM
→ IpepeBipuHn HAcTpoIOBaHHCTpyMmHHOITpy6Kn.
→ IpepeBipuTn DOCTaTHiCt b 06'Emy noaHi BOUN.
→ BtarrHb 3 donomoroo nnoncory6uB MEpexeBn fIbTp 3 enemETy dna BOdonocTauaHnra T npOMnTE IYOU npOTOH BODi.
→Перед ВИКОРИСТАНHAМ ВИКАЧТЯNOВITРЯ i3 npICTPOHO.
BvIMKHyTn pnpctpi 6e3 npEHaHOI ctpymHHOI Tpy6Kn Ta dAni Homy nnonpaouBatn (He 6bnbe 2 Xbnn) NOKN 3 nCtoTe He noNe BHXoDHTn BOa 6e3 6ynbSAooN oBtpr. BvIMKHyTn pnCTpri Ta 3HOBy npEeHaTHc TcyMHHy Tpy6Ky.
Belenki nepenada Tucky
OHCTNTNU fopcyHky BVCOKOTo TnCKy: TOnIOHO npN6paTNI 6pyd 3 OTbOpY fopcyHKn Ta npOMTu II BOIOU.
→ IpepeipTe KJIbKICtB noaBaHOI BOuN.
Anapat HerepMeTHHn
→ He3nauHaHereepMeTnUHCTb npNCtPO 3ymOBnHea texHCHMMOcBnBOCTMn.PnpCnBnHerepeMeTnUHOCTi 3BepHtCBd o ABTOp3oBAHOI CnyK6n cepBICHOOcbnyROBaHHa.
OuHCHN 3acio He BCMOKTOCTbC
BnKOpNCtOByBaTn CtpymHHy Tpy6ky VarioPower. NObepHTn CtpymeHeBy Tpy6ky B nOJoxKeHHa .Mix".
→apeBipNTn, YN CBTaBNeHa BIDKpHTa PIIraika 3 MmHmM 3ac06om Plug'n' Clean BNb3 B 3eDhaNbHn eMEENT for mHnHoro 3ac06y.
Biccyi iHnkaia Tncky Ha BnCOKOHanipHomy nicToJeTi
IpebeBipTu/3amIHHTu 6aTapei
3anachi YactHH
BnokpOCTOByTtINbOpirHAnbHi zanachi YactHHn
phiM KARCHER. ON. 3aZanachnx YactNH HapnkiHui
daHOI hCTpykui 3 ekcnnyataui.
Fapanthria
YKoKHi KpaHII DIIOTb YMBoN rapaHTI, HadaHOI BIDNoBIDHOO fipMOIO-npOadAbeM. HenOnaKnB Ipo60I pNCTPO MO yCyBaEMO b6KoTHoBHO pnoTOrAM TepMHy DII rapaHTI, kAIO BOHN BmIKnKaHI 6paKOM MATEPIAn YN NOMILKAMN BINOTOBNeHH. Y BnAaKy UHHoI rapaHTI 3BePTITcBdo npOabuMH u HaNbIeKHHy ABTOP3OBAHIN cepBICHI cHTP 3 DOkUMeHTaJIbHM nITBpeJXEHNM NOKYKN.
aIpeCN Bn 3MOKeTe 3HaIITn Ha Be6-CTOpIHU:
www.kaercher.com/dealersearch
TexhiHi xapaKTePnCTnKi
Elektprnue nipknloeHH
71364 Winnenden (Germany)
Ten.: +49 7195 14-0
ΦaKc: +49 7195 14-2212
Winnenden, 2015/10/01
5.966-728.0 10/15