USER MANUAL PFS 5000 E BOSCH
natural_image
Technical illustration of two Bosch air purifiers with labeled parts, shown from different angles (no text or symbols on the devices themselves)
no Crinipinal air/feptin-putules
- Alkunserüst obient
In Drilling Isolation,
d Originallyectine caimia
nl instruicio originalna






natural_image
Illustration of a robotic arm spraying liquid onto a tiled floor, with an arrow indicating flow direction (no text or symbols)
natural_image
Illustration of a spray gun with motion arrows indicating airflow or spray direction (no text or symbols)
6

natural_image
Diagram showing a robotic arm interacting with a curved mechanical or electronic component, with directional arrows indicating motion (no text or symbols present)

natural_image
Three mechanical components with directional arrows indicating movement or assembly (no text or symbols)


natural_image
Illustration of industrial robotic devices on a workbench, no text or symbols present
1 609 92A 7VA | (30.05.2022) Bosch Power Tools

Bosch Power Tools 1 609 92A 7VA | (30.05.2022)
Deutsch
Sicherheitshinweise
www.bosch-pt.com/serviceaddresses
Entsorgung
WARNING
Read all safety warnings, instructions, illustrations and specifica-
tions provided with this power tool. Failure to follow all instructions listed below may result in electric shock, fire and/or serious injury.
Save all warnings and instructions for future reference.
The term "power tool" in the warnings refers to your mains-operated (corded) power tool or battery-operated (cordless) power tool.
Work area safety
▶ Keep work area clean and well lit. Cluttered or dark areas invite accidents.
▶ Do not operate power tools in explosive atmospheres, such as in the presence of flammable liquids, gases or dust. Power tools create sparks which may ignite the dust or fumes.
▶ Keep children and bystanders away while operating a power tool. Distractions can cause you to lose control.
Electrical safety
▶ Power tool plugs must match the outlet. Never modify the plug in any way. Do not use any adapter plugs with earthed (grounded) power tools. Unmodified plugs and matching outlets will reduce risk of electric shock.
▶ Avoid body contact with earthed or grounded surfaces, such as pipes, radiators, ranges and refrigerators. There is an increased risk of electric shock if your body is earthed or grounded.
▶ Do not expose power tools to rain or wet conditions. Water entering a power tool will increase the risk of electric shock.
▶ Do not abuse the cord. Never use the cord for carrying, pulling or unplugging the power tool. Keep cord away from heat, oil, sharp edges or moving parts. Damaged or entangled cords increase the risk of electric shock.
▶ When operating a power tool outdoors, use an extension cord suitable for outdoor use. Use of a cord suitable for outdoor use reduces the risk of electric shock.
▶ If operating a power tool in a damp location is unavoidable, use a residual current device (RCD) protected supply. Use of an RCD reduces the risk of electric shock.
Personal safety
▶ Stay alert, watch what you are doing and use common sense when operating a power tool. Do not use a power tool while you are tired or under the influence of drugs, alcohol or medication. A moment of inatten-
tion while operating power tools may result in serious personal injury.
▶ Use personal protective equipment. Always wear eye protection. Protective equipment such as a dust mask, non-skid safety shoes, hard hat or hearing protection used for appropriate conditions will reduce personal injuries.
▶ Prevent unintentional starting. Ensure the switch is in the off-position before connecting to power source and/or battery pack, picking up or carrying the tool. Carrying power tools with your finger on the switch or energising power tools that have the switch on invites accidents.
Remove any adjusting key or wrench before turning the power tool on. A wrench or a key left attached to a rotating part of the power tool may result in personal injury.
▶ Do not overreach. Keep proper footing and balance at all times. This enables better control of the power tool in unexpected situations.
▶ Dress properly. Do not wear loose clothing or jewellery. Keep your hair and clothing away from moving parts. Loose clothes, jewellery or long hair can be caught in moving parts.
If devices are provided for the connection of dust extraction and collection facilities, ensure these are connected and properly used. Use of dust collection can reduce dust-related hazards.
▶ Do not let familiarity gained from frequent use of tools allow you to become complacent and ignore tool safety principles. A careless action can cause severe injury within a fraction of a second.
▶ Do not force the power tool. Use the correct power tool for your application. The correct power tool will do the job better and safer at the rate for which it was designed.
▶ Do not use the power tool if the switch does not turn it on and off. Any power tool that cannot be controlled with the switch is dangerous and must be repaired.
▶ Disconnect the plug from the power source and/or remove the battery pack, if detachable, from the power tool before making any adjustments, changing accessories, or storing power tools. Such preventive safety measures reduce the risk of starting the power tool accidentally.
▶ Store idle power tools out of the reach of children and do not allow persons unfamiliar with the power tool or these instructions to operate the power tool. Power tools are dangerous in the hands of untrained users.
- Maintain power tools and accessories. Check for misalignment or binding of moving parts, breakage of parts and any other condition that may affect the power tool's operation. If damaged, have the power tool repaired before use. Many accidents are caused by poorly maintained power tools.
20 | English
▶ Keep cutting tools sharp and clean. Properly maintained cutting tools with sharp cutting edges are less likely to bind and are easier to control.
▶ Use the power tool, accessories and tool bits etc. in accordance with these instructions, taking into account the working conditions and the work to be performed. Use of the power tool for operations different from those intended could result in a hazardous situation.
▶ Keep handles and grasping surfaces dry, clean and free from oil and grease. Slippery handles and grasping surfaces do not allow for safe handling and control of the tool in unexpected situations.
Service
▶ Have your power tool serviced by a qualified repair person using only identical replacement parts. This will ensure that the safety of the power tool is maintained.
Safety instructions for fine spray systems
▶ Keep your work area clean, well lit and free of paint or solvent containers, cloths and other flammable materials. There is a risk of spontaneous combustion. Ensure that you have access to functioning fire extinguishers or extinguishing equipment at all times.
▶ Ensure that the spray area is well ventilated and that there is sufficient fresh air circulating in the whole area. Evaporating flammable solvents create an explosive environment.
▶ Do not spray or clean with materials with a flash point lower than 55 °C. Use water-based materials, non-volatile hydrocarbons or similar materials. Volatile evaporating solvents create an explosive environment.
▶ Do not spray near ignition sources such as static electricity sparks, naked flames, pilot lights, hot objects, engines, cigarettes and sparks created by plugging in and unplugging electric cables or operating switches. These kinds of spark sources can lead to combustion of the surrounding environment.
▶ Do not spray materials if it is not clear whether they might be dangerous. Unknown materials could create hazardous conditions.
▶ Do not spray boiling water. Spray only warm water (max. 55 °C) which is free from chemical additives.
▶ Wear additional personal protection equipment such as appropriate protective gloves and a protective mask or respirator when spraying or handling chemicals. Wearing personal protection equipment appropriate to the conditions reduces your exposure to hazardous substances.


▶ Take note of possible risks posed by the spray material. Observe the markings on the container or the manufacturer's information regarding the spray material, including the instructions about using personal protective equipment. You must comply with the manufacturer's instructions in order to reduce the risk of fire and of injury caused by poison, carcinogens, etc.
▶ Keep the mains plug and the spray system trigger switch free from paint and other liquids. Never hold the cable by its plug connection for support. Doing this could cause electric shock.
▶ Supervise children. This will ensure that children do not play with the fine spray system.
Products sold in GB only:
Your product is fitted with an BS 1363/A approved electric plug with internal fuse (ASTA approved to BS 1362). If the plug is not suitable for your socket outlets, it should be cut off and an appropriate plug fitted in its place by an authorised customer service agent. The replacement plug should have the same fuse rating as the original plug.
The severed plug must be disposed of to avoid a possible shock hazard and should never be inserted into a mains socket elsewhere.
Symbols

The sticker regarding operation of the fine-spray system is located on the base station. The correct interpretation of the symbols helps you operate the fine-spray system better and more safely.
Symbols and their meanings Detailed description
ALLPaint



The fine-spray system is suitable for varnishes and lacquers and for wall paints.
"Wood/varnish" application:
Spraying varnishes and primers
"Wood/lacquer" application:
Spraying solvent-based and water-dilutable lacquers, clear lacquers and oils
"Wall" application:
Spraying emulsion and latex paints
(see "Intended Use", page 21)

Step 1: Choose the correct nozzle cap

Choose the grey nozzle cap (11) for the "wood/ varnish" application

Choose the black nozzle cap (12) for the "wood/lacquer" application

Choose the white nozzle cap (10) for the "wall" application
(see "Changing the nozzle cap (see figures B1-B2)", page 22)
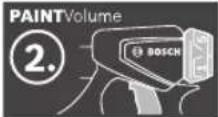
Step 2:
Setting the spray material quantity
1-3
Select setting 1, 2 or 3 on the thumbwheel (4) for the "wood/varnish" application
1-3
Select setting 1, 2 or 3 on the thumbwheel (4) for the "wood/varnish" application
4-5
Select setting 4 or 5 on the thumbwheel (4) for the "wall" application
(see "Setting the spray material quantity (see figure J)", page 24)
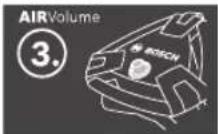
Step 3: Setting the air flow

Set the "wood/varnish" application at the air flow control (25)

Set the "wood/varnish" application at the air flow control (25)

Set the "wall" application at the air flow control (25)
(see "Setting the air flow (see figure D)", page 25)
Product Description and Specifications

Read all the safety and general instructions.
Failure to observe the safety and general instructions may result in electric shock, fire and/or serious injury.
Please observe the illustrations at the beginning of this operating manual.
Intended Use
The power tool is intended for spraying all common paints: Emulsion and latex paints (wall paints), solvent-based and water-dilutable (recommended) lacquers, varnishes, primers, impregnations, clear lacquers (ALLPaint), oils and water.
The power tool is not suitable for use with caustic solutions, wood stains, acidic coating materials, disinfectants, pesticides and house paints.
Product Features
The numbering of the product features refers to the diagram of the power tool on the graphics page.
(1) Spray gun
(2) Air cap
(3) Cap nut
(4) Thumbwheel for spraying capacity
(5) Trigger switch
(6) Lock ring
(7) Container for spray material
(8) Spare container for spray material
(9) Hose port (spray gun)
(10) Nozzle cap (white: for "wall" application)
(11) Nozzle cap (grey: for "wood/glaze" application)
(12) Nozzle cap (black: for "wood/lacquer" application)
(13) Filling sieve
22 | English
(14) Transfer bucket ^a)
(15) Nozzle needle
(16) Container seal
(17) Suction tube
(18) Ventilation hole
(19) Paint channel
(20) Air hose
(21) Bayonet lock
(22) Base unit
(23) Carrying handle
(24) Holding clamp
(25) On/off button with air flow control
(26) Hose port (base unit)
(27) Accessory compartment
(28) Cleaning brush
(29) Air filter cover
(30) Air filter
a) Accessories shown or described are not included with the product as standard. You can find the complete selection of accessories in our accessories range.
Technical Data
| Fine-spray system PFS 5000 E |
| Article number | 3 603 B07 2.. |
| Rated power input W 1200 | |
| Spraying capacity ml/min 500 | |
| Required time for application of paint on 3 m^2 | min 1 |
| Container capacity for spray material | ml 1000 |
| Length of air hose m 4 | |
| Weight according to EPTA-Procedure 01:2014 | kg 4,9 |
| Protection class | ☐/II |
The specifications apply to a rated voltage [U] of 230 V. These specifications may vary at different voltages and in country-specific models.
Noise emission values determined according to EN 62841-1.
Typically the A-weighted noise level of the power tool are: 84 dB(A); sound power level 95 dB(A). Uncertainty K = 3 dB.
Wear hearing protection
Vibration total values a_n (triax vector sum) and uncertainty K determined according to EN 62841-1:
a_n<2.5 m/s^2,K=1.5 m/s^2
The vibration level and noise emission value given in these instructions have been measured in accordance with a standardised measuring procedure and may be used to com-
pare power tools. They may also be used for a preliminary estimation of vibration and noise emissions.
The stated vibration level and noise emission value represent the main applications of the power tool. However, if the power tool is used for other applications, with different application tools or is poorly maintained, the vibration level and noise emission value may differ. This may significantly increase the vibration and noise emissions over the total working period.
To estimate vibration and noise emissions accurately, the times when the tool is switched off or when it is running but not actually being used should also be taken into account. This may significantly reduce vibration and noise emissions over the total working period.
Implement additional safety measures to protect the operator from the effects of vibration, such as servicing the power tool and application tools, keeping their hands warm, and organising workflows correctly.
Assembly
▶ Pull the plug out of the socket before carrying out any work on the power tool.
▶ Ensure that the spray gun and base unit are assembled completely and with all seals. Only this will ensure the function and safety of the fine-spray system.
- Open the holding clamp (24) and unwind the air hose (20) completely from the base unit (22).
Connecting the base unit:
- Insert a bayonet lock (21) of the air hose securely into the holes in the base unit port (26) according to the arrow marks.
- Turn the bayonet lock a quarter turn clockwise.
Connecting to the spray gun:
- Insert the second bayonet lock (21) of the air hose securely into the holes in the spray gun port (9) according to the arrow marks.
- Turn the bayonet lock a quarter turn clockwise.
Note: Remove the air hose (20) before pouring in spray material (quarter turn of the bayonet lock (21) anticlockwise; pull the bayonet lock (21) out of the port (9)).
The fine-spray system is supplied with three nozzle caps:
| Nozzle cap |
| (10) (11) (12) |
| Paint | White Grey Black |
| Delivery condition | Mounted In the accessory compartment (27) under the holding clamp (24) |
| Application | "Wall" "Wood/var-nish" | "Wood/lac-quer" |
Note: Check the spray material by stirring it before selecting the nozzle cap. Thinner-viscosity material (e.g. wood paint) can be sprayed better with the grey nozzle cap (11) or the black nozzle cap (12), whereas thicker-viscosity material (e.g. wall paint) can be sprayed better with the white nozzle cap (10).
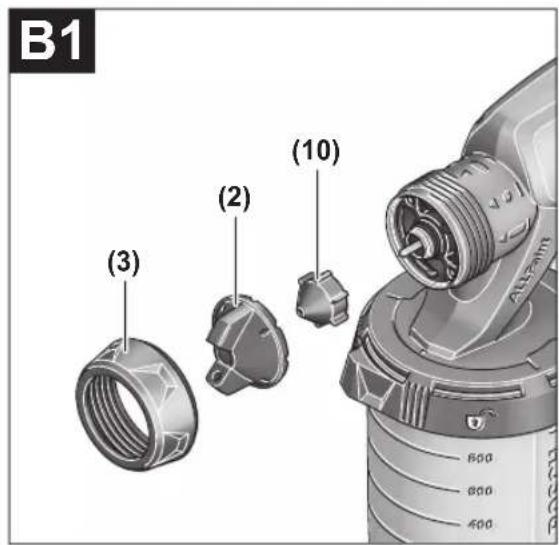
- To change the nozzle cap, unscrew the cap nut (3).
- Pull off the air cap (2).
- Unscrew the mounted nozzle cap.
- Open the holding clamp (24) and take the required nozzle cap out of the accessory compartment (27).
- Screw the required nozzle cap into the thread in the spray gun.
- Put the air cap (2) on the nozzle cap and tighten it with the cap nut (3).
Operation
▶ Pull the plug out of the socket before carrying out any work on the power tool.
▶ Products that are only sold in AUS and NZ: Use a residual current device (RCD) with a nominal residual current of 30 mA or less.
Work preparation
Spraying on the sides of water bodies (lakes, rivers, etc.) or neighbouring surfaces in the direct catchment area is not permitted.
▶ When purchasing paint, lacquer and spray material, pay attention to their environmental compatibility.
Preparing the spray surface
The spray surface must be clean, dry and grease-free.
- Roughen smooth surfaces and then remove the sanding dust.
When spraying, all non-covered surfaces can be contaminated by the spray mist. Therefore, thoroughly prepare the area around the surface to be sprayed:
- Carefully cover floors, furnishings, doors, windows as well as door and window frames, etc. Painting substrate, for example, is recommended for covering the floors.
- Fix the cover material in place. Cover material that is not fixed in place securely can be detached or blown away by the powerful air jet.
▶ Carefully mask off plug sockets and switches. Uncovered plug sockets and switches may cause a short-circuit and increase the risk of electric shock.
Preparing the spray material
▶ When diluting, make sure that the spray material and the diluting agent are compatible. When using a faulty diluting agent, lumps can develop that can lead to clogging of the spray gun.
When diluting the spray material, make sure that the flash point of the mixture is above 55 °C again after diluting. Diluting substances such as solvent-based lacquers lowers the flash point.
▶ Note the specifications of the paint manufacturer relating to sprayability, e.g. in the technical information sheet or data sheet. Make sure that you do not spray any paints that are not suitable according to the manufacturer's specifications.
- Stir the spray material thoroughly. Using spray material at room temperature will yield a better spray pattern.
- Dilute the spray material if necessary.
If the spray test does not produce a good spray pattern, dilute in 5% increments until an optimal spray pattern is achieved.
Spray material Recommended
dilution
Wood preservatives, oils, glazes, impreg- 0 % nations, water
Solvent-dilutable or water-dilutable (recommended) lacquers, primers, anti-rust primers, radiator lacquers, thick-coat glazes 0–5%
Emulsion paints and latex paints (wall paints) At least 5%
Dilution table
| Spray material [ml] | Diluting agent [ml] for dilution |
| 5 % 10 % 15 % |
| 300 15 30 45 | | |
| 400 20 40 60 | | |
| 500 25 50 75 | | |
| 600 30 60 90 | | |
| 700 35 70 105 | | |
| 800 40 80 120 | | |
Note: Remove the air hose (20) before pouring in spray material (quarter turn of the bayonet lock (21) anticlockwise; pull the bayonet lock (21) out of the port (9)).
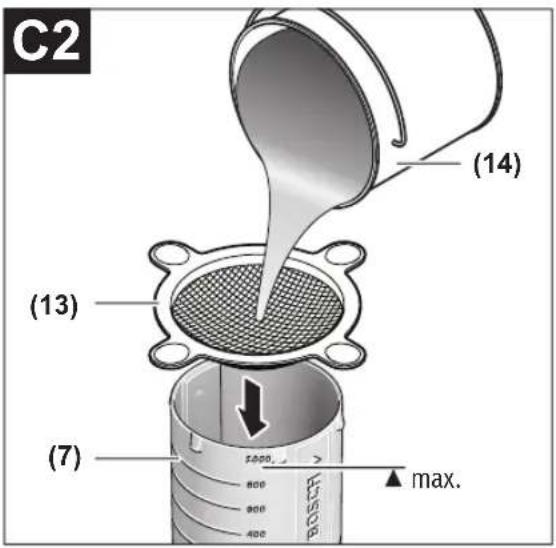
- When using large buckets, pour the spray material into a smaller transfer bucket (14) if necessary (e.g. 10 l wall paint into an empty 2.5 or 5.0 l bucket).
- Hold the spray gun in place with one hand and use the other hand to turn the container (7) towards the open symbol.
- Pull the spray gun off the container (7).
- If you are using already opened spray material, place the thoroughly cleaned filling sieve (13) on the container (7) to hold back any lumps of paint when pouring in.
- Pour the spray material into the container (7) up to no more than the 1000 mark.
- Put the spray gun on the container (7). Turn the container (7) towards the close symbol until you hear the lock ring (6) engage.
- Carry out a test-spray run on a test surface.


24 | English
If the spray pattern is optimal, you can begin spraying. or
If the spraying results are unsatisfactory or no paint is emitted: (see "Troubleshooting", page 27)
Starting Operation
▶ Pay attention to the mains voltage. The voltage of the power source must match the voltage specified on the rating plate of the power tool.
▶ Make sure that the base unit cannot draw in dust or other contamination during operation.
▶ Make sure never to spray on the base unit.
▶ Stop spraying if fluid escapes from places other than the intended nozzle during spraying, and restore the spray gun to its proper condition. There is a risk of electric shock.
▶ Do not direct the fine-spray system against yourself, other persons or animals.
- Check whether the correct nozzle cap is fitted. (see "Changing the nozzle cap (see figures B1-B2)", page 22)
- Plug the mains plug into a plug socket.
- Grasp the spray gun by the handle and point it at the target area.
- Switch on by pressing the on/off button (25).
- Set the on/off button (25) to the required application to regulate the air flow (see "Setting the air flow (see figure D)", page 25).
- Pull the trigger switch (5) on the spray gun.
Note: Air always flows out at the air cap (2) when the base unit is switched on.
Switching off
- Let go of the trigger switch (5) and switch off by pressing the on/off button (25).
– Pull the mains plug from the plug socket.
Working Advice
Note: Pay attention to the wind direction when you are using the power tool outdoors.
- Firstly, carry out a spray test and adjust the spray pattern and the spray material quantity according to the spray material.
For adjustments, see the following sections.
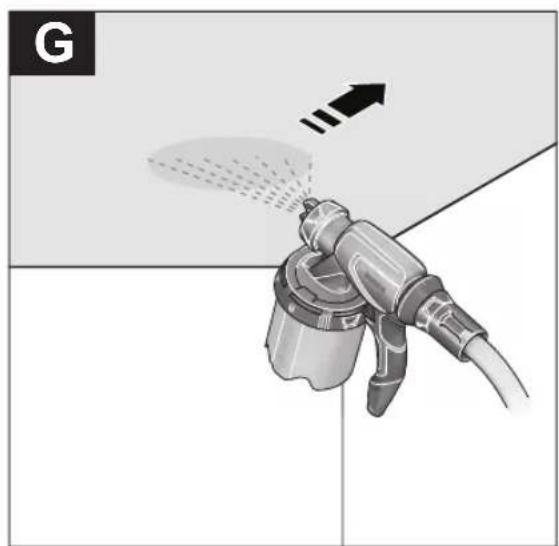
- Make sure to hold the spray gun with a uniform clearance of 20–25 cm vertical to the object being sprayed.
- Begin the spraying procedure outside the target area.
- Move the spray gun evenly horizontally or vertically according to the spray pattern configuration.
An even surface quality can be achieved when the spray paths overlap by 4–5 cm.
- When spraying horizontal objects or spraying overhead, hold the spray gun at a slight angle and move back from
the sprayed surface.
Risk of tripping! Be aware of potential obstacles.
- Avoid interruptions when spraying the target area.
Guiding the spray gun evenly will provide uniform surface quality.
A non-uniform spraying angle and distance will lead to heavy formation of paint mist and consequently an uneven surface.
- End the spraying procedure outside the target area.
Never completely empty the container for the spray material by spraying. If the suction tube is no longer immersed in the spray material, the spray jet will be interrupted and this will result in an inconsistent surface.
- After breaks or refilling the container (7), check the nozzle cap (10)/(11)/(12) and the air cap (2) and clean them if required.
- If spray material settles on the air cap (2) or the nozzle cap, clean the components with the supplied cleaning brush (28) or a commercially available washing-up brush.
▶ Never actuate the trigger switch (5) while adjusting the air cap (2).
- Turn the air cap (2) to the required position.
Air cap Spray jet pattern Application


Horizontal flat jet for vertical working direction


Vertical flat jet for horizontal working direction
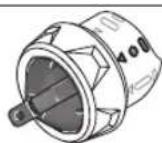

Round jet for corners, edges and hard to reach locations
- Turn the thumbwheel (4) to set the required spray material quantity:
Stages 1/2/3: "Wood/varnish/lacquer" application, Stages 4/5: "Wall" application.
- Start with a spray test at setting 1 and increase the spray material volume until the required spray pattern is achieved. If a satisfactory spray pattern is not achieved, dilute the spray material in 5% increments (see "Preparing the spray material", page 23).
Please note: The intensity of the paint application is highly dependent on the moving speed.
Spray material Setting volume
Too much material on target area The spray material volume must be reduced.
- Turn down by one setting.
Not enough material on target area
The spray material volume must be increased.
– Turn up by one setting.

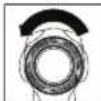
- Turn the air flow control (25) to select the appropriate application in order to set the correct air flow and pressure for the spray material used.
Start with minimum/"Wood/varnish" application
Setting the applications
Thin-viscosity spray material Thick-viscosity spray material


"Wood/varnish" application

The air flow and pressure can be steplessly adjusted within an application.
Excessive paint mist:
The air flow must be reduced.
- Turn the air flow control (25) to the left.
Atomisation too coarse:
The air flow must be increased.
- Turn the air flow control (25) to the right.
Dampening Wallpaper
To make it easier to remove old wallpaper, you can spray warm water on the wallpaper (max. 55 °C). Use the grey nozzle cap (11) to do so.
A carrying handle (23) is fitted to the base unit to enable easy transport of the fine-spray system.
Wheels are fitted to the bottom of the base unit (22). You can pull the base unit behind you by the air hose (20) during work.
The spray gun (1) can be put down on a flat work surface during breaks. No spray material can leak out.
▶ Always put the spray gun upright on a flat surface when it is filled with spray material. Spray material can leak out from a spray gun if it is lying down.
Maintenance and Service
Maintenance and Cleaning
▶ Pull the plug out of the socket before carrying out any work on the power tool.
▶ To ensure safe and efficient operation, always keep the power tool and the ventilation slots clean.
In order to avoid safety hazards, if the power supply cord needs to be replaced, this must be done by Bosch or by an after-sales service centre that is authorised to repair Bosch power tools.
Thoroughly clean the individual parts of the fine-spray system immediately after each use, especially all paint-carrying components. Proper cleaning is a prerequisite for faultless and safe operation of the spray gun. No warranty claims will be accepted if cleaning has not been done at all or has not been done properly.
Always clean the spray gun and the spray material container with warm water.
Never clean the nozzle and air holes in the spray gun with pointed objects.
- Switch off the base unit (22) and remove the air hose (20) from the spray gun (1).
- Remove the container (7) from the spray gun (1). Hold the container (7) underneath the suction tube (17) and pull the trigger switch (5) on the spray gun so that the spray material can flow back into the container.
- Empty the container (7).
The spray material can be stored in an airtight, sealed paint container for other applications. Use the spare container (8) with cover or the original spray material container, for example, for this purpose.
- Clean the container (7).
- Remove the suction tube (17) with the container seal (16) and rinse it thoroughly. Reattach the suction tube (17) with the container seal (16) to the spray gun.
- Fill the container (7) with warm water and fit it to the spray gun (1) again.
- Connect the air hose (20) to the spray gun (1)again.
- Spray until only clear water comes out. You may have to fill the container with warm water again.
- Remove the air hose (20) from both the base unit (22) and the spray gun (1).
- Clean the base unit if necessary with a moistened cloth and then remove the base unit (22) and the air hose (20) from the immediate cleaning environment.
26 | English
- Remove the cap nut (3), the air cap (2), the nozzle cap used (10)/(11)/(12) and the suction tube (17) with the container seal (16).
- Clean all paint-carrying parts in a bucket with warm water using the cleaning brush (28) or with a commercially available washing-up brush. Also clean the paint channel (19) of the spray gun (1).
- Check that the suction tube (17) and the container seal (16) are free of spray material and undamaged.
- Clean the ventilation hole (18) using the cleaning brush (28).
- If required, clean the filling sieve (13) thoroughly with warm water.
- Clean the outside of the container (7) and the spray gun (1) with a damp cloth.
- Allow all components to dry thoroughly before assembling them.
- Reassemble the fine-spray system in reverse order.
Slide the container seal (16) upwards again into the groove of the suction tube (17).
Ensure that the container seal is positioned precisely all around in the suction tube groove in order to seal the spray gun correctly.
Make sure that you slide the suction tube (17) all the way back onto the paint channel (19).
Always clean the spray gun and the container for the spray material with the respective diluting agent for the spray material being used.
Never clean the nozzle and air holes in the spray gun with pointed objects.
Wear suitable gloves during cleaning work involving solvents and solvent-based paints.
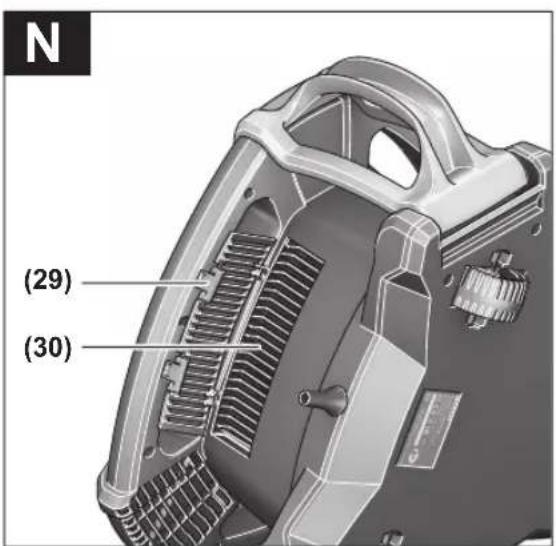
The air filter (30) must be cleaned occasionally. The air filter must be replaced if it is heavily contaminated.
- Open the air filter cover (29).
- Remove the air filter (30).
– Light contamination: Knock on the air filter (30).
or
Heavy contamination:
Clean the air filter (30) un
sequently leave it to dry th
mould from forming.
or
Replace the air filter (30).
- Reinsert the air filter.
- Close the air filter cover (29) again.
▶ Never use the fine-spray system without air filter. Dirt particles may get into the motor compartment and damage it.
Material Disposal
Contaminated diluting agent, remnants of spray material and, if applicable, remnants of diluting agent must be disposed of properly and in an environmentally friendly man-
ner. Observe the manufacturer's disposal information and the local regulations for disposal of hazardous waste. Chemicals harmful to the environment may not be disposed of into soil, groundwater or bodies of water. Never pour chemicals harmful to the environment into the sewerage system.
Storage
- Before putting the fine-spray system into storage, thoroughly clean the fine-spray system and allow all parts to dry completely before assembling them.
Troubleshooting
| Problem Cause Corrective measure |
| Spray material does not cover properly | Spraying capacity too low | Turn the thumbwheel (4) towards setting 5 |
| Clearance to target area too large Reduce spray distance |
| Not enough spray material on target area, too few spray paths sprayed over target area | Apply more spray paths over target area |
| Spray material too viscous Dilute the spray material again and carry out a test-spray run |
| Spray material runs off after coating | Too much spray material applied | Turn the thumbwheel (4) towards setting 1 |
| Clearance to target area too close Increase spray distance |
| Viscosity of spray material too low Add original spray material |
| Spray material applied too often over same spot | Remove spray material; reduce number of spray paths over same spot |
| Atomisation too coarse Spraying capacity too high | Turn the thumbwheel (4) towards setting 1 |
| Air flow too low |
| White nozzle cap (10) mounted (nozzle diameter too large) |
| Nozzle needle (15) contaminated |
| Spray material too viscous Dilute the spray material again and carry out a test-spray run |
| Air filter (30) heavily contaminated |
| Excessive paint mist Too much spray material applied | Turn the thumbwheel (4) towards setting 1 |
| Air flow too high |
| Clearance to target area too large Reduce spray distance |
| Spray jet pulsates Not enough spray material in container Refill spray material |
| Ventilation hole (18) on suction tube (17) clogged |
| Suction tube (17) loose |
| Container seal (16) not positioned or not correctly positioned in groove of suction tube (17) |
| Nozzle cap (10)/(11)/(12) loose |
| Air filter (30) heavily contaminated |
| Spray material too viscous Dilute the spray material again and carry out a test-spray run |
| Spray material dripping at the nozzle cap | Deposit of spray material on the nozzle cap (10)/(11)/(12), the nozzle needle (15) and the air cap (2) | Clean the nozzle cap, nozzle needle and air cap |
| Nozzle cap (10)/(11)/(12) loose | Tighten the nozzle cap |
| No spray material coming out of the nozzle cap | Base unit is switched off | Press the on/off button (25) |
| No pressure build-up in container (7) due to container not being completely closed | Turn the container (7) towards the close symbol until you hear the lock ring (6) engage |
Bosch Power Tools 1 609 92A 7VA | (30.05.2022)
28 | Français
Problem Cause Corrective measure
| Suction tube (17) loose | Slide the suction tube all the way onto the paint channel (19) |
| Nozzle needle (15) clogged | Clean nozzle needle |
| Suction tube (17) clogged | Clean suction tube |
| Ventilation hole (18) on suction tube (17) clogged | Clean the suction tube and the ventilation hole |
| Container seal (16) missing or damaged | Slide a (new) container seal over the suction tube into the groove |
| Spray material too viscous Dilute the spray material again and carry out a test-spray run |
| Spray material dirty (lumps of paint) Completely empty and clean the spray gun; pour the spray material through the filling sieve (13) when filling |
After-Sales Service and Application Service
Our after-sales service responds to your questions concerning maintenance and repair of your product as well as spare parts. You can find explosion drawings and information on spare parts at: www.bosch-pt.com
The Bosch product use advice team will be happy to help you with any questions about our products and their accessories.
In all correspondence and spare parts orders, please always include the 10-digit article number given on the nameplate of the product.
Great Britain
Robert Bosch Ltd. (B.S.C.)
P.O. Box 98
Broadwater Park
North Orbital Road
Denham Uxbridge
UB 9 5HJ
At www.bosch-pt.co.uk you can order spare parts or arrange the collection of a product in need of servicing or repair.
Tel. Service: (0344) 7360109
E-Mail: boschservicecentre@bosch.com
You can find further service addresses at:
www.bosch-pt.com/serviceaddresses
Disposal
Spray gun, electrical unit, accessories and packaging should be sorted for environmentally friendly recycling.
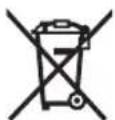
Do not dispose of power tools along with household waste.
Only for EU countries:
According to the European Directive 2012/19/EU on Waste Electrical and Electronic Equipment and its implementation into national law, power tools that are no longer usable must be collected separately and disposed of in an environmentally friendly manner.
If disposed incorrectly, waste electrical and electronic equipment may have harmful effects on the environment and human health, due to the potential presence of hazardous substances.
Only for United Kingdom:
According to Waste Electrical and Electronic Equipment Regulations 2013 (2013/3113), power tools that are no longer usable must be collected separately and disposed of in an environmentally friendly manner.
Français
Robert Bosch (France) S.A.S.
www.bosch-pt.com/serviceaddresses
natural_image
Three black circular icons showing human face, hand gesture, and mask (no text or symbols)
www.bosch-pt.com/serviceaddresses
Eliminación
www.bosch-pt.com/serviceaddresses
Eliminação
www.bosch-pt.com/serviceaddresses
Smaltimento
www.bosch-pt.com/serviceaddresses
Afvalverwijdering
Bosch Service Center
Telegrafvej 3
2750 Ballerup
På www.bosch-pt.dk kan der online bestilles reservedele eller oprettes en reparations ordre.
Tlf. Service Center: 44898855
Fax: 44898755
E-Mail: vaerktoej@dk.bosch.com
www.bosch-pt.com/serviceaddresses
Bortskaffelse
Bosch Service Center
Telegrafvej 3
2750 Ballerup
Danmark
Tel.: (08) 7501820 (inom Sverige)
Fax: (011) 187691
www.bosch-pt.com/serviceaddresses
Avfallshantering
www.bosch-pt.com/serviceaddresses
Deponering
www.bosch-pt.com/serviceaddresses
Hävitys
www.bosch-pt.com/serviceaddresses
Απόσυρση
www.bosch-pt.com/serviceaddresses
Tasfiye
Robert Bosch Sp. z o.o.
www.bosch-pt.com/serviceaddresses
Utylizacja odpadów
Bosch Service Center PT
K Vápence 1621/16
692 01 Mikulov
www.bosch-pt.com/serviceaddresses
Likvidace
www.bosch-pt.com/serviceaddresses
Likvidácia
www.bosch-pt.com/serviceaddresses
Eltávolítás
natural_image
Technical illustration of a mechanical component with a circular shape on the right (no text or symbols)
natural_image
Technical illustration of a mechanical knob or knob component with no visible text or symbols
natural_image
Technical illustration of a mechanical component with a circular head and internal shaft (no text or symbols)
www.bosch-pt.com/serviceaddresses
www.bosch-pt.com/serviceaddresses
Утилізація
www.bosch-pt.com/serviceaddresses
Service scule electrice
Strada Horia Măcelariu Nr. 30-34, sector 1
013937 Bucureşti
www.bosch-pt.com/serviceaddresses
Eliminare
Service scule electrice
Strada Horia Măcelariu Nr. 30-34, sector 1
013937 Bucureşti, România
www.bosch-pt.com/bg/bg/
www.bosch-pt.com/serviceaddresses
Отстранување
www.bosch-pt.com/serviceaddresses
Uklanjanje dubreta
Pištolj za prskanje, električna jedinica, pribor i pakovanja treba da se odvoze na reciklažu koja odgovara zaštiti čovekove okoline.

Ne bacajte električni alat u kućni otpad!
Samo za EU-zemlje:
Prema evropskim smernicama 2012/19/EU o starim električnim i elektronskim uređajima i njihovim pretvaranju u nacionalno dobro ne moraju više upotrebljivi električni pribori da se odvojeno sakupljaju i odvoze nekoj regeneraciji koja odgovara zaštiti čovekove okoline.
www.bosch-pt.com/serviceaddresses
Odlaganje
Pršilno pištolo, električno enoto, pribor in embalažo morate reciklirati okolju prijazno.

www.bosch-pt.com/serviceaddresses
Zbrinjavanje
www.bosch-pt.com/serviceaddresses
www.bosch-pt.com/serviceaddresses
www.bosch-pt.com/serviceaddresses
Šalinimas
Robert Bosch Morocco SARL
53,شارع الملازم محمد مصرود
20300 الدار البيضاء
CE
|
| de | EU-Konformitätserklärung | Wir erklären in alleiniger Verantwortung, dass die genannten Produkte allen einschlägigen Bestimmungen der nachfolgend aufgeführten Richtlinien und Verordnungen entsprechen und mit folgenden Normen übereinstimmen.Technische Unterlagen bei:* |
| Feinsprühsystem | Sachnummer |
| en | EU Declaration of Conformity | We declare under our sole responsibility that the stated products comply with all applicable provisions of the directives and regulations listed below and are in conformity with the following standards.Technical file at:* |
| Fine-spray system | Article number |
| fr | Déclaration de conformité UE | Nous déclarons sous notre propre responsabilité que les produits décrits sont en conformité avec les directives, règlements normatifs et normes énumérés ci-dessous.Dossier technique auprès de:* |
| Pistolet à peinture | N° d'article |
| es | Declaración de conformidad UE | Declaramos bajo nuestra exclusiva responsabilidad, que los productos nombrados cumplen con todas las disposiciones correspondientes de las Directivas y los Reglamentos mencionados a continuación y están en conformidad con las siguientes normas.Documentos técnicos de:* |
| Pistola de pintar (pulverización fina) | N° de artículo |
| pt | Declaração de Conformidade UE | Declaramos sob nossa exclusiva responsabilidade que os produtos mencionados cumprem todas as disposições e os regulamentos indicados e estão em conformidade com as seguintes normas.Documentação técnica pertencente à:* |
| Sistema de pulverização fina | N.° do produto |
| it | Dichiarazione di conformità UE | Dichiariamo sotto la nostra piena responsabilità che i prodotti indicati sono conformi a tutte le disposizioni pertinenti delle Direttive e dei Regolamenti elencati di seguito, nonché alle seguenti Normative.Documentazione Tecnica presso:* |
| Sistema a microspruzzo | Codice prodotto |
| nl | EU-conformiteitsverklaring | Wij verklaren op eigen verantwoordelijkheid dat de genoemde producten voldoen aan alle desbetreffende bepalingen van de hierna genoemde richtlijnen en verordeningen en overeenstemmen met de volgende normen.Technisch dossier bij:* |
| Fijnspuitsysteem | Productnummer |
| da | EU-overensstemmelseserklæring | Vi erklærer som eneansvarlige, at det beskrevne produkt er i overensstemmelse med alle gældende bestemmelser i fölgende direktiver og forordninger og opfylder fölgende standarder.Tekniske bilag ved:* |
| Finsprøjtesystem | Typenummer |
| sv | EU-konformitetsförklaring | Vi förklarar under eget ansvar att de nämnda produkterna uppfyller kraven i alla gällande bestämmelser i de nedan angivna direktiven och förordningarnas och att de stämmer överens med följande normer.Teknisk dokumentation:* |
| Finstrålesystem | Produktnummer |
| no | EU-samsvarserklæring | Vi erklærer under eneansvar at de nevnte produktene er i overensstemmelse med alle relevante bestemmelser i direktivene og forordningene nedenfor og med fölgende standarder.Teknisk dokumentasjon hos:* |
| Finsprøytingssyst em | Produktnummer |
| fi | EU-vaatimustenmukaisuusvakuutus | Vakuutamme täten, että mainitut tuotteet vastaavat kaikkia seuraavien direktiivien ja asetusten asiaankuuluvia vaatimuksia ja ovat seuraavien standardien vaatimusten mukaisia.Tekniset asiakirjat saatavana:* |
| Hienoruiskutusjär jestelmä | Tuotenumero |
| el | Δήλωση πιστότητας EE | Δηλώνουμε με αποκλειστική μας ευθύνη, ότι τα αναφερόμενα προϊόντα αντιστοιχούν σε όλες τις σχετικές διατάξεις των πιο κάτω αναφερόμενων οδηγιών και κανονισμών και ταυτίζονται με τα ακόλουθα πρότυπα.Tεχνικά έγγραφα στη:* |
| Σύστημα λεπτού ψεκασμού | Αριθμός ευρετηρίου |
| tr | AB Uygunluk beyani | Tek sorumlu olarak, tanimlanan ürünün aşağıdaki yönetmelik ve direktiflerin geçerli bütün hükümlerine ve aşağıdaki standartlara uygun olduğunu beyan ederiz.Teknik belgelerin bulunduğu yer:* |
| ince (hassas) püskürtme sistemi | Ürün kodu |
||
CE
| pl | Deklaracja zgodności UE | Oświadczamy z pełną odpowiedzialnością, że niniejsze produkty odpowiadają wszystkim wymaganiom poniżej wyszczególnionych dyrektyw i rozporządzeń, oraz że są zgodne z następującymi normami.Dokumentacja techniczna:* |
| System natryskowy | Numer katalogowy |
| cs | EU prohlásení oshodě | Prohlašujeme na výhradní zodpovědnost, že uvedený výrobek splňuje všechna příslušná ustanovení níže uvedených směrnic anařízení aje vsouladu snásledujícími normami:Technické podklady u:* |
| Jemně stříkací systém | Objednací číslo |
| sk | EÚ vyhlásenie ozhode | Vyhlasujeme na výhradní zodpovednosť, že uvedený výrobok spĺňa všetky príslušné ustanovenia nižšie uvedených smerníc anariadení aje vsúlade snasledujúcími normami:Technické podklady má spoločnosť:* |
| Systém na jemné rozprašovanie | Vecné číslo |
| hu | EU konformitási nyilatkozat | Egyedüli felelőséggel kijelentjük, hogy a megnevezett termékek megfelelnek az alábbiakban felsorolásra kerülő irányelvek és rendeletek valamennyi idevágó előírásainak és megfelelnek a következő szabványoknak.Műszaki dokumentumok megőrzési pontja:* |
| Finom szórórendszer | Cikkszám |
| ru | Заявление о соответствии EC | Мы заявляем под нашу единоличную ответственность, что названные продукты соответствуют всем действующим предписаниям нижеуказанных директив и распоряжений, а также нижеуказанных норм.Техническая документация хранится y:* |
| Пульверизатор | Товарный No |
| uk | Заява про відповідність ЄС | Мизаявляємо під нашу одноособову відповідальність, що названі вироби відповідають усім чинним положенням нищеозначених директив і розпоряджень, а також нижчеозначеним нормам.Технічна документація зберігається y:* |
| Пульверизатор | Товарний номер |
| kk | EO сәйкестік мағлумдамасы | Өз жауапкершілікпен біз аталған өнімдер төменде жзылған директикалар мен жарлықтардың тиісті қағилаларына сәйкестігін және төмендері нормаларға сай екенін білдіреміз.Техникалық құжаттар:* |
| Бүріккіш жүйе | Өнім нөмірі |
| ro | Declaratie de conformitate UE | Declarăm pe proprie răspundere că produsele mentionate corespund tuturor dispozițiilor relevante ale directivelor și reglementărilor enumerate în cele ce urmează și sunt în conformitate cu următoarele standarde.Documentаție tehnică la:* |
| Sistem de pulverizare fină | Număr de identificare |
| bg | ЕС декларация за съответствие | С пълна отговорностние декларираме, че посочените продукти отговарят на всички валидни изисквания на директивите и разпоредбите по-долу и съответства на следните стандарти.Техническа документация при:* |
| Система за фино разпръскване | Каталожен номер |
| mk | EU-Изјава за сообразност | Со целосна одговорност изјавуваме, дека опишаните производи се во согласност со сите релевантни одредби на следните регулативи и прописи и се во согласност со следните норми.Техничка документација кај:* |
| Систем за фино распрскување | Број на дел/артикл |
| sr | EU-izjava o usaglašenosti | Na sopstvenu odgovornost izjavljujemo, da navedeni proizvodi odgovaraju svim dotičnim odredbama naknadno navedenih smernica u uredaba i da su u skladu sa sledećim standardima.Tehnička dokumentacija kod:* |
| Sistem za fino prskanje | Broj predmeta |
| sl | Izjava o skladnosti EU | Izjavljamo pod izključno odgovornostjo, da je omenjen izdelek v skladu z vsemi relevantnimi določili direktiv in uredb ter ustreza naslednjim standardom.Tehnična dokumentacija pri:* |
| Sistem za fino pršenje | Številka artikla |
| hr | EU izjava o sukladnosti | Pod punom odgovornošću izjavljujemo da navedeni proizvodi odgovaraju svim relevantnim odredbama direktiva i propisima navedenima u nastavku i da su sukladni sa sljedećim normama.Tehnička dokumentacija se može dobiti kod:* |
| Sustav za fino prskanje | Kataloški br. |
CE
III
| et | EL-vastavusdeklaratsioon | Kinnitame ainuvastutajatena, et nimetatud tooted vastavad järgnevalt loetletud direktiivide ja määruste köikidele asjaomastele nõuetele ja on kooskõlas järgmiste normidega.Tehnilised dokumentid saadaval: * |
| Peenpihustussüst Tootenumber eem |
| Iv | Deklaräcija par atbilstību ES standartiem | Mës ar pilnu atbildibu paziņojam, ka šeit aplūkotie izstrādājumi atbilst visiem tālāk minētajās direktīvās un rīkojumos ietvertajām saistošajām nostādnēm,kā arī sekojošiem standartiem.Tehniskā dokumentācija no: * |
| Smalkās izsmidzināšanas sistēma | Izstrādājuma numurs |
| It | ES atitikties deklaracija | Atsakingai pareiškiame, kad išvardyti gaminiai atitinka visus privalomusžemiau nurodytų direktyvų ir reglamentų reikalavimus ir šiuos standartus.Techninė dokumentacija saugoma: * |
| Dažų pulverizatorius | Gaminio numeris |
| PFS 5000 E | 3 603 B07 2.. 2006/4 | 2/EC2014/30/EU2011/65/EU | EN 62841-1:2015EN 55014-1:2017+A11:2020EN 55014-2:2015EN IEC 61000-3-2:2019EN 61000-3-3:2013+A1:2019EN IEC 63000:2018 |
| (H)BOSCH | * Robert Bosch Power Tools GmbH(PT/ECS)70538 StuttgartGERMANY |
| Henk BeckerChairman of Executive Management | Helmut HeinzelmannHead of Product Certification |
| Robert Bosch Power Tools GmbH, 70538 Stuttgart, GERMANYStuttgart, 01.03.2021 |
IV
CE
Fine-spray system Article number
PFS 5000 E 3 603 B07 270
We declare under our sole responsibility that the stated products comply with all applicable provisions of the regulations listed below and are in conformity with the following standards.
Technical file at: Robert Bosch Ltd. (PT/SOP-GB), Broadwater Park, North Orbital Road, Uxbridge UB9 5HJ, United Kingdom
Supply of Machinery (Safety) Regulations 2008
Electromagnetic Compatibility Regulations 2016
The Restriction of the Use of Certain Hazardous Substances in
Electrical and Electronic Equipment Regulations 2012
EN 62841-1:2015
EN 55014-1:2017+A11:2020
EN 55014-2:2015
EN IEC 61000-3-2:2019
EN 61000-3-3:2013+A1:2019
EN IEC 63000:2018

BOSCH
Robert Bosch Power Tools GmbH, 70538 Stuttgart, Germany represented (in terms of the above regulations) by
Robert Bosch Limited, Broadwater Park, North Orbital Road,
Uxbridge UB9 5HJ, United Kingdom
Vonjy Rajakoba
Managing Director - Bosch UK
Martin Sibley
Head of Sales Operations and Aftersales
Robert Bosch Ltd. Broadwater Park, North Orbital Road, Uxbridge UB9 5HJ, United Kingdom, as authorised representative acting on behalf of Robert Bosch Power Tools GmbH, 70538 Stuttgart, Germany
Uxbridge, 11/05/2021


