Atino - Laser level BOSCH - Free user manual and instructions
Find the device manual for free Atino BOSCH in PDF.

| Product type | Laser level |
| Brand | Bosch |
| Model | Atino |
| Dimensions (L x W x H) | 124 x 115 x 62 mm |
| Weight | 0.26 kg |
| Power supply | 1 LR6 (AA) 1.5 V battery |
| Battery life | 5 h minimum |
| Laser class | 2 |
| Laser type | 630–650 nm, < 5 mW |
| Leveling accuracy | ±0.3° |
| Laser line length | 1.7 m |
| Integrated tape measure length | 1.5 m |
| Operating temperature range | +5 °C to +40 °C |
| Storage temperature range | -20 °C to +70 °C |
| Max operating altitude | 2,000 m |
| Max relative humidity | 90% |
| Main functions | Horizontal and vertical line projection, automatic leveling, auto-off after 15 min, manual calibration |
| Mounting | Gel pad holder for smooth surfaces, pin holder for rough surfaces |
| Maintenance and cleaning | Clean the device with a soft, damp cloth; clean the gel pad with water and mild soap |
| Safety | Do not direct the laser beam at people or animals; use appropriate protective accessories |
| Spare parts and repairability | Bosch after-sales service, spare parts available at www.bosch-pt.com; repair by a qualified professional |
| General information | Supplied with self-adhesive laser warning label and gel pad protective cap |
Frequently Asked Questions - Atino BOSCH
User questions about Atino BOSCH
0 question about this device. Answer the ones you know or ask your own.
Ask a new question about this device
Download the instructions for your Laser level in PDF format for free! Find your manual Atino - BOSCH and take your electronic device back in hand. On this page are published all the documents necessary for the use of your device. Atino by BOSCH.
USER MANUAL Atino BOSCH
natural_image
Close-up of a Bosch-branded industrial device (no visible text or symbols)natural_image
Hand inserting a device into a wall corner, showing a curved arrow indicating motion (no text or symbols)B
natural_image
Close-up of a Bosch air lift component with directional arrows indicating assembly or adjustment (no text or symbols on the device itself)1 609 92A 5YH | (09.07.2020) Bosch Power Tools
flowchart
graph TD
    A["Initial Component"] --> B{Disassembly}
    B -->|Yes| C["Reassembly"]
    B -->|No| D["Unreassembly"]
    C --> E["Final Assembly"]
    D --> F["Final Reassembly"]
    style A fill:#f9f,stroke:#333
    style E fill:#ccf,stroke:#333
    style F fill:#ccf,stroke:#333
Bosch Power Tools 1 609 92A 5YH | (09.07.2020)
Deutsch
Sicherheitshinweise

www.bosch-pt.com/serviceaddresses
Entsorgung
All instructions must be read and observed in order for the measuring tool to function safely. The safeguards integrated into the measuring tool may be compromised if the measuring tool is not used in accordance with these instructions. Never make warning signs on the measuring tool unrecognisable. SAVE THESE IN-
STRUCTIONS FOR FUTURE REFERENCE AND INCLUDE THEM WITH THE MEASURING TOOL WHEN TRANSFERRING IT TO A THIRD PARTY.
▶ Warning! If operating or adjustment devices other than those specified here are used or other procedures are carried out, this can lead to dangerous exposure to radiation.
The measuring tool is delivered with a laser warning sign (marked in the illustration of the measuring tool on the graphics page).
If the text of the laser warning label is not in your national language, stick the provided warning label in your national language over it before operating for the first time.

Do not direct the laser beam at persons or animals and do not stare into the direct or reflected laser beam yourself. You could blind somebody, cause accidents or damage your eyes.
▶ If laser radiation hits your eye, you must close your eyes and immediately turn your head away from the beam.
▶ Do not make any modifications to the laser equipment.
▶ Do not use the laser goggles as protective goggles. The laser goggles make the laser beam easier to see; they do not protect you against laser radiation.
▶ Do not use the laser goggles as sunglasses or while driving. The laser goggles do not provide full UV protection and impair your ability to see colours.
▶ Have the measuring tool serviced only by a qualified specialist using only original replacement parts. This will ensure that the safety of the measuring tool is maintained.
▶ Do not let children use the laser measuring tool unsupervised. They could accidentally dazzle someone.
▶ Do not use the measuring tool in explosive atmospheres which contain flammable liquids, gases or dust. Sparks may be produced inside the measuring tool, which can ignite dust or fumes.
Keep the magnet away from implants and other medical devices, e.g. pacemakers or insulin pumps. The magnet generates a field that can impair the function of implants and medical devices.
▶ Keep the measuring tool away from magnetic storage media and magnetically-sensitive devices. The effect of the magnets can lead to irreversible data loss.
Product Description and Specifications
Please observe the illustrations at the beginning of this operating manual.
Intended Use
The measuring tool is intended for determining and checking horizontal and vertical lines.
The measuring tool is suitable for indoor use.
Product features
The numbering of the product features shown refers to the illustration of the measuring tool on the graphic page.
(1) Marking aid
18 | English
(2) On/off button
(3) Light-up ring
(4) Laser beam outlet aperture
(5) Battery compartment cover
(6) Battery compartment cover locking mechanism
(7) Pin pad
(8) Pin
(9) Serial number
(10) Magnet
(11) Tape measure housing
(12) Tape measure
(13) Holder for gel pad
(14) Gel pad
(15) Protective cap for gel pad
(16) Laser warning label
Technical data
| Line laser Atino | |
| Article number | 3 603 F63 A.. |
| Laser line lengthA) | 1.7 m |
| Levelling accuracy of visible laser line ±0.3° | |
| Length of tape measure 1.5 m | |
| Tape measure measuring accuracy ±2 mm/m | |
| Tape measure accuracy class II | |
| Operating temperature +5 °C to +40 °C | |
| Storage temperature -20 °C to +70 °C | |
| Max. altitude 2000 m | |
| Relative air humidity max. 90 % | |
| Pollution degree according to IEC 61010-1 2 | B) |
| Laser class 2 | |
| Laser type 630–650 nm, < 5 mW | |
1 609 92A 5YH | (09.07.2020) Bosch Power Tools
English | 19
Line laser Atino
| C_6 | 5 |
| Divergence 15 × 15 mrad (full angle) | |
| Battery 1 × 1.5 V LR6 (AA) | |
| Operating time at least 5 h | |
| Weight according to EPTA-Procedure 01:2014 0.26 kg | |
| Dimensions (length × width × height) 124 × 115 × 62 mm |
A) depending on surface characteristics and ambient conditions
B) Only non-conductive deposits occur, whereby occasional temporary conductivity caused by condensation is expected.
The serial number (9) on the type plate is used to clearly identify your measuring tool.
Assembly
Inserting/Changing the Battery
It is recommended that you use alkaline manganese batteries to operate the measuring tool.
▶ Do not use lithium-ion batteries. This may result in damage to the measuring tool.
To open the battery compartment cover (5), press on the locking mechanism (6) and remove the battery compartment cover. Insert the battery.
When inserting the batteries, ensure that the polarity is correct according to the illustration on the inside of the battery compartment.
Close the battery compartment before using the measuring tool.
If the battery is running low, the light-up ring (3) will flash yellow three times after the tool is switched on. The measuring tool can be operated for approx. another 15 min.
▶ Take the battery out of the measuring tool if you do not intend to use the tool for a long time. When it is stored in the measuring tool for longer periods, the battery can corrode and discharge itself.
Attaching the Measuring Tool
Selecting/changing the pad
The measuring tool can be attached to walls or other vertical surfaces. Depending on the type of substrate, either the gel pad (14) including the gel pad holder (13) or the pin pad (7) with 2 pins (8) can be used.
20 | English
As a general rule: The gel pad (14) is suitable for smooth surfaces. The pin pad (7) is suitable for coarse or rough surfaces and wallpaper on drywalls. The pin pad cannot be attached to concrete (regardless of the surface).
| Substrate for attaching with the | |
| Gel pad Pin pad | |
| (Ceramic) tiles Wallpaper (woodchip, paper and fleece) | |
| Smooth wooden surfaces Plastered surfaces (up to a roughness of around 2 mm) | |
| Natural stone, marble, concrete | |
| Gloss-coated surfaces (depending on the age and condition of the substrate) |
To change the gel pad, turn the gel pad holder (13) anticlockwise and take the gel pad (14) and holder off the measuring tool. Attach the pin pad (7) and turn it clockwise as far as it will go. The same procedure should also be followed when switching from the pin pad to the gel pad.
Attaching with the gel pad
Requirements:
The substrate must be dry and firm.
The gel pad is not guaranteed to stick to damp, particularly dusty, sharp-edged or highly textured surfaces. If attached to unsuitable surfaces such as these, the measuring tool can fall off and become damaged or damage the substrate.
If the gel pad becomes dirty or does not stick to smooth surfaces any more, it must be cleaned or replaced (see "Cleaning the Gel Pad", page 24).
Before every use, select an inconspicuous area lower down on the desired surface to check whether the gel pad will stick to this substrate, and that it can be safely removed without damaging the substrate.
Always remove the measuring tool once you have finished taking a measurement, or if the substrate is being worked on in some manner (e.g. drilling, screwdriving, or hammering).
Positioning the measuring tool on the substrate:
Turn the protective cap (15) of the gel pad anticlockwise and remove it. Remove the protective film from the gel pad before using it for the first time.
Gently press the measuring tool against the chosen surface until it is firmly affixed. Applying excessive pressure may damage the measuring tool.
If the laser line is intended to appear at a certain height on the wall, this height should be marked in advance. Then position the measuring tool on the wall so that the height marking is situated in the centre of the marking aid (1) of the measuring tool.
Removing the measuring tool from the substrate (see figure A):
Carefully remove the measuring tool from the substrate as shown in the image. Removing the measuring tool from a delicate surface too quickly can damage the substrate.
After removing the tool, check that the gel pad (14) is still clean. If it has become dirty, it should be cleaned as necessary.
Place the protective cap (15) on the gel pad (14) and turn it clockwise to lock it in place. The measuring tool should only ever be transported and stored with the protective cap attached. If the gel pad becomes dirty, it will lose its adhesive strength.
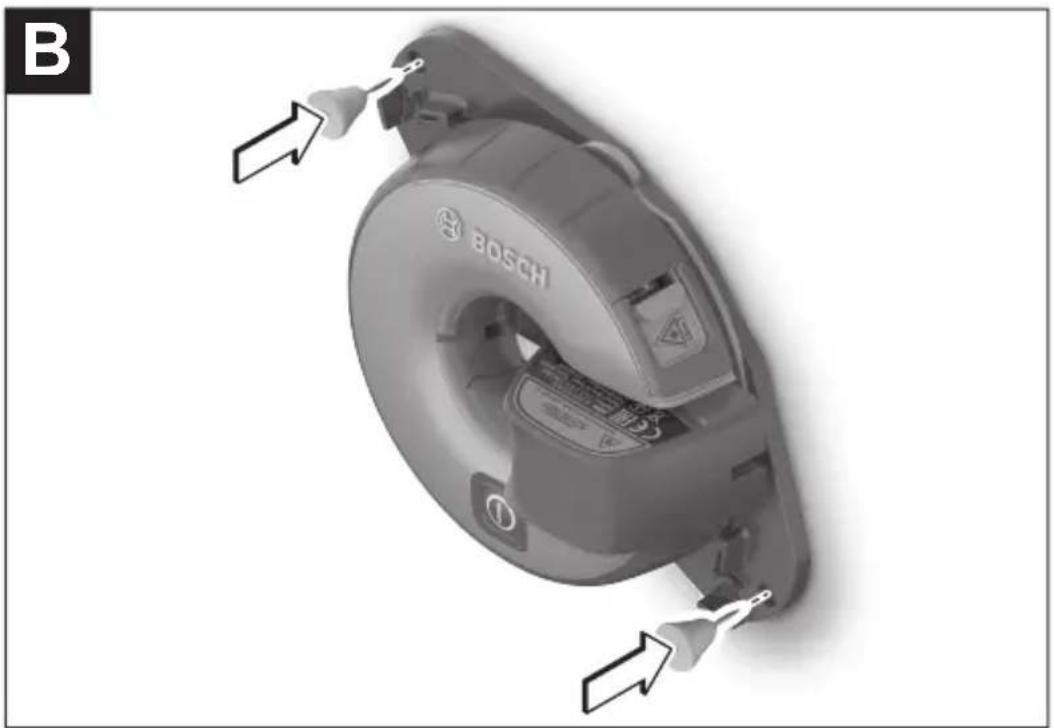
Attaching with the pin pad (see figure B)
The substrate must be dry and firm.
To ensure the attachment is secure, position the measuring tool with the pin pad (7) on the substrate so that the pins are diagonally aligned to the measuring tool. It is not recommended to attach with pins horizontally or vertically to the measuring tool.
Insert the pins into the recesses on the pin pad. Ensure that the pins are securely affixed to the substrate.
If the laser line is intended to appear at a certain height on the wall, this height should be marked in advance. Then position the measuring tool on the wall so that the height marking is situated in the centre of the marking aid (1) of the measuring tool.
Always remove the measuring tool once you have finished taking a measurement, or if the substrate is being worked on in some manner (e.g. drilling, screwdriving, or hammering).
Operation
Starting Operation
▶ Protect the measuring tool from moisture and direct sunlight.
▶ Do not expose the measuring tool to any extreme temperatures or variations in temperature. For example, do not leave it in a car for extended periods of time. In case of large variations in temperature, allow the measuring tool to adjust to the ambient temperature before putting it into operation. The precision of the measuring tool may be compromised if exposed to extreme temperatures or variations in temperature.
22 | English
▶ Avoid substantial knocks to the measuring tool and avoid dropping it. Damaging the measuring tool can cause accuracy to be compromised. Calibrate the measuring tool after it has been dropped or subjected to heavy impact. Check the laser line by comparing it with a known horizontal or vertical reference line.
Switching On/Off
To switch on the measuring tool, briefly press the On/off button (2). The light-up ring (3) flashes green three times when the battery has sufficient capacity; if the battery is weak, it flashes yellow three times.
If the measuring tool is roughly vertical, it sends a laser line out of the outlet aperture (4) immediately after switching on.
▶ Do not direct the laser beam at persons or animals and do not stare into the laser beam yourself (even from a distance).
To switch off the measuring tool, briefly press the on/off button (2) again.
▶ Never leave the measuring tool unattended when switched on, and ensure the measuring tool is switched off after use. Others may be blinded by the laser beam.
If no button on the measuring tool is pressed for approx. 15 minutes and the housing is not rotated, the measuring tool will automatically switch off to preserve battery life.
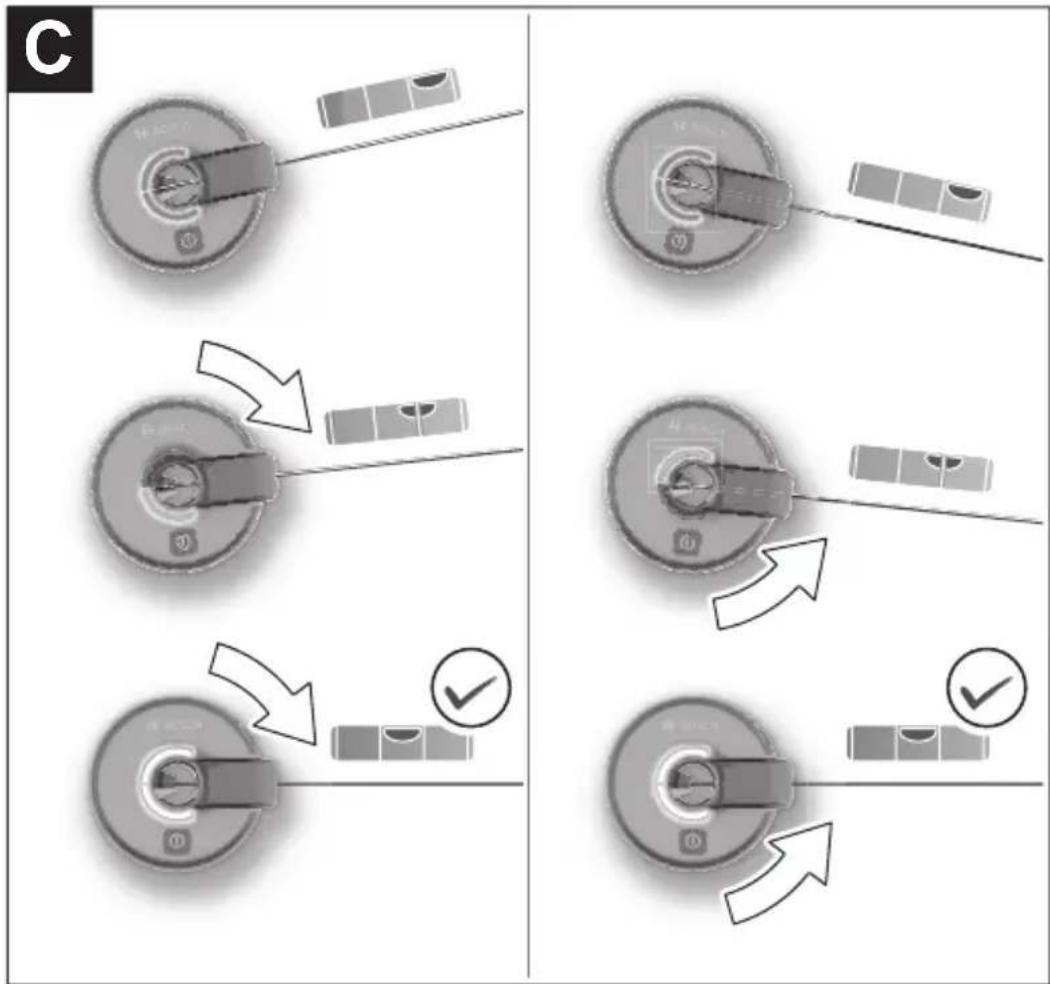
Levelling in the laser line (see figure C)
The laser line is only switched on if the measuring tool is tilted no more than 10^ forwards or backwards.
The laser line can either be levelled in horizontally to the right (90°) or left (270°), or vertically upwards (0°) or downwards (180°).
The levelling status is indicated by means of the light-up ring (3):
Light-up ring Levelling
| Red The laser line is neither horizontal nor vertical. Turn the housing of the measuring tool so that it is horizontal or vertical as required. | |
| Yellow(only one corresponding half of the light-up ring is displayed) | The laser line is close to being completely horizontal or vertical. To precisely adjust the laser line, turn the housing in the direction of the lit half of the light-up ring. |
| Green The laser line has been successfully levelled in either horizontally or vertically. | |
| After successfully levelling in the laser line, make sure to let go of the housing carefully without rotating it again. | |
Working Advice
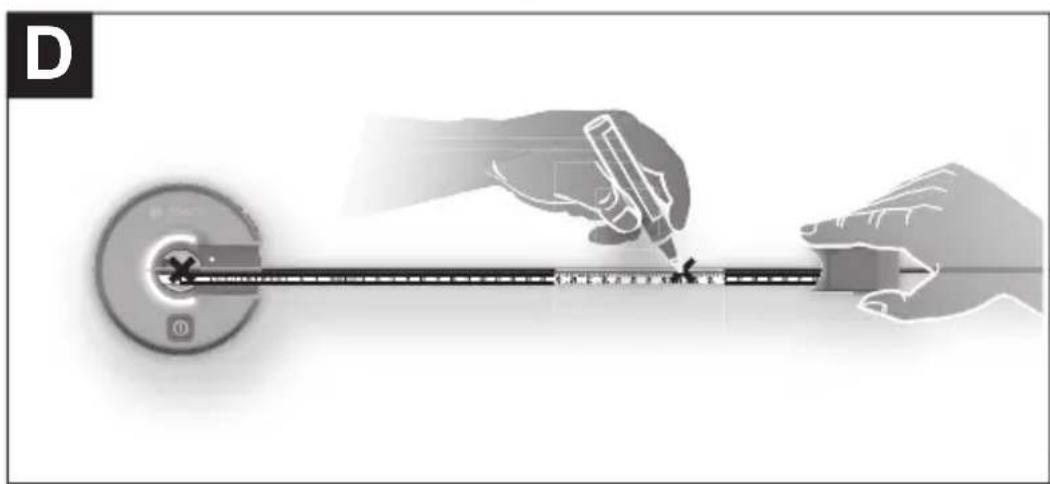
Working with the tape measure (see figure D)
The zero point of the tape measure (12) is situated in the centre of the marking aid (1) and can be marked directly on the substrate.
Note: The zero point marking can be offset by up to ±1 mm compared to the laser line.
Pull the tape measure housing (11) away from the measuring tool and mark additional points at the required distances at the height of the laser line. When marking, ensure that the light-up ring (3) continues to be illuminated green and that the measuring tool is consequently levelled in.
Do not pull the tape measure (12) out any further than up to the end of the imprinted scale.
The tape measure will roll itself up again automatically. Hold the tape measure housing (11) with a relaxed grip and allow the tape measure to slowly retract itself. Make sure that the tape measure housing engages in the recess on the measuring tool.
Note: Do not let go of the tape measure while it is unrolled. Uncontrolled retraction may damage the tape measure.
Calibrating the Laser Line
Calibration should be carried out in the following cases:
– After the tool has been dropped or subjected to heavy impact
– Every 6 months
If necessary, check the levelling of the laser line on a known horizontal or vertical reference line.
Always perform a thorough and complete calibration to avoid incorrect measuring results.
- Attach the measuring tool to a vertical surface.
- While the measuring tool is either switched on or off, press and hold the on/off button (2) until the laser beam starts flashing and the light-up ring (3) is no longer lit.
- Slowly and evenly rotate the housing of the measuring tool once by more than 360^ (either clockwise or anticlockwise). The rotation should take at least 15 s.
- The calibration process is completed successfully once the light-up ring (3) lights up green.
- If the light-up ring (3) lights up red after calibration, the calibration has failed. Restart the calibration.
24 | English
Rectifying Errors
| Problem Corrective measures | |
| The light-up ring (3) flashes yellow 3 times during operation, then the measuring tool switches off. | Replace the battery. |
| The measuring tool is not within the operating temperature range specified in the technical data and switches itself off. | Allow the measuring tool to reach the correct temperature and switch it back on once it is back within the operating temperature range. |
| The gel pad (14) does not affix properly. | - Check whether the substrate is suitable for the gel pad.- If the gel pad is dirty, it should be cleaned.- If the gel pad is damaged, it should be replaced. |
| The laser line is not vertical or horizontal as required after it has been levelled in. | Calibrate the laser line. |
Maintenance and Service
Maintenance and Cleaning
Keep the measuring tool clean at all times.
Never immerse the measuring tool in water or other liquids.
Wipe off any dirt using a damp, soft cloth. Do not use any detergents or solvents.
The areas around the outlet aperture of the laser in particular should be cleaned on a regular basis. Make sure to check for lint when doing this.
Cleaning the Gel Pad
Clean the gel pad (14) whenever it has become contaminated with dust or other particles, or if its adhesive strength has been reduced.
▶ Only wash the gel pad when it has been detached from the tool. The measuring tool itself must not be washed or submerged in water.
To detach the gel pad, turn the gel pad holder (13) anticlockwise and take off the holder. Rinse the gel pad (14) with water. Wash it as necessary using a common household neutral soap or a detergent. Do not use any cleaning agents that contain alcohol or solvents. If necessary, the protective cap (15) should also be cleaned.
Leave the gel pad, holder and protective cap to dry completely. The gel pad must not be warmed up (e.g. through warm air or heating).
Place the protective cap (15) on the gel pad (14) and turn it clockwise to lock it in place.
Place the gel pad holder (13) on the measuring tool and turn it clockwise to secure it.
If the adhesive strength is still not sufficient even after the gel pad (14) has been cleaned, it should be replaced.
After-Sales Service and Application Service
Our after-sales service responds to your questions concerning maintenance and repair of your product as well as spare parts. You can find explosion drawings and information on spare parts at: www.bosch-pt.com
The Bosch product use advice team will be happy to help you with any questions about our products and their accessories.
In all correspondence and spare parts orders, please always include the 10-digit article number given on the nameplate of the product.
Great Britain
Robert Bosch Ltd. (B.S.C.)
P.O. Box 98
Broadwater Park
North Orbital Road
Denham Uxbridge
UB 9 5HJ
At www.bosch-pt.co.uk you can order spare parts or arrange the collection of a product in need of servicing or repair.
Tel. Service: (0344) 7360109
E-Mail: boschservicecentre@bosch.com
You can find further service addresses at:
www.bosch-pt.com/serviceaddresses
Disposal
Measuring tools, accessories and packaging should be recycled in an environmentally friendly manner.
Do not dispose of measuring tools or batteries with household waste.
26 | Français
Only for EU countries:
According to the Directive 2012/19/EU, measuring tools that are no longer usable, and according to the Directive 2006/66/EC, defective or used battery packs/batteries, must be collected separately and disposed of in an environmentally correct manner.
Français
Robert Bosch (France) S.A.S.
36 | Français
www.bosch-pt.com/serviceaddresses
www.bosch-pt.com/serviceaddresses
Eliminación
www.bosch-pt.com/serviceaddresses
Eliminação
www.bosch-pt.com/serviceaddresses
Smaltimento
www.bosch-pt.com/serviceaddresses
Afvalverwijdering
Bosch Service Center
Telegrafvej 3
2750 Ballerup
På www.bosch-pt.dk kan der online bestilles reservedele eller oprettes en reparations ordre.
Tlf. Service Center: 44898855
Fax: 44898755
E-Mail: vaerktoej@dk.bosch.com
www.bosch-pt.com/serviceaddresses
Bortskaffelse
Bosch Service Center
Telegrafvej 3
2750 Ballerup
Danmark
Tel.: (08) 7501820 (inom Sverige)
Fax: (011) 187691
www.bosch-pt.com/serviceaddresses
Avfallshantering
www.bosch-pt.com/serviceaddresses
Kassering
www.bosch-pt.com/serviceaddresses
Hävitys
www.bosch-pt.com/serviceaddresses
Απόσυρση
www.bosch-pt.com/serviceaddresses
Tasfiye
Robert Bosch Sp. z o.o.
www.bosch-pt.com/serviceaddresses
Utylizacja odpadów
Bosch Service Center PT
K Vápence 1621/16
692 01 Mikulov
www.bosch-pt.com/serviceaddresses
Likvidace
www.bosch-pt.com/serviceaddresses
Likvidácia
www.bosch-pt.com/serviceaddresses
Hulladékkezelés
www.bosch-pt.com/serviceaddresses
Утилизация
www.bosch-pt.com/serviceaddresses
Утилізація
www.bosch-pt.com/serviceaddresses
Кәдеге жарату
Service scule electrice
Strada Horia Măcelariu Nr. 30–34, sector 1
013937 Bucureşti
www.bosch-pt.com/serviceaddresses
Eliminarea
Service scule electrice
Strada Horia Măcelariu Nr. 30–34, sector 1
013937 Bucureşti, România
www.bosch-pt.com/bg/bg/
www.bosch-pt.com/serviceaddresses
Бракуване
www.bosch-pt.com/serviceaddresses
Отстранување
www.bosch-pt.com/serviceaddresses
Uklanjanje dubreta
Merni alati, pribor i ambalaža treba da se uključe u reciklažu koja odgovara zaštiti čovekove okoline.
252 | Slovenščina

Merne alate i baterije nemojte bacati u kućni otpad!
Samo za EU-zemlje:
Prema evropskoj direktivi 2012/19/EU merni alati koji se više ne mogu koristiti, a prema evropskoj direktivi 2006/66/EC akumulatorske baterije/baterije koje su u kvaru ili istrošene moraju se odvojeno sakupljati i uključiti u reciklažu koja odgovara zaštiti čovekove sredine.
Slovenščina
Varnostna opozorila

www.bosch-pt.com/serviceaddresses
Odlaganje
Merilne naprave, pribor in embalažo oddajte v okolju prijazno recikliranje.
www.bosch-pt.com/serviceaddresses
Zbrinjavanje
Mjerne alate, pribor i ambalažu treba dovesti na ekološki prihvatljivo recikliranje.
Mjerne alate i baterije ne bacajte u kućni otpad!
Samo za zemlje EU:
Sukladno europskoj Direktivi 2012/19/EU mjerni alati koji više nisu uporabivi i sukladno europskoj Direktivi 2006/66/EZ neispravne ili istrošene aku-baterije moraju se odvojeno sakupljati i dovesti na ekološki prihvatljivo recikliranje.
Eesti
Ohutusnõuded

www.bosch-pt.com/serviceaddresses
Jäätmekäitlus
www.bosch-pt.com/serviceaddresses
www.bosch-pt.com/serviceaddresses
Šalinimas
www.bosch-pt.com/serviceaddresses
처리
www.bosch-pt.com/serviceaddresses
www.bosch-pt.com/serviceaddresses
Copyright © 2016-2019 STMicroelectronics
All rights reserved.
Redistribution and use in source and binary forms, with or without modification, are permitted provided that the following conditions are met:
- Redistributions of source code must retain the above copyright notice, this list of conditions and the following disclaimer.
- Redistributions in binary form must reproduce the above copyright notice, this list of conditions and the following disclaimer in the documentation and/or other materials provided with the distribution.
- Neither the name of STMicroelectronics nor the names of its contributors may be used to endorse or promote products derived from this software without specific prior written permission.
THIS SOFTWARE IS PROVIDED BY THE COPYRIGHT HOLDERS AND CONTRIBUTORS "AS IS" AND ANY EXPRESS OR IMPLIED WARRANTIES, INCLUDING, BUT NOT LIMITED TO, THE IMPLIED WARRANTIES OF MERCHANTABILITY AND FITNESS FOR A PARTICULAR PURPOSE ARE DISCLAIMED. IN NO EVENT SHALL THE COPYRIGHT OWNER OR CONTRIBUTORS BE LIABLE FOR ANY DIRECT, INDIRECT, INCIDENTAL, SPECIAL, EXEMPLARY, OR CONSEQUENTIAL DAMAGES (INCLUDING, BUT NOT LIMITED TO, PROCUREMENT OF SUBSTITUTE GOODS OR SERVICES; LOSS OF USE, DATA, OR PROFITS; OR BUSINESS INTERRUPTION) HOWEVER CAUSED AND ON ANY THEORY OF LIABILITY, WHETHER IN CONTRACT, STRICT LIABILITY, OR TORT (INCLUDING NEGLIGENCE OR OTHERWISE) ARISING IN ANY WAY OUT OF THE USE OF THIS SOFTWARE, EVEN IF ADVISED OF THE POSSIBILITY OF SUCH DAMAGE.
| de | EU-Konformitätserklärung | Wir erklären in alleiniger Verantwortung, dass die genannten Produkte allen einschlägigen Bestimmungen der nachfolgend aufgeführten Richtlinien und Verordnungen entsprechen und mit folgenden Normen übereinstimmen. | |
| Linienlaser | Sachnummer | ||
| en | EU Declaration of Conformity | We declare under our sole responsibility that the stated products comply with all applicable provisions of the directives and regulations listed below and are in conformity with the following standards. | |
| Line laser | Article number | ||
| fr | Déclaration de conformité UE | Nous déclarons sous notre propre responsabilité que les produits décrits sont en conformité avec les directives, règlements normatifs et normes énumérés ci-dessous. | |
| Mètre laser lignes | N° d'article | ||
| es | Declaración de conformidad UE | Declaramos bajo nuestra exclusiva responsabilidade, que los productos nombrados cumplen con todas las disposiciones correspondientes de las Directivas y los Reglamentos mencionados a continuación y están en conformidad con las siguientes normas. | |
| Láser de línea | N° de artículo | ||
| pt | Declaração de Conformidade UE | Declaramos sob nossa exclusiva responsabilidade que os produtos mencionados cumprem todas as disposições e os regulamentos indicados e estão em conformidade com as seguintes normas. | |
| Nível laser de linhas | N.° do produto | ||
| it | Dichiarazione di conformità UE | Dichiariamo sotto la nostra piena responsabilità che i prodotti indicati sono conformi a tutte le disposizioni pertinenti delle Direttive e dei Regolamenti elencati di seguito, nonché alle seguenti Normative. | |
| Livella laser a linee | Codice prodotto | ||
| nl | EU-conformiteitsverklaring | Wij verklaren op eigen verantwoordelijkheid dat de genoemde producten voldoen aan alle desbetreffende bepalingen van de hierna genoemde richtlijnen en verordeningen en overeenstemmen met de volgende normen. | |
| Lijnlaser | Productnummer | ||
| da | EU-overensstemmelseserklæring | Vi erklærer som eneansvarlige, at det beskrevne produkt er i overensstemmelse med alle gælden- | |
Bosch Power Tools 1 609 92A 5YH | (09.07.2020)
||
CE
| Linjelaser | Typenummer de bestemmelser i følgende direktiver og forordninger og opfylder følgende standarder. | |
| sv | EU-konformitetsförklaring | |
| Linjelaser | Produktnummer | |
| no | EU-samsvarserklæring | |
| Linjelasere | Produktnummer | |
| fi | EU-vaatimustenmukaisuus-vakuutus | |
| Linjalaser | Tuotenumero | |
| el | Δήλωση πιστότητας ΕΕ | |
| Γραμμικό λέιζερ | Αριθμός ευρετηρίου | |
| tr | AB Uygunluk beyani | |
| Çizgi lazeri | Ürün kodu | |
| pl | Deklaracja zgodności UE | |
| Laser liniowy | Numer katalo-gowy | |
| cs | EU prohlášení oshodě | |
| Čárový laser | Objednací číslo | |
| sk | EÚ vyhlásenie ozhode | |
| Líniový laser | Vecné číslo | |
1 609 92A 5YH | (09.07.2020) Bosch Power Tools
CE
III
| hu | EU konformitási nyilatkozat | Egyedüli felelőséggel kijelentjük, hogy a megnevezett termékek megfelelnek az alábbiakban felsorolásra kerülő irányelvek és rendeletek valamen-nyi idevágó előírásainak és megfelelnek a következő szabványoknak. | |
| Vonalas lézer | Cikkszám | ||
| ru | Заявление о соответствии EC | Мы заявляем под нашу единоличную ответственность, что названные продукты соответствуют всем действующим предписаниям нижеуказанных директив и распоряжений, а также нижеуказанных норм. | |
| Линейный лазерный нивелир | Товарный No | ||
| uk | Заява про відповідність ЄС | Мизаявляємо під нашу одноособову відповідальність, що названі вироби відповідають усім чинним положенням нищеозначених директив і розпоряджень, а також нижчеозначеним нормам. | |
| Лінійний лазер | Товарний номер | ||
| kk | ЕО сәйкестік мағлүмдамасы | Өз жауапкершілікпен біз аталған өнімдер төменде жзылған директикалар мен жарлықтардың тиісті қағидаларына сәйкестігін және төмендегі нормаларға сай екенін білдіреміз. | |
| Лазерлік уровень | Өнім нөмірі | ||
| ro | Declarație de conformitate UE | Declarăm pe proprie răspundere că produsele mentionate corespund tuturor dispozițiilor relevante ale directivelor și reglementărilor enumerate în cele ce urmează și sunt în conformitate cu următoarele standarde. | |
| Nivelă laser cu linii | Număr de identificare | ||
| bg | ЕС декларация за съответствие | С пълна отговорностние декларираме, че посочените продукти отговарят на всички валидни изисквания на директивите и разпоредбите по-долу и съответства на следните стандарти. | |
| Линеен лазер | Каталожен номер | ||
| mk | EU-Изјава за сообразност | Со целосна одговорност изјавуваме, дека опишаните производи се во согласност со сите релевантни одредби на следните регулативи и прописи и се во согласност со следните норми. | |
| Линиски ласер | Број на дел/ артикл | ||
| sr | EU-izjava o usaglašenosti | Na sopstvenu odgovornost izjavljujemo, da nave- deni proizvodi odgovaraju svim dotičnim odredba- | |
Bosch Power Tools 1 609 92A 5YH | (09.07.2020)
IV
CE
| Linijski laser | Broj predmeta ma naknadno navedenih smernica u uredaba i da su u skladu sa sledećim standardima. | ||
| sl | Izjava o skladnosti EU | Izjavljamo pod izključno odgovornostjo, da je omenjen izdelek v skladu z vsemi relevantnimi do-ločili direktiv in uredb ter ustreza naslednjim stan-dardom. | |
| Linijski laser | Številka artikla | ||
| hr | EU izjava o sukladnosti | Pod punom odgovornošću izjavljujemo da navede-ni proizvodi odgovaraju svim relevantnim odred-bama direktiva i propisima navedenima u nastav-ku i da su sukladni sa sljedećim normama. | |
| Laserski nivelir | Kataloški br. | ||
| et | EL-vastavusdeklaratsioon | Kinnitame ainuvastutajatena, et nimetatud tooted vastavad järgnevalt loetletud direktiivide ja mää-ruste kõikidele asjaomastele nõuetele ja on koos-kõlas järgmiste normidega. | |
| Joonlaser | Tootenumber | ||
| lv | Deklarácija par atbilstibu ES standartiem | Mês ar pilnu atbildību paziņojam, ka šeit aplūkotie izstrādājumi atbilst visiem tālāk minētajās direk-tīvās un rīkojumos ietvertajām saistošajām no-stādnēm, kā arī sekojošiem standartiem. | |
| Liniju lāzers | Izstrādājuma numurs | ||
| lt | ES atitikties deklaracija | Atsakingai pareiškiame, kad išvardyti gaminiai ati-tinka visus privalomus žemiau nurodytų direktyvų ir reglamentų reikalavimus ir šiuos standartus. | |
| Linijinis lazeris | Gaminio nume-ris | ||
| Atino 3 603 F63 A.. | 2014/30/EU EN 61010-1:20102011/65/EU +A1:20192014/32/EU EN 61326-1:2013EN IEC 63000:2018 | ||
CE
V
| de | Die notifizierte Stelle Nr. 0071: Laboratoire National de métrologie et d’Essais (LNE) 1, rue Gaston Boissier, 72724 Paris Cedex 15, FRANCE, hat die Prüfung gemäß 2014/32/EU, Modul D1 durchgeführt und folgende Bescheinigung ausgestellt: Nr. LNE-36144 Revision 2, vom 08.11.2019.Technische Unterlagen bei: * |
| en | The notified body no. 0071: Laboratoire National de métrologie et d’Essais (LNE) 1, rue Gaston Boissier, 72724 Paris Cedex 15, FRANCE, has carried out the testing in accordance with 2014/32/EU, Module D1 and issued the following certificate: Nr. LNE-36144 Revision 2, dated 8th November 2019.Technical file at: * |
| fr | L’organisme notifié n° 0071: Laboratoire National de métrologie et d’Essais (LNE) 1, rue Gaston Boissier, 72724 Paris Cedex 15, FRANCE, a effectué le contrôle conformément à la directive 2014/32/UE (module D1) et établi le certificat suivant : Nr. LNE-36144 Revision 2, du 08.11.2019.Dossier technique auprès de: * |
| es | El organismo notificado N.° 0071: Laboratoire National de métrologie et d’Essais (LNE) 1, rue Gaston Boissier, 72724 Paris Cedex 15, FRANCE, ha llevado a cabo la prueba de acuerdo a 2014/32/UE, módulo D1 y ha emitido el siguiente certificado: Nr. LNE-36144 Revision 2, con fecha del 08.11.2019.Documentos técnicos de: * |
| pt | O organismo notificado n.° 0071: Laboratoire National de métrologie et d’Essais (LNE) 1, rue Gaston Boissier, 72724 Paris Cedex 15, FRANCE, realizou o teste de acordo com a diretiva 2014/32/UE, módulo D1 e emitiu o seguinte certificado: Nr. LNE-36144 Revision 2, de 08.11.2019.Documentação técnica pertencente à: * |
| it | L’organismo notificato n. 0071: Laboratoire National de métrologie et d’Essais (LNE) 1, rue Gaston Boissier, 72724 Paris Cedex 15, FRANCE, ha effettuato la verifica secondo il modulo D1 della 2014/32/UE e ha rilasciato il seguente certificato: Nr. LNE-36144 Revision 2, datato 08-11-2019.Documentazione Tecnica presso: * |
| nl | De aangemelde instantie nr. 0071: Laboratoire National de métrologie et d’Essais (LNE) 1, rue Gaston Boissier, 72724 Paris Cedex 15, FRANCE, heeft de keuring conform 2014/32/EU, module D1 uitgevoerd en het volgende certificaat afgegeven: Nr. LNE-36144 Revision 2, van 08-11-2019.Technisch dossier bij: * |
| da | Det bemyndigede organ nr. 0071: Laboratoire National de métrologie et d’Essais (LNE) 1, rue Gaston Boissier, 72724 Paris Cedex 15, FRANCE, har udført |
Bosch Power Tools 1 609 92A 5YH | (09.07.2020)
VI
CE
| testen i henhold til 2014/32/EU, modul D1 og udstedt følgende certifikat: Nr. LNE-36144 Revision 2, den 08.11.2019.Tekniske bilag ved:* | |
| sv | Anmält organ nr. 0071:Laboratoire National de métrologie et d’Essais (LNE) 1, rue Gaston Boissier, 72724 Paris Cedex 15, FRANCE, har utfört kon-troll enligt 2014/32/EU, modul D1 och utfärdat följande intyg: Nr. LNE-36144 Revision 2, den 08.11.2019.Teknisk dokumentation:* |
| no | Teknisk kontrollorgan nr. 0071:Laboratoire National de métrologie et d’Essais (LNE) 1, rue Gaston Boissier, 72724 Paris Cedex 15, FRANCE, har utfört kon-trollen i samsvar med 2014/32/EU, modul D1 og utstedt følgende attest: Nr. LNE-36144 Revision 2, datert 08.11.2019.Teknisk dokumentasjon hos:* |
| fi | Ilmoitettu laitos nro 0071:Laboratoire National de métrologie et d’Essais (LNE) 1, rue Gaston Boissier, 72724 Paris Cedex 15, FRANCE, on suorittanut testin standardin 2014/32/EU moduulin D1 mukaan ja myöntänyt seuraavan ser-tifikaatin: Nr. LNE-36144 Revision 2, päiväys 08.11.2019.Tekniset asiakirjat saatavana:* |
| el | O koivopoinμένος οργανισμός αριθ. 0071:Laboratoire National de métrologie et d’Essais (LNE) 1, rue Gaston Boissier, 72724 Paris Cedex 15, FRANCE, πραγματοποίησε τη δοκιμή σύμφωνα με την οδηγία 2014/32/ΕΕ, ενότητα D1 και εξέδωσε το ακόλουθο πιστοποιητικό: Nr. LNE-36144 Revision 2, από τις 08.11.2019.Tεχνικά έγγραφα στη:* |
| tr | Onaylanmış kuruluş olan No. 0071:Laboratoire National de métrologie et d’Es-sais (LNE) 1, rue Gaston Boissier, 72724 Paris Cedex 15, FRANCE, 2014/32/EU, D1 modülü uyarınca test gerçekleştirmiş ve aşağıdaki sertifikayı vermiştir: 08.11.2019 tarihli Nr. LNE-36144 Revision 2.Teknik belgelerin bulunduğu yer:* |
| pl | Jednostka notyfikowana nr 0071:Laboratoire National de métrologie et d’Es-sais (LNE) 1, rue Gaston Boissier, 72724 Paris Cedex 15, FRANCE, przepro-wadziła badanie zgodnie z dyrektywą 2014/32/UE, moduł D1 i wystawiła nastę-pujący certyfikat: Nr. LNE-36144 Revision 2 z dnia 08.11.2019.Dokumentacja techniczna:* |
| cs | Notifikovaná osoba č. 0071:Laboratoire National de métrologie et d’Essais (LNE) 1, rue Gaston Boissier, 72724 Paris Cedex 15, FRANCE, provedla zk-oušku podle 2014/32/EU, modul D1 a vystavila následující certifikát: |
1 609 92A 5YH | (09.07.2020) Bosch Power Tools
CE
VII
| Nr. LNE-36144 Revision 2, z 08.11.2019.Technické podklady u: * | |
| sk | Notifikovaný orgán č. 0071:Laboratoire National de métrologie et d’Essais (LNE) 1, rue Gaston Boissier, 72724 Paris Cedex 15, FRANCE, vykonal skúšku podľa 2014/32/EÚ, Modul D1 a vystavil toto osvedčenie: Nr. LNE-36144 Revision 2, z 08.11.2019.Technické podklady má spoločnost: * |
| hu | A 0071 számú kijelölt szervezet:Laboratoire National de métrologie et d’Essais (LNE) 1, rue Gaston Boissier, 72724 Paris Cedex 15, FRANCE, a 2014/32/EU irányelv D1 moduljában leírtaknak megfelelően végrehajtotta a vizsgálatot és kiállította a következő számú tanúsítványt: Nr. LNE-36144 Revision 2, 2019. november 08.Müszaki dokumentumok megőrzési pontja: * |
| ru | Уполномоченный орган No 0071:Laboratoire National de métrologie et d’Essais (LNE) 1, rue Gaston Boissier, 72724 Paris Cedex 15, FRANCE, провел испытание в соответствии с Модулем D1 2014/32/EU и выдал следующий сертификат: Nr. LNE-36144 Revision 2 от 08.11.2019.Техническая документация хранится y: * |
| uk | Уповноважений орган No 0071:Laboratoire National de métrologie et d’Essais (LNE) 1, rue Gaston Boissier, 72724 Paris Cedex 15, FRANCE, провів випробування згідно з 2014/32/EU, модуль D1, і видав наступний сертифікат: Nr. LNE-36144 Revision 2, від 08.11.2019 року.Технічна документація зберігається y: * |
| kk | No 0071өкілетті мекеме:Laboratoire National de métrologie et d’Essais (LNE) 1, rue Gaston Boissier, 72724 Paris Cedex 15, FRANCE, 2014/32/EU стандартының D1 модуліне сэйкес сынақ өткізді және келесі сертификаты шығарды: Nr. LNE-36144 Revision 2, күні: 08.11.2019.Техникалық күжаттар: * |
| ro | Organismul notificat nr. 0071:Laboratoire National de métrologie et d’Essais (LNE) 1, rue Gaston Boissier, 72724 Paris Cedex 15, FRANCE, a efectuat verificarea conform Directivei 2014/32/UE, Modulul D1 și a emis următorul certificat: Nr. LNE-36144 Revision 2, la data de 08.11.2019.Documentаție tehnică la: * |
| bg | Уведоменият орган ном. 0071:Laboratoire National de métrologie et d’Essais (LNE) 1, rue Gaston Boissier, 72724 Paris Cedex 15, FRANCE, е извършил проверка съгласно 2014/32/EC, модул D1 и е издал следния |
VIII
CE
| сертификат: Nr. LNE-36144 Revision 2, от 08.11.2019.Техническа документация при:* | |
| mk | Овластеното тело со бр. 0071: Laboratoire National de métrologie et d’Essais (LNE) 1, rue Gaston Boissier, 72724 Paris Cedex 15, FRANCE, ja изврши проверката според 2014/32/EC, модул D1 и ја издаде следната потврда:Nr. LNE-36144 Revision 2, од 08.11.2019 г.Техничка документација кај:* |
| sr | Ovlašćeno telo br. 0071: Laboratoire National de métrologie et d’Essais (LNE) 1, rue Gaston Boissier, 72724 Paris Cedex 15, FRANCE, je sprovelo testiranje u skladu sa 2014/32/EU, modul D1 i izdalo je sledeću potvrdu:Nr. LNE-36144 Revision 2, sa datumom 08.11.2019.Tehnička dokumentacija kod:* |
| sl | Priglašeni organ št. 0071: Laboratoire National de métrologie et d’Essais (LNE) 1, rue Gaston Boissier, 72724 Paris Cedex 15, FRANCE, je izvedel preizkus v skladu z Direktivo 2014/32/EU, modul D1, in izdal naslednje potrdilo:Nr. LNE-36144 Revision 2 z dne 08.11.2019.Tehnična dokumentacija pri:* |
| hr | Prijavljeno tijelo br. 0071: Laboratoire National de métrologie et d’Essais (LNE) 1, rue Gaston Boissier, 72724 Paris Cedex 15, FRANCE, provelo je ispitivanje u skladu s Direktivom 2014/32/EU, Modul D1 i izdalo je sljedeću potvrdu:Nr. LNE-36144 Revision 2, od 08.11.2019.Müszaki dokumentumok megőrzési pontja:* |
| et | Teavitatud asutus nr 0071, Laboratoire National de métrologie et d’Essais (LNE) 1, rue Gaston Boissier, 72724 Paris Cedex 15, FRANCE, tegi katse kooskõlas direktiivi 2014/32/EL mooduliga D1 ja andis 08.11.2019 välja töendiNr. LNE-36144 Revision 2.Tehnilised dokumentid saadaval:* |
| lv | Paziņotā struktūra Nr. 0071: Laboratoire National de métrologie et d’Essais (LNE) 1, rue Gaston Boissier, 72724 Paris Cedex 15, FRANCE, veica pārbaudi saskaņā ar Direktīvas 2014/32/ES D1 moduli un izsniedza šādu sertifikātu:Nr. LNE-36144 Revision 2, 08.11.2019.Tehniskā dokumentācija no:* |
| lt | Notifikuota jstaiga Nr. 0071: Laboratoire National de métrologie et d’Essais (LNE) 1, rue Gaston Boissier, 72724 Paris Cedex 15, FRANCE, atliko patikrą pagal 2014/32/ES, modulis D1, ir išdavė šj pažymėjima: Nr. LNE-36144 Revision 2, 2019-11-08.Techninė dokumentacija saugoma:* |
1 609 92A 5YH | (09.07.2020) Bosch Power Tools
CE
IX
 BOSCH* Robert BoschPower Tools GmbH(PT/ECS)70538 StuttgartGERMANY BOSCH* Robert BoschPower Tools GmbH(PT/ECS)70538 StuttgartGERMANY | ||
| Henk BeckerChairmanof ExecutiveManagementHelmut HeinzelmannHead ofProduct Certification | ||
 Robert Bosch Power Tools GmbH,70538 Stuttgart, GERMANYStuttgart, 03.07.2020 Robert Bosch Power Tools GmbH,70538 Stuttgart, GERMANYStuttgart, 03.07.2020 |