PCL 1 - Laser level BOSCH - Free user manual and instructions
Find the device manual for free PCL 1 BOSCH in PDF.

| Product Type | Laser Level |
| Brand | Bosch |
| Model | PCL 1 |
| Laser Class | Class 2 |
| Laser Diode | <1 mW, 635 nm |
| Self-Levelling Range | ±4° |
| Levelling Accuracy | ±0.5 mm/m |
| Working Range | Up to 10 m |
| Lines Projected | Horizontal and vertical |
| Working Temperature | -10°C to 50°C |
| Storage Temperature | -20°C to 70°C |
| Power Supply | 2 x AA batteries (1.5V) |
| Battery Life | Approx. 20 hours |
| Weight (with batteries) | 0.3 kg |
| Dimensions (L x W x H) | 12 x 6 x 8 cm |
| Tripod Thread | 1/4" |
| Protection Class | IP54 |
| Material | Plastic housing |
| Scope of Delivery | Laser level, 2 x AA batteries, carrying case, manual |
| Maintenance | Clean with soft dry cloth, avoid solvents |
| Security | Laser class 2, do not stare into beam |
Frequently Asked Questions - PCL 1 BOSCH
User questions about PCL 1 BOSCH
0 question about this device. Answer the ones you know or ask your own.
Ask a new question about this device
Download the instructions for your Laser level in PDF format for free! Find your manual PCL 1 - BOSCH and take your electronic device back in hand. On this page are published all the documents necessary for the use of your device. PCL 1 by BOSCH.
USER MANUAL PCL 1 BOSCH
natural_image
3D rendering of a Bosch vacuum cleaner with control panel and rotary buttons (no text or symbols on body)Deutsch English Français Español Português Italiano Nederlands Dansk Svenska Norsk Suomi Ελληνικά Türkçe

A
natural_image
Line drawing of a compact device with labeled part '8' (no text or symbols on the device itself)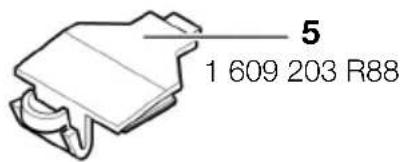
B
natural_image
Line drawing of a tripod-mounted camera setup with a top-mounted device and a dashed line indicating alignment (no text or symbols)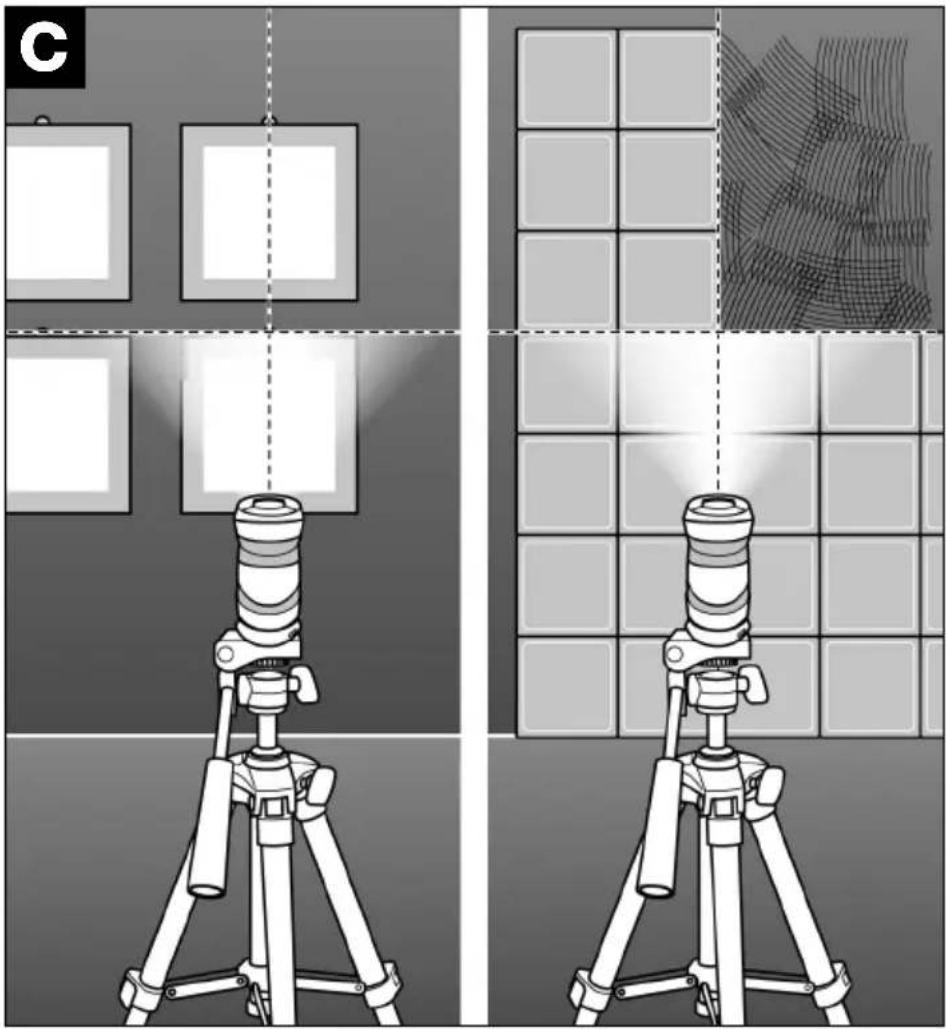
natural_image
Two identical diagrams showing a camera setup on tripod, with one panel and one grid-patterned panel in the background (no text or symbols)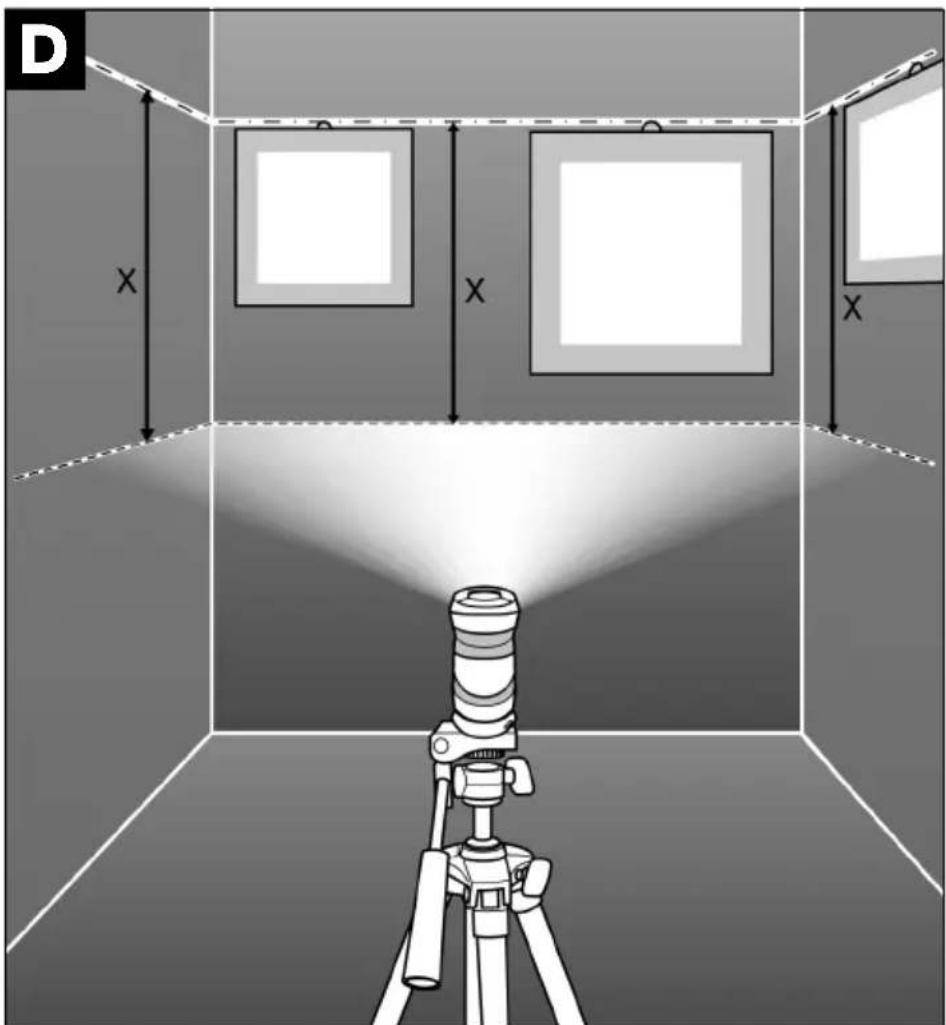
natural_image
Interior view of a studio with a camera setup and two framed artworks on walls, no text or symbols present.
natural_image
Illustration of a camera setup with a tripod-mounted device and two spotlights in a 3D cube frame (no text or symbols)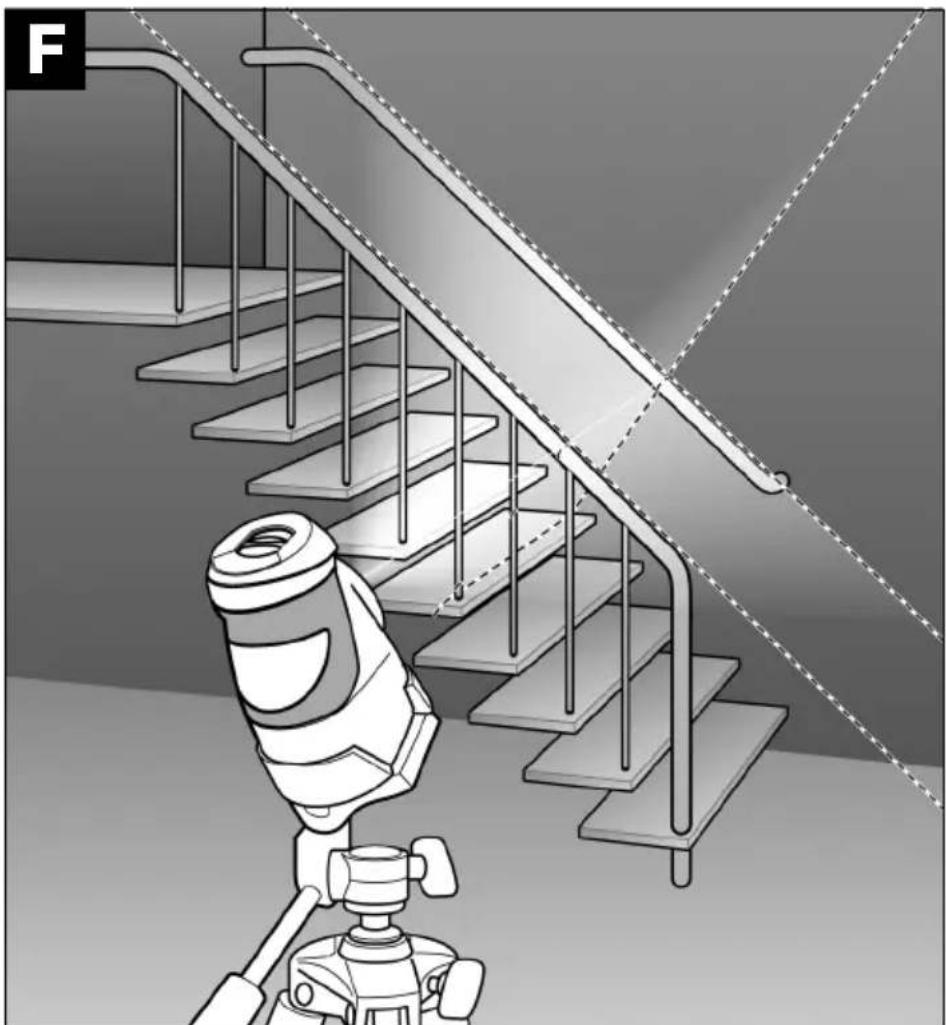
natural_image
Illustration of a robotic device positioned on a staircase with metal railings, no text or symbols present.
Zu Ihrer Sicherheit

natural_image
Warning symbol with a triangular triangle containing a central starburst pattern (no text or numbers)① Service: +43 (0)1/61 03 80
Fax....+43 (0)1/61 03 84 91
© Kundenberater: .....+43 (0)1/7 97 22 30 66
E-Mail: abe@abe-service.co.at
Schweiz
① Service: +41 (0)1/847 16 16
Fax....+41 (0)1/847 16 57
© Kundenberater 0 800 55 11 55
All instructions must be read completely and strictly followed to ensure safe and secure working with the measuring instrument. Do not make the warning signs on the measuring instrument unreadable. SAVE THESE INSTRUCTIONS IN A SECURE PLACE.
The measuring instrument is delivered with a warning sign (identified in the illustration of the measuring instrument on the graphic page with the number 6):
natural_image
Warning symbol with a triangular triangle containing a central starburst pattern (no text or numbers)EN 60825-1:2003-10, < 5 mW, 635 nm Laser radiation class 2M Do not look directly into the laser beam or view directly with optical instruments
■Do not direct the laser beam at persons or animals and do not look directly into the laser beam. This measuring instrument generates laser radiation of the laser class 2M according to EN 60825-1. Looking directly into the laser beam – especially with optical light collecting instruments such as binoculars, etc. – can damage the eyes.
■ Do not use the laser viewing glasses as protective glasses. The laser viewing glasses serve for better recognition of the laser beam, however, they do not protect against the laser radiation.
■Do not use the laser viewing glasses as sun glasses or in street traffic. The laser viewing glasses do not provide complete UV protection and reduce colour perception.
■Have the measuring instrument repaired only by qualified specialist personnel and only with original replacement parts. In this manner, it is ensured that the safety of the instrument is maintained.
■Do not allow children to use the laser measuring instrument without supervision. They could unintentionally blind other persons.
Product Specifications
Cross Line Laser PCL 1
Article number 3 603 K08 0..
Accuracy ±0.5 mm/m
Laser class 2M
Laser type 635 nm, <5 mW
Self-levelling range ±5°
Levelling time, typically 4 s
Operating temperature +5 °C ... +40 °C
Storage temperature -20 °C ... +70 °C
Batteries 4 x 1.5 V DC LR6 (AA)
Weight in accordance with
EPTA-Procedure 01/2003 0.5 kg
Please refer to the article number on the nameplate of your unit since the trade designation of individual units can vary.
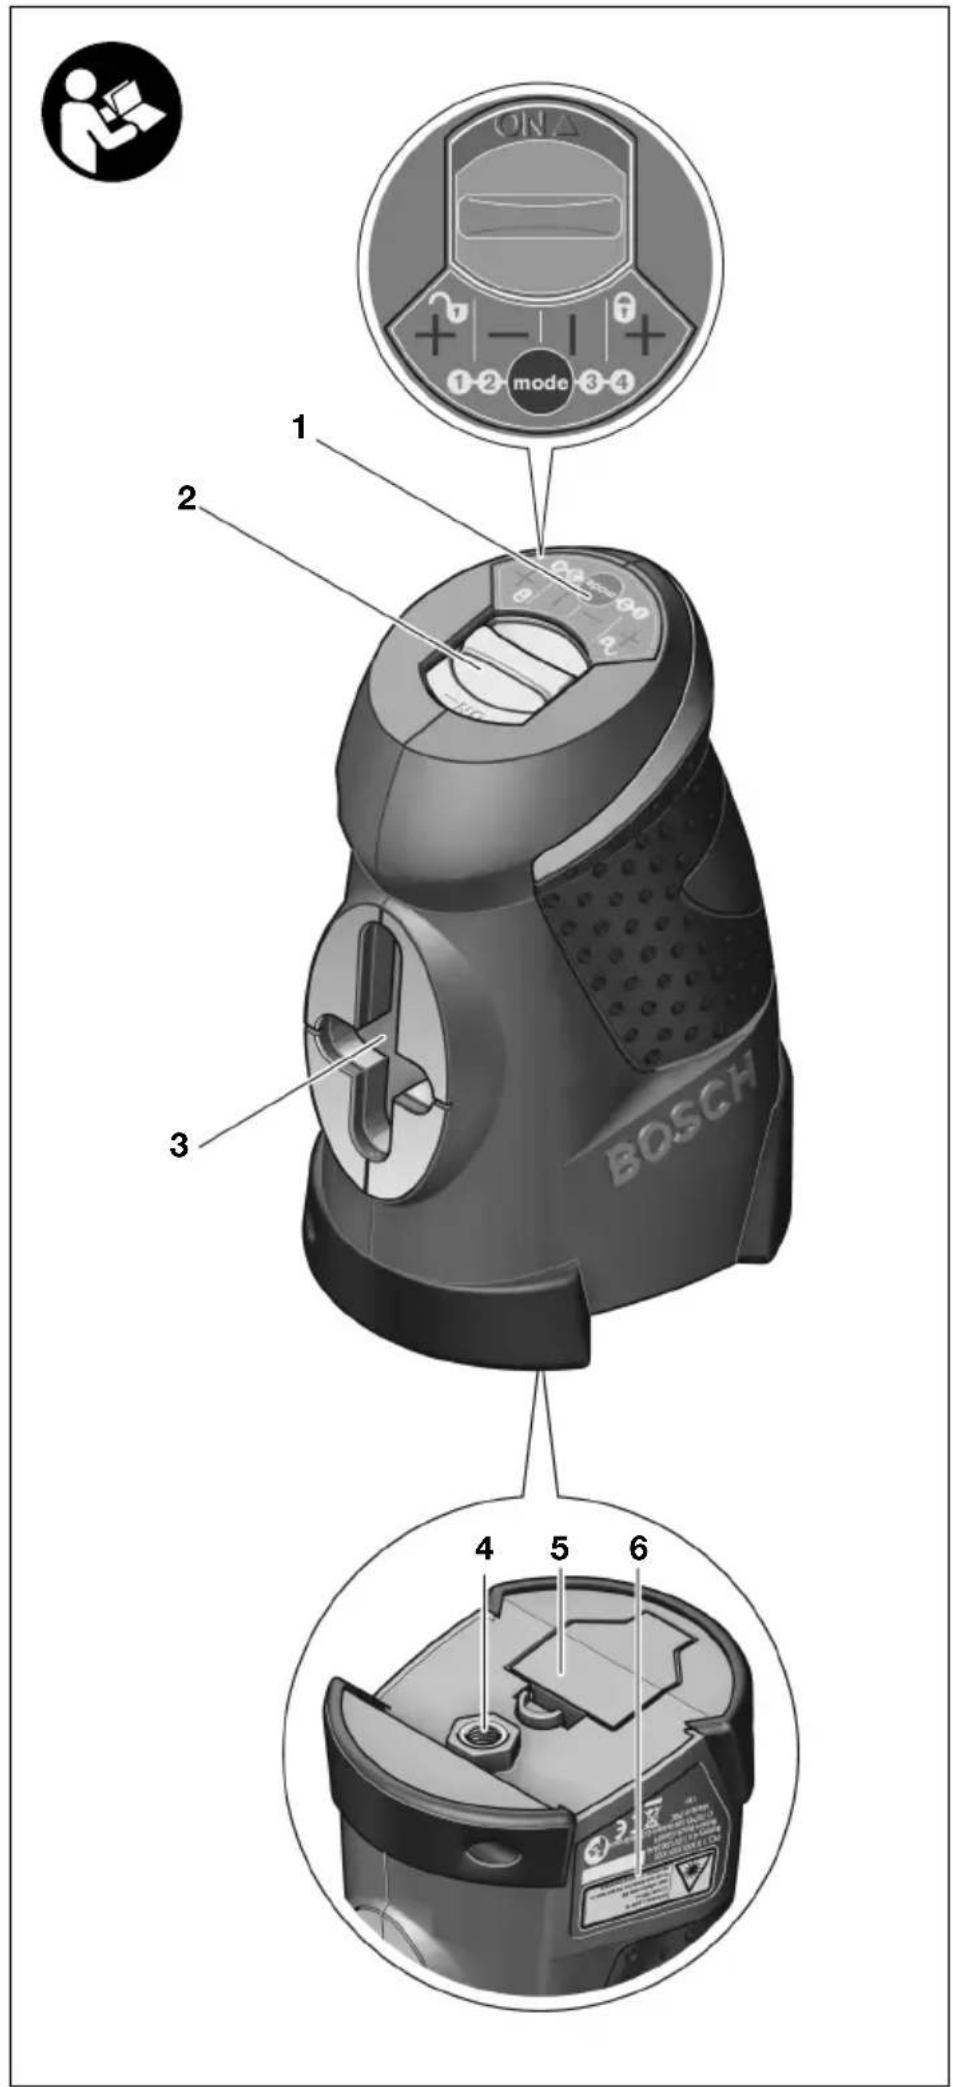
Product Elements
The numbering of the product elements refers to the illustration of the unit on the graphic page.
1 "Mode" button for measuring mode
2 On/Off switch with transport safety
3 Laser beam outlet
4 1/4" threaded hole (photo tripod attachment)
5 Battery compartment cover
6 Warning sign
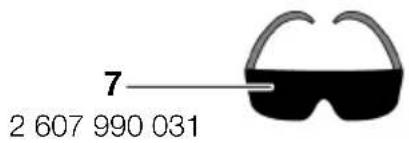
7 Laser viewing glasses*
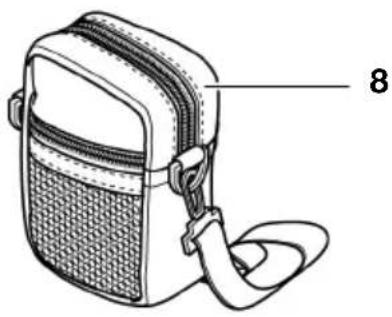
8 Protective bag
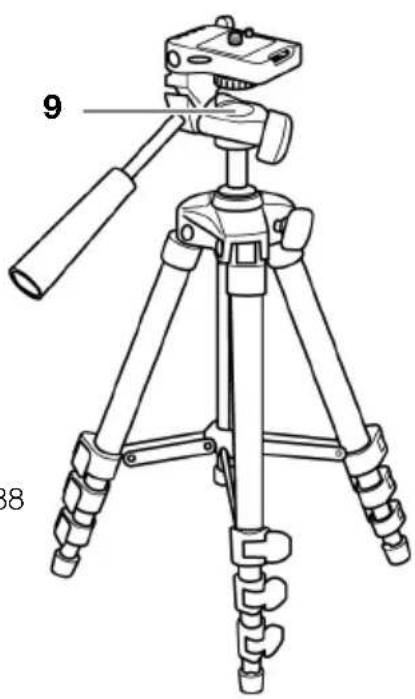
9 Tripod (commercially available)*
* Not all the accessories illustrated or described are included in standard delivery.
Intended Use
The measuring instrument is intended for the determination and checking of horizontal and vertical lines.
Protection of the Unit
■Protect the unit from moisture and direct sunrays.
■Do not expose the unit to extreme temperatures and temperature variations (e.g., do not leave in vehicles).
■If the unit is not used for a long period, the batteries must be removed (danger of self-discharge and corrosion).
■Switch off the unit after use.
■ Protect the unit from strong impacts and falls. Damage to the unit can degrade the accuracy.
After a strong impact or fall, check the laser line by comparing with a known horizontal or vertical reference line.
■Transport and store the unit in the protective bag 8.
Inserting/Replacing the Batteries
Use Alkali-Manganese batteries exclusively.
Open the battery compartment cover 5 and insert the batteries provided. When inserting the batteries, pay attention to the correct polarisation.
Always replace all batteries at the same time. Use only batteries from a single manufacturer and with the same capacity.
Putting into Operation
Switching on:
■When switched on, the instrument immediately emits a laser beam from the outlet opening 3. Do not direct the laser beam at persons or animals and do not look directly into the laser beam (especially not with optical instruments).
Press the on/off switch 2 in the "ON" direction. The instrument always starts in the crossed line mode with levelling control.
Switching off:
Press the on/off switch 2 in the "OFF" direction. The instrument is switched off. The laser unit is locked.
Measurement Functions
Operation with Levelling Control
With levelling control, the instrument automatically compensates for unevenness within the self-levelling range of approx. 5°. The levelling is complete as soon as the laser line no longer moves. If automatic levelling is not possible, for example when the surface on which it is standing deviates more than 5° from the horizontal, a warning signal sounds and the laser switches itself off. In this case, reposition the instrument to horizontal and wait for the self-levelling to complete.
Crossed Line Operation (see Fig. C)

Place the instrument on a firm horizontal surface or attach to a tripod and switch on. The laser is in crossed line operation with levelling control and produces a horizontal and a vertical line.
Horizontal Operation (see Fig. D)

Press the measuring mode button "mode" 1 once. The laser is in horizontal operation with levelling control and produces a horizontal line.
Vertical Operation (see Fig. E)
Press the measuring mode button "mode" 1 again or press twice directly after switching on. The laser is in vertical operation with levelling control and produces a vertical line.
Operation without Levelling Control
Crossed Line Operation (see Fig. F)
Press the measuring mode button "mode" 1 again or press three times directly after switching on. The levelling control is then switched off. In this mode, the instrument can be held freely in the hand or tilted on a tripod. The laser produces two crossed lines that can be freely aligned and are therefore no longer forced to be perpendicular to each other.
Renew pressing of the measuring mode button “mode” 1 brings the instrument back to operation with levelling control.
Working Instructions
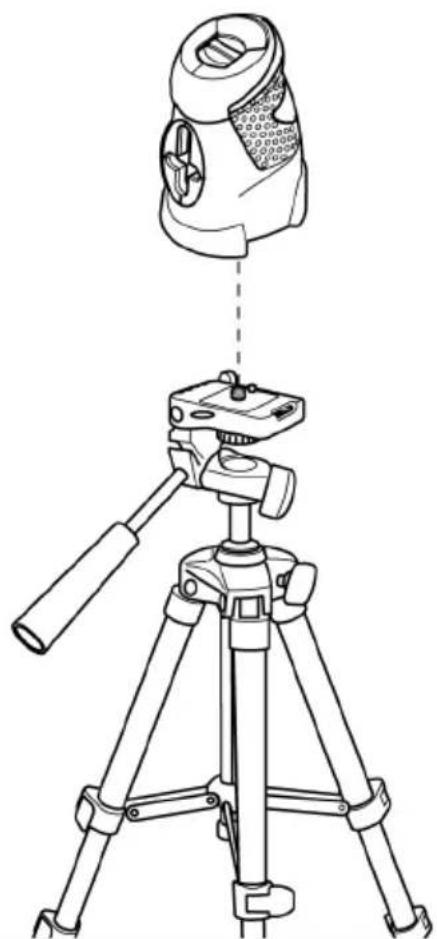
Working with a Tripod (see Fig. B)
A tripod provides a stable, height adjustable support. Screw the instrument with the threaded hole 4 on the underside of the case onto a commercially available tripod with a 1/4" attachment screw (photo tripod threads).
Laser Viewing Glasses (Accessory)
The laser viewing glasses filter out the ambient light. As a result, the red light of the laser appears brighter to the eye.
■The laser viewing glasses (accessory) are not protective glasses against laser radiation. Do not use them as protective glasses against strong sun light or in traffic.
Maintenance and Cleaning
Before each use, check the unit. For visible damage or loose parts in the interior of the unit, reliable functioning is no longer ensured.
Always keep the unit clean and dry.
Wipe off dirt with a damp, soft cloth. Do not use aggressive cleaning agents or solvents.
Clean the laser outlet 3 regularly with a cotton swab and remove lint.
If the unit should fail despite the care taken in manufacture and testing, repair should be carried out by an authorised customer services agent for Bosch power tools.
For all inquiries and replacement parts ordering, always include the 10-place article number on the nameplate of the unit.
In case of repair, send in the unit in the protective bag 8.
Disposal
The measuring instrument, accessories and packaging should be disposed of for recycling in a environmental friendly manner.
Only for EU countries
Do not dispose of measuring instruments in the household waste!
According to the European Guidelines 2002/96/EG for waste electric and electronic equipment and its implementation into national law, measuring instruments that are no longer usable must be collected separately and recycled in an environmentally friendly manner.
Batteries
Do not throw batteries into the household waste, fire or water. Batteries should be collected, recycled or disposed of in an environmentally friendly manner.
Only for EU countries
According to the Guidelines 91/157/EEC, defective or used batteries must be recycled.
Batteries/rechargeable batteries that are no longer useable can be sent directly to:
Great Britain
Robert Bosch Ltd. (B.S.C.)
P.O. Box 98
Broadwater Park
North Orbital Road
Denham-Uxbridge
Middlesex UB 9 5HJ
① Service....+44 (0) 18 95/83 87 82
① Advice line .....+44 (0) 18 95/83 87 91
Fax....+44 (0) 18 95/83 87 89
Service and Customer Advice
Exploded views and information on spare parts can be found under: www.bosch-pt.com.
Great Britain
Robert Bosch Ltd. (B.S.C.)
P.O. Box 98
Broadwater Park
North Orbital Road
Denham-Uxbridge
Middlesex UB 9 5HJ
① Service....+44 (0) 18 95/83 87 82
① Advice line....+44 (0) 18 95/83 87 91
Fax....+44 (0) 18 95/83 87 89
Ireland
Beaver Distribution Ltd.
Greenhills Road
Tallaght-Dublin 24
① Service....+ 353 (0)1/414 9400
Fax . . . . . . . . . . . . . . . . . . . . . . . . . . . . . . . . . . . . . . . . . . . . . . . . . . . . . . . . . . . . . . . . . . . + 353 (0)1/459 8030
Australia and New Zealand
Robert Bosch Australia Pty. Ltd.
RBAU/SBT
1555 Centre Road, P.O. Box 66
3168 Clayton/Victoria
①....+61 (0)1/3 00 30 70 44
Fax....+61 (0)1/3 00 30 70 45
www.bosch.com.au
Specifications subject to change without notice
Pour votre sécurité

natural_image
Warning symbol with a triangular triangle and central sunburst pattern (no text)Mode lignes croisées (cf. figure C
Service horizontal (cf. figure D)

Service vertical (cf. figure E)

Mode lignes croisées (cf. figure F

Robert Bosch France S.A.S.
Service Après-vente/Outillage
natural_image
Warning symbol with a triangular triangle and central sunburst pattern (no text)natural_image
Warning symbol with a triangular triangle containing a central starburst pattern (no text or numbers)① +351 21/8 50 00 00
Fax +351 21/8 51 10 96
Brasil
Robert Bosch Ltda.
Caixa postal 1195
13065-900 Campinas
① 0800/70 45446
E-Mail: sac@bosch-sac.com.br
natural_image
Warning symbol with a triangular triangle and radiating lines, no text or numbers presentnatural_image
Warning symbol with a triangular triangle containing a central starburst pattern (no text or numbers)natural_image
Warning symbol with a triangular triangle containing a central starburst pattern (no text or numbers)natural_image
Warning symbol with a triangular triangle and radiating lines, no text or numbers presentnatural_image
Warning symbol with a triangular triangle and radiating lines, no text or numbers presentEN 60825-1:2003-10, < 5 mW, 635 nm Laserstråling klasse 2M Ikke se inn i strålen eller se direkte på strålen med optiske instrumenter
natural_image
Warning symbol with a triangular frame and a central starburst pattern (no text or numbers)natural_image
Warning symbol with a triangular triangle and central explosion (no text or numbers)natural_image
Warning symbol with a triangular triangle and radiating lines, no text or numbers present.Bosch San. ve Tic. A.S.
Ahi Evran Cad. No:1 Kat:22
Polaris Plaza
80670 Maslak/Istanbul
Power Tools Division
70745 Leinfelden-Echterdingen
www.bosch-pt.com
1 609 929 J06 (05.07) T/69