
SBT-20 - Sander SCHEPPACH - Free user manual and instructions
Find the device manual for free SBT-20 SCHEPPACH in PDF.

| Product type | Compressed air sandblaster |
| Brand | Scheppach |
| Model | SBT-20 |
| Dimensions (L x W x H) | 330 x 305 x 815 mm |
| Weight | 16.5 kg |
| Operating pressure | 4 - 8 bar |
| Pressure tank volume | 20 L |
| Minimum air consumption | 250 L/min |
| Maximum shot filling capacity | 13 L |
| Recommended shot particle size | 0.1 - 0.63 mm |
| Spray hose length | 2.5 m |
| Supply | Compressed air (external compressor) |
| Main functions | Removal of rust, paint, impurities from metal, wood, stone, concrete, aluminum, stainless steel |
| Required protective equipment | Safety goggles, respirator mask, gloves, hearing protection, safety shoes |
| Safety | Safety valve, pressure gauge, stop valves, pressure purge |
| Maintenance and cleaning | Cleaning after use, regular draining of water separator, tank purge, inspection of nozzles and hoses |
| Wear parts | Nozzle, spray hose, seals, sealing ring, shot flow hose |
| Included accessories | Handle, stand, wheels, pressure gauge, spray gun, hoses, nozzles, fork wrench, hex key, Teflon tape, funnel, protective cover, instruction manual |
| Recommended storage | Dry place, frost-free, temperature 5-30 °C, vertical position, empty tank |
| Warranty | Legal warranty, defective parts replaced free of charge, labor costs borne by customer |
Frequently Asked Questions - SBT-20 SCHEPPACH
User questions about SBT-20 SCHEPPACH
0 question about this device. Answer the ones you know or ask your own.
Ask a new question about this device
Download the instructions for your Sander in PDF format for free! Find your manual SBT-20 - SCHEPPACH and take your electronic device back in hand. On this page are published all the documents necessary for the use of your device. SBT-20 by SCHEPPACH.
USER MANUAL SBT-20 SCHEPPACH
natural_image
Industrial gas purifier with attached hose and control unit (no visible text or symbols)
Made in P.R.C.
SBT-20
| DE | Mobiles SandstrahlgerätOriginalbetriebsanleitung | 6 |
| GB | Mobile sandblasterTranslation of original instruction manual | 21 |
| FR | Sableuse mobileTraduction des instructions d'origine | 34 |
| IT | Dispositivo mobile di sabbiaturaLa traduzione dal manuale di istruzioni originale | 48 |
| NL | Mobiele straalketelVertaling van de originele gebruikshandleiding | 61 |
| ES | Unidad móvil de chorreadoTraducción del manual de instrucciones original | 74 |
| PT | Aparelho portátil de jato de areiaTradução do manual de operação original | 87 |
| CZ | Mobilní pískový tryskací přístrojPřeklad originálního návodu k obsluze | 100 |
| SK | Mobilná pieskovačkaPreklad originálného návodu na obsluhu | 113 |
| HU | Mobil homokfúvó készülékEredeti használati utasltás fordítása | 126 |
| PL | Mobilne urządzenie do piaskowaniaTłumaczenie oryginalnej instrukcji obsługi | 139 |
| HR | Pokretni stroj za pjeskarenjePrijevod originalnog priručnika za uporabu | 153 |
| SI | Mobilni peskalnikPrevod originalnih navodil za uporabo | 166 |
| EE | Mobiilne liivapritsiseadeOriginaalkältusjuhendi tõlge | 178 |
| LT | Mobilusis smėliasrautis aparatasOriginalios naudojimo instrukcijos vertimas | 190 |
| LV | Pārvietojams smilšstrūklas aparātsOriginālās lietošanas instrukcijas tulkojums | 203 |
| SE | Mobil sandblästringsapparatÖversättning av original-bruksanvisning | 216 |
| FI | Liikuteltava hiekkapuhalluslaiteKäännös alkuperäisestä käyttöohjeesta | 228 |
| DK | Mobilt sandblæserOversættelse fra den oprindelige betjeningsvejledning | 241 |
| NO | Mobil sandblåsemaskinOversettelse av den originale brukerveiledningen | 253 |
| BG | Мобилна пясъкоструйкаПревод на оригиналното ръководство заексплоатация | 265 |
| GR | Κινητή συσκευή αμμοβολήςΜετάφραση του πρωτοτύπου των οδηγιών χρήσης | 279 |
| RO | Aparat mobil de sablat cu nisipTraducere din manualul de exploatare original | 293 |
| RS | Mobilni uređaj za peskarenjePrevod originalnog uputstva za upotrebu | 306 |
| TR | Seyyar kum püskürtme cihazıOrijinal kullanım talimatı çevírisi | 319 |

Günzburger Straße 69
D-89335 Ichenhausen
Verehrter Kunde,
Homepage: https://www.scheppach.com/de/service
Explanation of the symbols on the product
Symbols are used in this manual to draw your attention to potential hazards. The safety symbols and the accompanying explanations must be fully understood. The warnings themselves will not rectify a hazard and cannot replace proper accident prevention measures.
 | Warning - Read the operating manual to reduce the risk of injury. |
 | Wear a dust protection mask. Harmful dust may be generated when sandblasting. |
 | Wear safety goggles. Sparks created during work or fragments, chippings and dust ejected by the product can cause sight loss. |
 | Wear hearing protection! |
 | Wear safety gloves! |
 | Wear safety shoes! |
 | Make sure that other persons maintain a sufficient safety distance. |
 | Warning! Danger of injury due to objects being flung away!Keep other people away. |
 | Do not expose the product to rain. The product may only be stationed, stored and operated in dry ambient conditions. |
 | Warning! Never work in enclosed or poorly ventilated spaces. |
 | The product complies with the applicable European directives. |
| △ Attention! | We have marked points in this operating manual that impact your safety with this symbol. |
 | The product complies with the applicable Serbian directives. |
Table of contents: Page:
- Introduction....23
- Description of the product 23
- Scope of delivery 23
- Proper use 24
- General safety instructions.... 24
- Residual risks 26
- Technical data....26
- Unpacking....26
- Layout 26
- Start-up 27
- Cleaning....30
- Storage & transport 31
- Maintenance 31
- Repair & ordering spare parts 31
- Disposal and recycling.... 32
- Troubleshooting 33
- Declaration of conformity 334
1. Introduction
Manufacturer:
Scheppach GmbH
Günzburger Straße 69
D-89335 Ichenhausen
Dear Customer,
We hope your new product brings you much enjoyment and success.
Note:
In accordance with the applicable product liability laws, the manufacturer of this product assumes no liability for damage to the product or caused by the product arising from:
- Improper handling
- Failure to comply with the operating manual
• Repairs carried out by third parties, unauthorised specialists
• Installing and replacing non-original spare parts - Improper use
Note:
The operating manual is part of this product. It includes important instructions for the safe, proper and economic operation of the product, for avoiding danger, for minimising repair costs and downtimes and for increasing the reliability and extending the service life of the product. In addition to the safety instructions in this operating manual, you must also observe the regulations applicable to the operation of the product in your country.
Familiarise yourself with all operating and safety instructions before using the product. Only operate the product as described and for the specified areas of application. Keep the operating manual in a good place and hand over all documents when passing the product on to third parties.
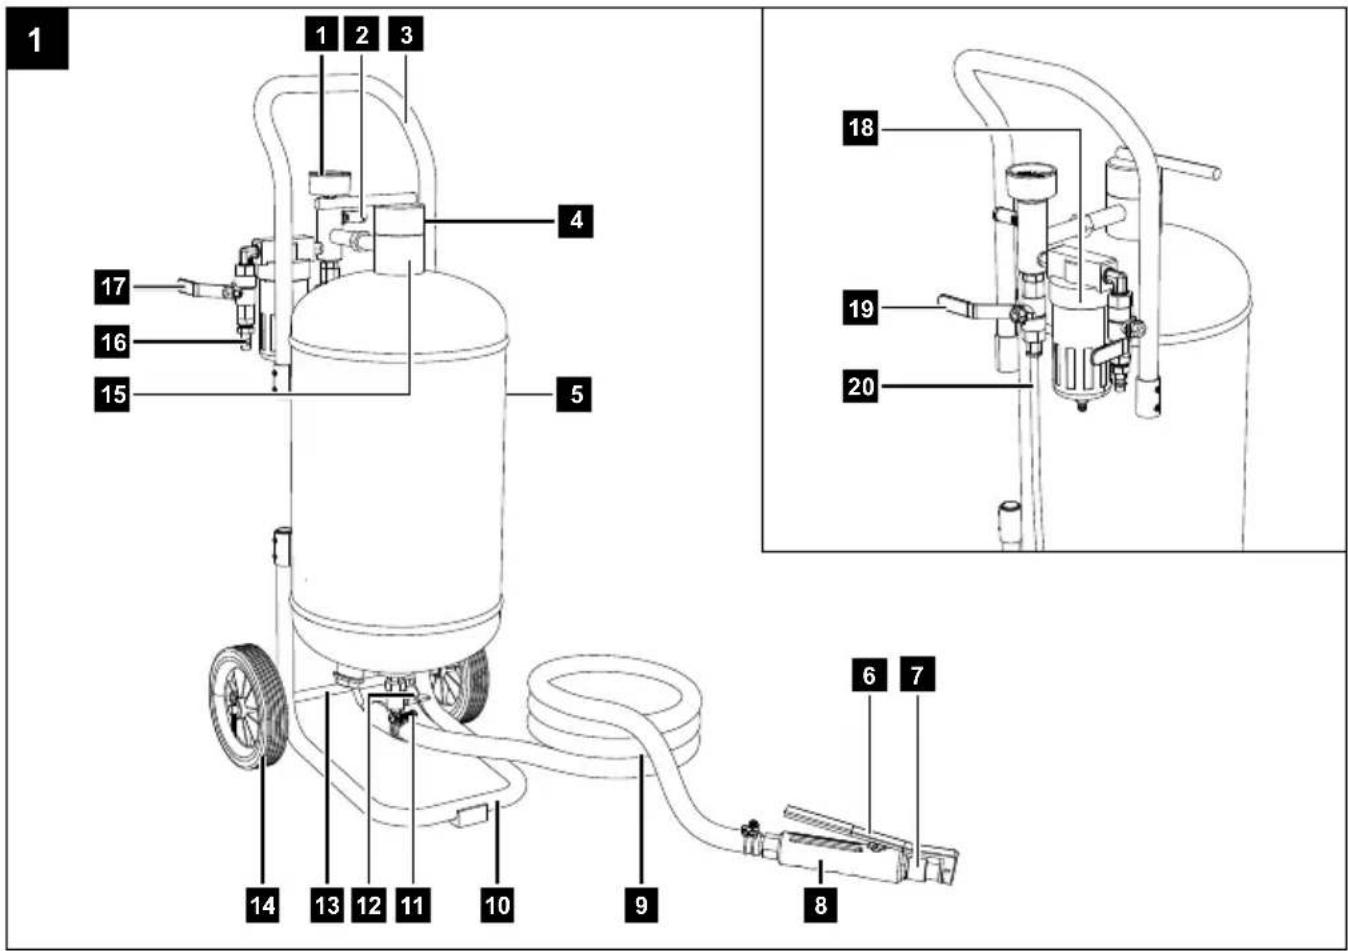
2. Description of the product
- Pressure gauge
- Safety valve
2a. Drain nut
2b. Safety connection
2c. Cap - Handle
3a. Grub screw - Seal
-
Pressure vessel
5a. Drain screw -
Lever
- Nozzle
7a. Sealing ring - Blasting gun
8a. Blasting gun connection nipple - Blasting hose
9a. Hose clamp - Foot
10a. Cover
10b. Grub screw - Blasting material connection
- Blasting material shut-off valve
- Wheel axle
- Wheel
14a. Split pin - Filling nozzle
- Compressed air connection
- Main supply line shut-off valve
- Water separator
18a. Drain valve - Blasting hose supply line shut-off valve
19a. Compressed air connection - Blasting hose supply line
20a. Blasting material discharge pipe
20b. Compressed air connection
20c. Blasting material discharge pipe connection nipple
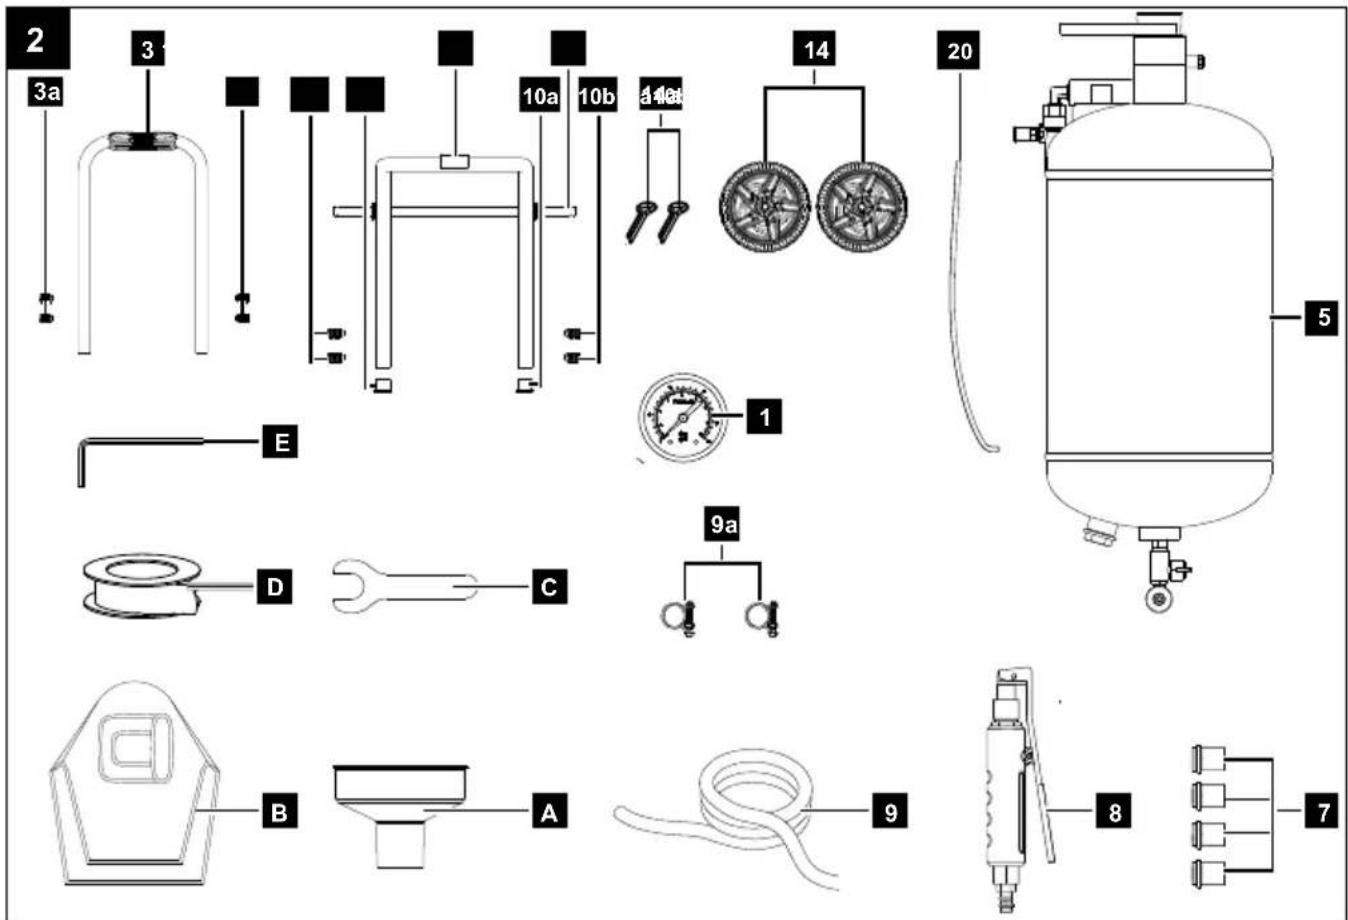
3. Scope of delivery
Item Quantity Designation
| 3 1x Handle | |
| 3 a | 4x Grub screw (pre-assembled) |
| 10 | 1x Foot |
| 10 a | 2x Cover (pre-assembled) |
| 10b | 4x Grub screw (pre-assembled) |
| 13 | 1x Wheel axle (pre-assembled) |
| 14 | 2x Wheel |
| 14 a | 2x Split pin |
| 20 | 1x Blasting hose supply line |
| 5 1x Pressure vessel | |
| 7 4x Nozzle | |
| 8 1x Blasting gun | |
| 9 1x Blasting hose | |
| 9 a | 2x Hose clamp |
| A | 1x Funnel |
| B 1x Protective cover |
| C 1x Open-ended spanner AF27 |
| D 1x Teflon tape |
| E 1x Allen screw AF3 |
| 1x Operating manual |
4. Proper use
The mobile sandblaster is used for cleaning various types of surfaces of rust, impurities, etc. by means of a compressed air stream with abrasive particles.
The product may only be used in the intended manner. Any use beyond this is improper. The user/operator, not the manufacturer, is responsible for damages or injuries of any type resulting from this.
An element of the intended use is also the observance of the safety instructions, as well as the assembly instructions and operating information in the operating manual.
Persons who operate and maintain the product must be familiar with the manual and must be informed about potential dangers.
The liability of the manufacturer and resulting damages are excluded in the event of modifications of the product.
The product may only be operated with original parts and original accessories from the manufacturer.
The safety, operating and maintenance specifications of the manufacturer, as well as the dimensions specified in the technical data, must be observed.
Please note that our products were not designed with the intention of use for commercial or industrial purposes. We assume no guarantee if the product is used in commercial or industrial applications, or for equivalent work.
The product is intended for use by adults. Children under the age of 16 may only use the product when supervised. The manufacturer is not liable for damage caused by improper use or incorrect operation.
5. General safety instructions
We have marked points in these operating instructions that impact your safety with this symbol: △
Furthermore, the operating manual contains other important text sections that are marked with the word "ATTENTION!".
⚠ Attention!
When using equipment, several safety warnings must be observed to prevent injuries and damage. For this reason, please carefully read this operating manual / safety instructions. If you hand the device over to another person, please hand over this operating manual / safety instructions as well. We accept no liability for accidents or damage that occur due to a failure to observe this manual and the safety instructions.
DANGER
A failure to observe these instructions poses an extreme danger of death or the risk of life-threatening injuries.
WARNING
A failure to observe these instructions poses a danger of death or the risk of serious injuries.
CAUTION
A failure to observe these instructions poses a minor to moderate danger of injury.
NOTE!
A failure to observe these instructions poses a risk of damage to the engine or other property.
Who is not permitted to use the device:
- Children and other people who do are not familiar with the usage instructions (local stipulations may specify a minimum age for users).
• People under the influence of alcohol, drugs and medication, as well as those who are tired or ill.
Safety at the workplace
- Keep your workplace clean and well-lit. Disorganised or poorly lit work areas can result in accidents. Act with foresight, observe what is being done and use common sense when using the device.
- Keep away from children and unauthorised persons. Carelessness can lead to loss of control over the product.
- Reinforced hoses should be used in areas particularly vulnerable to damage.
- The pressure line must be connected and disconnected with the main supply line shut-off valve closed.
- Do not interrupt the compressed air supply by squeezing or bending the lines.
- Gradually increase the air supply to the product to ensure that it works properly. If the product does
not function properly, disconnect it from the compressed air immediately and contact the manufacturer's service department.
- Operate the product outdoors only.
⚠ Warning! Also secure the working area from unauthorised access. Only the user is allowed in the area of the sandblaster. Only persons who have the same protective equipment as the user may be at a distance of 2 metres from the device.
Personal safety
- Be careful when operating the product. A moment of carelessness when working can result in serious injury.
- The protective clothing and all accessories used must correspond to the "Personal Protective Equipment" directive.
• Always wear safety goggles, when using the sandblaster it is recommended to wear a complete face shield with filter. - Do not wear loose clothing or jewellery. Keep hair, clothing and gloves away from moving parts. Loose clothes, jewellery or long hair can be caught in moving parts.
- Foreign objects or blown off parts can easily cause injuries.
- Wear a respirator when working with the product. Dusts are harmful to health!
- Do not overestimate your abilities. Make sure that you have a secure footing when working. This gives you better control over the product in the event of unexpected situations.
- When working with the device, dust is generated which may contain substances that are harmful to health. Operate the product outdoors only. It is recommended to wear a protective hood.
Safe use of the product
- Before any work, check for general damage or damage to moving parts (breakage of parts and components or other conditions that could affect the safe operation of the product). In the event of damage, the product must be sent for repair before use.
- Please note that the product's safety systems or equipment must not be tampered with or deactivated. Never remove any safety-related parts.
-
Only use accessories from the manufacturer. Use of other accessories may result in injury to the user.
• Always keep the product in good operating condition. -
Make sure that all nuts, screw-fittings and screws are securely tightened so that the product is kept in a safe working condition.
- Do not transport the product by the pressure line or hang it from the pressure line.
- Maintenance and replacement of hoses, nozzles etc. should only be carried out with the compressed air supply switched off and the tank empty.
- Only compressed air shall be used to supply the product. It is prohibited to use other gases.
• Always hold the transport the product in an upright position. - Only blasting material specially designed for sand-blasting shall be used for the product. It is strictly prohibited to use ordinary sand!
- Use only blasting material that is absolutely dry.
- When the product is transported or not in use, the pressure in the pressure vessel should be reduced. The pressure gauge should show a value of 0.
- The product must always be disconnected from the compressed air supply during any kind of break in work.
- This product is only suitable for use on firm, level and smooth ground. Therefore, always ensure that you have a firm footing! And that all screw fittings, especially of the hoses, are sufficiently tightened.
- Operate the product at an air pressure between 4.6 and a maximum of 8 bar! If the pressure is higher, the product may be damaged! This can also put people at risk.
- Before each use, check all hoses and other connections for firm seating and for damage.
Safety instructions for working with the blasting gun
- Ensure there is sufficient distance to the product, at least 2 m, and keep the blasting gun away from the product during operation.
- Do not direct the pressure line or the blasting gun towards yourself, other people or animals.
Operation of pressure vessels
- Anyone who operates a pressure vessel must keep this in good working order, operate and monitor it correctly, perform the necessary maintenance and servicing works immediately and implement safety measures as required according to the circumstances.
- The regulatory authority can instruct necessary monitoring measures in individual cases.
- A pressure vessel must not be operated if it exhibits a defect that poses a danger to personnel or third parties.
- Check the pressure vessel for rust and damage each time before use. The pressure vessel shall not be operated if the pressure vessel is damaged or rusty. If you discover damage, please contact the customer service workshop.
6. Residual risks
Neglect of ergonomic principles
Negligent use of personal protective equipment (PPE)
Careless use or omission of personal protective equipment may result in serious injury.
- Wear prescribed protective equipment.
Human behaviour, misconduct
• Always concentrate fully on all work.
Residual danger - Can never be excluded.
Behaviour in an emergency
In case of an accident, initiate the necessary first aid measures and seek medical assistance as quickly as possible.
7. Technical data
Dimensions (L x W x H) 330 x 305 x 815 mm
| Tank dimensions (∅ x H) | 250 x 473 mm |
| Pressure vessel volume | 20 l |
| Air consumption min | 250 l/min |
| Operating pressure | 4 – 8 bar |
| Recommended blasting material | Glass beads Aluminium oxide |
| Max. filling quantity of blasting material | 13 l |
| Blasting hose length | 2.5 m |
| Blasting material diameter | 0.1 - 0.63 mm |
| Weight | 16.5 kg |
Subject to technical changes!
8. Unpacking
- Open the packaging and carefully remove the product.
- Remove the packaging material, as well as the packaging and transport safety devices (if present).
- Check whether the scope of delivery is complete.
- Check the product and accessory parts for transport damage. In the event of complaints the carrier must be informed immediately. Later claims will not be recognised.
- If possible, keep the packaging until the expiry of the warranty period.
- Familiarise yourself with the product by means of the operating manual before using for the first time.
- With accessories as well as wearing parts and replacement parts use only original parts. Spare parts can be obtained from your specialist dealer.
- When ordering please provide our article number as well as type and year of manufacture for the product.
⚠ WARNING!
The product and the packaging material are not children's toys! Do not let children play with plastic bags, films or small parts! There is a danger of choking or suffocating!
9. Layout
△ Attention! Always make sure the product is fully assembled before commissioning!
Required tool:
| Item Quan- tity | Designation |
| 1x Open-ended spanner SW10 (not included in the scope of delivery) | |
| E 1x Allen key SW3 (included in the scope of delivery) | |
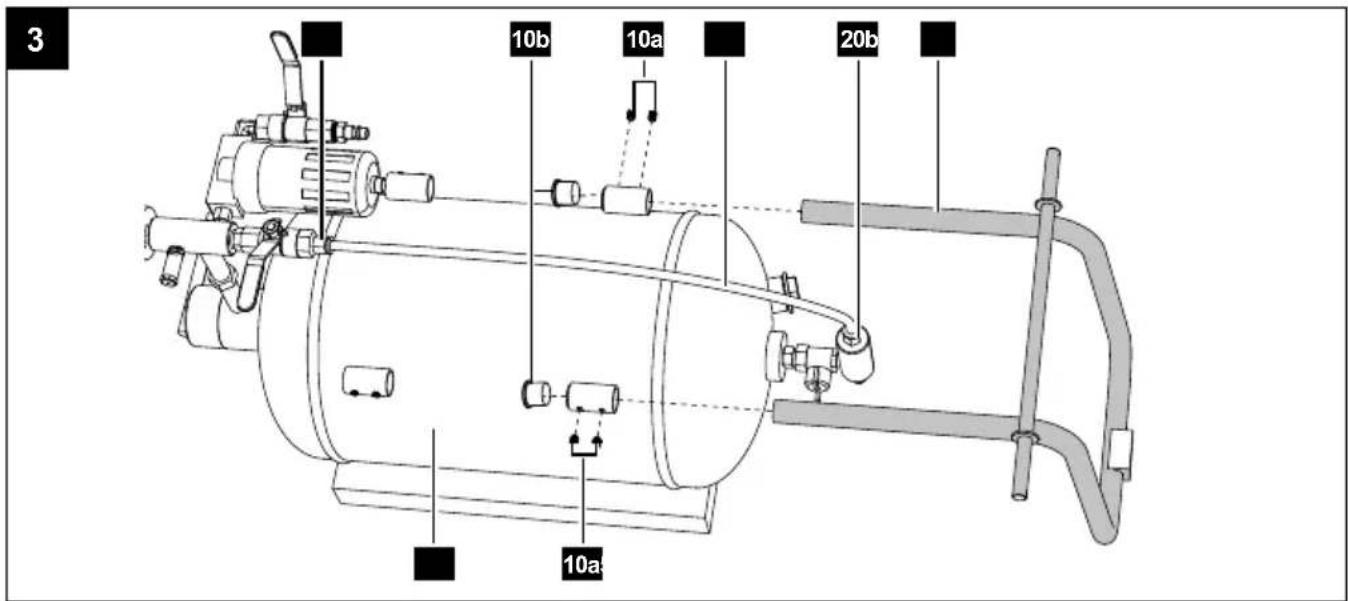
9.1 Assembly of the blasting hose supply line (Fig. 3)
- Turn the pressure vessel (5) so that the rear end faces upwards.
- Secure the product against slipping and toppling (e.g. with square timbers).
- Connect the blasting hose supply line (20) to the compressed air connections (19a) and (20b).
9.2 Fitting the foot (Fig. 3)
- Fit the foot (10) provided as shown in.
- Secure the foot with the covers (10a) and the grub screws (10b).
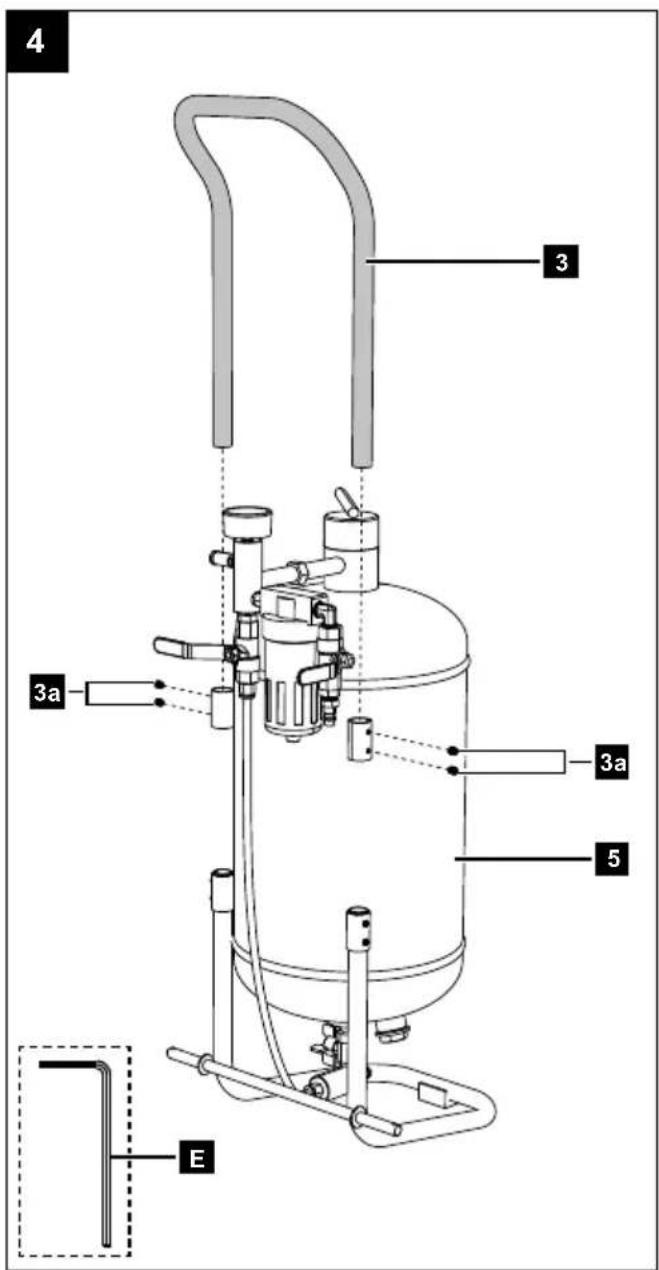
9.3 Fitting the handle (Fig. 4)
- Fit the handle (3) as shown.
- Insert two grub screws (3a) on each side and screw them together using the Allen key (E).
9.4 Fitting the wheels (fig. 5)
- Fit the wheels (14) provided as shown.
- Slide the wheels (14) onto the wheel axle (13) on the right and left and secure them with a split pin (14a).
9.5 Installing the pressure gauge (Fig. 6)
- Position the pressure gauge (1) straight. Ensure that it does not tilt.
- Tighten the pressure gauge (1) by hand until a clear resistance can be felt.
- Carefully tighten the thread with an open-end spanner (not on the housing!). Only tighten the thread until it is tight. Avoid overtightening.
- Move the pressure gauge to the desired position. If this is not possible, you must reseal the thread with Teflon tape (D) (see 9.6).
- Check whether the connection is tight.
- Check that the pressure gauge (1) is working correctly.
9.6 Seal the thread with Teflon tape
1. Existing Teflon tape
- Remove any Teflon tape completely.
2. Checking the thread
- Ensure that you only attach the Teflon tape (D) to the external thread of the pressure gauge (1).
3. Note the screw-in direction
- Always wrap the Teflon tape (D) around the thread in the screw-in direction (clockwise). This prevents the Teflon tape (D) from coming off again during the assembly of the product.
4. Technique
- Initially keep the Teflon tape (D) slightly taut.
- Wrap it smoothly, overlapping and evenly around the external thread.
- Leave the first thread free so that no fibres can get into the pipe.
5. Number of windings
- Wrap the thread 4 - 8 times depending on the size.
- A higher number may be necessary for coarse threads.
- The Teflon tape (D) should cover the threads evenly. It must not tear or clog the threads.
6. Assembly
- After sealing, the pressure gauge (1) can be fitted as described in section 9.5.
9.7 Assembly of the blasting hose (Fig. 7, 8)
- Attach one hose clamp (9a) to each end of the blasting hose (9).
- Push one end of the hose over the blasting gun connection nipple (8a) and a hose clamp (9a) over the blasting gun connection nipple (8a).
- Tighten the hose clamp (9a) with the open-end spanner AF10.
- Push one end of the hose over the connection nipple of the blasting material discharge pipe (20c).
- Slide a hose clamp (9a) over the connection nipple of the blasting material discharge pipe (20c).
- Tighten the hose clamp (9a) with an open-end spanner AF10.
△ Attention! After mounting the blasting hose (9), it is essential to check that it is firmly seated on the connection nipples (8a+20c).
9.8 Installing the nozzle on the blasting gun (Fig. 8) ⚠ WARNING!
Health hazard! When mounting the nozzle, there is a risk of crushing fingers and hands.
- To fit the correct nozzle (7), hold down the lever (6) and open the screw fitting by turning it anti-clockwise. Attention! Danger of crushing!
- Remove the sealing ring (7a) and the nozzle (7) and store them safely.
- Select one of the available nozzles (7) as required and insert it with the sealing ring (7a) into the screw connection.
- Hold the lever (6) down again and screw the nozzle (7) onto the blasting gun (8).
10. Start-up
⚠ Attention!
Always make sure the product is fully assembled before commissioning!
- Systematically check the condition of nozzles, valves and hoses before each use. The abrasive material causes wear on the hose walls.
⚠ WARNING!
Health hazard!
Inhalation of vapours and dusts can cause serious damage to health, unconsciousness and in extreme cases death.
- Do not breathe in vapours or dusts.
- Operate the product outdoors only.
10.1 Selecting the right nozzle
- Select the appropriate nozzle depending on the size (diameter) of the material.
- To mount the nozzle (7) on the blasting gun (8), proceed as described in 9.8.
10.2 Selecting the right blasting media
The product can basically be used with any industrial blasting material as long as the grain size is uniform and lies between 0.1 and 0.63 mm. The blasting material is selected according to the surface and the desired result (strong removal or gentle cleaning).
Attention: A test blasting process on a non-visible area is recommended in order to assess the result before large-scale application.
We recommend the following blasting material for working the following materials:
Material Working Recommended blasting material
| Metal (steel, iron, cast iron) | Remove paint or rust | Aluminium oxide, glass beads |
| Cleaning and preparation before painting | ||
| Satin finish | ||
| Body / rims Remove lacquer Glass beads | ||
| Wood Remove paint or lacquer | Glass beads with fine grain | |
| Stone / Brick / Concrete Cleaning (graffiti, soiling) | Aluminium oxide | |
| Aluminium, stainless steel | Cleaning and degreasing | Glass beads |
WARNING
Health hazard and risk of damage to the product
Do not use river sand or building sand, as these materials contain harmful substances such as silicon dioxide and favour excessive dust formation and can therefore be harmful to health. In addition, they do not have a uniform grain, which can clog or damage the product.
10.3 Recommended blasting material, grain size, nozzles and filling quantities
The following table shows which blasting material may be used with the mobile sandblasting unit, as well as the permissible nozzle and pressure ranges.
Important: Only use dry blasting material. Impermissible combinations can lead to blockages, increased wear or damage to the product.
NOTE:
Fill the compressor and the blasting unit completely before starting. After starting, the display on the unit usually drops 2 - 3 bar below the compressor set point and stabilises. This is the basis for the following pressure data.
| Blasting material | Recommended grain/size | Recommended nozzles | Working pressure * | Blasting material shut-off valve position | Tank filling |
| Glass beads | 0.15 - 0.25 mm | 2.0 - 3.5 mm | 4 – 8 bar | approx. 1/3 open | 13 l |
| Brown corundum (aluminium oxide 75 - 95) | 0.125 mm (fine) | 2.0 - 3.5 mm | 4 – 8 bar | approx. 1/3 open 13 l | |
| Black corundum (aluminium oxide 45 - 75) | 0.41 mm (medium) | ≥ 3.0 mm | min. 4 bar | approx. 1/2 open | 11.5 l |
| Black corundum (aluminium oxide 45 - 75) | 0.71 mm (coarse) | ≥ 3.5 mm (partly 3.0 mm) | min. 4 bar | approx. 2/3 open | 10 l |
* Specification refers to the pressure gauge on the sandblasting unit (operating pressure during blasting).
10.4 Filling with blasting media (Fig. 9)
- Put on your personal protective equipment, i.e. respirator, safety goggles and gloves.
- Ensure that the blasting media is not damp. Check the correct grain size of the blasting material from 0.1 - 0.63 mm to ensure that the supply lines are not clogged.
- Close the main supply line shut-off valve (17) on the air supply line and make sure that the pressure gauge (1) is at 0 bar.
- Close the blasting material shut-off valve (12).
- Slowly open the seal (4) by turning anti-clockwise.
NOTE: If you notice air escaping when opening the seal (4), wait until the pressure is completely released before opening the seal (4) completely.
-
Slowly fill the pressure vessel (5) with blasting material, with the help of a funnel (A). Note the max. filling capacity. The exact values can be found in the table under 10.3.
-
Remove the funnel (A) again and close the pressure vessel (5) with the seal (4) by turning it clockwise.
10.5 Compressor requirements
- The right compressor for sandblasting should meet the following requirements:
• A pressure vessel of at least 100 litres capacity.
• We recommend a delivery rate of 250 l/min.
NOTE!
- What is important here is the output power and not the intake power of the compressor.
-
Also note that the output of the compressor changes as the pressure increases.
-
It is recommended to use a pressure of 4 - 8 bar on the sandblaster to achieve the optimum results.
10.6 Connecting to the compressed air (Fig. 10)
- Before connecting the compressed air line, make sure that the main supply line shut-off valve (17) is closed.
- Connect the compressed air hose (not included in the scope of delivery) to the compressed air connection (16).
10.7 Working with the product (Fig. 1, 10, 11) ⚠ WARNING!
Danger of injury! Make sure that other persons maintain a sufficient safety distance.
-
Connect the compressed air hose to the compressed air connection (16) and set the preferred operating pressure on the compressor. It is recommended to use a pressure of 4 - 8 bar on the sandblaster to achieve the optimum results.
-
Slowly open the main supply line shut-off valve (17).
3 Then open the blasting hose supply line shut-off valve (19).
-
Now slowly open the blasting material shut-off valve (12) until blasting material comes out of the blasting gun (8). This regulates the amount of sand that reaches the blasting gun (8) from the pressure tank (5). For optimum sandblasting results, observe the values in the table under 10.3.
-
Hold the blasting gun (8) firmly, point it at the surface to be worked on and press the lever (6). When you release the lever (6), the supply of blasting material must be completely stopped.
-
Clean the surface to be worked on by moving the blasting gun (8) slowly and evenly.
-
After the work process, first close the blasting material shut-off valve (12) so that no blasting material remains in the lines.
- Close the main supply line shut-off valve (17).
- Switch the compressor off.
- Keep the lever (6) on the blasting gun (8) pressed until all the air has escaped from the lines.
- Close the blasting hose supply line shut-off valve (19).
- It is recommended to empty all of the blasting material out of the container after work to avoid clumping due to humidity.
10.8 Work hints and tips
When sandblasting, there are some important points that should be considered:
• Always wear protective clothing. Sandblasting can release small sand particles and dust that can irritate the eyes, skin and respiratory organs. It is important to wear protective clothing such as safety gloves, goggles and a respirator.
- Prepare the surface: Before sandblasting, the surface should be thoroughly cleaned to remove dirt, grease and rust. This ensures an even blasting force.
- Pressure and nozzle selection: The blasting pressure and nozzle selection must be matched to the surface to be treated in order to avoid damage and deformation.
- Correct blasting direction: The blasting direction should be perpendicular to the surface to ensure even removal.
- Keep your distance: The distance between the blasting nozzle and the surface should be kept constant to avoid damage.
- Disposal of the blasting material: Sand released during blasting may contain pollutants and should therefore be disposed of properly.
10.9 Releasing the pressure (Fig. 12, 13)
- After the work process, first close the blasting material shut-off valve (12) so that no blasting material remains in the lines.
- Close the main supply line shut-off valve (17).
- Switch the compressor off.
- Keep the lever (6) on the blasting gun (8) pressed until all the air has escaped from the lines.
- Slowly open the seal (4) by turning it anti-clockwise until the pressure relief holes are visible. This allows the remaining pressure to escape from the container.
NOTE! If you notice air escaping when opening the seal (4), wait until the pressure is completely released before opening the seal (4) completely.
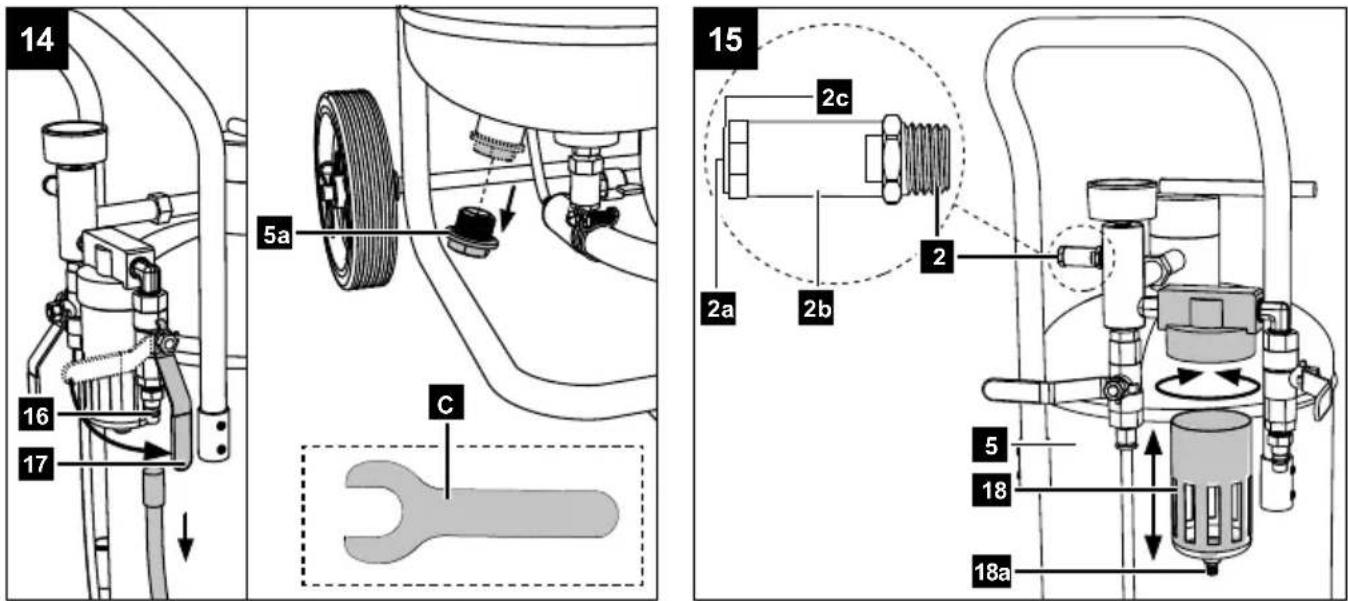
10.10 Disconnecting the compressed air supply (Fig. 14)
- Close the main supply line shut-off valve (17).
- Switch the compressor off.
- Disconnect the compressed air hose from the compressed air connection (16).
10.11 Use of the drain plug (5a) (Fig. 14)
The drain plug is used to empty the blasting material tank quickly and conveniently. Regular emptying after work prevents the abrasive in the tank from clumping together or binding moisture. The drain plug also makes it easier to change the abrasive.
- Switch off the compressor and carefully open the pressure release valve until the pressure gauge on the sandblasting unit indicates "0 bar". Make sure that there is no residual pressure in the unit (see 10.9).
- Place the supplied open-end spanner AF27 (C) on the drain plug (5a). Slowly turn them anti-clockwise.
- Position a collection bucket directly below the drain opening. Allow the abrasive to run out completely.
- Tilt the product slightly forwards or to the side to loosen any remaining residue. If necessary, shake the tank gently to loosen any jammed particles.
- After draining, turn the drain plug (5a) firmly clockwise again. Ensure a tight fit to prevent subsequent pressure loss.
- Note: Clean the drain plug (5a) regularly to remove abrasive dust.
11. Cleaning
⚠ Attention!
Depressurise the product before carrying out any cleaning or maintenance work! Danger of injury!
- Wipe the product with a clean cloth.
• We recommend that you clean the product directly after every use. - Clean the product at regular intervals using a damp cloth and a little soft soap. Do not use any cleaning products or solvents; they could attack the plastic parts of the product. Make sure that no water can penetrate the interior of the product. Water penetration increases the risk of rust formation in the product.
12. Storage & transport
12.1 Storage
Attention!
Disconnect the compressed air hose from the compressed air connection (16).
Attention!
Store the product upright!
• Always store the product without abrasive in the tank to prevent corrosion and moisture build-up.
- Store the product and its accessories in a dark, dry and frost-free place that is inaccessible to children.
- The optimum storage temperature lies between 5 and 30^ .
- Store the product in its original packaging.
• Cover the product to protect it from dust or moisture.
- Store the operating instructions with the product.
12.2 Transport
- The product can be tilted it up by means of the handle (3) so that it can be transported on the wheels (14).
- The product must be secured against tipping and slipping during transport in vehicles in order to prevent damage and injuries.
13. Maintenance
Attention!
Depressurise the product before carrying out any cleaning or maintenance work! Danger of injury!
- The product shall not be operated if the pressure vessel (5) is damaged or rusty. If you discover damage, please contact the customer service workshop.
13.1 Safety valve (Fig. 15)
The safety valve (2) is set to the maximum permissible pressure of the pressure vessel (5). It is not permitted to adjust the safety valve (2) or to remove the connection lock (2b) between the drain nut (2a) and its cap (2c).
Actuate the safety valve (2) every 30 operating hours but at least 3 times a year to ensure that it works when required. Turn the perforated exhaust nut (2a) anti-clockwise to open it and use your hands to pull the valve rod outwards over the perforated exhaust nut (2a) to open the outlet of the safety valve (2). Now, the valve audibly releases air. Then, tighten the exhaust nut (2a) clockwise again.
13.2 Emptying the water separator (Fig. 14, 15)
Emptying the water separator on a sandblaster is an important step to ensure that the product works effectively and damage is avoided.
Check the water separator regularly and empty it if necessary. This will ensure that the blasting device works effectively and will prolong the life of the device.
The device drains itself via the drain valve (18a) when the water separator is disconnected from the pressure.
- Close the main supply line shut-off valve (17).
- Release the pressure as described in 10.9.
- Press the latching switch and turn the water separator (18) until it can be removed. Remove the water separator (18) downwards.
- Empty the water separator (18).
- Reinsert the water separator (18). Turn it in one direction until it clicks into place.
14. Repair & ordering spare parts
After repairs or maintenance, make sure that all safety-related parts are installed and are in perfect condition. All parts which may cause injury must be kept where they are inaccessible to children or others.
Attention: According to the German Product Liability Act, no liability is accepted for damage caused by improper repairs or by not using original spare parts.
Such work should be performed by a customer service centre or an authorised specialist. The same applies to accessory parts.
Spare parts and accessories can be obtained from our Service Centre. To do this, scan the QR code on the front page.
Important note in the case of repairs:
When returning the device for repair, for safety reasons, please ensure that the blasting media is completely removed.
14.1 Ordering spare parts
Please provide the following information when ordering spare parts:
- Model designation
- Item number
- Type plate data
14.2 Service information
With this product, it is necessary to note that the following parts are subject to natural or usage-related wear, or that the following parts are required as consumables.
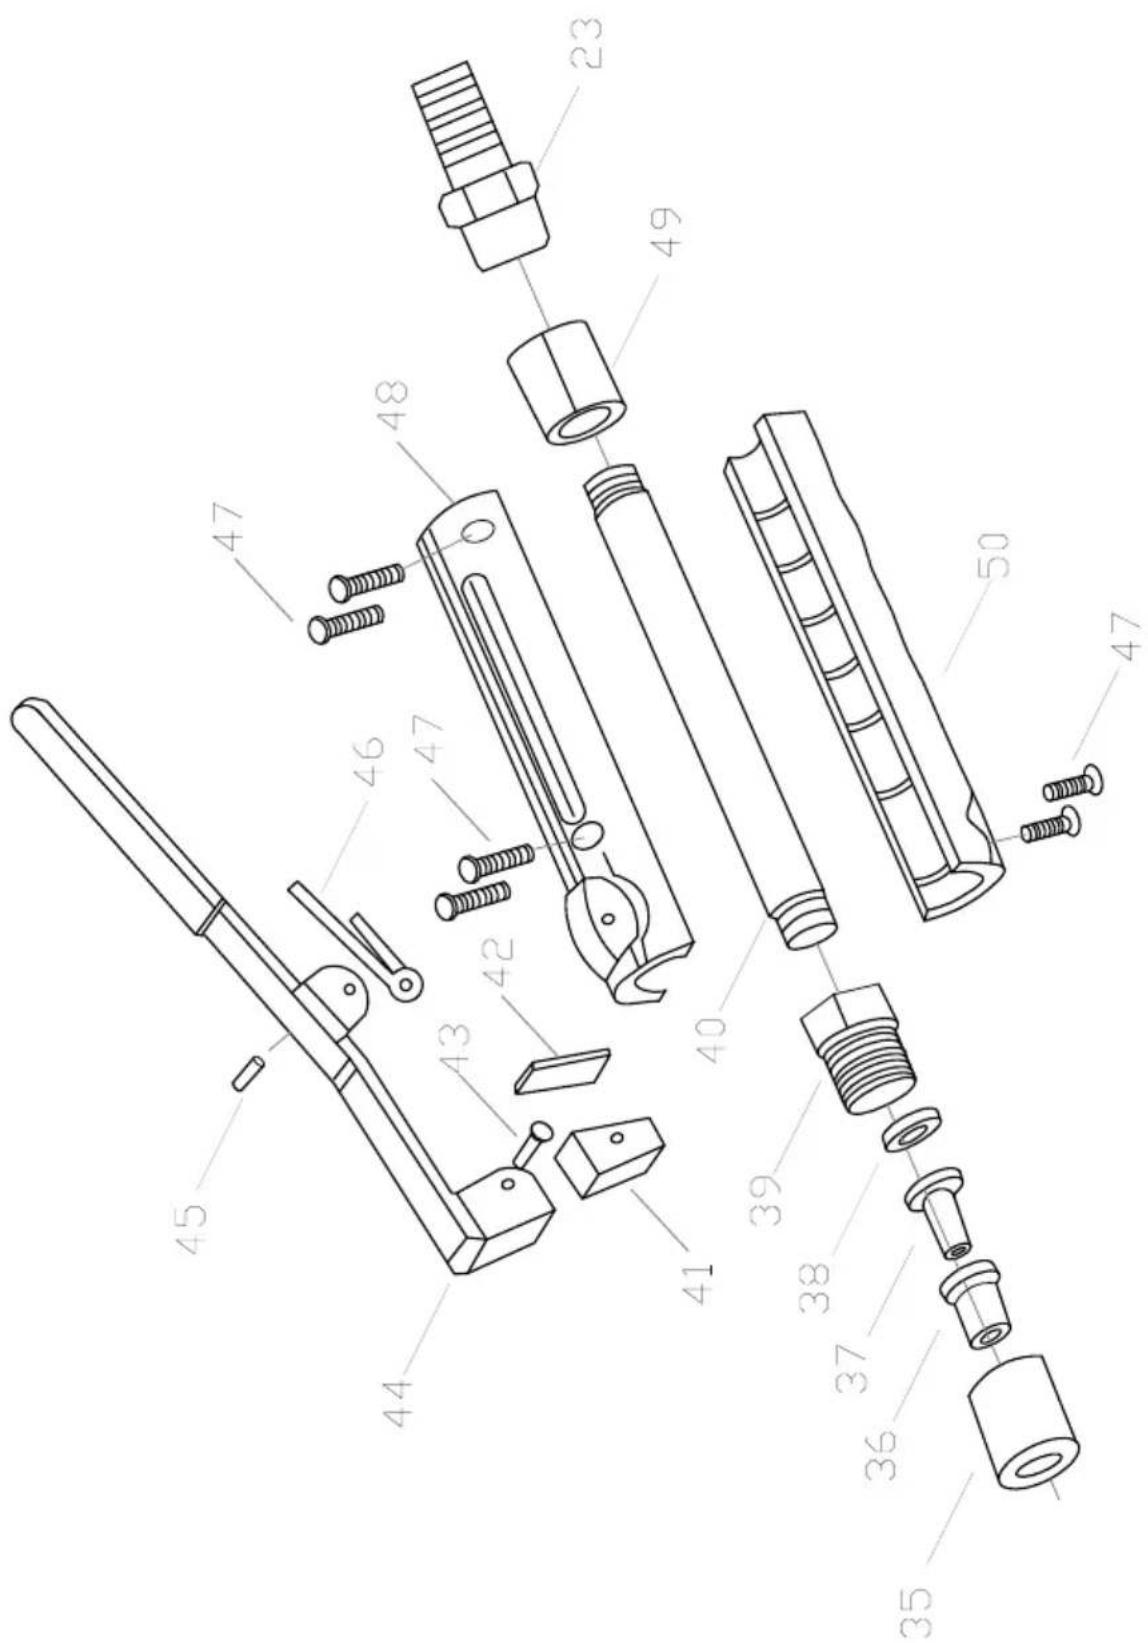
Wearing parts*: Sealing ring, blasting hose, nozzle, protective hood, blasting material discharge pipe * may not be included in the scope of delivery!
15. Disposal and recycling
15.1 Notes for packaging


The packaging materials are recyclable. Please dispose of packaging in an environmentally friendly manner.
15.2 Disposal of sandblasting material
The disposal of sandblasting material depends on the type of material used for sandblasting and the local regulations and environmental laws in your region. In general, however, there are some steps you can follow to safely dispose of sandblasting materials:
- Collect the sandblasting material in suitable containers such as plastic or metal drums. Avoid using paper or plastic bags as they can tear and release the material.
- Check the material composition of the sandblasting material. If hazardous materials such as asbestos are involved, you should follow the specific regulations for the disposal of hazardous waste.
- Check local regulations and laws for disposal of sandblasting material. In some areas it may be necessary to have the sandblasting material collected by an approved disposal company.
- Dispose of the sandblasting material in a way that does not harm the environment. Avoid discarding the sandblasting material in open areas such as fields, forests or bodies of water.
- If possible, recycle the sandblasting material. Some materials can be recycled to make new products. You can contact local recycling companies to see if they accept the sandblasting material.
16. Troubleshooting
The following table shows fault symptoms and describes remedial measures in the event of your product failing to work properly. If you cannot localise and rectify the problem with this, please contact your service workshop.
| Fault Possible cause Remedy | ||
| Blasting media not delivered. | Compressed air not connected. | Connect the product to the compressor. |
| Too little pressure. | Turn up the pressure regulator further / increase the pressure. | |
| Compressor output is too low. Use another source of compressed air. | ||
| Check the product for leaks. | ||
| Blasting material is too moist. | Use dry blasting material. | |
| Empty the water separator. | ||
| Blasting hose supply line shut-off valve closed. | Blasting hose supply line shut-off valve open. | |
| Clogging | Check whether the nozzle size matches the grain size. Use the correct nozzle. | |
| Check whether the working pressure is set to the minimum value for medium/coarse grain size. | ||
| Open the blasting material valve according to the table (or briefly open it further) or shake the tank slightly. | ||
| Too much blasting material discharged by the blasting gun. | Blasting hose supply line shut-off valve opened too far. | Close the blasting material supply line shut-off valve further. |
| Pressure loss | The safety valve leaks. | Contact your local service centre. Only allow qualified personnel to carry out repairs. |
| The seals are damaged. Check seals and replace if necessary. | ||
| Hose connections leaking. | Check compressed air hose and tools, replace if necessary. | |
| Seal not closed. Close the seal. | ||
| Safety valve does not switch off. | Safety valve defective. | Contact your local service centre.Only allow qualified personnel to carry out repairs. |
| Safety valve incorrectly set. | ||
Günzburger Straße 69
D-89335 Ichenhausen
Cher client,
Günzburger Straße 69
D-89335 Ichenhausen, Germania
Egregio cliente,
Günzburger Straße 69
D-89335 Ichenhausen
Geachte klant,
Günzburger Straße 69
Günzburger Straße 69
Günzburger Straße 69
D-89335 Ichenhausen
Vážený zákazníku,
Günzburger Straße 69
D-89335 Ichenhausen
Vážený zákazník,
Günzburger Straße 69
D-89335 Ichenhausen
Kedves Ügyfelünk!
Günzburger Straße 69
D-89335 Ichenhausen
Szanowny Kliencie,
Günzburger Straße 69
D-89335 Ichenhausen
Poštovani kupci,
želimo vam mnogo zadovoljstva i uspjeha pri radu s novim proizvodom.
Napomena:
Prema važećem njemačkom Zakonu o odgovornosti za proizvode, proizvođač ovog proizvoda ne odgovara za štete koje nastanu na ovom proizvodu ili koje ovaj proizvod uzrokuje u slučaju:
Günzburger Straße 69
D-89335 Ichenhausen
Spoštovani kupec,
želimo vam veliko veselja in uspeha pri delu z vašim novim izdelkom.
Napotek:
Proizvajalec tega izdelka skladno z veljavnim zakonom o odgovornosti za izdelke ne jamči za poškodbe na tem izdelku ali poškodbe s tem izdelkom, do katerih pride pri:
Günzburger Straße 69
D-89335 Ichenhausen
Austatud klient!
Günzburger Straße 69
D-89335 Ichenhausen
Gerbiamas kliente,
Günzburger Straße 69
Günzburger Straße 69
D-89335 Ichenhausen
Bästa kund!
Günzburger Straße 69
D-89335 Ichenhausen
Arvoisa asiakas,
Günzburger Straße 69
D-89335 Ichenhausen, Tyskland
Kære kunde
Günzburger Straße 69
D-89335 Ichenhausen
Kjære kunde,
Günzburger Straße 69
D-89335 Ichenhausen, Германия
Уважаеми клиенти,
Günzburger Straße 69
D-89335 Ichenhausen
Αξιότιμε πελάτη,
Günzburger Straße 69
D-89335 Ichenhausen
Stimate client,
Günzburger Straße 69
D-89335 Ichenhausen
Poštovani kupče,
Günzburger Straße 69
D-89335 Ichenhausen
İthalatçı:
Scheppach GmbH, Günzburger Str. 69, 89335 Ichenhausen
| DE | EU-KonformitätserklärungÜbersetzung der OriginalkonformitätserklärungWir erklären in alleiniger Verantwortung, dass das hier beschriebene Produkt mit den geltenden Richtlinien und Normen übereinstimmt. | Der hier beschriebene Gegenstand der Erklärung erfüllt die Vorschriften der Richtlinie 2011/65/EU des Europäischen Parlaments und des Rates vom 8. Juni 2011 zur Beschränkung der Verwendung bestimmter gefährlicher Stoffe in Elektro- und Elektronikgeräten.*Technische Unterlagen verfügbar bei: ** | ||
| Artikelnummer*** | Artikelbezeichnung: Mobiles Sandstrahlgerät SBT-20 | Marke**** | ||
| GB | EU Declaration of ConformityTranslation of the original Declaration of ConformityWe declare under our sole responsibility that the product described here complies with the applicable directives and standards. | The object of the declaration described here fulfils the regulations of the directive 2011/65/EU of the European Parliament and Council from 8th June 2011, on the restriction of the use of certain hazardous substances in electrical and electronic equipment.*Technical documentation available at: ** | ||
| Item number*** | Item designation: Mobile sandblaster SBT-20 | Brand**** | ||
| FR | Déclaration UE de conformitéTraduction de la déclaration de conformité originaleNous déclarons, sous notre propre responsabilité, que le produit décrit ici est conforme aux directives et normes en vigueur. | L'appareil décrit ci-dessus dans la déclaration est conforme aux réglementations de la directive 2011/65/EU du Parlement Européen et du Conseil du 8 juin 2011 visant à limiter l'utilisation de substances dangereuses dans la fabrication des appareils électriques et électroniques.*Dossier technique auprès de: ** | ||
| Référence *** | Désignation de l'article: Sableuse mobile SBT-20 | Marque **** | ||
| IT | Dichiarazione di conformità UETraduzione della dichiarazione di conformità originaleDichiariamo sotto la nostra esclusiva responsabilità che il prodotto qui descritto è conforme alle direttive e alle norme vigenti. | L'oggetto della dichiarazione, qui descritto, soddisfa le disposizioni della Direttiva 2011/65/UE del Parlamento Europeo e del Consiglio dell'8 giugno 2011, sulla restrizione nell'utilizzo di determinate sostanze pericolose negli apparecchi elettrici ed elettronici.*Documentazione tecnica disponibile presso: ** | ||
| Gaminio numeris *** | Nome articolo: Dispositivo mobile di sabblatura SBT-20 | Marchio **** | ||
| NL | EU-conformiteitsverklaringVertaling van de originele conformiteitsverklaringWij verklaren onder eigen verantwoordelijkheid dat het hier beschreven product voldoet aan de geldende richtlijnen en normen. | Het hier beschreven onderwerp van deze verklaring voldoet aan de voorschriften van richtlijn 2011/65/EU van het Europese Parlement en de Raad van 8 juni 2011 omtrent de beperking van het gebruik van bepaalde gevaarlijke stoffen in elektrische en elektronische apparaten.*Technische documentatie verkrijgbaar bij: ** | ||
| Artikelnummer *** | Artikelnaam: Mobiele straalketel SBT-20 | Merk **** | ||
| ES | Declaración de conformidad UETraducción de la Declaración de conformidad originalDeclaramos, bajo nuestra exclusiva responsabilidad, que el producto aquí descrito cumple las directivas y normas aplicables. | El objeto de la declaración aquí descrito cumple las disposiciones de la Directiva 2011/65/UE del Parlamento Europeo y el Consejo del 8 de junio de 2011 sobre restricciones a la utilización de determinadas sustancias peligrosas en aparatos eléctricos y electrónicos.*Documentación técnica disponible en: ** | ||
| Núm. de artículo*** | Denominación del artículo: Unidad móvil de chorreado SBT-20 | Marca**** | ||
| PT | Declaração de conformidade UETradução da declaração de conformidade originalDeclaramos, à nossa exclusiva responsabilidade, que o produto aquí descrito está em conformidade com as diretivas e normas aplicáveis. | O objeto da declaração aqui descrito cumpre com as normas da Diretiva 2011/65/UE do Parlamento Europeo e do Conselho de 8 de junho de 2011 relativamente à restrição da utilização de determinadas substâncias perigosas em equipamentos elétricos e eletrónicos.*Documentos técnicos disponíveis junto de: ** | ||
| Número de artigo*** | Designação do artigo: Aparelho portátil de jato de areia SBT-20 | Marca**** | ||
| CZ | EU prohlásení o shoděPřeklad originálního prohlásení o shoděProhlašujeme na svou výlučnou odpovědnost, že zde popsaný výrobek od-povídá platným směrnicím a normám. | Zde popsany předmět prohlásení splňuje předpisy směrnice 2011/65/EU Evrop-ského parlamentu a Rady ze dne 8. cervna 2011 pro omezení používání určitých nebezpečných látek v elektrických a elektronických zařízeních.*Technické podklady k dispozici u: ** | ||
| Číslo výrobku*** | Název výrobku: Mobilní pískový tryskací přístroj SBT-20 | Značka**** | ||
| SK | EÚ vyhlásenie o zhodePreklad originálneho vyhlásenia o zhodeNa vlastnú zodpovednosť vyhlasujeme, že tu popísany výrobok je v sůlade s platnými smernicami a normami. | Tu opísany predmet vyhlásenia je v sůlade s predpismi smernice Európskeho parlamentu a Rady 2011/65/EÚ z 8. júna 2011 o obmedzení používania určitých nebezpečných látok v elektrických a elektronických zariadeniach.*Technické podklady sú k dispozícii na: ** | ||
| Číslo výrobku*** | Označenie výrobku: Mobilná pieskovačka SBT-20 | Značka**** | ||
| HU | EU megfelelőségi nyilatkozatAz eredeti megfelelőségi nyilatkozat fordításaSaját kizárólagos felelősségünkre kijelentjük, hogy az itt ismertetett termék megfelel az érvényes irányelveknek és szabványoknak. | A nyilatkozat itt megnevezett tárgya teljeslti az Európai Parlament és Tanács 2011. június 8-i, egyes veszélyes anyagok elektromos és elektronikus berendezésekben való alkalmazásának korlátozásáról szóló 2011/65/EU irányelvének előírásait.*A műszaki dokumentáció elérhető: ** | ||
| Cikkszám *** | Termék megnevezése: Mobil homokfúvó készülék SBT-20 | Márka **** | ||
| PL | Deklaracja zgodności UETłumaczenie oryginalnej deklaracji zgodnościOświadczamy na własną odpowiedzialność, że opisany tutaj produkt jest zgodny z obowiązującymi dyrektywami i normami. | Wymieniony powyżej przedmiot niniejszej deklaracji jest zgodny z wymogami dyrektywy 2011/65/UE Parlamentu Europejskiego i Rady z 8 czerwca 2011 r. w sprawie ograniczenia stosowania niektórych niebezpiecznych substancji w sprzęcie elektrycznym i elektronicznym.*Dokumentacja techniczna dostępna na stronie:** | ||
| Numer artykułu *** | Nazwa artykułu: Mobilne urządzenie do plaskowania SBT-20 | Marka **** | ||
| HR | EU izjava o sukladnostiPrijevod originalne izjave o sukladnostiNa svoju odgovornost izjavljujemo da je ovdje opisan proizvod usklađen s važećim direktivama i normama. | Ovdje opisani predmet Izjave ispunjava propise Direktive 2011/65/EU Europskog parlamenta i Vijeća od 8. lipnja 2011. o ograničenju uporabe određenih opasnih tvari u električnoj i elektroničkoj opremi.*Tehnička dokumentacija dostupna je na:** | ||
| Broj artikla*** | Naziv artikla: Pokretni stroj za pjeskarenje SBT-20 | Marka**** | ||
| SI | EU izjava o skladnostiPrevod originalne izjave o skladnostiS polno odgovornosłjo izjavljamo, da je tukaj opisani izdelek v skladu z ve-ljavnimi smernicami in standardi. | Tukaj opisani predmet izjave izpolinjuje predpise Direktive 2011/65/EU Evropskega parlamenta in Sveta z dne 8. junij 2011 za omejevanje uporabe določenih nevarnih snovi v električnih in elektronskih napravah.*Tehnični dokumenti so na voljo pri:** | ||
| Številka izdełka *** | Opis izdelka: Mobilni peskalnik SBT-20 | Znamka **** | ||
| EE | EL vastavusdeklaratsioonVastavusdeklaratsiooni originaali tõlgeMe deklareerimine ainuisikuliselt vastutades, et siin kirjeldatud toode ühtib esitatud direktiivide ja normidega. | Deklaratsiooni objektiks olev siin kirjeldatud ese vastab Euroopa Parlamendi ja nõukogu direktiivile 2011/65/EÜ kuupäevaga 8. juuni 2011 teatud ohtlike ainete kasutamispiirangu kohta elektri- ja elektroonikaseadmetes.*Tehnilised dokumentid on saadaval:** | ||
| Artiklinumber *** | Art nimetus: Mobiline Ilivapritsiseade SBT-20 | Kaubamärk **** | ||
| LT | EB atitikties deklaracijaAtitikties deklaracijos originalo vertimasPrisimidami išskirtinę atsakomybę deklaruojame, kad čia aprašytas gaminys atitinka galiojančias direktyvas ir standartus. | Čia aprašytas deklaracijos objektas atitinka 2011 m. birželio 8 d. Europos Parlamento ir Tarybos direktyvos 2011/65/ES dėl tam tikrų pavojingų medžiagų naudojimo elektros ir elektroninėje jrangoje apribojimo reikalavimus.*Techninius dokumentus galima gauti iš:** | ||
| Gaminio numeris *** | Gaminio pavadinimas: Mobilusis smėliasrautis aparatas SBT-20 | Prekės ženklas **** | ||
| LV | ES atbilstības deklarācijaOriginālās atbilstības deklarācijas tulkojumsMės, uzņemoties pilnu atbildību, paziņojam, ka šeit apraksītais ražojums atbilst spēkā esošajām direktivm un standartiem. | Šeit apraksītais deklarācijas priekšmets atbilst Eiropas Parlamenta un Eiropas Padomes 2011. gada 8. jūnija Direkīvas 2011/65/ES notekumiem par noteiktu bīstamo vielu izmantošanas ierobežošanu elektriskajās un elektroniskajās ierićės.*Tehniskā lieta ir pieejama pie:** | ||
| Preces numurs *** | Preces apzīmējums: Pārvietojams smilšstrūklas aparāts SBT-20 | Prečzīme **** | ||
| SE | EU-försākran om överensstämmelseÖversättning från försākran om överensstämmelse i originalVi förklarar under eget ansvar att produkten som beskrivs här överensstämmmer med gāliande riktlinjer och standarder. | Föremålet för försākran som beskrivs här överensstämmer med bestämmelserna i Europaparlamentets och rädets direktiv 2011/65/EU av den 8 juni 2011 om begränsning av användningen av vissa farliga ämnen i elektriska och elektroniska produkter.*Teknisk dokumentation tillgänglig hos:** | ||
| Artikelnummer *** | Artikelbeteckning: Mobil sandbląstringsapparat SBT-20 | Märke **** | ||
| FI | EU-vaatimustenmukaisuusvakuutusAlkuperäisen vaatimustenmukaisuusvakuutuksen käännösVakuutamme omalla vastuullamme, että tässä kuvattu tuote täyttää voimas-sa olevien direktiivien ja standardien määräykset. | Tässä kuvattu vakuutuksen kohde täyttää tiettyjen vaarallisten aineiden käytön rajoittamisesta sähkö- ja elektronikkalaitteissa 8. kesäkuuta 2011 annetun Euroo-pan parlamentin ja neuvoston direktiivin 2011/65/EU määräykset.*Tekniset asiakirjat saatavana:** | ||
| Tuotenro *** | Tuotenimike: Liikuteltava hiekkapuhalluslaite SBT-20 | Merkki **** | ||
| DK | EU-overensstemmelseserklæringOversættelse af den originale overensstemmelseserklæringVi erklærer under eget ansvar, at det her beskrevne produkt overholder de gældende direktiver og standarder. | Genstanden for den her beskrevne erklæring overholder bestemmelserne i Europa-Parlamentets og Rådets direktiv 2011/65/EU af 8. juni 2011 vedr. begrænsning af brugen af visse farlige stoffer i elektrisk og elektronisk udstyr.*Tekniske dokumenter findes på:** | ||
| Artikelnummer *** | Art.-betegnelse: Mobil sandblæser SBT-20 | Mærke **** | ||
| NO | EU-samsvarserklæringOversettelse av den opprinnelige samsvarserklæringenVi erklærer med enansvar at produktet som er beskrevet her er i samsvar med gjeldende direktiver og standarder. | Gjenstand for erklæringen beskrevet her oppfyller forskriftene til direktiv 2011/65/EU fra Europa-Parlamentet og Rådet av 8. juni 2011 om begrensning av bruken av bestemle farlige stoffer i elektronikk og elektronisk utstyr.*Tekniske dokumenter tilgjengelig hos:** | ||
| Artikkelnummer *** | Art.betegnelse: Mobil sandbląsemaskin SBT-20 | Merke **** | ||
| BG | ЕС Декларация за съответствиеПревод на оригиналната декларация насъответствиеНие декларираме на своя отговорност, че описаният тук продукт отговаря на приложимите директиви и стандарти. | Описаният предмет в декларацията отговаря на разпоредбите на Дирек-тива 2011/65/EC на Европейския парламент и на Съвета от 8 юни 2011 г.относно ограничението на употребата на определени опасни вещества велектрическото и електронното оборудване.*Техническата документация се предоставя от: ** | ||
| Каталожен номер *** | Обозначение на артикула: Мобилна пясъкоструйка SBT-20 | Марка **** | ||
| GR | Дήλωση συμμόρφωσης EEMетафрасн апто то прштотипто тис δήλωσης συμμόρφωσηςДнішівουє ме апоклеистикі фас еудівні óти то проївів thou періврафетаіото паров бріскетай се συμμόρφωσн ме тис іоху́ουсес Однігіес кай Про́тута. | То аvtikeієво тис пароївас ділішос, то отпою терпіврафетаї едів, ектилпрівеітис бідатаєіс тис Однігіас 2011/65/EE tou Eurωπαϊкою Коивоβουλίου кай тон Єυμβουλίου тис 8інс Іουνίου 2011 охетика ре тов періорістю тис хрігіс орізмівівептиківдувив о worsów се нлектрікі кай нлектровико езоплищо. *О техвикós факелос еівай діабезімос стні біеся: ** | ||
| Арібмос еідους *** | Овомасія проївто: Ківнті суσкеун амюболініS BBT-20 | Мáрка **** | ||
| RO | Declaratie de conformitate UETraducere a declarației de conformitate originaleDeclaram pe proprie răspundere că produsul descris aici coincide cu direc-tivele și normele în vigoare. | Objectul declarației descris aici îndeplinește prescripțiile directivei 2011/65/UE aParlamentului European și a Consiliului din 8 lunie 2011 asupra limitării utilizăriianumitor substanțe periculoase în aparatele electrice și electronice. *Documentație tehnică disponibilă la: ** | ||
| Număr articol *** | Denumirea articolului: Aparat mobil de sablat cu nisip SBT-20 | Marcă **** | ||
| RS | EU izjava o usaglašenostiPrevod originalne izjave o usklađenostiIzjavljuemo na našu isključivu odgovomost da je ovde opisani proizvod usk-lađen sa primenljivim smernicama i standardima. | Ovde opisani predmet ove izjave ispunjava odredbe Direktive 2011/65/EU Evrops-kog parlamenta i Saveta od 8. juna 2011. godine o ograničenju upotrebe određenihopasnih materija u električnoj i elektronskoj opremi.*Tehnička dokumentacija dostupna kod: ** | ||
| Broj artikla *** | Oznaka proizvoda: Mobilni uređaj za peskarenje SBT-20 | Brend **** | ||
| TR | AB uygunluk beyaniOrijinal uygunluk beyanının çevirisiBurada açıklanan ürünün geçerli yönetmeliklere ve standartlara uygun oldu-ğunu tamamen kendi sorumluluğumuz altında beyan ediyoruz. | Işbu uygunluk beyanının düzenlendiği burada adı geçen ürün, Avrupa Parlamen-tosu’nun ve 8 Haziran 2011 tarihli Konsey’in elektrik ve elektronik cihazlarda belirlitehlikeli maddelerin sınırlandırılması ilişkin 2011/65/AT sayılı direktifini yerinegetirmektedir. *Teknik belgeler şurada mevcuttur: ** | ||
| Ürün numarası *** | Ürün Tanım: Seyyar kum püskürtme cihazi SBT-20 | Marka **** | ||
| ***5914403901 / 5914402948 | ****SCHEPPACH | |||
** :Georg KohlerGünzburger Str. 69D-89335 Ichenhausen i. V. Andreas Pecher /Head of Project Management i. V. Andreas Pecher /Head of Project Management i.V. Simon Schunk /Division Manager Product CenterIchenhausen, 20.11.2025 i.V. Simon Schunk /Division Manager Product CenterIchenhausen, 20.11.2025 | ☐ 2011/65/EU*☐ 2014/30/EU☐ 2014/29/EU☐ 2014/35/EU☐ 2004/22/EG☐ 2014/68/EU☐ 89/686/EWG_96/58/EG☐ 90/396/EWG | ☐ 2006/42/EG☐ Annex IVNotified Body:Notified Body No.:Certificate No.: | ☐ 2000/14/EG; 2005/88/EGNoise:measured L_WA =guaranteed L_WA =☐ Annex V☐ Annex VINotified Body:Notified Body No.: | |
| ☐ 2016/1628/EUEmission No.: | ||||
| EN 12100:2010; EN 1248:2001+A1:2009 | ||||
Garantie DE
Apparent defects must be notified within 8 days from the receipt of the goods. Otherwise, the buyer loses its rights of claim due to such defects are invalidated. We guarantee for our machines in case of proper treatment for the time of the statutory warranty period from delivery in such a way that we replace any machine part free of charge which provably becomes unusable due to faulty material or defects of fabrication within such period of time. With respect to parts not manufactured by us we only warrant insofar as we are entitled to warranty claims against the upstream suppliers. The costs for the installation of the new parts shall be borne by the buyer. The cancellation of sale or the reduction of purchase price as well as any other claims for damages shall be excluded.
Garantie FR
Apparent defects must be notified within 8 days from the receipt of the goods. Otherwise, the buyer's rights of claim due to such defects are invalidated. We guarantee for our machines in case of proper treatment for the time of the statutory warranty period from delivery in such a way that we replace any machine part free of charge which provably becomes unusable due to faulty material or defects of fabrication within such period of time. With respect to parts not manufactured by us we only warrant insofar as we are entitled to warranty claims against the upstream suppliers. The costs for the installation of the new parts shall be borne by the buyer. The cancellation of sale or the reduction of purchase price as well as any other claims for damages shall be excluded.
Záruka CZ
Apparent defects must be notified within 8 days from the receipt of the goods. Otherwise, the buyer is rights of claim due to such defects are invalidated. We guarantee for our machines in case of proper treatment for the time of the statutory warranty period from delivery in such a way that we replace any machine part free of charge which provably becomes unusable due to faulty material or defects of fabrication within such period of time. With respect to parts not manufactured by us we only warrant insofar as we are entitled to warranty claims against the upstream suppliers. The costs for the installation of the new parts shall be borne by the buyer. The cancellation of sale or the reduction of purchase price as well as any other claims for damages shall be excluded.
Garantii EE
Apparent defects must be notified within 8 days from the receipt of the goods. Otherwise, the buyer's rights of claim due to such defects are invalidated. We guarantee for our machines in case of proper treatment for the time of the statutory warranty period from delivery in such a way that we replace any machine part free of charge which provably becomes unusable due to faulty material or defects of fabrication within such period of time. With respect to parts not manufactured by us we only warrant insofar as we are entitled to warranty claims against the upstream suppliers. The costs for the installation of the new parts shall be borne by the buyer. The cancellation of sale or the reduction of purchase price as well as any other claims for damages shall be excluded.
гаранция BG


- SBT-20
- Verehrter Kunde,
- Explanation of the symbols on the product
- Table of contents: Page:
- Introduction
- Manufacturer:
- Dear Customer,
- Note:
- Description of the product
- Scope of delivery
- Proper use
- General safety instructions
- ⚠ Attention!
- DANGER
- WARNING
- CAUTION
- NOTE!
- Who is not permitted to use the device:
- Safety at the workplace
- Personal safety
- Safe use of the product
- Safety instructions for working with the blasting gun
- Operation of pressure vessels
- Residual risks
- Neglect of ergonomic principles
- Negligent use of personal protective equipment (PPE)
- Residual danger - Can never be excluded.
- Behaviour in an emergency
- Technical data
- Unpacking
- ⚠ WARNING!
- Layout
- Assembly of the blasting hose supply line (Fig. 3)
- Fitting the foot (Fig. 3)
- Fitting the handle (Fig. 4)
- Fitting the wheels (fig. 5)
- Installing the pressure gauge (Fig. 6)
- Seal the thread with Teflon tape
- Existing Teflon tape
- Checking the thread
- Note the screw-in direction
- Technique
- Number of windings
- Assembly
- Assembly of the blasting hose (Fig. 7, 8)
- △ Attention! After mounting the blasting hose (9), it is essential to check that it is firmly seated on the connection nipples (8a+20c).
- Installing the nozzle on the blasting gun (Fig. 8) ⚠ WARNING!
- Health hazard! When mounting the nozzle, there is a risk of crushing fingers and hands.
- Start-up
- Always make sure the product is fully assembled before commissioning!
- Health hazard!
- Selecting the right nozzle
- Selecting the right blasting media
- Health hazard and risk of damage to the product
- Recommended blasting material, grain size, nozzles and filling quantities
- Filling with blasting media (Fig. 9)
- Compressor requirements
- Connecting to the compressed air (Fig. 10)
- Working with the product (Fig. 1, 10, 11) ⚠ WARNING!
- Work hints and tips
- Releasing the pressure (Fig. 12, 13)
- Disconnecting the compressed air supply (Fig. 14)
- Use of the drain plug (5a) (Fig. 14)
- Cleaning
- Storage & transport
- Storage
- Attention!
- Transport
- Maintenance
- Safety valve (Fig. 15)
- Emptying the water separator (Fig. 14, 15)
- Repair & ordering spare parts
- Important note in the case of repairs:
- Ordering spare parts
- Service information
- Disposal and recycling
- Notes for packaging
- Disposal of sandblasting material
- Troubleshooting
- Cher client,
- Egregio cliente,
- Geachte klant,
- Vážený zákazníku,
- Vážený zákazník,
- Kedves Ügyfelünk!
- Szanowny Kliencie,
- Poštovani kupci,
- Napomena:
- Spoštovani kupec,
- Napotek:
- Austatud klient!
- Gerbiamas kliente,
- Bästa kund!
- Arvoisa asiakas,
- Kære kunde
- Kjære kunde,
- Уважаеми клиенти,
- Αξιότιμε πελάτη,
- Stimate client,
- Poštovani kupče,
- İthalatçı:
- Garantie DE
- Garantie FR
- Záruka CZ
- Garantii EE
- гаранция BG
Brand : SCHEPPACH
Model : SBT-20
Category : Sander