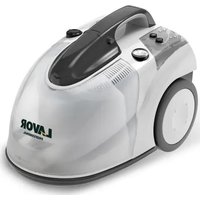
GV KONE - Steam cleaner Lavor - Free user manual and instructions
Find the device manual for free GV KONE Lavor in PDF.

| Product type | Steam cleaner |
| Brand | Lavor |
| Model | GV KONE |
| Boiler capacity | 1.6 L |
| Boiler volume | 2.4 L |
| Operating temperature | 145 °C |
| Boiler material | Die-cast aluminum |
| Safety | Safety valve, pressure switch, safety thermostat, anti-unscrewing cap |
| Steam intensity regulator | 5 positions (1-5) |
| Vibrations transmitted to user | < 2.5 m/s² |
| Storage and transport temperature | 0–40 °C |
| Ambient operating temperature | 0–40 °C |
| Included accessories | Steam hose, squeegee, large brush, triangular brush, brush, cloth fabric, protective cover, funnel, graduated carafe, carrying bag, hook for extension, 2 extensions, descaling product (25 g) |
| Main uses | Tiled floors, wood, stone, linoleum, carpet, windows, mirrors, upholstered furniture, joints, radiators, blinds |
| Boiler maintenance | Cleaning every 5-10 fills; descaling according to water hardness (<10 dH: every 100 fills, 10-22 dH: every 75 fills, >22 dH: every 50 fills) |
| Recommended water type | Distilled water or low-mineral tap water |
| Additional safety devices | Waterproof steam control handle, boiler cap with safety valve |
| Warranty | According to current standards, from date of purchase (wear parts excluded) |
| Disposal | Do not discard with household waste; follow WEEE directive 2012/19/EU |
Frequently Asked Questions - GV KONE Lavor
User questions about GV KONE Lavor
0 question about this device. Answer the ones you know or ask your own.
Ask a new question about this device
Download the instructions for your Steam cleaner in PDF format for free! Find your manual GV KONE - Lavor and take your electronic device back in hand. On this page are published all the documents necessary for the use of your device. GV KONE by Lavor.
USER MANUAL GV KONE Lavor
natural_image
Two-step diagram showing a mechanical assembly with arrows indicating motion, no text or symbols present.EN Depending on the model, there are differences in the scopes of delivery (see packaging).
natural_image
Illustration of a hand using a tool to clean or brush with a brush (no text or symbols)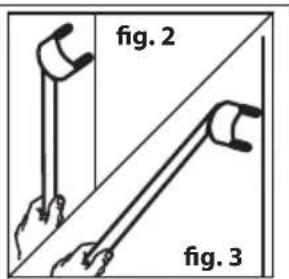
natural_image
Diagram of a car with a coiled cable and directional arrows indicating motion (no text or symbols)IT
▶ Safety of the steam cleaner 20 USE OF THE STEAM CLEANER 20
Field of application
Assembly of wheels and handle 21
Assembly of the holding hook
Parts of the steam cleaner:
Starting the steam cleaner
Fill with water
Connecting the steam cleaner 22
Pouring water into the boiler
Filling
Disconnecting the steam cleaner
▶ ACCESSORIES' APPLICATION
MAINTENANCE
▶ HOW TO STORE THE STEAM CLEANER
▶ CLEANING THE BOILER
▶ DESCALING THE BOILER
▶ HOW TO ELIMINATE LITTLE FAILURES
TECHNICAL DATA STICKER
WARRANTY CONDITIONS
DISPOSAL
FR
▶ RENSEIGNEMENTS POUR LA SÉCURITÉ 27
11
UTILISATION PRÉVUES 27
▶ RENSEIGNEMENTS POUR LA SÉCURITÉ 28
EMPLOI DU NETTOYEUR VAPEUR 28
▶ DEN KESSEL ENTKALKEN 41
HILFE BEI PROBLEMEN 41
▶APLIKACE PŘÍSLUŠENSTVÍ 70
▶ ÚDRŽBA 72
▶ULOŽENÍ PARNÍ ČISTIČKY 72
ČIŠTĚNÍ BOJLERU 72
▶ ODSTRANĚNÍ VODNÍHO KAMENE Z BOJLERU 72
▶ODSTRANĚNÍ DROBNÝCH ZÁVAD 73
ŠTÍTEK S TECHNICKÝMI ÚDAJI 73
ZÁRUČNÍ PODMÍNKY 74
LIKVIDACE 74
DA
▶SIKKERHEDSOPLYSNINGER 75
BEREGNET ANVENDELSE 75
▶SIKKERHEDSOPLYSNINGER 76
TEKNISET TIEDOT SISÄLTÄVÄ KILPI 105
▶TAKUUEHDOT 105
HÄVITYS 106
HU
▶ BIZTONSÁGI INFORMÁCIÓK 107
RENDELTETÉS 107
▶ A GÖZTISZTÍTÓRA VONATKOZÓ BIZTONSÁGI
SZABÁLYOK 108
▶ GÖZTISZTÍTÓ HASZNÁLATA 108
▶FJERNING AV KALKHOLDIGE LAG I VANNBEHOLDE REN 120
▶FJERNING AV SMÅ FEIL 121
TYPESKILT FOR TEKNISKE DATA 121
▶ GARANTIBETINGELSER 121
AVSKAFFELSE 122
PL
▶ ŚRODKI OSTROŻNOŚCI 123
PRZEWIDZIANE UŻYTKOWANIE 123
▶ GARANTIVILLKOR 161
UNDANSKAFFANDE 161
BG 162
▶ INFORMATION ABOUT SAFETY
- Introduction
This Operation and Maintenance Manual uses the symbols indicated below, in order to draw your attention to important information.
| Symbol Warning Meaning | ||
 | DANGER | Warning of possible serious or fatal injury |
 | WARNING | Warning of possible minor injury or material damage |
 | ATTENTION | Warning of possible damage or destruction of the device |
 | IMPORTANT / NOTE | Additional information and helpful hints for correct use of the device |
| One of the following symbols will be used according to the nature of the danger: | ||
 | DANGER | Danger from electrical current |
 | WARNING | Danger from hot steam |
 | WARNING | Danger of scalding |
INTENDED USE
- This appliance is suitable for commercial use, for example in hotels, schools, hospitals, factories, shops, offices and rental businesses.
Useful information on steam cleaning:
Water in the form of steam has an ecological cleaning action and is superior to modern detergents. In the form of steam, water is used sparingly. The steam produced by the machine because of the high temperature reached dissolves fats and dust particles which are normally hard to remove. Steam has an hygienic cleaning action and leaves no bacteria, mites, germs, pathogens; it binds dust particles, thus preventing dust from causing any allergies. You can benefit from all these advantages by using the steam cleaner for your house work and at the same time you can make your contribution to the environment.
Important!
The instruction Manual is an integral part of the appliance. Read it carefully before using the machine. Always keep the instruction manual to hand, in order to consult it each time it is needed.
▶ Safety of the steam cleaner
· DANGER!
Please observe the safety measures below.
- Only use the appliance for what it is designed
- Connect the appliance to a mains supply which complies with the voltage indicated on the data plate and make sure that the power outlet is earthed
- The appliance's electrical connection must comply with the IEC 60364-1 standard.
Before connecting the appliance, make sure that the nameplate data are the same as those of the electrical mains and that the socket is protected by a differential security breaker with tripping sensitivity below 0.03 A - 30 ms.
- Do not pull the power supply cable to remove the plug from the power outlet
- Do not use the power supply cable to drag the appliance
- Do not use extension leads; if an extension lead is necessary, make sure it features an approved safety mark and that it is earthed. Completely unwind the extension lead before use
- Disconnect the appliance after use and before filling the boiler and before replacing the steam hose
- Before using the appliance, make sure the cable, plug and steam hose are not damaged. Do not use the appliance if any damages have been found. Have the appliance checked by the Authorized Service Centre.
- Do not use the appliance to clean electrical equipment or power outlets
- Do not use the steam to clean the appliance
- Never work with wet hands or feet when the appliance is connected to the power supply
- Do not immerse in any liquids
- This flexible hose contains electrical connections. Do not immerse it in water for cleaning it.
- Do not empty the boiler while the water is still hot. Warning! Danger of burns and scalds.
- Do not leave the appliance unattended when it is connected to the power supply or when the appliance is switched on
- Have repairs carried out only at an authorised service centre
-
The electric power cable may only be replaced by an authorised service centre
-
Do not aim the steam jet at people or animals
- Do not touch the steam jet.
- Do not cover the appliance during use, it may overheat
- The appliance must not be used by children or by anyone who has not been trained to use it
- If the appliance is lent to others, make sure you also include the instruction manual.
- The appliance is not to be used by children or persons with reduced physical, sensory or mental capabilities, or lack of experience and knowledge, unless they have been given supervision or instruction.
• Children being supervised not to play with the appliance.
USE OF THE STEAM CLEANER
Important advices
- ATTENTION!
- Always make sure that the materials or the surfaces to be cleaned are suitable for the steam cleaner.
- Follow the manufacturer's instructions about the cleaning of materials.
- If information about certain materials or surfaces is not available, test the cleaner on a small area. Should any damage occur, do not use the steam cleaner.
- Use the recommended accessories.
- Always put the cotton cloth on the brushes to avoid scratches.
- On vertical surfaces, always work from the top to the bottom. Put a cloth under the surface to be cleaned, to collect dirt.
- Use the extension pipes if necessary.
- Spray the steam on small areas of the surface at a time. Dissolved dirt can be removed more easily.
- In case of dirt which is hard to remove, treat the surfaces directly with the steam jet.
- On delicate surfaces, such as wood surfaces, spray a little steam and dry immediately.
- Carpets must be cleaned first with the vacuum cleaner and then with the steam cleaner.
NOTE:
- The steam jet can't remove any limescale. To get rid of it, use the descaler.
Field of application
The steam cleaner is suitable for cleaning:
Wide surfaces, such as:
- Tiled floor, parquet, stone and linoleum floor.
- Wax-treated tiled floor (wax removal)
- Tiles or tiled walls
Roller shutters, guillotine windows - Carpets
Small surfaces, such as:
- Interstices of heat radiators, tile joints, skirting boards
- Door or window frames
- Shutters
Glass surfaces, such as:
- Windows, glass walls
- Glass doors
- Mirrors
Upholstery, such as:
- Carpets and moquettes
- Upholstered furniture (sofas, airmchairs).
- ATTENTION!
Furniture surfaces can be treated with the steam cleaner under the following conditions:
- Never clean with the direct steam jet.
• Always use a soft absorbent cloth
• Work with little steam pressure - When you clean, don't exert any pressure with the brush.
Assembly of wheels and handle
- Assemble wheels by hand as shown in picture on fig. B. No tool is required.
- The handle (13) must be fitted on the upper part of the appliance with 4 screws (included in the accessories supplied) (see picture on page II). You will need a screwdriver for this operation (not included in the accessories supplied).
Assembly of the holding hook
- For a comfortable use of the two extensions, assemble the holding hook (29).
- The holder must be fixed with screws (included in the accessories) under the extensions (see picture fig. B)
Parts of the steam cleaner:
1 Steam lever
2 Flexible hose
7 Window wiper
8 Steam indicator
9 Boiler cap
10 Plug and power cord
11 Wheels
12 Steam intensity regulator
13 Handle
14 Scrubbing brush with clamps
15 Cloth holding clamps
16 Brush-joint
17 Extension pipes
18 Spring button
19 Steam nozzle handle
20 Tilting sprayer
21 Brush
22 Triangular brush
23 Cloth
24 Cotton cover
25 Anti-scale bag
26 Funnel
27 Jug
28 Accessory bag
29 Holding hook
CONTROL PANEL
• 3 Steam pressure lamp (green)
- 4 Main switch
• 4/B ON-OFF switch light (orange)
- 5 Heater light (green)
• 6 Water indicator lamp (orange)
Starting the steam cleaner
Fill with water
(fig. E)
- ATTENTION!
- Before filling the boiler with water, unplug the machine.
- Fill in the steam cleaner only with distilled water or with tap water with low mineral contents.
- The formation of limescale in the machine can cause the machine to overheat and clog the steam outlet pipe.
-
The steam cleaner must rest on a plane surface.
-
Turn the boiler cap (9) anticlockwise at the same time, so as to unscrew it completely.
- Pour a suitable amount of water (min. 0.5 l, max. 1.6 l) using the provided jug and funnel.
- Put the cap (9) on the boiler: turn it clockwise, so as to screw it tight.
WARNING!
- Make sure that the boiler cap is properly closed. Cap loosening during use may cause scalds!
Connecting the steam cleaner

DANGER!
(fig. C)
- Connect the machine only if the mains voltage matches to the rated voltage marked on the rating plate.
- The main switch (4) must be disconnected (OFF position).
- The power cord (10) must not be damaged.
- The water tank must be filled with a sufficient water quantity (min. 0.5 l) using the special measuring jug.
- The hose must be connected to the relevant accessory.
- The steam nozzle must not be obstructed.
- Press the main switch (4); the indicator lights (4/B and 5) come on (heating begins).
- The machine is in operation.
- Water is heated and steam is generated.
- When the green lamp lights up (3) the machine is ready to work.
Pouring water into the boiler

WARNING!
- When the machine is in use, don't open the boiler cap (9)! Danger of scalds!

NOTE:
- When the boiler water is finished, the orange water indicator lamp (6) will light up.
Filling
- After the orange "no water" light (6) comes on, make sure that the machine no longer supplies
steam (keeping the control device (12) open) by repeatedly activating the steam lever (1).
- Disconnect the main switch (4) (OFF position).
- Remove the electrical plug (10) from the supply socket.
- Let the steam cleaner cool down until the index reaches the yellow area.

NOTE: the boiler cap is equipped with a safety valve that prevents the valve from opening as long as steam pressure is high.
- Turn the boiler cap (9) anticlockwise at the same time, so as to unscrew it completely.
- Pour water into the boiler.
- Put the cap (9) on the boiler: turn it clockwise, so as to screw it tight.
Disconnecting the steam cleaner
- Disconnect the main switch (4) (OFF position).
- Pull out the electrical plug (10) from the supply socket.
- Let the steam cleaner cool down.

ACCESSORIES' APPLICATION
Fitting or removing accessories
· DANGER!
- Never work with wet hands. Electric current: Danger of death!
- The steam cleaner must be disconnected before removing the accessories.
- Accessories get hot when the machine is working. Let them cool down before carrying out any replacement. Be careful when replacing the accessory during operation: danger of scalds.
Fit the extension pipe
- Press the spring button (18) on the steam nozzle handle (19)
- Fit the steam nozzle handle (19) into the sleeve of the extension pipe (17) until the spring button (18) snaps into place.
Fitting the brushes
(fig. D)
- In order to be able to use the rectangular or the triangular scrubbing brush, it is necessary to connect the brush-joint (16) first:
- Keep the brush-joint pointed downwards and insert it firmly into the brush. Then turn the brush-joint upwards.
- Press the spring button (18) on the steam nozzle handle (19) or on the extension pipe (17).
- Fit the brush-joint (16) into the steam nozzle handle (19) or into the extension pipe (17), until the spring button (18) snaps into place.
Removing the pipe or the brushes
- Push the spring button (18) on the steam nozzle handle (19) or on the extension pipe (17).
- Remove the extension pipe (17) from the steam nozzle handle (19).
- Keep the brush-joint (16) pointed downwards and remove the brush from the brush-joint.
Protection cloth
(fig. F)
NOTE:
WARNING!
- Cotton cloths are used to protect surfaces from scratches. Be careful! Cloths become hot while you do the cleaning.
- Change the cloth only after unplugging the steam cleaner!
- Dirty cloths can be washed in the washing-machine.
Applying the cloth to the scrubbing brush
- Put the protection cloth on a plane surface.
- Lay the scrubbing brush (14) in the middle of the cloth.
- Push the cloth holding spring clamps (15) and keep them pressed.
- Put two corners of the cloth under the spring clamps (15) from behind.
- Now put the front half of the cloth under the spring clamps (15) and release them.
Applying the cloth to the triangular brush
- Place the triangular brush (22) on the cloth (24)
- Wrap the cloth around the triangular brush (see figure).
Fitting the small brush

NOTE:
- The small brush (21) must be used only together with the bent nozzle (20).
- Fit the small brush into the bent nozzle.
- Fit the bent nozzle into the pipe (17) or into the steam nozzle handle (19).
Cleaning window glass
(fig. G)
- ATTENTION! If external temperatures are around the freezing-point, the window glass can be slightly sprayed with steam at a distance of 20 cm, at least.
- After that, you can treat the whole glass surface with steam to offset sudden changes in temperature and to avoid tensile stress on the glass surface.
- Sudden changes in temperature between glass and steam can break the glass.
Installing the glass cleaner - use
(7) Optional (fig G)
- Fit the window cleaner into the steam nozzle handle (19) or into the extension pipe (17) until the spring button (18) snaps into place.

NOTE:
- The regulator (12) features 5 adjustable positions: on position 1, steam quantity is minimum, whereas in position 5 it is maximum. Do not use position 1 for more than 5 minutes.
- Very dirty windows must be cleaned first with the small (22) or big (14) brush and the cloth (23 or 24).
- Then, clean the window with the window cleaner.
- After cleaning, remove dirt from the rubber head of the window cleaner with a clean cloth. Only a clean and well stretched band allows a perfect cleaning of the window without leaving stripes.
EN
- Spray steam onto the window starting at the top and moving downward (fig. 1) by placing the regulator on position 3.
- Remove dirt with the rubber sponge (fig. 2).
- Lay the wiper rubber band on a part of the window treated with steam (fig. 3).
(7) Optional
- Lay the wiper rubber band on a part of the window treated with steam.
MAINTENANCE

DANGER!
• Before any maintenance or cleaning,
- Switch off
- Unplug the machine.
- Do not empty the machine as long as there is hot water inside the boiler.
- In order to avoid formation of limescale, it is recommended to fill the boiler with water rinse and empty it once a month.
- If the machine is not used for a long period of time, the boiler must be emptied.
- Allow the appliance to cool down before storing it.
- To prevent the build up of any scale contained in the water, use the anti-scale as indicated below.
▶ HOW TO STORE THE STEAM CLEANER
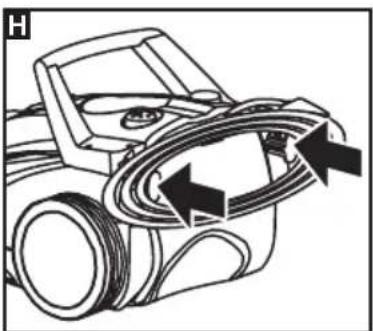
(fig. H)
- The cable may be wound around the two hooks on the back.
Cleaning
- ATTENTION!
- Don't use any solvents as they may damage the machine plastic components.
- Clean the machine enclosure with a wet cloth.
- Clean the machine accessories only with water.
- Let the clean brushes dry, with the bristles turned upwards, to avoid deforming them.
▶ CLEANING THE BOILER
• All maintenance jobs must be performed only
when the appliance is cold and with the plug disconnected.
- Clean the appliance boiler every 5 maximum 10 fills depending on water hardness. Such information can be obtained from your municipal authorities or water utility.
- Fill the boiler with water and shake well. Afterwards empty the boiler by tilting the appliance on one side.
▶ DESCALING THE BOILER (using the descaler)
The descaler prevents limescale from depositing on the appliance components and In the pipes coming into contact with steam.
- ATTENTION! Do not swallow. Do not mix with other substances. If the product comes into contact with the eyes or face, wash with plenty of water. Store in its original, tightly closed bottle.
S2 = Keep out of the reach of children. The appliance cannot be used as long as the liquid is inside the boiler. - To ensure good and long appliance operation, the boiler is best descaled according to the following schedule (DH= deutsche Haerte)
1 dH = 9,52 gr/l CaO (Calcium Carbonate)
< 10 Dh: Every 100 fills
between 10/22 Dh: every 75 fills
▶ 22 Dh: every 50 fills
• To find out water hardness, contact your municipal authorities or water utility
1 Pour about 1 litre of hot water into the appliance
2 Pour the contents of HALF the bag provided and allow the solution to work for about 8 hours
3 Do not close the cap.
4 Subsequently empty the appliance. Because a certain amount of liquid still remains in the boiler, rinse this with cold water 2 or 3 times to remove any scale residues
5 The appliance is now ready to use
- The contents of the bag provided is enough for two descaling operations. Afterwards any other antiscale product available on the market can be used (in powder or liquid).
▶ HOW TO ELIMINATE LITTLE FAILURES
- DANGER! Repairs must be carried out only by an Authorized Service Centre.
NOTE: Failures may occur even when using the machine properly. The table below reports some failures and remedies. If these instructions should fail, kindly apply to an Authorized Service Centre for further information.
TECHNICAL DATA STICKER
Check that technical data on the sticker correspond to the ones of the electrical circuit to which you are going to connect the machine.
Safety features: Service pressure switch • Service thermostat • Safety thermostat • Steam control on the waterproof handle • Tamper-proof cap with pressure release valve • Boiler in die-cast aluminium.
TECHNICAL DATA
Boiler volume 2,41
Boiler capacity 1,6 l
Operating temperature 145°C
Temperature during transport and storage 0÷40°C
Working room temperature 0÷40°C
Arm vibrations <2,5 m/s ^4
TECHNICAL DATA
See technical data plate:
Voltage / Frequency V Hz
Boiler draw rate W
Steam pressure kPa (bar)
Dimensions / Weight Kg
WARRANTY CONDITIONS
All our machines are subjected to strict tests and are covered against manufacturing defects in accordance with applicable regulations. The warranty is effective from the date of purchase.
The following are not included in the warranty: - Parts subject to normal wear. - Rubber parts, charcoal, filters and the accessories and optional accessories. - Accidental damage, caused by transport, neglect or inadequate treatment, incorrect or improper use and installation failing - The warranty shall not cover any cleaning operations to which the operative components may be subjected, such as clogged nozzles and filter blocked due to limestones.
DISPOSAL

- Disposal must be carried out in accordance with applicable environmental legislation.
- The appliance and its accessories must be posed of in accordance with the materials used their construction.
- Disposal must be carried out in accordance with applicable local legislation. Contact your municipality for the nearest refuse dumping site.
- As owner of an electrical or electronic product, you are not allowed by law (according to EU-
| Failure Cause | Remedy | |
| The steam cleaner is ready to work, but no steam comes out. | The steam intensity regulator (optional) is on position 0.The accessory is obstructed. | Turn the steam intensity regulator on position 1-5.Check the accessories. |
| The flow of steam does not come out regularly and is accompanied by water spray. | The boiler has been filled with too much water. | Press the lever (1) to drain the excess water. Be careful not to overfill the appliance (max 1.6 liter). |
| When you work with the steam cleaner, an accessory comes off. | The accessory has not been connected properly. | Fit the accessory properly. |
Directive 2012/19/EU on waste electrical and electronic equipment and the particular national laws of the EU-Member States transforming this Directive) to dispose of this product or its electrical/electronic accessories as unsorted domestic waste. You shall use the designated free possibilities for return instead.

NOTE:
- Please always follow the environmental regulations of your local authority. Here you can obtain the addresses required for an ecological disposal of your steam cleaner.
▶ RENSEIGNEMENTS POUR LA SÉCURITÉ
- Avant-propos
▶ DEN KESSEL ENTKALKEN
(7) Optional (afb.G)
▶ APLIKACE PŘÍSLUŠENSTVÍ
▶SIKKERHEDSOPLYSNINGER
- Introduktion
▶ SIKKERHEDSOPLYSNINGER
(7) Optional (SIVU G)
TEKNISET TIEDOT SISÄLTÄVÄ KILPI
EN Acoustic pressure
EN Technical booklet at
(Legal Representative
Lavorwash S.p.A.)