
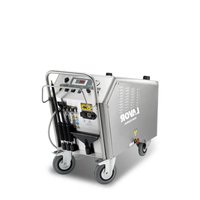
Graffiti Waster - Steam cleaner Lavor - Free user manual and instructions
Find the device manual for free Graffiti Waster Lavor in PDF.

| Product type | Professional steam cleaner |
| Brand | Lavor |
| Model | Graffiti Waster |
| Power supply | 230-240 V ~ 50 Hz single-phase or 400-415 V three-phase (depending on version) |
| Operating pressure | 5 to 10 bar |
| Maximum steam temperature | 190 °C |
| Water tank capacity | 25 L |
| Diesel tank capacity | 25 L |
| Detergent tank capacity | 2.4 L |
| Heating type | Diesel burner |
| Noise level | 75 dB(A) |
| Main functions | Dry/wet steam, detergent distribution, sandblasting (with optional kit) |
| Safety devices | Safety valve, pressure switch, thermostat, safety stop on the gun |
| Maintenance and cleaning | Weekly boiler cleaning, check electrodes and diesel nozzle, annual descaling |
| Spare parts and reparability | Original parts mandatory, repairs by authorized center |
| General information | Professional use, do not use indoors without adequate ventilation |
Frequently Asked Questions - Graffiti Waster Lavor
User questions about Graffiti Waster Lavor
0 question about this device. Answer the ones you know or ask your own.
Ask a new question about this device
Download the instructions for your Steam cleaner in PDF format for free! Find your manual Graffiti Waster - Lavor and take your electronic device back in hand. On this page are published all the documents necessary for the use of your device. Graffiti Waster by Lavor.
USER MANUAL Graffiti Waster Lavor
MODELS
MODELOS
"Graffiti Waster"
kit sabbiante
EN Sand blasting set
FR kit de sablage
DE Sandstrahlkit
ES kit lanza arenadora

natural_image
Line drawing of a spray gun and a cleaning device connected by tubing (no text or symbols)
natural_image
Line drawing of a fuel pump connected to a car, showing hoses and wiring (no text or symbols)fi g. M

IT Indicazioni tipo di gasolio da utilizzare: Diesel per autotrazione e senza additivi. EN Information on the type of Diesel fuel to be used: Diesel for transport uses and without additives. FR Indications du type de gazole à utiliser : Fioul routier sans additifs. DE Angaben bezüglich des zu verwendenden Dieseltyps: Diesel für den Fahrzeugantrieb und ohne Zusatzstoff e. ES Indicaciones tipo de gasóleo que se debe usar: Diésel para auto-tracción y sin aditivos. NL Indicatie te gebruiken type Diesel: Diesel voor voertuigen zonder toevoegingen.
EL Evdeičeis túpou pterpelaiou pou prépei va χρησιμοποιθεί: Diesel yia autokivnşn kai χωρις πρόσθετα. PT Indicações sobre o tipo de gasóleo a utilizar: Diesel automotivo e sem aditivos. CS Doporučený typ nafty k použití: Nafta pro automobile a bez aditiv. FI Käytettävän polttoainetyypin ohjeistukset: Diesel ajoneuvoille ja ilman isääineita. SL Podatki o ustreznem gorivu: uporabite dizelsko gorivo za vozila. Gorivo ne sme vsebovati dodatkov. SV Indikationer om vilket Dieselbränsle som ska användas:
Diesel för fordon och utan tillsatse. HR Indikacije vrste goriva za uporabu: Dizel za automobile, te bez aditiva. TR Kullanılacak olan motori tü rü n ait bilgiler: motorlu araçlara yönelik katkısız motorin. ET
natural_image
Crossed construction lines and a right-angle symbol (no text or labels)
natural_image
Silhouette of a shopping cart with an arrow indicating direction (no text or symbols)> DESCRIZIONE DELL'APPARECCHIO
vedi fig. A B
PROGRAMMA MANUTENZIONI PROGRAMMATE
- This appliance's performance and userfriendliness make it suitable for PROFESSIONAL use.
- The steam generator for industrial cleaning is used for the cleaning and disinfecting of any object in an easy and ecological way, also in the most difficult points with or without detergents.
> THECNICAL DATA
(see thecnical data plate)
SYMBOLS

WARNING: It is important to be careful of the following items.

IMPORTANT

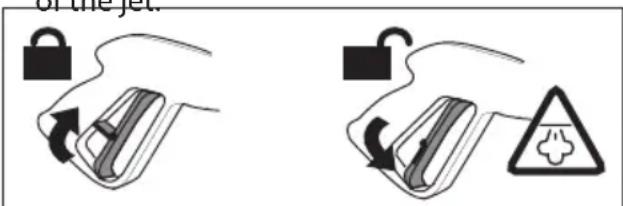
LOCKED

OPEN

IF PRESENT
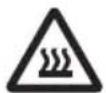
WARNING: do not touch .- a warning relative to the danger of heat - steam ions;

WARNING: symbol do not inhale

Detergent tank

only water

WARNING: symbol, Danger from hot
steam.

- IT IS OBLIGATORY TO WEAR PROTECTIVE GLOVES WHEN USING THE MACHINE.

- IT IS OBLIGATORY TO WEAR PROTECTIVE GOGGLES WHEN USING THE MACHI
SAFETY PRECAUTIONS
- WARNING: It is important to be careful of the following items.
• IMPORTANT WARNINGS
04 This machine has been designed for use with the cleaning agent supplied or recommended by the manufacturer. The use of other cleaning agents or chemicals may adversely affect the safety of the machine.
⚠️1°. High pressure jets can be dangerous if subject to misuse. The jet must not be directed at persons, live electrical equipment or the machine itself.
05a Do not use the machine with in range of persons unless they wear protective clothing.
23 Do not direct the jet against yourse If or others in order to clean clothes or foot-wear.
21 Risk of explosion - Do not spray flammable liquids.
24 High pressure cleaners shall not be used by children or untrained personnel.
22 High pressure hoses, fittings and couplings are important for the safety of the machine. Use only hoses, fittings and couplings recommended by the manufacturer.
16e To ensure machine safety, use only original spare parts from the manufacturer or approved by the manufacturer.
24-XX Water that has flowed through backflow preventers is considered to be non potable.
03 Do not use the machine if a supply cord or important parts of the machine are damaged, e.g. safety devices, high pressure hoses, trigger gun.
⚠️ XY Inadequate extension cords can be dangerous.
2^ . If an extension cord is used, it shall be
suitable for outdoor use, and the connection has to be kept dry and off the ground.
^2 b. It is recommended that this is accomplished by means of a cord reel which keeps the socket at least 60 mm above the ground.
3°. Do not use combustion engine powered machines indoors unless adequate ventilation is assessed by national labour authorities.
4^ . Ensure that any exhaust emissions are not in the vicinity of air intakes.
^5^ . For gas or oil-heated machines it is important to provide adequate ventilation and make sure that the flue gases are properly discharged.
11 Always switch off the mains disconnecting switch when leaving the mach unattended.
⚠️XZ Incorrect fuels shall not be used as the y may prove hazardous.
> GENERAL WARNINGS
- 01WARNING: This appliance is for outdoor use only.
·02WARNING: Always disconnect the electricity and water supplies on completion of every job.
· WARNING:
05b - Do not allow other people or animals within a range of 5m when operating the machine.
05c - Always wear suitable protective clothing in order to protect yourself against ricocheting parts.
05d - Do not touch the plug and the appliance with wet hands or when barefoot.
05e - Wear safety goggles and non-slip rubber footwear.
- IT IS OBBLIGATORY TO WEAR PROTECTIVE GLOVES WHEN USING THE MACHINE.
- IT IS OBBLIGATORY TO WEAR PROTECTIVE GOGGLES WHEN USING THE MACHINE.
- 06WARNING: Do not direct the nozzle toward mechanical parts containing lubricant grease, as the grease will dissolve and spread over the surrounding ground. Vehicle tyres/tyre valves may only be cleaned from a minimum distance of 30 cm, otherwise the vehicle tyre/tyre valve could be damaged by the high-pressure jet. The first indication of this is a discoloration of the tyre. Damaged vehicle tyres/tyre valves can
be deadly dangerous.
07WARNING: High pressure jets can be dangerous if subject to misuse. The jet must not be directed at persons, animal, live electrical equipment or the machine itself.
- 08WARNING: High pressure hoses, fittings and couplings are important for the safety of the machine. Use only hoses, fittings and couplings recommended by the manufacturer. (it is extremely important to protect these components against damage by avoiding their improper use and protecting them against bending, knocks and scratches).
· 12WARNING: Every machine is tested in its operating conditions, so it is normal for a few drops of water to be left inside it.
· 13WARNING: Take care not damage the electric cable. If the supply cord is damaged, it must be replaced by the manufacturer, its service agent or similarly qualified persons in order to avoid a hazard
· 14WARNING: Appliance with fluid under pressure. Keep a firm hold on the gun and be prepared to take the kickback pressure. Only use the high pressure nozzle provided with the appliance.
· 16WARNING: This appliance is not intended for use by persons (including children) with reduced physical, sensory or mental capabilities, or lack of experience and knowledge, unless they have been given supervision or instruction concerning use of the appliance by a person responsible for their safety.
· 17WARNING: Children should be supervised to ensure that they do not play with the appliance.
· 18WARNING: Never start this appliance without first completely unwinding the high-pressure hose.
· 19WARNING: When winding and unwinding the pipe take care not to cause this appliance to overturn.
· 20WARNING: Before unwinding or winding the hose, switch the machine off and release the pressure in the hose itself (switching off). - XX WARNING: the machine shall be disconnected from its power source, by removing the plug from the socket-outlet, during cleaning or maintenance and when
EN
replacing spare parts
- XJ WARNING: If an extension cord is used, the plug and socket must be of watertight construction.
- WARNING: It is absolutely forbidden to use the machine in potentially explosive environments or areas.
· WARNING:
- NEVER EVER TOUCH THE MACHINE WITH WET HANDS OR BARE FEET.
- NEVER PULL THE POWER SUPPLY CABLE OR MACHINE IN ORDER TO DISCONNECT THE PLUG FROM THE SOCKET.
- IF DURING FUNCTIONING THE POWER SUPPLY RUNS OUT, FOR SAFETY REASONS, TURN THE MACHINE OFF.
- K1 All the maintenance and adjustment activities described in this handbook must be carried out only after stopping the machine (main switch turned to off) and disconnecting the power cord, if not clearly indicated that the operation must be carried out when the machine is on.
- K2 All the adjustment and activities that are not described in this handbook must be carried out by qualified and skilled operators to avoid any accident or damage to the machine and to the operator.
- K3 Carefully read this operating handbook before use.
It provides important information about a safe installation, use and maintenance of the machine.
- K4 The non-compliance with the safety measures may entail serious injuries to the operator and damages to the machine.
- K5 Carefully keep this handbook for consultation purposes up to the machine final dismantling. The use and maintenance activities must be carried out correctly; otherwise, the builder cannot be held responsible for the damages to people, animals or things deriving from the non-compliance with the following instructions.
- K6 Check that both the machine and its components are undamaged when unpacking them. Contact your reseller in case of doubts.
- K7 Make sure that the rating corresponds to the factory power line before energising the machine.
· K8 De-energise the machine before any cleaning or maintenance activity.
· K9 Never leave the machine energised if
unused. Turn the main switch off.
- K10De-energise the machine in case of failure and / or troubles. Do not tamper with its controls and equipment. Just contact the authorised after-sales service points for servicing purposes and always order original spare parts.
• K11 The draining and loading pipes, the safety sheaths and the solenoid valves must not be cut and tampered with. De-energise the machine in case of damages
· K12 Any use of the machine other than the one it has been built for represents an anomalous condition and can cause serious damages to the operating means and entail a serious risk for the operator using it.
- K13 Never remove or hide the warning labels applied to the machine.
- K14 The same instructions are valid for various models; some details may differ according to the machine model.
· K15 Never touch or start the machine with wet hands or bare feet;
- K16 Remove the casings and the doors of the electric boards only once the machine has been stopped and de-energised;
For fire-prevention purposes:
· K18 Keep all inflammable or combustible products away from the equipment area.
· K19 Obviously, the above-mentioned instructions are not sufficient to prevent all sorts of accidents; therefore, the user will have to be cautious.
- K20 The machine must not be modified or changed in any way without the builder's written authorisation.
- WARNING: We recommend the use of de-mineralized water.
- WARNING: Never use the power cable or the gun cable to move it.
> SAFETY DEVICE
- WARNING: the gun is fitted with a safety catch. Whenever use of the machine is interrupted it is important to operate the safety catch to prevent accidental activation of the jet.
Safety features:
- Safety valve
- Manostat
- Thermostat
- Pump with a by-pass valve or stopping device.
> STABILITY
- WARNING: The machine must be always kept on horizontal bases, in a safe and stable way.
> WATER SUPPLY
Water supply collection
Water supply from the water main
- Connect a supply hose (not included) to the water inlet of the unit and to the water supply.
- Open the water supply.

WARNING: (symbol) machine not table for connection to the potable water ins.
The cleaner can only be connected to the water mains if the water mains is separated by a backflow preventer. Make sure that the hose is at least ∅ 13mm-1/2 inch and that it is reinforced.
- WARNING: Water that has flown through backflow preventers is considered to be nonpotable.
IMPORTANT: Only clean or filtered water should be used for intake. The delivery of the water intake tap should be equal to the double of the maximum pump range.
- Maximum intake water temperature: 40^ C
- Max inlet water pressure: 1Mpa Place the machine as close to the water supply system as possible.
Failure to comply with the above conditions causes serious mechanical damage to the pump and the loss of warranty cover.
Water supply from the water tank build-in
- Switch off the unit.
- WARNING: We recommend the use of de-mineralized water.
> ELECTRICITY SUPPLY
- The appliance's electrical connection must comply with the IEC 60364-1 standard.
IMPORTANT: Before connecting the appliance, make sure that the nameplate data are the same as those of the electrical mains and that the socket is protected by a differential security breaker with tripping sensitivity below 0.03 A - 30 ms.
- If the appliance's plug is not compatible with the socket, have the socket replaced with another of suitable type by professionally qualified staff.
- Never use the appliance in ambient temperatures below 0^ C if it is equipped with a PVC (H VV-F) cable.
- XY WARNING: Inadequate extension cords can be dangerous.
- XJ WARNING: If an extension cord is used, the plug and socket must be of watertight construction.
Information for supply may also be obtained from the plug manufacturer.
| 230-240V | 400-415V |
| 3G 2,5 mm2 | 4G 2,5 mm2 |
| max 20 m | max 30 m |
USAGE
> UNPACKING
Remove the upper and the lower hooks retaining the cardboard box to the pallet, take the cardboard box off, place two wheels of the machine on ground and withdraw the pallet.
> Machine handling and transport
- Always use the handle supplied to move the machine.
- WARNINGS Never move the machine by using the power cable or steam hose.
EN
natural_image
Crossed construction lines and a pipe diagram symbol (no text or labels)
natural_image
Simple line drawing of a shopping cart with an arrow indicating direction (no text or symbols)> MACHINE DESCRIPTION
see fig. A B
① Detergent tank
② Handle
③ Steam gun connection plug
④ Electric cable
⑤ Water inlet
⑥ Diesel tank
⑦ Water tank
⑲ Switch detergent device
see fig. C
Model: Major
③ Steam gun connection plug
⑳Steam outlet valve, closed
see fig. D
⑧ dry steam / wet steam adjuster
⑨ Pressure gauge
⑩ Main switch ON/OFF
⑪ Boiler switch
⑫ + temperature adjuster
⑬ - temperature adjuster
⑭ Thermo regulator display
see fig. A
⑮ Steam gun + hose
⑯ Accessory
⑰ Detergent spray switch
see fig. E
⑱ inverter switch (mod. 12V)
⑱ battery pilot lights (mod. 12V)
> INSTALLATION AND START-UP
IMPORTANT: The machine installation environment should be kept at between 10°C and 35°C.
> POSITIONING OF THE CHIMNEY FOR INDOOR APPLICATION
(see fig. M)
- WARNING: In case of operation indoors, adequate ventilation and gas venting must be assured.
Sometimes a chimney is necessary to remove the exhausts from the pressure cleaner.
This problem hasn't to be faced when the machine operates outdoor, but when it's installed indoor, the following recommendations must be followed:
- The chimney path must be always in ascent, straight vertical if possible, and preferably not exceeding a 5 m lenght.
- The exit of the chimney must be sheltered to avoid the dripping of rain and to allow the exaust flow.
- The chimney section A must be 3 times the outlet chimney of the machine B and at distance of at least 20 cm.
It must be underlined that the above recommendations are extremely important to prevent the condensate from back dripping into the machine. The exausts contain sulphuric acid, condensating at a temperature of approximately 180°C. The condensation shall be avoid, but in any case the condensate from chimney shall not enter the machine.
The non observance of these recommendations may lead to the damage of the machine.
CHIMNEY SECTION: 3 times the area of chimney Chimney pipe diameter = 150 mm.
CHIMNEY SECTION FOR 2 BOILER: 6 times the area of chimney.
Chimney pipe diameter = 225 mm.
FUELLING
Information on the type of diesel fuel to be used:
Diesel for transport uses and without additives.
DIESEL
(see fig. A) 251
Fill the tank with the fuel indicated on the technical data plate (Diesel)
In order not to damage the fuel pump, ensure that the tank never empties while running.
- WARNING: Use of unsuitable fuel may result in dangerous situations.
DETERGENT
(see fig. A) 2,41
Fill the detergent tank with the product recommended for the task to be carried out.
- WARNING: Make use only of liquid detergent, do not absolutely use acid or too much alkaline products. We suggest you to make use of our products, which have been studied for the use with washer machines.
WATER
see fig. A) 251
see section on "WATER SUPPLY"
only model : Major
- Connect the hose ③⑮,
- turn up the safety catch C2
- then open the steam tap 20.

WARNING: Danger from hot steam.
> 1ST START-UP (BEFORE INITIAL USE)
12 V battery model
- Ensure that the main switch ⑩ is set to (0) OFF
see fig. E
- Unscrew the 2 hand screws and lift the cover away
- Connect the plug to the inverter.
- Position the inverter switch to (I) ON ⑱
- The illuminating "LED" lights up.
- Lower the cover and screw the hand screws back up.
> Batteria
12 V battery model
- Check the battery charge level and recharge:
- ⑲ when the green "LED" is lit, the battery is charged
- ⑲ when the yellow "LED" is lit, the battery is at 50% charge
- ⑲ when the red "LED" is lit, the battery is discharged
To charge the battery:
- Place the switch to ⑩ (0) OFF
- Connect the plug to the electricity supply
- The charger charges the battery
IMPORTANT: The battery charger works also with the main switch ⑩ in position (I) (II) (O).
IMPORTANT: Follow the battery manufacturer use and safety manual.
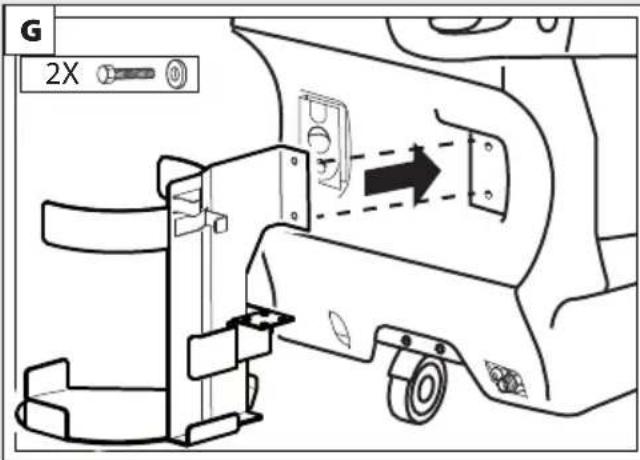
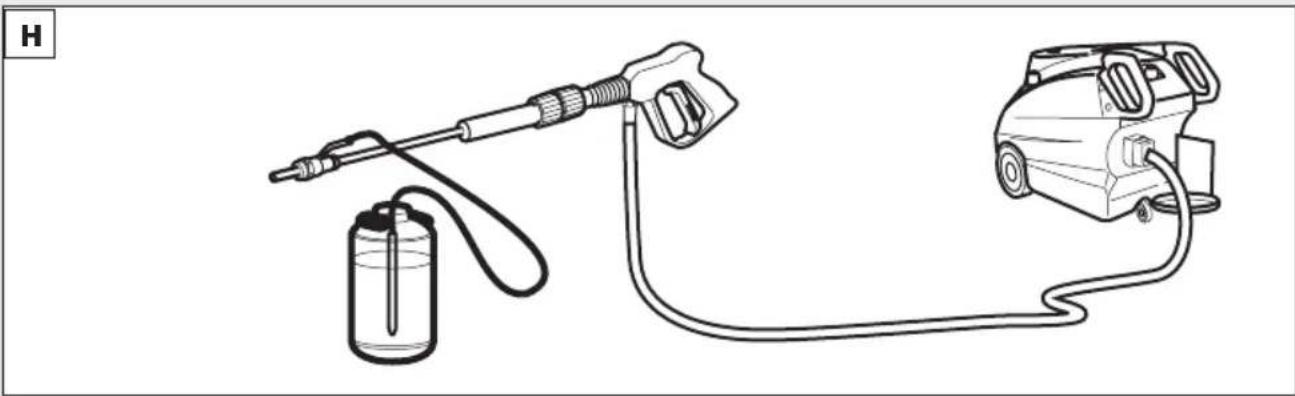
> Sand blasting kit
only model " Graffiti Waster"
(see fig. FGHI)
Sand blasting work may be carried out with suitable accessories.
- Fill the container with sand (sand not supplied), sand for blasting, sand calibrated at ∅ 0.5 mm..
IMPORTANT: use dry sand.
> Temperature adjustment
(see fig. D)
Adjust the temperature by means of the thermo regulator situated on the control panel.
This machine is equipped with an electronic thermo regulator to check and adjust the boiler temperature as well as the pressure from min. 5 bar to max. 10 bar.
- When turning the unit on, the display shows the temperature reading in the boiler. Adjust the temperature as follows:
- Hold the (+) and (-) buttons pressed simultaneously for a few seconds;
- Press the (+) button to increase the temperature, or the (-) button to decrease it. It is essential that the thermo regulator is set to 190^ C in order to be able to work at 10 bar.
TABLE OF COMPARISON BETWEEN DEGREES CENTIGRADE AND STEAM PRESSURE EXPRESSED IN BAR
| °C bar | WARNING: |
| 152 5 | - The machine is pre-set at the max temperature of 190^ . |
| 159 6 | |
| 165 7 | |
| 170 8 | - For any adjustment, timing or replacement action not described in this handbook, |
| 175 9 | |
| 180 10 |
EN
contact qualified personnel at the manufacturer or resale outlet.
- Adjustments can be made to adapt the machine to various production requirements.
> Steam and water output adjustment
(see fig. D)
Adjust the steam and water output by using the two knobs situated on the the left hand side of the machine ⑧.
H_2O
wet steam ;

dry steam ;
> Electric controls
(Reference Description)
⑩ MAIN SWITCH: It is a 2-position selector that energises the machine if to (I)ON. the machine is de-energised if to (0) OFF.
12 V battery model:
⑩ - MAIN SWITCH:
(I) ON: machine works on mains power
(0) OFF: the machine is unpowered
(II) ON: machine works on battery power
⑪ BOILER ON button: press to turn the boiler on.
⑫⑬ THERMO REGULATOR: refer to paragraph
| OPERATION | MACHINE PART | PERIODICITY | |
| 1 Boiler cleaning | 1 Remove limestone from the boiler1 Clean the water level sensors | 1 Every year1 Every three months | Authorized After Sales Service |
| 2 Visual checks | 2 Machinery + gun | 2 Every week | The user |
| 2 Electrical parts | |||
| 2 Integrity of the water and steam hoses and gun | 2 Every mont | The user | |
| 3 Cleaning the burner | 3 Ignition electrodes, Diesel nozzle | 3 Every year | Authorized After Sales Service |
| 4 General cleaning | 4 External cleaning | 4 Every week | The user |
"Temperature adjustment".
⑭ Display:
- Temperature indicator
- Indicates "H2O" when water is missing from the tank.
- Indicates "GAS" when diesel is missing from the tank.
> Steam gun
Use of the steam gun
- Plug the lance jack into the appropriate socket and lock it with the two levers;
- To obtain a spray of steam, press the trigger on the pistol grip;
· WARNING:
- For any subsequent adjustment, setting or replacement of parts not foreseen in this manual, please contact qualified personnel at the manufacturer or resale outlet.
- Before carrying out any replacement, ensure that the main switch is in the (0) OFF position.
> START-UP
Description of the start sequence
After carrying out all the connections and preventative inspections described in the previous chapters, start the machine according to the following instructions:
1) Before starting the generator, fill the tanks with water and DIESEL up to the set level.
2) Press the main switch situated on the control panel to the (1) ON ⑩ position -for working on mains power
or
(II) ON - for working on battery

IMPORTANT: the machine is battery operated with either the plug attached to the electrical mains or the machine operated with the plug disconnected from the electrical mains.
3) Press the BOILER ON button situated on the control panel to (1) ⑪.
6) If the display show H2O, it means that there is no water in the tank. Fill the tank (see "Filling the tanks with water and detergent")
> TO SPRAY DETERGENT
To spray and mix the detergent with steam:
- Press button ⑰ on the pistol grip.
.> Machine stop (at end of work)
At the end of the work shift, stop the machine in the following way:
1) Press boiler switch button to (0) OFF ⑪
2) Press main switch to (0) OFF ⑩.
3) Unplug the machine from the electrical power supply.
Boiler steam discharge
Follow the instructions below:
- A few minutes before the end of the work shift, turn off the boiler by pressing the BOILER START luminous green push-button, continuing to use the steam gun until the pressure gauge indicates a value of 0-1 bar;
see fig. F (Optional)
Follow the instructions below:
- Carefully open the boiler drain cock, situated on the machine right side and drain all the water from the boiler into a suitable container;

WARNING: Danger from hot steam.
IMPORTANT: Should it be necessary for any reason to de-activate the machine quickly, place the main switch on the control panel to the OFF position.
· WARNING:
- V15 While the machine is functioning, it is strictly forbidden to remove safety devices set by the Manufacturer for the purpose of protecting the operator against incidents.
- Only skilled and qualified operators must use the machine.
- Avoid aiming the steam lance towards personnel or delicate objects such as plastic, crystal or other materials which may melt or deteriorate with contact to steam at 180°C.
- Never leave the machine unattended.
- Always remove the power supply from the machine before filling the tanks.
- We recommend the use of demineralized water.
CARE AND MAINTENANCE
SCHEDULED MAINTENANCE PLAN
Visit website and download the scheduled maintenance plan.
IMPORTANT: Before doing any work on the cleaner, discharge the pressure and disconnect the electricity and water supplies.
SEE ROUTINE MAINTENANCE TABLE
· WARNING
Before any maintenance or replacement activity, remember to:
- stop the machine (MAIN SWITCH turned to OFF)
- unplug it.
- K1 Maintenance, replacement or servicing activities described in this handbook must be entrusted only to skilled operators familiar with the technology used on the machine.
· K2 Consult qualified personnel at the manufacturer or sales outlet for any adjustment, tuning or replacement actions not included in this manual.
The safety valve and accessories should be checked according to the provisions of DM 329/04 and the national regulations and laws.
Machine general cleaning
Once a week, remove all the dust from the machine using compressed air.
Clean the machine body externally with suitable detergents.
⚠ WARNING:
Always wear protective gloves when cleaning the machine.
TROUBLESHOOTING
(see table)
- 22WARNING: To ensure machine safety, use only original spare parts supplied or approved by the manufacturer.
Machine noise level
Determination of the resonant level: 75 dB (A)
IMPORTANT: the machine shows no adverse indications if used throughout the working day and complies with the provisions of Legislative Decree No. 277 of 15/8/91
WARRANTY CONDITIONS
All our machines are subjected to strict tests and are covered against manufacturing defects in accordance with applicable regulations. The warranty is effective from the date of purchase.
The following are not included in the warranty: - Parts subject to normal wear. - Rubber parts, charcoal, filters and the accessories and optional accessories. - Accidental damage, caused by transport, neglect or inadequate treatment, incorrect or improper use and installation failing - The warranty shall not cover any cleaning operations to which the operative components may be subjected, such as clogged nozzles and filter blocked due to limestones.

DISPOSAL (WEEE)
As the owner of electrical or electronic equipment, the law (in accordance with the EU Directive 2012/19/EU on waste from electrical and electronic equipment and the national laws of the EU Member States that have implemented this Directive) prohibits you from disposing of this product or its electrical / electronic accessories as municipal solid waste and obliges you to make use of the appropriate waste collection facilities. The product can be disposed of by returning it to the distributor when a new product is purchased. The new product must be equivalent to that being disposed of. Disposing of the product in the environment can cause great harm to the environment itself and human health.
The symbol in the figure indicates the urban waste containers and it is strictly prohibited to dispose of the equipment in these containers. Non-compliance with the regulations stipulated in the Directive 2012/19/EU and the decrees implemented in the various EU Member States is administratively punishable.
| TROUBLES CAUSES SOLUTIONS | ||||
| 1 | THE GENERATOR PRESSURE DOES NOT INCREASE | 1- Pressure switch1-Burner1-Resistance temperature detector PT100 | 1-Check the pressure switch1-Check electrodes, diesel nozzle1-Check that the temperature is at least 150°C | - Authorized After Sales Service- The user- The user |
| 2 | THE PUMP CANNOT RUN2.1 It loads no water2.2 Sound allarm | 2.1 The water tank is empty2.1 Pump2.1 Clogged filter2.1 Water level sensors2.2 Lack of water in the tank2.2 Check the electronic level2.2 water solenoid valve | 2.1 Fill the tank2.1 Replace the pump2.1 Clean the filter2.1 Clean the water level sensors2.2 Fill the tank2.2 Replace the solenoid valve2.2 Check and eventually replace it | - The user- Authorized After Sales Service- The user- The user- Authorized After Sales Service |
| 3 | THE SAFETY VALVE OPENS REPEATEDLY3.1 It keeps on loading water | 3.1 Boiler water level probe3.1Pressure switch3.1Safety valve | 3.1 Clean the water level sensors3.1Replace the pressure switch and check that the connection discharging tube is free from incrustations.3.1Replace the safety valve | - Authorized After Sales Service- Authorized After Sales Service- Authorized After Sales ServiceThe safety valve can be replaced only by or qualified service center.Safety valve replacement must be set at 12 bar and be accompanied by certified PED as provided for category IV |
INDICATIONS GÉNÉRALES
> UTILISATION PRÉVUES
natural_image
Pure electrical circuit lines without any symbols
natural_image
Silhouette of a shopping cart with an arrow indicating direction (no text or symbols)>DESCRIPTION DU L'APPAREIL
voir fig. A
CONDITIONS DE GARANTIE
- ACHTUNG:
Beveiligingen:
- Sicherheitsventil
- Betriebsdrukschakelaar
- Thermostat
natural_image
Pure cross symbol illustration of crossed-out road signs without any text or labels
natural_image
Simple black-and-white illustration of a shopping cart with an arrow indicating direction (no text or symbols)natural_image
Pure electrical circuit lines without any symbols
natural_image
Silhouette of a shopping cart with an arrow indicating direction (no text or symbols)TR
natural_image
Pure electrical circuit lines without any symbols
natural_image
Silhouette of a shopping cart with an arrow indicating direction (no text or symbols)> CİHAZIN AÇIKLAMASI
bkz. Şekil A B
⚠️ ВНИМАНИЕ:
natural_image
Symbolic illustration of crossed-out pipes and a valve with directional arrows (no text or labels)
natural_image
Silhouette of a shopping cart with an arrow indicating direction (no text or symbols)> ОПИСАНИЕ МАШИНЫ
см. рис. А В
< membership rmality
"Graffiti Waster " hectم موديل
natural_image
Crossed construction lines and equipment symbols (no text or labels)
natural_image
Silhouette of a shopping cart with an arrow indicating direction (no text or symbols)وصف الجهاز>
انظر الشكلA - B
① خزان المنظف
مبيض ②
TR
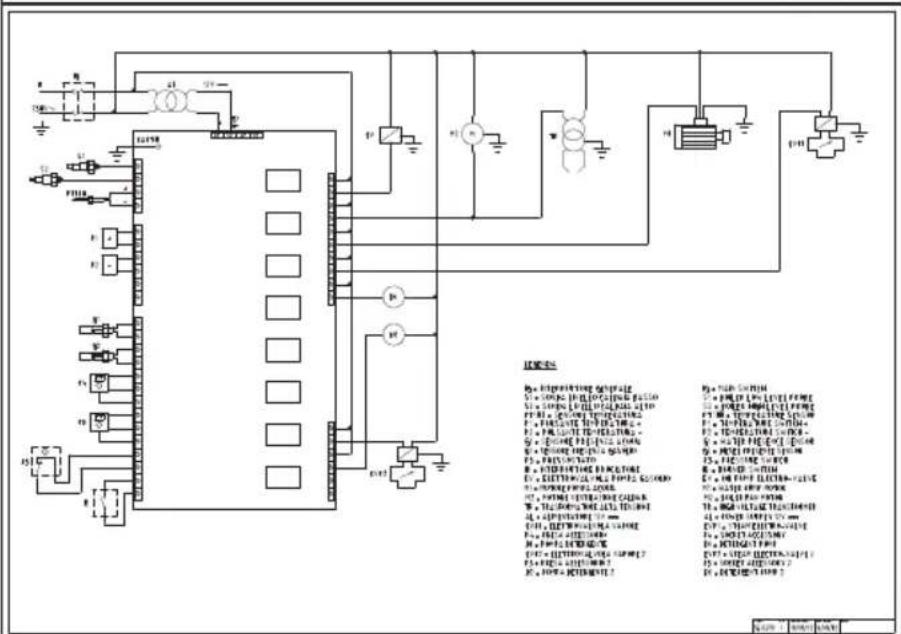
LG = 2014 AL-TEN
S1 = KAZAN TÜGLER SEVYE PROBU
S2 = KAZAN DIÜK SEVYE PROBU
ET100=5C4KUKSNSOR
E2=SKASJKSNEH108-
G1 = SUYARDGISSENSO
G2 = DISELYARDIAGISSENSO
02 = DRESS TANT VANGELI PERSONS
P3 = BASING ANAHTAGI
II - ERODER KIGHTAR
DI - MOTOCINCOMPAC
M1=ST POWCAST MOTOR
M2 = KAZAN FAN MOTORU
TR = VIBSE GEBIUM TRAN
16 = DOSSES GROUP (60M SPREADERS)
AL = CUCRAYAGI 12 V
EUP = BUIHARE ELECTRONAL
FA = SCOT MAXIMUM
D-CETERJAN POMPASI
mod. "2 Way"
IG=ANALTER
ST = KAZAN YURSEK SEVIYE PROBU
PT100=SCAKUKSENSOR
E=3546+16-280798-
GI - SU VARLIGI SENSORO
G2 - DIZEL YAKIT VARLGI SENSORI
18 - 1900.08 ANHETAR
EV = MOTORIN FOMPAS ELECTRONAL
M1 = S - POWER-ELECTOR
M1=30TOMPASTMOTOR
M2=KAZIANEONMOTOR
YR = YOER, GEMUM TRANSFORMATOR
EoF-GUCKOENGL123
P4 - SOCTA NEESUARI
C = PROB/CHAS
P=6K10
1-INVENTOR
IT Dichiarazione CE/UE di Conformità ai sensi delle Direttive (e successive modificazioni): EN EC/EU declaration of conformity according to Directive (and following amendments): FR Déclaration CE/UE de conformité aux termes des directives européennes (et leurs modifications successives): DE EG/EU-Konformitätserklärung gemäß Richtlinien (und späteren Änderungen): ES Declaración CE/UE de Conformidad en virtud de las Directivas (y sus sucesivas modificaciones): TR UYGUNLUK BEYANICE/EU aşağıdaki Direktifleri ile müteakip değişikliklerine uygun olduğunu beyan eder: RU Декларация Соответствия EC/EU в соответствии с Директивой (и последующими изменениями): SK ES/EU Vyhlásenie o zhode v zmysle Smerníc (a ich následných variácii):
2006/42/EC 2014/30/EU 2000/14/EC - 2005/88/EC 2011/65/EU 2014/68/EU

Certificate n°
TIS-PED-MI-16-11-066876-10510
Giancarlo Lanfredi (Legal Representative Lavorwash S.p.A.)
LpA 75 dB (A)
IT Livello pressione acustica
EN Acoustic pressure
FR Niveau de pression acoustique
DE Schalldruckpegel
ES Nivel de ruido
TR Ses basınç seviyesi
RU Уровень звукового давления
LwA 88dB(A) K (uncertainty) 3dB (A)
IT Livello di potenza sonora misurato
EN Acoustic power measured
FR Niveau dû puissance sonore mesuré
DE Abgemesstes Schalleistungsniveau
ES Nivel de potencia acústica mesurado
TR Ölçülen akustik güç seviyesi
RU Акустическая измеренная мощность
LwA 91dB(A)
IT Livello di potenza sonora garantito
EN Acoustic power granted
FR Niveau du puissance sonore garanti
DE Garantiertes Schalleistungsniveau
ES Nivel de potencia acústica garantido
TR Garanti edilen akustik güç seviyesi
RU Акустическая мощность предоставлено


- fi g. M
- > DESCRIZIONE DELL'APPARECCHIO
- vedi fig. A B
- PROGRAMMA MANUTENZIONI PROGRAMMATE
- > THECNICAL DATA
- SYMBOLS
- SAFETY PRECAUTIONS
- • IMPORTANT WARNINGS
- > GENERAL WARNINGS
- EN
- · WARNING:
- For fire-prevention purposes:
- > SAFETY DEVICE
- Safety features:
- > STABILITY
- > WATER SUPPLY
- Water supply from the water main
- Water supply from the water tank build-in
- > ELECTRICITY SUPPLY
- USAGE
- > UNPACKING
- > Machine handling and transport
- > MACHINE DESCRIPTION
- see fig. A B
- see fig. C
- Model: Major
- see fig. D
- see fig. A
- see fig. E
- > INSTALLATION AND START-UP
- > POSITIONING OF THE CHIMNEY FOR INDOOR APPLICATION
- (see fig. M)
- FUELLING
- Diesel for transport uses and without additives.
- DIESEL
- (see fig. A) 251
- DETERGENT
- WATER
- > 1ST START-UP (BEFORE INITIAL USE)
- > Batteria
- > Sand blasting kit
- > Temperature adjustment
- > Steam and water output adjustment
- > Electric controls
- (Reference Description)
- > Steam gun
- Use of the steam gun
- > START-UP
- Description of the start sequence
- > TO SPRAY DETERGENT
- .> Machine stop (at end of work)
- Boiler steam discharge
- see fig. F (Optional)
- CARE AND MAINTENANCE
- SCHEDULED MAINTENANCE PLAN
- Visit website and download the scheduled maintenance plan.
- SEE ROUTINE MAINTENANCE TABLE
- · WARNING
- Machine general cleaning
- ⚠ WARNING:
- TROUBLESHOOTING
- Machine noise level
- WARRANTY CONDITIONS
- DISPOSAL (WEEE)
- INDICATIONS GÉNÉRALES
- > UTILISATION PRÉVUES
- >DESCRIPTION DU L'APPAREIL
- CONDITIONS DE GARANTIE
- - ACHTUNG:
- TR
- > CİHAZIN AÇIKLAMASI
- bkz. Şekil A B
- ⚠️ ВНИМАНИЕ:
- > ОПИСАНИЕ МАШИНЫ
- см. рис. А В
- LpA 75 dB (A)
- LwA 88dB(A) K (uncertainty) 3dB (A)
- LwA 91dB(A)
Brand : Lavor
Model : Graffiti Waster
Category : Steam cleaner