GV 4.1 VAC - Steam cleaner Lavor - Free user manual and instructions
Find the device manual for free GV 4.1 VAC Lavor in PDF.

| Product type | Steam cleaner with vacuum and ironing |
| Brand | Lavor |
| Model | GV 4.1 VAC |
| Boiler water tank capacity | 1.2 L |
| Recovery tank capacity | 8 L |
| Power supply | Mains, see rating plate |
| Max ironing temperature | 200 °C |
| Main functions | Steam cleaning, dry and liquid vacuuming, vertical and horizontal ironing, water filtration |
| Vacuum types | Dust, liquids, steam |
| Steam adjustment | Rotary knob (3 levels: min, medium, max) |
| Vacuum adjustment | 4 power levels via button on handle |
| Filtration | Microfiber filter, sponge filter, solid elements filter, HEPA filter, carbon filter |
| Safety | Overpressure valve, safety thermostat, float, steam safety lock, low-voltage controls |
| Included accessories | Large brush with adapters (floor, carpet, liquids), upholstery nozzle, lance, brushes, squeegee, iron (optional depending on model) |
| Maintenance | Regular filter cleaning, tank emptying, use of distilled water for boiler |
| Warranty | Minimum 12 months |
Frequently Asked Questions - GV 4.1 VAC Lavor
User questions about GV 4.1 VAC Lavor
0 question about this device. Answer the ones you know or ask your own.
Ask a new question about this device
Download the instructions for your Steam cleaner in PDF format for free! Find your manual GV 4.1 VAC - Lavor and take your electronic device back in hand. On this page are published all the documents necessary for the use of your device. GV 4.1 VAC by Lavor.
USER MANUAL GV 4.1 VAC Lavor


natural_image
Close-up of hands installing or adjusting a mechanical component with a labeled 'W' (no text or symbols on the object itself)

natural_image
Close-up of a hand inserting a small electronic component into a device, with no visible text or symbols.

natural_image
Close-up of hands holding a curved object with a numbered label (Z) pointing to a section, no visible text or symbols beyond the label.
natural_image
Two grayscale photos showing a vacuum cleaner on tiled floor and a close-up of its tip (no text or symbols visible)ASPIRAZIONE A SECCO O DI LIQUIDI
natural_image
Close-up of a mechanical component with a textured surface and smoke trail (no visible text or symbols)PULIZIA A VAPORE
natural_image
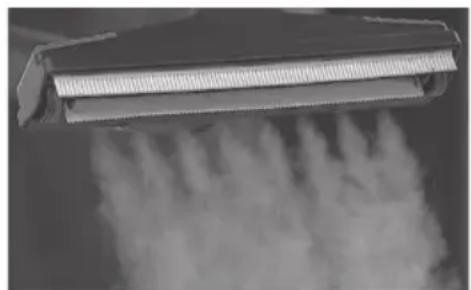
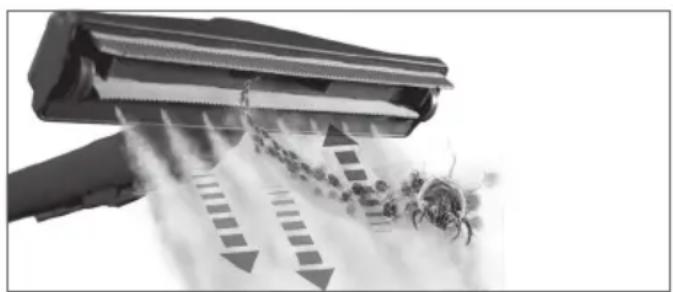
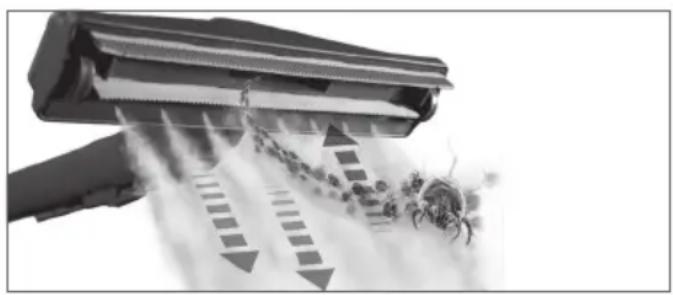
Industrial machine emitting smoke or vapor discharge with a cluster of debris (no visible text or symbols)ASPIRAZIONE e PULIZIA SIMULTANE A VAPORE
natural_image
Hand ironing a steam iron on a bed, with steam rising (no text or symbols visible)STIRATURA PROFESSIONALE OPTIONAL
5 AVVERTENZE GENERALI
natural_image
Close-up of a mechanical component with a spherical housing and mounting flanges, labeled 'Fig. 6' (no readable text or symbols beyond label)
natural_image
Close-up of a circular mechanical component with a pointer labeled 'K' and 'Fig. 7' (no readable text or symbols beyond labels)

natural_image
Diagram of a spray gun emitting particles, labeled Fig. 10 (no text on diagram itself)natural_image
Close-up of hands holding a small object with arrows indicating motion or force, labeled 'Fig. 13' (no readable text or symbols)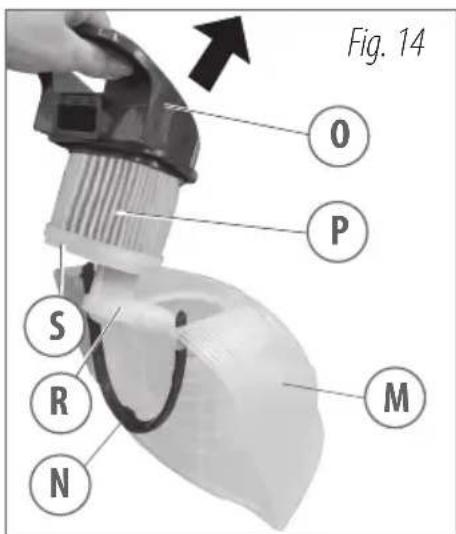
natural_image
Close-up of a mechanical component with a labeled section 'Fig. 22' (no other text or symbols visible)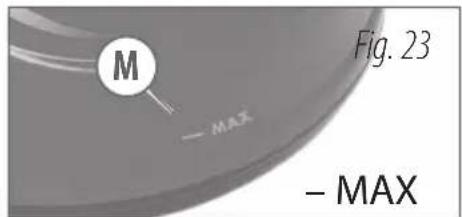
natural_image
Close-up of a hand holding a hairdryer tool with a white arrow pointing to the handle area (no text or symbols on the tool itself)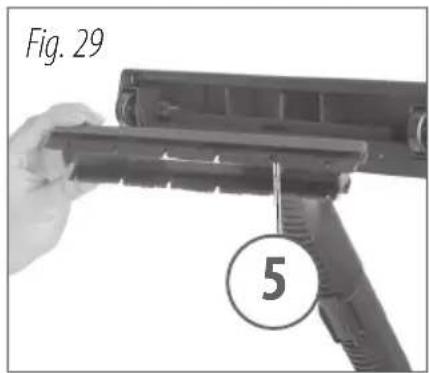

natural_image
Hand holding a handheld device with an arrow pointing to it, labeled 'Fig. 32' (no other text or symbols visible)
natural_image
Close-up of hands holding a handheld device with a probe inserted (no visible text or symbols)
natural_image
Diagram of a mechanical device with a labeled section 'Fig. 34' showing internal components (no text or symbols on the diagram itself)
natural_image
Hand holding a cylindrical device with an arrow pointing to it, labeled 'Fig. 35' (no other text or symbols)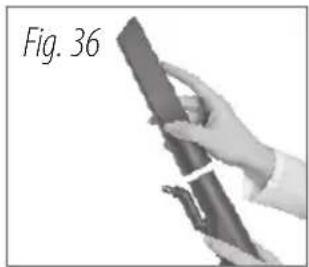
natural_image
Hand holding a cylindrical object, labeled 'Fig. 36' (no other text or symbols visible)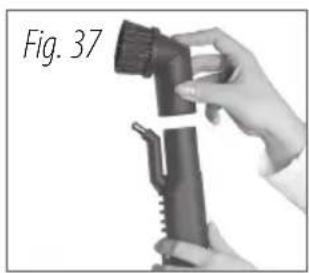
natural_image
Hand holding a handheld device labeled Fig. 37, no visible text or symbols on the device itself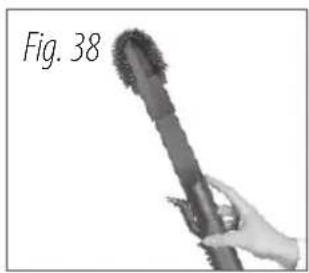
natural_image
Hand holding a cylindrical object with textured surface, labeled 'Fig. 38' (no other text or symbols visible)BOCCHETTA PER TAPPEZZERIA (20)
natural_image
Close-up of a mechanical component with circular flange and bolt holes, labeled Fig. 43 (no text or symbols on the object itself)natural_image
Close-up of hands using a tool to adjust or install a mechanical component (no visible text or symbols)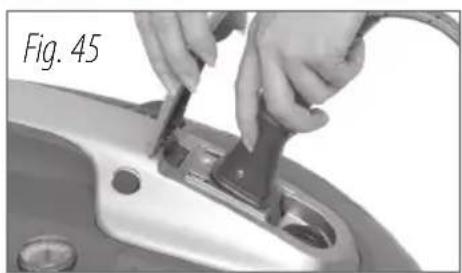
natural_image
Close-up of hands using a tool to adjust or install a mechanical component (no visible text or symbols)
natural_image
Close-up of a hand pressing down on a circular mechanical component, labeled 'Fig. 46' (no other text or symbols visible)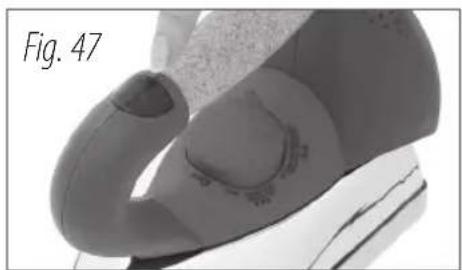
natural_image
Close-up of a human foot and ankle joint (no text or symbols visible)
natural_image
Close-up of a hand holding a textured, circular object (no visible text or symbols)
natural_image
Close-up of a steam iron pressing down on a textured surface (no text or symbols visible)Etichetta
natural_image
Person in suit handling a metal object, labeled 'Fig. 50' (no other text or symbols visible)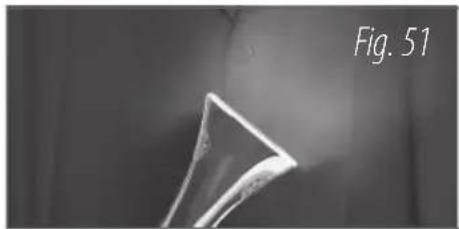
natural_image
Close-up of a triangular object with a pointed tip, labeled 'Fig. 51' in the corner (no other text or symbols)11 SVUOTAMENTO SERBATOIO (M)
natural_image
Close-up of a handheld electric shaver with control buttons and power plug (no visible text or symbols)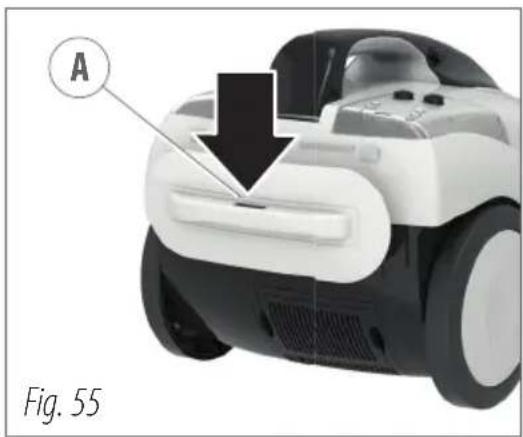
natural_image
Close-up of a robotic car with labeled component A and arrow indicating motion (no text or symbols on the car itself)
natural_image
Close-up of a white and black vacuum cleaner with a brush, labeled 'Fig. 56' (no other text or symbols visible)natural_image
Close-up of a hand holding a small object with a suspended rod above it, labeled 'Fig. 58' (no other text or symbols visible)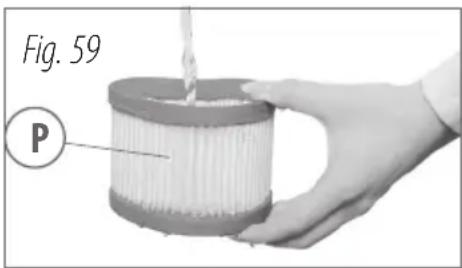
natural_image
Person applying adhesive to a mechanical component, labeled 'X' with no visible text or symbols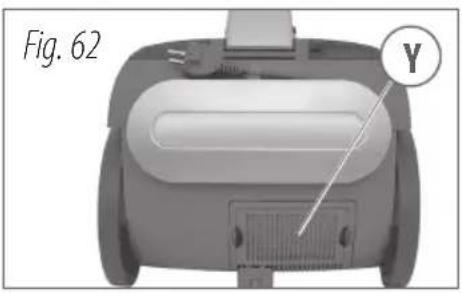
natural_image
Top-down view of a robotic device labeled Fig. 62, showing internal components and a circular annotation with letter Y (no readable text or symbols beyond label)15 RISOLUZIONE GUASTI
7.1 Using the appliance as a steam cleaner....pag. 36
7.2 Using dust vacuum and steam...pag. 36
7.3 Using steam and suction simultaneously....pag. 37
7.4 Using steam and liquid suction simultaneously....pag. 37
7.5 Dust vacuum function with water filtering....pag. 39
8 USING THE ATTACHMENTS......pag. 40
9 SUGGESTIONS....pag. 44
9.1 Steam cleaning suggestions......pag. 44
10 IRONING....pag. 46
10.1 Using the appliance for ironing . pag. 46
10.2 SUGGESTIONS ...... pag. 47
10.3 Upright ironing ...... pag. 48
10.4 Freshening up clothes....pag. 48
11 EMPTYING THE TANK (M)...... pag. 49
12 TOPPING UP THE BOILER WATER TANK (L)....pag. 49
13 AFTER USE ...... pag. 50
14 MAINTENANCE.... pag. 51
15 TROUBLESHOOTING ...... pag. 52
16 DISPOSAL....pag. 53
CAUTION! Pay attention for safety reasons.
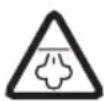
CAUTION! Hazard due to hot steam.

IMPORTANT NOTE

07CAUTION: High pressure jets can be dangerous if subject to misuse. Jets must not be directed at people, animals, live electrical equipment, or the appliance.
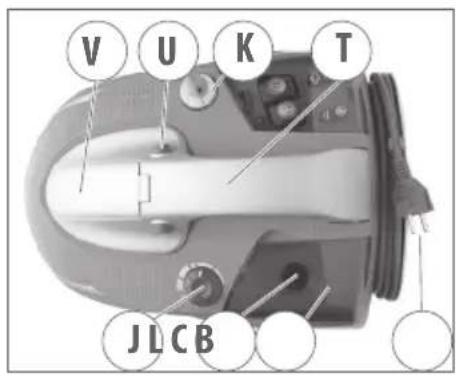
1 DETAILS

natural_image
Close-up of hands installing or adjusting a mechanical component on a device (no visible text or symbols)

natural_image
Close-up of a hand using a computer to press a small electronic device (no visible text or symbols)

natural_image
Close-up of hands holding a curved object with a numbered label (Z) pointing to a detail, no readable text or symbols present.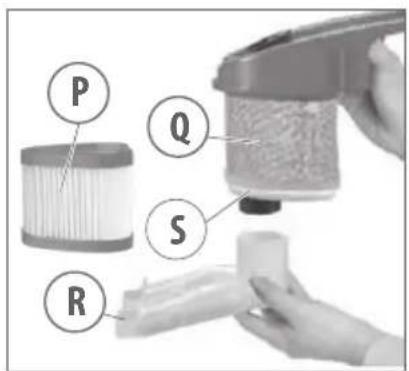
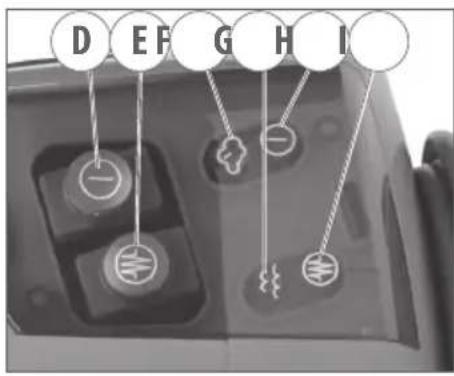
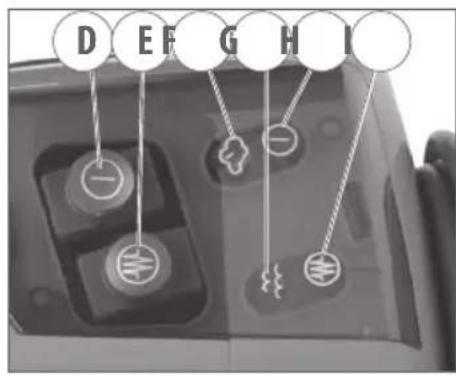
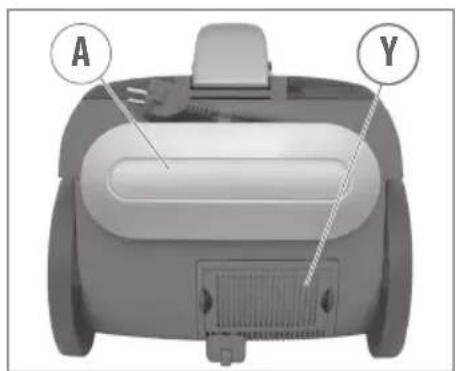
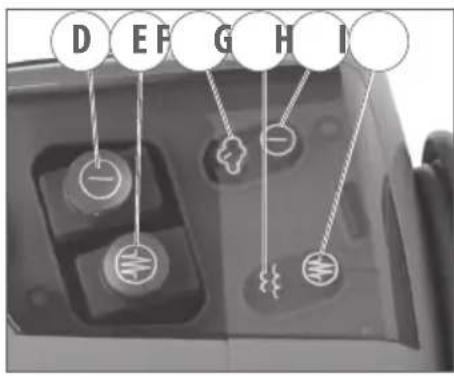
A. cable rewinder
B. power cable
C. boiler water tank cap
D. main switch
E. boiler switch
F. steam-ready pilot light
G. no-water pilot light
H. main switch pilot light
I. boiler switch pilot light
J. steam adjustment knob
K. pressure gauge
L. boiler water tank
M. tank
N. tank handle
- filter assembly with float (01)
P. microfibre filter (washable)
Q. sponge filter (washable)
R. solids filter (washable)
S. lower filter cover
T. handgrip
U. handgrip button
V. safety cover
W. steam socket
X. HEPA air filter (not washable)
Y. carbon filter (not washable)
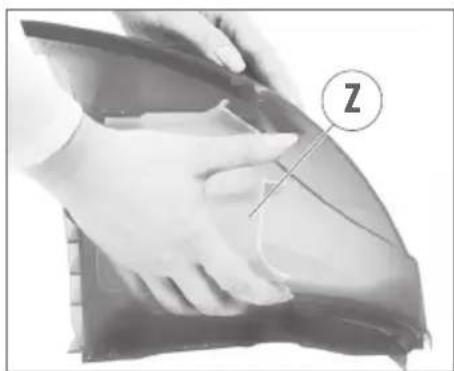
Z. internal tank baffle
2 LIST OF ATTACHMENTS AND COMPONENTS
Depending on the model, differences in the supply may occur (see packaging).
Depending on the model, differences in the supply may occur (see packaging).
* Optional
- Flex/flexible tube
- Extension tubes
- Big brush
- Brush support hook
- Floor fitting
- Carpet fitting
- Liquid fitting
-
Cotton cloth
-
Steam/suction connector
-
Extension for steam nozzle
- Plastic brush
- Steel brush
- Brass brush
- Scraper
-
Small triangular nozzle
-
Small liquid suction brush
- Flat nozzle
- Radiator brush
-
Brush
-
Upholstery nozzle
- Wiper attachment
- Bristled attachment
23.* Iron
24.* Iron support
- Kit of spare seals
- Handgrip
- Quick connector
- Front button
- Steam lever
-
Lower hooking lever
-
Remote suction motor button
-
Suction power level LED indicator
-
Steam delivery safety lock
34.* Iron plug
35.* Steam hose
36.* Luminous button + iron steam lever
37.* Temperature regulator knob
38.* Detergent sprayer with detergent canister
39.* Detergent

3 BEFORE USE
CAUTION! The user's manual is an integral part of the appliance. Read the user's manual carefully before using the appliance. Keep the manual for future reference.
TECHNICAL DATA (see technical data plate)
3.1 Symbols
The manual uses symbols, shown below, to draw your attention to specific details.
⚠️ CAUTION! For safety reasons, be cautious.
⚠ WARNING: contains additional information and useful advice for the appropriate use of the appliance.
4 USES
With the sole use of water, this appliance lets you steam-clean surfaces, suck up dust and liquids and iron easily, quickly.
- This appliance is also suitable for commercial uses, for example in hotels, schools, hospitals, factories, shops, offices and rental businesses.
- With the high pressure stainless steel boiler with an unlimited life span, readily usable and complete with all attachments, it is possible to clean and disinfect all surfaces with high pressure steam, thereby eliminating mites, germs and bacteria as well as preventing allergies.
natural_image
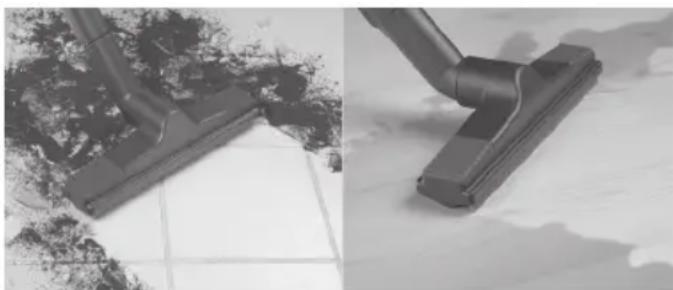
Two black-and-white photos showing a vacuum cleaner's side profile and its close-up of tiled floor (no text or symbols visible)DRY OR LIQUID SUCTION
- With its high-efficiency suction and electronic control, it is possible to adjust the suction power directly from the gun and pick up the dirt that has been dissolved by steam, suck dust and liquids with a 4 filtering passage system.
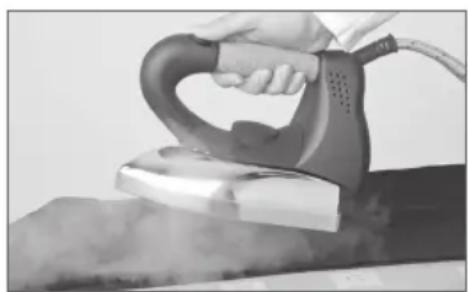
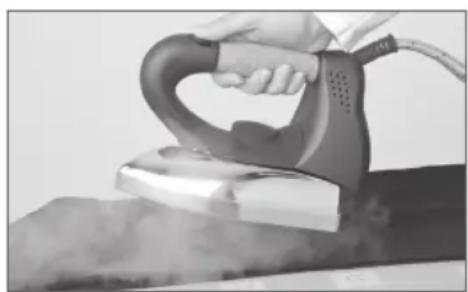
- You can use the iron to iron and freshen up clothes.
natural_image
Close-up of a mechanical device emitting exhaust heat, showing airflow and spray patterns (no text or symbols visible)SIMULTANEOUS STEAM SUCTION AND CLEANING

natural_image
Close-up of a mechanical component emitting smoke or vapor (no visible text or symbols)STEAM CLEANING
natural_image
Hand using a steam iron on a flat surface (no text or symbols visible)IRONING OPTIONAL
5 GENERAL WARNINGS
▲01. Carefully read the "User Guide" before use. The manufacturer will not be held responsible for injuries to persons or damage to property due to non-compliance with the aforementioned "User Guide".
△02. It is recommended to keep all packaging to protect the machine and attachments during transport to another location or for evaluation / repair. Disposal of any packaging should be in accordance with current disposal laws.
△03. Use the machine for its specific purposes nly.
△04. The appropriate Personal Protective Equipment should be worn to operate the appliance and protect the user. This should be in accordance with an appropriate risk assessment prior to its first use.
△05. Connect machine to a suitable power outlet compatible with the technical data of the appliance. It is recommended that a circuit breaker is used to provide earthed protection.
△06. Do not pull the plug by its cable.
△07. Do not drag the appliance by its power cable.
△08. Unwind the power cable completely before use.
△09. Avoid using electrical extension cables; if necessary, use an extension cable with a safety approval mark with a protective earthing system. Minimum cross section of extension cable 1.5 mm.
△10. Unplug the appliance after use and before filling, cleaning of the tank and replacement of the flexible tube.
△11. Do not fill the tank by placing the appliance directly under the tap.
△12 Before using the appliance, make sure that the cable, plug and hose are not damaged.
△13. Do not use the appliance for steam-cleaning electrical appliances or electric sockets.
- Once the appliance is plugged in, do not work with wet hands or feet.
⚠️15. Do not immerse the appliance in any liquid.
△16. The appliance is not to be used by children or persons with reduced physical, sensory or mental capabilities, or lack of experience and knowledge, unless they have been given supervision or instruction.
△17. Do not use or store the appliance in vertical position.
⚠18. Do not steam-clean the appliance.
△19. Do not leave the appliance unattended when it is connected to the mains or when the appliance is on.
△20. Repairs must be carried out only by an authorised service centre.
△21. The electric cable must be replaced only by an authorised service centre.
△22. Do not vacuum explosive, toxic and inflammable substances (e.g. chimney ashes and soot) or substances that may be dangerous to your health.
△23. Do not use the appliance to suck water from containers, sinks, baths, etc.
△24. Do not place the suction orifice near delicate parts of the body such as eyes, mouth and ears.
△25. Do not put your hands close to the steam jet.
△26. Do not point the steam jet towards people or animals.
△27. During use the appliance could overheat if covered.
△28. The appliance must not be used by children or by people who have not been properly instructed.
△29. If the appliance is lent to someone else, the user's manual should also be passed on.
SAFETY

IMPORTANT WARNINGS
-
CAUTION: This appliance has been designed for use with the detergent supplied or recommended by the manufacturer, neutral detergent shampoo type based on biodegradable anionic surfactants. The use of other cleaning agents or chemicals may endanger the safety of the appliance.
-
CAUTION: High pressure jets can be dangerous if subject to misuse. The jet must not be directed at persons, live electrical equipment or the machine itself.
-
CAUTION: Do not use the appliance within range of persons unless they wear protective clothing.
-
CAUTION: Do not direct the jet against yourself or others in order to clean clothes or footwear.
-
CAUTION: Risk of explosion. Do not spray flammable liquids.
-
CAUTION: The appliance shall not be used by children or untrained personnel.
-
CAUTION: To ensure machine safety, use only original spare parts from the manufacturer or approved by the manufacturer.
-
CAUTION: Maintenance and repairs must always be performed by qualified personnel. Any malfunctioning parts must be replaced only with original spare parts.
-
CAUTION: Water that has flowed through backflow preventers is considered to be non potable.
-
CAUTION: Do not use the appliance if the electric cable or important parts of the appliance are damaged, e.g. safety devices, high pressure hose, gun, etc.
-
CAUTION: Inadequate extension cords can be dangerous.
△41. CAUTION: If an extension cord is used, it shall be suitable for outdoor use, and the connection has to be kept dry and off the ground.
△42. CAUTION: It is recommended to use a cord reel which keeps the socket at least 60 mm above the ground.
-
CAUTION: Fully switch off the appliance (main switch in (0) OFF position) every time it is unattended.
-
CAUTION: This hose contains electrical connections: do not use it to collect water and do not immerse in water for cleaning.
6 STARTING UP
6.1 Starting up the boiler (steam)
⚠ WARNING: When preparing the appliance for use, switch it off and unplug it.
⚠ WARNING: the appliance must be placed on a horizontal flat surface.
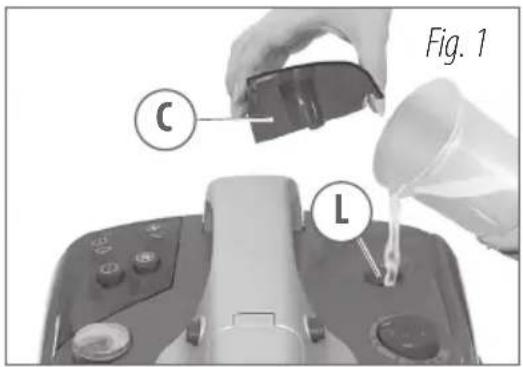
- Remove the boiler water tank cap (C) (Fig. 1)
- Fill the boiler water tank (L) (max 1.2 litres) with distilled water.
- Put on the boiler water tank cap (C).
6.2 Preparing the vacuum cleaner
The appliance is supplied and equipped with a microfibre filter (P) which is already assembled.
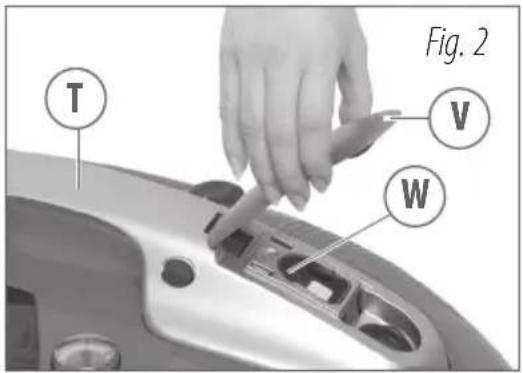
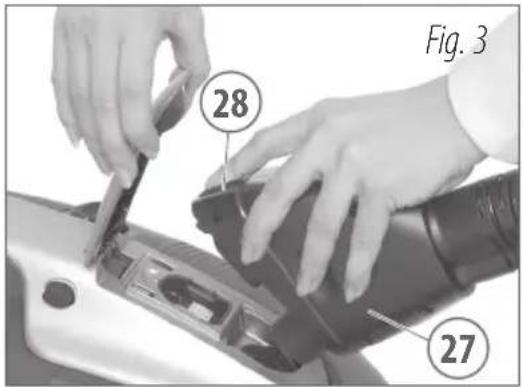
⚠ WARNING: for safety reasons, the handgrip (T) can be released only if the quick connector (27) is not inserted.
- Lift the safety cover (V) (Fig. 2)
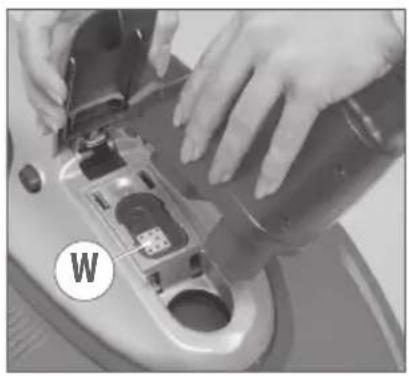
- Insert the quick connector (27) of the flex (1) by pressing the front button (28) into the steam socket (W) (Fig. 3)
• Make sure it is properly fastened: (once in position button (28) should click)
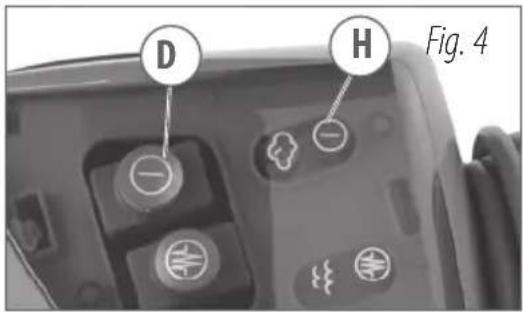
- Plug the power cable (B) into an appropriate socket provided with an earthing system.
- Press the main switch (D); the pilot light (H) will come on (Fig. 4)
7 OPERATION
7.1 Using the appliance as a steam cleaner
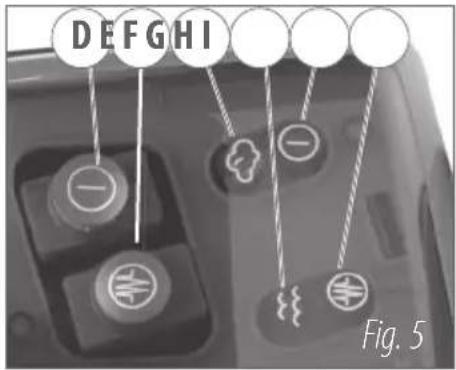
Please refer to the chapter "Starting up the boiler" before use. Press the main switch (D) and the boiler switch (E), the respective pilot lights (H) and (I) will come on. Water will start heating up and steam will then be produced (Fig. 5).
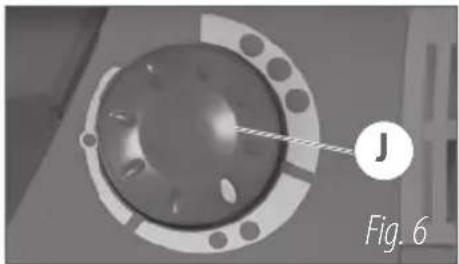
Pre-select the amount of steam using the knob (J) located on the appliance (Fig. 6).
The gauge (K) indicates the pressure inside the boiler: the grey/silver area indicates the ideal pressure for use (Fig. 7).
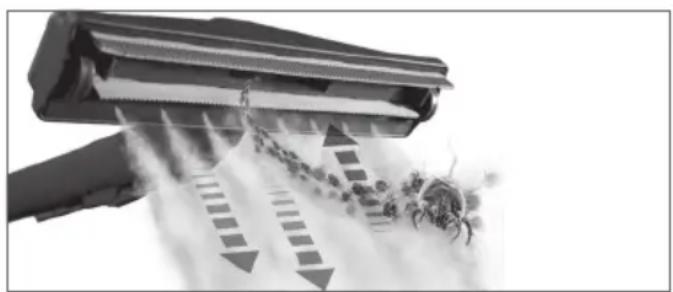
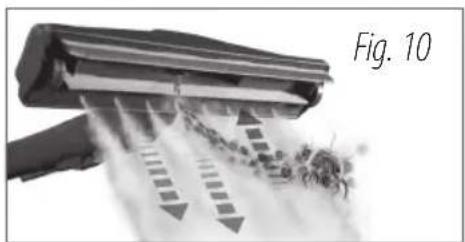
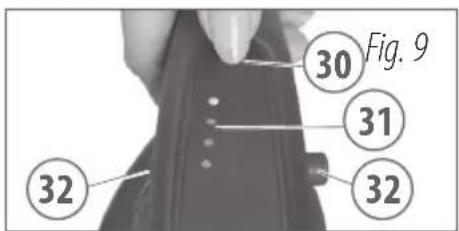
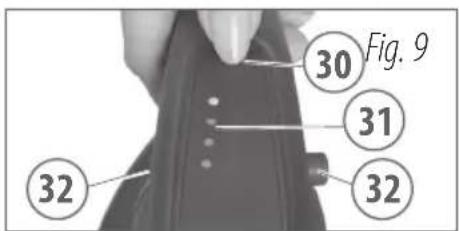
When the pilot light (F) comes on, the appliance will be ready to function with steam. Now press the lever (29) on the handgrip (26) (Fig. 8).
The first amount of steam will come out with water condensation; direct the jet to one side or onto a cloth.
The handgrip (26) has a safety lock (32) which prevents steam from accidentally escaping (Fig. 9):
• left lock: the lever is free
• right lock: the lever is locked
Note: To obtain the correct quantity of steam, wait 3-4 minutes for the water to heat up.
7.2 Using dust vacuum and steam
⚠️ CAUTION! Do not vacuum without microfibre filter (P) installed.
- Microfibre filter (P): it has high filtering capacity and allows perfect dust vacuum and steam.
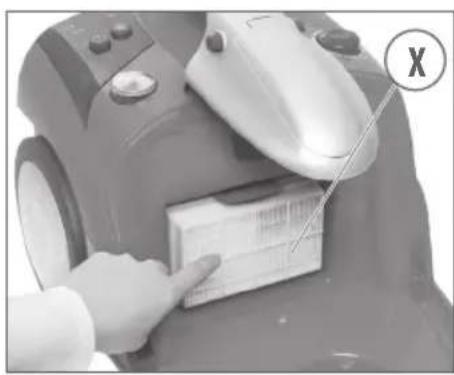
⚠️ CAUTION! Do not vacuum without HEPA filter (X) installed.
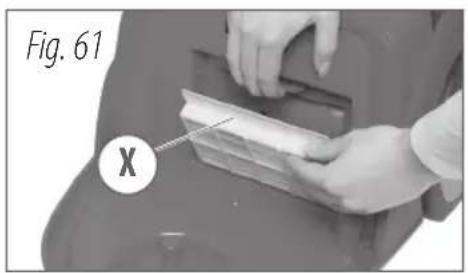
- HEPA air filter (X): it has very high filtering capacity and filters fine dust ensuring output air quality. Periodically inspect by lifting the hooking lever. See section ""MAINTENANCE"" (Fig. 61)
Note: the tank (M) must be empty and dry.
- To turn the vacuum cleaner on and off, press and hold the suction button (30) for approx. 2 seconds.
To select suction power (from 1st to 4th level), shortly press the suction button (30) on the handgrip (26) several times; the LED (31) corresponding to the selected power level lights up (Fig. 9)
natural_image
Close-up of a mechanical component with a spherical housing and mounting holes, labeled 'Fig. 6' (no readable text or symbols beyond label)
natural_image
Close-up of a circular mechanical component with a pointer labeled 'K' and 'Fig. 7' (no readable text or symbols beyond labels)

natural_image
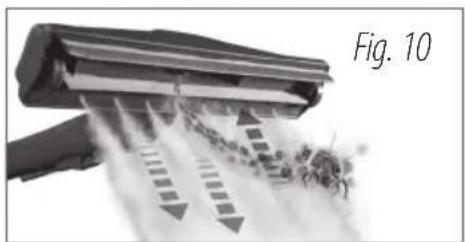
Diagram of a hand spraying water with arrows indicating flow direction, labeled 'Fig. 10' (no text or symbols on diagram itself)It is possible to change the power level with suction both on and off. Every time the quick connector (27) is removed, at the next insertion the suction power level restarts from 1st level.
7.3 Using steam and suction simultaneously
Please refer to the chapter "Starting up the boiler" before use. It is possible to combine the steam cleaning and suction functions described above to perform the washing and suction cycles at the same time. When work is finished, release the steam lever (29) a few moments prior to switching off the suction motor button (30). This will allow the suction ducts to recover the humidity.
Note: Whilst you are working, it is normal to occasionally hear the pump as it pumps in the water. Be careful not to confuse this noise with the audible warning signal (beep) made when the boiler water tank is empty.
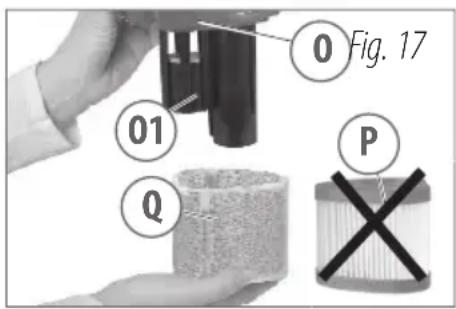
7.4 Using steam and liquid suction simultaneously
- Fully press the two buttons (U) to the sides of the handgrip (T) (Fig. 11).
- Lift the handgrip (T).
- Lift the handle (N) and remove the tank (M) (Fig. 12).
- Remove the HEPA filter (X) (Fig. 13).
• Overturn the handle (N) of the tank and slide out in backward lower direction the filter assembly with float (O) (Fig. 14).
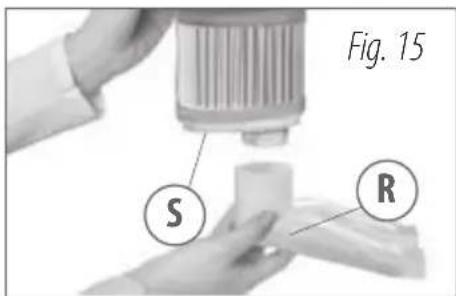
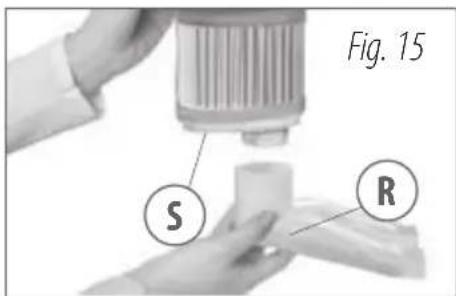
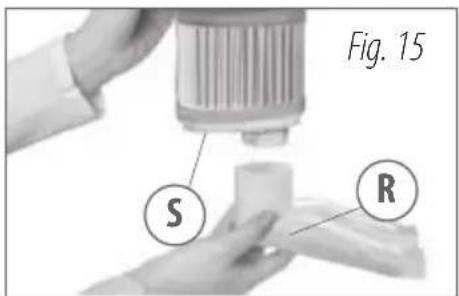
• Disassemble the solids filter (R) (Fig. 15).
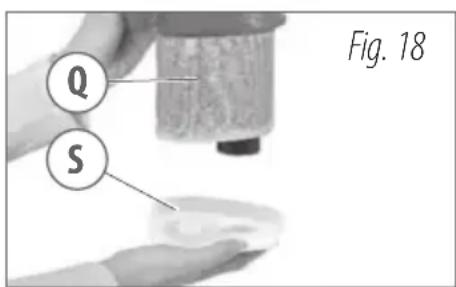
• Disassemble the lower filter cover (S) (Fig. 16).
- Replace the microfibre filter (P) and insert the sponge filter (Q) in the proper seat (Fig. 17).
Note: Sponge filter (Q): to be used for liquid suction.
- Fully insert the lower filter cover (S) (Fig. 18).
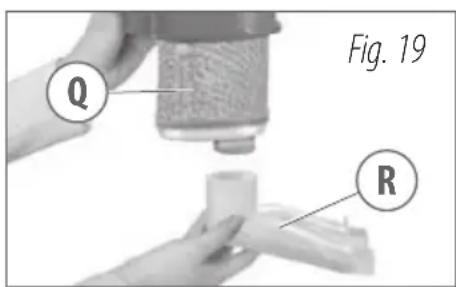
• Fully insert the solids filter (R) (Fig. 19)
Note: Solids filter (R): performs a first filtering of debris and dimensionally significant bodies.
- Check proper fitting of the assembly, with filter, lower filter cover (S) and solids filter (R) fully inserted.
- Reposition the filter unit (0) with float (01) in the tank (M).
- With the handgrip (T) lifted, reposition the tank (M) on the appliance.
- Lower the handgrip (T).
- Close the handgrip (T) by pushing down and check proper click of buttons (U).
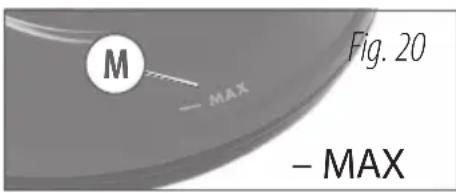
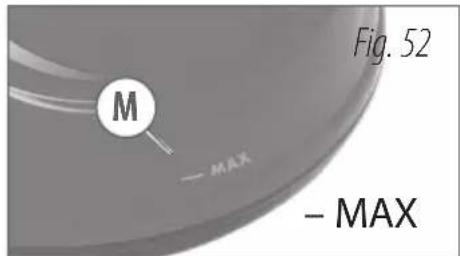
Note: During liquid suction on surfaces, do not exceed the MAX level inside the tank (M) (Fig. 20).
Note: The appliance is equipped with safety float (01) (Fig. 17), which triggers if the maximum permitted level of liquid inside the tank (M) is exceeded (Fig. 20). In this case there is no appliance suction and simultaneously the motor revolutions increase. Turn off the appliance and empty the tank (M).
⚠️ CAUTION! Do not pour detergents or flammable substances in the tank.
CAUTION! Never perform suction if the sponge filter (Q) is not installed.
CAUTION!
- Do not vacuum explosive, toxic and inflammable substances (e.g. chimney ashes and soot) or substances that may be dangerous to your health.
- Do not use the appliance to suck liquids from containers, sinks, baths, etc.
- Do not suck foam
- If foam forms inside the tank, turn off the appliance immediately and empty the tank (M).
- In case of water filtering, replace it when cloudy.
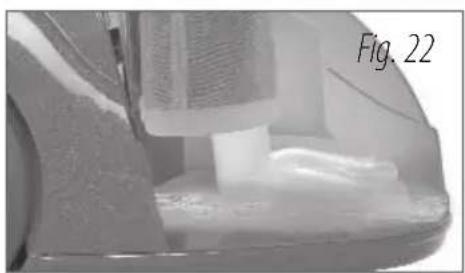
7.5 Dust vacuum function with water filtering
IMPORTANT: the microfibre filter (P) must not be used with water filtering function.
IMPORTANT: the HEPA filter (X) must not be used with water filtering function.
Water filtering allows to "capture" dirt while keeping the output air clean, resulting in even more effective cleaning.
Proceed as described in section "Preparing the vacuum cleaner" by replacing the microfibre filter (P) with the sponge filter (Q) (Fig. 17).
Add 1 litre of tap water inside the tank (M), until reaching the MAX level mark on the tank (Fig. 23).
CAUTION! Do not pour detergents or flammable substances in the tank.
CAUTION! Never perform suction if the sponge filter (Q) is not installed.
CAUTION!

natural_image
Close-up of a mechanical component with a tool inserted, labeled 'Fig. 22' (no other text or symbols visible)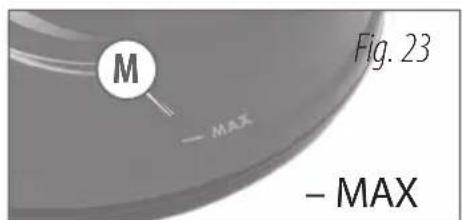
- Do not vacuum explosive, toxic and inflammable substances (e.g. chimney ashes and soot) or substances that may be dangerous to your health.
- Do not use the appliance to suck liquids from containers, sinks, baths, etc.
- Do not suck foam
- If foam forms inside the tank, turn off the appliance immediately and empty the tank (M).
- During liquid suction on surfaces, do not exceed the MAX level inside the tank (M)
- The appliance is equipped with safety float (01) (Fig. 17), which triggers if the maximum permitted level of liquid inside the tank is exceeded (Fig. 23). In this case there is no appliance suction and simultaneously the motor revolutions increase. Turn off the appliance and empty the tank (M), see section "Emptying the tank (M)".
8 USING THE ATTACHMENTS
See list of attachments and components.
The attachments can be directly connected to the handgrip (26) or, depending on your needs, to the extension tubes (2).
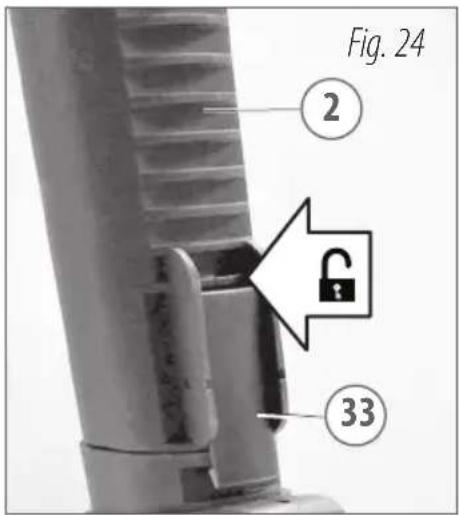
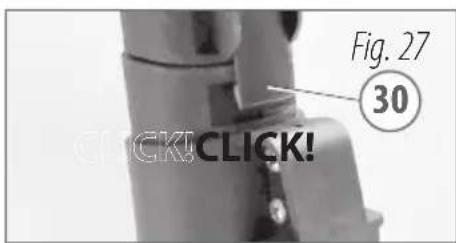
- Fitting the attachments: fit completely until the lower hooking lever (33) is hooked (Fig. 24).
- Disconnecting the attachments: press the lower lever (33) and pull out the attachment. (Fig. 24).
CAUTION! Make sure it is properly fastened by pulling it slightly.
CAUTION! Never separate the attachments when steam is coming out. Risk of burns.
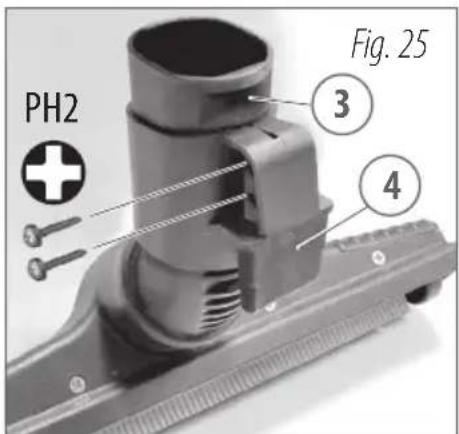
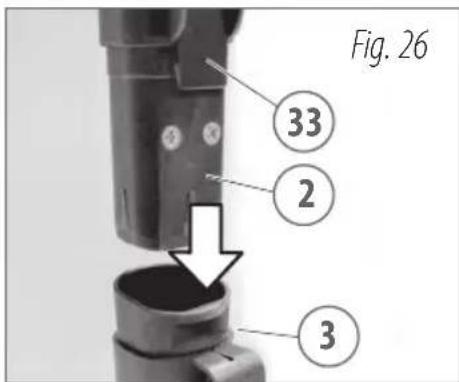
BIG BRUSH (3)
- insert the brush holder hook (4) up to the curve of the neck of the big brush (3), leave one tooth free as shown in (Fig. 25),
- screw the two screws.
- fully insert the extension tube (2) until the hooking of the lower lever (33) (Fig. 26) (Fig. 27).
CAUTION! Make sure it is properly fastened by pulling it slightly.
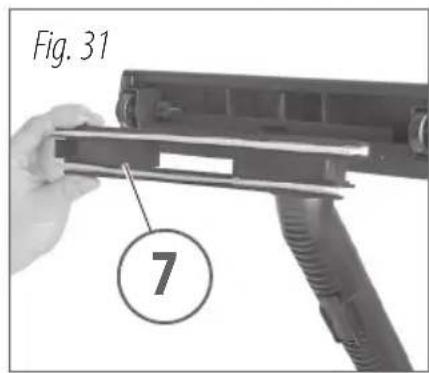
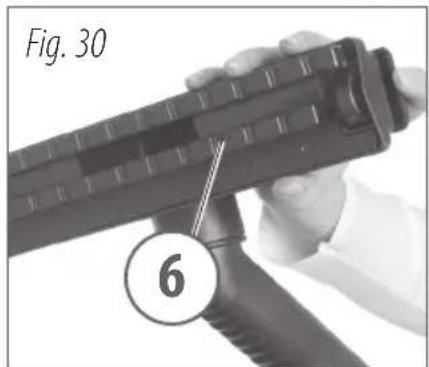
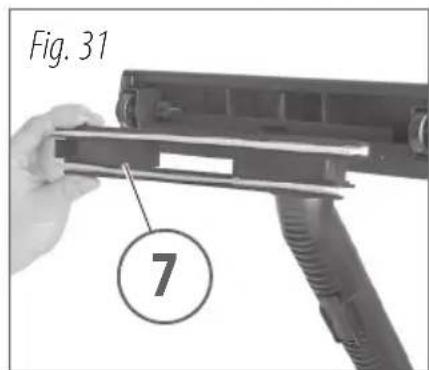
The big brush (3) is provided with an articulated connection, wheels, steam diffuser and a suction unit. Three different fittings can be attached to it:
• floor fitting (5) (Fig. 29)
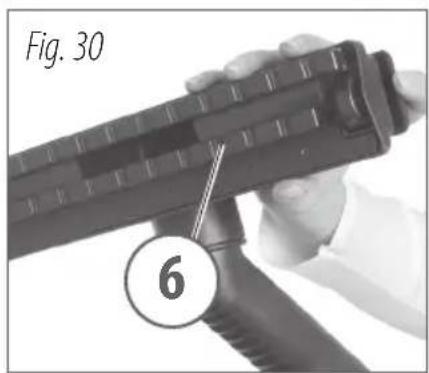
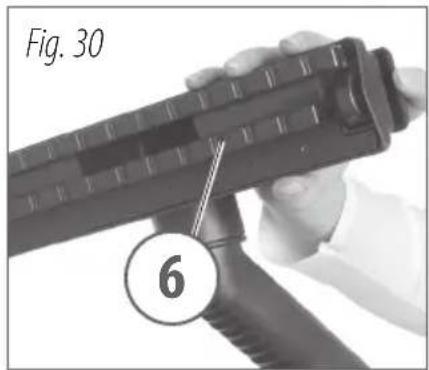
• carpet fitting (6) (Fig. 30)
- liquid fitting (7) (Fig. 31)
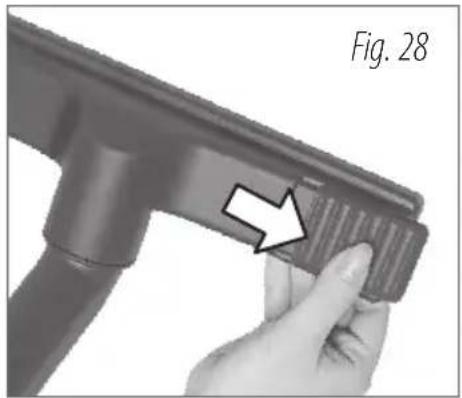
To assemble the fitting:
- Move the two top slides outwards (Fig. 28)
- Turn the brush (3) upside down
- Fit the required fitting and make sure it is properly oriented (the wide part must face forward) (Fig. 29)(Fig. 30)(Fig. 31)
- Fasten the fitting by moving the two top slides inwards (Fig. 28)
natural_image
Close-up of a hand holding a hairdryer tool with a white arrow pointing to the handle area (no text or symbols on the tool itself)

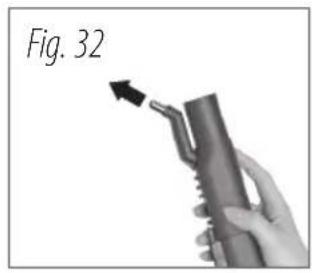
STEAM/SUCTION CONNECTOR (9), STEAM ATTACHMENTS, SUCTION ATTACHMENTS
- Fit the steam/suction connector (9) into the handgrip (26) or extension tube (2).
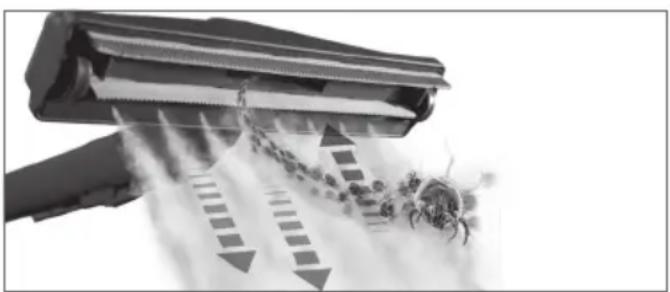
The steam/suction connector (9) is equipped with concentrated steam diffuser (Fig. 32), to clean limescale, splits, etc., and is equipped with connector for suction attachments (Fig. 35).
The following attachments can be used:
- extension for steam nozzle (10), to clean limescale, splits, etc. (Fig. 34)
- small nozzle brush, scraper, small triangular nozzle (or other attachments, see packaging) to be directly applied on the steam/suction connector (9) (Fig. 33), or on the steam nozzle extension (10) (Fig. 34), to clean limescale, splits, etc.
- crevice (17) (Fig. 36), for suction in difficult points, corners, sofa creases, etc.
- brush (19) (Fig. 37), with natural bristles, for more effective suction and cleaning.
- radiator attachment (18) (Fig. 38), specific for suction of dust in radiator splits, to be used together with the crevice (17).
NOTE: Depending on the model, differences in the supply may occur (see packaging).
natural_image
Hand holding a handheld device with an arrow pointing to it, labeled 'Fig. 32' (no other text or symbols visible)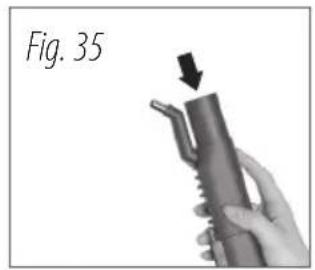
natural_image
Hand holding a cylindrical device with an arrow pointing to it, labeled 'Fig. 35' (no other text or symbols)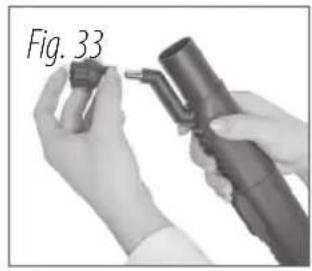
natural_image
Close-up of hands holding a handheld device with a probe inserted (no visible text or symbols)
natural_image
Hand holding a cylindrical object, labeled 'Fig. 36' (no other text or symbols visible)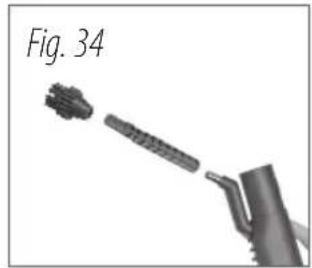
natural_image
Diagram of a mechanical device with a labeled section 'Fig. 34' showing a tool interacting with a textured component (no readable text or symbols)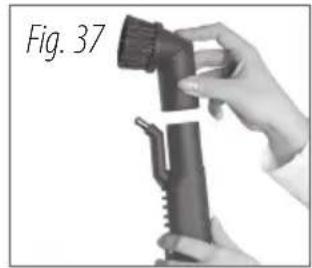
natural_image
Hand holding a handheld device labeled Fig. 37, no visible text or symbols on the device itself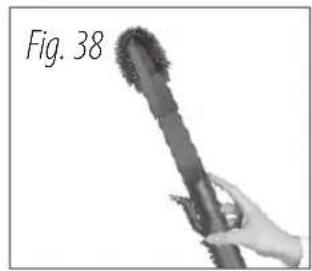
natural_image
Hand holding a cylindrical object with textured surface, labeled 'Fig. 38' (no other text or symbols visible)UPHOLSTERY NOZZLE (20)

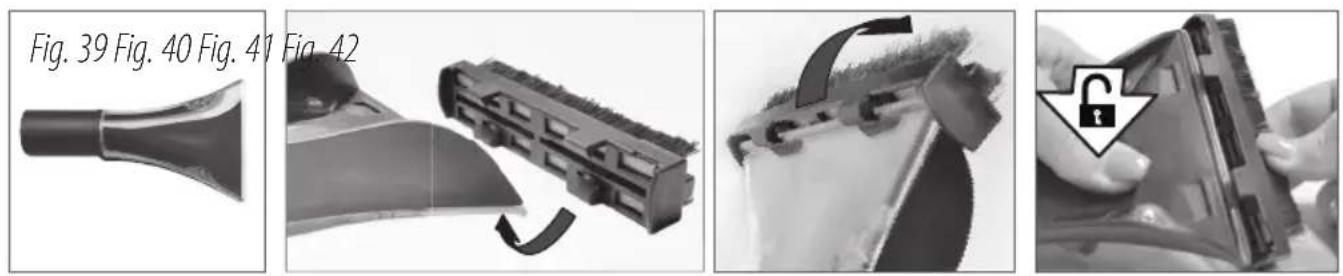
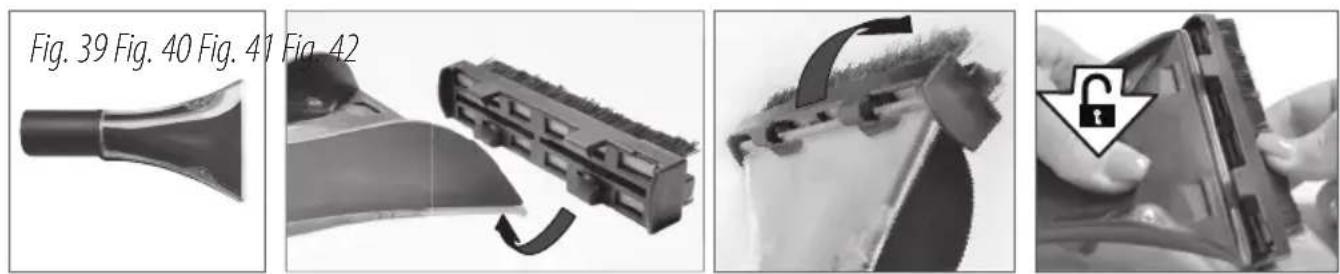
- Fit the upholstery nozzle (20) (Fig. 39) into the handgrip (26) or extension tube (2).
It has a steam diffuser and a suction nozzle. Two different fittings can be attached to it:
- wiper attachment (21) for hard and smooth surfaces and window wiper function.
• bristled attachment (22) for armchairs and sofas, etc.
The attachments are snap-fit on the upholstery nozzle (20) (Fig. 40) (Fig. 41).
To disassemble the attachment, press with your thumb on the LOWER part, to disengage the attachment hooking teeth (Fig. 42).
CAUTION!
Significant temperature changes between the window glass and the steam can cause glass breakage.
In case of cold outdoor temperatures, pre-heat the glass by dispensing steam at a distance of 30-50cm.
Then spray steam on the entire surface of the glass to compensate for temperature changes and avoid tension on the glass surface.
Using wiper attachment (21), window wiper function:
- Wiper the window cleaner on the surface from top to bottom.
• To dry, vacuum by placing the rubber band of the wiper on the surface.
- For slightly dirty surfaces, use steam and suction at the same time.
WARNING:
To avoid dripping from the attachment, stop dispensing steam and continue vacuum for a few moments to allow the liquid to flow back up the suction ducts.
After each cleaning operation, clean the rubber band of the wiper with a clean cloth. Only a clean, well stretched band allows a window cleaning without stripes.
9.1 Steam cleaning suggestions
When starting to clean, or after having a long break, you should direct the first steam jet to one side in order to eliminate possible water residues from the steam hose; especially when cleaning the textile surfaces (carpets, rugs, sofas).
Always test a hidden spot of the surface to be cleaned. Let it dry and then check to see if the surface withstands the heat. Clean extremely dirty surfaces slowly in order to vacuum the dirt off with the steam.
natural_image
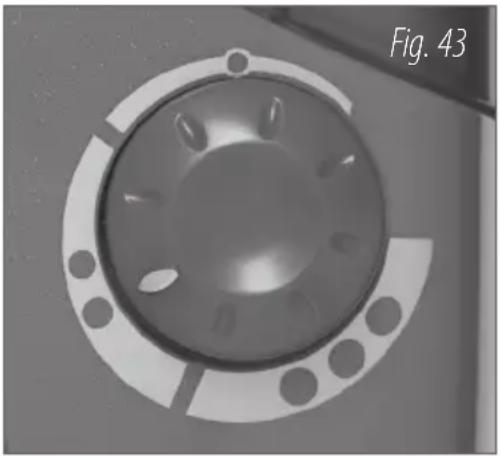
Close-up of a mechanical component with a circular flange and bolt holes, labeled Fig. 43 (no text or symbols on the object itself)Adjust the amount of steam with the knob (J):
turn anticlockwise to increase the amount of steam; turn clockwise to reduce it.
● = minimum steam for delicate surfaces, upholstery, furniture, glass
● ● = intermediate steam for maintenance cleaning and textile surfaces
● ● ● = maximum steam for thorough cleaning, disinfecting and greasy surfaces
USAGE TABLE
The following table describes, depending on the surface to be cleaned, the amount of steam, the attachment and the method to be used:
| Surface to be cleaned | Amount of steam | Attachment to be used | Cleaning method |
| LARGE SURFACESparquet floor, wood, linoleummarble, stone, ceramic | 1 ●2 ●● | big brush (3) + fitting for liquids (7)big brush (3) + fitting for liquids (7) | Tough grime: use fitting with bristle before steam-cleaning and vacuuming.Normal surfaces: use fitting for liquids before steam-cleaning and vacuuming |
| SMALL SURFACESgaps, cornersfloor groutingtaps, sanitary, fixtures | 2 ● ●3 ● ● ●3 ● ● ● | steam/suction connector (9) + crevice (17)steam/suction connector (9) + crevice (17)steam/suction connector (9) + crevice (17) | Use bristles for tough grime.Steam clean and then vacuum |
| WINDOW OR DOOR FRAMESskirting boards, window or doorframesshutters, blinds | 1 ●2 ●● | steam/suction connector (9) or small brush (20)steam/suction connector (9) or small brush (20) | Use crevice for small brush, depending on how big the surface is. Tough grime:use bristles. Smooth surfaces: use squeegee |
| UPHOLSTERY MADE OF FABRICcarpetsrugsfurniture paddingsofas | 2 ● ●2 ● ●2 ● ●2 ● ● | big brush (3) + carpet fitting (6)big brush (3) + carpet fitting (6)small brush (20)small brush (20) | First vacuum to remove the dust from the fabric.Deliver the steam + suction.Direct the first steam jet aside to avoid wetting the fabric. |
| GLASS | 1 ● | small brush (20) + small wiper (21) | Use nozzle with squeegee or windows wiper,depending on how big the surface is |
| FURNITUREDelicate furniture (e.g. varnished)plastic-coated furniture (e.g. kitchen furniture) | 1 ●2 ●● | small brush (20) + small wiper (21) or bristled attachment (22).small brush (20) + small wiper (21) or bristled attachment (22). | Delicate surfaces: put a cotton cloth in between.Smooth surfaces: bristled attachment (22). |
10 IRONING
10.1 Using the appliance for ironing
Plug the power cable (B) into the socket.
Lift the safety cover (V).
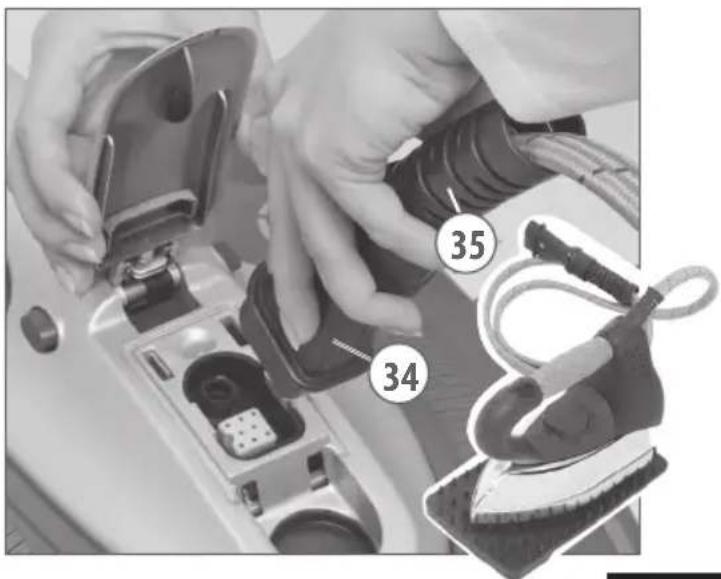
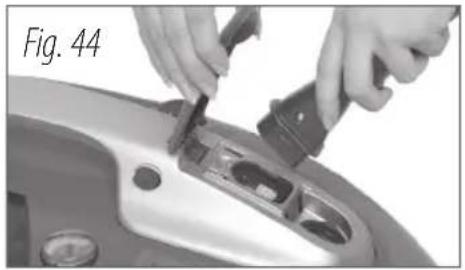
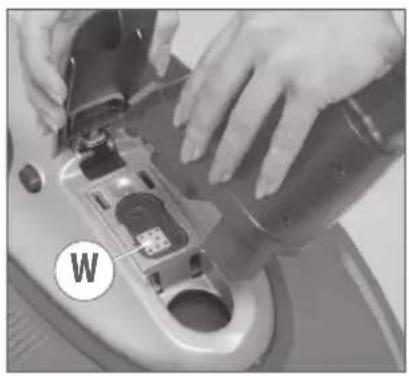
Plug the iron plug (34) into the socket (W) (Fig. 44)(Fig. 45).
If the flex (1) is inserted, first remove the quick connector (27) of the flex by pressing the front button (28).
Please refer to the chapter "Starting up the boiler" before use. Press the main switch (D) and the boiler switch (E); the boiler switch pilot light (I) will come on. Now the water will be heated to create the steam. Pre-select the required steam power by using the steam adjustment knob (J) on the appliance. The gauge (K) indicates the level of pressure inside the boiler; the grey/silver area indicates the ideal pressure for use. Adjust the required temperature with the knob (37) located on the iron (Fig. 46).
The luminous button (36) will indicate that the soleplate of the iron is heating up (Fig. 47). The iron will be ready for use when the luminous button (36) turns off. Adjust the amount of steam with the knob (J) located on the appliance. To work with steam, set a temperature higher than the steam symbol indicated on the knob (37).
When the steam-ready pilot light (F) comes on, the appliance will be ready to function with steam (Fig. 47). Press the iron steam lever button (36) to make steam come out (Fig. 48).
⚠ WARNING: the appliance can be equipped with different types of irons, depending on the supplied equipment or specifications.
CAUTION!
- Before connecting the iron, switch off the appliance and unplug the power cable (B).
• Always remove the plug from the socket before connecting the iron.
- The steam hose (35) must not come in contact with the soleplate of the iron, sharp or pointed objects.
- Place the iron only on its support (24) (Fig. 49).
- Do not leave the iron unattended when connected to the appliance.
natural_image
Close-up of hands using a tool to adjust or install a mechanical component (no visible text or symbols)
natural_image
Close-up of hands using a tool to adjust or install a metal component on a surface (no text or symbols visible)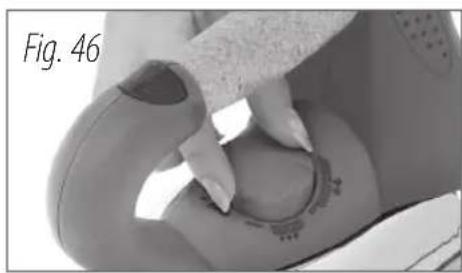
natural_image
Close-up of hands pressing down on a circular mechanical component (no visible text or symbols)
natural_image
Close-up of a shoe's sole and side view, labeled Fig. 47 (no other text or symbols visible)
natural_image
Close-up of a hand holding a textured cylindrical object, labeled 'Fig. 48' (no other text or symbols visible)
natural_image
Close-up of a steam iron pressing down on a textured surface (no text or symbols visible)Label
Divide the garments according to the type of fabric. Check that they do not need to be repaired. Also check that the different garments have been properly cleaned and that they are free from stains and damage.
- Ironing at a maximum temperature of 200^ C
Dampen the fabric
- Ironing at a maximum temperature of 150^ C
Place a damp cloth between the iron and the fabric
- Ironing at a maximum temperature of 100^ C
Place a damp cloth between the iron and the fabric
• The garment does not tolerate ironing
STEAM-IRONING CHART
Type of fabric Intensity
Linen/cotton 2
Wool/silk 1
Nylon/synthetics 1
10.2 SUGGESTIONS
- Check the label. For those who still have not gained confidence through practice, remember that all garments have a label showing:
- the type of fabric
- if it can be ironed
• the most appropriate temperature.
- Cotton and silk. Natural fibre garments (cotton and silk) can be ironed better if they are slightly damp.
- Saving time and money. Separate your household linen according to the type of fabric and iron your clothes at the same temperature.
- A “free” trick. When you have finished ironing, use the remaining heat to iron delicate garments, which require lower temperatures.
- Cleaning. Thoroughly clean the soleplate of the iron and the steam holes.
- Direct the first steam jet toward a separate piece of cloth.
- When ironing, press the luminous button (36) only at an appropriate distance.
- Let the iron gently slide across the garment. You do not have to apply excessive pressure.
• Always iron on an ironing surface, which is permeable to steam and heat resistant.
- Dry clothes should be ironed to avoid additional formation of creases.
- Delicate garments should be ironed inside out.
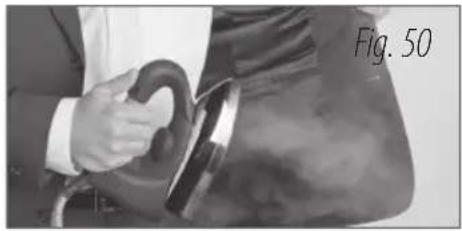
10.3 Upright ironing
Adjust the required temperature with the knob located on the iron (37) (from the steam section onward).
Adjust the amount of steam with the knob (J) located on the appliance. Direct steam onto the hanging garment from a distance of approximately 20 cm (Fig. 50). For delicate fabrics, first place a clean cotton cloth over the garment before steaming it.
10.4 Freshening up clothes
Use the flex (1) with the upholstery nozzle (20) (Fig. 51).
Adjust the amount of steam with the knob (J) located on the appliance. Direct steam onto the hanging garment from a distance of approximately 20 cm.
For delicate fabrics, first place a clean cotton cloth over the garment before steaming it.
You can vacuum the garments before, during and after the steaming process (Fig. 51); set the appliance to low suction power.
natural_image
Person holding a curved object, possibly a device or tool, in a suit (no visible text or symbols)
natural_image
Close-up of a triangular object with a pointed tip, labeled 'Fig. 51' in the corner (no other text or symbols)11 EMPTYING THE TANK (M)
CAUTION! Before removing the tank, switch off the appliance and unplug it.
- Disassemble the tank (M) (Fig. 52) as described in section "Using steam and liquid suction simultaneously"
- Check the solids filter (R) and remove any deposits. If steam or liquids have been vacuumed or if filtration water has been used, rinse the internal part of the tank as well as the filter assembly components with running water.
12 TOPPING UP THE BOILER WATER TANK (L)
The boiler water tank (L) supplies the boiler through an electronic level control; since this is an external tank, it can be topped up any time.
- When distilled water runs out in the boiler water tank:
-
the appliance beeps intermittently
-
the no distilled water level pilot light (G) flashes.
-
the steam stops coming out.
To top up, proceed as follows:
- switch off the boiler switch (E)
• turn off the main switch (D) ①
- remove the cable from the socket
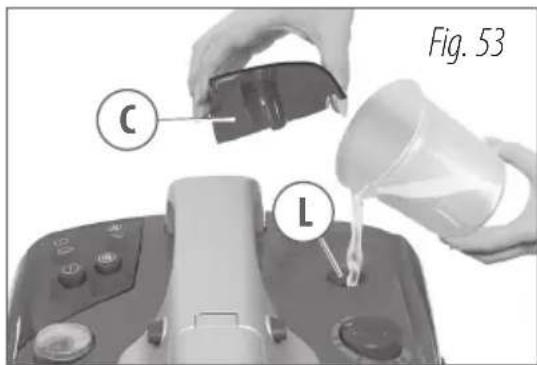
- remove the boiler water tank cap (C) (Fig. 53)
• fill the boiler water tank (L) with distilled water
- put on the boiler water tank cap (C).
13 AFTER USE
△ Every time you finish working, switch off the appliance and unplug it.
- switch off the boiler switch (E) .
- turn off the main switch (D). ①
- remove the cable from the socket.
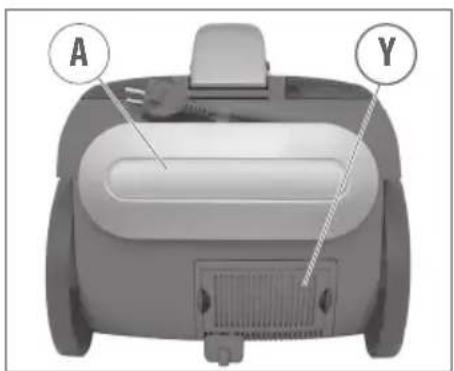
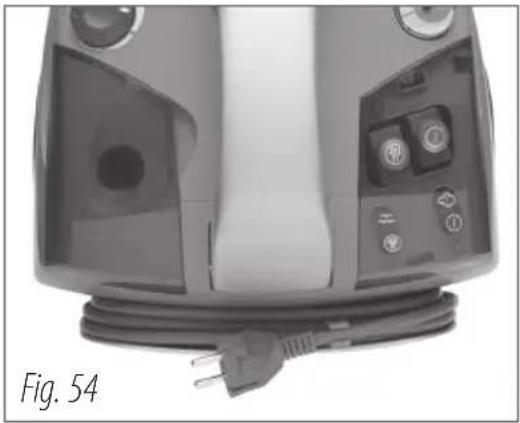
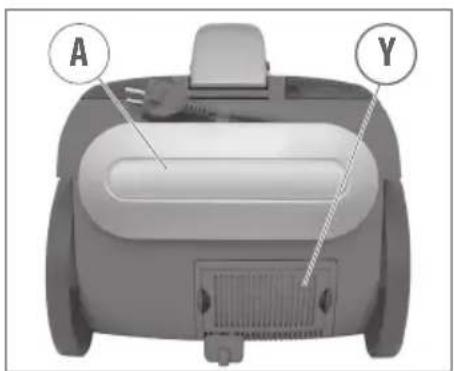
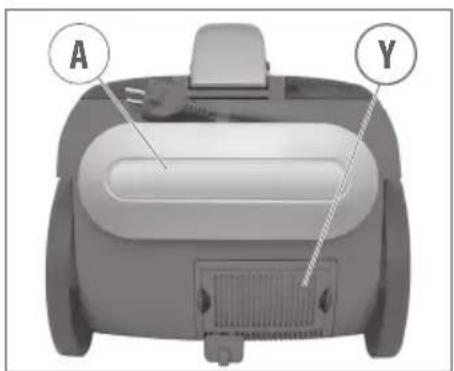
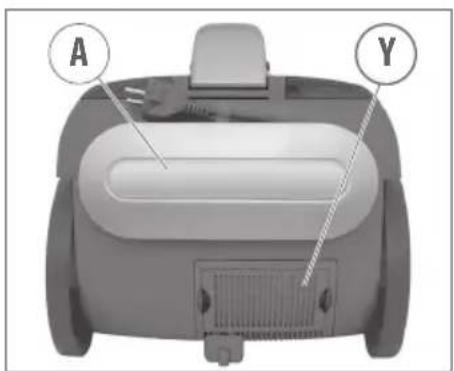
Wind the electric cable on the cable rewinder (A) (Fig. 54).
Empty the tank (M) every time you finish using it (see section "Emptying the tank (M)").
Let the appliance and the iron cool down before putting them away.
Fit the brush and the brush holder hook into the seat on the cable rewinder (A) (Fig. 55) (Fig. 56).
natural_image
Close-up of a handheld electric shaver with control buttons and power plug (no visible text or symbols)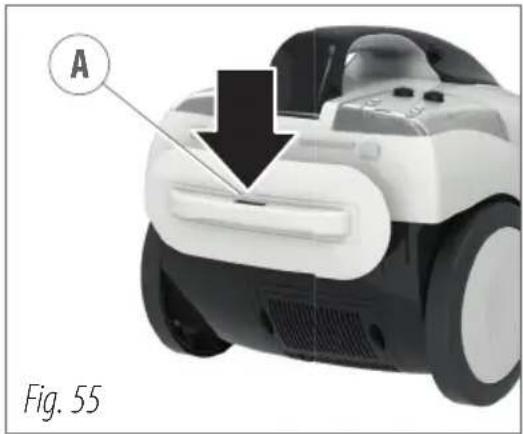
natural_image
Close-up of a robotic car with labeled component A and arrow indicating motion (no text or symbols on the car itself)
natural_image
Close-up of a white and black compact vacuum cleaner with a brush, labeled 'Fig. 56' (no other text or symbols visible)CAUTION! Before any maintenance or cleaning operation, remove the plug from the socket.
Clean the outside of the appliance with a damp cloth.
Do not use solvents or detergents.
Don not use solvents, which could damage the plastic parts of the appliance.
Do not steam-clean the appliance.
Empty the tank (M) every time you finish using it (see section "Emptying the tank")
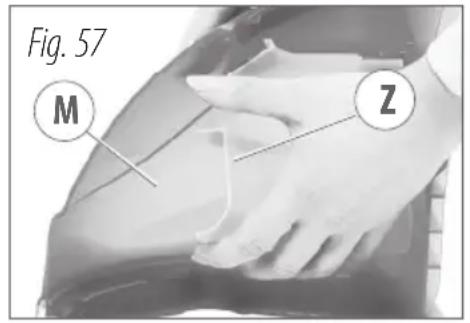
Periodically, for easier internal cleaning, it is possible to release the baffle (Z) inside the tank (M) (Fig. 57): lever out and carefully release both ends of the inner baffle (Z). For reassembly, fit the baffle on the tank edge and hook the ends.
Clean the soleplate of the iron while it is warm (use special products available on the market).
Only use water to clean the attachments.
To eliminate dirty residues from the inside of the attachments (tubes, extension or brushes), wash the internal vacuuming ducts with running water.
CAUTION! Do not wash or immerse the flex (1) in water or any other liquid.
To prevent the brushes from becoming misshapen, leave the clean brushes to dry with the bristles facing upwards.
The appliance is supplied with a kit of spare seals. Periodically, check if the seals are worn out and, if necessary, replace them.
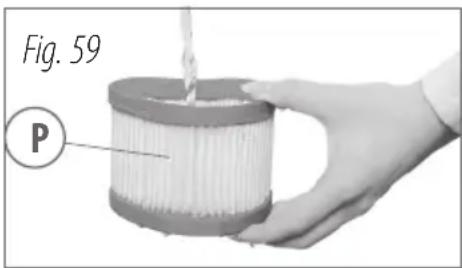
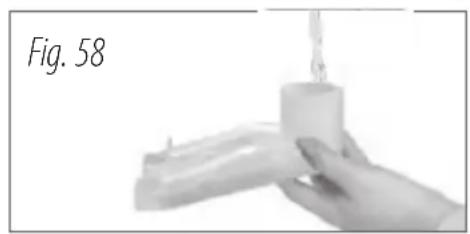
- Solids filter (R): (Fig. 58) Inspect and wash with running water.
Best to replace every 6 months. - Microfibre filter (P): (Fig. 59) wash inside with running water, let dry before reassembling the filter assembly.
natural_image
Close-up of a hand holding a small cylindrical object with a suspended hook, labeled 'Fig. 58' (no other text or symbols visible)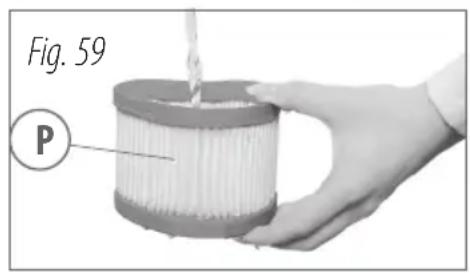
NOTE: the microfibre filter (P) must not be used with water filtering function.
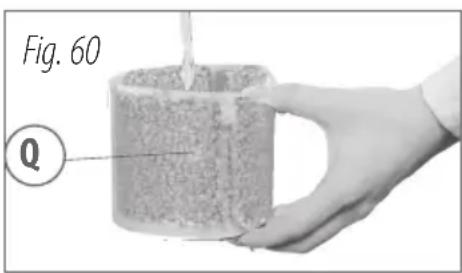
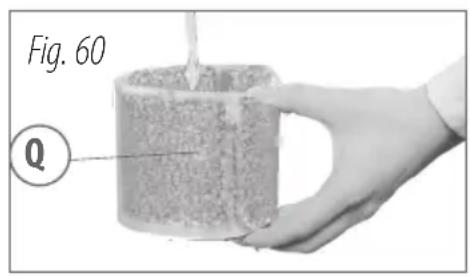
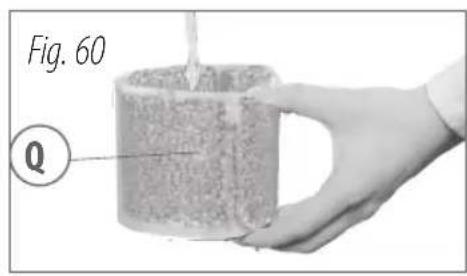
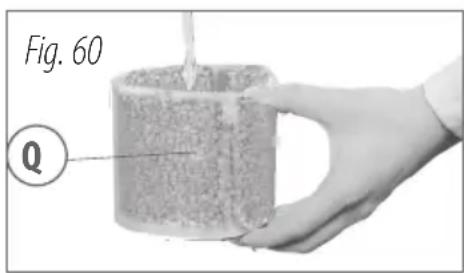
- Sponge filter (Q): (Fig. 60) to be used for liquid suction. Wash from inside to outside with running water. Best to replace every 6 months.
- HEPA air filter (X): (Fig. 61) Periodically inspect by lifting the hooking lever. Best to replace every 6 months.
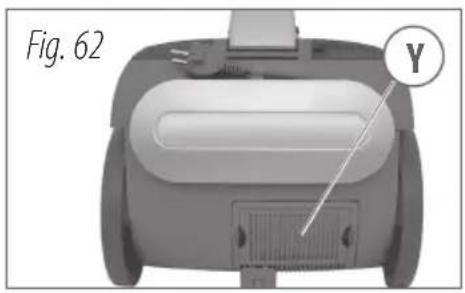
- Carbon filter (Y): (Fig. 62) has very high filtering capacity. It traps the motor carbon dust generated during operation. Inspect monthly by removing the retaining grille; replace if dirty. Best to replace every year.
CAUTION! Handle with care, do not inhale and keep out of reach of children.
15 TROUBLESHOOTING
CAUTION! Repairs should be carried out only by an authorised Service Centre.
Breakdowns may occur when the appliance is not used properly. The following table describes a few problems and explains how to solve them. If our solutions do not help, call an Authorised Service Centre.
| TROUBLE CAUSE SOLUTION | ||
| - After switching on, the no-water pilot light (L) flashes and the appliance is beeping | - Low water level in the tank (L) | - Fill the distilled water tank |
| - The appliance is ready for use but there is no suction and steam | - The quick connector of the flex tube is not fitted properly | - Make sure that the quick connector (27) is hooked properly into the socket |
| - The steam-ready pilot light is on but no steam is coming out | - The steam safety lock (32) is on | - Release the safety lock |
| - The steam adjustment knob (J) is in the closed position | - Turn the steam adjustment knob (J) to open position | |
| - When working, an attachment falls off | - The attachment has not been connected properly | - Connect the attachment properly |
| - When working, the suction power drops | - The attachment is clogged - Check and clean the attachment | |
| - The suction power is too low - One of the filters is clogged - Check and clean solids filter (R), microfibre filter (P) or sponge filter (Q), air filter (X) and carbon filter (Y) | ||
| - Air bypass - Make sure that the tank (M), the filter assembly (O), the flex tube (1) and the quick connector (27) are positioned correctly. | ||
| - The suction motor is working but there is no suction | - The float has come in operation | - Empty the tank |
| - The handgrip buttons do not hold the handle safely | - Wrong assembly or position of filter assembly (O) | - Check the assembly, make sure that microfibre or sponge filter are properly inserted |
| - Malodorous smell from flex tube or attachment | - Wet dirt remnants in flex tube or attachment | - Clean the parts according to "Maintenance" in use instructions |
16 DISPOSAL
As the owner of electrical or electronic equipment, the law (in accordance with the EU Directive 2012/19/EU on waste from electrical and electronic equipment and the national laws of the EU Member States that have implemented this Directive) prohibits you from disposing of this product or its electrical / electronic accessories as municipal solid waste and obliges you to make use of the appropriate waste collection facilities. The product can be disposed of by returning it to the distributor when a new, equivalent product is purchased. Disposing of the product in the environment can cause great harm to the environment itself and human health. The symbol in the figure indicates the urban waste containers and it is strictly prohibited to dispose of the equipment in these containers. Non-compliance with the regulations stipulated in the 2012/19/EU Directive and the decrees implemented in the various EU Member States is administratively punishable.
17 TECHNICAL DATA
17.1 Technical data nameplate
CAUTION! Make sure that the technical data shown on the nameplate correspond to the electric mains to which you want to connect the appliance.
17.2 Technical specifications
• Water tank capacity: 1.2 l
- Recovery tank volume: 8 l
17.3 Safety features:
Process pressure switch
Process thermostat
Safety thermostat
Boiler overpressure valve
Low-voltage electric controls
Controls on flex
Float
18 WARRANTY
WARRANTY CONDITIONS All our appliances are subjected to strict tests and are covered against manufacturing defects in accordance with applicable regulations (minimum 12 months). The warranty is valid from the date of purchase. If your device or attachments are handed in for repair during the warranty period, a copy of the receipt must be enclosed. During the warranty period, our service centre will repair all those malfunctions that, despite the user has followed the instructions in our manual, can be attributed to defective materials. The parts deemed faulty will either be replaced or repaired under the warranty. The replaced parts remain our property. Replacements or repairs do not extend the warranty period; for the parts replaced, the appliance's period of warranty is valid. We shall not be liable for damages or faults to the appliance or to any of its components if they are caused by an improper use or maintenance of the appliance. The same applies if the instructions given in our user's manual are not followed or if parts or attachments are used that are not included in our programme. The warranty will no longer be considered valid if people that have not been authorised by us tamper with the appliance. The warranty does not cover wearable parts whose wear is a natural result of the appliance's use.
CAUTION! Failures, such as clogged nozzles, mechanisms blocked due to limescale, damaged attachments (e.g. bent hose) and/or appliances normally working without any defects ARE NOT COVERED BY THE WARRANTY.
ALL COSTS INCURRED FOR UNAUTHORISED OR UNACKNOWLEDGED WARRANTY CLAIMS WILL BE CHARGED
INSTRUCTIONS D'UTILISATION
1 DÉTAILS ...... pag. 56
2 LISTE DES ACCESSOIRES ET DES COMPOSANTS....pag. 57
3 AVANT L'UTILISATION....pag. 59 3.1 Symboles....pag. 59
4 UTILISATIONS ...... pag. 59
5 AVERTISSEMENTS GÉNÉRAUX ...... pag. 60
natural_image
Close-up of hands installing or adjusting a mechanical component with a labeled 'W' (no text or symbols on the object itself)

natural_image
Close-up of a hand using a computer to press a small electronic device (no visible text or symbols)

natural_image
Close-up of hands holding a fabric or garment with a numbered label (Z) pointing to a seam or seam, no readable text or symbols present.
natural_image
Two grayscale photos showing a vacuum cleaner's tip and tiled floor, no text or symbols visible.natural_image
Close-up of a mechanical component emitting smoke or vapor (no visible text or symbols)NETTOYAGE À LA VAPEUR
natural_image
Close-up of a mechanical device emitting smoke or vapor, with arrows indicating airflow direction (no text or symbols visible)natural_image
Hand using a steam iron on a flat surface (no text or symbols visible)REPASSAGE EN OPTION
5 AVERTISSEMENTS GÉNÉRAUX
natural_image
3D mechanical component with a central spherical feature and mounting holes, labeled 'Fig. 6' (no readable text or symbols beyond label)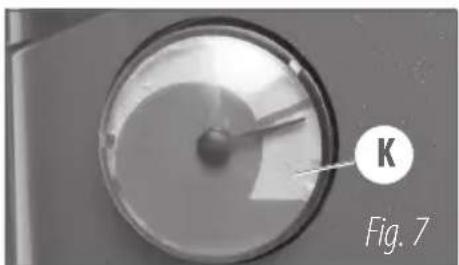
natural_image
Close-up of a circular mechanical component with a pointer labeled 'K' and label 'Fig. 7' (no readable text or symbols beyond labels)
natural_image
Diagram of a spray gun emitting powder, labeled Fig. 10 (no text on diagram itself)natural_image
Close-up of hands holding a small metallic object with arrows indicating motion or force direction (no text or symbols)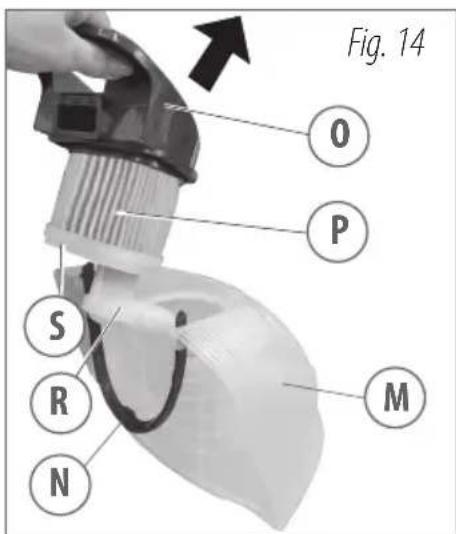

natural_image
Close-up of a mechanical component with a labeled section 'Fig. 22' (no other text or symbols visible)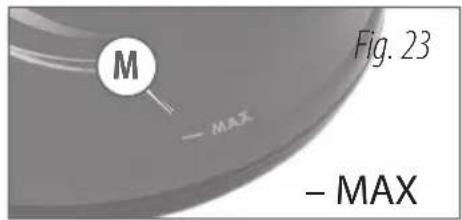
natural_image
Close-up of a hand holding a hairdryer tool with a white arrow pointing to the handle area (no text or symbols on the tool itself)


RACCORD EXTENSION + PULVÉRISATEUR (9), ACCESSOIRES VAPEUR, ACCESSOIRES ASPIRATION
natural_image
Hand holding a cylindrical device with a black arrow pointing to it, labeled 'Fig. 32' (no other text or symbols)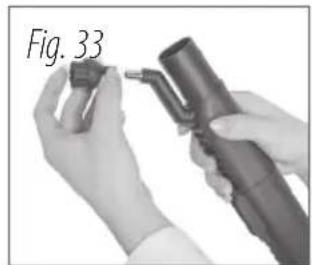
natural_image
Close-up of hands holding a handheld device with a probe inserted (no visible text or symbols)
natural_image
Close-up of a mechanical component with a textured tip and lever mechanism, labeled 'Fig. 34' (no other text or symbols)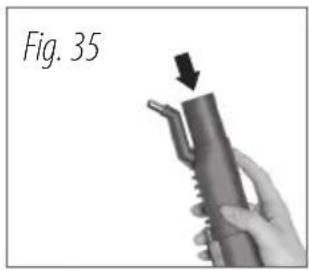
natural_image
Hand holding a cylindrical device with an arrow pointing to it, labeled 'Fig. 35' (no other text or symbols)
natural_image
Hand holding a cylindrical object with a label 'Fig. 36' (no other text or symbols visible)
natural_image
Hand holding a handheld device labeled Fig. 37, no visible text or symbols on the device itself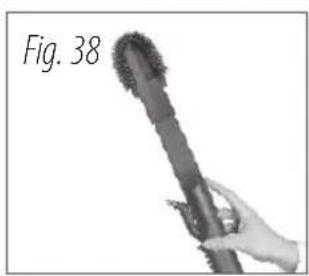
natural_image
Hand holding a brush with textured brush tip, labeled Fig. 38 (no other text or symbols)SUCEUR POUR CAPITONNAGES (20)

natural_image
Close-up of a mechanical component with circular flange and bolt holes, labeled Fig. 43 (no text or symbols on the object itself)natural_image
Close-up of hands using a tool to adjust or install a mechanical component (no visible text or symbols)
natural_image
Close-up of hands using a tool to adjust or install a component on a stainless steel surface (no text or symbols visible)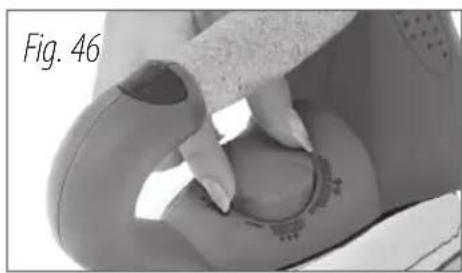
natural_image
Close-up of a hand pressing down on a circular mechanical component, labeled 'Fig. 46' (no other text or symbols visible)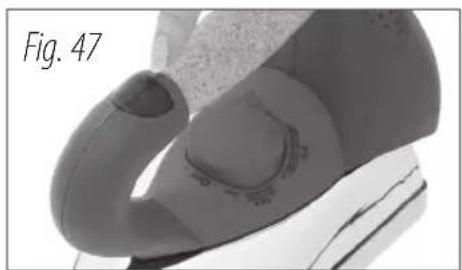
natural_image
Close-up of a shoe's sole and side view, labeled Fig. 47 (no other text or symbols)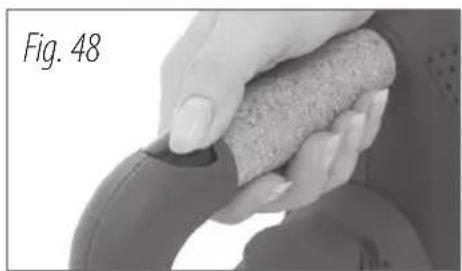
natural_image
Close-up of a hand holding a textured circular object, labeled 'Fig. 48' (no other text or symbols visible)
natural_image
Close-up of a steam iron pressing down on a textured surface (no text or symbols visible)Étiquette
natural_image
Person in suit handling a steaming iron, labeled 'Fig. 50' (no other text or symbols)
natural_image
Close-up of a triangular object with a pointed tip, labeled 'Fig. 51' in the corner (no other text or symbols)11 VIDANGE DU RÉSERVOIR D'EAU (M)
natural_image
Close-up of a handheld electric shaver with control buttons and power plug (no visible text or symbols)
natural_image
Close-up of a robotic car with labeled component A and arrow indicating motion (no text or symbols on the car itself)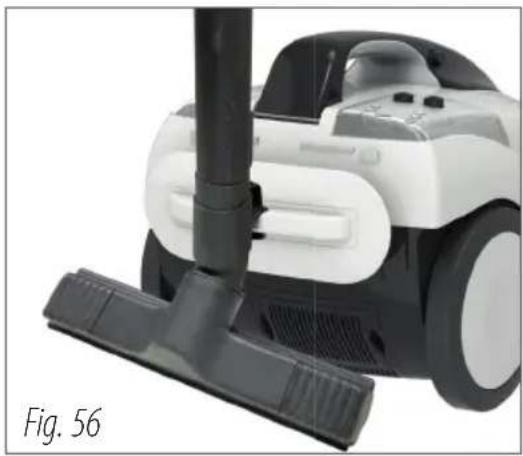
natural_image
Close-up of a white and black compact vacuum cleaner with a brush, labeled 'Fig. 56' (no other text or symbols visible)14 MAINTENANCE
natural_image
Hand holding a small object with a suspended hook, labeled 'Fig. 58' (no other text or symbols visible)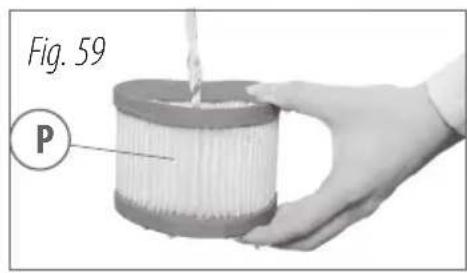

natural_image
Close-up of hands installing or adjusting a mechanical component with a labeled 'W' (no text or symbols on the object itself)

natural_image
Close-up of a hand using a computer to press a small electronic device (no visible text or symbols)

natural_image
Close-up of hands holding a curved object with a labeled point 'Z' (no text or symbols on the object itself)
natural_image
Close-up of hands using a power switch and iron shaver to install components (no visible text or symbols)3 VOR DEM GEBRAUCH
natural_image
Two black-and-white photos showing a vacuum cleaner on tiled floor and a close-up of its tip (no text or symbols visible)NASS- ODER TROCKENSAUGEN

natural_image
Close-up of a mechanical component emitting smoke or vapor (no visible text or symbols)DAMPFREINIGUNG
natural_image
Diagram of a mechanical device emitting smoke or vapor, with arrows indicating airflow direction (no text or symbols)natural_image
Hand using a steam iron on a flat surface (no text or symbols visible)BÜGELN OPTIONAL
natural_image
Close-up of a mechanical component with a circular housing and mounting holes, labeled 'Fig. 6' (no readable text or symbols beyond label)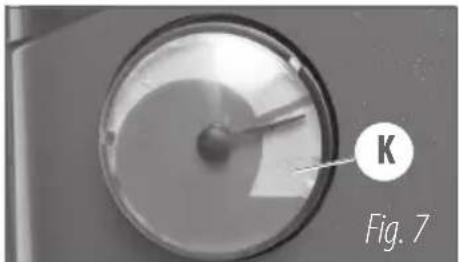
natural_image
Close-up of a circular mechanical component with a pointer labeled 'K' and label 'Fig. 7' (no readable text or symbols beyond labels)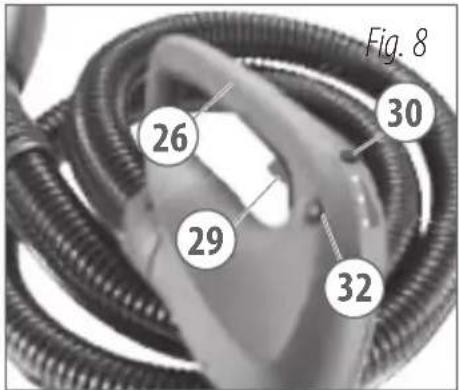

natural_image
Diagram of a device emitting particles with arrows indicating flow direction (no text or symbols)natural_image
Close-up of hands holding a metallic object with arrows indicating motion, labeled 'Fig. 13' (no readable text or symbols)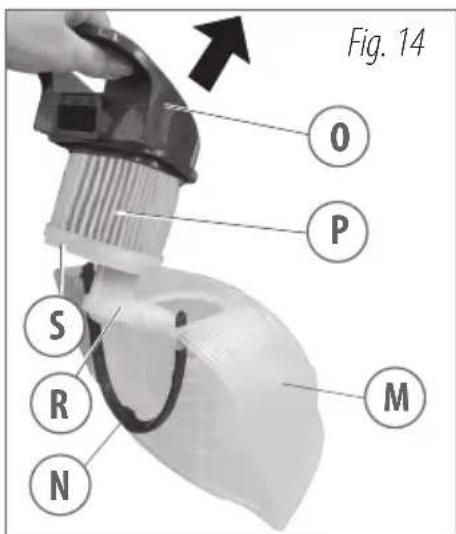
natural_image
Close-up of a mechanical component with visible internal structure and part, labeled 'Fig. 22' (no other text or symbols)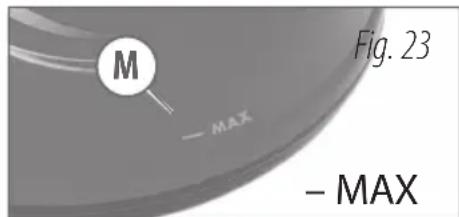
8 ZUBEHÖRTEILE
natural_image
Close-up of a hand holding a hairdryer tool with a white arrow pointing to the handle area (no text or symbols on the tool itself)

DAMPF-/SAUGARMATUR (9), DAMPFZUBEHÖR, SAUGZUBEHÖR
natural_image
Hand holding a pen or tool with an arrow pointing to it, labeled 'Fig. 32' (no other text or symbols visible)
natural_image
Hand holding a cylindrical device with a black arrow pointing to it, labeled 'Fig. 35' (no other text or symbols)
natural_image
Close-up of hands holding a handheld device with a probe inserted (no visible text or symbols)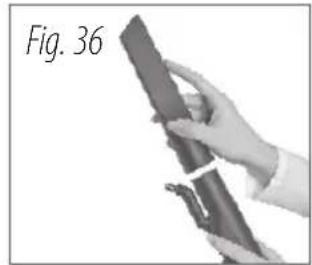
natural_image
Hand holding a cylindrical object, labeled 'Fig. 36' (no other text or symbols visible)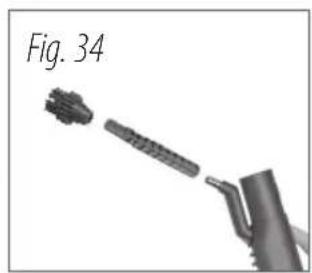
natural_image
Close-up of a mechanical component with a textured tip and lever mechanism, labeled 'Fig. 34' (no other text or symbols)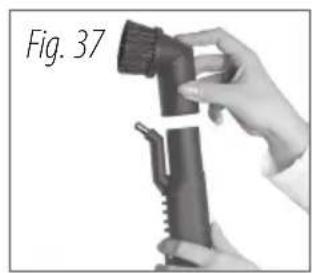
natural_image
Hand holding a handheld device labeled Fig. 37, no visible text or symbols on the device itself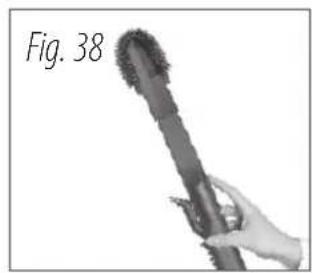
natural_image
Hand holding a cylindrical object with textured surface, labeled 'Fig. 38' (no other text or symbols visible)POLSTERDÜSE (20)
natural_image
Close-up of a mechanical component with circular flange and bolt holes, labeled Fig. 43 (no text or symbols on the object itself)natural_image
Close-up of hands using a tool to adjust or install a mechanical component (no visible text or symbols)
natural_image
Close-up of hands using a tool to adjust or install a metal component on a surface (no text or symbols visible)
natural_image
Close-up of a hand pressing down on a circular mechanical component, labeled 'Fig. 46' (no other text or symbols visible)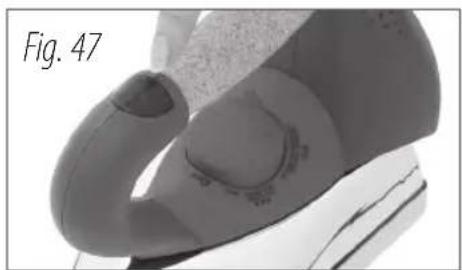
natural_image
Close-up of a mechanical component with textured surfaces and a labeled section 'Fig. 47' (no other text or symbols visible)
natural_image
Close-up of a hand holding a textured circular object, labeled 'Fig. 48' (no other text or symbols visible)
natural_image
Close-up of a steam iron pressing down on a textured surface (no text or symbols visible)Etikett
natural_image
Person holding a curved object, possibly a device or tool, in a suit (no visible text or symbols)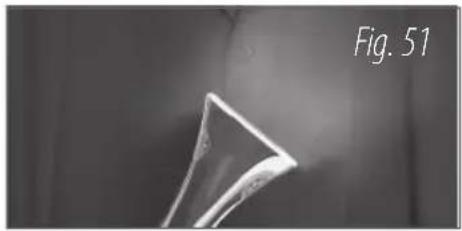
natural_image
Close-up of a triangular object with a pointed tip, labeled 'Fig. 51' in the corner (no other text or symbols)11 AUSLEEREN DES BEHÄLTERS (M)
natural_image
Close-up of a portable air conditioner unit with control panel and power plug (no visible text or symbols)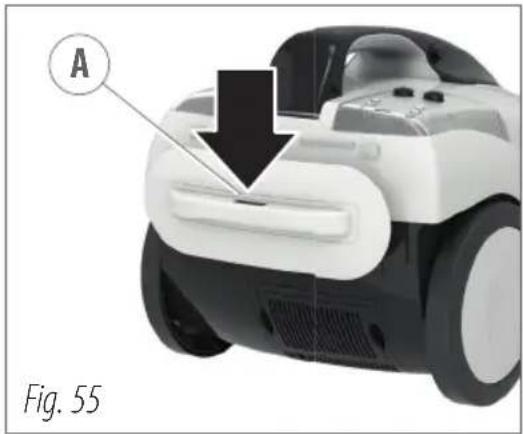
natural_image
Close-up of a robotic car with labeled component A and arrow indicating motion (no text or symbols on the car itself)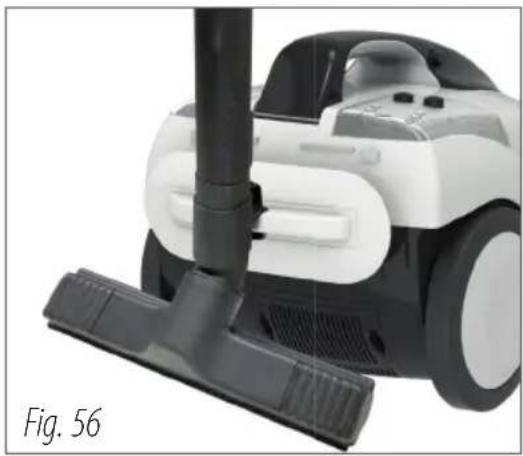
natural_image
Close-up of a white and black compact vacuum cleaner with a brush, labeled 'Fig. 56' (no other text or symbols visible)natural_image
Hand holding a small object with a suspended hook, labeled 'Fig. 58' (no other text or symbols visible)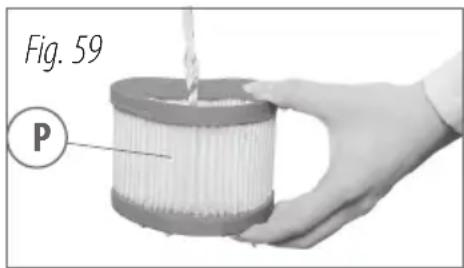
natural_image
Top-down view of a robotic device labeled Fig. 62 with a circular indicator Y pointing to a component (no text or symbols on the device itself)15 PROBLEMLÖSUNG

natural_image
Close-up of hands installing or adjusting a mechanical component on a surface, with no visible text or symbols.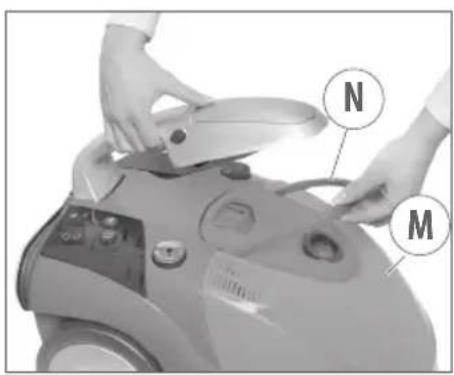

natural_image
Close-up of a hand using a vacuum cleaner to press a small electronic device (no visible text or symbols)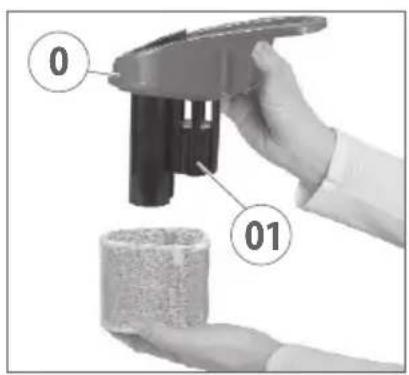

natural_image
Close-up of hands holding a fabric or material with a numbered label (Z) pointing to a seam or seam, no readable text or symbols present.
natural_image
Close-up of hands using a power plug to install an electric shaver, with numbered callouts highlighting components (no text or symbols on the diagram itself)3 ANTES DEL USO
natural_image
Two grayscale photos showing a vacuum cleaner on tiled floor and a close-up of its tip (no text or symbols visible)natural_image
Close-up of a mechanical component emitting smoke or vapor (no visible text or symbols)LIMPIEZA A VAPOR
natural_image
Industrial exhaust pipe emitting smoke and debris, no visible text or symbolsnatural_image
Hand using an iron on a steam iron (no text or symbols visible)PLANCHADO PROFESIONAL OPCIONAL
natural_image
Mechanical component with a central spherical feature and mounting holes, labeled 'Fig. 6' (no readable text or symbols beyond label)
natural_image
Close-up of a circular mechanical component with a pointer labeled 'K' and label 'Fig. 7' (no readable text or symbols beyond labels)

natural_image
Diagram of a mechanical device emitting particles with directional arrows, labeled Fig. 10 (no text or symbols on diagram itself)natural_image
Close-up of hands holding a small metallic object with arrows indicating motion or force direction (no text or symbols)

natural_image
Close-up of a mechanical component with visible surfaces and a labeled section 'Fig. 22' (no other text or symbols)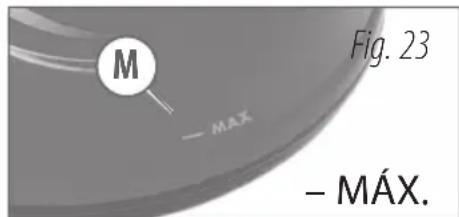
8 USO DE LOS ACCESORIOS
natural_image
Close-up of a hand holding a hairdryer tool with a black arrow pointing to the handle area (no text or symbols visible)
natural_image
Hand holding a pen or tool with an arrow pointing to it, labeled 'Fig. 32' (no other text or symbols visible)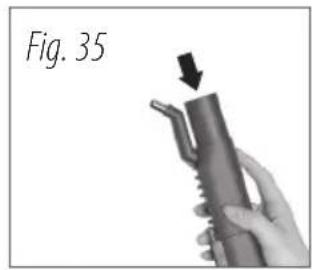
natural_image
Hand holding a cylindrical device with a black arrow pointing to it, labeled 'Fig. 35' (no other text or symbols)
natural_image
Close-up of hands holding a handheld device with a probe inserted (no visible text or symbols)
natural_image
Hand holding a cylindrical object, labeled 'Fig. 36' (no other text or symbols visible)
natural_image
Close-up of a mechanical component with a labeled section 'Fig. 34' (no other text or symbols visible)
natural_image
Hand holding a handheld device labeled Fig. 37, no visible text or symbols on the device itself
natural_image
Hand holding a cylindrical object with textured surface, labeled 'Fig. 38' (no other text or symbols visible)TOBERA DE TAPICERÍA (20)

natural_image
Close-up of a mechanical component with circular and radial features, labeled 'Fig. 43' (no other text or symbols)natural_image
Close-up of hands using a tool to adjust or install a mechanical component (no visible text or symbols)
natural_image
Close-up of hands using a tool to adjust or install a metal component on a surface (no text or symbols visible)
natural_image
Close-up of a hand pressing down on a circular mechanical component, labeled 'Fig. 46' (no other text or symbols visible)
natural_image
Close-up of a mechanical component with textured surfaces and a labeled section 'Fig. 47' (no other text or symbols visible)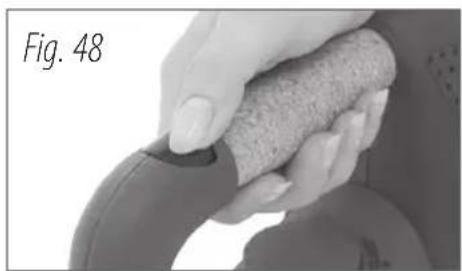
natural_image
Close-up of a hand holding a textured, circular object (no visible text or symbols)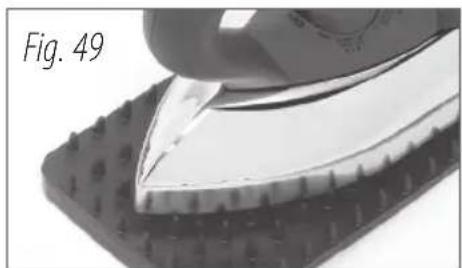
natural_image
Close-up of a steaming iron on a textured surface, labeled 'Fig. 49' (no other text or symbols visible)Etiqueta
natural_image
Person in suit holding a steam iron, no visible text or symbols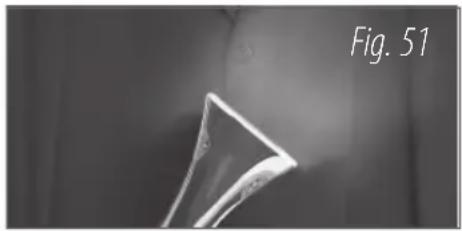
natural_image
Close-up of a triangular object with a pointed tip, labeled 'Fig. 51' in the corner (no other text or symbols)natural_image
Close-up of a handheld electronic device with control buttons and a power plug, labeled Fig. 54 (no readable text or symbols on the device itself)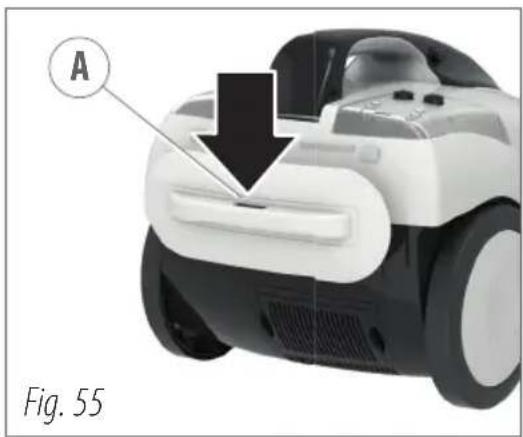
natural_image
Close-up of a robotic car with a labeled component 'A' and a downward arrow, shown in technical view (no text or symbols on the car itself)
natural_image
Close-up of a white and black compact vacuum cleaner with a brush, labeled 'Fig. 56' (no other text or symbols visible)14 MANTENIMIENTO
natural_image
Hand holding a small object with a pipette above, labeled 'Fig. 58' (no other text or symbols visible)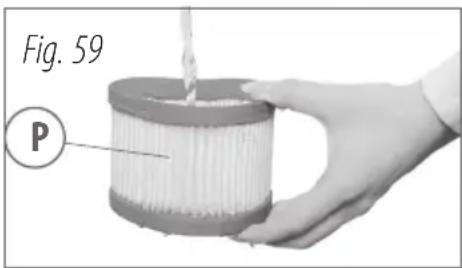

natural_image
Top-down view of a robotic device labeled Fig. 62, showing internal components and a circular annotation with letter Y (no readable text or symbols beyond labels)
natural_image
Close-up of hands installing or adjusting a mechanical component with a labeled 'W' (no text or symbols on the object itself)
natural_image
Close-up of a hand inserting a small electronic device into a device (no visible text or symbols)
natural_image
Close-up of hands holding a garment with a sewing machine needle (no visible text or symbols)
natural_image
Two grayscale images showing a mounted vacuum cleaner and a tiled wall, both without any text or symbols.natural_image
Close-up of a mechanical component emitting smoke or vapor, no visible text or symbolsПАРОВАЯ ЧИСТКА

natural_image
Close-up of a mechanical device emitting exhaust heat, showing spray patterns and debris (no text or symbols visible)natural_image
Hand ironing a steam iron on a flat surface (no text or symbols visible)natural_image
Mechanical component with a central spherical feature and mounting holes, labeled 'Fig. 6' (no readable text or symbols beyond label)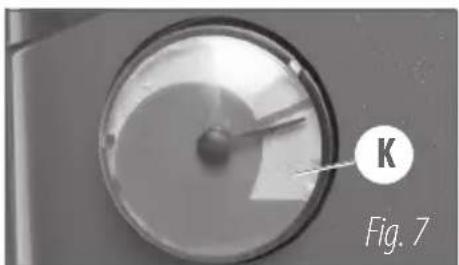
natural_image
Close-up of a circular mechanical component with a pointer labeled 'K' and 'Fig. 7' (no readable text or symbols beyond labels)


natural_image
Diagram of a mechanical device emitting particles with arrows indicating flow direction (no text or symbols)natural_image
Close-up of hands holding a small metallic object with arrows indicating motion or force direction (no text or symbols)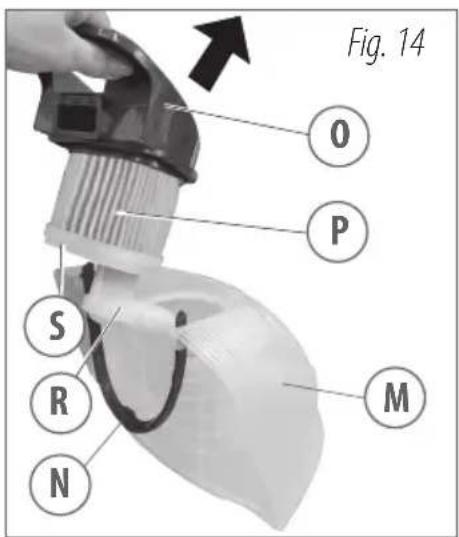
natural_image
Close-up of a mechanical component with textured surfaces and a labeled section 'Fig. 22' (no readable text or symbols on the main subject)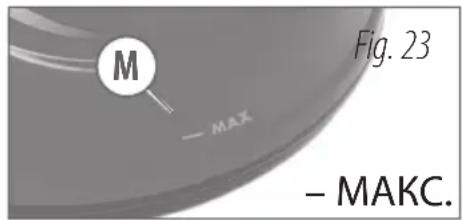
natural_image
Close-up of a hand holding a hairdryer brush with a white arrow pointing to the brush tip (no text or symbols on the brush itself)


natural_image
Hand holding a cylindrical device with a pointed tip, labeled 'Fig. 32' (no other text or symbols visible)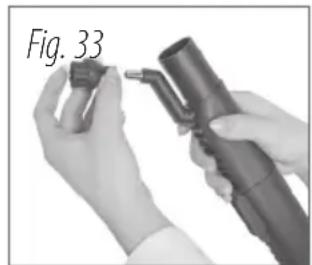
natural_image
Close-up of hands holding a handheld device with a probe inserted (no visible text or symbols)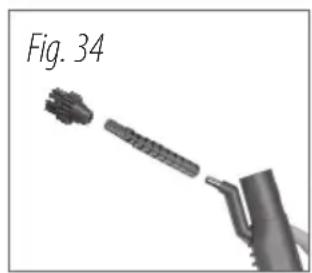
natural_image
Close-up of a mechanical component with a labeled section 'Fig. 34' (no other text or symbols visible)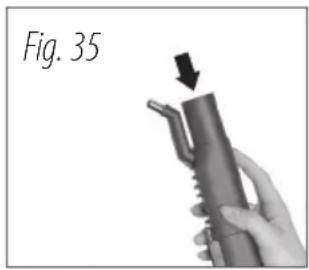
natural_image
Hand holding a cylindrical device with a black arrow pointing to it, labeled 'Fig. 35' (no other text or symbols)
natural_image
Hand holding a cylindrical object, labeled 'Fig. 36' (no other text or symbols visible)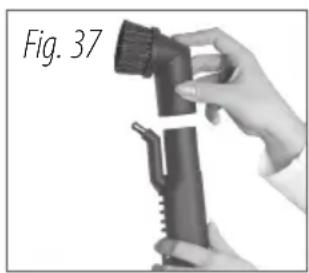
natural_image
Hand holding a handheld device labeled Fig. 37, no visible text or symbols on the device itself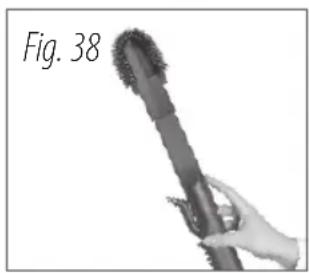
natural_image
Hand holding a cylindrical object with textured surface, labeled 'Fig. 38' (no other text or symbols visible)ТУРБОЩЕТКА (20)

natural_image
Close-up of a mechanical component with a circular flange and bolt holes, labeled Fig. 43 (no text or symbols on the object itself)natural_image
Close-up of hands using a tool to adjust or install a mechanical component (no visible text or symbols)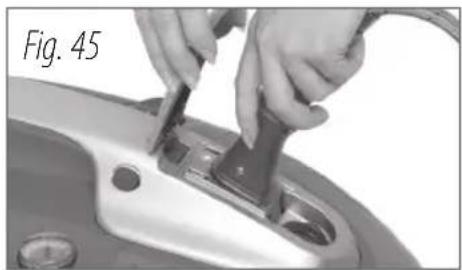
natural_image
Close-up of hands using a tool to adjust or install a mechanical component on a stainless steel surface (no text or symbols visible)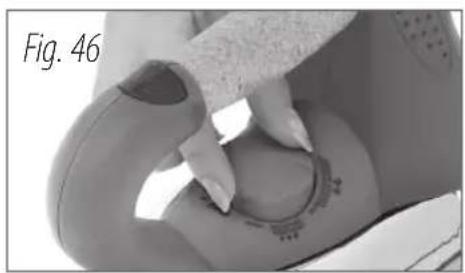
natural_image
Close-up of a hand pressing down on a circular mechanical component, labeled 'Fig. 46' (no other text or symbols visible)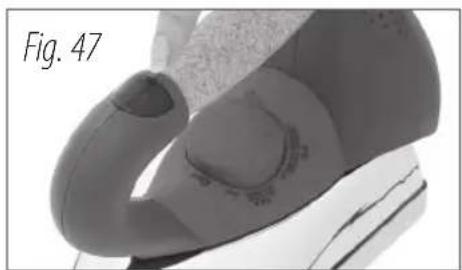
natural_image
Close-up of a shoe's sole and side view, labeled Fig. 47 (no other text or symbols)
natural_image
Close-up of a hand holding a textured, circular object (no visible text or symbols)
natural_image
Close-up of a steam iron pressing down on a textured surface (no text or symbols visible)Этикетка
natural_image
Person holding a curved object, possibly a device or tool, in a suit (no visible text or symbols)
natural_image
Close-up of a triangular object with a pointed tip, labeled 'Fig. 51' in the corner (no other text or symbols)natural_image
Close-up of a portable air conditioner unit with control panel and power plug (no visible text or symbols)
natural_image
Close-up of a robotic car with labeled component A and arrow pointing to a button (no text or symbols on the car itself)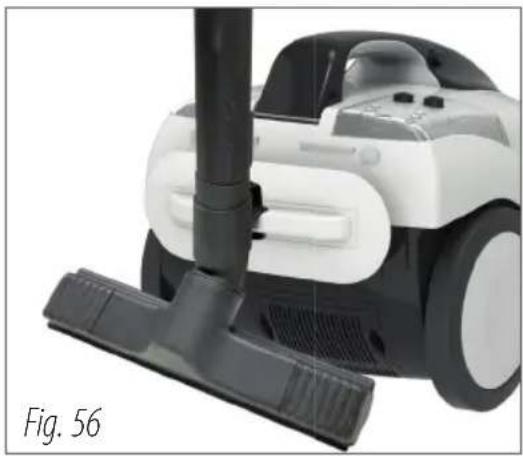
natural_image
Close-up of a white and black vacuum cleaner with a brush, labeled 'Fig. 56' (no other text or symbols visible)14 ТЕХОБСЛУЖИВАНИЕ
natural_image
Hand holding a small object with a lit candle above, labeled 'Fig. 58' (no other text or symbols visible)