
biOrb EARTH 125 - Aquarium OASE - Free user manual and instructions
Find the device manual for free biOrb EARTH 125 OASE in PDF.

| Product type | Terrarium |
| Brand | Oase |
| Model | biOrb EARTH 125 |
| Dimensions (L x W x H) | 571 × 500 × 567 mm |
| Weight | 19.1 kg |
| Power supply (unit) | 100-240 V AC, 50/60 Hz, 24 V DC, 180 W |
| Power supply (device) | 24 V DC, 105 W |
| Ambient temperature range | 15 to 35 °C |
| Tank capacity | 4 L |
| Lighting | LED Sunlight (650 lm), RGB & Infrared, UV (318 nm UV-B) |
| Humidity | Ultrasonic fog generator, rain nozzles |
| Control | OASE Control app (iOS/Android) |
| Connectivity | WLAN 2.4 GHz, IEEE 802.11 b/g/n |
| Noise level | 37-42 dB (standard), 34-37 dB (silent) |
| Material | Acrylic glass, expanded polystyrene |
| Warranty | 2 years |
| Protection class | II (unit), III (device) |
| Maintenance | Cleaning with clean water, filter change every 3-6 months |
| Included accessories | Funnel, filters, biOrb Humidimist (recommended) |
| Use | Indoor only |
Frequently Asked Questions - biOrb EARTH 125 OASE
User questions about biOrb EARTH 125 OASE
0 question about this device. Answer the ones you know or ask your own.
Ask a new question about this device
Download the instructions for your Aquarium in PDF format for free! Find your manual biOrb EARTH 125 - OASE and take your electronic device back in hand. On this page are published all the documents necessary for the use of your device. biOrb EARTH 125 by OASE.
USER MANUAL biOrb EARTH 125 OASE
natural_image
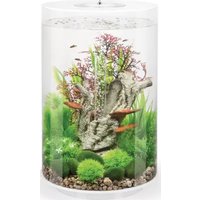
Interior view of a glass terrarium with bamboo plants, red flowers, and moss on the floor (no text or symbols)biOrb EARTH
DE Inbetriebnahme
EN Commissioning
FR Mise en service
T_1, T_2, , T_n
BO80324
natural_image
Diagram of a plant growth setup inside a container with cooling fans and ventilation system (no text or symbols)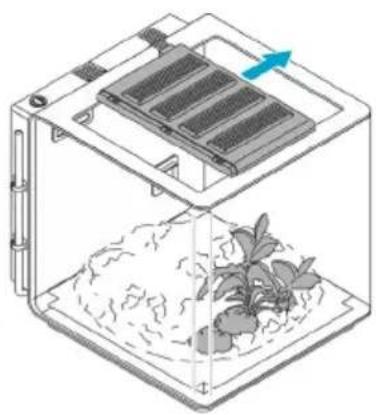
natural_image
Diagram of a container with internal components and a plant growing in a container (no text or symbols)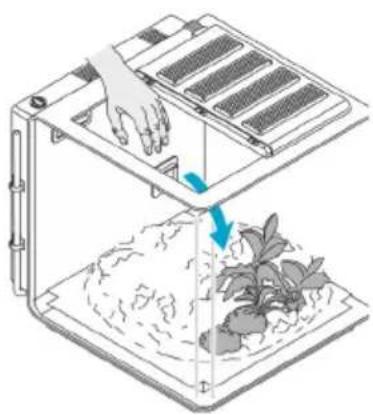
natural_image
Illustration of a robotic vacuum cleaner with a hand operating it, showing airflow and plant growth (no text or symbols)BOB0326
Zubehör

BOB0325
Variante
BOB0327
natural_image
Diagram of a device with labeled buttons and a plant on a base, no text or symbols presentBO80331
natural_image
Diagram of a door with a digital display and magnified view of the window (no text or symbols)natural_image
Diagram showing a door with a blue arrow pointing to a window, no text or symbols presentBOB0335
So gehen Sie vor:
BOB0338
Reparatur
Rückenteil ersetzen
DE

BOB0339
So gehen Sie vor:
BOB0330
So gehen Sie vor:
Original manual. This manual belongs with the unit and must always be passed on together with the unit.
WARNING
This unit can be used by children aged 8 and above and by persons with reduced physical, sensory or mental capabilities or lack of experience and knowledge if they are supervised or have been instructed on how to use the unit in a safe way and they understand the hazards involved. Do not allow children to play with the unit. Only allow children to carry out cleaning and user maintenance under supervision.
Contents
Safety information....27
Intended use....27
Product Description 28
Set-up 34
Commissioning/start-up....37
Maintenance and cleaning.... 39
Repair 41
Malfunction remedy....45
Technical data....46
Disposal 47
Guarantee....48
Guarantee for North America....49
Safety information
Installation
- Protect the unit from direct sunlight.
- Do not cover the ventilation openings of the unit.
- Ensure that there is sufficient space to access the unit.
Electrical connection
- Only connect the unit if the electrical data of the unit and the power supply match.
- Only use the power pack included in the scope of delivery.
- Only plug the unit into a correctly installed outlet.
- Protect open plugs and sockets from moisture.
Safe operation
- Do not use the unit, if electrical lines or the housing are damaged.
- Route lines in such a way that they are protected from damage and do not present a tripping hazard.
- Should problems occur, please contact the authorised customer service or OASE.
Intended use
Only use the product described in this manual as follows:
- as an artificial environment for plants and animals if animal protection, in particular the issue of species-appropriate animal housing, is observed.
- Indoors only.
- While adhering to the technical specifications. (→ Technical data)
Product Description
The biOrb EARTH is a vivarium – an artificial habitat for plants and small animals – that can recreate a variety of climate zones.
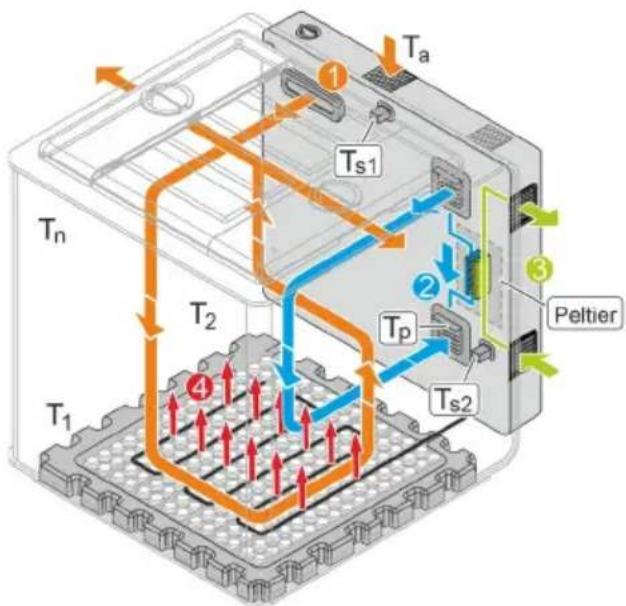
The sun has the greatest effect on our real climate. It heats the air and ground. The resulting thermals cause the air to move, generating wind. When water evaporates in warm temperatures, this generates rain clouds. When the air in these rain clouds cools down, it rains.
These interactions are recreated in the biOrb EARTH through intelligent interplay of light, humidity and air and floor temperature.
The biOrb EARTH is operated, configured and monitored via a smartphone or tablet using the "OASE Control" app for iOS or Android.
If the temperature or air humidity in the biOrb EARTH is outside of the specified range, you can have the app notify you – either with a push notification on your smartphone or tablet or in an e-mail.
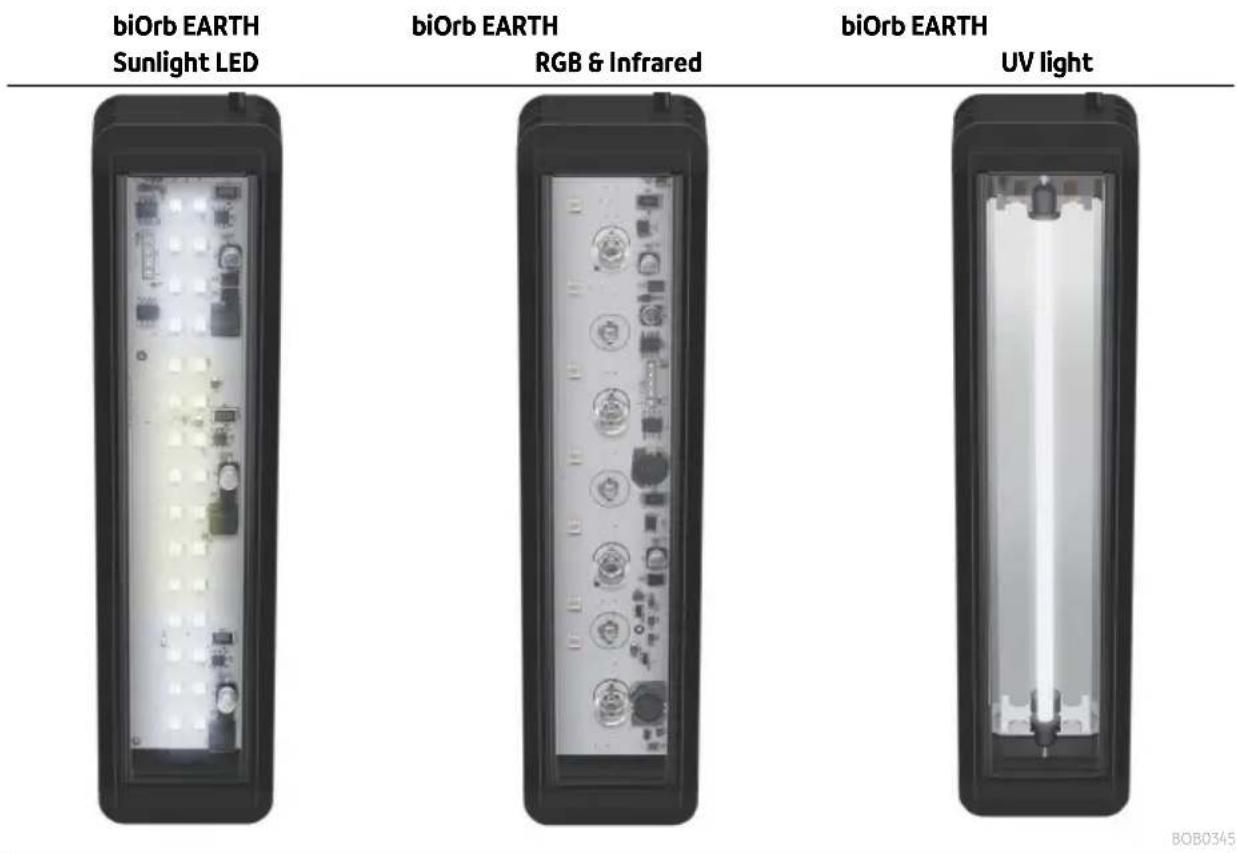
Light
The radiation spectrum emitted by the sun that is vital to life on earth ranges from vitamin-forming ultraviolet (UV) to warming infrared (IR). The spectrum of visible light lies between these two points. In the biOrb EARTH the following lamps replicate this radiation spectrum:
biOrb EARTH Sunlight LED: This lamp emits visible light with an increased blue content. Three additional LEDs that emit different light colours permit adaptation of the light to the plants and animals.
biOrb EARTH RGB & Infrared: The RGB function of the lamp can be used to generate shades of colour, e.g. to simulate a sunset. In addition the lamp emits infrared radiation.
biOrb EARTH UV light: This light replicates the sun's UV-A/B radiation. UB-A stimulates pigmentation, while UV-B is essential for healthy bone growth. If your animals do not tolerate direct UV radiation, please take this into account when setting up your biOrb EARTH and positioning the UV lamp.
Humidity
An ultrasonic mist unit regulates the air humidity. In addition, it is possible to simulate rain with the aid of two nozzles.
Air and ground temperature
By mixing fresh air with heated or cooled circulated air, the biOrb EARTH creates a climate with desired temperature differences, as in nature.
A heating cable on the floor ensures the desired substrate temperature.
The following figure shows the possible air currents in the biOrb EARTH and their effects on the temperatures:
flowchart
graph TD
    A["T1"] --> B["T2"]
    B --> C["Spindle"]
    C --> D["Ta"]
    D --> E["Peltier"]
    E --> F["Ts1"]
    F --> G["Tp"]
    G --> H["Ts2"]
    H --> I["Ta"]
    style A fill:#f9f,stroke:#333
    style B fill:#ccf,stroke:#333
    style C fill:#cfc,stroke:#333
    style D fill:#fcc,stroke:#333
    style E fill:#cff,stroke:#333
    style F fill:#ffc,stroke:#333
    style G fill:#fcc,stroke:#333
    style H fill:#ffc,stroke:#333
EN
①
Fresh air
The biOrb EARTH is constantly supplied with air from its environment through the mist outlet. This air is then discharged through the side covers (wings).
To prevent harmful substances (particles, odours, etc.) from entering thebiOrb EARTH from the environment, the supplied air is guided through an active carbon filter in the back section. To prevent odours from escaping thebiOrb EARTH, the waste air is guided through active carbon filters in the side covers.
②
Circulating air (heated or cooled)
The "OASE Control" app can be used to activate air circulation, with a Peltier element heating or cooling the air depending on the settings in the app.
③
Supply and waste air for the Peltier element
④
Floor heater
An electric floor heater can be switched on or off via the app. When the heater is switched on, it does not just heat the floor, but also creates a rising air flow due to thermals.
T_a
Ambient temperature
T_p
Temperature generated by the Peltier element. The cooling capacity of the Peltier element depends on the ambient temperature of the biOrb EARTH.
T_s1, T_s2
Sensor values. The temperatures measured by the sensors are displayed in the "OASE Control" app.
T_1, T_2, , T_n
Actual temperature at different points in thebiOrb EARTH.
Due to air currents, the actual temperatures at different points in the biOrb EARTH may differ from the sensor temperatures shown in the app.
The actual temperatures at different points in the biOrb EARTH may range from max. +40°C (104°F) to 2.5°C (36.5°F) below the ambient temperature.
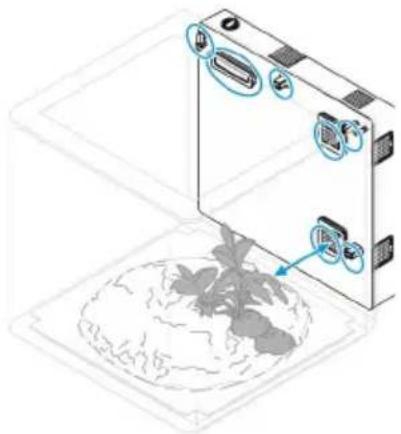
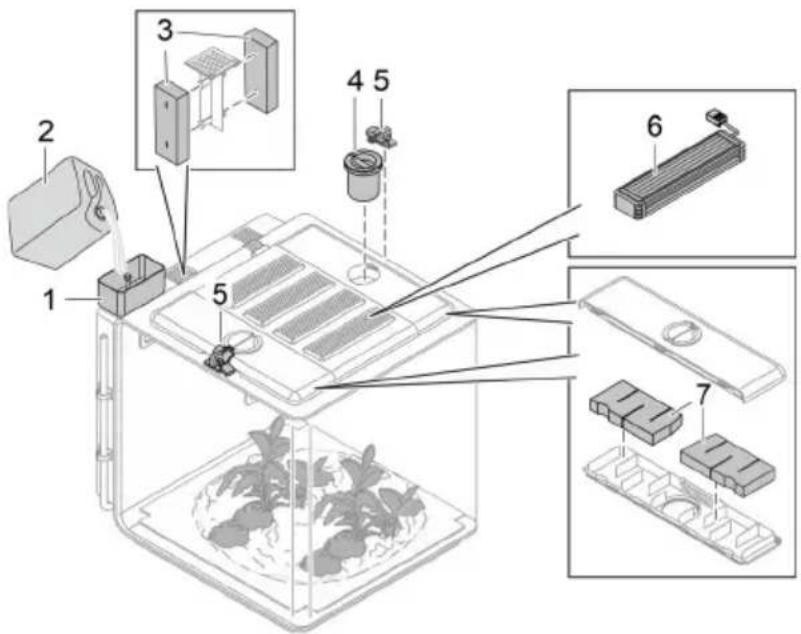
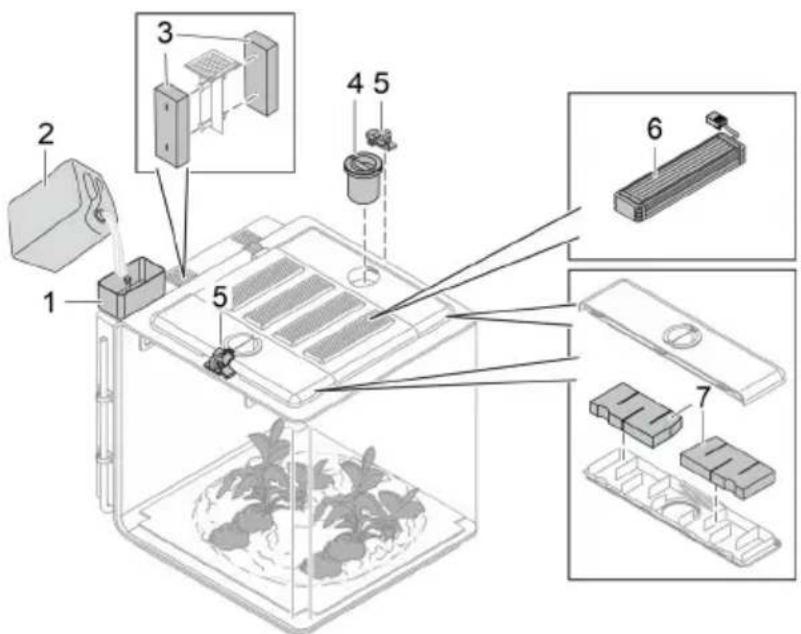
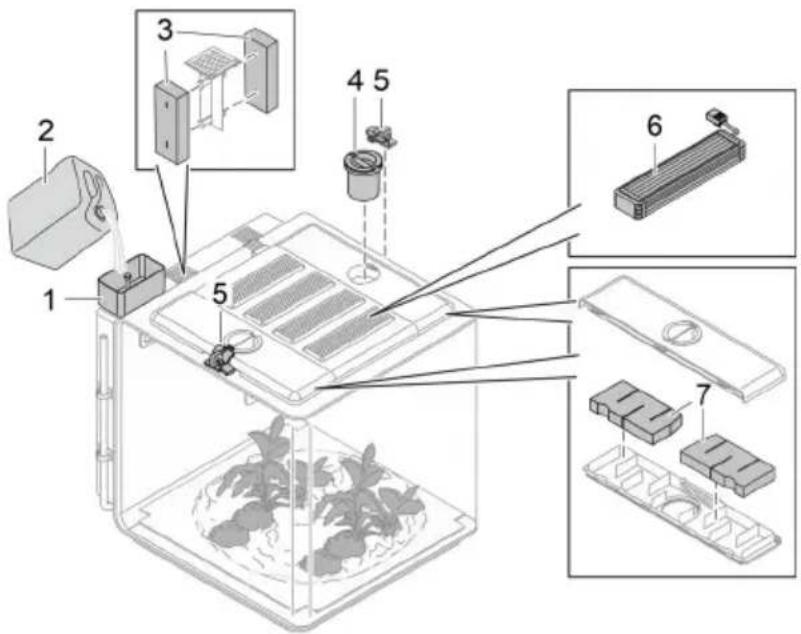
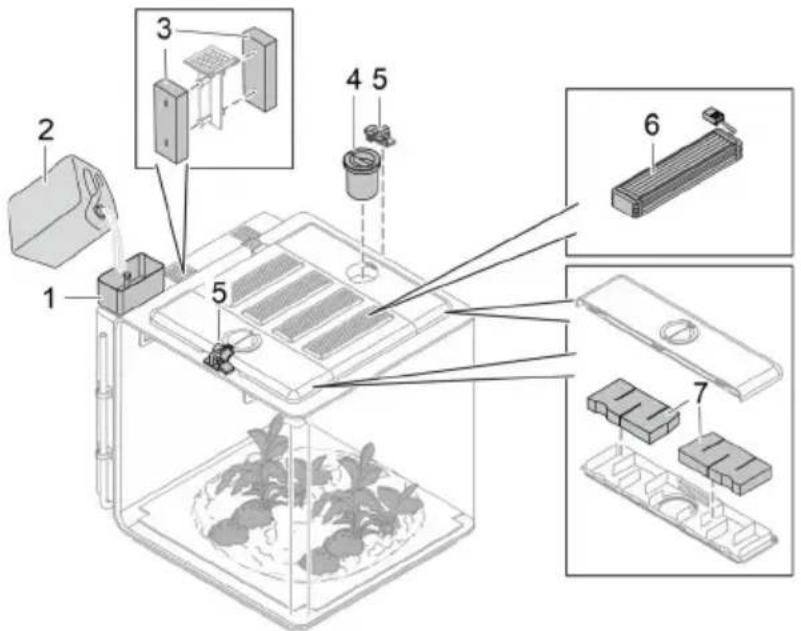
Overview of function elements
BO80324
1 Side cover (wing) with food opening and carbon filter (outgoing air)
2 Centre cover with 4 lights
- When the cover is removed or tilted, the lights are switched off.
- The lights alternate between becoming dimmer and brighter if the biOrb EARTH has no water for 48 hours.
3 Foam mat
- Stores moisture from rain or mist, thereby replicating soil moisture.
4 Capillary mat
• Transports moisture from the foam mat into the substrate with the plant roots located above it.
• Prevents roots from entering the foam mat.
5 Polystyrene base with heating cables (floor heating)
6 Drain with drain hose
- For emptying water from the unit.
7 Filling port, liquid reservoir for rain and mist
- We recommend biOrb Humidimist (→Accessories) as rain and mist fluid.
- Do not fill with tap water, as limescale will damage the acrylic glass.
8 Funnel for filling the liquid reservoir
9 Carbon filter in the rear section (fresh air)
10 Speaker
11 Outlet air Peltier element
12 Inlet air Peltier element
13 Inlet opening for the circulating air cooled or heated by the Peltier element
14 Extraction opening of the air circulation system
15 Button with LED.
• Functions (see following section).
- To press the button, remove the grating of the inlet air opening (11).
16 Rain nozzle
17
Temperature and humidity sensor
- The "OASE Control" app shows the current sensor values. Due to the air circulation, different values may be measured at a different location.
| 18 | Mist outlet and inlet opening for fresh air |
| 19 | Power pack |
| 20 | Power cable with country-specific power plug |
| 21 | Rubber stopper |
- For sealing the housing openings when the rear section containing the electronics is removed.
Operating conditions indicated by the LED (15)
| LED status | Description | |
| Green | Continuous light | biOrb EARTH is operating and has a network connection. |
| Flashing | biOrb EARTH is operating and is looking for a network connection. | |
| Red | Continuous light | biOrb EARTH is starting (boot phase) or being reset. |
| Flashing | Malfunction pending; possibly ...the cover is not positioned correctly.the target temperature or the target humidity have not been reached. | |
| Blue | Continuous light | biOrb EARTH is in delivery condition and is waiting for configuration via the "OASE Control" app. |
| Flashing | Liquid reservoir empty ( Filling the liquid reservoir). | |
| Off | biOrb EARTH is switched off. | |
Button functions (15)
| Usage | Description |
| Press briefly | Reset "Liquid reservoir empty" message. (The LED stops flashing in blue.) |
| Hold for 5 seconds | Reset network connection. A signal is audible at the end. |
| Hold for 15 seconds | Reset biOrb EARTH and app to factory settings. Three signals are audible at the end. |
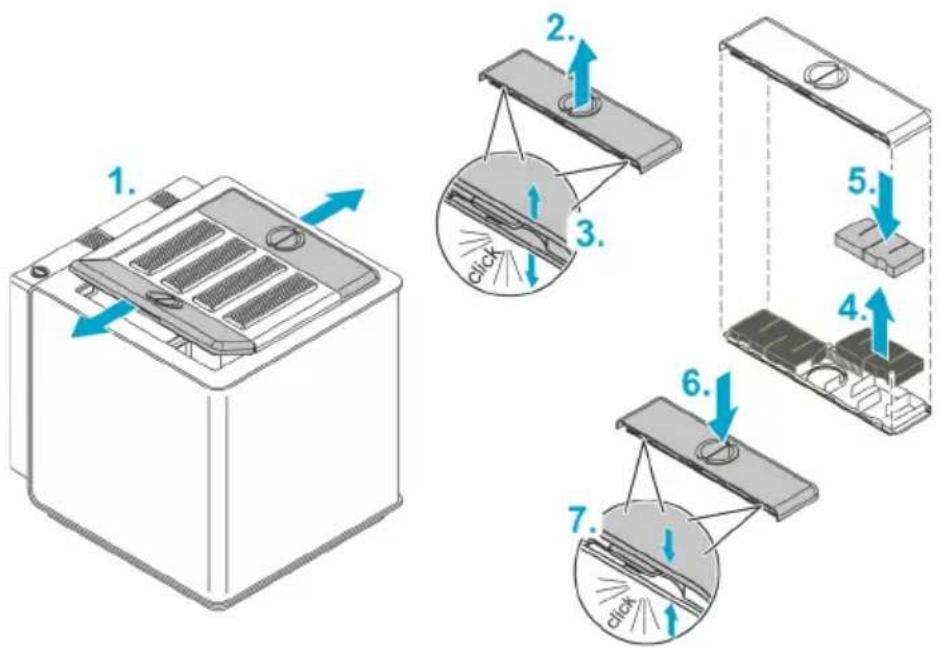
Access to the device
natural_image
Three-step diagram showing a container with seedlings growing in trays, with arrows indicating rotation and movement (no text or symbols)BOB0326
Accessories

BOB0325
1 biOrb EARTH funnel
For filling the liquid reservoir
• Article number 77495
2 biOrb Humidimist
Special water for the rain and mist function. It contains the number of electrolytes required to prevent limescale deposits on the glass and all components containing water.
- 4 × 500 ml bottle (4 × 0.13 gal): article number 46155
- 1 × 5 l canister (1 × 1.3 gal): article number 46156
3 biOrb EARTH carbon filter back
• Article number 77491
4 biOrb EARTH feeder
For easy feeding of the organisms in the vivarium.
• Article number 77492
5 biOrb EARTH lock set
2 locking mechanisms with padlocks to secure the side covers including the food openings.
• Article number 77493
6 Spotlight
• biOrb EARTH Sunlight LED kit: Article number 77487
• biOrb EARTH RGB & Infrared kit: Article number 77488
• biOrb EARTH UV-light kit: Article number 77489
7 biOrb EARTH wing filter set
• Article number 77490
On www.oase.com you can order a wide variety of different decoration items and substrates to replicate a natural environment for your animals.
Symbols on the unit
| The unit has protection rating II and is protected by double or reinforced insulation. | |
| The unit has protection rating III. Only operate the unit with safetylow voltage. | |
| Only use the unit indoors or in a dry environment. | |
| Do not dispose of the unit with normal household waste. | |
| Read the operating instructions. |
EN
Set-up
How to proceed:
- If necessary, modify floor heater ( Modifying the floor heater).
- If necessary, modify lighting ( Modifying the lighting).
- Install biOrb EARTH ( Installing the unit).
- Fill biOrb EARTH ( Filling the unit).
Modifying the floor heater
If required, you can adapt the floor heater to the needs of the organisms in the vivarium.
Moderate, tropical climate
Standard (factory installation)
Desert-like climate

Variant
BOB0327
-
In a moderate or tropical climate, some plants need soil moisture. It is therefore necessary to insert the capillary mat and the foam mat.
• The heating cable heats the entire floor. -
A desert has no soil moisture. The capillary mat and the foam mat should therefore not be inserted.
- We recommend covering the drain opening e.g. with a cut piece of foam mat so that it is protected against clogging.
- The heating cable only heats a specific section of the floor. This is usually the area where the desert creatures rest.
How to proceed:
(→ Laying a new heating cable or replacing the cable)
Modifying the lighting
To replicate natural conditions as closely as possible, the biOrb EARTH is equipped with a variety of different lamps that can be combined and arranged as required.
EN
This lamp emits sun-like light.
This lamp adds infrared radiation to the sunlight.
This light replicates the sun's UV-A/B radiation.
We recommend the following sequence (factory installation, back to front):
- Sunlight LED
- RGB & Infrared
- UV light
- Sunlight LED
NOTE
The vivarium may only be used when it is equipped with 4 lamps. Otherwise the openings created by the missing lamps will interfere with the ventilation concept required to maintain even temperatures and humidity levels.
How to proceed:
(→ Replacing lamps)
Installing the unit
Position the biOrb EARTH on a sufficiently large, load-bearing surface, for instance on a table or on a cabinet.
NOTE
▶ Protect the unit from direct sunlight.
▶ Ensure that an electrical outlet is in the immediate vicinity.
▶ Do not cover the ventilation openings of the unit.
▶ Very warm air can exit the ventilation openings on the sides and cause damage to plants or other heat-sensitive materials. Ensure sufficient clear space.
▶ Ensure that there is sufficient space to access the unit.
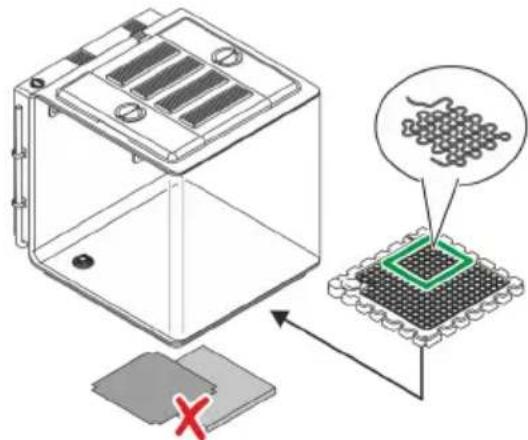
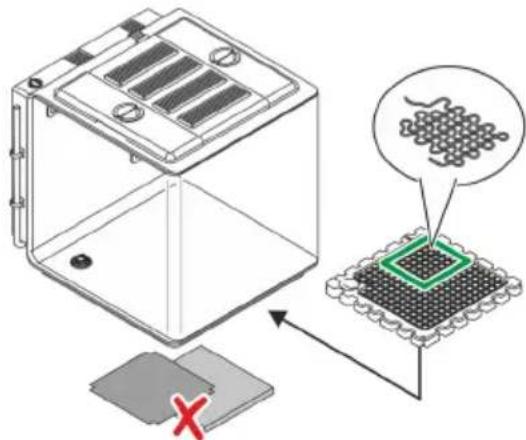
Filling the unit
natural_image
Diagram of a device with labeled components and a globe at the base (no text or symbols present)BOB0331
Access the unit and fill the biOrb EARTH as desired. (→ Access to the device)
A variety of decorative items and plants are available from OASE retail partners or at www.oase.com.
NOTE
▶ Ensure that the items used to fill the unit do not cover ventilation grilles, rain nozzles and sensors. (→ Overview of function elements)
▶ To ensure that the rain is true to nature, the rain nozzles must be aligned so that the entire space gets rained on, if at all possible.
Commissioning/start-up
How to proceed:
- Fill the liquid reservoir ( Filling the liquid reservoir).
- Switch on the unit ( Switching on the unit).
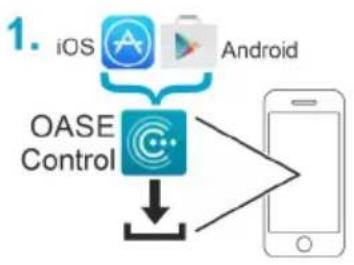
- Install the "OASE Control" app (→ Connecting the unit with your smartphone/tablet).
- If you have not already done so, create an OASE account in the app.
- Use the app to configure the biOrb EARTH.
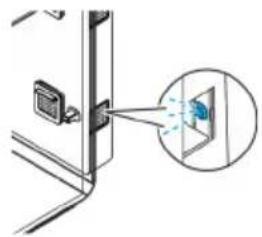
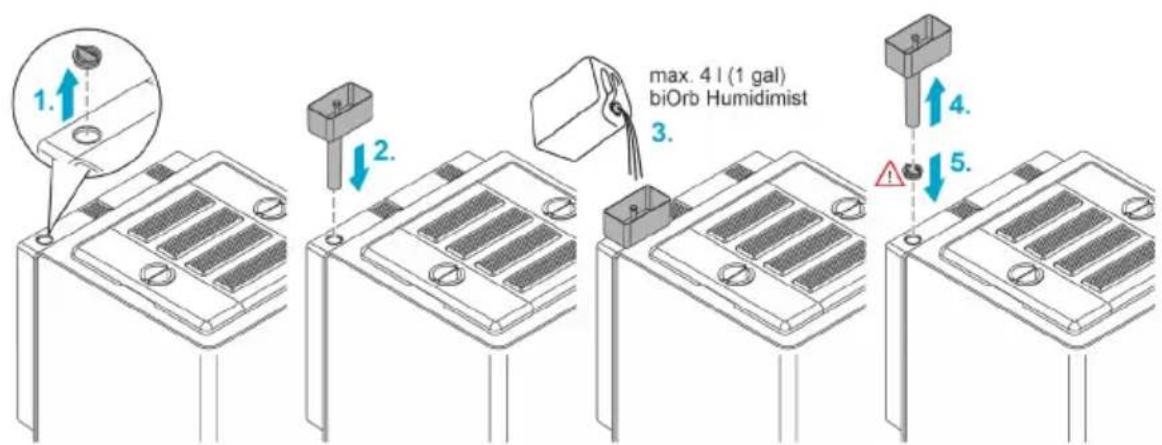
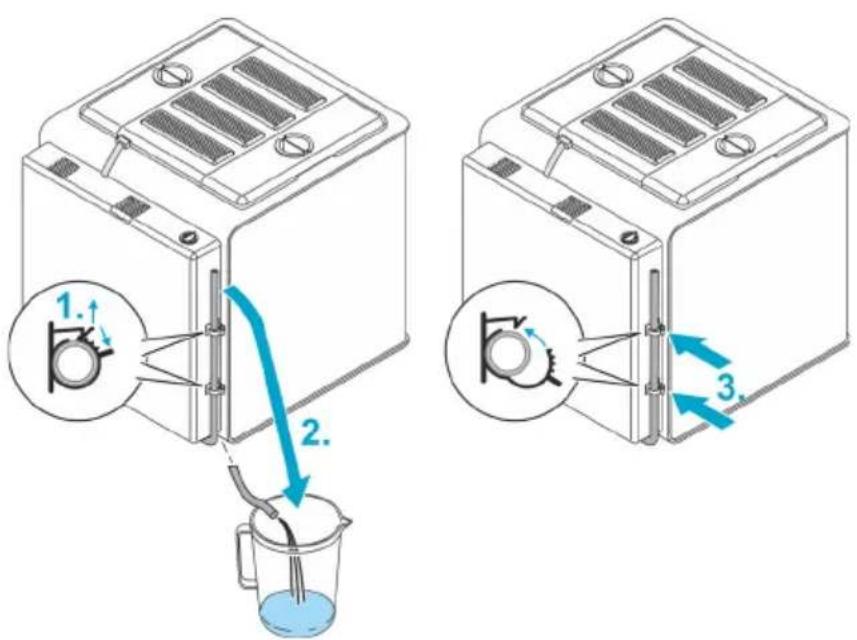
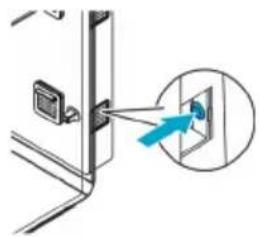
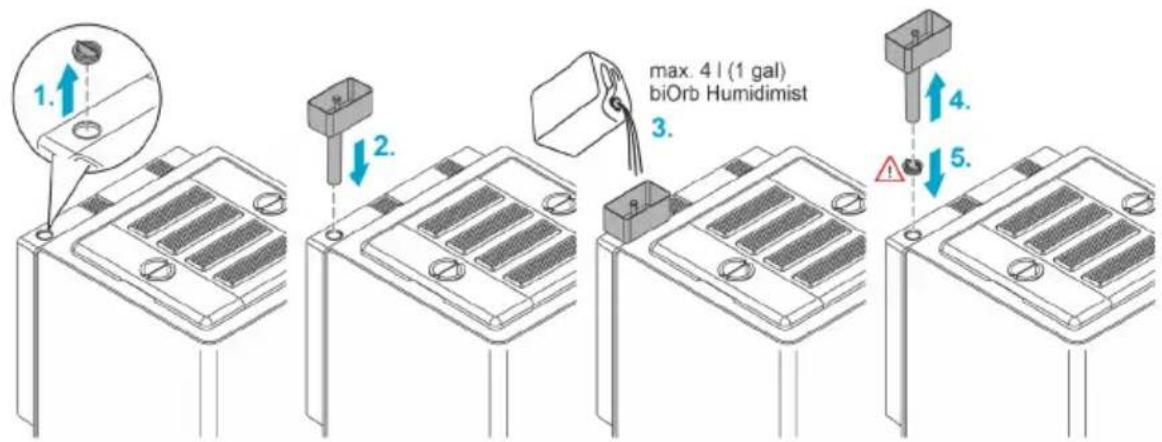
Filling the liquid reservoir
The liquid reservoir must be filled sufficiently to permit the mist and rain function. The mist and rain function is deactivated automatically if the liquid level is too low.
natural_image
Diagram showing a device with an inset image of a magnified view of a screen (no text or symbols present)The LED flashes blue if there is insufficient liquid.

natural_image
Diagram showing a door with a blue arrow pointing to a component, no text or symbols presentAfter filling the liquid reservoir, press the button to acknowledge the message.

The "OASE Control" app will also notify you of a lack of liquid and it is possible to acknowledge this message in the app.
NOTE
We recommend only using "biOrb Humidimist" (→Accessories) to fill the liquid reservoir. This prevents limescale deposits on the glass and the components containing water.
BOB0334
How to proceed:
- Remove the cover of the liquid reservoir filling port.
- Place the funnel on the filling port.
- Pour biOrb Humidimist (→Accessories) into the funnel. A float switch shows when the liquid reservoir is filled (on initial filling approx. 4 litres (1 gal)).
- Remove the funnel from the filling port.
- Close the filling port with the cover.
- Confirm filling in the "OASE Control" app or by using the button on the unit.
√ Now the rain and mist functions are fully available again.
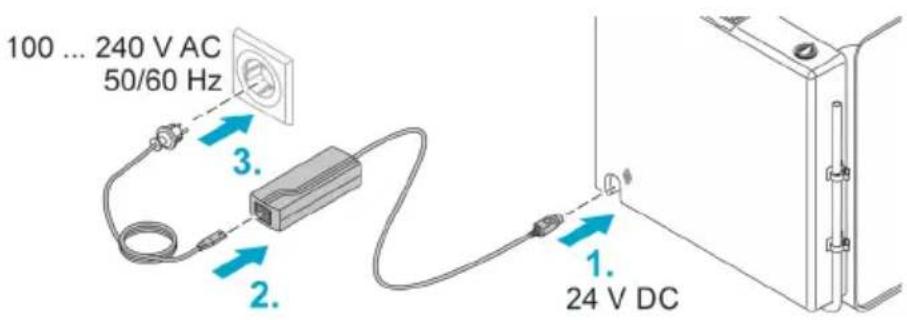
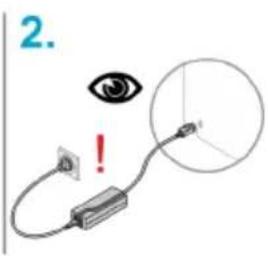
Switching on the unit
Switching on the unit: Insert the power plug of the power pack into the socket. The unit switches on immediately.
Switching off the unit: Pull the power plug of the power pack.
How to proceed:
BOB0332
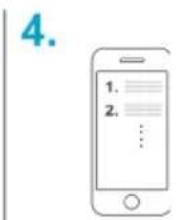
Connecting the unit with your smartphone/tablet
How to proceed:
flowchart
graph TD
    A["iOS"] --> C["OASE Control"]
    B["Android"] --> C["OASE Control"]
    C --> D["Mobile Phone"]

BOB0333
Maintenance and cleaning
NOTE
EN
Do not use aggressive cleaning agents or chemical solutions. These agents can damage the housing, impair the function of the device and harm animals, plants and the environment.
▶ Clean the unit with clear water and a soft, clean cloth.
▶ For the exterior surfaces we recommend the polish from biOrb (Article no. 46033).
Draining liquid
BOB0335
How to proceed:
- Open the two clips.
- Place the drain hose in a collection container underneath the unit.
- Once the liquid has drained, place the hose back in the clips and close them.
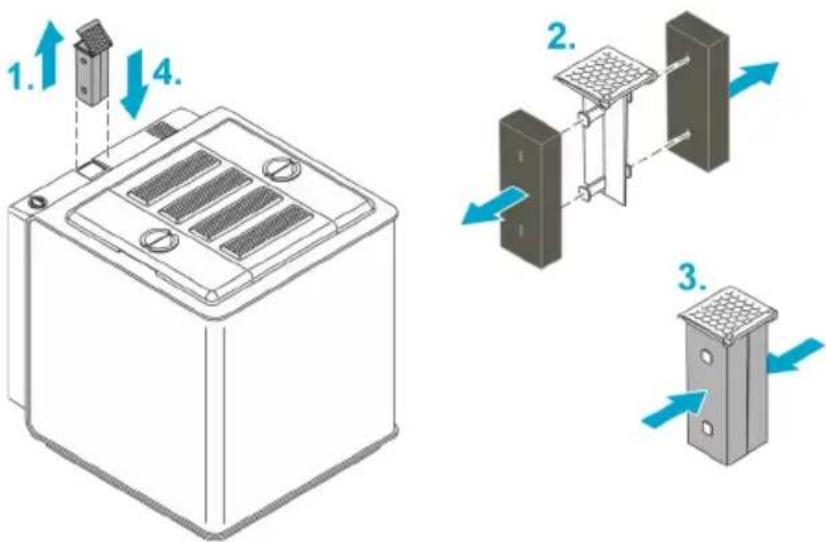
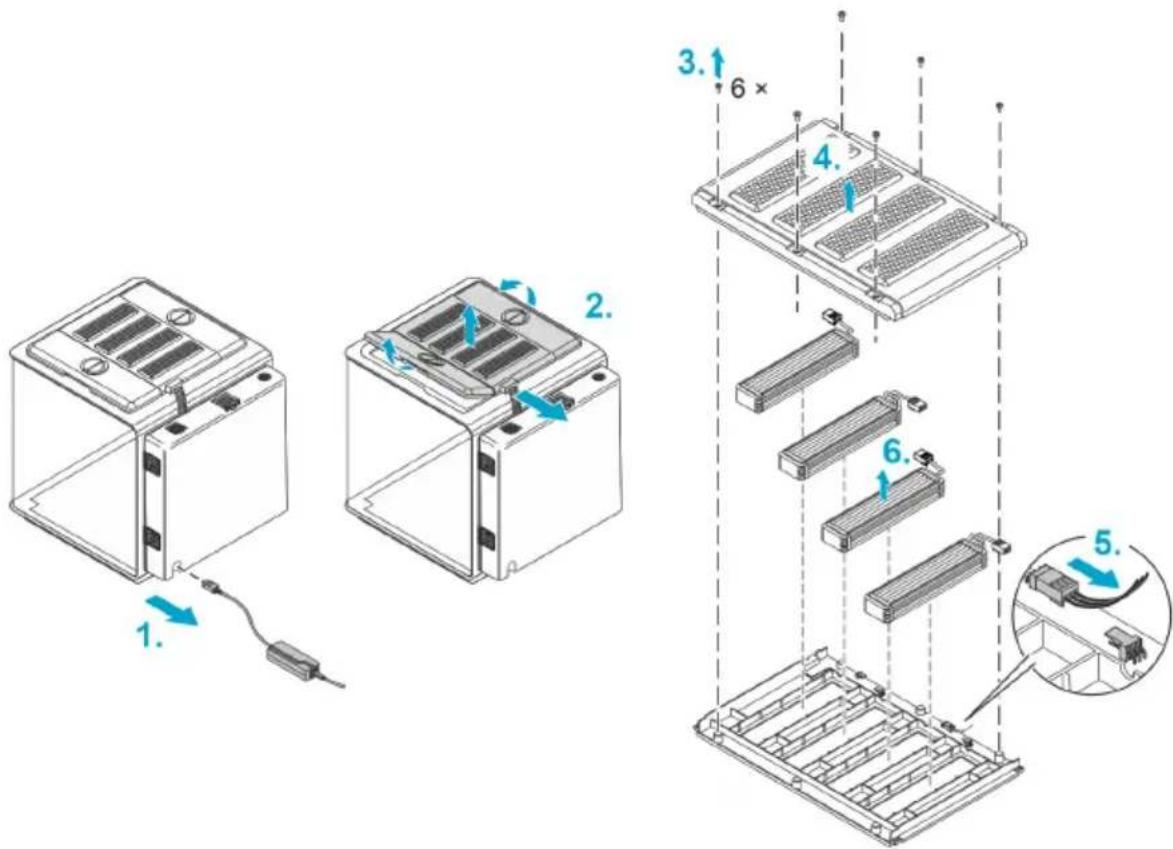
Replace air filter
Replacing the filter back
- Replacement interval every 3 months
• biOrb EARTH carbon filter back, Art. No. 77491
How to proceed:
BOB0337
Replacing the wing filters
Replace the filters in the two side covers (wings).
- Replacement interval every 6 months
• biOrb EARTH wing filter set, Art. No. 77490
How to proceed:
BOB0338
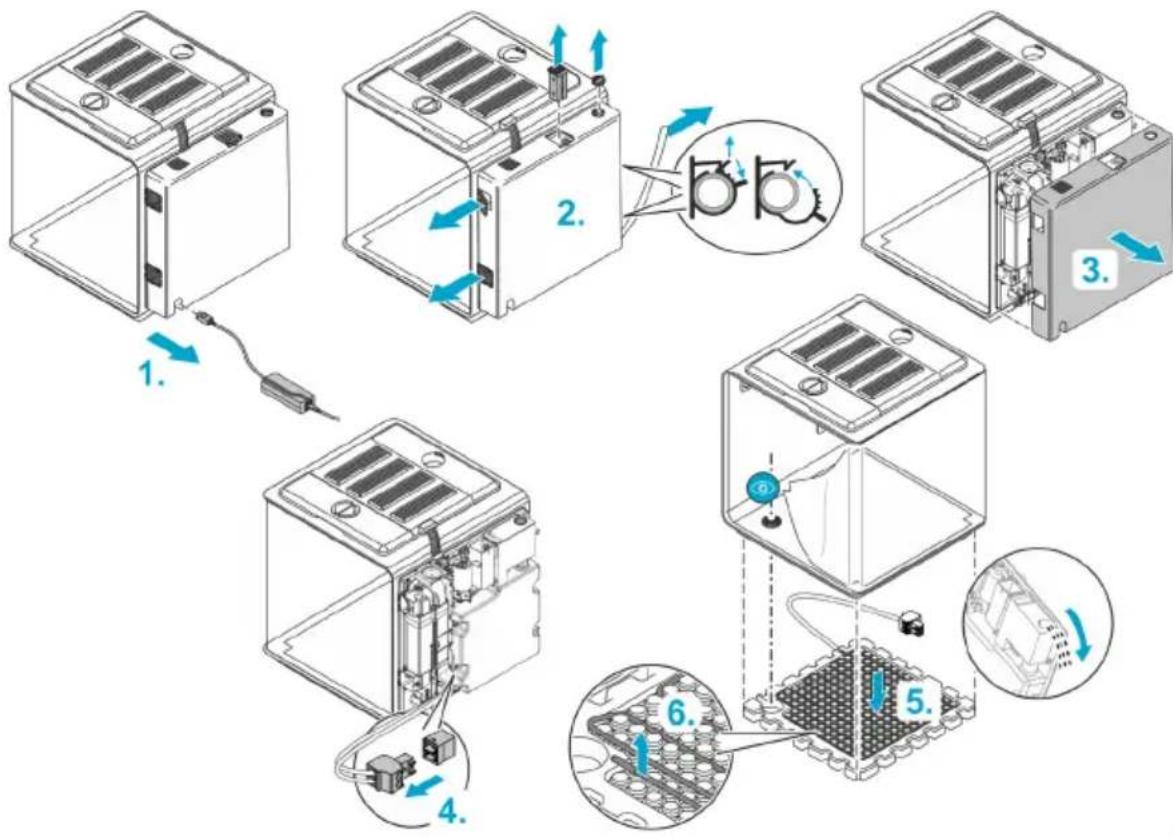
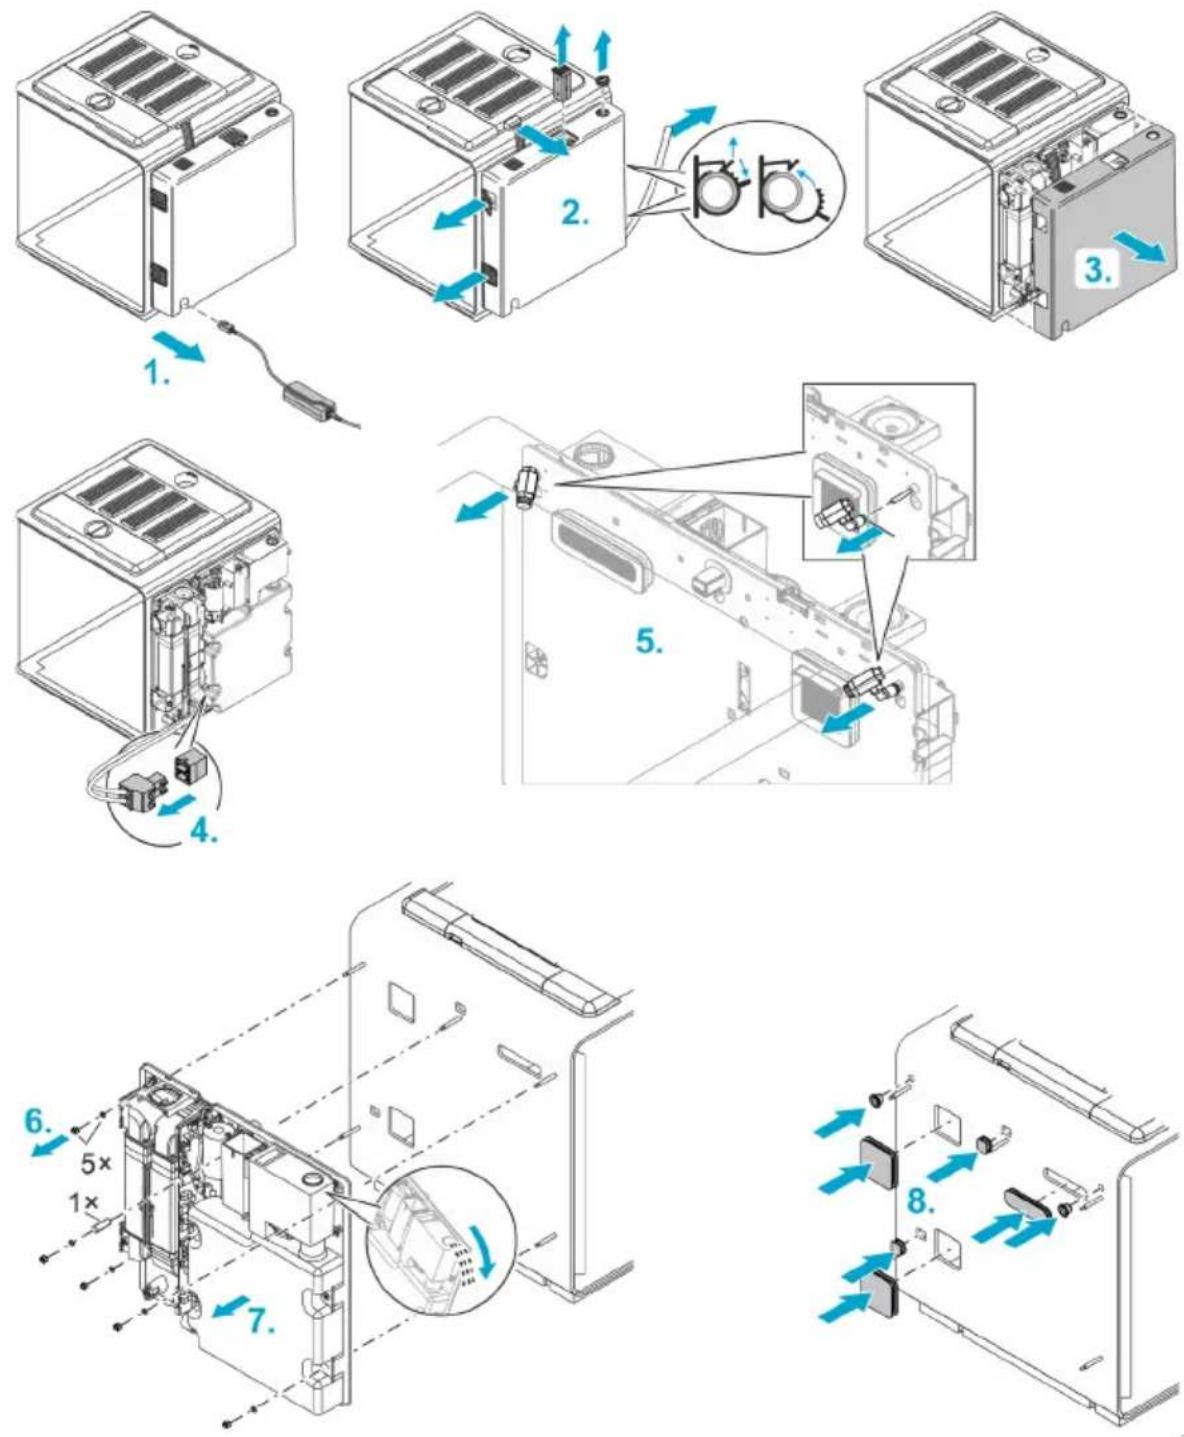
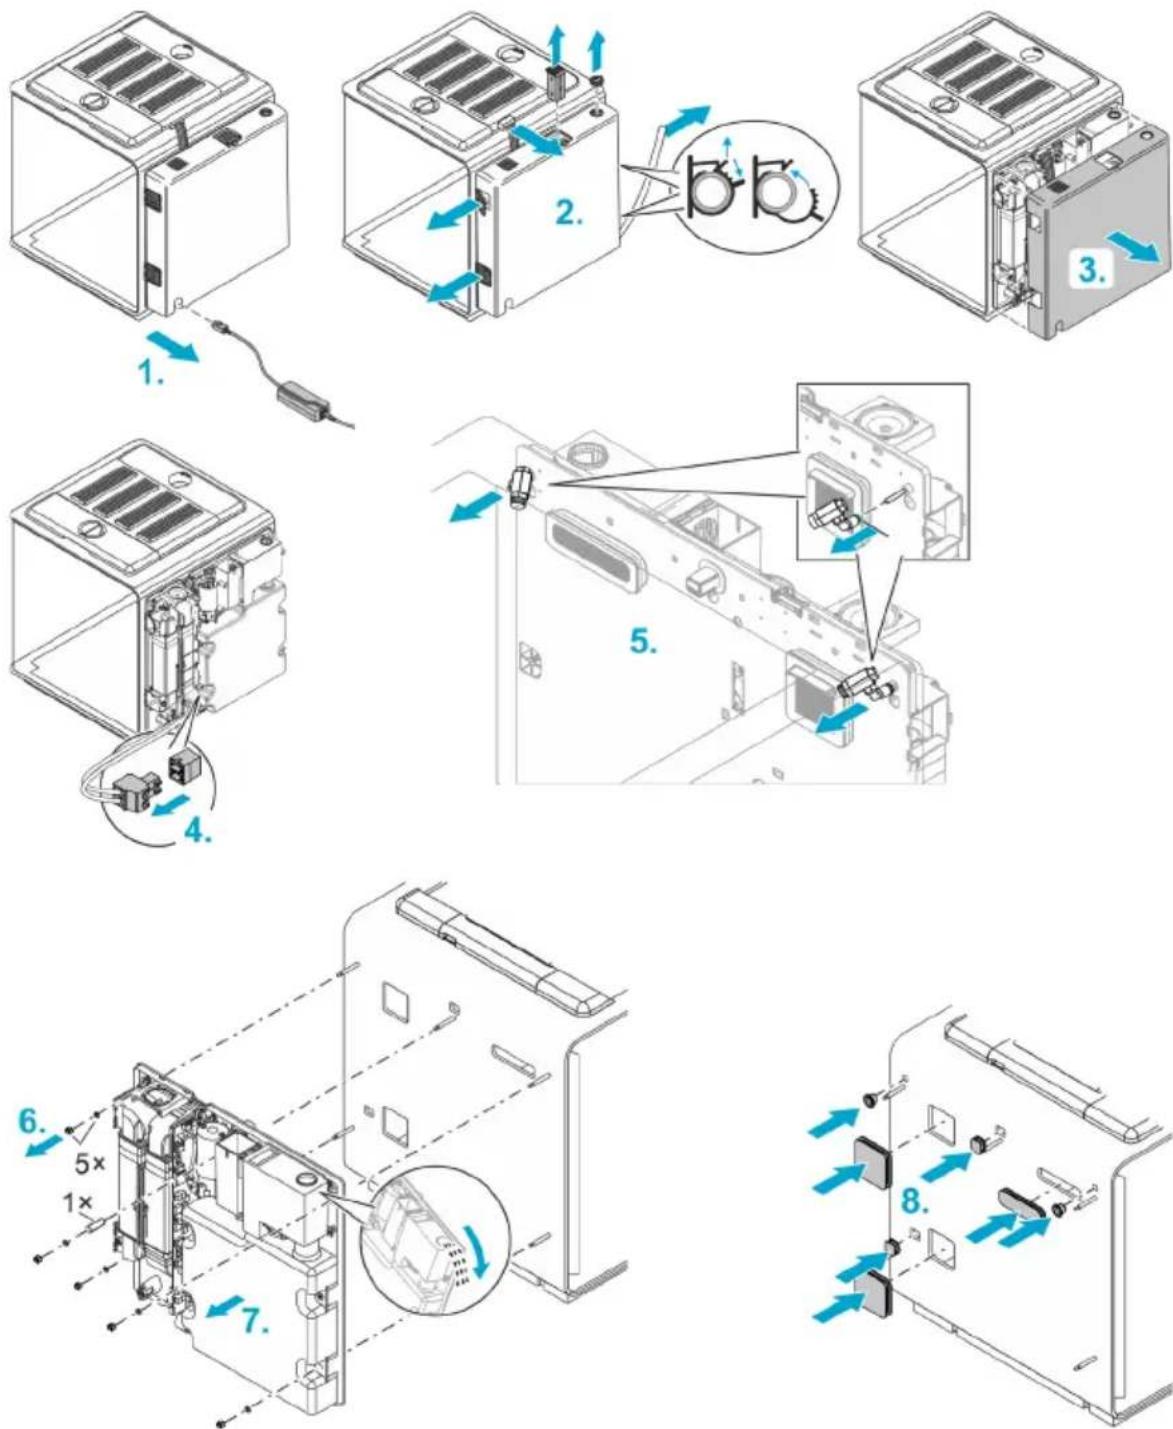
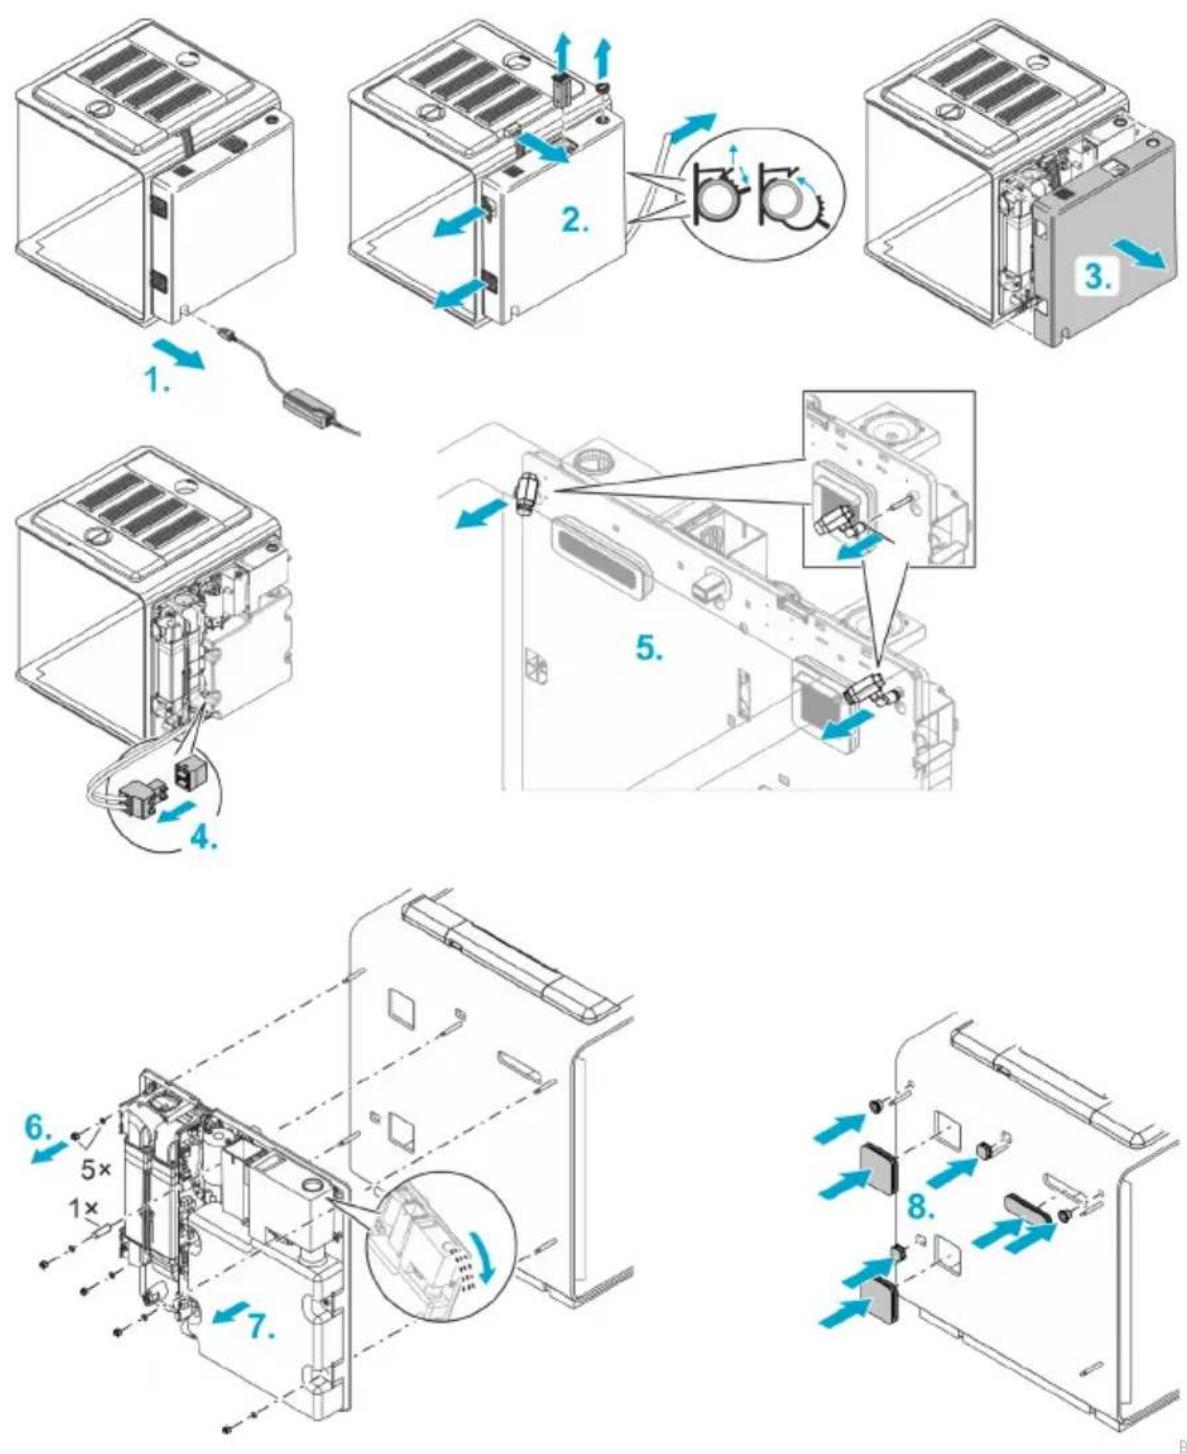
Repair
Replacing the back section
EN

BOB0339
How to proceed:
- Pull the power plug.
-
Remove ...
-
the lamp plug,
— the cover of the filling port,
– the filter back,
– the grilles of the intake and waste air opening, -
the drain hose.
-
Pull off the casing of the back section.
- Pull the heating cable plug.
- Remove the two rain nozzles. To do so push the black ring in the direction of the nozzle on its holder and simultaneously pull the nozzle forward.
- Remove the 5 nuts with washer and a spacer sleeve.
- Carefully and evenly pull off the back section.
Note: If the liquid reservoir contains liquid, carefully pour it out through the filling port so that the water cannot get into the electronics.
- Insert the supplied rubber plugs in the 7 openings created by removing the back section. This prevents animals living in the vivarium from escaping through the holes.
- Install a new back section and re-assemble the unit in reverse order.
When fitting the back section casing, ensure that no cables are kinked or crushed.
Replacing lamps
BOB0330
How to proceed:
- Pull the power plug.
- Pull the lamp plug and remove all covers.
- Undo the 6 screws on the centre cover.
- Remove the top shell of the cover.
- Pull the plug of the lamp you wish to remove.
- Remove the lamp from the cover.
- Insert a new lamp, connect it and re-assemble the unit in reverse order.
Laying a new heating cable or replacing the cable
flowchart
graph TD
    A["1. Battery Mount"] --> B["2. Internal Panel"]
    B --> C["3. External Panel"]
    C --> D["4. Internal Panel"]
    D --> E["5. Final Assembly Unit"]
    style A fill:#f9f,stroke:#333
    style B fill:#ccf,stroke:#333
    style C fill:#cfc,stroke:#333
    style D fill:#fcc,stroke:#333
    style E fill:#cff,stroke:#333
BOB0328
How to proceed:
- Pull the power plug.
-
Remove ...
-
the cover of the filling port,
- the filter back,
— the grilles of the intake and waste air opening, -
the drain hose.
-
Pull off the casing of the back section.
- Pull the heating cable plug.
We recommend having two people perform the following step:
- Tilt the unit slightly forward and remove the polystyrene base.
Note: If the liquid reservoir contains liquid, the unit may not be tilted or only tilted very slightly (max. 45°), depending on the liquid level. Otherwise liquid may spill and destroy the electronics.
If necessary, carefully pour out the liquid through the filling port so that no water can get into the electronics.
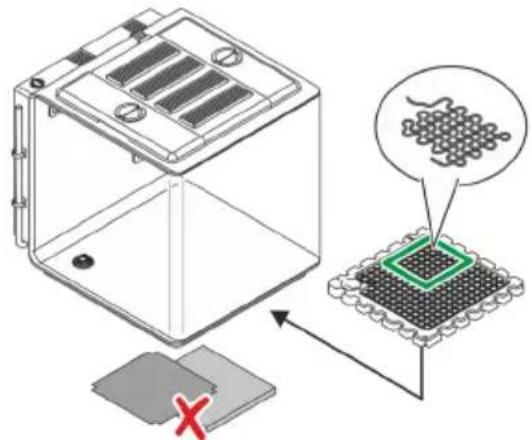
- Pull the heating cable off the polystyrene base and lay it in its new position.
- Reassemble the unit in reverse order.
- When inserting the polystyrene base, position it so that the drain is located in the cut-out at the bottom.
— When fitting the back section, ensure that no cables are kinked or crushed.
Malfunction remedy
Error messages
The app sends the following notifications, either as push notifications to your smartphone or as an e-mail:
| Message | Remedy |
| Liquid reservoir empty | Refill liquid (→Filling the liquid reservoir). |
| No water for 24 hours | Refill liquid (→Filling the liquid reservoir) or check water circuit. |
| Temperature too high/too low | Check temperature via the app and readjust, if necessary.If necessary, switch off the floor heater and/or reduce the ambient temperature.Due to air currents, the actual temperatures at different points in the biOrb EARTH may differ from the sensor temperatures shown in the app. The actual temperatures at different points in the biOrb EARTH may range from max. +40°C (104°F) to 2.5°C (36.5°F) below the ambient temperature. |
| Air humidity too high/too low | Check air humidity and/or rain time via the app and readjust, if necessary.If the substrate contains a lot of liquid, drain it through the drain hose. (→Draining liquid) |
EN
Technical data
Power pack
| Primary | voltage | AC V | 100 ... 240 |
| Mains frequency | HZ | 50/60 | |
| Cable length | m | 1.5 | |
| ft | 4.9 | ||
| Secondary | voltage | DC V | 24 |
| Max. power | W | 180 | |
| Cable length | m | 1.5 | |
| ft | 4.9 | ||
| Protection class | II |
biOrb EARTH, general
| Supply | voltage | DCV | 24 |
| Power, max. | W | 105 | |
| Noise (at a distance of 80 cm) | Standard | dB | 37 ... 42 |
| Quiet mode | dB | 34 ... 37 | |
| Protection class | III | ||
| Ambient temperature range | °C | 15 ... 35 | |
| °F | 59 ... 95 | ||
| Dimensions (L × W × H) | cm | 571 × 500 × 567 | |
| in | 225 × 197 × 223 | ||
| Weight | kg | 19.1 | |
| Ibs | 42.1 |
biOrb EARTH, WLAN
| Protocol | IEEE 802.11b/g/n | |
| Frequency band | GHz | 2.4 |
| Max. transmission power | dBm | 20 |
| Safety | WEP, WPA 2, WPA 3 | |
| DHCP | Automatic | |
| Max. reach | m | 80 |
| ft | 262 |
biOrb EARTH, climate
| Air circulation | Function elements | Fans | ||
| Air temperature (This information is based on measurable values in the biOrb EARTH at an ambient temperature of +25°C (+77°F). Due to air circulation, the sensor values may differ by up to 10°C (+50°F.) | Function element | Peltier element | ||
| Heating (max. temp.) | °C | +40 | ||
| °F | +104 | |||
| Cooling (min. temp.) | °C | 2.5 | below ambient temper-ature | |
| °F | 36.5 | |||
| Temperature diff., max. | °C | 10 | ||
| °F | 50 | |||
| Floor temperature | Function element | Electric heating cable | ||
| Heating (max. temp.) (When operated without capillary and foam mat.) | °C | 35 | ||
| °F | 95 | |||
| Humidity | Function elements | Ultrasonic mist unit, rain pump/nozzles | ||
| Liquid reservoir | I | 4 | ||
| gal | 1 | |||
biOrb EARTH, lamps
| Sunlight LED | Light colour | K | 3,200 ... 7,300 |
| Light current, total | lm | 650 | |
| Energy efficiency class | G | ||
| RGB & Infrared | Light current, total | lm | 56 |
| UV light | Wavelength | nm | 318 (UV -B) |
| UV-B power at distance of 0/5/10/15/20/25/30 cm | W/cm^2 | 1940/310/119/60/35/23/15 | |
| UV index at distance of 0/5/10/15/20/25/30 cm | 64/9/4/2/1/0.7/0.5 |
Disposal
NOTE
Do not dispose of this unit with household waste.
▶ Dispose of the unit by using the return system provided for this purpose.
▶ Should you have questions, please contact your local disposal company. They will give you information on how to correctly dispose of the unit.
▶ Render the unit unusable by cutting the cables.
Guarantee
OASE GmbH guarantees this OASE device that you have purchased for a period of 24 months in accordance with the conditions listed below. The guarantee exists in addition to the statutory warranty obligations of the seller and does not affect these statutory warranty obligations. The guarantee applies without prejudice to mandatory statutory liability provisions, for example the provisions of the Product Liability Act, in cases of intent and gross negligence, injury to life, limb or health on the part of OASE GmbH or its vicarious agents.
Guarantee period
The guarantee period begins on the date of first purchase of the OASE device from the OASE stockist. The guarantee period will not be extended or renewed in the event of a guarantee claim or if the OASE device is resold.
Guarantee
OASE GmbH guarantees proper functionality and usability of the OASE device in accordance with its intended purpose. In this regard, the state of science and technology at the time of production shall be authoritative. The OASE device must have already shown the defect that caused the damage at this point in time.
In the event of a guarantee claim, OASE GmbH reserves the right to repair the OASE device free of charge or to deliver spare parts for the OASE device or a replacement device free of charge. If the device type of the OASE device in question is no longer being manufactured, OASE GmbH reserves the right to deliver a replacement device of its own choice from the OASE product range that most nearly approaches the device type that is the object of the complaint.
The guarantee applies only to damage on the purchased OASE device itself. Reimbursement of expenses for installation, removal and inspection, compensation claims for damage that did not occur on the purchased article itself, as well as claims for loss of profit or loss of use and further claims for damages and losses of any kind whatsoever caused by the OASE device or its use, are excluded from the guarantee.
Guarantee exclusion
Excluded from the guarantee are damages caused by
- mechanical damage due to accident, fall or impact, or
- force majeure or natural disasters, in particular, but not limited to, floods, fires or frost damage,
- negligent or wilful destruction (e.g. by cutting off the plug or shortening the power cable), or
- misuse, improper or non-intended use, installation and operator errors or lack of care (e.g. use of unsuitable cleaning agents, omitted maintenance, lime-scale deposits), overload or failure to comply with the user instructions,
- the user's own repair efforts, as well as damages to
- wear parts such as illuminant and rotors,
- fragile parts, such as glass, light bulbs and
• consumables, such as batteries or filter foams.
With regard to proper use, OASE GmbH refers to the operating instructions, which are a component of this guarantee.
Assertion of claims
Guarantee claims can only be asserted against OASE GmbH, Tecklenburger Straße 161, 48477 Hörstel, Germany, within the guarantee period. To do this, the person submitting the claim,
bearing the shipping costs and the transport risk, sends the device, or the part of the device, that is the object of the complaint, to OASE GmbH together with a copy of the original sales receipt issued by the OASE stockist, this guarantee certificate and written information concerning the defect that is the object of the complaint.
General provisions
This guarantee is governed by German law with exclusion of the United Nations Convention on Contracts for the International Sale of Goods (CISG).
Guarantee for North America
OASE North America will guarantee this OASE unit that you have purchased for a period of 24 months in accordance with the provisions set out below. The guarantee exists in addition to the seller's statutory warranty obligations and does not affect them. It applies irrespective of any statutory liability provisions, e.g. under the German Product Liability Act, and in the event of intent and gross negligence or injury to life, limb or health caused by OASE North America or its vicarious agents.
Duration of the guarantee
The guarantee starts on the date on which the OASE unit is first purchased from the OASE specialist dealer. The guarantee term is neither extended nor renewed if a claim is asserted under it or the OASE unit is sold on.
Scope of the guarantee
OASE North America guarantees the impeccable, purpose-related functionality and usability of the OASE unit. This is determined based on the state of the art at the time of its manufacture. The OASE unit must already have exhibited the defect that caused the damage at this point in time.
If a claim is made under the guarantee, OASE North America reserves the right to repair the OASE unit at no cost or to supply spare parts for the OASE unit or a replacement unit at no cost. Should the type of the OASE unit concerned no longer be manufactured, OASE North America reserves the right, at its discretion, to supply a replacement unit from the OASE range that comes as close as possible to the type of unit subject to complaint.
The guarantee is only valid for damage on the purchased OASE unit itself. The guarantee does not cover reimbursing costs for installation, removal and checks, compensation claims for damage not caused to the purchased item itself, claims for lost profit or due to downtime, or any other claims for damage or loss of whatever kind that are caused by the OASE unit or its use.
Exclusion from the guarantee
The guarantee does not cover damage due to:
- mechanical damage caused by an accident, fall or impact; or
- force majeure or natural disasters, particularly but not exclusively in the event of flooding, fire or frost damage; or
- negligent or deliberate destruction (e.g. by cutting off the plug or shortening the power cable); or
- misuse, inappropriate or improper use, installation and operation errors or lack of care (e.g. using unsuitable cleaning agents, neglecting maintenance, limescale deposits), overloading or failing to follow the user instructions/instructions for use; or
-
damage that is exacerbated through the user's own efforts to repair it, and damage to:
-
wear parts such as lamps and rotors,
- fragile parts such as glass and lightbulbs, and
• consumables such as batteries and foam filter pads.
With regard to inappropriate use, OASE North America refers users to the instructions for use, which form part of this guarantee.
Asserting guarantee claims
Claims under the guarantee can only be asserted against OASE North America, Aurora, Ohio 44202, USA during the guarantee term. To this end, the claimant must send the unit or part of the unit subject to complaint to OASE North America at its own cost and risk, enclosing a copy of the original purchase receipt from the OASE specialist dealer, this guarantee document and written details of the defect being complained about.
General provisions
This guarantee is governed by German law under the exclusion of the United Nations Convention on Contracts for the International Sale of Goods (CISG).
T_1, T_2, , T_n
FR
natural_image
Three-step diagram showing a container with seedlings growing in trays, with arrows indicating rotation and movement (no text or symbols)BOB0326
Accessoires

FR
Standard (installation en usine)
Climat désertique
Variante
BOB0327
natural_image
Isometric diagram of a device with labeled components inside a transparent enclosure, showing a plant and battery (no text or symbols)BOB0331
natural_image
Diagram showing a door with a small device and a magnified inset highlighting a blue object (no text or symbols)natural_image
Diagram of a door with a blue arrow pointing to a wall-mounted device (no text or symbols present)BOB0335
BOB0338
Réparation
BOB0330
T_1, T_2, , T_n
BO80324
natural_image
Three-step diagram showing a plant growth setup in a container, with arrows indicating rotation and movement (no text or symbols)BOB0326
Toebehoren

BOB0325
Standaard (installatie af fabriek)
Variant
BOB0327
natural_image
Diagram of a washing machine with labeled components and a plant growing from it (no text or symbols present)BOB0331
natural_image
Diagram showing a device with a magnified inset highlighting a component (no text or symbols present)natural_image
Diagram showing a door with a blue arrow pointing to a window, no text or symbols presentBOB0335
Zo gaat u te werk:
BOB0338
Reparatie
BOB0330
Zo gaat u te werk:
T_1, T_2, , T_n
BO80324
natural_image
Three-step diagram showing a container with plants growing in different stages, each with a hand adjusting the interior (no text or symbols present)BOB0326
Accesorios

BOB0325
Variante
BOB0327
natural_image
Diagram of a device with labeled buttons and a plant on a base, no text or symbols presentBO80331
natural_image
Diagram showing a device interacting with a window, with an inset magnified view of the window (no text or symbols present)natural_image
Diagram of a door with a blue arrow pointing to a window (no text or symbols)BOB0335
BOB0338
Reparación
BOB0330
T_1, T_2, , T_n
BO80324
natural_image
Three-step diagram showing a container with seedlings growing in trays, with arrows indicating rotation and movement (no text or symbols)BOB0326
Acessório
PT
Variante
BOB0327
natural_image
Diagram of a device with labeled buttons and a plant on a base, no text or symbols presentBOB0331
natural_image
Diagram of a door with a close-up inset showing a magnified view of the glass (no text or symbols present)O LED que emite luz intermitente azul avisa da falta de líquido.

natural_image
Diagram showing a door with a blue arrow pointing to a window, no text or symbols presentBOB0335
BOB0338
Reparação
BOB0330
T_1, T_2, , T_n
BO80324
natural_image
Three-step diagram showing a container with plants growing in trays, with arrows indicating rotation and movement (no text or symbols)BOB0326
Accessori

IT
BOB0325
1 Imbuto biOrb EARTH
Variante
BOB0327
natural_image
Isometric diagram of a container with a plant and two labeled devices, no text or symbols presentBOB0331
natural_image
Diagram of a door with a close-up inset showing a magnified view of the glass (no text or symbols present)natural_image
Diagram showing a door with a blue arrow pointing to a window, no text or symbols presentBOB0335
BOB0338
Riparazione
BOB0330
BO80324
natural_image
Three-step diagram showing a container with plants growing in trays, with arrows indicating rotation and movement (no text or symbols)BOB0326
Tilbehør

DA
BOB0325
Standard (installation fra fabrikken)
∅rkenlignende klima
Variant
natural_image
Diagram of a device with labeled components and a plant base, no readable text or symbols presentBO80331
natural_image
Diagram showing a door with a small device and an inset close-up of a window (no text or symbols)natural_image
Diagram showing a door with a blue arrow pointing to a window, no text or symbols presentBOB0335
Sådan gør du:
Reparation
BOB0330
Sådan gør du:
T_1, T_2, , T_n
Faktisk temperatur på ulike steder i biOrb EARTH.
BO80324
natural_image
Three-step diagram showing a container with plants growing in trays, each with blue arrows indicating rotation or movement (no text or symbols)BOB0326
Tilbehør

1 biOrb EARTH funnel
Variant
natural_image
Isometric diagram of a plant growing inside a transparent enclosure with labeled components (no text or symbols)BOB0331
natural_image
Diagram of a door with a close-up inset showing a magnified view of a window (no text or symbols)En LED som blinker blått varsler om manglende væske.

natural_image
Diagram showing a door with a wall-mounted device and a magnified inset of a window (no text or symbols)BOB0335
Slik går du frem:
BOB0338
Reparasjon
Bytte av bakdel

BOB0339
Slik går du frem:
- Trekk ut støpslet.
- Ta ut...
BOB0330
Slik går du frem:
T_1, T_2, , T_n
BO80324
natural_image
Three-step diagram showing a container with seedlings growing in trays, with arrows indicating rotation and movement (no text or symbols)BOB0326
Tillbehör

BOB0325
1 biOrb EARTH tratt
Standard (fabriksinstallation)
Ökenliknade klimat
Varianter
- Sunlight LED
- RGB & Infrared
- UV-light
- Sunlight LED
ANVISNING
natural_image
Isometric diagram of a container with a plant growing inside, showing three labeled components (no text or symbols present)BOB0331
natural_image
Diagram of a door with a close-up inset showing a magnified view of the glass (no text or symbols present)natural_image
Diagram showing a door with a blue arrow pointing to a window, no text or symbols presentBOB0335
Gör så här:
BOB0338
Reparation
Byta baksida

BOB0339
Gör så här:
BOB0330
Gör så här:
T_1, T_2, , T_n
BO80324
natural_image
Three-step diagram showing a container with plants growing in different stages of a filtration or drying process, no text or symbols present.BOB0326
Lisätarvikkeet

1 biOrb EARTH Suppilo
Versio
natural_image
Isometric diagram of a container with a plant growing inside, showing labeled components (no text or symbols present)BOB0331
natural_image
Diagram showing a door with a close-up of a window and a magnified inset highlighting the interior (no text or symbols)natural_image
Diagram showing a door with a blue arrow pointing to a window, no text or symbols presentBOB0335
Toimit näin:
BOB0338
Korjaus
Takaosan vaihto
BOB0339
Toimit näin:
BOB0330
Toimit näin:
T_1, T_2, , T_n
BO80324
natural_image
Three-step diagram showing a container with plants growing in different stages, each with a hand interacting with it (no text or symbols present)BOB0326
Tartozékok

Változat
natural_image
Isometric diagram of a device with labeled components inside a transparent enclosure, showing a plant and battery (no text or symbols)HU
BOB0331
natural_image
Diagram of a door with a close-up inset showing a magnified view of the glass (no text or symbols present)natural_image
Diagram showing a door with a blue arrow pointing to a window, no text or symbols presentBOB0335
BOB0338
Javítás
Hátsó rész cseréje

BOB0339
BOB0330
T_1, T_2, , T_n
BO80324
natural_image
Three-step illustration of a plant growth setup in a container, showing indoor and outdoor views with arrows indicating movement (no text or symbols)BOB0326
Akcesoria

BOB0325
Wersja
BOB0327
natural_image
Diagram of a device with labeled components and a plant base, no readable text or symbols presentPL
BOB0331
natural_image
Diagram showing a door with a close-up of a window and a magnified inset highlighting the interior (no text or symbols)natural_image
Diagram showing a door with a blue arrow pointing to a window, no text or symbols presentBOB0335
BOB0338
Naprawa
BOB0330
T_1, T_2, , T_n
BO80324
natural_image
Three-step diagram showing a container with plants growing in different stages, each with a hand adjusting the interior (no text or symbols present)BOB0326
Příslušenství

Varianta
BOB0327
natural_image
Diagram of a device with labeled buttons and a plant on a base, no text or symbols presentBOB0331
natural_image
Diagram of a door with a close-up inset showing a blue object, no text or symbols presentnatural_image
Diagram showing a door with a blue arrow pointing to a window, no text or symbols presentBOB0335
BOB0338
Oprava
Výměna zadního dílu

BOB0339
BOB0330
T_1, T_2, , T_n
BO80324
natural_image
Three-step diagram showing a plant growth setup in a container, with arrows indicating rotation and movement (no text or symbols)BOB0326
Príslušenstvo

1 biOrb EARTH funnel
Variant
natural_image
Isometric diagram of a container with a plant growing inside, showing labeled components (no text or symbols present)BOB0331
natural_image
Diagram of a door with a close-up view of a window and a blue indicator light (no text or symbols)natural_image
Diagram showing a door with a blue arrow pointing to a window, no text or symbols presentBOB0335
BOB0338
Oprava
Výmena zadnej časti
BOB0339
BOB0330
T_1, T_2, , T_n
BO80324
natural_image
Three-step diagram showing a container with plants growing in trays, with arrows indicating rotation and movement (no text or symbols)BOB0326
Oprema

Različica
natural_image
Isometric diagram of a device with labeled components inside a transparent enclosure, showing a plant and battery (no text or symbols)BOB0331
Omogočite si dostop in opremite napravo biOrb EARTH po svoji zamisli. (→ Dostop do naprave) Veliko število okraskov in rastlin najdete v specializirani trgovini OASE ali na strani www.oase.com.
NASVET
natural_image
Diagram showing a door with a mounted device and a magnified inset highlighting a blue object (no text or symbols present)natural_image
Diagram of a door with a blue arrow pointing to a window (no text or symbols)BOB0335
BOB0338
Popravilo
BOB0330
T_1, T_2, , T_n
BO80324
1 Bočni poklopac (krilo) s otvorom za dovod i filtrom za ugljen (ispušni zrak)
natural_image
Three-step diagram showing a container with plants growing in trays, with arrows indicating rotation and movement (no text or symbols)BOB0326
Dodatna oprema

1 biOrb EARTH Lijevak Za punjenje rezervoara za tekućinu • Broj artikla 77495
2 biOrb Humidimist Specijalna voda za funkcije kiše i magle Sadrži potrebnu količinu elektrolita za sprječavanje kamenca na diskovima i svim dijelovima koji vode vodu. • 4 boca × 500 ml (4 × 0,13 gal): Broj artikla 46155 • 1 spremnik × 5 l (1 × 1,3 gal): Broj artikla 46156
3 carbon biOrb EARTH filter back • Broj artikla 77491
4 biOrb EARTH feeder Za jednostavno hranjenje stanovnika. • Broj artikla 77492
Standardna (tvornička instalacija)
Varijanta
-
U umjerenoj tropskoj klimi postoje biljke kojima je potrebna vlaga iz tla. Zbog toga se postavljaju kapilarna podloga i spužvasta podloga.
• Grijaći kabel zagrijava cjelokupno tlo. -
U pustinji nema vlage u tlu. Zbog toga se ne postavljaju kapilarna podloga i spužvasta podloga.
- Preporučujemo da otvor za odvod prekrijete npr. odrezanim komadićem spužvaste podloge kako biste ga zaštitili od začepljenja.
- Grijaći kabel zagrijava samo određeni dio tla. U pravilu ono područje na kojem se stanovnik pustinje odmara.
natural_image
Isometric diagram of a device with labeled components inside a transparent enclosure, showing a plant and battery (no text or symbols)BOB0331
Omogućite pristup uređaju i opremite biOrb EARTH u skladu sa svojim zamislima. (→ Pristup uređaju)
Veliki broj ukrasa i biljaka možete pronaći u trgovinama OASE ili na www.oase.com.
NAPOMENA
▶ Ventilacijske rešetke, mlaznice za kišu i senzori ne smiju biti pokriveni opremom. (→ Pregled funkcionalnih elemenata)
▶ Za prirodnu kišu, mlaznice za kišu moraju se poravnati tako da se cijela prostorija navodnjava kišom što je više moguće.
Stavljanje u pogon
natural_image
Diagram showing a door with a sensor and a magnified inset highlighting a blue object (no text or symbols)LED svjetiljka koja treperi plavom bojom označava nedostatak tekućine.
natural_image
Diagram showing a door with a blue arrow pointing to a window, no text or symbols presentNakon što se spremnik te- kućine napuni, pritisnite tipku za potvrdu poruke.

Aplikacija "OASE Control" će vas upozoriti na manjak te- kućine i putem aplikacije se poruka može i potvrditi.
BOB0334
NAPOMENA
Preporučujemo da rezervoar za tekućinu punite isključivo sredstvom "biOrb Humidimist" (→ Dodatna oprema). Sprječava kalcifikaciju diskova i dijelova koji provode vodu.
BOB0334
BOB0335
BOB0338
Popravak
BOB0330
T_1, T_2, , T_n
BO80324
natural_image
Three-step diagram showing a container with plants growing in trays, with arrows indicating rotation and movement (no text or symbols)BOB0326
Accesorii

Variante
BOB0327
natural_image
Isometric diagram of a container with a plant growing inside, showing labeled components (no text or symbols present)BOB0331
natural_image
Diagram of a door with a close-up inset showing a magnified view of the glass (no text or symbols present)natural_image
Diagram showing a door with a blue arrow pointing to a window, no text or symbols presentBOB0335
BOB0338
Reparare
BOB0330
T_1, T_2, , T_n
BOB0324
natural_image
Three-step diagram showing a container with seedlings growing in trays, with arrows indicating rotation and movement (no text or symbols)BOB0326
Аксесоари

BOB0325
1 biOrb EARTH funnel
Вариант
BOB0327
natural_image
Diagram of a device inside a transparent container with a plant at the base (no text or symbols)BOB0331
natural_image
Diagram showing a door with a mounted device and a magnified inset highlighting a blue object (no text or symbols present)natural_image
Diagram showing a door with a mounted device and a magnified inset highlighting a component (no text or symbols)BOB0335
BOB0338
Ремонт
BOB0330
T_1, T_2, , T_n
BOB0324
natural_image
Three-step diagram showing a container with seedlings growing in different stages, no text or symbols present.BOB0326
Обладнання
BOB0325
1 biOrb EARTH лійка
Варіанти
BOB0327
natural_image
Isometric diagram of a plant inside a transparent enclosure with two labeled devices, no text or symbols present.BOB0331
natural_image
Diagram showing a device interacting with a window, with an inset magnified view of the window (no text or symbols present)natural_image
Diagram of a door hinge with a blue arrow pointing to a wall detail (no text or symbols)BOB0335
UK
BOB0338
Ремонт
BOB0330
T_1, T_2, , T_n
BOB0324
natural_image
Three-step diagram showing a plant growth setup in a container, with arrows indicating rotation and movement (no text or symbols)BOB0326
Комплектующие
BOB0325
1 biOrb EARTH воронка
Варианты
BOB0327
natural_image
Diagram of a device with two labeled buttons and a plant inside a transparent enclosure (no text or symbols)BOB0331
natural_image
Diagram showing a device interacting with a window, with an inset magnified view of the window (no text or symbols present)
natural_image
Diagram showing a door with a blue arrow pointing to a wall-mounted device (no text or symbols present)
BOB0334
BOB0335
RU
BOB0338
Ремонт
BOB0330
B0B0324
natural_image
Three-step diagram showing a container with plants growing in different stages, each with a hand interacting with it (no text or symbols present)BOB0326
配件

B0B0325
1 bi0rb EARTH 漏斗
用于灌注蓄液器
- 产品编码 77495
2 bi0rb Humidimist
标准(工件安装)

派生型
B0B0327
natural_image
Isometric diagram of a device with labeled components and a plant base (no text or symbols)B0B0331
natural_image
Diagram showing a door with a digital display and an inset image of a device emitting light (no text or symbols)蓝色闪烁 LED 报告液体不足。

natural_image
Diagram of a door hinge with a blue arrow pointing to a window (no text or symbols)蓄液器注满后,按下按键确认消息。

B0B0335
步骤如下:
B0B0338
修理
后部 更换
B0B0339
CN
步骤如下:
B0B033C
步骤如下:
BOB0324
natural_image
Diagram of a plant growth setup inside a container with cooling fans and airflow arrows (no text or symbols)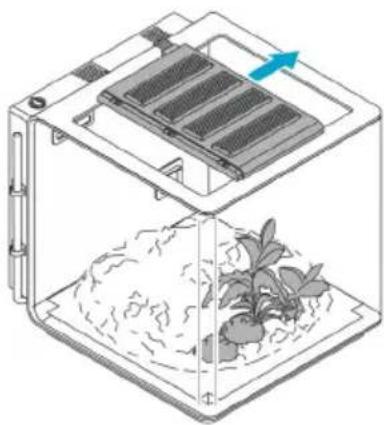
natural_image
Diagram of a plant growth setup inside a container with a side panel, showing seedling and water flow direction (no text or symbols)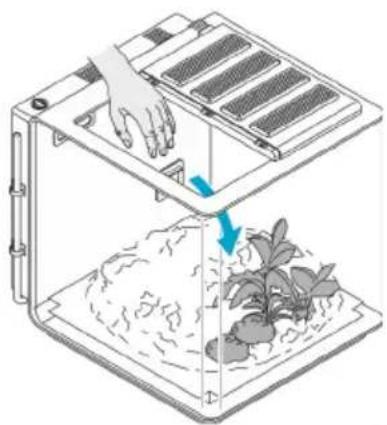
natural_image
Diagram of a filtration or seedling setup with a hand operating the top panel and a base with plants growing in soil (no text or symbols)BOB0326
JA
付属品
BOB0325
1 biOrb EARTH 漏斗
液体リザーバーの充填用
- 品番 77495
2 biOrb Humidimist
標準(工場出荷時設定の設置)
砂漠気候

バージョン
BOB0327
natural_image
Diagram of a device with labeled buttons and a globe at the base (no text or symbols present)BOB0331
natural_image
Diagram showing a device interacting with a window, with an inset magnified view of the window (no text or symbols present)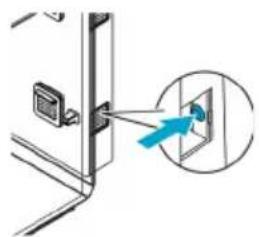
natural_image
Diagram showing a door with a blue arrow pointing to a wall-mounted device (no text or symbols present)
BOB0334
BOB0335
手順:
BOB0337
ブレードフィルターの交換
BOB0338
修理
背面部品の交換

BOB0339
JA
手順:
BOB0330
手順:
Declaration of EU-conformity
OASE GmbH
Tecklenburger Str. 161
48477 Hörstel
Tel. +49 5454 / 80-0
Email: info@oase.com
declares that the product
Produkt / Product:
Terrarium
Vivarium
Typ / Type:
biOrb EARTH
complies to the following directives of the Union:
2014/53/EU, 2011/65/EU
The complete Declaration of EU-conformity is available at the following internet address:
www.oase.com/ce_red
Technische Daten
Technical data
max. emitted transmission power:
08-21
BOB0344
OASE GmbH
Post Box 20 69
48469 Hörstel
Germany
+49 (0) 5454 80-0
OASE Middle East FZ-LLC
Dubai Design District (d3)
Building 3, 3rd Floor, Design Quarter
P.O. Box 333090
Dubai, UAE
+971 56 4845 412
uae@oase.com
OASE China
No. 80 North Dongting Road
Taicang, Jiangsu
China
+86 (0) 512 5371 9578
+86 (0) 512 5371 9555
info.cn@oase.com
(Indoor Aquatics)
OASE North America
7241 Haverhill Business Park-
way,
Suite 105
West Palm Beach
33407 Florida USA
+1 (0) 866-627-3435
customercare@
oase.com
(biOrb)
OASE North America
Aurora
44202 Ohio USA
+1 (0) 888-755-5646
biorbsupport@
oase.com
OASE Italia Srl
Via San Antonio, 22
Customer support North America:

us.oase-livingwater.com/contact
- biOrb EARTH
- Zubehör
- Reparatur
- Rückenteil ersetzen
- WARNING
- Contents
- Safety information
- Installation
- Electrical connection
- Safe operation
- Intended use
- Product Description
- Light
- Humidity
- Air and ground temperature
- Fresh air
- Circulating air (heated or cooled)
- Supply and waste air for the Peltier element
- Floor heater
- Ambient temperature
- Overview of function elements
- Accessories
- Set-up
- Modifying the floor heater
- Modifying the lighting
- NOTE
- Installing the unit
- Filling the unit
- Commissioning/start-up
- Filling the liquid reservoir
- Switching on the unit
- Connecting the unit with your smartphone/tablet
- Maintenance and cleaning
- Draining liquid
- Replace air filter
- Replacing the filter back
- Replacing the wing filters
- Repair
- Replacing the back section
- Replacing lamps
- Laying a new heating cable or replacing the cable
- Malfunction remedy
- Error messages
- Technical data
- Disposal
- Guarantee
- Guarantee period
- Guarantee exclusion
- Assertion of claims
- General provisions
- Guarantee for North America
- Duration of the guarantee
- Scope of the guarantee
- Exclusion from the guarantee
- Asserting guarantee claims
- Accessoires
- Réparation
- Toebehoren
- Reparatie
- Zo gaat u te werk:
- Accesorios
- Reparación
- Acessório
- Reparação
- Accessori
- Riparazione
- Tilbehør
- Sådan gør du:
- Reparation
- Slik går du frem:
- Reparasjon
- Bytte av bakdel
- Tillbehör
- ANVISNING
- Gör så här:
- Byta baksida
- Lisätarvikkeet
- Toimit näin:
- Korjaus
- Takaosan vaihto
- Tartozékok
- Javítás
- Hátsó rész cseréje
- Akcesoria
- Naprawa
- Příslušenství
- Oprava
- Výměna zadního dílu
- Príslušenstvo
- Výmena zadnej časti
- Oprema
- NASVET
- Popravilo
- Dodatna oprema
- NAPOMENA
- Stavljanje u pogon
- Popravak
- Accesorii
- Reparare
- Аксесоари
- Ремонт
- Обладнання
- Комплектующие
- 配件
- 步骤如下:
- 修理
- 后部 更换
- 付属品
- 手順:
- ブレードフィルターの交換
- 背面部品の交換
- 手順:
- OASE GmbH
- Technische Daten
- OASE Middle East FZ-LLC
- OASE China
- (Indoor Aquatics)
- OASE North America
- (biOrb)
- OASE Italia Srl
- Customer support North America:
Brand : OASE
Model : biOrb EARTH 125
Category : Aquarium