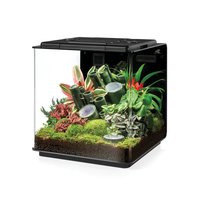
biOrb HALO 60 - Aquarium OASE - Free user manual and instructions
Find the device manual for free biOrb HALO 60 OASE in PDF.
| Product type | Aquarium with LED lighting, integrated filtration, and oxygenation pump |
| Capacity | 60 liters |
| Power supply | Mains adapter 230 V AC / 12 V AC, 50 Hz (IP20) |
| Lighting consumption | 2 W, energy class A++ |
| Pump consumption | 0.8 W |
| Lighting type | Fixed white LED (daylight), without remote control |
| Filtration | Filter cartridge with ceramic substrate |
| Oxygenation | Air pump with air diffuser and non-return valve |
| Tank material | Acrylic |
| Permissible water temperature | +4 °C to +35 °C |
| Filter cartridge maintenance | Replace every 4 to 6 weeks |
| Air diffuser maintenance | Replace every 6 months |
| Oxygenation pump maintenance | Replace every 12 months if necessary |
| Cleaning the lighting unit | With a special cleaning cloth, without abrasive products |
| Water preparation | Use supplied Water Conditioner and Biological Booster |
| Safety | Do not look directly at the LEDs; disconnect power before maintenance; indoor use only |
| Wear parts | Ceramic substrate, air diffuser, filter cartridge |
| Warranty | 24 months manufacturer's warranty (see terms) |
| Recycling | Do not dispose of with household waste; recycle batteries and electronic components separately |
| Adapter protection rating | IP20 |
Frequently Asked Questions - biOrb HALO 60 OASE
User questions about biOrb HALO 60 OASE
0 question about this device. Answer the ones you know or ask your own.
Ask a new question about this device
Download the instructions for your Aquarium in PDF format for free! Find your manual biOrb HALO 60 - OASE and take your electronic device back in hand. On this page are published all the documents necessary for the use of your device. biOrb HALO 60 by OASE.
USER MANUAL biOrb HALO 60 OASE
natural_image
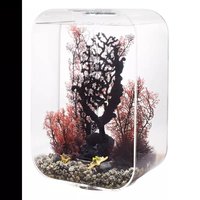
Black-and-white photo of a fishbowl containing aquatic plants and rocks, no text or symbols visible.HALO
EN Operating instructions
FR Notice d'emploi
BOB0021
B
BOB0022
C
BOB0023
D
BOB0024
E

natural_image
Diagram of a power plug with two terminal blocks and a plug inserted into the socket (no text or symbols)BOB0032
F
BOB0025
G
BOB0015
H
BOB0036
J
natural_image
Diagram of a laboratory setup with a bucket, coiled tube, and gas collection apparatus (no text or labels)BOB0027
K
BOB0028
natural_image
Line drawing of a fire extinguisher with a central cylinder and surrounding rubble (no text or symbols)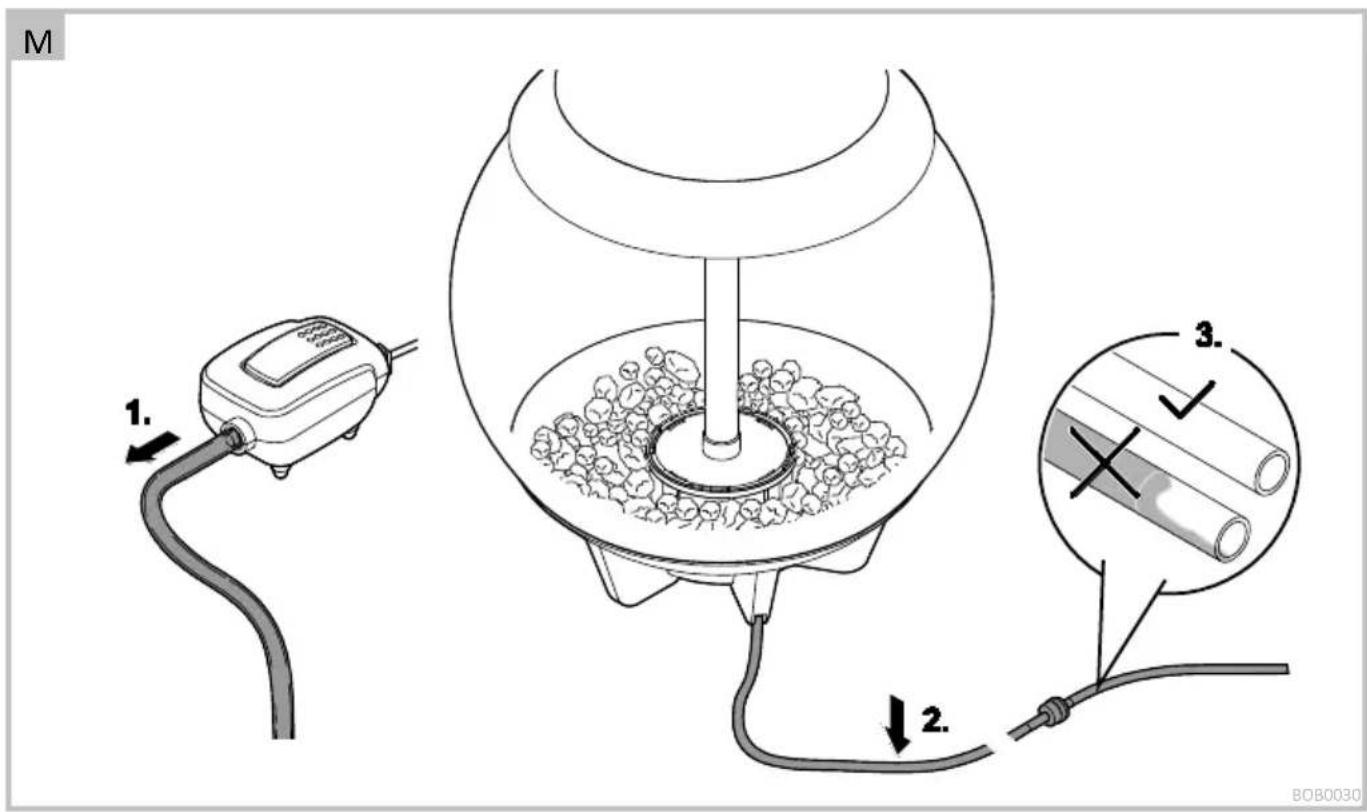
N
BOB0031
- biOrb HALO 30/60 LED
• biOrb HALO 15/30/60 MCR LED
biOrb HALO 30/60 LED
biOrb HALO 30/60 MCR LED
Translation of the original Operating Instructions
WARNING
- This unit can be used by children aged 8 and above and by persons with reduced physical, sensory or mental capabilities or lack of experience and knowledge if they are supervised or have been instructed on how to use the unit in a safe way and they understand the hazards involved.
- Do not allow children to play with the unit.
- Only allow children to carry out cleaning and user maintenance under supervision.
- Switch off all units in the aquarium or disconnect the power plugs of all units before reaching into the water.
- Do not use the unit if electrical cables or housings are damaged.
- Only connect the unit if the electrical data of the unit and the power supply correspond. The unit data is to be found on the unit type plate, on the packaging or in this manual.
- Disconnect the power plug before carrying out any work on the unit.
SAFETY INFORMATION
- Never operate the unit if the housing is defective!
- Never operate the unit if any electrical cables are defective!
- Never carry or pull the unit by the electrical cable.
- Route cables such that they are protected from damage and do not present a tripping hazard.
- Only open the unit housing or its attendant components if this is explicitly specified in the operating instructions.
- Only carry out work on the unit that is described in this manual. If problems cannot be overcome, please contact an authorised customer service point or, if in doubt, the manufacturer.
- Only use original spare parts and accessories for the unit.
- Never carry out technical changes to the unit.
- When using heaters, ensure that they are approved for use in the aquarium and that they do not come into contact with the acrylic wall of the aquarium. Suitable heaters meet the requirements in accordance with EN 60335-2-55.
- Protect the plug connection from moisture.
- Only connect the unit to a correctly fitted socket.
Symbols used in these instructions
Warnings
The warning information is categorised by signal words, which indicate the extent of the hazard.
WARNING
- Indicates a possibly hazardous situation.
- Non-observance may lead to death or serious injuries.
NOTE
Information for the purpose of clarification or for preventing possible damage to assets or to the environment.
Additional information
☐ A Reference to a figure, e.g. Fig. A.
PRODUCT DESCRIPTION
- Check that the delivery scope is correct, complete and undamaged.
| ☐ A | biOrb HALO |
| 1 | Operating instructions biOrb HALO |
| 2 | Cover with cover ring and product-specific lighting unit |
| 3 | Air column |
| 4 | Air hose with integrated non-return valve |
| 5 | Aerator pump with connection cable |
| 6 | Plug-in transformer |
| 7 | Ceramic substrate– Quantity is product-specific |
| 8 | Bag with Water Conditioner and/or Biological Booster |
| 9 | Filter unit |

WARNING
Danger of suffocation.
Keep plastic bags and small parts out of reach of babies and young children.
Intended use
Exclusively use the biOrb HALO as follows:
- As an aquarium.
- Only operate with water at a water temperature of +4 °C to +35 °C.
- Ensure that the water temperature is suitable for the type of fish.
The supplied components may only be used for the bi-Orb products as specified in the following:
- The aerator pump: For aeration and supplying oxygen to the aquarium.
- The lighting unit: For lighting the aquarium.
- The plug-in transformer: For connecting the aerator pump and lighting unit to the mains.
• Operation under observance of the technical data.
The following lighting units are approved for lighting the biOrb HALO aquarium:
• biOrb HALO 30/60 LED
• biOrb HALO 15/30/60 MCR LED
Function description
Aquarium with LED lighting, filter unit and external aerator pump for circulating the water.
The light colour depends on the lighting unit used and can be white, coloured, continuous or automatically changing.
All the lighting units can be programmed with the exception of biOrb HALO 30/60 LED.
biOrb HALO 30/60 LED
• Daylight: White LEDs are continuously lit
biOrb HALO 30/60 MCR LED
- Four modes for automatic changes between different daylight and moonlight phases for a period of 24 hours.
- The colour and dimming variants are controlled via the remote control
biOrb HALO 15 MCR LED
- White light or individually set coloured light, which can be set and dimmed by remote control.
INSTALLATION AND CONNECTION
Setting up the aquarium
How to proceed:
- Carefully unpack the acrylic aquarium.
- Do not expose to direct sunlight.
- Only set up in closed rooms.
- Do not move the aquarium when it is filled.
- Do not place on or near electrical devices.
- Do not place on or near heat sources.
• Operation under observance of the technical data.
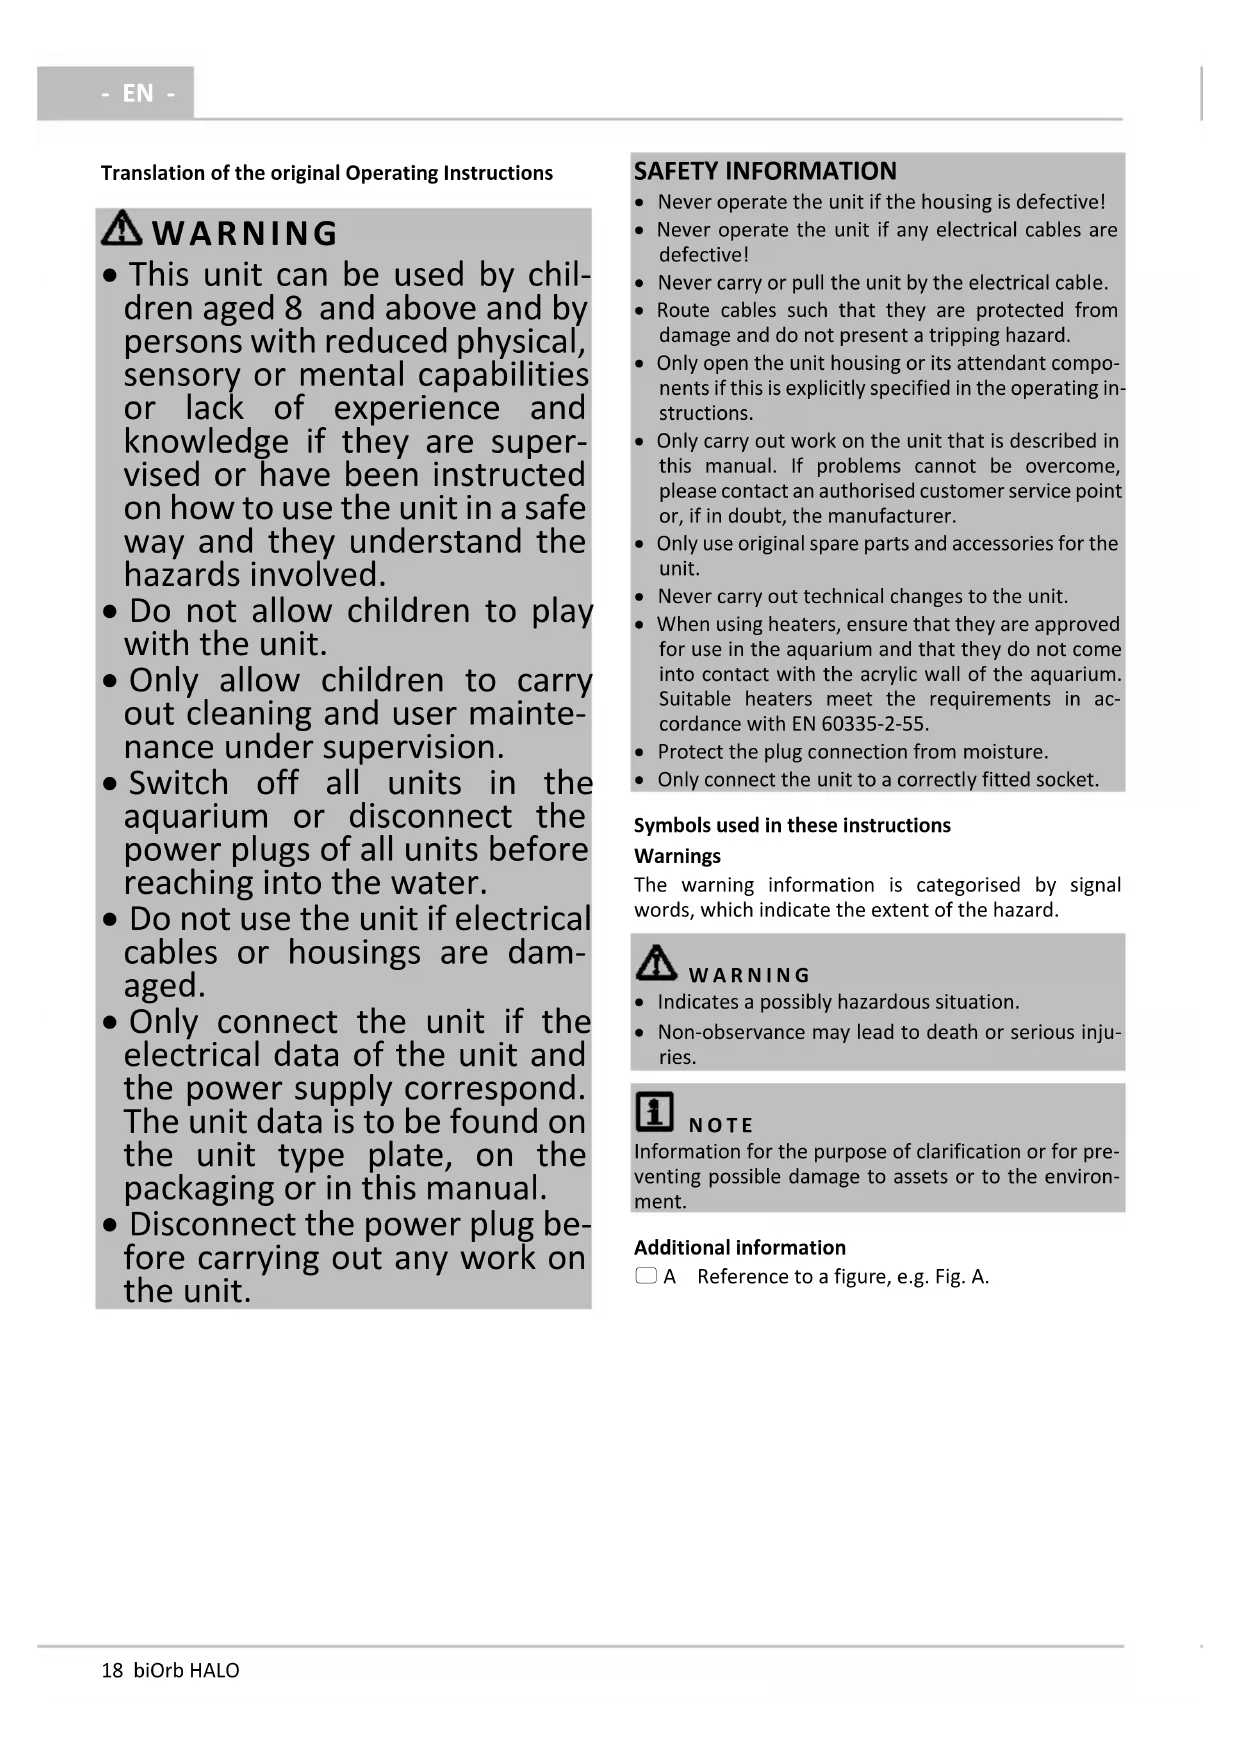
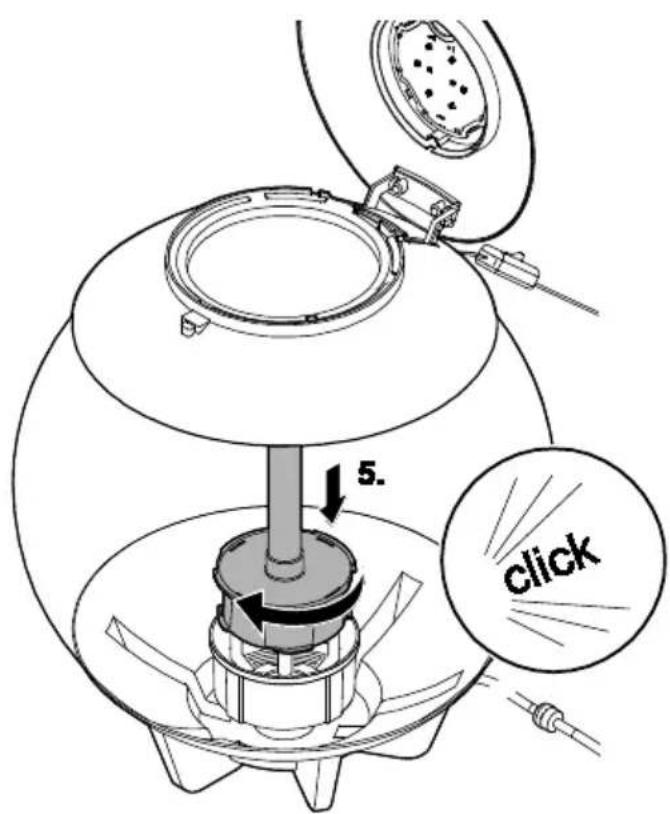
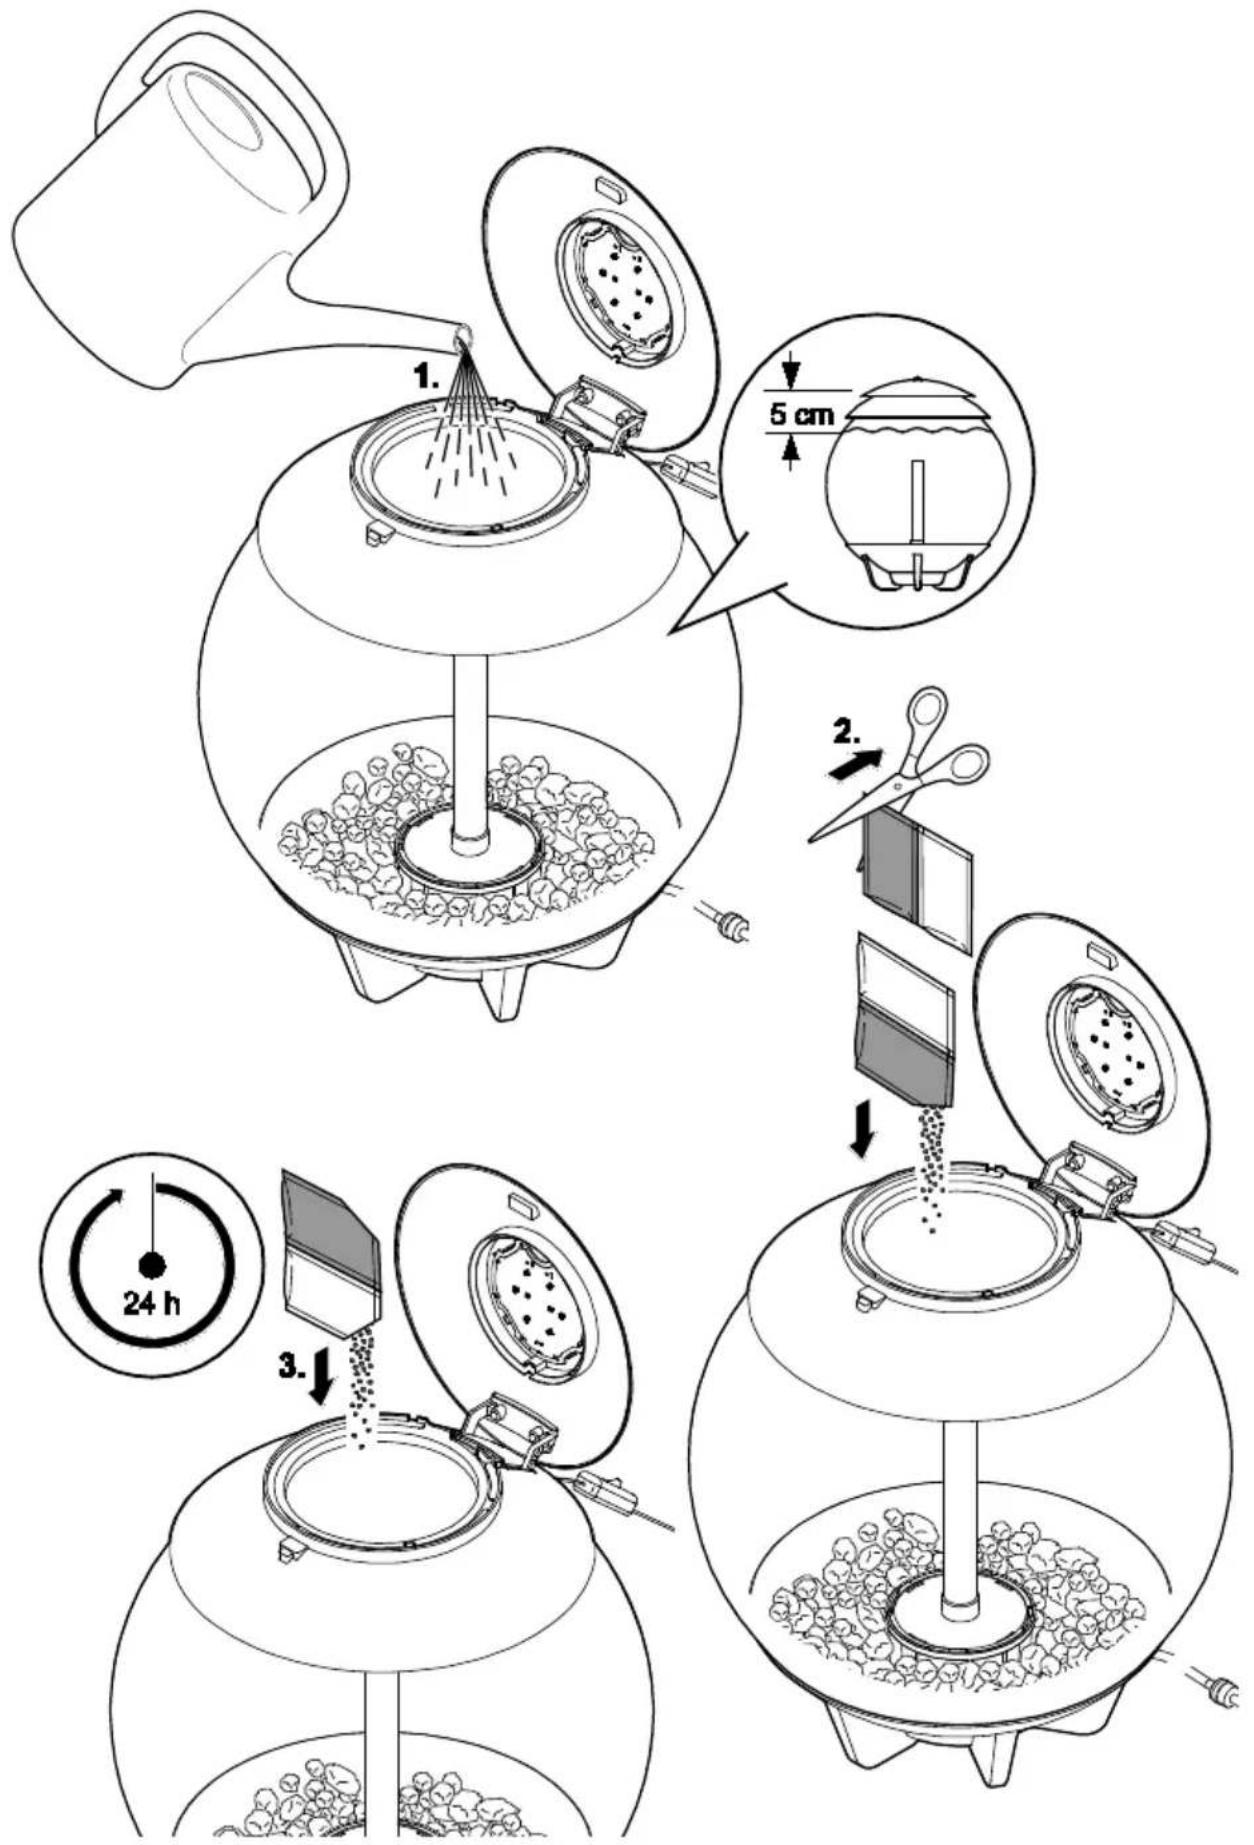
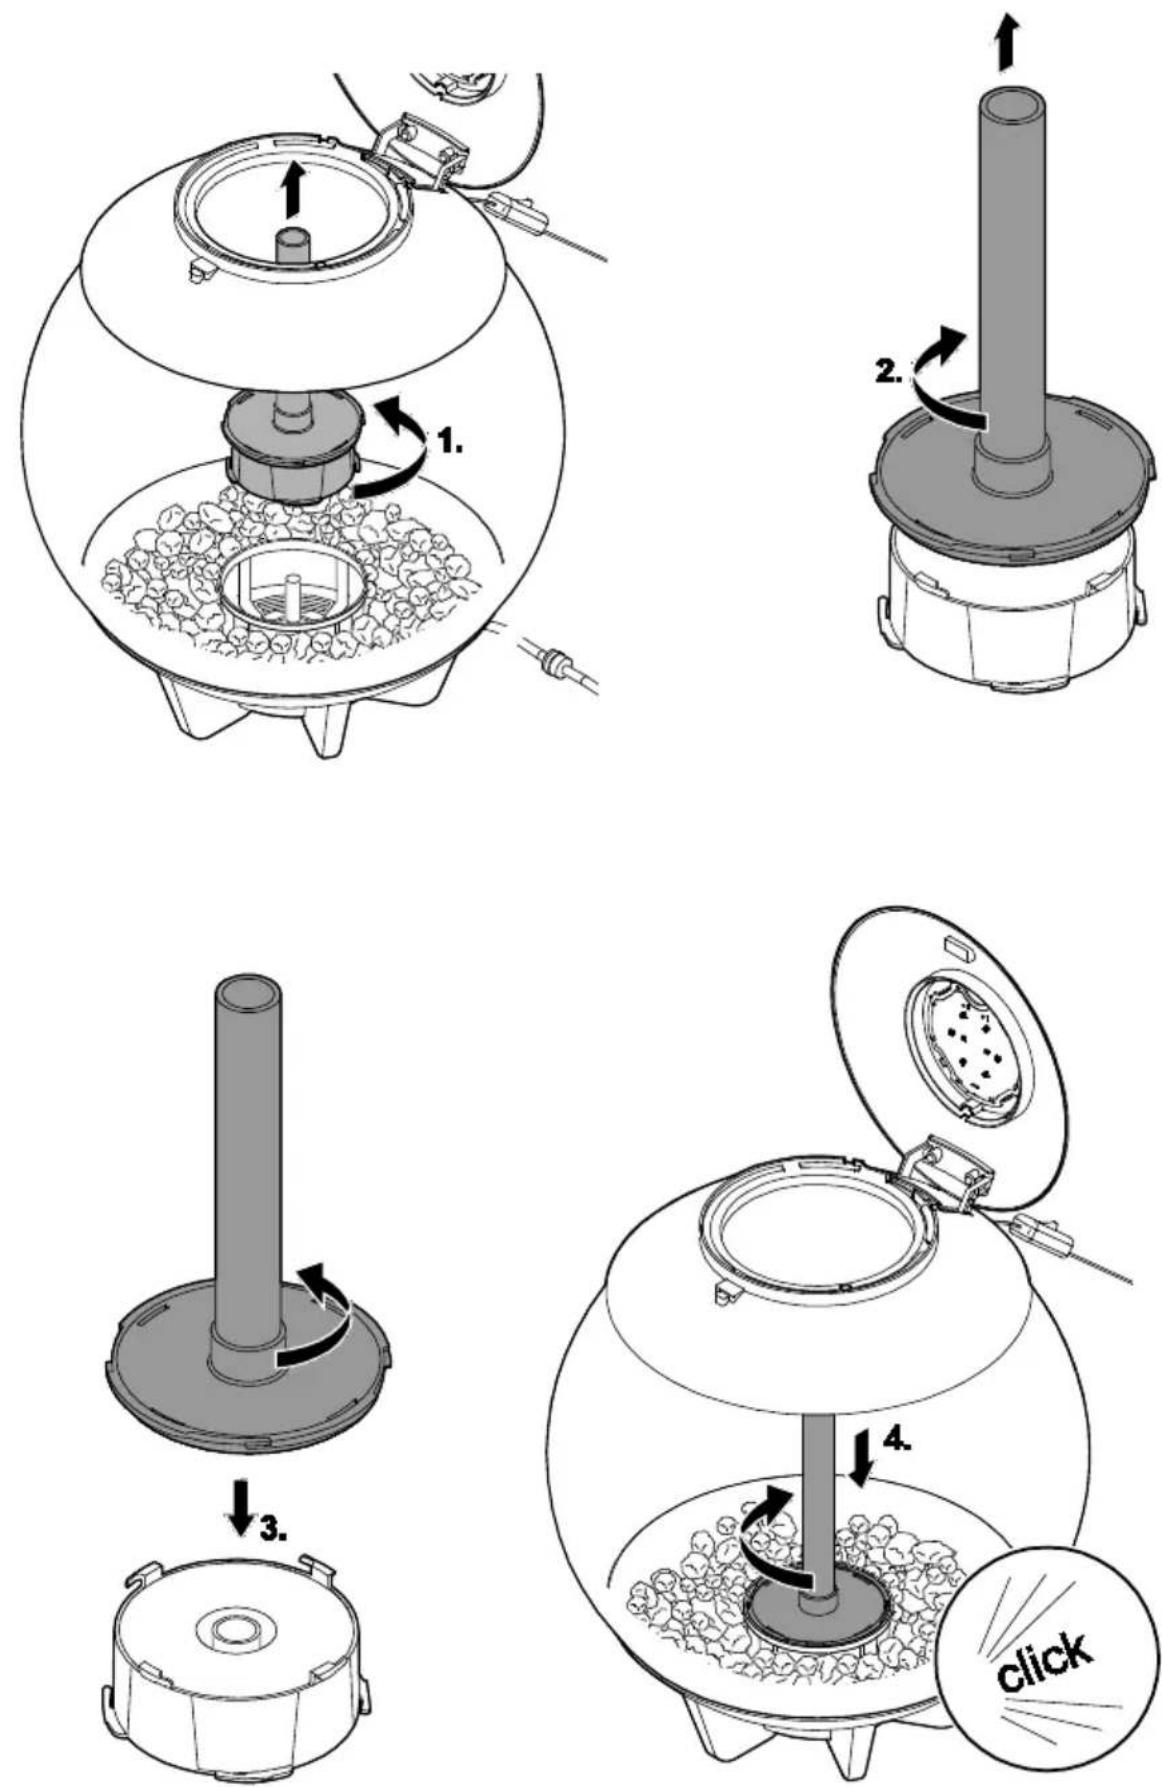
Fitting the filter unit
How to proceed:
- Remove the packaging from the filter medium.
□ B
- Open the lid.
- Remove the evaporation tray.
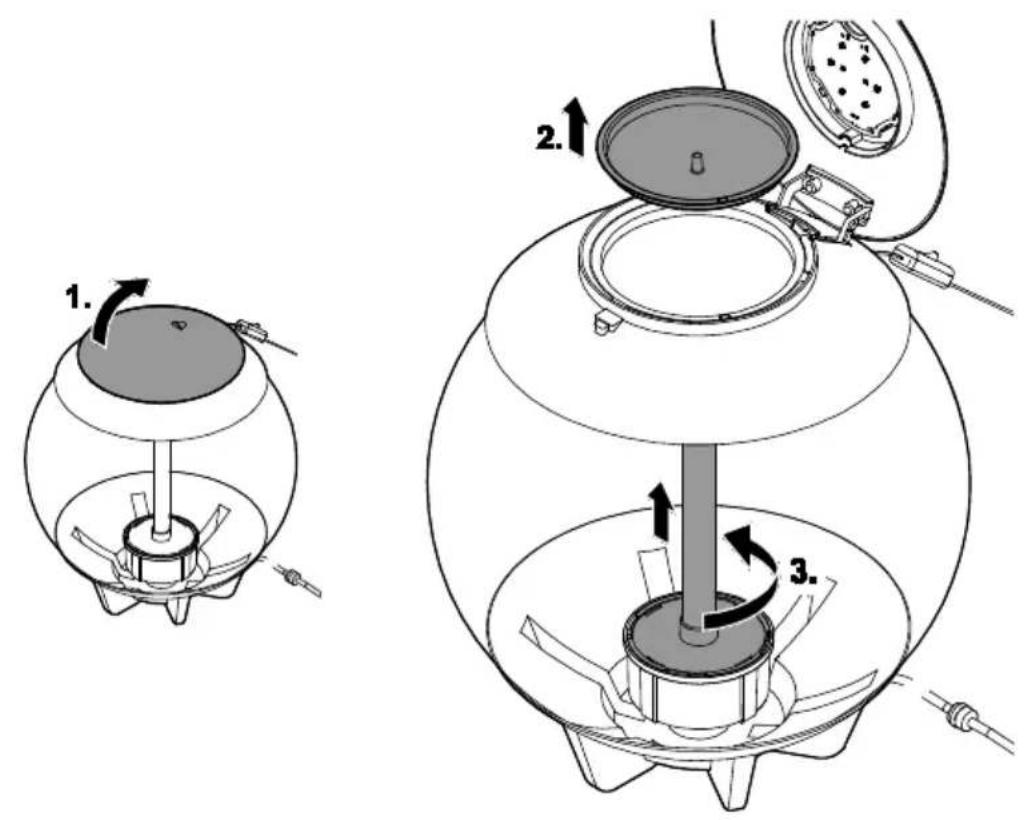
- Release the air column from the filter housing by a quarter turn counterclockwise (bayonet closure) and lift out.
- Place the air column onto the filter cartridge and fasten the air column by a quarter turn counterclockwise.
- Insert the air column into the aquarium and fasten it to the filter housing by a quarter turn clockwise.
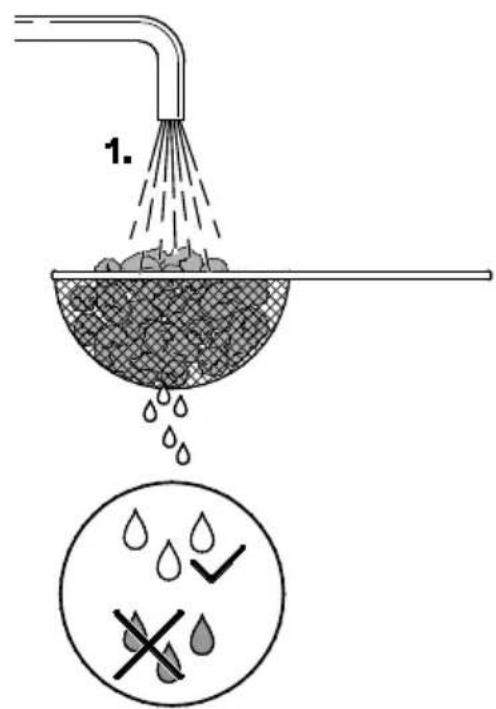
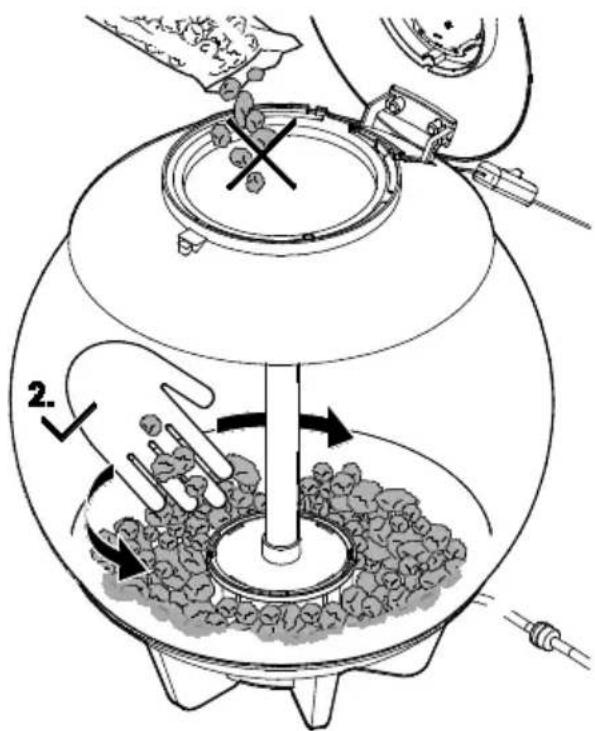
Using the ceramic substrate

NOTE
Remove the packaging from the filter medium. Thoroughly rinse the ceramic substrate with warm tap water before using for the first time to remove any soiling. ( Replacing the filter cartridge)

NOTE
- Do not use aquarium gravel as it could clog the filter cartridge.
- Only use the ceramic substrate provided.
- Do not tip the ceramic substrate into the aquarium from a height as it could scratch the acrylic.
- Only use ceramic substrate particles that are at least pea-sized. Remove and dispose of any particles that are smaller.
How to proceed:
□ C
- Wash and then place the supplied ceramic substrate carefully into the aquarium and arrange it around the filter housing.
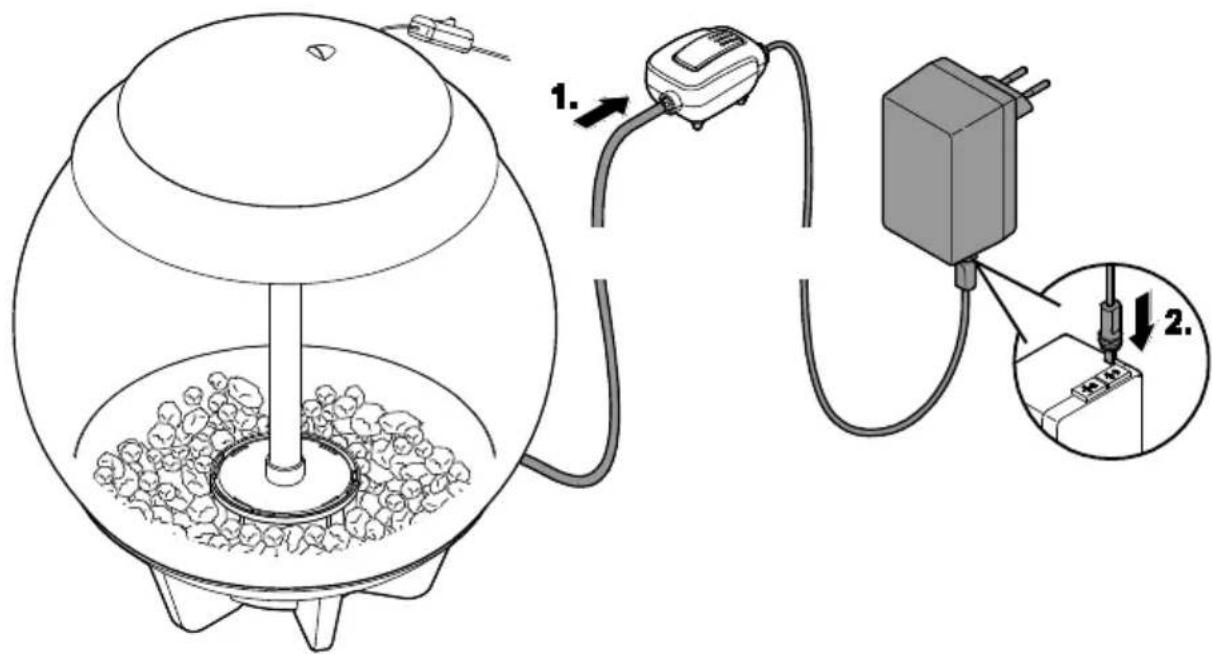
Installing and connecting the aerator pump

NOTE
When installing the unit, ensure that it
• is located outside the aquarium
• is not placed on or over the aquarium
- cannot fall into the water or move out of position.
Damage resulting from incorrect installation is not basis for a claim within the framework of the guarantee or warranty.
How to proceed:
□D
- Connect the air hose leading out of the aquarium to the air connection of the aerator pump and fit the aerator pump above the subsequent level of the aquarium water. This prevents water from leaking or damage to the pump in case the integrated non-return valve should fail.
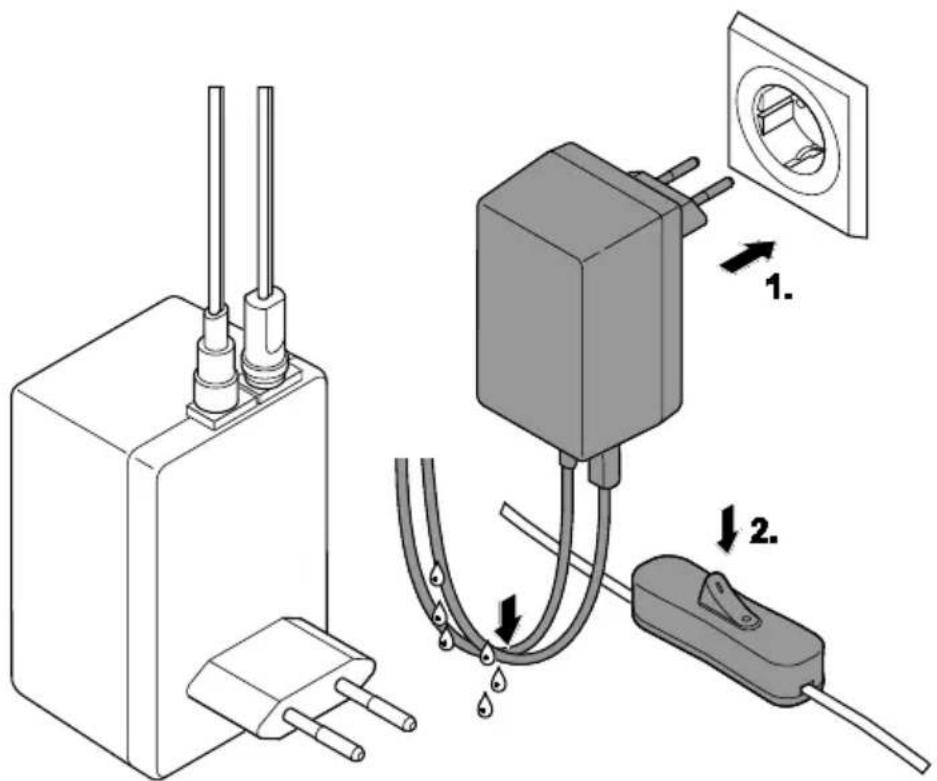
- Connect the connection cable to the separate socket of the plug-in transformer but do not yet connect the plug-in transformer to the mains socket. First complete the start-up preparations.(→ Commissioning/start-up)
Connecting the lighting unit

NOTE
Never immerse the lighting units in water or other liquids.
How to proceed:
□ E
- Connect the connection cable to the separate socket of the plug-in transformer but do not yet connect the plug-in transformer to the mains socket. First complete the start-up preparations.(→ Commissioning/start-up)
COMMISSIONING/START-UP
Filling with and preparing the water
It is necessary to prepare the aquarium water by adding "Water Conditioner" and "Biological Booster".
How to proceed:
□F
- Fill the aquarium with tap water up to about 5 cm below the cover.
- Cut open the "Water Conditioner" bag and pour the contents into the water.
- Switch on the aerator pump; after the pump has been running for at least 24 h, sprinkle the contents of the "Biological Booster" bag into the water. (→ Switching ON/OFF)
Switching ON/OFF

CAUTION
Strong LED radiation!
Possible consequences: Eye injury due to light flash.
- Never look into the light source.

NOTE
Never operate an air connection by itself, i. e. without the tube and aerator connected.
How to proceed:
□G
- Switching on: Insert the plug-in transformer into the socket.
- Check that the cables form drip loops.
- The aerator pump will switch on immediately.
- Additionally actuate the ON/OFF switch of the lighting unit to switch it on.
- Switching off: Disconnect the plug-in transformer.
OPERATION
How to proceed:
- Switch on the lighting unit with the ON/OFF switch.
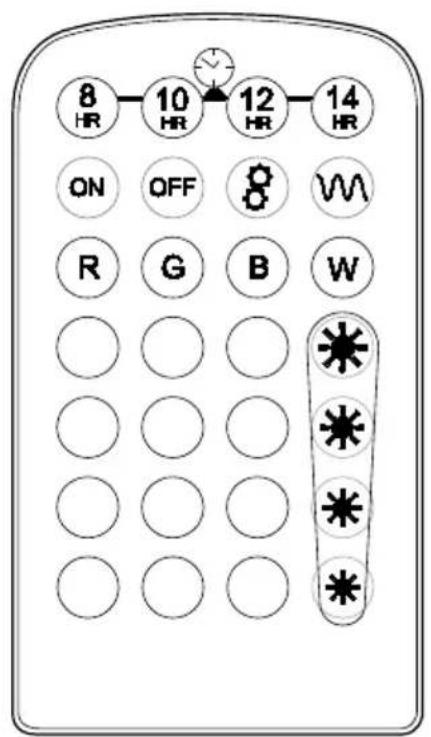
Programming the biOrb MCR LED
- Pull out the small plastic strip before using the remote control for the first time.
- Switch on the lighting unit with the ON/OFF switch.
How to proceed:
□H
- Carry out further settings with the aid of the remote control.
 | Switches on the light. |
 | Switches off the light. |
 | Start of the cycle through the possible light colours. |
 | End of the cycle through the possible light colours. |
 | Switches the LED to the basic colour red (R). Green (G), blue (B) respectively, or colours other than these 3 basic colours. 15 predefined colours. |
 | White light ("Daylight"', W) |
 | Dims the light, 4 brightness stages: 80 % ... 20 %. To reset to 100 % press any button for selecting the light colour. |
 | Four buttons for setting the daylight and moon-light phase. |
 |
Daylight and moonlight phases
The time for daylight and night light can be changed using the keys 8 HR, 10 HR, 12 HR or 14 HR. The daylight is always reduced by 15 min for sunrise and 15 min for sunset. Total duration of a daylight or night light phase: 24 h.
| Time | |||||
| Mode/button | 8HR | 10HR | 12HR | 14HR | |
| Sunrise | Min. | 15 | 15 | 15 | 15 |
| Daylight | h | 7.5 | 9.5 | 11.5 | 13.5 |
| Sunset | Min. | 15 | 15 | 15 | 15 |
| Night light | h | 16 | 14 | 12 | 10 |
MAINTENANCE AND CLEANING
Cleaning and maintenance work:
| Area | Tasks to be carried out |
| Lighting unit | Clean when required.Change the battery of the remote control when necessary.(→ Changing the battery) |
| Aquarium water | Partially replace every 4 to 6 weeks.Together with the filter cartridge.(→ Preparing the water) |
| Filter cartridge. | Replace every 4 to 6 weeks depending on the number of fish.(→ Replacing the filter cartridge) |
| Aerator | Replace every 6 months.(→ Replacing the aerator) |
| Aerator pump | Replace every 12 months if necessary. (→ Installing and connecting the aerator pump) |
Cleaning the lighting unit
Cleaning cloths are available as OASE biOrb "Cleaning cloths" (46027).
How to proceed:
- Bottom surface of the lighting unit: Wipe with a special cleaning cloth to avoid scratches.
Changing the battery
How to proceed:
□1
- Turn the remote control over and open the battery compartment.
- Pull the battery holder completely out and change the batteries.
— Pay attention to the polarity of the batteries. - Push the battery holder back into the remote control.
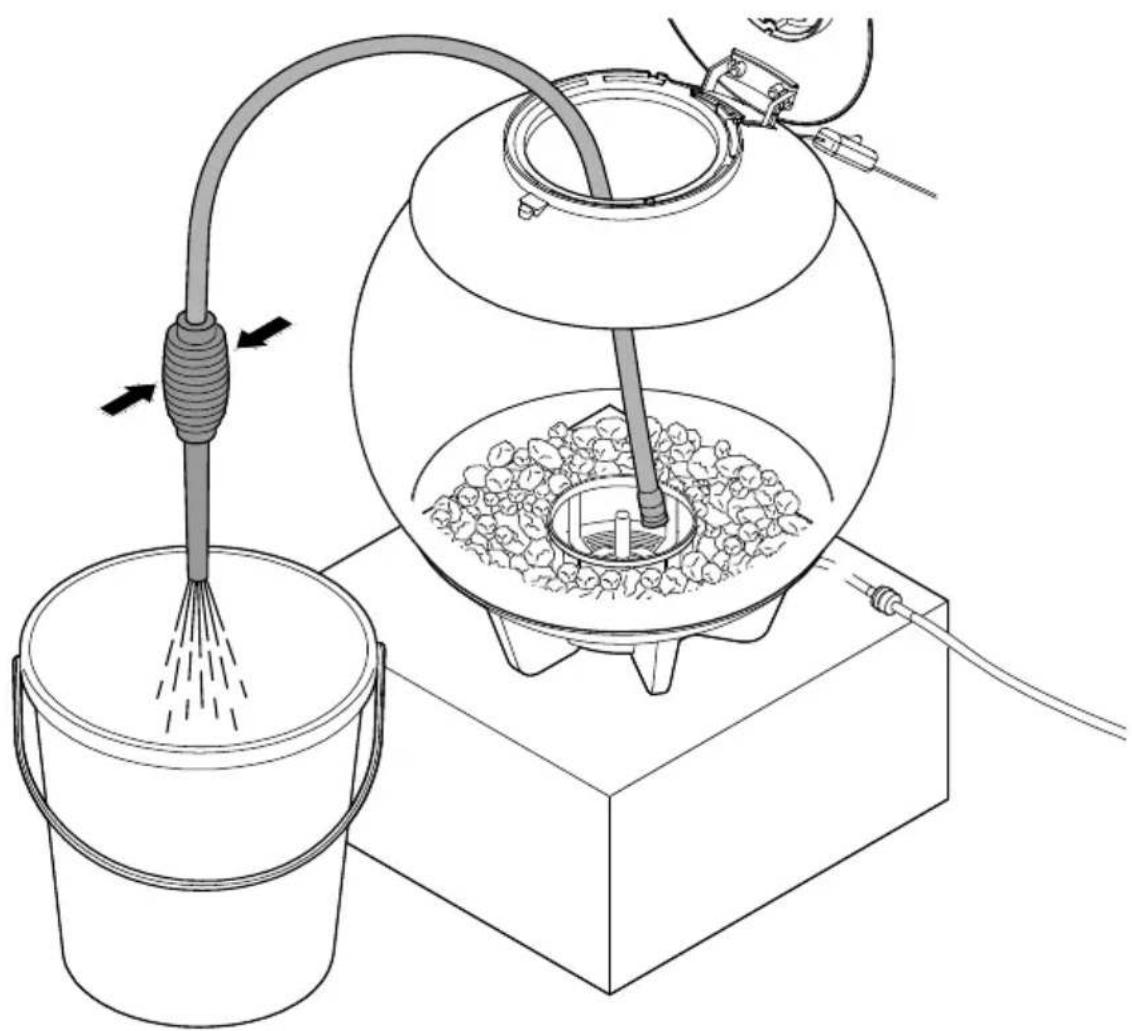
Preparing the water
Filter cartridge, water treatment sachets and a cleaning pad are available as OASE biOrb Service Kit (46014). Prerequisite:
Fresh water has been treated with "Water Conditioner" 24 h beforehand and has reached room temperature. Required quantity: Approx. one third of the aquarium volume.
How to proceed:
□J
- Remove the water to be replaced and clean the aquarium with the cleaning pad for acrylic glass if necessary.
OASE recommends:
• biOrb cleaner pump (46025)
- Cleaning pads (46026, only use the rough side for particularly stubborn deposits).
- Top up the aquarium with the treated water.
Replacing the filter cartridge

NOTE
- Switch off the aerator pump before commencing with this maintenance work.
- Switch on the aerator pump again after completing the work.
How to proceed:
- Remove the packaging from the filter medium.
□K
- Release the air column from the filter housing by a quarter turn counterclockwise (bayonet closure) and lift out.
- Release the air column from the filter cartridge by a quarter turn clockwise and lift out.
- Place the air column onto the new filter cartridge and fasten by a quarter turn counterclockwise.
- Insert the air column into the aquarium and fasten by a quarter turn clockwise.
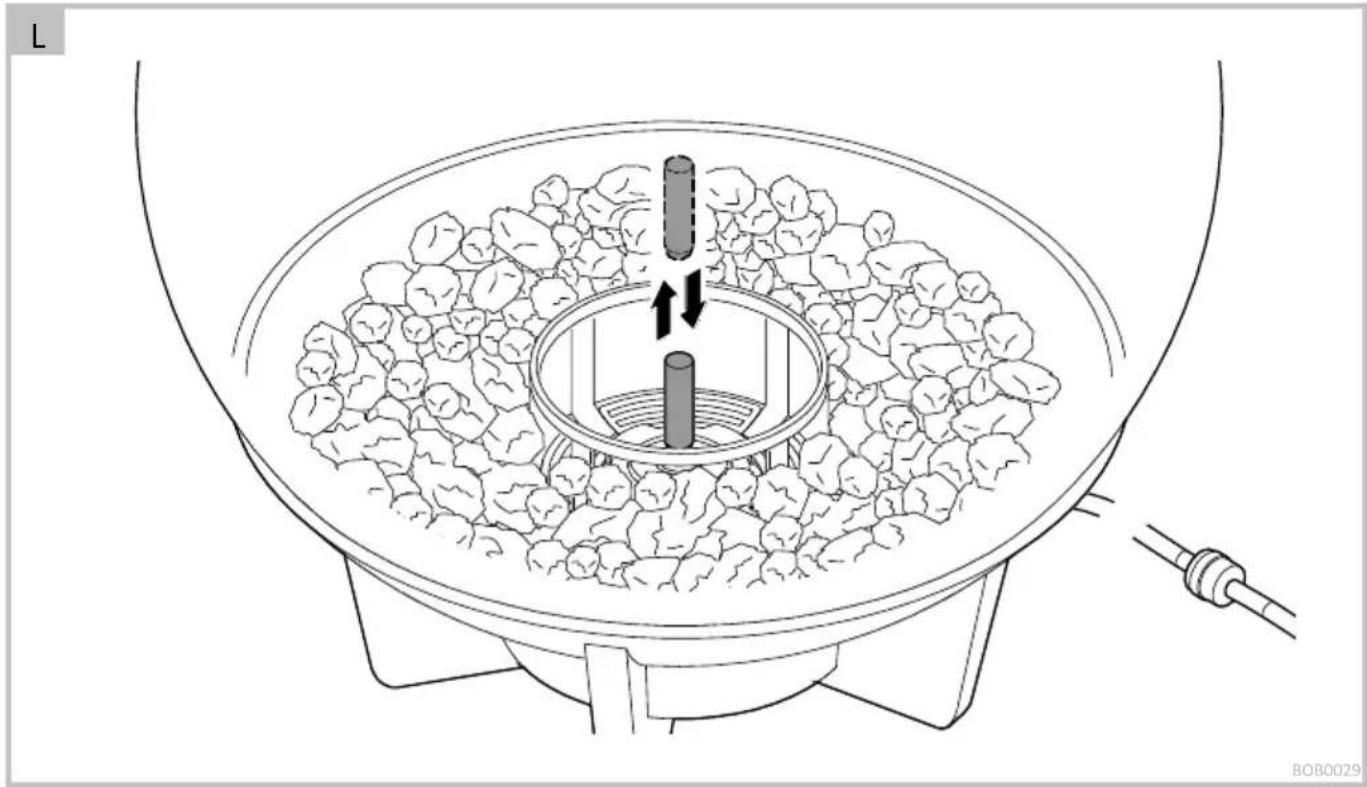
Replacing the aerator
Prerequisite:
- The aerator pump is switched off and the air hose has been removed from the aerator pump.
How to proceed:
□L
- Remove the air column. ( Replacing the filter cartridge)
- Pull off the aerator and replace.
- Insert the filter cartridge into the air column and install the air column.
Checking the non-return valve
A non-return valve is defective if water can flow out of the aquarium into the air hose.
How to proceed:
□M
- Switch off the aerator pump and pull the air hose from the aerator pump.
- Hold this end lower than the water level in the aquarium.
- If any water emerges, it is necessary to replace the non-return valve. ( Replacing the non-return valve)
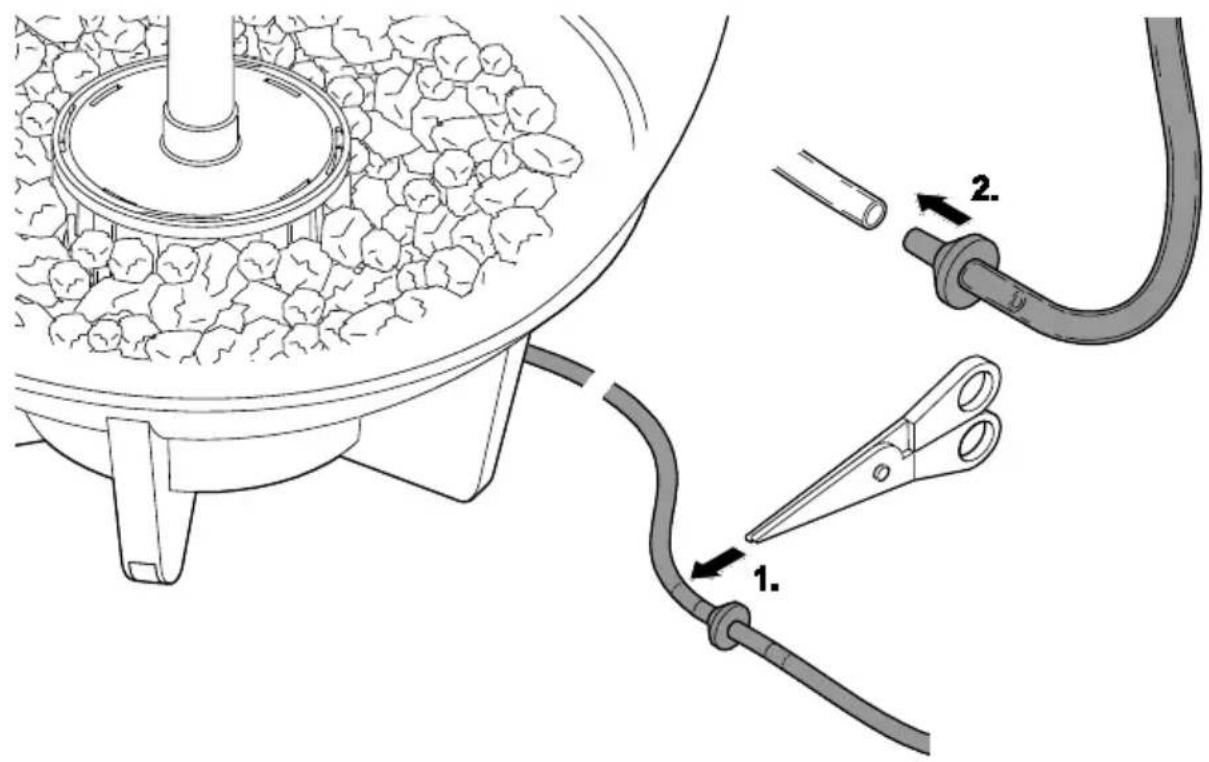
Replacing the non-return valve
Prerequisite:
- The aerator pump is switched off and the air hose has been removed from the aerator pump.
How to proceed:
□ N
-
Replace the defective non-return valve.
-
The non-return valve is supplied with the air hose fitted.
-
Ensure that it is correctly positioned.
-
If the defective valve cannot be removed, cut open the air hose as near as possible to the defective non-return valve and fit the new non-return valve there.
- Fit the air hose onto the aerator pump again before switching on the aerator pump again.
WEAR PARTS
- Ceramic substrate
- Aerator
- Filter cartridge.
DISPOSAL

NOTE
This unit contains electronic components - do not dispose of this unit with domestic waste!
- Render the unit unusable by cutting off the cables.
- Remove the replaceable or rechargeable batteries from the unit and dispose of them separately via the return system provided for this purpose.
- Dispose of the unit by using the return system provided for this purpose.

NOTE
Disposal of batteries
Do not dispose of batteries with household waste.
- Only dispose of the batteries by using the return system provided for this purpose.
Disposal of batteries within the European Union
As a consumer you are legally obliged to return used batteries. Return is free of charge.
- Either dispose of batteries through the public return and recycling systems of your town or municipality, or return the batteries to the place where they were purchased.
Labelling of batteries containing harmful substances
PB = Battery contains lead
Cd = Battery contains cadmium
Hg = Battery contains mercury
Li = Battery contains lithium
GUARANTEE
For this OASE unit purchased by you, OASE GmbH assumes a 24 month manufacturer's guarantee in accordance with the guarantee conditions laid down in the following. The guarantee period starts with the first purchase from an OASE specialist dealer. In other words, in the event of a resale, the guarantee period will not start again. If services are provided under the terms of this guarantee, this does not lead to extension or renewal of the guarantee period. Your legal rights as a purchaser, especially those ensuing from the warranty, persist. They are not restricted by this guarantee.
Guarantee conditions
OASE GmbH guarantees impeccable, purpose-related properties and workmanship, expert assembly and proper functionality. Subject to our discretion, the guarantee refers to free-of-charge repair or free-of-charge supply of spare parts or of a replacement unit respectively. Should the unit type concerned no longer be manufactured, we reserve the right, at our discretion, to supply a replacement unit from our range that is closest to the type subject to complaint. Claims, the origin of which can be traced back to installation and operating faults as well as lack of care, e.g. the use of unsuitable cleaning materials or negligent maintenance, use other than that intended, damage due to accidents, falls, impact, effect of frost, cutting plugs,
SPARE PARTS
The use of original parts from OASE ensures continued safe and reliable operation of the unit.
Please visit our website for spare parts drawings and spare parts.
shortening cables, calcium deposits or improper attempts to repair the unit, are not covered by our guarantee. We hereby refer to the proper use as specified in the instructions of use that form an integral part of the guarantee. Wear parts such as bulbs etc. are exempted from the guarantee.
The refund of costs for removal and installation, checks, claims for lost profit and damages are exempted from the guarantee together with further reaching claims for damages and loss of whatever nature caused by the unit or its use.
The guarantee is only valid in the country in which the unit was purchased from an OASE dealer. This guarantee is governed by German law under the exclusion of the agreement of the United Nations covering contracts governing the international sale of goods (CISG) regulations.
Guarantee claims can only be brought forward by presenting the sales receipt to us, OASE GmbH, Tecklenburger Straße 161 in D-48477 Hörstel, Germany by returning to us the unit or part of the unit subject to complaint, freight free, at your own risk, accompanied by a copy of the original purchase receipt from the OASE specialist dealer, this guarantee document and written information of the fault encountered.
The guarantee expires, if the serial number is removed or the aquarium is dismantled.

www.oase-livingwater.com/spareparts-ia
REMEDY OF FAULTS
| Malfunction | Cause | Remedy |
| The water becomes soiled within a short time. | The filter cartridge is exhausted. | Replace the filter cartridge. |
| Overfeeding | Reduce the amount of food. | |
| Too many fish | Reduce the number of fish. | |
| Aerator pump doesn't start up. | No mains voltage | ·Check the connection of the aerator pump at the transformer.·Check the mains voltage. |
| Aerator pump defective | Replace the aerator pump. | |
| Aerator pump is noisy. | Aerator pump is vibrating. | Place the aerator pump onto a softer surface. |
| Fewer air bubbles in the air tube than normal | Aerator is exhausted. | Replace the aerator. |
| The aerator pump is noisy and there are still fewer air bubbles even after replacement of the aerator. | The aerator pump is only functioning to a limited extent. | Replace the aerator pump immediately. |
| The lighting cannot be switched on. | No mains voltage | Check the mains voltage and power connection cables. |
| The lighting module is not responding to the remote control. | Too large a distance between the remote control and the aquarium. | Reduce the distance. |
| The remote control battery capacity is exhausted. | Replace the battery. | |
| The remote control is not pointing towards the aquarium. | Point the remote control at the aquarium. |
TECHNICAL DATA
| biOrb HALO | 30 LED | 60 LED | 15 MCR LED | 30 MCR LED | 60 MCR LED | ||
| Plug-in transformer | Primary rated voltage | V AC | 230 | 230 | 230 | 230 | 230 |
| Secondary rated voltage | V AC | 12 | 12 | 12 | 12 | 12 | |
| Mains frequency | Hz | 50 | 50 | 50 | 50 | 50 | |
| Protection type | IP20 | IP20 | IP20 | IP20 | IP20 | ||
| Aerator pump | Rated voltage | V AC | 12 | 12 | 12 | 12 | 12 |
| Rated power | W | 0.8 | 0.8 | 0.8 | 0.8 | 0.8 | |
| Length of the connection cable | m | 1.5 | 1.5 | 1.5 | 1.5 | 1.5 | |
| Lighting unit | Energy efficiency class | A++ | A++ | A | A | A | |
| Energy efficiency | lm/W | 85 | 85 | 17 | 17 | 17 | |
| Rated power | W | 2 | 2 | 2.9 | 2.9 | 2.9 | |
| Rated voltage | V AC | 12 | 12 | 12 | 12 | 12 | |
| Length of the connection cable | m | 1.5 | 1.5 | 1.5 | 1.4 | 1.4 | |
| Remote control MCR | Battery type | - | - | CR 2025 | CR 2025 | CR 2025 | |
SYMBOLS ON THE UNIT
| IP 20 | Protected from contact with fingers. | |
 | Protection class II, reliable electrical isolation from the mains by reinforced or double insulation. | |
 | For use indoors. | |
 | Do not dispose of with household waste. | |
 | Read and adhere to the instructions for use. | |
- biOrb HALO 30/60 LED
• biOrb HALO 15/30/60 MCR LED
biOrb HALO 30/60 LED
biOrb HALO 30/60 MCR LED
Programmer biOrb MCR LED
- biOrb HALO 30/60 LED
• biOrb HALO 15/30/60 MCR LED
Functiebeschrijving
biOrb HALO 30/60 LED
- Daglicht: witte leds branden continu
biOrb HALO 30/60 MCR LED
AFVOER VAN HET AFGEDANKTE APPARAAT

OPMERKING
www.oase-livingwater.com/onderdelen-ia
STORING VERHELPEN
- biOrb HALO 30/60 LED
• biOrb HALO 15/30/60 MCR LED
biOrb HALO 30/60 LED
- Luz diurna: Los LEDs blancos se iluminan permanentemente.
biOrb HALO 30/60 MCR LED
• biOrb HALO 30/60 LED
• biOrb HALO 15/30/60 MCR LED
biOrb HALO 30/60 LED
- Luz do dia: LEDs brancos dão luz permanente
biOrb HALO 30/60 MCR LED
Programar LED biOrb MCR
• biOrb HALO 30/60 LED
• biOrb HALO 15/30/60 MCR LED
biOrb HALO 30/60 LED
biOrb HALO 30/60 MCR LED
• biOrb HALO 30/60 LED
• biOrb HALO 15/30/60 MCR LED
biOrb HALO 30/60 LED
• Dagslys: Hvide LED'er lyser permanent
biOrb HALO 30/60 MCR LED
OPSTILLING OG TILSLUTNING
SYMBOLER PÅ APPARATET
- biOrb HALO 30/60 LED
• biOrb HALO 15/30/60 MCR LED
biOrb HALO 30/60 LED
• Dagslys: hvite LEDer lyser permanent
biOrb HALO 30/60 MCR LED
SYMBOLER PÅ APPARATET
• biOrb HALO 30/60 LED
• biOrb HALO 15/30/60 MCR LED
biOrb HALO 30/60 LED
• Dagsljus: vita lysdioder lyser permanent
biOrb HALO 30/60 MCR LED
INSTALLATION OCH ANSLUTNING
Installera akvariet
Gör så här:
• biOrb HALO 30/60 LED
• biOrb HALO 15/30/60 MCR LED
Toiminnan kuvaus
biOrb HALO 30/60 LED
biOrb HALO 30/60 MCR LED
• biOrb HALO 30/60 LED
• biOrb HALO 15/30/60 MCR LED
Funkcionális leírás
biOrb HALO 30/60 LED
biOrb HALO 30/60 MCR LED
• biOrb HALO 30/60 LED
• biOrb HALO 15/30/60 MCR LED
Opis działania
biOrb HALO 30/60 LED
biOrb HALO 30/60 MCR LED
• biOrb HALO 30/60 LED
• biOrb HALO 15/30/60 MCR LED
Popis funkcí
biOrb HALO 30/60 LED
biOrb HALO 30/60 MCR LED
www.oase-livingwater.com/nahradnidily-ia
ODSTRAŇOVÁNÍ PORUCH
• biOrb HALO 30/60 LED
• biOrb HALO 15/30/60 MCR LED
Popis funkcie
biOrb HALO 30/60 LED
• Denné svetlo: biele LED svietia nepretržite
biOrb HALO 30/60 MCR LED
• biOrb HALO 30/60 LED
• biOrb HALO 15/30/60 MCR LED
Opis funkcij
biOrb HALO 30/60 LED
biOrb HALO 30/60 MCR LED
• biOrb HALO 30/60 LED
• biOrb HALO 15/30/60 MCR LED
Opis rada
biOrb HALO 30/60 LED
biOrb HALO 30/60 MCR LED
• biOrb HALO 30/60 LED
• biOrb HALO 15/30/60 MCR LED
biOrb HALO 30/60 LED
biOrb HALO 30/60 MCR LED
• biOrb HALO 30/60 LED
• biOrb HALO 15/30/60 MCR LED
biOrb HALO 30/60 LED
biOrb HALO 30/60 MCR LED
• biOrb HALO 30/60 LED
• biOrb HALO 15/30/60 MCR LED
biOrb HALO 30/60 LED
biOrb HALO 30/60 MCR LED
• biOrb HALO 30/60 LED
• biOrb HALO 15/30/60 MCR LED
biOrb HALO 30/60 LED
biOrb HALO 30/60 MCR LED
• biOrb HALO 30/60 LED
• biOrb HALO 15/30/60 MCR LED
功能说明
biOrb HALO 30/60 LED
- 日光:白色LED持续亮起