
AS4325B - Floor cleaner Viper - Free user manual and instructions
Find the device manual for free AS4325B Viper in PDF.
User questions about AS4325B Viper
0 question about this device. Answer the ones you know or ask your own.
Ask a new question about this device
Download the instructions for your Floor cleaner in PDF format for free! Find your manual AS4325B - Viper and take your electronic device back in hand. On this page are published all the documents necessary for the use of your device. AS4325B by Viper.
USER MANUAL AS4325B Viper
Model No.: 50000579/50000581
VS15356 Rev. C JUN. 2021
Original instructions

| EU / UE / EC / EE / ES / EU / AB Declaration of Conformity Prohläseni o shodé Konformitätserklarung Overenstemmelseserkläring Declaración de conformidad Vastavusdeclaratsoon Declaración de conformité Vaatimustemukaisuusvakuutus | Déknapaia 3a cboTbctTbn Δηλωοι Μαμιρφωοις Megfeilelsségi nyilatkozat Izjava o sukladnosti Dichiarazione di conformità Atitikties declaracija Attilistibas dekaracija Samsvarserklaring Conformiteitsverklaring | Declaração de conformidade Deklaraca zgodnoci Declaratie de conformitate Déknapaia o cootbetctbn Forsakran om overensstammelse Vyhlasenie o zhode Izjava o skladnosti Uygunluk beyani |
| Manufacturer / Vyrobce / Hersteller / Fabricante / Fabricante / Kontraktor / Fabricante / Fabricante / Fabricante / Fabricante / Fabricante / Fabricante / Fabricante / Fabricante / Fabricante / Fabricante / Fabricante / Fabricante / Fabricante / Fabricante / Fabricante / Fabricante / Fabricante / Fabricante / Fabricante / Fabricante / Fabricante / Fabricante / Fabricante / Fabricante / Fabricante / Fabricante / Fabricante / Fabricante / Fabricante / Fabricante / Fabricante / Fabricante / Fabricante / Fabricante/ Fabricante / Fabricante / Fabricante / Fabricante / Fabricante / Fabricante / Fabricante / Fabricante / Fabricante / Fabricante / Fabricante / Fabricante / Fabricante / Fabricante / Fabricante / Fabricante / Fabricante / Fabricante / Fabricante / Fabricante / Fabricante / Fabricante / Fabricante / Fabricante / Fabricante / Fabricante / Fabricante / Fabricante / Fabricante / Fabricante / Fabricante / Fabricante / Fabricante /Fabricante / Fabricante / Fabricante / Fabricante / Fabricante / Fabricante / Fabricante / Fabricante / Fabricante / Fabricante / Fabricante / Fabricante / Fabricante / Fabricante / Fabricante / Fabricante / Fabricante / Fabricante / Fabricante / Fabricante / Fabricante / Fabricante / Fabricante / Fabricante / Fabricante / Fabricante / Fabricante / Fabricante / Fabricante / Fabricante / Fabricante / Fabricante / Fabricante / Fabricande / Fabricante / Fabricante / Fabricante / Fabricante / Fabricante / Fabricante / Fabricante / Fabricante / Fabricante / Fabricante / Fabricante / Fabricante / Fabricante / Fabricante / Fabricante / Fabricante / Fabricante / Fabricante / Fabricante / Fabricante / Fabricante / Fabricante / Fabricante / Fabricante / Fabricante / Fabricante / Fabricante / Fabricante / Fabricante / Fabricante / Fabricante / Fabricante / Fabricante / Unsichtungen in der conformità con l'ingener Verantwortung, dass das offen genannte Produkt den folgenden Richtlinien und Normen entspricht. Vi, Nilfisk erkräter hermed under eget ansvar at ovennævnte Produkt(er) er i overenstemmelse med fällende direktiver og standarder. Nosotros, Nilfisk declares bajo notreña una responsabilitad que el produit antes Mentionado está en conformidad con las siguidentes directivas y normas Meie, Nilfisk Käesolevaga kinnitame ja kannane alainisikulist vastutist, et eyspool nimetadto doote on koosiklas järgmistede direktivide ja Nilfisk déclare sous notre seule responsabilité que le produit mentionné ci-dessus est conforme aux directives et normes suvanties. Mi, Nilfisk tâten vakutamme omalla vastuilla, attà edellmainiti du toque on ydenmukalien seuraavlen direktivlen je standardlien mukaisesti | Nilfisk A/S, Kornmarksvej 1 DK-2605 Broendby, DENMARK FC - Floor Scrubber/Sweeper - Battery; FC - Floor Scrubber/Sweeper Working mode: 24VDC, Charging mode: 100-240V 50-60Hz; 220-240V 50-60Hz, IPX24 Nois, a Nilfisk declaresros, sob nessa exclusiva responsabilitadde, que o produits acimamentionado está em conformidade com as diretrizes e nomas a seguir. | Nós, a Nilfisk declaresros, sob nessa exclusiva responsabilitadde, que o produits acimamentionado está em conformidade com as diretrizes e nomas a seguir. |
| Pióiov / Termék / Proizvod / Prodotto / Produtos / Produtos / Artikel / Produtos / Produs / Izdelek / Ürün | My, Nilfisk Niniejszym oswiadzamy z peñagodopowiedzialnosciq, ze węjeż wymiemiay produkt jest zgodny z następućymi dyrektywami i normami.. | |
| Wir, Nilfisk erläken in alleiniger Verantwortung, dass das offen genannte Produkt den folgenden Richtlinien und Normen entspricht. Vi, Nilfisk erkräter hermed under eget ansvar at ovennævnte Produkt(er) er i overenstemmelse med fällende direktiver og standarder. Nosotros, Nilfisk declares bajo notreña una responsabilitad que el produit antes Mentionado está en conformidad con las siguidentes directivas & normas Meie, Nilfisk Käesolevaga kinnitame ja kannane alainisikulist vastuilla, et eyspool nimetadto doote on koosiklas järgmistede direktivide ja Nilfisk déclare sous notreagle responsabilité que le produit mentionné ci-dessus est conforme aux directives et normes suvanties. Mi, Nilfisk Käesolevaga kinnitame ja kannane alainisikulist vastuilla, et eyspool nimetadto doote on koosiklas järgmistede direktivide ja Nilfisk déclare sous notreagle responsabilité que le produit mentionné ci-dessus est conforme aux directives et normes suvanties. Mi, Nilfisk Käesolevaga kinnitame ja Kannane alainisikulist vastuilla, et eyspoel nimetadto doote on koosiklas järgmistede direktivide ja Nilfisk déclare sousorette responsabilité que le produit mentionné ci-dessus est conforme aux directives et normes suvanties. Mi, Nilfisk Käesolevaga kinnitame ja Kannane alainisikulist vastuilla, et eyspoel nimetadto doote on koosiklas järgmistede direktivide ja Nilfisk déclare sousorette responsabilité que le produit mentionné ci-dessus est conforme aux directives et normality. |
Authorized
Pierre Mikaelsson, Executive Vice President, Global Products & Services, Nilfisk NLT
signatory:
Jan 17, 2020

UK Declaration of Conformity
We,
Nilfisk Ltd
Nilfisk House, Bowerbank Way Gilwilly Industrial Estate
Penrith Cumbria
CA11 9BQ UK
Hereby declare under our sole responsibility that the
Product: FC - Floor Scrubber/Sweeper - Battery; FC - Floor Scrubber/Sweeper
Description: Charging mode: 100-240V 50/60Hz; Working mode: 24V DC; 220-240V 50-60Hz, IP24
Type: AS4325B, AS4335C
Is in compliance with the following standards:
EN 60335-1:2012+A11:2014+A13:2017+A1:2019+A2:2019+A14:2019
EN 60335-2-72:2012
EN 55014-1:2017+A11:2020
EN 55014-2:2015
EN 61000-3-2:2019
EN 61000-3-3:2013+A1:2019
Following the provisions of:
Supply of Machinery (Safety) Regulations 2008/1597
Electromagnetic Compatibility Regulations 2016/1091
Penrith, 25-1-2021
Stewart Dennett
GM/MD

TABLE OF CONTENTS
ENGLISH QUICK START GUIDE 1-18
Some general and detailed machine information is not included in this guide.
Please refer to QUICK START GUIDE Manual on supplied CD-ROM reading by Adobe Reader.

NOTE
The numbers in brackets refer to the components shown in Machine Description chapter.
GUIDE PURPOSE AND CONTENTS
The purpose of this instruction for use is to provide the operator with all basic information and technical characteristics, operation, machine inactivity, spare parts and safety conditions etc.
Before performing any procedure on the machine, the operators and qualified technicians must read the Instruction for Use manual.
Contact our company in case of doubts concerning the interpretation of the instructions or for any further information.
HOW TO KEEP THIS INSTRUCTION FOR USE
The instruction for use must be kept near the machine, inside an adequate case, away from liquids and other substances that can cause any damage to it.
DECLARATION OF CONFORMITY
Declaration of Conformity is supplied with the machine and certifies machine conformity with the law in force.

NOTE
The copies of the original declaration of conformity are provided together with the machine documentation.
ACCESSIONS AND MAINTENANCE
All the necessary operation, maintenance and repair procedures must be made by qualified personnel, our company appointed repair center. ONLY original or approved spare parts and accessories can be used.
Contact our company customer service for any service or purchase of accessories or spare parts if necessary.
CHANGE AND IMPROVEMENT
We are committed to continuous improvement of our products, and the company reserves the right to machine changes and improvements without additional information.
SCOPE OF APPLICATION
The scrubber applies to commercial and industrial use. It is suitable for cleaning smooth and solid floor, operated by a qualified person in safe circumstances. It is not suitable for outdoor use or on carpet or rough floor cleaning.
MACHINE IDENTIFICATION DATA
The machine serial number and model name are marked on the serial label.
This information is useful. Use the following table to write down the machine identification data when requiring spare parts for the machine.
MACHINE MODEL
MACHINE SERIAL NUMBER
QUICK START GUIDE ENGLISH
TRANSPORT AND UNPACKING
When the carrier delivers the machine, make sure the packaging and machine are both whole and undamaged. If there is any damage, inform the carrier before accepting the goods, and reserve the right to compensation for the damage.
Follow the instructions on packaging strictly when unpacking the machine.
Check the package to ensure following items are included:
- Technical documentation including instruction for use, and Parts list.
- Battery connection components.
- Electronic battery charger manual (if installed) (^*)
SAFETY
The following symbols indicate potentially dangerous situations. Always read this information carefully and take all necessary precautions to safeguard people and property.
VISIBLE SYMBOLS ON THE MACHINE

WARNING!
Read all the instructions carefully before performing any operation on the machine.
WARNING!
Do not wash the machine with direct or pressurized water jets.
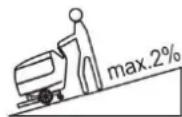
WARNING!
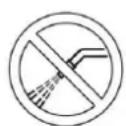
Do not use the machine on slopes with a gradient exceeding that is defined in the specifications section.
SYMBOLS THAT APPEAR ON THE INSTRUCTION FOR USE

DANGER!
It indicates a dangerous situation with risk of death for the operator.

WARNING!
It indicates a potential risk of injury for people.

CAUTION!
It indicates a caution, or a remark related to important or useful functions.
Pay attention to the paragraphs marked by this symbol.

NOTE
It indicates a remark related to important or useful functions.

CONSULTATION
It indicates the necessity to refer to the Instruction for Use manual before performing any procedure.
GENERAL SAFETY INSTRUCTION
Specific warnings and cautions to inform about potential damages to people and machine are shown below.

DANGER!
This machine must be operated by trained and authorized personnel according to guidance of the manual.
Before performing any cleaning, maintenance, repair or replacement procedure, read all the instructions carefully, ensure to turn the machine OFF and disconnect the battery connector.
- Do not operate the machine near toxic, dangerous, flammable and/or explosive powders, liquids or vapour. This machine is not suitable for collecting dangerous powders.
- Do not wear jewelry when working near electrical components.
- Do not work under the lifted machine without supporting it with safety stands.
- When using lead (WET) batteries, they may emit inflammable gas under normal use, must keep sparks, flames, smoking materials and radiating, illuminating and burning items away from the batteries.
- When charging lead (WET) batteries, they may emit hydrogen gas which may cause explosive. Must ensure the charging environment is well ventilated and away from potential flames.

WARNING!
This machine is intended for COMMERCIAL USE, for example in hotels, schools, hospitals, factories, shops, offices and rental businesses.
- Machines left unattended shall be secured against unintentional movement.
In order to prevent unauthorized use of the machine, the power source shall be switched off or locked, for example by removing the key of the main switch or the ignition key.
- Check the machine carefully before each use. Ensure that all the components have been well assembled before use. Loose components may cause damage to people and properties.
Before using the battery charger, ensure that the values of frequency and voltage indicated on the machine serial number label match those of mains.
- Never move the machine by pulling the battery charger cable. Do not allow the charging cable to become damaged by a door closing, or sharp corners. Do not run the machine over the battery charger cable. Keep the battery charger cable away from heated surfaces.
- Do not charge the batteries if the battery charger cable or the plug are damaged.
To reduce the risk of fire, electric shock, or injury, make sure machine is off before leaving.
Use or store the machine indoors in dry conditions, it is not allowed for outdoor use.
The machine storage and working temperature must be between 0^ and +40^ , the humidity of air must be between 30% - 95% .
- Do not use the machine on slopes with a gradient exceeding the specifications shown.
- When using and handling floor cleaning detergents, follow the instructions on the labels of the detergent bottles and wear suitable gloves and other protective devices.
- Use brushes and pads supplied with the machine or defined in the manual. Using other brushes or pads could reduce safety.
In case of machine malfunctions, ensure that these are not due to lack of maintenance. If necessary, request assistance from the authorized personnel or from an authorized Service Center.
Take all necessary precautions to prevent hair, jewelry, and loose clothes from being caught by the machine moving parts.
- Do not use the machine in particularly dusty areas.
- Do not wash the machine with direct or pressured water jets, or with corrosive substances.
- Do not bump into shelves or scaffoldings, especially where there is a risk of falling objects.
- Do not lean liquid containers on the machine, use the relevant can holder.
QUICK START GUIDE ENGLISH
- To avoid damaging the floor, do not allow the brush/pad to operate while the machine is stationary.
In case of fire, use a dry powder fire extinguisher. Do not use liquid fire extinguishers. - Do not remove or modify the machine stickers.
- Do not tamper with the machine safety guards and follow the scheduled maintenance instructions closely.
- Pay attention during machine transportation when temperature is below freezing point. The water in the recovery tank and in the hoses could freeze and cause serious damage to the machine.
If spare parts need be replaced, order ORIGINAL spare parts from an Authorized Dealers or Retailers. - Return the machine to the Service Center if it doesn't work as usual or it is in condition such as damaged, placed outdoors, dropped into water.
- To ensure machine proper and safe operation, the scheduled maintenance shown in the relevant chapter of this Manual, must be performed by the authorized personnel or an authorized Service Center.
The machine must be properly disposed of, due to the presence of toxic-harmful materials (batteries, etc.), which are subject to standards that require disposal in special centers (see Scrapping chapter).
This machine is a cleaning tool only, not for, and is not intended for any other purpose.
Always keep the openings free from dust, hairs and any other foreign material which could reduce the air flow. Do not use the machine if the openings are clogged. - Use the machine only where proper lighting is provided.
This machine is not intended for use by persons (including children) with reduced physical, sensory or mental capabilities, or lack of experience and knowledge. - Close attention is necessary when used near children.
Children should be supervised to ensure that they do not play with the machine.
While using this machine, take care not to cause damage to people or objects. - Cleaning and user maintenance shall not be made by children without supervision.
- Operators shall be adequately instructed on the use of these machines.
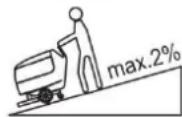
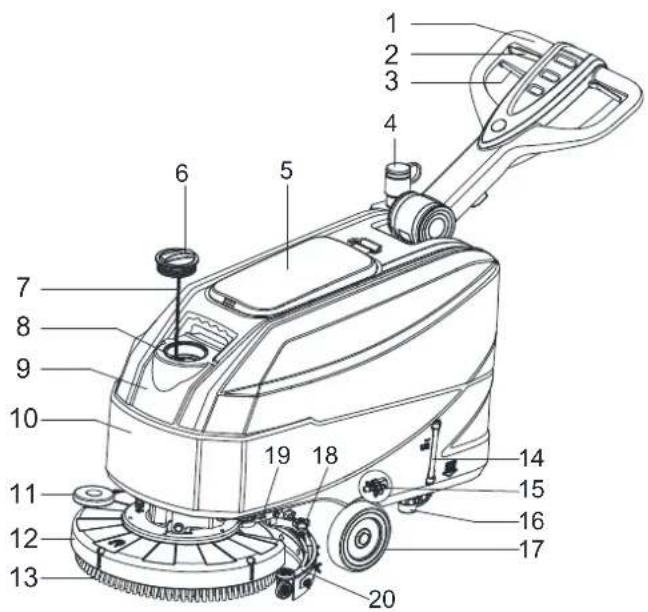
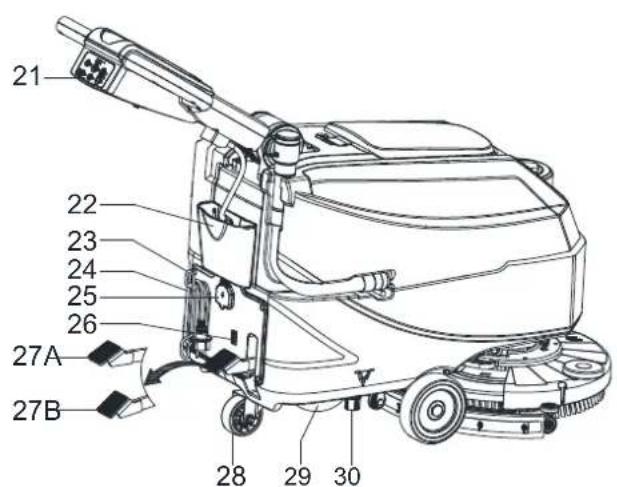
MACHINE DESCRIPTION MACHINE STRUCTURE (as shown in Figure 1)
- Handlebar
- Safety switch lever
- Handlebar adjusting lever
- Recovery water drain hose
- Recovery tank lid
- Fresh water cover
- Cover retention chain
- Filling hose neck
- Recovery tank
- Solution tank
- Brush deck bumper wheel
- Brush/pad-holder deck
- Brush/pad-holder
- Solution level hose
- Solenoid valve
- Solution filter
- Front wheels
- Squeegee knobs
- Squeegce lifting handle
-
Squeegce assembly
-
Control panel
- Accessory parts box (*)
- Battery charge cable holder
- Battery charge cable
- Security cover of changing jack
- Charging signal lights
- Deck lifting/lowering pedal a) Pedal position when deck is lowered b) Pedal position when deck is lifted
- Caster wheel
- Recovery water drain hose
- Outlet cover
(^*) : Optional
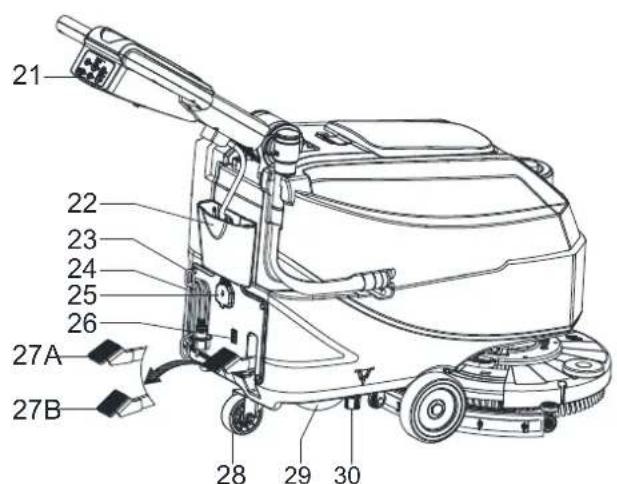
Figure 1
QUICK START GUIDE ENGLISH
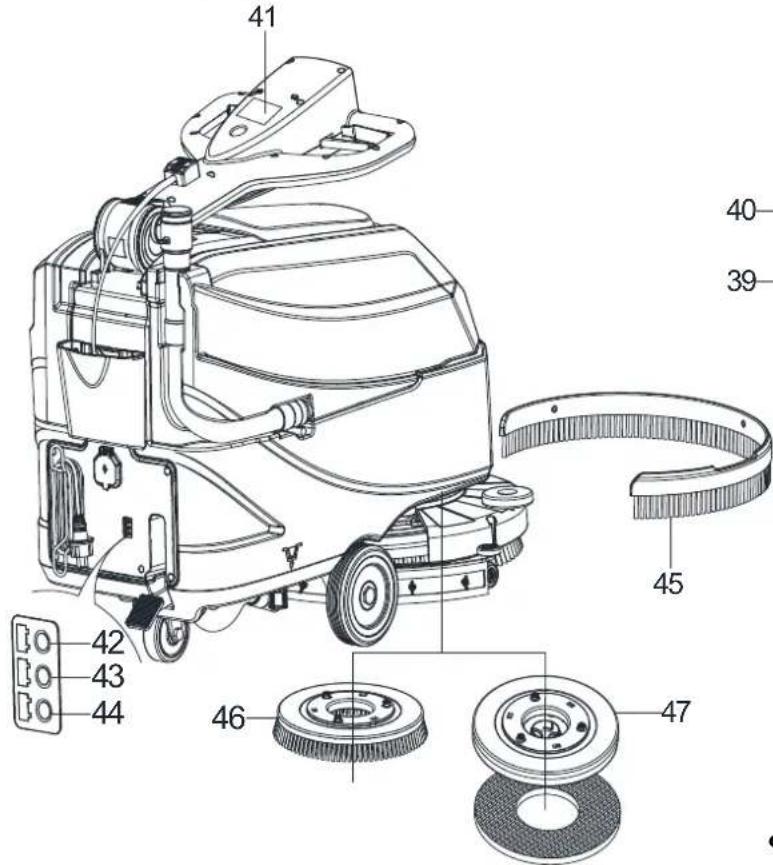
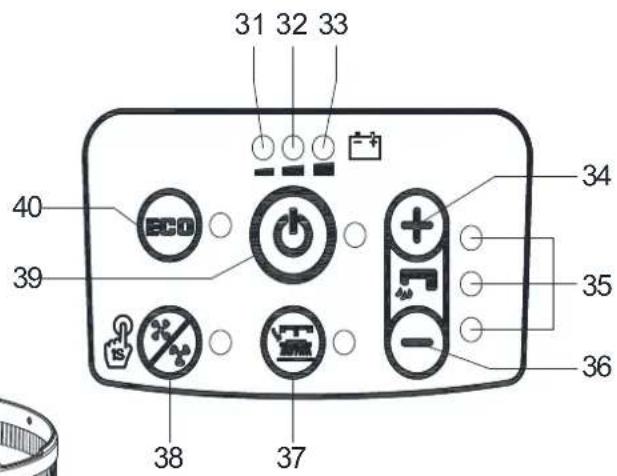
CONTROL PANEL (as shown in Figure 2)
- Discharged battery warning light (red)
- Semi-discharged battery warning light (yellow)
- Charged battery warning light (green)
- Flow increase switch
- Solution flow indicator
- Flow decrease switch
- Brush/pad-holder release switch
- Normal vacuum motor model
- One button starting
-
ECO mode
-
Serial number plate/technical data
- Charging red LED
- Charging yellow LED
- Charging green LED
- Skirt (*)
- Brush
- Pad-holder (*)
(^*) : Optional

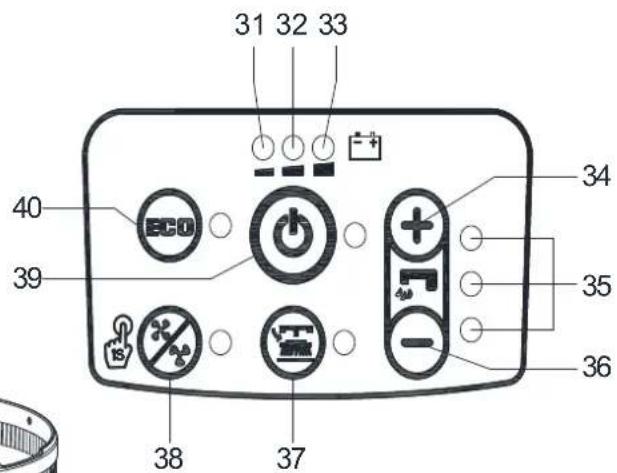
Figure 2
DISPLAY WINDOW OF CHARGER INDICATION LIGHT (as shown in Figure 2)
- At the beginning of charging, the red LED (42) of charger is normally on. It is the first stage of charging.
- After charging some time, the red LED (42) turns off, the yellow LED (43) turns on, this is the second stage of charging.
- After the charging is finished, the yellow LED (43) is off, the green LED (44) turns on to indicate that the battery is fully charged.

NOTE
When charging, if the yellow LED (48) of charger is flashing, it may be caused by: Battery and charger does not match, battery is not connected well, or output is short-circuited.
The red LED of charger flashing may be caused by charger internal short circuit.
TECHNICAL PARAMETERS
| Parameter Type Units | Model | |
| AS4325B | ||
| Solution tank capacity L / Gal 25 L / 6.6 Gal. | ||
| Recovery tank capacity L / Gal 25 L / 6.6 Gal. | ||
| Machine Length mm/Inches 1020 mm / 40.1 Inches | ||
| Machine width with squeegee mm/Inches 570 mm / 22.4 Inches | ||
| Machine width without squeegee mm/Inches 485 mm / 19.1 Inches | ||
| Machine Height (without handle) mm/Inches 647 mm / 25.5 Inches | ||
| Machine Height (with vertical handle) mm/Inches 118 | mm / 46.5 Inches | |
| Working width mm/Inches 432 | mm / 17 Inches | |
| Driving wheel diameter | mm/Inches | 153 mm / 6 Inches |
| Rear wheel diameter | mm/Inches | 89 mm / 3.5 Inches |
| Brush/Pad diameter | mm/Inches | 432 mm / 17 Inches |
| Brush/Pad pressure (max) | Kg/Lbs. | 19 Kg / 41.8 Lbs |
| Solution Flow (max) per setting | L / Gal per minute | (0.59/0.69/1.11/1.68) Liters (0.16/0.18/0.29/0.44) Gallons |
| Sound pressure level | dB (A) | 69 ± 3 dB (A) |
| Sound pressure level in ECO mode or in silent mode | dB (A) | 65 ± 3 dB (A) |
| Handle Vibration Level (max) | m/s² | < 2.5 m/s² |
| Climbing capacity (max) | % grade | 2% |
| Vacuum motor power | Watt / H.P. | 300 W / 0.4 HP |
| Vacuum capacity | mm/In of H₂O | 838 mm / 33 ± 3 In of H₂O |
| Vacuum capacity in ECO mode or in silent mode | mm/In of H₂O | 635 mm / 25 ± 3 In of H₂O |
| Brush motor power | Watt / H.P. | 400 Watt / 0.54 HP |
| Brush speed in normal mode | RPM | 140 RPM |
| Brush speed in ECO mode | RPM | 100 RPM |
| IP protection class | IP | IP24 |
| Battery Compartment Size (L x W x H) | mm/Inches | (265 x 350 x 230) mm / 10.4 x 13.8 x 9.1 Inches |
| Voltage | DC | 24 V |
| Batteries (*) | Ah | 85Ah C20 / 67Ah C5 |
| Battery run time (standard batteries) (*) | Hour | Up to 4 hours |
| On-Board Charger (*) | Volts/Amps | 24V 10A |
| Productivity (max) m | 2/h | 18,514 sq. ft./hr (1720 m²/h) |
| Machine weight with empty tanks (without batteries) | Kg/Lbs. | 58 Kg / 128 Lbs. |
| Gross Vehicle Weight (GVW) | Kg/Lbs. | 134 Kg / 295 Lbs. |
| Shipping Weight | Kg/Lbs. | 137 Kg / 302 Lbs. |
| Packing dimensions (L x W x H) mm/Inches | (1) 130 x 730 x 1040 mm | /(44.5 x 28.7 x 41 Inches) |
(^*) : Optional
QUICK START GUIDE ENGLISH
OPERATINGGUIDE

WARNING!
On some points of the machine there are some adhesive plates indicating:
DANGER!
- WARNING!
- CAUTION!
CONSULTATION
While reading this Manual, the operator must pay particular attention to the symbols shown on the plates. Do not cover these plates for any reason and immediately replace them if damaged.
BATTERY CHECK/SETTING ON A NEW MACHINE

WARNING!
The electric components of the machine can be seriously damaged if the batteries are either improperly installed or connected. The batteries must be installed by qualified personnel only. Set the function of the electronic board and the built-in battery charger according to the type of batteries used (WET or GEL/AGM batteries). Check the batteries for damage before installation. Disconnect the battery connector and the battery charger plug. Handle the batteries with great care. Install the battery terminal protection caps supplied with the machine.

NOTE
The machine requires two 12V batteries, connected according to the diagram (Figure 3).
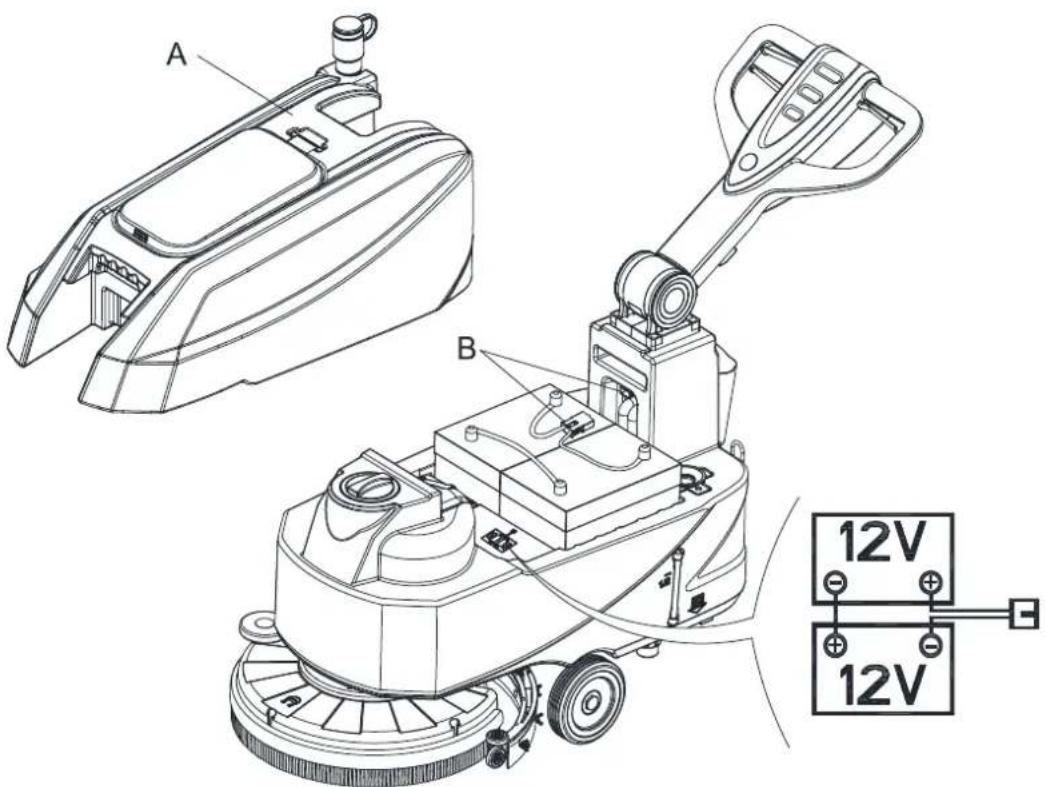
Figure 3
QUICK START GUIDE ENGLISH
The machine can be supplied in one of the following modes:
A) Batteries (WET or GEL/ AGM) already installed and charged
- Check that the batteries are connected to the machine with the connector (B, Figure 3).
- Pressing the switch (39 Figure 2). If the green warning light (33) turns on, the batteries are fully charged. If the yellow (32) or red warning light (31) turns on, the batteries must be charged (see the procedure in Maintenance chapter).
B) Without batteries
- Buy appropriate batteries (see the Technical Data paragraph).
- For battery choice and installation, apply to qualified battery Retailers.
- Set the machine and the battery charger according to the type of batteries (WET or GEL/ AGM), as shown in the next paragraph.
BATTERY INSTALLATION AND BATTERY TYPESetting (WET OR GEL/ AGM)
According to the type of batteries (WET or GEL/AGM), set the machine and electronic board of the battery charger as follows:
Machine setting
When One-button Start S3 is turned off, press water volume + and - buttons (S5 and S6) at the same time, 0.5 seconds later, LED1, LED2 and LED3 are all lit up to enter the battery mode setting:
- Then press water volume + or - to switch between "WET", "GEL/AMG" and "DIS-EV". In the mode of "WET", Red light is on. And "GEL/AGM", light is green. "DIS-EV", light is yellow.
- Press One-button Start to finish setting and exit, turn off machine to store and update all battery setting, when it's on, it will work as setting.

NOTE
Default battery type is GEL/AGM.
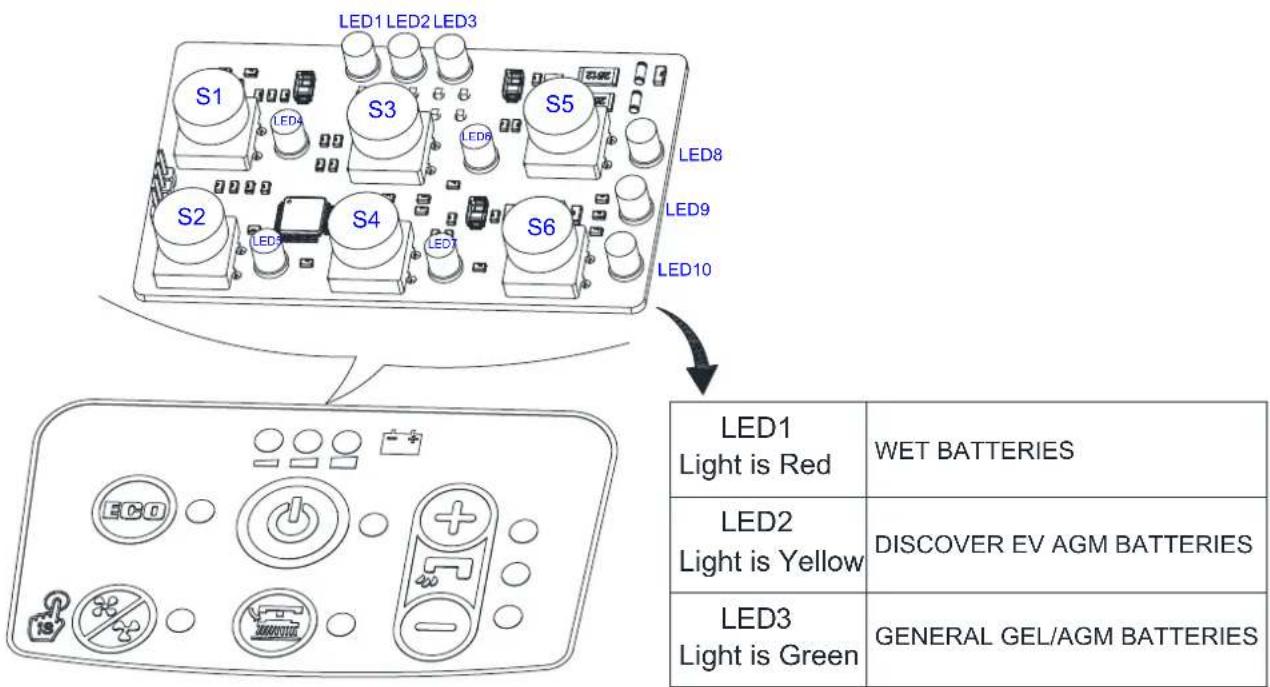
Figure 4
QUICK START GUIDE ENGLISH
Battery installation
- Open the recovery tank cover (5, Figure 1) and check that the recovery tank (9, Figure 1) is empty; otherwise empty it with the drain hose. (4, Figure 1)
- Close the recovery tank cover (5, Figure 1).
- Move the recovery tank kit (A, Figure 3) carefully.
- The machine is supplied with cables suitable to install 2x12V batteries. Carefully put the batteries into the compartment, then install them correctly.
- Route and install the battery cable as shown in (Figure 3), then carefully tighten the nut on each battery terminal.
- Place the protection cap on each terminal, then connect the battery connector (B, Figure 3).
- Carefully put it back the recovery tank kit (A, Figure 3).
Battery charging
- Charge the batteries. (See procedures in maintenance chapter).

CAUTION!
Cut off all the power of the machine before perform the following procedure!
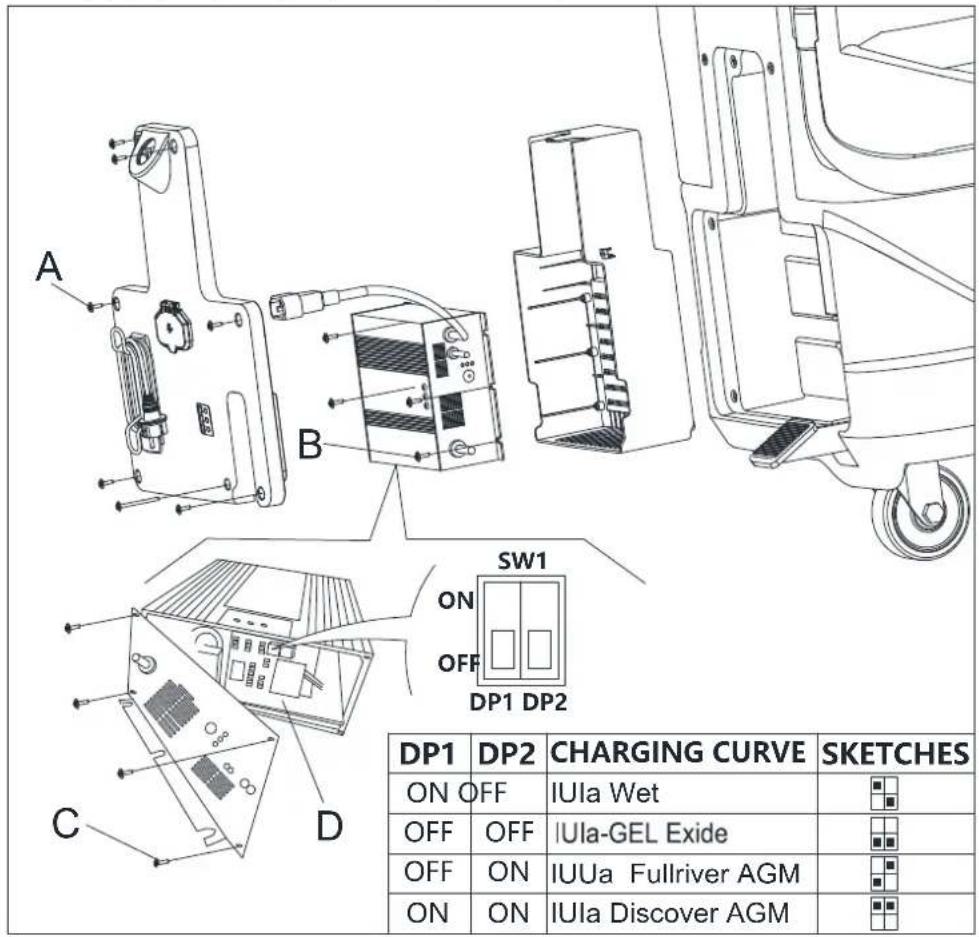
Battery charger setting
- Remove the screws (A, B, C, Figure 4.1).
- Open the charger and find the sw1 (D, Figure 4.1).
- Set the switches as the table of Figure 4.1.
- Install the screws (A, B, C, Figure 4.1) after setting complete.
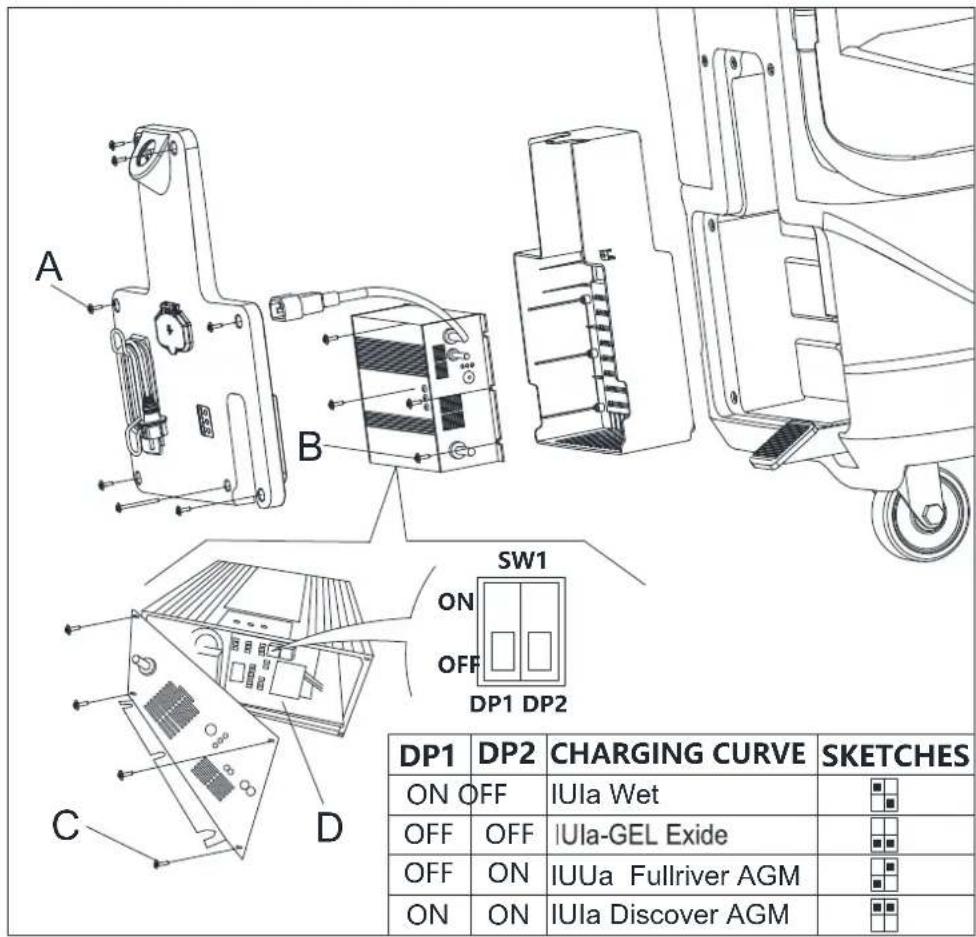
Figure 4.1
QUICK START GUIDE ENGLISH
BRUSH/PAD-HOLDER INSTALLATION AND REMOVAL

NOTE
Install either the brush (A, Figure 5) or pad-holder (B and C, Figure 5) according to the type of floor to be cleaned.

CAUTION!
Before installation or removal of brush or pad-holder, make sure all the switches on machine are in off position and lifting up the squeegee and the brush/pad-holder deck from the floor. The operator must be equipped with suitable personnel protection devices such as gloves to reduce the risk of accidents.
Proceed as following:
- Shut off the power switch (39, Figure 2).
- Lift the deck by pressing the pedal (27, Figure 1).
- Place the brushes (A, Figure 5) or the pad-holder (B, Figure 5) under the deck (12, Figure 1).
- Lower the deck on the brushes/pad-holders by pressing the pedal (27, Figure 1).
- Press the start switch (39, Figure 2).
- Press one of the Brush/forward gear safety switch lever (2, Figure 1) to engage the brush/pad-holder, then release it. If necessary, repeat the procedure until the brushes/pad-holders are engaged.
- If Step No. 6 above proves to be difficult, use the manual method by turning the brush/pad-holder in the direction opposite to the normal turning direction, and it can be taken off. (as shown in Figure 5)
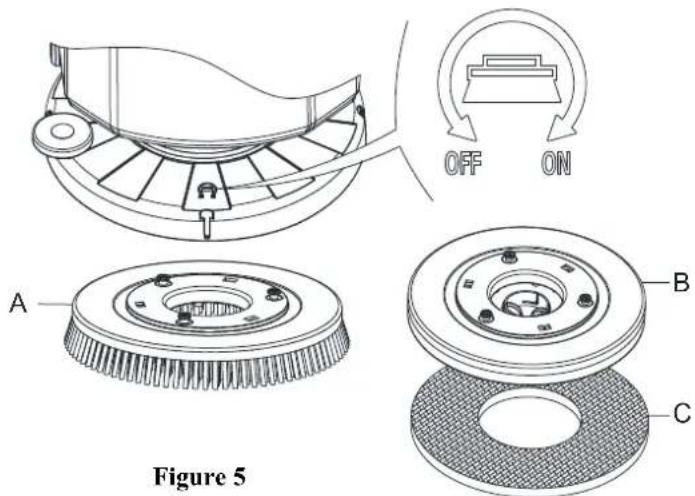
Figure 5

WARNING!
To engage the brush/pad-holder press the safety switch lever (2, Figure 1) which turns on the brush/pad-holder motor.
- To remove the brush/pad-holder lift the deck by pressing the pedal (27, Figure 1), then press the switch (37, Figure 2), the brush/pad-holder will be removed.
QUICK START GUIDE ENGLISH
SQUEEGEE ASSEMBLE INSTALLATION AND REMOVAL

CAUTION!
It is advisable to wear protective gloves when installation and removal the squeegee assemble because there may be sharp debris.
- Push the machine to a level floor.
- Ensure that the machine is off.
- Lower the brush/pad-holder deck (12, Figure 1) by lifting the pedal (36), Brush on the floor.
- Place squeegee in the place between brush deck and front wheel.
- Fix stud A to the opening B, then fix another screw C to the open D, fasten squeegee knob and connect recovery water drain hose F to the connector E (Figure 6).
- Disconnect the squeegee in the reverse order of disassembly.
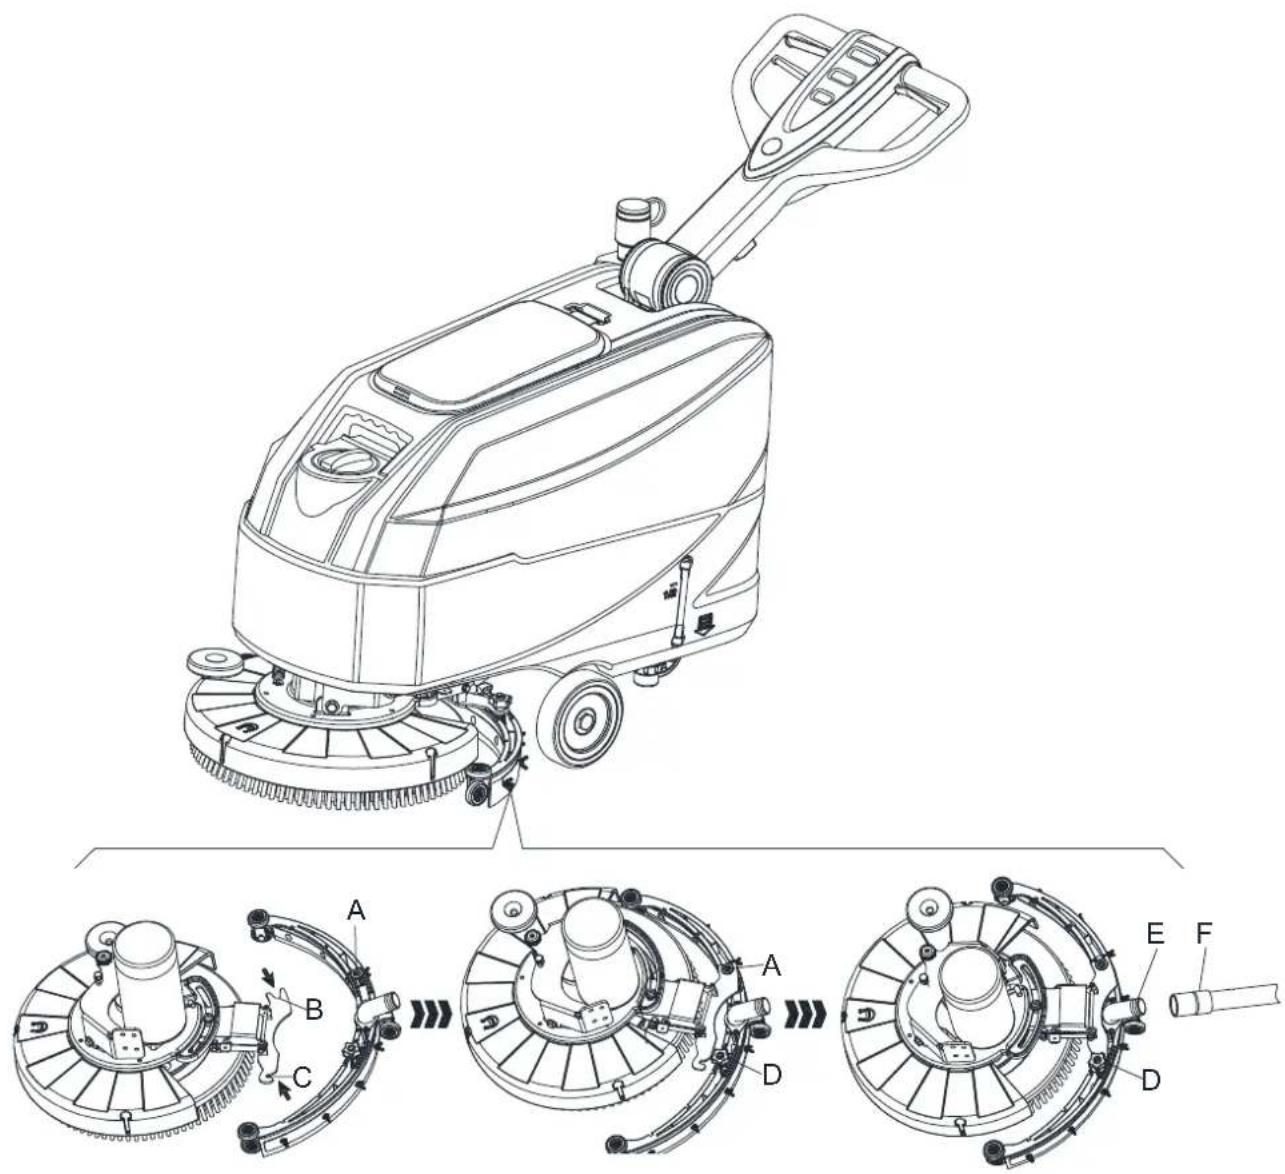
Figure 6
QUICK START GUIDE ENGLISH
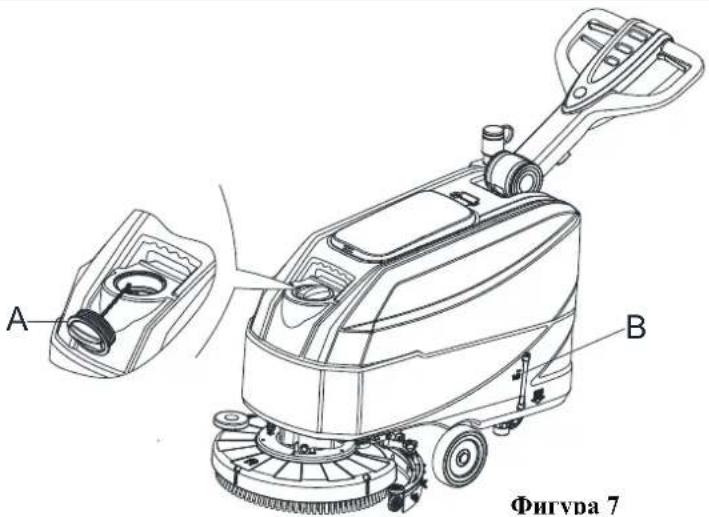
SOLUTION OR WASHING WATER TANK FILLING
- Open the water inlet cover (A, Figure 7).
- Fill with water or solution suitable for work performance. The solution temperature must not exceed +104^(+40^)
- Do not overfill the tank, refer to water level indicator (B, Figure 7) for the water volume.
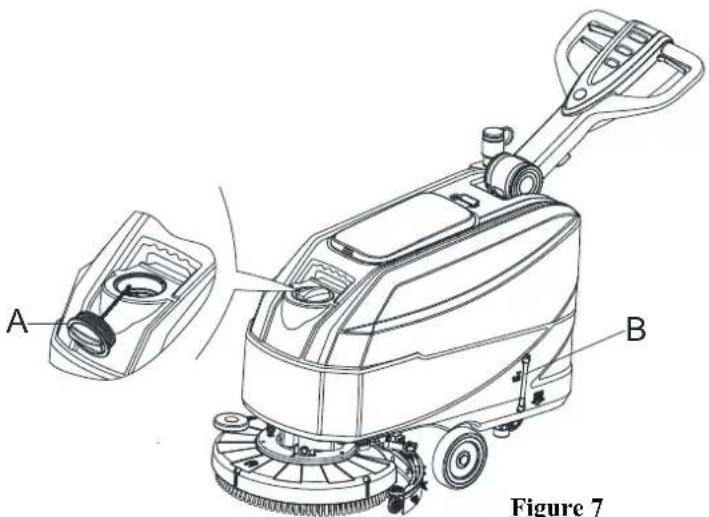
Figure 7

WARNING!
Use only low-foam and non-flammable detergents, intended for automatic scrubber applications.
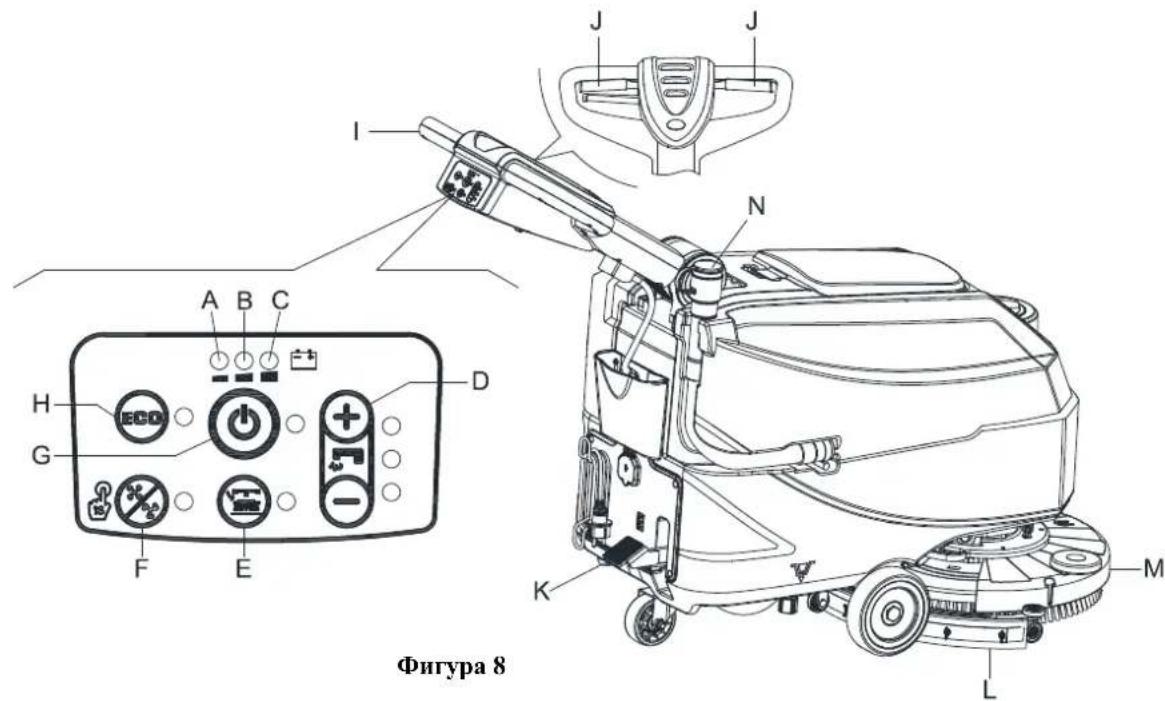
MACHINE START AND STOP
Starting the machine
- Prepare the machine as shown in the previous paragraph.
- Push the machine to the area to be cleaned, by pushing it with the hands on the handlebar (I, Figure 8).
- Lower the brush/pad-holder deck (M, Figure 8) and the squeegee (L) by lifting the pedal (K).
- Press the start switch (G, Figure 8). Check that the green warning light (C) turns on (charged battery). If the yellow (B) or red warning light (A) turns on, Shutoff the power switch (G, Figure 8) and charge the batteries (see the procedure in Maintenance chapter).
- Press the washing water flow control switches (D, Figure 8) as necessary, depending on the type of cleaning to be performed.
- Start cleaning by pushing the machine with the hands on the handlebar (I) and pressing the safety switch lever (J).
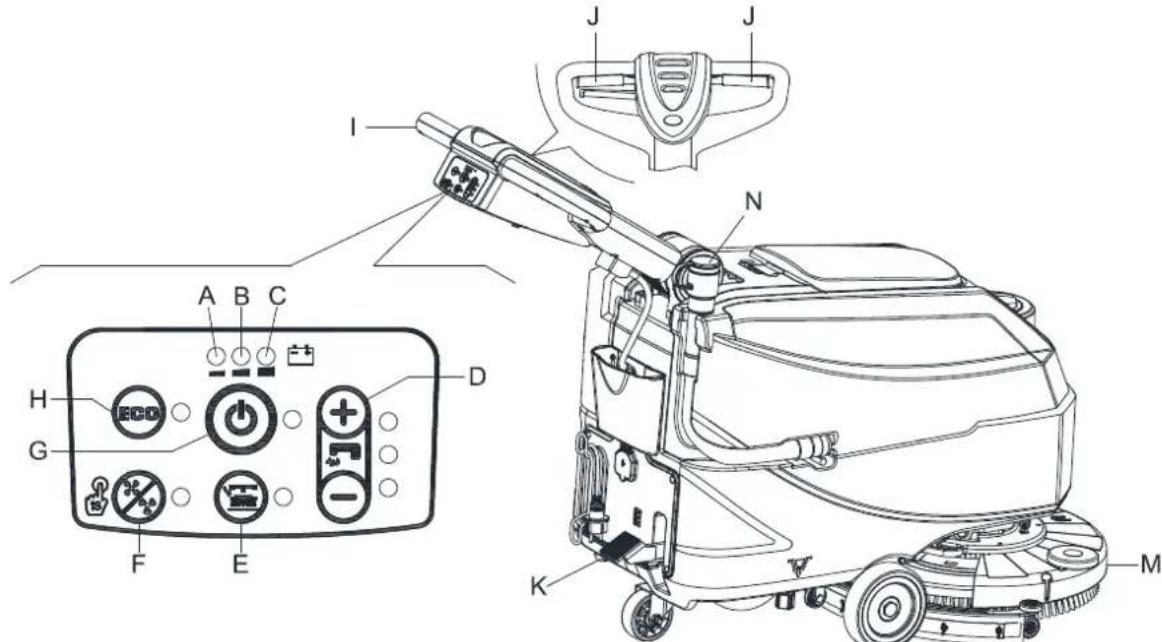
Figure 8
QUICK START GUIDE ENGLISH

NOTE
To move the machine forward, press either the left or right safety switch lever (J, Figure 8) or both.
- If necessary, press the handlebar adjusting lever (3, Figure 1) to adjusting the handlebar height.
Stopping the machine
- Stop the machine by using the handlebar (I).
- Stop the brushes and the vacuum system by pressing the switch (G). The vacuum system stops after a few seconds.
- Lift the brush/pad-holder deck(M) and the squeegee (L) by pressing the pedal (K).
- Make sure that the machine cannot move independently.
MACHINE OPERATION (SCRUBBING AND DRYING)
- Start the machine as shown in previous paragraphs.
- While keeping both hands on the handlebar press the safety switch lever (J, Figure 8), then manoeuvre the machine and start scrubbing/drying the floor.

NOTE
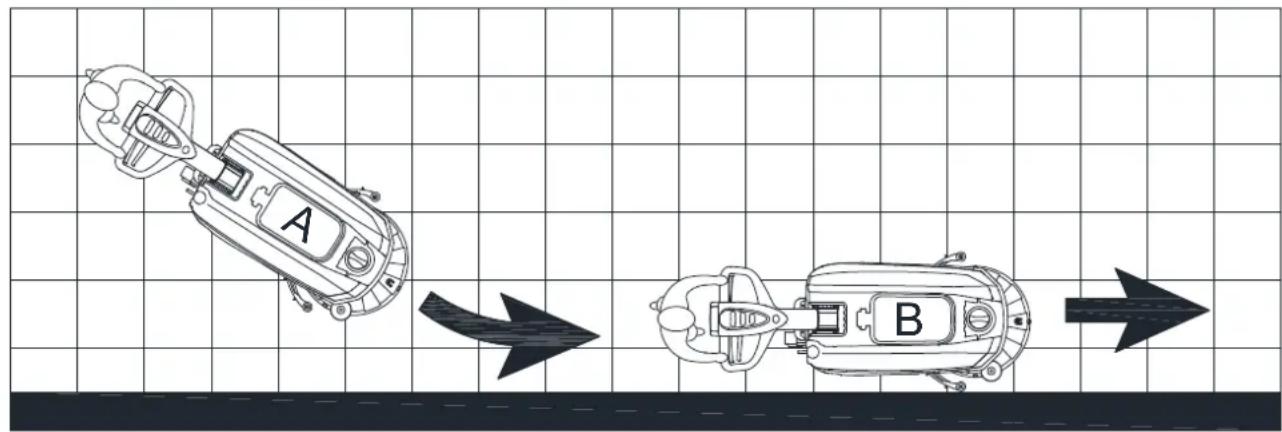
For correct scrubbing/drying of floors at the sides of the walls, it is Suggested to go near the walls with the right side of the machine (A and B, Figure 9) as shown in the figure.

CAUTION!
To avoid any damage to the floor surface, turn off the brushes/pad-holders when the machine stops in one place.
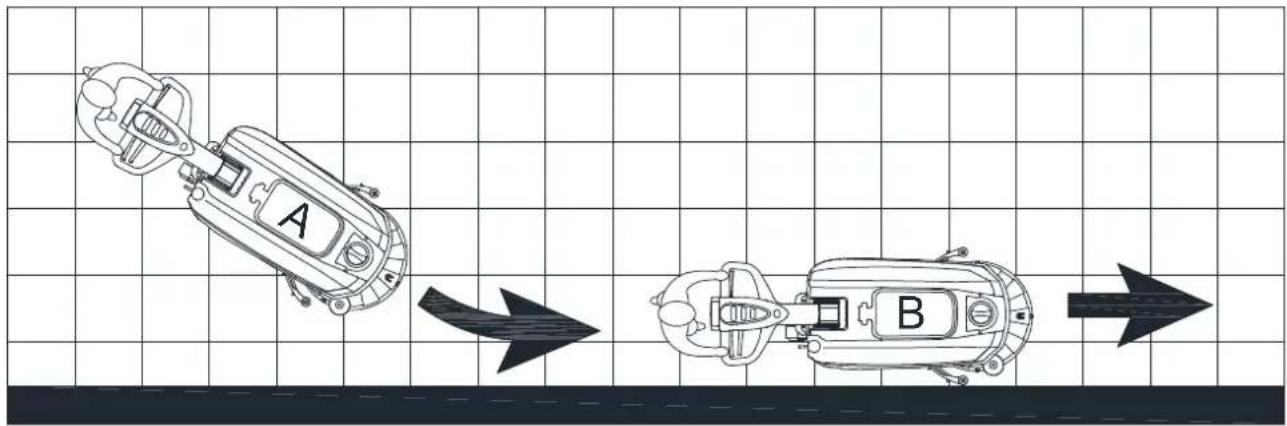
Figure 9
Battery discharge during operation
While the green warning light (C, Figure 8) stays on, the batteries allow the machine to work normally. When the green warning light (C) turns off, and the yellow warning light (B) turns on, it is advisable to charge the batteries, because the remaining charge will last for a few minutes (depending on battery characteristics and work to be performed). When the red warning light (A) turns on, batteries are fully discharged. After a few seconds, the brush/pad-holder is automatically tuned off.

CAUTION!
Do not use the machine with discharged batteries, to avoid damaging the batteries and reducing the battery life.
QUICK START GUIDE ENGLISH
TANK EMPTYING
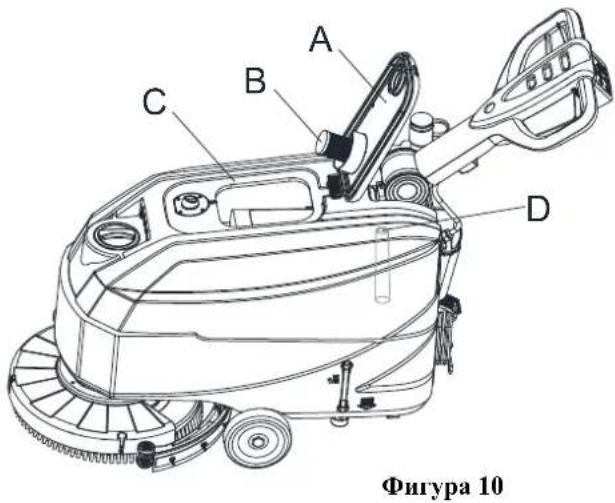
An automatic float shut-off system (B, Figure 10) blocks the vacuum system when the recovery water tank (C) is full. The vacuum system deactivation is signaled by a sudden increase in the vacuum system motor noise frequency, also the floor has not dried.

CAUTION!
If the vacuum system turns off accidentally (for example, when the float is activated because of a sudden machine movement), to resume the operation: turn off the vacuum system by pressing the switch (G, Figure 8), then open the cover (A, Figure 10) and check that the float inside the grid (B) has gone down to the water level. Then close the cover (A) and turn on the vacuum system by pressing the switch (G, Figure 8).
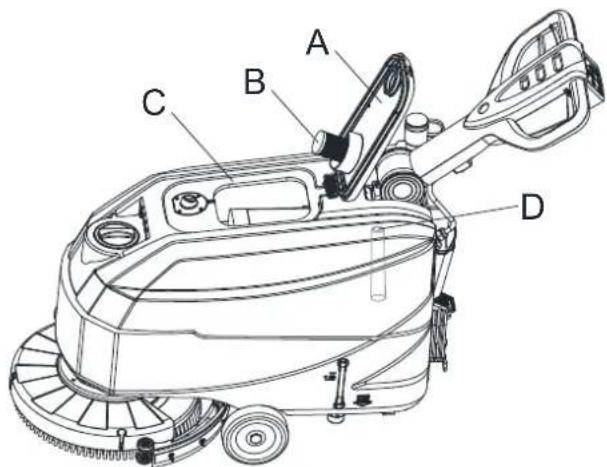
Figure 10
When the recovery water tank (C, Figure 10) is full, empty it according to the following procedure.
Recovery water tank emptying
- Stop the machine.
- Lift the brush/pad-holder deck (M, Figure 8) and the squeegee (L) by pressing the pedal (K).
- Push the machine to the appointed disposal area.
- Empty the recovery water tank with the hose (N, Figure 8). Then, rinse the recovery tank (C, Figure 10) with clean water.
- Remove the recovery tank lid (A, Figure 10) and clean the inside of the cover and the filter floater grid (B) with clean water.
- Check the recovery tank (D, Figure 10) whether there is foreign body jam and clean it.
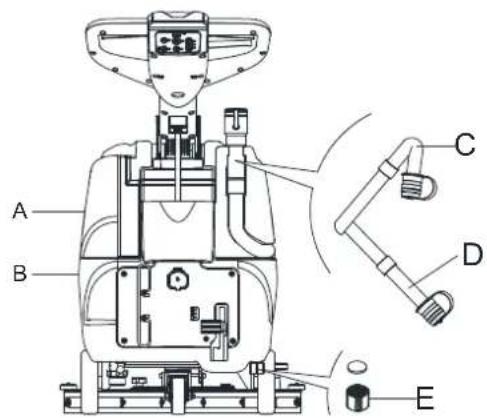
Figure 11

CAUTION!
When draining the wastewater, the vacuum tube for waste must be folded (C, Figure 11) and lowered to a lower position (D, Figure 11), and then open the lid of the vacuum tube for waste to drain the water. Do not make the outlet of the vacuum tube for waste face upward to drain the water vertically. This is to avoid wastewater spilling onto the operator.
- Perform steps 1 to 4.
Solution/clean water tank emptying
- Empty the solution tank with the outlet cover (E, Figure 11). After working, rinse the tank with clean water.
BATTERY CHARGING
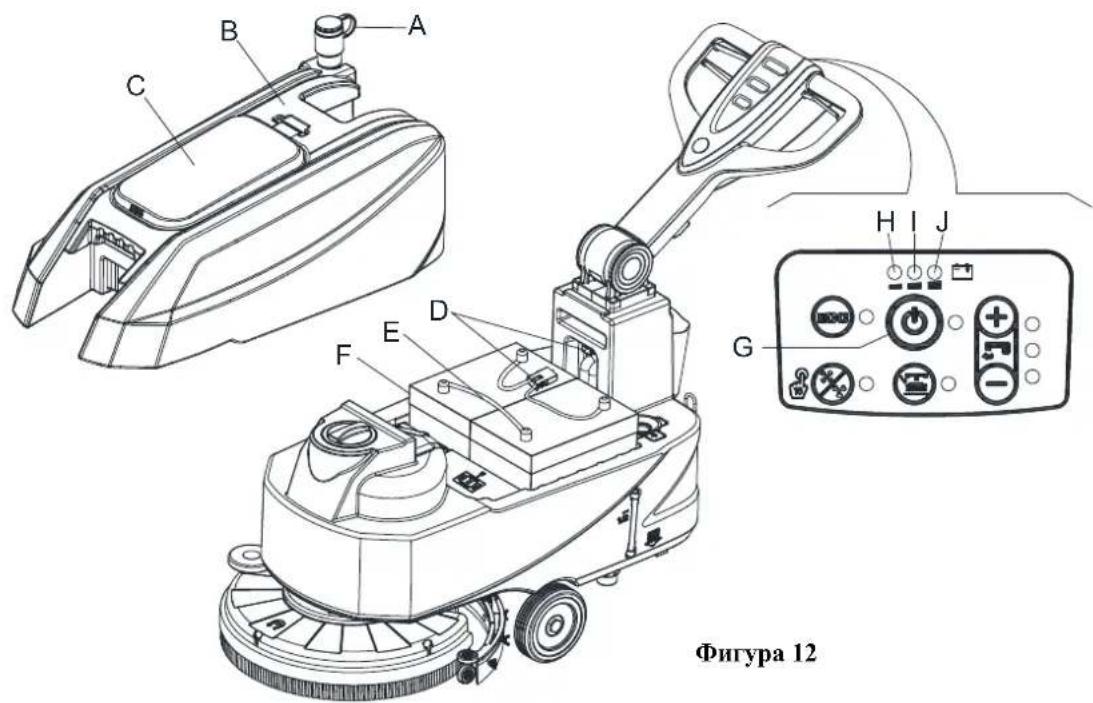
Preliminary procedures
- Open the cover (C, Figure 12) and check that the recovery water tank (B) is empty, otherwise empty it with the drain hose (A).
- Carefully move the recovery tank kit (B, Figure 12).
- Connect the battery connector (D, Figure 12).
QUICK START GUIDE ENGLISH
- Carefully put it back the recovery tank kit (B, Figure 12).
- Pushing the machine on a level floor.
- Press the start switch (G, Figure 12).
-
For WET batteries only:
-
Check the level of electrolyte inside the batteries (F); if necessary, top up through the caps.
- Leave all the battery caps open for next charging.
-
If necessary, clean the upper surface of the batteries (F).
-
Charge the batteries according to the following procedure.
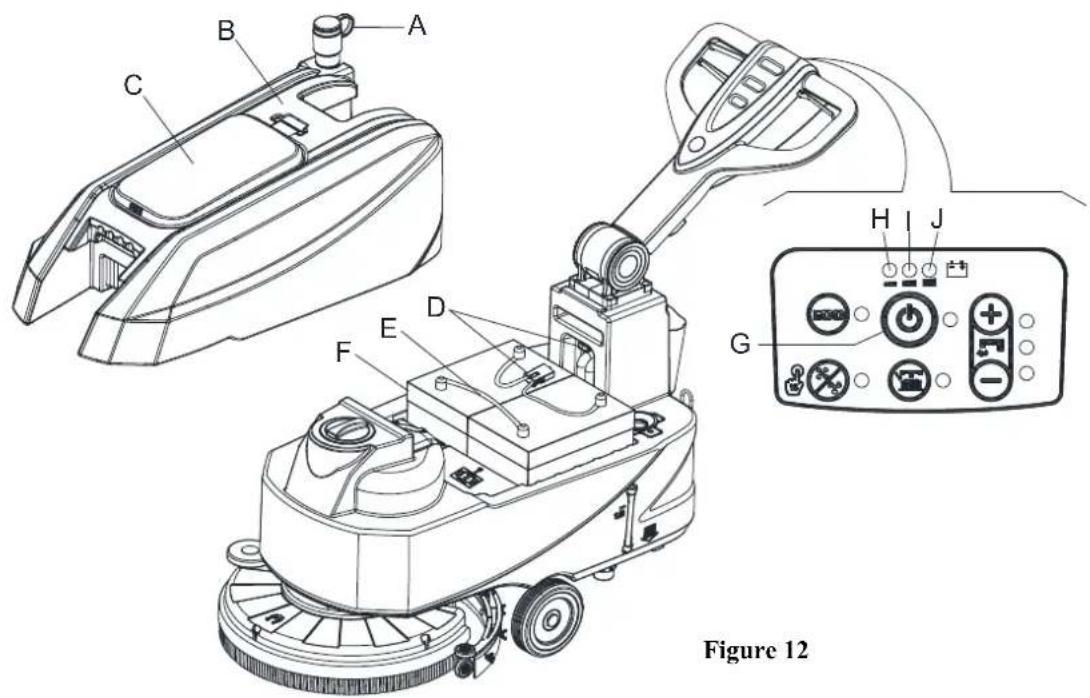
Figure 12

NOTE
Charge the batteries when the yellow (I, Figure 12) or red warning light (H) turns on, or when finishing cleaning.

CAUTION!
Keeping the batteries charged makes their life last longer.

CAUTION!
When the batteries are discharged, charge them as soon as possible, as that condition makes their life shorter. Check for battery charge at least once a week.

WARNING!
WET battery charging produces highly explosive hydrogen gas. Charge the batteries in well-ventilated areas and away from naked flames. Do not smoke while charging the batteries. Keep the tank open while charging the batteries.
QUICK START GUIDE ENGLISH

WARNING!
Pay careful attention when charging the batteries as there may be battery fluid leakages. The battery fluid is corrosive. If it comes in contact with skin or eyes, rinse thoroughly with water and consult a physician.
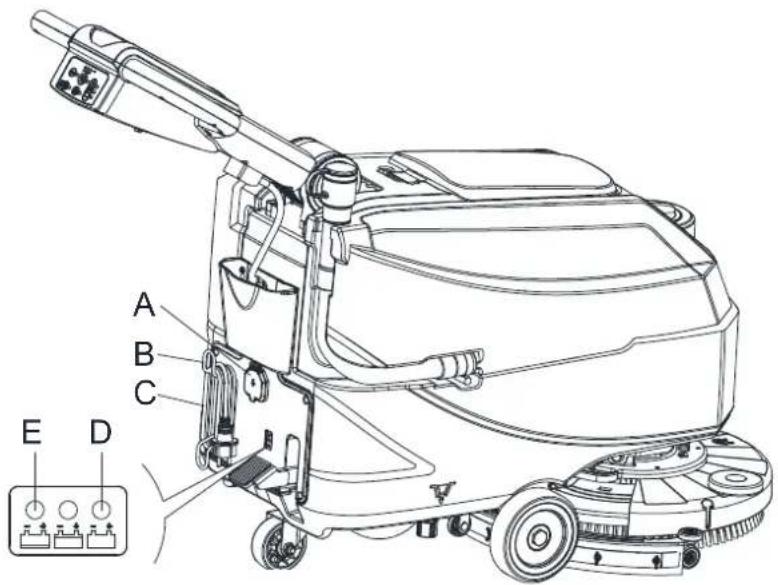
Battery charging with battery charger installed on the machine
- Connect the battery charger cable (C, Figure 13) to the electrical mains (A) voltage and frequency must be compatible with the battery charger values shown on the machine serial number plate (41, Figure 2). When the battery charger is connected to the electrical mains, all machine functions are automatically cut off. If the red warning light (E) on the battery charger control panel stays on, the battery charger is charging the batteries.
- When the green warning light (D) turns on, the battery charging is completed.
- When the battery charging is completed, disconnect the battery charger cable (C) from the electrical mains (A) and wind it round its housing (B).
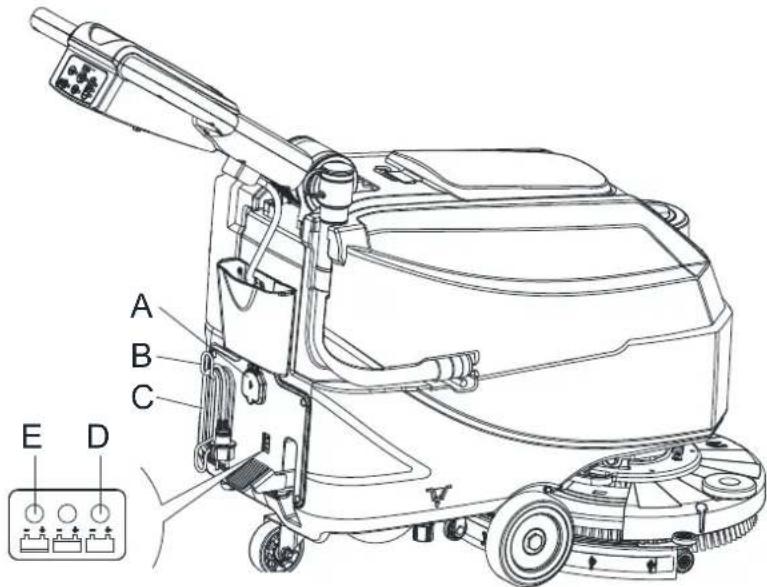
Figure 13

NOTE
For further information about the operation of the battery charger, see the relevant Manual.
AFTER USING THE MACHINE
After working, before leaving the machine:
- Remove the brushes/ pad-holders.
- Empty the tanks (A and B, Figure 11) as shown in the previous paragraph.
- Perform the daily maintenance procedures (see the Maintenance chapter).
- Store the machine in a clean and dry place, with the brushes/ pad-holders and the squeegee lifted or removed.
MACHINE LONG INACTIVITY
If the machine is not going to be used for more than 30 days, proceed as follows:
- Perform the procedures shown in After Using the machine paragraph.
- Disconnect the battery connector (B, Figure 3).
QUICK START GUIDE ENGLISH
FIRST PERIOD OF USE
After the first 8 hours, check the machine fastening and connecting parts for proper tightening and check the visible parts for wear and leakage.
MAINTENANCE

WARNING!
Maintenance procedures must be performed after the machine is turned off and the battery charger cable is disconnected. In addition, carefully read the safety chapters in the manual.
All scheduled or extraordinary maintenance procedures must be performed by qualified personnel or an authorized Service Center. This manual only describes the general and common maintenance procedures.
SCHEDULEDMAINENANCETABLE

CAUTION!
The procedure marked with (1) must be performed when the machine is used after 9 hours for the first time. The procedure marked with (2) must be done by Service Center that is qualified by our company.
| Procedure Daily, after each | use Weekly Semiannually | Yearly | ||
| Battery charging | ||||
| Squeegee cleaning | ||||
| Brush/Pad-holder cleaning | ||||
| Tank cleaning | ||||
| Tank sealing strip inspection | ||||
| Float ball filter cleaning | ||||
| Squeegee blade check and replacement | ||||
| Cleaning water filter cleaning | ||||
| Solution filter cleaning | ||||
| WET battery fluid level check | ||||
| Screw and nut tightness inspection | (1) | |||
| Brush/Pad-holder carbon brush check or replacement | (2) | |||
| Suction motor carbon brush check or replacement | (2) |
KPATKO PbKOBOJCTBO BBJIAPCKH
BbBEHNE

IPEyIpyEKDEHNE!
Hact OTO6hata HctaiJHa HhOpMaHHa ypcHa Hc BkHouCha H hactOnHOTo pbkoBOCTBO.
MoIa, npooyete KPATKOTO PbKOBOJCTBO, Koeto ce npedoctabra Ha CD-ROM m Moke da 6bJe npoucetno c Adobe Reader.

3ABEJE2KKA
HcnaTbBCKo6nte ce oTHaer 3a elemEnrTe, HocOeuHn B paZdEi OuncaHne Ha ypeHa.
IEJI IN CbIbPZAHNE HA PbKOBOJCTBOTO
IpeHa3HaeHHero Ha Te3n HnctpyKuHn 3a ynoTpe6a e da ce npedocabn Ha onepaTopa aata OCHOBHa HhOpMaHn 3a TexHHueckntexapakreptncn,paobotara n NOKo HA mnnnHATA, pe3epBHTte cactn H ycIOBHnra 3a 6e0nnacOCT.
IpeHnHa H3BbPbBt KaKbHTo H da e DeiHocTH No ypea, KaKTo OnepaTOpHTe, Taka H KBAJIHhHpHaHHr TepcoHaT Tpa6Ba Da IIpoUeTa HNCTpyKINHTe 3a ynoTpe6a. CbPkTe c c HAnata KOMIIAHn B cIyau Ha cMbHeHc OTHO TBJkyBaHcTO Ha HnctpyKINHTe Hn 3a BCsKa DoHbIHHTeJHa HhOpMaHn.
KAKДАСБХРАВATE TEЗИНСТРУКПИЗ 3A VIIOTPEBA
HcpykuHre 3a yHOrpe6a Tp6Ba Da ce cbxpanHBar B 6JHHoCT Jo ypeJa, B IOAnxoHa OHaKOBKa, JaHeu OT TeHocTH H npyH BeueCTBa, KOHTO MORaT da ro NoBpeAaT.
JEKJIAPAUN3A CBJTBECTBNE
IeknapaHn 3a cbOTBcTcTBHe cC npEOCTabra 3aeIO C yctpOHTBOTo H yIOCTOBepRABa, YpeLT B cbOTBcTcTBHe cJeHcTBaHIO TakoHOaTeJIcTBO.

3A6EJE2KKA
KoHHHTa OI opHrHaJa Ha IekJaapaHHTa 3a CbOTBcTcTBnCe cIpeIOCTaBnT 3acHNo cIOkymcHTaunHa ypeJa.
PE3EPBHH YACTH IIOIDPbKKA
BcHKn HcO6xOHNPiOneynpH 3a ecnnoataH, nOpBkKa n pEmoHT np6BaJa cc H3BbPbIBat OT KBAJIHΦHHpaH nepcoHaT, HTH OIO6peH or hauHATA ΦHpMa cepBn3eHneHtp. Morat Ja ce H3IOJ3BAT camo opHHaJIHH HIN OIO6peH pe3epBnH qactH aKcecoapH. B cnyaH na Heo6xOHNMOCT ot pEmoHT HIN nopBka Ha pe3epBnH qactH HIN akcccoapH, MOJI CBpbKeTe ce c Hac
IIPOMEHNIIOJIOBPEHNA
HHe HnpeKbchato IOIO6pBaMe H O6HOBBaMe HaHTe IPOyKT, KaTO KOMHaHHaTc 3aIa3Ba IIpaBTo Da IpoMeH H IOIO6pBa ypcntc, 6c3 da CbOIIaBa 3a TOBA IOJIbIHrCJHo.
OBJACT HA IIPNJIOJKEHNE
IIOIOHCTAOKATA e IpeHa3NaueHa 3a TbproBckn H pomHHJIeHN HjKIN. IIOxOJaIIa e 3a IOHCTBaHe Ha IJIaIKN H TBpIHIOOBN NaTO Tp6BaJa CCnIO3BA O KBAHΦHHpaIO JHIE B 6e3oIacna CpeJa. He e IOXoJIIa 3a H3IOJIbaIe Ha OTKpHTo, BpykNIMM N INrpy6HIOOBH HAcTHIKN.
IIEHTNΦHKAIIHOHHI DAHHI HA YPEJIA
MoIcTbH cepHHH HOMep Ha ypeHa ot6eJ3aHH Ha cTHKeTa bc cepHHH HOMep.
TaaH HhOpmaH e BaxHa. H3no13BaHTe cIeHata Ta6HHa, 3a da 3aHHHeTe HeHTnHkaHooHHte HaHH Ha ypeHa, Te Ie ca Bn Heo6xOHNH npH nopBvKa ha pc3cpBHH qactH.
MOJEI HA MAUHHATA
CEPHEN HOMEP HAMAIHHATA
KPATKO PbKOBOCTBO BbJIAPCKH
PA3OIIAKOBAHE ITPAHCIIOPT
IpnIOCTABkata, yBepete ce, ye OIIAKOBkata H cAMHrtype3 ca 3paBn H HeIOKBTHaTH. AKO yCTAOHBTE HRAKBAH IIETH, HHPOpMpaIte TpaHcnpTtA ra TpEHN da pHeMeTe IOCTABkata, 3a Na CH 3aHa3HTe PpABOTn Ha o6e3IeTEHc 3a IETHTe.
Ipn pa3oIIaKOBaHe Ha ypeHa, cJeBaiTe cTpHKTHO HcHcpykunHe Ha oIIaKOBKaTa.
IpoBepete daJIH cIeHNHe TaCTH da HaJIHcHH B OIIaKOBKaTa.
- TexHHuecka IOKyMeHTaIINH, BKJIIOuBaIIa HNCTpyKIIIN 3a yIOTpe6a H cINCbK Ha aactHTe.
- Komnohctn 3a cbbp3BaHc Ha akyMylatopa.
- PbkoBoCTBO 3a eJKeTPOHIO 3apJHO yCtpoCTBO 3a akmyJAtopa (ako e HnctaJInpaHO) (^*)
BE30IIACHOCT
CneHHTe cHMBOHN IpeyIpeKJaBAt 3a IOTeHuaJHO OAnch ChTyauHH. IpOyeTe Ta3N HOpMaunBHHMaTeIHo H da B3MeTe BCnKN Heo6xOaHMn IpeHa3HH MepKn, 3a 3aunHa Xopata H HmYueCTBOTO.
BUDIMMO3HAUEHNIA
BHHMAHNE!
IpoueTeBHHMaTe.IHO BCHUKN HHeTpkyuHH, IpcHJa H3BbPbHTe KaKbaTo H da c JeHHocT Bbpxyypea.

BHHMAHNE!
He mHnTe ypea c HneKTHa cTpy HJIN BOa Hua HaHaTahe.
BHHMAHNE!
He H3H0.13BaaiTe ypeTa Bbpy HaKIOHN IOBbpxHOCTn, YHHTo IpaIyc HaIBHnaba IooCCHN B cIeHHnKauHHte.
CHMBOJIN, KOINTO CE H3IOJBBAT BHHCTPYKUNITE 3A YNOTPEBA

OIIACHO!
Othacce 3a onachacnhyann, koro moke da npnnnmcmbptta ha onepaTopa.

BHIMAHHE!
Ioka3Ba IotenHuaJIen pnc ot hapaHbAHn.

IPEUYIIPEKJENHE!
PepynpckdHe 3aIOBHHHO BHHMaHHe Hn 3a6eKKa, cBbP3Ha C BaKHH Hn HIOJc3HH fYHKHH.
06bphcTe BHHMaHHe Ha a63aHTe, MapKHpAHn C To3H CHMBOJI.

3ABEJEKKA
Cbtpka cneHnHa HhΦopMaHH, Cbbp3aHa c BaKHH HIIHOJIe3HH ΦyHKHH.

IIPEIIOPBKA
ToBa Ioka3Ba Heo6xoHMoCTTa Ia npOBepHTe HHeTpkyKHHTe 3a ynoTpe6a, npEn Ia H3IbJIHHTe HkOJ npoucdupa.
KPATKO PbKOBOJCTBO bJIIGAPCKH
OBIIHACOKN3ABE3OJIACHOCT
CneHHHn Hnpdynpckcnn H npda3nn Mepkn OTHcno pncKa ot cbcHTya.IHH HapaHbAHHa 3a xopata n IeTn 3a ypcda, KaKTo e yka3ao No-IO.ty.

OIIACHO!
To3n ypeI trpa6Ba Ia ce H3noT3Ba cAmO ot o6yueHH yHbJHOMoHcIyKHTe.H, cbIacHO HAHbTcTBnTa B ToBa pBkoBOAcTBo.
IpeH npOBekJanaeTo Ha KaKaBato H a e npOeJeypa 3a NoOpHeTbae, NOpPbKka, pEmOH Hn H3AmHa, npOeTeBHHMaTcIHBO BCHKHNHCTpyKuHH, yBepctc cc, Yc ypcJBt c H3KIOUcH H3BaIcTe KOHeKTopa Ha akMyJatopa.
He pa6oTeTe cypeBa 6IHH3OCT Do ToKCHHH, OIIaChH, IeCHO Bb3IIJaMeHHMn H/H.IH B3PHBOOIIacHH IIpaXObE, TeHocTH H.II NaHp. YpeBbT He c IIIOxOJIIM 3a cb6Hpae Ha oIIacch IIpax.
He hocete 6hkyta, korato paobHTe B 6JH3OCT no eJeKTPHueCKN KOMnOHeHTN.
He pa6oTeTe Hoi ypeHa, KOrato e HOBdHnHt, OCBen aKo He ce yBepHte, Ye cdo6pe 06c0Hacn.
- Hn H3no13bae Ha o1obHn akmyIaTOpH (c TE4EH EJEKTKPOJHT), HmaTe npEbn, Ye npn HopMaJIHata cn yHotpe6a Tc MoIAT Da H3JbYBaT 3aHaJIHHrTaOBe. ETo 3aIo TpR6Ba Da cc cbXpaHbAr JaIeH or Hckpn, I.IaMbHn, HmHn H 06lbYBaHn BeIecTBa, OCBETHeHH TeJa HTopHH MaTePhA.H.
IIO Bpmc Ha 3apckdHaHc To Ch OIOBHNr AckMy.laOpH (cbIbPkaH N TEUEN EJEKTOJHT)OTc.1nT rA30o6paCH BOIOPO, KoTo MoKe Na IOBeDe Do eKcnIO3H. 3a 3apeKaHero ochrypere npobetpBO npocptpanCTBO, daJeY ot NOTCHHa.ICh OHbH.

BHHMAHNE!
TaH MaHHa c IpeHa3HaCyHa 3a IIPOΦECHOHAJIHa yIIOTp6a, HAnpHmcp B xOte.IH, yHHJHHa, 60IHHH, a p K ,M a r a H H, oHCH nHnHnHnHnHnHe nHaem.
- Ypcntte, octaBCHN 6c3 Hau30p, trpaBa da 6bIaT 06c30nacHH cpeHy HcBOJHO DBJKeHc.
C nI Ia ce npelotbpaTH nepa3peHnO H3no.3BaHe Na ypeA, H3TOuHKbT Ha 3axpaHbae Tp6Ba Ia 6bIe H3KIOUeyH HIN 3aKIOUeyH, HAnpHmep Upe3 OTcTaPbHaBe Ha KIOyA oT OCHOBHH IIpeBkIOYBaTe.I HJIN KIOVHa 3a 3aHaJIbAie.
IpoBepBaHrte ypea BHHMaTeJHO npEn BcKa yHOrp6a.IpeHn H3No.13BaTe ypeHa, yBepTe ce, YC BChKHNOMHOENTN ca 6HIn crIO6eHH IO6pe.Pa3XJa6eHHTe KOMHOENTM Moar Ia IIpruHnrBpeHa Xopa HINmMyUccTBo.
IpeHnHa H3no.13BaTe 3apHnHO yctpoCTBO, yBepere ce, ye cToHocHTe Ha YecToA HnHapEKeHHne, nocOeHH na cTHKcTa c6c cepHHHnHOmCp Ha ypcJa, cbBnAdT C xapaKtcpHcTHKHe Ha cJekTpHuCeckata MpeKa.
Hukora He Mectete ypeia, KaTo To IbpaTe ype3 Ka6eHa Ha 3apAnIOy cTpoiCTBO. He No3BO.TaBaIte 3apeKdAHHRT Ka6e1 Da 6bIc YbpeDen OT 3atBapnH CC BpAH NIN OcTpN p6oBe. He HactbHbaIte Ka6eHa HA 3apAnIOy cTpoiCTBO Cc camHa ypei. Na3eTe Ka6eHa Ha 3apAnIOy cTpoiCTBO DaJeY OT rOpeH NOBpxHOCTH.
He 3apckdaHc 6aTeepHHe, aKo Ka6c.1bT HIn KOeKToPbT Ha 3apHHOy cTpoHCTBO ca HOBpeChn.
3a haama.HTpe hcka or nokap, tokoB ynap Hn npaaHbahe, ce ybepete, ye ypeIbTe nKIOueH, npdHa 10 octabHte 6c3 Ha3Op.
H3noJ3BaIe H cbxpanraBaiTe yctpoiCTBOTo Ha 3akpHTo, B cyxN IomeIIeHHy, ynoTpe6aTa Ha otKpHTo He e pa3peuHa.
Kakto Temepatypata 3a cbxpanenhe, taka n pa60thata temepatypa, trpa6ba Ia 6bIaT mekdy 0^ n 40^, npn B.IaKHOCT Ha Bb3Jyxa B HHTcpBa.Ia 30% -95%
He H3no13BaIte ypea Bbpy hakioeHH NOBbpxHocTH, qHTo rpaIyc HADBHnaba DOHycTHMn c6r.lacho CneuHkauHtC.
Ipn H3noJIbahe npaOta c noHCTBaunn Ippeapatn 3a noOBn HactNJK, cTeJaBte HnctpyKHHTE Ha etHKeHTHe ha 6yTHIKHTc HocCt nIOxOAnuPbKaBUnn H npyTH 3aunTHn Ppncnoc6JeHH.
H3no13BaIte npieocabeHre cypea Hn HocoyHre B yka3aHHra YETKN HnoyHCTBaHn HNOJIOKKn. Yhotpc6bTa Ha npynctkn Hn HooKKn MoKe da Hama.Ih 6c0HacOCTta.
- IIpn HOBbHa IeIeKr ce yBepete, Ye npHnHnata He e nopaH JHHcata Ha HoOpBjka. Ako e Neo6xOHNMO, HOHCKaIrc bIcHCTBHe OYIIbIHOOMoCHN. IInua HIN OTOpH3HpAH CcpBn3HH UcHTPOBC.
KPATKO PbKOBOCTBO BbJIAPCKH
B3eMeTe BcHKn Heo6xOHMn MepKn, 3a Ia HpeIOTbpaHTe 3aHHBaHeto Ha KocA, 6KyTa HIN HHPOKn Apexn B noBHKNTte YactH naypeJa.
He H3H013BaIte ypea B Ooc6cho 3aIIpaIeHH HOMcIeHH.
HeMHrTe ypea c HpeKTHa ctpya BOHa nHaJIraH e HIN Kopo3HBHb BWeIeCTBa.
H36bIbaiTe yIaIbN bpaΦTObcIcJIeTa, TbII KaTo cbIeCTByBa pHcK OT naIaIIH IIpeIMCTH.
He 6bIraTe cIIOBe c TeHIOCTN Bbpy ypea, H3IOJI3BaIe TcBtBTbHTa NoctabKa.
3a Ia H36eHrE He OOBpeHN Ho HactHrkata, He octabnIte YcHKATA / NoocntBaunata HoIOKKa Ja pa60TH, 1OKatoypeTHe Ce ABKN.
BcayaiiHa hokap H3no.13BaIte cyx npaxOB hokaporachte.I.He h3no.13BaIte teHH nokaporachte.II
He cBaJIaIIte H He IIpoMeHJIte CTHKePHTe Ha ypeIa.
He npomchHre 3aunHTHre npncoc6ieHHn Ha mauHHata n cJcBaHre ctpHKTHo HNCTpyKHHTe 3a IIHaHOBA noipbkkna.
BbIe BHHMaTeIHn Iprn TpaHcHOpTHpHa He Ha ype, Korato TemHePaTyPe a cno HyIa. BoDaTa Bpe3epBoapa 3a MpIbCa BOHa H MapKyuHTe MoKe Ia 3amPb3ne, Koeto 6n PnPHHIO cepHOHN IOBpeHn Ha ypeA.
Ako e Heo6xOHa HOpMa Ha cactn, HopbBaIe OPHHAAJIHN pe3epBHH cactn ot oToPn3npaHH nHeTp6yTopn HJIN TBpOBckn IpeIcTaBHTeJH.
Bbphc ypcHa ha ocbNykbuaa Hcepb3, aKHe pa6oTH KaKTo obHKHOeHo, HJH npH cAHO or cIeHHTe 06ctOHTeCTBa: IOBpeHa, ocTabHHe Ha otKpHTo, nJaHae BB BOba.
3a da rapaHTnpate 6c0nacHata H npabHHa pa6ota Ha ypcia, ochIpyeTc H3BbpuBaHcTo Ha IHaHOBO TcXHHcCKO 06cTyKBAhe ot YbTHOMoHEn NepcoHaJ HIn cepBHeH NENTbp B cbOTBeTcTBHe C IIaHOBeTe 3a NoDpBkKa B cBOTBEHTHe pa3JeHn Ha pkoBOAcTBoTO.
- YpeBt Tpr6Ba Ia 6bIe 6paKyBaII npabHIO npaHn Ha.IuHneTo Ha otpoBHn H onaHn MaTePhA.H (akMyJatopn H ap.). Kato Te Tpr6Ba Ia 6bIaT HxBbPJIeHN B CHeHa.IHH DaHcH O npHIOKHMHTe 3aKOHn H paHOpC16N (BHKTe pa3Ie.6paKyBaHc Ha ypcia).
Ta3n MaunHHe c npHa3Ha cHHcHo 3a NoHcTBaHc, He c npocKTHpaHa 3a H3HO3BaHc 3a HHKaKBH npyH HeJH.
BHHH HIOIbpaKaiTe OTbOpHTe YnCTH - 6e3 npax, KocMH BcKaKBH yJHKn TcHa, KOHTo 6hxa MoJIH da HamaJIHT nphtoka Ha B3nyx. He H3noJIbaiTe ypeJa, ako OTbOpHTe ca 3anyWeHH.
- H3no.13baite ypea camo korato e ochnypeho noxdoanooocbetieHne.
To3nypei ne npepna3nayen 3a H3no.3Ba n e0 Hua (BKnHouHTeJHO Jena) c h3nueckn, cien3opnn HIn ymctbeHH yBpcKdAHHH, HIN C HcIOCTaTBCH OHN H3AHHH.
CneHnAo BHHMaHHe e Heo6xoJHMo, KOraTo ce H3No3Ba B 6JH3OcT Jo DeHa.
- Ieuaata Tpna 6buaat Ha6JIOaBaHn, 3a Ja Hc cn HrpaT Cypda.
IIO BpeMe Ha H3NoJ3BaHe Ha ypea BHHMaBaHrTe Da He npHnHrTe HETn HApHaBbHa.
IIOHcTbae H 06cIyKbae He Tp86Ba Da ce N3BbPnBAT OeHa 6e3 NaI3Op.
Onepaopurte np6ba da 6bIaT noXoJHIO HnCTpyKTHpAHn 3a H3noJ3BaHeTo Ha Te3MaHHHH.
KPATKO PbKOBOCTBO BJIIGAPCKN
ONHCAHNE HA YPEDA
YCTPOHCTBO HA YPEIA (kaKTo e yKa3aHo Ha ΦHrypa 1)
1.Дьжka3aупаВленнE
2.Ппспаителенлoct
3. JIoCT 3a peryIIPAhe Ha npbXkata
4. Mapkyu 3a H3ToyBaHc Ha pe3cpBoApa 3a Mpbcha BoJa
5. KaiaKaHa pe3epBoaapa 3a Mpbcha B0da
6. Kanak ha pe3epBoaapa 3a Ynctra BOJa
7. BepnkkKa 3a npnBpKae Ha KaHaKa
8. NaKpaIIHnK Ha MapkyHa 3a IIbIHeHe
9. Pe3epBoap 3a MpbchA BOJa
10. Pc3epBoap 3a noHCTbaII pa3TbOp
11. Byepho KOJIeIO Ha IIaTΦopMaTa C HeTkata
12. IafoMa c TcKa/NoHCTBaIIa NoIOKka
13. Jbpkau Ha YetKa/HoHcTbaHa HIOJIOKka
14. Mapkya npenapat
15. EIEKTPOMaHHTeKJIaIIaH
16. _HJTb 3a pa3TBopa
17. IpeHH KoeJea
18. PeryaTopn Ha HkpaHnka
19. PbKOxBaTka 3a NOBnHahe Ha HApHnKa
20. KomTnKrHa rymen HaKpaHnK
- IaHeJI 3a ynpabJIeHHe
- KyTTha 3a akcecoapn H uactH (^*)
23.Дьрkaн Ha 3axpaHbuaЯ Ka6eI - 3axpaHbIaKabcJI
25.3aHHTENKanKaKaKa3a3apeKJane - CBeTININH INIKaTOPh 3a 3apeKdane
-
IeIa 3a IOBUNHae/CbJIaHE Ha IIATfOpMaTa a) IIOJKeHHe Ha IeJaII npc BcJIaHe IIATfOpMa b) IIOJKeHHe Ha IeJaII npn BdHrHa TlATfOpMa
-
XoIOBOKOJIcIIO
- Mapkyu 3a H3ToUBaHe Ha pe3epBoapa 3a Mpbcha B0da
- KaTak Ha HxOJa
(^*) :IIOH36op
Φnrgypa 1
KPATKO PbKOBOCTBO BJIIGAPCKN
IIAHEJI 3A YIIPABJIEHNE (kaKTo e Ioka3aHn Ha ΦHrypa 2)
- PpeynpeHnTeHna cBeTnHa 3a paepen ankymyIaTop (hepBeHa)
- IpeIyIpeIHTeIIHa cBETIIHb 3a NOpIpyaIpeIeH aKyMyIaTOp (KbJI Ta)
- PpeynpeHnHeHa CBeTInHa 3a 3apeHnAkyMyJatop (3eJeHa)
- Knoa 3a ybcnnaBaHc na cTpyTa
- Hdikatop 3a ctpyta
- KIOU 3a HAMJIBAHe Ha cTpyTa
- KIOH 3a OCBO6KJaBAHe Ha HAKpaHHKa c YcTKA/NOHcTBAHa IIOJIOKKA
- HopmaJIeH MoJeI Ha MoTOp 3a npaxocMykaUka
-
CtraptnpaHc c dHH 6ytoH
40.ИкohOMHueH(ECO)pexHM -
Ta6eTa c6e cepHmHn HmOp/TEXHmueckn npaMeTpH
- LED HnHkaTOp 3a 3apeKdahe -epeBHe
- LED INHINKATOP 3a 3apeKdahe -XbIIT
- LED HNINKaTOp 3a 3apeXdaHe - 3eJH
- Ioka (^*)
- Yerka
47.ДьрkaHаинIOIOKKaTa3aNOHCTBaHc(*)
(^*) :IIO n36op
Φhγρa 2
IIPO3OPEU 3A HHHKACHA 3APJIA (kaKTo e yka3aHo Ha ΦHrypa 2)
- B haHaIoto Ha 3apeKdaHTo YepBeHHr LED HnHKaTOp (42) Ha 3apAHHo Yo cTPOcTBO o6HKHOeHO CBETN. TOBa e IIbPbAta a3a O T 3apeKdaHTo.
- CteH3BecTHIO BpeMe H3apeKJlAHe, HepBeHHrT CBETOHOI (42) H3rAcBa H ce BKIOUBy KbTTHTC BcetoHOI (43), TOBa e BTOPHrT cTAn H3apeKJlAHe.
- CJI KATO 3apeKdAHeTO IpuHKIOH, KbTTHT LED HINKATOP (43) H3racBa H CBeTBA 3eJHHRT (44), KOETO NOKa3Ba, He AkyMylatopBt e HAnBjHO 3apeJeH.

3ABEJE2KKA
Ako no BpeMe Ha 3apeKdaHero KbTTHT LED HnHkaTOp (48) Ha 3apAnHO yctpoietBO npHMrrBa, npHHaTa 3a ToBa MoKe Ia e: AkymyIaTOpBt H 3apAnHO yctpoietBO He ca cbbmecTHMn, akymyIaTOpBt He e CbP3aIIo6pe Hm HMa KbCo cbeHNHeHne.
MnraHcTo Ha cpeBcHH CBeTOIOHO MoKe Ia O3HaHbA BbTpceHNO Kbco CbcHHeHc.
KPATKO PbKOBOCTBO BbJIAPCKH
TEXHNUECKN IAPAMETPN
| LED1 Light is Red | WET BATTERIES |
| LED2 Light is Yellow | DISCOVER EV AGM BATTERIES |
| LED3 Light is Green | GENERAL GEL/AGM BATTERIES |
KPATKOPbKOBOJCTBOBJIIGAPCKH
Mottzka akymyjatopa
- OtBopere KaHaka Ha pe3epBoaap 3a Mpbcha B0da (5, Hrpya 1) He cyhepe, he pe3epBoapbTa 3a Mpbcha B0da (9, Hrpya 1) e npa3cn; B pOHTBcH cIyauT ro H3TOeTe NocpcCTBOM Mapkya 3a H3TOBaHc. (4, Hrpya 1)
- 3aTbOpTe KaIaKa Ha pe3ePBoApa 3a MpbchA BoJa (5, ΦHpya 1).
- OtrpaHrE raphHTpyaHape3epBOapa 3a MpbchaBoa(A,Phrypa 3) BHHMaTeJHO.
- MaHHaTe ce IocTabe KabeH, IOxOJaH 3a MoHTaKa Ha 2 aKymlaTopa IIo 12V. BHHMaTeJHO IocTabe AeKymlaTopHe BOTIOCHNTO, CIOI KOCTO rH HAMcCTe PJIbTHO.
- IpekapaHTe H MOHTpaHTe Ka6eJIHa aKMyJIaTOpHrE, KaKTo e NOKa3aHO Ha (ΦNHypa 3), cJIeI Koero BHHMaTeJHO cTERHeTe raKaTa Ha BCaKa cIIHa OT KJIcMHTe.
- IocTabeTe IpeIina3HaTa KaIaUka Ha BcKa KJIeMa HIOscIe CbByPKeTe KOHeKTopa Ha aKymyIaTopa (B,ΦHrypa 3).
- BHIMATEJIHOIOCTABeO6paTHo rAPHTypaHa Ha pe3epBoapa 3a Mpbca Hbda (A,Phpya 3).
3apekdahe na akymlyaTopa
- 3apeTe akyMnyaTOpHrTe. (BHXTe IpoueyHpTe B pa3JeI IooIpbKa).

IPEyIeKJdHHe!
IpeKbcheTe haHbJHo 3axpaHbaHeto Ha MaHHaTa, npen Da H3IbJIHHe cJeBaUata nponeypa!
HacrpoKn Ha 3apAnHO to yctpoNcTbO 3a akymyJatop
- OtctpaHcTe BnHTOBte (A, B, C, Fmpya 4.1).
- Otrbopete 3apnHTo ycrpoNCTBO HamepeTe sw1 (D, Pnrypa 4.1).
- IocTaBete KIOHOBete KaKTo e NOKa3aHo B Ta6JIuIaTa Ha ΦHypya 4.1.
- 3aBnIe BnHTOBe (A, B, C, ΦHpya 4.1) cJIe I KaTO 3aBbpiHte HAcTPOIIKHe.
Phiypa 4.1
KPATKO PbKOBOCTBO BJIIGAPCKN
IIbJIHEHE HA PE3EPBOAPA C BOJa IJIN IOUHCTBAIH PA3TBOP
- OTbopete KaIaKa Ha otBopa 3a BOJaTa (A, ΦHrypa 7).
- HanbJIHcTe c BOa HJIN pa3TBOp, IOxOJa 3a cbOTBEHTa IOUHCTBaIIa IPOeIpya. TeMnepaTpya Ha pa3TBopa Hc 6nBa Ja haBnHaaba +104°F (+40°C).
3.He npBbBaIte pe3epBoapa, npOBepTe 06ema Ha TeHocTt ape3 HnNkATopa 3a HHBO Ha BoDATA (B,Φnrypa7).
ΦHrvda 7

BHIMAHNE!
H3no3BaIe caMo HocnCTBaHn HpeHapath, KOHO He 06pa3yBaT Hna, He ca Jecno3aHaHHMn H ca Hoxo1nn 3a ABOTMAHTHn ypeHn 3a HocnTBAHe.
CTAPTHPAHE IN CTOIIHPAHE HA MAIHHATA CTapTHPaeHa MaIHHHaTa
- PioIroTBcE ype, KaKTo c OOnHcaHO B IpcXIOHnpa3dcl.
- IpeMeCTe MAHHHATA NO MCTOTO, KOEt IOIe 6bIe IOHnCTBaHO, KATO 6yTate c pblte 3a npkkaTa (I, Hpya 8).
- CbaIcTe HaIOy IIarOphiMaTa c IbPkaHa Ha YETKaTa/HaKpaHHKa (M, Hpya 8) HaKpaHHKa (L), Kato BnHrHeTe PdaJa (K).
- Hattchere KIOHc 3a cTAP (G, FHyra 8). YBepere ce, He 3eJIeHata IIpeIyIpeINTEHa CBeTTHa (C) CBETH (akmyJATOPHTe ca 3apeEH). AKO CE BKNIOHN KbITATA (B) INN UEPBeHATA (A) IpeIyIpEINTEHa CBeTTHa, 3aBBpTe TE KIOHa 3a 3aIIaBAHe OTHOBO (G, FHypa 8) H 3apeTe akMyJATOPHTe (BHXrte CTbIKnRE BpaJe IIOuPbKa).
- HATHCHEIpeBKnOuBaTeHnTe 3a peryHpaHe Ha BOHaTa cTpyr (D, PHyrpa 8), 3a Ja peryHpate KOINueCTBTO cnPMA NOHCTBaHATA IOBbpxIOCT.
- 3aNoOHcTe NoOHCTBaHcTo, Kato 6yTaTc MaHHaTa C pBtca 3a npbXkata (I) n HATnckata PpePnAsHTeJIHHA loct(J).
KPATKO PbKOBOCTBO BbJIAPCKH

3ABEJEKKA
3a I npHbNkHTe MaHHHaTa HAnpe, HATHeTe HIN JEBHn, HIN DecHH npeIa3HTeJHe JIOCT (J, PhHrypa 8), HIN HIBata.
- Ako e Heo6xOdmo, HATCHeTe peryHpaunu JIOCT Ha Ipbkkara (3, ΦIpya 1), 3a Ja npOMEHTe BncoHHara Ha Ipbkkara.
H3KIOUbaHe Ha ypeia
- Cnpete MaunHaTa c NOMOHTa Ha npBkata (I).
- Cnpete yETKHTe H cMykateJIHATA cHcTeMa, KATO H3IOJ3BaTe KIOOa (G). CmykateJIHATA cHcTeMa ce H3KIOOyBa cJeI IRAKOJIko cckyHN.
- IIOBUNHnE HArOp EIIaTbOpMaTa C bIbPkaHa Na HeTKa/NaKpaHHKa (M) H NaKpaHHKa (L), Kato nHaTHcHHe TepaJa (K).
- YBepete ce, Ye ypeIbT He MoKe Ia Ce 3aIBNKn CaMOCToTe.IHO.
PABOTA HA MAIINHATA (IOUHCTBAHE I IOJCYIABAH)
- Ctraptnpaai Te ype da cnopei onHcHHeTo n-o-rope.
- IOKato IIbpxHTe HIBete CH pBHe Ha npBykKaTa, HATHCHe TpeHnA3HTeTINH JIOCT (J, FHTypa 8), npHDBKKeTe MAHHNtata HAnpeH n 3aHNOHEte NOHCTBaHTo/NoCcyuHaBAHTo HA NoJa.

3ABEJE2KKA
3a npabnnoTO noHcTBane/HocybaBa HnHOOBn NOBbpxnoCT B6JH30CT No cTeHN Bn CbBetBaMe da ce np6JHKHTe do cteHaTc dacHata ctpaHa MaMaHHata (A n B, Phhrypa 9), KaKTo e NOKaHa Ho phhrypata.

IIPEUYIPEKJENHE!
3a Ie NOBpeHrTe NOIOBATA NOBbPxHocT, H3KIOoYBaHTe YeHKaTa/NoOHCTBaHcTA NoIOJokKa, KOrato ypeIbT cHpe Ha MHeTo, OOC6eHO KOrATO e BkIoOeHa fYHKmHTA 3a DOnbJIHHTe.IHO HAJIHTAHC.
Φnrgypa 9
H3toaBaHe Ha akymyJatopa IIO BpeMe Ha pa6oTa
Iokato cBtH 3eJeha T npdynpdtJIHa CBTINHa (C, Hpya 8), akmylaTOpHTe ochrypBaT HopMaIHata pa6oHa Ha MaHHaTa. Korato yrache 3eJeha npdynpdtJIHa CBTINHa (C) n CBeTHe KbTTATA npdynpdtJIHa CBTINHa (B), ce npenopbUba da 3apeHte akmylaTOpHTe, 3aIoTO ocTabuHnT 3apIe e IOCTaBueHcAMO 3a HkoJIKO MmHYTH (B 3aBHCHMOCT OT XapakTePncTHKHTe Ha akmylaTOpHTe H3BbPbIIbHaHata pa6oTa). Korato cBtIE ChepeBcHATA npdynpdtCIHa JAmTA (A), akmylaTOpHTe ca Hnblno H3ToiEHH. CneI hkoIko CekyhIn DpbKaYbT Ha Yetkata/NoHCTBaIIaHATA NIOLOKka CE KKHIOvBA ABOTMAHHO.

IPEyIPEKJEHNE!
Hc H3HIO.I3BaIte MaHHHaTc H3TOUeHH aKyMyIaTOPH, 3a Da H36eiHcTe IOBpcHa Ha aKyMyIaTOPHe cKbcHBaHc Ha KHBOTA Hm.
KPATKOPbKOBOCTBOBJIAPCKH
H3TOUBAHE HA PE3EPBOAPITE
A B T O M A T H N H C H N P A T E J H A C H C T E M A C H O I I A B B K (B, F H r y p a 10) 6 J I O K H P A C M Y K A T E J H A T A C H C T E M A, K O R A T O P E 3 E P B O A P B T 3a M P b C H A B D A (C) e I I b J E H. C H N P A H E O H C M Y K A T E J H A T A C H C T E M A c C H R H J H 3 H P A C B H C A H O Y B E L I N H U A B H C H I W M A H A M O T O P A H I I P A X O C M Y K A Y K A T A, A I N O D B A T A I N O B B P X H O C T O C T A B H C N O D C Y I I C H A.

IPEyIpeKJdEHNE!
Ako cmykaTeHaTa ChcTeMa Ce H3KIOH C.IuYauHn (HaunpHmcp, aKO IouIaBBkbT cc 3aIBHHN IIpy P83KO IbHexHe Ha MaIIHHATA), 3a Da IIpoIbIXHTe pa6ota: H3KIOHOTe cmykaTeHaTa ChcTeMa C HAITCKAHe Ha KIOHa (G,ΦHypa 8), cIEI KOeTO OTBOpETe KAnaka (A,ΦHypa 10) H IPOBcPcTe DaIIIN HOIaBBkbT B pChcTKaTA (B) ce e H3paBHN C HHBTo Ha BOJAta. CIEI TOBa 3aTBOpCTe KAnaka (A) H BKIOHETe cmykaTeHaTa ChcTeMa, KaTO HAITHcHete KIOHa (G,ΦHypa 8).
Korato pe3epboapbTa mPbcha B0a (C,Φhrypa 10) ce HnBnHn, H3ToOeTe r, KaTO cIeDbate Te3H cTbHK:
I3To4BaHe Ha pe3epBoapa 3a MpbchA B0da
- N3KJIIOUeTe ypeJa.
- IIobHrHre HArOpE IHaTΦopMaTa cIbPkaHa Ha YeTKaHaHakpaHHKa (M,ΦHrypa 8) H AkpaHHKa (L), KaTo HAHTCHeTe NeJa (K).
- PnBnKTe MaHHHaTa No onpEeChHa Ta 30Ha 3a 6cbYkBaHc.
- H3toHrTepe3epBoaapa 3a Mpbchaa BOHa, Kato H3noBtBe Mapkya (N, Hnrypa 8). CnToBa H3nnakHepepe3epBoaapcC,Hnrypa 10)cHnctaBOHa.
5.CbJIeTe KaIaKa Ha pe3epBoapara 3a MpbchA BoJa (A,ΦHrypa 10) H noHCTeTe KaIaKa H peWetKata c NoIIaBbKa (B) C uHcTa BOJa. - IpoBcpeTe pe3epBoapa 3a Mpbchb B0la (D, Hpypa 10) 3a HATpyBaHHe Ha yKdTeJa HTo NoHCTe.

Фигура 11

IIPEyIYIpeKJEHHe!
Ipn H3ToUBAHc Ha Mpbchata B0a CmyKateJIHHHT MapkyHa IIpaXocMcyKaUkata Tp6Ba Da 6bIe cTbHAT (C, ΦHrypa 11) HocTaBEN B Na-IOIO HOLOJKeHNe (D,ΦHrypa 11), cIe I KOeTO MOKeTe Na OTBOpHTe KAnaka Ha cmyKateJIHHATA Tp6Ba, 3a Na H3ToUHTE BOHATA. He HacOuBaIIte IOJHHN Kpai Ha CmyKateJIHHATA Tp6Ba BEptHKaIIHO KbM cHphiHa. Taka OneparOpBT Ima Na ce HApIbcka.
- H3HbJHeTe cTbIKn O1 Do 4.
H3ToUbaHe Ha pe3epBoapa 3a IOnHcTBaII pa3TBOp/BoJa
- H3npa3HHepe3epBoapa c noHcTbaH npapar npes 0rBopa 3a H3TOBaH (E, FHTypa 11). CTeJ yNtpe6a H3nKaBaiTe pc3epBoapa c HcTa BOJa.
3APEKDAHE HA AKMYJATOPA
IIOITBHTe.IHH npouecdpyh
- OTrbopete KaIaKa (C, FHypa 12) II npOBepTe DaIIH pe3epBoapbT 3a MpbchA B0a (B) e npa3eH, B npotnBeH cIyau Iro H3npa3HeTe C Mapkyua 3a H3ToHbaHe (A).
- BHMMeJIHO IpeMeCteIe raphHTypaHa pe3epBoapa 3a Mpbca Bda (B, Hpypa 12).
- H3K100CTc KOHcKTopa Ha akyMylatopa (D, Pnrypa 12).
KPATKO PbKOBOCTBO BbJIAPCKH
- BHHMaTeJIHOIOCTaBete 6oPaTHO rAPHTypaTa Ha pe3epBoapaa Mpbca Boa(B,ΦHpya12).
- IIpHbHKTe MaHHHata Jo paBHnOBbpxHOCT.
- Hattchete KIOH 3a cTAP (G, FHyrpa 12).
-
Camo 3a akmyjatopn c TEUH EJEKTPOJIHT:
-
IpoBepete HnBoto Ha eKtpoHtta B akyMnaTopHe (F); ako e Heo6xoHMo doJeIte ppe 0rBopHe.
OctabeTe BCnKn KaNaKn OTBOpEHn npn CteBaIIOTo 3apeKdaHe. -
Akoc hco6xOJHMo, nooHCTcTe rohpTa ctpaHa Ha akymyIaToPiTe (F).
-
3apeereakymylatopnre cblnachoeJHHTe CbHK

3A6EJE2KKA
3apcde acMyIatopHre, KOrato cBte HeKbIITATA npdynpnteHa cBtINHa (I, PnIpya 12) Hn HpeBHeNAt npdynpnteHa cBtINHa (H), Hn CJIe Kpa Ha NoocTbaHTo.

IIPEUYIPEKJEHNE!
IopbpaHToHaakymaIatopHr3apeHn yJbJkaBaTexHHKHBOT.

IIPEyIIPKJDEHNE!
Korato 6aTepeHnTe ca pa3peHn, 3apeTe HbB3MoJHO ha-ckopo, Tb KaTO HnAye ce cKbcBa JHBOTbT HM. PpOBCPraBaIte 3apeJeHocCTTa Ha 6aTepeHnTe IOHe BCINhBk CCIMNHO.

BHIMAHHE!
AkymylaTOPHTe c TEUH EJEKTPOJNT OTeJIHT cIIO ekCHIO3HNBEN Ra30o6pa3EN BOIOPOI. 3apejaiTe akymylaTOPHTe B IO6pe IIOBcTpBaIIH CC HOMeIHIN H JaIeIOT OT KPHrOTbH. He IIyIeTe, JOKaTo 3apekdaTe akymylaTOPHTe. IpbKTe KopHyca OTbOpEH, JOKaTo 3apekdaTe akymylaTOPHTe.
KPATKO PbKOBOJCTBO BbJIAPCKH

BHIMAHNE!
Ha6HoaabaIte BHHMaTe.3aapeKaJdAero Ha akMyIaTopHe, Tb Kato MoKe Ja Hma H3THuane Ha cckKpOJIHT. EicKtpOIHTbT B aKMyIaTopHe IpuHnnHbRa KOpOHN. Ako HoHaIHC Bbpxy KoKaTa HIN OHHTe, IpomHnTe 6hHIO C BOHa N CE KOHCITHpAite C Jekap.
3apeKHaHe Ha akyMyIaTopHe c6c 3apnHO yctpoiCTBO, BrpaJeHO MaHHaTa
- CbpycTe Ka6cHa Ha 3apJHOTO yctpoHCTBO (C, Phypa 13) KbM ccktpnueccKa t Mpeka (A), Kato HApjcckHeTo n cctotata Tp6Ba Jca Ca cbMeCTHMn Cbc CTOIOCTHTe 3a 3apJHOTO yctpoHCTBO, Ioka3aHH BbpxY Ta6JIkata Cbc cepHHHOmeP Ha MaHHATA (41, Phypa 2). Korato 3apJHOTO yctpoHCTBO e Cbpl3aNO KbM Mpeka, BcnKHN FyHKINn Ha MaHHATA cc H3KIOHbAT ABOMATHNO. Ako CBETN YepBeHATA IpEynpeHITeJHa CBeTINHa (E) Bbpxy KOHTPOJIHHn HaHeI Ha 3apJHOTO yctpoHCTBO, 3apJHOTO yctpoHCTBO 3apeKJa akyMyIaTOPHe.
- Ako 3eIeHaTnpeDyIpeHITHeJHa JAMnA (D) CBeTHe, akyMyIaTOpHrCe ca HAIbJIHO 3apeHn.
- Korato 3apckjnahto Ha akymyataopa 3abbpHn, H3KIOUcTe Ka6cHa Ha 3apAHHOT yCTpoIcTBO (C) or Mpckata (A) n ro HABHITc OKoIO HerOBHn KOpNc (B).
ΦHryda 13

3ABEJEKKA
3a 101b1HHTeHa HhΦopMaHH OTHoCHO pa6oTAt Ha 3apHHO yctpoiCTBO BHKTe CbOTBeHOTOpbKOBIOCTBO.
CJIJEI YIOTPEBA HA YPEDA
Cneynpnope6a nnpcn da npnepeTe ypea:
1.CBaJIeTeHKeHTe/HoHcTBAaHHTeNoIOJIOKKn.
2. H3roTepeepBoapHe(AH B,Phpya11) cnopeonncnHReB npenHHnnaparpaCtbnK.
3. H3bpiHte ekeHeBHaTa HoIipbKa (BHXe pa3Je IIOIpbKa).
4. Ipnbepe Tyeepa Ha HcTo H cyxO McTo, KaTO PpeBapHTeJIHO BINrHHeTe HIN DeMOHTnPaTe HaKpaHHka C HeTKata/NouHCTBaHaTa IIOIOJKA.
IPOJbJIJKTEJEH IEPNOHa CbXPAHEHNE
Ako He BB3HaMpcBaTe Da H3IOI3BaTe ypeDa B npOJIkeHnC Ha IOBce O 30 dHH, HapPabCTc cIeHTo:
- H3nBHeTe CbHKnHe rO paIe I CieI yIyIorpe6a na ypeA.
- H3KIOHOTe KOHeKTopa Ha akymlaTopa (B, Pnrypa 3).
KPATKO PbKOBOCTBO bJIIGAPCKN
| LED1 Light is Red | WET BATTERIES |
| LED2 Light is Yellow | DISCOVER EV AGM BATTERIES |
| LED3 Light is Green | GENERAL GEL/AGM BATTERIES |
RYCHLA PRIRUCKA CESKY
Vlození baterií
INSTALACE A DEMONTAZ SACI TRYSKY

UPOZORNENI!
| LED1 Light is Red | WET BATTERIES |
| LED2 Light is Yellow | DISCOVER EV AGM BATTERIES |
| LED3 Light is Green | GENERAL GEL/AGM BATTERIES |
TILBEHOR OG VEDLIGEHOLDELS
| LED1 Light is Red | WET BATTERIES |
| LED2 Light is Yellow | DISCOVER EV AGM BATTERIES |
| LED3 Light is Green | GENERAL GEL/AGM BATTERIES |
LYNVEJLEDNING TIL HURTIG OPSTART DANSK
Batteriinstallation
OAHTOE PTHOTPHE EKKINHEEAHNIKA
OAHΓIEΣ XPHΞH

IIPOEIAOIOIHEN!
Eeepka onieia ro uynavnparos npapxov avtokoanrq nvaikideoov liev:
- KINAYNO2!
- IIPOEIAOIOIH2H!
-ПОSOXH!
-2YMBOYAE
Kata vavvwoan autov tov cyxapidio, o xupotnnc npetva npooteia idaitepa ta oubola oe avtc tic ivakidec. Mny kalntare auvc tic ivakidec yia kavva loyokai atkataothe tac aouoc ov nooov qmu.
EAEIXO2/PyOMIeH MIIATAPIAe E KAINOYPIO MHXANHMA

IPOEIAOIOIH2H!
Ta nektpika eapntmuata tou npayavmaotc npopei va exov ovostei oobepes nguee, sav o upatipies iie
dev exov yekataoataei oosra h dey exov svdeo c oosra. O npatapic 0a npia va ykataoataoov mvo
an6 eikouev npoowniko. Pooiote tnaeupvya ts npaketac kai tou vovpatouov
popti n pataiv ovavaloy a teov tono tov npatapiov nov xnpoiopoiovtai (pataipies WET n
GEL/AGM). Eeygte ts pataipae yua tvov nguee npiv ts tonoetnere. Anovodote to bopa ta
mataipac kat to bopa taov popti n pataipac. Xpioterte ts pataipace me ayaln npooyn. Tonoertnate
ta kalmuata npoostiaocov noovodoeovrnnxavma.

\SHMEIΩ∑H
To mynvma xpaia 160 mataipie 12 V,ovoddpueve sOpovva t to diypma (xna 3).

2xμα3
OAHTO2 TPHTOPH2 EKKINH2EAAHNIKA
To mynavma npexetra 6a n o tic napakato aartovpyies:
| LED1 Light is Red | WET BATTERIES |
| LED2 Light is Yellow | DISCOVER EV AGM BATTERIES |
| LED3 Light is Green | GENERAL GEL/AGM BATTERIES |
OAHTO2 TPHTOPH2 EKKINH2EAAHNIKA
INAKA ΠIPOΓPAMMATIΕΜΕΝΥNTHPHΕΗ

PPOOxH!
H diadikacia nov eiva onuioivn u (1) npetv a kteaiitot av to uynavma xnpouonoiitai ia npot qop, mra 9 opc. H diadikacia nov siva onuioivn u (2) npetv va kteaiitai ank kvtpo eovnpittnoic nov eiva eoovioodntuv o anr taepia ma.
| LED1 Light is Red | WET BATTERIES |
| LED2 Light is Yellow | DISCOVER EV AGM BATTERIES |
| LED3 Light is Green | GENERAL GEL/AGM BATTERIES |
JUHENDI EESMÄRK JA SISU
| LED1 Light is Red | WET BATTERIES |
| LED2 Light is Yellow | DISCOVER EV AGM BATTERIES |
| LED3 Light is Green | GENERAL GEL/AGM BATTERIES |
KIRJUHEND EESTI
Akude paigaldamine
| LED1 Light is Red | WET BATTERIES |
| LED2 Light is Yellow | DISCOVER EV AGM BATTERIES |
| LED3 Light is Green | GENERAL GEL/AGM BATTERIES |
PIKAKAYNNISTYSOPAS SUOMI
Akun asennus
| LED1 Light is Red | WET BATTERIES |
| LED2 Light is Yellow | DISCOVER EV AGM BATTERIES |
| LED3 Light is Green | GENERAL GEL/AGM BATTERIES |
GUIDE DE DÉMARRAGE RAPIDE FRANÇAIS
| LED1 Light is Red | WET BATTERIES |
| LED2 Light is Yellow | DISCOVER EV AGM BATTERIES |
| LED3 Light is Green | GENERAL GEL/AGM BATTERIES |
PRIRUCNIK ZA BRZI POCTAK RADA HRVATSKI
Instaliranje akumulatora
- OtvoritePoklopac spremnika za prikupljanje vode (5, slika 1) i uvjerite se da je spremnik za prikupljanje vode (9, slika 1) prazan; aka nije, ispraznite ga crijcvom za ispustanje vode. (4, slika 1)
- ZatvoritePoklopac spremnika za priukuplanje vode (5, sika 1).
- Pažljivo pomicite garniturupremnika za priukuplanje vode (A, slya 3).
- Stroj ima kabele, prikladne za instaliranje dva akumulatora od 12 V. Pazljivo stavite akumulatore u pretinac, zatim ih prvilno instalirajtc.
- Usmjerite i instalirajte kabel akumulatora kako je prikazano (slika 3), zatim pažljivo pritegnite maticu na svakoj stezaljki akumulatora.
- Postavite zašitnu kapicu na svaku stezaljku, zatim spojite priključak akumulatora (B, slika 3).
- Pazljivo vratite garniturupstremnika za priukpljanje vode nazad (A, sika 3).
Punjenje akumulatora
- Napunite akumulatore. (Za postupke vidi poglavlje Održavanje).

OPREZ!
| LED1 Light is Red | WET BATTERIES |
| LED2 Light is Yellow | DISCOVER EV AGM BATTERIES |
| LED3 Light is Green | GENERAL GEL/AGM BATTERIES |
GYORS ÜZEMBE HELYEZÉSI UTMUTATÓ MAGYAR
| LED1 Light is Red | WET BATTERIES |
| LED2 Light is Yellow | DISCOVER EV AGM BATTERIES |
| LED3 Light is Green | GENERAL GEL/AGM BATTERIES |
| LED1 Light is Red | WET BATTERIES |
| LED2 Light is Yellow | DISCOVER EV AGM BATTERIES |
| LED3 Light is Green | GENERAL GEL/AGM BATTERIES |
4 pav.
GREITOJOPALEIDIMO VADOVAS LIETUVISKAI
| LED1 Light is Red | WET BATTERIES |
| LED2 Light is Yellow | DISCOVER EV AGM BATTERIES |
| LED3 Light is Green | GENERAL GEL/AGM BATTERIES |
PAMATA LIETOSANAS INSTRUKCIJA LATVIESU VALODA
Akumulatora uzstadisana
- Atverietrekuperacijas tvertnes vaku (5, 1. attels) un parbaudiet, vai rekuperacijas tvertne (9, 1. attels) ir suksha, pretja gadijumaztuksojiet izmantojot nopuides sluteni. (4, 1.atells)
- Aizveriet rekuperacijas tvertnes parsegu (5.1.atteis).
- Uzmanigi parvietojiet regeneracijas tvertnes komplektu (A, 3. attels).
- Masina tiek piegadata ar kabeliem, kas ir piemeroi divu 12 V akumulatoru uzstadisanai. Uzmanigi ivietojiet akumulatorus nodalijumā, poc tam uzstadict tos parcizi.
- Virziet un uzstadiet akumulatora kabeli, ka paradits (3. attels), pec tam uzmanigi pievelciet uzgriezni uz katra akumulatora terminala.
- Uzlieciet aizsargvacipu uz katram terminalim, pec tam pievienojiet akumulatora savienotaju (B, 3. attels).
- Uzmanigi ieviietojit atpakal regeneracijas tvertnes komplektu (A, 3. attels).
Akumulatora uzlade
| LED1 Light is Red | WET BATTERIES |
| LED2 Light is Yellow | DISCOVER EV AGM BATTERIES |
| LED3 Light is Green | GENERAL GEL/AGM BATTERIES |
SNELSTARTGIDS NEDERLANDS
Accu installeren
TILBEHOR OG VEDLIKEHOLD
TRANSPORT OG UTPAKKING
Ved levering av maskinen, ma det sjekkes at emballasjen og maskinen er hel og uskadet. Hvis det er skader, ma du informere transportoren for du aksepterer varenc, og forbeholde dog retten til erstatting for skaden.
| LED1 Light is Red | WET BATTERIES |
| LED2 Light is Yellow | DISCOVER EV AGM BATTERIES |
| LED3 Light is Green | GENERAL GEL/AGM BATTERIES |
HURTIGSTARTVEILEDNING NORSK
NUMER SERYJNY MASZYNY
SKROCONA INSTRUKCJA URUCHAMIANIA POLSKI
TRANSPORTI ODPAKOWANIE
| LED1 Light is Red | WET BATTERIES |
| LED2 Light is Yellow | DISCOVER EV AGM BATTERIES |
| LED3 Light is Green | GENERAL GEL/AGM BATTERIES |
SKROCONA INSTRUKCJA URUCHAMIANA POLSKI
Montaz akumulatora
INSTALACJA I DEMONTAZ ZESPOLU SSAWY

PRZESTROGA!
| LED1 Light is Red | WET BATTERIES |
| LED2 Light is Yellow | DISCOVER EV AGM BATTERIES |
| LED3 Light is Green | GENERAL GEL/AGM BATTERIES |
GUIA DE INICIO RAPIDO PORTUGUES
| LED1 Light is Red | WET BATTERIES |
| LED2 Light is Yellow | DISCOVER EV AGM BATTERIES |
| LED3 Light is Green | GENERAL GEL/AGM BATTERIES |
GHID PENTRU PORNIRE RAPIDA ROMAN
Instalarea bateriei
PYKOBODCTBOIHOHAYAJV PABOTbI PYCCKN
BBEDEHNE

BHUMAHNE!
Hckotopaa 06aann Hno1po6ha HnfoopmaHHO MaHHHC HxOHT BdaHHoc pykoBOCTBO.
IokaJyHcTa, cm. PYKOBOCTBO IIO HAYAJY PABOTbI Ha IIpHJaeraMOM KOMIIaKT-DnCKe, YHTaEMOM

Adobe Reader.
IIIPMEUAHNE
IIHpBb B cKo6kax OTHcHTc K KOMHOHeITAM, IOKa3aHHbIM B TJIabe OINcaHHe MaHHHbI.
IeJIb PYKOBOJCTBA H COJEPRKAHNE
IeJIbIO DaHHo HnCTpyKuHn IIO IIpHMeHeHHIO ABJITcIpeIOCTaBJIeHHe OIIepATopy BceI OCHOBHO IHΦOpMaHH, CBeDEHHIO TeXHHueckHX XapakTePncHTKkax, 3KCIJIyAtauHH, 6e3JeICTBHIM MaHHHbI, TEXHHueCKOM 6cJIyKHBAHHH, 3aIIaCHbIX YactRX yCJIOBHX 6e3OAnachOCTH H T.I.
PepBbHIOHHeM IO60I pOeIpybHa MaIIHHe OeepaOpBn KBaTHHINHOPOAHHe CNEIHAnCTbIOJHKHb IPOHTaB HNCTpyKHHIO IO pIPMeHEHHO.ObpaaiAITecb B HaIy KOMIIAHIO, B cIyuec COMHeHH, KacaIOHHxC8 TOIKOBAHn HHCTpyKHH IIH 3a IO60I IOIOIIHrTeJIbHO HIIΦopMaIIHe.
KAK XPAHHTb DAHHYIO HNCTPYKIIIO IIO IIPIMEHEHIO
Hcpykui H npHMeHeHHo DoJHKa XpaHHTbcra pIOM C MaHHHO, B pHrOHNOM IuHKe, IOnaJIbIe OT KIIKOCtei H npYHX BeIeCTB, KOtopbc MOrTy Bb3BaTb KaHC-1n6o NOBpcKDeHH.
DEKJIAPAIIHCOOTBETCTBHA
IekJIapauHn COOTBeTCTBn H IpeIOCTaJIHeTc BMeCTe C MaIIHHoH N yIOCTOBepET COOTBeTCTBHe MaIIHHbC DeIcTByIOHMM 3aKOHOJATEJIbCTBOM.

ПИМЕЧАНЕ
KoHHn opHnHa.1a DeK.lapaunu cooTbcTeBn H npocOCTabJIOHTc BmCtce c DOkymeHTaHHei MaHHbI.
AKCECCYAPbI N O6CJyKHBAHNE
Bce Heo6xHMBie npoueIpyb IO KcuiyatauHH, TexHHueKOMy o6cJyKHaHHIO H peMOHTy IIOJIHKBI BIIIOJIHTBCR KBAIHΦHINPOBaHbIM NepcoHAIOM, HIN HA3HaeHHbIM ccpBHCbIM IeITPOM HAIIeKOMHaHH. CteIyET HcHIOJIb3OBaTb TOJIbKO pa3peHHeBIE 3aIhactn H akceccyyapbl.
B cIyue Heo6xOHNMOCTH IOnIyueHHN O6cIyKHBAHN HIN NOKyIKN AkceccyyapOB HIN 3aIacHbX Yactei 6paiaTecb B IeHTp IO 06cIyKBAHHIO KJIHeHTOB HAWei KOMHaHH.
N3MEHEHNE N YJYUSSHENE
MbCTpcMMcKIOCTOaHOMy COBepHHeCTBOBaHHIO CBOe IPOJyKHH, H KOMHaHHo OCTaBBnE3a c60n Ipabo HA H3MeHeHHa yIyUHHeHHMaHHb 6e3 DoHOJIHTeJIbHOrO HhOpMHpOBaHH.
CΦEPA IIPIMHEHENIA
O6OpYIOBAAHHe IOJXODHTIJI KOMMEpuecckoro H IPMbHIeHHORo HCIOJIb3OBaHHa. MaIIHHa IIOXODHTIJI OvHCTKH TJIaIKORHO CIIIOUHOrO IIa, BblIOJIHaEmOI KBaJIHΦIIuHPOBaHHbM paOToHHKOM B 6e3OHaChbIX ycIOBHX. He IOXODHTIJI HcNOJIb3OBaHHa Ha OTKpbITOM BO3DyxC, OUYCTKN KOBoPob HIN rpyoH IOBcpxHocTH IOnla.
IHEHTHΦHKAUHOHHbIE DAHHbIE MAHHbI
CepHHbH HOpem HHa3BaHHe moJeHH MaHHbI 06o3HaueHbHa cepHHHOJ 3THKTeK.
3a HhOpMaHnIone3Ha. HcnoIb3yHte cIeIyOuYIO Ta6IHHy IINrTO, YTO6bl 3aHHcaTb HHeHTHkauHOHHbI daHHbIe MaHHbI, KOrJa IOTpe6byOTc 3aIacHbIe qACTH dJI MaHHbI.
MOJEJIb MAIIHHIbI
CEPIIIBI HOMEP MAIIHHB
PYKOBOJCTBOIHOHAJYPABOTbI PYCCKH
TPAHCIOPTHPOBKA IN PACIAKOBKA
Korla npebo3nKIOCTABJHET MaHHHy, y6eHTecb, qTO yHaKOBka H MaHHHa HeIbe H 6e3 NOBpeKeHH. IIpH o6hApyKeHH KaHX-160 NOBpeKeHH COo6HHTc O6 OTOM npeBO3nKHy, ppeJe Yem PnHHTb TOBap, qTO6bI OCTaBHb 3a cO60 IpaBO HA KOMHeHCAHNO yyep6a.
Ctporo cIe,dyIte HNCTpyKIIHMa yIyakOBKe npH paIaNkOBKe MaIIHHbI.
IpoBepbte ynaKOBky Ha haHnHHe cJeayounx npEIMeTOB:
- TexHHueckKaIOKymeHTaIIH, BKIOUaH NHeTpkyIINIO IINPMcEHIIIO H CnHcOK DeTaeJI.
- KomnoentbI Jua coeHHHeHs 6aTapeH.
- PykoBoCTBO K 0eKToHOMy 3apAnHom yctpoIcTBy 6aTapeN (pH nannn) (^*)
BE30IIACHOCTb
CJeIyIOHne cHMBOJIbO6O3HaJHO IOTeHNHJIbHO OINACHbE cHTyaIHIN. BcerTa BHHMaTeJIbHO HHTaIIte 3Ty HnΦopMaIHNO INpHHMaJIte BCC HcO6XoINMbIC McpbI NpcIOCTOpKHOCTN IIN 3aIHTbI IIOcHn HmYIscTBA. BH3VAJIbHbIE CHMBOJIbI HA MAIIHHE.
BUNIMbIE CHMBOJbI HA MAIIHHE

IIPEUYIPEKJEHNE!
IpeaBbHIOJIeHHem IIO60 OIEpaHn Ha MaIIHHe BIIHMaTeJbHO npOHTaIe BCE HcIcTpyKHH.
IIPDEUYIPEKJDEHNE!
Hc moiTe mauHHy nio npmoH Hn HauhoH cytb.
IPEyIpyEKDEHNE!
He HcnoJIb3yIte MaHHHy Ha cKIOHx C yKIOHOM, IIpeBbIIaIOIH M yKIOH, yKa3aHHbI B pa3IcIe cnEHHΦHKaIIH.
CHMBOJIbI, KOTOPBIE IIOBJIOTcB HNCTPyKIIH IO IIPIMEHEHIO

ONACHOCTb!
3to yka3blyaet na onacnyo cHTyannIO c pnckOM cmeptn IJIOnepeTopa.

IIPEyIIPKJDEHNE!
Oro yka3bIbaet na noTeHHaJIbHyIO onaoHcTB noLyuenn TpaMbI JINJHOeI.

BHHMAHNE!
To yka3bIbaetn npedoctepekeHne HJN 3ameaHne, CBa3HIOe C BaxkbIMn HJN HOJIe3bIMn FyIKHHM.
06paTHTe BHHMaHHe Ha IyHKtbl, 0603HaueHHbIe 3THM CHMBIOm.

IIIPIMEuaHHe
To yka3bIbaet Ha 3ameyHHe, CBA3AHoe c BaKbIMn HIN HOJE3HbIMn FyHKUHMn.

KOHCYJIbTAIIH
30yka3bIbaetna Heo6xOIMocTb 6paHTbcra K HnctpyKnnn no npHmeneHHIO nepa Bblno.1HHem JIO60I npoueHypb.
PYKOBODCTBOIHOHAJYPABOTbI PYCCKH
OBIIHHTPYKUNI NO BE3OINACHOCTN
KoHHKpeTHbIe npdynpckJcHn H npceOcrepcckHn dnn coo6uHn o nTochuaJIbHbIX IOBpeKdHnx IHOaM MauHHbI Noka3aHb HnKe.

OIIACIOCTb!
- JaHHa MaHHa JoJHKa Ockyayatpobatc8 o6yehHbIM H ynoJHOmeHbIM NepcoHaIOM B COOTBeTCTBHH c yKa3aHHMn HactoHICrO pyKOBODCTBa.
- IpeBbHIOJIeHHem IO60I npOeUpyb OOHCTKN, 06cIyKHBANH, peMOHTa HIN 3aMeHb, BHHMaTeJbIO npOHTaHTc BCC HHCTpykUnH, y6CINTcB TOM, 1TO MAUNHa BBIKHOChA HOTCOCHHHTc pa3bcM 6atapch.
He HcnoIb3yIte MaHHHy B6JIH3N TOKCHYbIX, OaChbIX, RopHxH/HJIN B3pBBOOaChbIX IopoIKOB, KHKoCTe HJIN NApob. 3Ta MaHHHa HC HOxOHT JIN C6opa OaChbIX IopoIKOB.
He noche nparoonnoctn BO Bpempaobtbpamc 3JeKtpueckHM KOMHOHHTaMn.
He pa6oTaIe c HODHTO mAMHHH 6c3 ee HAdEKnHO fHKcaHH Ha 3aunTHbIX HoHooKkax. - HnnoIb3oBaHH CBHIOBHX 6aTape, OH MOrTy BByJeHrToRTOOpHr Ra3 Hn HOpMaJIbHOM HCIOJIb3OBAHH. DePKeHc HcKpHHeCCH, BoCIIaMChHIOHHee H N3yHaHOHc MaTePhA.Ib, a TAKKe IpcdMeblocBeHenn H rOpeHH IOdaJIbHe or 6aTapei.
Ipn 3apnKc CBHIOBbIX (KHNKHX) 6aTapei, OHN MOrY T BILCHTB BOIOPOI, KOtOpBI MoKCT Bb3BaTb B3pIB. Bbl IOnIKbI cJIeINTb 3a TeM, YTO6bI oecneHTb xopoIIIO pOBeTpBaemoe 3apnIOe IOMeIIeHHe, BdaHr OT NOTCHINHA.IbHbIX HCTOHHKOB IIAMCHN.

IPEyIPEKJDEHNE!
- MaHHa MaHHa HpCHa3HauCha I.1 KOMMEPUECKOTO HCIOJB3OBAHHA, Hauhmpc, B roctHHuaX, HKOJax, 60.bHHax, Ha 3aBOJax, B mara3HHax, ophiax apeyembIX HOMeueHHx.
MaHHbI, octABicHHbc 6c3 npHcMoTa, Heo6xoJHMo 3aHHTb ot cJyaiHoro HpcdBHKchHn. - TTo6bI H36eKaTb HeaIKHIOHPOBaHHOro HcNoJIb3OBaHH MaHHNbl, HeoXoHMo 0TKJIOHTb HIN 3a6.JKHpOBA Tb HCTOHHK IHTAHH: HApHMcP, BbHyTb KJIouH 3ΓJIaBHO BBkIOHYateJI HIN KJIouY 3aKHRHaHH.
BHHMaTeJIbHO npOBepaHTe MaHHHy npeK KaKJbHM HcNoJIb3OBAHHeM. Y6eHHTec, 1TO Bce KOMHOENTbI npabHbIO c6paHbI hcpd HcIOJB3OBAHHeM. HeipabHbHO 3akpeIIIEHHbc KOMHOHTbIMoYr HaHcETn yIepe6 JIOHM m HmYmectBy.
IepiHcnoJIb3OBAHHem 3apHOro yctpoHCTBa, y6eHtccb, YTO 3NaehnHa cTOTb H HauPckHH, yKa3aHHbc Ha Ta6JHKe C cepHbIM Homepom MaHHbl, coBnaiaot C npamETpamH cETH.
HKKoHa He HepemeeaHte MaHHy, B3BbHc6 3a Ka6eJIb 3apAnHO yctpoHCTBa. He donyckaiTe NOBpeKHeHH Ka6eJIb 3apAnHO yctpoHCTBa B pezIbTaTe 3akpIbTHn JIbEPn HIN KOnTAKTa C oCtPbIMn YrJaMH. He cTabBeMaHHy Ha Ka6c.Ib 3apAnHO yctpoHCTBa. IepKHe Ka6eJIb 3apAnHO yctpoHCTBa HOnA.IbHc ot Haarpctbx NoBepxHocTei.
He 3apKaiiie 6aIapen, cII IN Ka6CbIb H.IIN BnIka 3apAnHO ro yctpoHCTBa IOBpeKJChbl. - HCHKHeHH pHcKa BO3HHKHOBeHHH HOkaPa, HopaKeHH 3JIeKTPueckHM TOKOM HIN TpaBMbl, Hpey yxo10m y6dntccb, ITO MAHHa BbIKHOChHa.
HcnoJb3yIe Hn XpaHHTe MaHHHy B NOMEeHHB cyHX yCIOBHX, He IOnyckaetc HcNoJIb3ObaTb MaHHHy Bne HOMeHCHN.
TeMnepatypa paoenH xpaenHMAHHbIOJHKha 6bTB B npdeJax oT O ^ C no +40^ ,BlaKnoctb Bo3yxa JOKHA 6bTB B npdeJax 30% -95%
He HcnoIb3yIte MaHHHnHa cKIOHax C yKIOHOM, IpeBbHnAIOHM yKIOH, yKaaAHbI B CneuΦHKaHH. - IIpn Hcno.1b30BaHH N 3KCHyataaHH MoIOuHx cpeCTB IIN HoHa, CJeayte HHCTpyKHHMa 3THKcKaX MOIOHx cpeCTB, HadeBaIte 3aunHTbIe nepaTKn HcNo.1b3yTe IpOue 3aunHTbIe ycToHcTaBA.
HcnoJb3yIe HETKn HnIbI,IOCTabIeMbIe C MaHHHOH yKa3aHbIe B pyKOBoCTBe. HcnoJb30BaHHe npYHX IeTOK HnIH IOB MOKeT CHN3HTb 6e3ONaIocTb.
B cIyue HeHcHpaBHOCTMaHHbI, y6eHNTecb, 3TO 3TO HpOeXoHT He H3-3a OTCYrTBEH TeXHHueckoIO 06cIyKbAHII. Ipn Heo6xOHNMOCTn 6paTHTeCb 3a HOMOJIIO K yNOJHOMOeHHOMy IepcoHaJy HJN B abTOPH3OBaHHbI ccpBCHbI uCHTp. - IpiHmTe Bce Heo6xoHMBe Mepe HpeIOCTopOJHOCTN, Yo6b HpeOTBpaHTb HoJaADHe BOIOc, ApaIooHIOCTei H ActCh OicKDbB DBrKyUHCCs TaCTH MaHHbI.
PYKOBODCTBOIHOHAJYPABOTbI PYCCKH
He HcHIOJIb3yIte MaHHHy B cHJIbHO 3aIIbJIeHHbIX Mecrax.
He MoTe MaIIHIIy IIOI npMaOH HIN HAnOpHoi cTpye BOIbI HIN C HcNOJIb3OBAHHem arpeccHBIIbIX BeIeeCTB.
He 3aebBaIe HIOIKH HJIN CTcJIaJHK, Oo6chHTo Tam, IcE cyuHCTBye Tpck HauChHH npCmTeOB.
He npHcIOHnIe EMKocTH c KHKoctbIO K MaIIHHe, HcNo.Ib3yIte COOTBeTcByIOHne DepeKaTeJIH.
- TRO6bI H36cKaTb HOBpeKdEHHH Ho1a, Hc DonyckaiTe pa6Ory IeKTH/H3da, KOrJa MaunHa cToHT Ha MccTe.
B c.tyae nojkapa, hnoJb3yIte cyxoi npoikobbl ornetaeJIb. He nOJb3yIte Jnkne orneryHntJIH.
He ydaHnre Hne HmHenre NaKJeKn MaHHnbl.
He npHTte 3aHHTbIe npHcNocO6JIeHH MaHHbI H TnAteJIbNo cJeYyTe HnCtpyKnHm No IJaHOBy TexHHueCKOMy O6cJyKHBAHIO.
ByIbTe BHHMaTe.IbHbBo BpEmr TpaHcHOpTHPoBKn MaHHbI npH TeMHepeTpy HnKe ToKn 3aMeP3aHH.BoaB 6aKe IJr pR3HO BoIbH b IIaHraX MoKCT 3aMcp3Hyb H cpcbcHIOOBpcdHTb MaHHy.
EcJHKaKHe-JH6o3aIacHbIe YAcTH Heo6xHMo 3aMeHHb,3aKaKHTe OPHINHAJIbHbIE 3aIacHbIe YAcTH B oΦHc HauWei KOMnAHn HIn y yHOJHomOCHHOrO dIcpa.
CooBHTe B cepBHCbH HENTp,ecH MaHHHa He pa6oTaer HcnpaBHo,IOBpeKHeHa,HaxOHNacb Ha oTKpblOM BO3dyxc HJyHa.1a BBOIy.
- 106eueen H npabHbHn H 63oNaChOH 0cknyataHH MaHHbl, HnaHOoe texHueckoe 06cJyKHaHne, yka3aHHoc B COOTBCTCTByIOUciI IABc DaHHoro PyKOBOCTBa, IOJIKHO BBIOIHHTbcra YIOJHOOMOCHBBIM nepcoHa.JOM HIN B ABTOPH3OBAHHom CepBHCHOM IcHTpe.
MaHHa 0JIKHa 6bIb HpaBnIbHO BBHy HaJIHH ToKCHHBx H oIaChbIX MaTePhaIOB (6aTapeH T.I.). IpoJeypa yTHIN3aIHn NoJHKHa npOxHb B COOTBeCTCBH C co CTaHApTaM, TpeSyIOHMn yTHIN3aIHn B cHeHauH3npoBaHHix HeTpax (cm.1abvYTHIN3aIHn).
- Dannn MaHHHa HcNoIb3yETc ToIbKo B KaueCTBe NoJIOMoeyHn MaHHNb H He npEa3NaeHa Jn HcNoJIb3OBAHn B.106bx IpyTHx IIIX.
BcerHa coepKHTe HJIaHn B uHcTote, TIO6bI He 6blIO cHpoTHBteHHN IOTOKy Bo3nyxa. He hno.Ib3yIte MaHHy, CC.Hn OH 3a6Htbl.
- HnnoIb3yIte MaIIHHy ToJIbko npH NaJIeKaIeM ocBeIeHH.
JaHHaMaHHa He npCHa3HaCyHe JIn HcNo.1b30BaHHn JInamn (B Tom YHcIc IctbMn) C orpaHHueckHMn, ceHcopHBmH JIn yMcTeBHeHHbIMn cHoc6HObCTMaHn, JIn cOTcyTcTBHeM onbIta H 3HaHH.
- IIpn Hcno.1b30BaHH MaHHHb praIOM c DeIbMn Heo6xHMo pa6OtaB MaKChMaJIbHo BHHMaTe.IbHO.
- DeTH NO.10KIIbI 6bITb IIO IN PnHCMOTpOM H He NOJIKHI HrpaTb C MaHHIOH.
- IIpu HcHIO.Ib3OBaHHI DaHHo MaHHHbI 6yIbTe BHHMaTeJbHbI, YTO6bl He HaHeCTH Bpc JIOHM HmHMyHecTBy.
OuHCTKa H TexHHueckoe 06cIyKHBaHHe cHJIaMH IIOJB3OBAHn He IOJIKbI BbIIIOJHHTbcr JeTbMn 6e3 IIpHcMoTp a B3pocJbIX.
Onepatopam Heo6xHMO npoTH HauJeKaHH HcTpykTaK No HcNoJIb30BaHHO 3THX MaHHI.
PYKOBOJCTBOIHOHAJYPABOTbI PYCCKH
ONHCAHNE MAHHbI
CTPYKTKYPA MAIIHHbI (KaK IOKa3aHo Ha Pnc.1)
- PyKoRtKa
- Pbyar IIpeekIIOuATEJIg 6e3oIacHocTH
- Pyhar perpyuipOBk pykoTkn
4.ДрснжньиллаHRбakarp3HOBBObI
5.Kpbuika6aka rpa3IOBbI - KpbIIIIka 6aka YHCTOIBoBbI
- ⅢeHbIgKpeHJIeHHKpbHKn
- TopIOBbHa HJIINBHOrO ⅢJHaHra
- BaK rpa3Hoi BO2bl
- Bak pactbopa
- Byepehoe KoIeco HacTHHa ⅢeTKH
- NaTHII IICTKN/IIITaTbHa NoIJIaIKN
- IIeIka/IIITaTHB NOIOKJIaIKN
- IIIaann noaapan pactbopa
- ΜεικτρομαπHηTHbI KJIaIIaH
- ΦHJIbTp pactBopa
- IepeHne kOleca
- Puykncckpe6ka
- RykoTka NOHHTNCKpe6Ka
-
BcacsbAioHnckpe6ok
-
IaHeJIb yIipabJIeHHN
22.Kopo6Ka CBCNOMORAteJIbHbIMHKOMIOHEHTAMH (^*) - ⅢtaTHB Ka6eIg 3JIeKIpOHTaHH
- Ka6cb 3eKtpoHtAnn
- 3aunTHa KaBbHaKa pa3bema 3apJKN
- CHTIaJIbTIbcIaMITbI 3apJIKN
-
IeIaJIb IOIINHrTHOIIyCKaHHHaCTHIIa)IO3nIHNeIaIIH, KOrIa HaCTHIOYHeH b)IO3nIHNeIaIIH, KOrIa HaCTHIO4H
-
CamoOpHeHTnpyIOIeecKoJIeCO
29.Дрэнхньшларбакгрзновьды - KpbIIka cJIINBa
PYKOBODCTBOIHOHAJYPABOTbI PYCCKN
TEXHNUECKNEIAPAMETPbI
| LED1 Light is Red | WET BATTERIES |
| LED2 Light is Yellow | DISCOVER EV AGM BATTERIES |
| LED3 Light is Green | GENERAL GEL/AGM BATTERIES |
PYKOBOICTBO HAOHAJY PABOTbI PYCCKH
Yctanobka 6atapen
- OrkpoIe KpbHky 6aKa Ipr3HO BDObI (5, Pnc. 1) H y6eHITecb, YTO 6aK (9, Pnc. 1) IyctO; B I npOTHBOM cJIyae cJIeIte H3 Hero BOy Ipn NOMOIIc CJHBIoro IIIJAAIra. (4, Pnc. 1)
4.3akpoitte KpbHkky 6aka rpa3HOI BOIbI (5, PnC.1). - Octopokho IepemecHTe y3a ka rpa3HOI BObI (A, Ptc. 3).
6.MaHaOcHaHeKa6eJIaMn,IOxOJHMMnIyCTaHOBKn IByx 12 B 6aTapei. AKKypaTHo BCTaBbTe 6aTapeH BOTcK,3aTEM npabHbHO yCTaHOBHTC HX. - HapabBte H yctaHOHTe Ka6eJIb 6aTapei, KaK Ioka3aHO Ha (PcCyHKe 3), 3aTeM aKKypaTHIO 3aΦHKCHpyHre RaKy HA KaKaJOM BbBOIc 6aTapei.
- Ha KaKbI BbIOI NOMcHTHe 3aIIHTbI KOJIaOyK, 3aTeM IOIOceIHHTe COeIHHTeJIb 6aTapei (B, Ptc. 3).
- Octopokho BepHHe Ha MeTo y3eI 6aKa Ipr83HOBdo (A, PnC.3).
3apka 6aTapeu
- 3apAHTe 6aTapeH. (Cm. npOuEpyb B rIaBe O6cIyKHBaHne).

BHHMAHHe! Ipcjke Yem BbnoJnHrTb cJeDyIOOHy IOpoNcIpy,OTKIOOHTe Bcc HHTaHHe OT MaHHHb!
Hactpoika 3apnHO yctpoictBa 6atapei
- OTKpyTHC BHTbI (A, B, C, PnC. 4.1).
- Orkpoite 3apnHoe yctpoHcBO n HauHnre KOMJIeKr IpeKeJIOHaeJeIe sw1 (D, Pnc. 4.1).
- Hactpoite NepeKIOUaTeJI B COOTBcTcTBHc T SaJIuIeII Ha Pnc. 4.1.
- YcTaHOBHTe BnHTb (A, B, C, PnC. 4.1) HMaTeIO NocJIe 3aBepIeHn HAcTpOKn.
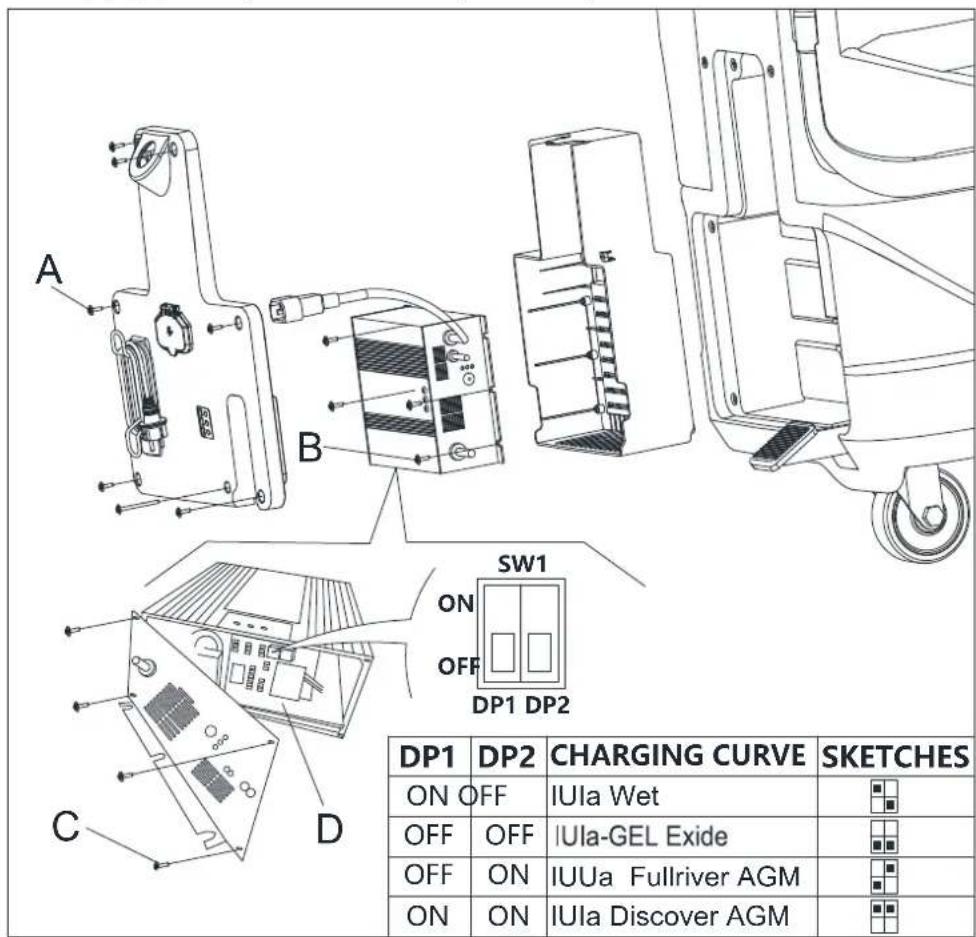
Pnc.4.1
PYKOBOJCTBOIHOHAJYPABOTbI PYCCKH
YCTAHOBKA IN CHI'THE IETKN/IIITATNBA IOJIAJIKN

IIIPIMEQUAHNE
YcTaHOBHTeIeKy(A,PnC.5)HINIOaKaIky(BnC,PnC.5)BCoOTBeTcBHnCTHNOIaIy6OpKn.

BHIMAHHE!
Ipey yctahOBKO HnH ydaJIeHHem IeTK Hn HHTaTHBa IIOKJaIKy6eHTecb, TTO Bce IpeKJIOaTe.Ha MaHHe HaxoTcB B BYKIOueHHOM IOIOKeHH, a BCaBbAIOIH cKe6oK n HAcTHn IeTKH/HTaTHBa IIOKJaIKn IOHNrC IIa. OepaTop IO.TkeH 6bITb OchAHen IOXOIAHHm CpeCTBaMH HnHbNdyAJIbHO 3aHHTb, TakHM KAK HepATKn, YTObIyMeHbHHTb Pnck HeccAAhTx bix c.lyaeb.
BbIIO.IHHTe cIeIyUoiHe:
- BbIKJIIOHITc IIpeKIIIOHATeJIb IHTaIIHr (39, Pnc. 2).
2.ПОДИМНЕпаэтнI,ПЯЖАВпЯпсдь(27,PnC.1). - Pa3MeCTHTe IeTKn (A, PnC. 5) HIN IIIaTHN NOkIaIKn (B, PnC. 5) NoI HaCTHIOm (12, PnC. 1).
- OnyctHe HacTHHa IIeTKHITaTHBbI NOKIAJKN, IAAKAB HA NcJIaJIb (27, PHe. 1).
- Haxmnte Ha nyckoBn npceKnHouaTeIb (39, Pnc. 2).
6.HaKMHe Ha OHH H3 pbHAROB HepeKIOHateJeIe 6eOHaHcOHTn HepeJauH HepeJHero XoJa/TeTOK (2, Pnc.1) TTObI 3aIyCTHTb IETKY/IITaTHB NOKIAJKN, 3aTeM OTNyCTHTe erO. IIpn Heo6XoJHMocTH NoBTOPaHTe IponeTypy IO Tex Nop, NOKa IcTK/HITaTHBbIOKIAJKN HC 3aNcyCTTcR. - Ecln yka3aHHB BbHHe III 6 BbHIOJIHHCTb CIOXHO, BpyHyIO NOBepHHTe IETKY/ITATNB HOKIAIKN B CTOPOHY, HpOTBHIOJOKHyIO HOpMaIbHOMy HAnpaJIeHHO BpaIeHHN, NocJe YeroHX MOKHO ByTc CHTB. (KaK NOKa3AIO Ha PChyHKe 5)


IPEyIpeKdEHHIE!
TTo6b3aHcyHTbIeTKy/IIaTHBIOKIAJKN,HaKMHTcHa pblar IpeKIOHOTc.16eOHaCHOCTN(2,PHC. 1),KOTOpBbIKHOHTMOTOpIeTKH/IIaTHBAIOKIAJKN.
- JIpa36opKn HETK/HTATBn HIOKIAJKN HOHMMTE HaTNI, HAKAB HA HeaJIb (27, Pnc. 1), 3aTeM HAKMITE HepeKIOHateJIb (37, Pnc. 2), IocJe Yero IeTKA/HTATNB NOKIAJKN pa36epetcra.
PYKOBOJCTBOIHOHAJYPABOTbI PYCCKH
YCTAHOBKA H CHRTHE CKPEBKA

BHHMAHNE!
Pekomchnyctcn Hcno.1b30BAtb 3aunHtBHe IepaATKn npn yctahOBKe n cHHTn y3Ja ckpe6Ka, TAK KA KMOYr nonadatbc octpbie ppeMetbl.
- ToJikar MaHHHhy, HpeMeCTHTe ee Ha rOpH3oHrAJIbHHyIO NOBepxHOCTb.
- Y6cHNTCCb, YTO MaIIHHa BbIKIOChHa.
- OIyCTHTHe HAcTHJI IeTKn/IIITaTHBa IIIOKIAIKN (12, Pnc. 1), IOINHb IIeJaJIb (36), IocJIe HeTo IeTeKa 6yIe KacatbScn IOna.
- PacnoJIOKHe CKepe6oKa H erO MeCte MeKdy HacTHIOOM IeTKH IepeDHH KJIeCOM.
- 3aΦHKCHpyIte ITHΦT A B OTBepCTHN B, 3aTe 3aΦHKCHpyIte pyroB BHTC B OTBepCTHN D, 3aKpeHHTe KHOKNy cKpe6Ka H NOKIIHOHTC CINBHON IIaHR 6aka rpr3HO B0bl F K pa3bemy E (Pnc. 6).
- OToeHNITHe ekpe6oK B o6paTiom nOpAKe.
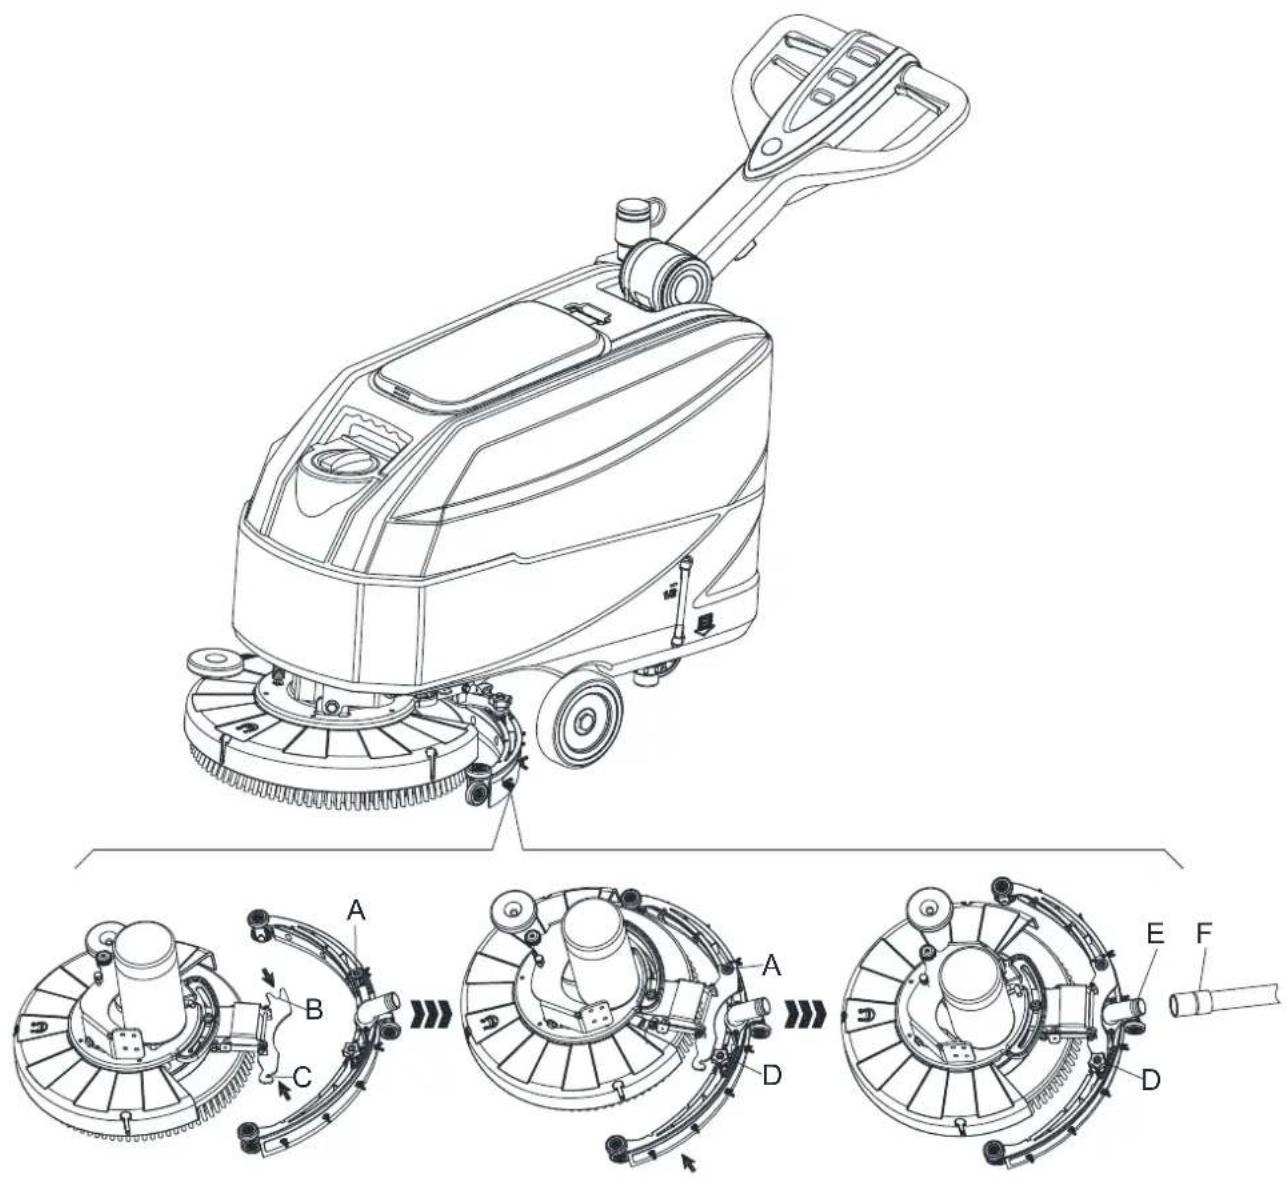
Pnc.6
PYKOBOJCTBOIHOHAJYPABOTbI PYCCKH
3AIIPABKA BAKA IJI PACTBOPA HIN IIPOMbIBOUHOI BOIbI
- OTKpoIe KpbHIIky 3aJIHHBOHO OTBepCTHn IJRA BOIbI (A, Pnc.7).
2.3aONHHCT6ak BOIOH HnIpaCTbOpOM, HOIXOJIIMHM pa6oTB MaIHINHb. TemncpatypacTBopa He noJkHa IpeBmHa+104°F(+40°C).
3.He nepenoiHnIte 6ak, cIeJnte 3a HnIKKATOPOM ypOBH BOJIb (B, PHC.7).
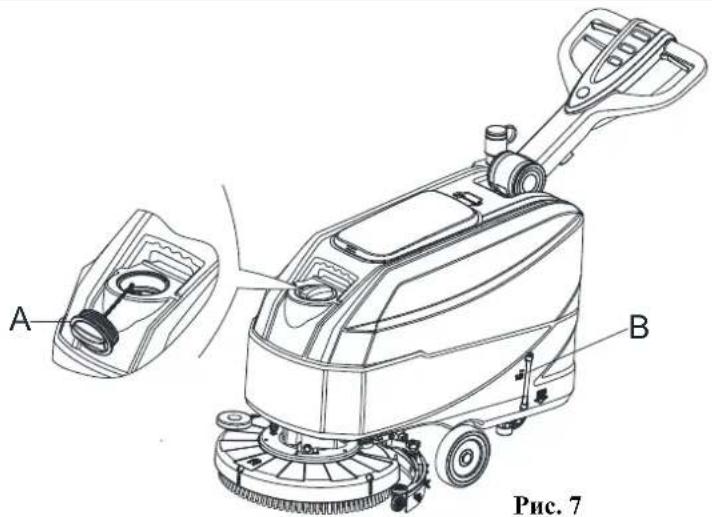
Pnc.7

IIPEUYIPEKJDEHNE!
HcnoIb3yIe To IbKO MAIOHHeHHHeec H HeBOChJaMeHHHOHHHee MoIOUHe cpeCTBa, HpeHa3HaueHHbe JIA ABOTOMaTHueckHX NoJIOMOeYHbIX MaHHII.
3AIIYCK H OCTAHOBKA MAHINHBI
3aynckMaHHbI
- IIOIROTOBbTe MaHHHy, KaK POKa3aHO B IpCebIyIeM NyHKTe.
- IepemecHTe MaHHHn Hn MeCTo y6OpKn, ToJIkAe ee DByMa pyKaAMn nIINOMOHN pyKoRTKn (I, Pnc.8).
- Onyctte hactnI IeTKH/IIaTHBa noKJaIKH (M, Pnc. 8) n ckpe6ok (L), noINHB ncaTb (K).
- HaKMHTe Ha NycKOBoI HepeKIOHOATEJIb (G, PnC. 8). Y6eHITcEb, 70r 3eJHeB IIpeDyHpeNTeJIbHb CBeTOBOI cHHaJI (C) BKIOueH (3apKeHHa 6aTaape). Ecln BkIOUHcIg KeJIbII (B) HIN KpaCHb (A) IIpeDyPiPeNTeJIbHb CBeTOBOI cHHaJI, BbIKIOHTe HepeKIOHOATEJI b HHTAHHg (G, PnC. 8) H 3apAHIte 6aTaape (cm. IpoJeIpy B Iabe ObcJyKBaHne).
- HaKMHe Ha KOHTpoJIbHbIe IpeKIIouaTeIN IOaUN BoIbI (D, PnC. 8), KaK eTO Heo6xoJIMo, B 3aBICMOCTH OT TIna y6OpKn.
- HauHrte y60py, ToHKa MaHHy pykAMn, paHIOKeHHbMn Ha pyKoTke (I), H HAKMaHa pBHaar nepeKnOHTeJ 6c30NaChocTH (J).
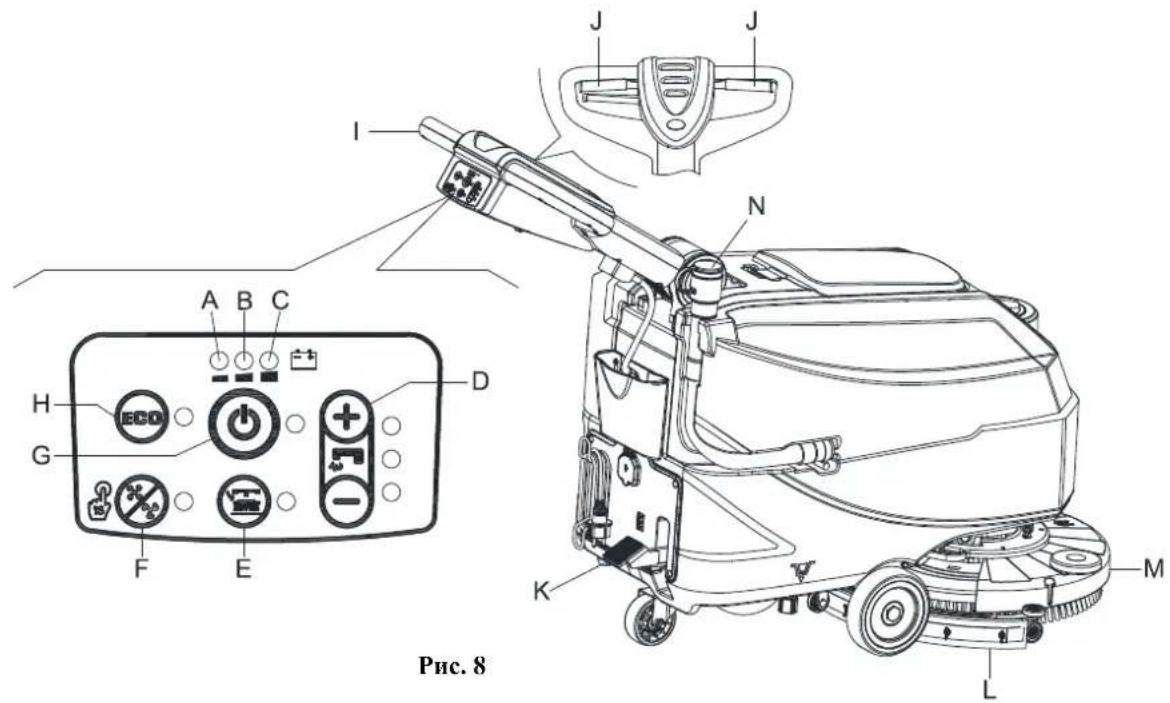
PYKOBOICTBO HAOHAJY PABOTBI PYCCKH

IIPIIMEUAHNE
ДИАВИЗЕНЯ MAIIHнБI BInepeI HAnMHTe JIeBbI HIN IIpaBbI PbUar NepeKIOuYaTe.I6e3OHaNacHoCTH (J, PnC.8) HIN 06a.
- Ipn Heo6xOHNMOCTH HAKMHTe Ha pHyar peryJInpOBKn pyKoRTKn (3, PnC. 1), qTo6bl OtperyIINpoBaTb BHCOTy pyKoRTKn.
OcTaHOBkaMaHHbI
8.OctaHOBHTeMaHHy,HcIOJIb3y pyKOHTy(I).
9. OctaIOBHTe IETKN H BakyymIyIO cHCTeMy, HaaKAB HA IpeKJIIOuATEJIb (G). BakyymIIaer cHCTeMa octaIOBHTcR Yepe3 IIeCKoJIbKO cckyHJ.
10. _O_H_M_T He HactHII HteKHI/HTaTHBa IIOKIAIKN (M) nCKpe6oK (L), HaxkAB Ha IeJaJIb (K).
11. Y6eHITReCb, yTO MaHHa He MOKeT ABHrA TbCB CaMOCTOaTeJIbHO.
PABOTAMAIINHHbI(HNCTKN CYIIKA)
- 3aIyucTHe MaIIHHy, KaK Ioka3aHO B IIpeIbIyIIHx IIyHKTax.
- YdepknBaa 06e pyKn Ha pyKoTKe, HAKMHTe Ha pbyar IpeekJIOaTeJIg 6e3OanocTH (J, Pnc. 8), a 3aTeMaHebpHpyre MaHHHO HauHHTE cKpe6kOM/cyHKy IJIa.

IIPHMEUAHNE
IpaBnHbHO OHcTKN/CyHK HIOOB NO 60kAM OT cTeH, IpeJraeTcH IBHTbcBa Bo3Je cTeH npabOH cToPOHOH MaHHbI (A H B, Pnc.9), KAK NOKa3Ho Ha pChyHke.

BHHMAHNE!
Bo h36ekannn HOBpeKdennn NOBepxHocTH noJa, BbIKIOaHTe IeTK/HoIbI, KOrJa MaHHHa oCTAHABINHbAcTc Ha ODHOM MecTe, OOC6eHHO KOrJa BKNHOeHa yHKHHN DOHOJHHTe.IbHOI IOJIeHH.
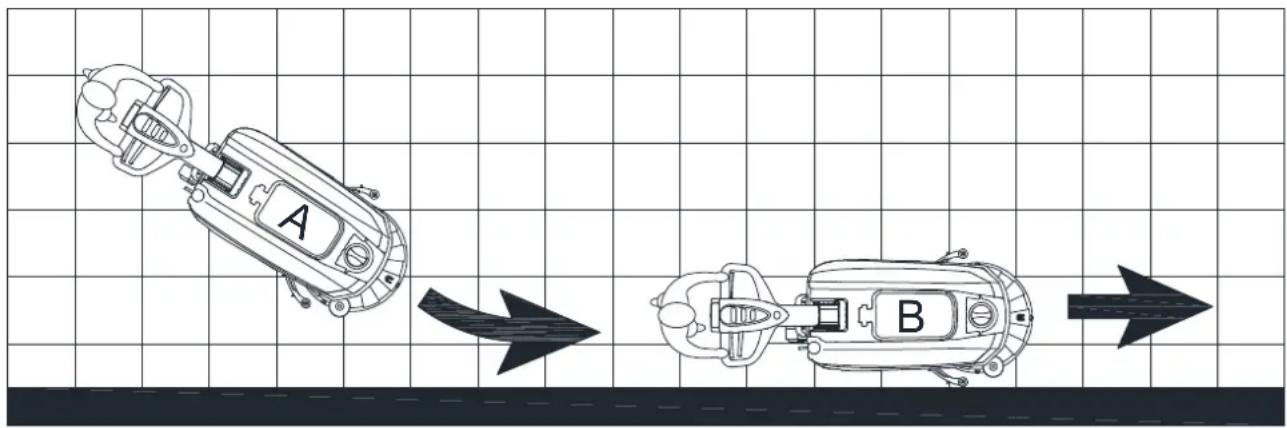
Pnc.9
Batapepa3pa3paKaetcBoBpeMa pa60tbI
Ioka ropt 3eJHb npdynpdeJIbHb cEBTOB cnHaC (C, Pnc. 8), 6aTape n oecneHbaOT HopMaIbHyO pa6Oy MaHHb. Korda 3eJHb npdynpdeJIbHb cEBTOB cnHaC (C) rachet, n 3aRopaetc JKeITb npdynpdeJIbHb cEBTOB cnHaI (B), peKOMeHNyETc 3apdHT b 6aTape n, NOTOM YTO OCTaBIIEc0c 3apra 6aTape n XBaHT BCero HA HeCKoJIbKO MHHyt (B 3aBHCHMOCTN OT xapaKtepnCTHK 6aTape n H BIIIOIIHMeMo pa6Otb). Ecln BKIOVAeTc KpaCIIb npdynpdeJIbHb cEBTOB cnHaI (A), 6aTape n POIHOCTbIO pa3pJxHe. Upe3 HccKOJIbKO ckyHII IIcTKa/IITaTH NIOKIIaIKN ABOTMAITHueckn BblIOHTc.

BHIMAHHE!
He hncnoJb3yIte MaHHy c pa3pJKeHHbIMn 6aTapeMn, TIO6bl npedotBpaHTb HOBpeKdHc 6aTapei n cokpaueHne cpoKa Hx CUYK6bl.
PYKOBOJCTBOIHOHAJYPABOTbI PYCCKH
CJIHB BAKA
IIIOJIABKOBaB CHCTeMa BbIKHOeHHB (B, PcHyHOK 10) 6IIOKHPyET BaKyUIMIyO ChCTeMy, KOrJa 6ak Tp3NIOB OBI (C) IIOJIO. De3aKTHBn3aUNBa KyUynHOI ChCTeMb cHrHaJIN3NPyETc BHe3aINbIM YBeIHueHHem YAcTOTb IIyMa DBrHraTeN BaKyUMHO ChCTeMb, a TaKke He IPOHCXoINT cyuKa IIOJa.

BHIMAHNE!
EcnB BakyyMna CnCTeMa BbIKIOHJAcB cIyuaHNO (HaIphmcp, KOrla IIOJIaBOK 6.10KnpcT H3-3a BHC3aHHO TO DBHKCHMaIIHHb),IIN BO3O6HOBJIeHNpa6TObl: BbIKIOHTe BAKyyMHyO ChCTeMy,HaKaB HA NepeKIOHATEJb (G,Pnc.8),3atem OTkpOIte KpbuKy (A,Pnc.10) n npOBepbTe, TTO NOJIaBOK BHyTpN HOJIaIBKOBoi KaMcpyi (B) OUYCTIHcH HnKe ypOBHn BObl. 3atem ZAkpoITe KpbuKy (A) IN BkIOHTe BAKyyMHyO chCTeMy,HaKaB Ha NepeKIOHateJb (G, Pnc.8).
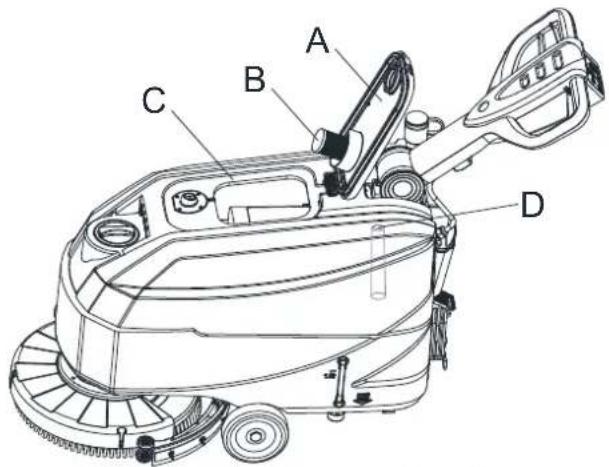
Pnc.10
EeH 6ak rpa3noi BoBt (C, Ptc. 10) 3aoJIHn, cIeHTe H3 Hero Body B cootberctbHn co cIeIyIOe IpoJeIpyoH.
CJHB 6aka yTHJIN3aHH
- OctaHOBHTe MaHHHy.
- IIOHIMHTe HAcTHI IIETKH/IIITaTHBa IIOKIAIKN (M, PHe. 8) nCKpe6ok (L), HaKaBHa IcdaJIb (K).
- ToJka MaHHy, nepMeCTHte ee B onpeJeHHOe MecTo yTHnH3aHH.
- CnreTe BOy H3 6aka rpa3HO B0dy npH HOMOHN HuaHa (N, Pnc.8). 3aTeM pPOMoTe 6ak rpa3HO BOBy (C, Pnc.10) nHcToB BOIOH.
- CHHMHTE KpbIHKy 6aKa rpa3HO B0Bb (A, PnC. 10) H OCHHTe BHYTpEHIO CTOpOHy KpbIHKn H IOJIABKOByo KaMepy fHJIbTpa (B) YNCTOJ BOJOn.
- IpoBepbTe 6ak rpa3HOBdI (D, PHe. 10) Ha HauHnue 3actprBHHX NOCTOPoHHNX ppcIMcTOB INOHTCtE OTOHIX.
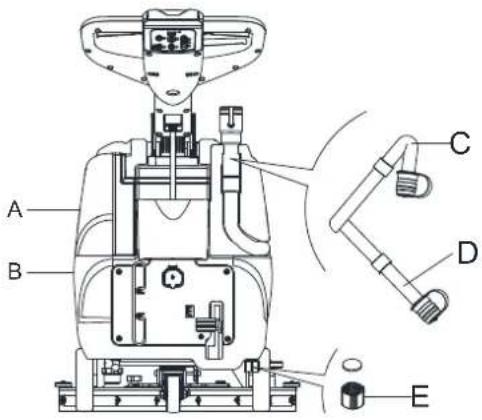
Pnc. 11

BHIMAHNE!
Ipn cInHe rpaHIOB OBO bAkyMna Tpy6ka Ira rpa3HO B0bI IOJKA Hpeekata (C, Pnc. 11) n onyHena B INKnee IIOJKeHne (D, Pnc. 11), 3aTe mOTkpoIte KpbHky BakyMno Tpy6kn Ira rpa3HO B0bln CueHre BOy. He HauPAB.Irae BbXOINoe OTBepCTHe BakyMHO Tpy6kn Ira OTXoIOB BBepx, YTO6blcJIHBaTb BOy BEpTHKaJIbHo. 3To IO3BOJHT H36EkaTb NOnaJaHne OTpa6OtaHHo BObHa Opeapota.
- BbINOJHnTe ⅢaH or 1 do 4.
CJIIB 6aka pactbopa/HTcToI BOJI
- CTeIe BOy H3 6aKa MoIOIeRo cpeCTBa Uepe3 KpbIIky CInBa (E, Pnc. 11). IocJe OkcnIpyaTINn IpomOHTe 6aK NcHcToB OBOJ.
3APRAKBAATAPEI
PpeBapnteJIbIbe npOteIpybI
- OrkpoIe KpbHky (C, Pnc. 12) n y6eHNTEcB, YTO 6aK rpa3HO BdoB (B) Iycr; B IIpoTHBOM cIyuae cJIeHTe H3 Hero BOdy npn NOMOIN CInHBHO rIIaHaA (A).
- OctopokHO npcmecCTHe y3e 6aKa rpaHnBoBb(B, Pnc.12).
- PtoCoeHHHTpe pa3bem 6aTapeH (D, Pnc. 12).
PYKOBOICTBO HAOHAJY PABOTbI PYCCKH
- Octopokho BepHHe Ha MeTo y3eJI 6aKa Ipr3Hoi BoDbl (B, Pnc.12).
- ToJIkaI MaIIHHy, IIepemecHTte ee Ha roPn3OHraJbHyIO IOBepxHOctb.
- Haxmhe Ha NyckoBoi NepeKJIOHaTeIb (G, PnC. 12).
-
TóIbko DnK HNCJIoTHblX 6aTapeii:
-
IpoBepbTe ypoBeH 3eKtpoHnTa BHyTpH 6aTapei (F); pH Heo6xOHNMOCTn NIOJINHTe eRo Ype3 KOJIaauKH.
Octabte KOJIaauKb 6aTapei OTKpbTbIMn IIN cIeNyIOuE 3apAKn. -
Ipn Hc06xoHMOCTHOHCTHTe BcpxHIO IOBcpxHOCt batapn (F).
-
3apnnte 6atapen B cootbetcBHH co cIeIyIOe I poneIpyoH.
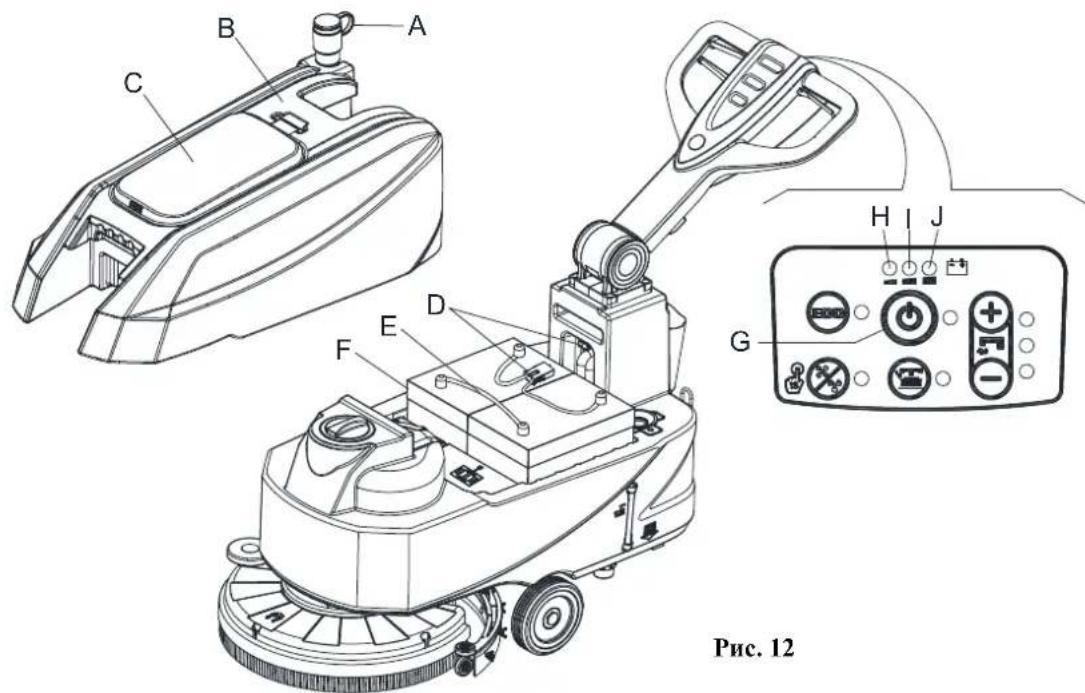
Pnc.12

ПРИМЕЧАНЕ
3apntc 6aapcn, cnn 3aropcn.1n Jeitb (I, Pnc. 12) nKpaehn npdynpntc.bhni CBeTOBoi cnHn (H), nHn noee 3abepmenny y60pn.

BHIMAHHE!
IopepkaHne 6aTapeB 3apxkeHHOM coctoHHyBEHNHBAe Hx cpoK cyjkb.

BHIMAHHE!
EcH 6aTapeH pa3pKaHe, KaK MoKHO cKopee 3apHInTe Hx, HocKo.1bKy TaKoe coCTOHHc cOKpaHaer cpoK cyK6b6aTapei. IIpOBCPHTe 3apH 6aTapeH He pCKe OJHO pAa B HcEJIHO.

IPEyIPEKJEHNE!
Ipn 3apnke KHKX 6bape BblneHcraepeBbuaa H B3pbboonacn b01opocoepekaanr a3. 3apkaHc 6bapcn B xopoio npobctpmbacMbix H omcechnx H bdaJH OT hctouHHKOB otKpbToro nlaMeHH. He kypTe BO BpeMa 3apKn 6bapei. OctabJHte 6ak otKpbItbIM BO BpeMa 3apKn 6bapei.
PYKOBOICTBO HAOHAJY PABOTBI PYCCKH

IIPDEUYIPKJEHNE!
Byte oueB bHMaTeIbIbI np3apKe 6aTapei, NocKoJIbKy H3 6atapen MoKet BblTeKaTb KHKoCTb. XKIOcTB B 6atapexx Bb3bIbAcT Kopp3HIO. Pp HnHaDaHHN KHKoCTH Ha KOy HIN B IHa3a TuaTeCbHO IpomoiTe BOIo H o6paHTecb 3a MeHHHHckOII HOMOIBIO.
3apka 6aapeepn npy yctahOBKe 3apHOrO yctpoIcTba Ha MaHHHe
- IIOKIIIOHTe Ka6cB 3apAHO yCTPOICTBa 6aTapeH (C, PHC. 13) K OJIeKTPOcTH (A); HApJXeHHc H aactota cctH IOJKHb 6bTT bCOBMeCTHMb co 3HaHeHHMn 3apAHO yCTPOIcTBa 6aTapeH, yKa3aHHbIMn Ha Ta5JIHcKe C cepHHbIM HomepOM MaHHbI (41, PHC. 2). KorJa 3apAIOHc yCTPOIcTBo 6aTapeH NOIKIOHcNO OJIeKTPOcTH, Bce FyHKINN MaHHbI ABTomATHueCKN OTKJIOaOTcE. Eun Ha NaHeHn YnpABHeHH 3apAHO yCTPOIcTBa RopHT KpaCHbI IIpeaypeHtJIbHbI CBEROBH CNIHAI (E), 3apAIOoe yCTPOIcTBO 3apJXaET 6aTapeH.
- BKIOHHeHne 3eIeHOro IpeyIpeIteIbHorO CBETOBORO cHaJa (D) O3HaHaTe, YTO 3apJaKa 6aTapeN 3aBepiHa.
- IocIe 3aBepHHeHHaapn6aTpeHOTcoeHHHTe Ka6cIb 3apnHO YoCTBa 6atapeH (C)ot 3eKtpocetn (A) H o6MotaTe erO BOKpyr Kopnyca (B).
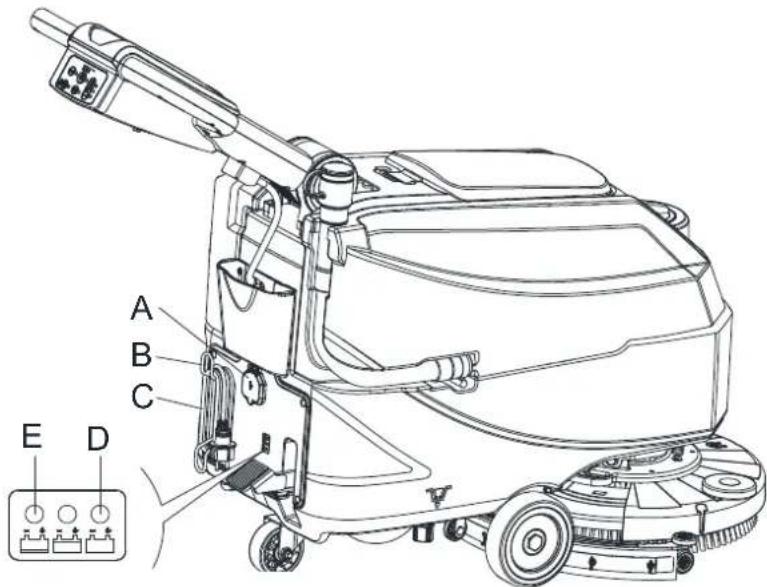
Pnc.13

IIPIMEUAHNE
IIOIyHenn 6oIe e IIOpOhoII HhOpMaHH O pa6ote 3apAHOro yctpoiCTBa 06paHTecb K COOTBeTcTBYIOHemy pyKOBOCTBy.
IIOCJIIEHCIOJIb3OBAHNA MAIIINHbI
IocE KcJIpyaTIN, npcJ ocTabJeHem MaHHbI:
- H3BJIeKHeIeTKn/IIITaTHBbI NOKJIaIKN.
2.CneIte BOy H3 6aKOB (A H B, PnC.11), KaK IokaHb B npEybUyIeM IyHKTe. - BbHnHHTe ekeHHeBhIe IpoueIpybI o6cJyKHaHH (cm. Taby «TexHmueckoe 06cJyKHaHHe»).
- XpaHHTe MaHHHy B YHCTOM H cyXOM MecTe, C IIOHHTbIMH HIN H3BJeEHbIMH IIETKaMH/IIITaTHBaMn IIOKJIaIKN H CKpe6KaMn.
JOJARBE3DEAETJBHOCTbMAHHbI
EeH MAnHHa He 6yET HcIOJIb3OBaTbCra OJIbIe, Yem 30 IHeB, BbIIOITHTre cJeJyIOIIee:
- BbnoHHTE npoeDpyb, yka3aHHbc B nyHKTe «IOcne HcnoJIb3OBAHHMaIIHHbIb
- OToeDHHHTpe pa3bEm 6aTapEn (B, PnC.3).
PYKOBODCTBOIHOHAJYPABOTbI PYCCKH
IEPBbI IEPNOIHCIOJIb3OBAHNA
IocJIe IepBbIX 8acOB, IIPOBepBte KpeIIeKbIe H coeIHHTeJIbHbIe DetAH JIA HeKHOI H IIPOBepBte BnHMbIE HaOTcyTCTBHe H3IOca H yTeKN.
TEXHNUECKOE OBCJIVKINBAHNE

IIPEyIIPKJEHNE!
IIPEIYIPEKJEHNE! IpOueIpybI TexHHueckoro 06cIyKHBaHHIOJIKbI BbHOINHTbcn HocJIe BbIKHOChHHMaHHbI N Ka6eIb 3apHOro yctpoHCTBa IOnJKeH 6bITb OTCoeHNHe. KpOme TOrO, 06H3ATc.IbHO 03HaKOMbTcBc C IABOII NO TexHHKE 6c30NaHcHcTH B IaHHOM pyKOBOCTBC.
Bce 3aIIaHnPOBaHHbc HIN Upe3BbUaHbI IpoueDpybI TxHHueCKOro O6cJyKbAHHIOJHKbI BbIOJIHTbcra KBAIHΦHnHOBAHHbIM
IepcoHaIOM HIN ABTOH3OBaHHbIM cepBCHbIM ueHTpOM. 3To pyKOoCTBO OINCbIAe TOLbKO OCHOBHe i 06ihe IpoueDpybI
06cJyKbAHHn.
TABJIINIIA IIIAHOBOTO TEXHNUECKORO OBCJYKIBAHNIA

BHIMAHNE!
IpoeHpya,OTmeHHnA(1)IOJKA6bITBbIIHO.IHeHa,KoTJaMaIHnHa HcNo.b3yETc HocJIe 9 YacOB B IepBbI pa3. IpOueHpya c HometKoI (2)IOJKA6bITBbIIHO.HcHa CcpBHCbIM HeHTpOM, KOTOpbI KBA.IHfHnnpobAH Haiei KOMnHne.
| LED1 Light is Red | WET BATTERIES |
| LED2 Light is Yellow | DISCOVER EV AGM BATTERIES |
| LED3 Light is Green | GENERAL GEL/AGM BATTERIES |
PRIRUCKA SO STRUCNYM NAVODOM SLOVENSKY
Instalácia batérié
- Otvorte vrchnak nadrze na spinavu vodu (5, obrzok 1) a skontrolujte, ci je nadrz (9, obrzok 1) prazdna; ak nie, vyprzdnite jus pomocou odtokovej hadice. (4, obrzok 1)
- Zatvorte vrchnak nadrze na špinavu vodu (5, obrzok 1).
- Opatrne posunte nadrz na spinavu vodu (A, obrazok 3).
- Stroj je vybavený káblami vchodnými na nainstalovanie 2 x 12 V bateri. Opatrne vlozte batérié do priehradky, potom ich riadne nainstalujtc.
- Vedte a pripevnite kabel baterie tak, ako je to na (Obr. 3), potom poriadne zatiahnite maticu na kaizdej svorke baterie.
- Na kazdu svorku umiestnite ochranny vrchnacik, potom pripojte konektor baterie (B, obrazok 3).
- Opatne vratte nadrz na spinavu vodu na svoje miesto (A, obrazok 3).
Nabijanicbaterii
- Nabite batarie. (Pozrite si postupy v kapitole Udrzba).

UPOZORNENIE!
Pred vykonanim nasledujuceho postupu odpoje vsetko napajanie stroja!
Nastavenie nabijačky baterić
- Odstrante skrutky (A, B, C, obrazok 4.1).
- Otvortc nabijaacku a najdite sw1 (D, obrazok 4.1).
- Nastavte spinače tak, ako to uvadza tabufka 4.1.
- Namontujte skrutky (A, B, C, obrazok 4.1).
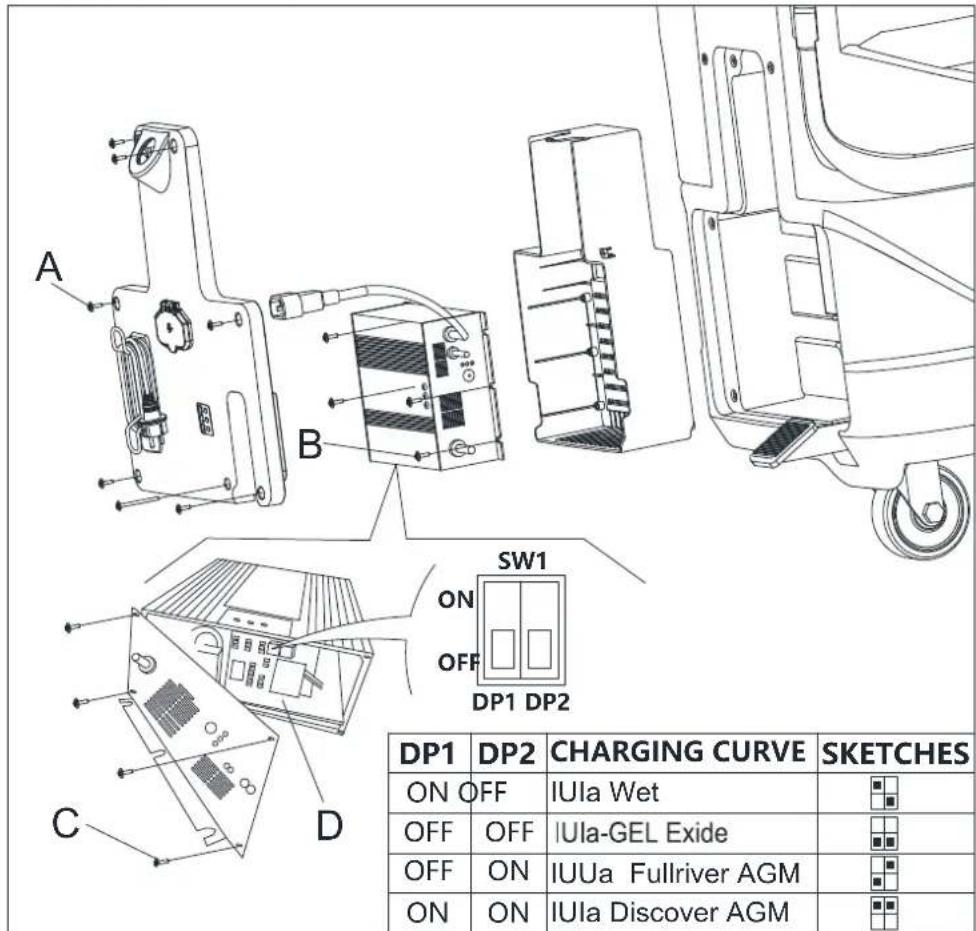
Obr. 4.1
PRIRUCKA SO STRUCNYM NAVODOM SLOVENSKY
MONTAZ A DEMONTAZ KEFY/DRZIAKA MOPU

POZNÁMKA
AK JE STROJ DLHO NECINNY
| LED1 Light is Red | WET BATTERIES |
| LED2 Light is Yellow | DISCOVER EV AGM BATTERIES |
| LED3 Light is Green | GENERAL GEL/AGM BATTERIES |
HITRI VODIC SLOVENSCINA
GUIDENS SYFTE OCH INNEHÄLL
FÖRÄNRING OCH FÖRBAATTRING
| LED1 Light is Red | WET BATTERIES |
| LED2 Light is Yellow | DISCOVER EV AGM BATTERIES |
| LED3 Light is Green | GENERAL GEL/AGM BATTERIES |
SNABBSTARTSGUIDESVENSK
Installation ay batteri
Batarya türüne (ISLAK veya JEL/AGM)进展情况 - Batarya's progress in the development of a new technology - Batarya's success in the development of a new technology - Batarya's success in the development of a new technology
Makine ayari
Tek dugmeli Baslatma S3 kapatildignda, su haymi + ve - dugmelerine (S5 ve S6) ayntanda basin, 0,5 saniye sonra LED1, LED2 ve LED3'un hepsi batarya modu ayarina giris icin yanar:
- Ardindan "ISLAK", "JEL/AMG" ve "DIS-EV"arasinda gecis yapmak icin su hacmi + veya - tusuna basin. "ISLAK" modunda, Kirmizi isik yanar. Ve "JEL/AGM", yesil isik yanar. "DIS-EV", sari isik yanar.
- Ayari ve cikisi bitirmek icin Tek diugmeli Baslat ogesine basin, tum batarya ayarlarim saklamak ve guncellemek icin makinyi kapatin; acildiginda ayarlandigi sekilde calisacaktir.

NOT
Varsaylan batarya turi JEL/AGM'dir.

| LED1 Light is Red | WET BATTERIES |
| LED2 Light is Yellow | DISCOVER EV AGM BATTERIES |
| LED3 Light is Green | GENERAL GEL/AGM BATTERIES |
Sekil 4
HIZLI BÁSLANGIC KILAVUZU TÜRKÇE
Batarya kurulumu
Viper Cleaning Equipment Co. Ltd.
Viper Industrial Estate
Liangbian, Liaobu,
Dongguan, Guangdong