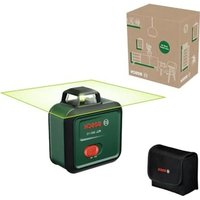
GIC 12V-5-27 C Professional - Measuring equipment BOSCH - Free user manual and instructions
Find the device manual for free GIC 12V-5-27 C Professional BOSCH in PDF.
| Product type | Digital inspection camera |
| Brand | Bosch |
| Model | GIC 12V-5-27 C Professional |
| Dimensions (L × W × H) | 242 × 140 × 66 mm |
| Weight (with battery) | 0.73–0.94 kg |
| Weight (with batteries) | 0.68 kg |
| Power source | Rechargeable Li-Ion battery 10.8/12 V, or 4 AA batteries (alkaline or NiMH) via adapter |
| Runtime (Li-Ion 2.0 Ah battery) | Approx. 6 hours |
| Runtime (alkaline batteries) | Approx. 2 hours |
| Runtime (NiMH 1.2 V batteries) | Approx. 3 hours |
| Display | 5 inches, 1280 × 720 px resolution |
| Camera resolution | 1280 × 720 px |
| Camera head diameter | 8.3 mm |
| Flexible cable length | 1.5 m |
| Min. bending radius | 25 mm |
| Protection rating (housing) | IP54 |
| Protection rating (head and cable) | IP67 |
| Image format | JPG |
| Video format | AVI |
| Internal memory | Up to 30 images (no video) |
| Removable storage | micro SD card |
| Button cell (clock backup) | CR2450, service life approx. 3 years |
| Operating temperature | -10 to +50 °C |
| Supplied accessories | USB Type-C cable, micro SD card, battery adapter, mirror, magnet, hook |
Frequently Asked Questions - GIC 12V-5-27 C Professional BOSCH
User questions about GIC 12V-5-27 C Professional BOSCH
0 question about this device. Answer the ones you know or ask your own.
Ask a new question about this device
Download the instructions for your Measuring equipment in PDF format for free! Find your manual GIC 12V-5-27 C Professional - BOSCH and take your electronic device back in hand. On this page are published all the documents necessary for the use of your device. GIC 12V-5-27 C Professional by BOSCH.
USER MANUAL GIC 12V-5-27 C Professional BOSCH
GIC 12V-5-27 C Professional
Robert Bosch Power Tools GmbH
70538 Stuttgart
GERMANY
www.bosch-pt.com
1609 92A 89L (2023.03) T/464

natural_image
3D rendered image of a handheld device with no visible text or symbolsnatural_image
Close-up view of a circular mechanical component with a central hole and two small camera icons on top (no text or symbols visible)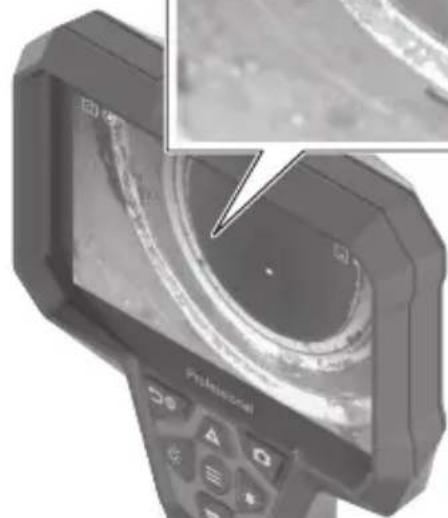
natural_image
Close-up of a medical imaging device with a close-up inset showing internal tissue (no visible text or symbols)(13)
5
6
1 609 92A 89L | (17.03.2023) Bosch Power Tools
Bosch Power Tools 1 609 92A 89L | (17.03.2023)
Deutsch
Sicherheitshinweise

www.bosch-pt.com/serviceaddresses
Transport
All instructions must be read and observed. The safeguards integrated into the inspection camera may be compromised if the inspection camera is not used in accordance with these instructions. STORE THESE INSTRUCTIONS IN A SAFE PLACE.
▶ Have the inspection camera repaired only by a qualified repair person and only using identical replacement parts. This will ensure that the safety of the inspection camera is maintained.
▶ Do not operate the inspection camera in explosive atmospheres, such as in the presence of flammable liquids, gases or dusts. Sparks can be created in the inspection camera which may ignite the dust or fumes.
24 | English
▶ Remove the rechargeable battery from the inspection camera before carrying out any work on the inspection camera (e.g. assembly, maintenance, etc.) as well as when transporting and storing the inspection camera.
▶ Remove the batteries from the inspection camera when not using it for longer periods. The batteries can corrode and self-discharge during prolonged storage.
▶ Do not direct the light beam at persons or animals and do not stare into the light beam yourself (even from a distance).
▶ Check the work area before using the inspection camera. No part of the inspection camera may come into contact with electrical cables, moving parts or chemical substances. Interrupt the electric circuit of electrical cables running through the work area. These measures reduce the risk of explosions, electric shock and damage to property.
▶ Wear appropriate personal protective equipment like protective goggles, protective gloves or a protective mask, if there are substances harmful to health in the work area. Sewers or similar areas can contain solid, liquid or gaseous substances that are poisonous, infectious, corrosive or otherwise harmful to health.
▶ Pay particular attention to cleanliness if you work in areas with substances harmful to health. Do not eat during work. Avoid contact with substances harmful to health, and clean hands and other body parts that could have come into contact with them with hot soapy water after work. This reduces the danger to health.
▶ Do not stand in water if you are using the inspection camera. Working in water poses a risk of electric shock.
▶ Do not open the battery. There is a risk of short-circuiting.
In case of damage and improper use of the battery, vapours may be emitted. The battery can set alight or explode. Ensure the area is well ventilated and seek medical attention should you experience any adverse effects. The vapours may irritate the respiratory system.
If used incorrectly or if the battery is damaged, flammable liquid may be ejected from the battery. Contact with this liquid should be avoided. If contact accidentally occurs, rinse off with water. If the liquid comes into contact with your eyes, seek additional medical attention. Liquid ejected from the battery may cause irritation or burns.
The battery can be damaged by pointed objects such as nails or screwdrivers or by force applied externally. An internal short circuit may occur, causing the battery to burn, smoke, explode or overheat.
When the battery is not in use, keep it away from paper clips, coins, keys, nails, screws or other small metal objects that could make a connection from one ter-
minal to another. A short circuit between the battery terminals may cause burns or a fire.
▶ Only use the battery with products from the manufacturer. This is the only way in which you can protect the battery against dangerous overload.
▶ Only charge the batteries using chargers recommended by the manufacturer. A charger that is suitable for one type of battery may pose a fire risk when used with a different battery.

Protect the battery against heat, e.g. against continuous intense sunlight, fire, dirt, water and moisture. There is a risk of explosion and short-circuiting.


WARNING


Ensure that the coin cell is kept out of the reach of children. Coin cells are dangerous.
▶ Coin cells must never be swallowed or inserted into any other part of the body. If you suspect that someone has swallowed a coin cell or that a coin cell has entered the body in another way, seek medical attention immediately. Swallowing coin cells can result in severe internal burns and death within 2 hours.
Keep the magnetic accessories away from implants and other medical devices, e.g. pacemakers or insulin pumps. The magnets in the accessories generate a field that can impair the function of implants and medical devices.
- Keep the magnetic accessories away from magnetic data storage media and magnetically-sensitive devices. The effect of the magnets in the accessories can lead to irreversible data loss.
Product Description and Specifications
Please observe the illustrations at the beginning of this operating manual.
Intended Use
The digital inspection camera is suitable for inspecting areas that are dark or difficult to access. It is also suitable for moving and removing small and light objects (e.g. small screws) after fitting the supplied accessories on the camera head.
26 | English
The digital inspection camera must not be used for medical purposes. It is likewise not intended for removing pipe blockages or installing cables.
Product Features
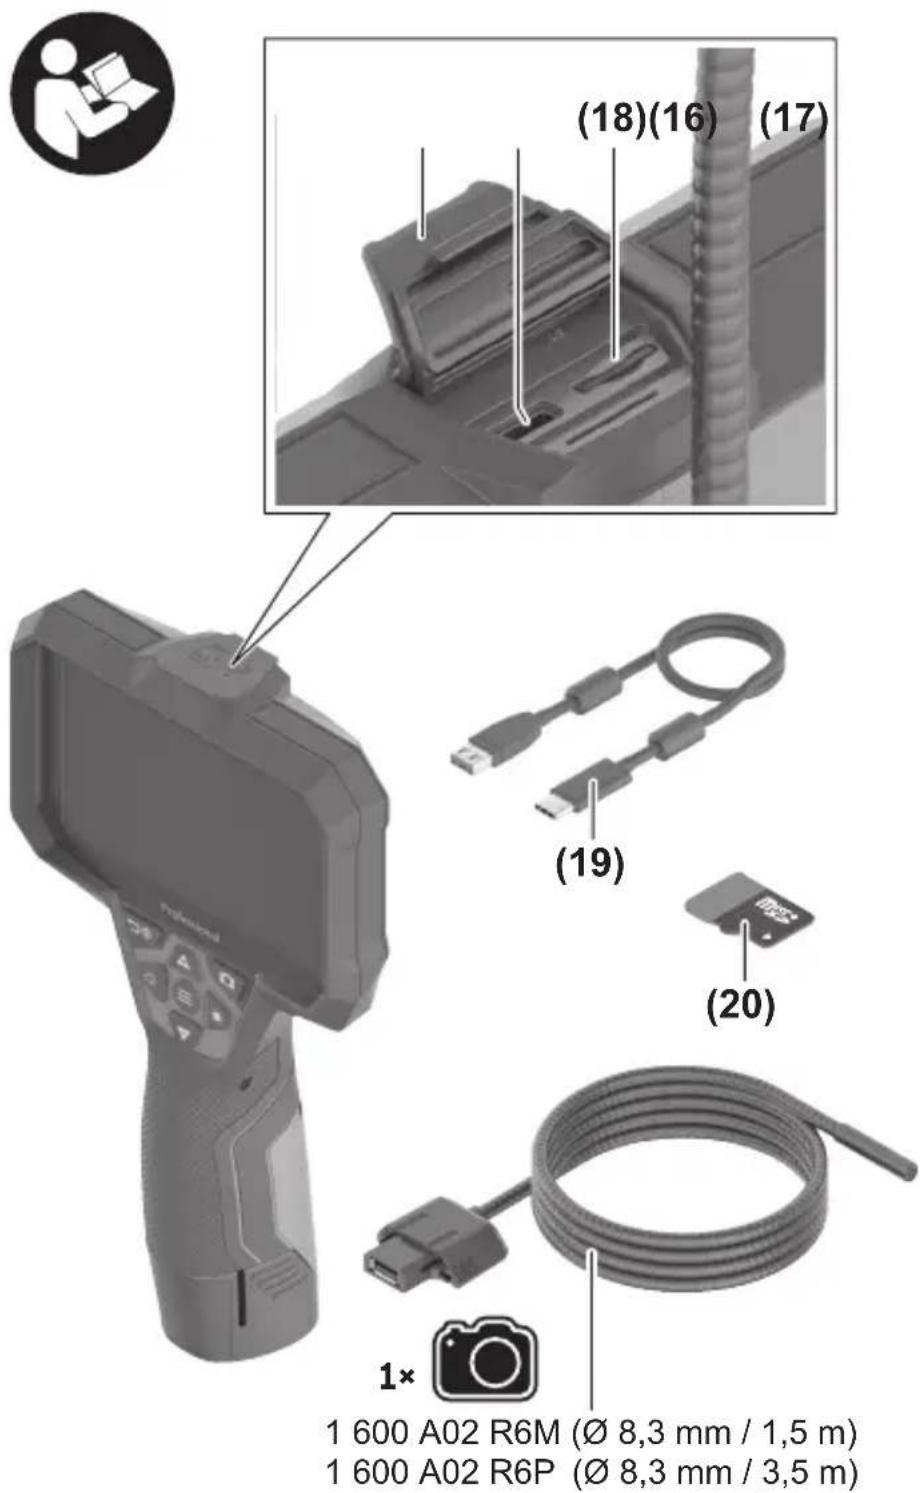
The numbering of the product features refers to the representation of the inspection camera on the graphic pages.
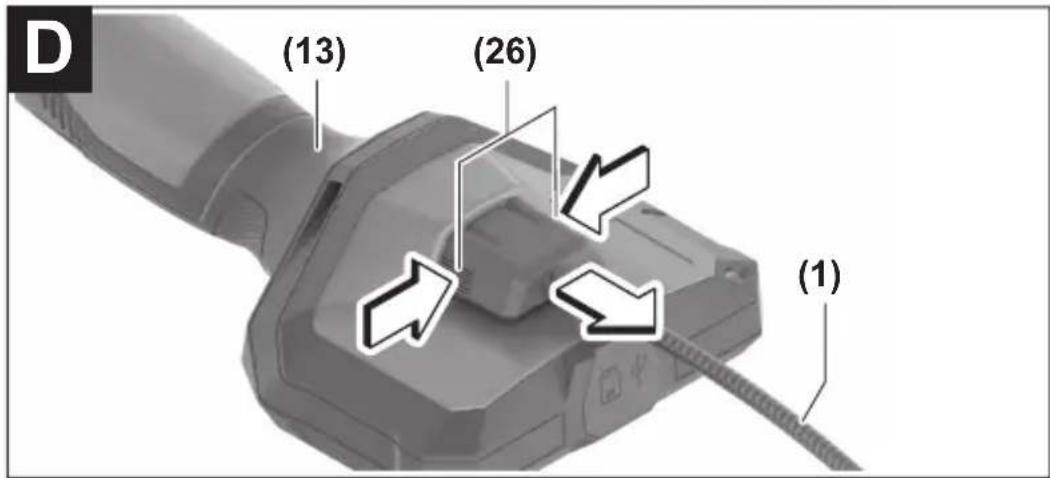
(1) Camera cable
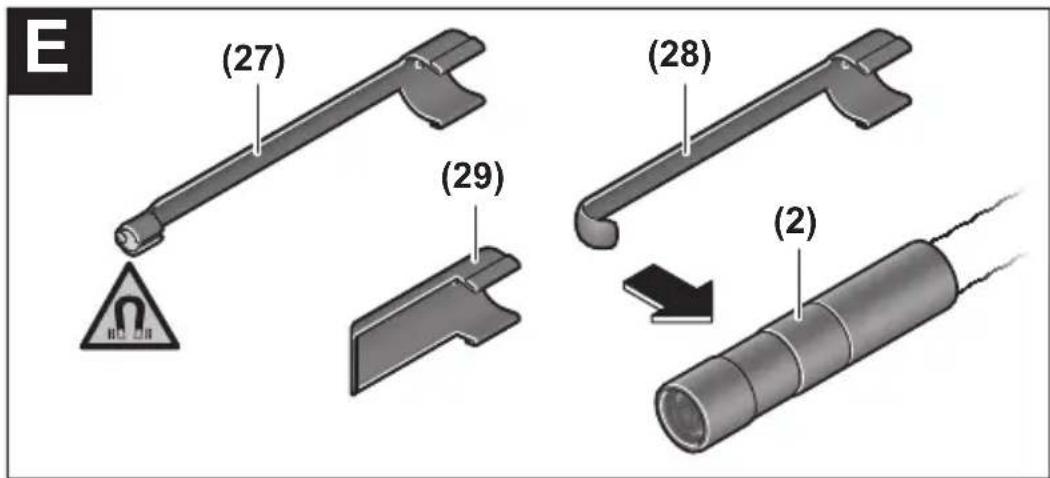
(2) Camera head
(3) Illumination light in the camera head
(4) Camera lens
(5) Display
(6) On/off button
(7) Up button
(8) Left-hand button
(9) Centre button
(10) Down button
(11) Right-hand button
(12) Photo/video recording button
(13) Handheld device
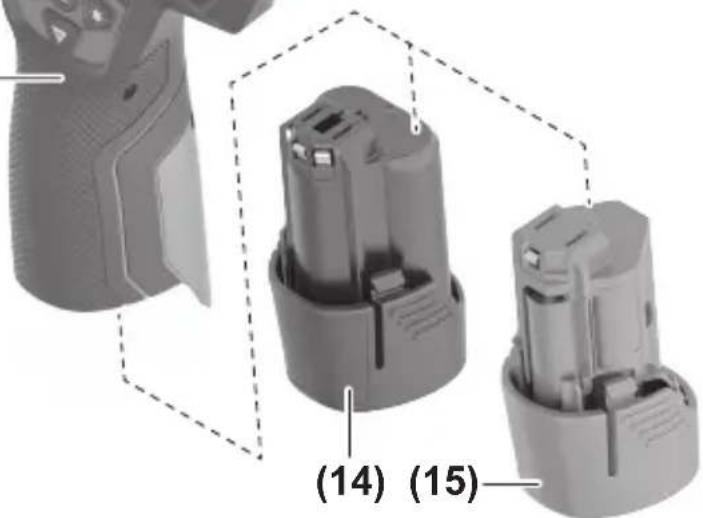
(14) Rechargeable battery ^a)
(15) AA1 battery adapter
(16) Top flap
(17) USB Type-C ^® port ^b)
(18) Slot for Micro-SD card
(19) USB Type-C ^® cable
(20) Micro-SD card
(21) Port
(22) Battery adapter cover
(23) Release button
(24) Battery adapter cap
(25) Camera connection
(26) Locking mechanism for camera cable
(27) Magnet
(28) Hook
(29) Mirror
a) Accessories shown or described are not included with the product as standard. You can find the complete selection of accessories in our accessories range.
b) USB Type-C® and USB-C® are trademarks of USB Implementers Forum.
Display Elements
(a) Recording mode symbol
(b) Status indicator function AutoUp
(c) Micro-SD card status indicator
(d) Battery charge indicator for rechargeable battery/non-rechargeable batteries
Technical Data
Digital inspection camera GIC 12V-5-27 C
| Article number | 3 601 B41 4.. | |
| Display size " 5 | ||
| Display resolution px 1280 × 720 | ||
| Camera resolution, photo and video files px 1280 × 720 | ||
| Screenshot format JPG | ||
| Video format AVI | ||
| Video frame rate | ||
| – without AutoUp function | fps 20 | |
| – with AutoUp function | fps 7 | |
| Max. number of photos in internal memory 30 | ||
| Field of viewA) | ° | 75 |
| Focus distance mm 30–80 | ||
| Max. luminous intensity of the illumination light in the camera headB) | lx 200 | |
| Max. immersion time for camera head/cable in diesel, engine oil, ethyl alcohol, petrol, AdBlue® or salt water (26.5 % salt content) | min 30 | |
| Power supply |
28 | English
Digital inspection camera GIC 12V-5-27 C
| - Rechargeable battery (Li-ion) 10.8 V/12 V | ||
| - Non-rechargeable batteries (alkaline manganese, with battery adapter) | 4 × 1.5 V LR6 (AA) | |
| - Rechargeable batteries (NiMH, with battery adapter) | 4 × 1.2 V HR6 (AA) | |
| Backup power supply for saving the time | ||
| - Coin cell CR2450 (3 V, lithium battery) | ||
| - Battery life approx. Years 3 | ||
| Operating time, approx. C) | ||
| - With rechargeable battery (Li-ion) D) | h | 6 |
| - With non-rechargeable batteries (alkaline manganese) | h | 2 |
| - With rechargeable batteries (NiMH, 1.2 V) h 3 | ||
| Weight according to EPTA-Procedure 01:2014 | ||
| - With rechargeable battery (Li-ion) kg 0.73–0.94 | E) | |
| - With non-rechargeable batteries (alkaline manganese) | kg 0.68 | |
| Dimensions (length × width × height)D) | mm 242 × 140 × 66 | |
| Camera head diameter mm 8.3 | ||
| Length of camera cable m 1.5 | ||
| Smallest bend radius of camera cable mm 25 | ||
| Protection rating of handheld device (without rechargeable battery/battery adapter) | IP54 | |
| Protection rating of camera head and camera cable | IP67 | |
| Recommended ambient temperature during charging | °C | 0 to +35 |
| Permitted ambient temperature during operation | °C | -10 to +50 |
| Permitted ambient temperature during storage | °C | -20 to +50 |
| Recommended rechargeable batteries GBA 10,8V... | GBA 12V... | |
Digital inspection camera GlC 12V-5-27 C
Recommended chargers GAL 12...
GAX18 ...
A) Measured across the diagonal of the image
B) at 50 mm distance in a dark environment
C) with camera display, with AutoUp function, average display brightness, illumination light with 50 % brightness
D) with GBA 12V 2.0Ah
E) Depends on battery in use
Assembly
Power supply
The inspection camera can be operated either with a Bosch lithium-ion rechargeable battery, with commercially available non-rechargeable batteries or with commercially available NiMH rechargeable batteries.
The battery charge indicator (d) will indicate the state of charge of the Li-ion battery, non-rechargeable batteries or NiMH batteries on the display.
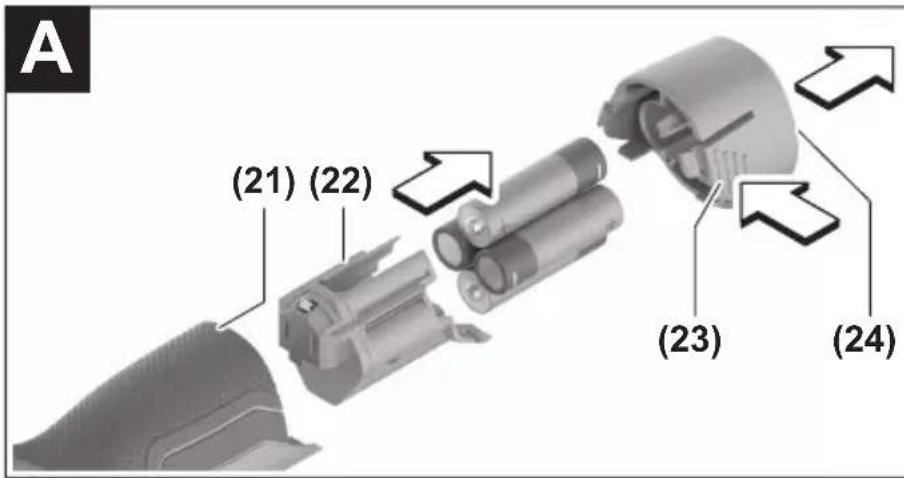
Operation with Battery Adapter (see figure A)
The non-rechargeable or NiMH rechargeable batteries are inserted into the battery adapter.
The battery adapter is intended only for use in designated Bosch inspection cameras and must not be used with power tools.
To insert the non-rechargeable/rechargeable batteries, slide the receptacle (22) of the battery adapter into the bay (21). Place the non-rechargeable/rechargeable batteries in the receptacle as shown in the picture on the cap (24). Slide the cap over the cover until you feel it click into place and it is flush with the handle of the inspection camera.
To remove the non-rechargeable/rechargeable batteries, press the release buttons (23) of the cap (24) and pull off the cap. Pull out the cover (22) from inside the port (21).
Always replace all the batteries at the same time. Only use batteries from the same manufacturer and which have the same capacity.
Remove the non-rechargeable/rechargeable batteries from the inspection camera when not using it for longer periods. The batteries and rechargeable batteries can corrode and self-discharge if stored for prolonged periods in the inspection camera.
30 | English
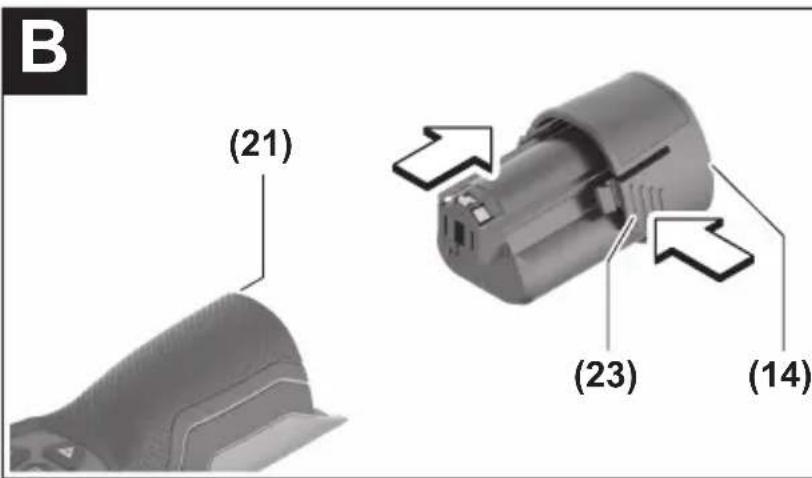
Operation with Lithium-Ion Rechargeable Battery (see figure B)
▶ Use only the chargers listed in the technical data. Only these battery chargers are matched to the lithium-ion batteries of your inspection camera.
Note: Lithium-ion rechargeable batteries are supplied partially charged according to international transport regulations. To ensure full rechargeable battery capacity, fully charge the rechargeable battery before using your tool for the first time.
To insert the charged rechargeable battery (14), slide it into the port (21) until you feel it click into place and it is flush with the handle of the inspection camera.
To remove the battery (14), press the release buttons (23) and pull it out of the port (21). Do not use force to do this.
Recommendations for Optimal Handling of the Battery
Protect the battery against moisture and water.
Only store the battery within a temperature range of -20 to 50 °C. Do not leave the battery in your car in the summer, for example.
A significantly reduced operating time after charging indicates that the battery has deteriorated and must be replaced.
Follow the instructions on correct disposal.
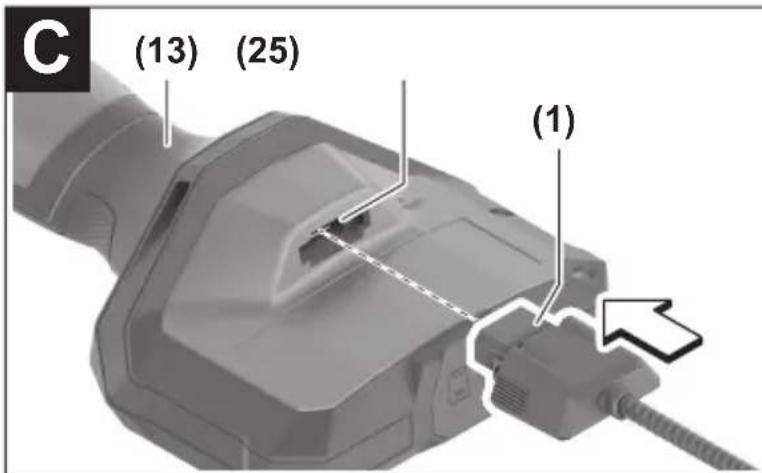
Fitting the camera cable (see figure C)
For operation of the inspection camera, the camera cable (1) must be fitted on the handheld device (13).
Push the connector of the camera cable (1) onto the camera connection (25) in the correct position until it clicks into place.
Removing the camera cable (see figure D)
To remove the camera cable (1), press the locking mechanism (26) and pull the connector out of the handheld device (13).
Fitting the mirror, magnet or hook (see figure E)
The mirror (29), the hook (28) or the magnet (27) can be fitted on the camera head (2) as accessories.
Push one of the three accessories, as shown in the figure, all the way onto the camera head (2).
Note: The magnet (27) and the hook (28) are only suitable for moving and removing loose, small and light objects. The inspection camera or the accessory can be damaged with too strong a pull.
Operation
▶ Protect the handheld device and the rechargeable battery or battery adapter from direct sunlight. Protect the rechargeable battery or battery adapter against moisture. The camera cable (1) and camera head (2) are watertight if assembled correctly; the handheld device (13) is splash-proof. However, the rechargeable battery (14) and the battery adapter are not protected against water. If they come into contact with water, there is a risk of electric shock or damage.
▶ Do not use the inspection camera if the lens on the camera head (2) has fogged up. Switch the inspection camera on only if the moisture has evaporated. The inspection camera may otherwise become damaged.
▶ The switched-on light (3) can become hot during operation. To avoid burns, do not touch the light.
▶ Do not subject the inspection camera to extreme temperatures or variations in temperature. For example, do not leave it in a car for extended periods of time. In case of large variations in temperature, allow the inspection camera to adjust to the ambient temperature before putting it into operation.
Starting Operation
Switching On and Off
To switch on the inspection camera, press the ON/OFF button (6) or the centre button (9).
Note: If the camera cable is not fitted when switching on, the display will show an error message.
To switch off the inspection camera, press the ON/OFF button (6) until the display switches off.
If no button on the inspection camera is pressed for a certain time, then the inspection camera will automatically switch itself off to preserve battery life. You can set the switch-off time in the main menu.
Regulating the illumination light in the camera head
To regulate the light, press the left-hand button (8) or the right-hand button (11) until it reaches the required brightness or the illumination light has switched off.
▶ Do not look directly into the light (3) and do not direct the light onto other people. The light can blind your eyes.
32 | English
Zooming In/Out of the Image in the Display
To set the magnification level of the display view, press the up button (7) or the down button (10) until the required magnification level has been reached.
Main Menu
To access the
Navigating in the menu
- To scroll through a menu: Press the up (7) or down (10) buttons.
- To switch to a submenu: Press the centre button (9) or the right-hand button (11).
- To confirm a selected menu option: Press the centre button (9).
- To switch a function with a virtual switch on or off : Either press the centre button (9), the right-hand button (11) or the left-hand button (8). This will also save the setting.
- To return to the previous, higher-level menu: Briefly press the ON/OFF button (6).
- To exit the main menu and return to the camera display: Briefly press the ON/OFF button (6).
Menu options
: Switch the function on or off.
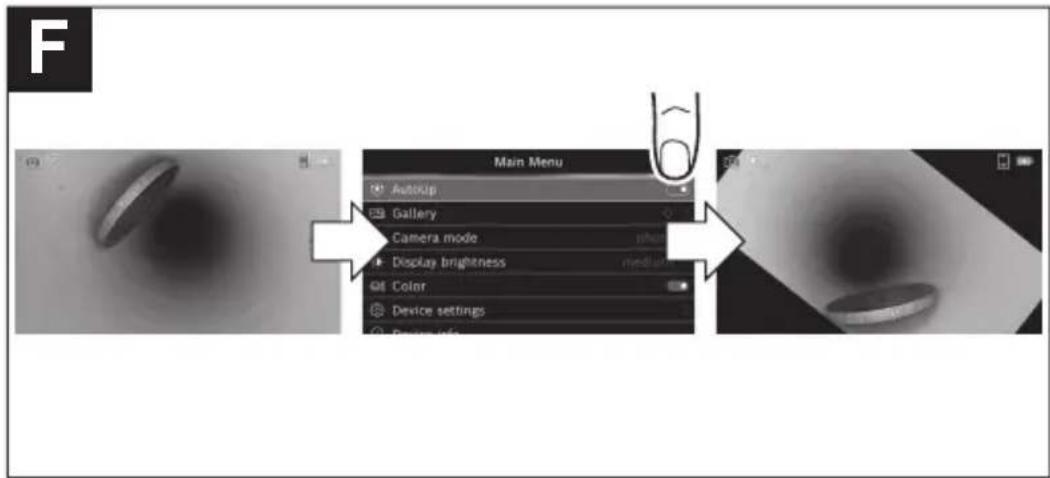
The AutoUp function rotates the image so that the "top" is shown at the top of the display (see figure F).
Note: The function is limited if a mirror (29) is fitted and/or with a vertically aligned camera cable (1).: This is where recorded photos and videos can be accessed.
You can select the required file based on its date using the down (10) or up (7) buttons.
Press the right-hand button (11) or the centre button (9) to see a preview of the selected photo or video.
To open the selected file, press the centre button (9).
Note: If a micro-SD card (20) is inserted, only files saved on this micro-SD card are displayed. To open photos from the internal storage, you must first remove the micro-SD card (20).: Choose between and : Set the required brightness for the display. : Switch between the colour view and black/white view of the display.
-
Note: If the date and time can no longer be saved, the built-in coin cell is drained. Contact an authorised Bosch-after-sales service centre if this happens.
-
-
: Here you will find device information, such as the installed software version and legal information. : You can reset all of the menu options to factory settings. This also simultaneously, permanently delete all of the saved files.
Saving/Transferring the Recordings
Taking Photos/Videos
If a micro-SD card (20) is inserted, the photos and videos are saved on the card.
If no micro-SD card is present, photos are stored on the internal storage on the inspection camera and it is not possible to take videos.
Photo mode: Press the photo/video recording button (12) to take a photo of the current display view.
Video mode: To start filming a video, press the photo/video recording button (12), to stop recording, press the photo/video recording button (12) again or the centre button (9).
You can switch between photo and video mode in the
Data transfer overview
- Transferring photo files from the internal storage to the micro-SD card (20): When a micro-SD (20) is inserted, a request appears in the display asking whether the data saved on the inspection camera's internal storage should be transferred to the micro-SD card.
- Transferring photo files from the internal storage via USB Type-C®: Transfer is only possible if there is no micro-SD card (20) inserted in the inspection camera.
- Transferring files from the micro-SD card (20): You can transfer files from the inserted micro-SD card (20) either via USB Type-C® or by removing the micro-SD card (20) and inserting it into another device.
Inserting the micro-SD card
Open the top flap (16) and push the micro-SD card (20) all the way into the slot (18), paying attention to the correct orientation. Carefully close the top flap again.
34 | English
Data transfer via the USB Type-C® interface
Switch on the inspection camera to transfer data via the USB Type-C® interface. Open the flap for the USB Type-C® port (17). Connect the USB Type-C® port to your PC via the USB Type-C® cable (19).
Open the file browser on your PC and select the drive for transferring the files. The name of the drive is as follows:
- If no micro-SD card is inserted into the inspection camera: Bosch_GIC
- If an unnamed micro-SD card is inserted into the inspection camera: Standard name of the USB drive
- If a named micro-SD card is inserted into the inspection camera: Name of the micro-SD card
The saved files can be copied from the internal memory or the micro-SD card of the inspection camera, moved to your PC or deleted.
As soon as you have completed the required operation, disconnect the drive following the standard procedure.
Note: Always disconnect the drive from the operating system of the PC first (eject drive), as failure to do so may damage the internal memory of the inspection camera.
Remove the USB Type-C® cable (the inspection camera will switch off automatically). Close the upper flap (16) to protect against dust or splashes.
Note: Only use the USB Type-C® interface to connect the inspection camera to a PC. The inspection camera may be damaged if connected to other devices.
Note: The USB Type-C® interface can only be used for data transfer. Rechargeable batteries or other devices cannot be charged by this interface.
Working Advice
Check the environment that you want to inspect, paying particular attention to obstacles or hazardous areas.
Bend the camera cable (1) so that the camera head can be easily introduced into the environment to be inspected. Carefully introduce the camera cable.
Adjust the brightness of the camera illumination light (3) so that the image is easily recognisable. When photographing highly reflective objects, for example, you can achieve better results in lower light or using black and white contrast setting.
If objects to be inspected look blurred, then reduce or increase the distance between camera head (2) and object.
English | 35
Errors – causes and corrective measures
| Error indicator in the display | Cause Corrective measures | |
 | Internal memory almost full | Delete the files from the internal memory or insert a micro-SD card (20). |
| (yellow warning) | ||
 | Internal memory full | Delete the files from the internal memory or insert a micro-SD card (20). |
| (red warning) | Error in the internal memory | Restart the inspection camera. |
| If the problem persists, contact an authorised Bosch after-sales service centre. | ||
 | Micro-SD card almost full | Delete the files from the micro-SD card (20). |
| (yellow warning) | ||
 | Micro-SD card full | Delete the files from the micro-SD card (20). |
| Error in the micro-SD card | Remove the micro-SD card (20) and insert it again. | |
| (red warning) | Check the micro-SD card in a different device. | |
Maintenance and Service
Maintenance and Cleaning
Do not immerse the handheld device (13) in water or other liquids.
Always keep the inspection camera clean. Clean the inspection camera and all accessories particularly thoroughly after you have worked in areas with substances harmful to health.
Wipe off any dirt using a damp, soft cloth. Do not use any detergents or solvents.
Clean the camera lens (4) in particular regularly and make sure to check for any lint.
36 | English
Replacing the Built-in Coin Cell
The coin cell replacement must be performed by Bosch or by an after-sales service centre authorised to work with Bosch power tools.
▶ Caution: The coin cell must always be replaced with a coin cell of the same type. There is a risk of explosion.
▶ Remove and dispose of drained coin cell correctly. Drained coin cell may leak and damage the product or cause personal injury.
After-Sales Service and Application Service
Our after-sales service responds to your questions concerning maintenance and repair of your product as well as spare parts. You can find explosion drawings and information on spare parts at: www.bosch-pt.com
The Bosch product use advice team will be happy to help you with any questions about our products and their accessories.
In all correspondence and spare parts orders, please always include the 10-digit article number given on the nameplate of the product.
Great Britain
Robert Bosch Ltd. (B.S.C.)
P.O. Box 98
Broadwater Park
North Orbital Road
Denham Uxbridge
UB 9 5HJ
At www.bosch-pt.co.uk you can order spare parts or arrange the collection of a product in need of servicing or repair.
Tel. Service: (0344) 7360109
E-Mail: boschservicecentre@bosch.com
You can find further service addresses at:
www.bosch-pt.com/serviceaddresses
Transport
The recommended lithium-ion batteries are subject to legislation on the transport of dangerous goods. The user can transport the batteries by road without further requirements.
When shipping by third parties (e.g.: by air transport or forwarding agency), special requirements on packaging and labelling must be observed. For preparation of the item being shipped, consulting an expert for hazardous material is required.
Dispatch battery packs only when the housing is undamaged. Tape or mask off open contacts and pack up the battery in such a manner that it cannot move around in the packaging. Please also observe the possibility of more detailed national regulations.
Disposal

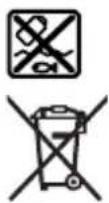
The inspection camera, batteries/rechargeable batteries, accessories and packaging should be sorted for environmentally friendly recycling. Do not dispose of the inspection camera or batteries/rechargeable batteries with household waste.
Only for EU countries:
In accordance with Directive 2012/19/EU and Directive 2006/66/EC respectively, inspection cameras that are no longer usable and defective/drained batteries must be collected separately and recycled in an environmentally friendly manner.
If disposed incorrectly, waste electrical and electronic equipment may have harmful effects on the environment and human health, due to the potential presence of hazardous substances.
Only for United Kingdom:
According to The Waste Electrical and Electronic Equipment Regulations 2013 (SI 2013/3113) (as amended) and the Waste Batteries and Accumulators Regulations 2009 (SI 2009/890) (as amended), products that are no longer usable must be collected separately and disposed of in an environmentally friendly manner.
Battery packs/batteries:
Li-ion:
Please observe the notes in the section on transport (see "Transport", page 36).
The integrated coin cell may only be removed for disposal by qualified personnel.
Français
Robert Bosch (France) S.A.S.
www.bosch-pt.com/serviceaddresses
Transport
natural_image
Symbolic icon of a person walking inside a circular arrow, with multiple curved arrows indicating rotation or movement (no text or symbols)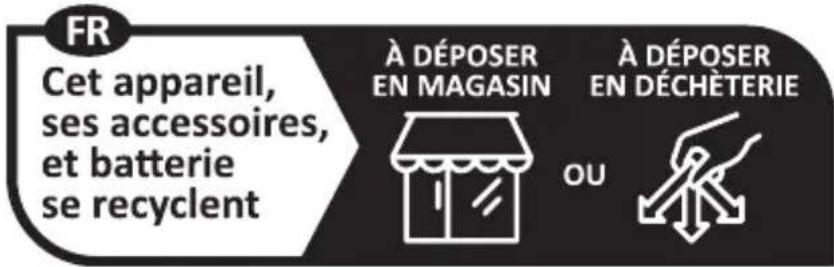
www.bosch-pt.com/serviceaddresses
Transporte
www.bosch-pt.com/serviceaddresses
Transporte
www.bosch-pt.com/serviceaddresses
Trasporto
(3) Lamp in camerakop
(4) Cameralens
(5) Display
(6) Aan/uit-toets
(7) Toets omhoog
(8) Toets links
(9) Middelste toets
(10) Toets omlaag
(11) Toets rechts
Lamp in camerakop regelen
www.bosch-pt.com/serviceaddresses
Vervoer
Bosch Service Center
Telegrafvej 3
2750 Ballerup
På www.bosch-pt.dk kan der online bestilles reservedele eller oprettes en reparations ordre.
Tlf. Service Center: 44898855
Fax: 44898755
E-Mail: vaerktoej@dk.bosch.com
www.bosch-pt.com/serviceaddresses
Transport
Bosch Service Center
Telegrafvej 3
2750 Ballerup
Danmark
Tel.: (08) 7501820 (inom Sverige)
Fax: (011) 187691
www.bosch-pt.com/serviceaddresses
Transport
(22) Hylster for batteriadapter
(23) Utløserknapp
(24) Deksel for batteriadapter
(25) Kameratilkobling
(26) Lås for kamerakabel
(27) Magnet
(28) Krok
(29) Speil
www.bosch-pt.com/serviceaddresses
Transport
www.bosch-pt.com/serviceaddresses
Kuljetus
www.bosch-pt.com/serviceaddresses
Μεταφορά
www.bosch-pt.com/serviceaddresses
Nakliye
Robert Bosch Sp. z o.o.
www.bosch-pt.com/serviceaddresses
Transport
Bosch Service Center PT
K Vápence 1621/16
692 01 Mikulov
www.bosch-pt.com/serviceaddresses
Přeprava
www.bosch-pt.com/serviceaddresses
Transport
www.bosch-pt.com/serviceaddresses
Szállítás
www.bosch-pt.com/serviceaddresses
272 | Русский
Транспортировка
www.bosch-pt.com/serviceaddresses
Транспортування
www.bosch-pt.com/serviceaddresses
Тасымалдау
Service scule electrice
Strada Horia Măcelariu Nr. 30–34, sector 1
013937 Bucureşti
www.bosch-pt.com/serviceaddresses
318 | Română
Transport
Service scule electrice
Strada Horia Măcelariu Nr. 30–34, sector 1
013937 Bucureşti, România
www.bosch-pt.com/bg/bg/
www.bosch-pt.com/serviceaddresses
Транспортиране
www.bosch-pt.com/serviceaddresses
Транспорт
www.bosch-pt.com/serviceaddresses
Transport
Preporučeni litijum-jonski akumulatori podležu zahtevima propisa o opasnim materijama. Korisnik može bez dodatnih uslova transportovati akumulatore na drumu.
Kod slanja preko trećih lica (na primer vazdušnih transportom ili špedicijom) mora se obratiti pažnja na posebne zahteve u pogledu pakovanja i označavanja. Tada se kod pripreme paketa za slanje mora pozvati stručnjak za opasne materije.
Akumulatorske baterije šaljite samo ako kućište nije oštećeno. Odlepite otvorene kontakte i upakujte akumulatorsku bateriju tako, da se ne pokreće u paketu. Molimo da obratite pažnju na eventualne dalje nationalne propise.
Uklanjanje dubreta
Kameru za inspekciju, baterije/akumulatore, pribor i pakovanja treba predati na reciklažu koja je u skladu sa zaštitom životne sredine.
www.bosch-pt.com/serviceaddresses
Transport
www.bosch-pt.com/serviceaddresses
Transport
Preporučene litij-ionske aku-baterije podliježu zakonu o transportu opasnih tvari. Korisnik bez ikakvih preduvjeta može transportirati aku-baterije cestovnim transportom. Ako transport obavlja treća strana (npr. transport zrakoplovom ili špedicija), treba se pridržavati posebnih zahtjeva za ambalažu i označavanje. Kod pripreme ovakvih pošiljki za transport prethodno se treba savjetovati sa stručnjakom za transport opasnih tvari. Aku-bateriju šaljite nekim transportnim sredstvom samo ako je njezino kućište neoštećeno. Oblijepite otvorene kontakte i zapakirajte aku-bateriju tako da se ne može pomicati u ambalaži. Pridržavajte se i eventualnih dodatnih nacionalnih propisa.
Zbrinjavanje

Inspekcijsku kameru, baterije/aku-baterije, pribor i ambalažu treba dovesti na ekološki prihvatljivo recikliranje.
Inspekcijsku kameru i baterije/aku-baterije ne bacajte u kućni otpad!
Samo za zemlje EU:
Sukladno europskoj Direktivi 2012/19/EU inspekcijske kamere koje više nisu uporabive i sukladno europskoj Direktivi 2006/66/EZ neispravne ili istrošene aku-baterije/baterije moraju se odvojeno sakupljati i dovesti na ekološki prihvatljivo recikliranje.
www.bosch-pt.com/serviceaddresses
Transport
www.bosch-pt.com/serviceaddresses
Transportēšana
www.bosch-pt.com/serviceaddresses