AL 3014 - Battery charger STIHL - Free user manual and instructions
Find the device manual for free AL 3014 STIHL in PDF.
Pick your language and provide your email: we'll send you a specifically translated version.
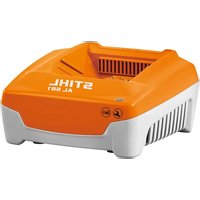
| Product type | Battery charger |
| Brand | Stihl |
| Model | AL 3014 |
| Input voltage | 220-240 V ~ 50/60 Hz |
| Output voltage | 14.4 V |
| Charging current | 3 A |
| Dimensions (L × W × H) | 200 × 100 × 80 mm |
| Weight | 0.5 kg |
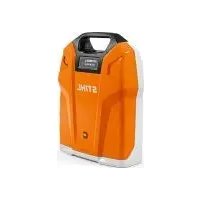
| Compatible battery type | Stihl lithium-ion batteries (AK, AP) |
| Charging time (battery 2.6 Ah) | Approximately 55 minutes |
| Charge indicator | 3-color LED (green, orange, red) |
| Safety features | Overcharge, short-circuit, and overheating protection |
| Maintenance and cleaning | Clean with a dry cloth, do not use water |
| Spare parts and repairability | No user-serviceable parts, contact Stihl customer service |
| Usage | Indoor only, avoid moisture |
| Operating temperature | 0 °C to 45 °C |
| Protection class | II |
| Protection rating | IP20 |
Frequently Asked Questions - AL 3014 STIHL
Can I charge batteries of other brands with the Stihl AL 3014 charger?
No, this charger is designed only for Stihl lithium-ion batteries from the AK and AP series. Using other batteries may damage the device or pose a safety risk.
How long does it take to charge a Stihl battery of 2.6 Ah?
With a charging current of 3 A, the charging time is approximately 55 minutes. For a higher capacity battery, the time will be proportionally longer.
What do the LED colors on the charger mean?
The LED indicates the charging status:
- Solid green: battery fully charged.
- Flashing orange: charging in progress.
- Flashing red: error (temperature too high/low, defective battery, etc.).
- Solid green: battery fully charged.
- Flashing orange: charging in progress.
- Flashing red: error (temperature too high/low, defective battery, etc.).
Can I leave the battery on the charger after full charge?
Yes, the charger automatically switches to maintenance mode once charging is complete, preventing overcharging. However, it is recommended to remove the battery if the charger is not used for a long period.
The charger emits a humming sound, is this normal?
A slight humming may occur during charging due to the internal transformer. This is generally normal. If the noise becomes loud or accompanied by odor, unplug immediately and contact customer service.
Can I use the charger outdoors?
No, the charger is designed for indoor use only. The protection rating is IP20, it is not protected against water or dust. Use it in a dry and ventilated area.
How to clean the charger?
Unplug the charger and clean it with a dry, soft cloth. Do not use water, solvents, or abrasive products that could damage the electrical components.
What to do if the battery does not charge?
Check that the battery is properly inserted, the charger is plugged in, and the outlet works. If the LED stays red, the battery may be too hot/cold or defective. Try with another battery. If the problem persists, contact Stihl customer service.
Can I buy spare parts for this charger?
The charger contains no user-serviceable parts. In case of malfunction, contact an authorized Stihl dealer or customer service for a warranty replacement.
Is this charger compatible with AK series batteries?
Yes, the Stihl AL 3014 is compatible with lithium-ion batteries from the AK and AP series. Make sure the battery is designed for a voltage of 14.4 V.
User questions about AL 3014 STIHL
0 question about this device. Answer the ones you know or ask your own.
Ask a new question about this device
No questions yet. Be the first to ask one.
Download the instructions for your Battery charger in PDF format for free! Find your manual AL 3014 - STIHL and take your electronic device back in hand. On this page are published all the documents necessary for the use of your device. AL 3014 by STIHL.