AL 501 - Battery charger STIHL - Free user manual and instructions
Find the device manual for free AL 501 STIHL in PDF.

| Product type | Battery charger |
| Brand | Stihl |
| Model | AL 501 |
| Compatible batteries | Stihl AK, AP, AR |
| Power supply | Mains plug, rated voltage and frequency according to nameplate (220-240 V or 100-127 V) |
| Rated power | See nameplate |
| Charging current | See nameplate |
| Status indicator | Green LED (charging) / red flashing (fault) |
| Fan | Integrated, automatic on/off |
| Wall mounting | Possible, mounting dimensions: a ≥ 100 mm, c = 100 mm, d = 4.5 mm, e = 9 mm, f = 2.5 mm |
| Charging temperature range | +5 °C to +40 °C |
| Storage temperature range | -20 °C to +50 °C |
| Protection | Use in a dry, enclosed room, do not expose to rain |
| Safety device | Recommended residual-current circuit breaker (30 mA, 30 ms) |
| Maintenance | Clean with a damp cloth, brush ventilation slots and contacts |
| Repairability | Do not open, contact a Stihl specialist dealer |
| Power cord | Replaceable by a Stihl dealer (if plug is detachable) |
| Charging time | Variable, see www.stihl.com/charging-times |
| Weight | Approx. 0.5 kg (estimate) |
| Dimensions (L × W × H) | Approx. 200 × 120 × 80 mm (estimate) |
Frequently Asked Questions - AL 501 STIHL
User questions about AL 501 STIHL
0 question about this device. Answer the ones you know or ask your own.
Ask a new question about this device
Download the instructions for your Battery charger in PDF format for free! Find your manual AL 501 - STIHL and take your electronic device back in hand. On this page are published all the documents necessary for the use of your device. AL 501 by STIHL.
USER MANUAL AL 501 STIHL
natural_image
Exterior view of a STIHL AL 307 electric vehicle charging station (no visible text or symbols beyond branding)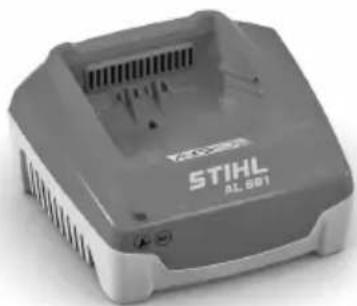
natural_image
Exterior view of a STIHL AL 801 electric vehicle charging station (no visible text or symbols beyond branding)natural_image
Technical illustration of a plastic device housing with labeled components (no text or symbols present)natural_image
Two-step diagram showing a plug being inserted into a battery, with no text or symbols present.1 Introduction.... 10
2 Guide to Using this Manual....10
3 Overview.... 11
4 Safety Precautions....11
5 Preparing Charger for Use......14
6 Assembling the charger.... 14
7 Charging the Battery, LEDs.... 14
8 Transporting....15
9 Storing....15
10 Cleaning....15
11 Maintenance and Repairs.... 15
12 Troubleshooting.... 16
13 Specifications....16
14 Spare Parts and Accessories....17
15 Disposal.... 17
16 Addresses.... 17
1 Introduction
Dear Customer,
Thank you for choosing STIHL. We develop and manufacture our quality products to meet our customers' requirements. The products are designed for reliability even under extreme conditions.
STIHL also stands for premium service quality. Our dealers guarantee competent advice and instruction as well as comprehensive service support.
STIHL expressly commit themselves to a sustainable and responsible handling of natural resources. This user manual is intended to help you use your STIHL product safely and in an environmentally friendly manner over a long service life.
We thank you for your confidence in us and hope you will enjoy working with your STIHL product.

Dr. Nikolas Stihl
IMPORTANT! READ BEFORE USING AND KEEP IN A SAFE PLACE FOR REFERENCE.
2 Guide to Using this Manual
2.1 Applicable Documentation
Local safety regulations apply.
▶ Read, understand and save the following documents in addition to this instruction manual:
– User instructions for STIHL AR battery
- Safety notes and precautions for STIHL AP battery
- Safety notes and precautions for STIHL AK battery.
- Safety information for STIHL batteries and products with built-in batteries: www.stihl.com/safety-data-sheets
2.2 Warning Notices in Text

DANGER
■ This notice refers to risks which result in serious or fatal injury.
▶ Serious or fatal injuries can be avoided by taking the precautions mentioned.

WARNING
■ This notice refers to risks which can result in serious or fatal injury.
- Serious or fatal injuries can be avoided by taking the precautions mentioned.
NOTICE
■ This notice refers to risks which can result in damage to property.
▶ Damage to property can be avoided by taking the precautions mentioned.
2.3 Symbols in Text

This symbol refers to a chapter in this instruction manual.
3 Overview English
3 Overview
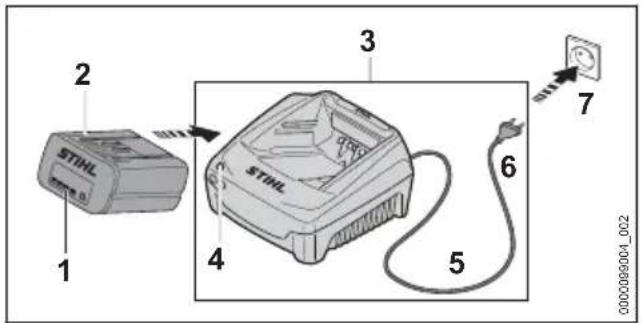
3.1 Charger

1 LED
The LED indicates the status of the charger.
2 Socket (AL 501 only)
The socket is used as a receptacle for the plug.
3 Plug (AL 501 only)
The plug connects the connecting cable to the charger.
4 Connecting cable
The connecting cable connects the charger to the mains plug.
5 Mains plug
The mains plug connects the connecting cable to a wall socket.
# Rating plate with machine number
3.2 Symbols
Meanings of symbols that may be on the charger:

Operate the electric product in a dry place, indoors only.

Do not dispose of the product with your household waste.

Read, understand and save the instruction manual.
4 Safety Precautions
4.1 Warning Signs
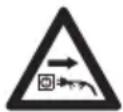
Meanings of warning signs on the charger:

Observe safety notices and take the necessary precautions.

Read, understand and save the instruction manual.

Protect charger from rain and dampness.
4.2 Intended Use
The STIHL AL 301 and AL 501 chargers recharge STIHL AK, AP and AR batteries.
WARNING
■ Batteries and chargers not explicitly approved by STIHL may cause a fire or explosion. Persons may be seriously or fatally injured, and property may be damaged.
▶ Use a STIHL AL 301 or AL 501 charger to recharge STIHL AK, AP and AR batteries.
■ Using the charger for purposes for which it is not designed may result in serious or fatal injuries and damage to property.
▶ Use the charger as described in this User Manual.
4.3 Requirements concerning the user
WARNING
■ Users without adequate training or instruction cannot recognize or assess the risks involved in using the charger. The user or other persons may sustain serious or fatal injuries.

▶ Read, understand and keep the User Manual.
▶ If the charger is passed on to another person: Always give them the user manual.
▶ Make sure that the user meets the following conditions:
- The user is rested.
- The user must be in good physical condition and mental health to operate the charger. If the user is able to operate the equipment but has physical, sensory or mental restrictions, the user may only work with the equipment under the supervision of or after receiving instruction from a responsible person.
- The user is able to recognize and assess the risks involved in using the charger.
- The user is an adult, or is being trained in an occupation under supervision according to national regulations.
- The user has received instruction from a STIHL servicing dealer or other experienced user before using the charger for the first time.
- The user is not under the influence of alcohol, medicines or drugs.
▶ If you have any doubts, be sure to consult a STIHL dealer.
4.4 Working Area and Surroundings
WARNING
■ Bystanders, children and animals are not aware of and cannot assess the dangers of a charger or electric current. Bystanders, children and animals may be seriously or fatally injured.
- Keep bystanders, children and animals away from the work area.
▶ Make sure that children cannot play with the charger.
■ The charger is not waterproof. If you work in rain or in a damp environment, an electric shock may occur. The user may be injured and the charger may be damaged.

- Do not operate it in the rain or in a damp environment.
■ The charger is not protected against all ambient conditions. If the charger is exposed to certain ambient conditions, it may catch fire or explode. This may result in serious injury to people and damage to property.
▶ Operate the charger in a dry place, indoors only
- Do not operate the charger in a flammable environment or in an explosive environment.
- Do not operate the charger on a readily combustible surface.
▶ Do not use and store the charger outside of the specified temperature limits, 13.3.
■ People can trip over the connecting cable. People may be injured and the charger may be damaged.
- Lay the connecting cable flat on the floor.
4.5 Safe Condition
The charger is in a safe condition if the following points are observed:
– Charger is undamaged.
– Charger is clean and dry.
WARNING
■ If components do not comply with safety requirements, they will no longer function properly and safety devices may be rendered inoperative. This can result in serious or fatal injuries.
▶ Do not use a damaged charger.
▶ If the charger is dirty or wet: Clean the charger and allow it to dry.
▶ Never attempt to modify the charger.
- Never insert objects in the charger's openings.
▶ Never bridge the charger's contacts with metallic objects (short circuit).
▶ Do not open the charger.
▶ Replace worn or damaged labels.
▶ If you have any queries: Contact a STIHL servicing dealer for assistance.
4.6 Charging
WARNING
■ A damaged or defective charger may produce an unusual smell or emit smoke during the charging process. This may result in personal injuries and damage to property.
▶ Disconnect the plug from the wall outlet.
■ The charger can overheat and cause a fire if heat dissipation is inadequate. This can result in serious or fatal injuries and damage to property.
▶ Do not cover the charger.
4.7 Connecting to the power supply
Contact with live components may occur for the following reasons:
- The connecting cable or the extension cord is damaged.
- The mains plug of the connecting cable or extension cord is damaged.
- The socket is not properly installed.
DANGER
■ Contact with live parts may result in electric shock. This may result in serious or fatal injury to the user.
▶ Make sure that the connecting cable, extension cord and their mains plugs are undamaged.
If the connecting cable or the extension cord is damaged:
▶ Do not touch the damaged area.
- Disconnect the mains plug from the power supply.
▶ Make sure your hands are dry before touching the connecting cable, extension cord or mains plugs.
- Plug the mains plug of the connecting cable or extension cord into a properly installed, shockproof socket with the correct fuse rating.
▶ Install the charger with a ground fault circuit interrupter (30 mA, 30 ms).
■ A damaged or unsuitable extension cable can result in electric shock. There is a risk of serious or fatal injury.
▶ Use an extension cable with the correct cable cross-section, 13.2.
WARNING
■ Overvoltage can occur in the charger if the line voltage or frequency are incorrect during charging. The charger may be damaged.
▶ Make sure that the mains voltage and the mains frequency of the power supply match the data on the rating plate of the charger.
If the charger is connected to a power strip, electrical components may be overloaded during the charging process. The components may overheat and cause a fire. Persons may be seriously or fatally injured, and property may be damaged.
▶ Ensure that the technical specifications for the power strip are not exceeded by the information on the rating plate of the charger and of all electrical devices connected to the power strip.
■ An incorrectly routed connecting cable or extension cord may be damaged, and people may trip over it. People may be injured, and the connecting cable or extension cord may be damaged.
- Route and mark the connecting cable and extension cord so that people will not trip over them.
- Route the connecting cable and extension cord so that they are not under tension or tangled.
- Route the connecting cable and extension cord so that they will not be damaged, kinked or crushed and will not be chafed.
▶ Protect the connecting cable and extension cord from heat, oil and chemicals. - Lay the connecting cable and extension cord on a dry surface.
■ The extension cable warms up in operation. If that heat cannot escape, it may cause a fire.
▶ If using a cable reel: completely unroll the cable reel.
■ If wiring and pipes are laid in the wall, they may be damaged if the charger is mounted on the wall. Contact with wiring can result in electric shock. This may result in serious injury to people and damage to property.
▶ Make sure there is no wiring or pipes in the wall at the proposed mounting site.
■ If the charger is not mounted on the wall as described in this User Manual, the charger or the battery may fall or the charger may overheat. This may result in injury to people and damage to property.
- Mount the charger on a wall as described in this User Manual.
■ If the charger is mounted on a wall with the battery inserted, the battery may fall out of the charger. This may result in injury to people and damage to property.
▶ Mount the charger on the wall first before inserting the battery.
4.8 Transporting
WARNING
■ The charger can turn over or move while being transported. This may result in personal injuries and damage to property.
▶ Disconnect the plug from the wall outlet.
▶ Remove the battery.
- Secure the charger with lashing straps, belts or a net to prevent it turning over and moving.
■ The connecting cable must not be used for carrying the charger. The connecting cable and the charger may be damaged.
- Wind up the connecting cable and attach it to the charger.
4.9 Storage
WARNING
■ Children are not aware of and cannot assess the dangers of a charger. Children can be seriously injured or killed.
▶ Disconnect the plug from the wall outlet.
- Store the charger out of reach of children.
■ The charger is not protected against all ambient conditions. If the charger is exposed to certain ambient conditions, the charger may be damaged.
- Disconnect the plug from the wall outlet.
English 5 Preparing Charger for Use
▶ If the charger is hot: Allow the charger to cool down.
- Store the charger in a clean, dry place.
- Store the charger in an enclosed room.
- Do not store the charger outside of the specified temperature limits, 13.3.
■ The connecting cable should not be used for carrying the charger or hanging up the charger. The connecting cable and the charger may be damaged.
- Hold the charger by the housing in a secure grip. The charger is provided with a handle recess to make it easy to pick up the charger.
- Hang the charger on the wall mounting.
4.10 Cleaning, Maintenance and Repair
WARNING
■ Harsh detergents, cleaning with a water jet or sharp objects can damage the charger. If the charger is not cleaned correctly, components may no longer function properly or safety devices may be rendered inoperative. They may cause serious injury to persons.
- Clean the charger as described in this User Manual.
■ If the charger is not serviced or repaired correctly, components may no longer function properly or safety devices may be rendered inoperative. This may result in serous or fatal injury to people.
- Do not attempt to service or repair the charger.
■ If the connecting cable is faulty or damaged:
▶ Have the connecting cable replaced by a STIHL dealer.
5 Preparing Charger for Use
5.1 Preparing the Charger for Use
The following steps must be performed before commencing work:
▶ If the connecting cable is pluggable:
▶ Fit the connecting cable, 6.1.
▶ Make sure the charger is in a safe condition, 4.5.
▶ Clean the charger, 0.1.
▶ If you cannot carry out this work: Do not use the charger and contact your STIHL authorized dealer.
6 Assembling the charger
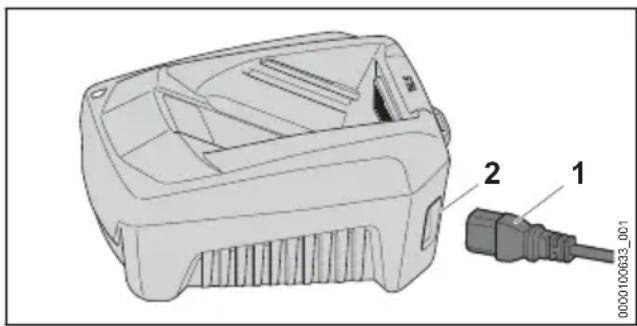
6.1 Attaching the connecting cable
natural_image
Technical illustration of a device housing with labeled components (no text or symbols beyond labels)▶ If the connecting cable is pluggable: Insert the cable plug (1) in the socket (2).
7 Charging the Battery, LEDs
7.1 Mounting the charger on a wall
The charger can be mounted on a wall.
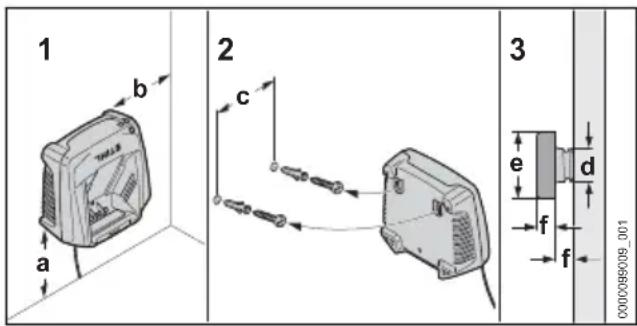
▶ Check the following points when mounting the charger on a wall:
– Use suitable mounting materials.
- The charger is level.
The following dimensions are observed:
- a = at least 100 mm
- b = at least 100 mm
- c = 100 mm
-d=4.5mm
- e = 9 mm
- f = 2.5 mm
7.2 Charging the battery
The charging time depends on various factors, e.g. the battery temperature or the ambient temperature. For optimum performance, note the recommended temperature ranges, 3.4. The actual charging time may vary from the charging time indicated. The charging time is indicated at www.stihl.com/charging-times.
The charging process starts automatically when the mains plug is plugged into a socket and the battery is inserted into the charger. The charger switches off automatically when the battery is fully charged.
The battery and the charger warm up during charging.
The charger has a built-in fan which may cut in and out during the charging process.
- Plug the mains plug (6) into an easily accessible socket (7).
The charger (3) will run a self-test. The LED (4) will glow green for about 1 second and red for about 1 second.
- Routing the connecting cord (5).
▶ Insert the battery (2) in the guides in the charger (3) and press it home as far as stop. The LED (4) glows green. The LEDs (1) glow green and the battery (2) is being charged.
▶ When the LED (4) and the LEDs (1) on the battery stop glowing: The battery (2) is fully charged and can be taken out of the charger (3)
▶ If the charger (3) is no longer required. Disconnect the mains plug (6) from the wall outlet (7).
7.3 LED on Charger
The LED indicates the operating status of the charger.
If the LED glows green, the battery is being charged.
▶ If the LED flashes red: Rectify the malfunction. Malfunction in charger.
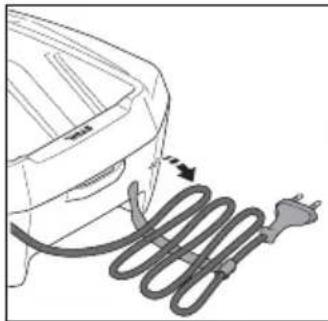
8 Transporting
8.1 Transporting the Charger
▶ Disconnect the plug from the wall outlet.
▶ Remove the battery.
- Wind up the connecting cable and attach it to the charger.
▶ Transporting the charger in a vehicle: Secure the charger with lashing straps, belts or a net to prevent it turning over and moving.
9 Storing
9.1 Storing the Charger
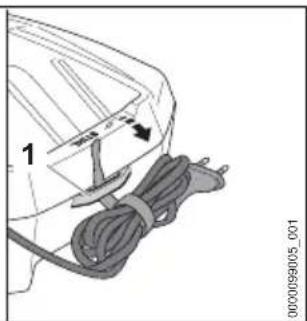
▶ Disconnect the mains plug from the socket.
natural_image
Diagram of a car charger with a coiled cable and plug, showing electrical connections (no text or symbols)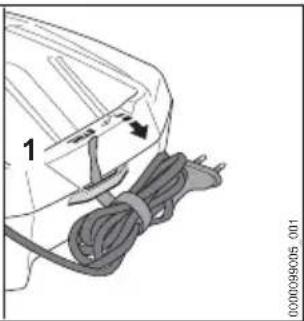
natural_image
Diagram of a cable being inserted into a device, showing a connector and cable (no text or symbols)-
Wind up the connecting cable and attach it to the charger.
▶ Observe the following points when storing the charger: -
Charger is out of the reach of children.
- The charger is clean and dry.
– Charger is in an enclosed space. - The charger is not suspended from the connecting cable or the holder (1) for the connecting cable.
- The charger is not stored outside of the specified temperature limits, 13.3.
10 Cleaning
10.1 Cleaning the Charger
▶ Disconnect the mains plug from the power supply.
▶ Clean the charger with a damp cloth.
▶ Clean vents with a paintbrush.
- Clean the charger's electrical contacts with a paintbrush or a soft brush.
11 Maintenance and Repairs
11.1 Servicing and Repairing the Charger
The charger cannot be serviced or repaired by the user.
▶ If your charger has a malfunction or is damaged or requires servicing: Contact your STIHL authorized dealer.
▶ If the connecting cable is faulty or damaged:
▶ If the connecting cable is pluggable: Replace the connecting cable.
▶ If the connecting cable is not pluggable: Do not use the charger and have the connecting cable replaced by a STIHL authorized dealer.
12 Troubleshooting
12.1 Troubleshooting the Charger
| Fault LED on Charger | Cause Remedy | |
| Battery not being charged. | The LED flashes red. | No electrical contact between charger and battery. |
| There is a malfunction in the charger. | ||
| The charger does not run a self test. | The LED glows green for about 1 second and then red for about 1 second. | Electrical contact to charger was briefly interrupted. |
13 Specifications
13.1 STIHL AL 301, AL 501 Charger
– Rated voltage: See rating plate
– Frequency: see rating plate
– Rated power: see rating plate
– Charging current: See rating plate
For charging times, see www.stihl.com/charging-times.
13.2 Extension Cords
If an extension cord is used, the cross sectional area of its conductors must meet the following minimum requirements – depending on the line voltage and length of the extension cord:
If rated voltage on the rating label is 220V to 240V:
– Cord length up to 20 m: AWG 15 / 1.5 mm ^4
- Cord length 20 m up to 50 m: AWG 13 / 2.5 mm ^2
If rated voltage on the rating label is 100V to 127V:
– Cord length up to 10 m: AWG 14 / 2.0 mm ^4
- Cord length 10 m up to 30 m: AWG 12 / 3.5 mm ^2
13.3 Temperature limits

WARNING
■ The battery is not protected against all ambient conditions. If the battery is exposed to certain environmental conditions, it may catch fire or explode. This may result in serious injury to people and damage to property.
- Do not charge the battery below -20°C or above 50°C.
▶ Do not store the battery or charger below -20^ or above +70^ .
13.4 Recommended temperature ranges
For optimum performance of the battery and charger, observe the following temperature ranges:
- Charging: 5°C to 40°C
- Storage: -20^ to +50^
If the battery is charged or stored outside the recommended temperature ranges, performance may be reduced.
If the battery is wet or moist, allow the battery to dry for at least 48 h between 15^ C and 50^ C and with less than 70% humidity. Higher humidity may extend the drying time.
13.5 REACH
REACH is an EC regulation and stands for the Registration, Evaluation, Authorisation and Restriction of Chemical substances.
For information on compliance with the REACH regulation see www.stihl.com/reach.
14 Spare Parts and Accessories
14.1 Spare parts and accessories
STIHL These symbols indicate original STIHL spare parts and original STIHL accessories.
STIHL recommends the use of original STIHL spare parts and accessories.
Despite ongoing market observation, STIHL is unable to judge the reliability, safety and suitability of other manufacturers' spare parts and accessories; accordingly, STIHL cannot warrant for the use of those parts.
Original STIHL spare parts and original STIHL accessories are available from STIHL dealers.
15 Disposal
15.1 Disposing of the charger
Contact the local authorities or your STIHL dealer for information on disposal.
Improper disposal can be harmful to health and pollute the environment.
▶ Take STIHL products including packaging to a suitable collection point for recycling in accordance with local regulations.
- Do not dispose with domestic waste.
16 Addresses
www.stihl.com
Table des matières
natural_image
Technical illustration of a plastic housing component with labeled parts (1, 2), no readable text or symbols beyond labelsnatural_image
Diagram of a car charger with a coiled cable and plug, showing electrical connections (no text or symbols)
natural_image
Diagram of a cable being inserted into a device, showing a connector and cable (no text or symbols present)natural_image
Technical illustration of a device housing with labeled components (no text or symbols present)natural_image
Line drawing of a car charger with a plug inserted, showing wiring and charging cable (no text or symbols)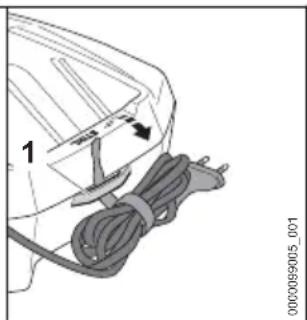
natural_image
Diagram of a cable being inserted into a device, showing a connector and cable (no text or symbols present)natural_image
Technical illustration of a device housing with labeled components (no text or symbols beyond labels)natural_image
Diagram showing two steps of cord insertion: one with a plug and cable, the other with a cord tied to a plug (no text or symbols present)natural_image
Technical illustration of a device housing with labeled components (no text or symbols beyond labels)- Om anslutningskabeln kan stickas in: Sätt i kontakten (1) i uttaget (2).
natural_image
Diagram showing two steps of cord insertion: one with a plug, the other with a cord tied to a cable (no text or symbols present)natural_image
Technical illustration of a plastic device housing with labeled components (no text or symbols present)natural_image
Line drawing of a car rear bumper with a plug inserted, showing a curved cable and arrow indicating direction (no text or symbols)
natural_image
Diagram of a cable being inserted into a device, showing a connector and cable (no text or symbols present)natural_image
Technical illustration of a device housing with labeled components (no text or symbols beyond labels)natural_image
Diagram of a car charger with a plug and cable, showing electrical connections (no text or symbols)
natural_image
Diagram of a cable being inserted into a device, showing a connector and cable (no text or symbols present)natural_image
Technical illustration of a medical device housing with labeled components (no text or symbols present)natural_image
Diagram showing two steps of a plug being inserted into a container, with no visible text or symbols.natural_image
Technical illustration of a device housing with labeled components (1, 2), no readable text or symbols beyond labels▶ Hvis tilkoblingsledningen er pluggbar: Sett pluggen (1) inn i kontakten (2).
natural_image
Diagram showing two steps of cord insertion: one with a coiled cable, the other with a cord tied to a plug (no text or symbols present)Ladetidene er angitt under www.stihl.com/charging-times.
natural_image
Technical illustration of a plastic housing component with labeled parts (1, 2), no readable text or symbols beyond labelsnatural_image
Diagram of a car rear bumper with a plug inserted, showing the cable being inserted (no text or symbols present)
natural_image
Diagram of a cable being inserted into a device, showing a plug and cable (no text or symbols)natural_image
Technical illustration of a mechanical device with labeled parts (1, 2), no readable text or symbols beyond labelsnatural_image
Diagram showing two steps of cord insertion: one with a coiled cable and arrow indicating direction, the other with a cord tied to a plug (no text or symbols present)natural_image
Technical illustration of a plastic housing component with labeled parts (1, 2), no readable text or symbols beyond labelsSe a linha de conexão for de encaixe: encaixar a ficha (1) na tomada (2).
natural_image
Line drawing of a car charging plug with a power plug, showing cable routing and charging direction (no text or symbols)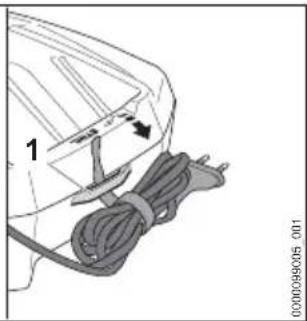
natural_image
Diagram of a cable being inserted into a device, showing a cable with a pin and a separate cable (no text or symbols present)natural_image
Technical illustration of a plastic device housing with labeled components (no text or symbols beyond labels)- Ak je prívodný kábel zapájací: konektor (1) zapojte do zásuvky (2).
natural_image
Diagram showing two steps of cord insertion: one with a plug, the other with a cord tied to a cable (no text or symbols present)natural_image
Technical illustration of a device housing with labeled components (no text or symbols beyond labels)natural_image
Line drawing of a car charger with a coiled cable and plug, no text or symbols present
natural_image
Diagram of a cable being inserted into a device, showing a connector and cable (no text or symbols present)natural_image
Technical illustration of a plastic device housing with labeled components (no text or symbols present)natural_image
Two-step diagram showing a plug being inserted into a car's front cover, with no text or symbols present.natural_image
Technical illustration of a plastic housing component with labeled parts (1, 2), no readable text or symbols beyond labelsnatural_image
Diagram of an electric car charger with a plug, showing cable routing and charging cable (no text or symbols)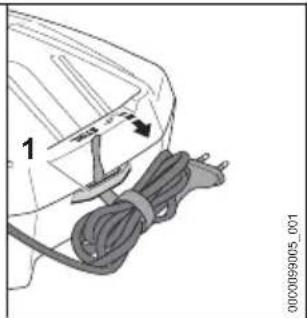
natural_image
Diagram showing a cable being inserted into a container with a labeled component (no text or symbols on the diagram itself)natural_image
Technical illustration of a device housing with labeled components (no text or symbols present)natural_image
Line drawing of a car charger with an electric plug inserted, showing the charger's cable and outlet (no text or symbols)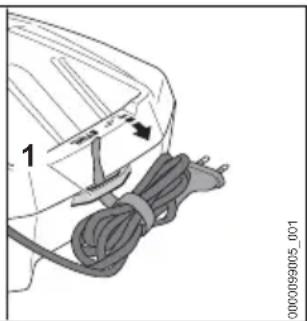
natural_image
Diagram of a cable being inserted into a device, showing a cable with a pin and a separate cable (no text or symbols present)natural_image
Technical illustration of a plastic housing component with labeled parts (1, 2), no readable text or symbols beyond labelsnatural_image
Line drawing of a car rear bumper with a coiled cable and plug, no text or symbols present
natural_image
Diagram of a cable being inserted into a device, showing a clip and wire (no text or symbols)natural_image
Technical illustration of a plastic housing component with labeled parts (1, 2), no readable text or symbols beyond labelsnatural_image
Diagram showing two steps of cord insertion: one with a plug and cable, the other with a cord tied to a cable (no text or symbols present)natural_image
Technical illustration of a plastic device housing with labeled components (no text or symbols present)natural_image
Line drawing of a car rear bumper with a plug plugged into the seat (no text or symbols)
natural_image
Diagram of a cable being inserted into a device, showing a cable with a pin and a separate cable (no text or symbols present)natural_image
Diagram showing two steps of cord insertion: one with a plug and cable, the other with a cord tied to a plug (no text or symbols present)natural_image
Technical illustration of a mechanical device housing with labeled parts (1, 2), no readable text or symbols beyond labelsnatural_image
Diagram of a car charger with a plug inserted, showing cable routing and charging cable (no text or symbols)
natural_image
Diagram of a cable being inserted into a container, showing rope routing and a labeled component (no text or symbols on the diagram itself)natural_image
Technical illustration of a device housing with labeled components (no text or symbols present)natural_image
Diagram of an electric vehicle rear panel connected to a power plug, showing wiring and charging cable (no text or symbols)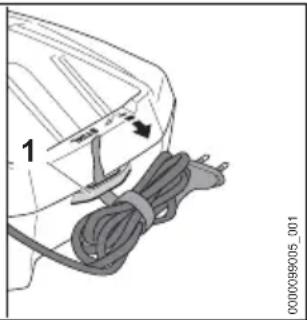
natural_image
Diagram of a cable being inserted into a container, showing rope routing and a labeled component (no text or symbols on the diagram itself)natural_image
Technical illustration of a mechanical device housing with labeled components (no text or symbols present)natural_image
Diagram showing two steps of cord insertion: one with a coiled cable and arrow indicating direction, the other with a cord tied to a plug (no text or symbols present)natural_image
Technical illustration of a plastic housing component with labeled parts (1, 2), no readable text or symbols beyond labelsnatural_image
Diagram showing two steps of cord insertion: one with a plug and cable, the other with a cord tied to a plug (no text or symbols present)natural_image
Technical illustration of a plastic housing component with labeled parts (1, 2), no readable text or symbols beyond labelsnatural_image
Diagram showing two cable installation steps: one with a plug and cable being inserted, the other with a plug and cable being wrapped in wires (no text or symbols present)▶ Priključni kabl zamotajte i pričvrstite na punjač.
- Punjač čuvajte tako da budu ispunjeni sledeći uslovi:
– Punjač je van domašaja dece.
– Punjač je čist i suv.
– Punjač je u zatvorenom prostoru.
natural_image
Technical illustration of a device housing with labeled components (no text or symbols present)natural_image
Diagram of a car charger with a plug plugged into the charger (no text or symbols present)