
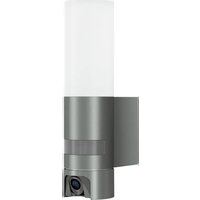
Spot Garden SC - Lamp STEINEL - Free user manual and instructions
Find the device manual for free Spot Garden SC STEINEL in PDF.
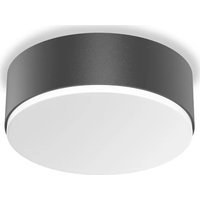
| Product type | Outdoor LED lamp with motion detector and Bluetooth connectivity |
| Brand / Model | Steinel Spot Garden SC |
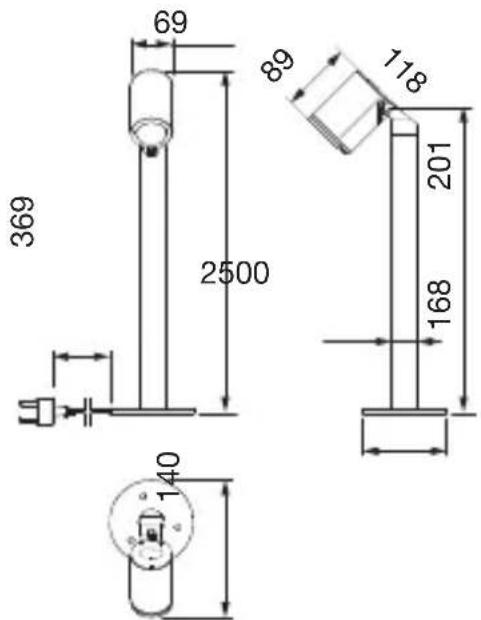
| Dimensions (L × W × H) | 69 × 118 × 369 mm |
| Cable length | 2,500 mm with mains plug |
| Supply voltage | 220-240 V, 50/60 Hz |
| Power consumption (Pon) | 7.90 W |
| Luminous flux | 512 lm (efficiency 64.8 lm/W) |
| Color temperature | 3,000 K (warm white) |
| Color rendering index | Ra > 80 |
| Average lifespan | L70B50 at 25 °C: > 20,000 h |
| Detection technology | Passive infrared (PIR) |
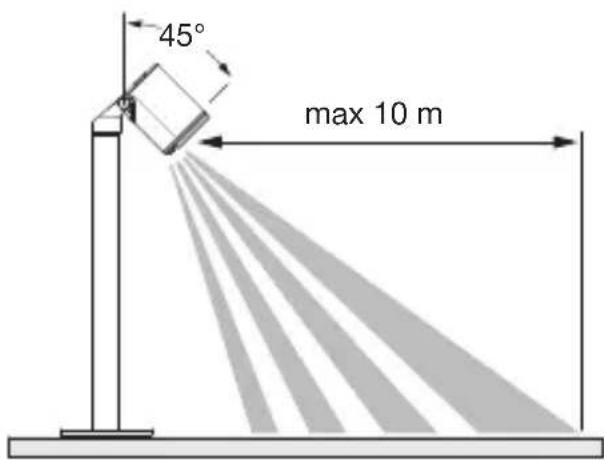
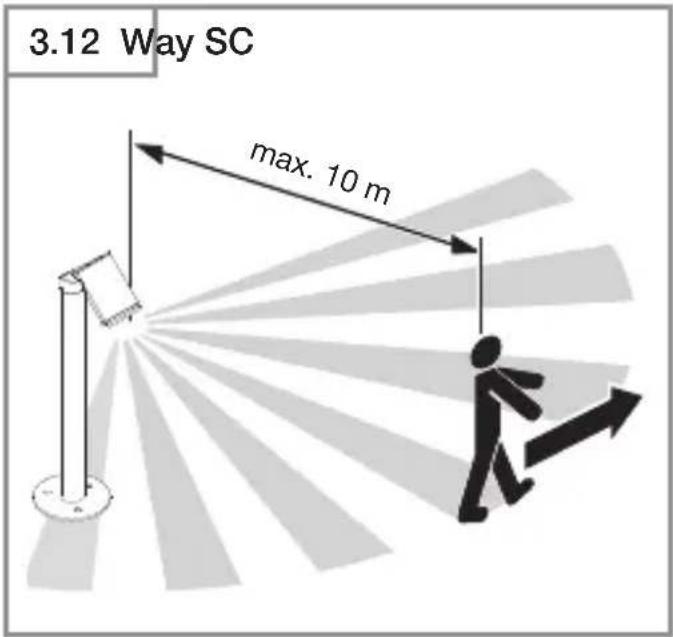
| Detection angle / Range | 90° / max. 10 m |
| Adjustable time delay | 5 s – 60 min (via app) |
| Trigger threshold | 2 – 2,000 lx (adjustable via app) |
| Protection rating | IP44 (suitable for outdoor use) |
| Protection class | I (earth connection required) |
| Connectivity | Bluetooth 2.4 – 2.48 GHz (Steinel Connect app) |
| Included light source | GU10 LED max. 9 W (replaceable) |
| Mounting | On ground spike (included) |
| Ambient temperature | -20 °C to +40 °C |
| Maintenance | Clean with a damp cloth without detergent |
| Manufacturer warranty | 3 years (5 years for XLED home series) |
Frequently Asked Questions - Spot Garden SC STEINEL
User questions about Spot Garden SC STEINEL
0 question about this device. Answer the ones you know or ask your own.
Ask a new question about this device
Download the instructions for your Lamp in PDF format for free! Find your manual Spot Garden SC - STEINEL and take your electronic device back in hand. On this page are published all the documents necessary for the use of your device. Spot Garden SC by STEINEL.
USER MANUAL Spot Garden SC STEINEL
natural_image
Black-and-white illustration of a modern desk lamp with a cylindrical lens and a small stand (no text or symbols visible)Spot Way
Spot Way NightAuto
Spot Way SC
Spot Garden
Spot Garden NightAuto
Spot Garden SC

GB.....20 Follow written instructions!
natural_image
Technical line drawing of a pole-mounted electrical fixture with coiled cable, screw base, and three screws (no text or symbols)3.2 Garden
natural_image
Line drawing of a handheld industrial air conditioner with attached cable and terminal (no text or symbols)3.3 Way
3.5 Way SC
3.4 Garden
3.6 Way NightAuto
3.7 Way
3.9 Garden NightAuto
3.10 Garden

3.8 Garden SC
3.11 Way SC
radar
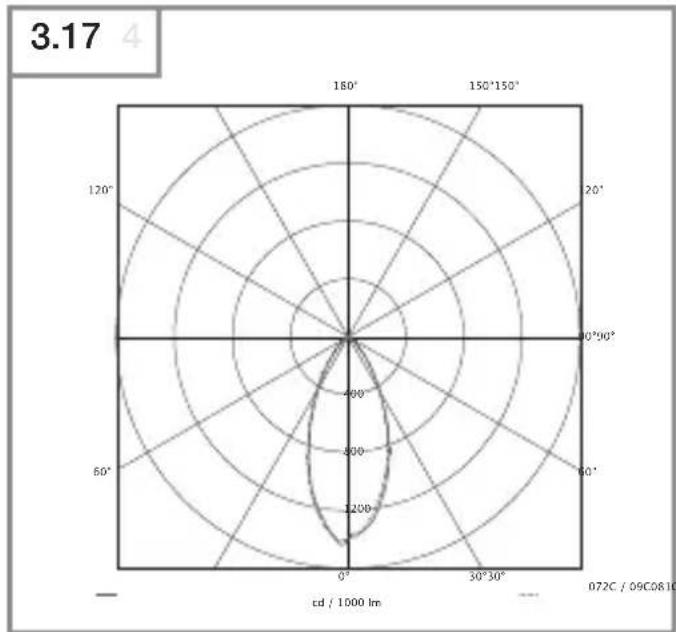
| Angle | Value | |-------|-------| | 0° | 1200 | | 30° | 800 | | 60° | 400 | | 90° | 200 | | 120° | 100 | | 150° | 50 | | 180° | 25 |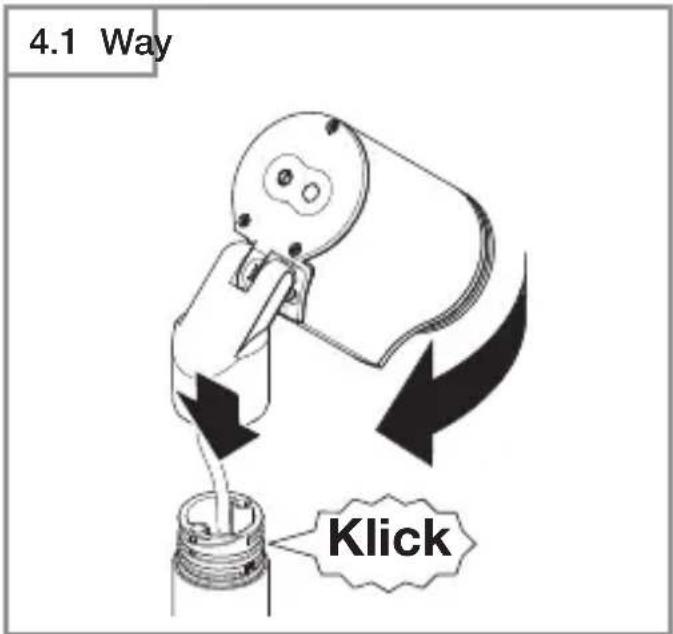
4.6 Garden 4.7 Garden
natural_image
Technical line drawing of a mechanical device with a rotating lever and adjustment mechanism (no text or symbols)
natural_image
Illustration of a hair dryer with a hose and plug, surrounded by flowers and a tiled wall (no text or symbols)4.8 Garden
natural_image
Diagram of a robotic arm connecting to a wall-mounted device with cable (no text or symbols)5.1 NightAuto
natural_image
Technical line drawing of a mechanical device with a lever and rotating component (no text or symbols)6.1 Way
6.2 Garden
5.2

6.3
natural_image
Technical illustration of a mechanical component with circular motion arrows indicating rotation (no text or symbols)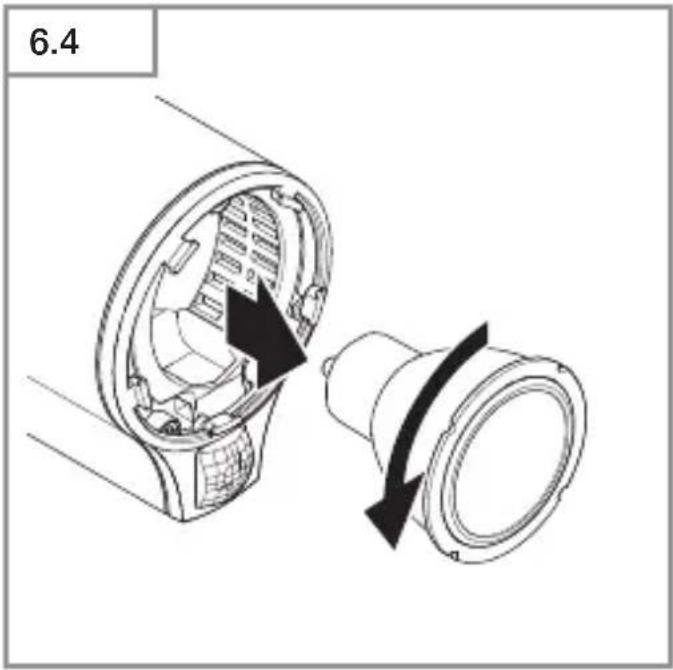
natural_image
Technical diagram showing a mechanical component with two circular parts, one highlighted by arrows indicating rotation or movement (no text or symbols present)DE

- Please read carefully and keep in a safe place.
- Undercopyright.
Reproduction either in whole or in part only with our consent. - Subject to change in the interest of technical progress.
- All product dimensions in mm.
Symbols

Hazard warning!

Reference to other information in the document.
2. General safety precautions

Disconnect the power supply before attempting any work on the unit.
→Only use genuine replacement parts.
→Repairs may only be made by specialist workshops.
→Not suitable for use with halogen lamps.
3. Way / Garden
Proper use
- Outdoor LED light for mounting on the ground.
- For connection to an IP44 power socket.
Spot Way NightAuto / Spot Garden NightAuto
- The sensor-switched LED light contains a light-level sensor.
Spot Way SC / Spot Garden SC
- The sensor-switched LED light contains an infrared motion detector and can only be adjusted via Bluetooth and app.
Non-intended use
- The LED light cannot be dimmed.

Not dimmable
Way spot package contents (Fig. 3.1)
– Light including pillar, ground plate and power cord cable with mains plug
- Three screws
- Three ground plugs
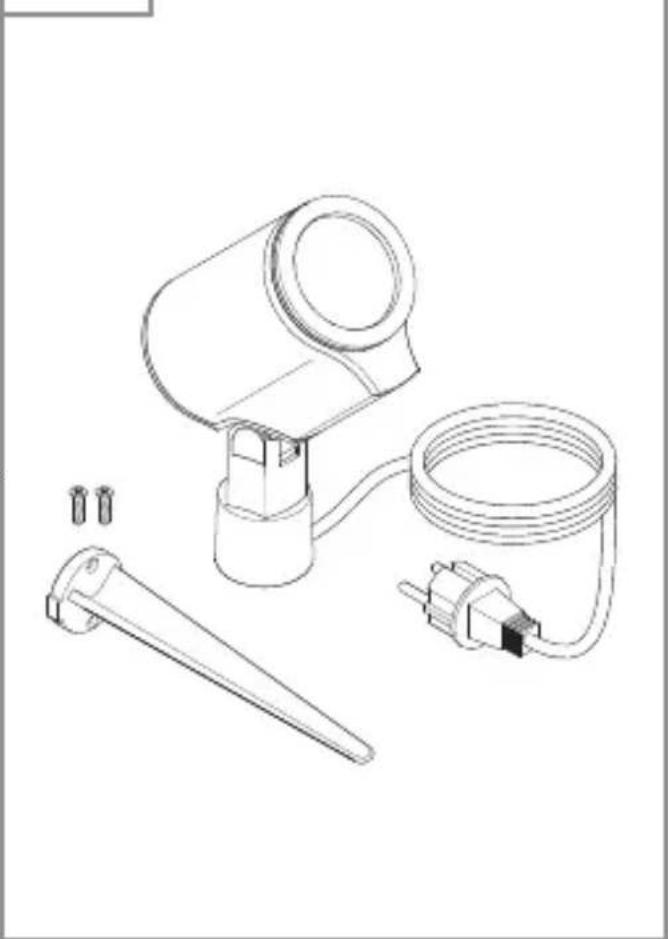
Garden spot package contents (Fig. 3.2)
– Light including power cord cable with mains plug
- Ground spike
- Two screws
Spot Way product dimensions (Fig. 3.3)
Spot Garden product dimensions (Fig. 3.4)
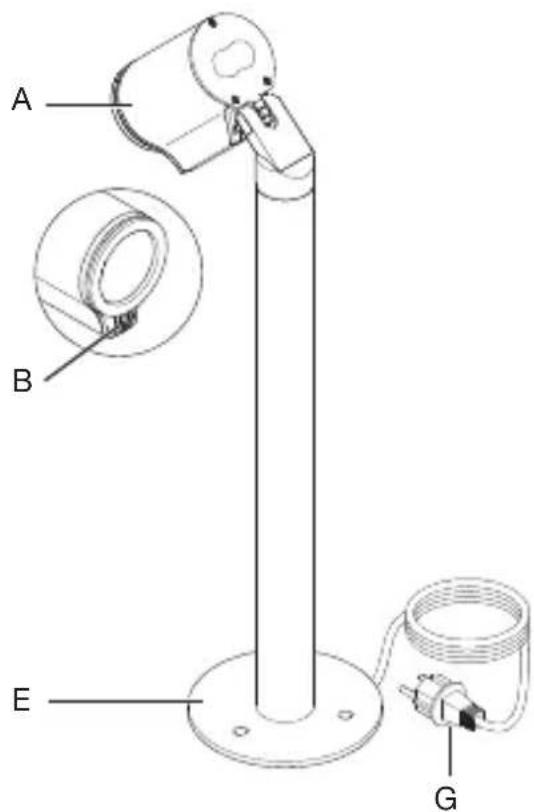
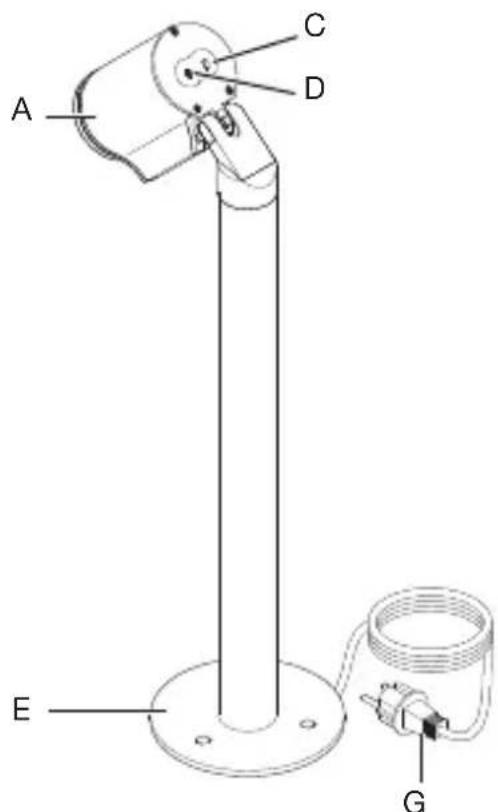
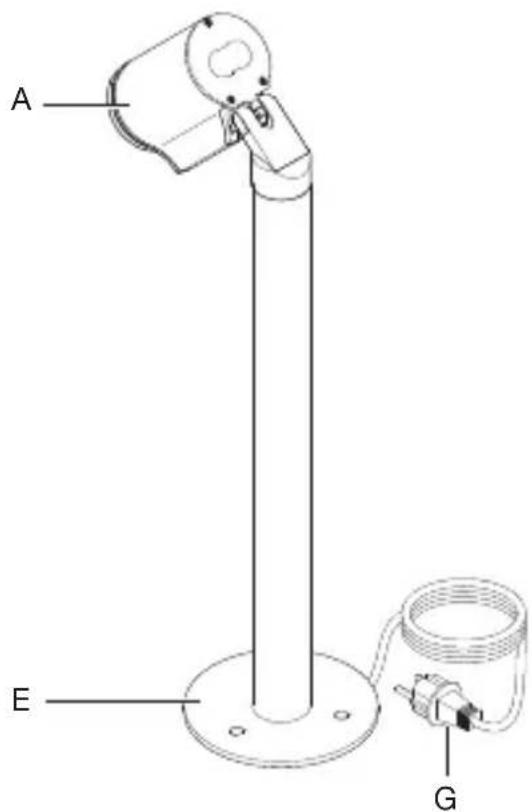
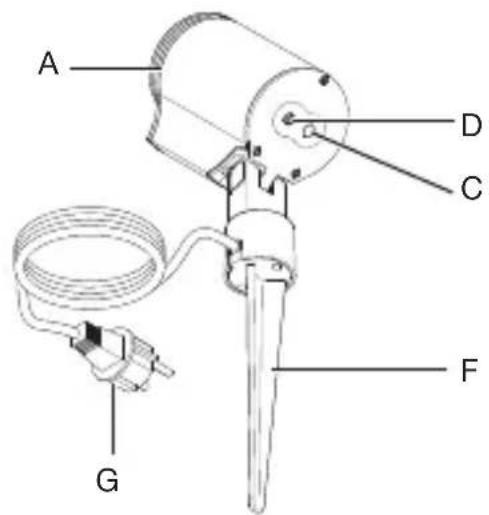
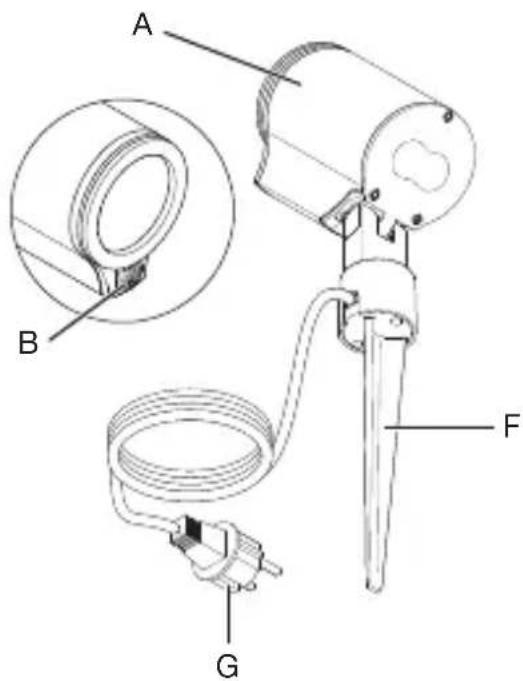
Product parts (Fig. 3.5 - 3.10)
A Light enclosure
B Motion sensor (Spot Way / Spot Garden SC only)
C Light-level sensor (Spot Way / Garden NightAuto only)
D Twilight setting (Spot Way / Garden NightAuto only)
E Pillar with ground plate (Spot Way only)
F Ground spike (Spot Garden only)
G Mains power cord with plug
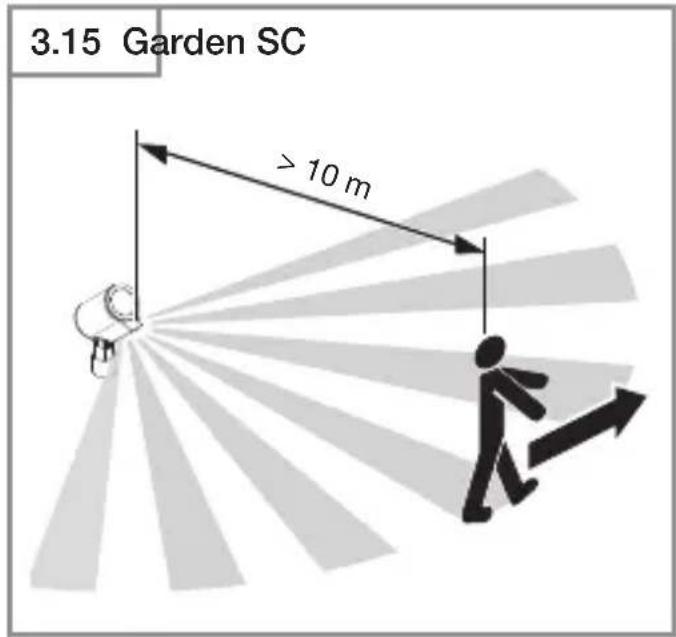
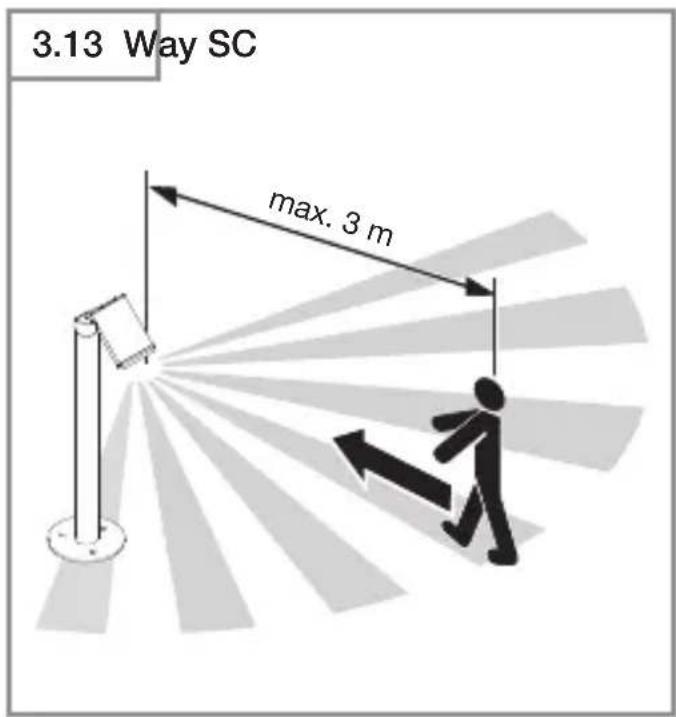
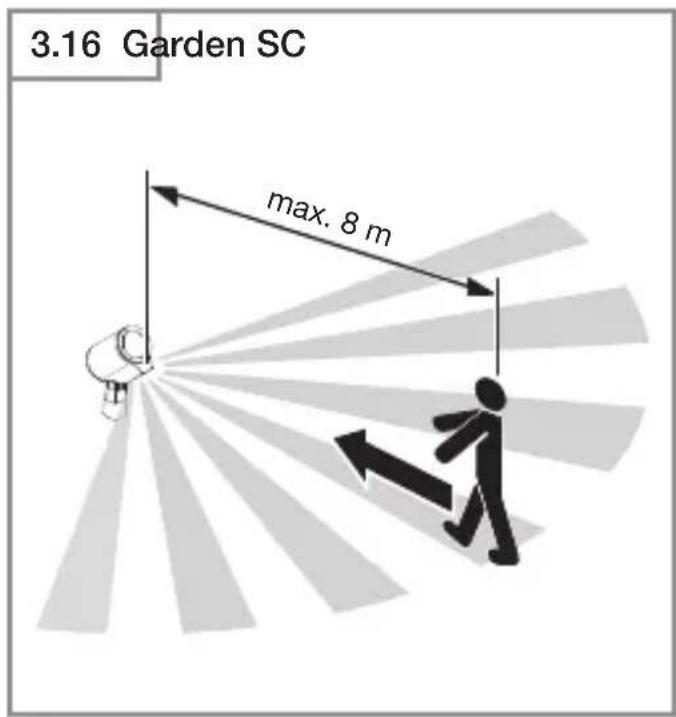
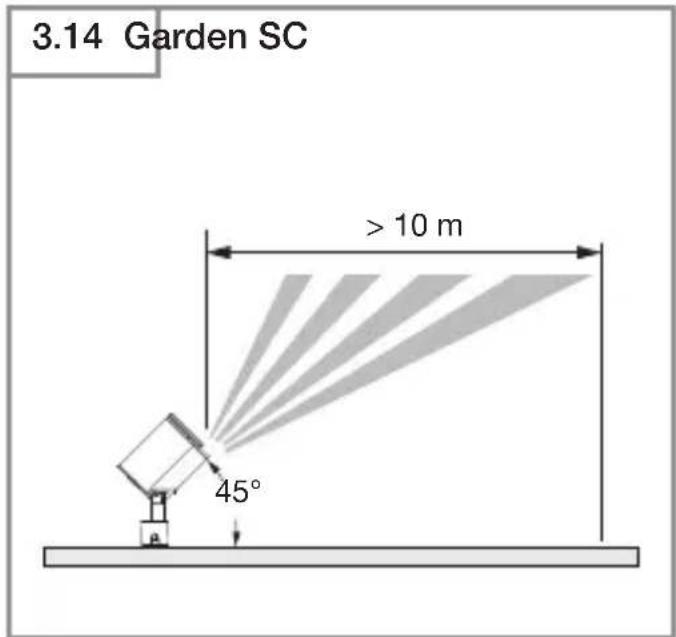
Detection zone for Spot Way / Spot Garden SC (Fig. 3.11 - 3.16)
Luminous intensity distribution (Fig. 3.17)
4. Installation
→Check all components for damage.
→Do not use the product if it is damaged.
→This light's external, flexible cord cannot be replaced.
If the cord gets damaged, the entire light must be replaced.
→ When installing the light, make sure the installation site is not subject to vibration.
→ Select an appropriate mounting location, taking the reach and motion detection into consideration.
Spot Way / Spot Garden SC only:
The most reliable way to detect movement is given by mounting the light to point across the direction in which people walk and by making sure no obstacles (e.g. trees, walls etc.) interrupt the line of sensor vision.
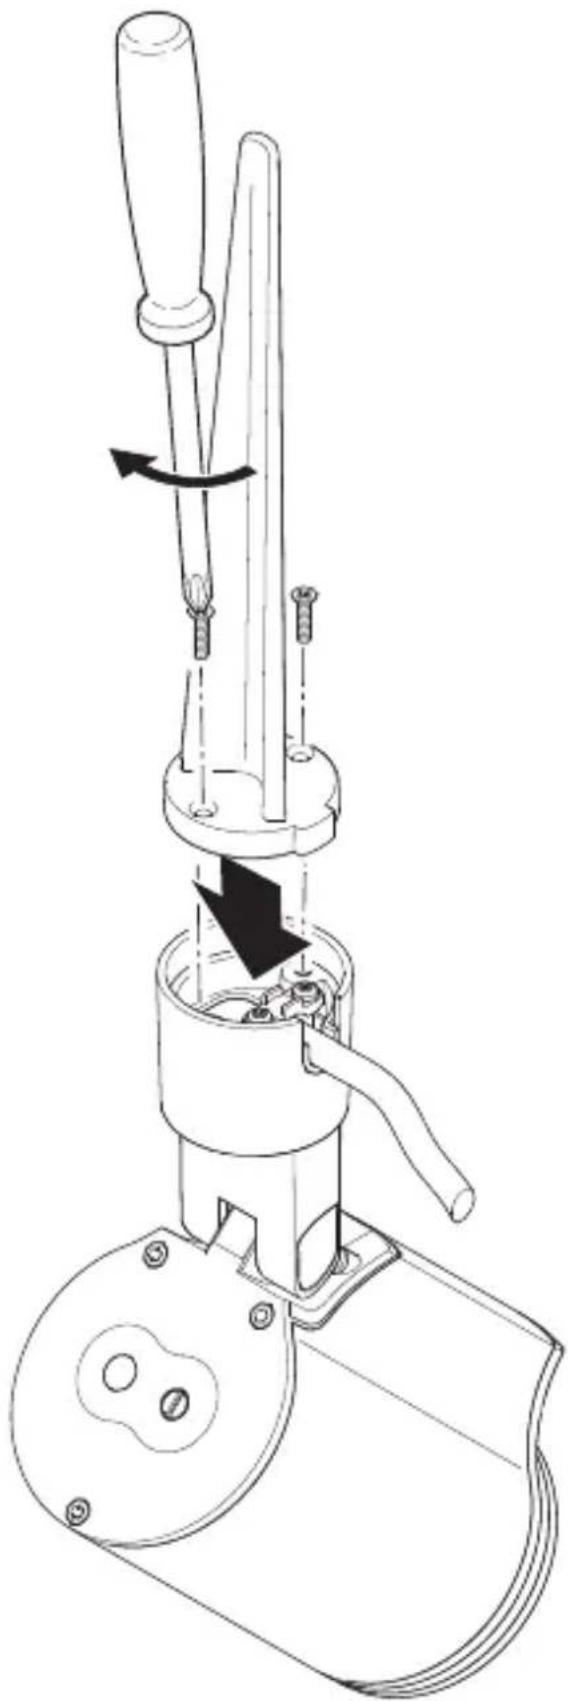
Way mounting procedure
→ Fit floodlight head on pillar and turn until it clicks into place. (Fig. 4.1)
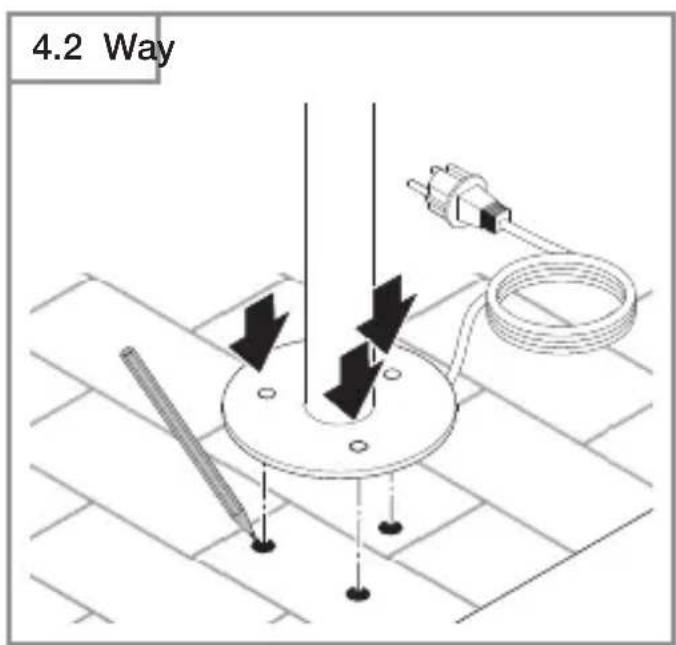
→ Mark drill holes for ground plate. (Fig. 4.2)
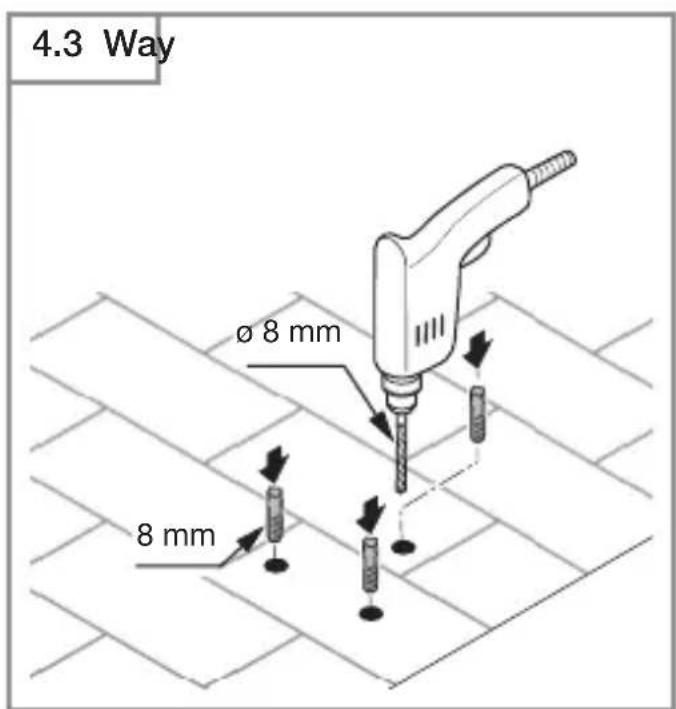
→ Drill holes and fit ground plugs. (Fig. 4.3)
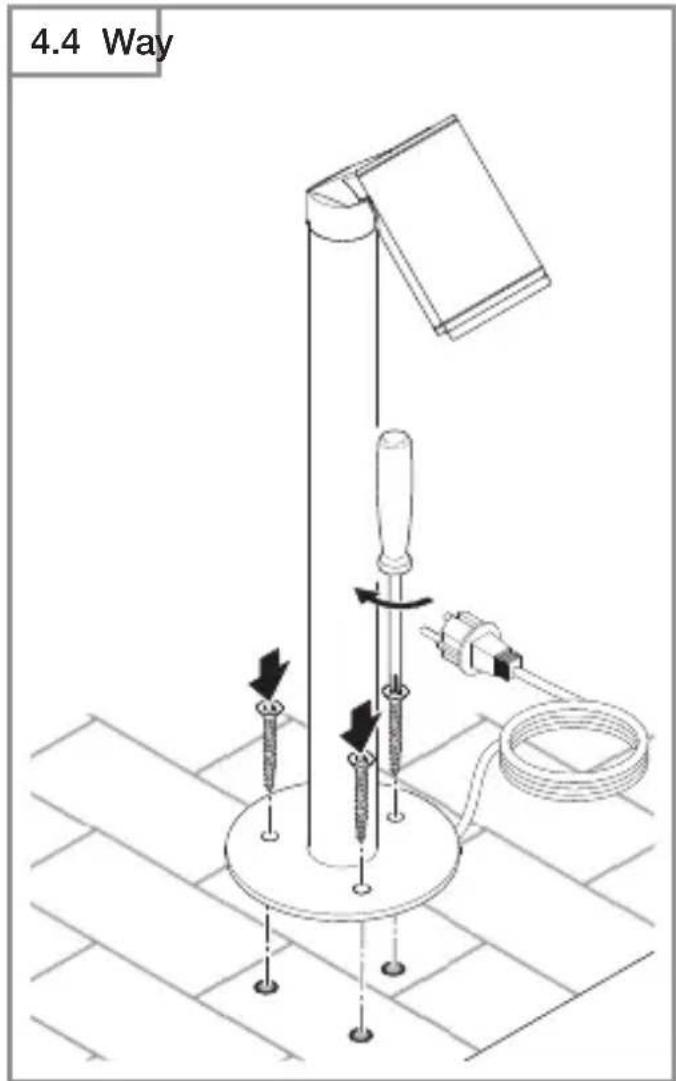
→ Procedure for mounting light on ground. (Fig. 4.4)
→Connect plug. (Fig. 4.5)
→Make settings.
→„5. Function“
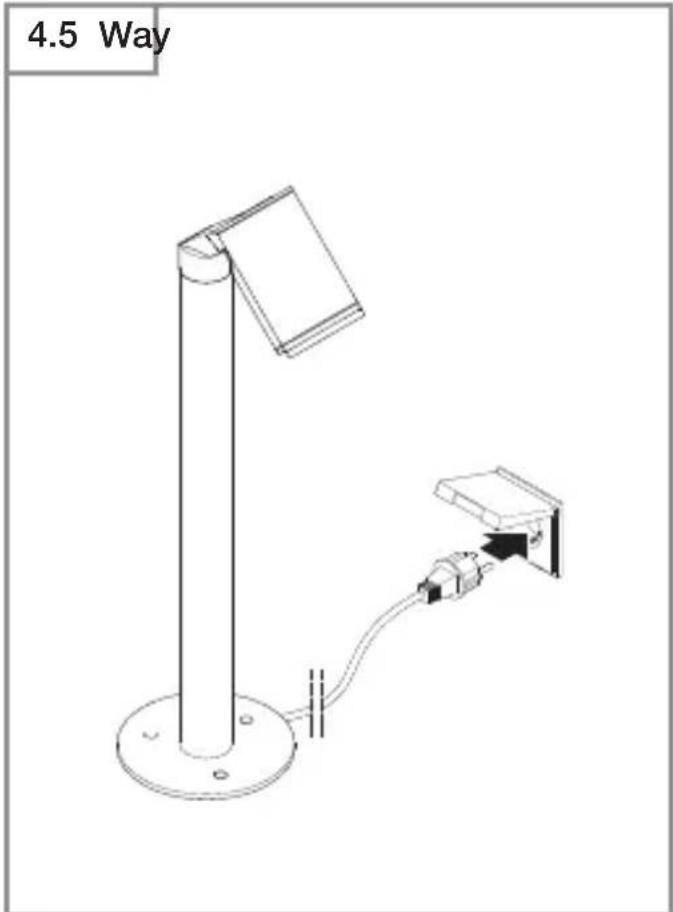
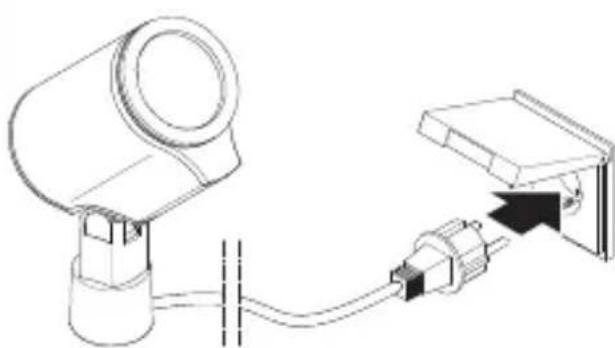
Mounting procedure for Garden
→Attach ground spike to light. (Fig. 4.6)
→Push light into ground. (Fig. 4.7)
→Connect plug. (Fig. 4.8)
→Make settings.
→„5. Function“
Information for NightAuto version
→ Make sure that the light-level sensor is not covered (e.g. by leaves).
5. Function
Spot Way NightAuto / Spot Garden NightAuto
Factory settings
- Control dial set to ⚙ = permanently ON
Twilight setting (Fig. 5.2 D)
The light's chosen response threshold can be infinitely varied from approx. 2 to 1,000 lux.
- Control dial set to ⚙ = permanently ON
- Control dial set to = night-time operation (approx. 2 lux)
For performing the functional test in daylight, the control dial must be set to

Spot Way SC / Spot Garden SC
Factory settings
– Twilight setting: 2,000 lux
– Time setting: 5 seconds
STEINEL Connect App
To configure the light via smartphone or tablet, you must download the STEINEL Connect App from your app store. You will need a Bluetooth-capable smartphone or tablet.
Android iOS


Following functions can be set via STEINEL Connect App:
- Time setting
– Twilight setting - ON and OFF times
- Automatic / manual control, depending on situation
- Interconnection
- Grouping
- Naming groups and lights
Note:
After the light switches OFF, it takes approx. 1 second before it is able to start detecting movement again. The light will only switch ON in response to movement once this period has elapsed.
The Spot SC has an internal clock for time-based activation and deactivation.
This automatically synchronises with the clock of the connected smartphone via the STEINEL Connect App each time a Bluetooth connection is established.
To ensure correct function following an interruption in the light's power supply, it must be re-connected via the STEINEL Connect App. The internal clock is re-synchronised with the smartphone clock.
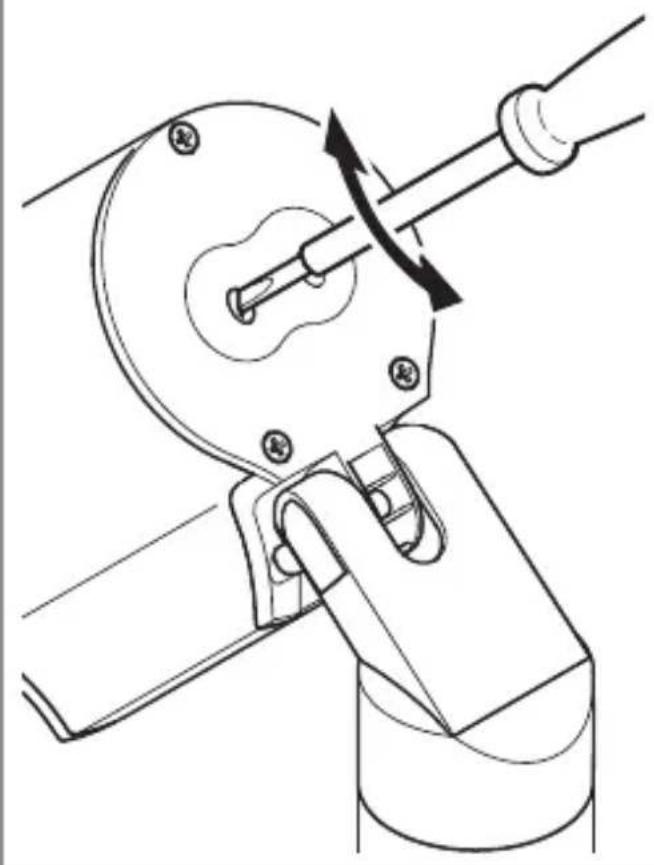
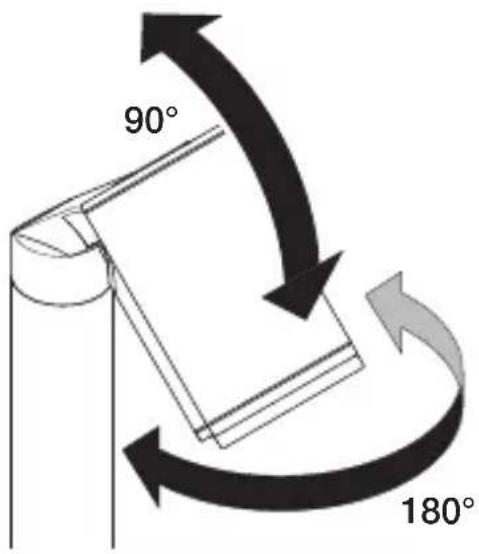
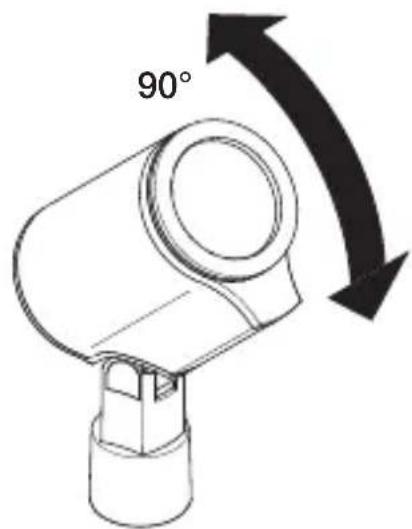
6. Light tilting / swivelling range / changing lamp
Light tilting / swivelling range
- Way (Fig. 6.1)
- Garden (Fig. 6.2)
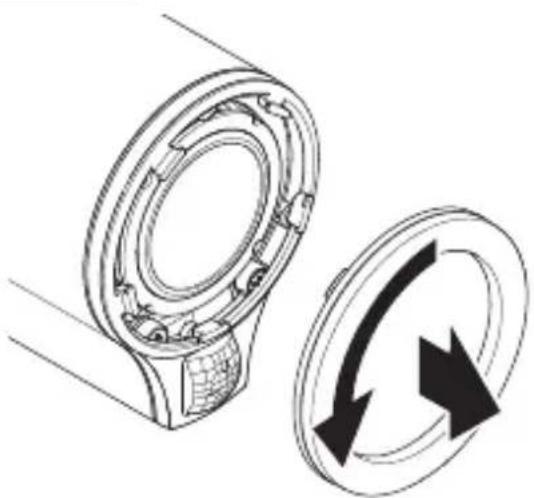
Changing lamp
→ Undo glass cover and detach from light enclosure. (Fig. 6.3)
→Disconnect and remove lamp. (Fig. 6.4)
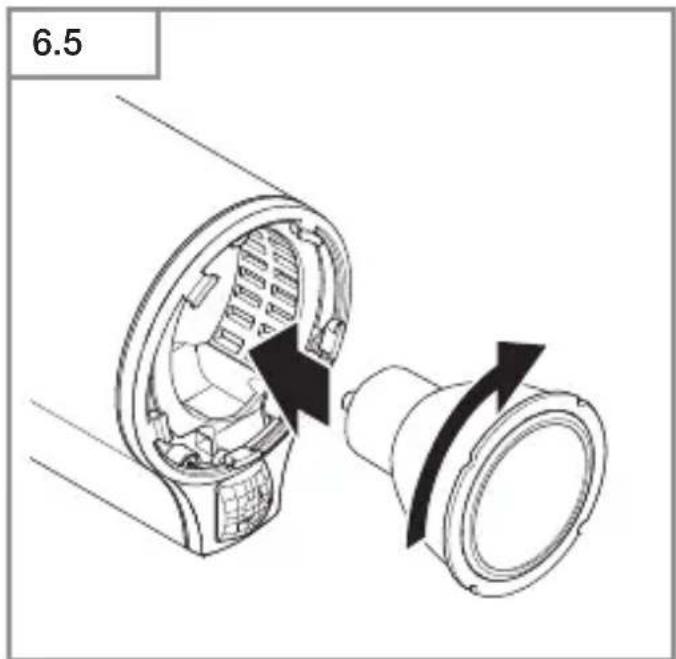
→ Insert new lamp and twist to engage. (Fig. 6.5)
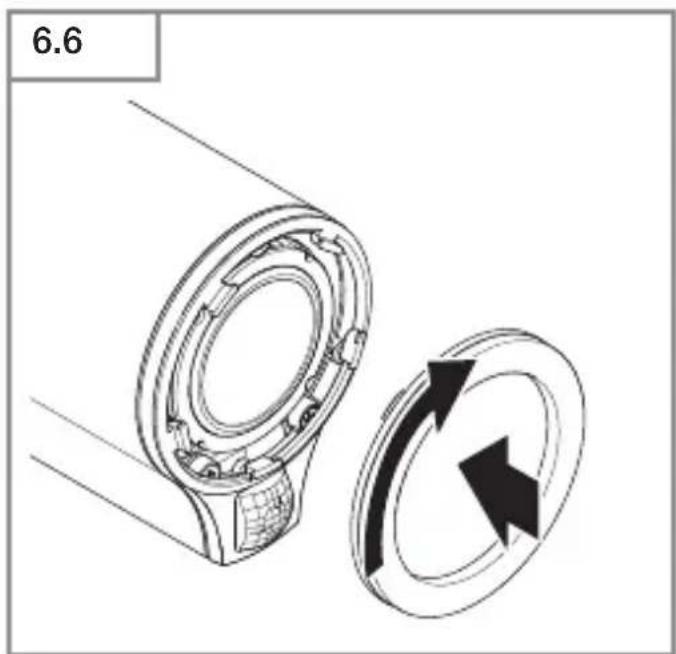
→ Fit glass cover and twist to engage. (Fig. 6.6)
Important:
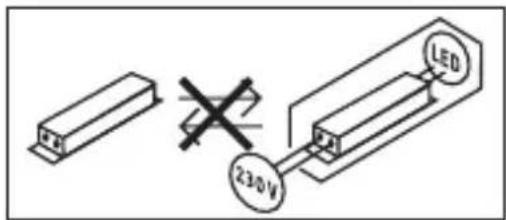
Only use GU10 LED lamp with a wattage up to 9 W.
Note:
→ On changing a lamp, make sure that the seal and sealing surface are not soiled or damaged.
7. Maintenance
The product requires no maintenance.
The light can be cleaned with a damp cloth (without detergents) if dirty.
Important note: the control gear cannot be replaced.
8. Disposal
Electrical and electronic equipment, accessories and packaging must be recycled in an environmentally compatible manner.
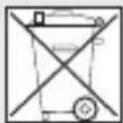
Do not dispose of electrical and electronic equipment as domestic waste.
EU countries only:
Under the current European Directive on Waste Electrical and Electronic Equipment and its implementation in national law, electrical and electronic equipment no longer suitable for use must be collected separately and recycled in an environmentally compatible manner.
9. Declaration of Conformity
Hereby, STEINEL GmbH declares that the radio equipment type Spot Way SC / Spot Garden SC is in compliance with Directive 2014/53/EU. The full text of the EU declaration of conformity is available at the following internet address:
www.steinel.de/en/declarations-of-conformity
10. Manufacturer's Warranty
Manufacturer's warranty of STEINEL GmbH, Dieselstrasse 80-84, DE-33442
Herzebrock-Clarholz, Germany
All STEINEL products meet the highest quality standards. For this reason, we, the manufacturer, are pleased to provide you, the consumer, with a warranty under the following terms and conditions:
The warranty covers the absence of deficiencies which are proven to be the result of a material defect or fault in manufacturing and which are reported to us immediately after detection and within the warranty period. The warranty shall apply to all STEINEL products sold and used in Germany - excluding STEINEL Professional products.
You can opt for warranty cover in the form of repair or replacement which will be provided free of charge (if applicable, in the form of a successor model of the same or higher quality) or in the form of a credit note.
The warranty period for the STEINEL product you have purchased is 3 years (5 years for products from the XLED home range) in each case from the date on which the product was purchased.
We shall bear the shipping costs but not the transport risks involved in return shipment.
Statutory rights accruing from defects, gratuitousness
The warranty cover described here shall be applicable in addition to the statutory rights of warranty – including special consumer protection provisions – and shall not restrict or replace them. Exercising your statutory rights in the event of defects is gratuitous.
Exemptions from the warranty
All replaceable lamps are expressly excluded from this warranty. In addition to this, the warranty shall not cover:
- any wear resulting from use or any other natural wear of product parts or any deficiencies in the STEINEL product that are attributable to wear caused by use or other natural wear,
– any improper or non-intended use of the product or any failure to observe the operating instructions,
– any unauthorised additions, alterations or other modifications to the product or any deficiencies attributable to the use of accessory,
– supplementary or replacement parts which are not genuine STEINEL parts,
– any maintenance or care of products that is not carried out in accordance with the operating instructions, - any attachment or installation that is not in accordance with STEINEL's installation instructions,
- any damage or loss occurring in transit.
Application of German law
The warranty shall be governed by German law excluding the United Nations Convention concerning the International Sale of Goods (CISG).
Making claims
If you wish to make a warranty claim, please send your product complete and carriage paid with the original receipt of purchase, which must show the date of purchase and product designation, either to your retailer or directly to us at STEINEL (UK) Ltd. – 25 Manasty Road, Axis Park, Orton Southgate, GB- Peterborough Cambs PE2 6UP United Kingdom. For this reason, we recommend that you keep your receipt of purchase in a safe place until the warranty period expires.
- Technical specifications
| Dimensions(W × D × H) (W × D × H) | Spot Way: 140 × 226 × 572 mmSpot Garden: 69 × 118 × 369 mm |
| Cord length 2,500 mm | |
| Supply voltage 220 – 240 V, 50/60 Hz | |
| Power consumption (Pon) Light* | Spot Way / Garden: 6.70 WSpot Way / Garden NightAuto: 7.86 WSpot Way / Garden SC: 7.90 W |
| Luminous flux / brightnessLight* | Spot Way / Garden: 512 lm; 76.40 lm/WSpot Way / Garden NightAuto: 512 lm; 65.10 lm/WSpot Way / Garden SC: 512 lm; 64.80 lm/W |
| Luminous flux Lamp 620 lm 92.5 lm/W | |
| Power consumption Lamp 6.7 W | |
| Standby (light) | Spot Way / Garden NightAuto: 0.20 WSpot Way / Garden SC: 0.42 W |
| Standby (network) (Pnet) Spot Way / Garden SC: 0.42 W | |
| Colour temperature* | 3,000 K (warm white) |
| Colour rendering index * | Ra > 80 |
| Average rated life expectancy* | L70B50 at 25 °C: > 20,000 hours. |
| Colour consistency SDCM* | 6 |
| Sensor technology Passive infrared (Spot Way / Garden SC only) | |
| Detection zone →Angle of coverage →Angle of aperture | (Spot Way / Garden SC only)90°90° |
| Reach max. 10 m (Spot Way / Garden SC only) | |
| Time setting 5 s – 60 min (Spot Way / Garden SC only) | |
| Twilight setting 2 – 1,000 lux (Spot Way / Garden NightAuto only)2 – 2,000 lux (Spot Way / Garden SC only) | |
| IP rating IP44 | |
| Protection class I | |
| Ambient temperature -20 to +40 °C | |
| Bluetooth frequency 2.4 – 2.48 GHz(Spot Way / Garden SC only) | |
| Bluetooth transmitter power (Pnet) | 5 dBm / 0.60 mW(nur Spot Way / Garden SC) |
| * for LED lamp providedThis product contains an energy efficiency class „F“ light source. | |
12. Troubleshooting
Malfunction Cause Remedy
| LED light does not switch ON | ■ Fuse has tripped, not switched ON, break in wiring■ Short circuit■ Lamp faulty | ■ Activate, change fuse, turn ON mains switch, check wiring with voltage tester■ Check connections■ Change lamp |
| NightAuto LED light does not switch ON | ■ Twilight setting in night-time mode during daytime operation■ Mains switch OFF■ Fuse has tripped■ Detection zone not correctly adjusted | ■ Reset■ Switch ON■ Activate, change fuse, check connection if necessary■ Readjust |
| NightAuto LED light does not switch OFF | ■ The twilight setting is set to permanently ON during night-time operation■ Continued movement within the detection zone■ Light-level sensor is covered (e.g. by leaves). | ■ Reset■ Check zone and readjust if necessary or apply shroud■ Remove shrouds from light-level sensor |
| SC LED light keeps switching ON/OFF | ■ Animals moving in detection zone | ■ Tilt sensor higher or fit shrouds to target sensor; adjust detection zone or fit shrouds |
| SC LED light switches ON when it should not | ■ Wind is moving trees and bushes in the detection zone■ Cars in the street are being detected■ Sudden temperature changes due to weather (wind, rain, snow) or air expelled from fans or open windows■ Sensor-switched LED light is swaying (moving) due to gusts of wind or heavy rain | ■ Change detection zone■ Change detection zone■ Adjust detection zone or install in a different place■ Mount sensor-switched LED light on a firm surface |
FR

Alleen spot Way / spot Garden SC:

Solo Spot Way / Spot Garden SC:

8. Smaltimento
Solo Spot Way / Garden SC:


8. Reciclagem

8. Avfallshantering
Monteringstrin for Garden

Følgende funktioner kan indstilles via STEINEL Connect App:
8. Bortskaffelse


Móvo Spot Way / Spot Garden SC:


8. Tasfiye


- Way (Obr. 6.1)
- Garden (Obr. 6.2)
Výměna žárovky

8. Likvidácia
Spot Way SC□/□Spot Garden SC

8. Utylizacja
Spot Way / Garden SC: 7,90 W
Strumień świetlny / jasność lampy* Spot Way / Garden: 512 lm; 76,40 lm/W Spot Way / Garden NightAuto: 512 lm; 65,10 lm/W Spot Way / Garden SC: 512 lm; 64,80 lm/W

Spot Way senzor Connect / Spot Garden senzor Connect
Samo Spot Way / Garden Senzor Connect:
Najbolj varno zaznavanje gibanja dosežete, će napravo montirate stransko glede na smer hoje in senzorja ne zastirajo ovire (npr. drevesa, stene itd.).
Montažni koraki za Way
→ Glavo sijalke namestite na stojalo in trdno privijte do klika. (SI. 4.1)
→ Zarišite luknje za vrtanje za talno ploščo. (SI. 4.2)
→ Izvrtajte luknje in vstavite vložke. (Sl. 4.3)
→Talna montaža svetilke. (SI. 4.4)
→Vtaknite vtič. (SI. 4.5)
→Izvedite nastavitve.
→„5. Delovanje“
Montažni koraki za Garden
→ Montirajte konico za v zemljo na svetilko. (SI. 4.6)
→Vtaknite svetilko v zemljo. (SI. 4.7)
→Vtaknite vtič. (SI. 4.8)
→Izvedite nastavitve.
→„5. Delovanje“
Spot Way senzor Connect / Spot Garden senzor Connect

8. Odstranjevanje
Električne aparate, opremo in embalažo oddajte v okolju prijazno ponovno predelavo.

Sljedeće funkcije mogu se podesiti putem aplikacije STEINEL Connect:
– Podešavanje vremena
– Podešavanje svjetlosnog praga
– Vrijeme uključivanja i isključivanja
– Upravljanje ovisno prema situaciji automatsko / ručno
– Umreženje
- Stvaranje grupe
- Imenovanje grupa i svjetiljki
Napomena:
- Way (Sl. 6.1)
- Garden (Sl. 6.2)
8. Zbrinjavanje
Ainult Spot Way / Garden Sensor Connect:


Spot Way / Garden SC:

Camo Spot Way / Garden SC:


natural_image
World map silhouette in grayscale, showing continents and oceans without any text or labelsContact
www.steinel.de/contact


- DE
- Symbols
- General safety precautions
- Way / Garden
- Proper use
- Spot Way NightAuto / Spot Garden NightAuto
- Spot Way SC / Spot Garden SC
- Non-intended use
- Way spot package contents (Fig. 3.1)
- Garden spot package contents (Fig. 3.2)
- Spot Way product dimensions (Fig. 3.3)
- Spot Garden product dimensions (Fig. 3.4)
- Product parts (Fig. 3.5 - 3.10)
- Installation
- Spot Way / Spot Garden SC only:
- Way mounting procedure
- Mounting procedure for Garden
- Information for NightAuto version
- Function
- Factory settings
- Twilight setting (Fig. 5.2 D)
- STEINEL Connect App
- Note:
- Light tilting / swivelling range / changing lamp
- Changing lamp
- Important:
- Maintenance
- Disposal
- EU countries only:
- Declaration of Conformity
- Manufacturer's Warranty
- Statutory rights accruing from defects, gratuitousness
- Exemptions from the warranty
- Application of German law
- Making claims
- Troubleshooting
- FR
- Alleen spot Way / spot Garden SC:
- Solo Spot Way / Spot Garden SC:
- Smaltimento
- Solo Spot Way / Garden SC:
- Reciclagem
- Avfallshantering
- Monteringstrin for Garden
- Bortskaffelse
- Móvo Spot Way / Spot Garden SC:
- Tasfiye
- Výměna žárovky
- Likvidácia
- Utylizacja
- Spot Way senzor Connect / Spot Garden senzor Connect
- Samo Spot Way / Garden Senzor Connect:
- Montažni koraki za Way
- Montažni koraki za Garden
- Odstranjevanje
- Napomena:
- Zbrinjavanje
- Ainult Spot Way / Garden Sensor Connect:
- Spot Way / Garden SC:
- Camo Spot Way / Garden SC:
Brand : STEINEL
Model : Spot Garden SC
Category : Lamp