
HTSB700 - Soundbar SHARP - Free user manual and instructions
Find the device manual for free HTSB700 SHARP in PDF.
| Product type | Soundbar |
| Brand | Sharp |
| Model | HTSB700 |
| Dimensions (approx.) | 900 x 100 x 100 mm (L x H x P) |
| Weight (approx.) | 2.5 kg |
| Power supply | AC adapter 18 V DC / 2.0 A (100-240 V AC, 50/60 Hz) |
| Power consumption | Standby: < 0.5 W; operation: 36 W max. |
| Audio inputs | HDMI eARC/ARC, optical (Toslink), analog input (3.5 mm mini-jack / RCA), Bluetooth |
| Audio output | Built-in speakers 2.0.2 channels, Dolby Atmos compatible |
| Main features | Dolby Atmos, Dolby Audio Processing, Dolby Virtualiser, preset equalizer (Movie, Voice, Music, Night), bass and treble adjustments, LED dimmer, auto standby, DRC |
| Bluetooth | Version not specified, range approx. 10 m, SBC codec |
| Remote control | Yes, with AAA batteries included |
| Included cables | HDMI (1.2 m), AC adapter, plug adapters (type C and G) |
| Care and cleaning | Unplug the device, clean the exterior with a soft dry cloth. Do not use chemicals. |
| Safety | Double insulation (Class II), surge protection, do not expose to water or heat |
| Spare parts and repairability | No user-serviceable parts. Contact Sharp authorized service. |
| General information | Compliant with RED 2014/53/EU and UKCA directives. Recycling according to WEEE. |
Frequently Asked Questions - HTSB700 SHARP
User questions about HTSB700 SHARP
0 question about this device. Answer the ones you know or ask your own.
Ask a new question about this device
Download the instructions for your Soundbar in PDF format for free! Find your manual HTSB700 - SHARP and take your electronic device back in hand. On this page are published all the documents necessary for the use of your device. HTSB700 by SHARP.
USER MANUAL HTSB700 SHARP
Product images are for illustration purposes only. Actual product may vary.
Trademarks:
Dolby Atmos
Dolby, Dolby Atmos, and the double-D symbol are registered trademarks of Dolby Laboratories Licensing Corporation. Manufactured under license from Dolby Laboratories. Conf dential unpublished works. Copyright c 2012-2020 Dolby Laboratories. All rights reserved.

The terms HDMI, HDMI High-Definition Multimedia Interface, HDMI Trade dress and the HDMI Logos are trademarks or registered trademarks of HDMI Licensing Administrator, Inc.

Bluetooth®
The Bluetooth ^® word mark and logos are registered trademarks owned by Bluetooth SIG, Inc.


ENGLISH
Important safety instructions
Please follow all safety instructions and heed all warnings. Keep this manual for future reference.

This symbol instructs the user to consult the user manual for further safety, operational and maintenance related information.

Refers to class II equipment.
This symbol indicates that this product has a double insulation system and does not require a safety connection to electrical earth (ground).

Refers to alternating current (AC).
This symbol indicates that the rated voltage marked with the symbol is AC voltage.

Refers to direct current (DC).
This symbol indicates that the rated voltage marked with the symbol is DC voltage.

For indoor use only

Energy efficiency marking with level VI

Polarity of d.c. power connector
Precautions
Damage
Please inspect the unit for damage after unpacking. If it is damaged in any way do not operate the unit and consult your dealer.

To prevent the risk of electric shock, do not remove back cover or open the power adapter. No user serviceable parts inside; please refer servicing to qualified service personnel.
Power connection and accessibility
- Do not handle the power cord with wet hands. Switch off the unit completely before unplugging. Ensure that the power plug is always easily accessible.
Power source
- Ensure that the unit is plugged into an AC 100-240V 50/60Hz power outlet.
Power cord protection
- Do not damage the power cord. If the power cord is damaged, it must be replaced by the manufacturer, a service agent or similarly qualified persons.
Power Adapter
- If the unit will not be used for a period of time it is recommended to switch the unit off and remove the AC power adapter from the mains outlet.
- Only use the supplied mains adapter as failure to do this may result in a safety risk and/or damage to the unit.
Child safety
• Always follow basic safety precautions when using this product, especially when children are present.
Location
- When in use this product should be placed on a flat, stable surface with no part of the main unit overhanging an edge.
Ventilation
- Slots and openings in the cabinet are provided for ventilation. These openings must not be blocked or covered.
Heat and operating temperature
- Do not install near any heat sources. Avoid exposure to direct sunlight.
Naked fl ames
- To prevent the risk of fire, keep candles or open flames away from this product.
Water, moisture, and liquid entry
- To prevent the risk of fire or electric shock, do not expose this product to water or moisture.
Storms and lightning
• Storms are dangerous for all electric products. You should disconnect all the cables and connectors of the product before a storm.
Maintenance
- Unplug the power cable from the power source before cleaning the product. Use a soft and clean cloth to clean the outside of the unit.
- Never clean it with chemicals or detergent.
Service and repair
- This product does not contain any parts that are serviceable by the user. Exposing the internal parts inside the device may endanger your life. In case of a fault, contact the manufacturer or authorised service department. The manufacturers guarantee does not extend to faults caused by repairs carried out by unauthorised third parties.
Batteries
Installation
- Do not use any batteries other than those specified. Observe the correct polarity when inserting the batteries. Never use different types of batteries together or mix new and old ones.
Use and maintenance
- Do not expose batteries to high temperatures, e.g. near fire or in direct sunshine. When the product is not to be used for a long time (more than a month), remove the batteries from the product to prevent them from leaking. If the batteries leak, wipe away the leakage inside the battery compartment and replace the batteries with new ones.
Child safety
• Always ensure battery compartment is closed and secured.
- Batteries are easily swallowed by young children and can cause severe internal burns and lead to death. Keep batteries away from children. Seek immediate medical advice if you believe a battery has been swallowed.
Environmental conditions
- Keep batteries away from low air pressure or high temperatures as this may result in an explosion or the leakage of a flammable liquid or gas.
Disposal
- Please dispose of batteries correctly by following the guidance in this manual (see section "Disposal of this equipment and batteries"). Do not throw them into fire, do not disassemble them and do not try to recharge non-rechargeable batteries. They could leak or explode.
Disposal of this equipment
Information for users on collection and disposal of old equipment.

This symbol on a product means that the product is covered by European Directive 2012/19/EU and must not be disposed of or dumped with your other household waste.

This symbol means that the product is designed and manufactured so that it can be recycled and reused.
These symbols on the products, packaging, and/or accompanying documents mean that used electrical and electronic products and batteries should not be mixed with general household waste. Household users should contact either the retailer where they purchased this product, or their local government office, for details of where and how they can take these items for environmentally safe recycling.
CE and UKCA statement:
- Hereby, Sharp Consumer Electronics Poland sp. z o.o. declares that this audio device is in compliance with the essential requirements and other relevant provisions of RED Directive 2014/53/EU and UK Radio Equipment Regulations 2017.
- The full CE text and UKCA declaration of conformity are available at sharpconsumer.com and then entering download section of your model and choosing "Declaration of Conformity".
What is included in the box:
- Main unit
• Remote control (inc. batteries) - HDMI cable (1.2m)
- Power adapter
• 2 pin (type C) plug adapter
• 3 pin (type G) plug adapter - User documentation
Controls
(Refer to 7 on page 3)
- -Switch the unit between ON and STANDBY.
- Volume down.
- -Volume up.
- INPUT – Select the audio source (TV (HDMI), Optical, Audio in, Bluetooth).
- ✗ – Long press to activate Bluetooth pairing for Bluetooth source. Short press to play/pause/resume playback in Bluetooth source.
(Refer to 2 on page 3).
- ⏻ – Switch the unit between ON and STANDBY.
- DIM – Press to change the LED brightness.
- INPUT – Select the audio source (TV (HDMI), Optical, Audio in, Bluetooth). Long press to activate Bluetooth pairing in Bluetooth source.
- (MUTE) – Mute or resume the sound.
- /+ Increase/decrease the volume level.
- /press to skip to previous/next track or long press to fast rewind/fast forward in Bluetooth source.
- ▶/||- Play/pause/resume playback in Bluetooth source. Long press to turn DRC to ON, OFF or AUTO.
- BASS – Press to activate bass level adjustment.
- TREB - Press to activate treble level adjustment.
- 3D – Short press to turn Dolby Audio Processing ON/OFF. Long press to turn Dolby Virtualiser ON/OFF.
- EQ OFF – Press to turn the EQ OFF. Long press to enable/disable Auto standby.
- EQ Presets – Set an EQ. Choose from MOVIE, VOICE, MUSIC or NIGHT.
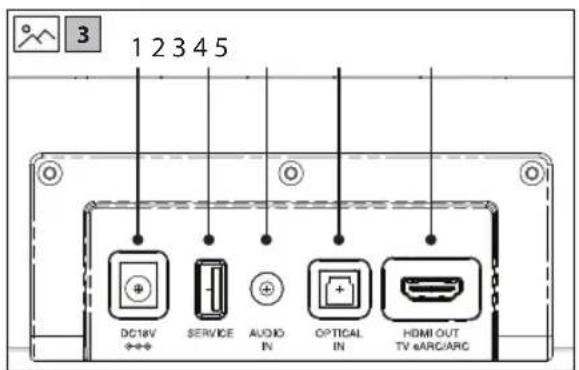
Inputs/outputs
(Refer to 3 on page 3).
- DC IN
Socket for connecting power adapter (DC 18V/2.0A). -
USB
(For fi rmware upgrade use only). -
AUDIO IN
Connect to an external audio device.
4. OPTICAL
Optical input jack.
5. HDMI eARC/ARC
Connect to your TVs HDMI (eARC/ARC) port.
Initial set up
Remote control operation
The provided remote control allows the unit to be operated from a distance.
- Even if the remote control is operated within the effective range of 6m, operation may be impossible if there are any obstacles between the unit and the remote control.
- If the remote control is operated near other products which generate infrared rays, or if other remote control devices using infrared rays are used near the unit, it may operate incorrectly. Conversely, the other products may operate incorrectly.
Battery installation
- To open the battery compartment, push your thumb down on to the battery compartment cover and slide it down.
- Fit two AAA batteries observing polarity +/- as shown. When replacing the batteries, use only the same type of battery supplied.
- Re-fi t the battery cover and clip it in place.
Placement
If your TV is placed on a table or a wall, you can place the unit on a fl at surface in front of or underneath the TV, centred with the TV screen.
Connections
Dolby Atmos
Dolby Atmos delivers an unparalleled audio experience, featuring overhead sound and the signature richness, clarity, and power of Dolby audio.
To listen to Dolby Atmos audio through your soundbar, you will need Dolby Atmos content delivered to your TV.
Dolby Atmos content is available via some broadcast services, streaming services or via external devices connected by HDMI e.g. a Dolby Atmos compatible games console or Blu-ray player.
For more information on Dolby Atmos content availability visit dolby.com.
Using Dolby Atmos
Dolby Atmos is available only on TV (HDMI) source. For the details of the connection, please refer to "HDMI eARC/ARC".
To experience Dolby Atmos through HDMI OUT (eARC/ARC), ensure your TV or source device HDMI eARC/ARC output is set to PASS THROUGH, AUTO, BITSTREAM or other equivalent mode. This setting is usually adjusted via the menu of your TV or source device.
Using eARC
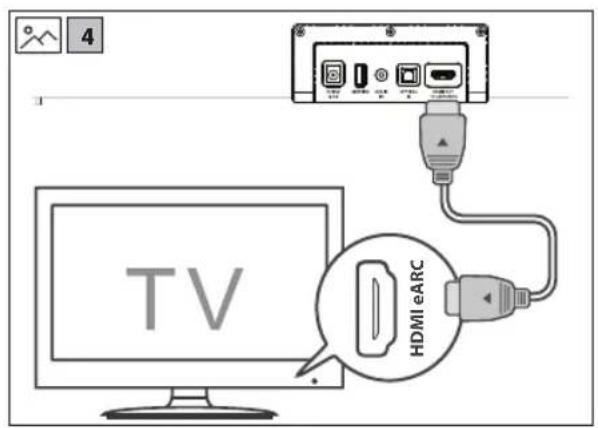
The "e" in eARC stands for "enhanced". AV equipment with eARC HDMI sockets enjoy greater bandwidth and speed compared to regular ARC sockets. This allows a wider frequency range and uncompressed audio resulting in more detailed, rich and vibrant sound delivery. Using eARC HDMI ports and compatible cables also allows audio formats such as Dolby Atmos to be played at their full capacity. Your soundbar comes with a high-speed HDMI cable to take advantage of the extra bandwidth offered by eARC.
HDMI eARC/ARC
(Refer to 4 on page 3).
The eARC (enhanced Audio Return Channel) function allows you to send audio from your eARC/ARC- compliant TV to your sound bar through a single HDMI connection. To enjoy the eARC/ARC function, please ensure your TV is both HDMI-CEC and eARC/ARC compliant and set up accordingly. When correctly set up, you can use your TV remote control to adjust the volume output of the sound bar.
- Connect the included HDMI cable from the units HDMI OUT socket to the HDMI (eARC/ARC) socket on your eARC/ARC compliant TV.
TIPS:
- Your TV must support the HDMI-CEC and eARC/ARC function and this must be set to "ON" or "ACTIVE" in the TV settings menu.
- The setting method of HDMI-CEC and eARC/ARC may differ depending on the TV. For details about eARC/ARC function, please refer to your TV manual.
- Only HDMI cables of version 2.0 or higher can support the eARC/ARC function.
Optical
(Refer to \$on page 3).
- Remove the protective cap of the OPTICAL socket, then connect an OPTICAL cable (not included) to the TV's OPTICAL OUT socket and the OPTICAL socket on the unit.
Audio in
(Refer to 6 on page 3).
A. Use a RCA to 3.5mm audio cable (not included) to connect the TV's or external audio device's audio output sockets to the AUDIO IN socket on the unit.
B. Use a 3.5mm to 3.5mm audio cable (not included) to connect the TV's or external audio device headphone socket to the AUDIO IN socket on the unit.
TIP:
- When you use the headphone output on the TV set, you will be able to adjust the volume level directly using the TV remote control.
Connect to power
(Refer to 7 on page 3).
- Before connecting the DC adapter, ensure you have completed all other connections.
- Risk of product damage! Ensure that the power supply voltage corresponds to the voltage printed on the back or the underside of the unit.
- Connect the power cable to the DC Socket of the unit and then into a power socket.
Basic operation
Standby/ON
- When you first connect the unit to the power socket, the unit will be in STANDBY mode.
- Press ⏻ on the remote control or the soundbar to switch the soundbar ON or OFF.
- Disconnect the plug from the power wall socket if you want to switch the unit off completely.
- With HDMI CEC control, you can use your TV remote to increase/decrease the soundbars volume.
Change source
- Short press INPUT to change between TV, OPTICAL, AUDIO IN and BLUETOOTH. The units LED will light up under the source you select.
Volume control
- Short press +/— to increase or decrease the volume. The indicator will light up as follows:
| TV | OPTICAL | AUDIO IN | 8 | 3D | DolbyATMO5 | |
| Min volume | ● | ○ | ○ | ○ | ○ | ○ |
| 50% volume | ● | ● | ● | ○ | ○ | ○ |
| Max volume | ● | ● | ● | ● | ● | ● |
- The LEDs will flash when you cannot lower or increase the volume any further.
Dolby Audio Processing
- Short press Return Dolby Audio Processing ON or OFF. Dolby Audio Processing up-mixes or down-mixes audio content to optimise it for the soundbars 2.0.2 ch speakers.
• DAP does not work with Dolby Atmos signals.
Dolby Virtualiser
- Long press return the Dolby Virtualiser ON or OFF. With the setting turned to ON, you can experience a virtual surround sound without the need for extra speakers.
| TV | OPTICAL | AUDIO IN | ∅ | 3D | ▶ Dolby ATMOs | |
| Dolby Virtualiser ON | ○ | ○ | ○ | ○ | ● | ● |
| Dolby Virtualiser OFF | ● | ● | ○ | ○ | ○ | ○ |
Dolby Atmos
When Dolby Atmos content is detected, the Dolby Atmos LED will turn on.
| TV | OPTICAL | AUDIO IN | 8 | 3D | ● Dolby ATMOs | |
| Dolby Atmos content detected | ● | ○ | ○ | ○ | ○ | ● |
- You can only enjoy Dolby Atmos content when using the TV source connected via HDMI e/ARC/CEC. Dolby Atmos is not available for OPTICAL, AUDIO IN or BLUETOOTH sources.
Equaliser
Press the MOVIE, MUSIC, VOICE or NIGHT button on the remote control to select between preset equalisers.
Press EQ OFF to turn the preset EQ OFF.
The LED indicator will show for 5 seconds to confirm the selection.
Adjust Bass and treble
Press the BASS or TREB on the remote control. Then press the ◀◀/▶◀ to change the custom bass and treble settings up or down.
The LED indicators show the level.
The LED indicator will show for 5 seconds to confirm the selection.
LED dimmer control
Press DIM on the remote control to adjust the brightness of the units LED's.
Choose from low, medium or high.
Auto standby
Long press EQ OFF to enable/disable Auto standby. By default, the unit will go into standby if no signal is detected for 20 minutes on Optical, Bluetooth and Audio In sources.
By turning Auto standby OFF, your unit will remain powered on even if no audio is detected.
Dynamic Range Control (DRC) is used for automatically normalising volume, making quieter sounds louder and louder sounds quieter. Long press ▶/□ to set the DRC.
Pair Bluetooth-enabled devices.
The first time you connect your Bluetooth device to this player, you need to pair your device to this player.
NOTE:
- Compatibility with all Bluetooth devices is not guaranteed.
- Any obstacle between this unit and a Bluetooth device can reduce the operational range.
-
If the signal strength is weak, your Bluetooth receiver may disconnect, but it will re-enter pairing mode automatically.
-
Select the Bluetooth input
-
Long press (3 seconds) the ✕ button on the soundbar or the INPUT on the remote control to start the pairing process. The Bluetooth input LED will fl ash.
-
Activate your Bluetooth device and select the search mode. "SHARP HT-SB700" will appear on your Bluetooth device list.
-
Select "Sharp HT-SB700" from the list of devices. The Bluetooth input LED will be solid.
-
Begin playing music from the connected Bluetooth device.
-
To pause/resume play, press ▶/|| on the remote control or the ✗ on the soundbar.
- To skip to a track, press / buttons on the remote control.
- Long press |◀/▶ fast rewind/fast forward.
Troubleshooting
Perform a factory reset
To perform a factory reset, press and hold the + and INPUT on the soundbar for 10 seconds. When complete, the soundbar will go into standby (LED's off).
No power
Ensure that the power adapter is properly connected.
Ensure that there is power at the AC outlet.
Press standby button on the remote control or soundbar to turn the soundbar ON.
No sound
For HDMI eARC/ARC to work, ensure you are using HDMI version 2.0 or higher.
Increase the volume. Press + on the remote control or on the soundbar.
Press ✕ on the remote control to ensure the soundbar is not muted. Press INPUT to select a different input source.
When connected to a digital source (HDMI or Optical), if there is no audio:
- Try setting the TV output to PCM or your TV may be set to variable audio output. Confirm that the audio output setting is set to FIXED
or STANDARD, not VARIABLE. Consult your TV's user manual for more detailed information.
If using Bluetooth, ensure that the volume on your source device is turned up and that the device is not muted.
Remote control does not work
Before you press any playback control button, first select the correct source.
Reduce the distance between the remote control and the unit.
Insert the battery with its polarities (+/-) aligned as indicated.
Replace the battery.
Aim the remote control directly at the sensor on the front of the unit.
I hear buzzing or humming
Ensure all cables and wires are securely connected.
Connect a different source device to see if the buzzing persists. If it does not, the problem may be with the original device.
Connect your device to a different input on the soundbar.
I can't find the Bluetooth name of this unit on my Bluetooth device
Ensure the Bluetooth function is activated on your Bluetooth device. Re-pair the unit with your Bluetooth device.
This device is set to standby after 20 minutes of no source signal.
When the unit's external input signal level is too low, the unit will be turned off automatically in 20 minutes. Please increase the volume level of your external device. This feature is a requirement of ERPII and is designed to save energy when the unit is not in use.
БЪЛГАРСКИ
Langt tryk ▶/∥ for at indstille DRC.
Olulised ohutusjuhised
| TV | OPTICAL | AUDIO IN | 8 | 3D | Delby ATMOs | |
| Volume minimum | ● | ○ | ○ | ○ | ○ | ○ |
| 50% du volume | ● | ● | ● | ○ | ○ | ○ |
| Volume maximal | ● | ● | ● | ● | ● | ● |
| TV | OPTICAL | AUDIO IN | ∅ | 3D | Dolby ATMOS | |
| Volume minimo | ● | ○ | ○ | ○ | ○ | ○ |
| 50% di volume | ● | ● | ● | ○ | ○ | ○ |
| Volume massimo | ● | ● | ● | ● | ● | ● |
| TV | OPTICAL | AUDIO IN | 8 | 3D | Delby ATMOs | |
| Volum minim | ● | ○ | ○ | ○ | ○ | ○ |
| 50% volum | ● | ● | ● | ○ | ○ | ○ |
| Volum maxim | ● | ● | ● | ● | ● | ● |
| TV | OPTICAL | AUDIO IN | ∅ | 3D | ▶ Dolby ATMOS | |
| Auto standby AV | ● | ● | ○ | ○ | ○ | ○ |
| Auto standby PÅ | ○ | ○ | ○ | ○ | ● | ● |
DRC
Sharp Consumer Electronics Poland sp. z o.o.
Ostaszewo 57B, 87-148 Łysomice, Poland
Made in China
SAU/MAN/0197 V1
www.sharpconsumer.com
SHARP


- Trademarks:
- Dolby Atmos
- Bluetooth®
- ENGLISH
- Important safety instructions
- Please follow all safety instructions and heed all warnings. Keep this manual for future reference.
- Precautions
- Damage
- Power connection and accessibility
- Power source
- Power cord protection
- Power Adapter
- Child safety
- Location
- Ventilation
- Heat and operating temperature
- Naked fl ames
- Water, moisture, and liquid entry
- Storms and lightning
- Maintenance
- Service and repair
- Batteries
- Installation
- Use and maintenance
- Environmental conditions
- Disposal
- Disposal of this equipment
- CE and UKCA statement:
- What is included in the box:
- Controls
- Inputs/outputs
- OPTICAL
- HDMI eARC/ARC
- Initial set up
- Remote control operation
- Battery installation
- Placement
- Connections
- Using Dolby Atmos
- Using eARC
- HDMI eARC/ARC
- TIPS:
- Optical
- Audio in
- TIP:
- Connect to power
- Basic operation
- Standby/ON
- Change source
- Volume control
- Dolby Audio Processing
- Dolby Virtualiser
- Equaliser
- Adjust Bass and treble
- LED dimmer control
- Auto standby
- NOTE:
- Troubleshooting
- Perform a factory reset
- No power
- No sound
- Remote control does not work
- I hear buzzing or humming
- I can't find the Bluetooth name of this unit on my Bluetooth device
- This device is set to standby after 20 minutes of no source signal.
- БЪЛГАРСКИ
- Olulised ohutusjuhised
- DRC
Brand : SHARP
Model : HTSB700
Category : Soundbar