
HT-SB32D - Soundbar SHARP - Free user manual and instructions
Find the device manual for free HT-SB32D SHARP in PDF.


| Product Type | Soundbar |
| Brand | Sharp |
| Model | HT-SB32D |
| Dimensions (W x H x D) | Approx. 910 x 62 x 85 mm |
| Weight | Approx. 2.3 kg |
| Power Supply | AC 100-240V, 50/60Hz |
| Power Consumption | 30 W (typical) |
| Audio Output | 2.0 channels, 60 W total output |
| Connectivity | Bluetooth 4.2, HDMI ARC, Optical, USB, AUX |
| Supported Audio Formats | MP3, WMA, WAV |
| Remote Control | Included (batteries not included) |
| Wall Mountable | Yes |
| Cleaning Instructions | Wipe with a soft dry cloth |
| Safety Precautions | Do not expose to moisture or heat sources |
| Spare Parts Availability | Contact Sharp support for replacement |
Frequently Asked Questions - HT-SB32D SHARP
User questions about HT-SB32D SHARP
0 question about this device. Answer the ones you know or ask your own.
Ask a new question about this device
Download the instructions for your Soundbar in PDF format for free! Find your manual HT-SB32D - SHARP and take your electronic device back in hand. On this page are published all the documents necessary for the use of your device. HT-SB32D by SHARP.
USER MANUAL HT-SB32D SHARP
Thank you for purchasing this SHARP product. To obtain the best performance from this product, please read this manual carefully. It will guide you in operating your SHARP product.

natural_image
Illustration of a Sharp audio player with multiple circular buttons and a remote control panel (no text or symbols)


The Bluetooth® word mark and logos are registered trademarks owned by Bluetooth SIG, Inc. and any use of such marks by SHARP is under license. Other trademarks and trade names are those of their respective owners.
The N Mark is a trademark or registered trademark of NFC Forum, Inc. in the United States and in other countries.
Manufactured under license from Dolby Laboratories. Dolby and the double-D symbol are trademarks of Dolby Laboratories.
Note: This product is recommended for flat panel TV (LED, LCD and plasma).
Accessories
The following accessories are included.
 Remote control x 1 AC/DC adaptor x 1 AC power lead x 1 Remote control x 1 AC/DC adaptor x 1 AC power lead x 1 |  |  |
 AC power lead x 1(for Australia and New Zealand only) AC power lead x 1(for Australia and New Zealand only) |  Plug adaptor x 1(for Philippines only) Plug adaptor x 1(for Philippines only) |  Spike leg x 2 Spike leg x 2 |
 Optical cable x 1 Pattern paper x 1 Optical cable x 1 Pattern paper x 1 |  |  NFC tag x 1 NFC tag x 1 |
 Velcro tape(hook type) x 1 Velcro tape(hook type) x 1 |  Velcro tape(loop type) x 2 Velcro tape(loop type) x 2 |
Special Notes
Warning:
- When the ON/STANDBY button is set at STANDBY position, mains voltage is still present inside the unit. When the ON/STANDBY button is set at STANDBY position, the unit may be brought into operation by the remote control.
● This unit contains no user serviceable parts. Never remove covers unless qualified to do so. This unit contains
dangerous voltages, always remove mains plug from the socket before any service operation and when not in use for a long period.
● To prevent fire or shock hazard, do not expose this appliance to dripping or splashing. No objects filled with liquids, such as vases, shall be placed on the apparatus.
General
- Keep your equipment at least 10 cm of free space along the sides, top and back for proper ventilation.

●Use the unit on a firm, level surface free from vibration.
- Keep the unit away from direct sunlight, strong magnetic fields, excessive dust, humidity and electronic/electrical equipment (home computers, facsimiles, etc.) which generate electrical noise.
- Do not place anything on top of the unit.
- Do not expose the unit to moisture, to temperatures higher than 60°C (140°F) or to extremely low temperatures.
- If the unit does not work properly, unplug and plug it in again. Then turn on the unit.
- In case of an electrical storm, unplug the unit for safety.
●Hold the AC power plug by the head when removing it from the wall socket, as pulling the lead can damage internal wires.
●The AC power plug is used as a disconnect device and shall always remain readily operable.
- Do not remove the outer cover, as this may result in electric shock. Refer internal service to your local SHARP service facility.
●The ventilation should not be impeded by covering the ventilation openings with items, such as newspapers, tablecloths, curtains, etc.
●No naked flame sources, such as lighted candles, should be placed on the apparatus.
●Attention should be drawn to the environmental aspects of battery disposal.
●This unit should only be used within the range of 5^ C - 35^ C ( 41^ F - 95^ F).
●SHARP is not responsible for damage due to improper use. Refer all servicing to a SHARP authorised service centre.
Warning:
●The supplied AC/DC adaptor contains no user serviceable parts. Never remove covers unless qualified to do so. It contains dangerous voltages, always remove mains plug from the main outlet socket before any service operation or when not in use for a long period.
●The AC/DC adaptor supplied with the HT-SB32D must not be used with other equipment.
●Never use an AC/DC adaptor other than the one specified. Otherwise, problem or serious hazards may be created.
●The voltage used must be the same as that specified on this unit. Using a higher voltage is dangerous and may result in a fire or other type of accident causing damage. SHARP will not be held responsible for any damage resulting from such usage.
●In case of repairing, please bring the entire system set to the service centre.
Volume control
The sound level at a given volume setting depends on speaker efficiency, location and various other factors. It is advisable to avoid exposure to high volume levels, which occurs while turning the unit on with the volume control setting up high, or while continually listening at high volumes.
■Front Panel
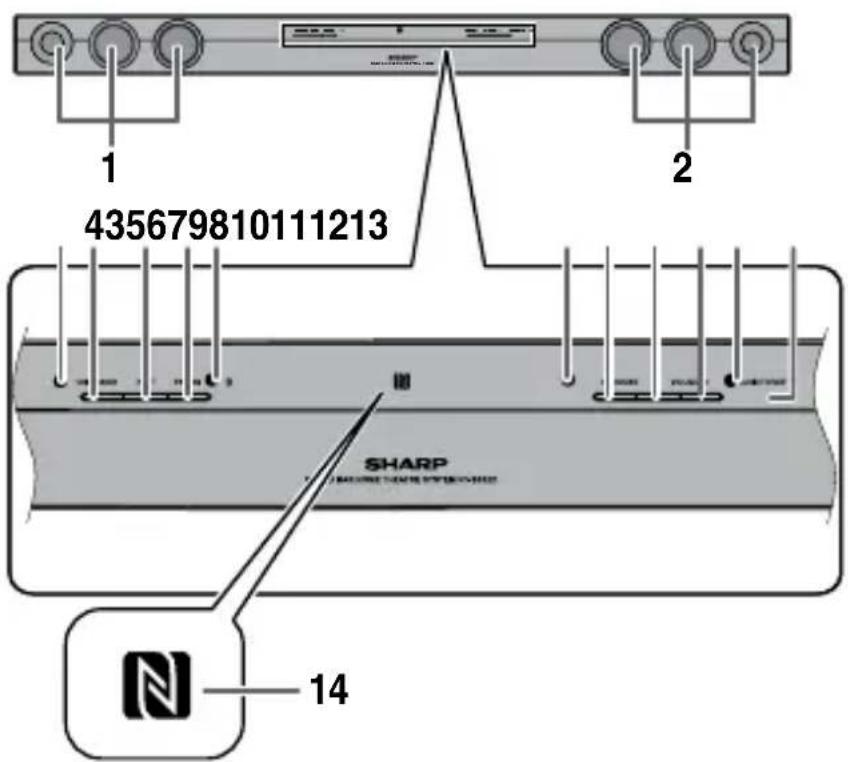
- Left Channel Speakers
- Right Channel Speakers
- On/Standby/Input Indicator
- On/Standby Button
- Input Button
- Pairing Button
- Pairing Indicator
- Surround Indicator
-
Surround Button
-
Volume Down Button
- Volume Up Button
- Audio Format Indicator
- Remote Sensor
- NFC detection area
■Rear Panel

- DC In Socket
- Optical In Socket
- Audio In Socket
Controls and indicators (continued)

■ Remote Control
- Remote Control Transmitter
- Mute Button
- Cinema (Sound Mode) button
- Music (Sound Mode) button
- Surround Button
- Bypass (Sound Mode) button
- TV Operation Buttons (only SHARP TV)
- Bluetooth Pairing Button
- Bluetooth Play/Pause Button
- Bluetooth Skip Up Button
- Bluetooth Skip Down Button
- On/Standby Button
- News (Sound Mode) button
- Input Button
- Volume Up/Down Buttons
Note:
Before using remote control, please remove plastic shield at battery holder.
| TV Operation Buttons (Only SHARP TV): | ||||
| On/Standby Button | [IMAGE] | Sets the TV power to “ON” or “STANDBY”. | Input Select Button (TV) | [IMAGE] Press the button to switch the input source. |
| Volume Up and Down Buttons | [IMAGE] | Turn up/down the TV volume. | Channel Up and Down Buttons | [IMAGE] Switch up/down the TV channels. |
Note: ● Some models of SHARP TV may not be operable.
● SHARP TV remote control will not work with HT-SB32D system.
System preparation
Make sure to unplug the AC power lead before installing the sound bar or changing the position.
Using spike legs
1 Peel the double sided tape separator.
Spike leg
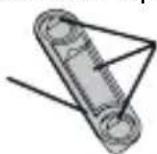
Double sided tape separator
2 Fix the spike leg onto the sound bar as shown.
Bottom of sound bar
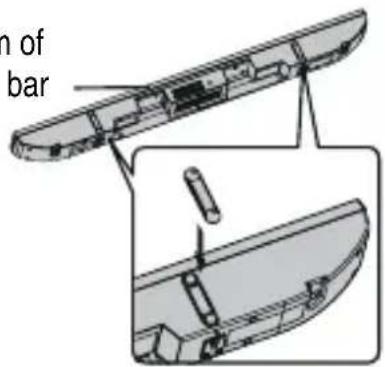
To mount the sound bar on the wall
Caution:
●Be very careful to prevent the sound bar [2.3 kg (5.1 lbs.)] from falling when mounting on the wall.
●Before mounting, check the wall strength. (Do not put on the veneer plaster or whitewashed wall. The sound bar may fall.) If unsure, consult a qualified service technician.
- Mounting screws are not supplied. Use appropriate ones.
●Check all wall mount angle screws for looseness. - Select a good location. If not, accidents may occur or the sound bar may get damaged.
● SHARP is not responsible for accidents resulting from improper installation.
■Driving screws
SHARP designed the sound bar so you may hang it on the wall. Use proper screws (not supplied). See below for size and type.
3.2 mm
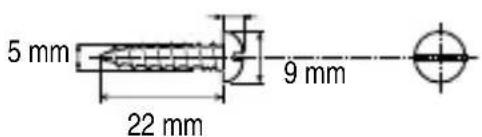
■Installing the sound bar
1 Fix the pattern paper to the wall in horizontal position as below.
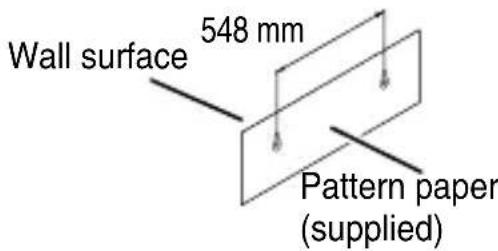
2 Make a hole on the wall following the screw point marks on the pattern paper by using a drill.

3 Fix a wall mount plug into the hole using a hammer, until it is flush with the wall surface.

4 Fasten the screws to the wall as shown below. (Total screw is 2 pieces)
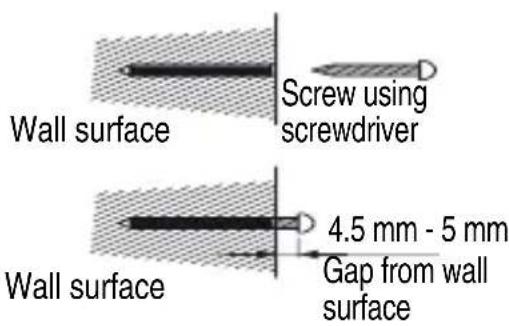
5 Hang the sound bar onto the screws.

natural_image
Simple line drawing of a mechanical component with two curved lines and a base, no text or symbols present.Placing the sound bar
Installation image:
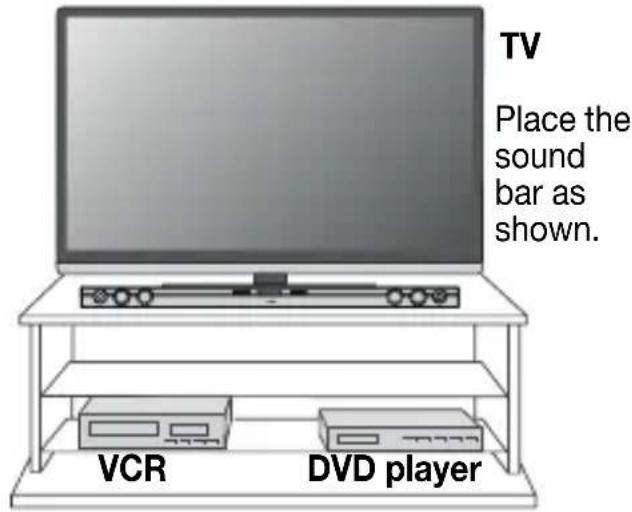
Notes:
- Remove the protective film covering the sound bar before turning on the system.
●The front panel of the sound bar is not removable.
Caution:
●Do not change the installation direction when the sound bar is turned on.
●Do not stand or sit on the sound bar as you may be injured.
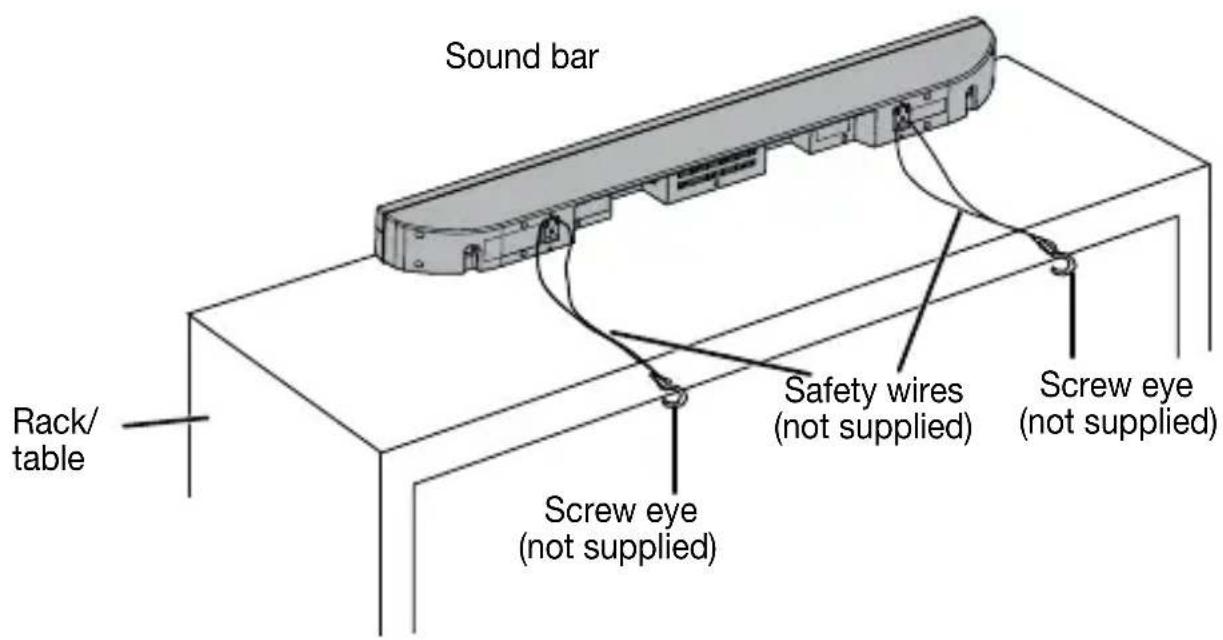
Falling prevention
● Safety wires (not supplied) are useful to prevent the sound bar from falling.

natural_image
Technical line drawing of a mechanical device with an inset showing a component detail (no text or symbols present)Falling prevention (continued)
■When mounting on the wall
Screw eye (not supplied)
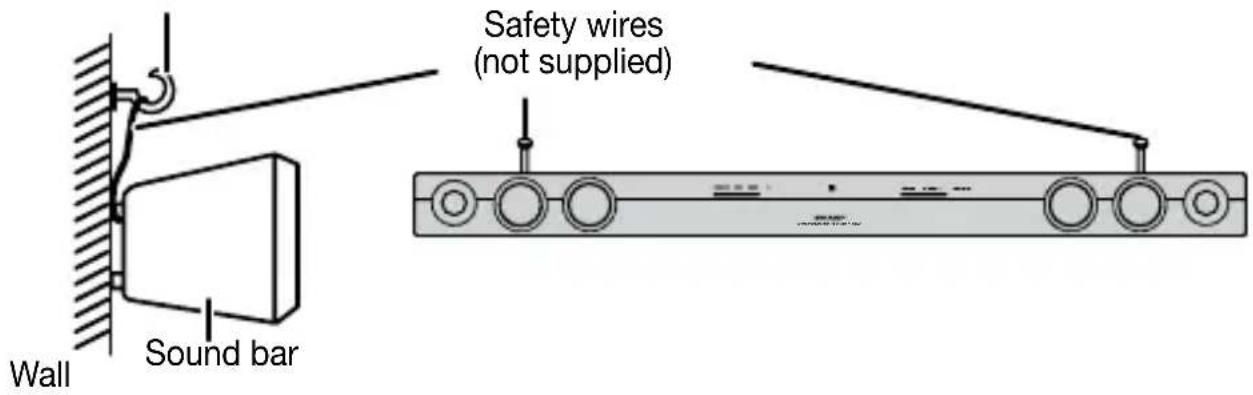
■When placing on the shelf/table
Sound bar connections to TVs
Caution:
Turn off all other equipment before making any connections.
Notes:
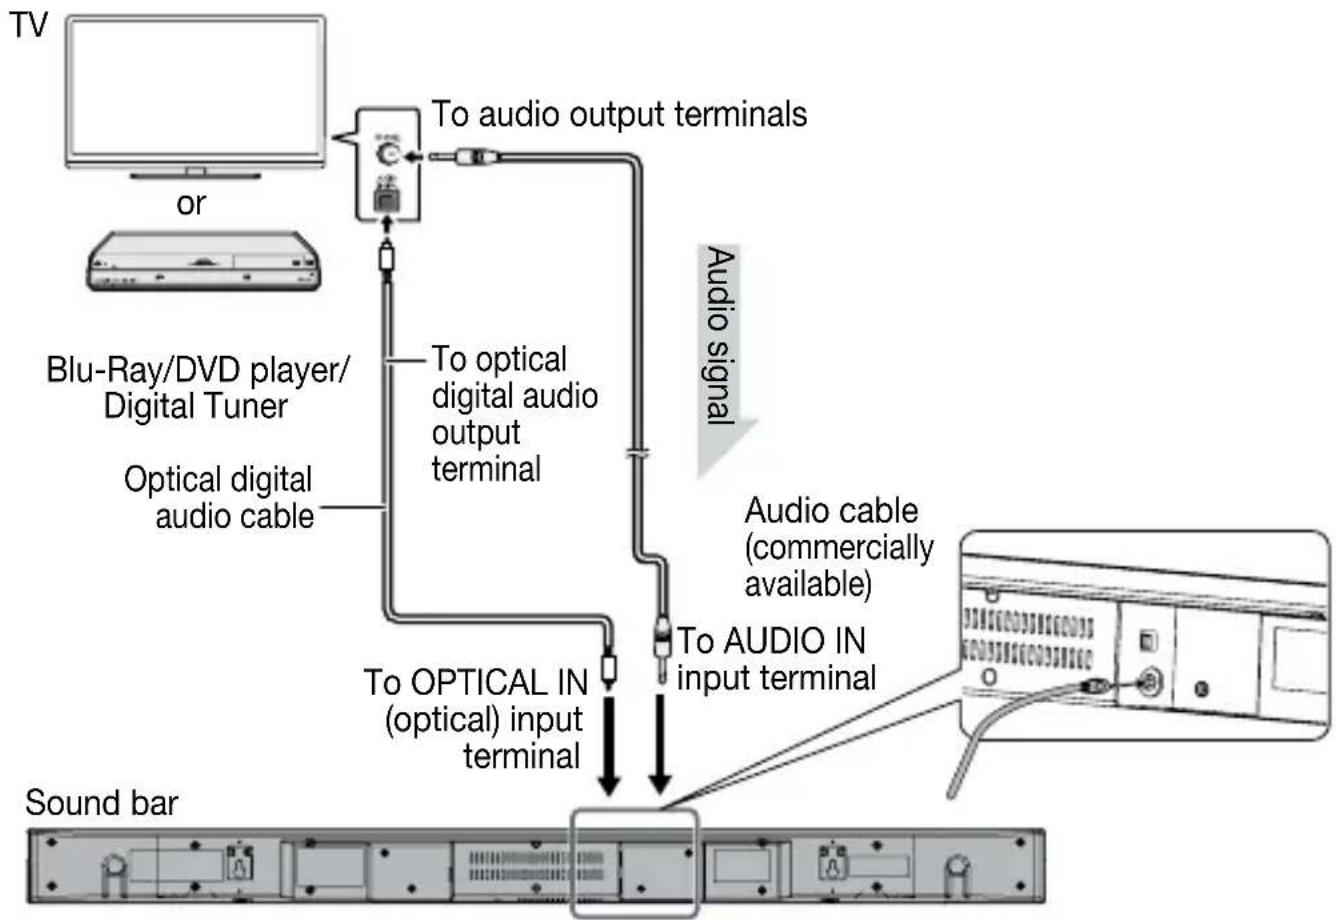
● To connect to TV/player, use AUDIO IN or OPTICAL IN terminals located at the rear of the sound bar.
● Refer the operation manual of the equipment to be connected.
● Fully insert the plugs to avoid fuzzy pictures or noises.
- If the TV volume is continuously at low level, the sound bar will automatically power off. Increase the TV output volume to enjoy the sound from the speaker.
■ Connecting a TV, or DVD player, etc.
If the TV/monitor has an audio or optical output, connect it to the AUDIO IN socket or OPTICAL IN socket on the rear of the sound bar.
Press the INPUT button repeatedly to select:
| Function On/Standby/InputIndicator |
| OPTICAL IN Turns green |
| AUDIO IN Turns cyan |
| Bluetooth Turns blue |
flowchart
graph TD
    A["TV"] --> B["or"]
    B --> C["To audio output terminals"]
    C --> D["Blu-Ray/DVD player/ Digital Tuner"]
    D --> E["Optical digital audio cable"]
    E --> F["To optical digital audio output terminal"]
    F --> G["To optical IN (optical) input terminal"]
    G --> H["Sound bar"]
    I["Audio cable (commercially available)"] --> H
    J["Audio signal"] --> H
    H --> K["To AUDIO IN input terminal"]
AC power connection
After checking all the connections have been made correctly, connect the AC power lead to the AC power input socket, then to the wall socket.
■Using with the AC/DC adaptor
① Plug the AC power lead into the AC/DC adaptor.
② Plug the AC/DC adaptor cable into the DC INPUT socket on the sound bar.
③ Plug the AC power lead into an wall socket. The PAIRING indicator turns BLUE.
Notes:
● Unplug the AC/DC adaptor from the wall socket if the sound bar will not be used for a prolonged period of time.
- Use only the supplied AC/DC adaptor. Using other AC/DC adaptor may cause an electric shock or fire.
Make sure to unplug the AC power lead before making any connections.

■Battery installation
1 While pushing the locking tab towards the center of the remote control, slide out the battery holder.

2 Remove the old battery from the battery holder, insert the new battery and then slide the battery holder back into the remote control.


Precautions for battery use:
Remove the battery if the sound bar will not be used for a long period of time. This will prevent potential damage due to battery leakage.
Caution:
- Do not use rechargeable battery (nickel-cadmium battery, etc.).
●Danger of explosion if battery is incorrectly replaced.
-Replace only with the same or equivalent type.
●Batteries (battery pack or batteries installed) shall not be exposed to excessive heat such as sunshine, fire or the like.
●Installing the battery incorrectly may cause the sound bar to malfunction.
Notes concerning use:
- Replace the battery if the operating distance is reduced or if the operation becomes erratic. Purchase “CR 2025”, coin lithium battery.
- Periodically clean the transmitter on the remote control and the sensor on the sound bar with a soft cloth.
●Exposing the sensor on the sound bar to strong light may interfere with operation. Change the lighting or the direction of the sound bar if this occurs. - Keep the remote control away from moisture, heat, shock, and vibrations.
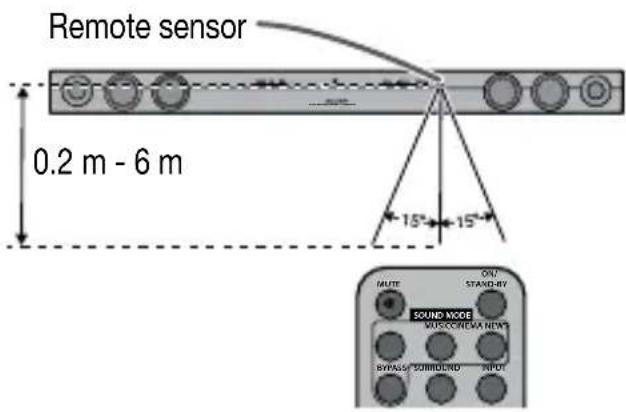
■Test of the remote control
The remote control can be used within the range shown below:
■To turn the power on
Press the ON/STANDBY button.
The On/Standby/Input Indicator lights up according to input source:
| Input source On/Standby/Input Indicator |
| OPTICAL IN Turns green |
| AUDIO IN Turns cyan |
| Bluetooth Turns blue |
Note:
If the power does not turn on, check whether the power lead is plugged in properly.
To set the sound bar to standby mode:
Press the ON/STANDBY button again. The PAIRING indicator turns BLUE.
■Bluetooth standby mode
●The first time the unit is plugged in, it will enter the Bluetooth standby mode (PAIRING indicator turns BLUE)
- To cancel the Bluetooth standby mode, press and hold the ON/STANDBY button during Bluetooth standby mode. The unit will enter the low power consumption mode (PAIRING indicator turns off).
●During low power consumption mode, to return to the Bluetooth standby mode, press the ON/STANDBY button twice.
- During Bluetooth standby condition, NFC function is activated once your device touches the NFC detection area or the supplied NFC tag.
Volume auto fade-in
If you turn off and on the sound bar again, volume will start at lower level and gradually increase to the last set level.
Volume control
Sound bar operation:
Press volume up (VOLUME + ) to increase the volume and press volume down (VOLUME - ) to decrease the volume.
Remote control operation:
Press the VOL + button to increase the volume and the VOL - button to decrease the volume.
Notes:
- When volume is maximum or minimum the SURROUND indicator blinks 3 times
●To increase or decrease the volume continuously, press and hold the VOLUME +/- buttons (main unit) or VOL +/- buttons (remote control).
■Muting
The volume is muted temporarily when pressing the MUTE button on the remote control (SURROUND indicator blinking). Press again to restore the volume.
■Surround
When the SURROUND button is pressed, the SURROUND sound is ON. (SURROUND indicator lights up (ORANGE))
Sound Mode
Remote control operation:
Press the desired sound mode button on the remote control.
The SURROUND indicator blinks once
| CINEMA (for cinema sound effect) |
| MUSIC (for standard sound effect) |
| NEWS (for news) |
| BYPASS (for flat sound effect) |
Function
When the INPUT button is pressed, the input source will change.
① Optical In Function - the On/Standby/Input indicator turns green.
② Audio In Function - the On/Standby/Input indicator turns cyan.
③ Bluetooth Function - the On/Standby/Input indicator turns blue.
Note:
The backup function will protect the memorised function mode for a few hours should there be a power failure or the AC power lead becomes disconnected.
■Auto power on function
●Auto power on function works only during Bluetooth standby mode (PAIRING indicator is blue). It will not work if the sound bar is in low power consumption mode (PAIRING indicator is off).
Optical In: Turn off the external source. The sound bar will automatically power ON if the external source is turned ON again.
Audio In/Bluetooth: The sound bar will automatically power ON if it detects audio signal from connected equipment.
■Auto power off and auto detect signal
●The sound bar will automatically go to standby mode (PAIRING indicator turns blue) if:
Optical In: No audio signal is detected after approximately 15 minutes.
Audio In: No audio signal is detected after approximately 15 minutes.
Bluetooth:
- No connection after approximately 1 minute.
- In the pause or stop mode and no incoming signal from device after approximately 15 minutes.
■Audio format
During the OPTICAL IN function the AUDIO FORMAT indicator will light up to indicate the audio format.
| Audio format | Audio format indicator | |
| Dolby Digital | One of the digital audio systems for theatrical use. You can also enjoy the stereophonic effect in the home theatre system.Lights up when detecting Dolby Digital signal. | Blue |
| PCM(Pulse Code Modulation) | This is a general term for digitally encoded audio signals on a CD or DVD.This sound bar lets you enjoy playback of digital signals from sources such as CD or DVD. | Violet |
Bluetooth one touch connection via NFC
■About NFC technology
Near Field Communication (NFC) is a set of standards for devices (smartphones/tablets) to establish radio communication with each other by touching/tapping them together or bringing them into close proximity.
Using NFC in this product simplifies the pairing method of Bluetooth connectivity.
Notes for Android devices
●This audio system supports NFC-enabled device with Android 4.1, Jelly Bean and higher.
●For device with a lower Android version, refer the operation manual of the device for recommended app (application).
Unlike other wireless technology, NFC requires no discovery or pairing.
Simply tap the source device to NFC detection area on the main unit or the NFC tag to instantly enjoy seamless connectivity between your smart device and the audio system.
■NFC detection area
NFC detection area location may vary depending on the device (smartphone/tablet). Refer operation manual of the device for detail.

flowchart
graph TD
    A["Smartphone"] --> B["Switch 'ON' Bluetooth"]
    B --> C["Search/scan"]
    C --> D["Pairing"]
    D --> E["Connect"]
    E --> F["NFC detection area (during Bluetooth standby mode)"]
    F --> G["NFC tag"]
    G --> H["A Bluetooth audio source device (smartphone/tablet)"]
    H --> B
    style A fill:#f9f,stroke:#333
    style F fill:#ccf,stroke:#333
■NFC tag set up
The NFC tags can be placed anywhere convenient to you. The velcro tapes supplied will help to secure the tags onto the desired location.
Caution:
●Make sure that the NFC tag is placed on a flat and level surface.
- If you choose not to use the velcro tape, do not place the NFC tag near metal surface to avoid connection interference during tagging.
Important:
●NFC tag has unique ID for each sound bar.
●SHARP will not be held liable for the damages caused by rewriting the tags.
Keep all small parts away from children as they may be accidentally swallowed.
Bluetooth one touch connection via NFC (continued)
1 Peel the separator off the velcro tape (loop type) and stick it on a desired surface.
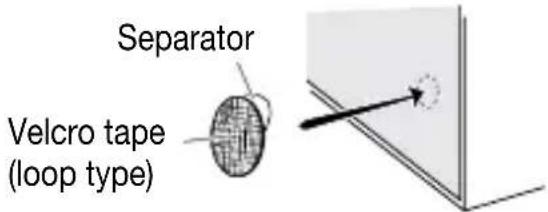
2 Peel the separator off the velcro tape (hook type) and stick it to the rear of the NFC tag.
Then place the tag onto the desired location.

■NFC connection for audio playback
Check that:
●Your device (smartphone/tablet) has an NFC function.
●NFC function on your device is enabled.
●Screen lock function of the device is off.
●This unit is not in low power consumption mode.
●Your device and NFC tag must be within 10 metres from the unit.
1 Touch your device to the NFC detection area on the main unit or supplied NFC tag. (NFC detection area of your device must touch to the NFC detection area of the main unit or supplied NFC tag.)
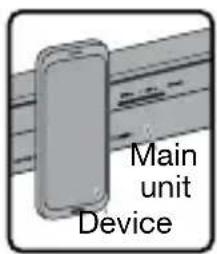

2 A pop-up window asking whether to proceed with the Bluetooth connection appears on the device. Select
3 Playback will start automatically, otherwise press play (on remote control or source device).
●The ‘connected’ message appears when the connection is complete.
● Sound will be heard from the speakers of this unit via audio streaming.
●Your device and NFC tag must be within 10 metres from the unit.
| Bluetooth operation buttons (remote control only) | |
 | Press the button to play or pause. |
 | Press the button to skip up. |
 | Press the button to skip down. |
Notes:
●To disconnect, simply touch your device to the NFC detection area on the main unit or the NFC tag again.
- To listen to audio via Bluetooth connectivity without NFC tag - refer "Pairing with other Bluetooth source devices" on page 16.
- It takes about 6-8 seconds for a Bluetooth enabled device (eg. smartphone) to establish Bluetooth connection with this unit via NFC or manual connection.
- If "Empty tag" or similar message appears on your device, touch the device again to the NFC detection area on the main unit or supplied NFC tag.
Listening to Bluetooth enabled devices
Bluetooth wireless technology is a short-range radio technology that enables wireless communication between various types of digital devices, such as mobile phone or computer. It operates within a range of about 10 metres (30 feet) without the hassle of having to use cables to connect these devices.
This sound bar supports the following:
Communication System: Bluetooth Specification version 2.1 Bluetooth + Enhanced Data Rate (EDR).
Support Profile : A2DP (Advanced Audio Distribution Profile) and AVRCP (Audio/Video Remote Control Profile)
Notes when using unit with a mobile phone
●This unit cannot be used to talk over the telephone even when there is a Bluetooth connection made to a mobile phone.
- Please refer to the operating manual supplied with the mobile phone for details on operation of your mobile phone while transmitting the sound using a Bluetooth connection.
■Pairing Bluetooth devices
Bluetooth devices need to be initially paired first before they can exchange data. Once paired, it is not necessary to pair them again unless:
●pairing is made with more than 99 devices.
Pairing can only be made one device at a time. This sound bar can be paired to a maximum of 99 devices. If subsequent device is paired, the oldest device paired, will be deleted and replaced with the new one.
●pairing information is deleted while repairing, etc.
Bluetooth indicators
| Status PAIRING | indicator (blue) |
| Unconnected Blinks | |
| Pairing mode Blinks quickly | |
| Connected Lights up | |
However, the indicator status is not displayed during low power consumption mode.
■ Pairing with other Bluetooth source device
1 Press the ON/STANDBY button to turn the power on.
2 Press the INPUT button to select Bluetooth function. (PAIRING indicator blinks.)
3 Press and hold the PAIRING button for 3 seconds or more.
PAIRING indicator blinks quickly. The sound bar is now in pairing mode and is ready to be paired with other Bluetooth source device.
4 Perform pairing procedure on the source device to detect this sound bar. "HT-SB32D SHARP" will appear in the detected devices list (if available) in the source device. (Refer the source device operating manual for details).
Notes:
● Place the devices to be paired within 1 metre (3 feet) of each other when pairing.
- Some source devices are unable to display lists of detected devices. To pair this sound bar with the source device, refer to the source device operating manual for details.
5 Select "HT-SB32D SHARP" from the source list. If Passcode* is required, enter "0000".
* Passcode may be called PIN Code, Passkey, PIN number or Password.
6 Pairing indicator (blue) will stop blinking once the sound bar is successfully paired with the source device. (Pairing information is now memorised in the sound bar.)
Some audio source devices may connect with the sound bar automatically after pairing is completed, otherwise follow the instructions in the source device operating manual to start connection.
7 Press the play button on remote control or source device to start Bluetooth streaming playback.
Listening to Bluetooth enabled devices (continued)
Notes:
- If a device such as microwave oven, wireless LAN card, Bluetooth device or any other device that uses the same 2.4 GHz frequency is placed near the system some sound interruption may be heard.
●The transmission distance of the wireless signal between the device and the sound bar is about 10 m, but may vary depending on your operating environment. If a steel concrete or metallic wall is between the device and the sound bar, the system may not operate at all, because the wireless signal cannot penetrate metal. - If this sound bar or the source device is turned off before Bluetooth connection is completed, pairing will not be completed and the pairing information will not be memorised. Repeat step 1 onwards to start pairing again.
●To pair with other devices, repeat steps 1 - 5 for each device.
This sound bar can be paired to a maximum of 99 devices. If subsequent device is paired, the oldest device paired, will be deleted and replaced with the new one.
- Once a device is ousted or deleted from the pairing list, the pairing information for the device is also deleted. To listen to the sound from the device again, it needs to be re-paired. Perform steps 1 - 5 to pair the device again.
- HT-SB32D supports Bluetooth profile AVRCP 1.4. If your device supports the same profile (refer to device manufacturer's specification), HT-SB32D is able to control the volume of the device.
Note:
Some music applications do not support this feature, hence there will be no volume synchronisation between your device and the sound bar even if your Bluetooth device supports such profile.
■Listening to the sound
Check that:
● The source device Bluetooth functionality is ON.
●Pairing of this sound bar and the source device is completed.
●Sound bar is in connected mode (pairing indicator (BLUE) lights up.)
●Any device connected to the AUDIO IN or OPTICAL IN socket is turned off.
| 1 Press the ON/STANDBY button to turn the power on. |
| 2 Press the INPUT button to select Bluetooth function. |
| 3 Start the Bluetooth connection from the Bluetooth stereo audio source device. |
| 4 Playback will start automatically, otherwise press play (on the remote control or the source device).Notes:For various Bluetooth operations, refer “NFC connection for audio playback” on page 15.If the source device has an extra bass function or equaliser function, set them to off. If these functions are on, sound may be distorted. |
Notes:
● Make the Bluetooth connection again if the source device is not turned on, or its Bluetooth functionality is off or is in sleep mode.
■ To disconnect the Bluetooth device
Perform any of the followings.
- Disconnect the Bluetooth connection on the audio source device.
Refer the operating manual supplied with the device.
- Turn off the Bluetooth stereo audio source device.
- Turn off this sound bar.
Note:
The volume of this sound bar may not be controlled as intended depending on the device.
Troubleshooting chart
Many potential problems can be resolved by the owner without calling a service technician. If something is wrong with this product, check the following before calling your authorised SHARP dealer or service center.
General
| Symptom Possible cause | |
| No sound is heard. | ●Is the input signal (selection) set properly? ●Is the volume level set to minimum? ●Is muting activated? ●Are the connections made correctly? |
| Noise is heard during playback. | ●Move the sound bar away from any computers or mobile phones. |
| Sound is distorted. | ●TV output sound is distorted. Reduce the TV volume or sound bar volume. |
| When a button is pressed, the sound bar does not respond. | ●Set this sound bar to the standby mode and then turn it back on. ●If the sound bar still malfunctions, reset it. (Refer to page 19.) |
| The power is not turned on. | ●Is the sound bar unplugged? (Refer to page 10.) ●The protection circuit may be activated. Unplug and plug in the power lead again after 5 minutes or more. |
■NFC / Bluetooth
| Symptom Possible cause | |
| NFC-enabled device cannot connect to Bluetooth via NFC tag. | ● Main unit is not in Bluetooth pairing mode. Perform “NFC connection for audio playback”. (Refer page 15.) |
| No sound is heard. | ●Is the sound bar too far from the Bluetooth stereo audio source device?●Is the sound bar paired with the Bluetooth stereo audio source device?●Is the Bluetooth stereo audio source device in playback condition?●Is a headphone plugged to the Bluetooth stereo audio source device? |
| Bluetooth sound is interrupted or distorted. | ●Is the sound bar too near to a device that generates electromagnetic radiation?●Is there any obstacle between the sound bar and the Bluetooth stereo audio source device? |
■Remote control
| Symptom Possible cause | |
| The remote control does not operate properly. | ●Is the battery polarity correct?●Is the battery dead?●Is the distance or angle incorrect?●Are there any obstructions in front of the sound bar?●Is there a strong light shining on the remote sensor?●Is the remote control for another equipment used simultaneously? |
| The sound bar cannot be turned on with the remote control. | ●Is the AC power lead of the sound bar plugged in?●Is the battery inserted?●Has the plastic shield at the remote control battery holder been removed? |
Troubleshooting chart
Condensation
Sudden temperature changes, storage or operation in an extremely humid environment may cause condensation inside the cabinet or on the transmitter on the remote control.
Condensation can cause the sound bar to malfunction. If this happens, leave the power on until normal operation is possible (about 1 hour). Wipe off any condensation on the transmitter with a soft cloth before operating the sound bar.
■Factory reset, clearing all setting
Make sure to disconnect all audio input cables attached to the sound bar before performing the factory reset.
- Press ON/STANDBY button to enter the power standby mode.
- While pressing down the PAIRING button, press the ON/STANDBY button.
- Press the ON/STANDBY button again. (PAIRING indicator will turn BLUE.)
Caution:
This operation will erase all data stored in memory.
■If problem occurs during operation
When this product is subject to strong external interference (mechanical shock, excessive static electricity, abnormal supply voltage due to lightning, etc.) or if it is operated incorrectly, it may malfunction.
If such a problem occurs, do the following:
1 Set the sound bar to the standby mode and turn the power on again.
2 If the sound bar is not restored in the previous operation, unplug and plug in the sound bar, and then turn the power on.
Maintenance
■Cleaning the cabinet
Periodically wipe the cabinet with a soft cloth.
Cautions:
- Do not use chemicals for cleaning (petrol, paint thinner, etc.). It may damage the cabinet finish.
- Do not apply oil to the inside of each component. It may cause malfunctions.


Specifications
As part of our policy of continuous improvement, SHARP reserves the right to make design and specification changes for product improvement without prior notice. The performance specification figures indicated are nominal values of production unit. There may be some deviations from these values in individual unit.
General
| Power source DC IN 19V 3.42A: AC/DC adaptor (AC 100 - 240V ~ 50/60Hz) | |
| Power consumption | Power on: 10 WPower standby: 0.4 W (*1)Power standby: < 2 W (*2) |
| Maximum output power | MPO: 60 W (30 W + 30 W)(10% T.H.D.)RMS: 30 W (10% T.H.D.)RMS: 24 W (1% T.H.D.) |
| Speaker 2-way Speaker System5.7cm Woofer2.5cm Soft Dome | |
| Input terminals | Analog input (AUDIO IN):Stereo mini socket ∅ 3.5mm500mV / 47kohmsOptical digital input(OPTICAL): Square type x 1 |
| Bluetooth Frequency Band | 2.400GHz - 2.480GHz |
| Compatible Bluetooth Profile | A2DP (Advanced Audio Distribution Profile), AVRCP (Audio/Video Remote Control Profile)Bluetooth 2.1 +EDR |
| Dimensions | Width: 940mmHeight: 73mmDepth: 83mm |
| Weight | 2.3 kg (5.1 lbs.) |
(*1): This power consumption value is obtained when the sound bar is in low power consumption mode.
(*2): This power consumption value is obtained in the Bluetooth Standby mode.
SHARP
FOR LOCATION ENQUIRIES WITHIN
AUSTRALIA
SHARP APPROVED SERVICE CENTRE
(LOCAL CALL COSTS APPLY WITHIN AUSTRALIA)
SHARP CORPORATION OF AUSTRALIA PTY LTD
SHARP
FOR LOCATION ENQUIRIES WITHIN
NEW ZEALAND
SHARP APPROVED SERVICE CENTRE
Consumer Electronic Products Congratulations on Your Purchase!
This Sharp product is warranted against faults in material and manufacture for the period as stated in the table below.
If service is required during the warranty period, please contact your nearest Sharp Approved Service Centre. These repairs would be carried out at no charge to the owner, subject to the conditions specified herein.
This warranty does not extend to defects or injuries caused by or resulting from causes not attributable to faulty parts or the manufacture of the product, including but not limited to, defect or injury caused by or resulting from misuse, abuse, neglect, lack of maintenance, accidental damage, improper voltage, liquid spillage, vermin infestation, software, or any alterations made to the product which are not authorised by Sharp.
Please retain your sales documentation, as this should be produced to validate a warranty claim. This warranty is in addition to and in no way limits, varies or excludes any implied rights and remedies under any relevant legislation in the country of sale.
This warranty does not cover transportation to and from the Sharp Approved Service Centre. Goods presented for repair may be replaced by refurbished goods of the same type rather than being repaired. Refurbished parts may be used to repair the goods. The repair of your goods may result in the loss of user generated data, please ensure that you have saved this data elsewhere prior to repair.
Australian customers: Our goods come with guarantees that cannot be excluded under the Australian Consumer Law. You are entitled to a replacement or refund for a major failure and for compensation for any other reasonably foreseeable loss or damage. You are also entitled to have the goods repaired or replaced if the goods fail to be of acceptable quality and the failure does not amount to a major failure. The criteria of a major failure is defined in the Australian Consumer Law. Should you require any assistance with a major failure please contact Sharp Customer Care.
WARRANTY PERIODS
Home Theatre Projector 12 months (excluding lamps and air filters)
Audio/Home Theatre 12 months
Microwave Oven 12 months
Steam Oven 12 months
Refrigerator 24 months
DVD/Blu-ray 12 months
Air Conditioner 60 months
Portable Air Conditioner 12 months
LCD Television 12 months
Air Purifier 12 months
Vacuum Cleaner 24 months


- Accessories
- Special Notes
- Warning:
- General
- Volume control
- ■Front Panel
- ■Rear Panel
- Controls and indicators (continued)
- ■ Remote Control
- Note:
- System preparation
- Using spike legs
- To mount the sound bar on the wall
- Caution:
- ■Driving screws
- ■Installing the sound bar
- Placing the sound bar
- Notes:
- Falling prevention
- Falling prevention (continued)
- ■When mounting on the wall
- ■When placing on the shelf/table
- Sound bar connections to TVs
- ■ Connecting a TV, or DVD player, etc.
- AC power connection
- ■Using with the AC/DC adaptor
- ■Battery installation
- Precautions for battery use:
- Notes concerning use:
- ■Test of the remote control
- ■To turn the power on
- Press the ON/STANDBY button.
- To set the sound bar to standby mode:
- ■Bluetooth standby mode
- Volume auto fade-in
- Sound bar operation:
- Remote control operation:
- ■Muting
- ■Surround
- Sound Mode
- Function
- ■Auto power on function
- ■Auto power off and auto detect signal
- Bluetooth:
- ■Audio format
- Bluetooth one touch connection via NFC
- ■About NFC technology
- Notes for Android devices
- ■NFC detection area
- ■NFC tag set up
- Important:
- Bluetooth one touch connection via NFC (continued)
- ■NFC connection for audio playback
- Check that:
- Listening to Bluetooth enabled devices
- This sound bar supports the following:
- Notes when using unit with a mobile phone
- ■Pairing Bluetooth devices
- ■ Pairing with other Bluetooth source device
- Listening to Bluetooth enabled devices (continued)
- ■Listening to the sound
- ■ To disconnect the Bluetooth device
- Troubleshooting chart
- Condensation
- ■Factory reset, clearing all setting
- ■If problem occurs during operation
- Maintenance
- ■Cleaning the cabinet
- Cautions:
- Specifications
- SHARP
- AUSTRALIA
- NEW ZEALAND
- Consumer Electronic Products Congratulations on Your Purchase!
- WARRANTY PERIODS
Brand : SHARP
Model : HT-SB32D
Category : Soundbar