S138i - Scarifier HUSQVARNA - Free user manual and instructions
Find the device manual for free S138i HUSQVARNA in PDF.
| Product type | Electric push scarifier / thatcher |
| Brand | Husqvarna |
| Model | S138i |
| Power source | 36 V lithium-ion battery (accessory) |
| Weight (without battery) | 19.5 kg |
| Cutting width | 37.5 cm |
| Adjustable cutting depth | From -8 mm to +5 mm |
| Grass collector capacity | 45 liters |
| Thatching equipment type | Delta blades and flexible tines (interchangeable) |
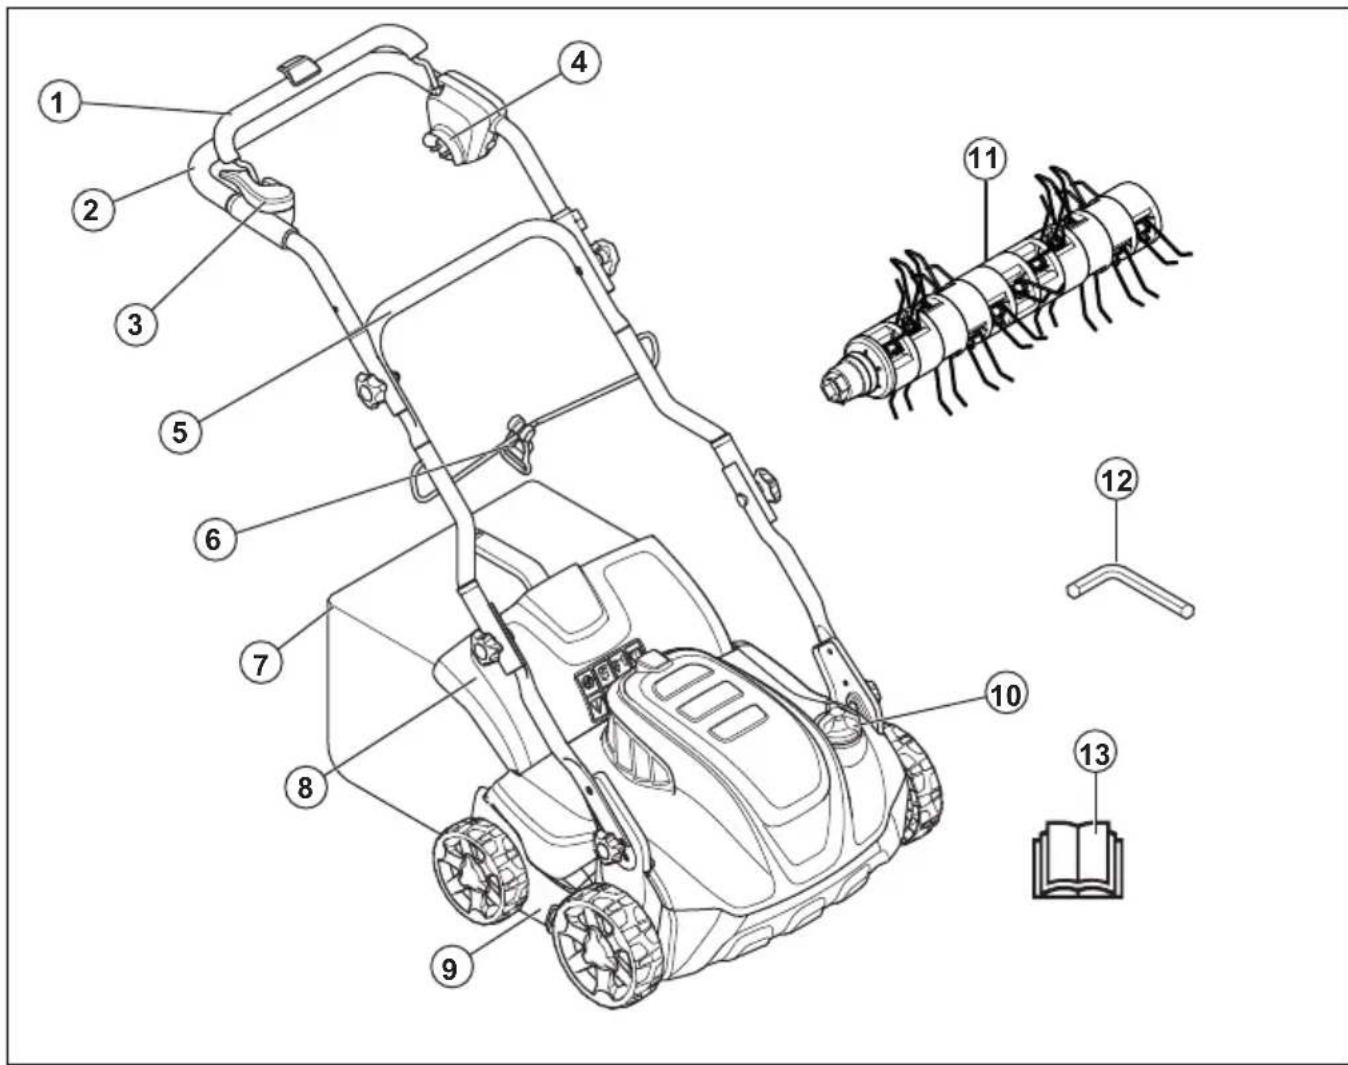
| Nominal speed | 3,200 rpm |
| Speed in SavE mode | 3,000 rpm |
| Measured sound power level | 89.2 dB(A) |
| Sound pressure level at ear | 75.3 dB(A) |
| Vibration on handle | 5.5 m/s² |
| Compatible batteries | BLi20 (4.0 Ah), BLi200 (5.2 Ah), BLi300 (9.4 Ah) |
| Runtime with 5.2 Ah battery (standard mode) | 102 min |
| Runtime with 5.2 Ah battery (SavE mode) | 115 min |
| Main functions | SavE mode, anti-restart, motor brake handle, safety key, depth adjustment |
| Maintenance and cleaning | Clean with a dry cloth; do not use water or high-pressure cleaner |
| Safety | Protective covers, motor brake, safety key, anti-restart |
| Spare parts and repairability | Interchangeable thatching equipment (Delta blades ref. 5973510-01, flexible tines ref. 5973509-01) |
| General information | CE compliance; use on slopes up to 15°; transport with battery removed |
Frequently Asked Questions - S138i HUSQVARNA
User questions about S138i HUSQVARNA
0 question about this device. Answer the ones you know or ask your own.
Ask a new question about this device
Download the instructions for your Scarifier in PDF format for free! Find your manual S138i - HUSQVARNA and take your electronic device back in hand. On this page are published all the documents necessary for the use of your device. S138i by HUSQVARNA.
USER MANUAL S138i HUSQVARNA
EN Operator's manual 2-26
BG PbkoBoDcTBo 3a ekcnnoataun 27-54
Transportation, storage and disposal. 22
Assembly. 14
Technical data. 23
Operation 15
EC Declaration of Conformity. 25
Maintenance. 19
EC Declaration of Conformity. 26
Introduction
Product description
The product is a pedestrian-controlled electrical dethatcher. The product removes thatch from the lawn and loosens the soil to let air and water into the lawn. The thatch is collected in a grass catcher or is released on to the lawn. The product has 2 types of dethatcher equipment.
Dethatcher equipment
Refer to To replace the dethatcher equipment on page 20 for information on how to replace the dethatcher equipment.
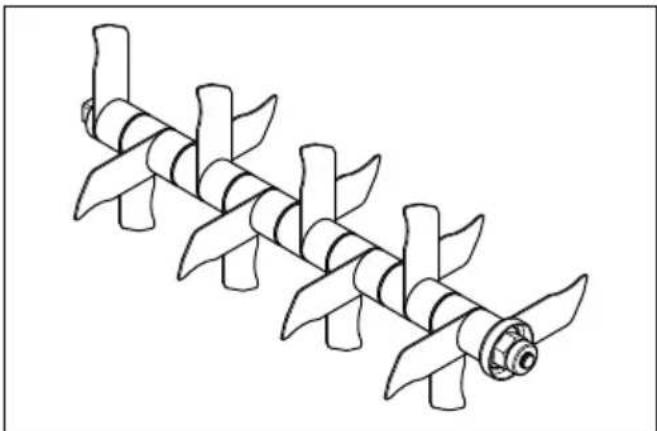
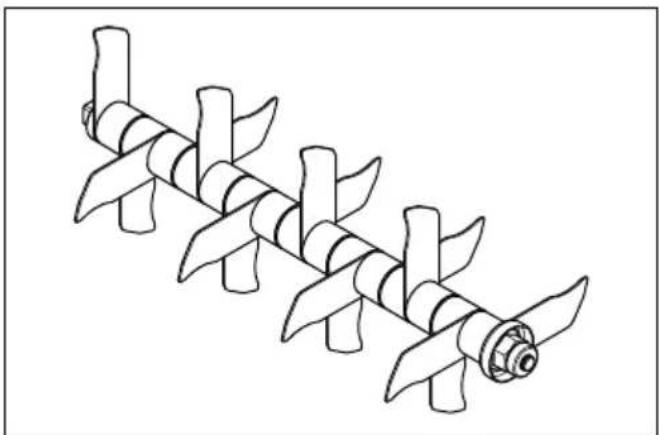
Delta blades
The delta blades remove thatch and cut the grass roots vertically. Use the delta blades on slopes, terraces and in soils that have a high quantity of clay. The delta blades let the water go down into the lawn and prevent that water collects on the surface
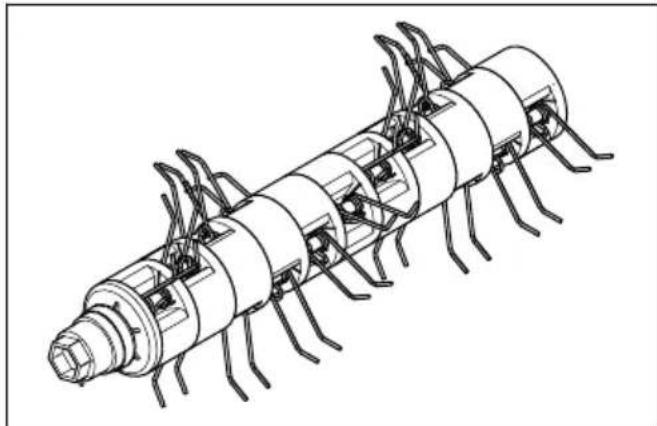
Spring tines
The spring tines carefully remove dead grass and thatch from the lawn with no damage to the grass roots.
Intended use
Use the product to remove thatch and moss and to loosen the soil in private gardens. Do not use the product for other tasks.
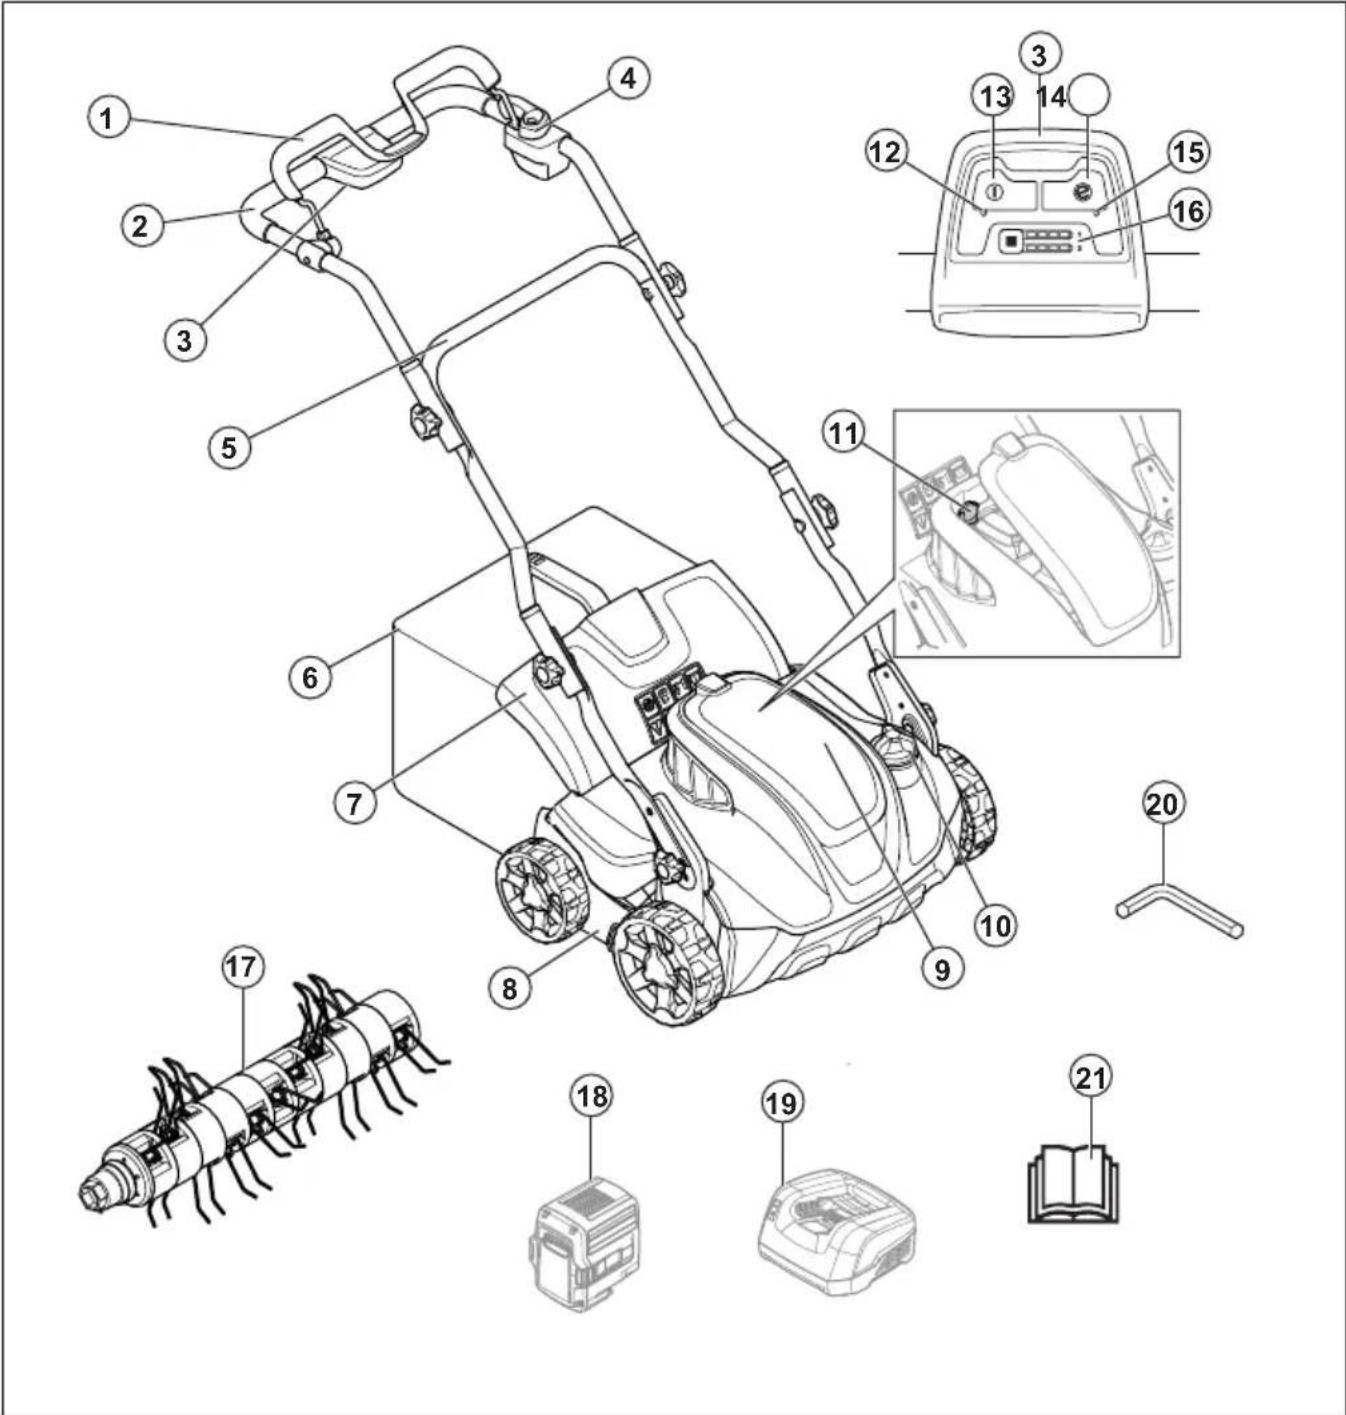
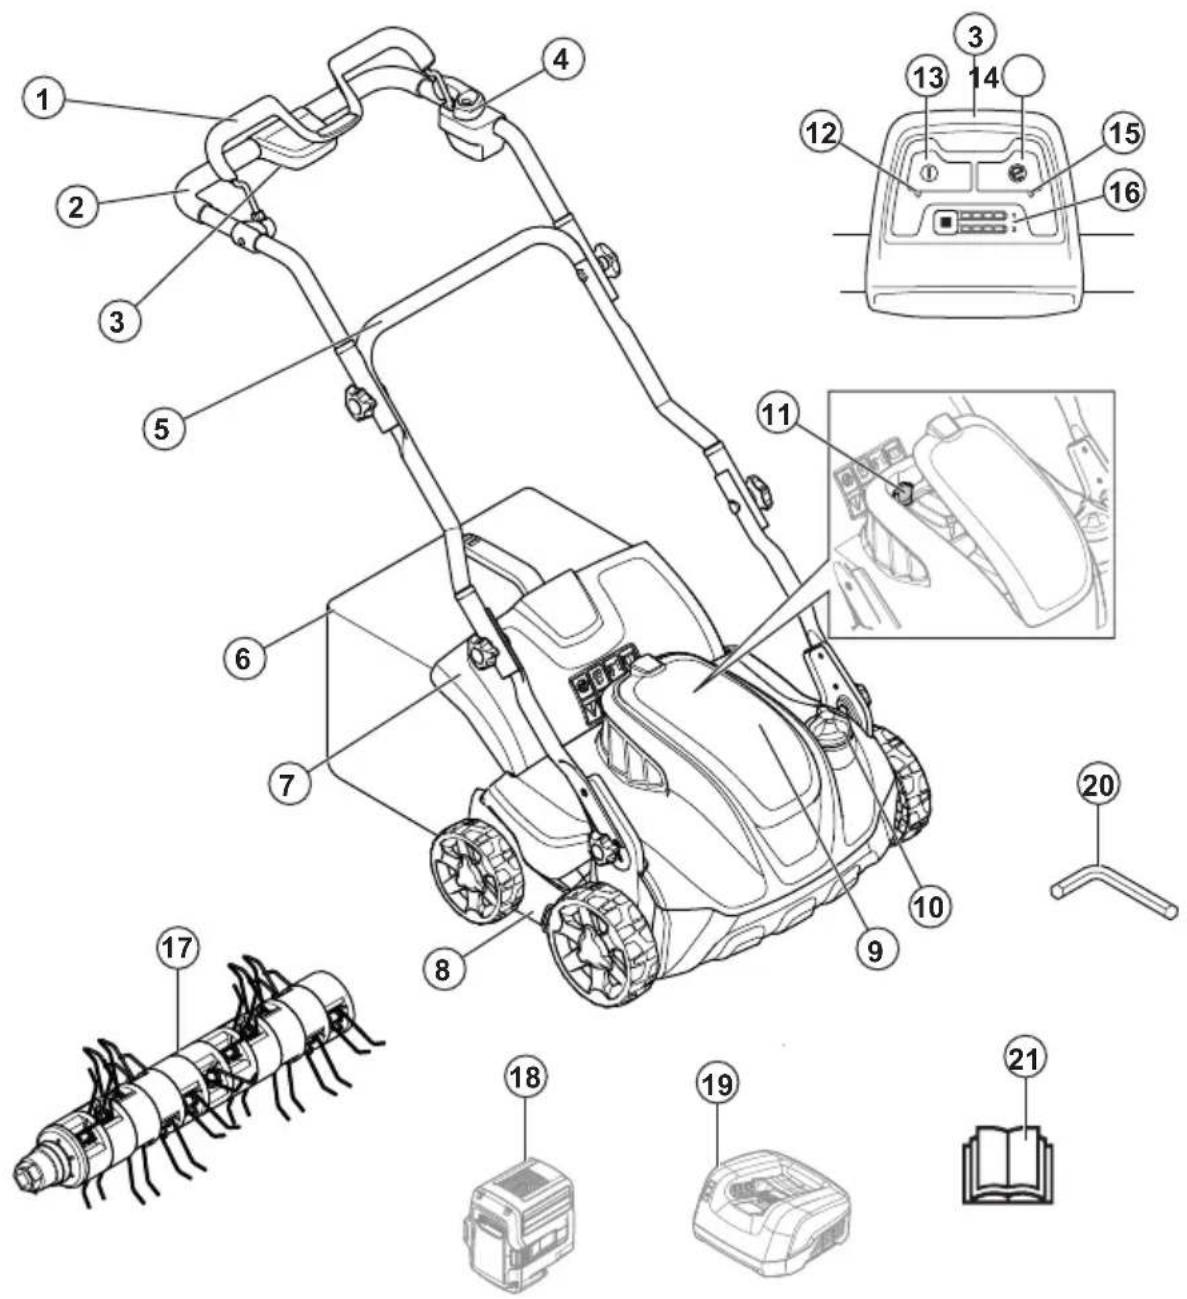
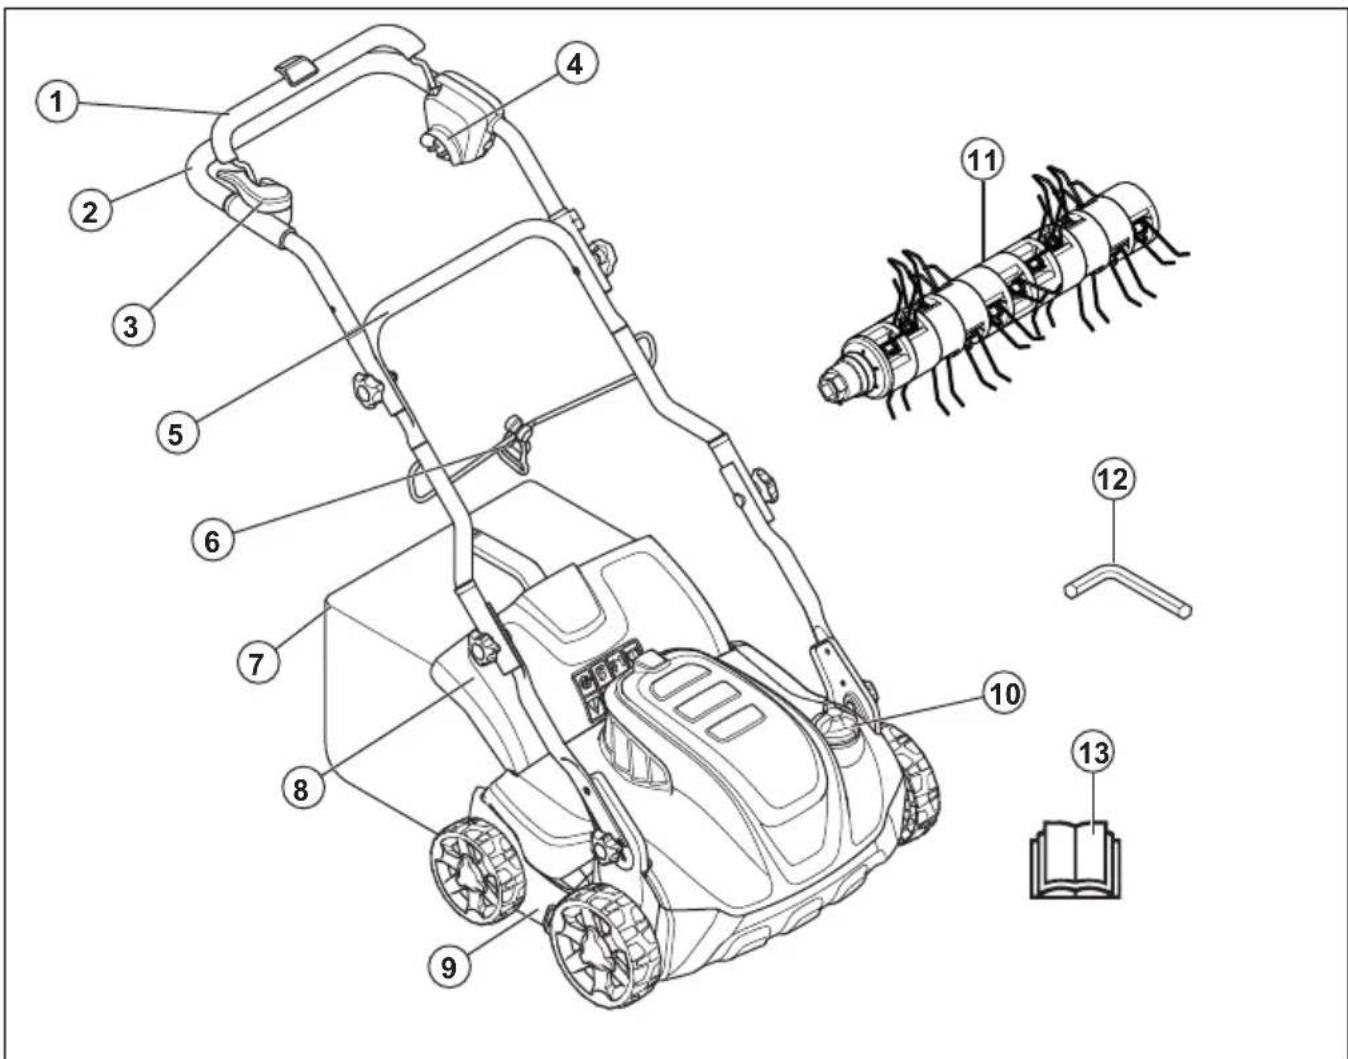
- Motor brake handle
- Upper handle
- Control panel
- Start inhibitor
- Lower handle
- Grass catcher
- Rear cover
- Dethatcher cover
- Battery lid
- Adjustment knob for the work depth
-
Safety key
-
ON/OFF indicator LED
- ON/OFF button
- SavE button
- SavE indicator LED
- Battery charge indicator and battery button
- Spring tines
- Battery (Accessory)
- Battery charger (Accessory)
- Hex key
- Operator's manual
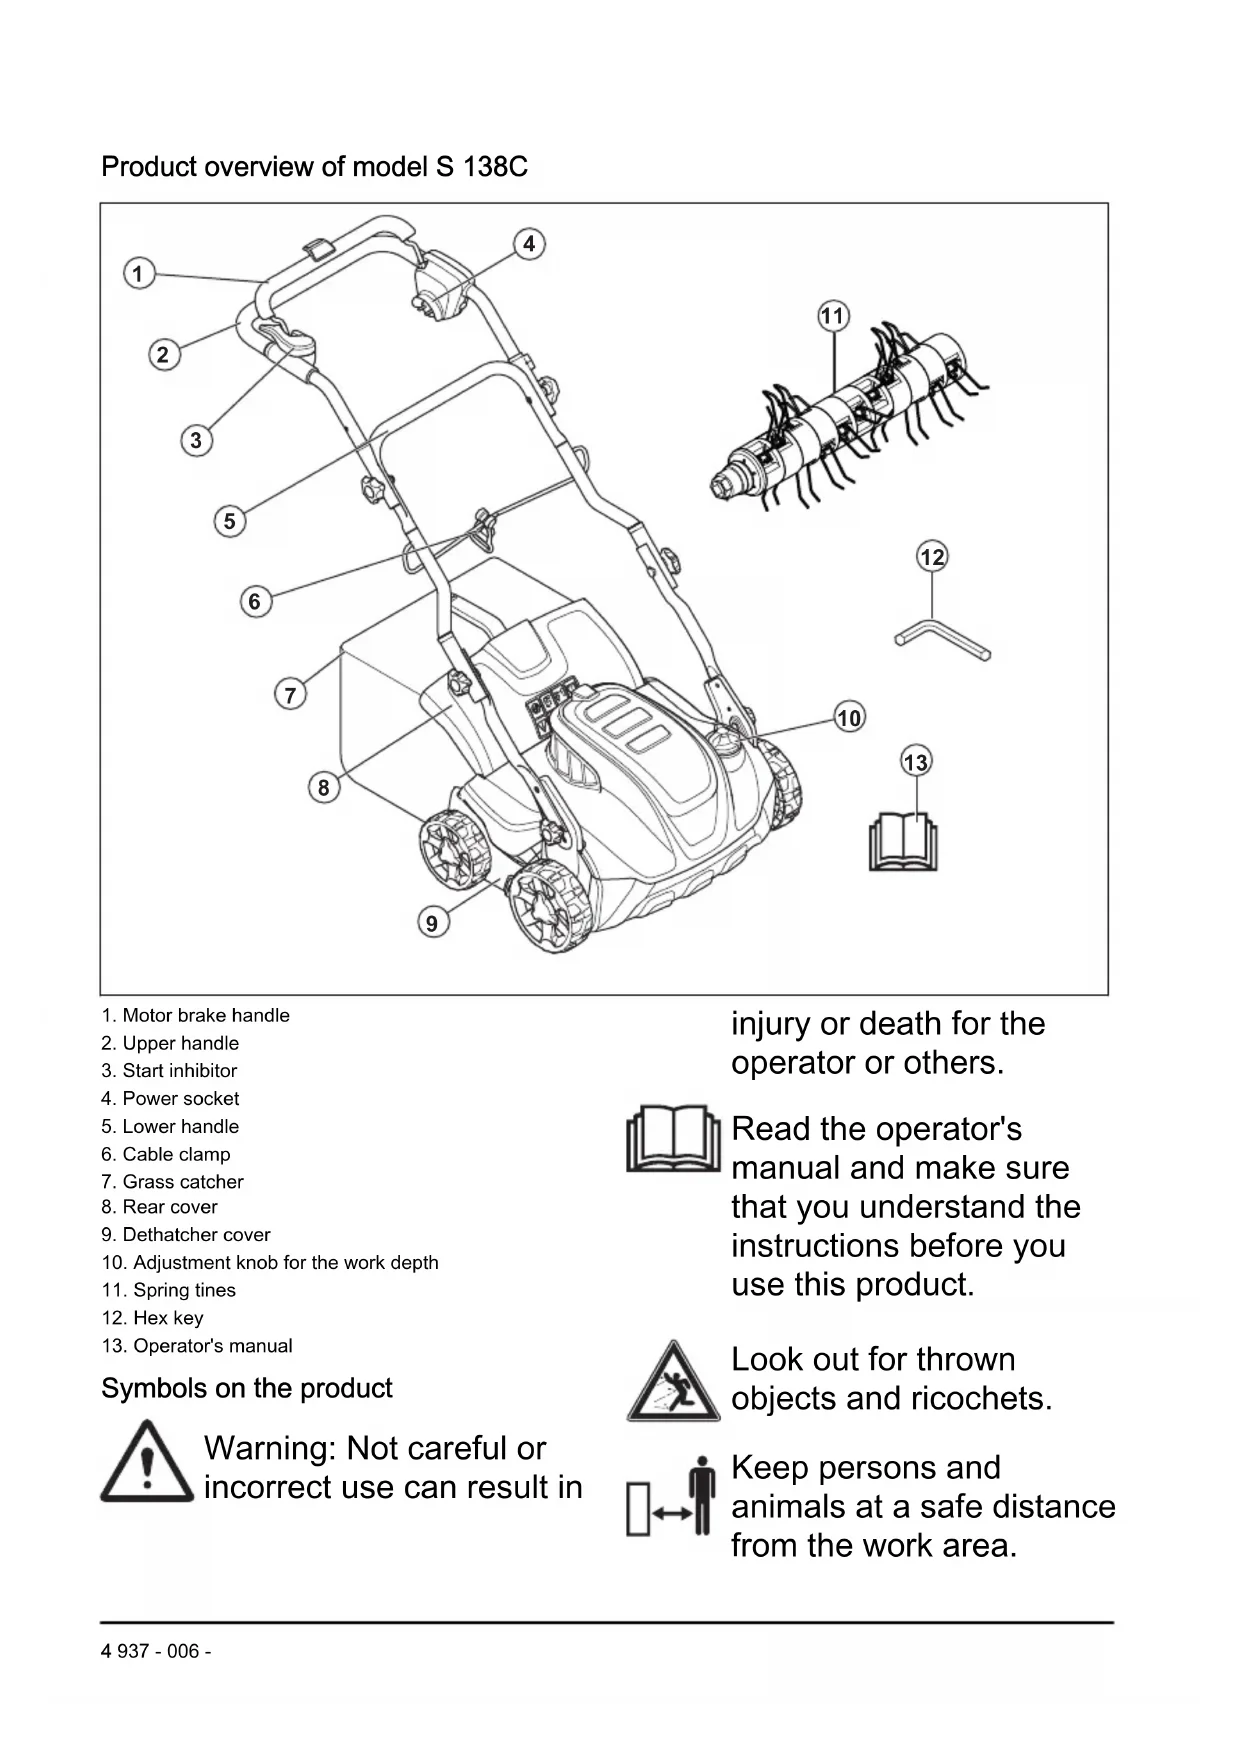
- Motor brake handle
- Upper handle
- Start inhibitor
- Power socket
- Lower handle
- Cable clamp
- Grass catcher
- Rear cover
- Dethatcher cover
- Adjustment knob for the work depth
- Spring tines
- Hex key
- Operator's manual
Symbols on the product

Warning: Not careful or incorrect use can result in
injury or death for the operator or others.

Read the operator's manual and make sure that you understand the instructions before you use this product.

Look out for thrown objects and ricochets.
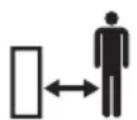
Keep persons and animals at a safe distance from the work area.
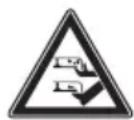
Warning: Keep hands and feet away from the rotating blade.
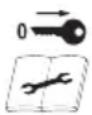
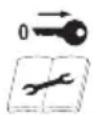
Remove the safety key before you do maintenance on the product (model S 138i).
Disconnect the product from electrical outlet before you do maintenance on the product (model S 138C).
Electrical shock hazard (model S 138C).

Do not expose to rain (model S 138i).
Warning: Do not operate the product across the power cord as this can result in electrical shock or damage to the product (model S 138C).

This product has protection against splashing water.

This product agrees with the applicable EAC directives.

This product is in accordance with applicable EC directives.

The product agrees with applicable UkrSEPRO directives.
Noise emission to the environment according to the European Community's Directive. The product's emission is specified in the Technical data chapter and on the label.

Double insulation (model S 138C).
Recycle this product at a recycling location for electrical and electronic equipment. (Applies to Europe only)

Start procedure for model S 138i: push the ON/OFF button, loosen the start inhibitor, push the motor brake handle down.

Start procedure for model S 138C: loosen start
inhibitor, push motor brake handle down.

Release the motor brake handle to stop.

Scannable code.
Note: Other symbols/decals on the product refer to certification requirements for some markets.
Product liability
As referred to in the product liability laws, we are not liable for damages that our product causes if:
- the product is incorrectly repaired.
- the product is repaired with parts that are not from the manufacturer or not approved by the manufacturer.
- the product has an accessory that is not from the manufacturer or not approved by the manufacturer.
- the product is not repaired at an approved service center or by an approved authority.
Safety
Safety definitions
Warnings, cautions and notes are used to point out specially important parts of the manual.

WARNING: Used if there is a risk of injury or death for the operator or bystanders if the instructions in the manual are not obeyed.

CAUTION: Used if there is a risk of damage to the product, other materials or the adjacent area if the instructions in the manual are not obeyed.
Note: Used to give more information that is necessary in a given situation.
General safety instructions

WARNING: Read the warning instructions that follow before you use the product.
- This product is dangerous if used incorrectly or if you are not careful. Injury or death can occur if you do not obey the safety instructions.
-
This product produces an electromagnetic field during operation. This field may under some circumstances interfere with active or passive medical implants. To reduce the risk of serious or fatal injury we recommend persons with medical implants to consult their physician and the medical implant manufacturer before operating this product.
-
Always be careful and use your common sense. If you are not sure how to operate the product in a special situation, stop and speak to your Husqvarna dealer before you continue.
- Keep in mind that the operator will be held responsible for accidents that involve other persons or their property.
- Keep the product clean. Make sure that you can clearly read signs and decals.
- Do not let a person use the product unless you make sure that they read and understand the contents of the operator's manual.
- Do not let a child operate the product.
- Do not let a person, without knowledge of the instructions, operate the product.
- Always monitor a person, with decreased physical capacity or mental capacity, that uses the product. A responsible adult must be there at all times.
-
Do not use the product if you are tired, ill, or under the influence of alcohol, drugs or medicine. This has a negative effect on your vision, alertness, coordination and judgment.
-
Do not use the product if it is defective.
- Do not change this product or use it if it is possible that it has been changed by others.
Work area safety

WARNING: Read the warning instructions that follow before you use the product.
- Remove objects such as branches, twigs and stones from the work area before you use the product.
- Objects that hit against the dethatcher equipment can eject and cause damage to persons and objects. Keep bystanders and animals at a safe distance from the product.
- Never use the product in bad weather such as fog, rain, strong winds, intense cold and risk of lightning. To use the product in bad weather or in moist or wet locations is tiring. Bad weather can cause dangerous conditions, such as slippery surfaces.
-
Look out for persons, objects and situations that can prevent safe operation of the product.
-
Look out for obstacles, such as roots, stones, twigs, pits and ditches. Long grass can hide obstacles.
To operate the product on slopes can be dangerous. Do not use the product on ground that slopes more than 15^ - Operate the product across the face of slopes. Do not move up and down.
- Be careful when you go near hidden corners and objects that prevent a clear view.
Work safety

WARNING: Read the warning instructions that follow before you use the product.
- Use this product to remove thatch and moss from grass lawns only. It is not permitted to use it for other tasks.
- Use personal protective equipment. Refer to Personal protective equipment on page 9.
- Do not operate the product in rain or wet conditions. The risk of electrical shock increases if water enters the product.
- Do not operate the product unless the dethatcher equipment and all covers are
attached correctly. An incorrectly attached dethatcher equipment can come loose and cause personal injury.
- Make sure that the dethatcher equipment does not hit objects such as stones and roots. This can do damage to the dethatcher equipment and bend the motor shaft. A bent axle causes heavy vibration and a very high risk that the dethatcher equipment becomes loose.
- If the dethatcher equipment hits an object or if vibrations occur, stop the product immediately. Stop the motor, turn the safety key to 0 and remove the battery (model S 138i) or disconnect the power cord (model S 138C). Examine the product for damages. Repair damages or let an authorised service agent do the repair.
- Never attach the motor brake handle permanently to the handle when the motor is started.
- Put the product on a stable, flat surface and start it. Make sure that the dethatcher equipment does not hit the ground or other objects.
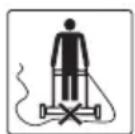
Always stay behind the product when you operate it.
- Let all the wheels stay on the ground and keep 2 hands on the handle when you operate the product. Keep your hands and feet away from the rotating dethatcher equipment.
- Do not tilt the product when the motor is started.
- Be careful when you pull the product rearward.
- Never lift up the product when the motor is started. If you must lift the product, first stop the motor, turn the safety key to 0 and remove the battery (model S 138i) or disconnect the power cord (model S 138C).
- Do not walk rearward when you operate the product.
- Stop the motor when you move across areas without grass, for example paths made of gravel, stone and asphalt.
- Do not run with the product when the motor is started. Always walk when you operate the product.
- Stop the motor before you change the work depth. Never make adjustments with the motor started.
- Never let the product stay out of view with the motor started. Stop the motor and make sure that the dethatcher equipment does not rotate.
Safety instructions for operation
Personal protective equipment
You must use approved personal protective equipment whenever you use the product. Personal protective equipment cannot eliminate the risk of injury but it will reduce the degree of injury if an accident does happen. Ask your dealer for help in choosing the right equipment.
Always wear:
- Hearing protection to minimise the risk of hearing impairment.
- Sturdy, non-slip boots or shoes. Do not wear sandals or go barefoot.
- Heavy, long pants. Do not wear shorts.
Wear gloves when required, for example when fitting, inspecting or cleaning the dethatcher equipment.

WARNING: Use approved hearing protection. Long term exposure to noise can result in permanent hearing impairment.
Safety devices on the product

WARNING: Read the warning instructions that follow before you use the product.
- Do not use a product with defective safety devices.
- Do a check of the safety devices regularly. If the safety devices are defective, speak to your Husqvarna service agent.
To do a check of the covers
The dethatcher cover decreases vibrations in the product and decreases the risk of injury from the dethatcher equipment.
- Examine the side dethatcher cover to make sure that there are no damages such as cracks.
- Examine the rear cover to make sure that there are no damages such as cracks.
Motor brake handle
The motor brake handle stops the motor. When the motor brake handle is released, the motor stops.
To do a check of the motor brake, start the motor and then release the motor brake handle. If the motor does
not stop in 3 seconds, let an approved Husqvarna service agent adjust the motor brake.
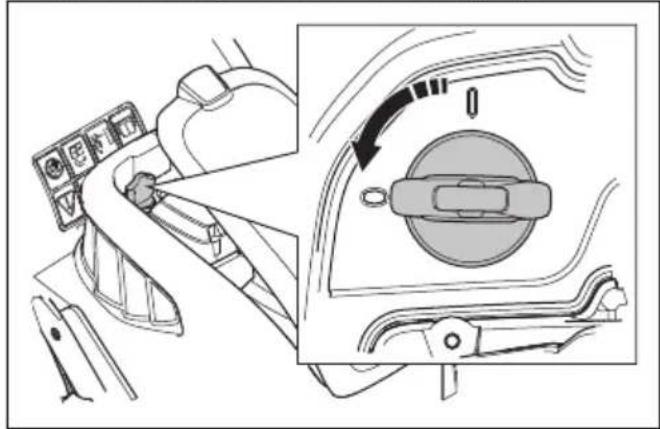
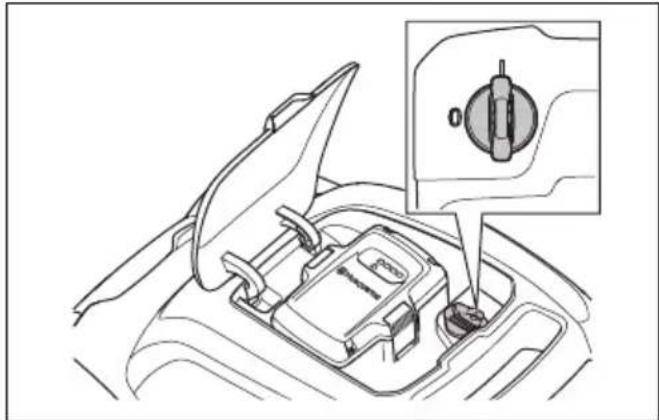
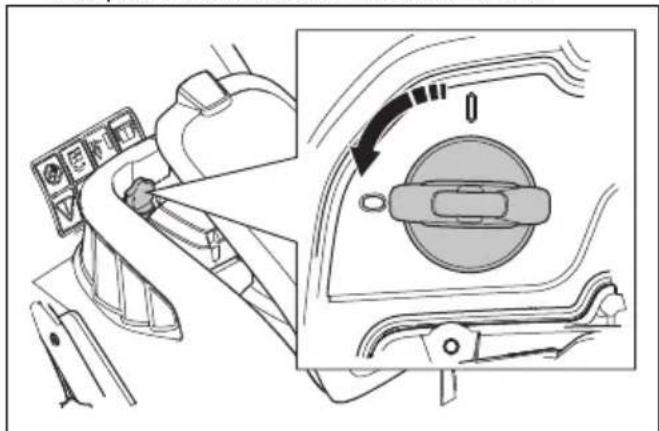
Safety key
The safety key is found below the battery lid. The safety key is used to connect the battery that supplies the motor with power.
- Start and stop the motor to do a check of the safety key.
- If the safety key functions correctly, the motor starts only when the key is turned to 1.
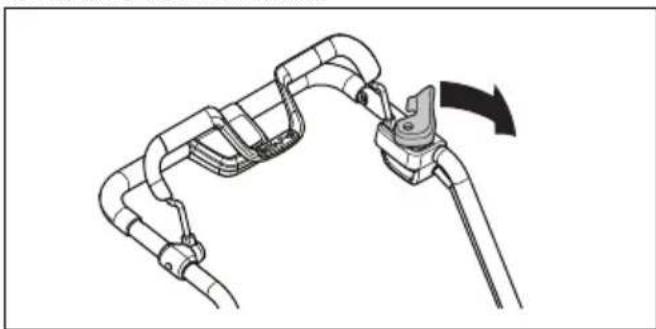
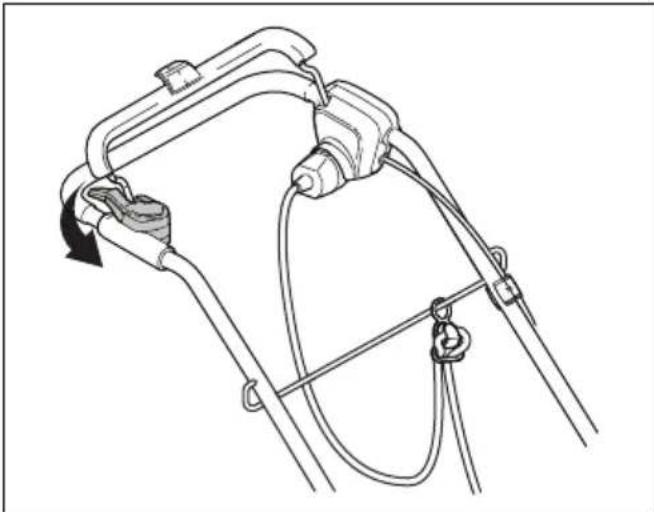
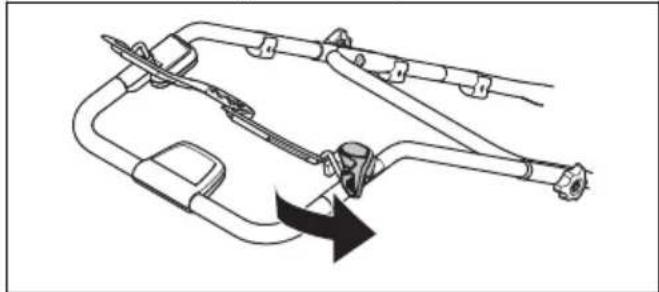
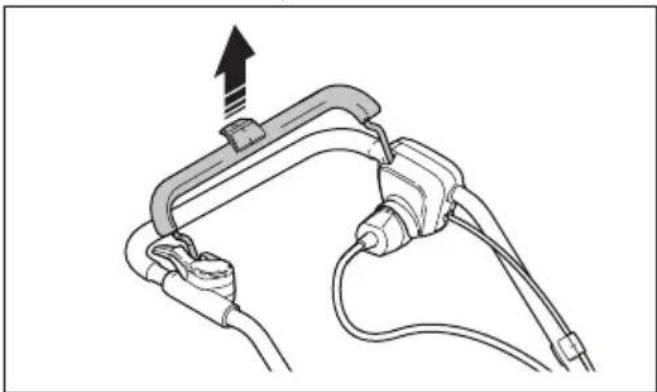
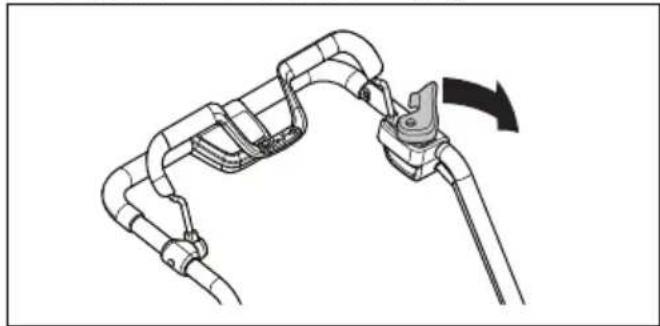
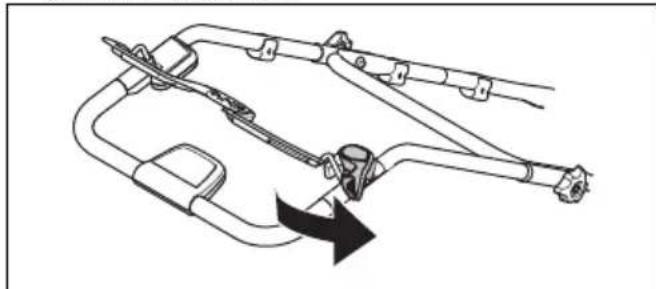
To examine the start inhibitor
Do a check of the start inhibitor to make sure that it prevents operation of the motor.
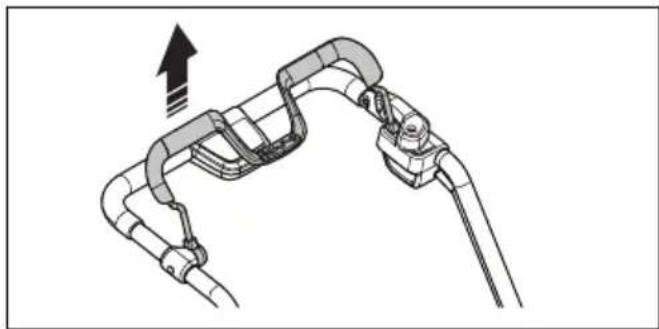
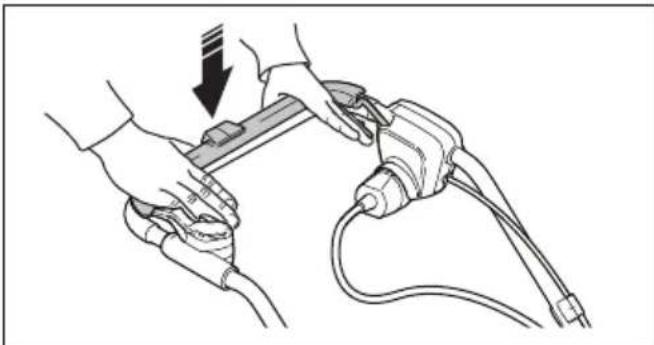
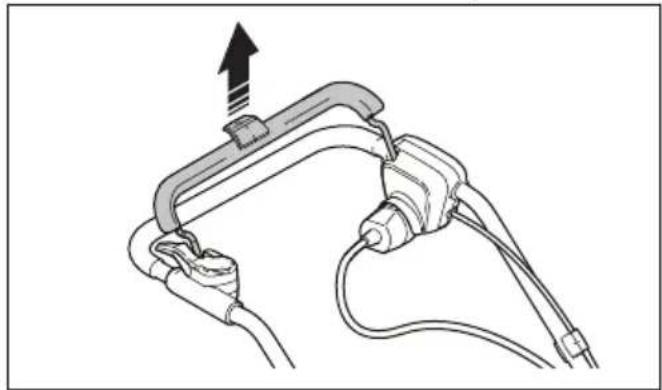
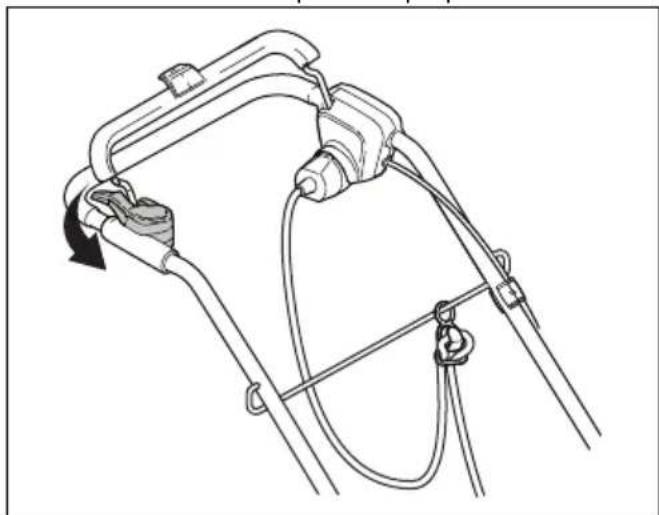
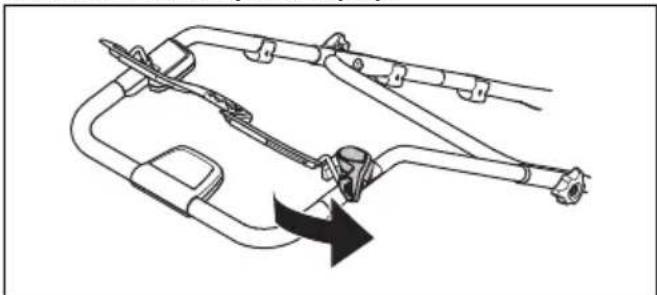
- Push the motor brake handle in the direction of the handlebar. The start inhibitor stops the movement.
- Push the start inhibitor out.
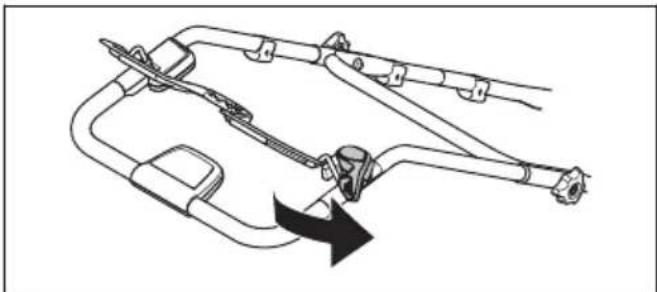
- Release the start inhibitor and make sure that it goes back to its initial position.
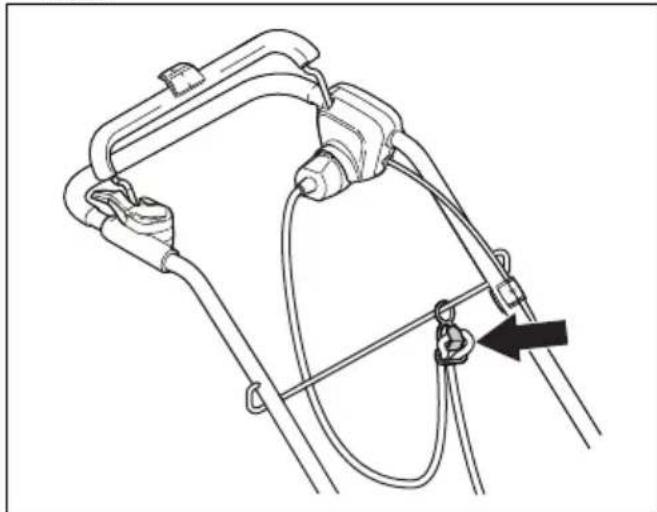
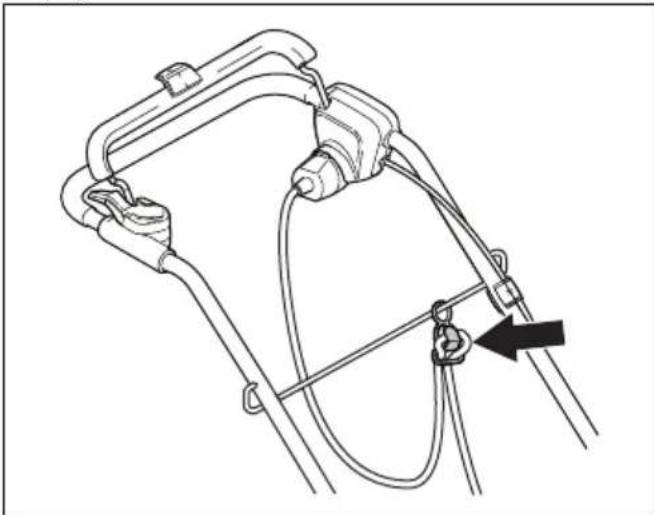
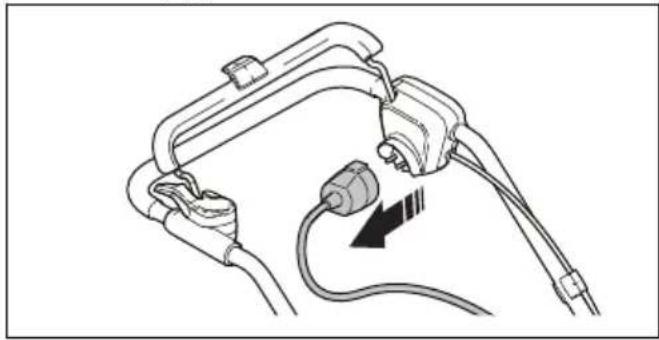
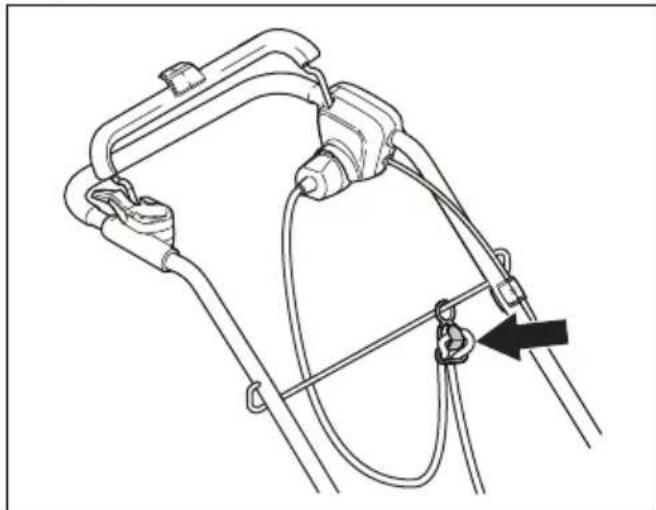
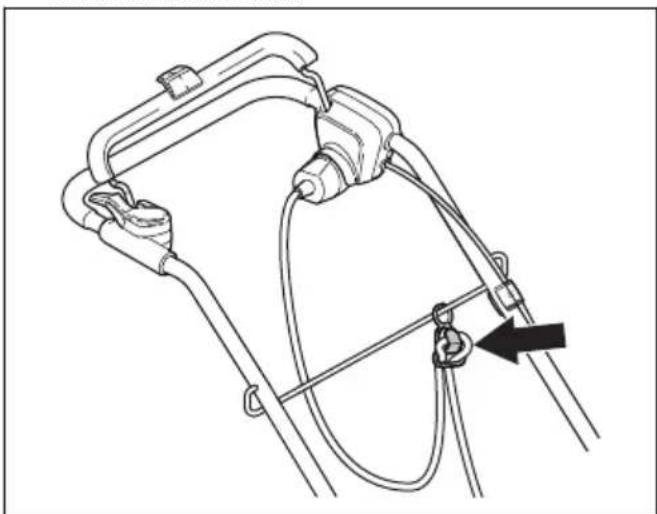
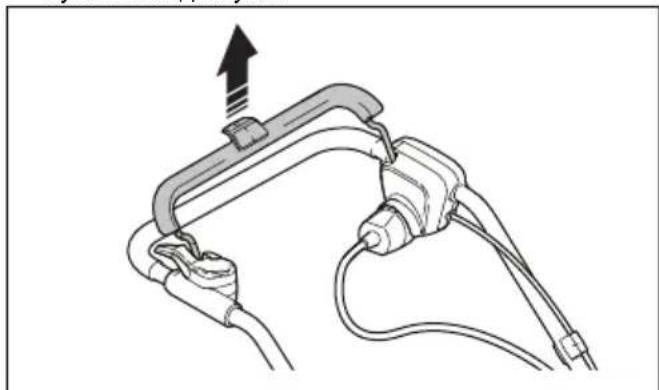
To use the power cord holder (model S 138C)
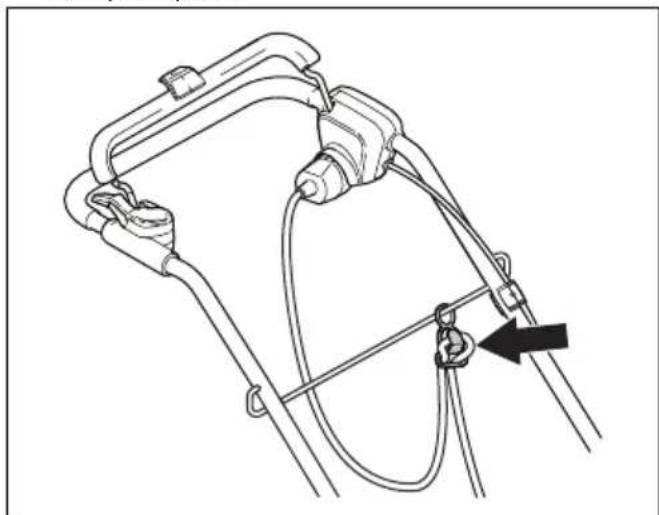
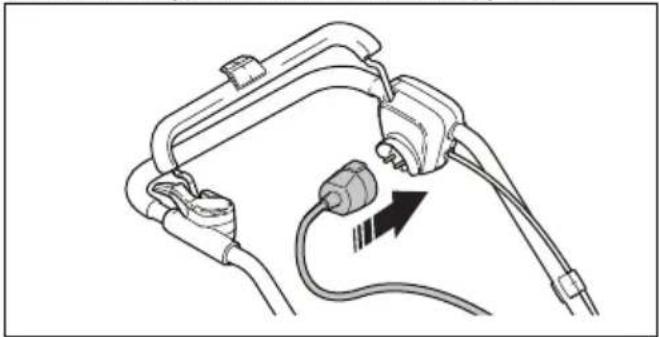
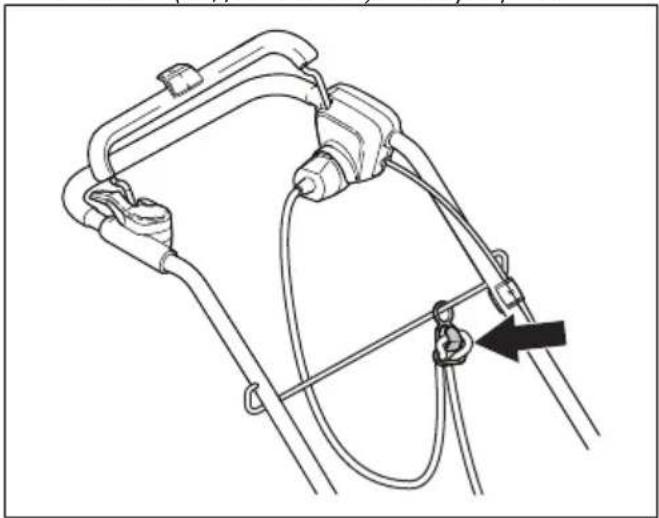
The power cord holder decreases the strain on the power socket and the power cord. The power cord holder also decreases the risk that you fall.
- Bend the power cord to a small loop.
- Put the loop in to the hole in the power cord holder.
- Put the loop around the hook.
- Pull the power cord to tighten the loop around the hook.
Battery safety

WARNING: Read the warning instructions that follow before you use the product.
- Use Husqvarna rechargeable batteries as a power supply for related Husqvarna products only. To prevent injury, do not use the battery as a power supply for other devices.
- Do not use non-rechargeable batteries.
-
Risk of electrical shock. Do not connect the battery terminals to keys, coins, screws or other metal. This can cause a short circuit of the battery.
-
Do not put objects into the air slots of the battery.
- Keep the battery away from sunlight, heat or open flame. The battery can explode and cause burns and/or chemical burns.
- Keep the battery away from rain and wet conditions.
- Keep the battery away from microwaves and high pressure.
- Do not try to disassemble or break the battery.
- If the battery leaks, do not let the liquid touch your body or eyes. If you have touched the liquid, clean the area with a large quantity of water and get medical aid.
- Use the battery in temperatures between -10^ and 40^ .
- Do not clean the battery or the battery charger with water. See To clean the battery and the battery charger on page 20.
- Do not use a defective or damaged battery.
- Keep batteries in storage away from metal objects such as nails, coins, jewellery.
Battery charger safety

WARNING: Read the warning instructions that follow before you use the product.
- Use the QC battery chargers to charge Husqvarna replacement batteries only.
- Risk of electrical shock or short circuit. Do not put objects into the air slots of the charger. Do not try to disassemble the battery charger. Do not connect the charger terminals to metal objects. Use an approved mains socket.
- This product produces an electromagnetic field during operation. This field may under some circumstances interfere with active or passive medical implants. To reduce the risk of serious or fatal injury, we recommend persons with medical implants to consult their physician and the medical implant manufacturer before operating this product.
-
Regularly make sure that the power cord of the battery charger is not damaged and that there are no cracks in it.
-
Do not lift the battery charger by the power cord. To disconnect the battery charger from a mains socket, pull out the plug. Do not pull the power cord.
- Keep the power cord and extension cables away from water, oil and sharp edges. Make sure that the cable is not pinched in doors, fences or equivalent. It can cause the charger to become energized.
- Do not clean the battery charger with water.
- The battery charger can be used by children aged from 8 years and above and persons with reduced physical, sensory, or mental capabilities or lack of experience and knowledge if they have been given supervision or instruction concerning use of the battery charger in a safe way and understand the hazards involved. Children shall not play with the battery charger. Cleaning and user maintenance shall not be made by children without supervision.
-
Do not charge non-rechargeable batteries in the battery charger.
-
Do not use the battery charger near flammable materials or materials that can cause corrosion. Do not cover the battery charger. Pull out the plug to the battery charger if there is smoke or fire.
- Do not use a defective or damaged battery charger.
- Only charge the battery indoors in a room with good airflow and away from sunlight. Do not charge the battery in wet conditions.
Power cord safety
For model S 138C.
The use of a Residual Current Device (R.C.D.) with a tripping current of not more than 30mA is recommended. Even with an R.D.C. installed, 100% safety cannot be guaranteed and safe work procedures must be obeyed at all times. Do a check of your R.C.D. each time you use it.
- Immediately disconnect from the mains if the power cord is cut or the insulation is damaged.
- Do not touch a cut or damaged power cord until the electrical supply is disconnected.
- Do not repair a cut or damaged power cord. Replace it with a new one.
Safety instructions for maintenance

WARNING: Read the warning instructions that follow before you use the product.
- For model S 138i: To prevent accidental start during maintenance, turn the safety key to 0 and remove the battery. Wait at minimum 5 seconds before you start the maintenance.
- For model S 138C: To prevent accidental start during maintenance, disconnect the power cord.
- Do the maintenance work correctly to increase the lifetime of the product and decrease the risk of accidents. Let an approved service agent do the professional repairs. Speak to your nearest service agent for more information.
- Only do the maintenance work written in this operator's
manual. More extensive work must be done by an approved service agent.
- Put on heavy duty gloves when you use the dethatcher equipment. The dethatcher equipment is very sharp and cuts can easily occur.
- Keep the blades on the dethatcher equipment sharp and clean for the best and safest performance.
- Let your service agent regularly examine the product and make necessary adjustments and repairs.
- Replace damaged, worn or broken parts.
- Obey the instructions for how to change accessories. Only use accessories from the manufacturer.
- When not in operation, keep the product, battery and battery charger apart in a dry, indoor and locked area. Make sure that children and persons that are not approved cannot get access to the product, battery or battery charger.
Assembly
Introduction

WARNING: Before you assemble the product, read the safety chapter.

WARNING: For model S 138i: To prevent accidental start during assembly, turn the safety key to 0, remove the battery and wait at minimum 5 seconds.
For model S 138C: To prevent accidental start during assembly, disconnect the power cord.
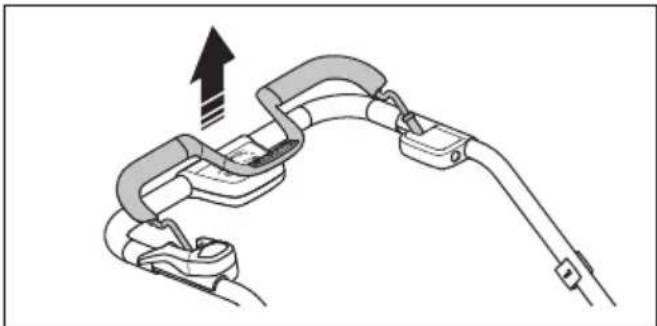
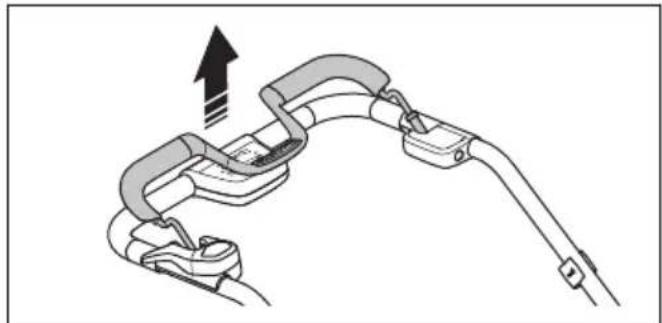
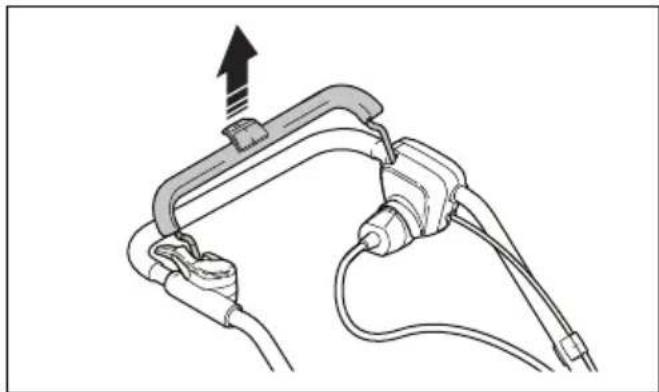
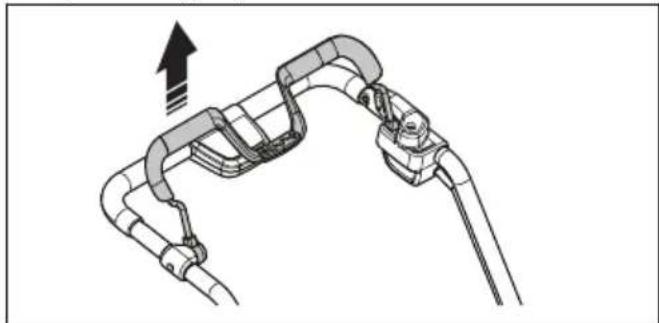
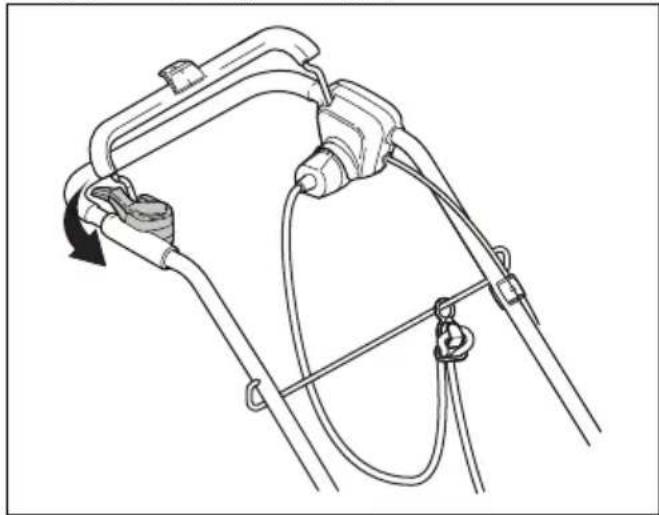
To assemble the handle
- Loosen the lower knobs.
- Move the knobs to the lower end of the grooves on the left and the right side of the product.
- Set the handle height in one of the 2 available positions.
- Move the knobs up in the direction of the handle until they stop and you hear a click.
- Tighten the knobs fully.
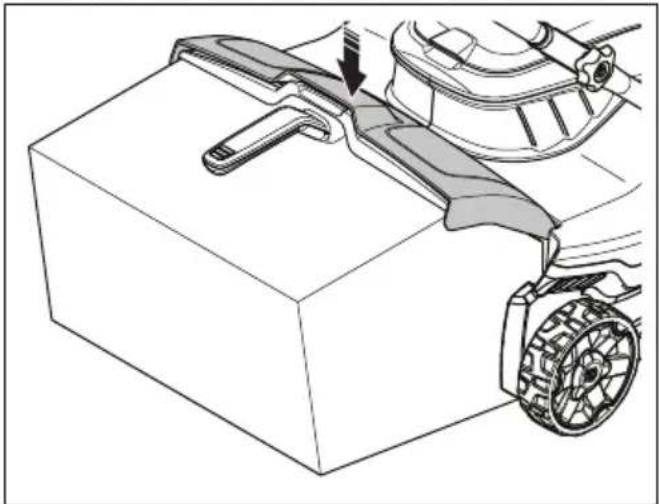
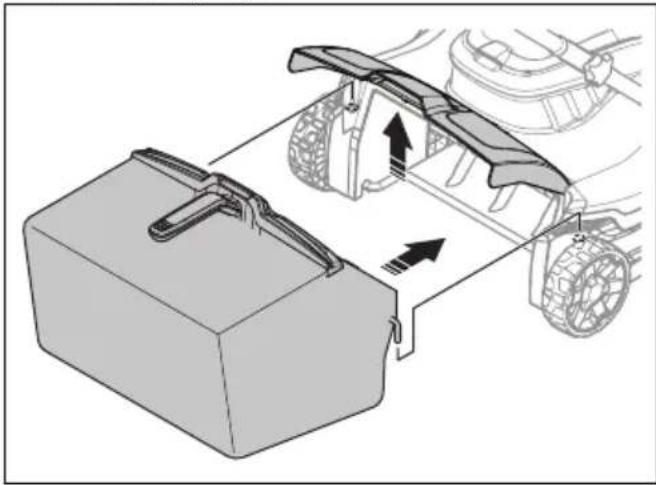
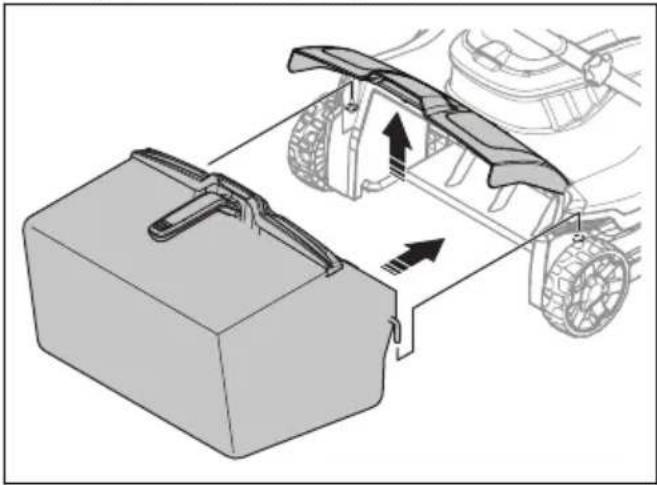
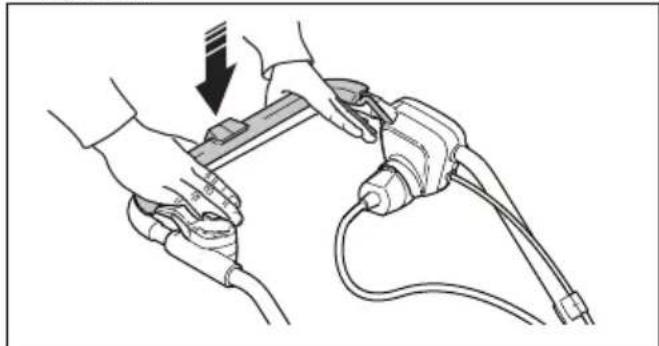
To assemble the grass catcher
- Attach the grass catcher frame to the grass bag with the rigid part of the bag on the bottom. Keep the handle of the frame on top of the grass bag.
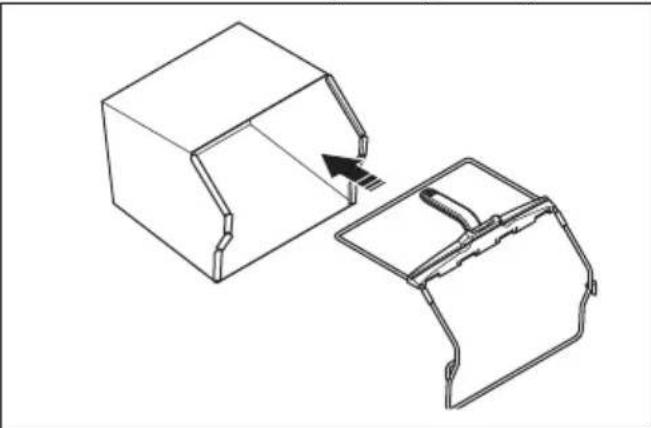
- Attach the bottom section of the grass catcher frame in the groove on the bottom of the grass catcher.
- Attach the grass bag to the grass catcher frame with the clips.
- Lift the rear cover.
- Move the grass catcher into the correct position.
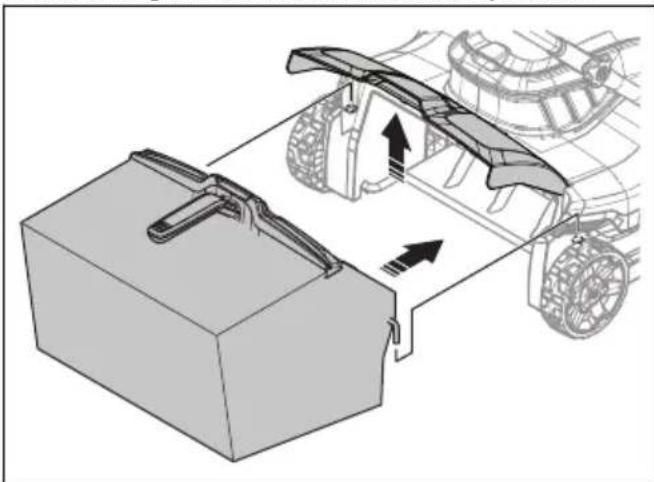
- Attach the grass catcher to the top edge of the chassis. Make sure that the rear cover seals against the grass catcher to prevent leakage.
Operation
Introduction

WARNING: Before you operate the product, you must read and understand the safety chapter.
Husqvarna Connect
Husqvarna Connect is a free app for your mobile device. The Husqvarna Connect app gives extended functions for your Husqvarna product:
- Extended product information.
Information about, and help with, product parts and servicing.
To start to use Husqvarna Connect
- Download the Husqvarna Connect app on your mobile device.
- Register in the Husqvarna Connect app.
- Do the instruction steps in the Husqvarna Connect app to connect and register the product.
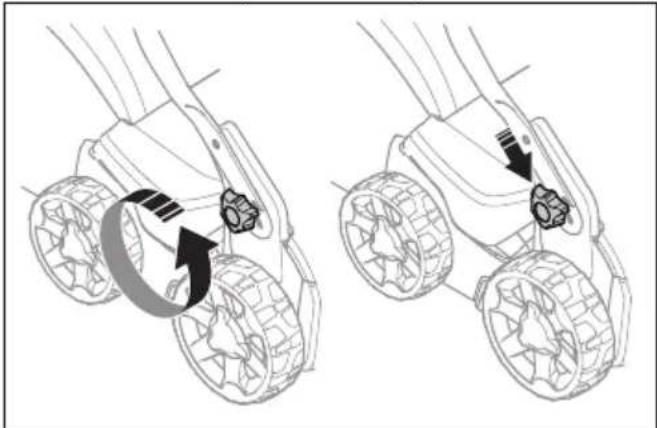
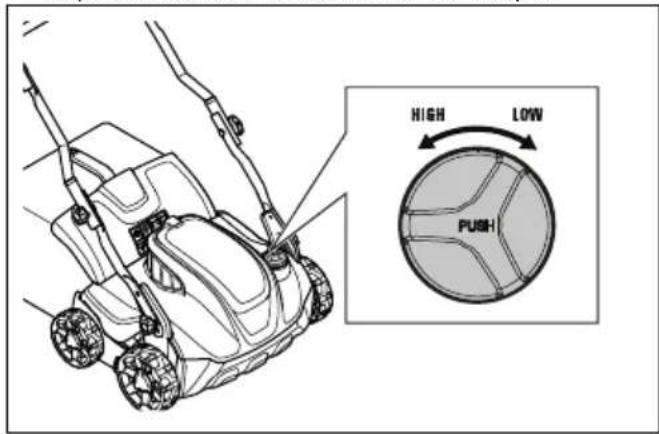
To set the work depth

WARNING: Do not adjust the work depth when you operate the product.
-
Push and turn the adjustment knob for the work depth counterclockwise to increase the work depth.
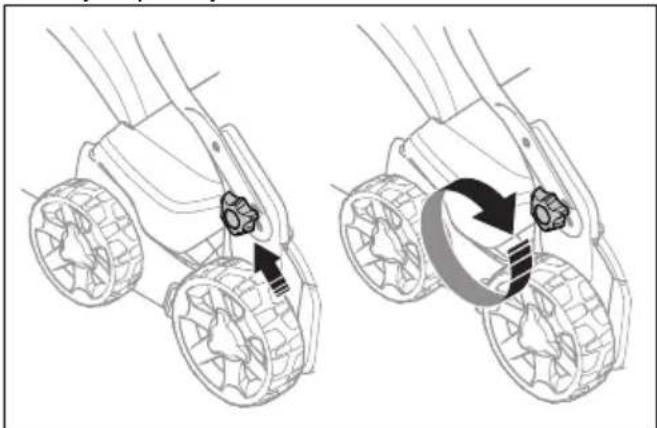
-
Push and turn the adjustment knob for the work depth clockwise to decrease the work depth.
Battery

WARNING: Before you use the battery, you must read and understand the safety chapter. You must also read and understand the operator's manual for the battery and the battery charger.
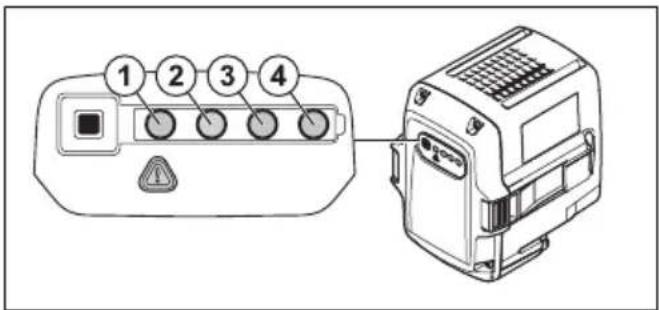
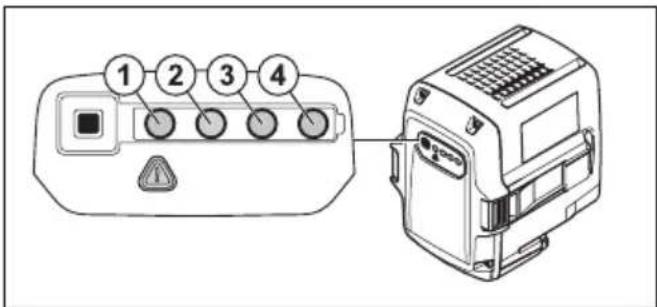
Battery status
The display shows the remaining battery capacity and if there are problems with the battery. The battery capacity is shown for 5 seconds after the product is switched off or the battery indicator button is pressed. The warning
symbol on the battery is on when an error has occurred. See Battery on page 21.
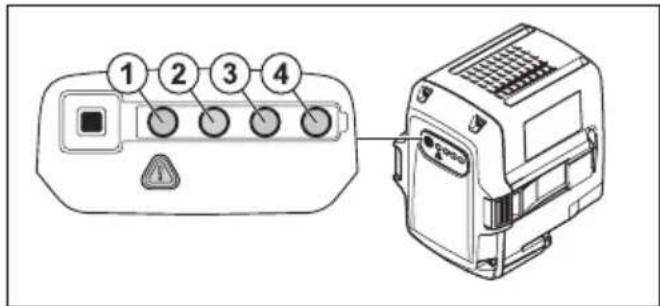
| LED lights Battery status | |
| All LEDs are lit Fully charged (75-100%) | |
| LED 1, LED 2, LED 3 are lit | The battery is 50%-75% charged |
| LED 1, LED 2 are lit The battery is 25%-50% charged | |
| LED 1 is lit The battery is 0% -25% charged. | |
| LED 1 flashes The battery is empty. Charge the battery. | |
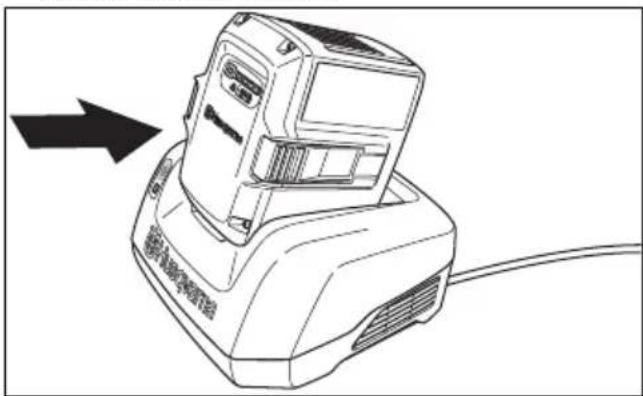
To charge the battery
Charge the battery before the first use. The battery is only 30% charged when supplied to the customer.
Note: The battery charger must be connected to the voltage and frequency specified on the rating plate.
The battery does not charge if the battery temperature is above 50^ . The battery charger decreases the temperature of the battery before it starts to charge.
- Connect one end of the power cord for the battery charger into the socket of the battery charger.
- Connect the other end of the power cord for the battery charger in an grounded mains socket. The LED on the battery charger flashes green one time.

- Put the battery in the battery charger. The green light on the charger comes on when the battery is correctly connected to the battery charger.
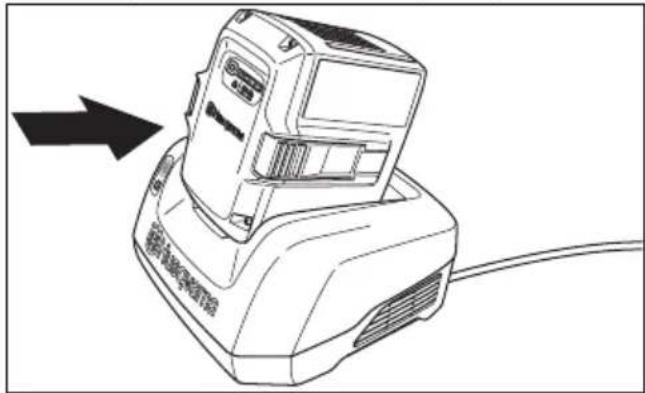
- When all LEDs on the battery have come on the battery is fully charged. Charge the battery for maximum 24 hours.
- To disconnect the battery charger from the mains socket, pull the plug, not the power cord.
- Remove the battery from the battery charger.
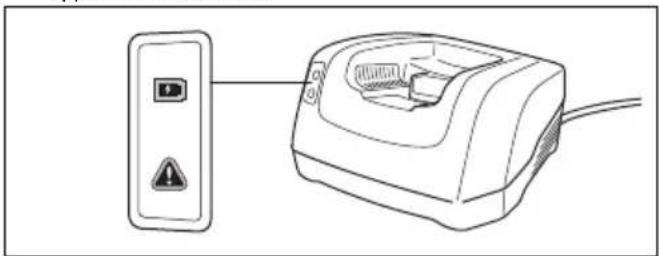
Battery charging status
A Husqvarna Li-ion battery can be charged or used at all charging levels. The battery is not damaged. A fully charged battery will not decrease its charge when the battery is left in the charger.
| LED display | Charging status |
| LED 1 flashes 0%-25% | |
| LED 1 is lit, LED 2 flashes | 25%-50% |
| LED 1, LED 2 are lit, LED 3 flashes | 50%-75% |
| LED 1, LED 2, LED 3 are lit, LED 4 flashes | 75%-100% |
| LED 1, LED 2, LED 3, LED 4 are lit | Fully charged |
To operate S 138i
To start the product
-
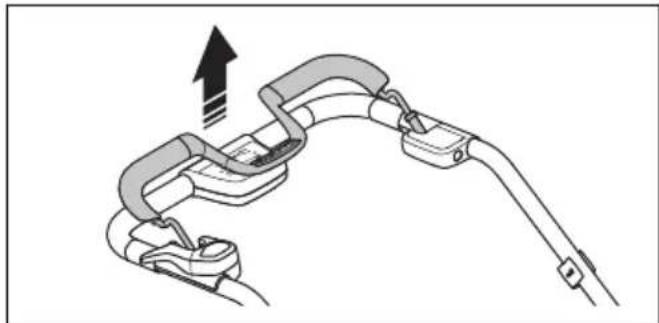
Put a charged battery in battery compartment number 1 below the battery lid. For longer operation time, put a second charged battery in battery compartment number 2.
-
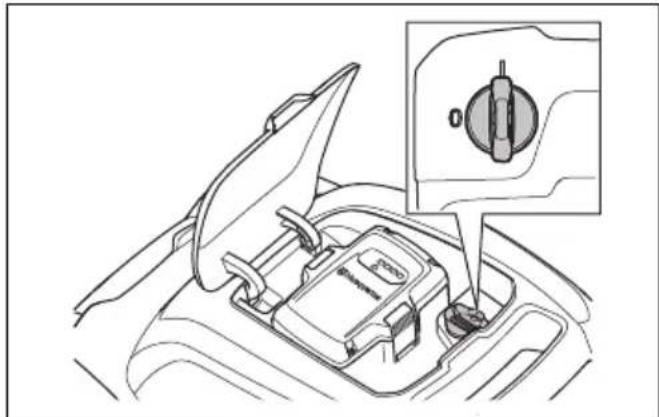
Turn the safety key to 1.
- Stay behind the product.
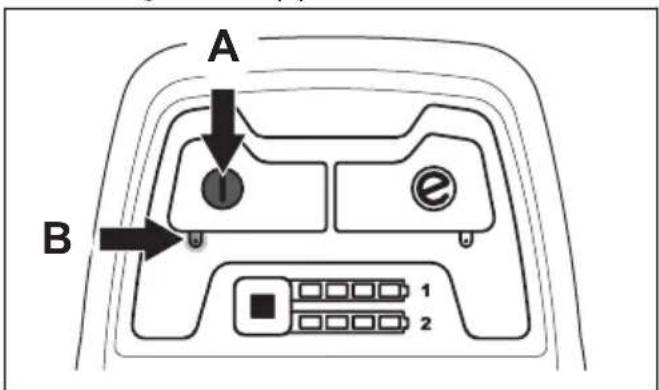
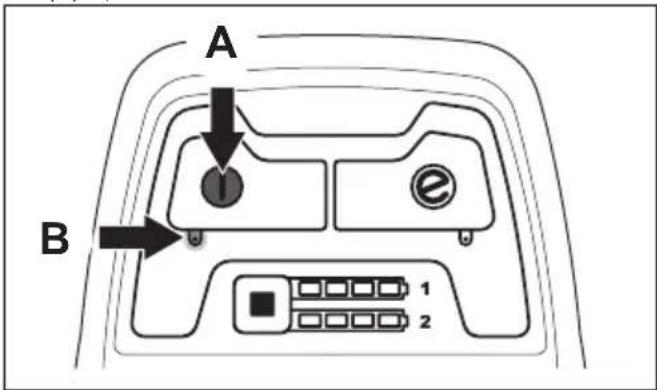
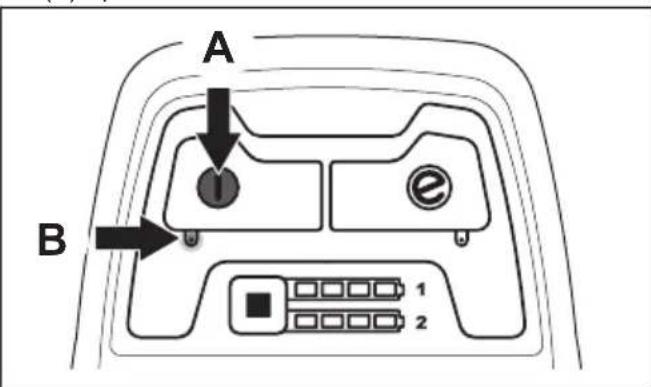
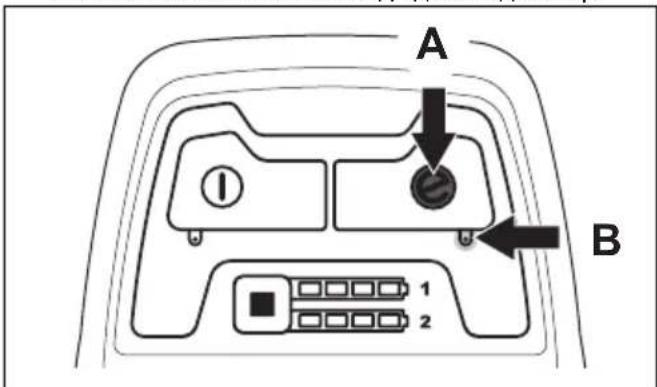
- Press the ON/OFF button (A) on the control panel and the green LED (B) comes on.
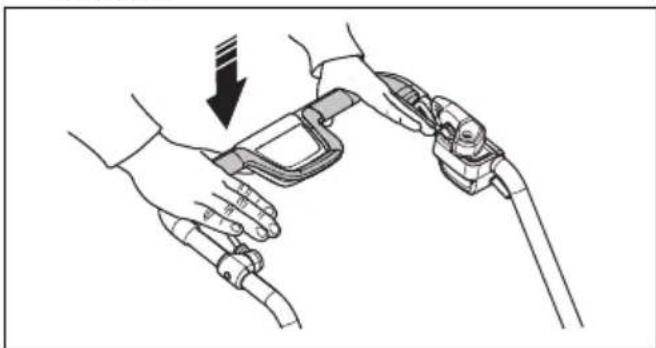
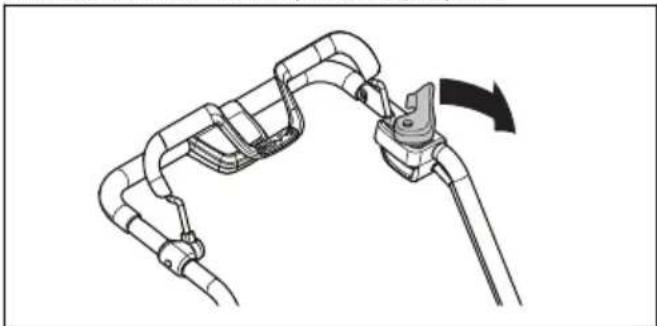
- Loosen the start inhibitor.
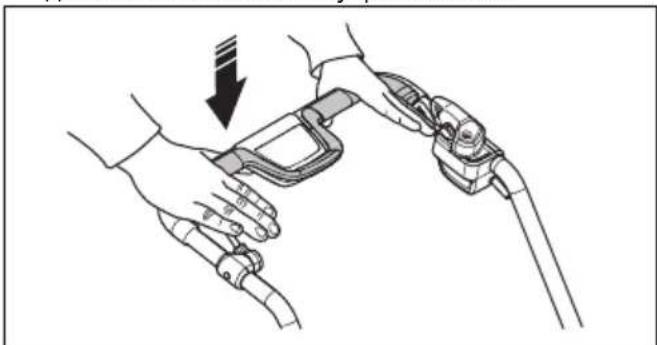
- Push the motor brake handle in the direction of the handlebar.
To use the SavE function
The product has a battery saving function (SavE) that gives longer operation time.
- Press the SavE button (A) to start the function. The green LED comes on.
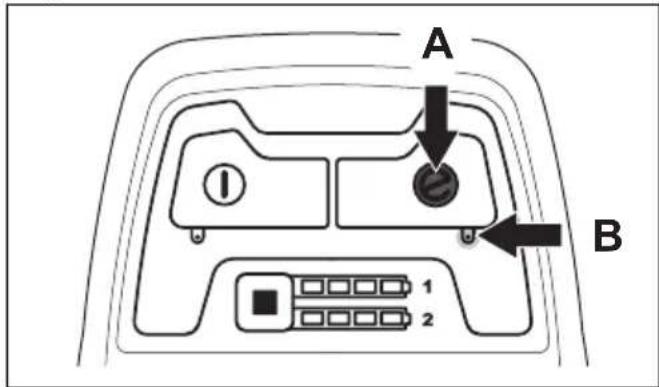
- Press the SavE button again to stop the function. The green LED (B) goes out.
To stop the product
The product stops automatically if you do not operate it for 10 minutes. Always turn the safety key to 0 before you let the product out of view.
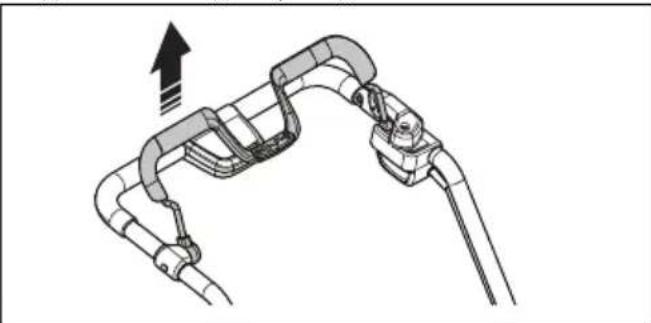
- Release the motor brake handle to stop the motor.
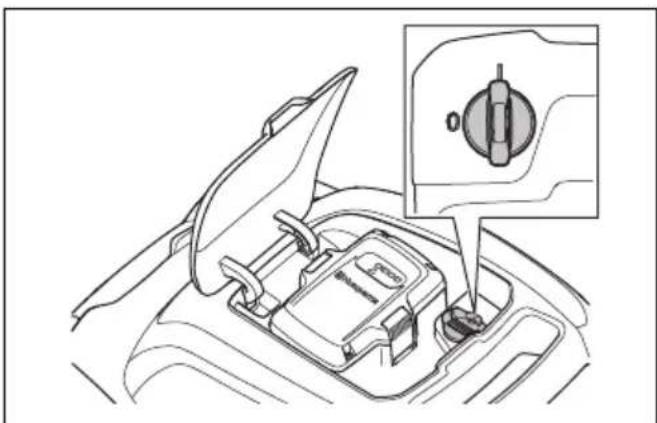
- Press the ON/OFF button (A) on the control panel and the green LED (B) goes out.

- Open the battery lid and turn the safety key to 0.
- To remove the battery, press the 2 release buttons at the same time and pull out the battery.

- Charge the battery if it is weak. For more information, see To charge the battery on page 16
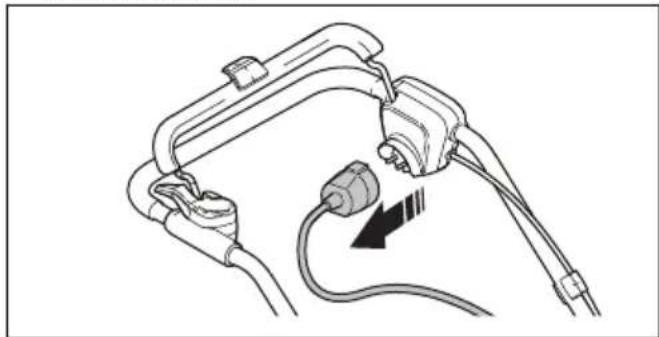
To operate S 138C
To start the product
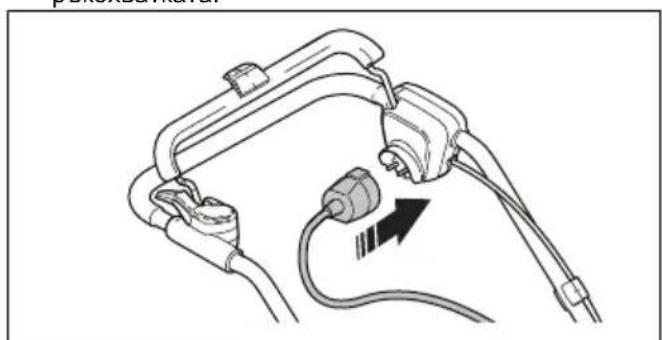
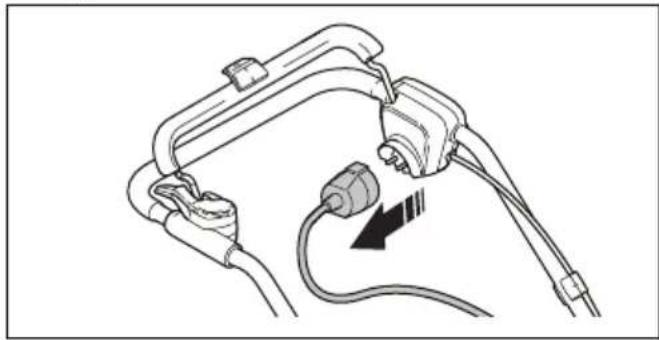
- Connect a power cord to the socket below the handle.
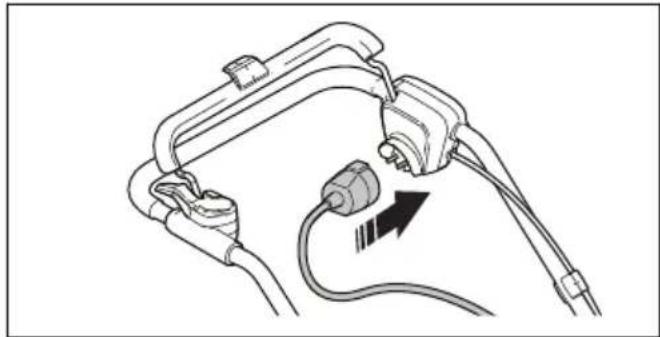
- Put the power cord in the power cord holder. Refer to To use the power cord holder (model S 138C) on page 10.
-
Stay behind the product.
-
Loosen the start inhibitor.
- Push the motor brake handle in the direction of the handlebar.
To stop the product
- Release the motor brake handle to stop the motor.
- Disconnect the power cord from the mains and then from the product.
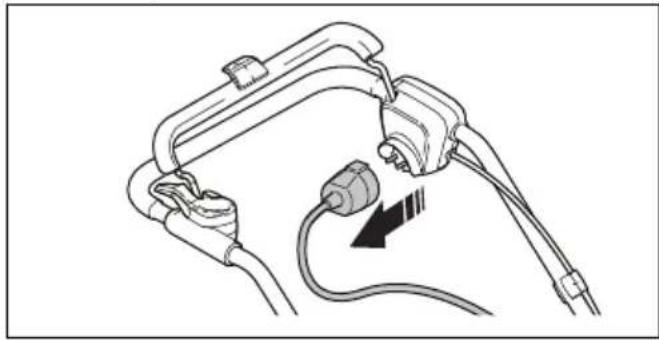

CAUTION: Pull the plug straight out. Do not pull the power cord.
Maintenance
Introduction

WARNING: Before you do maintenance, you must read and understand the safety chapter.
For all servicing and repair work on the product, special training is necessary. We guarantee the availability of professional repairs and servicing. If your dealer is not a service agent, speak to them for information about the nearest service agent.
Maintenance schedule
The maintenance intervals are calculated from daily use of the product. The intervals change if the product is not used daily.
For maintenance identified with *, refer to Safety devices on the product on page 9.
| S 138i and S 138C | Each use | Monthly | Each season |
| Do a general inspection. X | |||
| Clean the product. X | |||
| Examine the dethatcher equipment. X | |||
| Make sure that the safety devices on the product are not defective. * X | |||
| Examine the covers. * X | |||
| Do a check of the motor brake handle. * X | |||
| Do a check of the start inhibitor. * X |
| S 138i only | Each use | Monthly | Each season |
| Make sure that the ON/OFF button operates correctly and is not defective. X | |||
| Examine the battery for damage. X | |||
| Do a check of the battery charge. X | |||
| Make sure that the release buttons on the battery operates correctly and that the battery locks into the product. | X | ||
| Examine the battery charger for damage and make sure that it operates correctly. | X | ||
| Examine the connections between the battery and the product. Also examine the connection between the battery and the battery charger. | X |
To do a general inspection
Make sure that the nuts and screws on the product are tightened.
- Make sure that the cables on the product are not in a position where they can get damaged.
To clean the product
- Clean plastic parts with a clean and dry cloth.
- Do not use water to clean the product. Water can enter the battery or the motor and cause short circuit or damage to the product.
- Do not use a high pressure washer to clean the product.
- Do not flush water directly on the motor.
- Use a brush to remove leaves, grass and dirt.
To clean the battery and the battery charger

CAUTION: Do not clean the battery or the battery charger with water.
- Make sure that the battery and the battery charger are clean and dry before you put the battery into the battery charger.
- Clean the battery terminals with compressed air or use a soft and dry cloth.
- Clean the surfaces of the battery and the battery charger with a soft and dry cloth.
To examine the dethatcher equipment

WARNING: For models S 138i: To prevent accidental start, turn the safety key to 0, remove the battery and wait at minimum 5 seconds.
For model S 138C: To prevent accidental start, disconnect the power cord.

WARNING: Use protective gloves when you do maintenance on the dethatcher equipment. The blades on the dethatcher equipment are very sharp and cuts can easily occur.
- Examine the dethatcher equipment for damage or cracks. Always replace a damaged dethatcher equipment.
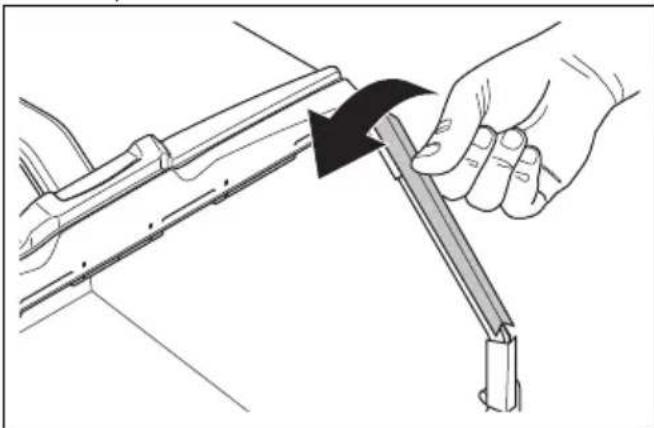
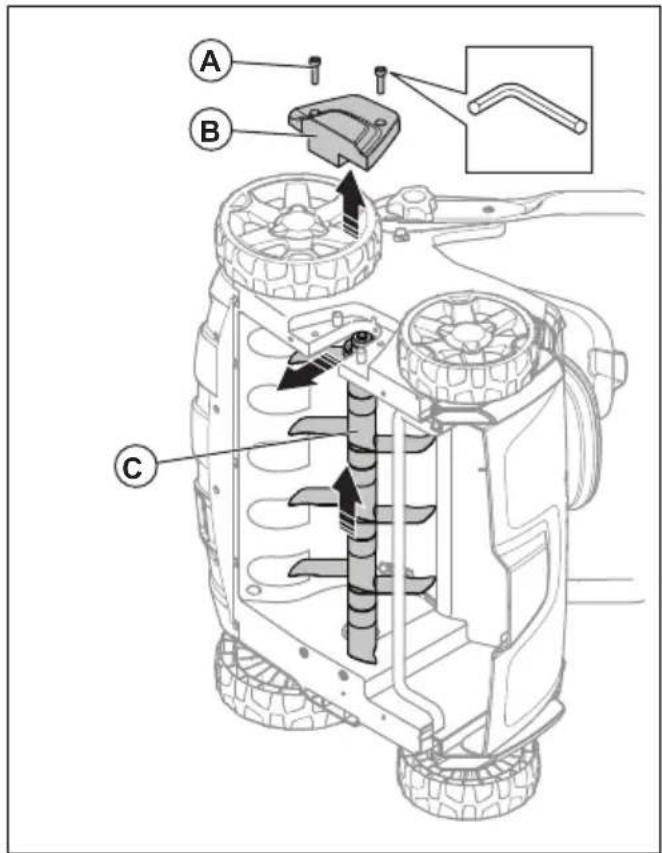
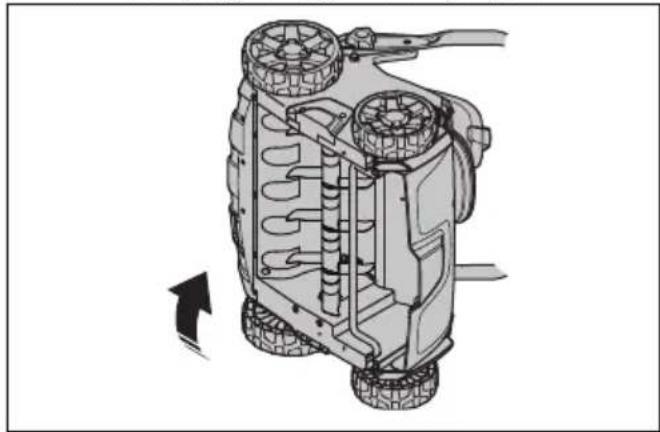
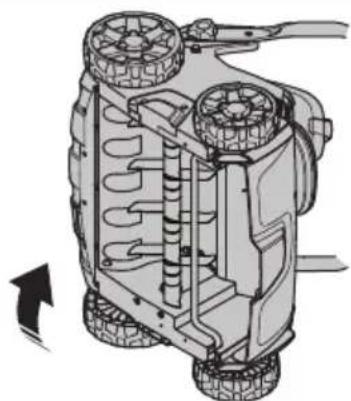
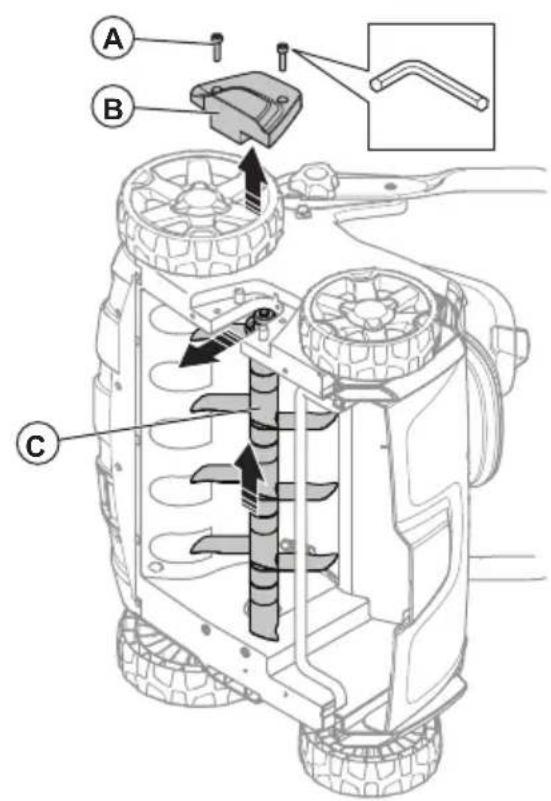
To replace the dethatcher equipment

WARNING: Use protective gloves when you do maintenance on the dethatcher equipment. The dethatcher equipment is very sharp and cuts can easily occur
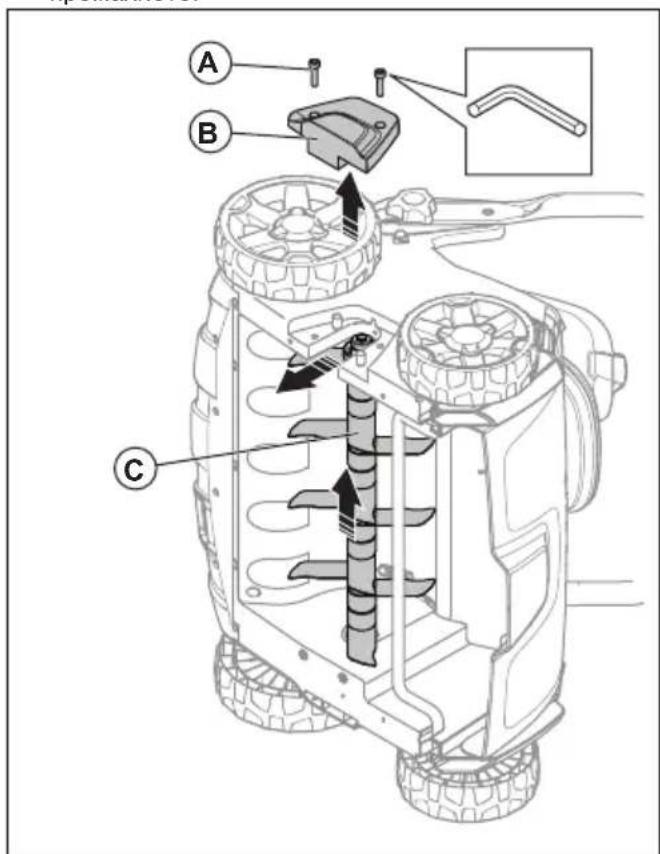
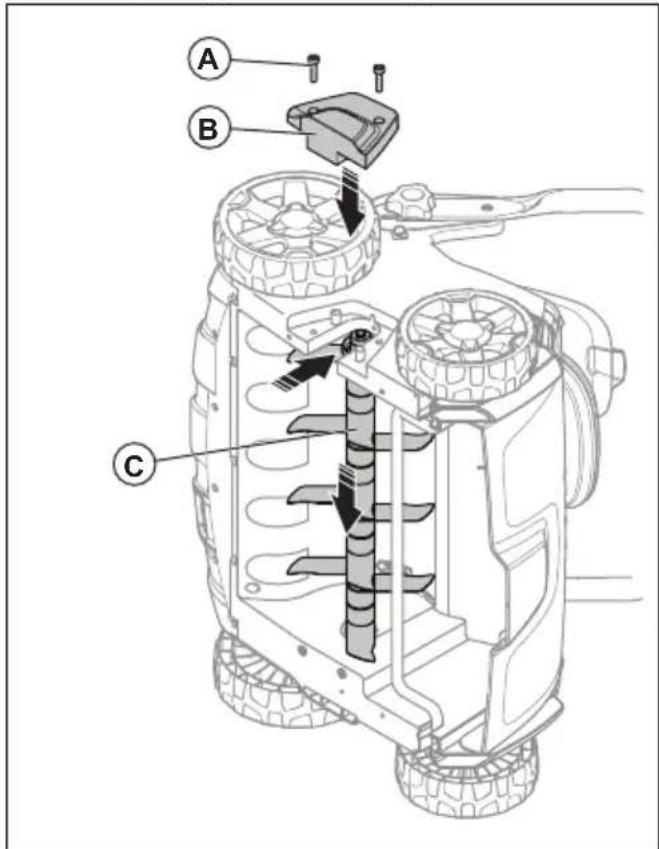
- Put the product on its right side.
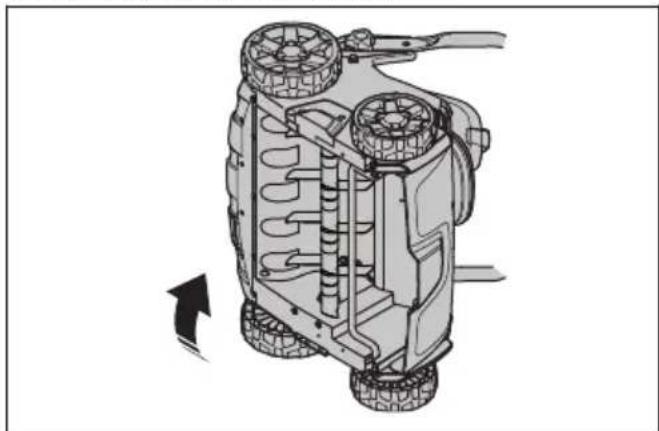
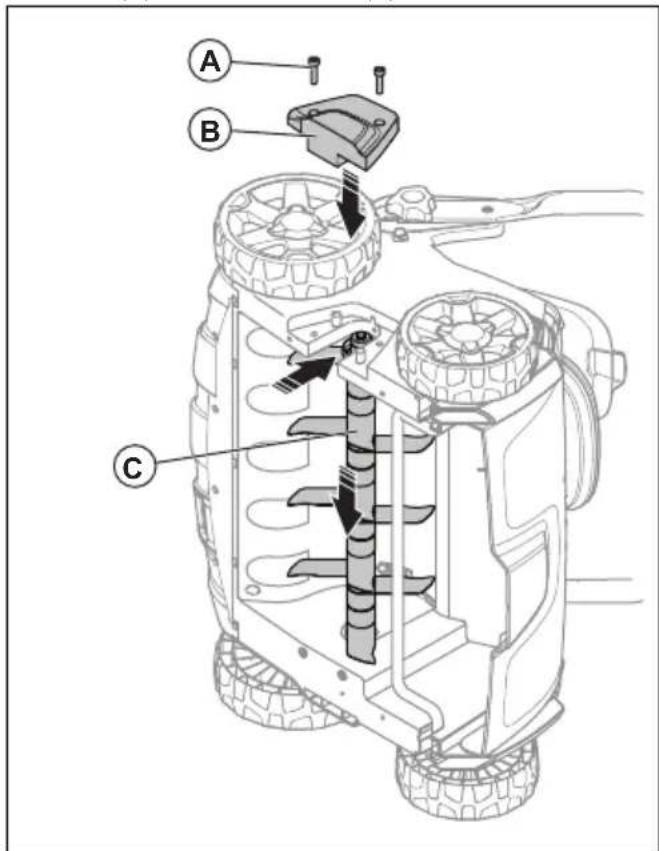
- Remove the 2 screws (A) and the dethatcher cover (B). Push the dethatcher equipment (C) up and out to remove it.
- Push the new dethatcher equipment (C) into the groove and down the hole. Attach the dethatcher cover (B) and the 2 screws (A)
Troubleshooting
Battery
| LED on the battery Possible faults Possible procedure | ||
| The green LED is flashing | The battery voltage is low Charge the battery. SeeTo charge the battery on page 16. | |
| The error LED flashes The battery is weak Charge the battery. SeeTo charge the battery on page 16. | ||
| The temperature in the work environment is too high or too low | Use the battery in temperatures between -10°C and 40°C. | |
| Overvoltage Check that the mains voltage is the same as on the rating plate on the product. | ||
| Remove the battery from the battery charger. Wait 5 seconds and try again to charge the battery. If the problem continues, speak to an authorised service agent. | ||
| The error LED is on Cell difference too much (1V) Speak to an approved service agent. | ||
Battery charger
| LED on the battery charger | Possible faults Possible procedure | |
| The error LED flash- es | The temperature in the work en- vvironment is too high or too low | Use the battery charger in temperatures between 5°C and 40°C. |
| The error LED is on Spe | speak to an approved service agent |
Control panel
For model S 138i
| Error Error code (Nu-ber of flashes) | Possible faults Possible action | ||
| Error LED flashes 3 | The motor is overloaded. Decrease the work depth. Refer to To set the work depth on page 15. If the er- ror LED continues to flash, the dethatch- er equipment is blocked. To prevent ac- cidental start turn the safety key to 0, re- move the battery and wait a minimum 5 seconds. Make sure that the dethatcher equipment can move freely. If the prob- lem continues, speak to an authorised service agent. | ||
| 5 The motor speed drops too much, and the motor stops. | |||
| 9 The motor control is too hot. Stop the motor and wait until it has be- come cool. | |||
| 7 Battery error or no signal from battery. | Put the battery in the product correctly and examine the battery connector. If the error LED on the battery flashes, refer to Battery charging status on page 16. | ||
| The battery is weak. Charge the battery. Refer to To charge the battery on page 16. | |||
| The product stops 6 | The battery is weak. Charge the battery. Refer toTo charge the battery on page 16. | ||
| 0 Battery connector failure. Examine the battery connector. | |||
| Other errors If other errors occur, turn the safety key to 0, remove the battery and speak to an approved service agent. | |||
Transportation, storage and disposal
Transportation
- The Dangerous Goods Legislation requirements apply to the contained Li-ion batteries.
- For commercial transports special requirements on package and labels must be obeyed.
- Make sure that you obey the regulations for dangerous material when you prepare the product for transport. Local regulations can apply.
-
Always remove the battery for transport.
-
Put tape on the battery connectors and make sure that the battery cannot move around during transport.
- Attach the product during transport.
Storage
Always remove the battery for storage.
- To prevent accidents, make sure that the battery is not connected to the product during storage.
- Keep the battery charger in a closed and dry space.
- Keep the battery and the battery charger in a dry space where there is no moisture or frost.
- Disconnect the battery from the battery charger during storage.
- Do not keep the battery where static electricity can occur. Do not keep the battery in a metal box.
- Keep the battery where the temperature is between 5^ and 25^ and out of sunlight.
- Keep the battery charger where the temperature is between 5^ and 45^ and out of sunlight.
Make sure that the battery is charged to 30% - 50% before you put it in storage for long periods. - Keep the product, battery and battery charger in a locked area out of reach for children and not approved persons.
- Clean the product and do a complete servicing before you put the product in storage for a long time.
Disposal
Symbols on the product or the packaging of the product indicate that this product cannot be handled as domestic
waste. It must be submitted to an appropriate recycling station for the recovery of electrical and electronic equipment.
By ensuring that this product is taken care of correctly, you can help to counteract the potential negative impact on the environment and people that can otherwise result through the incorrect waste management of this product. For more detailed information about recycling this product, contact your municipality, your domestic waste service or the shop from where you purchased the product.

Technical data
Technical data
| S 138i S 138C | ||
| Motor | ||
| Motor type BLDC (brushless) 36V Series AC Motor | ||
| Attachment speed - SavE, rpm 3000 N/A | ||
| Attachment speed - Nominal, rpm 3200 4200 | ||
| Motor output - max. kW 1.28 1.8 | ||
| Motor output - Nominal, kW 0.9 1.6 | ||
| Weight | ||
| Weight, kg 19.5 (without battery) 19.0 | ||
| Battery | ||
| Type of battery Husqvarna Battery Series NA | ||
| Battery runtime | ||
| Battery runtime, min, (free run) with SavE activated, with one Husqvarna 5.2 Ah battery (Bli200). | 115 NA | |
| Battery runtime, min, (free run) with standard mode activated, with one Husqvarna 5.2 Ah battery (Bli200). | 102 NA | |
| Noise emissions1 | ||
| Sound power level, measured dB (A) 89.2 95.7 | ||
| Sound power level, guaranteed LWA dB (A) | 91 | 98 |
| Sound levels2 | ||
| Sound pressure level at the operators ear, dB (A) 75.3 81.7 | ||
| Vibration levels3 | ||
| Handle, m/s2 | 5.5 8.3 | |
| Operation | ||
| Work depth max/min, mm -8/+5 -8/+5 | ||
| Work width, cm 37.5 37.5 | ||
| Delta blades attachment 5973510-01 5973510-01 | ||
| Spring tines attachment 5973509-01 5973509-01 | ||
| Grass catcher capacity, litre 45 45 | ||
| Approved batteries Type Battery capacity, | Ah | Voltage, V Weight, Ib/kg |
| BLi20 Lithium-ion 4.0 | 36 | 2.6/1.2 |
| BLi200 Lithium-ion 5.2 | 36 | 2.8/1.3 |
| BLi300 Lithium-ion 9.4 | 36 | 4.1/1.9 |
| Approved chargers for the specified batteries, BLi | Input voltage, V | Frequency, Hz | Power, W |
| QC80 | 100–240 50–60 | 80 | |
| QC80F | 12 | 0 | 80 |
| QC330 | 100–240 50–60 | 330 | |
| QC500 | 100–240 50–60 | 500 |
EC Declaration of Conformity
EC Declaration of Conformity
Husqvarna AB, SE-561 82 Huskvarna, Sweden, tel: +46-36-146500, declares that the dethatcher Husqvarna S 138i from serial number 2018XXXXXX and onwards, comply with the requirements of the COUNCIL'S DIRECTIVE:
- of June 8, 2011 on the "restriction of use of certain hazardous substances" 2011/65/EU
of May 17, 2006 "relating to machinery" 2006/42/EC
of February 26, 2014 "relating to electromagnetic compatibility" 2014/30/EU
of May 8, 2000 "relating to the noise emissions in the environment" 2000/14/EC
For information relating to noise emissions, see the Technical data chapter.
The following standards have been applied: EN 60335-1:2012+A11:2014+A13:2017, EN 50636-2-92:2014, EN 55014-1:2017, EN 55014-2:2015
Huskvarna, 2019-01-15

Claes Losdal, Development Manager/Garden Products (Authorized representative for Husqvarna AB and responsible for technical documentation.)
EC Declaration of Conformity
EC Declaration of Conformity
Husqvarna AB, SE-561 82 Huskvarna, Sweden, tel: +46-36-146500, declares that the dethatcher Husqvarna S 138C from the serial number 2018XXXXXX and onwards, complies with the requirements of the COUNCIL'S DIRECTIVE:
- of June 8, 2011 on the "restriction of use of certain hazardous substances" 2011/65/EU
of May 17, 2006 "relating to machinery" 2006/42/EC
of February 26, 2014 "relating to electromagnetic compatibility" 2014/30/EU
of May 8, 2000 "relating to the noise emissions in the environment" 2000/14/EC
For information relating to noise emissions, see the Technical data chapter.
The following standards have been applied:
EN 60335-1:2012+A11:2014+A13:2017, EN
50636-2-92:2014, EN 55014-1:2017, EN 55014-2:2015, EN 61000-3-2:2014, EN 61000-3-11:2000
Huskvarna, 2019-01-15

Claes Losdal, Development Manager/Garden Products (Authorized representative for Husqvarna AB and responsible for technical documentation.)
Copepkanhe
BbBeHeHne 27
OTcTpaHraBaHe Ha npo6JIemn. 48
Bezonachoc31
TpaHcnpOpTaPHe,cbxpaHHe n 3XbBpJHaHe.50
MoHTax. 41
Texnueckn daHHN. 51
Oepaia 42
Deknapa3a cboTBcTbne Ha EO. 53
Pondpbckka. 46
Deknapa3a cboTBcTbne Ha EO. 54
BbVeDeHne
OnncanHe Ha npOdyKta
To3n npOdyKT e neJexxoHNO ynpabIraBaH eJIeKtpueckn BepTKyTnp. IpOdyKbT npEmaxBa cNtBcTeHa TpeBa OT Mopabata n pa3pOxKBa NObAta, 3a da N03BOJn Ha Bb3dyxa H BOdaT da npOHKnAT B Mopabata.
CnIbCTeHaTapeBaCeCb6npaB KOU 3a TpeBa NIN ce pa3npedeNo Mopaba.TpOdyKTBt NMa2 Tnna o6OpyDbAHe 3a BepTNkyTnp.
O6opyDbaHe 3a BepTKkyTnp
Hanpabete cnpabka c 3a cmaHa Ha o6opydBaHoTo 3a BeptnkyTnp Ha ctpaHnla 47 3a nHΦopMaunr OTHOHO ToBa KaK Da CMeHIne o6opydBaHoTo 3a BeptnkyTnp.
Hoxobe Delta
JeTt Da NcKOBeTe IpemaxBa CnIbCTeHaTa TpeBa NOTp3Ba KopeHInTe Ha TpeBaTa BepTnKaJHo.
N3noJI3BaIe DeIa DnCKOBeTe Ha CkIoH, Tepacn I 3a NoUBy C BnCOKO CbIbpxKaHne Ha rInHa. DeIa DnCKOBeTe N03BOJRAbAT Ha BOata Da ce npocMyKbA B MopabTa n PpeIOBpTaRa 3aIbpxKaHeTo Ha BOda Ha NobbpxHOCTTa
PpykHHN octpneTa
PpykHHNHTe OCTpneTa BHNMaTeHNO npemaxBaT cnBCTeHa n MbpTbTa TpeBa OT Mopabata, 6e3 da HapaHraBt KopeHnTe Ha TpeBata.

PpeDHa3HaueHne
N3noJ3BaIte npOyKta, 3a da npEmaxHeTe cnJIbCTeHaTa TpeBa n Da pa3pOxKBaTe NOvBaTa B YacTHn rpaDHH. He n3noJ3BaIte npOyKta 3a dpyrN 3aJaun.
- PbkoBbAtka 3a cnpaKaTa Ha DnBaTeTae
- TopHa npbkk
- Nyt 3a ynpabneHne
4.БлOKировkaHa nyskaHeto
5.HnckapkoXBaTka - Kow 3a TpeBa
- 3aenkanak
- Kanak Ha BepTnkyTnp
- Kanak Ha akymyntaTopa
-
PboKoXBatka 3a perynnpaHe Ha dbl6OuHata Ha pa6ota
-
KIIOU 3a 6e30NaCHOCT
- CBeToIIOIeH INIINKaTOp ON/OFF (BKJI./N3KJI.)
- ByToH 3a BKJ./M3KJI.
- Bytoh SavE
- CBeToIIOJIoEN INHdNkaTOp 3a SavE
16.Индikatop 3a 3apnHa akymynaToppa n 6yToH 3a akymynaToppa
17.ПужинниoctpneTa - Akymylatop (Пинадлжноct)
19.3apraHNO yCTpoNCTBO 3a aKymyIaTOp (PnHaJNeXHOCT)
O6u npereHa moeJa S 138C
- PbkoBbTaKa 3a cnpaKaTa Ha DBrGaTeJa
- TopHa DpbKka
3.БлokировkaHa nyckaHTo - Enektpueeckn KOHTaK
- Hncka pBkoXBAtka
- Cko6a Ha Ka6eI
- Kow 3a TpeBa
- 3aEN KaIak
- Kanak Ha BepTuKyTup
- PboKoXBaTka 3a perylnpahe Ha nbIb6OuHaTa Ha pa6ota
11.ПужинниoctpneTa - JecToTeHEn KIOU
13.Инстукцяза ekcnnoataця
CnmboJIbBpXyMaunHaTa

He n3naIaIe Ha IbXd (MoJeS 138i).
IpeDynpexKdEHe: Pn pa6ota c npOdykTa He npemHaBaTe Bbpxy 3aXpaHBaUmaShHyp, Tb
KATO TOBA MOXe Da IOBHeI Do eJIeKTPnueCKn YdAp NII NOBpeDa Ha npOdykTa. (MoJeI S 138C).
IPX4 PpOdykTbTe cbc 3aunTa OT npBcKn Boda.
EAC PpOdyKTBt eB CbOTBETCTBnE C IpnIOxIMTe DnpeKtNBn Ha EAC.
CE Ta3n MaunHa OTROBapr Ha n3NCKBaHnTa Ha npINIOXIMTe DnpeKtNBn Ha EO.
To3n npoDyKTe B CbOTBcTCTBnE C npINOJXIMTe DnpeKtNBn Ha UkrSEPRO.
Lb WymOBn emncn B OKoJIHaTa CpeDa B CbOTBETCTBNE C InpeKtNbata Ha Ebponeckata o6uHocT Emncnte Ha npOdykta ca nocouHn B pa3dela 3a TEXHnueCKn XapaKTepnCTnKn n Ha Ta6eJkata.
KoI C Bb3MOxHOCT 3a cKaHnpaHe.
3a6eIekka: OctaHaJIte CmBOJN/CTnKePn Ha MaunHaTa Ce OTHacrT Do N3nCKBaHnNo OTHoWeHne Ha cePTnΦnKaTn 3a OnpeDeJeHn Na3apn.
OTROBOPHOCT 3a npoodykta
KaKTo e nocOHeHO 3aKOHHe 3a OTROBOpHocT 3a BpeDN, pNCHHeHn OT CTOKN, Hne He HOCm OTROBOpHocT 3a UeTN, pNCHHeHn OT Haun npOdyKT, aKO:
- npOdyKtBt e HnpaBnHOp emOHtuPAH.
- pOdykTbTepeMOHTnpaH C yactn, KOnto He ca ot npOn3BOOnTeNn Hn He ca OOn6peHn OT npOn3BOOnTeN.
- npOdykTbT mMa npHnAdIeXHoCT, KOaTO He e OT npOn3BOuNTeY nN He e Odo6peHa ot npOn3BOuNTeY.
- npOdykTbT He e peMoHTnpaH B Odo6peH cepBn3eH ueHTbp nn OT Odo6peH oprH.
БezonaCHOCT
DeΦnHnζm 3a 6e3oNaCHOCT
IpeDynpexKdEHHa3a BHNMaHne n 6eJExKn ce n3NoJ3BaT 3a yKa3BaHe Ha OCObEHO BaXHn Yactn Ha HHCTpyKcYra.

I P E D U N P E X K D E H N E: I3noJ3Ba ce, aKo nMa onaChOCT OT HapaHЯBaHe nIi CmBpT 3a OnepaTopa nIi 3a OKoJIHnTe, aKO He ce
Cn3BaT INHCTpyKcNITe B pkoBODCTBOTO.

BHIMAHNE:ИзползВа
ce, aKO nMa ONaCHOCT OT
NOBpeXdaHe Ha
MaunHaTa,dpuTn
MaTePnAJI NJI
CbceHaTa 30Ha, aKO He
ce cna3BaT
HNCtpyKcHNTeB
pbkoBODCTBOTO.
3a6eJexka: N3noJ3Ba ce 3a
IpeIoCTaBЯHe Ha NoBeue
HΦopMaζη, KOrTO e
Heo6xOДmAb DaJeHa
CITyaζη.
O6uHnHCTpyKcnn 3a 6e30nacHOCT

ПРЕДУПЕЖДЕНЕ:
PpOyTeTe cIeDbaunTe
PpeDynpednteHn yka3aHna, PpeDi a n3NoJ3BaTe MaunHaTa.
To3n npOdyKT e onaceH, aKo Ce n3NoJ3Ba HEnpaBnIHO nIaKO He CTe BHNMaTeJIHN. Hecna3BaHeTo Ha INHCTpyKcNITe 3a 6e30NaChOcT MOKe Da DOBeDe Do HapaHЯBaHe IJI N CMbPT.
- Ta3n Ma7nHa c63dAba eJIeKTPOMaHHTHO NOJe NOBpeMe Ha pa6Ota. Prn HraKoN yCNoBnA TOBa NOJe MOKe Da INHTeppepnpa C aKTNBn NIN PAcNBn MeDnCnHcN NmPnAHTaHTn. 3a Da HAmaIte pNcKa OT TeJko NIn CMbPTOHOCHO HapaHЯBaHe, Hne npenOpbYBaMe INuCaTa C MeDnCnHcN NmPnAHTn Da TROBOPrT C JeKapr Cn N IpOn3BOdnteJa Ha MeDnCnHcNy NmPnAHT, PpeDi da 3aNochHaT da pa6OT r Ta3n Ma7nHa.
BHHaHn 6bJeTe BHNMaTeJHn I NOxOJaIte pa3ymHo. Ako He cTe cnrypHn KaK da pa6OTnte C npOdykTa npi CpeHaHa CHTyaUa, CnpTe N ce OsbPHeTe KbM Ba7n JaIbP Ha Husqvarna,IpeDi Da npoDbJIxnte.
- Имайтейпразди, ч
- операюрьт Ноч
OTROBOPHOCT 3a Heцастни
Случи, Вклочваши друг;
Хора Или ТяхOTO
ИмуsectBO.
- ПдьраиTe npoДуКТa YBepTe ce, ye pa3uNTateЯCHO 3HaUNTe n CTnKePInTe.
He n03B0JBAIte Ha KOrOTo I da e da pa6OTn c npOdyKTA, DOKaTO He ce yBepNTe, ye e npOyei pa36paI
CbDbPkaHneToHa INHCTpyKzraTa 3a ekCnIooatauia.
He no3B0JBAIte Ha deca da pa6OTa c npOdykTa.
He no3BoJBaITe Ha Iuca, KOINTO He ca 3aNo3HaTn C INHCTpyKUInTe, Da pa6OTr C npOdyKtA.
BnHaHn HabIoDaBaIte Iuca c HamaJIeH 3NueCKn IInu YmCTBeH KaNaIITeT, KOnTO n3NoJ3BaT npOdyKta. Ppe3 ZaIOTO BpeMe Tp86Ba Da npncbCTBa OTROBopeH Bb3paCTeH.
He n3noJ3BaIte npOdyKta, aKO cTe yMOpEni, 6oJIHn IJI INoD Bb3DeIcTBNeTO Ha aJIKOxOJ, HApKOTuN iJI INeKapCTBa. TOBa CbCTOJHne OKa3Ba OTpuCaTeJHo VB3deIcTBVe Bbpxy BaIeTo 3peHne, 6dnteJHOCT, KOOpDInHaZnI N pPeZeHka.
He n3noJ3BaIte npOdyKta, aKO e HEn3npaBeH.
He npomehyTe To3n npoDyKT nHn He rO n3NoJ3BaITe, aKo nMa BepoTHOCT Toi Da e 6nI npomehen OT dpyr.
БezonaCHOCT Ha pa6oTHaTa o6nact

Kniou 3a 6e3oNaCHOCT
Knoub3a 6e30anachocct ce Hamupa noJ kanaka Ha akymyataopa. Knoub3a 6e30anachocct ce n3noJ3Ba 3a
Bpb3ka c akymylaTopa, KOITo 3axpaHb DAuratela C eHeprna.
- CtraptnpaIte n cnpete DnBraTeIa, 3a da n3BbPwIte npOBepka Ha KInOHa 3a 6e3OnaCHOCT.
Ako KIIOyBT 3a 6e3oNaChOCT yHKUHOHpa npabUNHO, DBNrTaTeJr CTApTnpa cAmO KOrato KIOHT E B NOJOXKeHne 1.
3a da npoBepnte 6IoknpOBkata Ha nyckaHTo
HanpaBete npOBepka Ha 6JIOKIpOBkata Ha nycKaHe,3a Da ce yBepTe, ye TRe He donycka pa6oTaHa DBnraTeJI.
- HatncheTe pkoxbatkata 3a cnnpaekata Ha dBnrgateNo nocokaHa ynpabneHneTo. BIOKpOBkata Ha nyckaHeto cnnpaDbNkeHneTo.
- HatncheTe 6JIOKIpOBkA Ta Ha NyckaHeTo HaBbH.
- Ocbo6oTe 6JOKnPOBkata Ha NyckaHeTo n Ce yBepeTe, Ye Tc e E BbPHaJa B NbpBOHaayHHO Tc noJIOKeHne.
3a n3no13BaHe Ha nbpkaHa 3axpaHbauu Hhyp (MoDen S 138C)
BbpxkaBt Ha 3axpaHbAunu Hhyp HamaJraBa HATOBapBaHeTO Bbpy eJeKtpnueckn KoHTaKT n 3axpaHbAunu hHyp. DbpxkaBt Ha 3axpaHbAunu hHyp HamaJraBa cbso n pncKa da naHete.
- CbHeTe 3axpaHbAun HHyp, 3a Da oOpMnTe MaKa npMka.
- NocTabete npimkata B OTbopa Ha nbpkaHa 3axpaHbaun Hyp.
- NocTabete npMkata OKOJyKaTa.
4.Дрнhte ZeaxpaHbuaHny shHy,3a Da 3aterHeTe npIMkata OKONO Kykata.

Инструкции 3a 6e3oNaCHOCT 3a 6aTepeYra

CTatyc Ha 6aTepeyraTa
IscnJeT noka3Ba OCTabaunna KaanuTeHa akymyNatopa N daHm Inpo6JIeMn C Hero. KaanuTebTa Ha akymyNatopa ce noka3Ba 3a 5
cekyHn, cIe KaTo npOdykTbT 6bIe n3KnUoyen nn 6byTOhBT 3a INDnKaTopa Ha akymyNatopa 6bIe HATnCHat. CmBOnbT 3a npEynpeJxdeHne Bbpxy akymyNatopa ce BKIOuBa, KORA To mHa rpeWka. BnKTe AkymyNatop Ha cTpaHnua 48.
| Сbvетононлампс Сразу | Са на батерияа |
| Всичkin Сbvетонон CBETТ | Наьлно заразец (75 - 100%) |
| Сbvетонон 1,2,3 CBETТ | Акymу latорыт e заразец на 50% - 75% |
| Сbvетонон 1 и 2 CBETТ | Акymу latорыт e заразец на 25% - 50% |
| Сbvетонон 1CBETИ Akymу latорыт e заразец на 0% - 25%. | |
| Сbvетонон 1 мига Батерияа | Баразец e ИЗтоцени. Заразец e заразец. |
3a 3apekdahe Ha akymynaTopa
3apeTe akymyNatopa npeDu n3non3BaHe 3a nbpBn nbT. AkymyNatopbTe 3apeDen Camo Ha 30% , Korato ce doCTABr Ha KIneHTA.
3a6eJekka: 3apdHTo ycTpoiCTBO Ha akymyIaTopa Tp8Ba Da 6bDe CBbp3aHO KbM HAnpeXeHHeTO N YecToTa, NocOeHN Ha TInOBaTa Ta6eKka.
AkyMynaTopbT He ce 3apeKda, aKO TemnepaTypaHa akyMynaTopa e HAD 50^ . 3aprHTo ycIpoiCTBO HaamraBa TemnepaTypaHa akyMynaTopa, npEi da 3anoHe da 3apeKda.
1.CbpxeTe eINHnKpaHa 3axpaHbuaunu shypr Ha 3aprHOTO yCTPOIcTBO B rHe3dOTO Ha 3aprHOTO yCTPOIcTBO.
2.CbpxKeTe npTu KpaHa 3axpaHbUaIu IHyp 3a 3aprHOTO yCTPOINCTBO B 3a3eMeH KOHTAKT. CBetoIOIObT Ha 3aprHOTO yCTPOINCTBO pIMMIRBa EDNH TbB 3eNEHO.
- NocTabete 6atepyra B 3apndHOTO yCTPOINCTBO. Korato akymnatopbTe npabnHO Cbbp3aH KbM 3apdHOTO yCTPOINCTBO, Ha 3apdHOTO yCTPOINCTBO CBETBa 3eJENA CBETNIHa.
- Korato BCnKn CBToDnOuHa akymyNaTopa CBeTHaT, akymyNaTopbTe HAnbIno 3apeJeH. 3apeKdAte akymyNaTopa 3a Hau-MHoro 24 yaca.
- 3a da pa3kaHTe 3apJHTo yCTpoIcTBo Ha akyMylatopa OT KOHTaKTA, n3dbpnaTe uenceeta, a He Ka6ena.
6.ИЗвадебateбатеретаOTзардноустpoиCTBO.
CbctoHHe Ha 3apeKdaHe Ha akymyNaTopa
ЛитneBO-ионнгт akymylatop Husqvarna може д бьдe 3apexdah nIN nI3noI3BaH bB BCnUKN HnBa Ha Зряда.БatepyTa He ce nobpejda. HanblHo ЗарedingTakymylatop HЯMa DA hAmaII 3apya DCn, Дори korato e OCTaBeH B 3apndHOTO yCTpoNCTBO.
| СbvETOДIOДEN ДИСПLEМ | СbvSTОДпЕ на ЗараздАнeto |
| СbvETOДIOД 1 мгa 0% - 25% | |
| СbvETOДIOД 1 сВЕТи, сBVETOДIOД 2 мгa | 25%-50% |
| СbvETOДIOДи 1 и 2 сВЕТи, сBVETOДIOД 3 мгa | 50%-75% |
| СbvETOДIOДи 1, 2 и 3 сВЕТи, сBVETOДIOД 4 мгa | 75%-100% |
| СbvETOДIOДи 1, 2, 3 и 4 сВЕТI | Наразлно зараздeн |
3a pa6ota c S 138i
3a cTaptnpaHe Ha npodykTa
- NocTabete 3apehen akymyNatop B OTdeneHneTo 3a akymyNatop Homep 1 noD kanaka Ha akymyNatopa. 3a no-DbIbI r nepnoi Ha pa6ota nocTabete BTOpN 3apehen akymyNatop B OTdeneHneTo 3a akymyNatop Homep 2.
2.3aBbptTe KIOUa 3a 6e3oNaCHOCT Ha 1.
3.OctaHete 3aD npOdykTa.
4. HatncheTe 6yToHa ON/OFF (BKJI./U3KJI.) (A) Ha pa3npedeJInteJIHOTo Ta6IIO n 3eJIeHnT CBeTOdNOd (B) ue cBeThe.
- Pa3xJa6Te HxN6tOpa 3a CtapTnpaHe.
- HatncheTe pkoXbKaTata 3a cnnpaKaTa Ha Dnuratena no nocoka Ha ynpaBneHneTo.
3a da n3noJ3BaTe cyHKnIyTa SavE
IpoNyKTbT pa3noJara c cyHKuJra 3a neCteHe Ha akymyNatopa (SavE), kOTo oCnHyprBa no-DbIro BpeMe ha pa6ota.
- Hatnche 6ytoHa SavE (A), 3a da cTaptnape TpyHKUraTa. 3eNEHnT CBeToNDoCBEtBa.

- HatncheTe OTHO6yToHa SavE, 3a da cnpeTe yHKnraTa. 3eNeHnT CBeToDIOB (B) n3racBa.
CnnpaHe Ha npodykTa
IpoNyKbT cnpa ABToMaTuH0, aKO He pa6oTHe C HeroB IpoDbJxKeHne Ha 10 MNHyTN. BInHaN 3abpbTaTe KIOUa 3a 6e3OanChocT Ha 0, npEi Da OCTaBtTe IpoNyKa 6e3 Na3Op.
1.Ocbo6oTe pBkoXbTkata 3a cnnpaKaTa Ha Dnuratena,3a da cnpeTe Dnuratena.
- Hatnche 6ytoHa ON/OFF (BKJI./N3KJI.) (A) Ha pa3npedeIHTeHOTo Ta6no n 3eJeHnT CBeToNDoD (B) uE n3rache.
- OTbOpTe Kanaka Ha akymyNatopa n 3aBbPTeTe KIOUca 3a 6eONachOCT B noJoxKeHne O.

4.3aДаИЗВадиTe aKуМЛanTopa,HaTnCHeTe eHOBpeMeHHO2-Ta6yToHa 3aOCBO6OxJaBaHe IN 3BaIeTe aKуMЛanTopa.

- 3apepete akymyntopa, ako e n3toeH. 3a noBee uHopMaucu BnKTe 3a 3apekdahe Ha akymyntopa Ha cTpaHnua 43.
3a pa6ota c S 138C
3a cTaptnipaHe Ha npodykTa
- CbpxkTe 3axpaHbaa Ka6eI KbM KOHTaKta noD pkoXbaTkata.
- NocTabete 3axpaHbauu uHyp B DbpxkaHa Ha 3axpaHbauu uHyp. Buxte 3a H3noJ3BaHe Ha DbpxkaHa 3axpaHbauu uHyp (Moden S 138C) Ha CtpaHnua 36.
3.OctaHeTe 3aD npOdyKta.
- Pa3xJa6Te HxHx6Ntopa 3a cTapTnpaHe.
- HatncheTe pbkoxBatkata 3a cnnpaKaTa Ha DnurataNo Nocoka Ha ynpabJeHneTo.

CnnpaHeHa npodykTa
1.Ocbo6oTe pBkoXbTkata 3a cnnpaKaTa Ha DBuratena, 3a da cnpeTe Dbratena.
- Pa3kayeTe 3axpaHbuaIaIy IHHyp OT KOHTaKTa I cneI TOBa OT npOdykTa.

BHIMAHHE: IVdbpnaTe uencena dokpa Habn. He dbpnaTe 3axpaHbuaaHyp.
PoaepbXka
BbBeHne

PPEyPPEKDEHNE: PpeN da n3Bbpnte Texnuecko 6cbnykBaHe, Tp6Ba da npoyetepa36epete pa3dena 3a 6e30nachocT.
3a BCNU pa6OTn NO IOdIPbXkKaTa N IONpaBkTa Ha npOyKta e Heo6xOIMo CneuaHNO oByeHHe. OcnrypBaMe npEJaRaHe Ha npOpeCnoHaHn peMOHTu OBcnyBaHe.AKO Baunr TINbp He npEJaRa cepBn3HOOBcnyBaHe,ROBopeTe C Hero,3a Da Bn daNe HOpMaunr 3a Hn-5n3Kn cepBn3.
BHIMAHHE: He nouchTaBte 6aTepeyraT aHn3apdHOTO yCTpoNCTBO C BODa.
-Ппддпбггггггггггггггггггггg yctpoiCTBO ce ybepeTe, Ye 6atepyTa n 3apdHOTO yctpoiCTBO ca uNCTn n cyxN.
-ПочиTe TE KIemite Ha akymlyaTopa CBb3dYx NOHaHnrahe HnN n3NoJ3BaIte YnCTa N cyXa Kbprna.
-ПочиTe NOBbpxHOCHTe Ha akymyNaTopa n 3apЯнOTO yctpoiCTBO c uNCTa n cyxa Kbpna.
3a da npobepnte obopyDbaHeto 3a BepTKkyTnp

PNEyPPEXDEHNE:3aMoJeS138i 3a da npedotbpaTne cnyaHc HO CTaptnaHe,3abbpTe KIOUa 3a 6e3oNaChocHa0OTcPaHete aKymyataTopaNn3uKaTe MHHmym5 cekyHn.
3a moen S 138C: 3a da npedotbpaTne CnyauHNO cTaptnpae, pa3kaueTe 3axpaHbaunu shyp.

PNEyPExEHNHe:HocTe 3aunTHn pbkauu, KOrato H3bIhRaBeTe DeHOCtN, CBp3aHcTexHueckTo O6cJyKBaHe Ha obOpuyDbaHeto 3a BepTuKyTnp. OcTpneTaHa o6OpuyDbaHeto 3a BepTuKyTnp ca MHOO ctpn mOKeTe leCHO da ce nopexKeTe.
-ПовереTe obopydBaHeTo 3a BepTuKytnp 3a NobpeDu Nn PnyKhHaTnHn. BuHaRu 3aMeHЯrTe NobpeDeHoTo obopydBaHeTo 3a BepTuKyTpnp.
3a smya Ha o6opydBaHeto 3a BepTKyTnp

PNEyPPEXJEHHE: HocTe 3aunTHn pbkauu, KOrato N3bNBAte DeHocTn, CBp3aHc TexHueCKTo O6cnKBaHe Ha o6OpyDbaHeTo 3a BeptKyTnp. O6OpyDbaHeTo 3a BeptKyTnp e MHOO octpo n MOKeTe JecHo Da ce nopexKeTe
- NocTabete npOdykTa Ha Ia ChHa My CtpaHa.
- OTeTpaHete 2-Ta BnHTa (A) n KanaKa Ha BeptNkyTnpa (B). HATncHeTe o6OpyDbaHeto 3a BeptNkyTnp (C) Harope n HABbH, 3a da ro npemaxHete.
- Hatnche Te HOBOTo 06OpyDbAHe 3a BepTKkyTnp (C) B KaHana n HaOny do OTbopa. PpIKpeTe Kanaka H a BepTKkyTupa (B) n 2-Ta BnHTa (A)
OttcpaHЯBaHe Ha npo6JIeMn
Akymylatop
- XaIapwOTe Tov avaToLaE EkkivnAnS.
Tehnilised andmed. 212
Attention : projections et ricochets.
ODPOWIEDZIALNOŚC ZA PRODUKT
- Extended product information.
Information about, and help with, product parts and servicing.
Verificar as coberturas
Texnueeckoe 6cbnyKuBaHne. .555
Ponck nyctpaHHe HeucnpaBHOcTei. 558
TpaHcnpOpOBka, xpaHene n yTuIn3aun.559
Texnueckne daHHbIe. .560
ДeКларачи COOTBeTCTBnE EC. 563
DeknapauncooTBeCTBnE.C. 564
BVeIeHne
Onncanne n3dennr
I3dennpeDCTaBnEeTco6oNeWexOHyb 3neKtpuecknCKapuФNKaTOp.I3dennyeUdaJIeTe C ra30Ha cOLOMy,a TaKke pbIXnT noCy,ObecneYBaar npOHKnHOBeHnE B Hee Bo3dyxa n BObl. CoNoma co6HpaeTcB TpaBOc6OpHnK HIn BB6paCbBaETcHa ra30H.I3dennoe OchauSeHo o6OpydoBaHnem ckapuФNKaTopa2TINOB.
IpeDynpexdEHe: He npnBnJaTe pyKn nHn HOrn K BpaaIoUeMyca HOxY.
Ipeed BbINOJIHeHnem
TexHnueCKoRo
O6cIyXnBaHnI N3dEJIIN
N3BLeKInTe
IpeDoxpaHnTeJbHbI
KlIOU (MoJeIb S 138i).
Ipeed BbINOJIHeHnEM TexHnueCKOro 06cIyXINBaHnI N3dJIInN OTKJIIOUHTe N3dJIIne OT 3JIeKTPnueCKoN CeTn (MoJeIb S 138C).
He octabIaTb IoI dOxJdEm (MoJeIb S 138i).
PpeDynpexKdene: 3anpeaetc npn pa6ote nepeceKaTb shHyp nITaHn, NOCKOJbKy 3TO
MOxET PnBecTu K
PopaxeHIO
3JIeKTPnueCKm TOKOM
NII IOBpeXdEHNIO
N3deJIny (MoJeIb S
138C).
IPX4ДaHHoe n3dJIe nMeeT 3aHTy OT 6pbI3r BOIbIC IIO6Oro HappaBHeHn.
EAC N3dJIne COOTBETCTBYeT DeIcTBYIOUIM DnpeKTHBaM EAC.
C E ΑaHhoe n3dJIeNe OTBeueaET Tpe6ObaHnIaM COOTBcETCTByIOuX DInpeKTHB EC.
Данhoeиздени OTbeuaet Tpe6obahnЯm COOTBETCTByIOx ДиректИВ YkpCEПО.
I3nyeHne 7yMa B OKpykaUOuYIO CpeDy cOrJaIacHO DnpeKtNBc EBrpoJeCKoro Coo6IecTbA.3BykoBOe I3nyeHne DaHHoro I3dJIy npVBedeHO B pa3dJe "TexHueckne daHHbIe" n Ha nacnpTHo Ta6nUyKe.
OTBETCTBEHHOCTb n3rTOBNTeJIa
B COOTBETCTBn C 3aKOHAMn O6 OTBETCTBEHHOCTN n3ROTOBNTeJI Mbl He Hecem OTBETCTBEHHOCTN 3a yuep6, BbI3BaHHbI 3KcPnyatauNeH aWero N3deJIIna B pe3yIbTate:
- HeHaДлЕжацero peMoHTo n3delenia;
- INCINb3OBAHnI DnpeMOHTa N3dEInNHeOpINHaJIbHbIX DeTaJe IINI DeTaJe, HeOIO6peHHbIX pON3BODnteJEM;
ИСЮЛБЗОВАнЯ HeOpINHaJIbHbIX DoONIHTeJIbHbIX npINHaJdIeXHcOTe IINI npINHaJdIeXHcOTe, He Odo6peHHbIX npOn3BOdIteIeM; - peMOHTa ɪnʒeJIŋB HeaBToPɪ3OBAHHOM cepBnCHOM ΚeHTrpe NIIH HeKBaJIInΦuIpOBAHHbIM CneζηaJIInCTOM;
Be30nacHOCTb
I P E D U N P E X K D E H N E: I cnoJIb3yE T C R, KOrDa Heco6JIH ODEH N E
HHCTpyKcIpyKOBOcTBa MOXeT pINBecTu K TpaBMam IIN CMePTN OEPaTopa IIN HAXOJxIXcR PAdOM NOCTOPOHNX JnC.

BHIMAHNE:
IcnoJb3yeTcra, KOrda
Heco6JIIODeHne
HHCTpyKcN pyKOBOdCTBa
MOXET npINBeCTn K
NoBpeJxDeHNO n3DeJIyra,
dpyrNX MaTePnaJIOB nJn
pnpJIeRaIoUeJ
TeppNTOpnn.
Примechанec:Исплььзуетсдля п dedoctablenяdoJIHNTeIbHbIX CBeDeHnO KOHKpeTHoN CHTyaциN.
ОьипЕ ИНСТРУКЦИ NOТEXHINKe 6e3OpaCHOCTN

IPEyPExEHN: B 06aTeBHom nopAKe npouHTe cJeDyoUne HnCTpyKcNn PO TexHKe 6e3OpacNoCTn, pexKe Yem npicTynatb K 3KcPlyatau nn3dEJIy.
- Пи HeбржнOM ИПИ
- НпразвЛьнOM obpaцEHIN
n3dJIne MoXeT OKa3aTbCra ONaCHbIM INHCTpyMeHTOM. Heco6JIIODeHne INHCTpyKcIy ITO TexHKe 6e3OpaCHOCTN MoXeT pINBeCTN K TpaBMam IJI N CMEPTN.
-BoBpempa60bI daHnoe
n3dJIne CO3daeT
3JIeKTPomarHHTHOe nOJe. B
ONpeDeJIeHHbIX
OBCToRteJIbCTBax 3TO nOJe
MOJcET CO3DaBaTb NOMEXn DJIa
PiaccNBbIX N aKTINBbIX
MeNtIHckNX IMPnaHTaTOB. B
ZeJIAX CHHXeHNr PnCKa
cepBe3HOJ INmCMePTeJIbHOJ
TpaBMbl IInzam C
MeNtIHckIMN
IMPnAHTaTAMN
peKOMeHnyetc
IpOKOHcyJIbTnPOBaTbcS C
BpaQOM N IN3rOTOBNTeJIeM
IMPnAHTata, ppeJde Yem
IPnCTUpaTB K 3KcNlyaTaCuN
DaHHoro n3dJIyra.
-БудьTe BcerДa ocTOpOxHbIpykoBOdCTByuTEcB 3dpaBBIMcMbIClOM.EcIn Bbl HeybepeHbI, KaK npaBnIbHO3KcIIpyATnpOBaTB n3deJIne BVOnpeJeLEHHo CNTyaUIN, ppeKpaTnte pa60Tu INpOKOHcyJbTnpyuTEcsCoCBOm dInlepOM Husqvarna, ppeXDe Yem npoDoJXITb.
- ПомнITE: OTBETCTBEHHOCTb 3a abapn, yrpojkaIOuIe npyIIM
JIIOJAM ININ INMMyIeCTBy, HecET ONEpATOp.
CoepKnte n3dJIne B uNCTOTE. CJIeIte 3a Tem, UTO6bI 3HaKN HaNKeiKN 6bln JERKO YHTaEMblMn.
He pa3pewaTe NOIb3OBaTbCra I3dEJIneM IIOJAM, He y6eINBwncb ChauaJa B TOM, YTO OHN IpOuHTaJI N IOHJI N COdepJkaHne pyKOBoDcTBA NO 3KcPnPyaTuN.
He n03B0JIaTe DeTЯm IcNoIb3OBaTb N3dEJIne.
He pa3pewaIte NOJIb3OBA TbCS I3dJIeNEm IIOJAM, KOTOpBie He 3HaKOMbl C DaHHbIMN INHCTpyKcIyMNI.
He octabIyTe 6e3 npncmOTpa JIOJeC c n3nuecknMn nnn yMCTBeHHbIMn HApUSeHnA Mn, nCNoJIb3yUOuX n3dEJIne. OHI dONKbI NOCToRnHO HaxODNTcY IOd pncmOTpOM B3PocJIoTO.
HnB Koem cnyuae He nCNoIb3yIte u3dJIne,ecn Bbl yCTaII,6OJIbHbI IIN HaxoIITcB POn BO3DeIcTBnEM CnIrpTHOrO, HApKOTnueCKNX BeIeCTB IIN IeKapCTBeHHbIX npenapaTOB. 3TO MOKeT NOBnAryt b Ha BaWe 3peHne,peakciIO,
KOOPdHaCuIIO NJI N OceHky DeiCTBnTeJbHOcTn.
3aPpeuaeTcNcNoIb30BaTb n3JeJIe,ecnOHO NOBpeJdeHo.
3aPpeuaeTcB Hocntb B n3dJIeMoNΦKauu NJIu NCIOJb3OBaTB n3dJIe,ecJIu Bbl NOIo3peBaTe, yTO B eRO KOHCTpyKcuIb BHeceHbI n3MeHeHnA DpyrMMn JNuamn.
Texnka 6e30napocTuHa pa6ooyem meCTe

PPEyPExEHNc:BO6aTeIbHOM nopAKeIpoHTaTe CJeDyUoUneINCTpyKcNn PO TexHKe6e3OpacHoCTN, PpeJdeYem PrnctuTb K3KcPlyaTaCm N3DeJIy.
Hnctpykun no 6e3oNaCHOCTN BO Bpemr 3KcnpyaTaun
CpeIcTbA INHINBnDyaIbHoN 3aunTbI
Kakdpa3 npa pabote c nHCTpyMeHTOM cneJeT
HCNOb3OBaTB peKoMeHNDBAHNble CpeDCTBa
INHINBnUdyaJbHOJ 3aunTbI. CpeDCTBA INHINBnUdyaJbHOJ
3aunTbI He MOrT NOJIHOCTbIO NCKlHOHTb PnCK
NONyHeHr TpABMbI, HO pRn HecuaCTHom CNyae OHN
CHNXaOT TjKeCTb TpABMbI. 3a NOMOuB B Bbl6ope
CpeDCTB 3aunTbI o6paauTeCb K DnJIepy.
Bcerda nCnoIb3yIte:
CpeIcTBa 3aunTbI opraHOB cnyxa, yTo6bl CBeCTn K MHNIMyMBy BO3MOXHOCTb HapyuEHHa cnyxa.
- YCTOyHBAI HHeCKoJIb3aIIaI O6yBb. He HocHTe CaHdAJIIMN IHE XODInTE 6OCIKOM.
-Почныдлнньieбюкn. He hocite wopTbI.
Pn Heo6xOaMocTn HaeBaIte NepuATKn, HapnMpEep, npyUcTaHOBKe, OCMOTpe nn Ounchke o6OpydoBaHna ckapnΦkaTopa.

PNEyPEXEHNHe: Bcerda noIb3yTeCb 3aUHTbIMn HayuHnKamn. PpOJHKTeJIbHOe BO3deIcTBne uyma MoKeT NOBLeyb 3a cObo HEn3JeHmOe yxUdWeHne cnYxa.
3aunthbIe yctpoiCTBa Ha n3deJIIN

PNEyPEXKDEHNE:B 63aTeIbHOM npraKe npouHTaTe cneDyUoune INCTpykCnIO TexNke 6e3OanCHOCTN, npexJe Cem npicTynb K EKcNpyaTaCn N3dJIIn.
3anpeaaetcnaonb30BaTb n3dJIne C HeNCpabHBIM 3aunTHbIMyCTpoiCTBaMn.
- Perynpho BbINONHnTe npOBepky 3aunTHbix yCTpoNCTB. EcIn 3aunTHbIe yCTpoNCTBa HeuCnpaBHbl, o6paTnTEcb B cepBnCHbI ueHTp Husqvarna.
PpOBepKa KpbIeK
KpbIka ckapuΦnKaTopa ChnKaet ypOBeHb Bn6paunn ⅢdJIy n pNCK TpaBMnPoBaHnO bOpUdoBaHneM ckapuΦnKaTopa.
- PpOBeBpTe 6OKOByU KpbIuKy cKaupnФkaTopa n y6eDntecb, YTO Ha Hei OTCyTCTByOT NOBpeXdEHHa, TAKne KaK TpeuHbl.
-Поверьтебаадию Кршky uбeДиТecь,чToHa Hei OTCyTCTByIOT NOBpeЖдЕнЯ,Takne KaK TpeuINHbl.
PykoTka MOTOPHOROTOPM03a
PykoTka MToptHoro TOpMo3a npedHa3NaYeHa dna octaHObKn DnIraTeN. Pn OTnyckAHn pykoTkn TopMo3a DnIraTeNb OCTaHaBnBaETc.
YTo6bI npOBepNTb MOTOpHbI TOPMo3, 3aNyCTnTe
DbIrataJIb, a 3aTeM OTNcyCTnTe pyKoTky TOPMo3a. Ecnn
DbIrataJIb He OCTaHOBITcYepe3 3ceKyHdbI,
O6paTntEcB b ABTOpH3OBAHHb CepBnCHbI cHTp
Husqvarna dIypeynipOBKn MOTOPHO TOpMo3a.
PpeoXpaHHTeJbHbI KJIIOU
PpeOxpaHntbHbI KInu HaxoHTcN pN KpbUkoI aKkymyIaTopa. OH nCnObl3yeTcN dNpNkNIOeHn aKkymyIaTopa, ot KOtOporo Ha DBuratEn bocTynaet nITaHne.
UTo6bI npOBepuTb pa6Otu npEoXpaHnteBHOKIOUa, 3aYCTNTe N OCTAHOBITE DnrgaTeNb.
- Ecni npeOxpaHntbHbI KInu HcnpaBHe, To DBnraTeNb 3anyckaetc TOnbko npu NpeBode KInoHa B NoNoKeHne "1".

PpOBepka orpaHnHTeIaYcKa
PpOBepbTe orpaHnHTeB 3anycka n y6eDntecb, qTO OH 6Iokpyet pa60ty dBratena.
1.ПиЖмITEpyKOTkyMOTOPHOroTOPMO3aB HAnpaBHeHn pyKOTkn arperata.OrpaHnHTeNb 3anyckaOCTaHOBnT DBNXKeHne pyKOTkn.
2.ПовернiteOrpaHnHTeIb3anyCaB HAnpaBneHnU, yka3aHHOM CTpeJIKO.
- Pa36nKpyIte orpaHnHTeIb 3ayncka n y6eIITecb, YTO OH BO3BpaIaeTcB INCXoDHOe noJoxKeHne.
IcnoNb3ObaHne depkaTeJia Hypa nHTaHnra (MoJeIb S 138C)
DepkateIb shypa nItaHn yMeHbwaet Harpy3ky Ha rHe3do nShypr nItaHn. Kpome TOrO, depkateIb shypa nItaHn cHxkae t pNCK BaWero naDeHn.
1.CBepHnTe Hhpy nHTaHnB He6oJbSyuO neTIO.
2.BCTaBbTe 3Ty nTJIIO B OTBepCTne B dEpKaTeNe UHypa NHTAHnA.
3.06epHnTe nTIO BOKpyr KpIoka.
4. Notaryte shyp nHTaHn, yTO6bI 3aTAYb neTIO Ha KPOKe.
Texnka 6e3oNaChocTn npi pa6ote c aKKyMylrTopom

ПЕДУПЕЖДЕНЕ:Вобязателовим поядке
npoHTaTe cJeDyUOuNe HNCTpyKcIn IO TexHnKe 6e3OpacNoCTn, npexde Yem npnstTyNaTb K 3KcPnyatauNn3dEJIy.
CocToHnE aKKymyIaTopa
Icnne OTo6paKaet octaBHyOc emKoCTb aKKyMylTopa HnHnue B HEm HeNcnpaBHOCT
EmkocbtaaKymyIaTopo oTo6paXaETcHa nucnnee B TeueHne 5 ceHynd nocJe OTKnUoyehna arperata nn nocJe Haxatn KHOPIKn-INHdNkAToPA aKKymyIaTopo.
Ppeynpekdaoun 3nak Ha aKymytope 3aropaetc B cnyae Bo3HKnHOBeHHa OUn6Kn. Cm. pa3den AKKymytoptopHa ctp.558.
| СbvETOДIOДHbIe ИнDIкaТОрbl | СоCTOЯнe аKKуМЛЯТopa |
| Всe СbvETOДIOДbI rОрЯт Ак уМЛЯТOP рОЛHOCTью Зapяжeн (75-100%). | |
| СbvETOДIOДbI 1, 2, 3 rОрЯт. | Зapяд akКуМЛЯТopa — 50-75%. |
- OTnycHTe pyKoRtky MOTOPHOrO TOPMo3a, yTo6bIOCTaHOBNTb DBrTaTeNb.
- OToCoeHInHe UHyp NHTaHnO TcETn, a 3aTeM OT n3JeJnA.

BHIMAHHE: N3BNeKInTe WTeKepe npmao. He TaHnTe 3a Ka6eNb nHTaHna.
TexHnueckoe o6cIyXnBaHne
BVeDHeHne

PNEyPEXKDEHNE:PeepBbINJHeHnEM Texo6cnykBaHn
Heo6xOaIMO BHNMaTeIbHO n3yHTb INOHrTa pa3dE6e3onacHocTn.
IINBbINONHeHnIO6bIXpa60TNOcePBCNCHMy 06cIyKbAHnIOpeMOHTyI3dENrHEo6xoDmO npOITNCeuaNBHOeOByeHne.MbI rapaHTnpyeM
DOCTYINHOCTy yCnyI NO pOPOceCCNOHaJIbHOMy peMOHTy IN cepBnCHOMy 6cnyKuBaHnIO. EcN Bau DNep He 3aHmMaETcA cepBnCHbIM 6cnyKuBaHnEM, O6paTntecb K Hemy dIy IOnyuEHHNtHOpMaucnO 6nXkaiWeM cepBnCHOM cEHTrpe.
n3dJIeHHe nCNOb3yeTcEeKeIHeBHO, INHTepBaJIbI Texo6cnyKmbAHnN 13MeHrTcR.
CbeHnO TexHueckOM 6cJyKuBaHH,OTMeueHHOM 3HaKOM*,CM.B pa3JeIe 3aUHTbIe yCTPOHCTBa Ha H3denn Ha Ctp.544
TpaΦnK TexHnueckoro 06cIyXnBaHnA
Tpaqnk Texnueckoro o6cnykuaHna paccuHaN HcxOJa n3 eKeIHeBHoro nCnonb30BaHn n3deJIn. Ecnn
BbInonHeHne oOeTo OcMOTpa
-Поверьтетатужкграеки вHTOB Ha n3deJINN.
- Y6eNTecb, yTO paONoXeHne Ka6eNe H e Donyckaet BO3MOxHOCTn IN NOBpeKDeHna.
OuInCTKa n3eJnna
OuHCTnTePiJAcTMacCOBbie DeTaJIIN YIcToN I cyXoI TKAHbIO.
He nCnoJb3yIte BODy ONUOCTKN 3dEJIINoT 3aRpy3HeHn.InonaDaHne BObI B aKKyMjIaTOP INn DBNrTaJIb MOKET Bbl3BaTb KOpOTKOE 3aMbikAHe INn NOBpeDNTb 3dEJIe.
He nCnoJIb3yIte MoeHbI arperat BbcOKoro daBJeHnI dIra OUcTkn I3dJIInr.
He HanpaBnIe CtpyIO BObl HEnocpeIcTBeHNO Ha DBuratEnb.
- IVcnoIb3yIe IeTky IJRA ydaJIeHnI NcTbeB, TpaBbl n rpr3n.
OuHCTka aKKyMylTopa n 3apJdHoro yCTpoiCTBa

BHIMAHHE: OuHCTKa aKKMyJrTopa nIIN 3apdHorO yctpoiCTBa BOOn 3anpeeHa.
-П配电дуем yctанавиваты akkymyлгторВЗарядhoe yctpoiCTBO,y6eINTEcb,чTO akkymyлгторИЗарядhoe yctpoiCTBO qHCTbIe n cyxne.
- NcnoIb3yIte dIg OUHCTKn KJIeMM AKKMyJrTopa CxA TbB BO3DyX INN MRAKYIO CYXYIO TKAhb.
OuHCTHe NOBepxHocn aKKyMnyTopa n 3apJHoro yCTpOuCTBa MrgKo N cyXo TkaHbI.
PpimHeHOTcCneDyUOuNe cTaHApTbI:
EN 60335-1:2012+A11:2014+A13:2017, EN
50636-2-92:2014, EN 55014-1:2017, EN 55014-2:2015
Huskvarna, 2019-01-15

Knaec IocdaI, DnpekTop oTdeIa pa3pa6oToK/CaObaa TeXnka (YnoJIHMOHeHHbI ppeCTabTeJIb Husqvarna AB u OTBeTcBeHHbI 3a TexHnueckyIO DokymeHTaunio.)
PpIMHeHOTcCJIeDyUOuIneCTaHApTbI:
EN 60335-1:2012+A11:2014+A13:2017, EN
50636-2-92:2014, EN 55014-1:2017, EN 55014-2:2015
EN 61000-3-2:2014, EN 61000-3-11:2000
Huskvarna, 2019-01-15

Knaec IocdaI, DnpekTop oTdeI pa3pa6oToK/CaObaa TeXnka (YnoJHomoueHHbI npEcdTaBnteH Husqvarma AB nOTBeCTBeHHbI 3a TexHueeCKyIO Dokymentaunio.)
Obsah
Uvod. 565
Riesenie problemov. 585
Bezpečnost 569
Preprava, skladovanie a likvidacia. 586
Montáž 577
OctepiraTecra pikoWety n 6'ekTIB, kI MOKytb BnItaTn 3-piD Bnpo6y.
CTopOHHi oO6n Ta TBapHn IOBHHI nepe6yBaTu Ha 6e3neuHi BiDcTaHi BiD pOboooi 30Hn.
Ybara! TpimaiTe pykn Ta HOrn Ha BicTaHi BiD Ie3a, 0o o6epTaEcBcra.
IpeedTexHicnM
O6cnyroByBaHHaM
Bnpo6y BnMaTe KIOU
6e3neKn (MoJeIb S 138i).
IpeedTexHicnHm
O6cnyroByBaHHaM
Bnpo6y BiD'EnHyTe NOro
BiEneKtpomepeKi
(MoJeIb S 138C).
He6e3neka ypaXeHNe eIeKtpnHm Ctpymom. (MoJeIb S 138C).

3axnauTe BIDdooy (MoJeB S 138i).
Ybara! He nepeixkajte
shHyp KINBJIeHHa
Bnpo6om, OCKIbKu Ze
MOJKe CnpuHHTN
ypaXeHHa eJeKTPnuHm
CTpymOM a6o
NoUKoJxHHeHHa Bnpo6y
(MoJelb S 138C).

Cey Bnpi6 3axueneHO BiD 6pn3ok.

Bnip6 BiDnoBidae BIMOram 3aCTOCOBHX DnpeKtNB EAC.

CenBnpi6 BIDNOBidae BIMOram BiINOBiHNX DnpeKtNB EC.

Bnip6 BiDnoBidae BImOram BiDIOBIDnX DInpeKTHYKpCEPPO.
Pibehb BnnpominHOBaHHa WymyBcepeoBnue BiIDNoBidae DnpeKtNBi CBpOneCbKOi CnilbHotn.Pibehb BnnpomHOBaHHa Wymy Bnpo6y Bka3aHoB p03diPi «TexHiNIdaHi iHa nacnpTHi Ta6lnuci.

PoiBiHa i3OJaCi (MoIeIb S 138C).
YtNiI3aciIO
Bnpo6y
Heo6xIDHO
PiPOBOiNTHa
PiIpiNcEMCTBi 3
pepeo6Kn
BiXoDiB
eJIeKTPuHOrO
I
eJIeKTPoHOrO
0bJaHaHn.
(IIne dJa
kpaIH CbpOnn.)

He haxnayTe Bupi6, kOIn DBNrHyyBIMKHeHn.
-Будъе obepexkhi πiД час pyxv y 3BOPOTHOMy HaprMky.
3abopohyETbCnPiHimatn Bnpi6, KOJn DnHyN yBIMKHeHn. JaKIo nOtpi6Ho nIiHNrN Bnpi6, 3ynHITb DnryH, NOBepHITb KInOu 6e3neKn B noLoXeHHa «0» i BnIMiTb akymyJTop (MoJeNb S 138i) a6o BiD'cHaIte shHyp XnBJIeHHa (MoJeNb S 138C).
He pyxaTecb y 3BOpOTHomy HnpanMky niD qac po6OtN 3 Bnpo6om.
BIMnKaITe DnHyN nIac pyxu yepe3 iJnHKn 6e3 TpaBn Ha KwTaIeT dopixok i3 rpaBIO, kameHIO a6o acpaJIbTy.
He 6iraTe 3 BInpo6om, KOJI n DvIrgyH yBIMKHeHn. IiJ yac Po6OTn 3 BInpo6om Heo6xIDHO XOJNTn 3i 3BnuaHNO IWBnDKiCTHO.
BIMnKaITe DBNrHy, nepu HIX 3miHIOBaTu pO6Ouy rIn6uHy. 3a6OpOHAcTBcR BnKoHyBaTu
perguobahnnp BBIMKHeHomy DBNrHi.
3abopohrbc3aHnuaTn Bnpi6 6e3 HaJy KoJn Dnrgn npauo. 3ynHtB Dnrgn i nepekoHaTec, o rpyHTopo3nyBaIbHe 6bnHaHH He o6epTaetbcra.
IpaBnlaTexhikn6e3neKnPiJ Yac BnKOpNCtAHHn
3acobn iHdbiDyajbHoro 3axncty
KoJHOrO pa3y niJ vac pO60Tu 3 BnPobOM o6OB'3KOBO KOpNCTuYTEc8 3aTBePdKeHNM 3ac6aMNIHnBIDyAJIbHO r3axNCTy. 3ac6b nIHnBIDyAJIbHO 3axNCTy He MoKyTB NOBHCtTO IIKBiYBaTN He6e3neky TpaBM, aIe B pa3i HeUaCHoro BNpAdKY BOHn 3Hn3rTb CTynih cepNo3HOCTI TpaBM. 3BepHITbc4 Do npOdaBuaNo DOnomory y Bn6opi npabnlbHnx 3aco6ib 3axNCTy.
06OB'3KOBOBdraIte:
- 3axnchi HabyuHnK, uo6 3Hn3nTn pn3nk noripweHHcnyx.
Miuchi chepeBnK a6o yO60Tu i3 niOuBOU, uO He KOB3ae. He hAdraTe Ha vac po60Tu caHdani Ta He XODITb 6ocOHIX.
Lynki doBri wTaHn. He hocitb niD qac po60TuOpTn.
3a Heo6xHocTi HaJraTe 3axnChi pykabuCi, Hanpknad nid yac yctahOBneHH, nepeBipKn a60 uenenne HpyHTopo3nyuBaHbHoro 6naHaHH.

IIOPEJXEHH: KopucTyIeceB iINOBiDHMn 3axNCHMn HabyuHNkAMn. TpBaNa po6oTa B yMOBax CnIbHO rMy MoKe np3BeCTn Do Heo6OpOTnx NopyWeh cnyx.
Mexahizm6e3neKaHa npncTpoi

NONEPEJXEHH: NepH HIX po3noaTN BIKOPNCtAHN BnO6y, yBaXHO npOuNTaTe HabeHei HxKHe nonepeJXeHH.
-He BnKOpncToBvIe Bnpi6 i3 noUkoJxKeHmN 3axuChHMn npNCtPOMn.
Perynno nepeBipre Te 3axnchi npncptoi.Y BnnaKy nookkeHH 3axnchnx npncptoIB 3bepHtbcdoHTpy o6cnyroByaHH Husqvarna.
Ipebeipka koxyxib
Koxyx rpyHTopo3nyuBaayacTkoBO norHaBie6paio Bnpo6y n 3Hnkye He6e3neky TpaBMyaHHr rpyHTopo3nyuBaJIbHM O6naHaHHaM.
OrnaHbTe 6okOBn Koxyx rpyHTopo3nyuBaay npekoHaTecra,IO BIn He MaC NOUKoXeHb Ha KUTaTT TpiuH.
OrnhaTe 3aHni Koxy i nepeKoHaTecra, 00 BIn He Mae NOnkOAnKeHb Ha KU TaT TpIuH.
PyuKa 3ynHHeHHa DnBryHa
Pyka 3ynnHeHHa DnBryHa 3ynnHae DnBryH. 3a BiDnyckaHHpyKn 3ynnHeHHa DnBryHa Bih 3ynnHaeTbcra.
IIO6 nepeBipuTn po6Ory raIbMa DBrHyHa, 3aynctiTB DBrHyH, a Notim BiDnycTiB pyKy 3yNHeHH. RaKuo DBrHyH He 3yINHcTBcR npOTraFOM 3 cekyHd, Heo6xIDHO nepedatn BpiB B aBtOpnsOBaHm ueHTp o6CnyroByBaHHa Husqvarna dJa HaJauTsyBaHHraIbMa DBrHyHa.
KJIou6be3neke
Kniou 6e3neKn po3aObaHn iD KpnIkoIO
akymyIaTOPHO BIDckiy. Kniou 6e3neKn np3HaueHn
IJa 3'EdHaHHa 3 akymyIaTOPOM, kN y CBOU cpepy
XNBUTb DBNYH.
-Дяпегеверки Кюча 6e3neки 3anyciTB i 3ynHITb DBNHyH.
KIO KIOU 6e3neKnpaBHN, DnBury 3aBOuNTbcra NIOSe TOni, KOII KIOU nepe6yBaB B NOJoxEHNI (1).
Ipebeipka o6mexybaa 3anycky
IpebeipTe 6mexkyBauchanycky,0o6 nepekoHaTncra,0o BIn Diincho 6nokye pOboTy DnryHa.
- NepemictiB pyky 3yINHHe HnBnHyBa HnPmky pykoTKn. O6mExyBa 3aNycky 6nOkye pyx.
- NotarHtB 6mexyBaay 3anycky.
- Biñnytīb obmexybau 3anycky Ta nepekoHaɪteča, ξθ BIH nobepTaεTbca Do noqatKOBOro noloxeHHa.
BukopncTaHHr TpMaHa uHypa KnBneHHra (MoJeIb S 138C)
Tpmau shHypa kINBneHHra 3MeHsUe MexaHicHe HabaHTaxKeHHHa po3Etky Ta SHyp kINBneHHra. TpMaay shHypa kINBneHHra TAKOK 3HNKyE pN3NK TORO, LIO BN nepeyeHNTecr qpe3 HbOrO.
- 3irHtB shHyp XnBJIeHHra, yTBOpNBuN By3bky netJIO.
2.BCTaBTe neTIO B OTBip y TpIMaU y Hypa KINBJIeHHJ. - HādīrHīt b nēTlɪn Ha rəʊk.
- NotarHtB 3a WHyp KInBJeHH, Oo6 3aTyrHyTN neTJIO HABKONo rayka.
3axoDi 6e3neKn iD yac po6OTn 3 akymyJrTopamn

PONEPEIXKENHRA:
Iepsh hix po3noaTu BnKOpncTahHbBnpo6y,
yBaXHo npOuNTaTe HabeDeHnXYe nonepedxehn.
-ДляжИВлЕннЯ ВИрбIB Husqvarna Heo6xIDNo BnKOpNCTOByBaTи Лшe akymylТори Husqvarna.Ло6 yHnKHyTN TpaBMyBaHHa, 3a6bOpOHaETbcr BnKOpNCTOByBaTи akymylTOp BЯкOSTi ДжеретаЖИВлЕння ДЯ iHux npnilaIb.
He BnKOpNCToBvIte oHopa3oBi 6aTapei.
Hebe3neka ypaXeHHa eJIekTpHnM CTPyMOM. 3a6OpOHaTbCnPiD'EDHyBaTu KJIeMn aKymyIaTOPa Do KJIuOiv, MoHET, rBnHTiB a6o iHux MeTaJIeBx npeImeTiB. LcMoJKe npn3BeCTn Do KOpOTKOro 3amKahHra B akymyIaTOpi.
3a6bOpHЯETbcra BCTaBnTn IpedmEtN y BeHTnJaCiiHi OTbOpn akymyJrTopa.
TpmaTe aKymyIaTO pOaJI BID npAIMX COHAnx npomeHIB, DKepeI TeNla Ta BIDKpNTOro BOrHIO. AkymyIaTO moKe Bn6yXHyTu, 10 npn3BeDe Do onikB Ta / abo ximiuHnx onikB.
- Берешит bakymyЯтор BiДdoшу Ta BOJOrn.
3axuatae akymyIaTOp BiD BnINBy MIKPOXBnJIb YN BnCOKOTo TnCKy.
3a6opohrεTbCp03bnpaTn nnamatn akymyIaTOp.
- Y pa3i BNTiKaHnI pIDHH 3 akymyJTopa cIIkYJTe, 06 BOHa He nOTpaNHa Ha TIIO qn B oOi. KaIpo pIDHa nOTpaNHa Ha shKIpY, IpOMnTe BpaxeHy dIINHKy BeJIKOIO KIlbKiCTIO BOHN Ta 3BepHiTbcra 3a MeDnUHO DOONOMOHO.
- AkymyJIaTOp Do3BOJЯeTbCra BnKOpNcTOBvBaTu 3a Tempepatypn BiD -10 ^ C do +40 ^ C .
3a6bOpOHeNo MmTn 6aTaapeo Yn 3apAHHn PnCtpiB BDOIO. DnB. YnIeHnAkyMnyTApa Ta 3apAHHOro PnCtpoHa cToPiHci 713.
He BnKOpncToBvIte HeCnpaBnH Nn POnKoJKeHn AkymyJIaTOp.
36epiraTe aKymyIaTOp
noaJI BiD MetaJIeBIX
npEiMeTiB Ha KStaIIT cBExiB,
MOHeT,IOBeJIipHnX BInpo6iB.
3axoJn 6e3neKn npn po60ti i3 3apAHHM nPNCtpoem

CTaH 3apJxKaHHaKymyIaTopa
JIiT-IOHHN akymyIaTOp Husqvarna MoXHa 3apJxAtn Ta BnKOpNCToBvBaTN 3a 6yDb-koRo pIBHra 3apJxKn. AkymyIaTOp He 6yDe nOswKOxHeo. NobHicTIO 3apJxKeHa akymyIaTOpHa 6atapeH He Btpaue 3apJ, kkuo II 3aIIuHTn B 3apADHom y npucTpoi.
| СbvITLOДIOДНМ ДИСПЛЕМ | Стан зараздк н 0-25 % |
| Блимас СbvITLOДIOДНМ iHДИКАТОР 1 | |
| Горпь СbvITLOДIOДНМ iHДИКАТОР 1, Блимас СbvITLOДIOДНМ iHДИKATOP 2 | 25-50 % |
1.ДЯ BBIMKHeHHAуHKiHaTnCHiTB KOnKy SaVE (A). YBIMKHeTbC3eHn CBITIOJIOHN iHdkaTop.
2.ДЯ BIMKHeHHHФуHKuII HATNCiTb KhoNky SavE ue pa3.3eHn CbitnoioHn iHdkatop (B) BIMKHeTbCra.
3yHnHaBnO6y
Jkuo Bn He KopncTyTeC8 Bnpobom npotrarom
10 XBUNH, BIN ABTOMATNUHO 3yINHReTBc. 3aJIINJauOuBNpi6 Be3 HargIy, 3aBXdN NOBepTaIe KInOu 6e3neKnB NONOKeHHN «0»
1.ДЯЗУПИЕНHAДВИGAHBAIDNYCTITbpyky 3уПИЕнHAДВИGAH.
- HatnciB KONky YBIMK./BUMKH. (A) Ha naheJI kepyBaHH, nicny Qoro 3eHn CBIIOJIOHN iDkATop (B) BmKHeTbcra.

- Biikpnite Kpnsky akymyIaTOpHOrO biDckiy Ta nobepHItbKnou6e3neKnB noJOnKeHHA 0
4.卍6 BnHrtna kymyIaTOp, OJHOaCHO HaTNCITb DBI KONKn φikCaTopa N BuTARHITb Ioro.

5.Якpo pibeHb 3apAkyakymyIaTopa Hn3bKn, 3apAitb Ioro.DoknaHiue dNb.3apAka akymyIaTopa Ha ctopiHci 708.
Ekcnnyataci S 138C
3anyckBnpo6y
1.BctaBte shHyp XnBHeHHB rHizdo nipykoio.
2.BCTABTe UHyp KINBNEHHy TpIMaU UHypa KINBNEHH. INB. BUKOPUCTAHNr TpIMaHa UHypa KINBNEHH (MOeNB S 138C) Ha CTOpIHci 702
-
3aHuaTeCe no3aDy Bnpo6y.
-
BiinnytItb o6mexyBau 3anycky.
- Nepemictb pyky 3yHHeHHa DnHyHa B Hapmky pykOarKn.
3yHnHa Bnpo6y
1.ДЯЗУNHHeHЯДВИryHa BiDnyctiTb pyUky 3yNHHeHЯДВИryHa.
- BiD'edhaIte uHyp KINBHeHHa BiE eJIeKTpOmepeXi, a NotIM BiD Bnpo6y.
TEXHlUHE OBCJnyROByBAHHa
Bctyn
PONEPENKHH: NpeBnKOHHnM p06i3 texHiuHoro 06cIyROByBaHHo 06o'3kOBo npouHTaTe yCbIDOMTe 3MiCT po3iny npo 3axOdu 6e3neKn.
Дя BCix po6it 3 obcnyrobyBaHHra TepeMOHTy Heo6xinda cneuaJIbHa nIiroTOBka. Mn rapaHTyEmo DoCTynHicTb nocnYr i3 npoceciHoro peMOHTy Ta 06cnyrobyBaHHra. JaKUO BaW dIneR He e OndHouacHO ueHTpOM o6cnyrobyBaHHra, 3BepHITbc4do HbOrO no
S 138i N S 138C Ppe
inΦopmaioIooHaai6JIHXHOro ceHTpy 06cnyroByBaHH.
TpaΦik texHicnHO o6cnyroByBaHHa
IHTepBaJIN TexHIOO 6cNpyOByBaHH Bka3aHI 3 ypaxyBaHHM 0oJeHHOro BNKOpNCtAHHH Bnpo6y. IHTepBaJIN 3MIHOHTbcr dner iHooi YactOTn BnKOpNCtAHHH Bnpo6y.
Bidiomocti npo BnDn 06cnyroByBaHHa, no3Nauehi 3ipouko (), nVB. y po3diNi MexaHi3Mn 6e3IeKn Ha npicTpoi Ha ctopiu 701.
| KOKHIM | LlOMiCzU | LlOkBapr |
| BVKOPnCT | Я | aJIbHo |
| aHHM |
3araJIbHa npeBipka. X
YnueHHBnpo6y.X
Ipebeipka rpyHTOpO3nyuBaNbHoro 6nlaHaHHa. X
Ipebeipka cnpaBHOCTi 3axnCHNX CnCTeM Bnpo6y. *X
IpebeBipka kOxyxib. *X
Ipebeipka pyuKn 3ynHeHHa DmryHa. * X
Ipebeipka o6mexkyBaay3anycky. *X
Tinbki S 138i Ppe
| koKHNM | LlOMicra | LlOKbapt |
| BVKOpNCT | Я | aJIbHO |
| aHHM |
Ipebeipka cnpaBnocti poobto KNonKn «YBMK./BIMK.».X
Ipebeipka akymyraTopa Ha haraBhictb nokoDkeHb. X
Ipebeipka pibn3apny akymynTopa.X
IpeBipka cnpabHocti KHOON BnMaHHa kMyJrTopa Ta HadiHocTi yTpmyBaHHa kMyJrTopa y Bnpo6i.
IpeBipka 3apAnHoro npictpoHa HaaBHicTb noKoJKeHb Ta npabnHocTi Ioro po60tn.
IpeBipka 3'eHaHb mix akymyTOpom Ta Bnpo6om. IpeBipka 3'eHaHb mix akymyTOpom Ta 3aprAHHm npnCTpoE M.
IpoceDypa 3araJIbHOi nepeBipKn
-ПepekoHaNTeCа,цoВci rαiKn rBnHTn Ha Bnpo6i 3aTgHvTi.
-PepekoHaTeCg,0ka6JI BCTaHOBneHi TaK,0o6 BOHn He NPOKODNUC.
UHnueHHBnpo6y
-Дя ouHHeHH nactMacOBx DeTaeN BKNOPNCOTByTe CYXU HCTV TKAHNHY.
He KopnctyntecB ODoIO IaOuIeHH BInpo6y. Boa moKe NotpanNTB aKymyIaTOp Nn DnBHyT Ta npn3BeCTn Do KOPOTKOro 3amKahHra a6o noWKoJKeHH BInpo6y.
-Дячиш�нг Виpo6у He BnKOpNCTOByTe MInOuH anapat BnCOKOrTo TnCKy.
3a6oPoneHO JNTN BOy 6e3nocepEHNbO Ha DnBnHy.
-ПибпаNTe JINCTa,Траву Ta 6pyd 3a DonomorOu OITKn.
YiueHHaakymyIaTopaTa3apdHoro npncTpoIO

YBAFA: 3a6oPHeHO MNTn 6aTaPeIO YN 3apAHH NpNCPTPi BOIOU.
- Nepu Hix BCTaBtTu akymyIaTOp y 3apAHN npucpii, nepekoHaItecra, 0o akymyIaTOp i 3apAHN npucptPi uNCTi My cyXi.
-CHNTNU KOHTAKTN aKymyIaTOPa NOTpi6HO CTNCHEHIM NOBITpAm a6o 3a DonomoroM'M'aKOIC cyXOI rAHyipKn. - UcHTnIOBepxHNOaKMyJyToppaTa3apdHoro npnctpoIO nOtpi6HO 3a DonomoroM'koI cyxoI raHupkN.
IpeBipka rpyHTOpO3nyuBaJbHoro 06naHaHHa

NONEPEDXEHH:ДЯ moDenei S 138i: 3aNo6irtnBnnaKOBomy 3anycky DBnryHa, nobephiTb KIOUc 6e3neu B NOJoxEHH «0》,BnMIb akymyIaTOp i 3aYeKaIte npHaMHi5 cekHyd.
Дя mojeni S 138C: lo6 3ano6irtn BnnaKOBOMy 3aNycky DnRgamma, BiD'edHaTe WHyp XnBnEHH.

NONEPEDXEHH:PiacTexHiHoro 06cnyrobybaHHpyHTopo3nyuBaIbHoro 06naHaHHBnKOpNCToByte3axChi pykabni.1e3aHa rpyHTopo3nyuBaIbHomy 06naHaHHiEdyke roCTpIMTOxHMM MOxHa NERKO npi3aTnCra.
- PnepeBipTe rpyHTOpO3nyUyBaJIbHe 06laIHaHHa HaABHicTb noIkoJKeHb a6o TpiUHN. O6OB'3KOB0 3amHIOte noIkoJKeH e rpyHTOpO3nyUyBaJIbHe 06laHaHHa
3aMHeHHrpyHTOpO3nyuBaIbHOro 06naHaHH

NONEPEJXEHH:PiucTexHCHORO 06cnyrobyBaHHrpyHTOp03nyuBaIbHORO 06naHaHHBnKOpNCyOByTe 3axNCi pykabui.1pyHTOp03nyuBaIbHe 06naHaHHdYxke roCTpe,TOX HMM MoXHa JERKO nopi3atncra
- Noknaaditb Bpi6 Ha npaby CTopoHy.
- BiikpyiTb 2 rBnHTn (A) nKoKyx rpyHTopo3nyuBaay (B). NotarHITb 3a rpyHTopo3nyuBaBHe o6naHaHHa (C) n 3HIMtB noRo.
- BcTaBTe HOBe rpyHTOpO3nyuBaIbHe o6NaHaHHa
(C) y na3 i dani B OTBip. YcTahOBiTb koxyx rpyHTopo3nyuBya a (B) n daBA rBNHTn (A)
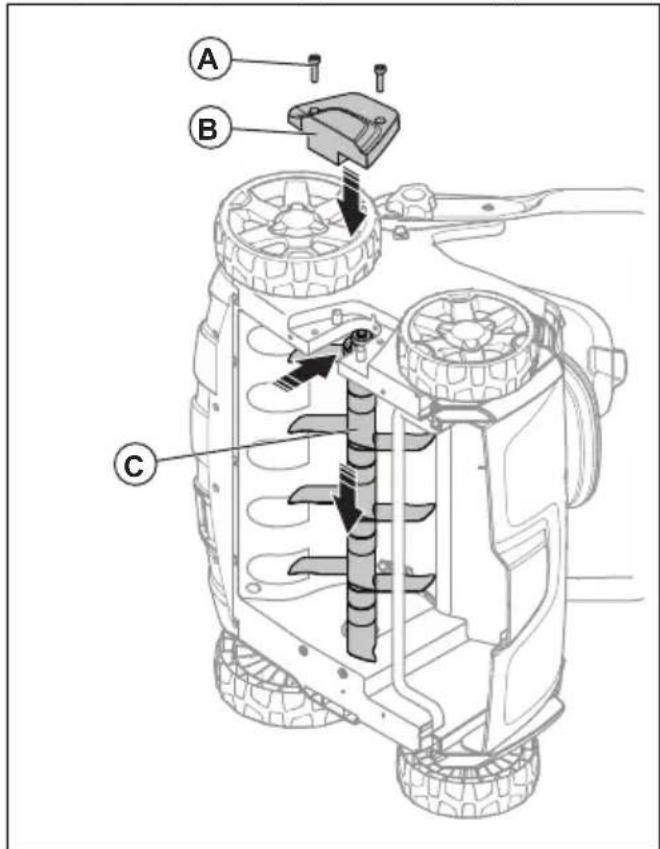
UcyeHHe HecnpaBHOCTeI
AkymyjTOp