USER MANUAL PR 300HV2S HILTI
2
natural_image
Diagram of three connected electrical components with a 1/2 cable connection (no text or symbols)
3
natural_image
Mechanical tripod device with two labeled parts (1 and 2) showing mechanical assembly, no text or symbols present.
4
5
PRA 90
Original operating instructions
1.1 About these operating instructions
- Warning! Read and understand all accompanying documentation, including but not limited to instructions, safety warnings, illustrations, and specifications provided with this product. Familiarize yourself with all the instructions, safety warnings, illustrations, specifications, components, and functions of the product before use. Failure to do so may result in electric shock, fire, and/or serious injury. Save all warnings and instructions for future reference.
- HILTI products are designed for professional users and only trained, authorized personnel are permitted to operate, service and maintain the products. This personnel must be specifically informed about the possible hazards. The product and its ancillary equipment can present hazards if used incorrectly by untrained personnel or if used not in accordance with the intended use.
- The accompanying documentation corresponds to the current state of the art at the time of printing. Please always check for the latest version on the product's page on Hilti's website. To do this, follow the link or scan the QR code in this documentation, marked with the symbol.
- Ensure that these operating instructions are with the product when it is given to other persons.
1.2 Explanation of symbols used
1.2.1 Warnings
Warnings alert persons to hazards that occur when handling or using the product. The following signal words are used:

DANGER
DANGER!
- Draws attention to imminent danger that will lead to serious personal injury or fatality.

WARNING
WARNING!
- Draws attention to a potential threat of danger that can lead to serious injury or fatality.

CAUTION
CAUTION!
- Draws attention to a potentially dangerous situation that could lead to personal injury or damage to the equipment or other property.
1.2.2 Symbols in the documentation
The following symbols are used in this document:

Read the operating instructions before use.

Instructions for use and other useful information

Dealing with recyclable materials

Do not dispose of electric equipment and batteries as household waste
1.2.3 Symbols in the illustrations
The following symbols are used in illustrations:

These numbers refer to the corresponding illustrations found at the beginning of these operating instructions
3
The numbering reflects the sequence of operations shown in the illustrations and may deviate from the steps described in the text

Item reference numbers are used in the overview illustrations and refer to the numbers used in the product overview section

This symbol is intended to draw special attention to certain points when handling the product.
1.3 Product-dependent symbols
1.3.1 Symbols on the product
The following symbols are used on the product:

Only use in enclosed spaces
HILTI
HILTI products are designed for professional users and only trained, authorized personnel are permitted to operate, service and maintain the products. This personnel must be specifically informed about the possible hazards. The product and its ancillary equipment can present hazards if used incorrectly by untrained personnel or if used not in accordance with the intended use.
The type designation and serial number are printed on the rating plate.
Write down the serial number in the table below. You will be required to state the product details when contacting Hilti Service or your local Hilti organization to inquire about the product.
Product information
| Automatic tripod PRA 90 | |
| Generation 01 | |
| Serial no. | |
We declare, on our sole responsibility, that the product described here complies with the applicable directives and standards. A copy of the declaration of conformity can be found at the end of this documentation.
The technical documentation is filed and stored here:
In addition to the information relevant to safety provided in the individual sections of these operating instructions and the information provided in the operating instructions of whichever type of rotating laser is being used, the following instructions must also be strictly observed at all times.
General safety instructions
Do not render safety devices ineffective and do not remove information and warning notices.
Proper preparation of the working area
- Secure the site in which you are taking measurements and take care to avoid directing the beam towards other persons or towards yourself when setting up the appliance.
- When performing alignment work on ladders, avoid postures to which you are unaccustomed. Make sure you work from a safe stance and stay in balance at all times.
▶ Ensure that the tool is set up on a stable, level surface (not subject to vibration).
▶ Use the tool only within its specified limits.
Take care to ensure that no parts of the body are located under the tripod when the tripod is set up or in operation.
- Do not use the tripod as a hoist or lifting aid.
- Keep children away. Keep other persons away from the working area.
When setting up the tripod in enclosed spaces (indoor rooms), check the suitability of the floor on which it stands, as the tripod could gouge scratches into the floor.
Electromagnetic compatibility
Although the device complies with the strict requirements of the applicable directives, Hilti cannot entirely rule out the possibility of interference to the device caused by powerful electromagnetic radiation, possibly leading to incorrect operation. Check the accuracy of the tool by taking measurements by other means when working under such conditions or if you are unsure. Likewise, Hilti cannot rule out the possibility of interference with other devices (e.g. aircraft navigation equipment).
General safety measures
▶ Check the condition of the device before use. If the device is found to be damaged, have it repaired at a Hilti Service Center.
▶ Always keep the PRA 90 threaded rod free from objects of any kind, including parts of the body or dirt.
Do not put your fingers or other parts of the body into the tubes of the tripod legs or other points at which injuries may be caused.
Although the appliance is designed for use on job sites under tough conditions, it should be handled with care, in the same way as other electrical appliances.
Although the device is protected to prevent entry of dampness, it should be wiped dry each time before being put away in its transport container.
▶ Only use the AC adapter for connecting to the power supply.
- Ensure that the appliance and AC adapter do not present an obstacle that could lead to a risk of tripping or personal injury.
▶ Ensure that the workplace is well lit.
- Check extension cords at regular intervals and replace them if found to be damaged. Do not touch the AC adapter if the extension cord or AC adapter are damaged while working. Disconnect the supply cord plug from the power outlet. Damaged supply cords or extension cords present a risk of electric shock.
- Avoid body contact with earthed or grounded surfaces such as pipes, radiators, cookers, stoves and refrigerators. There is an increased risk of electric shock if your body is grounded.
- Do not expose the supply cord to heat, oil or sharp edges.
▶ Never operate the AC adapter when it is dirty or wet. Dust (especially dust from conductive materials) or dampness adhering to the surface of the AC adapter may, under unfavorable conditions, lead to electric shock. Dirty or dusty tools or appliances should thus be checked by Hilti Service at regular intervals, especially if used frequently for working on conductive materials.
- Avoid touching the contacts.
- Use the carry strap supplied with the tripod to make it easier to carry the PRA 90. When transporting the PRA 90, take care not to allow the tripod to cause injury either to yourself or to other person. Particular care should be taken in checking the position of the points at the ends of the legs during transportation.
- When you are finished using the PRA 90, always make sure that the threaded column is fully wound down before the tripod legs are folded together.
▶ Use only batteries of the type approved for use with the applicable tool. Use of other batteries or use of the batteries for purposes for which they are not intended presents a risk of fire and explosion.
- Do not expose batteries to high temperatures and keep them away from fire. There is a risk of explosion.
Do not disassemble, squash or incinerate batteries and do not subject them to temperatures over 80 °C (176 °F). This presents a risk of fire, explosion or injury through contact with caustic substances.
- Do not allow moisture to enter the battery. Moisture in the interior of the device may cause a short circuit and chemical reactions resulting in burns to the skin or fire.
- Observe the special guidelines applicable to the transport, storage and use of Li-ion batteries.
- Avoid short circuiting the battery terminals. Check that the battery terminals and the terminals in the power tool are free from foreign objects before inserting the battery in the tool. Short circuiting the battery terminals presents a risk of fire, explosion and chemical burns.
▶ Never continue to use or attempt to charge damaged batteries, e.g. batteries with cracks, broken parts, bent or pushed-in / pulled-out contacts).
▶ Only use the AC adapter PRA 85 or the motor vehicle power adapter PRA 86. for operating the appliance and charging the battery. The appliance may otherwise be damaged.
3 Description
3.1 Product overview
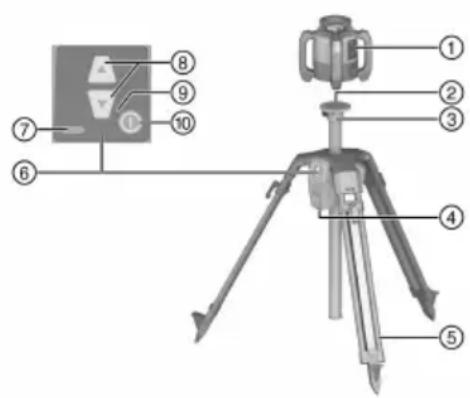
① Rotating laser
② Laser adapter 5/8"
③ Tripod head
④ Battery compartment
⑤ Extendable supports
⑥ Control panel
⑦ Charge state indicator
⑧ height regulation
⑨ LED display
⑩ On/off button
3.2 Intended use
The product described is an automatic tripod onto which a rotating laser can be fitted. The tripod can be moved in height using the control panel or a remote control unit. Using the tripod and the rotating laser fitted to it, a horizontal laser plane can be established which is directed onto a particular target height, meter marks can be transmitted and horizontal heights aligned and checked.
▶ Use only the Hilti PRA 84 Li-ion battery for this product.
For these batteries, use only the Hilti PRA 85 AC adapter.
The tripod can be operated in two different ways: by means of the control panel directly on the tripod, or with a Hilti laser receiver/remote control unit (in combination with a Hilti rotating laser for automatic alignment and monitoring).
Compatible laser receivers/remote control units:
3.3 Automatic alignment
The tripod can be automatically aligned with the HiltiPR 30-HVS A12, PR 30-HVSG A12 or the PR 300-HV2S rotating laser. These rotating lasers are specifically matched to the PRA 90 and support three-device communication between tripod, rotating laser and associated laser receiver/remote control unit.
Using these three components together, a laser plane can be aligned onto a precise point automatically.
Only the target height has to be indicated with the laser receiver/remote control unit and the PRA 90 moves the laser plane of the rotating laser exactly to this height.
Automatic alignment is not possible when other rotating lasers are used.
3.4 Charge state indicator
During charging in the device, during operation
| Status Meaning | |
| 4 LEDs light. Charge state 100% | |
| 3 LEDs light, 1 LED blinks. Charge state ≥ 75% | |
| 2 LEDs light, 1 LED blinks. Charge state ≥ 50% | |
| 1 LED lights, 1 LED blinks. Charge state ≥ 25% | |
| 1 LED blinks. Charge state < 25% | |
During charging outside the device
| Status Meaning | |
| Red LED on the battery lights. | Battery is charging |
| Red LED on the battery does not light. | Charge state 100% |
3.5 Items supplied
Automatic tripod PRA 90, Li-ion battery PRA 84, AC adapter PRA 85, carry strap, operating instructions, manufacturer's certificate.
Other system products approved for use with this product can be found at your local Hilti Store or at: www.hilti.group
4 Technical data
4.1 Technical data PRA 90
| Rated voltage | 7.2 V |
| Rated current | 1,500 mA |
| Communication range with PRA 30 in direction of the tripod control panel | 60 m(164 ft - 1 in) |
| Communication range with PRA 30 to the side of, or in the option site direction of, the tripod control panel | 60 m(98 ft - 5 in) |
| Transportation length | 94 cm(37 in) |
| Weight | 8 kg(18 lb) |
| Carry weight | ≤ 5 kg(≤ 11 lb) |
| Maximum height (with rotating laser) | 1.95 m(6 ft - 4.77 in) |
| Minimum height (with rotating laser) | 0.97 m(3.18 ft) |
| Maximum site elevation above datum | 2,000 m(6,561 ft - 8 in) |
| Maximum relative humidity | 90 % |
| Total travel | 54 cm(21 in) |
| Smallest travel | 0.25 mm(0.010 in) |
| Operating temperature | -20 °C ... 60 °C(-4 °F ... 140 °F) |
| Storage temperature | -25 °C ... 60 °C(-13 °F ... 140 °F) |
| Protection class | IP 56 |
| Tripod thread | 58" × 11 mm (0.43") |
| Radiant power | 1.1 dBm |
| Frequency | 2,400 MHz ... 2,483.5 MHz |
4.2 Technical data PRA 84
| Rated voltage | 7.2 V |
| Maximum voltage during operation or during charging while in operation | 13 V |
| Charging time at 32 °C (+90 °F) | 130 min |
| Operating temperature | -20 °C ... 50 °C(-4 °F ... 122 °F) |
| Storage temperature (dry) | -25 °C ... 60 °C(-13 °F ... 140 °F) |
| Charging temperature | 0 °C ... 40 °C(32 °F ... 104 °F) |
| Weight | 0.3 kg(0.7 lb) |
4.3 Technical data PRA 85
| Mains power supply | 115 V ... 230 V |
| AC frequency | 47 Hz ... 63 Hz |
| Rated power | 36 W |
| Rated voltage | 12 V |
| Operating temperature | 0 °C ... 40 °C(32 °F ... 104 °F) |
| Storage temperature (dry) | -25 °C ... 60 °C(-13 °F ... 140 °F) |
| Weight | 0.23 kg(0.51 lb) |
5 Before use
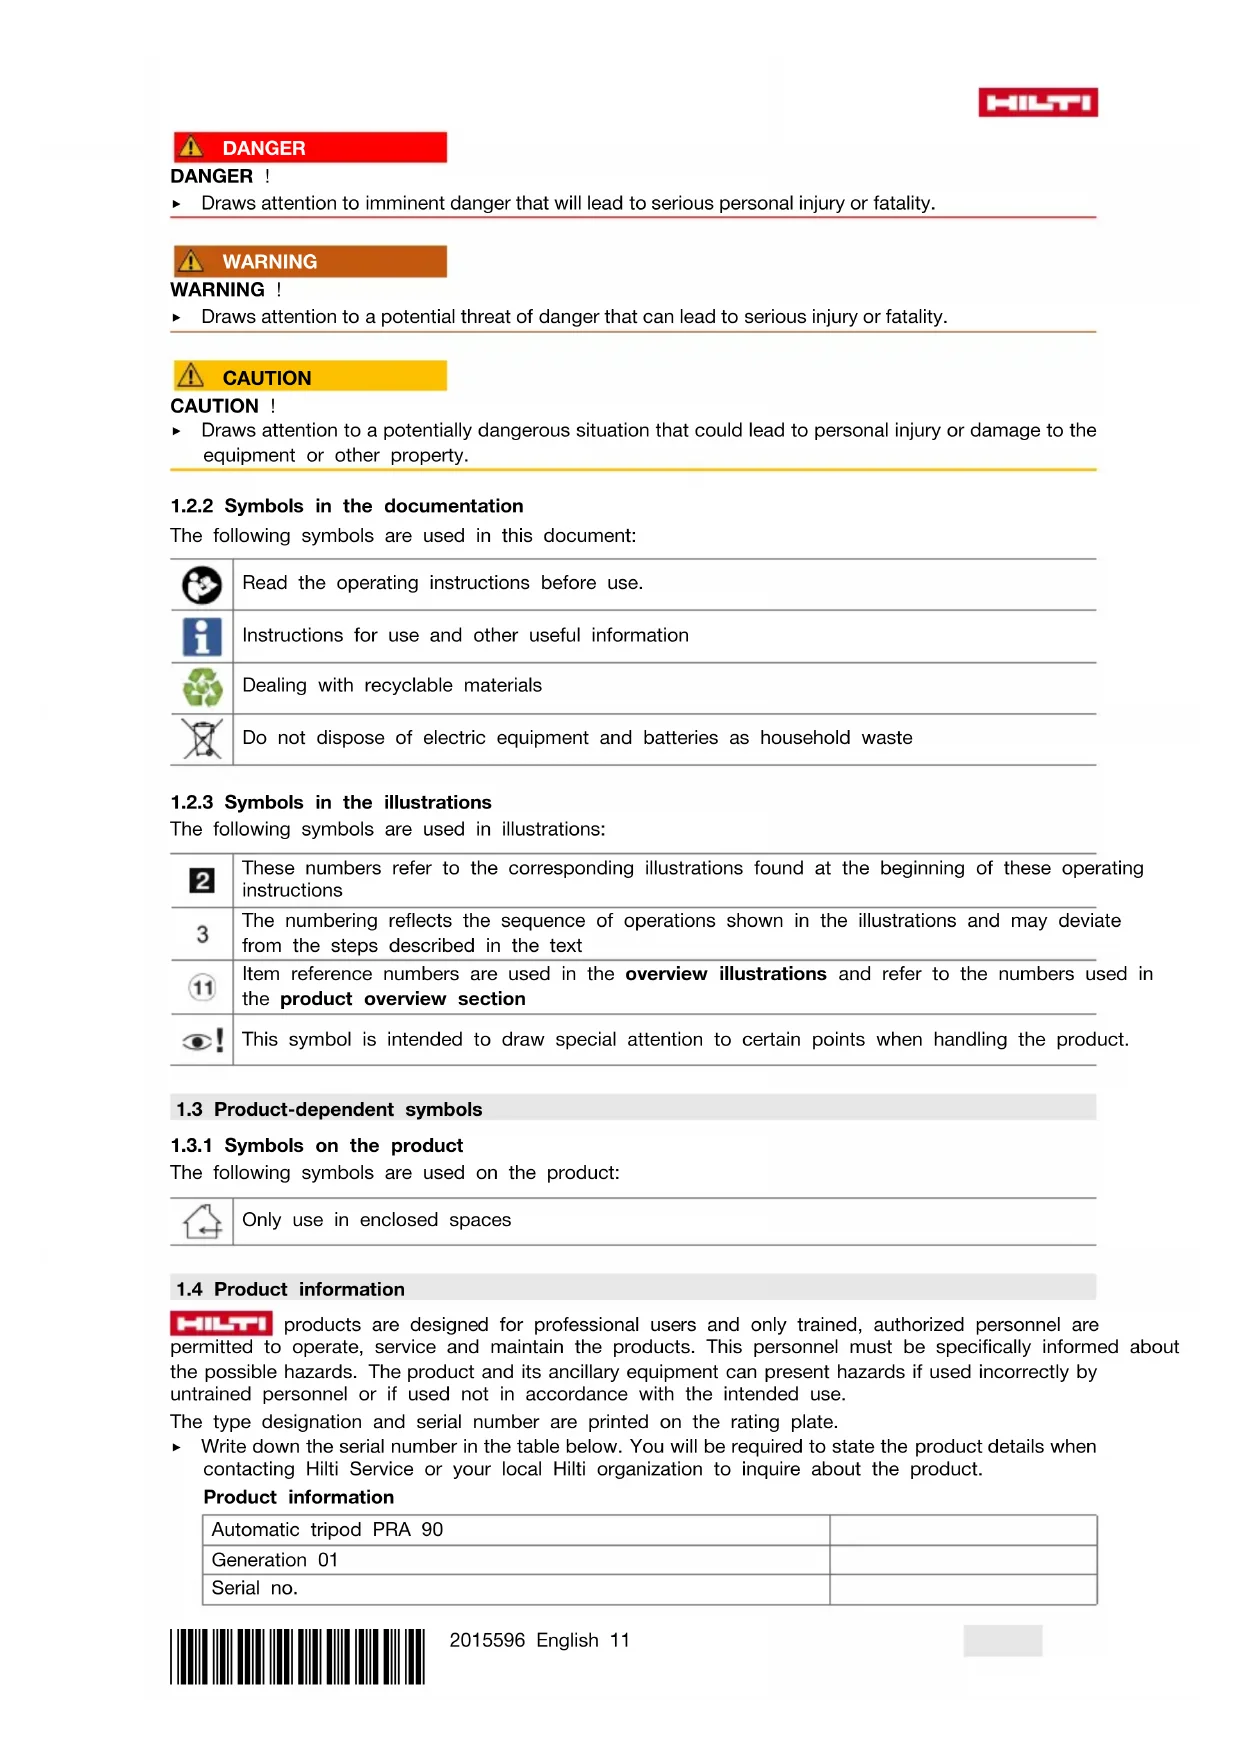
5.1 Charging the battery 2

This tripod must only be operated with the Hilti battery PRA 84.
- Charge the batteries fully before using them for the first time.

WARNING
Electrical hazards. If liquids penetrate the tool, they may cause the AC adapter to short circuit and explode.
This may result in serious injury and cause burns!
The PRA 85 AC adapter is for indoor use only.
- Place the battery into the battery compartment.
- Rotate the socket cover so that the charging socket on the battery can be seen.
- Plug the cord from the AC adapter or motor vehicle power adapter into the battery.
- Connect the AC adapter or the motor vehicle power adapter to the power supply.

The current charge status is shown by the battery display on the tripod when it is switched on.
5.1.2 Charging the battery externally (not in the toll)

WARNING
Electrical hazards. If liquids penetrate the tool, they may cause the AC adapter to short circuit and explode. This may result in serious injury and cause burns!
The PRA 85 AC adapter is for indoor use only.
- Remove the battery from the tripod and plug in the connector of the AC adapter or the motor vehicle power adapter.
- Connect the AC adapter or the motor vehicle power adapter to the power supply.

The red LED on the battery lights while charging is in progress.
- Turn the cover so that the charging socket on the battery can be seen.
- Plug the connection of the AC adapter into the battery.
The tripod works during the charging operation and the charge state is displayed by the LEDs on the tripod.
5.2 Inserting the battery

Check that the terminals on the battery and on the tripod are free from foreign objects before inserting the battery.
- Slide the battery into the holder on the tripod.
- Turn the catch two notches in a clockwise direction until the "locked" symbol appears.
5.3 Removing the battery
- Turn the catch two notches in an counter-clockwise direction until the "unlocked" symbol appears
- Remove the battery from the tool.
6 Operation
6.1 Fitting rotating laser to tripod

Only fit devices that weigh no more than 5 kg (11 lbs).
▶ Screw the rotating laser onto the tripod.
6.2 Working with the tripod without the remote control unit
- Press the On/Off button on the tripod.
▶ The tripod switches on.
- On the control panel of the tripod, press the appropriate arrow buttons in order to move the tripod upwards or downwards.
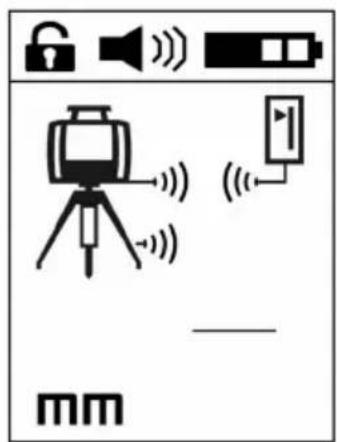
6.3 Working with tripod and laser receiver/remote control un 4, 5

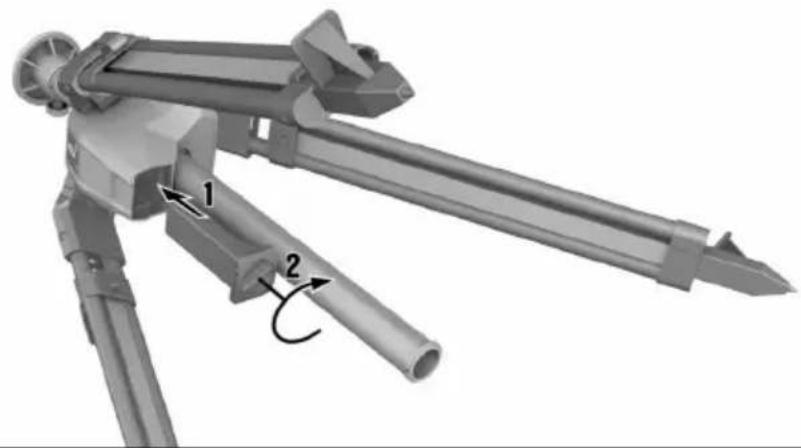
Before use, the laser receiver/remote control unit has to be paired with the tripod to enable communication between the two devices.
The rotating laser also has to be paired separately with the laser receiver/remote control unit. This establishes the three-device pairing that is essential for automatic alignment of the laser plane.
- Press the On/Off button on the tripod and on the remote control unit and hold the buttons pressed simultaneously for at least 3 seconds.
- Successful pairing is indicated by a chain symbol on the display of the laser receiver/remote control unit, accompanied by flashing of all the LEDs on the PRA 90. Both devices then switch off automatically.
- Switch the tripod, the rotating laser and the laser receiver/remote control unit on.
The display of the laser receiver/remote control shows the rotating laser including tripod, with the active wireless connection depicted as a wave.
▶ If there is no active radio connection, a warning triangle appears on the display instead of the wave.
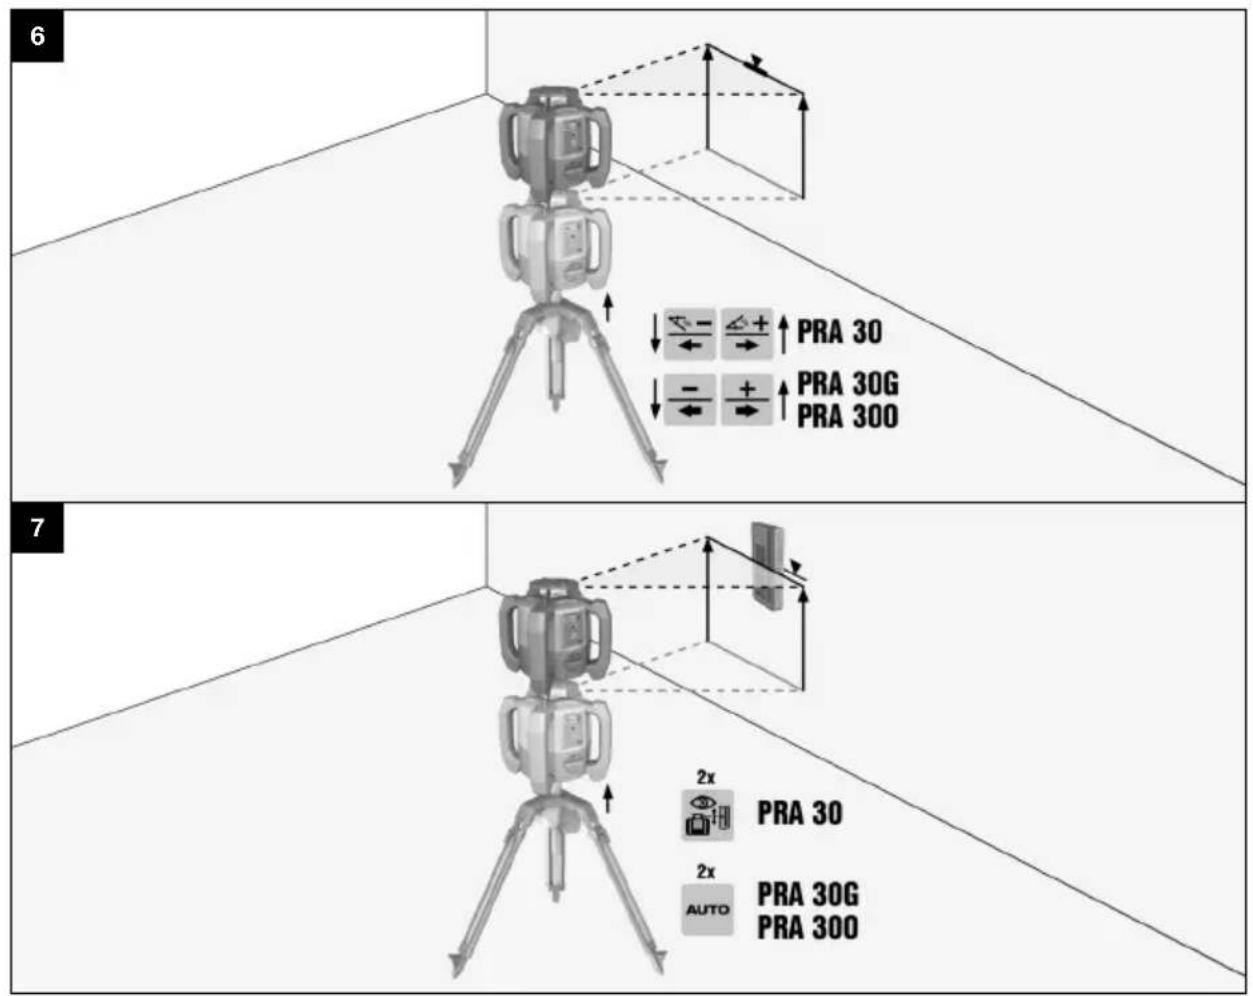
6.4 Align using the automatic tripod PRA 90

When used for the first time, the laser receiver/remote control unit has to be paired with the tripod.
- Screw the rotating laser onto the tripod. 16
- Switch the tripod, the rotating laser and the laser receiver/remote control unit on. 17
- Now align the height of the laser plane manually 17 or automatically 17.
6.4.1 Manual alignment
- On the laser receiver/remote control unit press the +/- buttons or on the PRA 90 press the arrow buttons to move the horizontal plane up or down in parallel.
6.4.2 Automatic alignment
- Hold the receiver side of the laser receiver/remote control unit at the desired target height and facing toward the control panel of the PRA 90. Hold the laser receiver/remote control unit steady while alignment is in progress and make sure that the line of sight between laser receiver/remote control unit and rotating laser is clear.
- Double-click the "Automatic alignment" button on the laser receiver/remote control unit. Double-click the button again to end the alignment procedure.
This double-click starts the process of bringing the laser plane into alignment, and the tripod moves up or down, as appropriate. An acoustic signal sounds continuously while this is in progress. As soon as the laser beam strikes the detection area of the laser receiver/remote control unit, the beam moves toward the position of the marking notch (reference plane). When the position is reached and the rotating laser has leveled itself, a signal tone of five seconds' duration sounds to indicate the conclusion of the process. The “Automatic alignment” symbol disappears.
- Check the height settings in the display.
- Remove the laser receiver/remote control unit.

If the automatic alignment process was not successful, short signal tones are emitted and the “Automatic alignment” symbol goes out.

Observe the temperature limits of -25 ^ ( -13 ^ ) to +60 ^ ( 140 ^ ) if you keep your equipment inside a motor vehicle.
- Always keep the threaded rod free from coarse dirt and concrete residues.
- Use only a clean, soft cloth for cleaning. If necessary, moisten the cloth slightly with pure alcohol or water. Do not use any other liquids as these may affect the plastic parts.
8 Transport and storage
Transport

CAUTION
Unintentional start-up during transportation. If batteries are left inserted, the tool may start up unintentionally during transportation and the therefore may be damaged.
▶ Always transport the tool with the batteries removed.
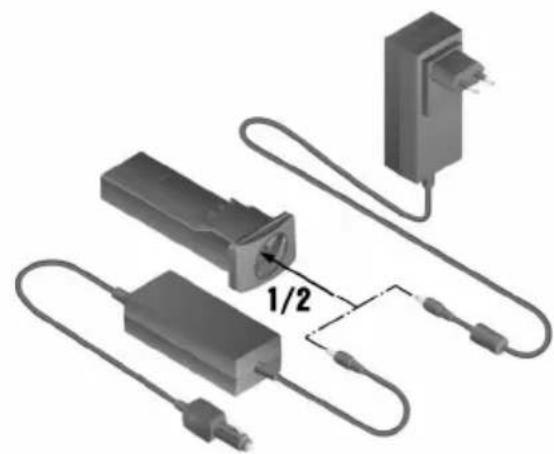
• After use, wind the threaded rod down fully.
- Remove the battery.
- Only now fold in the tripod legs.
- For transporting or shipping your equipment, either use the Hilti shipping box, the Hilti transport pouch or an equivalent form of packaging.
• Always check the accuracy of the equipment before it is used after a prolonged period of transportation.
Storage

CAUTION
Unintentional damage caused by defective batteries. Leaking batteries may damage the tool.
▶ Always store the tool without the batteries inserted.
- Store tools and appliances in a dry place where they cannot be accessed by children or unauthorized persons.
- Remove the tool from its case if it has become wet. Tools, carrying cases and accessories should be dried and cleaned at a maximum temperature of 40 °C (104 °F).
- Repack and store the equipment only once it is completely dry.
- Always check the accuracy of the equipment before it is used after a prolonged period of storage.
- Store the battery in a place that is as cool and dry as possible.
Never store the battery where it is exposed to direct sunlight or sources of heat, e.g. on heaters / radiators or behind glass.
9 Troubleshooting
If the trouble you are experiencing is not listed in this table or you are unable to remedy the problem by yourself, please contact Hilti Service.
9.1 Troubleshooting
| Trouble or fault Possible cause | Action to | be taken |
| Tripod does not respond. | Tripod not switched on. | ▸ Switch on tripod. |
| Tripod not paired. | ▸ Pair the remote control unit with the tripod.17 |
| Tripod cannot be switched on. | Battery not fully inserted or empty. | ▸ Insert the battery so that a “click” is heard or charge the battery. |
| Automatic alignment not successful. | The desired height is outside the maximum possible setting height. | ▸ Check the adjustment height. |
| Excessive vibration from external influences. | ▸ Completely unfold the tripod and check that it stands firmly |
| Trouble or fault Possible cause Action to be taken | |
| Automatic alignment not successful. | Tripod is out of range. | ▸ Approach the tripod more closely with the remote control unit and/or align the control panel towards the remote control unit. |
| Setting the monitoring mode is not successful. | The desired height is outside the maximum possible setting height. | ▸ Check the adjustment height. |
| Excessive vibration from external influences. | ▸ Completely unfold the tripod and check that it stands firmly |
| Tripod is out of range. | ▸ Approach the tripod more closely with the remote control unit and/or align the control panel towards the remote control unit. |
10 RoHS (Restriction of Hazardous Substances)
Click on the link to go to the table of hazardous substances: qr.hilti.com/r56543.
There is a link to the RoHS table, in the form of a QR code, at the end of this document.
11 Disposal

WARNING
Risk of injury due to incorrect disposal! Health hazards due to escaping gases or liquids.
▶ DO NOT send batteries through the mail!
▶ Cover the terminals with a non-conductive material (such as electrical tape) to prevent short circuiting.
- Dispose of your battery out of the reach of children.
- Dispose of the battery at your Hilti Store, or consult your local governmental garbage disposal or public health and safety resources for disposal instructions.

Most of the materials from which Hilti products are manufactured can be recycled. The materials must be rectly separated before they can be recycled. In many countries, your old tools, machines or appliances can be returned to Hilti for recycling. Ask Hilti Service or your Hilti sales representative for further information.

- Do not dispose of power tools, electronic equipment or batteries as household waste!
12 Manufacturer's warranty
▶ Please contact your local Hilti representative if you have questions about the warranty conditions.
13 FCC statement (applicable in US) / IC statement (applicable in Canada)

CAUTION
Interference to radio reception Use of the product in residential areas may cause interference to radio reception.
This equipment has been tested and found to comply with the limits for a Class A digital device, pursuant to part 15 of the FCC rules. These limits are designed to provide reasonable protection against interference when the equipment is operated in a commercial environment. This equipment generates, uses, and can radiate radio frequency energy and, if not installed and used in accordance with the instructions, may cause interference to radio communications.
However, there is no guarantee that interference will not occur in a particular installation. If this equipment does cause harmful interference to radio or television reception, which can be determined by turning the equipment off and on, the user is encouraged to try to correct the interference by taking the following measures: Re-orient or relocate the receiving antenna. Increase the distance between the equipment and receiver. Consult the dealer or an experienced TV/radio technician for assistance.
Changes or modifications not expressly approved by Hilti may restrict the user's authorization to operate the equipment.
This device is in compliance with paragraph 15 of the FCC Regulations RSS-210 of the IC Regulations.
Operation is subject to the following two conditions:
This device shall cause no harmful interference.
This device must accept any interference received, including interference that may cause undesired operation.
▶ Stativet kopplas in.
① Rotacijski laser
② Vpenjalo laserja 5/8"
③ Glava stojala
④ Prostor za akumulatorsko baterijo
⑤ Izvlečni oporniki
⑥ Polje za upravljanje
⑦ Indikator napolnjenosti
⑧ Regulacija višine
⑨ Prikaz z LED-diodami
⑩ Tipka za vklop/izklop
3.2 Namenska uporaba
① Rotacijski laser
② Prihvat lasera s navojem 5/8"
③ Glava stativa
④ Pretinac za akumulatorsku bateriju
⑤ Izvlačne noge
⑥ Upravljačka ploča
⑦ Indikator stanja napunjenosti
⑧ Reguliranje visine
⑨ LED indikator
⑩ Tipka za uključivanje/isključivanje
24F., No. 16, Xinzhan Rd., Banqiao Dist., New Taipei City 220, Taiwan (R.O.C.)
Tel. 0800-221-036

Manufacturer:
Hilti Corporation
Hilti (Gt. Britain) Limited
No. 1 Circle Square, 3 Symphony Park
Manchester, England, M1 7FS
PRA 90 (01)
Serial Numbers: 1-99999999999
2006/42/EC | Supply of Machinery (Safety) Regulations 2008
2014/53/EU | Radio Equipment Regulations
2017
2011/65/EU | The Restriction of the Use of Certain Hazardous Substances in Electrical and Electronic Equipment Regulations 2012
EN 61010-1:2010,
A1:2019, AC:2019
EN 62479:2010
EN 300 440 V2.1.1
EN 301 489-17 V3.2.4
EN 300 328 V2.2.2
EN 301 489-1 V2.2.3

Dr. Tahar Zrilli
Head of Quality and Process Management
Business Area Electric Tools & Accessories
Schaan, 08.02.2024

Sriram Makineedi
Head of BU Measuring Systems
Business Unit Measuring Systems


Hilti Corporation
LI-9494 Schaan
Tel.:+423 234 21 11
Fax:+423 234 29 65
www.hilti.group