DD VP-U - Laser level HILTI - Free user manual and instructions
Find the device manual for free DD VP-U HILTI in PDF.

| Product Type | Vacuum pump for drilling systems |
| Brand | Hilti |
| Model | DD VP-U |
| Dimensions (L x W x H) | 383 x 154 x 282 mm |
| Weight | 9.0 kg |
| Supply voltage | 230 V |
| Rated current | 2.1 A |
| Frequency | 50 Hz |
| Power consumption | 450 W |
| Maximum flow rate | 6 m³/h |
| Minimum relative vacuum | 700 mbar |
| Water separator capacity | 0.5 L |
| Protection class | I (grounded) |
| Protection type | IP 54 |
| Intended use | Generate vacuum for mounting drilling columns with suction base, for diamond core drills up to Ø 250 mm |
| Main functions | On/off switch, vacuum monitoring via manometer (green/red zone), water separator drain via bayonet closure |
| Maintenance and cleaning | Regularly empty the water separator; clean ventilation slots with a dry brush; clean the housing with a damp cloth without silicone |
| Safety | Disconnect before maintenance; do not use in explosive areas; keep ventilation slots clean; regularly check hoses and cables |
| Spare parts and repairability | Spare parts and consumables available from Hilti Customer Service or online at www.hilti.group |
| Manufacturer's warranty | Contact local Hilti partner |
| Recycling | Do not dispose of with household waste; return to Hilti for recycling |
Frequently Asked Questions - DD VP-U HILTI
User questions about DD VP-U HILTI
0 question about this device. Answer the ones you know or ask your own.
Ask a new question about this device
Download the instructions for your Laser level in PDF format for free! Find your manual DD VP-U - HILTI and take your electronic device back in hand. On this page are published all the documents necessary for the use of your device. DD VP-U by HILTI.
USER MANUAL DD VP-U HILTI
DD VP-U
en Original operating instructions .... 1
Original operating instructions
1 Information about the documentation
1.1 About this documentation
- Read this documentation before initial operation or use. This is a prerequisite for safe, trouble-free handling and use of the product.
- Observe the safety instructions and warnings in this documentation and on the product.
- Always keep the operating instructions with the product and make sure that the operating instructions are with the product when it is given to other persons.
1.2 Explanation of symbols
1.2.1 Warnings
Warnings alert persons to hazards that occur when handling or using the product. The following signal we are used:

DANGER
DANGER!
- Draws attention to imminent danger that will lead to serious personal injury or fatality.

WARNING
WARNING!
- Draws attention to a potential threat of danger that can lead to serious injury or fatality.

CAUTION
CAUTION!
- Draws attention to a potentially dangerous situation that could lead to personal injury or damage to the equipment or other property.
1.2.2 Symbols in the operating instructions
The following symbols are used in these operating instructions:


Comply with the operating instructions
Instructions for use and other useful information
Dealing with recyclable materials
Do not dispose of electric equipment and batteries as household waste
Hilti Li-ion battery
Hilti charger
1.2.3 Symbols in illustrations
The following symbols are used in illustrations:

These numbers refer to the illustrations at the beginning of these operating instructions.

The numbering reflects the sequence of operations shown in the illustrations and may deviate from the steps described in the text.

Item reference numbers are used in the overview illustration and refer to the numbers used in the key in the product overview section.

These characters are intended to specifically draw your attention to certain points when handling the product.
1.3 Product information
HILTI products are designed for professional users and only trained, authorized personnel are permitted to operate, service and maintain the products. This personnel must be specifically informed about the possible hazards. The product and its ancillary equipment can present hazards if used incorrectly by untrained personnel or if used not in accordance with the intended use.
The type designation and serial number are printed on the rating plate.
Write down the serial number in the table below. You will be required to state the product details when contacting Hilti Service or your local Hilti organization to inquire about the product.
Product information
| Type designation DD VP-U | |
| Generation 01 | |
| Serial no. |
2 Safety
2.1 Additional safety instructions
▶ Also study all instructions relating to safety and operation in the corresponding operating instructions of the system products (vacuum base plate, drill stand, diamond core drilling machine).
- Keep the air vents of the pump free from dirt and dust. Ensure adequate free space at the air discharge to prevent overheating.
- Stand the pump on a dry, horizontal surface for operation and secure the vacuum pump so that it cannot slip out of position.
In the event of failure of the electric supply or malfunction of the product, the vacuum is maintained for a short time. Stop working immediately and check the pressure gages on vacuum pump and vacuum base plate. Secure the drilling system so that nothing can fall.
- Do not tamper with or modify the product in any way.
▶ Use only Hilti Hilti spare parts.
▶ Always empty the water separator before transporting the vacuum pump.
▶ Ensure that the working area is well lit.
- At regular intervals, check the vacuum hose for leaks and damage and replace faulty hoses without delay.
- Avoid kinks in the vacuum hose.
- Keep the supply cord, extension cord, water hose and vacuum hose away from rotating parts of the machine.
This product is not intended for use by persons (including children) with physical, sensory or mental disabilities or persons lacking the appropriate experience and/or knowledge. These persons must receive instruction in safe handling of the appliance and must be supervised throughout their use of the appliance by a responsible person.
- Check the appliance's supply cord at regular intervals and have it replaced by a qualified specialist if found to be damaged. If the machine's supply cord is damaged it must be replaced with a specially prepared and approved supply cord available from Hilti Customer Service. Check extension cords at regular intervals and replace them if found to be damaged. Do not touch the supply cord or extension cord if it is damaged while working. Disconnect the supply cord plug from the power outlet. Damaged supply cords or extension cords present a risk of electric shock.
3 Description
3.1 Product overview
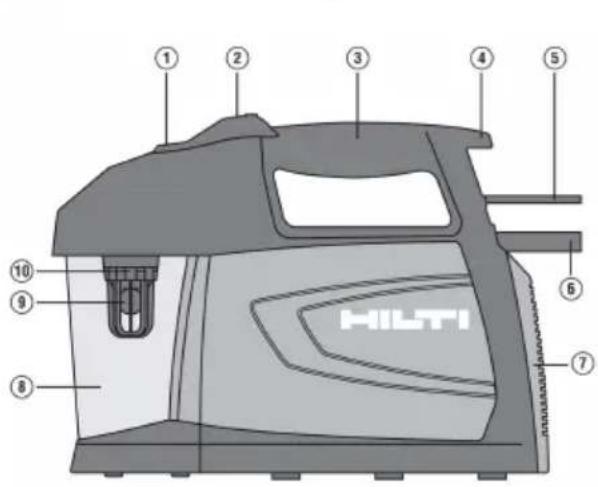
① Pressure gauge
② On/off switch
③ Grip
④ Supply cord hook
⑤ Supply cord
⑥ Hose
⑦ Air vents
⑧ Water separator
⑨ Ball float
⑩ Cage
3.2 Intended use
The vacuum pump is designed to create a vacuum for securing a drill stand with a vacuum base plate use in combination with vacuum holding jigs such as are used, for example, with Hilti diamond core drill machines (core bits up to max. 250 mm diameter).
• The vacuum pump is designed exclusively for intaking air. Intaking other gases or liquids is prohibited.
- The product must not be used in an explosive environment.
3.3 Items supplied
Vacuum pump, operating instructions

Other system products approved for use with this product can be found at your local Hilti Store or at: www.hilti.group
4 Technical data
4.1 Product properties
| Weight | 9.0 kg |
| Dimensions (L x W x H) | 383 mm x 154 mm x 282 mm(15.1 in x 6.1 in x 11.1 in) |
| Power input | 450 W |
| Maximum volumetric flow rate | 6 m3/h |
| Minimum relative volume flow rate | 700 mbar(10.2 psi) |
| Water separator capacity | 0.5 ℓ |
| Protection class | Protection class I (earthed) |
| Protection class | IP 54 |
| Voltage | 230 V |
| Rated current input | 2.1 A |
| Frequency | 50 Hz(3,000 /min) |
4.2 Noise information (in accordance with EN ISO 2151)
| Typical A-weighted sound pressure level | < 70 dB(A) |
5 Before use
5.1 Setting up vacuum pump

WARNING
A damaged supply cord presents a hazard! Do not touch the supply cord or extension cord if damaged while working. Disconnect the supply cord plug from the power outlet.
If the power tool's supply cord is damaged it must be replaced with a specially-prepared and approved supply cord available from Hilti Customer Service.
- Find a suitable location with the following characteristics:
▶ Supporting surface is smooth and dry.
▶ Cooling air inlet and cooling air outlet have at least 20 cm clearance from walls and other obstructions.
- Secure the vacuum pump against slippage.
- Check the water level in the water separator and empty it if necessary.
- Connect the vacuum connector on the vacuum base plate to the vacuum pump.
6 Operation
6.1 Switching on vacuum pump
- Plug the supply cord into the power outlet.
- Press the on / off switch.
▶ The vacuum pump starts.
6.2 Checking vacuum

Check operation of the vacuum pump and check the vacuum after maintenance work and before every use.
- Plug the supply cord into the power outlet.
- Switch on the vacuum pump. → page 4
▶ Within a short time, the needle of the pressure gauge is in the green part of the scale.
6.3 Observing pressure gage

The pressure gage shows the current partial vacuum created by the vacuum pump.
- Pressure gage in green zone → partial vacuum is adequate
-
Pressure gage in red zone → partial vacuum is too low
-
Observe the pressure gages on the vacuum pump and vacuum base plate while drilling is in progress.
The pressure gage must remain constantly in the green zone throughout the drilling operation.
If the pressure gage drops to the red zone, interrupt the drilling operation and switch the drilling system off. Secure the drilling system so that nothing can fall! - At regular intervals, check the vacuum hoses for leaks, kinks or other damage.
▶ Have faulty parts repaired or replaced by Hilti Service.
6.4 Observing fill level of water separator

The water separator has a safety valve that mechanically shuts off the intake aperture if the fill level i too high. This prevents the vacuum pump from intaking water and suffering damage.
- Observe the fill level of the water separator while drilling is in progress. If possible, empty the water separator before the safety valve trips.
▶ Empty the water separator. → page 5
If the safety valve trips, the vacuum pump stops creating vacuum and the partial vacuum created until then will slowly drop.
Interrupt the drilling operation and switch the drilling system off. Secure the drilling system so that nothing can fall.
▶ Empty the water separator. → page 5
6.5 Switching off vacuum pump
- Stop drilling and switch the drilling system off.
- Remove the drilling system.
- Switch the vacuum pump off by pressing the on/off switch.
- Operate the vacuum release valve on the vacuum base plate.
▶ If applicable, set the drill stand down safely. - Remove the vacuum hose from the vacuum base plate.
- Unplug the supply cord from the power outlet.
7 Care and maintenance

WARNING
Electric shock hazard! Attempting care and maintenance with the supply cord connected to a power outlet can lead to severe injury and burns.
▶ Always unplug the supply cord before carrying out care and maintenance tasks.
Care
- Carefully remove stubborn dirt from the tool.
- Clean the air vents carefully with a dry brush.
- Use only a slightly damp cloth to clean the casing. Do not use cleaning agents containing silicone as they can attack the plastic parts.
Maintenance

WARNING
Danger of electric shock! Improper repairs to electrical components may lead to serious injuries including burns.
- Repairs to the electrical section of the tool or appliance may be carried out only by trained electrical specialists.
- Check all visible parts and controls for signs of damage at regular intervals and make sure that they function correctly.
- Do not operate the product if signs of damage are found or if parts malfunction. Have it repaired immediately by Hilti Service.
• After cleaning and maintenance, fit all guards or protective devices and check that they function correct

To help ensure safe and reliable operation, use only genuine Hilti spare parts and consumables. Spa parts, consumables and accessories approved by Hilti for use with the product can be found at yo local Hilti Store or online at: www.hilti.group.
7.1 Emptying water separator

If the water separator fills up while drilling is in progress or if the safety valve trips, interrupt the operation, switch the drilling system off and secure the drilling system so that nothing can fall.
- Interrupt the drilling operation and switch the drilling system off.
-
Secure the drilling system so that nothing can fall.
-
Switch the vacuum pump off.
- If applicable, vent the vacuum.
- Turn the water separator container in the OPEN direction and pull it down and off (bayonet connection).
-
Empty the container.
-
Check the ball float.
-
Carefully ease the ball float free if it is stuck.
The ball is loose at the bottom of the cage and the intake aperture is clear. -
Clean the edge of the water separator.
-
Position the water separator on the bayonet connector of the container and turn it in the CLOSE direction.
8 Troubleshooting
| Trouble or fault Possible cause Action to be taken | ||
| Vacuum pump is running but not enough vacuum is achieved at the vacuum plate (pressure gage of the vacuum base plate in red zone). | The filter is clogged. ▶ Contact | Hilti Service. |
| Dirt in the hoses, fittings, pump or vacuum baseplate seals (water separator, connectors, etc.). | ▸ Clean out the hoses, fittings and seals or replace them if necessary. | |
| Operation at high altitude. ▶ Use | an anchor base plate to secure the drilling system. | |
| Vacuum pump is running but not enough vacuum is created (pressure gage of the vacuum pump in red zone). | Water separator is full. ▶ Empty | the water separator. → page 5 |
| Ball float has become stuck. | ▸ Check the ball float. → page 5 | |
| Water separator is leaking, damaged or not installed. | ▸ Fit the water separator. Replace it if damaged. | |
| Hose is damaged or squashed. | ▸ Contact Hilti Service. | |
| Vacuum pump is faulty. | ▸ Contact Hilti Service. | |
| Vacuum pump does not start. | Power failure. | ▸ Check the fuses and cables. Check the position of the switch. ▶ Check that the electric supply voltage complies with the details given on the rating plate. |
| Supply cord not connected. | ▸ Connect the supply cord. | |
| Vacuum pump is faulty. | ▸ Contact Hilti Service. | |
| Vacuum pump switches itself off. | Vacuum pump overheated. | ▸ Let the product cool down. The vacuum pump starts up again automatically after it has cooled down sufficiently. ▶ Clean the air vents. ▶ Check the operating voltage. |
| The water separator container cannot be removed. | System is still under vacuum. | ▸ Vent the vacuum (e.g. by means of the vacuum release valve of the vacuum base plate). |
9 Disposal
Most of the materials from which Hilti tools and appliances are manufactured can be recycled. The materials must be correctly separated before they can be recycled. In many countries, your old tools, machines or appliances can be returned to Hilti for recycling. Ask Hilti Service or your Hilti representative for further information.

- Do not dispose of power tools, electronic equipment or batteries as household waste!
10 Manufacturer's warranty
▶ Please contact your local Hilti representative if you have questions about the warranty conditions.
11 Further information
For more information on operation, technology, environment and recycling, follow this link: www.hilti.group