
AD 6415 - Saucepan ADLER - Free user manual and instructions
Find the device manual for free AD 6415 ADLER in PDF.
| Product type | Immersion sous-vide cooker |
| Brand | Adler |
| Model | AD 6415 |
| Power | 1200 W |
| Voltage | 220-240 V ~ 50/60 Hz |
| Temperature range | 25 °C to 95 °C (adjustable) |
| Timer | Up to 99 hours (adjustable) |
| Maximum container capacity | 20 liters |
| Recommended container diameter | 24 cm |
| Water level | Between MIN and MAX marks |
| Heating element material | Stainless steel |
| Display | Digital (current temperature) |
| Control | Touch panel with +/- buttons and adjustment key |
| Functions | Preheating, cooking, pause, stop |
| LED indicator | Light ring: blue (preheating), red (cooking), green (finished) |
| Cleaning | Heating element: soapy water; lid and cap: dishwasher safe |
| Approximate weight | 1.5 kg |
| Approximate dimensions | 30 x 10 x 10 cm |
| Included accessories | Stainless steel lid, bottom cap |
| Intended use | Indoor sous-vide cooking only |
Frequently Asked Questions - AD 6415 ADLER
User questions about AD 6415 ADLER
0 question about this device. Answer the ones you know or ask your own.
Ask a new question about this device
Download the instructions for your Saucepan in PDF format for free! Find your manual AD 6415 - ADLER and take your electronic device back in hand. On this page are published all the documents necessary for the use of your device. AD 6415 by ADLER.
USER MANUAL AD 6415 ADLER
SAFETY CONDITIONS - IMPORTANT SAFETY INSTRUCTIONS
PLEASE READ CAREFULLY AND KEEP FOR FUTURE REFERENCE
The warranty conditions differ if the device is used for commercial purposes.
- Before using the product, please read carefully and always follow the instructions below. The manufacturer is not responsible for any damage caused by improper use.
- The product may only be used indoors. Do not use the product for purposes inconsistent with its intended use.
- The voltage used is 220 - 240V , 50 / 60Hz . For safety reasons, do not plug multiple devices into a single electrical outlet.
- Be careful when using children. Do not let children play with the product. Do not let children or people unfamiliar with the device use it unsupervised.
- WARNING: This device may be used by children over 8 years of age and persons with reduced physical, sensory or mental abilities or persons with no experience or knowledge about the device, only under the supervision of a person responsible for their safety or if they have been instructed on the safe use of the device and are aware of the risks associated with its operation. Children should not play with the device. Cleaning and maintenance of the device should not be performed by children, unless they are 8 years of age or older and these activities are performed under supervision.
- After you finish using the product, always remember to gently pull the plug out of the outlet while holding the outlet with your hand. Never pull on the power cord !!!
- Never leave the product connected to a power source unattended. Even if the use is interrupted for a short time, disconnect it from the mains, disconnect the power supply.
- Never put the power cord, plug or the entire device into water. Never expose the product to weather conditions such as direct sunlight or rain, etc. Never use the product in wet conditions.
- Periodically check the condition of the power cord. If the power cord is damaged, take the product to a professional service center for replacement to avoid hazardous situations.
- Never use the product if the power cord is damaged or if it has been dropped or damaged in any way or if it does not function properly. Do not try to repair a damaged product yourself as this may result in electric shock. A damaged device should always be taken to a professional service center for repair. Any repairs may only be performed by authorized service technicians. Incorrectly performed repairs may cause dangerous situations for the user.
- Never place the product on or near hot or warm surfaces or kitchen appliances, such as an electric oven or gas burner.
- Never use the product near flammable materials.
- Do not let the cord hang over the edge of the countertop.
- N e submersed in the water above the indicated maximum level.
- Do not touch the hot surface of the device. Use gloves to remove or touch hot parts.
- Do not carry or carry the device while it is in operation. After finishing work, the device may only be moved when it is cold.
- Store the device and its power cord (if detachable) out of the reach of children.
-
Never connect the device to the power supply network when the working part is not submerged and liquid is in water.
-
The heating element remains hot when the plug is removed, and should not be touched
or placed on any flammable surfaces.
- Before removing the heater from the liquid, disconnect the plug from the power socket.
- The device is not intended to be operated with an external timer or other remote control of the power supply.
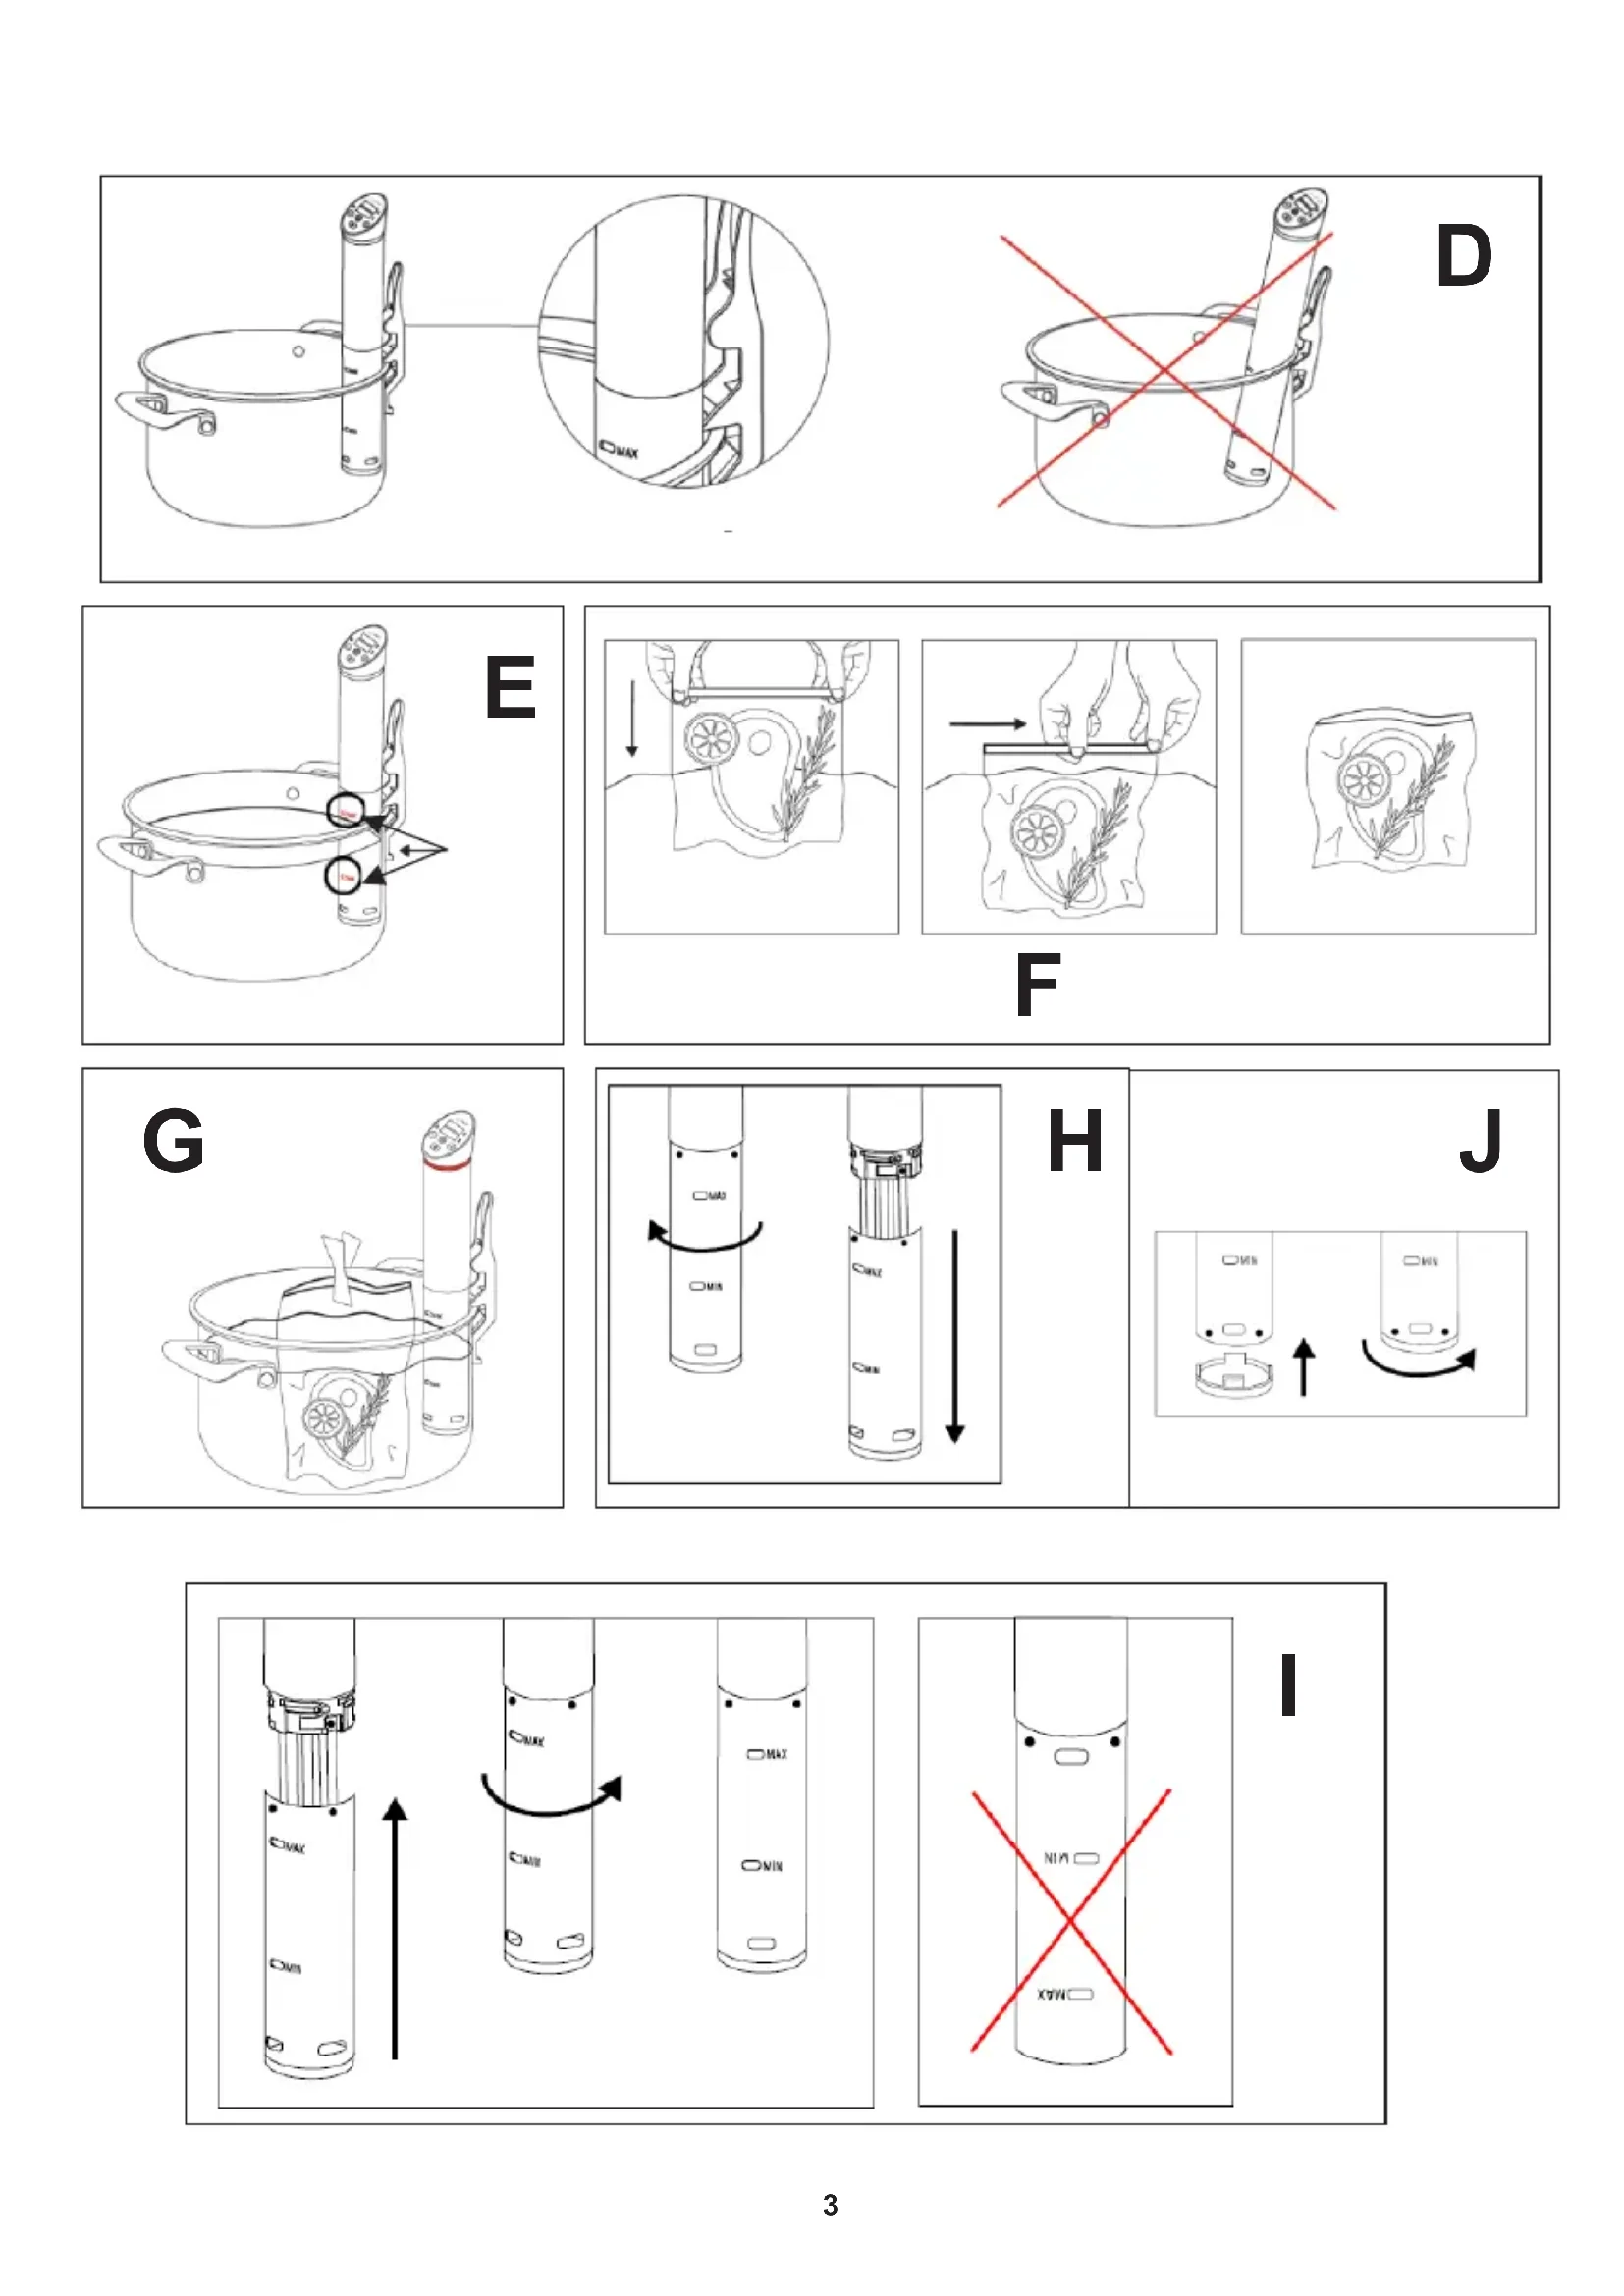
Device Description:
A:
- digital control panel
- LED light ring
- motor body
- stainless steel removable element cover
- minimum (MIN) and maximum (MAX) water level indicators
- water flow channels
7.clamp - stainless steel heating element
- water circulator
- removable cap
COOKING PHASE LED INDICATOR:
B:
- Preheating mode
- Cooking mode
- Completed mode
Control Panel:
C:
- current water temperature display
- set cooking time and set water temperature display
- set timer icon
- +/- : cooking time and temperature adjustment buttons
- start/pause button
- set temperature icon
- setting button: to set cooking time and temperature
Using the device:
NOTE: During first use of the appliance, smoke and/or a slight odor may occur from the appliance because of the initial warming process of the materials. This is normal and will quickly disappear. It will not recur after appliance has been used a few more times.
-
Plug the power cord into an 220-230 V AC wall outlet to turn the device on. The device wil beep and on the Control Panel (A1) the current temperature will appear.
-
Press the Setting button (C7) to adjust the cooking settings:
2.1 After first press the temperature icon will light up (C6) after second press the Set timer will light up(C3). Use the + / - buttons to set the desired temperature. Confirm with the setting button (C7)
2.2 Then the set time icon will light up (C3). Use the + / - buttons to set the desired hours and then press the Setting button (C7). Confirm the set time with the setting button (C7).
2.3 You can use the Setting button (C7) to toggle between the time and temperature settings until you are satisfied with the setup.
-
Once the desired temperature and time have been set press the Start pause button (C5) to start the water heating process. Note that the ring around the control Panel will turn Blue for the heating process.(B1)
-
Once the preheating stage is complete the device will signal it with a beeping sound. Please only then add the previously prepared bags into the water.
-
To start the cooking process press the Start Pause button (C5) for 3 seconds. The device will emit a beeping sound and the ring will change to red color signaling the cooking process (B1).
NOTE: You can change the cooking process startup procedure to start the cooking process right after the preheating phase.
You can do that by connecting the device into the wall outlet and pressing the + / - (C4) buttons at the same time for 3 seconds. The device will then emit a beeping sound confirming the change of the configuration.
- After the countdown is finished the device will emit an Beeping noise and the ring around the control panel will change color to Green.(B3) After that please remove the device, dry it with a paper towel and leave to dry before packing.
Pause Function:
Anytime during the cooking or preheating phase you can pause the device by pressing the Start Pause button (C5). Do not pause the cooking for more than 2 minutes as the cooling water might change too much for perfect results. Press the Start Pause button (C5) again to resume the cooking process.
Steps to sous vide cooking:
- Select a proper cooking container:
The cooking container must be large enough to hold food bag(s) with plenty of room for water to circulate entirely around each food bag. It is recommended to use a large metal pot of 24cm (9.5") diameter with a wall height of 17-20 cm minimum. The maximum container capacity should not exceed 20 liters.
Do not use plastic containers made with BPA or PVC materials.
Place the cooking pot on a stable, flat and heat resistant surface such as a protective trivet.
- Clamp the precision cooker securely.
Clamp the device to the side of the container. It is important to ensure the device is perpendicular to the water level in order to properly circulate the water bath. (D)
-
Add water to the water container. The water level should reach in between the minimum (Min) and maximum (Max) fill line (E), shown on the stainless steel element cover. Please make sure to leave enough room in the container for the food to be added.
-
Plug the power cord to the wall outlet. The appliance will beep and the upper display will show the current temperature of the water.
Set the target temperature and time then press the Start / Pause button (C5) to start the appliance.
- Place the food in a Vacuum sealed bag or zip-top freezer bag.
5.1 Vacuum sealing food is practical but not necessary for sous vide cooking. Bags made of polyethylene and polypropylene that are labeled BPA-free are safe for sous vide cooking. Most name-brand zip-top freezer bags as well as the bags sold for vacuum sealing can be used. Avoid thinner, generic bags or bags that are not labeled as BPA-free.
5.2 Ensure food placed in freezer bags are not overcrowded. Water must circulate entirely around each portion of food to be cooked, do not layer food in the bag.
5.3 Spices or marinades can be added to the food inside the bag. It is recommended to use a little less seasoning than with traditional cooking methods, especially when seasoning with salt. It is always possible to season to taste after cooking is completed.
NOTE: For cooking periods longer than 8 hours, it is recommended to seal food with an vacuum sealer.
- Remove air from the freezer bag and seal it.
6.1 If a vacuum sealer and pouch is used, the seal will be created by the vacuum sealer after the air has been removed.
6.2 If using a zip-top freezer bag, it is required to remove air from the bag, creating as much as possible, a tight vacuum seal. While holding the top of the bag open, slowly lower it into the container of water. The pressure of the water will squeeze the air out of the bag. Just before the top of the bag reaches the water, zip it closed. (F)
- Submerge the sealed bag into the cooking container.
Once preheating stage is completed and the water bath is ready for cooking the LD light ring will change to red. At this time, the sealed bag can be immersed into the water container.
7.1 If using a vacuum sealed pouch, the bag can completely be submerged below the water level.
7.2 However, if using a zip-top freezer bag, do not submerge the seal of the bag. Clip the top of the bag to the side of the cooking pot ensuring the seal will not go underwater to avoid liquid to leak inside the bag.
NOTE: It is important to ensure the food is fully submerged into water throughout all the cooking phase. If the food bag floats above water, use a large, heavy metal spoon, plate or any other heat resistant utensil to weigh the bag down to keep food submerged.
- Sear meat and serve
Once cooking phase is completed use tongs and protective oven mitts to remove the bag from the water bath. Remove the food from the bag, pat food dry before searing.
Sear the meat in a hot preheated cast iron skillet or a barbecue for about 30- 60 seconds on both sides for a golden crispy texture.
NOTE: If the cooked food is not going to be consumed immediately, do not remove food from the bag. Plunge the sealed bag into ice water to reduce temperature quickly and keep refrigerated.
FOR COOKING GUIDELINES PLEASE VISIT OUR SITE UNDER THE LINK BELOW OR USE THE QR CODE ON THE BACK OF THE MANUAL AND THE BOX.
LINK:
https://www.adler.com.pl/dane/recepie/ad_6415.pdf
CLEANING:
1- HOW TO REMOVE / INSTALL THE ELEMENT COVER
1.1 Unplug the appliance if it is plugged in.
1.2 To remove, rotate the stainless steel element cover left and slowly pull downward. (H)
To install, attach the element cover back onto the lower part of the motor body. Align the four dots around the element cover in between the four tabs at the bottom of the motor body. Turn the element cover right to securely lock in place. A "click" is heard. (I) It is important to insert the cover upright, with MIN and MAX indicators as shown in the below image. If the cover is not reinstalled correctly, the water flow channels will not be in position to properly circulate the water bath.
NOTE: Never operate the appliance with the stainless steel element cover removed. Always ensure the element cover is properly installed before using the appliance.
2- HOW TO REMOVE / INSTALL THE BOTTOM CAP
To remove, rotate the black bottom cap left and pull downward.
To install, insert the cap back into the bottom of the stainless steel element cover aligning the four tabs into the cover between the four dots around the bottom of the element cover. Turn the cap right to securely lock in place. (J)
3-CLEANING
WARNING Unplug before cleaning.
NEVER IMMERSE the motor body, the control panel, the electrical cord or the plug in water or any other liquid.
After use, remove the stainless steel element cover and rinse the internal parts (heating element,
temperature sensors and water circulator) under cold water. Let all pieces air dry.
If needed, the heating element and the water circulator can be cleaned in warm soapy water with a soft
toothbrush. Ensure to not immerse the motor body. Rinse and dry thoroughly.
Wipe motor body with a damp cloth and dry thoroughly
The stainless steel element cover and the bottom cap are dishwasher safe.
NOTE: Do not use abrasive cleaners or scouring pads or any other object that could scratch.
User manual
4- DECALCIFYING
After several uses, the heating element may be covered with mineral deposits from water. This is normal and may occur more frequently depending on the minerals in the water used. Follow below steps to clean minerals on the heating element.
Clamp the precision cooker to a heat proof container. Fill the container to the maximum line (MAX) indicated on the stainless steel element cover with equal amounts of water and white vinegar.
Plug the power cord. Set the target temperature to 70^ / 158^ and set timer for 20 minutes. Press the Star / Pause button (C5) button to start the appliance.
Once completed, unplug the power cord to turn off the appliance and let it cool down.
Discard the water from the container, rinse the element cover and the internal parts under cold water. Dry thoroughly before storage.
Technical Data:
Power: 1200 W
Voltage: 220-240V 50/60 Hz
Maximum water in container: 20 L
To protect your environment: please separate carton boxes and plastic bags and dispose them in corresponding waste bins. Used appliance should be delivered to the dedicated collecting points due to hazardous components, which may effect the environment. Do not dispose this appliance in the common waste bin.
DEUTSCH
1-AZ ELEMFEDEK ELTAVOLITASA / TELEPITESE
2-HOGYAN KELL TALALNI / TELEPITEENI AZ ALSO KAPCSOLATOT?
IEN-noka3aTeN 3a pa3aTa Ha roTbeHe:
B:
- PexkIM Ha 3arpeBahe
- Pekim Ha rotBehe
- Komplinzipan pejxim
KoHTpOJEn nAHeJI:
C:
- MOMENTaJIeH npIka3 Ha TemnepaTypaTa Ha BOJaTa
- NOCTABETe Bpeme 3a rotBeHe N OCTABETe pNkA3 Ha TEMnepaTpyaTa Ha BOdaTa
- nocTaBeTe NkOHa 3a TajMep
- +/:- KONUHbA 3a npnlaOyBaHbHe Ha BpeMeTo N TemnepaTpya 3a rotBeHbe
- konue 3a cTapTyBaHe/ nay3a
- NOCTABETe IKOHa 3a TEMNepaTypa
- Konue 3a noctabByBaHe: 3a Da nI NoCTaBnTE BpeMeTo I TemnepaTypaTa Ha rotBeHe
KopncTeHe Ha ypeDoT:
3A5EJIeIKA: 3a BpeMe Ha npBaTa yNoTe6a Ha anapaTOT, MoKe Da HactaHe qad n/nn Cnab Mnpnc OJ anapaTOT nopaoi npBnuHnO npocec Ha 3aToPnLyBaHa e Ha MaTePnJaInTe. Oba e HopMaJIHo n 6p30 Ke nCue3He. Hema da ce nobTopu OTkako anapatot e KopncTeH yUte HeKoNky nATn.
- Bknyte ro ka6enot 3a HanojyBaBe BO walluDen uTekep oJ 220-230 V AC 3a da ro BKnyuHte ypeDTo. YpeDTo Ke CnHaJIIN3npa n Ha KOHTPOJHNOT NaHeI (A1) Ke ce nojabu MOMeTaNHaTa TEMNepaTypa.
2.ПиТиСнeTe ro konчeTo NocTaВaBaHbe (C7) 3a Ду И рилЯгдпe NOcTaBKnTe 3a rOtВeHbe:
2.1 OTKAKO npBO Ke npTnCHeTe, IKoHATA 3a TempepaTyPe Ke CBETHe (C 6), NO BTOPOTo npTnCHyBaHe, TajMePOT 3a NoCTaByBaHe Ke CBETHe (C 3). KopNCTeTe rKoNHHaTa + / - 3a da ja nocTabTe cakaHaTa TempepaTypa. NtBpDeTe CO KOnHeTo 3a NoCTaByBaHe (C7)
2.2 Ntoa IkoHaTa 3a NoCTaBeHO BpeMe Ke CBeThe (C 3). KopnCTeTe rKoNCHbTa+/-3a Da rN NoCTaBnte CaKaHInTe YacOBu N NoToa npTncHeTe ro KonTuTo TocTaYBaHBe (C 7). NtBpTeTe ro NoCTaBeHO To BpeMe co KonTuTo 3a DoTepyBaHBe (C 7).
2.3 MoKTe Da ro KOpHCTnTe KOHcTeo Setting ( C 7) 3a da ce npepPnate nomery noCTaBKeTe 3a BpeMe H TempepaTpa OdoKa He bIeTe 3aDOBOJIHN CO NOCTaBvBaHbETo.
-
OTKAKO Ke ce nocTaBaT cakahata TemnepaTy a BpeMe, npntncheTo ro konyeTo Start pause (C5) 3a da ro 3anoHHe npoecot Ha 3arpeBaBe Ha BOdaTa. 3abeJekeTe DeKa npctehOT OKony KOHTpOHNOT NaHeI Ke cTaHe CInHO 3a npoecot Ha rpeeBe. (B1)
-
OTKAKO Ke 3aBpHn faa3aTa Ha 3aRpeBaHbe, ypeIOT Ke ro CnHaJIn3npa co 3ByueH cnHaI. Be MoIIME caMo ToraUdoJaTe m npETXODHO NOIROTBENITE KECN BO BODaTa.
-
3a da 3ano4HeTe co npouecOT ha roTBeHe, npHTncHeTe ro konHeTo Start Pause (C5) 3 cekyHn. YpeoT Ke emTuBa 3ByeH cnHaJ npCTeHOT Ke ce CMeHN BO uPbeHa 6oJa To rO cnHann3npa npouecOT Ha roTBeHe (B1).
3A5EJIeIKA: MoKeTe da ja npomeHnte nOCTankata 3a cTapTyBaHe Ha npouecOT Ha rotBeHe 3a da ro 3anOHTe npouecOT Ha rotBeHe BeHaaw no pa3aTa Ha 3arpeBaHe.
Moxete da ro hampabite toa co noobp3ybahe ha ypeoT BO wallinHnOt wTeke npntnckahe Ha konynbata + / - (C4) nctobpeMeHO 3
cekyndn. Ypeodnt noToa Ke emTuBa 3Bvye HcHnla TTo ja nObpyBa npomHaTa Ha KOHpIgpaJiJaT.
- 10 3aBpUyBaHbTo Ha O6bpojYBaHbTe, ypeoT Ke nCnyuTn 3Byk Ha BnHHn npCTeHOT OKony KOHTpOHaTa Ta6na Ke ja npomeHn 6oJaTa BO 3eHeHa. (53) Itoa otctpaHete ro ypeoT, nCyuTe ro co xapTneHa Kpna n octaBeTe da ce nCyu npe Da ro cnaKyBaTe.
Функида за науза:
Bo cekoe BpeMe 3a BpeMe Ha 0a3aTa Ha rotBeHe 3a 3arpeBaHe, MoKeTe Da ro nay3npate ypeoTcKbHe Ha konyHn nay3a (C5). He ro nay3npajTe rotBeHeTo NOBeKe o2 MInHyTu 6BneJkn BoDaTa 3a NaedeHe MoKe Da ce npomeHn npemHory 3a COBpueHn pe3yNTaTn. PnHTncHete Ro KOnyTe 3anOuHn 3a nay3a (C5) nobTOphO 3a da npoDOnXnTe co npocet H a rotBeHe.
Yekopn 3a COHJINBO rOTBeHe:
1.Изберете COODBeTeH caI 3a rotbeHe:
KoHTeJHePOT 3a roTBeHbe MOpa da 6nIe DOBOJIHO rOIeM 3a da Tn DpXn BpeKeITe CO xpaHa co MHOry IpoCTOp 3a BOJa da cIpKUInpa ceIOcHo OKOly CeKOJa Keca co XpHa. Ce npenopayBa da CE KOpNCr TOnEeMeTaNEH caI co DNJaMeTap od 24 cm (9,5") co BucINHa Ha wallNodOT OD MNHNMym 17-20 cm. MaKcImaJIHNOT KanaunTeH KaOHTeJHePOT He TpeBa da HADMinHyBa 20 nITpn.
He KopncTeTe INaCTuHn CaIOBn HAnpaBeHn Co MaTePnjaJIn OJ BNA JIn PBL.
CTabete ro tenpepto 3a rotbehe Ha cta6nHa, pamHa n OTnpHa HA TOnnHa NOBpHnHa, kako uTO e 3aHTTNOT dpKau.
2.3aTeHHeTe ro npeu3HnOt uOpet 6e36eHNo.
CTerHete ro ypeoT ha cTpaHata Ha caoT. BaxHo e da ce ocInrypate deka ypeoT e HopMaIeH ha HnBOTO Ha BOdaTa co 1 npabuHIO Da UnpKyInpa BoDena 6aHa. (F)
-
IdoaTe BOa BO caOT co BOa. HnBOTO Ha BOata Tpe6a da IOCTHHe NOMEy MHNMaHATA (MNH) u MaKcMaHATA (MaKcMaJIHa) IINHja 3a nonHeBe (E), npKakhaHa ha KaIAKOT Ha eIeMeHTOT oN HePrcyBaQk YeIIK. Be MoJIme, octabete doBOJHO npocToP BO caTOT 3a Da ce IdoaTe XpaHATA.
-
PnKnyTe ro Ka6eNoT 3a HanojyBaHe BO theHnHOT WTeKeP.AnapatOT Ke nCnyStn 3ByueH CnHaJ, a rOpHnO T dncJIpej Ke ja npKaxe MOMENTaHATA TEMNepaTpya Ha BODaTa. NocTabeTe ja cEHNata TEMNepaTpya n Bpeme, noToa npTuChete ro KonUeTo Start / Pause (C5) 3a da ro BKnyHte anapatOT.
-
Ctabete ja xpaHata BO Bakyymcka 3aTbopeha Keca Nn Bpeka 3a 3amp3HyBaHe co nateHT.
5.1 XpaHata 3a BakyMcko 3aIeTuBaHe e npakTuHa, Ho He e HeonXoDHa 3a roTBeHe co cycneHnJa. Top6nte n3pa60TeHn oJ pOJIeTIeH n pOJIIpOIIeH KOn ce O3HaueHn KaKo 6e3 BPA Ce 6e36dHn 3a cOHINBO roTBeHe. MoKe da Ce KopNCtAT NOBKeTo Kecn 3a 3AmP3HyBaHbCe Co NaTeHT-6peHd, KaKO i KeCtE uTo ce PpOdaBaat 3a BakyMcko 3aneuAtyBaHbe. N36erHyBaJte NoTeHN, ReHepNUK Kecn mN KeCn KOH He ce O3HaueHn KaKo 6e3 BPA.
5.2 Ocnirpajte ce deka xpaHata cmeCTeHa BO BpeKn 3a 3amp3HyBaHhe He e npHeacelHa. BoDaT a Mopa ueiocho da uipkynipa okony cekoI den oXpaHata UTO Tpe6a da CE TOBn, He CTabaTe XpaHa BO BpeKaTa.
5.3 3aunHn HJIM MauHaM MoKe Da Ce DoJaTa BO XpaHaT Bo BpeKaTa. Ce npenopayBa Da Ce KOpNCTMaNky NOMaIKy 3aunHn OTKoJIky CO TpaHnOHaHnTe MeToDn 3a rotBeHe, Oco6eHO Kora Ce 3aunHyBa Co coN. CekoraIe MoXHo Da ce 3aunHn NO BKyc OTkAKo Ke 3aBpHn RotBeHbeto.
3A6EJIeJKA: 3a nepnoiHa roTbeNo 8 uca, ce npenopayBa da ce 3aneaTu xpaHaTa co BaKyyM 3aneaTyBa.
6.ИЗbaTeTe ro Bo3dYxOT od BpeKaTa 3a 3amp3HyBaIbe n 3aneYaTeTe ro.
6.1 Ako Ce KopnCTn BaKyymcKa 3aNTNBka N TopbUka, 3aNTNBkata Ke 6nnde CO3daeHa OJ BaKyymckNt 3aNeaTByBaU OTKAKO BO3dyXOT Ke 6nnde OTCTpaHET.
6.2 Ako KopnCTne BpeKa 3a 3amp3HyBaHbe co nateHT, nOteBHO e da ro OTCpaHtE Bo3dyXOT oK eKaTa, c03daBajKn KOnKy wTO e MoKHO, UBCPTa BAKyyMcKa 3aNTNBka. IoKeKa rO dpXHrTe rOpHnOT den OJ Kecata OTBOpeH, NoneKa CnyWtTe rO BO CaOT CO BODa. PInTnCOkOT Ha BODaTa Ke ro nCuei B03dyXOT oBpeKaTa. HenocpeHNO ppe BPOT Ha TOpBaTa da CTnHrHe Do BODaTa, 3aTBopeTe rO co nateHT. (F)
- Notonete ja 3aneuatahata keca BO caoT 3a roTbeHe.
Otkako Ke 3aBpHn PaaTa Ha 3aRpeBaHe N BodeHaTb 6aHa e NOIroTBHe 3a roTBHe, LD npCTeHOT Ke ce cMeHN BO uPBeHo. Bo Toa BpeMe, 3aneuTeHaTKeCa MoKe Da Ce IOTOnN BO caD0T 3a BOna.
7.1 Ako KopnCTnte BaKyym 3aneuataHa TOp6wUka, Top6aTa MoXe ZelOCho Da ce NToTOnI NOD HINBOTo Ha BODaTa.
7.2 Merytoa, ako Kopncntte Bpeka 3a 3amp3HyBaHbe co nateHT, He ro notonybajTe 3antNBkata Ha TOp6aTa. PnuiBpcTeTe ro tropHnot dI od Kecata ha CTpHa Ha caDOT 3a TOTBeHe, OcnrgpyBaJKN DeKa 3antNBkata Hema da NOMHe IOD BOda 3a da N36eHete NCTekyBaHbe TeuHOCT BO BpeKaTata.
3A5EJIeIKA: BaxHo e da ce ocirpyate deka xpaHata e cJeNoCHO notoneHa BO B0da BO TEKOT Ha cenata 4a3a Ha rotBeHe. Ako BpeKaTa co XpHa JneBn HAD BOATA, KopicTeTe rOleMa, TeWka MeTAlHa JaxNca, YHHJa NIN KOJ 6bNIO npiBop OTNOPen HA TOnnHa 3a da ja HATEKHTe TOPbata 3a da ja dpKNTe XpaHata nO B0da.
- 3anpxkeTe ro mecoto n cepBnpaJte
Otkako Ke 3aBpHn p3aTa Ha RotBeHe, KopncTe KNeWTH n 3aWTHn 6eJe3Hn 3a NeKa 3a da ja oTcTpaHnTe TOpBaT oD BoDeHaTa 6ba. N3BaTe je xpaHaTa od Kecata, ycUeTe ja xpaHaTa nped da ce 3aneYe.
3anehe To mecoto BO Bpeia Taba od IeaHO Jeie3o nnckapa OKny 30-60 ckyHn oD dBete ctpan 3a da do6neTe 3naTHa KpkaBa TEKCTypa.
3A5EJIeIJKA: Ako BaepHaTa XpaHa Hema Da ce KOH3ymnpa BeDnHa, He OTCpHaYBaJte ja XpaHaTa oN Kecata. BMeTHeTe ja 3aneuateHaTa Keca BO JedeHa BOda 3a 6p30 HamaNyBaHe Ha Tempepatyata N UyBaHe BO qpnKJep.
3A IPINJABA 3A IOTBEE BE MOJIMME IOCETETE JA HAIATA CTPAHA IOD JINHKOT IOOJY INI KOPNCTETE I N KYDNTE 3A IPEJMET HA IPIPAUHIKOT IN KYTNUJATA.
JIHHK:
https://www.adler.com.pl/dane/recepie/ad_6415.pdf
1-KAKO DA CE OTCTPAHIN / INHCTAINPAM IPEKJIyUyBAE HA EJEMEH
1.1 Ncknyte ro anapatoT od ctpya doKoJy e BknyeH.
1.2 3a da ro oTcpanHe, 3aBpTeTe ro kanakot Ha eJeMeHToT od HeprocyBaKn yeJInk JneBo n noJleKa nobJeueTe HaOJy. (H)
3a nHCTaIINpaHe, 3aKaUeTe ro KanaKOT Ha eIeMeHTOT Ha3aHa DoJIHNOT DeI OJ TeIIO To HA MOTOpT. IopamHete rI YeIupnte TQKN OKNY KanaKOT Ha eIeMeHTOT NOMEy YEtIupTe Ja3NHyBa Ha dHOTo Ha TEIOTo HA MOTOpT. CBpTeTe ro KanaKOT Ha eIeMeHTOT HaeCHO 3a 6e3bENo 3aKnYyBaBe Ha CBOETo MeCtO. Ce cnyuA „Knik". (I) BaxHo e Da ro CTaBnTE KanaKOT nCnpaBeHo, co INdIKatOpn MIN n MAX KaKo wTo e PnIKaKaHOn Ho cNkata NoDony. Ako KanaKOT He e NOBTOPO IHCTaJIInpAH IpABUNHO, KaHJIInTe 3a npOTOK Ha BOda Hema Da 6uDaT Bo COcTojBa npabunHO da UrkyJInpaaT BODeHa 6aHa.
3A6ENEUKA: HnKoraw He paKyBajTe co anapatOT co OTCpaHET Kanak Ha enemeHTOT od HeprocyaKn YeNk. Cekoraaw ocNrgpajTe ce DeKa KanaKot Ha enemeHTOT e npabuHNO IHCTaJInpan PpeD da fo KopNCNTe anapATOT.
2-KAKO DA CE OTCTPAHIN/INHCTAINPAT DOJIEMNOT KANIK
3aOTcpanhyBaHbe, 3aBPTeTe FO pHOTO DOJHO Kanaue NeBO N IOBJeHTe HaDOny.
3a da ro nHCTanipate, BMeTHeTe ro kanaueTo Ha3aI Ha dHOTo Ha kanaKOT Ha eJeMeHTOT oN HePrcyBaKn YenIK, ycornacyBajkn m YeTIPrTe ja3uynHa
BO KanaKOT NOMEY YEINPITe TOOKI OKOJy DHOTo HA KanaKOT Ha eJeMeHToT. CBpTeTe ro KanaeTe DeCHO KOH
6e36eHNO 3aKnyte Ha MeCTo. (J)
3- YNCTEE
IPEyPENEYBAE Ncknyte ro od ctpja nped uicTehe.
HNIKOrAHEIOyBAJTE ro TeIOTo Ha MoTOpO, KOHTpOJIHaTa Ta6Ja, eJIeKtpuHnO T Ka6eJ nn npNKnyOKOT 3a BOa nn 6nlo Koj
TeuHa.
IyoNtpe6a, n3BaTeToKanakOT Ha eIeMeHToT Od HeprocyBauKn YenIK NcPiakHe Tn BHaTpeHHTeJeIOBN (rpeJHnOte IeMeHn, ceH3Opn 3a TeMnepaTypa u npkynatop 3a BOa) noL naHa BOa. Octabe Tn CITE NapuHa da Ce nCyUaT Ha BO3dyx.
Ioknky e nTpe6Ho, rpeJHnot enemEn I npKyNaTopoT 3a B0da MoKe da Ce NcHnCTaT BO TOnla B0da Co CanyHua Co MeKa
YeTka 3a 3abn. Ocnirpajte ce da He ro Notonite Teno To Ha MOTOP. Ncnilakhe Te n CyuTe TeMeJHo.
N36pnWTe ro TenoTo Ha MoTOpOT Co BnAxxHa Kpna NcCyWTe Ro TeMeHNO.
Kanakot Ha enemeHTOT OI HePrcyBaUHcYeINK IN DOHNOT KANAK CE MJaT BO MaUNHa 3a MHeBe caIOBn.
3A6EJIeUKA: He KopinCTe a6pa3nBn CpeiCTBa 3a YnCTeHe nI IN NOJIOuKn 3a YnCTeHe nI IN KOJ 6nIO npEmT ITO MoKe da ce n3rpe6e.
YnATCTBO3aKOpNCTeHbE
4-DEKAJIUNΦIKNUPAE
IIO HekONky HameHn, rpejHNOt eJEMeHT MoJE Da 6Nde NOKPHeH CO MNHEpAHN HacnArn O BDA. OBa e HopMaJIHO M OMeJe da Ce noJaBn NOyecTO BO 3aBnCHoCT OJ MInHEpaNITe BO KOpNCteHaT BODa. CNeDeTe Tn YekOPrTe POnOly 3a Da Tn INChNCTITE MNHEpaNITe Ha rpeiHNOt eJEMeHT.
3aTeHHeTo npeun3HnOT WnOpet BO ca3 a OTnOpHocT Ha TOnnHa. HanoHHeTe ro caDt Do MaKcMaHnHaTa JInHJa (MAX) 03HaueHa KaNAKOT Ha eJeMeHTOT OJ HePrcyBaUKN YeNk Co eHaKBN KOJIuHH BODa N 6eI OeT.
PnKnyte ro KaBent 3a HanojyBaHe. NocTabe ja cenHata TemnepaTpa Ha 70^ / 158^ nnoCTabeTe ro TajMepot 20 MHyTN. PnTnCHete ro konyeTo StarBe3da / Naay3a (C5) 3a da ro BknyHte anapatOT.
Otkako Ke 3aBpuHte, Ncknyute Ro Ka6enot 3a HanojyBaHe 3a Da ro Ncknyute anapatot n octaBeTe ro da ce n3na.
OToPnTe ja BODaTa oD caoT, nCnnaKHeTe ro KanaKOT Ha eNeMeHTOT N BHaTpeuHInTe DeNoBn Iod JaadHa Boda. Ce cyuN TeMeHNO nped CKlaIpaIbe.
TexnuknnoaTou:
MokHOCT:1200W
Hanoh: 220-240V 50/60 Hz
MaKcImaHa Boda Bo KOHTeJHep: 20 n

Ce rpnKIMe 3a npnpOHaTa CpeDnHa. KapTOHCKInTe NaKOBKn MOJIme Da Ce HameHaT 3a peUKNIPAhe. POnJIeTNHeOBInTe Kecn (PE) da ce cppnat BO KOHTeHerp 3a NpactuKa. NcKOpNCteHNOT ypeN Tpe6a Da ce npeJaDe BO COODBeTHNOT CKJaDnPaQKn NyHK, 6nEjeKn He6e36BnHInTe CoCTojKn KOn CE HAOraaT BO ypeoT MoKaT Da 6nDaT 3arpo3yBaHe 3a CpeDnHaTa. EneKtpuHnOt ypeN Tpe6a Da ce npeJaDe Ha HauH Koj Ke OHeBO3MOxN HeROBa NOBtOpHa yNoTpe6a NcKOpNCtYBaHe. DOKONky BO ypeoT mMa 6atePnn, Tpe6a Da ce n3Baat Nnoce6Ho Da ce npeJaDaT BO CKJaDnPaQKnOT nyHKT.
OPOI AΣΦAΛEIAΣ - ΣHMANTIKEΣ OΔHΓIEΣ AΣΦAΛEIAΣ
IAPAKAΩ DIABASTE IPOSEKTIKA KAI KPATHSTE IAMEMONTIKH ANAFOPA OI opoi eyyunong dbiaepouv evn ouokekun xpnoiouotieitai yia eutopikouc oKOTouc.
UCIOBNA B3ONACHOCTN - BAXHbIE YKA3AHN NO B3ONACHOCTN
IPOKALNYUCTA, IPOUHTAUTE BHIMATEJIbHO IN COXPAHNTE JIA BUDYUEFO NCIOJIb3OBAHnI
YcnoBra rapaHTn pa3nuaOTc, ecn yCTPOCTBO nCNOJb3yeTcB KOMMepuecknx ceJx.
- Перацлбовим рожкту вииматьно рочтente и BCERda сеуnte npIBeDEHHbIM HIXe INHCTpyKcIyM. ПОИЗБODITeJIb He Hecet OTBETCTBEHHOCTN 3a IIO60I yIep6, Bbl3BaHHbI HePpABUNbHbIM ICNoJIb3OBaHMeM.
2.ИЗдени можно ИСпОЛьЗОВаТь TOЛьКВ ПОмeшен. He ИСпОЛьЗуITE пpoДуКТВцELЯX, HECOBMECTIMbIX C erO Ha3HaueHHeM. - Историяе наслегене 220-240 B, ~ 50/60 Г. В с来不及 доюпоста не подклочаиму Heckольков усторов К одно Лжшевский роземпесков роземпес.
4.БудьTe ocToPoXHbI npn nCNoJb3OBaHmДeTeN. He nO3BOJYte DeTAm nrgpaTb C n3dennem. He nO3BOJYte DeTAM nIN JIOyM, He 3HaKOMbIM C yCTPOYCTBOM, nCNOJb3OBaTb er0 6e3 npncMOtpa. - PEPENPEXEHE: 3TO yCTPOIcTB OMYT NcNOb3OBaTb DeTN CTapwe 8 JETN JINUca C ORpaHnueHHbIMN Qn3nueCKIMN, CEHCOPHBIMN JINY MCTBEHHbIMN CNOco6HOCTaMNI JINI JINuCa, He IMeOJne ONbTA INN 3HaHN N6 yCTPOIcTB, TOJIbKO NOd Ha6JIoDEHnEM JINuCa, OTBeTCTBeHHoro 3a INX 6e3OJaCHOCtB, INN ECIN OHN 6blIN IPOHNCpYKTIpOBAHbI O 6e3OJaCHOM NcNoJIb3OBaHn N yCTPOIcTBa N OCBeDOMJeHbI O PNCKax, CB83aHHbIX C ERO 3KcIIyatauNe. DeTN HE DOJxHbI INrPaTb C yCTPOIcTBOM. DeTN HE DOJxHbI YnCTNTB IN OBcJyXnBaTb yCTPOIcTBO, ECIN IM He NCNOJIHnIOCb 8 JET N 3TN DeInCTBnA He BblONHЯOTcN ION PPNCMOTpOM B3POCJIbIX.
- ПО OKOHЧИМ ИСПОЛБЗОВАнЯ прдукта BCERДа He 3aБыBaIte OCTOPOXH O BbITACKNBAТь BnIky n3 po3eTKn, ydepxNBaЯ po3eTKy pykoJ. HnkOrda He TЯнITE 3a shHyp nITaHnry !!!
- HnKoIa He octabJrnte npOdyKT NOkJIIOUeHHbIM K NCTOUYHKy NITaHn8 6e3 npNCMOtpa.
JaKe ecnn nCpONb3ObaHnE npepbIBaetcra Ha KOpOTKoe BpeM, OTKJIIOuHTe erO OT cTn,
OTKnIOUHTe NITaHnE. - HnKOrIa He onyckaiTe shHyp nHTaHna, BNkU nn BCE yCTPOcTBO B BOdy. HnKOrIa He NOBepraIte npOdyKT BO3DeiCtBNIO NOrOHNbIX ycNoBni, TAKNX KaK PpRAMOI COJHeuHbI CBET, DoXNb I T. D. HnKOrIa He NCNOJIb3yIte npOdyKT BO BlaJxHbIX ycNoBnx.
- Пернодунеши ровераite состаяне унура петашия. Ecпшур петашия NOВпжден, OTHEСТЕ порукт в пофессноюньньи сервочьи чЕТР дя заMuHы, YTOбы ИЗБEXАТОПАСНБИСТУАЦИ.
- HnKoIa He nCnoJb3yIte npOdyKT, ecn shHyp nHTaHnRA NOBpeXdEh, ecn erO yPOHnI INI IOBpeDInI KAKIM-ILNO OBpa3OM, INI ECIN OH He paBoTaET DOJXHBIM OBpa3OM. He nbITaIteScb camocToTeJIbHO OTpeMOHTnpOBaTb NOBpeXdEHbIM IPOdyKT, TAK KAK 3TO MOxET pINBeCTN K NopaxeHNIO 3JeKtpueCKM TOKOM. NOBpeXdEHHOye yCTpOiCTBO BCERda CNeDyET OTHeCTN B NPOceCCNoHaJIbHbI CEpBcHbI YeHTp DJIpeMOHTa. JIObON peMOHT MOxET BblOnHЯTbCra TOJbKO aBTOpN3OBaHHbIMn CEpBcHbIMN CNEuJaNTAMN. HenpaBnIbHO BblOnHeHHbI peMOHT MOxET CO3DaTb ONaCHbIe CNTyaUIN DJI Naob3OBaTeJIa.
- HnKoIa He pa3MeuTe n3eJIne Ha ropeux IIN TeNbIX NOBepxHocTAX IIN KyXOHbIX np6opax, TaNX KaK 3JeKtpueckay dYXOBka IIN ra3OBa rOpelka, INI prdOM C HIMN.
- Hikorda He nCloB3yIe npOdyKT pIaOM c JeRKOBOcPJaMeHraUcMnsc MaTePnaJamN.
- Cneinte, TTo6bI uHyp He CBeuBaNcC Kpaar cToJeuHNUbl.
- H no əJIeKtpoHHOI nOpykaIOT B BOe BbIe yKa3aHHoro MaKcImMaJIbHOrO yPOBHa.
- He npikacaiTecb K ropeyien nobepxHoctn ycTpoiCTBa. IcnoJb3yIte nepaTk, YTO6bl ydaNTb nnn doTPOHyTbcra Do ropeuX qacteY.
- He nepehocnte n He nepehocnte yctpoicTBo BO Bpempaotbl. IooKOHuaHn paobtbl
YCTPOINCTBO MOXHO NEPEMeAaTb TOJbKO B XOJOHOM COCTOHIN.
- XpaHnTe yctpoiCTBO n'ero shHyp nHTaHn (ecn OH oTcoeHnHe) B HeIOCTyHOM dIa deteMecTe.
- Hikorda He nodknoaTe np6op K 3neKtpocetn, ecn pa6oay qactb He norpyxeha B BOy, a XNDKOCTb HaxOHTcB BOe .
- HarpeBaTeIbHbI ΚIeMeHT OCTaETcR rOpAUM, KOrda BbIHMaETcR BnJIka, I erO HeJIb3r Tporat b IJN CTaBNTb Ha IerKOBocPnaMeHraUoIueCRA NOBepxHOCTN.
- Npeed Tem, KaK BbIHyTb T3H n3 KnIDKOCTN, BbIHyTb BNJKy n3 PO3eTKN.
- YcTpoIcTBO He npEiHa3HaueHo IJpa6Otbl C BHeUHm TaIMePOM NJIpyrIM NyIbTOM dNCTaHcUHOHOrO ynpabJeHnI NCTOCHNKOM NITaHnI.
Описнисторіства :
A:
1.црвая naHeь упавелня
2. CBeToIIOHOe CBeTOBOE KOJIbO
3. Kopnyc DBnraTeTne
4. KpbIiKa cBemHOrO 3JIeMeHrTa I3 HepXaBeIOSeI CTaJI
5. INДиКаTOpbI MInHIMaJIbHOrO (MIN) mAkCmJaJIbHOrO (MAX) ypoBnBaBoIbI
6. KaHaJIbI DnI npoTOKa BODJI
7. 3axmm
8. HarpBeBaTeIbHbI 3JIeMeHT I3 HePkaBeIOSeI CTaJI
9. BOBBIUUPKUYIaUHOHHbI
10. cbeMHa KpbIiKa
CBETOIOHbI INHINKATOP FA3bI PIPNTOBNEHNA:
B:
- Pexim npedbapntelbHoro harpeBa
2.PexmPnuroToBHeHn - 3aBepueHHbpeKMM
PanaheIynpaBneHnA:
C:
- OTo6paXHeNteKyuIeN TeMnepaTypbI BoDbl
- yctaHOBtB Bpem npiroTOBHeHn u YcTaHOBtB DicPJIe TEmpeaTpybl BObl
3.yCTaHOBnTb 3HaQOK TaIMepa - +/:- KhoNknyepyInpOBKn BpeMeHn npiroTOBJIeHn N TeMnepaTpybl
- KhoNka cTapt / nay3a
- 3haQOK yCTaHOBKN TeMnepeatypbl
- Khonka HacptponKn:ДЯ уctahOBKn BpeMeH N TempepaTpybl npriroTOBneHn
IcnoJIb3ObaHne yctpoiCTBa:
PIMEAHHE: Bo BpemnepBoro nCnoB3OBAHnnp6opn3-3a HauanbHOro npouecca HarpBa MaTePnaIOB MoKeT NcXOnITb DbIM /nnI JERKm 3aJax . 3TO HopMaNBHO n 6bICTpO nCye3HeT. OH 60JIbWe He NOBtOpNTcNocne NOBtOPHOro nCNoB3OBAHnnp6opnHeCKoJIbKO pa3.
1.Подклioчnte shypпntaHЯн К розтke nepemehHOrTo Ka 220-230 B,чTOБы BKIOUHTb yCTpoIcTBO.YCTPOIcTBO n3dAcT 3ByKOBoN cnHAn,иHa Панелу npablenHЯ (A1)ОTO6pa3NTcRe Tekyuza TEmnepaTypa.
2. Haxmte KhoNky HactpoKn (C 7), TTo6bl OtperyJInpObaTb HactpoKn npiroToBneHna:
2.1 Nocne nepBoro Haxatna 3aropntc3Haoyok TemnepaTpyb (C6), nocne BtoporO Haxatna 3aropntc TaHmep yctahOBKn (C3). C NOMOsbKHOHONK +/ -yCTaHOBNTe XeNaemyo TemnepaTpy. NoTBePdTe KhoNkOHacTpOKn (C7).
2.2 3aTeM 3aRopntc3HaOyK yCTAHOBJIeHHOro BpeMeHn (C 3). C NOMOuBIO KHOJOK +/ -YCTAHOBNTe XeJaEMbIe Yacbl, a 3aTeM HaxMNTE KHOJky HaCTpOKn (C 7). NOpTBePdNte YCTAHOBJIeHHoe BpeMa c NOMOuBIO KHOJKN HaCTpOKn (C 7).
2.3 BbMOKeTe NcNOJIb3OBA Tb KONky HAcTpoKn (C 7) IJy NepeKJIIOUeHn MExIy HAcTpoKaMn BpeMeHN I TeMnepaTypbl, NOKA He BydTe yIDOBNETBOpEnb HAcTpoKoN.
3. Tocne yctahOBKn JeNaemoy TemnepaTybI IN BpemeHn HaxMnTe KhoNky Ctap Na3by (C5), YTO6bl HaaytaB npouecc HappeBa BOdbI. Obpatnte BHNMaHHe, YTO KOJIbIO BOKpyr NaHeHn UnpaBHeHn CTAHET CINHM B npouecce HappeBa. (B1)
4. 10 3aBepseHm 3Tana npedBapntelbHoro HarpeBa yCTPOIcTBO CnHAn3NpyET oB 3TOM 3ByKOBblm CnHApom. TOnbKO nocJe 3TOrO doabnTe 3apahee noTROBLeHHBe NaKeTbIB OBody.
5. Yto6bHaHaatbpnoceepnpiroTOBHeHn, HaxMnte n ydepkBaIte KhoNky Start Pause (C5) B TeueHne 3 cekyHd. YcTpoiCTBO n3daCT 3BykoBo CnHan, a CBet KObUa N3MeHHTcra Ha KpaChbI, CnHAnu3npyO npocece npiroTOBHeHn (B1).
PIMMEUAHNE: Bb moKeTe N3MeHnTb npOeDpy 3ayncKa npOecca npiroTOBHeHn, TTo6b HauaTb npOeCC cpa3y nocne pa3bI npedBaPHTeBHOrHO HarpeBa.
Bb moKeTe CJIaTb 3TO, POKINHOUB yCTPOICTBO K PO3ETKE N OJHOBPMeHNO HAKAB KHOPIK +/-(C4) B TeueHne 3 cekyH. 3aTeM yCTPOICTBO I3DACT 3BYKOBO CNIHAN, NOITBEpXdIoUuN IN3MeHeHNE KOHOpnrypaun.
- По okOHaHmObpaTHoro OTCyTe aYCTPOINCTBO n3dAcT 3ByKOBo CnHaJI, И KOJIbIcO BOKpyr NaHeHn UynpaBJeHn I3MeHIT CBet Ha 3eJIeHbI. (B3) ПocNe 3TOrO n3BJIeKInTe yCTPOINCTBO, BbITpuTe erO bymaxHbIM NOJOTeHcEm N daJIte Emy BBICOXHyTB nepeD ynaKOBkoN.
Функшпя пayзbl:
B JIO60 MoMeHT BO Bpem 4a3bl npiroTOBHeHn HIN PpeBaPteNbHO HarpeBa Bb MOKeTe npnoCTaHOBT yCTPOIcTB, HaxkAB KhoNky Start Pause (C5). He npocTaHaBJIbAaTe npiroTOBHeHne 6oJee Yem Ha 2 MNHyTb, TAK KAc OXJaKaIOUaB ODa Moxe T CInuKOM CInbHo I3MeHnTbcra IyIeAaNbHO pe3yIbTaTa. HaxMnte KhoNky Start Pause (C5) eue pa3, Yo6bBo3O6HOBNTb npocecc npiroTOBHeHn.
UaHn no npiroToBHeHIO cy-BnDeo:
1.Bb6epnte noDxOaIyU oMKoCTb IJI nprirotOBneHnA:
EMKOCbIpynroTOBHeHnNnIOJXHa 6bITb DOCTaTOHcOBJW, YTObI BMeCTNTb NaKeT (-bl) C NIIeH, IN HEM DoJXHO 6bITb DOCTaTOHcMOCTa, YTObI BOa MOJIa NOJHOCTbIO cnpkYIpOBaTB BOKpy KAKDOro NaKeTa C NIIeH. PeKOMeHdyETcR NCIOJB3OBaTB 60JIbwoM eTANlNeCKn TropwK dNaMeTpom 24 cm (9,5 DIOIMa) C BbcOTOn CTEN He MeHee 17-20 cm. MaKcImaJIbHra BMeCTmOcTb KOHTeHepa He DOJXHa PpeBbIwaTb 20 IINTPOB.
He nCnONb3yIte nIaCTNKOBbie KOHTeHepbl, n3rOToBNeHHbIe n3 MaTePnaIOB BPA nn PVc.
YcTaHOBnTe KAcTpOJIO Ha ycToIuNByU, IIOCKyU IN TepMOCToKyu NOBepxHocTb, HApPIMeR, Ha 3aunTHyU NOCTaBky.
- Hadejxho 3axmnte KxyoHnyo Pnity.
IpyxMnTe yctpoiCTBO K cteHke emKocTN. BaXHO, YTObI ycTPOiCTBO 6blIO nepneHmkyjrapHO ypoBHIO BObl IpaBnIbHOI npkUJIaCIN BOJAHOH 6AHN. (D)
3.Добавы Te BObI B EMKocTb ДЯ BObl.УрOBeH bObl DoJxKeH HaxOHTbcMexdMy MHNMaJIbHOi (Min) u MaKcMaJIbHOi (Max) nHHeNHaONJIHEnH (E), nOKa3aHHo Ha KpbIuke 3JeMeHt a N3 HepXaBeIOUe cTaJI. Y6eINTeCb, yTo B KOHTeHpe DoCTaTOUHO MeCTa DЯ DoabBNeHn npOdyKToB.
-
BCTaBbTe UHyp nHTAHnB R PO3eKy. PpN6Op NOdAcT 3ByKOBo CnHaJI, N Ha BepXHeM DnCInJe OTO6pa3ntc TKeUaTg TEMpePaTpa BObl. YCTaHObNTe UeNeByIO TEMpePaTy N BPeM, 3aTeM HAXMnte KhoNkY CTopt / Pany3a (C5), YTO6bl 3aIyCTnTb pnpOp.
-
NomeCTIte npOdyKtbl B BaKyyMhbl naket UINn naket dNra 3amOpO3Kn Ha MoHNHn.
5.1 BakyymHare Repmetn3aunn nIeBbIX npOyKTOB npakTnHa, Ho He o6ra3ateJIbHa IJ npiroTOBHeHnB pexmC cy-Bu. NaKeTb I3 noIN3TuHe H noINnpOnInHe C MapKnpOBkOg He coepxNt 6ncpeHOnA 6eONacHb IJ npiroTOBHeHnB pexmCeCy-Bu. MoXHO nCIOBJ30BaTb 6oJIbWHCTBO n3BeCTHBIX TopROBX MapOK naKeTob IJn 3amOpO3Kn C 3actekKo-MOJIHnei, a TaKke NaKeTbI, npOdaBaemle DnB BakyyMHO 3aneHaTbBAHn. N36eauTe 6oJee TOHKnx OboHybx NaKeTob II IN NaKeTob, Ha KOTopbIX He yka3aHO, YTO OHn He coepxKAT 6ncpeHOn A.
5.2 y6eNTecb, YTO pOdyKTbI, NOMEeHHe B NaKeTbI DnA 3aMOpO3Kn, He nepenONHeBbI. BOba DoJHKHa NoNHOCTbIO cIpKyInpOBA Tb BOKpyr KaKdoN nopZuN rOTOBaUeCn PnUu, He KNaDInTe pOdyKTbIB naKeT.
5.3 B nIuy Bnytpn naKeTa moKHO do6abTb CneuH Nm MapHaDbI. PeKoMeHdyETcN cNoIb3ObaTb HEmHO MeHbWe npnPpAB, Yem npn TpaIuOnHHbIX cnocobax npiroTOBHeHn, ocbeHNO npD o6abHeHn coN. Iocne 3aBepueHn npiroTOBHeHn Bcerda MoXHo npnpapBtNo BKcy.
PIMMEUHNE. EcnBpem npiroToBnHn npebblaaet 8 yacob, peKomeHnyeTc3aneaTbBaTb npOdykTBc NOMOuB BaKyMHOyakOBuNka.
- YdAnIte Bo3dyx n3 naKeTa dIy 3aMopaxnBaHnI n 3akpoTe erO.
6.1 Ecnn nncnoJIb3yeTc BaKyyMhbl ynaKOBuNk N naKeT, repeTu3aunia 6ydt co3daHa BaKyyMHbIM ynaKOBUnkom nocne ydaJIeHnB O3dyxa.
6.2 Pn nCNOJIb3OBaHmI NaKeTa DnIy 3AmOpO3Kn C 3AcTeKKO-MoJHHeN HeoBxOJIMO yJaNTb Bo3DyX nI NaKeTa, Co3DaB KAK MoKHO 60Tee PnOTHOe BakyUHMoe yNJIOHTHeHne. YdepXINBA BepXHIO YacTB NaKeTa OTKpblTO, MeJInEHH OYCTnte ERO B EMKOCt b C BOOn. Hanop BObl BIteCHIT Bo3DyX n3 MeUka. He3aONrO Do TORO, KaK BepxCymkn IOCTnHET BObl, 3actHnTE ee. (F)
- Norpuy3nte 3aneuataaHHbI naKet B EMKoCTb Dnra rTOBKn.
Tocne 3aBepenHn 3tana npedBapntbHoro HarpBa n roTOBHOCTN BODHO BAH N pnpiroTOBHeHHIO CBeTOBOE KOJIbO LD cTaHET KpaCHbIM. B 3TO Bpem 3aneyataHHbI NaKet MOxHO Norpy3NTB EEMKoCTb DnB OBDbl.
7.1 Ecnn nncnbl3yetc Bakyymhni naKet, ero moxno nonHoctbio norpyntb Hnke ypOBH BObl.
7.2 Odnako npn nCnoB3oBaHnnaKeTa dny 3aMOpO3Kn C 3acTeKkOJ-MoHne Hne norpyKaIe Te yNtTheHne naKeTa. PnPKpeNTe BepXHIOU YacTb NaKeTa K CTHeKke KaCTpIOn, cNeJa 3a Tem, YTo6bl yNtOHTHeHne He yXoDnIO NO Body, YTo6bl XnIDKOCTb He npocOuHnAcB BHYTp b naKeTa.
PIMMEUHNE. Baxho, yTo6bI npOdyKbI 6bln noNHOCTbIO nOrpyKeHb I BDOy Ha npOTaKeHHB CBe fo3bI npriTOBHeHNA. Ecn naket c eoIN PnabaET HAD BOOn, INcNoJIb3yIte BoJIbUyIO TReJeIyIO MetaIIInueckyIO JoxKy, TapeIKy INI NIOByIO DpyryIO TepMOCTOnkyIO nocydu, yTo6bI yTReKeJITb NaKet, yTo6bI eDa OCTablanacb nOpyKeHHoN.
8.ObxapbTe mco n iOdaBaHTe.
Tocnie 3aBepenHn 3tana npiroTOBHeHn HcNIOb3yIte uINuIe I 3aunTHbIe pyKaBnUdIg dYxOBKn, YTO6bl BbHyTb nKeT n3 BoJHOB 6aHN. DocTaHbTe npOvKT n3 naKeta, pPOMOKHnte ero neped oXkapnBaHnEM.
O6kapbTe Mco Ha ropayeI pEiBapnteIbHO pa3orpeToH yuryHHo cKOBopoDe IIN Ha rPnne B TeueHne 30-60 cekyHc C o6eHX CTOpOH, TTO6bI NOLYHTB 30JOTNCTyU xpyCTaIyU TEKTcTyP.
PIMMEUHNE. Ecn npiroTOBnEHny nuy He cObnpaTeEc yNtpebTb cpa3y, He BbHmMaIte ee n3 naKeTa. Iorpy3nte 3aneYataHHbI nakET B NedHyIO BDOy, YTObI bICrPO CHN3NTb TEMnepaTy I OCTaBnTB XoJIoDJIbHnke.
IJIPEKOMEHDAUINIO IIPNIGOTOBJIEHNO IOXAJNYICTA,IOCETITE HAI CHT NO CCBJIKE HIXE INIINICNOJIb3YITE QR-KOJ HA 3ADHEYNACTN PYKOBOIDCTBA N HA KOPO6KE.
CCBJKA:
https://www.adler.com.pl/dane/recepie/ad_6415.pdf
CHCTKA:
1-KAK CHIMATb / YCTAHOBNTb KpblIKy 3JIEMEHTA
1.1 OTKHouHTe np6op OT 3JIeKTPoCeTn, ecN OH BkHIOueH B PO3eTKy.
1.2 TTo6bI ChrTb, NOBepHnTe KpbIshKy 3JneMeHTa n3 HepXkabeIoSe cTaI N BJeBO mMeJneHHO notHnTe BnI3. (YAC)
Iy cTaHOKn CHOBA npKpEniTe KpbIuKy 3JemeHTA K HnXHe N acTn Kopnyca MoToPA. CoBMeCTne YeTbpe ToCKn BOKpyr KpbIuKN 3JIeMeHtA MEkDy YcTbIPMa BBICTyNamn B HnXHe YacTn KOpNyca DBrnteJI. NOBepHNTe KpbIuKy 3JIeMeHtA BnPaBO, YTO6bl HaExKHO 3aФнкCupoBaTB ee Ha MeCTe. CblWeH UeYhOk. (I) BaXHo BCTaBnTB KpbIuKy BeptNKaJIbHO, CmHdNkaTopAMN MIN n MAX, KaK POKa3aHO Ha pucyHKe HnXe. EcIn N KpbIuKa He Bydt NapBnBHO nepeyctaHOBJIeHa, KaHaNb I dIra NotOKa BoDi He cmOryT npaBnJIbHO uPKyIuPoBaTB B BOdHOr 6aHe.
PIMMEUHNE. HkOrHaHe BkIouaTe np6op co ChrToK kpiKo 3JeMeHTa n3 HepKaBeIOe CTaJI. Pepe IcNoJb3OBAHnEM np6opa Bcerda npoepeTte, YTO6bl Kpkioka 3JeMeHTa 6blna npabnlbHO yCTaHOBNeHa.
2-KAK CHIMATb/YCTAHOBNTb HNXHIOKpbliky
YTO6bI CHaTb, NOBepHnTe UeHyIO HxNHiO KpbIiKy BnEBo I NOTaHnTe BHN3.
IycaHOBKn BCTabTe KOiHaOc ObaTHo B HxKHO YoacTb KpbIaKN 3JeMaTeNtA N3 HePxaBeOuE CTaJI, CoBMeCTNb YeTbpe BbICTya.
B KpbIshky MeJdy YeTbIpbM ToUkAmn B HIXKHe YacTe KpbIshKn 3JeMeHtA. NObepHInTe KOJINaQok BnpaBO, UTo6bl HaDeXHO 3aФИNKcUpyIte Ha MeCTe. (J)
3- UNCTKA
BHIMAHHE! OTKJIIOUHTe OT cTeI nepei uNCTKoJ.
HINKOrIaHE IOPYKAITE KOpNc DnurateJIa, NaHeIb ynpabJeHnra, 3NeKtpueckn uHyp nIn BnIKy B Body nIn dpyrne XnDKoCTb.
IocJIe nCNoJIb3OBAHnA CHNIMTe KpbIuKy 3NeMeHt aN3 HepKaeBIOue cTaN IN pOMoITe BHyTpEHnHe qACTn (HarpeBaTeNbHbN 3NeMeHT, DaTHNK TEmHepaTpybI u CnpKyJrTop BoDbl) NOxONODHOBOOn. DaNTe BCEM Yactram BBICOXHyTB Ha BO3dyXe.
Pn Heo6xOIMOCn HArpeBaTeIbHbI 3JeMeHT N BoJHO UINPKyIaTOp MOXHO IpOMbITb TEJIIOB MblbHO BDOI C NMOUcBO MRKON TpIKN.
3y6ha 1eTka. CneInte 3a TEM, yTo6bl KOpNc MToopa He norpyxKanC B Body. TuaTeJIbHO npOmblb N BbCyUHTb.
PpOtpnTe KOpNc DmRatEn BImaXHO TkaHbIO N TuaTeJIbHO BbITnTe.
KpbIbIky 3neMeHnta n3 HepXkabeIOe cTaIN HnHXHIOIO KpbIbIKy MOxHOMbITb B NocydomOeHoi MaunHe.
PIMMEUHNE. He nCnoB3yIe a6pa3nBbIe YnCTaIe CpeDcTba, rY6Kn IJy MbITbI yOcyIbI nn DpyrHe PpeMeTbI, KOtOpblc MoryT nouapanaTb.
PykoBOdCTBO Nolb3ObaTeIa
4-DEKALbUHΦIKALUN
IocJIe HeCKoJIbKINX NcIOJIb3OBAHn HArpeBaTeJIbHbIy 3JEMeHT MoKeT NOKpbITbCmMHepaJIbHbIMN OTOJIOKeHnA Mn 3BObl. 3TO HOPMaJIbHO I MOKeT NpOcXoJntb YaUe, B 3aBNCIMOCtN OT MInHepaIbOB I NCNOJIb3yEmoB BoE. BbINOJIHNTe CJeDyUOune DeIcTBnY, UTO6bl OUYCTNTb HArpeBaTeJIbHbIy 3JEMeHT OT MInHepaIbOB.
PnKpeNtTe KxohHyo nnHry K TepmoyctOuHBOMy KOHTeHepy. 3aONHnTe EMKocTb DO MaKcmaJbHOJ OTMeTKI (MAX), yka3aHHoHa KpbIiKe 3JIeMeHTa HEPKaBeIOUe CTaJI, paBbIM KOINueCTBOM BOdI N BeNOrO YKCyca.
IopKnHHTe HHP nHTaHn. YcTaHOBtte cJeBeyToemepatpy Ha 70 °C / 158 °F u yctaHOBtte taMep Ha 20 MInyT. HaxmTe KhoNky Star / Pause (C5), yTO6bl 3aYcTntb np6Op.
Tocne 3aBepweHn OTKIOHTe WHyP NITAHN, YTObI BbIKIOHTb npnbOp n DaTb EMy OCTbITb.
CneTe Body n3 eMKoCTn, npOMOte KpbIuKy 3JeMeHt a N BHyTpeHHHe yactn noD xoJIoHOB BOIO. Ipeed xpaHeHm TuaTeJIbHO npocyuHTe.
TexHnueckne daHHbIe:
MoUHOCTB:1200BT
HapnkeHe:220-240B,50/60Tc
MaKcImaJIbHoe KOJIuYeCTBO BOdBi EMeKoCTn: 20 JI.
3a6oTcB o6 Okpykaioue cpe. ..ynakobky n3 KapToHa nepeaIte, noXaIyIctA, Ha MaKyIaTyP. POnIeTneHOBbIe MeuK (PE) BbIKDaTb B pe3epByap dIra IINactMaccbI. N3HOweHHe yCTpoiCTBO hAO nepeDaTb B COOTBeTcTBYIOU ToKy XpaHEnH, TAK KAK HaxOJaIueCeb YCTPOICTBEONACHbIe CoCTABJIHOUIe MOYr ABNITbCry YrPo3OI dIg Okpykaioue Cpebl. 3NeKtpnHeCKoe yCTPOICTBO hAO nepeDaTb TakIM Obpazom, YTObl OrpaHHTb ERO NOBtOpHoe yNtpe6beHne HcNoJb3OBAHme. EcIn B yCTPOICTBE HAXOJaTcB 6TaapeH, IN HAO BbITbHyTb N pePeDaTb B TOkY xpaHEnH OTeNbHo. YCTPOIcTB He BbIKDaTb B pe3epByap dIra KOMMyHaJIbHbIX OTxOIOB!
(NL) NEDERLANDS
VEILIGHEIDSVOORWAARDEN - BELANGRIJKE VEILIGHEIDSINSTRUCTIES LEES ZORGVULDIG EN BEWAAR VOOR TOEKOMSTIGE REFERENTIE!
KOOKFASE LED-INDICATOR:
B:
He BnKOpncToBnyTe nIaTmKOBI KOHTeHepn 3 MaTepiAIB BPA a6o PBX.
IocTaBte KactpynHa cTInKy, pIBHy I TepMOCTInKy NOBepxHIO, HAnpKnaIa, 3axNCHy NyxOBNK.
- HadiiHo 3aTnCHiB ToUHy PnHTy.
3aTnCHiB npncptpi 360ky konTeHepa. BaxnBO 3a6e3neHTn nepneHdkyIpaHicTb npncptpoHO do pIBH BOH, o6 npabnlbHO npKynOBaTn BOJHy 6aHIO. (D)
3.Доиnte BodyB EMHcTBЯ BODn.PiBeHb BOu IOBHeH DoCraTn MIX MIHImaJIbHOO (MIHIMaJIbHOO) Ta MaKcMmaJIbHOO (MAKcMaJIbHOO)JIHIEO 3aOBHeHHr (E),3a3HaueHOHa KpIuCi enEmeHTa 3 HepXaBIIOoI CTani.I BydJaACKa, He 3a6yDbTe 3aIIWHTN B KOHTeHepi DOCTaTHBO MICr Dn DODaBaHHr npOdyKTIB.
- BCTaBTe 3Hyp JxNnBnEHH B po3eKy. IpnnaI ndoactb 3BykOBm CnHaI, a BepxHn DnCnne NOKaxe nOTouHy TeMnpaTy pOBDn. BcTaHOiB 3aDany TeMnpaTy p Ta ac, a Notim HATNCiB KhONky Pnyck / Pay3a (C5), u06 3anyctnT npinaIad.
5.ПомICTITb npodykTN y BakyumnrepeMeTnHn naket a6o naket i3 Mopo3nIbHO kamepoIO Ha 6nckabci.
5.1 Bakyumhe yuJIbHeHH npOkyTtB e npakTuHm, aJe He oOB'3KOBm DnI npiroTyBaHH Ctpab uepe3 BiDeo. MiXk 3 noJIeTIneHy Ta NoINpOInEny, kI MaOTb MapKyBaHH «Be3 BPA», e 6e3neHmN dI npiroTyBaHH uepe3 sous vide. BInbWictb diPmOBx MiKIB i3 MOpO3nIbHO KamepoHO Ha 6JIMCKABU, a TAKOX NaKeTn, 0IO npOdaHTbcra IJI BaKyyMHOI repMeTn3aui, MOXHa BIKOPNCTOByBatN. YHKaTe 6JINb ToHKnX, YHIEpcanbHnx MiKB abo MiKB, kI He 3a3Naehi kR BinbHi Bid BPA.
5.2 NepekoHaTeC8, 10 npOdyKTH, nOMiueHb MOpO3nIbHI naKeTn, He nepeNoBHeHi. BODa nobHHa nobHicTIO npKyIbBATn HABKOHO KOKHOI nopui iKi, kY noTpi6Ho npiroToBAtn, He knadITb iKy waOp m y naKeT.
5.3 Cnei a60 MapnHaM MoxHa IOnaBAtN Do npdykTIB BCEpeHni NaKeTa. PeKOMeHyETbCBy KxBaTu TpOx MHepe npnpab, Hix y TpaHnuiHnx cnoocax npiroToyBaHHa, ocobJInBO npn npnpabu ciinIO. 3aBXd moxHa npnpabUTn 3a CMAKOM nicra 3aBepWeHHa npiroToyBaHHa.
PIMITKA: npeioiB npiroTybaHH IOwe 8 roHn peKOMeHycTbcr repMeTHyBaTu Iky BaKyHMnM repMeTNkOM.
- Budanitb nobitpr 3 MOp03nIbHOi kamep Ta tegmetuho 3akpnTe iii.
6.1 RaKIO BnKOpNCToBcBaKyMHN repMeTNI MiueyOK, yIJIbHeHH 6yde CTBOpeHO BaKyMMHm repMeTIKOM nICnBnDaJIeHHNIOBITpR.
6.2 Y pa3 BnKOpNCaHn MOpO3nBHO NaKaTa Ha 6nckabui Heo6xHOBuDaaTn NOBITpr 3 NaKeTa, CTBOPNBUN, HACKINbKNe MOKJNBO, 1iNbHy BAKyyMHy rePmeTN3aUIO. TpMaOnu BepXHIO uactnHy CymKn BiIKpnTOIO, NOBInbHO onyckaIte II B EMHCtB 3 BoIOHO. TnCK BOIN BNTncHE NoBITpr 3 Mioka. He3aOBo Ido TORO, Ra BepxCymKn DoCgrHe BOIN, 3akpnite II ha 6nckabky. (K)
7.3aHypTe termetnHHn naket y KOHTeHep dIy npriroTyBaHHra iKi
Picra 3aBepHnHa etany nonepeHbOHarpBaHHI BOJHOi BcH, roTOBOI DO npiroToyBaHH, CBITIOBNI KJIbCe LD 3miHtbcn Ha cepBoHn. Y ceu yac repMeTnHn naket MOKHa 3aHypTuY EMHCtB 3 BDOIO.
7.1 RaKIO BnKOpNCToBcBc BaKyUmHm TepMeTnHn NaKeT, MiOJK MoXHa NOBHicTIO 3aHypntN iD pBeHb BOHN.
7.2 Ondak, kkuo BN BnBkOpncToBye TaKeT i3 MOp03JbHOIO KAmepoHO Ha 6bnckaUi, He 3aHypioTe yuJIbHeHHra NaKeTa. PpntnCHITb BepxHIO YactInHy NaKeTa 36Oky Do KacTpyni, uo6 yuiIbHeHHr He NotpanuIIO nD Body, uo6 yHnKHyTN BuTikAHr piINHN BCEpeDInHy naKeTa.
ПРИМТКА:ВаЖлноCTeЖиТ,цобixа nobHicTIO 3aHypIOBaIacr y BOу npOTЯROM yciCi pa3n npriroTyBaHH.ЯкsoхapHOBniMiWOK nlaBAe NaD BOYO,ВИКОпсTOBуTe BeNkky,BaЖky MeTaJIeBy loXKy,TapIKy a6o 6yDb -якni IhSiJxapOMiChn Nocyd,ц6b 3BaXHTn NaKeT,ц6b UTPmAtn IXy NiD BOYO.
8.ObcmaXTe M'rao i noaBaAte Do cToIy
Iicra 3aBepWeHH pa3 npiroToyBaHH cKOpncTaTecb uINpUcMn Ta 3axNCHmPyKaBnCmN dN pyXOBKn, 06 3HrTn naket 3 BOJHO 6aHI. DictaHbTe kky 3 naKeTa, npocuWt b kvy nepeo3paJIIOBaHHm.
O6cmXTe M'rco B rapaui posirpiit i abyHni ckoBopiizi abo 6ap6ekIO npotraom 30-60 ckyHd 3 obox ctopiH dno OTpMaHHa 30nToCToi xpycTko TEkctypn.
ПРИМТКА:Якso roToBa iKa He 6уde croKHTa HerauHo, He BnMaTe iKy 3 NaKeTa. 3aHypTe miJok y KpIkaHy BoDy, uO6 WbNdko 3Hn3NTn Tempeatpyi, i 36epiraiTe B xOIOdINbHnky.
IJI KOPNCTYBAHHIPO IOTYBAHH, BUYI JACKA, HAIITE HAI CAI T IINHKOM HIXUE, a6o BNKOPNCTOBYTE QR -KOJ HA 3ADHI PYKOBODCTBI I KOPOBKI.
ПОСИАНHA:
https://www.adler.com.pl/dane/recepie/ad_6415.pdf
OuHJEHHa:
1- YK 3HATN / BCTAHOBHTN KPNUKY EJEMEHTA
1.1 BmKHTb npnad, kso biN iikHouehn do Mepeksi.
1.2 3nT, nBepHtB kpiuky eIementa 3 hepkabiooyo tani niBopyi i nobilho notarHtB Bn3. (H)
IINBCTAHOBHNNPnKpIniTb KpiWky eIeMeHTa Ha3aD IO HxNKBoI yactHNI KOpNcy DBrHyHa. BnpIBHnTe OOTnp TOnKn HABKOIO KpnuKNe eIeMeHTa mix YoTnPMa BNCTynAMn BHn3y KOpNcy DBrHyA. NobepHtB KpiWky eIeMeHTa BnPaBO, 06b HadiNo 3aΦikCyBaTN II Ha Micui. YcETbc "KlaCAnHH". (I) BaxnBO BCTaBnTI KpiWky BeptnKaIbHO 3 INnKaIopAmM MIN Ta MAX, kNnOka3aHO Ha 306paXeHHi HnKHe. KaIIO KpUkHa He BCTAHOBHe HAleXHm YHOM, KaHAI NODaCI BOIN HE 3MOxyTB HaneXHm YHOM UNPKUYIOBAITN BOJMy
6aHIO.
IPIIMTKA: Hikon He ekcnnyaTne npnad 3i 3raTOO KpUkoEeMeHTa 3 HepXaiooCTani.Ipeed BnkOpncTaHHm npnady 3abKd NepekoHaTeC, 00 KpUka eMeHTIB HaJeKHMM YHOM BCTAHOBNeHa.
2-Як 3HAMITN / BCTAHOBNTIДОHHN KPNUKY
Ioo3HnIOBepHiTbOpyH NxKHy KpiuKy IiBopyu i NotraHtB Bn3.
IooBcTaHOBnTn, BcTaBTe KObNaOK Ha3a y HmXHIO uactHy KpNtKN eJeMeHTa 3 HepKaBIOoHi cTani, BmPbHBnOHTnpn BVCTynn
B YOxON MIX QOTnPMA KpAnKAMn BHN3y KpnuKN eJeMeHtA. NObepHiTb KpnuKy npaBopyu Ha
HadiiHo 3aΦikCyBaTn Ha Micu. (J)
3- OUHIIEHHJ
PONEPEDXEHHBAmmkaTe Npeed YnueHHaM
HIKOJIH HE 3AKYIIOHTE Kopnyc dBnryHa, naHeIb ynpaBniHn, eNeKtpnHn IHy a6o wTeNceIbHy BnKy y BOny qIb -ky IHsy piDnHa.
Iicra BnKOpncTahHr 3himitb KpuiuKy enemeHTa 3 HepKaibiooCi ctaJI ta npomnTe BHytpiHi qactHn (HarpiBaJbnHn eneMeHT, DaTunKn TeMnepatypTu Ta uNpkyLiaB BoDn) nIXOIOHOIO BOIO. DaIte BCIM qactHnAM BnCOxHyTu Ha nobITpi.
Pn Heo6xHocTl HarpBaIbHne eneMeHT Ta BOaHn cIpyJITop MOXHa OcHCTuB TeNII MInbHIO BODI 3 M'koHO BDOHO 3y6ha uitka. He 3aHypnoTe Kopnyc dBnuryHa. PeTeJIbHO pOpmnTe i BucywiTB.
Ipoptipb Kopnyc DnHyHa BONorO raHupkoIO ipeTeJIbHO BucyWitb.
KpnuKa enemTa 3 HepXabiooI cTajI Ta HnXHr KpnuKa MoXHa MNTn B NocydomnHi MaunHi.
PIMITKA: He BnKopncToBnyTe a6pa3NBHi MNoChi 3ac06N, YnCTaYi npoknAaKn a6o 6yDb -rki iHsi npedMeTn, kki MoKyTB nOprpNaTn. Noc6HnK KopncTyBaVa
4-DEKAJIΦIKAU
Iicn KJIbKoX BnKOpNCTaHb HarpBaJIbHm EmeMeT MoKe 6yTu NOKpHTM MiHepaJIbHMN BiJkJaDeHNrMa 3 BoH. LJe HopMaJIbHO i MOKe BnHKATu Yactiue 3aJIeXHo BiD MiHepaJIb y BnKOpNCTaHm BOi. BnKOHaTe HxKYe KpOKn DIIr OOnUeHNr MiHepaJIb Ha HarpBaJIbHOMy eemeHTI.
PnTNCHTb TOnHy PnHt y Do TepMoCTiIKoKOHTeHepa. 3AnOBHtB EMHICTb Do MaKcMaJIbHOI JInII (MAX), 3a3NaueHOI Ha KpNusI eEmeMeHa 3 HEPXaBIIOO CTani, PiBHOIO KJIbKICIO BODn Ta 6iNoro OTuY.
BCTABTe shHyp XINBnEHH. BcTaHObit binboby Tempeatpy 70^ / 158^ Fi BcTaHObit TaMep Ha 20 XBNIIN. HATNCHTb KHONky 3ipKn/ nay3n (C5), 0o6 3anyctntn npnilad.
Iicra 3aBepweHH BID'cHaHte Kaebb XnBneHH, OoB BMkHyTn npuJa i daTn Nomy oxonoHyTN.
BuknHbTe Body 3 EMHOCTI, Ipomnte KpUkky eemeHTIB I BHyTpHi cactHH iD XoNoHO BOIO. IpeEi 36epiraHHaM peTJIbHO BVcuyITb.
TexhiHi dahi:
IOTyXHICTb:1200BT
Hanpyra: 220-240 B 50/60 T
MaKcImaJIbHa KInbKiCTb BODN B KOHTeHepi: 20 n

Y iHTepecax HABKOLNIuHbOro cepeOboNua.
BvNb NaCa, BiDaiTe KAPToHnY ynaKOBky B Micce 36Opy MykynaTpy. NOniTneHobi MiKn (PE) BnHyTN B CMTHNK DnA nnactny. BiNpaCboBaHn NpncTpien NobHeH 6ytN BiInnpabJeHn y BiNobiDny Tocky 36epirAHn, Tomy 90 B npncTpoi e Hebe3neHi iHrpdeieHTn, Aki MoKyb CTaHOBtN 3arpo3y HABKOINHbOMy CepedOuSy. ENeKTpnHn npncTpien Notpi6Ho NoBepHytn TAK, 9o6 ObMexHn Ioro nobTophe BnKopNCtaHHa. KaUo y npncTpoi e 6aTepeKeKN, To Notpi6Ho IX BnTaryn I BiDaTn Do BiNNoBIDHO NyHTKY.
(SV) SVENSKA
SAKERHETSFORESKRIFTER - VIKTIGA SAKERHETSINSTRUKTIONER
bgyoXyI - 1aiaiOyoIago
y jll yjlyg jll g jll jll jll
- 1
1
gall ydl. jay alalal pao jy jay all ciaal al aai alal ay lal alal alal alal alal
BPA.
5.2 1 a p aal j plabll g sall y wsl dall. y jy jy eall Jals Jg Jg Jg Ja aal al al al
5.3 1
111 111 111 111
Aa 8 1
- jjclgall no 2021 all aiei
6.1 12
6.2 1
[1] 1
He n3non3BaTe nIactMacOBn KOHTeHepn, n3pa6oTeHn OT BPA nn PVc MaTepeNaJN.
IocTaBeTe TeHxepata 3a rotBeHe Bbpxy CtaBnHa, paBaHa NToNIOyCtOuYnBa NOBbPxHOCT, HApPImeP 3aUHTHa KaTbΦa.
- 3aTeHHeTe 3dpaBO npeuHaTa roTbapcKa neUka.
3aTeHHeTe yctpoiCTBOTO OCTpaHn Ha KOHTeHepa. BaxHo e yctpoiCTBOTO Da e nepneHdNkUyIrpHO Ha HNBOTo Ha BOdaT, 3a Da UnpkyInpa npabunHO BoDHaTa 6aHa. (D)
3.Добавete BOаВ KOHTeHepa 3a BOda.HNBOTo HA BOdA Tp6Ba DAdoCTnHE MExdy MNHMajHaTa (MHN.) IMakCmuaHaTa (MaKc.) JINHra 3a IIbIHe He (E), NOKa3aHa Ha KAnaka Ha enMeHa T O HepbXJaema CTOMHa. MoJr, He 3a5paBryTe da OCTaBnte DOCTaTBuHO MRCTO B KOHTeHepa, 3a Da MoKe Da ce Do6abn XpaHaTa.
-
BkIIOUeTe 3axpaHbAunr Ka6eBn B KOHTa. YpeBt 7e N3daJe 3ByKOB CnHaN I rOpHNr T dCnIIe 7e NOKaKe TeKyuaTa TEMNEpatyha BoData. 3aDaTe 9eJIeBata Temnepatya n uac, cIeN KoETo HATNCHe 6yToHa CTapt / Naay3a (C5), 3a da cTaptupe ypeDa.
-
NocTabete XpaHATA BbB BakyMHO 3aTBopeHa Top6uKa IIN Top6uKa C cpn3ep C uIN.
5.1 BakyymHOTo 3aneaTbHe Ha xpaHa e npakTuH, Ho He he eo6xOIMo 3a rotBeHe sous vide. YaHTn, n3pa6oteHN OT noJIeTInen H NOINPOniNeH, MapKpAHH 6e3 BPA, ca 6e3onachn 3a rotBeH B sous vide. Morat Da ce n3noJ3Bat NOBEeTO TOP6uKn 3a 3ampa3BaHe C cIc TbpROBcKa mapka, KaKTo I TOp6nte, IpOdaBAHN 3a BakyMHO 3aneaTbHe. N36raTBAte No-TbHKn, YHnBepcaJIHn TOP6uKn IIN Top6uKn, KONTO He ca ETNKeTIpaHn Kato 6e3 BPA.
5.2 YbepTe Ce, Ye XpaHaTa, NocTabeHa BbB Ppns3epn TOp6uKn, He e npenbIHeHa. BoaTa Tp8Ba Da cnpkyIpa n3qno OKoNo BCraKa TopuHa, KOrTo ige Ce roTbN, He HacnoBaIte XpaHa B TOpbaTa.
5.3 KbM xpaHaTa BbTpe B Top6aTa MOrat Da Ce Do6abRr TNOIpaBKn Nm MapHaTn. IpeOpbYBa Ce da n3noN3BaTe MaKIO No -MaIKO NOIpaBKN, OTKoJIKOTo Pnp TpaDnUOnHnTe MeTOn Ha rotBeHe, OcObeHO KOrato NOIpaBraTe Cbc CoJ. BuHaRn E Bb3MOxHo Da ce NOIpaBRA Na BKyc CneI npNKIIOnuBaHe Ha rotBeHeTo.
3A6EJEXKKA: 3a nepnoiHa roTbeHe, no -IbItn O8 yaca, ce npenopbUba da 3aneyataTe xpaHaTa C BakyymeH yIbnTHnTeI.
Electric Kettle AD 02
Espresso Machine AD 4404
Standing Fan AD 7305

Sandwitch maker AD 3015
Heater Fan AD 77
Oil Heater AD 7808
Hair Clipper AD 2823
Hair Clipper AD 2825
Dripp Coffee Maker AD 4407
Kettle AD 1286
Hair Dryer AD 2252
Hair Clipper AD 2832
Hair Shaver AD 2932
Kitchen Scale AD 8121
Nut Cookie Maker AD 3039

Blender AD 4076
COOKING GUIDELINES


- SAFETY CONDITIONS - IMPORTANT SAFETY INSTRUCTIONS
- PLEASE READ CAREFULLY AND KEEP FOR FUTURE REFERENCE
- CLEANING:
- 1- HOW TO REMOVE / INSTALL THE ELEMENT COVER
- 2- HOW TO REMOVE / INSTALL THE BOTTOM CAP
- 3-CLEANING
- 4- DECALCIFYING
- DEUTSCH
- OPOI AΣΦAΛEIAΣ - ΣHMANTIKEΣ OΔHΓIEΣ AΣΦAΛEIAΣ
- CHCTKA:
- (NL) NEDERLANDS
- VEILIGHEIDSVOORWAARDEN - BELANGRIJKE VEILIGHEIDSINSTRUCTIES LEES ZORGVULDIG EN BEWAAR VOOR TOEKOMSTIGE REFERENTIE!
- 2-Як 3HAMITN / BCTAHOBNTIДОHHN KPNUKY
- 3- OUHIIEHHJ
- 4-DEKAJIΦIKAU
- (SV) SVENSKA
- SAKERHETSFORESKRIFTER - VIKTIGA SAKERHETSINSTRUKTIONER
- COOKING GUIDELINES
Brand : ADLER
Model : AD 6415
Category : Saucepan