
GL 7735 - Heating ADLER - Free user manual and instructions
Find the device manual for free GL 7735 ADLER in PDF.


| Product Type | Electric Heater |
| Brand | Adler |
| Model | GL 7735 |
| Power Consumption | 2000 W |
| Heating Type | Fan Heater |
| Number of Heat Settings | 2 (low/high) |
| Thermostat | Adjustable |
| Overheat Protection | Yes |
| Tip-Over Switch | Yes |
| Dimensions (W x D x H) | 22 x 15 x 28 cm |
| Weight | 1.5 kg |
| Cord Length | 1.5 m |
| Noise Level | ~45 dB |
| Power Supply | 230 V ~ 50 Hz |
| Color | White |
| Material | Plastic |
| Cleaning Method | Wipe with damp cloth |
| Safety Features | Overheat protection, tip-over switch |
| Warranty | 2 years |
Frequently Asked Questions - GL 7735 ADLER
User questions about GL 7735 ADLER
0 question about this device. Answer the ones you know or ask your own.
Ask a new question about this device
Download the instructions for your Heating in PDF format for free! Find your manual GL 7735 - ADLER and take your electronic device back in hand. On this page are published all the documents necessary for the use of your device. GL 7735 by ADLER.
USER MANUAL GL 7735 ADLER
GL 7735
GENERAL SAFETY CONDITIONS
IMPORTANT SAFETY INSTRUCTIONS FOR USE MUST BE READ CAREFULLY AND SAVED FOR LATER USE
The device is NOT intended for commercial / professional use.
The device is NOT suitable for indoor use. This product is a ceiling mount device; never use it as a portable device.
Attention! Before using, it is essential to read this manual in order to avoid any accidents and for the correct use of the device. Keep this manual and keep it so that it can be easily used when needed.
I. INSTRUCTIONS CONCERNING SAFETY OF USE
- Before use, check that the voltage given on the rating plate corresponds to the local power supply parameters, but remember that the marking: AC- is alternating current and DC - is direct current.
- The device must only be connected to a 220-240 V \~ 50/60 Hz earthed socket.
- Unwind and straighten the power cord before use. Keep the power cord away from the hot heater body.
- Make sure that the power cord and plug have no visible damage.
- Before and during use, make sure that the power cord is not stretched over an open fire or other heat source and over sharp edges that may damage the cable insulation.
- Before the first use, remove all packaging elements. Attention! In the case of a housing with metal elements, an invisible protective foil may be stretched over these elements, which must also be removed.
- The device should not be used by children, persons with reduced physical, sensory and mental abilities without the supervision of authorized or experienced persons and always in accordance with these instructions.
- The equipment is not intended to be operated using external timers or a separate remote control system.
WARNING: This equipment may be used by children over 8 years of age and people with reduced physical, sensory or mental capabilities, or people with no experience or knowledge of the equipment, ONLY if it is done under the supervision of a person responsible for their safety or if they have been instructed on the safe use of the device and are aware of the dangers associated with its use. Children should not play with the equipment. Cleaning and maintenance of the device should not be performed by children, unless they are over 8 years of age and these activities are performed under supervision. The device must not be left unattended during operation.
- Do not immerse the device and the power cord in water or any other liquids.
- When the device is not used, it should always be disconnected from the power socket.
- When removing the plug from the socket, never pull the power cord by the plug.
- Do not put ANY METAL OBJECTS inside the machine.
- The manufacturer is not responsible for any damage caused by improper use of the device.
- It should be remembered that some parts of the device and housing become very hot during operation, so be extremely careful not to touch them, you may get burned.
- NEVER cover the appliance while it is in operation or when it is not completely cold.
- Remember that the appliance's heating elements take time to cool down completely.
- When using the device, ensure adequate space above and around the device. During operation, the device must not touch any easily flammable objects such as decorations, paper towels, curtains, clothing, etc.
- Keep a distance of at least 40 cm from other objects.
- The device cannot be used with external timer switches or other separate remote control systems.
- Do not expose the device to direct weather conditions such as rain.
- Periodically check the condition of the power cord. If the power cord is damaged, it should be replaced by a specialist repair shop in order to avoid a hazard.
- Do not use the device near flammable materials.
- Do not use this heater in the immediate vicinity of a swimming pool.
- Do not use if there are visible signs of damage to the heater.
- The heater must not be placed directly under a wall socket. It is recommended that, for increased safety, the electrical system should be equipped with an automatic residual current switch with a starting current of 30mA. Note: If the power cord or plug is damaged, it must be replaced or repaired by a specialized repair shop.
II. WARNINGS
- Never use the device if it is damaged or not functioning properly.
- Never use the device if it has previously been dropped and shows visible signs of damage.
- Do not use extension cords or other electrical outlets that do not comply with applicable electrical standards and regulations.
- Any repair, disassembly or replacement of any parts should always be performed by a specialized facility.
- In the event that the device and components such as electrical contacts, plug or cord get wet, dry the device and its components before use.
- Do not use the device with wet hands.
- If you are concerned that the device has been damaged, NEVER repair the device yourself.
- Never wash the device under running water or in such a way that water drips down to it.
- Make sure the device has cooled down before storing.
- Do not touch the housing during use. Only the knobs and switches should be used during work. After switching off, wait for the device to cool down.
ceiling etc.
Additionally, there must be a free space of at least 50 cm on the sides between the device and any side walls, the tarpaulin and other objects. There must also be at least 1.80 m between the control panel (5) and the ground surface. See figure 4. The heater must never be hung from the hook in the wall as it could hang diagonally!
There are two methods of hanging the heater:
I. on the ceiling
II. on the frame (e.g. tent frame)
The device includes (figure 2):
- Chain with a ring at one end and a carabiner at the other end (1)
- An additional chain with carabiners at both ends of the chain (7)
- Metal expansion bolt with a hanging eye with a diameter of 8mm (8)
I. Ceiling mounting - figure 4A
The heater should be hung on a concrete ceiling. Never hang it on a ceiling made of wood, plaster or any other material! Fastening materials and fire protection measures are not suitable for this type of installation. Look for a ceiling space that meets all these requirements.
- Drill a sufficiently deep hole with a diameter of 8 mm.
- Drive the metal screw with the hanging eye into the hole. Secure the bolt by turning it clockwise (then the metal parts of the bolt will be expanded into the concrete). See figure 5. Check that the dangle eye is properly threaded into the screw. Make sure that the mounting kit can support a weight of at least 15 kg.
- Hang the heater on the hanging ear with a carabiner so that the heater is 40 cm from the ceiling.
- Make sure the carabiner is properly locked.
I. Mounting on the frame elements (e.g., on the tent frame) - figure 4B
Make sure that the heater can hang freely from the chosen mounting point and that the mounting point is strong enough to support the weight of the heater. Secure it properly so that it does not slip or move in any other way. Look for a place on the rack that meets all these requirements.
- Use the attached chain with carabiners on both ends to secure the device effectively:
1.A. Hook an additional chain on the end link of the hanging chain that was previously attached to the heater with a carabiner.
1.B. Wrap the chain around the frame once.
- Then attach the second carabiner to the same link in the chain to ensure the required distance of 40 cm between the upper casing of the heater and the frame/rack.
- Check that the carabiner is properly closed and that the heater is securely attached. It shouldn't slip, fall, or move at all!
WARNING! The upper casing of the heater must be at least 40 cm from the tarpaulin of the tent, frame, or any other object!
The following applies to both methods: Route the power cord (2) along the hanging chain and secure it at several points with the cable tie. The first tie needs to be attached to the third link as the first few links get hot. Make sure the cable is taut along the chain, but do not hang the device on the cable! Route the power cord from the (hot) heater to the outlet.
PRODUCT DESCRIPTION (Figures 1 & 2 & 3)
- A chain with a ring at one end and a carabiner at the other end
- Power cord
- Upper casing 4. Power switch
- Control panel 5A. Power switch:
I - low heating power II - medium heating power 5B. Timer switch 6. Remote control 7. An additional chain with carabiners at both ends of the chain
III - high heating power
- Metal expansion bolt with hanging eye
USE OF THE DEVICE
The device can be operated manually by pressing buttons on the control panel (5) or by using the remote control (6).
- Assemble the device according to the instructions in the chapter: Before first use.
- Connect the device to a power source.
- To turn the device on, press the power button to position 1. To turn the device off, press the power button to position 0 again. At first start-up, the device defaults to low heating power.
- To adjust the heating power level, press the 5A button on the control panel or on the remote control in sequence. The selected power level is indicated by a red lamp on the control panel (5).
- Use the 5B button on the control panel or the remote control to set the timer that will count down until the device turns off. By pressing the 5B button successively, you will be able to set the working period from 1 to 7 hours in full hour increments and turn off the timer. The selected period of operation of the device will be indicated on the control panel (5) by one green lamp for 1/2/4 hours (1H / 2H / 4H). The selected period of operation of the device will be signaled on the control panel (5) by lighting of two green lamps for 3/5/6 hours (1H + 2H / 1H + 4H / 2H + 4H). The selected period of operation of the device will be indicated on the control panel (5) by lighting of three green lamps for 7 hours (1H + 2H + 3H).
CLEANING AND STORAGE
- Before cleaning, always disconnect the heater from the wall socket and let it cool down.
- Clean the outside of the device by wiping with a damp cloth and polish with a dry cloth.
- Do not use any detergents or abrasives and do not let water get into the heater.
- If the device is not used for a long time, protect it against dust and store it in a clean, dry place.
Technical data:
Power: 1900-2100W
Power supply 220-240V \~ 50Hz
Ip24
Device is made in class II of insulation. Device is compliant with EU directives:
- Low voltage directive (LVD)
- Electromagnetic compatibility (EMC)
Device marked CE mark on rating label
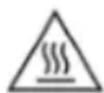


"Caution Hot Surface" - The temperature of accessible surfaces may be higher when the equipment is in operation, which means that the housing elements become hot during operation, BE CAREFUL !!!
WARNING: In order to avoid overheating - do not cover the heater
WARNING: Do not use this equipment near swimming pools or similar water tanks
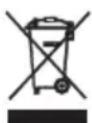
To protect your environment: please separate carton boxes and plastic bags and dispose them in corresponding waste bins. Used appliance should be delivered to the dedicated collecting points due to hazardous components, which may affect the environment. Do not dispose this appliance in the common waste bin.
PRODUCT DESCRIPTION (figures 1 & 2 & 3)
IMPORTANT SAFETY INSTRUCTIONS
READ CAREFULLY AND SAVE FOR FUTURE USE
PRODUCT DESCRIPTION (figures 1 & 2 & 3)
IMPORTANT SAFETY INSTRUCTIONS
READ CAREFULLY AND SAVE FOR FUTURE USE

- GL
- GENERAL SAFETY CONDITIONS
- IMPORTANT SAFETY INSTRUCTIONS FOR USE MUST BE READ CAREFULLY AND SAVED FOR LATER USE
- INSTRUCTIONS CONCERNING SAFETY OF USE
- WARNINGS
- USE OF THE DEVICE
- CLEANING AND STORAGE
- PRODUCT DESCRIPTION (FIGURES 1 & 2 & 3)
- IMPORTANT SAFETY INSTRUCTIONS
- READ CAREFULLY AND SAVE FOR FUTURE USE
Brand : ADLER
Model : GL 7735
Category : Heating