
L 620 CAM SC - Motion detector STEINEL - Free user manual and instructions
Find the device manual for free L 620 CAM SC STEINEL in PDF.
| Product type | Motion detector with camera and intercom |
| Brand | Steinel |
| Model | L 620 CAM SC |
| Dimensions (H × W × D) | 305 × 78 × 131 mm |
| Power supply | 220-240 V, 50/60 Hz |
| Power consumption (operation) | 14 W |
| Standby consumption | 0.50 W (detector) / 0.50 W (network) |
| Luminous flux | 925 lm |
| Color temperature | 3,000 K (warm white) |
| Color rendering index (CRI) | 80 |
| Average lifetime (L70B50 at 25°C) | 36,000 hours |
| Protection rating | IP44 |
| Protection class | I |
| Detector range | 10 m (tangential) |
| Detection angle | 180° with 45° angular aperture |
| Trigger threshold adjustment | 10 to 10,000 lux |
| Adjustable timer | 1 min, 3 min, 10 min, 15 min |
| Orientation (dimmed light) | 0 to 40% |
| Camera resolution | 1,920 × 1,080 px |
| Camera aperture angle | 110° horizontal / 90° vertical |
| Memory card | max. 128 GB (16 GB card included) |
| Connectivity | WiFi 2.4 GHz (requires <2 Mbps) |
| Main functions | Infrared motion detection, camera with recording, intercom via Steinel CAM app |
| Maintenance and cleaning | Clean the lenses with a damp cloth, do not use detergents |
| Safety | Cut off power before any intervention; installation according to NF C-15100 standard |
| Manufacturer warranty | 3 years (excluding wear parts and non-replaceable light sources) |
Frequently Asked Questions - L 620 CAM SC STEINEL
User questions about L 620 CAM SC STEINEL
0 question about this device. Answer the ones you know or ask your own.
Ask a new question about this device
Download the instructions for your Motion detector in PDF format for free! Find your manual L 620 CAM SC - STEINEL and take your electronic device back in hand. On this page are published all the documents necessary for the use of your device. L 620 CAM SC by STEINEL.
USER MANUAL L 620 CAM SC STEINEL
GB . . . . 16 Follow written instructions!
Please read carefully and keep in a safe place.
- Under copyright. Reproduction either in whole or in part only with our consent.
- Subject to change in the interest of technical progress.
Symbols

Hazard warning!

Reference to other information in the document.
2. General safety precautions

Disconnect the power supply before performing any work on the unit.
- During installation, the electric power cable being connected must not be live. Therefore, switch off the power first and use a voltage tester to make sure the wiring is off-circuit.
- Installing the camera light involves work on the mains voltage supply. This work must therefore be carried out professionally in accordance with national wiring regulations and electrical operating conditions. (e.g. DE-VDE 0100, AT-ÖVE/ÖNORM E8001-1, CH-SEV 1000)
- Only use genuine replacement parts.
- Repairs may only be made by specialist workshops.
3. L 620 CAM SC
Proper use
- Sensor-switched light with integrated camera and intercom system for installing on outdoor walls
The L 620 CAM SC features a camera with memory card and intercom system. Both functions can also be controlled via an app.
A passive motion detector is integrated in the L 620 CAM SC. The integrated high-performance infrared sensor detects the invisible heat radiated from moving objects ( people, animals, etc.). The heat detected in this way is converted electronically into a signal that switches the light ON automatically. Heat is not detected through obstacles, such as walls or panes of glass. Heat radiation of this type will, therefore, not trigger the sensor.
Important:
The most reliable way of detecting motion is to install the camera light with the sensor aimed across the direction in which a person would walk and by ensuring that no obstacles ( such as trees and walls, for example ) obstruct the line of sensor vision. Reach is limited when walking directly towards the light.
Package contents (Fig. 3.1)
- Camera light
- Four screws
- Four wall plugs
- Reset key
- Torx spanner
Product dimensions (Fig. 3.2)
Product components (Fig. 3.3)
A Camera light
B Lock
C Connecting terminal
D Wall mount
E Sensor unit
F Camera
G Reset button
H Status LED
Slot for memory card
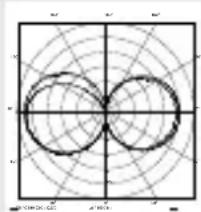
Luminous intensity distribution (Fig. 3.4)
4. Electrical connection
- Switch OFF power supply (Fig. 4.1)
Wiring diagram (Fig. 4.1)
The supply lead consists of three wires:
L = phase conductor (usually black, brown or grey)
N = Neutral conductor (usually blue)

=protective-earthconductor (green / yellow)
If you are in any doubt, identify the conductors using a voltage tester; then disconnect from the power supply again. Connect phase, neutral and protective-earth conductor to the terminal.
Important: Incorrectly wired connections will produce a short circuit later on in the product or your fuse box. In this case, you must identify the individual conductors once again and reconnect them. A mains power switch for turning the unit ON and OFF may of course be installed in the mains supply lead.
The light source of this luminaire cannot be changed. If the light source needs to be replaced (e.g. at the end of its service life), the complete luminaire must be replaced.

Connection to a dimmer will result in damage to the camera light.
5. Mounting
- Check all components for damage.
- Do not use the product if it is damaged.
- When installing the camera light, make sure the installation site is not exposed to vibration.
- Select an appropriate mounting location, taking the reach and motion detection into consideration. (Fig. 5.1)
- Select an appropriate mounting location, taking the WLAN speed into consideration. A minimum of 2 Mbps must be available for operation.
Mounting procedure
- Undo retaining screw, detach camera light from wall mount. To do this, press lock (Fig. 5.2)
Mark drill holes (Fig. 5.3) - Drill holes and insert wall plugs (Fig. 5.4)
- Screw down wall mount (Fig. 5.5)
- Connect conductors (Fig. 5.6)
- Fit camera light on wall mount and tighten retaining screw (Fig. 5.7)
- Switch ON power supply (Fig. 5.7)
- Remove stickers from sensor and camera (Fig. 5.7)
- Make settings "6. Function"
The camera can be aligned by hand. (Fig. 5.8)
6. Commissioning
System requirements:
-2.4 GHz >> the cam can only be installed in a 2.4 GHz network. For installation process, please temporarily deactivate the 5 GHz frequency band in router (or rename the 5 GHz network). It can be re-activated after completing installation.
-During the installation process, remove Wi-Fi repeaters from network; they can be re-activated later on
-Make sure Wi-Fi 6 is deactivated, or downward compatibility for Wi-Fi 4 is activated in router settings
-Make sure Wi-Fi network is encrypted to WPA2 standard. Cam does not support WPA3 or higher
-Make sure camera light has sufficient bandwidth at place of installation
-Make sure Steinel cam app on smartphone has all necessary authorisations (in particular location sharing (needed by camera light to detect Wi-Fi network, we do not record any of our customers' locations))
Configuring device:
Power supply connected:
Device boots up.
- Status LED lights up red.
After booting:
- Acoustic signal every 4 seconds.
- Status LED flashes red.
- Open Steinel CAM app.
- Enter Wi-Fi router's network name and network key into Steinel CAM app.
While unit and Wi-Fi router are connecting:
- Acoustic signal every second.
- Status LED flashes green in rapid succession.
Once the smartphone or tablet is connected with the device:
- Signal stops sounding.
-
Status LED slowly flashes green.
-
Configure unit via Steinel CAM app. Now enter the network name and password of the Wi-Fi router into your app.
7. Function
Factory settings
Twilight level: 10,000 lux
Time setting: 1 minute
Basic light level: 40%
STEINEL CAM App 2

Android

iOS
Note:
The camera light needs a stable Wi-Fi connection. The smartphone or tablet
used must have access to the Internet and be connected to the same Wi-Fi network as the camera light for the installation process.
Installation
- Wifi 4 / WPA2 encryption Wifi network 2.4 GhZ / min. 2 Mbit/s Software version Android 5.0 / iOS 11.0 or newer
- Download app.
- The camera light is ready for configuration as soon as the power supply is switched ON. A signal sounds every 4 seconds during configuration.
- The signal sounds once a second while the camera light is being connected to the smartphone or tablet.
- Now enter the network name and password of the Wi-Fi router into your app.
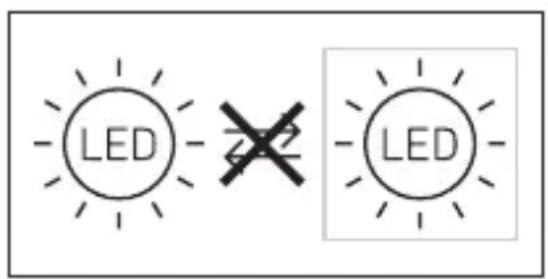
Camera function
- As soon as the camera has been set up from a smartphone or tablet, it can only be shared with other devices from that device via QR code / serial number.
- Once the sensor has triggered, you will receive a push notification via the app.
- Open the app. You can now use the image display and intercom system.
- The camera films a sequence when the sensor has been triggered. The filmed sequence is saved on the memory card and can be retrieved at any time. The recorded data is only saved on the camera light's memory card.
Note:
You will find further information on the functions and setting options in the app.
Twilight setting
The chosen response threshold can be infinitely varied from 10 to 10,000 lux.
Time setting
The time you wish light to stay ON for can be set to 1 minute, 3 minutes, 10 minutes or 15 minutes. Any movement detected before this time elapses will restart the timer.
Basic light level
The basic light level function provides illumination at approx. 0% to 40% light output when light level falls below the light-level setting.
Changing the memory card
- Undo retaining screw and remove cover (Fig. 6.1, optional)
- Changing memory card (Fig. 6.2, optional)
- Fit cover and tighten retaining screw (Fig. 6.4, optional)
Restoring factory settings
- Press the reset button for approx. 7 seconds (Fig. 6.3, optional)
Note:
Pressing the reset button with the key will return the camera light to factory settings.
Once the light has been reset, an acoustic signal will sound every 4 seconds.
- Fit cover and tighten retaining screw (Fig. 6.4, optional)
8. Maintenance and care
The camera light requires no maintenance.
Weather conditions may affect the way the camera light functions. Strong gusts of wind, snow, rain or hail may cause the light to come ON when it is not wanted because the sensor is unable to distinguish sudden changes of temperature from sources of heat. Detector lens and camera lens may be cleaned with a damp cloth if they get dirty (do not use cleaning agents).
Important note: the control gear cannot be replaced.
9. Disposal
Electrical and electronic equipment, accessories and packaging must be recycled in an environmentally compatible manner.
Do not dispose of electrical and electronic equipment as domestic waste.
EU countries only:
Under the current European Directive on Waste Electrical and Electronic Equipment and its implementation in national law, electrical and electronic equipment no longer suitable for use must be collected separately and recycled in an environmentally compatible manner.
10. Declaration of Conformity
Hereby, STEINEL GmbH declares that the radio equipment type L 620 CAM SC is in compliance with Directive 2014/53/EU. The full text of the EU declaration of conformity is available at the following internet address: www.steinel.de
11. Manufacturer's warranty
Manufacturer's warranty of
STEINEL GmbH, Dieselstrasse 80-84, DE-33442 Herzebrock-Clarholz, Germany All STEINEL products meet the highest quality standards. For this reason, we, the manufacturer, are pleased to provide you, the consumer, with a warranty under the following terms and conditions: The warranty covers the absence of deficiencies which are proven to be the result of a material defect or fault in manufacturing and which are reported to us immediately after detection and within the warranty period. The warranty shall apply to all STEINEL products sold and used in Germany - excluding STEINEL Professional products.
You can opt for warranty cover in the form of repair or replacement which will be provided free of charge (if applicable, in the form of a successor model of the same or higher quality) or in the form of a credit note.
The warranty period for the STEINEL product you have purchased is 3 years (5 years for products from the XLED home range) in each case from the date on which the product was purchased.
We shall bear the shipping costs but not the transport risks involved in return shipment.
Statutory rights accruing from defects, gratuitousness
The warranty cover described here shall be applicable in addition to the statutory rights of warranty – including special consumer protection provisions – and shall not restrict or replace them. Exercising your statutory rights in the event of defects is gratuitous.
Exemptions from the warranty
All replaceable lamps are expressly excluded from this warranty. In addition to this, the warranty shall not cover:
- any wear resulting from use or any other natural wear of product parts or any deficiencies in the STEINEL product that are attributable to wear caused by use or other natural wear,
- any improper or non-intended use of the product or any failure to observe the operating instructions,
- any unauthorised additions, alterations or other modifications to the product or any deficiencies attributable to the use of accessory,
-supplementary or replacement parts which are not genuine STEINEL parts, - any maintenance or care of products that is not carried out in accordance with the operating instructions,
- any attachment or installation that is not in accordance with STEINEL's installation instructions,
-any damage or loss occurring in transit.
Application of German law
The warranty shall be governed by German law excluding the United Nations Convention concerning the International Sale of Goods (CISG).
Making claims
If you wish to make a warranty claim, please send your product complete and carriage paid with the original receipt of purchase, which must show the date of purchase and product designation, either to your retailer or directly to us at STEINEL (UK) Ltd. - 25 Manasty Road, Axis Park, Orton Southgate, GB- Peterborough Cambs PE2 6UP United Kingdom. For this reason, we recommend that you keep your receipt of purchase in a safe place until the warranty period expires.

YEAR
MANUFACTURER'S
WARRANTY
12. Legal Notes
Privacy
The L 620 CAM SC has been developed for outdoor use. Laws in your country may restrict the observation of areas outside your home or property. Please familiarise yourself with local legislation. To protect the privacy of others, install the camera so that it is unable to film public places, roads or your neighbour's property. We also recommend that you inform relatives, visitors and household employees about the L 620 CAM SC and its function.
Safety
Please note that the app will not automatically inform you if the L 620 CAM SC is activated in emergencies or, for instance, in the event of burglaries. If necessary, you must always make an emergency call. STEINEL GmbH will not accept any liability for lacking or incorrect notification or film sequences.
13. Technical specifications
Dimensions (H × W× D) 305 × 78 × 131 mm
Power supply 220-240 V, 50/60 Hz
Power consumption (P_on) 14 W
Sensor on standby (P_sb) 0.50 W
Standby network (P_net) 0.50 W
Luminous flux (360^) 925 lm
Efficiency 66 lm/W
Colour temperature 3,000 K (warm white)
Colour rendering index R a = 80
Average rated life expectancy 36,000 hours ( L70B50 at 25^ )
Colour consistency SDCM Starting value: 3
Luminous intensity distribution
Communication Wi-Fi 2.400-2.483.5 MHz
Transmitter power < 100 mW
Sensor technology Passive infrared
Angle of coverage 180^ with 45^ angle of aperture
Mounting height 1.8-2 m
Detection reach 10 m tangential
Light-level setting 10-10,000 lux
Basic light level 0-40%
Time setting 1 min, 3 min, 10 min, 15 min
Temperature range -10 °C to 40 °C
IP rating: IP44
Protection class
Energy efficiency class This product contains an energy efficiency class "E" light source.
| Camera | GB |
| Resolution 1,920 x 1,080 px, dazzle guard | |
| Angle of aperture 110° horizontally / 90° vertically | |
| Setting angle 90° horizontally to either side / 20° to 30° vertically | |
| Memory card. Max. 128 GB (16 GB memory card is included) | |
| Power consumption 1.53 W |
14. Troubleshooting
| Malfunction Cause Remedy | ||
| Camera light without power | ■ Fuse has tripped, not switched ON, break in wiring | ■ Activate, change fuse, turn ON power switch, check wiring with voltage tester |
| ■ Short circuit in mains power supply lead | ■ Check connections | |
| ■ Mains switch OFF | ■ Switch on mains switch | |
| Camera light not switching ON | ■ Incorrect twilight setting selected | ■ Readjust |
| ■ Mains switch OFF | ■ Switch ON | |
| ■ Fuse has tripped | ■ Activate, change fuse, check connection if necessary | |
| Camera light not switching OFF | ■ Continued movement within the detection zone | ■ Check detection zone |
| Camera light switches ON without obvious movement | ■ Camera light not mounted for detecting movement reliably | ■ Securely mount enclosure |
| ■ Movement occurred, but not identified by the observer (movement behind wall, movement of a small object in immediate lamp vicinity etc.) | ■ Check detection zone | |
| Camera light not switching ON despite movement | ■ Rapid movements are suppressed to minimise malfunctioning or detection zone set too small | ■ Check detection zone |
| ■ Incorrect twilight setting selected | ■ Readjust | |
| No access to camera light via app | ■ Wi-Fi router is too far from the camera light or building elements, such as walls, are obstructing transmission | ■ Use repeater |
| Smartphone / tablet cannot be connect- ed to camera light | ■ A terminal device is already connected | ■ Press reset button or scan QR code from connected terminal device |
| No live image transmission | ■ Temperature too high | ■ If necessary, deactivate manual override and let cool down |
FR
3 Å R S PRODUSENT GARANTI
12. Juridiske merknader
Privatsfare
cimen: www.steinel.de
11. Gyári garancia
Natancno preberite in shranite!
- Zašciteno z avtorskimi pravicami.
Ponatis v celoti ali po delih je dovoljen le z našim soglasjem. - Spremembe zaradi tehničega napredka so pridržane.
Razlaga simbolov

Opozorilo pred nevarnostmi!

Napotec na mesta besedila v dokumentu.
L = φa3a (obukHOBeHo YepeH, KaφyB INI INCIB)
NocJeIOBaTeJIHOCT 3a MOHTaX
- ObezonacnteHnrt BnHT da ce OTBnHTN, KaMepaTa Da ce OTdJI NOT cTOnKaTa 3a CTeHa. 3a cIeTTa Da Ce HATNCHe 3aCTOnOpraBaHETO (pnc.5.2)
-Да ce МаркИрат MeCTaTа 3a npObNBaHc (pnc.5.3)
- Да се побит дупкite и за се поставт дюбени (pnc. 5.4)
- CToiKaTa 3a CTeHa Da Ce 3aTeTHe (pnc.5.5)
- KaßeniTE da ce CBbpxkAT (pnc. 5.6)
- Kamepata Da ce noctabn Ha cToiKaTa 3a CTeHa n OBe3OpaCInTeHnIaRT BnHT Da Ce 3aBnHTn (Pnc.5.7)
- Enejktpo3axpaHbaHeTo Da Ce BKNIOU (pnc. 5.7)
- ПремaxbaHe Ha CTnkepnte OT cEH3opa n KaMepaTa (pnc. 5.7)
- Да ce habпавгт настюк
→"6. Функця"
Kamepata ce hacouba pbyho. (pnc. 5.8)
3amhaHa KapTaTc nAmet
- Obe3oIacNTeHHaT BnHT da ce OTBnHTn KaNaKbT da ce CbaJI (pnc. 6.1, no n36op)
- 3amha Ha KapTa C nAmet (pnc.6.2, no n360p)
- KanakbT da ce noctabu n o6e30-nacnteJHHaT BnHT da ce 3aBnHTn (pnc. 6.4, no n36op)
BpbuaHe Ha 3aBoDcKn HacTpoiKn
- Pecet 6byToHa Tp6Ba Da ce HaTnCHe 3a OKoNo 7 cekyHn (Pnc. 6.3, no n36Op)
CbeHne:
Korato HATINCHETe 6yToHa 3a peCTapTnpaHe C KJIouHa,JaMnata Ce BpbUa Ha 3aBOIDCKN HAcTPOIKN.
Cnei n3BbprwBaHe Ha peceT,Ha BCEKN 4 cekyHnnp03ByuBa CnRHaJ.
- KanakbT da ce noctabn n 06e30-nacnteHnrt BnHT da Ce 3aBnHTn (pnc. 6.4, no n36op)
ONaKOBaH I npuPyXeH OT KpaTko
ONICAHHe Ha JepeKTa, KacOBa
6eIeKka nn paKaTpya (daTa Ha
NOKyPkA N neaT Ha TbproBeU).
Pemonten cepBn3: CJIeN n3TnuaHe Ha rapaHnra Ta IIN pRn DepeKtn, HENOKPITN OT rapaHnraTa, NOnNTaIte B Na6JIn3Kn 3aBODcKn cepBn3 3a Bb3MOXHOCTnte 3a peMOHT.

12. Празвни сбendeши
JIuHa cfepa
L 620 CAM SC e pa3pa6oTeHa 3a yno-tpe6a HaBbH. 3aKOHnte BbB Ba7ata cTpaHa MOraT Da OgranuAbaT Ha6IIO-DeHnTo Ha 3OHN u3BbN Ba7aTa Kb7a, Ba7eTo XJInIe IIN Ba7na NapceI. MoJr INΦopMpaIte ce 3a IOKaIHO-TO 3aKOHODaTeJICTBO. 3a Da ONa3nte JInHata Ccpepa Ha dpyrIte, MOHTnpaI-Te KaMepaTa Taka, Ye Da He MOraT Da 6bDat 3aChemaHn ObIecTBeHn MeCTa, YInu NII CNBcEHN napeJI.
OcBeH ToBa npEOpBvBaMe Da NH-ΦopMnPaTe pOdHnHn, NocEtIeJn I nepcoHaI 3a L 620 CAM SC n HeHnTe ΦyHKuN.
CnryphocT
IImaIte npeBnD, ye ynoTpe6bata Ha L 620 CAM SC B n3BbHpeHN cNtuau nn HapnpMeB CnyauHa Obnp He BOIN aBTOMaTNUHO Do Cbo6UeHne B npInloXeHneTo. B cnyauHa Huxda Bne Tpr6Ba Da OCbIeCTBnTe CneShOTO NobIKBaHe. STEINEL GmbH He noema OTROBOPHOCT 3a JInncBauni I rpeuHn NOBINKBAHNAI 3aPiNCn.
13. Texnueckn daHnn
N = HnyeBOI npOBoD (aue BCero CnHni)
= npoBOd 3a3eMJIeHnA (3eJIeHbI / XeJIITbI)
B clyuae comHeHnIeHTnOu npoBaTb npOBoJa C NOMOUsIO INHnKaTopa, 3aTeM CHOBA OTKJIouHTb HApJxKeHne. PnpcoEINHTb pa3HbI, HnyeBOI npOBoN I npOBoD 3a3eMJeHnK COOT-BETCTByUzIM KJIeMMam CBetnJbHnKa.
Baxkho: He npaBnIbHoe npincoeHne npoBOIOB B yCTPOINCTBE INN B paCnppeDeJIInTeBHom RAUNKE C npeOxpaHNTeJMaM MoKET pINBeCTN K KOPOTKOMy 3aMbIkaHIO. B TaKOM cLnyae peKOMeHN dyETcE ue pa3 npOBepITb npoBOda n 3aHOBO NOKJIOnHTb nx. Pn HEo6XoIMOCTN B CTeBOI npOBOD MOKET 6bITb BMOHTuPobAH BbIKNoHaTeNb dIy BKIOUChEN I BBIKIOUeHNA CTeBOrTO TOKa.
IcToHnK CBeTa 3TOrO npoxKeKTopa He nOpJexKHT 3aMeHe. PnHcO6XoDnMoCTn 3aMeHbI NcToHnKaCBeTa (HaNPmEp, B KOHcE erO cPokaClyk6bl), Heo6xOdIMO 3aMeHnTb BeCbnpoxKeKTop.
IodKIOUeHne K cyMepeHOMy OCBeIeHNIO BeTeK IOBpeXdEHNIo CBETNJbHNKa C KaMepoI.
5. MoHTax
- Поберпь BCE KOHCTpyKTHBhIe detaJI Na npEIMET NOBpeJKeHnIa.
- Пи поврждених He BKJIIOUaTb npOdyKT.
- Пи мотхе CBeTNьнka C
- Камеро СледиТь 3a Tem, YTOбI OH
- Креллся 6e3 Вбраци.
- Bыбраь похояшee MeCTO ДЯ мОнТаЖа с учETOM paДиУСа ДeйСТВИА и PerINCTpaцИN DBИХЕНИ. (pnc. 5.1)
- BbI6paTb NOxOJaUe MeCTO JnMy MoHTaxKa C yYeTo cKOpocTu WLAN. Jn pa6oTb IOnXHa 6bITb oBeCneueHa cKOpocTb B KaK MInHmym 2 M6nt/c.
Popraok MoNTaxka
OTnyCTNTb KpeNexKhbl BnHT n CHrTb CBETnJIbHnK C KaMepoC KPOHJTeuHa.ДЯэTORO HaxKaTbФNKCaTop (pnc.5.2)
- HAMETNtB OTBepCTnI dIy CBepNeHnI (pnc. 5.3)
- ПорocВерЛNTь OTВерСТЯ И BCTаВИТь Дюбел (pnc. 5.4)
- Пикрутпь кронштейн (pnc. 5.5)
- ПОДКЛЮЧИТБ COЕДИНΥТЕЦHBи Kабел (pnc. 5.6)
- HandeTb CBeTnIbHnK C Kamepoi Ha KpoHHTeH N 3aTAYtB KpeNExKhBi BnHT (pnc.5.7)
BkIIOHTb 3JIeKTPoNTaHHe (pnc.5.7)
- YdaJIte HaKJIeKN C ceHcopa N KaMepbl (pnc. 5.7)
- Bылолнить ретулировки → "6. Эксплуataция"
Kamepy MOxHOBbIPOBHrTb BpyHyIO. (pnc. 5.8)
6. BbOДВЭКСПЛУАТAUH
Cnctemhble Tpe6oBaHna:
- 2,4 ΓΓι >> KaMepa MoXeT 6bITb yCTaHOBHeHa TOnbKO B CeTn 2,4 ΓΓι. POnxAlyuNcTa, BpeMeHNO OTKlIOUHTe YacToTHbI dNaIa3OH 5 ΓΓι B MapwpyTu3aTope Ha BpeMa yCTaHOBKn (NII NpeEmeHynte cTe b 5 ΓΓι). Ero MOxHo NOBTOpHo aKTINBIPOBaTb NocJe 3aBepWeHn IPOUeCCA yCTaHOBKn.
- OTKJIIOUHTe peTpaHcJIaTOp WLAN ot CETN BO BpEMI pOUECCA yCTaHOBKN, N03Ke eIg MOxHo 6yDet CHOBa aKTHINPOBaTb
- Y6eHNTecb, yTO WiFi6 oTKIIOUeyen nJIy uTO B HAcTpoiKax MapuPyTu3aTopa aKTINBInPOBaHa o6paTHaY COBMeCTIMOcTB dJa WiFi4.
- Y6eIITecb, yTO CeTb WLAN 3aunΦpoBaHa B COOTBETCTBn CO CTaHapToM WPA2. KaMepa He NOndepKnBaet WPA3 n BBiSe
- Y6eIITecb, YTO CBET KaMepbl IMeET DOCTaTOHyIO npOnyCKHyO CnOCo6HOCTb B MecTe yCTaHOBKN.
- YbEITecb, yTO npIIOxKeHne Steinel Cam Ha cMapTfoHe nMeet BCE Heo6XODIMbIe pa3peUeHn (ocObeHNO pa3peUeHne Ha ONpeJeHne MeCTOnOLOXKeHn (Heo6XODIMO dIa TOrO, yTO6bl KaMepa OShapyKnla CeTB WLAN,MbI He 3aINCbIBaEM MECTOnOLOXKeHne HaJINKJIeHTOB)).
KoHfIgypaun np6opa:
3JIeKtpoNTaHHe yCTaHOBJIeHo:
-Пиборзагружkaetс.
- CIV COCTOHNI T KpaCHbIM UBeTOM.
Pocne 3aRpy3kn:
-3ByKOBOI cHnJI KaKdIe 4 cEkyHdbI.
-
CBETODIOI COCTOHN MURAET KpacHBIM LCBETOM.
-
OTkpblTb npnIOxKeHne Steinel CAM.
- BBecTu Ha3BaHne cEtTu n CeTeBOi KIIOU WLAN-poyTepa B npuIoXeHne Steinel
CAM.
Bo Bpem CoeHHeHn np6opa n WLAN-poytera:
- CeKyHnHbI 3ByKOBoN cnHnA1.
- CnД coCTOЯня 6bICTpo MInraet 3eJIeHbIM LcBETOM.
CmapTfoH nnI nnHaHWeT CoeINHeHbIC npi6opom:
- CnHaJ OTKJIIOUJIIC.
- CIV COCTOHN MEdJIeHNO Mnraet 3eJIeHbIM LCBETOM.