SUWH500 - Wall mount SONY - Free user manual and instructions
Find the device manual for free SUWH500 SONY in PDF.
| Product Type | Wall mount for TV |
| Brand | Sony |
| Model | SUWH500 |
| Compatibility | Sony LCD TVs from LX90, NX80, NX70 series (40 to 60 inch models) |
| Tilt | Yes, thanks to the integrated tilt bracket |
| Material | Steel |
| Color | Black |
| Maximum supported weight | 50 kg (estimate for compatible models) |
| Wall fixing | Wall plugs and screws provided (for thick or thin walls) |
| Package contents | Bracket with wire, 2 pulleys, tilt bracket, belt bracket, support belt, wall plugs (A and B), screws (wood and M5, M6), washers, paper template, installation guide, instruction manual |
| Safety | Anti-fall support belt to be fixed to the wall |
| Installation | Must be carried out by a certified installer |
| Maintenance | Clean with a soft, dry cloth; do not use abrasive products |
| Repairability | Spare parts not available; contact Sony after-sales service |
| Warranty | Standard legal warranty; covers manufacturing defects |
Frequently Asked Questions - SUWH500 SONY
User questions about SUWH500 SONY
0 question about this device. Answer the ones you know or ask your own.
Ask a new question about this device
Download the instructions for your Wall mount in PDF format for free! Find your manual SUWH500 - SONY and take your electronic device back in hand. On this page are published all the documents necessary for the use of your device. SUWH500 by SONY.
USER MANUAL SUWH500 SONY
To Customers and Sony Dealers
Wall-Hanging Bracket
Instructions GB
Mode d'emploi FR
Instrucciones ES
Gebrauchsanweisung DE
Instructies NL
Istruzioni IT
Bruksanvisning SE
Instrukcje PL
Instruções PT
Vejledning DK
Käyttöohje FI
Instruksjoner NO
Οδηγός GR
Talimatlar TR
Utasítások HU
Instrukce CZ
Inštrukcie SK
Инструкции RU
Інструкції UA
Hướng dẫn VN
說明書 CT
사용설명서 KR
วิธีใช้งาน TH
تعليمات AR
راهنما PR
SU-WH500
On Safety
Thank you for purchasing this product.
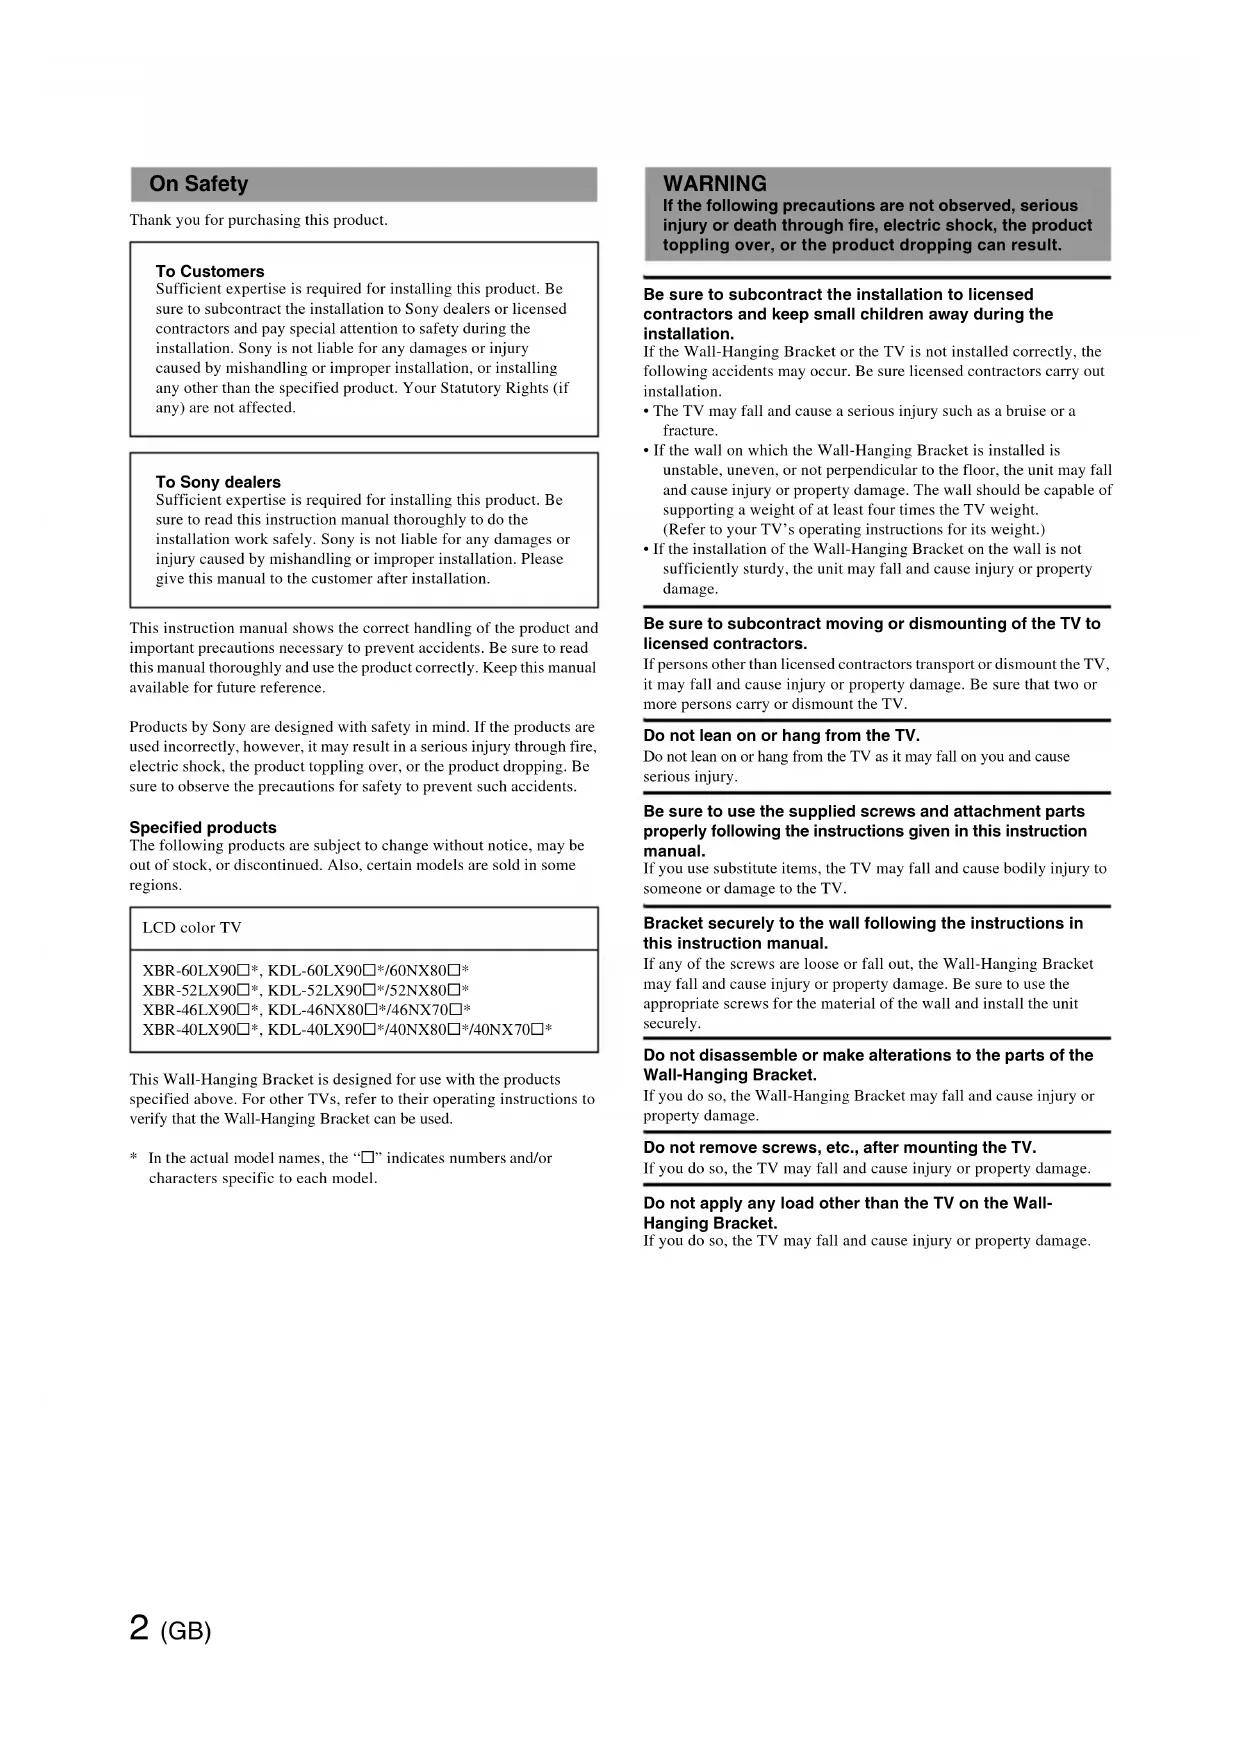
To Customers
Sufficient expertise is required for installing this product. Be sure to subcontract the installation to Sony dealers or licensed contractors and pay special attention to safety during the installation. Sony is not liable for any damages or injury caused by mishandling or improper installation, or installing any other than the specified product. Your Statutory Rights (if any) are not affected.
To Sony dealers
Sufficient expertise is required for installing this product. Be sure to read this instruction manual thoroughly to do the installation work safely. Sony is not liable for any damages or injury caused by mishandling or improper installation. Please give this manual to the customer after installation.
This instruction manual shows the correct handling of the product and important precautions necessary to prevent accidents. Be sure to read this manual thoroughly and use the product correctly. Keep this manual available for future reference.
Products by Sony are designed with safety in mind. If the products are used incorrectly, however, it may result in a serious injury through fire, electric shock, the product toppling over, or the product dropping. Be sure to observe the precautions for safety to prevent such accidents.
Specified products
The following products are subject to change without notice, may be out of stock, or discontinued. Also, certain models are sold in some regions.
LCD color TV
XBR-60LX90□*, KDL-60LX90□*/60NX80□*
XBR-52LX90□*, KDL-52LX90□*/52NX80□*
XBR-46LX90□*, KDL-46NX80□*/46NX70□*
XBR-40LX90□*, KDL-40LX90□*/40NX80□*/40NX70□*
This Wall-Hanging Bracket is designed for use with the products specified above. For other TVs, refer to their operating instructions to verify that the Wall-Hanging Bracket can be used.
* In the actual model names, the “□” indicates numbers and/or characters specific to each model.
WARNING
If the following precautions are not observed, serious injury or death through fire, electric shock, the product toppling over, or the product dropping can result.
Be sure to subcontract the installation to licensed contractors and keep small children away during the installation.
If the Wall-Hanging Bracket or the TV is not installed correctly, the following accidents may occur. Be sure licensed contractors carry out installation.
- The TV may fall and cause a serious injury such as a bruise or a fracture.
- If the wall on which the Wall-Hanging Bracket is installed is unstable, uneven, or not perpendicular to the floor, the unit may fall and cause injury or property damage. The wall should be capable of supporting a weight of at least four times the TV weight. (Refer to your TV's operating instructions for its weight.)
- If the installation of the Wall-Hanging Bracket on the wall is not sufficiently sturdy, the unit may fall and cause injury or property damage.
Be sure to subcontract moving or dismounting of the TV to licensed contractors.
If persons other than licensed contractors transport or dismount the TV, it may fall and cause injury or property damage. Be sure that two or more persons carry or dismount the TV.
Do not lean on or hang from the TV.
Do not lean on or hang from the TV as it may fall on you and cause serious injury.
Be sure to use the supplied screws and attachment parts properly following the instructions given in this instruction manual.
If you use substitute items, the TV may fall and cause bodily injury to someone or damage to the TV.
Bracket securely to the wall following the instructions in this instruction manual.
If any of the screws are loose or fall out, the Wall-Hanging Bracket may fall and cause injury or property damage. Be sure to use the appropriate screws for the material of the wall and install the unit securely.
Do not disassemble or make alterations to the parts of the Wall-Hanging Bracket.
If you do so, the Wall-Hanging Bracket may fall and cause injury or property damage.
Do not remove screws, etc., after mounting the TV.
If you do so, the TV may fall and cause injury or property damage.
Do not apply any load other than the TV on the Wall-Hanging Bracket.
If you do so, the TV may fall and cause injury or property damage.
CAUTION
If the following precautions are not observed, injury or property damage may occur.
Do not install the Wall-Hanging Bracket on wall surfaces where the corners or the sides of the TV protrude away from the wall surface.
Do not install the Wall-Hanging Bracket on wall surfaces such as a pillar, where the corners or the sides of the TV protrude away from the wall surface. If a person or object happens to hit the protruded corner or side of the TV, it may cause injury or property damage.
Do not install the TV over or under an air-conditioner.
If the TV is exposed to water leaks or air current from an air conditioner for a long time, it may cause a fire, an electric shock or a malfunction of the TV.
Be sure to tighten the screws securely in the designated position.
If you fail to do so, the TV may fall and cause bodily injury to someone or damage to the TV.
Be careful not to subject the TV to shock during installation.
If the TV is exposed to shock, it may fall or break apart. This may cause injury.
Be sure to install the TV on a wall that is both perpendicular and flat.
If you fail to do so, the TV may fall and cause injury.
Do not allow the AC power cord or the connecting cable to be pinched.
If the AC power cord or the connecting cable is pinched between the unit and the wall or is bent or twisted by force, the internal conductors may become exposed and cause a short circuit or an electrical break. This may cause a fire or an electric shock.
Do not handle the product with excessive force during cleaning or maintenance.
Do not apply excessive force on the topside of the TV. If you do so, the TV may fall and cause injury or property damage.
Precautions
- If you use the TV installed on the Wall-Hanging Bracket for a long time, the wall behind or above the TV may become discolored or the wallpaper may come unstuck, depending on the material of the wall.
- If the Wall-Hanging Bracket is removed after installing it on the wall, the screw holes are left.
- Do not use the Wall-Hanging Bracket in a place where it is subjected to mechanical vibrations.
Preparation
- Be sure to have the TV's operating instructions, the supplied "Installation Guide," a Phillips screwdriver, and an electric drill before installation.
- If you use a supported TV model that is not described in this manual, check the installation procedure by referring to your TV's operating instructions.
- Refer to the "Installation Guide" when there is a appended to the procedure.


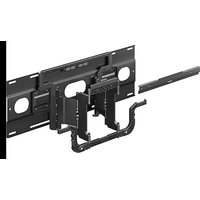
Check the supplied items
| A Wire Bracket ×1 | |
| B Pulley ×2 | |
| C Ti t-up Bracket ×1 | |
| D Belt Bracket ×1 | |
| E Support Belt ×1 | |
| F Anchor A ×6 (Spare ×1) | |
| G Wood Screw (φ5×65) | ×6 (Spare ×1) |
| H Anchor B ×6 (Spare ×1) | |
| I Screw (M5×60) ×6 (Spare ×1) | |
| J Screw (M6×18) ×4 | |
| K Cushion A ×4 | |
| L Cushion B ×4 | |
| M Paper Template ×1 | |
| N Installation Guide ×1 | |
| O Instructions(this manual) | ×1 |
20^
Keep small children away from the small parts to prevent accidental swallowing.

Installation
1
Decide on the installation location
Decide on the center position of your TV.
1 Make a mark on the Paper Template Ⓜ that indicates the screen center of your TV, referring to the Screen center dimension Ⓒ in "TV installation dimensions table" at the end of this manual.
Tape the Paper Template to the wall.
2 Decide on the installation location, referring to your TV's dimension and the screen center mark on the Paper Template Ⓜ, and tape the Paper Template Ⓜ to the wall.
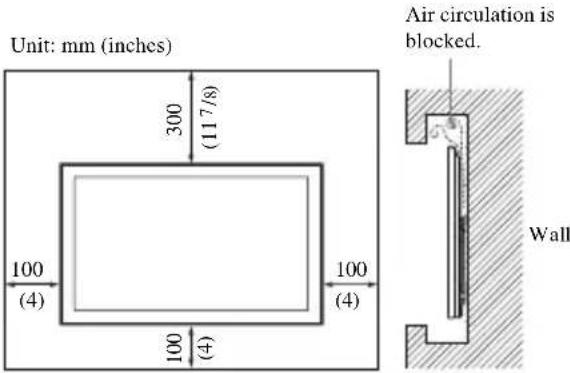
Allow for suitable clearance between your TV and the ceiling and protruding parts of the wall as shown below to the left. Never install your TV as shown below to the right:
_2
If you intend to route the cables into the wall, make a hole in the wall to insert the cables before beginning the installation.
2
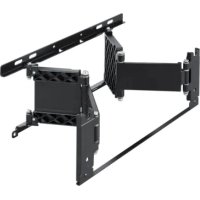
Install the Wire Bracket on the wall
WARNING
The wall that the TV will be mounted on should be able to support a weight of at least four times that of the TV. (Refer to your TV's operating instructions for its weight.)
Determine the strength of the wall the TV will be mounted on. Reinforce the wall sufficiently, if necessary.
Make holes for installing on the wall.
1 Make four holes at the marks on the Paper Template Ⓜ using an electric drill.
A For thick walls
Make holes 65 mm (2 5/8 inches) deep in the wall using a 9 mm (3/8 inches) electric drill. This is for a standard installation.
B For thin walls
This is for a sturdier installation using the Anchor B Ⓗ. Make holes only in the superficial area of the wall using a 13 mm ( ^17/_32 inches) electric drill.
Install the Wire Bracket.
Peel the Paper Template Ⓜ from the wall, and secure the Wire Bracket Ⓐ to the wall.
A For thick walls
① Insert the Anchors A Ⓕ into the holes of the wall.
2 Secure the Wire Bracket Ⓐ with the four Wood Screws (φ5×65) Ⓖ to the wall.
B For thin walls
① Insert the Anchors B Ⓗ with the metal parts turned towards the holes of the wall.
2 Pull the Anchors B and confirm that they do not come out from the wall.
3 Push the cap of the Anchor B Ⓗ into the wall.
4 Shift the upper and lower tips of the Anchor B Ⓗ to the front and back, and then stretch the two handle pieces up and down until they touch the wall.
5 The two handle pieces are torn out, and the Anchor B Ⓗ is fixed in the wall.
6 Secure the Wire Bracket Ⓐ with the four Screws (M5×60) Ⓞ to the wall.
3 Prepare for the installation of the TV
Make sure that your TV has the Table-Top Stand attached, and the TV is not tilted (at an angle of 0^ ). If your TV has a terminal cover or a bottom cover attached, remove it before carrying out the procedure below.
For details, refer to your TV's operating instructions.
When using an electric screwdriver, set the torque setting to approximately 1.5 N•m {15 kgf•cm}.
Attach the Cushions.
Attach one Cushion A Ⓗ to each Pulley Ⓑ, and attach two Cushions B Ⓛ each to the Tilt-up Bracket Ⓒ and the Belt Bracket Ⓓ, respectively.
If you use the Home Theatre System HT-CT350
Also attach the remaining Cushions to each Cushion that has already been attached to the two Pulleys, Tilt-up Bracket, and Belt Bracket respectively.
Remove screws from the rear of your TV.
If your TV has four screws tightened on the rear, remove all of them. Refer to your TV's operating instructions for details.
Attach the Pulleys.
Tighten the Pulleys Ⓑ with Screws (M6×18) ⏻ to the upper two screw holes on the rear of your TV.
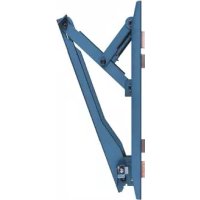
Attach the Tilt-up Bracket.
Tighten the Tilt-up Bracket © with Screw (M6×18) ⏻ to the bottom right screw hole on the rear of your TV.
Attach the Support Belt.
Align the Support Belt E^* between the two sides of the Belt Bracket D , and adjust the position of the Support Belt E so that at least one hole of it hangs down below the bottom edge of the TV.
Tighten it with Screw (M6×18) ⏻ to the bottom left screw hole on the rear of your TV.
Installation of the Support Belt Ⓔ on the wall is recommended for safety.
Connect the AC power cord and connecting cables.
For details, refer to your TV's operating instructions.
4 install your TV on the wall
Remove the Table-Top Stand.
For details, refer to your TV's operating instructions.
Hang your TV on the wire of the Wire Bracket.
Be sure that two or more persons hold the TV, each person using both hands. Hang the axles of both Pulleys ⑧ installed to the TV onto the wire firmly.
Adjust the slant of your TV.
Move your TV right or left as you look at its front, so as to adjust it horizontally.
Prevent your TV from falling.
Tighten the Support Belt ⑤ with the Anchor A ④ and the Wood Screw ( 5×65 ) ⑥ (for thick walls), or with the Anchor B ⑦ and the Screw (M5×60) ① (for thin walls) to the wall.
Confirm the completion of the installation
Check the following points.
- The axles of both Pulleys Ⓑ are firmly hung onto the wire.
- The cord and the cable are not twisted or pinched.
Other information
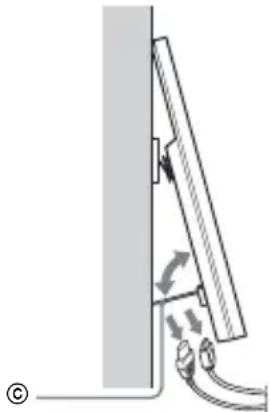
To disconnect the cables
Use the Tilt-up Bracket © to tilt your TV to the front to easily disconnect the cord and cables with the TV still hung to the wall.
If your TV is XBR-60LX90□* or KDL-60LX90□*/60NX80□*, the Tilt-up Bracket © cannot be tilted.
* In the actual model names, the “□” indicates numbers and/or characters specific to each model.
natural_image
Diagram of a mechanical assembly with rotating components and a curved pipe (no text or symbols)Retirez le support de table.
natural_image
Diagram of a mechanical assembly with rotating components and a curved pipe (no text or symbols)工
XBR-40LX90□*, KDL-40LX90□*/40NX80□*/40NX70□*
natural_image
Diagram of a mechanical assembly with rotating components and a curved pipe (no text or symbols)Sicherheit
XBR-40LX90□*, KDL-40LX90□*/40NX80□*/40NX70□*
natural_image
Diagram of a mechanical assembly with rotating components and a curved pipe (no text or symbols)Veiligheid
natural_image
Diagram of a mechanical assembly with rotating components and a curved pipe (no text or symbols)XBR-40LX90□*, KDL-40LX90□*/40NX80□*/40NX70□*
natural_image
Diagram of a mechanical assembly with rotating components and a curved pipe (no text or symbols)Om säkerhet
XBR-40LX90□*, KDL-40LX90□*/40NX80□*/40NX70□*
natural_image
Diagram of a mechanical assembly with rotating components and a curved pipe (no text or symbols)Bezpieczeństwo
XBR-40LX90□*, KDL-40LX90□*/40NX80□*/40NX70□*
natural_image
Diagram of a mechanical assembly with arrows indicating motion, no text or symbols presentSegurança
XBR-40LX90□*, KDL-40LX90□*/40NX80□*/40NX70□*
natural_image
Diagram of a mechanical or electrical component with curved arrows indicating motion, no text or symbols present[Unreadable]
XBR-40LX90□*, KDL-40LX90□*/40NX80□*/40NX70□*
natural_image
Diagram of a mechanical assembly with rotating components and a curved pipe (no text or symbols)Turvallisuus
The Ground Truth image displays a single, solid horizontal line. According to Rule 2 (UNDERSCORE & LINE RULES), this is a stylistic or background line, not a placeholder underscore. Therefore, the OCR result must ignore it and output nothing or only meaningful text. The provided OCR content is "____", which consists of four underscores. This is an incorrect interpretation of the line as a placeholder, violating the rule that stylistic lines must be ignored. The OCR has hallucinated underscores where none should exist based on the GT's visual context. Hence, the OCR result is inconsistent with the Ground Truth.
Irrota pöytäjalusta.
natural_image
Diagram of a mechanical assembly with rotating components and a curved pipe (no text or symbols)Om sikkerhet
Forhindre at TV-en velter.
natural_image
Diagram of a mechanical assembly with rotating components and a vertical panel (no text or symbols)Ασφάλεια
natural_image
Diagram of a mechanical assembly with rotating components and a cable, no text or symbols presentGüvenlikle İlgili
XBR-40LX90□*, KDL-40LX90□*/40NX80□*/40NX70□*
natural_image
Diagram of a mechanical assembly with directional arrows indicating motion, no text or symbols presentBiztonság
XBR-40LX90□*, KDL-40LX90□*/40NX80□*/40NX70□*
natural_image
Diagram of a mechanical assembly with rotating components and a curved pipe (no text or symbols)O bezpečnosti
XBR-40LX90□*, KDL-40LX90□*/40NX80□*/40NX70□*
natural_image
Diagram of a mechanical assembly with rotating components and a curved pipe (no text or symbols)XBR-40LX90□*, KDL-40LX90□*/40NX80□*/40NX70□*
natural_image
Diagram of a mechanical assembly with rotating components and a curved pipe (no text or symbols)_2
Ak máte televízor XBR-60LX90□* alebo KDL-60LX90□*/60NX80□*, vyklápací držiak © nie je možné naklonif.
natural_image
Diagram of a mechanical assembly with rotating components and a curved pipe (no text or symbols)natural_image
Diagram of a mechanical assembly with rotating components and a curved pipe (no text or symbols)Về sự an toàn
XBR-40LX90□*, KDL-40LX90□*/40NX80□*/40NX70□*
natural_image
Diagram of a mechanical assembly with arrows indicating motion, no text or symbols present產品名稱:壁掛式支架
型號: SU-W11500
製造年份:如包裝上標示
生產國別:中國
進口商:台灣索尼股份有限公司
地址:台北市長春路 145 號 5 樓
關於安全
感謝您購買本產品。
致用戶
XBR-40LX90□*、KDL-40LX90□*/40NX80□*/40NX70□*
natural_image
Diagram of a mechanical assembly with rotating components and a vertical panel (no text or symbols)안전을 위하여
XBR-40LX90□*, KDL-40LX90□*/40NX80□*/40NX70□*
natural_image
Diagram of a mechanical assembly with arrows indicating motion, no text or symbols presentว่าด้วยความปลอดภัย
natural_image
Diagram of a mechanical assembly with rotating components and a base, no text or symbols presentنصب تلاويزيون روی دیوار
4
natural_image
Diagram of a mechanical assembly with rotating components and a base, no text or symbols presentnatural_image
Diagram of a mechanical assembly with arrows indicating motion, no text or symbols presentXBR-40LX90□*, KDL-40LX90□*/40NX80□*/40NX70□*