
GBA 18V - Portable radio Fein - Free user manual and instructions
Find the device manual for free GBA 18V Fein in PDF.
| Product type | Jobsite portable radio |
| Brand | Fein |
| Model | GBA 18V (ARAD18BCAS) |
| Power supply | 18 V lithium-ion battery (GBA 18V / ProCORE18V) or mains 100-240 V via included adapter |
| Audio output power | 2 x 7.5 W |
| Radio reception | DAB+ (174.928-239.200 MHz) and FM (87.5-108 MHz) |
| Bluetooth | Version 5, range 10 m, power 10 mW |
| Connectivity | 3.5 mm AUX input, USB port for charging (max 1.2 A) |
| Dual Speaker function | Allows using two radios in stereo |
| Memory | 4 presets per source (DAB, DAB2, FM, FM2) |
| Display | Multi-function display with backlight |
| Protection | IP54 (dust and splash water protected) with covers closed |
| Weight | Approx. 2.8 kg (without battery) to 3.9 kg (with battery) |
| Backup battery | CR2032 (for clock and settings) |
| Battery life | Variable depending on battery (up to several hours) |
| USB charging | Charging external devices (max 1.2 A) |
| Antenna | Telescopic rod |
| Carrying handle | Integrated |
| Suspension hook | Integrated |
| Auto power off | After 19 minutes without signal or volume at 0 |
| Cleaning | Soft damp cloth, no solvents |
| Safety | Protected battery and connector covers, auto stop |
Frequently Asked Questions - GBA 18V Fein
User questions about GBA 18V Fein
0 question about this device. Answer the ones you know or ask your own.
Ask a new question about this device
Download the instructions for your Portable radio in PDF format for free! Find your manual GBA 18V - Fein and take your electronic device back in hand. On this page are published all the documents necessary for the use of your device. GBA 18V by Fein.
USER MANUAL GBA 18V Fein
Original instructions
Safety instructions

Read all the safety and general instructions. Failure to observe the safety and general instructions may result in electric shock, fire and/or serious injury.
Keep all the safety and general instructions for future reference.
Always check the radio, power supply, cable and plug before use. Stop using the radio if you discover any damage. Do not open the radio or power supply yourself, and have them repaired only by a qualified specialist using only original replacement parts. Damaged radios, power supplies, cables and plugs increase the risk of electric shock.
The mains plug of the power-supply must match the plug socket. Never modify the plug in any way. Do not use any adapter plugs with radios. Unmodified plugs and matching plug sockets will reduce the risk of electric shock.
Do not misuse the cable of the power supply, for example by using it to carry, hang up or unplug the radio. Keep the cable away from heat, oil, sharp edges and moving parts. Damaged or entangled cords increase the risk of electric shock.

Do not expose the radio and power supply to rain or wet conditions. If
water penetrates into the radio or power supply there is an increased risk of an electric shock.
Do not open the battery. There is a risk of short-circuiting.
In case of damage and improper use of the battery, vapours may be emitted. The battery can set alight or explode. Ensure the area is well ventilated and seek medical attention should you experience any adverse effects. The vapours may irritate the respiratory system.
If used incorrectly or if the battery is damaged, flammable liquid may be ejected from the battery. Contact with this liquid should be avoided. If contact accidentally occurs, rinse off with water. If the liquid comes into contact with your eyes, seek additional medical attention. Liquid ejected from the battery may cause irritation or burns.
The battery can be damaged by pointed objects such as nails or screwdrivers or by force applied externally. An internal short
circuit may occur, causing the battery to burn, smoke, explode or overheat.
- When the battery is not in use, keep it away from paper clips, coins, keys, nails, screws or other small metal objects that could make a connection from one terminal to another. A short circuit between the battery terminals may cause burns or a fire.
Only use the AMPShare battery in the manufacturer's products or those of the AMPShare partners. This is the only way in which you can protect the battery against dangerous overload.
Only charge the batteries using chargers recommended by the manufacturer. A charger that is suitable for one type of battery may pose a fire risk when used with a different battery.

Protect the battery against heat, e.g. against continuous intense sunlight, fire, dirt, water and moisture.
There is a risk of explosion and short-circuiting.
Products sold in GB only:
Your product is fitted with an BS 1363/A approved electric plug with internal fuse (ASTA approved to BS 1362).
If the plug is not suitable for your socket outlets, it should be cut off and an appropriate plug fitted in its place by an authorised customer service agent. The replacement plug should have the same fuse rating as the original plug.
The severed plug must be disposed of to avoid a possible shock hazard and should never be inserted into a mains socket elsewhere.


WARNING


Ensure that the coin cell is kept out of the reach of children. Coin cells are dangerous.
- Coin cells must never be swallowed or inserted into any other part of the body. If you suspect that someone has swallowed a coin cell or that a coin cell has entered the body in another way, seek medical attention immediately. Swallowing coin cells can result in severe internal burns and death within 2 hours.
Ensure that coin cell replacement is carried out properly. There is a risk of explosion.
en 15
Only use the coin cells listed in this operating manual. Do not use any other coin cells or other forms of electrical power supply.
Do not attempt to recharge the coin cell and do not short circuit the coin cell. The coin cell may leak, explode, catch fire and cause personal injury.
Remove and dispose of drained coin cell correctly. Drained coin cell may leak and damage the product or cause personal injury.
Do not overheat the coin cell or throw it into fire. The coin cell may leak, explode, catch fire and cause personal injury.
Do not damage the coin cell and take the coin cell apart. The coin cell may leak, explode, catch fire and cause personal injury.
Do not allow damaged coin cells to come into contact with water. Leaking lithium may mix with water to create hydrogen, which could cause a fire, an explosion, or personal injury.
The Bluetooth® word mark and logos are registered trademarks owned by Bluetooth SIG, Inc. Any use of such marks by C. & E. Fein GmbH is under license.
Product Description and Specifications
Please observe the illustrations at the beginning of this operating manual.
Product Features
The numbering of the product features refers to the illustration of the radio on the graphics page.
(1) Display
(2) On/off button
(3) Speaker
(4) Carrying handle
(5) Preset buttons
(6) Rod antenna
(7) Source button
(8)Mute button
(9) Seek button (scan up)
(10) Seek button (scan down)
(11) Bluetooth® button
(12) Battery cover
(13) Locking lever for rechargeable battery cover
(14) Rechargeable battery holder
(15) Connector compartment
(16) Rechargeable battery release button
(17) Rechargeable battery a)
(18) Coin cell cover
(19) Utility hook
(20) Power supply (country-specific)
(21) Power supply plug-in connector
(22) Power supply connection socket
(23) USB charging socket
(24) AUX-IN socket
(25) AUX cable
a) Accessories shown or described are not included with the product as standard. You can find the complete selection of accessories in our accessories range.
Display Elements
(a) Bluetooth® indicator
(b) Audio source indicator
(c) Storage space indicator
(d) Time indication
(e) Menu function indicator
(f) Pause indicator
(g) Mute indicator
(h) Stereo indicator
(i) Battery charge indicator
(j) Multi-function indicator
Technical Data
| Construction site radio ARAD18BCAS | |
| Article number 9260 ... | |
| DAB+ reception ● | |
| Operating voltage | |
| - For operation with power supply | 18 |
| - For battery operation | 18 |
| Nominal output of amplifier | 2 x 7.5 |
| FM reception range MHz 87.5- | 108 |
| DAB+ reception range MHz 174 | 239.200 |
| Bluetooth® compatibility | Bluetooth® Spec. 5 |
| Bluetooth® operating frequency range | 2,402-2,480 |
| Max. Bluetooth® transmission power | 10 |
| Coin cell (back-up battery) | CR 2032 3 V lithium battery |
| Weight according to EPTA-Procedure 01:2014 | 2.8-3.9 A) |
| Protection ratingB) | IP54 (dust and splash-proof) |
en
Construction site radio ARAD18BCAS
| Recommended ambient temperature during charging | °C 0 to +35 |
| Permitted ambient temperature during operation and during storage | °C -20 to +40 |
| Recommended rechargeable batteries (2-8 Ah) | GBA 18V... ProCORE18V... |
| Recommended chargers | GAL 18... |
A)Depends on battery in use
B) When the battery cover (12) and connector compartment (15) are closed
C) Limited performance at temperatures < 0^
Power supply
| Article number 3 13 24 000 421 | |
| Input voltage V~ 100-240 | |
| Input AC frequency Hz 50-60 | |
| Input current mA 800 | |
| Output voltage V= 18 | |
| Output current A 1.8 | |
| Weight according to kg EPTA-Procedure 01:2014 | 0.22 |
| Protection class | ☐/II |
For additional technical data, visit: https://fein.com/ecodesign
Radio Energy Supply
Energy can be supplied to the radio via a lithium-ion rechargeable battery (17) or via the power supply (20).
Operation with Battery Pack
Use only the chargers listed in the technical data. Only these chargers are matched to the lithium-ion rechargeable battery of your radio.
Note: The use of rechargeable batteries unsuitable for your radio can lead to malfunctions or damage to the radio.
The lithium-ion battery is protected against deep discharge by "Electronic Cell Protection (ECP)". A protective circuit switches the radio off when the rechargeable battery is drained.
Do not switch the radio back on after it has been switched off by the protective circuit.
This can damage the battery.
Replacing a Rechargeable Battery
Disengage the locking lever (13) of the battery cover and open the battery cover (12) flap.
To remove a rechargeable battery, press the battery release button (16) and pull the re
chargeable battery out of the battery compartment. Do not use force to do this.
To insert a rechargeable battery, push it into the battery holder (14) such that the connections of the rechargeable battery are in line with the connections of the battery holder. Allow the rechargeable battery to engage.
Close the battery cover (12) and lock it.
Battery Charge Indicator
When the rechargeable battery is inserted, you can see the state of charge of the battery (17) in the display. When the rechargeable battery is removed, you can see this on the battery itself.
Battery Charge Indicator in the Display
The battery charge indicator (i) will appear in the display as soon as a rechargeable battery with sufficient voltage is inserted and the radio is not connected to the mains supply via the power supply (20).
| Display | Capacity |
| 80-100 % | |
| 60-80 % | |
| 40-60 % | |
| 20-40 % | |
| 5-20 % | |
| 0-5 % |
Battery Charge Indicator on the Rechargeable Battery
If the rechargeable battery is removed from the radio, its state of charge may be indicated by the green LEDs of the battery charge indicator on the rechargeable battery.
Press the button for the battery charge indicator or to show the state of charge.
If no LED lights up after pressing the button for the battery charge indicator, then the battery is defective and must be replaced.
Battery model GBA 18V...

| LEDs | Capacity |
| 3× continuous green light | 60–100 % |
| 2× continuous green light | 30–60 % |
| 1× continuous green light | 5–30 % |
| 1× flashing green light | 0–5 % |
en 17
Battery model ProCORE18V...

| LEDs Capacity | |
| 5× continuous green light 80 | -100 % |
| 4× continuous green light 60 | -80 % |
| 3× continuous green light 40 | -60 % |
| 2× continuous green light 20 | -40 % |
| 1× continuous green light 5–20 | % |
| 1× flashing green light 0–5 % |
Operation with power supply (see figure A)
Use only the power supply listed in the technical data. This is the only this way to ensure proper operation of the radio.
Pay attention to the mains voltage. The voltage of the power source must match the voltage specified on the type plate of the power supply.
Open the protective cap of the connector compartment (15). Insert the plug-in connector (21) of the power supply into the connection socket (22) (DC IN 18V). Connect the power supply to the mains supply.
After removing the plug-in connector (21), reattach the protective cap of the connector compartment (15) to protect against dirt/debris.
Changing the coin cell
To save the time and other settings on the radio, a coin cell must be inserted as a back-up battery. Before using the radio for the first time, remove the protective strip from the inserted coin cell. Disengage the locking lever (13) of the battery cover and open the battery cover (12) flap.
If required, remove the rechargeable battery (17). Pull out the protective strip under the cover (18) of the coin cell.
Replace the coin cell once the radio no longer saves the time and the display is getting weaker. To do this, turn the cover (18) of the coin cell anticlockwise (e.g. with a coin) and remove the cover. Insert a new coin cell.
When doing so, ensure that the polarity is correct according to the illustration on the inside of the cover (18).

Put the cover (18) of the coin cell back on and turn it firmly clockwise. The cover is only securely locked if the markings on the cover and padlock symbol are facing each other.
Take the coin cell out of the radio if you are not using it for a prolonged period of time.
When stored in the radio for longer periods, the coin cell can corrode and discharge itself.
Operation
Protect the radio against direct water contact. Water entering the radio increases the risk of an electric shock.
- Keep the battery cover and the protective cap of the connector compartment closed if possible. The closed covers protect the radio against water and dust.
Audio Operation
Switching On and Off
To switch on the radio, press the on/off button (2). The display (1) is activated and the audio source that was set the last time the radio was turned off is played back.
The display (1) is illuminated for a few seconds each time a button is pressed.
To switch off the radio, press the on/off button (2) again. The current setting of the audio source will be saved.
Adjusting the Volume
After the radio is switched on, the volume is always set to low.
To increase the volume, turn the on/off button (2) clockwise; to reduce the volume, turn it anticlockwise.
The volume setting
To switch off the sound, you can briefly press the mute button (8). To switch on the sound again, either briefly press the mute button again or turn the on/off button (2) clockwise.
The volume can be changed at any time. If the menu function is activated, the display will return to the menu a few seconds after you have changed the volume.
The radio switches off automatically after 19 min, if during this time:
The volume on the radio is set to 0,
The radio is muted or
- The volume on the playback device (e.g. smartphone) is set to 0.
Selecting an Audio Source
To select an audio source, press the source button (7) until the required internal or external audio source is shown in the display:
-
DAB/DAB2: Digital radio via DAB+,
FM/FM2: Analogue radio via FM, -
AUX: External audio source (e.g. smartphone) via the 3.5-mm socket AUX IN (24) in the connector compartment (15),
External audio source (e.g. smartphone) via the Bluetooth® connection.
The current audio source can be seen on the audio source indicator (b) or Bluetooth® indicator (a).
The audio sources DAB and DAB2, as well as FM and FM2, do not differ in their functionality; they offer only additional preset spaces.
Setting/saving DAB+ radio stations
To select the audio source DAB+ radio stations, press the source button (7) until DAB or DAB2 appears on the audio source indicator (b).
After a short initialisation, the last set radio station will be played back.
Each station name appears on the top line of the multi-function indicator (j). The additional information shown on the bottom line of the multi-function indicator can be set with the menu function.
- To switch the station, turn the source button (7) until the required station is shown in the display. Press the source button (7) to confirm the selection. The radio will switch to the selected station.
Alternatively, you can press the seek button (scan down) (10) or the seek button (scan up) (9) to switch the station. The radio will switch to the next available station (in alphabetical order, either descending or ascending). - To save a set station, press the preset button (5) of the required storage space until the number of the storage space appears in the storage space indicator (c).
If the four storage spaces of the DAB audio source are occupied, then switch to the DAB2 audio source, in which four further storage spaces are available, by pressing the source button (7). Please note that you must reset the required station after switching to save the change.
- To start playback of a saved station, briefly press one of the preset buttons (5). The number of the storage space will appear on the storage space indicator (c). If required, switch between audio sources DAB and DAB2 by pressing the source button (7), to allow you to go back to all saved stations.
Note: If the radio signal is weak,
To do this, either select
will be saved in preset spaces 1 to 4. Stations that have already been saved will be overwritten here.
If no DAB+ radio stations can be found,
Setting/Saving FM Radio Stations
To select the audio source FM radio stations, press the source button (7) until FM or FM2 appears on the audio source indicator (b).
The frequency of each current station will appear on the top line of the multi-function indicator (j).
The additional information shown on the bottom line of the multi-function indicator can be set with the menu function.
If there is sufficiently good reception of a suitable signal, the radio will automatically switch to stereo reception, and the stereo indicator (h) will appear in the display. The reception type can be changed to mono reception with the menu function.
- To set a specific station, turn the source button (7) (TUNE) until the required frequency or the required station is shown in the display.
- To search for the next station with high signal strength, briefly press the seek button (scan down) (10) or the seek button (scan up) (9). The next station found is shown in the display and played back.
- To search for all stations with high signal strength, press the seek button (scan down) (10) or the seek button (scan up) (9) for longer than half a second. Any station found is played back for 5 seconds, then the search is continued until the end of the frequency band. To cancel the station search, briefly press the seek button (scan down) (10) or the seek button (scan up) (9).
- To save a set station, press the preset button (5) of the required storage space until the number of the storage space appears in the storage space indicator (c). If the four storage spaces of the FM audio source are occupied, then switch to the FM2 audio source, in which four further storage spaces are available, by pressing the source button (7). Please note that you must reset the required station after switching to save the change.
- To automatically search for and save the stations with the best reception (AUTOSTORE), press the seek button (scan down) (10) and the seek button (scan up) (9) simultaneously. The radio will check all receivable stations and save the four stations with the best reception in preset spaces 1 to 4. Please note that stations that have already been saved will be overwritten here where ne
en 19
cessary.
Once the search has finished, the station saved in preset space 1 will be played back.
- To start playback of a saved station. briefly press one of the preset buttons (5). The number of the storage space will appear on the storage space indicator (c). If required, switch between audio sources FM and FM2 by pressing the source button (7), to allow you to go back to all saved stations.
Setting the Rod Antenna
The radio is supplied with a fitted rod antenna (6). For FM radio operation, point the rod antenna in the direction that enables the best reception.
If the reception is insufficient, position the radio at a different location that enables better reception.
Note: When operating the radio in the direct vicinity of radio-communication equipment or radio transceivers, or other electronic equipment, the radio reception can be subject to interference.
Connecting External Audio Sources via AUX
Remove the protective cap of the connector compartment (15) and insert the 3.5-mm connector of the AUX cable (25) into the AUX IN socket (24). Connect the AUX cable to a suitable audio source.
To play back the AUX audio source, press the source button (7) until AUX appears on the audio source indicator (b).
After removing the AUX cable connector, reattach the protective cap of the connector compartment (15) to protect against dirt/debris.
If one of the preset buttons (5) is pressed during AUX operation, the radio will switch to the station that was saved in the last used radio operating mode.
Playing Back/Controlling External Audio Sources via Bluetooth®
To play back an audio source (e.g. smartphone) via Bluetooth® , either press the source button (7) until the Bluetooth® indicator (a) appears in the display, or briefly press the
Bluetooth® button (11) regardless of the current audio source.
Whilst a connection is being established or during the search for a connection, the Bluetooth® indicator (a) will flash.
-
If the radio has already been connected to an external audio source via Bluetooth® and if this audio source is available, a connection to this audio source will automatically be established.
-
If no saved audio sources are available, the search process will start. Activate the new connection via the external audio source. For smartphones, that is generally possible via the settings in the Bluetooth® menu. The radio will appear as an available source under the name ARAD18BCAS xxx. Please observe the operating instructions for your audio source/ smartphone.
- If an available connection to an audio source via Bluetooth® needs to be ended and a new connection needs to be searched for (PAIRING), press the Bluetooth® button (11) for longer than 0.5 seconds. Activate the connection as described above.
As soon as an audio source is connected via Bluetooth® the Bluetooth® indicator (a) will light up continuously.
The name of the device connected via Bluetooth® is displayed on the top line of the multi-function indicator (j). The text from the connected device appears on the bottom line.
If no connection can be established via Bluetooth® the radio will switch off automatically after 19 minutes.
The audio source connected via Bluetooth® can also be controlled via the radio:
- To select a track and to start playback, briefly press the seek button (scan up) (9) or the seek button (scan down) (10) until the required track has been reached. Playback of the selected track is started automatically.
- To interrupt playback, press the mute button (8). The pause indicator (f) will appear in the display.
- To continue playback, press the mute button (8) again, change the volume via the on/off button (2) or press the seek (scan up) button (9) or the seek (scan down) button (10).
- To fast-forward or rewind within a track. press and hold the seek (scan up) button (9) or the seek (scan down) button (10) until the required place in the track has been reached.
If one of the preset buttons (5) is pressed during operation via Bluetooth® the radio will switch to the station that was saved in the last used radio operating mode.
Playback with Dual Speaker Sound (with Bluetooth® audio source)
If an audio source is played back via Bluetooth® the dual speaker sound (DSS) function can be activated. Two ARAD18BCAS radios act here as a right-hand and left-hand speaker for the same playback.
Activating the dual speaker sound function:
One of the two radios must already be connected to the audio source via Bluetooth®.
- Selecting the radio as the right-hand speaker: Select from the menu
→ . - Selecting the radio as the left-hand speaker: Select from the menu <Set DSS <Left Speaker> .
- Switch on the operating mode Bluetooth® on the second radio as well.
- Select the other speaker from the menu on the second radio.
- Control the playback via Bluetooth® as usual.
Changing Menu Settings
To get to the menu function, press the mute button (8) (MENU) until the menu function indicator (e) appears in the display.
Navigating in the menu:
- To scroll through a menu: Turn the source button (7).
- To select and save a menu setting: Press the source button (7) (OK).
- To switch to a submenu: Press the source button (7).
- To switch from a submenu back to a higher menu: Briefly press the mute button (8). If the highest menu level has been reached, the radio will return to audio operation.
To leave the menu function on any level and return to audio operation, press the mute button (8) until the menu function indicator (e) in the display turns off. Alternatively, the radio will automatically switch back to audio operation 10 seconds after the last press of a button.
If menu settings are no longer being saved when you switch off the radio, replace the coin cell (back-up battery).
Menu Options
The menu selection is partially dependent on the audio operating mode of the radio.
Within the menus, the name of each menu is displayed on the top line of the multi-function indicator (j), and the selectable setting on the bottom line.
Sound menu: You can adjust the treble
Time menu:
- You can choose between 24-hour <24 Hour Mode> and 12-hour <12 Hour Mode> time formats.
- You can adjust the time manually with
or .
Note: If a radio station that transmits the time is selected with the DAB/DAB2 audio source,
this time is automatically adopted. Manual time settings will be overwritten.
Reset menu: You can reset all menu settings to factory settings <Yes> or return to the current settings <No> .
Automatic station search menu: You can start an automatic station search.
Manual setting menu: You can set the required frequency manually.
- The information broadcast by the radio station
,
The frequency of the station Frequency> - The signal strength
- The program type broadcast by the radio station
.
- The information broadcast by the radio station
, - The station name
, - The program type broadcast by the radio station
.
Mono reception menu: You can switch on
Mono reception is recommended if the radio often switches between stereo and mono reception when a station has poor reception.
Dual speaker sound menu: You can set the radio as a right-hand speaker
Power Supply of External Devices
USB Port
The USB port can be used to charge devices that can be powered via USB (e.g. various mobile phones). The maximum charging current is 1.2 A. Open the protective cap of the connector compartment (15). Using a corresponding USB cable, connect the USB port of the external device to the USB charging socket (23) of the radio (USB charging).
In operation with a rechargeable battery, the external device will only be charged if the radio is switched on.
en 21
After removing the USB cable connector, reattach the protective cap of the connector compartment (15) to protect against dirt/debris.
Working Advice
Utility hook
Your radio is equipped with a utility hook (19) for hanging it up, for example, from a ladder. To do so, turn the utility hook to the required position.
Recommendations for Optimal Handling of the Battery
Protect the battery against moisture and water. Only store the battery within a temperature range of -20 to 50^ . Do not leave the battery in your car in the summer, for example.
Occasionally clean the ventilation slots on the battery using a soft brush that is clean and dry. A significantly reduced operating time after charging indicates that the battery has deteriorated and must be replaced.
Follow the instructions on correct disposal.
Maintenance and Service
Maintenance and Cleaning
Keep the radio and power supply clean to ensure good, safe operation.
Wipe off any dirt using a damp, soft cloth. Do not use any detergents or solvents.
Range of accessories
Only use original FEIN accessories. The accessories must be intended for the product.
Maintenance and After-Sales Service
Please note that products must only be repaired, serviced and tested by qualified electricians. Improper repairs can pose considerable hazards to the user.
When working metals in extreme conditions, conductive dust can settle in the interior of the product. Regularly blow out the interior of the product through the ventilation openings with dry and oil-free compressed air.
Processing gypsum-containing materials can create dust. This can settle in the interior of the product and on switching elements, and may harden due to the humidity. This may impair the switching mechanism. Regularly blow out the interior of the product through the ventilation openings and the switching elements with dry and oil-free compressed air.
Products that have come into contact with asbestos must not be brought for repair. Dispos of products contaminated with asbestos according to the regulations for disposing of waste containing asbestos that apply in the country of use.
If FEIN products or accessories require repair, please contact the FEIN after-sales service. The address can be found online at
www.fein.com.
Replace labels and warnings on the product if they show signs of ageing or wear.
The current spare parts list for this product can be found online at
www.fein.com.
Only use original spare parts.
Warranty and Guarantee
The warranty on the product is in accordance with the statutory provisions of the country in which it is placed on the market. Furthermore, the FEIN guarantee applies in accordance with the FEIN manufacturer guarantee declaration.
It is possible that only some of the accessories described or depicted in this operating manual will be among the items included with the product you have purchased.
Declaration of Conformity
FEIN declares, under its sole responsibility, that this product complies with the relevant provisions specified on the final pages of this instruction manual.
Technical documentation at:
C. & E. Fein GmbH, 73529 Schwabisch Gmünd, Germany
Transport
The recommended lithium-ion batteries are subject to legislation on the transport of dangerous goods. The user can transport the batteries by road without further requirements.
When shipping by third parties (e.g.: by air transport or forwarding agency), special requirements on packaging and labelling must be observed. For preparation of the item being shipped, consulting an expert for hazardous material is required.
Dispatch battery packs only when the housing is undamaged. Tape or mask off open contacts and pack up the battery in such a manner that it cannot move around in the packaging. Please also observe the possibility of more detailed national regulations.
Disposal
Electrical and electronic equipment, batteries, accessories and packaging should be sorted for environmentally friendly recycling.
Do not dispose of electrical and electronic equipment and batteries in the household waste!
Only for EU countries:
According to the Directive 2012/19/EU on waste electrical and electronic equipment and its transposition into national law, electrical and electronic equipment that are no longer usable, and, according to the Directive 2006/66/EC, defective or drained batteries must be collected separately and disposed of in an environmentally correct manner.
If disposed incorrectly, waste electrical and electronic equipment may have harmful effects on the environment and human health, due to the potential presence of hazardous substances.
Only for United Kingdom:
According to The Waste Electrical and Electronic Equipment Regulations 2013 (SI 2013/3113) (as amended) and the Waste Batteries and Accumulators Regulations 2009 (SI 2009/890) (as amended), products that are no longer usable must be collected separately and disposed of in an environmentally friendly manner.
Battery packs/batteries:
Li-ion:
Please observe the notes in the section on transport (see "Transport", page 21).
fr 23
Notice originale
Ative a funcão Dual Speaker Sound:
Paoipwvo epyoTaXiou ARAD18BCAS
Movo yia xwpeTNC EE:
Ota tarvittaessa akku (17) poised.
Preehravani's Dual Speaker Sound (u audiozdroju Bluetooth®)
| Indicator Capacitate | |
| 80-100% | |
| 60-80% | |
| 40-60% | |
| 20-40% | |
| 5-20% | |
| 0-5% | |
PekomeHnyetcOuHCTnTb HHTpymeH T OT nblnn NOcne KaJDoTO NcNoB3OBaHH.
XpaHeHne
-Heo6xOJMO XpaHHTb B CyXOM MeCTe
-Heo6xOaIMO XpaHHTb BdaIIN OT NCTOCHIKOB NOBblweHHbIX TeMnepaTyp IN BO3JeICTBnR COJI HeHbIX Lyuei
- npxpaheHn Heo6xoIIMO n36eRaTb pe3KOrOpepenada TemnepaTyp
-xpaHHeH6e3yNaKOBKn HeNoIyCkaETcA
- noDpO6HbIe Tpe6oBaHN K yCNoBnM XpaHeHHa CMOTpuTe B FOCT 15150-69 (yCNoBne 1)
TpaHcnoptnpoBka
KaTeOpnueckn He DoynyckaTcnaJeHne nIIO6bIe MexaHnueckNe BO3JeNCTBnHa yNaKOBky npI TpaHCnpTIpOBke
- npn pa3rpy3ke/norpy3ke He donyyckaetc nC NOIb3OBaHne IIO6Oro BUNa TeXHKn, pa6oTaIOUeN IO npnHUnny 3aJxMma yNaKOBKn
- noDpO6HbIe Tpe6oBaHnK yCIOBnM TpaHC-nOpTnpOBKn CMOTpnte B FOCT 15150-69 (YcIOBne 5)
Yka3aHnI NO TexHnKe 6e3oNaCHOCTN

PpoHTte Bce yKa3aHnN m HnCTpyKcnnno Texnke 6e3onacHOCTn. Heco6IIOJeHne yKa3aHn NTO TexnKe 6e3oNaCHOCTn n HnCTpyKcnn MOKeT npNBecTn KnopaxHeHIO 3NeKtpnuE
CKIM TOKOM, NOXapy N/INI TRAKeJIbIM TpaBMam. CoxpaHnTe 3TN INHCTpyKcnnu yKa3aHnA dny6dyuero nCNoNb3OBaHHa.
Kakdbpa3nepeHaayanompa60tbI npoBepaTe paHnonpHemHK,6LOKnTahnaCoWtencelbHOBnIKO,WHypnTahnauWtencelb.He nCNoIb3yIte paHnonpHemHK,ecnO6hApUxKeHbIOBpeXdEHnHe BCKpbBaHTe paHnonpHemHK 6LOKnTahNco WtencelbHOBnIKo camocToaTeNbHO,ero pEmONT pa3peuAetcBAInOnHrTb TObKO KBAHnHnUPOBAHHomY NepcoHaHy NTObKO C HCNOB3OBAHmOpnHaHbHbIX 3aunacte. NobpeJdeHHbe paDnONpHemHK,6LOKn nTatNaHco WtencelbHOBnIKO,WHyp n WTeKeP IOBbuaOT pNCKnopaxHe HsEKTPOTOKOM.
TENCeBnHa Bnka 6Ioka NITAHn DaJHK Ha NOxOHTb K TENTeBHO Po3ETke. Hn B KOem Cnyaae He N3MeHnTe TENTeBHyo BNky. He nCnoJIb3yIte Bmecte c paDnONpHnEMnKAMn TENTeB-NEpEXoHNK. Hen3MeHeHHbIe TENTeBHbIE BnIKN I NOxOJaIe WtENTeBHBie PO3ETKN CHNXAIOT PnCK NOPaKeHnE 3JIeKTpUeCKM TOKOM.
VcnoIb3OBaHHe 6Hypa 6Ioka NHTaHnco co wTeNCelbHOB BNKOH He NO Ha3NaueHnIO, HApnPmep, Ira TpaHCNOPTnPOBKn IIN NoBBeCKn paHNONPneMHKna, INI IJI BByTARBaHH BUNKn n3 WTeNCelbHOH PO3eTKn, He DOnyckaetc. N36eraIte Bo3deNCTBnHa
ru 193
Hyp BbICOKHX TemnepaTyp, Macna, OCTpbIX KpOMOK HIN NOdBHXHBIX qacte
3JIeKTPoHHCTpyMeHTa. NobpeXdeHHbI INn CnyTaHHbI WHyp NOBbIwaet pNCK nopaxeHn
3JIeKTPuueckmTOKOM.

3aunuatapepaonnpemHnK 6LOK nHTaHnco wTeNCelbHOBnKOOTdoxndncbipoCTn.PoHnKHOBEHNE BOdy B paHNOpneMHNKnn6LOK nTAtHnco wTeNCelbHOBnKOI NOBbHaet pCK NopaeHHN 3JIeKTpuuecknM TOKOM.
He BCKpbBaIte aKKMyJrTOp. Pn3TOM BO3HnKaet ONaCHOCTb KOpOTKOrO 3aMbKaHnA.
Pn noBpeKdEHH n HeHaJIeXaIeM nC NOJb3OBAHH aKKyMyIaTopa MoKet BbldeH NTbca ra3. AkkymyIaT op MoKet BO3rOp paTbca HN B3PbIBaTbc.06ecneHbTe npITOK CBexero BO3dyxa n npn BO3HNKHOBeHH JkaNo6 o6paTntEc b K BpaY. Ra3bl MoryT Bbl3BaTb pa3dpaxHe NdxAteNbHbIX nyTei.
Pn HnpabHbHom hCnoB3OBaHm n3 akKymyIaTopa MoXeT NOTeY bXnIKoCTb. N3-6eraIte cponkocHObeHc Hei. Pn CnyaHOM KONTAKTe npomOte COOTBeTCTByIOuee MeTO BOOn. Ecn 3Ta XnIKoCTb nonaET B rA3a, To DonOpHntelbHO o6paTHTecb 3a NOMOuBIO K BpaUy. BItKeAIOuaa aKKymyJIaTOPHaer XnIKoCTb MOXe TpNBecTu K pa3dpaxeHHIO KOxN INN K OKOrAM.
OcTpbIMnPpeMeTaMn, KaK HAp., rBO3dEmnn OTBepTKo, a TaKxE BHeuHm CnIO-BbIM BO3DeNCTBHeM MOXHO NOBpeHTb aK-KymyIaTOPOeTeNpBiBeCTN K BHyTpEnHEmy KOpOTKOMy 3aMbIKAHIO, BO3rOpAHIO C 3aDbIMLeHEm, B3pbBy NII neperpeBy aKKymyIaTOPOH6aTapei.
3aunuane HeHcnoB3yEmbI aKKyMyJrTOP OT KaHcJIePcKnx CkpeNOK, MoHET, KIOUey, rBO3Je, BnHTOB uDpyrNX MaHehBKnX MetaIINuYeCKNX PpeMToB, KOtOpbie MOrTy 3aKOpOTb NIOUca. KoPOTKoe 3aMbKaHne NOJIOCOB aKKymJrTopa MOKeT pINBeCTn K OKoRa mI IN Noxapy.
McnoIb3yIteakKymJrTop AMPShare TOnbKO Bn3dEJInx N3ROTOBNTeI nn napThepa AMPShare.ToIbKO TaK aKKymJr- Top 3aunueHOT onaCHO neperpy3KN.
3apKaTe aKKyMylTOpHbIe 6aTapeu TOlbKO C NOMOcBIO 3apAHybIX yCTPOiCTB, peKomeHDoBaHHbIX H3ROTOBHTeMe. 3apJHOe yCTPOiCTBO, ppeDyCMOTpeHHoe IJn ONpeJeHHeHO BnDa aKKyMylrTOpOB, MOxET npNBecTI K NOxapHOI ONaCHOCTI pni NC- NOlb3OBAHN erO C dpyrIMN aKKyMylrTOpaMN.

3aunuataeakkymyTOpHyo6a- tapeoOT BbICOKHX TemnepaTyp, HAp.,OT DInTeBHO HarpeBaHn Ha CoHHcE,OT ORH, rpa3N, BObl n Blarn. CyueCTByET ONaCHOCTb B3pblBa N KOPOTKOrO 3aMbKaHn.


PNEyIpyEKdEHNE


XpaHnte MmHaTIOHbIe 3JIeMeHTbl NITaHnB HeOCTyHOM IaIg DeTei MeCTe.MuHaTIOHbIe 3JIeMeHTbl NITaHnHe6e3-
ONaCHbl.
MUNHnAToHbIe 3JemeHbI NHTAHN HeJIb3r IOTaB HIN BBOINTB BIO6bIe DpyRne ECTeCTBeHHbIE OTBepCTH. Pn HAnuHN NOO3peHn, YTO MNHaTIOHbI 3JemeH THTAHN 6bl IpORIOueHnn 6bl BBedeH uepe3 HHO eCTeCTBeHHoe OTBepCTHe, HeMeJeHHo 06paNTecb K BPaCy. IpOrnaTbBaHnE MNHnAToHPO HO 3JemeHt AITaHn MOKET B TeHHe 2 acOB npNBECTN K TRAKeJIbIM BHyTpEHnM OXKOrAM n CMEpTN.
BbInolHnTe 3aMeHy MNHaTIOphORo 3neMeHTa HNTAHN HaJIeKaunm cnoco6om. CyueCTByET OnaCHOCTb B3pb1Ba.
McnoIb3yIte TOnbKO MmHnATOpHbIe 3JeMENTbI NHTAHN, yKa3aHHbIe B HAcTOraempyKOBoDCTBe NO 3KcnNyatauH. He nCnoJIb-3YIte INHbIE MmHnATOpHbIe 3JeMeNTbI NHTAHNINHbIE NCTOCHNK NITAHN.
He nbItaTecb NOBTOPOH 3apAHTb MHHaTIOHPbI 3JIeMeHNT NITAHN I He 3AmbikaTe ero hakopoTKO. MHNAtOPbH bI 3JIeMeHNT NITAHN MOKeT yTpATNb TepMeTuHOCTB, B3OpPbTaBcA, 3aOpTeBcA n HaHeCTn IIOJAM TpaB-Mbl.
M3BneKaIte n yTuINn3NpyIte pa3pJxHeHHbI MUNHaTIOPHBIE 3JIeMeHTbI NITaHnB C COOTBETCTBnC ppeHNCAHnAMn. Pa3pJxHeHHbIE MNHaTIOPHBIE 3JIeMeHTbI NITaHnB MOrYT yTpATNTb REpmTeuHOCt b INOBpeiNTb IPOdyKT nII HAHECTN IIOdAm TpaBMbl.
He HarpeBaTe MUNHaTIOpHbI 3JIeMeHT NtAHnI H He 6pOcaIte ero B OOrHb. MnHaTIOpHbI 3JIeMeHT NtAHHa MOKeT yTpAITb RePMeTuHOCb, B3OpBaTbCra RopeTbcN HaHECTN JIOdAm TpaBMbl.
He NOBpeKdaIe MmHnauTIOpHbI 3JIeMeHT NITaHnI Hpe pa36npaIteero.MmHnauTOp-HbI 3JIeMeHT NITaHnI MOKeT yTpAITb rep
MeTNUHOCTb, B3OPBaTbC8, 3aRopeTbC8 N HaHe-CTN IIOJAM TpaBMbl.
He daBaIte NOBpeKdeHHOMy MNHnA TIOpHOMY 3JIeMeHTy NITaHHa KONTaKTnPOBaTb CBOO. BbICBO6OuINBUniC JNTN MOKeT BCTyNTb B peakun C BOJOpODom BObl, Bbl-3BaB pRn 3TOM NOxap, B3pbIB nII TpaBMPOBaHne IIOJe.
CNoBechblnTOBapHbI 3NaK Bluetooth® n rpa-phiueckn 3NaK (Jorotn) yBIAOTc 3apernCTpnpoBAHHbIMn TOBapHbIMn 3HaKaMn uCo6CTBeHHocTbIO Bluetooth SIG, Inc. IIO6oe NCnonb3OBaHne 3TORO CNoBecHoro/rpaΦnueCKORo TOBapHoro 3HaKa oCyueCTBnaTeTcN C.& E.Fein GmbH ToIbko no NnueH3nn.
Onncannne npoodykTa n ycnyr
IoxaanyiCTa,co6nOdaTe nllIOCTpaunB HauaJIpe pyKOBOCTBa NO 3Kcnpyataun.
1306paXKeHHbIe COCTaBHbIe qACTn
Hymepaun npedctabHbIX COCTaBbIX aacte BbINOHeHa no 306paKeHHIO paIINOpnpeMnKa Ha cTpaHnCe CnnkOcTpaunm.
(1)Диспел.
(2) BbIKHouaTeInb
(3)ДиHAmIKU
(4)PyuKaIJIepeHocKn
(5)KHONKNIpeBapntbHO HAcTpoeHHbIX paAnOCTaHcN
(6)山TbpeBa aHTeHHa
(7)KHOHnKa yCTaHOBKn ayDnO nCTOuHNKa
(8) KhoNka OTKnOHeHn 3ByKa
(9) KhoNka noncKa «BnepeJ
(10) KHONka noncka «Ha3aД»
(11) Khonka Bluetooth®
(12) Kpbiuka aKKyMyIaTOpHOro oTceka
(13)PbHar 6IOKnPOBKn KpbIuKN aKKyMnyTOp-HOHOOTCEKa
(14)Дерхаелыakkyмлторнбатар.
(15)OTceKДЯ NOДКЛIOUeHIN
(16) KhoNka pa36loKupOBk n AkkyMnyTopa a
(17) AKKymyTOp a
(18) Kpbiuka KhonouHoro ənemeHa nHTaHn
(19)KpOyOK DnI NOBvBHaHn
(20) BLOK NITaHnco WTeNceBHOB BNkoB (B 3aBNCIMOCTNO CTpaHbI)
(21) 6opa
(22)Pa3bemIINIOKJIIOUeHn6NOKaIITAHNO CO WTeNCeBHOB BNIKOIN
(23) USB-pa3bem Дял зардкн
(24) Pa3beM AUX-IN
(25) Ka6eBb AUX
a) N3o6paXeHHbIe HnHOncaHHbIe npHaJaJIeKHOCTN He BXOJAT B CTaNapTbHI bOeBm NOCTABKn. NOnHbI aCCOPTMHT pHaJaJIeKHOCTe CM. B HaWei nporpaMMe npHaJaJIeKHOCTeI.
3nemeHTbIMHdkaun
(a)ИнданkaTOpBluetooth®
(b) INДИКaTOp aydINO nCTOчнka
(c) INHДИΚAToPЯЧЕКIN NaMЯТN
(d) Yacbi
(e) INHdNKaTOp MeHIO fHyKcN
(f) INДикаTop nay3bl
(g) INДиКаTOp BbIKIQUeHn3ByKa
(h) INHINKaTOp CtepeoNpneMa
(i) INДикaTOp 3apЯжeHHOCTn aKKyMylaTOp-HoH 6aTapeN
(j) MHorOfoyHKUHOHaJIbHbI INHdNKaTOp
TexHnueckne daHHbIe
CtpoNTbHoe paAno ARAD18BCAS
HnKaTOp 3apXeHHoCTNaKkymyIToPa
Korda 6atapera yctahOBnHeHa, Ha dncnnee OTo6paKaIOTc DaHHbIe O CTeneH 3apJKeHHOCTn aKKMyIaTopa (17), KOrda aKKMyIaTOp n3Bne-ueH, 3TN daHHbIe OTO6paKaIOTc Ha CaOM aKKMyIaTope.
HnkaTop 3apXeHHocTn aKKymyIaTopa Ha dncnnee
HnKAtop 3apKeHHocTn akymyIaTopa (i) noBraETcHa DnCnlee npu yCTaHOBke akymyIaTopa C DOCTaTOHybIM yPOBHeM 3apJa, KOrda YCTaHOBJIeH akymyIaTOP c DOCTaTOHybIM yPOBHeH HanpJKeHna, a paDnONpneMHnK He nOJKNIOUeH K 3JIeKTPoCeTn uepe3 6LOK NITAHnco WTeNCEbHO BnIKoN (20).
| Инданатор Emкость | |
| III | 80-100 % |
| III | 60-80 % |
| III | 40-60 % |
| II | 20-40 % |
| I | 5-20 % |
| I | 0-5 % |
HndkaTOp 3apXeHHoCTn aKKymyIaTopa Ha aKKymyIaTope
Ecnn akymyIaTOP n3BneueH n3 paanopnpemHNka, ypoBeHb erO 3apra MoKeT 6bItb OTo6paKeH npn NOMOuN 3eJeHbIX CBEToIONoOB INDnKaToPa 3apxKeHHoCTn Ha akymyIaTOpe.
HaKmTe KhoNky HnDnKaTopa 3apXeHHOCTn aKKymyIaTOPHO6batapeu nn yTO6bl
OTOpa3ntbCTeNeHb3apJKeHHOCTn aKKymIaTropHO6atapen.
Ecni nocne haxatna Ha KhoNky HndnkaTopa 3apxekHHoCTn aKKymyIaTOpH0n 6aTapeH He 3aropaaTcH N OIN CBeTOAnOHNb HNDnKaTOp, AkKymyIaTOp HncnPabEH eRO cNeNyET 3ameHHTb.
Tun akkymyraTopa GBA 18V...

| Сbvetoodyы Emkoc'tb | |
| Henpepbivbni 3eilehni CBET 3x | 60-100% |
| Henpepbivbni 3eilehni CBET 2x | 30-60% |
| Henpepbivbni 3eilehni CBET 1x | 5-30% |
| Mirahande 3eilehbi m cBeTOM 1x | 0-5% |
Tun akkymyntopa ProCORE18V...

| СbvetoДионы Emkocstb | |
| HenpepbИньий 3eileньий CBET 5x | 80-100 % |
| HenpepbИньий 3eileньий CBET 4x | 60-80 % |
| HenpepbИньий 3eileньий CBET 3x | 40-60 % |
| HenpepbИньий 3eileньий CBET 2x | 20-40 % |
| HenpepbИньий 3eileньий CBET 1x | 5-20 % |
| Miraанne 3eileньIMцВетом 1x | 0-5 % |
3KcNpyaTaunca 6NOKOM NHTAHNA CO WTeNCenbHOB BnIKoA (cm.pnc.A)
POnb3yITeCbTolbKO6nOKAMnNTaHnco WTeNCeJIbHOB BUNK0yKa3aHHbIMNBTexHNuecknxXapaKTePncTKax.2To eINHCTBeHHbCnOCo6,06ecneuBaIOuN 6e3ykOpn3HeHHypo6OtypaDnONpneMHNKOB.
YuHTbIaTe HanpXeHne B cetn! HanpXeHne NCTOCHNkA NITaHnA DOJIHXo COOTBeTCTBOBaT DaHHbIM Ha 3aBOJCKO Ta6NJUKe 6JOKa NITaHnA CO UTeNCBHO BNIKoN.
OTkpOte 3aunTHyIO KpbIuKy OTceKa Inna NOdkIIOUeHnra (15).BCTaBbTe WtEnCeIbHyIO BUNKy 6NOKa NITaHnna npnbopa (21) B pa3bEm IINr
NoKIOUHn (22) (DC IN 18V). NoKIOUHTe
6JOK NITAHN CO WTeNCeBHON BUNKOI K CETNI.
JIpypeOTBpaueHn NOJaAHN rpr3N 3aKpOHTe 3aunTHbIK OJINaQOK OTCEKa DJIy
NoKIOUHn (15) NocNE n3BLeueHn WTeNCeBHON BUNKI npu6opa (21).
3aMeHa KHONOuHoro 3JIeMeHTa NITaHn
KHOIOuHbI 3JIeMeHT NITAHN JOJKeH 6bITb YcTaHOBnE H KaueCTBe pe3epBHOJ 6aTapeN dJa COxpaHeHn HaCTpoEK BpemeHN I pOvHX HaCTpoEK paDIOONPnEMHnKa.
Ipeed BBODOM paHIOponpHemnka B 3KcNpyatauYdAInTE 3aunTHbI JpblbOc KHONoHOro 3JemeHTaNTAH.
Pa36JIOKUPyIe C nOMOuBIO pHyara (13) KpbIuKy aKKMyJIaTOPHOrO OTcKa N OTKpoTe ee (12).
Pn Heo6xOAnMoCTn n3BLeKeNte aKKMyIaTOp (17).
BbTaUnte 3aunTHbI npbHOK n3-NOKpkiu (18) KHONOHORO 3nemeHTaNTAHN
KHOIOUHbI 3JIeMeHT NITaHIN NOIDJeXHT 3aMe-He,ecn paDIOnpneMHNK 6OJIbSe He COxpaHReT HAcTPOkN BpeMeHn I rachET DnCnJIeN.
Длг STORO NOBepHNTe KpbIshky (18) KHOIOyHOrO 3JIeMeHTa NITaHnI PpOTnB YacOBo CTpeKn (HAnPIMep, C NOMOuH MOHeTbI) IN CHUMITE ee. UCTaHOBInTe HOBbI ΘJIeMeHT NITaHnI.
CneInte npn 3TOM 3a npabNlbHbIM HappaBHeHnEM NOIOUCOB B COOTBECTBUN C N3O6paKeHnEM Ha BHTpeHHe CTOpOHb I KpbIuKN (18).

YcTaHOBnTe KpbIuKy (18) KHONoHOrO 3JEmeHtA nHTaHn I NOBepHnTe ee no YacOBo CTpeNke. KpbIuKa HaJeKHO 3aKpbItA, TOnbKO KOrJa MapKn-POBKn Ha KpbIuKe i CmBOJe 3aMka YKa3bIBaOT dpyr Ha Dpyra.
M3BLeKaIe KHONoUHbI 3IeMeHT NtTaHnA n3 paAnOpnpemHnKa,ecn npemHnK He 6ydtncOJb3OBaTbcra B TeueHne npoDJI XHTeJbHoro BpeMeHN. Ppi dIITeJIbHOM xpa- HENn BHyTp n paAnOpnpemHnKa BO3MOxHa Kopp03n I camOpazka 3IeMeHT aNtHaHn.
3Kcnpnyataun
He donyckaTe npmaoro KOHTa pa-dnOpnpemHnka C BOIO. PonaadHne BOdbpaNDnOpnpemHnK yBelenuBaet pck ydapa3NeKTpueCKM TOKOM.
DepeKHTe KpbIshky akKymyJIaTOpHOrO OTceKa H 3aunTHbI KOnnauKo OTceKa IJN NOKJIIOUHeHNo BO3MOXHOCTn 3aKpbITbIMN.
3aKpbTbIe KpbIuKN O6ecnueHbOT 3aunTy pa- dIOONpNIEMNHKA OT BObl NblIN.
ru 197
Bocnpon3BeDenHe aydno
BkIOueHme/BBKIOueHne
YTo6bI BKIOHHTb paINOpnpeMHNK HaKMITEHa BbIKIOHATEJIb (2).DIncIIeN (1) aKTINBIPyETcN HauHHaETCBOCPON3BeDEHne ayDNOC NocNeHrero yCTaHOBNEHHORO nCTOHNka.
PnKaJDOM HaxaTIN KHOKN DcNnei (1) 3aropaaTcHa HeCKoNbKO CeKHyI.
YTo6bBbIKIOHTbpaINOpnpeMHNKCHOBaHaJXMnTe Ha BbIKIOUaTeIb(2).TekyuNe HAcTpOKnBOcPpON3BeDEHn6ydyT coXpaHeHbl.
Hactpoika rpongkoctn
Iocne BkUOeHn paAnOpnpmHnKa yCTaHaBnBaETc H3Ka rPOMKoCTb 3Byka.
NoBepHnTe BbIKIOuOaTeIb (2) No YacOBoC TpeKe, yTo6bl yBeINuHTb rPOMKoCTb, INI pOTNB YACOBO CTpeKN, yTO6bl yMeHbUHTb rPOMKoCTb.
Ha nncnnee B TeueHne HeckoIbKnx CekyHd OTo6paKaaeTc HAcTpOoi Ka rpOMKOCTn
YTo6bI OTKIOUHTb 3ByK, Bbl MOKeTe ODNHOKpaTHO HAnKaTb KHOJNY OTKIOUeHn3ByKa (8). YTo6bI CHOBA BKIOUHTb 3ByK, ODNHOpaTHO HaKMITE KHOJNY OTKIOUeHn3ByKa nIN NOBepHnTe BBIKIOUaTeJIb (2) NO YaCOBOI CTpeJIke.
POMKoCTb MOXHO N3MeHnB B IIO6oe BpeM. EcIn ΦyHKuN MeHNO AKTNBnPOBaHa, INCnne Bo3BpaaTaC B MEHIO Uepe3 HeCKOJIbKO CeKYHIO NCJe N3MeHeHr POMKoCTn.
PAnOpnPmEHMK ABTomatueeCKN BbIKIOHaeTcpe3 19 MHyT,ecnB TeueHne 3TOR0BpeMeH:
- rPOMKOCTb paIIOIpnEMHnka yCTaHOBHeHa Ha 0.
-3BykHa paIIOnpHMeMHKe BbIKIOueHII - rPOMKoCTb Ha yCTPOINCTBE BOCnpon3BeDeHnna (HaNPmep, Ha cMapTfoHe) yCTaHOBneHa Ha 0.
Bb6op aydno nctouhka
ДявьбopaaydnoHCTOCHNkaHaKIMaTe KHOJky yctaHOBKn aydno HCTOCHNka7)NOKaHaDnCnlee He NOBITcR Heo6xODmBb BHyTpEHn nIN BHeuHMy aynO HCTOCHNk:
- DAB/DAB2:цифpoBoe paДиовьане DAB+,
-FM/FM2: aHaIorOBoe FM-BeuaHne, - AUX: BheHnAayNo nCTOuHnK (Ha npMep, CmapTfoH) uepe3 pa3bem 3,5 MM AUX IN (24) BOTCEKe DnI NOIKIOUeHnR (15),
- BHeuHn ayDIO nCTOuHnK (Ha npmep, cMapToOH) NO Bluetooth®-CoeDnHeHNO.
Tekyuni aydno nCTOuyHK MOXHO y3HaTb no OTO6paKaIOUeMycs INHdkaTopy aydno nCTOUYK(a) nn HdkaTopy Bluetooth® (a).
Функюнал aydno nctouHnKOB DAB u DAB2, a TAKKe FM u FM2 He OTInuHaTcR, ODAHkoДЯ yCTaHOBKn nporpaMM Tpe6yIOTcR pa3nHbIe rYeKn nAmrTn.
YcTaHOBka/coxpaHeHne uΦpObblx paNoctaHmDAB+
ДявьбopaВКачесТеayДиNOИСТОУнkaUФ-рови радиocTahuN DAB+нжIMaTe KHONky yCTaHOBKN ayDINO INCTOUYHnKa (7), nOKa He noRBYTCa INHДNKaTOP ayDINO INCTOUYHnKa (b) DABIIN DAB2.
Nocne HnpoOnJxTeIbHoi nHuaIaun 6ydt BocpnOu3BeDeHa NocJeHra yCTaHOBHeH Ha paIOCTaHua.
Ha3BaHne paAnocTaHcun OTo6paKaetcB Bepx-Hei CToPoKe MHOrOfoyHKUHOHaJIbHOrOHdNKaTopa(j).B MeHIO FOYHKcIM MOKHO yCTaHOBnTb OTo6paKeHne IOnOIHNHTeJIbHOINHΦOpMaUNB HIXKHeI CToPoKe MHOrOfoyHKUHOHaJIbHOrO INHdNKaTopa.
ДлЯИЗМЕHEHЯ paHIOCTaHcHIN NOBOPaHuBaIte KHOKNy yCTaHOBKn aydINO
NCTOuHNka (7), nOKa Ha dncJIee He NoRbNTcRe
Heo6xoUIMma cTaNzra. HaxMITE KHOKNy
YCTaHOBKn aydno NCTOuHNka (7)ДЯ NOITBeP-
KJDeHnRA Bb6opa. PaHIOpneMHNK nepeKlIOuaeTcRa HA Bb6paHHyO cTaNZIO.
KpOME TOrO, YTO6bl CMeHnTB paHIOCTaHcNIO
Bbl MoKeTe HaKaTb KHOKNy NOnCKA"Ha3aD" (10) nIK KNOpKy NOnCKa "BnpeE" (9).PaHIOnpneMHNK nepeKIIIOuaeTc Ra cNe dyIOuOIO DOCTyHyo paHIOCTaHcNIO (B aΦabNT-HOM NoprJaKe, nO y6bIBAHIO nI IN NO BO3pactaHIO).
-Дя coxpaHHeHn HaCTpoe paHIOCTaHnHaKIMaTe KHOJIpy npeBapNTeIbHO Ha-CTpoEHHHix paHIOCTaHn (5) Heo6xoIMoJyEeKN pAMrTn, NOKa HOMep yEeKN pAMrTn He OTPa3HTcHa INHdNKaTOpe yEeKN pAMrTn (c).
Ecn 4 qeykn namrny aynno nctouhknOB DAB3aHnTb, haxmnte KhoNky yCTaHOBKn (7) ayno nctouhna DAB2, YTO6bl nepeKIOuHTb CnHa aynno nctouhnik, JIy KOTOPORO DOCTyHb eue 4 qeykn naMrtn. O6paNTe BHMaHne, YTO Bam HyxHO CHoBA HAcTPONTb HyXHypo paINOCTAHUIO NOCJIe N3MeHeHHy, YTO6bl COxpaHnTB ee.
-уTO6b3aNYCTHTB BOCnPOH3BeDeHHe COxpaHHeHHo paNIOCTAHU,ODHOKpATHO HaKMnTe Ody n3 KHOJOK ppeBapNTeHbHOHaCTpoEHhIx paNIOCTAHU (5).HomepЯeKENnPamrtn 3aRopaETc HnHnKaTope JyeKNiPamrtn (c).Ipr Heo6XoDMocTn HaxKaTneM KHONK yCTaHOBKn ayDINO nCTOuHnka (7)MOHXpeKIIouaTbc MExd y ayDINO nCTOuHnKa-MN DAB N DAB2,UTo6bl NOyHTb DOCTyN KOBCEM COxpaHeHHbIM paNIOCTAHUm.
PnmeaHne: npn cna6om paNocnHaJe OTo6paXaAeTcra
Длг STOROBыберпгулngo
EcnuΦpoByoCTaHcUoDAB+He ydaetc HauTn,
YcTaHOBka/coxpaHeHne FM-paNoctaHn
Дя Bыбopa FM-paioctaHиь kaueCTBe ayINO nCTOuHnKa HaxmMaTe KHOKNy yCTaHOBKn ayINO nCTOuHnKa (7), noka He NOBNTcR uHnKaTOp ayINO nCTOuHnKa (b) FM nI FM2.
Yactota BOCPON3BOJMOB DAHbIMOMeHT CTAHUO OTO6paKaTcB B BepxHei Ctpoke MHORofoyHKUHOHaJIbHOrO INHdNKaTopa (j).B MeHIO FOyHKUIM MOXHO yCTaHOBVOTOp6paKeHne DOIOnHHTeJIbHOINHOFOpMaUNB HnKHei CtpoKe MHOFOyHKUHOHaJIbHOrO INHdNKaTopa.
PnIOCTaTOHNO yCTOHNBOM npneMe Heo6xoDnMOrO CnHaIpaADNoPnEMNHk ABToMaTHueCKNpeKluOaEcra HcTpeOpnpem,Ha nCnnee OTo6paxaetc HnDKaTop cTepeOpnpema(h).B MeHIO FyHKm MOxHO n3-MeHHTb TIN pnpema Ha MOHOpnpem.
-Дя yctaHOBKn onpeDeleHHo paNocTaHcNIOBopauBaIte KHOJIky yCTaHOBKn aydINOcTOUHnka (7) (TUNE), noka Ha dncnlee He NOBNTcR HyxHa YaCTOTa NIN CTaHcNIA.
-ДлЯ NONСКССLEDEUOSEI PAHNOCTAHUNC 60Jee yctOnuHBIM CnHANOM ODHOKpaTHO HAKMITE KHOKNKу NOICKa "Ha3aD" (10) nII KHOKNy NONCKA "BnepeD" (9).CledyUoJAA HAIJIeHHaP aHIOCTAHUN6bET COXpAnHeN BOCnpOu3BeDeHa.
-ДлЯ NONСКА BCEX paДиOCТанCуCTOЛBbIM CnTHANOM ydePKNBaIte HaxKaToN KHOKnyNONCKA"Ha3aD"(10) nII N KHOKNy NOINCKA"BnpeD"(9) He MeHHe NNCEkyHdb. KaJdAraHaiDeHHa PaNIOCTAHcNBAocpOn3BOAnTcB TeueHne 5 c, noCle Yero NOINK npOdoJka-etcdo rpaHcblnoLcbl yactOT. YTO6bl OTMeHNtB NOINCK paNIOCTaHcN, ODHOKpaTHo HaxMNTe KHOKNy NOINCKA"Ha3aD"(10) nII KNOHKy NOINCKA"BnpeD"(9).
-ⅡIa coxpaHHeHH HAcTpoE kaHIOCTaHcHn HAKIMaTe KHOKNy PpeBapNTeNbHO HaCTpoEHbIX paNIOCTaHcN (5) Heo6xoJIMoJ RyeKn NaMrtn, NOKa HOMep Yeekn NaMrtn He OTPa3NTcHa INDkATope YaeKn
narnTn(c).
Ecn 4 qeykn namrTn ayDNO nCTOCHKO B FM 3aHrTb, haxMMTE KHOKNy yCTAHOBKn (7) ayDNO nCTOCHNka FM2, yTO6bl nepeKIOUHTbcra Ha ayDNO nCTOCHNK, IJRA KOtOPORo DOCTYNHbe eue 4 qeykn namrTn. O6paNTte BHMmaHne, yTO Bam HxKHO CHOba HAcTPONTb HxKHyIO pa-dINOCTAHUNIO NOCNE IN3MeHeHHy, yTO6bl coXpaHHTb ee.
-ДяЯ ABTOMATUHECKORO NOUCKa u COxpaHENpaNIOCTAHcN C CambIM yCTOINBBIMCnHaIOM (AUTOSTORE) OJHOBpeMeHHo HAKMMTe KONKy NOUCKa "Ha3aD" (10) n KONKyNOUCKa "Bnepei" (9).PaNIOnpmEHNK npOBeppEET BCE npHNMaemblc CTAHcN IN COxpaHReT4 cTAHcN C CambIM LyuHmM pPmEMOM B YeKkax Namrtn NporpamM c 1 no 4.ObpatnteBHImaHHe, yTO BCE coXpaHENbIe paHee paDNOCtAHcN 6ydyT nepe3anncAhI.10ZABepHenn NOcKa HauHaeTcBocNPouIN3BeDEHne PaNIOCTAHcN, COxpaHENB JueKe NaMrtn NporpamM nOd Homepom 1.
-TO6b3aIyCTHTB BOCpOIN3BeDeHHe COxpaHHeHHo paIIOCTAHU,ODHOKpaTHo HaKMnTe ONDHy N3 KHOJOK IpeDBapNTeJIbHO HA-CTPOEHbIX paIIOCTAHU (5).Homep JueeKn NaMRTN 3aRopaETcHa INHdNKATope JueeKn NaMRTN (c).Pnp Heo6XODIMOCTn HaxKaTneM KHONK YCTaHOBKn ayDNo nCTOUYHka (7)MOHXpeEKIIouaTbcMexdy ayDNO nCTOUYHKA-Mn FMnFM2,TO6bI NOJyHTb DOCTYn KO BCEM COxpaHEHbIM paIIOCTAHUm.
HanpaBHeHne uTbIpeBoa aHTeHHbI
PaHIOONPnEMNHK NOCTaBnIeTcC yCTaHOBHeHON WtBpeBOH aHTeHHO (6).PpN nCNOb3OBaHN paHIOONPnEMHnKa Ha FM-BeuaHn HAKNoHnTe WtBpeByo aHTeHHy B TOM HApBaJIeHHN, rDe oEbcneuBaETc CaMbY uCTOHyHBn npMe. Ecnn CnHn pnpema HeIOctaToueH, nepemecTnte paHIOONPnEMNHK B MeCTO, rDe CnHaN yNaBnBAeTc LyUwe.
Yka3aHHe:ecnpaNOnpneMHNKNCNoJIb3yETcB HEnOpceIeTBeHHo6bn3OCTnOT paNIOOOpyDoBaHn,paNIOpnp6OpOBnnIpyrnx 3NeK-TPoHHbIX yCTpoiCTB,pAioNpneM MoKeT yXyIDHTbcR.
IopKIOUOHeHBEWeHHxaydnoNCTouHKnOB uepe3 pa3bem AUX
OTKpoIte 3aunTHyO KpbIuKy OTceKa IINPOIKIOUeHnA (15) n BCTaBBTe 3,5 MM uTEkep Ka6eAUX (25) B AUX IN pa3bEm (24). POnkIOuHTe Ka6eJIb AUX K noxOJaemy ayDnO nCTouHNKy.
YTo6bI 3anyCTnTB BOCnpON3BedeHne ayDnIO NC ToUHnKa AUX, HaxmMaTe KHOKNy yCTaHOBN k ayDnIO nCTOuHnKa (7), NOKa He NOBNTcN INDnKaTOp ayDnIO nCTOuHnKa (b) AUX.
ДлпnpedOTbpaueHnI nonaHaHnI rpy3n 3akpoI-Te 3aunTHbIKoNnaQOK OTceKa IJnPOKIOUeHnI (15) nocne n3BleueHnI wTekepa Ka6eJaAUX.
EcnBBO BpemB OBCPOn3BeDeHnayDnO NO AUX 6yDet Haxkata Onda N3 KHOJOK npeDbapnteHNO HAcTPOEHbIX paNIOCTaHcN (5),paNIOnpneMHNK nepeKJIouaetcHa NocLeHIO COxpanenHHyIO B peKIMpeNIOnpneMHnKa paNIOCTaHcNIO.
Bocnpoun3BeJeHne/ynpabLeHne BHeuHMn aydno nctouHKamn no Bluetooth®
YTo6bHaHauaBBOcnpoN3BeDeHHe c ayNo nCTOuHnKa (Ha npMep, CmApTfoHa) no Bluteoth® IIn6o HaxnMaIte KHOhKny yCTaHOBKn ayDnO nCTOuHnKa (7), NOKa Ha IINcPiee He NOBNTcR INHnKaTOp Bluteoth® (a), JIn6o, BHe 3aBNCUMoCTn OT TekyIero ayNo nCTOuHnKa, HaxmTe ODNHKpAtno KHNkY Bluteoth® (11).
Bo BpeM yctaHOBKn COeHHeHn IIN NONcKa COeHNHeHn MNrae T HdkaTOp Bluetooth® (a).
Ha MHOrOfoyHKUHOHaJIbHOM INHdNkaTope (j) 3aRopaetc
- Ecnn paAnOpnpnemHnK yKe noKnIouen K BHeUHEMy ayDIO nCTOuHNky no Bluetooth® n 3TOT ayDIO nCTOuHNK DOCTyNeH, CoeDINHeHne C 3TNM nCTOuHNKOM yCTaHaBnBaETC aBTOMaTnueCKN.
- PnO TCTBnIO DOCTynHOro COxpaHeHHoro ayNIO nCTouHnKa, 3anyckaetc npocec c noNcKa. AKTNbpyuTe HOBOe coeINHeHne C BHeUHM ayDnO nCTouHnKOM. KaI npaBnO, Ha CmApTfoHax 3TO MOXHO CdeJaTB HAcTPOiKAX B MeHIO Bluetooth®. PaIIO OTo6paJXaeTcB KauEcTBe IOCTyHORo nCTouHnKa NO HA3BaHnEM ARAD18BCAS xxx. O6pATnTe BHMaHHe Ha INHΦOpMaunIO, pnpBeDeHHyo B pyKOBoIDCTBE NO 3KcNlyaTaun BaWero ayDnO nCTouHnKa/cmApTfoHa.
- Ecnn BbXOTnTe npepbTaB cyuEcTByIOuee coEINHeHne cayINO NCTOCHNKOM NOBluetoothN BblONHHTb NOCK HOBOrO NCToHHKa (PAIRING), HaxMMTE u ydePKNBaIte KhoNkY Bluetooth® (11) He Mehee 0,5c. AKTN-BpyTe CoeINHeHne B COOTBeTCTBUN C ONNCAHNEM, PnBEdEHbIM Bblie.
KaK ToIbko BOCPOn3BeDeHne ayDnO no Bluetooth® 6yJeT yCTaHOBNeHo, HauHHaET ropeTb INdIKaTOP Bluetooth® (a).
Ha3BaHne np6opa, noKIOUOeHHoro no Bluetooth® OTO6paKaaeTcB B BepXHei CTPOKe MHOFOyHKUOHaJIbHOro INHnKaTopa (j). B HnKHei CTPOKe OTO6paKaaeTcTeKCT, nepeJaBaembl IOKIIQUeHHbIM pnp6opom.
PnO TcTbH N yCTaHOBneHHORo COeINHeHNr NO Bluetooth® ,paIIOpPNmHK aBTOMaTNueCKNOTKIOUHaETcYpeep3 19 MHN.
Aydno nctouHnKOM, NOkHooeyHHbIM NO Bluetooth MOxHO TAKKe ynpabJIaTb uepe3 pa- dNOONpEMHK:
-TO6bBbIbpaTbN3anyCTnTB My3bKaJIbHyIO DOpOKy, KOPOTKHaJIMaTe KONKy NOncKa "Ha3aD" (9) ININ KONKy NOUCKa "BnepeD" (10), noka He 6yDet BbIbpaHa Heo6XOIMaJ DOpOKKa. Bocpoun3BeJeHne Bbl- 6paHHoJ DOpOKKn HaHHeTcA ABTomATnueCKN.
-To6bI npepBaTb BocpOn3BedeHne, HaxMnTe KhoNky OTKIOUeHn 3Byka (8).HaDcPnnee NOBNTCA INDNKATOP nay3bl (f).
-TO6bI BO306HOBnTB BOCnPON3BeHHe, CHOBA HAXMNTE KHONKY OTKIOUeHn 3Byka (8), N3MeHNTe rPOMKOCTb C NOMOuBIO BBKIOUaTeTg (2) NUN HAXMNTe KHONKY NOUCKa "Ha3aD" (9) NUN KHOKNY NOUCKa "BnepeD" (10).
-Дляпесдаьпесди Ha3aI NO My3bl- KaIbHbIM DopoKkam ydepKINBaIte HAKaTOI KHOKNy NOnCKa "Ha3aD" (9) nII KHOKNy NOnCKa "Bnepei" (10), nOKa He 6ydt DOCTnHyTa HxHHaN IO3nCn.
EcnBBO BpemB OBCPOn3BeDeHnayDnO nO Bluteoth 6ydt HaxaTa OHa n3 KHOOK npedbapntelbHo HAcTPOeHHbIX paNIOCTaHcN (5),paNIOnpneMHNK nepeKlIOyAetcHa NocIeHNIO COxpaHeHHyOB peKIMpePAIONPNEMHNA paNIOCTAHU.
Bocnpon3BegeHne no TexHoIorHn Dual Speaker Sound (ecJn aydno nctouHnK noKnIOeH no Bluetooth®)
Ecnny aynno nctouHnBocnpo3BOOHTcno Bluetooth,MOKHOaKNBnPOBaTbYHKUIO Dual Speaker Sound (DSS).2 paNOnpneMnka ARAD18BCAS nCNoIb3yOTcB KaueCTBe npaboro n IeBOrO dInHaMnOB dJIb BOCnpo3BeDeHnOdHoro nTOrO Je 3ByKOBOMaTePnaJa.
BkIouHeNc FyHKcunn Dual Speaker Sound:
- OdnH n3 dByx paIIOnpnEMHKnOBdoJKeH 6bItb yke noKJIoueH kaydno NCTOCHNY NO Bluetooth®.
-Bb6op paAnOpnemHnKa B KaecTBe npaBOrO DnHaMnKa: Bb6epnte B MeHIO→ .
-Bb6oppaanOpnpHmHaBkaKaucTBeJeBOrO DnHaMnKa:Bb6epnte B
MEHIO
- BkIouHte peKm pa6Ot bNo Bluetooth® TaK-Ke Ha BTOPOM paAnOpnpemHnke.
- Ha BTOpOM paIIOnpnEMnKe Bbl6epnte MeHIO npyOn DnHaMnK.
- YnpabnTe BocpOn3BedeHnEm No Bluetooth® KaK 06bHuO.
M3MeHHeH HeCTpoe MeHIO
Длд дocупа KMeHIOФункин HabKMaTe KhoNky OTKIIOUeHn 3Byka (8) (MENU), nOKa He NOBHTcR INHdNKaTOP MeHIOФунки (e).
Habiragurno MeHIO:
-ПолпстalebMuHIO:NOBepHIne KHONky yCTaHOBKN aydno nctOuHnka (7).
- Bb6paTb n COxpaHnTb HAcTpOuKn MeH0:HaKMMTe KONKy yCTaHOBKn aydnoNCTOCHNka (7) (OK).
- IpeenB NOMeHIO: HaxMnte KHonky yctaHOBKn aydno nCTOuHnka (7).
-BepHybca n3 NOdMeHIO B OCHOBHOe MeHIO: ODHOKpaTHO HaxMMTe KHONky OTKJIIOUeHn 3Byka (8).Ppi DOCTNKeHHn yPOBn OCHOBHO- ro MeHIO,paINOpPNemHHK BO3BpauaetcB peKMBOcnpOn3BeDeHHaYdNO.
YTo6bI BbIITn I3 MeHIO cyHKcN C JIO6Oro yPOB-H N BepHyTbCBApeKIM ayDNO, HAKIMaIte KHOKNy OTKIOUeHIN 3ByKa (8), NOKA INDNiKaTOP MeHIO cyHKcN (e) He nOracHET Ha DnCJIeE. B KaueCTBe aJIbTePHaTHNBHO BapNaHTa, pa- dIOONpneMHNK ABOTOMaTIueCKN nepeKIOUaETcB PexHM ayDNO no nCTeueHIN 10 c NoCne nocJeHero HaxKatN KHOKN. Ecn NaCTpoNk MEHIO 6OJIbSe He coXpaHIOrTCn pN BbIKIOUeHIN paDNIOpneMHNka, 3aMeHInTe KHONoHbI 3JIeMeHNTnTaHIN (pe3epBHa8 6aTape).
MehIO onzui
MeHIO BbI6opa qactnUHO 3aBNCIT OT peKIma aydno, yCTaHOBJIeHHORO dIra paIIOnpneMHNka. B BepxHei cTPOKe MHORoOyHKUHOHaJbHOrO nHdkaTopo (j) BcERda OTO6paKaetc Ha3BaHne MeHIO, a BbI6IpaemHaCTpOJa Ka BbcBeyNBaeTcB HHXHei cTPOKe.
MeHIO HAcTPOKn 3ByKa:BblMOKeTe yCTaHOBNTb BbICOKn
MehIO hAcTpoKuYacOB:
- Bы можete ВьбраТь Формат Врemeи 24 уас <24 Hour Mode> Или 12 уасов <12 Hour Mode>.
- Bby MoKeTe HaCTpOHTb BpeMa BpyHyIO C NO-MoUbIO
NIN .
-Yka3aHHe:ecnI IJIy ayDIO nCTOCHNkA DAB/DAB2 BbI6paHa paAnIOCTAHnI, KOTOPa nepeJaET BpEm, 3TO BpEm npINHMaeTc ABToMaTtueckn. HAcTpoKn BpEmeH, pOn3BeDeHNbIe BpyHyIO, 6ydyT nepe3aNCAHbl.
MeHIO c6pOca HAcTpoE: BbIMoKTe c6pocntb BCE HaCTPOUKN MeHIO IO 3aBOIDCKNX
MeHIO aBTOMaTmueckoro noncka paAnocTaH-
M: BbI MoKeTe 3aNyCTnTb aBTOMaTnueckn IONCK CTAHm.
MeHIO pyHoi HAcTpoKNI: Bbl MOKeTe BpyHyO yCTaHOBtB Heo6xoDmMyO YaCTOTy.
MehIO TnA HnDnKaUuN: Bbl MoXeTe Bbl6paTb, Ka-KoI TeKCT 6yJeT NOBJIaTbC B HnXHei CTpOKe MHOrOfoHkUHOHaJIbHOrO HnDnKaTopa (j):
- INHΦOpMaUOHHbI TeKCT, IpepaBaembl pa-DnOCTaHcnei
, - yactOTa paIIOCTaHcIMN
- MOUHOCTb CnHaJa
- TIN nporpamMbI, npepaBaemoi paHIOCTaH-uen
.
Meho Tnna Hndkaunn: Bbl MoKeTe Bbl6paTb, Ka-KoT TeKCT 6yJeT NOBnTbC B HnKHeN CTpOKe MHOROfoHKUHOHaJIbHOrO INHdkaTopa (j):
- INHΦOpMaUOHHbI TeKCT, IpeJaBaEmbI pa-DIOCTaHcnei
, - Hα3BaHηne paДиOCTaHcιn
, - TIN npOrpamMbI, npepaBaemoi paNocTaH- Unei
MeHIO fYHKcun Dual Speaker Sound: Bbl MOXeTe HaCTpOuNTb paDInOpnpeMHNK B KaueCTBe npaBOrO dINHaMnKa
KpOyOK dIa IIOBWeuBaHH
C NOMOUBKPOUKa IINI NODBeWNBaHN (19) pa- DINO MOXHO NODBeCNb, HApnIMep, Ha JecTHNUy. ⅡJI TTO ROBEPHNTe KPOUOK IINI NODBeWNBAH NHBEO6XODNMOE NOJOKKeHne.
Yka3aHnno ONTmAlbHomy 06paueHnIO cakkyMylrTopoM
3aunuauTe aKKymyTOp OT BlaHn BOdbI.
XpaHnTe aKKymyIaTOp TOnbKO B dHaana3OHe TemnepaTp oT-20°C Do 50°C. He octabIaIe aKymyIaTOp JETOM B aBTOMo6nIe.
BpemaOT BpemH npouuauTe BeHTnlaOnH HbI npope3n aKKymyTopa MrgKo, CyXO uCTO KNTOCHKO.
3NaHTeNbHoe cokpaueHne npoJOnJnteNbHOCTn pa6Otbl nocle 3apra CbUeTeNbCTByeT O CTapeHnn aKKyMylrTopa N yKa3bIbAeT Ha Heo6XODMOCTb ero 3ameHbl.
YuNbBaIeYka3aHnIOyTuIN3aUIn.
Texo6cIyXnBaHne n cepBnC
Texo6cIyXnBaHne nOuHCTka
JaKaueCTBeHHoHnHaJeXHo pa60tI NoepKJBaiTe paINOpnpemMHIK nWTeNCEbHyIO BUNKyB YICTOTE.
BbItnpaIte 3arpa3HeHnCyXo N MmKoTprAnKo. He nCNoIb3yIe KaKe-Im6O YnCTaUne cpeIcTBa nn pactbOpnteJiN.
Bb6op npnHaJnxHocTei
IcnoB3yTe TOnbKO opuHnHaHbHe npHaIaLeXHoCTn FEIN. PpHaIaNeJxHOCTb DOJIxHa 6bITb COBMecTIma C pnp6Opom.
TexHmueckoe n cepBnchoe 06cnyXnBaHne
PemOH, 06cIyKbAHnE n TexHnueckn OCMOTp np6OpOB MOrTy BbINONHrTb TOnbko KBaINuPobAHhBle 3JIeKTPnKN, TaK KaK HeCOOTBeTCTByIO-ee TexHnueckoe 06cIyKbAHnE MoKeT CO3DaTb Cepbe3HyIO YrPoO3y DnI NOb3OBaTeJn.
B3KCTpeMaJIbHbIx yCLOBnI x pa6oTbI npu o6pa-60tke MeTaJIIOB BHyTpI npu6Opa MoKeT OTKla-DbBaTcR TOKOpBOJaAa TaIIb. PeryJrpho npOyBaIte BHyTpEHHIOU cactb npu6Opa uepe3 BEHTINJIauIOHbIe OTBepCTNc CyxIM CKaTbIM BO3-DyXOM 6e3 Macna.
PnO6pa6OTke MaTeepnaIaOB, CoepeKaaIcx rInc, MoXeT O6pa3ObIbAIBcra Nbl. OHa MoXeT OceCTb Ha BHTpeHHnx Ha KOMMyTaUHOHHbIX 3JeMeHax np60pa H 3aTBepde TB BO BLaXHbIX ycNoBHX. 3TO MoXeT pNBeCTn K NOBpeKdEHHo MexAHn3Ma nepeKnIOuATEJIa. PeryJrphno npOdy
BaITe 3JIeMeHbI nepeKIIIOuTaTeI IN BHyTpEHNOU OaCTb npI6Opa uepe3 BeHTnlaUHOHHbe OTBepCTNcYxIM CKaTbIM BO3dYxOM 6e3 MaCna.
N3dJIIN, KOHTaKTpyUOUIne C ac6ecTOM, HEnb3rOTDaBaTb B pEmOH. YTuIN3npyIte N3dJIIN, 3aTgpr3HeHHbIe ac6ecTOM, B COOTBcTcBmC DeiCTByIOUIMN B CtpaHep npabINammyTuIN3aUINOTXoOB, CODepKauix ac6ecT.
Ecn Baun np60bny npHaJnEHHocTn FEIN HykaOTcB peMOHTe, o6paNTecb B cepBnCHyIO cnjx6y FEIN. AApca cepBnChbIX ueHtpOB yKa3aHb Ha Be6-caTe
www.fein.com
3aMeHnTe nOtepeBwne aKTyalbHOCTb N3HOWeHHbe HaKneKn N ppeynpeNTeJbHbIe yKa3aHnHa np6ope.
AkyaIbHk KaTalor 3anachbix YacteY Iy 3TOrO np6opa MoKHO HaHTu Ha caTe
www.fein.com
IcnoJb3ynte ToJIbKO opnHahBhie 3aNaChbIe. HACTN.
O63aTeIbHn IOnONHHTeIbHa rapaHTn
O6a3aTeIbHna rapaHTnHa n3dJIne npedocTabIaETcB COOTBeTCTBUN C NOLOKeHNrM 3aKHOIaTeIbCTBa B CTpaHE NOLb3OBaTeNl. Cbepx 3TOr, FEIN npedocTabIeR dONoJHInTeJbHyIO rapaHTIO B COOTBeTCTBUN C rapaHTnHbIM O6a3aTeIbCTBOM pOnu3BOUntEJI FEIN.
KOMnIeK T NocTabKn BaWero npnbopa MoKeT co-epKaTb ToIbKO YaCtB ONuCaHHbIX ININ N3O6paXeHHbIX B HAcToRJaEM PYKOBODCTBe NO 3KcNlyataun PnHaDJIeKHOCTeN.
CeptnuKAT COOTBETBn
KOMPANHNAFEINOTBETCTBEHHO3aABNRE,HTO IN3- DEINE COOTBETCTByeT NOLOXKeHNYM,YkA3aHHbIM Ha NOCJIENHX CTpaHnucx DaHHORo PYKOBOCDBa.
Texnuecka DOKyMeHtauNHa H3dJIe: C.&E.FeinGmbH,73529SchwabischGmund, Germany
TpaHcnpToPobKa
Ha pekomeHnyeMbIe IINTH-NONHBIE aKkymyIaTOpHbIe 6aTapei pacnpocTpahraIOc Tpe6OBAHHB OTHoWeHH TpaHCnOpTnpOBKn ONaChbIXpy3OB.AKKymyIaTOpHbIe 6aTapei MoryT nepeBO3NTbcr CaMM NOJIb3OBaTeIeM ABTOMO6NJbHbIM TpaHCnOPTOM 6e3 Heo6xOdImOCTN CO6JIIODeHHN DOnOJIHHTeJIbHbIX HOPM.
PnnepeBO3Ke c npNBleHennm TpeTbNx NlUc (Haep.: camoJETOM nIIT TaPacnOpTHbIM 3KcpeNi-TopOM) Heo6xoDIMO co6IIOaTb OOCbIe Tpe6OBaHnK ynaKOBKe n MapKnPOBKe. B 3tOM cIyuae npn PNOrTOBKe rpy3a K OTnpabKe Heo6xoDIMO yuactne 3KcNepTa nOanChbIM rpy3Am.
OTnpaBnIe aKKyMnyIopHyo 6aTapeIO TOnbKOC HENOBpeKdEHHbIM KOpNycOM.3akNeIe
OTKpbTbIe KOHTaKTbI yNaKyIte aKKyMnyTOpHyO 6aTaapeIO TaK, YTo6bI OHa He nepMeUaJaCbBHyTpN yNaKOBKn. IOnKaIyIcTa, Co6JIoJaITe TaKKe BO3MOXHbIe DOnOIHNITeNbHbIe HaCuHOHaNbHbIe PpeDnncAHn.
YTNIN3aCnA
3NeKtpOnHCTpyMeHTbI,akkymyIaTOpbl/6aTapeiKn, npHaJnEJXHOCTN uYnaKOBky HxKHO CdaBaTb Ha 3KOJIOrnueCKn YnCTyO yTNJIN3aUIO.
He bblpaocbIbainTe 3neKTPoHCTpyMeHTbI n aKKyMnyTOpHbIe 6aTapeN/6aTapeKN B 6blTOBOMycop!
ToIbKO dIa CTpaH-ueHOB EC:
BcooTBeTCTBnC eBponeckOJnpeKTHBOI 2012/19/EU o6 Otpa6oTaHHbIX 3JeKTPnuuecknx I 3JeKTPoHHbIX npi6opax N ee npeo6pa3oBAHne B HauNoHaJIbHOe 3aKOHOJaTeJIbCTBO BblweJInu3 yNtpe6JIeHnna 3JeKTPoHHCTpyMeHTb I B COOTBeTCTBnC eBponeckOJnpeKTHBOI 2006/66/EC DeΦeKTHbIe INO TcLyKnBwne CBOI cPOK aKKymyIaTOPhIE 6aTapeN/6aTapeNk DOnJXHbI Co6HpTaBC pa3dJIbHO IN CdaBaTbcra Ha 3KoJIoTRnuECKn UNTcyIO pekypeaunIO.
Pn HnpabnblHo yTtnn3aun Otpa6oTaHHbIe 3neKtpnueckne n 3neKtpoHHbIe np6Opbl MOryT OKa3aTb BpeHoe BO3deNCTBHe Ha OKpyKaIOuYIO CpeNy n 3DopOBBe yeNoBeka N3-3a BO3MOxHO rnpCytCTBnB HNX ONaCHbIX BeUeCTB.
AkkymyIaTopb/6aTapeN:
JIITM-HOHHbIe:
IoxaanyiCTa,yuTbBaIte yka3aHne Bpa3dene TpaHCnOpTnpOBKa (cm. "TpaHCnOpTnpOBKa", CtpaHua 201).
BukopncTaHHOpriHaJIbHoro WTeNCeI Ta HaneJHOI PO3EKN 3MeHwye PN3NK ypaKeHH eJEKTPnHMM CTpyMOM.
He BnKOpNCToBMyTe 6Hyp 6NOKy XMBLeHHa3i WtencelbHOo BnIKOIO IJI nepeHeceHHpaionpImaua, nIDBiwyBaHHa 60BNTaryBaHHa Ttencela 3 pO3eTK.3axuaiTe 6Hyp BiD II BnCOkNX TemepaTyp, oII, roCTpIX KpaIB Ta Detale npHaay, 0p pyxAOTbcra.10sKOJKeHn a6o 3akpyehn 6Hyp 36ilbWye pniHK ypaXeHHa eNEKTPnuHm CTpyMOM.

3axuaiTe paionmu Ta 6nok KINBHeHHa 3i wTeNCelbHOU BUNKOIO
BIDdouyIBONn. NotpannHn BOny paiaionpnMau a6o 6Iok XNBHeHH3i WTeNCeJbHOIO BNKOIO NiDBNue pniK ypaKeHH eJEKTpuHHM CTpymOM.
He BIDKpNBaIe akyMnyTopHy 6aTapeIO. IChyE He6e3neKa KOpOTKOrO 3AmuKaHHr.
Pn noxkoHcHHi a6o HnpabNbHi ekcnnyatauii akymyIaTOPHO 6atapei MoKe
BnxOHTn nap. AkymyIaTOPha 6aTaper MoKe 3aMAtnc a6o Bn6yxatn. Bnyctitb CbiKe nobITpy i - y pa3i ckapr - 3epeHITbcra do Niikapr. Nap moKe noDpa3HOBaTu DnXaJIbHi IJnxN.
Pn HnpabHbHomy BkOpncTahHi 3 akymyIaTOPHO6aTapei MOKe NOteKTn piHa. YnkaTe KOtAcTy 3 HeIO. Pn BnnaKOBOMy KOtAKTi NpOMNte BiNoBIDHe MlCe BOIO. KaIO pINHa NOTpanHnA B Oci, DOaTKOBO 3BepHITbcrdo Iikapr.AkmyIaTOPHa pINHa MoKe CnpuHHrTI NOpa3HeHH WkIp a6o OnIKn.
ToctpmnppeMeTaMn,HaP.,rBizdkamna a6o BnKpyTkamn,a6o npKnaaHnMa 3OBiushboi CNM MoXHa NOnKOJNTN akymyIaTOphy 6aTapeo.MoknBe BHyTpiliHc KOpOTke 3AmNKaHHa,3aropHHa, yTBOpEHnDmy,Bn6yx a6o neperpi bakymyIaTOhpOi 6aTapei.
He 36epiraTe akymyIaTopHy 6aTapeIO, KOIO Bn came He KopnctyTeCb, Nopd i3 KaHcJIepcBKMm cKpINkAMn, KIOUamn, RbI3dkAMn, rBNHTAmu Ta IHWMN HeBeIKMm MeTaIeBMM npEIMeTamn, kki MOKyTB cPnPunHHTn NpeEMKaHHa KOHTAKTIB. KopOTke 3aMKaHHa MIX KOHTaKTAmn akymyIaTopHOi 6aTapei MoKe cPnPunHrtn oniKn a6o noXeky.
BukopncToByte akymyIaTOpHy 6aTapeo AMPShare TlbKn B npOdyKtax Bnpo6Hnka nnapThepih AMPShare. Nnue 3a TaKnx yMOB akymyIaTOp 6ye 3axnueHn BiD He6e3neHoro nepeBaHTaKeHHa.
3apJxAte akyMylTOpH6aTapeI NWe B 3apAnHx npnCTpoX, peKOMeHDoBaHnx BnPo6HnKOM. BkOpncTaHHa 3apJxKyBaJIbHO rnpCTpOIO Iy aKymyTAOPHnx 6aTapeN, Iy kNx BIn He nepeI6aueHm, MoKe Ipn3BODnTn Do nokexi.

3axnauTe akymyIaTOpy 6aTapeo BID Tena, 3OKpema, HAp., BiD COHuaHnx npomHIB, BorHIO, 6pydy, BOIN Ta BOJOrn. lChy He6e3neKa Bn6xyi KOpOTKOrO 3AMnKaHH.


NONEPEJXEHH
TpmaTe MiHaTIOphi eMeHTN XNBLeHHy HeOCTynHOMy IaI TeMicu.MhiATIOphi eMeHTN XNBleHH
MiHiaTIOHHeIeMeHTN KINBLeHH He MOXHa KOBTaTH a60 BBOdHTN B IHwi npnpOHi OTBOPn TINA.Y pa3i NiO3pHu NaPOKOBTyBaHHa MiHaTIOPHORo eIeMeHTa KINBLeHHa 6o Noro BBeJeHH Kpi3b IHwi npnpOHi OTBOp HcAHIHO 3BepHITbc DO Iikapra. POKOBTyBaHH MaHiaTIOPHORo eIeMeHTa KINBLeHH MoKe npOTyrom 2 rOHN npu3BeCTn Do BaKkNx BHyTpIHix OnIKIB i Cmepti.
Bukohyte 3amHy miHiaTIOPHnx eIeMeHTIB XNBHeHH HaJeHHM YHOM. IChye He6e3neKa Bn6yxy.
BnKOpNCToByIte IInIe eIemEnT KINBLeHNNKHOKNKOBO Tnny, BkA3aHI Bcii IHcTpKuII 3 ekCnLyatau. He BnKOpNCToByTe 6yDb-aki iNsi MiHiAtIOpHi eIemEnTu KINBLeHNN a6o iNsi Dxkepena CTpyMy.
He HamaraTec3HOBy 3apAHTNI MiHiaTIOPHN eIeMeHT XNBLeHHHa Ha 3akOpOyTe MHiATIOPHN eIeMeHT XNBLeHHa MOKe BTPaTNr RepMeTuHicTh, Bu6yXHyTN, 3aHHTnC1r TpaBMyBaTN IIOJe.
BnmaTe yTuNl3yTe po3paJxehi miniaTOpHie eMeHTu KMBLeHHe 3rIHO 3 npnncamn. Po3paJxehi mHaTOpHi eMeHTu KMBLeHHaMOKyTB BtpaTtU repMeTuHicThb i NOuKOHTu pOdyKT a6o TpaBMyBaTNIOJe.
He neperpiaBate miHiatOpHn eneMeHT KMBLeHHa I He KnaAte NOrO y BOROb. MiHaTIOPHn eneMeHT KINBLeHHa MOKe BTPaTNTI repMeTNUHICTb, BNU6yXHyTN, 3aHHTNCa I TpaBMyBaTN JIOJe.
He nowkoJyIte MiHaTIOPHn eIeMeHT KINBLeHnI He po36npaIte NOro. MiniaTOPHn eIeMeHT XNBJIeHHr MOKe BTPaTIu T repMeTuHicTh, BNU6yXHyTu, 3aHHTNC i TpaBMByATn IIOJe.
He Do3BOJrTe MiniaTIOHOMy eIeMeHTY KMBLEHHKONTAKTYBaTN 3 BOIOIO. BnBInbHeHn IiTi MoKe yBiTIu B peakciio 3 BOHNEM BOIN, BNKNIAOu Ni pN cBOMy NOXeKy, BN6x a6o TpaBMyBaHHJIIOJe.
CNoBeCHN 3HaK Bluetooth® Ta INorOTnH e 3apeecTpOBaHMn TOBapHMn 3HaKaMn Ta BlaChicTIO Bluetooth SIG, Inc. Byb-jaKe BnKOpNCtAHN yboro CNoBeCHORo 3HaKa/ 3o6paXyBaIbHorO 3HaKa C.&E.Fein GmbH 3DiinCHIOCTbC4 3JIueH3iEIO.
Bnok XNBHeHH 3i wTenceIbHOIO BnIKoIO
IHHI TexHiHx XapAKePncTnKn DnB. Hs: https://fein.com/ecodesign
EheproxNbIeHna padionpImMaua
EheproKnBHeHHpaIionpniMmaya 3diNCHIOeTbcyape3 lii-iOHHn akymyIaTOp (17) a6o 6JOKKNBHeHH 3i WTeNCelbHOIO BUNKOIO (20).
Ekcnnyataia BiakymytaTopho 6atapei
BnKOpNCTOByTe Imwe 3apAHi npCtpoi, 3a3NaueHbTexHcHnx DaHx. NIwe Ha ci 3apAHi npCtpoi po3paxoBaHni liTi-iOHHH aKymyJrTOp, 0IO BnKOpNCTOByETbc y BaOmy padionpuiMaqi.
Bka3ibKa: BnKOpNCTaHHa kMyJTopHnx 6aTapei, 10 He c npu3HaueHmI dIa bOro paiaopniMa4, MoKe npu3BeCTn Do nepe6oIB y po6oTI a6o noWkoJxehn paiaOpniMa4a. Iii-iOHHn akymyJIaTOp 3axuieHn BiD rIn6okoro po3pAikHn CnCTeMoIO «Electronic Cell Protection (ECP)». Ppi po3pJxKeHomy akymyJIaToPi paiaOpnpMau BmUkaETbcra 3aBdAn CXeMI 3axNCTy.
Hikon He BMKaTe paiaionpmau nicn Ioro BmKHeHH cxmoIO 3axncty. Ce moKe N0WKoNTn akymyIaTOpHy 6aTapeio.
3aMiHa akMyIaTOpHoi 6aTapei
BiKpnTe BaKInb 6LokyBaHHa (13) KpNkny akMyJrTopHOi 6Taapei Ta NiHIMtB KpNkky (12). Lio6 BnHATn akMyJrTop, HATNCHTb Ha KHONky po36JokyBaHHa kMyJrTopa (16) i BNIMtB Noro
206
3akymyITopHOro BiDckiy.He 3actocobynt npu bomy cnny.
Uo6 BCTaBHTn akymyIaTOp, nocyHbTe noro y TpMaay akymyIaTOpHOi 6Taapei (14) TaK, uo6 Micu KpiPiEHH Ha akymyIaTOpi Ta TpMaui cInBnA. DaTe akymyIaTOpY yBiTu y 3aenIIeHH.
3aKpInTe KpInsKy aKymyTOpHoi 6aTapei (12) Ta 3a6NoKyIne II.
IhdkaTop 3apxkeHoocTi akymyIaTOPhoI 6aTapei
KoIyakymyTOp BCTaHOBHeH,Ha DCnnei BiO6paKaHObCg DaHi npO CTynIHb 3apJxKeHoCTi akymyTOpa (17),AkuO BuHrTu aKymyTOp, Li daHi BiO6paKaHTMBybCg Ha cAMOMy akymyTOpi.
IhdkaTop 3apdxkHeocsti akymyIaTOPHOI 6aTapei Ha nucnnei
IHnKaTOp 3apAaKeHoCTi akyMnyTOpHOi 6aTapei (i) 3'ABnEbCnHa DnCnneI, 0oH0 6yDe BCTaHOBnEHO akyMnyTOp 3 DOCTaTHim pIBHem HAnpyr, a paionpnnMaH He NiKIOueHn Do eJeKtpomepeXi yeep3 6IOK XINBHeHHa 3I WTeNCeJIbHOIO BnIKOIO (20).
| Индана_TOP РмнICTь | |
| 80-100 % | |
| 60-80 % | |
| 40-60 % | |
| 20-40 % | |
| 5-20 % | |
| 0-5 % | |
IhdkaTop 3apJxHeOCTi akymyIaTOpHOI 6aTapei Ha akymyIaToPI
KaOaKymyIaTOPHa 6aTapeBnHnTa3 paionpimMaua,ctynih 3apJxHeOCTi aKymyIaTopa MoXHa BIDo6pa3NTn 3a DOnOMOrIO 3eJeHX CBITNOIOIB INDkAToPA 3apJxHeOCTi Ha aKymyIaTOpHn 6aTapei. HatNCihtb KONky IHNkATOPa 3apJxHeOCTi aKymyIaTOpHOI 6aTapei a6o BIDo6pa3NTn CTynih 3apJxHeOCTi. Raio nCIA HaNTCKAHHa KONky IHNkATOpA 3apJxHeOCTi aKymyIaTOpHOI 6aTapei JKOden CBITNOIOd He 3aropReTbcra, aKymyIaTOp BnW 3 naY i noro Tpe6a 3amHnTi.
Tn akymyIaTOPHO 6aTaapei GBA 18V...

HanpaBneHHaTnpbOBoa aHTeH
PaionpimMau NOCTaHaTbcra 3i BCTAHOBHeHOU
HTnpbOBOA aHTeHOIO (6).PnBVKOpNCtAHHi
paionpimMaua 3 FM-MoBHeHHaHaxNJyTe
HTnpbOBy aHTeHy B TOMy HAnpMyK, De
3a6e3neuYcTBcH aHcTiKiWiN npniOM.
Kaio CnHan pniomy HeIOCTaTHi,
nepemictiB paionpimMau B Micue 3 Kpaum
pniomom.
Bka3iBa: kuo paionpmau BkOpncTOByeTbc8 B 6e3nocepEni 6n3bKoCTi Bi,paiooo6naHaHHra,paionpinaiaB a6o iHux eJeKtpOHnX npictpoIB,paionpnmOM moKe noripwnTcR.
PiKIOeHH 3OBHIHix ayIOxepen uepe3 AUX
BikpnTe 3axnCHN KOBnaOK BiDcky IJIa nIKHoueHHy (15) i BCTaBTE wTekep Ka6eIIO AUX 3,5 MM (25) B po3'EM AUX IN (24).PiKluOitb Ka6eIb AUX do notpi6Horo ayioJxepena. Lio6 3anyctHTu BiITbOpeHHraayioJxepena AUX,HaTnCKaIte KHOKNy 己 XepeLO7) NOKn He 3'ABNTbCnIHnKauaI ayioJxepena (b) AUX. IJr3ao6irHnNotpanJIaHHIO 6pydy 3akpnTe 3axnCHN KOBnaOK BiDcky IJIa nIKHoueHHy (15) nicra BnIMMaHHra wTekepa AUXKa6eIIO.
Kaio n iac BiTbOpenHn AUX 6yHe HaTncHyTa OHa 3 KHOIOK nAm'rTi paioctaHui (5), paio npinMauch nepemikaetbcra Ha OCTaHHIO 36epexeHy B pexkmi paio npinMaaya paioctaHIO.
BiTBopeHHyynpaBlinH3O8HiHIM ayioKepeIamuyepe3Bluetooth®
Lio6 noaTn BiIDTBOpENHryAydIOJKepeLa (HaPnKnaI, CMapTfoHa)No Bluetooth® HaTnCKaIe KHOJIky «ДжepEno» (7), nOKn HaIncPneI He 3'ABNTbcI INDkauciai Bluetooth® (a), a60, He3aJeKHO BiI NOToUHOrO ayIOJKepeNa, KOPOTKOuacCHO HATNCHTb KHOJKy Bluetooth® (11).
Пичac BCTaHOBNeHnH3'EDHaHH6nMaI INnkaJi Bluetooth® (a).
Ha 6araTofoHKIOHaIbHOMy IHnKaTOpi (j) BiO6paKaAeTbcra
-Якpo paioopnmau Bxne iKlOueHndo 3OBHIhboRo ayioJKepeNa no Bluetooth® i ce ayioJKepeNo IOCTynHe,3'eHaHHN3 cIMdKepeIOM BCTaHOBIOcTbC8aABTomaTuHo.
-Якso 36epexehe ayioxepeno He IOCTynHe, po3noHaTbCn NowyK. AKTNByTe HOBe 3'EDHAnH3 3OBHIM ayioXkepeIOM. 3aBnau Ha CmapToHax ce MoKHa 3pO6nTu B HanaTuBaHHx y MeHIO Bluteoth®. Paio 3'ABnEcbcra KIOCTynHe DKepeNo nIi Ha3BOIO
ARAD18BCAS xxx.3BepHiTb yBary Ha iHΦopMaζIIO, HabeJeHy B kepiBnIcTBI 3 ekCnIyataaII BaWOrO ayioJxKepeNa/ cMapTfoHa.
-Якwo notpi6Ho po3ipBaTu icHyOye 3'eHaHHa 3ayioDjKepeNo uepe3 Bluetooth® Ta 乌kaTn HOBe dKepeNo 3Byky (PAIRING), HATNCKaTe KHOKNy Bluetooth® (11)doBwe HIX 0,5c. AKTNByIte 3'eHaHHa,ЯK OINcaHo Bnue.
LioHNO ayioJKepeNo iKIOuHTbcn NO Bluetooth®.nouHaTePnBaIcCBiTncra IHNkaicBleuth® (a).
Ha3Ba npictpoH, nIKnIOeHOro no Bluetooth®, BiIO6paKaAeTbcra y BepxHbOMy pIaKy 6aratoOfHyKcIOHAJIbHO rIHnKaTopa (j). Y HNkHbOMy pIaKy BiIO6paKaAeTbcra TeKCT, IaKIn nepeJaETbcra nIKKnIOueHm npictpoEM.
KaIO He Bdaetbcra BCTaHOBHTN 3'EnHaHHaYepe3 Bluetooth®, paio abTOMaTHO BUMnKaETbcra Yepe3 19 XbUNH.
AyiojKepeom, nikIOueHm no Bluetooth MoKHa TAKoX ynpabTn uee3 paionpma:
- Ⅲo6 Bn6paTni 3anyCTHTN KOMno3uio, KOPOTKOUacHO HaTNCHITb KHONky NOuyKy 3a HAcTyINHMn pe3yIbTaTAMN (9) a6O KONky NOuyKy 3a nonepedHIMn pe3yIbTaTAMN (10), NOKn He nepeiDeTe Do notpi6HoI KOMno3uii. BiTbOpEHnBn6paHOI KOMno3uii NoCHETbcABTOMaTHUHO.
- Uo6 nepepbn BiTbOpenhH,HaTNCiTb KHOKNy BmKHeHH 3Byky (8).Ha dncnnei 3'BAHTbc iHnKaicn nay3n (f).
-Ⅲo6 BiHOBHTBIBTBOpeHH,3HOBy HaTNCiThb KONKy BUMKHeHH 3ByKy (8), 3MiHiThb rHyHicThb 3a DOnOMOrHO BUMNKaHa (2) a6o HATNCiThb KONKy N0wky 3a HaCTyNHIMPe3yIbTaTAmu (9) uN KHONKy NOwky 3a nonepdHIMn pe3yIbTaTAmu (10).
-Дя nepexody Bnepei i Ha3a no KOMno3nii yTpmyTe KHONky NOwyKy 3a HAcTyNHIMPe3yNbTaTamu (9) Yu KNoHcy NOwky 3a NonepeHIMn pe3yNbTaTamu (10), NOKI Bka3IBNk He DOcRHe BCTaHOBJeHOI NO3nui KOMNO3nii.
Kaio n iac BiTbOpeHHno Bluetooth® 6ynde HATnCHyTa ONaHa 3 KHONoK NaM'Ati paIOCTaHcU (5),paIOIpnIMaMnepeMNkaeTbcR
Ha octaHHIO 36epexeHy B pexuMI paioopnmaa paiooctauio.
BiTbOpENHa 3 Dual Speaker Sound (3 ayDioXepeIom Bluetooth®)
KuO ayioJKepeo BiTBoHoeTbcn no Bluetooth, MoKaHa aKTHyBaTu PhyHKciO Dual Speaker Sound (DSS).PpN cBOMy 2 paio ARAD18BCAS cnIgryIOb IpaBIMTu Ta IiBIMn DInHaMikAm Nla OHaKOBO BoITBOpEHn.
AktuBaIg fYHKuii Dual Speaker Sound:
-Одн 3 Дов радионпшмчь Ма 6утв Вже
пдлочен no ayiodжерета no
Bluetooth®.
-Bu6ip paiaionpmaa B kocti npaboro DnHaMiKa: Bu6epiTb B MeHIO
-Bn6ip paiaionpmaa B kocti iiboro DnHaMiKa: Bn6epiTb MEHIO
- YbIMKHiTb peKmPo6oTu No Bluetooth® TaKoK Ha dpyromy paiaionpimaui.
Ha pyromy paionpmai Bn6epitb y MeHO IHsHIMdHaMik.
- KepyBaHHa BiIbTOpeHHaM 3diCHIOeTbcra NO Bluetooth®, 阿3a3BnuaH.
3MiHa HalaawTyBaHb MeHIO
ДлдяdoуФнкiiMeHIOHaTnCKaIte KhoNkyBIMKHeHH3ByKy(8)(MENU),NOKHaДиCnIeI He 3'ЯВТьСЯfHKiIe MeHIO(e).
HabirajB MeHIO:
- IepexiD y MeHIO: NOBepHiTb KNONKy «JkepeNo» (7).
Bn6ip Ta 36epexeHHHaHaTuBaH MeHIO: HaTnCHiTB KONKy《JKepeNo》(7)OK. - Iepexi y niIMeHIO: HATNCHiTb KHOIky «Jxepeno» (7).
-Поверненя 3 NiДмию B OCHOBHe MeHIO: KOPOTKOчАСЮHaTиСИть KONКУ BIMKHeHHa 3ByKy (8).При ДОСЯн HeHpiBHR OCHOBHOrO MeHIO paIIONpIMaH NOBepTaETbCBy Pexm BiTbOpeHHa ayDio.
IIO6 BnITn 3 MeHIO FyHKci 3 6yDb-RAKO pIBH i NOBepHyTNCB PexKIM BiITBOpEHNAYIO, HAITCKaIte KHONKY BIMKHeHHN 3ByKy (8), NOKI IHINKAUI MEHIO FyHKci (e) Ha DnCpIeI He 3rache. TaKoP aDiOpnMaU ABtOMaTHO nepemKaETbcR B pexKIM BiITBOpEHNAYIO nicra CnJIbAHHH 10 cekyHd nicra OCTaHHbORO HATNUCKAHN KHOKN.
KaHnHaauTyBaHHMeHIO6JIbSe He 36epiraOtbcNpN BmKHeHHi paioipnMaHa, 3aHiTb MiHaiaTOpHN eIeMeHT KINBHeHHa pe3epBHa 6atape).
Onui MeHIO
MeHIO Bn60py uactKOBO 3aJIeKHTb BiIpeKIMy BiITBOpEHHaayIO,BCTaHOBHeHOrO Ipaiaopnmaa.
YBepxHbOMy pAnky 6araToOHyKIOHaIbHoro iHnKaTopa (j) BiO6paXaTebCra Ha3Ba MeHIO, a o6paHe HalaTByBaHH - y HnXhOBMy.
Meho HanaWtyBaHHa 3ByKy: Bn MOKeTe BCTaHOBtN BVCOKm
MeHou HanaTuBaHHa cacy:
-Bn MoKeTe Bn6paTn foPMaT BiIO6paJxHnHa cacy 24 roDInn<24 Hour Mode> a6o 12 roDInh<12 Hour Mode>.
-Bn MoKeTe HanaTuBaTn Yac BpyHy 3a DOnOMOrOo
Bka3iBa: kUO nIayioJKepeNa DAB/DAB2 6paHa paIOCTaHiz, kA nepeJaC vac, cei vac npuMaetbca ABTomTuHo. PyHi HanaTByaHHa cacy 6byt 3mHeHi.
MeHIO cKnJaHHaHaawTyBaHb: BN MOKeTe CKNHyTN BcI HaJauTByBaHHa MeHIO Do 3aBOIDcbKINX
MeHIO aBTOMaTnUHOro nouKy paIioCTaHci: BNMOKeTe 3aNyCTHTaBToMaTnUHmNouYK CTaHci.
Meho Tny iHdkaqii: Bn MOKeTe Bn6paTn, kNk
TEKCT 3'ABJIaTmEtbcra B HIXKhbOmy prkky
6araTofoyHKIOHaJIbHOro iHdkaTopa (j):
-iHOpMauiHn TeKCT, kNn nepedaetbca paioctanciIO
- yactota paioctaHui
- cnla cnHaJy
- TIN nporpam, lopeaTbcra paioctanuieIO
MehIO TnIy IHNkauii:Bn MOKeTe Bn6paTu, kKIN TEKT 3'ABTAMMeTbCBA HNXHbOMy pAnky 6araTofoHyHKUioHaNbHorO IHNkATopa (j):
-iHOpMauiHn TeKCT, kN nepedaetbcpaioctaHciEIO
- H3Ba paioctaHcii
TIN nporpaMn, 0o nepeaetbcra paioctanucicIO <Program Type:
MehIO MOHOpnMy:MOHOpNIOM MOKHa
uk 211
YbIMKHyTN
MoHOpnIOM peKOMeHDoBaHNI, kUO paIOCTaHcIy qAto NepemNkaETbcra MIX Ctepeo-i MOHOpnIOMOM Upe3 Cna6Kn CuHaJI.
Mehio yHKuii Dual Speaker Sound: MoKHa HanaTbATn paIionpIMMaU B JKOcTi npABOrO dHAmika
KMBLeHH3OBHiHix npnnaib
USB-po3'EM
USB-po3'EM MOxHa BnKOpNCTOByBaTu INIa 3apJxKaHHN pncTpoIB, kI MOxKyTb OTPMByBaTu EneKtpOxKNBHeHn no USB (HanPknlaD, pi3Hi Mo6iNbHr TenefoHn).MaKcImaJIbHnPiBeHb 3apJHOrO CTPMy CTAHOBntb 1,2A.
BiikpnIte 3axncnKOBNaOK BiCiKy IaI niKluueHHra (15).PiKluoytUSB-po3'EM 30BHIHbOrO npictpoIO do USB-po3'Emy dIra 3apJkaHnpaia (23) 3a DOnomoroIO biNobiDHorO Ka6eio (USB charging).
PnEeKnnyataa3akymyIaTOPOM 3OBHIuHi npncpti moKHa 3apJxKaTu, TlBkn KOJI paiaopniMaay yBIMKHeHNI.
ДязлбоггнnotpanлгнHIO6pyd3akpnte 3axnchnoKOBnaOK BiDcIKyIJI
πiKluoyehn(15)nicraBIMaHHwTekepaUSBKa6eJIO.
Bka3iBKn zoDo po6OtN
Tayok nijnpiBiyBaHH
3a donomoroIraKaInI niBiyBaHHn (19) padionpnimau MoKHa, HAp., niBicHTn Ha dpa6nHi. Iy cboRo NOBepHtB rayok nI niBiyBaHHy noTpi6He noJoxKeHH.
Bka3iBKn 0oO ONTmAlbHOro NOBdoXeHHa 3 akymyIaTOPOM
3axuainTeakymyIaTOpBIDBOJOrnIBOIN.
36epiraTe akyMylTOp Inwe 3a Tempeatypn BiD-20°C do 50°C. 3okpema, He 3aIiMaITe akyMylTOp BnITKy B MaunHi.
Yac BiJ Yacy npOuHuaIe BeHTnlaIciHi OTbOpN aKymyJIaTopa M'JaKM, YIcTm I cyXmM NeH3JIrkOM.
3aHaTOKOPoTKa TpnuBaIicbpo60nnicra 3apJxKaHnCbiDHTnpOTe,IOaKymyIaTOP BnHePnaBce6e iNOro Tpe6a nomHrtn.
3BaKaITe Ha BkazIBKNIIODo BNdaJIeHHa.
Texhivhe 06cnyrobyBaHHa cepbic
TexHicHe 06cnyroByBaHHiaOuHneHHa
Дякichoi i haiiHoipo6OTn Tpmaite padionpnimau 6IOK XNBleHHa 3I WTeNCEJIbHOIO BUNKOIOB YNCTOTI.
BntnpaTe 3a6pydHeHH BONOrOIO M'koIO raHupkoIO. He BnKOpNCTOByTe KODHnx MNIOUHX 3aco6iB a6o po3HHNKIB.
Bn6ip npnilaia
BnKOpNCToBvIe Iiue opurHbHe npunaAFEIN. PpuaJaTNOBHHo 6yTu npu3HaueHe dNBApo6y.
Itochn peMOHT Ta cepbicha cnyx6a
BpaxoyIte, 6yNb Iacka, 10 Bnpo6n Do3BOJeHO peMOHTyBaTn, O6cnyroByBaTn Ta nepebiprTn nnEneKtpnKaM, OCKInbKn Upe3 HnnpaBnblHn peMOHT MOKyTB BuHnKHyTn cepNo3Hi 3arpo3n dJa KOpNCtYBaHa.
PnHa3BnuaHmXyMOBaX BkOpncTaHHn Pnp 6o6oCi ycepeHNi BnPo6y MoKe OciDaT n eEeKtpponpOBDHnn. Yacto npOdyBaIte cepeHy BnPo6y uee3 BeHTnJIauiHi OTBOpn CyXM CTNCHyTM NOBITpM 6e3 ONNBn.
PnO6pO6i MaTepiAIB, kI MtCTaTb rinc, MoKe YTBOPIOBATNCIIN. BIn MOKe OcIdaTN BCEpeHNI HBNPO6y, a TAKoK 3aTBePdIBaTN y NOeHNHHi 3 BOIoroIO NOBITpy. Lc MoKe HeRaTHBNO BnHInHyTu Ha MexaHI3M NepemukAHN. YaCTO npOduBaHTe CpeDnHy BNPO6y Ta enEmeHTN nepeMUKAHN Yepe3 BeHTUNJIiHi OTBOpN CyXIM CTCHYTM NOBITPM 6e0JIbN.
Bnpo6n,IO KOHTaKTyIb 3 a36ecTOM,He MoXHa BIDaBaTn BpeMOHT. YtNiI3yIte 3a6pydHeni a36ecTOM npOdyKTn BiINOBiINO DO npPnNCIB KOHKpeTHoi KpaIH NIOYO tNlI3aui BiIXoDiB,IO MICTaTB a36eCT.
3BepTaItec 3 Bnpo6aMn FEIN Ta 3napAДm, lo NOTpe6yIOb peMOHTy DO CBORO cepBICHOU eHTpy FEIN. AApecy MoXHa 3HaNTN B IInTepHeti Ha
www.fein.com.
OHOBIIOIe HaKNeIKn Ta nonepaKyBaJIbHi BkA3IBKn Ha Bnpo6i y BuNaAdKy CTapIHn Ta 3HOUeHHN.
IToUHn CnCOK 3aNuaCTn UbOro BInpo6y MoKHa 3HaTn B IHTepHeTi Ha
www.fein.com.
BukopncTOByIte InIe opurHaihhi 3aHactuHn.
3o6ob'zahhh Ta rapaHTi
TapaHTia Ha Bnpi6 qHHa BiNobiDHO Do 3aKoHOaBcHx HOpM KpaIH npOaBua. TaKoX TapaHTia FEIN HadaeTbc RbIDNOHO rapaHTiHnx 306OB'3aHb Bnpo6Hka FEIN.
B 06c3i NOCTABKN BaWOrO BInpO6y MoKe 6ytN TaKoX NlIe YacTHNa npUaDЯ, ONuCaHOro a6o 3o6paKeHOrO y cMbMy Noci6Hnky 3 ekcnnyatauii.
Дeкnapaia BiNobiHocti
FipMaFEIN3aBnE nID CBOU BnHrTKOBy BiINOiIaNbHiCTb,IO CEu BNpi6 BiNIOBiae HOpMaM,3a3HaueHm Ha OCTaHHIX CTOpIHkax Ubo Ioc6HnKa 3 ekCnIyataii. TexHnHa DOKymeHTaui B: C.&E.FeinGmbH,73529 Schwabisch Gmund, Germany (HimeyuHa)
TpaHcnpTyBaHHa
Ha pekomehnoBaHI nitiEBO-ioHHI akymyIaTOpHi 6aTaapei po3NOBcOJxOyOTbcra BmOrn IIOdo TpaHCnOpTyBaHH He6e3NeuHnx BaHTaxKIB. AkymyIaTOpHi 6aTaapei moKytbe nepeBo3ntncr KopNCtYbayem ABTomO6JIbHM TpaHCnOpTOM 6e3 Notpe6n DToPMaHH NOdaTkoBHX HOpM.
Pn nepcunI TpetIMNOC6amn (Haep. NOBITpHnM TpaHCnOpTOM a6o TpaHCnOpTHm EKcneHTOPOM) NOTPi6HO DOepeKyBaTNCRA OCO6bNBx BmOR 0do ynaKOBKNaMapKyBaHH. Y cBMy BNnAky y niROTOBci NocuKn NobHeH 6paTu yacTh bekCnept 3 He6e3neuHNx BaHTaXIB.
BiDcnaTe akymyIaTophy 6aTaapeo Inwe 3 HENOWKOJKeHUM KOpnycom. 3akJeTe BiKpnti KOHTAKTI Ta 3anaKyte akymyIaTophy 6aTaapeo TAK,IO6 BOHa He COBaIacB yynakOBuCi. DToPmMyIeCe, 6ydJaCkA, TAKOX MOKJIINBX DoaTkoBnx HaioHOJIbHnx pinnncib.
Ytwnizaia
EneKtpoHCTpyMeHTn,akymyIaTOpu/6aTaapei, npnaIaI yIaNKObky Tpe6a3daBAtn Ha ekOJIorIHNO HcCTy NOBTOPh nepepO6Ky.
He BnKuJaTe eNeKtpoiHcTpymeHTa aKymyIaTOpHi 6aTapei/6aTaapeKKn B no6yTOBe CMITT!
Jnne dna KpaH EC:
BidiobHIO do Ebponecboi DnpeKTHBn 2012/19/EU 0do BixoDIB eektpnuHoro Ta eektpponHoro 6bAHaHH Ta II nepetbOpeHH B HaioHaJIbHe 3aKOHOaBCTBO eektpuHi npictpoi, kki 6IbIe He npndaTHI DO BIKOPNCtAHN, a TAKOK BiINOBiHO DO Ebponecboi DnpeKTHBn 2006/66/EC HecnpabHI a6o BiINpaCbOaHI akymyIaTOpHI 6aTaapei/6aTaapeKNI NobHHI 3daBaTncs OKpemoi yTuNl3yBaTncs ekolorHNO uCTNM cnocO6OM. Pn HnepabNBIHni yTuNl3aui BiINpaCObaHI eektpnuHIT aEektpoHHI pnilanMOkyTb MaTI WkIDINBn BnNB Ha HABKOLNIHc cepeOBnue Ta 3dopoB'JIOHNH uepe3 MOKInBy HauBHicTB He6e3neuHx peOBHH.
AkymyIaTOPn/6aTapeiKn:
JIiriEBO-IOHHI:
Bynb nacka, 3BaJkaIte Ha BkaiBn B po3di TpaHcnopTyBaHHa (INB. ,TpaHCnopTyBaHHa", CtopiHa 212).
bg 213
OpunHaHa HnctpyKzna
Yka3aHnna 3a cnryphocT

PpOyETe BHNMaTeJHNO BCnUKN yKa3aHnN HnHCTpyKuN 3a 6e3o-nachOCT. Pponyckn npn Cna3BaHeTo Ha nHCTpyKuNtE 3a 6e3oNaCHOCT N yKa3aHnTAta pa6ota Morat da NMAT
3a NocIeIcTBnE TOKOB yIap, NOXap I/IIIN TeKKN TpaBMN.
CbxpaHbBte Te3n yka3aHna Ha cnrypho MRCTO.
PpOBepBaIe Ipei BcKa ynoTpe6a paDnOTo, ueKepeHna aanTep, Ka6eNa u cenCeHa. He nol3BaIte paNoTO, aKO yCTaHOBtne nobpeHn. He OTbapraTe paNoTO u ueKepeHna aanTep camu N b3laRaIte peMOHTa cMo HA KBaHnHnUpaH eKcnepTeH nepcoHaI n cMoC opHnHaHn pe3epBn qactn. POBpeHnTe paAnOTa, ueKepeHna aanTepu, Ka6eN u cencelen yBeneuBaT pNCKA oT TOKOB ynap.
UencelbT Ha uekephnna aanterp Tpr6Ba da e nOxodu3a KOHTa. B HkaKbB clyuaH He ce donycka N3MeHHe Ha KOHCTpykunra Ta Ha uenceHa He n3no3BaTe aanterpn 3aeHNO C paNoto. POn3BaHTo Ha opunHaJIHn UeIcEIn N KOHTaKTn HaMaJIBa pCKa OT BB3HNKBaHe Ha TOKOB ydap.
He n3non3BaIte 3axpaHbauu Ka6eHa ⅢekepHnA aadTep 3a ceH, 3a KOHTO ToH He e PpeBnDcH, HAp. Da PpeHacTe PaN- OTO, da FO OKaYBaTe Nn Da N3dbPbBaTe ⅢeCena OT KONTkTa. PpeNa3BaIte Ka6eJa OT HarpBaHe, OmacLBAHe, DOnnp DO OCTPN Pb6ObE Nn Do NOdBHXHN 3BeHa Ha MaunHH. IOBpeHn Nn yCyKaHn Ka6eN yBeJInuaBat pUCKa OT Bb3HnKBaHe Ha TOKOB ydap.

Ppea3BaIte paNTo n uekepHna aanTep OT bXn OOBaXnBaHe. POnHKBaHTo Ha BOda B paNi-OTo nnB uKeepHna aanTep yBeiHaBa pNcKa OT TOKOB yap.
He oTbapnTe akymaTopHaTa 6aTepy. CbueCTByBa onaCHOCT OT Bb3HnKBaHe Ha KbCO CbeDnHeHne.
Pn noBpeKdane HnepaBnHa ekCnNoaTaun O T AkymylatopHaTa 6aTeprna Morat Da ce OTdeJeT nap. AkymylatopHaTa 6aTeprna MoKe Da ce 3aNaHn nn Da ekCnNoDnpa. Norpuxte Ce 3a Do6po npOBetpBaHe n npn ONnakBaHn Ce o6bPeHte KbM Iekap. Napnte Morat da pa3dpa3HrT dnxateJHnte nbTu7u.
Pn HnpabnHNO n3no3BaHe nn NOBpeDa akymytaTopha 6aTepyoT He MoKe Da n3Teue eKtpoNT. N36raBae KOtakKa c Hero.AKO Bbnpekn TOBa Ha Koxata Bn nonaHne eKtpoNT, n3nAkhete MCTOTO 06nHc BOda.AKO eKtpoNT nonaHep B OHTe Bn, He3a6abHO ce Osbphete 3a NoMouk KbM ouhen lekap.EeKtpoNTbT MOKe Da npedn3Bnka n3rapaHna Ha Koxata.
AkymyaTopHaTa 6atepna MoKe da 6bJe NOBpeHeHa OT OCTpn npeMetn, Hapn. NPOH nn OTBeptKn, nn OT CNHN yApn. MoKe da 6bJe npei3BkaHo BtpeHNO KbCo CbeINHeHne n akymyataopHaTa 6atepna MoKe da ce 3anaN, da 3anyu, da ekCnIOnpa nn da ce nperee.
IpeJn3BaTe HEn3No3BaHnTe akymytaTOPHN 6aTePNOT KOHTKT CROJIEM NIMMAKN MeTALN INpeDMETH, HApP. KlaMepn,MOHETN, KIOUOBE, INPOHn, BINTOBe nDp.I., TbN KATO TE MORAT Da IpeNJ3BnKATKBCO CBeENHeHne. IocJeCTBnTA OT KbCOTOCbeINHeHne MORa Da 6bDaT N3rapHn NINOxap.
I3noI3BaIte AMPShare akymyIaTopHaTa 6aTepe nMo B npOdyKtn Ha npOn3BODnteHa AMPShare napTHbOp.Camo TaKa TRe npPeIpa3eHa OT OnacHO 3a He npTeOBapBaHe.
3apekdaTe akyMylatOpHnTe 6atepnCaMo CbC 3apAHNTE yCTPOICTBa, KONTO ce npenopbYBaT OT npOn3BODHTeJ. Korato n3PON3BaTe 3apAHN yCTPOICTBa 3a 3apejda-He Ha HEnoXOJaN akyMylatOpHn 6aTepn, CbIeCTByBa ONaCHOCT OT Bb3HnKBaHe Ha NoJxap.

Ipeia3BaIte akymlaTophata 6aTePnO TBnCOKn TemnepaTpyn, Hnp. BCNECTBne Ha npoDbJnxTeHNO n3JaRaHe Ha DnpekTHa CbHNeBa CBETnHa,OrbH, MPbcOTn, BOda N OBnaXHBAHe. Ima onaCHOCT OT EKcNIO3n IN KbCO CbeDInHeHne.

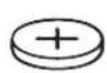


PNEyPENPEKDEHNE
BytoHH 6aTePN He 6Ba Da nonaDat B pueTe Ha deua. BytoHHte 6aTePn ca onachn.
BytoHHte 6aTePN He 6Na HnKora da ce TbNTAT Nn Da CE BkapBaT B npyH OTBOpn Ha TaIOTO.AKO NMa CbMHeHne,ye e 6NnA rThata 6yToHn 6aTePN nN e 6nna Bka
paHaBpyrOTBOpHaTJANO,NOTbpcTe He3a6abHoJekapcKa NOMou.ΓbTaHTo Ha 6yTOHb6aTePnMoKeJa npEni3BnKa TeKKn BbTpEHNyBpeKDaHnN CmbpT BpAMKIne Ha 2 yaca.
PnCMraHa Ha 6yToHHata 6aTePNBbHMaBaIte 3a KOMNETHTHOuNtBHeHHe Ha onepauTAt. CbueCTByBa ONaCHOCT OT EKcIIIO3NIA.
M3noJI3BaIte cAmO 6yToHHTe 6aTePnH, nocOueHN B TOBa pBkoBOdCTBO 3a ekCnloaTa-ua. He n3noJ3BaIte dpYn 6yToHH 6aTePnH nn dpyrN n3TOUHnK Ha TOK.
He ce onntbaite Da npesapexdaTe 6ytoHa 6aTepyn Hne npabete Kbco cbeHHeMeKdy Klemnte. ByToHHata 6aTepyn MoKe Da npotehe, da ekcnloDnpa, da Ce B3nlaMeHN i Da npedn3Bnka HapaHbAHn Ha Xopa.
N3BaXdAaTe N3XBpIaTe N3xa6eHn 6yTOHH 6aTePN CbIacHO npedncaHnra.
N3xa6eHN 6yToHH 6aTePN MoT Da npoteKaT I da yBpeJr PtOdyKta nn Da npen3BnKaT HapaHBAHn.
He nperpraBaIte 6yToHH 6aTeepn H He rN XbPRAIeBOrbH. ByToHHata 6aTeepn MoKe Da npoteue, da ekCnloDnpa, da ce Bb3nlaMeHN I da npedn3BnKa HapaHbAHn Ha xOpa.
BHHMabaiTe da He nobpeDnte 6yToHnata 6aTeepn u He ce OOnTbaTe da pa3rIoo6BaTe. ByToHnHaTa 6aTeepn MoKe da npoteYe, da ekCnIOJnpa, da Ce Bb3JIaMeHN i Da npedeN3BnKa HapaHbAHn Ha Xopa.
He donyckaTe noBpeDeHa 6yToHn 6aTePnna Bn3a B KOHTaKT C BOa. Pnp peaku Ha n3TuAun JNTm C BOa MoKe da Ce OTJeN BOOpO, BCJeCTBne Ha KoEt Da Bb3HnKHe NOKap, EKCnIO3n IIn Da 6bDaT npEdu3BnKaHn HapaHbAHn.
Mapka Ta Bluetooth® n 306paXeHnTa (Iorota) ca pernctpaHn MapKn u co6ctBeHoCT ha Bluetooth SIG, Inc. Bcya ynotpe6a Ha Ta-3n MapKa/n3o6paXeHn oT C.&E.Fein GmbH CTaba no IInceH3.
OnncanHe Ha npOdyKta n DeHocTTa
Molra, mMaTe npedBnI n3o6paKeHnra B npedHaTa qAcT Ha pBkoBOIDCTBOTO 3a pa6Ota.
N3o6pa3eHn eJeMeHTn
HomepupaHTo Ha n3o6pa3eHnTe KOMnOHeHTn Ce OTHaCdo n3o6paXeHnETo Ha paAnOTo Ha rpaΦnHaTc TpaHnua.
(1)Диспел.
(2) Konue BkN/n3Kn
(3) BucOKoROBOpuTeI
(4)PbKOXBaTka3a npHeHaCraHe
(5) ByToHn 3a 3anaMetraBeHa Ha cTaHcHn
(6) AHTeHa
(7) Konque Source
(8) ByToH n3KlnOueH 3ByK
(9) ByToH TbpcHe Happei
(10) ByToH TbpCHe Ha3a
(11) ByToH Bluetooth®
(12)KanakHaakymyataOpHata6aTePn
(13) 3aKIOUOBAuIoCT KaNak Ha aKyMaJaTOpHa-Ta 6aTePnIa
(14)「He3do 3a akymylaTOpHa 6aTepeHn
(15)OTdeneHne3aCBbp3BaHe
(16) ByToH 3a OTKIIIOUBAHe Ha aKyMyJaTOpHaTa 6aTepeia
(17) AkymylaTopHa 6aTepeRn a)
(18) Kanak 6yToHna 6aTePnA
(19) Kyka 3a OKaUBaHe
(20) Μιεκερην ἀπαπτερ (cπευφήνεη 3a ctpa-Hata)
(21) Μεκερ ὅνγρει Μεκερην ἀπαπερ
(22)ПисьeннTeHa 6уКca шeKepeH aan-TeP
(23) USB 6yKca 3a 3apeXdAnHe
(24) AUX-IN 6yKca
(25) Ka6en AUX
a) N3o6pa3eHnTe Ha fHyprnte H onncanHte DonblnHTENn nPcncoc6NeHn He ca BKNoUeHNbCTaHdapThata OKOMnEKTobKa Ha ypeHa. N3eepNaTeHn cNcBk Ha donblnHtEnHnTe npCncoc6NEHn MoKTe Da HamepNTe CbOTBEHO B KaTANOra HN 3a DonblnHTenHn nPcncoc6NeHn.
HdNKaTopn eJeMeHTN
(a) INHdNkaTop Bluetooth®
(b) INHdkaTop aydno n3TOHHK
(c) INHДИΚAТОР мЯСТо пamET
(d) YacobHnK
(e) INHДИКaTOp ΦyHKUЯ MeHIO
(f) INHdkaTOp nay3a
(g) INДИКaTOp 3a ИЗКИЧЕн 3ByK
(h) INДикaTOp 3a CTpeo-приemaH
(i) INdkatop 3a akymylatopHaTa 6aTepey
(j) MyntnfohkuoHaHNO nolne
TexHnueckn daHHN
| Радио заст pontе- лень обekt | ARAD18BCAS |
| Каталожен Homep 9 260 ... | |
| Приеманe DAB+ ● | |
| Hоминално наразожени | |
| Радио засточ- len обekt | ARAD18BCAS |
| - ри рабota сшике- penaadпетер | 18 |
| - ри рабota на akу- myлаторни бate- рinn | 18 |
| Hominahalma мошноct усuinba teл | 2 x 7,5 |
| Диапазон на п rieme- нe укВ | 87,5-108 |
| Диапазон на п rieme- нe DAB+ | 174,928- 239,200 |
| Съвмостимоct Bluetooth® | Bluetooth® Spec. 5 |
| Рабoting честох диапазонBluetooth® | 2402-2480 |
| Прedingating мош- нoc't Bluetooth® Мakc. | 10 |
| Бутона 6atepany (6y- ферна 6atepany) | CR 2032 Литnevва 6ate- рnia 3 V |
| Maca съласно EPTA-Proce- dure 01:2014 | 2.8-3.9 A |
| Вид зашURA | IP54 (зашURA срешичы понік- вае на прах и пьскки вoda) |
| Пренихелна temпера typа на OKолнatable среда п ri- зAPEДанe | 0 ... +35 |
| Разшени temпера- тура на OKолнatable среда п ri работаC) n пri сklадирaine | -20 ... +40 |
| Пренихелны akу- латорни 6atepany (2-8 Ah) | GBA 18V... ProCORE18V... |
| Пренихелны за- разdnу усточа CB | GAL 18... |
| A)В Завсимоct OT ИЗПОЛЗВанatura akуMuлаторна 6ate- рnia | |
| B) ри затовен калak на akуMuлаторна 6atepany (12) и затовен OTДЕЛЕNHUE 3a CBp3BAne (15) | |
| C) Orpanuhe na Mошноct п ri Temпера typi <0°C. | |
| Шеберен(addтөр) | |
| Ка talojжөн Homeр 3 13 24 000 421 | |
| Вхаяшо нарөгэн e V~ 100 | -240 |
| Вхаяшо чECTOTа Na прөнүлүвөн тok | 50-60 |
| Вхаяш тok mA 800 | |
Uekepen aanTep
| Изхов从业人员 Ниe | V= | 18 |
| Изхов从业人员 | A | 1,8 |
| Терглесьгласно EPTA- Procedure 01:2014 | kg | 0,22 |
| Клас на зашита | ☐/☐ |
ДоьннтелгТexнчecкДаHHN ue OTKpueTe Ha aDpec: https://fein.com/ecodesign
3axpaHbaHe Ha paINoTO
3axpaHbHaTeTo Ha paAnOTo MoKe Da ce N3BbPwBa OT IInTneBO-NoHHa aKymyIaTOPHa 6aTepy (17) nnn npes zkeepnna aanTep (20).
Pa6ota c akymylaTopha 6aTepey
H3non3BaTe cAmO nocoueHnTe B pa3dela TexHHueckn daHHn 3apAHH ycTpoiCTBa.
Camo Te3n 3apAHH yCTpoiCTBa ca c npaMetpn, NOxOJaun 3a nIIOJI3BaHaTa BbB Ba-WeTO paINO IITNeBO-IOHHa 6aTePna.
Yka3aHHe: N3noN3BaHeTo Ha akymlaTOpHn 6aTeepnn, KOnto He ca npedHa3NaeHn 3a BaWeTo paIIO, MOKe Da npEIN3BnKa HnpeBnHOT My fHKUHOHPaHe nI Na rO NobpeDi.
IITnHeBO-IOHHaTa akymyLatopHa 6aTePn e 3a-
uHTeHa cpeSy IbIbOko pa3peKdahe ue3 enekTPOHHa TcTeMa "Electronic Cell Protection (ECP)".Ipn pa3peDeHa 6aTePn paAnoto ce n3KJIIOUba OT npedna3en npekbcBa.
Ako paHnOTo 6bJe n3KlIOUeHO OT npEpa3HHa PpeKbCBa, He FO BkIIOuBaHTe OTHOB。
AkymylaTopHaTa 6aTePnMa MoKe Ja 6bJe NOBpeDeHa.
CmHa Ha akymylaTopHaTa 6aTepy
OTBOpTe 3aKJIIOUBaIINJIOCT (13) Ha KaNaka Ha aKyMylaTOPHaTa 6aTePnI N BdInrHeTe HArope KaNaka (12).
3a N3BaXJaHe Ha akymlyaTopHaTa 6aTepy HaTnCHete OCBO6OxKaDaBauNHa 6yToH Ha6aTepyTa (16) nI3NbpaNaTe akymlyaTopHaTa6aTepy OT rHe3dOTo. Pn TOBa He npnlaarTe cnna.
3a n3noJ3BaHe Ha akymlyaTOPHa7 6aTePnra n36yTaIe B rHe3dOTo (14), TaKa Ye CBbp3BaHnra-Ta Ha akymlyaTOPHa7 6aTePnra Da NErHaT Bbpxy CBbp3BaHnraTa Ha rHe3dOTo Ha akymlyaTOPHa7 6aTePnra AkymlyaTOPHa7 6aTePnra Tp8Ba Da ce 3axBaHe C npeuPaKBAhe.
3aTbOpTe Kanaka Ha akymylaTopHaTa 6aTePn (12) n rO 3aknHcTe.
HdkaTop 3a akymylaTophata 6atepn
PnnoocTaBeHaakymyataOpHa6aTepeHmOKeTe Da pa3n03Haete CbCToHHeTo Ha 3apeKdaHe Ha 6aTepeHtA(17)HaDncnner,a npu CbaJeHaakymyataOpHa6aTepeHnBpxycamaTa6aTepeHn.
HnkaTOp 3a akymylaTophata 6atepna Ha dncnne
HnkaTob3aakymlaTophata6atepna (i) ce nokaBaHaDcPiier, KOrato Ce NoCTaBN akymyIaTopHa 6atepna CIOCTaBHyHO HanpeXeHne npaNoTO He e CBpb3aHo ppe3 ueKePHNAaanTep (20) c eJeKtpnueckataMpexa.
| Инд�示器 Top Kanau | ИтET |
| 80-100 % | |
| 60-80 % | |
| 40-60 % | |
| 20-40 % | |
| 5-20 % | |
| 0-5 % |
HnkaTop 3a akymylatophata 6atepnBbpxy 6aTepyta
Ako akymylaTOPHATA 6aTePnCe BaDi OTpaN-OTO,cbCToHHeTO Ha 3apeXJaHE MOKe Da CE NOKa3Ba Upe3 3eJeHInTe CBeToIOJn Ha INHINKaTopa 3a CbCToHHeTO Ha 3apeKJaHe Bbpxy akyMylaTOPHATA 6aTePn.
3a da Bnnte CteeneHTa Ha 3apeDeHocT ha 6aTe-pnra,HaTncHeTe 6yToHa 3a HnNkaun
Ako CneI HaTnCKaHe Ha 6yToHa 3a HnDnKaunie He CBETN HHTO eINH CBTeODnO, aKymyNaTOPHaTa 6aTePnE NOBpeHa N TpRbBa Da 6bDe 3aMeHeHa.
AkymylaTOPHa 6aTePna moen GBA 18V...

| Сbvетонод Кацитet | |
| Henpeкьсато сbveteи 3х 3елени | 60-100% |
| Henpeкьсато сbveteи 2х 3елени | 30-60% |
| Henpeкьсато сbveteи 1х 3елени | 5-30% |
| Miraшиа сbvетлиа 1х 3елени | 0-5% |
AkymylaTopha 6aTePma Moel ProCORE18V...

CmHa Ha 6yToHHata 6aTePn
3a 3ana3BaHe Ha yaca n Ipyrnte HactpOnk no paAnOTO Tpr6Ba Da ce nI3NoJ3Ba 6yToHn6aTepe npKaTO 6yfepeHa 6aTepe.
Ipei npbbaTaynoTppe6aHa paanoto cbaTe 3aunTHaTaJeHTA Bbpxy n3nOlaHata 6yToHHa 6aTepy.
OTBOpTe 3aKJIIOUBaIINJIOCT (13) Ha KaNaka Ha aKyMylaTOPHaTa 6aTePnI IN BdIrHHeT e Harope kaNaka (12).
CbaIe npn Hxkda akymytaTopHaTa 6aTePn (17).
I3terIeTe 3aunTHata JENTa NOJ KANAKa (18) Ha 6yToHHata 6aTePn.
CmeheTe 6yToHHaTa 6aTeepn, aKo YacbT Ha pa- dIto Beue He Ce 3aNaMeTBA u INHdNkAToPbTe e No-cna6.
3a cenTa 3aBpTeTe Kanaka (18) Ha 6yToHnHaTa 6aTePnO6paTHo Ha YacOBnKa (HaNP. C MoHeTa) n CbIeTe Kanaka. NocTabete HOBa 6yToHnHa 6aTePn.
IpiTOBa BnHmBaIte 3a npabHHaTa noJIpHOCT, nO6pa3eHa OT BbTpewHaTcTpaHa Ha KanaKa (18).

IocTabeTe Kanaka (18) Ha 6yToHHaTa 6aTePnna 06paTHO n rO 3aTeHHeTe NO NOCOKa Ha YacOBHNka. KaNakBT e 3akJIOUeH CNrpyHO cMo KOraTOMapKnPOBkNTe Bbpxy Hero n Bbpxy CmBOJa CKaTNHAp COuAT eHa KbM dpyra.
M3BaTe 6yToHHaTa 6aTePnO rT pAnoTO, aKO HMa Da rno 3NoI3BaTe NO-DbIro BpeMe. Pn npOdbNKeTIHO cbXpaHbAHe B paDnOTo 6yToHHaTa 6aTePnMOKe da KOpOnpaN da ce camOpapEn.
Pa6ota
PaHnOTo OT npK KOtAKT C BOda. PpOHnKBaHTo Ha BOda B paHnOTo yBEnuYBa pUCKa OT TOKOB yAp.
PbB3MOXHOCT dpkTe Kanaka Ha akymyIaTOPHATA 6aTepn H 3auNTHO TO Kanaue HaOTDeJIeHNTo 3a Cbbp3BaHe 3aTBOpEHnTE Kanaun PpeDn3BaT paNtO TO BOJa n npax.
AydnopeKIM
BkIIOUBAHe m3KIOUBAHe
3a BKNIOUbaHe Ha paIINOTO HAITNCHETe KONHTO BKN/NI3K(2).IUCNPET(1) ce aKTUBIPA u 3aOnuBa Bb3IPON3BExKaHTo OT NOCNEJHO NOI3BaHnIpeDN I3KIOUBAHTo Ha paIINOTO ayDNO I3TOHNK.
IucnneT (1) ce OCBetra 3a HAKONKo CekyHnn npn BcKaHOHaNTCKaHe Ha 6yTOH.
3a N3KIOUBAHe Ha paIIMO TOHOBO HAITCHETe KONHTO BKN/UN3Kn (2). Tekyo I3NoI3BaHnayIIO INTOUYHK Ce 3aNaMeTBA.
Hactpoika Ha cnilata Ha 3Byka
CneBVKIOUbAHeHa paIIOTO BnHarN e HAcTpoeHa HNCa Cnla Ha 3Byka.
3a yBéNiuYBaHe Ha CnIaTa Ha 3ByKa 3aBbPTeTe KONUeTO BKN/INKl (2) NO NOCOKa HA YacOBHnKa, 3a HAMJIYBaHe Ha CnIaTa Ha 3ByKa rO 3aBbPTeTe O6paTHo HA YacOBHnKa.
HactpoKaTa Ha cnlaTa Ha 3Byka
3a n3knIOUbaHe Ha 3Byka MoKeTe Da HaTnCHeTe 3a KpaTKO 6yToHa 3a 3aIyUbaHe (8).3a da BKIOuHTe OTHOBO 3Byka, HATNCHETe OTHOBO 3a KpaTKO 6yToHa 3a 3aIyUbaHe IIN 3aBbPTeKONueTO Bk/IN3Kn (2) NO NOCOKA Ha YacOBHnKa.
CinataHa 3Byka MoKeJa Ce IpomEna NO BcKaO BpeMe.AKO fYHKunraTa Ha MeHIOTo e AKTNBupaHa, INDnKATOpbT Ie Ce BbpHe O6paTHo KbM Me
HOTO HAKOLKO CEkyHn CneI npomHaTa Ha cn- naTa Ha 3Byka.
PaINoTO aBtOMaTHUHO ce n3KJIIOuBa cJeI 19 min, aKO Ipe3 TOBa BpeMe:
- cnntaHa 3Byka Ha paanoto e Ha 0,
-TOHbT Ha paIIOTo e N3KIOUeH INN - CnnaTa Ha 3ByKa Bbpxy Bb3Pon3BExJaunypei(Ha np. cMaprfoH)e Ha 0.
H36op Ha aydno n3TOHnK
3a n360p Ha aydno n3TOUHnK HaTnCKaIte KOnHeTo Source (7) Dotoraba, dokaTo Ha dncnJe He ce noKaKe JeHaHnT BbTppeWeH, pecn. BbHweH aydno n3TOUHnK:
- DAB/DAB2:Дигигално радию пе з DAB+,
FM/FM2: aHaIorObo paIIO npE3 YKB,
-AUX: BbHWeh ayDnO n3ToUHnK (HaNP. CmApT- OH) npes 3,5 mm 6yKca AUX IN (24) B OTdeJeHHeTO 3a CbP3BaHe (15), - HbHueh aydno n3TOUHK (HaNP. CmapTFOH) npesBp3ka c Bluetooth®.
AkyHnT ayno n3TOHMK MOKe da ce pa3NHy B INnKaTopa 3a ayno n3TOHKn (b) pecn. HnKAtopa Bluetooth® (a).
AynIO n3ToHnIte DAB n DAB2 KaKTO n FM n FM2 He ce pa3nUaBt NO fYHKuHOHaJIHoCTTa cn, a npEJaRaT cAmO dONbHInTeJHO MeCTa 3a nporpaMnpaHe B NaMeTTa.
HactpoBaHe/3aametTbaHe Ha DAB+ paNoctanu
3a n360p Ha aydno n3ToUHnK DAB+ paAnocTaHnI HAHTNCKaIte KOnyTeo Source (7) IOToraba, DOKaTO B INDnKaTopa 3a aydno n3ToUHnK He ce nokaxe (b) DAB nn DAB2.
CneI KpaTka HnHuaN3aUcCe Bb3npOu3BeXda nocJeHO HaCTpoEHaTa paDIOCTAHU.
HMeTo Ha cTaHnIyTa Ce NOKa3Ba CbOTBeTHO B rOpHnpeHa MyNTnΦyHKuHOHaHn HnDnKaTOp (j). KaKbA DoNbHInTeJHa INΦopMa- nIe Ce NOKa3Ba B DOJHnpeHa MyNTnΦyHKuHOHaHn HnDnKaTOp, MoKe Da Ce HAcTPOB BB ΦyHKuYrTa Ha MeHIO.
-3aCMHa Ha CTaHnraTa 3aBbPTeTe KOnyTeo Source (7)doKaTo JeenaHaTa CTAHnHe ce nokae Ha nCnpe. HATncHe TcOnye To Source (7), 3a da NotBbPnte n36opa. PaNoTO CMeHa Ha n36paHaTa CTAHn.
AnTePHaTnBHO 3a CMHa Ha CTaHcunTa MoKeTe Da HATnCHe6yToHa 3a TbpcHe Ha3aD (10) mN 6yToHa 3a TbpcHe HAppe (9) PaIIMO tCmHg Ha CneBaUcaTa HAIuHa cTaH Uzra (no a36yueH peH HADOny nH Harope).
-3a 3anaMeTBAHe Ha HAcTpOeHa CTAHUNHa TtCHHe6yToHa 3a 3anaMeTBAHe Ha nporpaMa (5) HaKeIaHOTOMrCTOBnAmETTa DOKaTO HmepbT Ha MrcTOTO BnAmETTa He Ce NOKaKe BnHnKaTopa 3a MrCTOBnAmETTa (c).
Ako 4-Te MeCTa B nAMETTa Ha aydno
n3TOUHnKa DAB ca 3aETn, To ype3 HATNCKaHe
Ha KOnyTeO Source (7) CMeHete Ha aydno
n3TOUHnK DAB2, B KOITo NMa OSe 4 MeCTa B
nAmETTa. ImaIte B npEbnI, ye CneIcMraHaTAt
TPra6Ba Da HAcTpOte OTHO Bo JKeNaHaTa CTAHu, 3a Da MoKeTe Da Ra 3aNaMeTIne.
-3a Bb3npON3BExKaHe Ha 3anaMeTeHa CTaHcna HAtncheTa 3a KpaTko eINH OT 6yTOHnTE 3a 3anaMeTBAHe Ha nporpama (5).HomepbT Ha MxCTOTO B NaMETta ce NOKa3Ba BV INDnKA-Topa 3a MxCTO B NaMETTA (c).Ppi Huxda CmeHete Qpe3 HaNTCKaHe Ha KonueTo Source (7) MeJy ayIIO u3TOHNuTE DAB n DAB2,3a Da MoKeTe Da IMaTe DOCTbN DO BCNUKN 3anaMeTeHn CTaHcIn.
Yka3aHne: PnCna6 paAno cnHan ce NOKa3Ba
Ako He MoKe da ce OTkpe DAB+ cTaHcNIA, ce NOKa3Ba
HactpoKa/3anametBaHe Ha YKB padnoctaHua
3a n36npaHe Ha ayIno n3ToUHnK YB paNocTahuHaNTCKaIte KOnyTeO Source (7) doToraba, DOKaTO B INHnKAtopa 3a ayIno n3ToUHnK (b) He ce NOKaKe FM nn FM2.
YeCTOTaHa aKtYaalHO Bb3Pon3BekJaHaTa CTAHnCe NOKa3Ba CbOTBETHO B TOpHnPeHa MyNTfYHKUOHaHLN Ha HINKaTOp (j). KaKbA DoNbHnTeHa HOpMaunJe Ce NOKa3Ba B DOnHn PeHa MyNTfYHKUOHaHLN Ha HINKaTOp, MOKe Da Ce HAcTPOB BB FyHKuYrTa Ha MeHIOTo. Pn DOCTaTBuHO CnHNo PrnEmaHe Ha NOxOJaCnHn PaDnOTo ABTomTuHO NpeBkUoHa Ba HCTepeo PrnEmaHe, Ha DInCnJle Ce NOKa3Ba HINKAtOpbT 3a Ctepeo PrnEmaHe (h). BvB FyHKUra Ta Ha MeHIOTo BnDbT Ha PrnEmaHe MoKe da Ce PpOMEH Ha MOHO.
-3a HactpoBaHe Ha onpeDeneHa cTAnu 3abbpTeTe KOnHTo Source (7) (TUNE)doKaTo JekHaHaTa YecTo, peCn. JekHaHaTa CTAHcNr Ce NOKaKe Ha DnCnIe.
-3a Tbpche Ha CneBbAaTa CTaHcNc BnCko Ca cna Ha CnHana HATNCHe 3a KpaTko 6yToHa 3a TbpcHe Ha3ad (10) nii 6yToHa 3a TbpcHe HAppe (9). CneBbAsaTa OTkpnta CTaHcNja ige Ce NOKaKe Ha DnCpIe N Ie Ce Bb3Pon3BeJe.
-3a TbpceHe Ha BCNCHK CTAHcHn C BNCOKa CnHa HcHrHaHa HATNCHE Te 3a KpaTKO 6yToHa 3a TbpCEHe Ha3ad (10) nIn 6yTOHa 3a TbpCeHe HAppei (9) 3a NOBue O TNOBUN CEkyHJa. BcKa OTKpNTa CTAHcUe Ce Bb3PON3BExJa 3a 5s, Cne ToBa TbpCHeTo Ue Ce npOJbLnIu Do KpaHa YecTOTnHa DnAa3OH. 3a Da npeKbcHeTe TbpCEHeTo Ha CTAHcUe, HATNCHE Te 3a KpaTKO 6yToHa 3a TbpCHe Ha3ad (10) nIn 6yToHa 3a TbpCHe HAppei (9).
-3a 3anametrahe Ha eHa HAcTpoHa CTAHnHaHTNCKaTe 6yToHa 3a 3anametrahe Ha nporpaMa (5) Ha JekaHOTo MCTO B nAmETTa DOKATO HOMepbT Ha MCTOTO B nAmETTa He ce NOKAKe B INdkaTopa 3a MCTO B nAmETTa (c). Ako 4-Te MeCTa B nAmETTa Ha aydno N3TOHnKa FM ca 3aEtN, To ype3 HATnCKaHe Ha KOnTuE To Source (7) Cmehete Ha aydno N3TOUHK FM2, B KOITOn Ima OSe 4 MeCTa B nAmETTa. ImaiTe B ppeBnD, Ye cIeI CMHaTAt Tp6Ba Da HAcTPOnte OTHOBO JekHaHATA CTAHn, 3a Da MoKeTe Da r 3anamETnte.
-3a aBTOMaTHUHO TbpcHe n 3anaMeTBAHe Ha Hau-CnJIHaTa CTAHcYRA (AUTOSTORE) HA-TnCHte 6yToHa 3a TbpCeHe Ha3aD (10) n 6yToHa 3a TbpCeHe HAppe (9) eHNOBpeMeHHo. PaNIO TO npOBepBa BCNUKn CTaHcN, KOITOMorat Da Ce npEeMaT n 3anaMeTBA 4-Te cTaN C Hau-DO6pO npEeMaH e Ha MeCTaT oT npOrpaMaT a 1 Do 4. O6bPHeTe BHNMaHne Ha TOBa, Ye npu HyKa Beue 3anaMeTeHHTe CTAHcN, Ue Ce npEzAnCBaT. Ako TbpCHeTO ce npEeKpaTN, Ue ce Bb3npOn3-BexJa 3anaMeTeHaT a NOD Homep 1 B NaMeTTa CTaHcN.
-3a Bb3npOn3BExKaHe Ha 3anaMeTeHa CTaHn HAHTNCHEte 3a KpaTko eINH OT 6yTOHnTE 3a 3anaMeTBAHe Ha nporpama (5).HomepbT Ha MCTOTO B nAMETTa CE NOKa3Ba B INHnKaTopa 3a MxCTO B nAMETTa (c).Ppi HuxJa CmHeTe Qpe3 HaNTCKaHe Ha KONHeTo Source (7) MeJy ayDINO n3TOHNuTE FM n FM2, 3a da MOKeTe Da IMaTe DOCTbN Do BCnKn 3anaMeTeHn CTaHn.
HacouBaHe Ha aHTeHaTa
PaIIOTO ce IOCTaBc MOHTIpaHa aHTeHa (6). Korato nol3BaTe paIIO c YKB, HAKIoHete aHTeHaTa B NOCOKaTa, B KOrTo npneMaHeTo e HaI-do6po.
Ako He MokeTe Da HamePte N03nUHa aHTeHaTa C Do6po PnpMaHe, NoCTaBepe paINoTO HaDpyrMoCTO, KbDeTo PnpMaHeTo e NO-Do6po.
Yka3aHHe: Pn pa60Ta Ha paAnOTo B HEnOpceICTBeHa 6n3oCT Do paAnOCTaHcHn, ypei, n3-1b4Baun paAnOBblHn nn dpyIn eJekTPOHHnypeiMoKeJaBb3HnKHAT CmUeHnB PaAnONpneMaHTo.
Cbbp3BaHe Ha BbHnHaaynO n3ToHnI npe3 AUX
OTBOpTe 3aUNTHOTo KaNaYe Ha OTdJeHneTo 3a npCbeINHBAHe (15) n pbxHeTe 3,5 mm ue-kep Ha AUX ka6eLa (25) B AUX IN-6yKcata (24). CbpxKeTe AUX ka6eLa KbM noDxOJa ayDnO n3-TOuHNK.
3a Bb3npoN3BekDaHe Ha AUX ayDnO n3TOuHnK HATNCKaIte KOnyeTo Source (7) DOKaTO B INDiKaTopa 3a ayDnO n3TOuHnK (b) He ce NOKaKe AUX.
3a 3aunTa OT 3aMbpCBAHe 3aTBopTe 06paTHO 3aHTHO KAaue Ha OTdeneHneTO 3a CBp3BaHe (15) KOrato cBaanTe uekepa Ha AUX Ka6ena.
Ako no BpeMe Ha AUX peXIM ce HaTnCHe eHIN OT 6yToHnTE 3a NaMeT 3a npOrpAmn (5).TO paAnOTO CmEHa CTaHcNtTa, KOrTO e 3aNaMeTeHa B NocJeHO H3NoJ3BaHHpeXIM Ha pa6ota Ha pa- DnOTO.
Bb3npoun3Bexkdahe/ynpablenHe Ha BbHnHa aydno n3TouHnI npes Bluetooth®
3a da Bb3npoN3BeJeTe ayDIO u3TOUHnK (HaNP. cMapTfoH) npe3 Bluetooth® , HaTnCKaJIe Te kon- yeto Source (7) DOToraba, IOKaTO INHdNKaTOPbT Bluetooth® (a) He ce NOKaKe Ha dncnne Jnn H3aBNCIMO OT aKtYaNHNy ayDIO u3TOUHnK 3a KpATKO HAuChHeTe 6yToHa Bluetooth® (11).
IIO Bpeme Ha npoueca Ha n3rpaKaJaHe, pecn. Ha TbpcHe Ha Bpb3ka INHnKaTOpBbT Bluetooth® (a) MURA.
B MyNTnФункUNoHaNoHnIuHДnKaTOp (j) ce nOKa3Ba
-AkopaoJnOToBeuee6NIO Cbbp3aHO C BbHueh aynO n3TOUHNK npE3 BluethoHToTnayIIO n3TOUHNK e HAIyHe, TO ue Ce n3rpaDN aBTOMaTHNO Cbbp3BaHe C TO3n ayDIO N3TOH NK.
-AKHOHaHnueH 3aNaMeTe H ayDIO n3TOUHNK,ce CTapTnpa NPOuecBt Ha TbPceHe.AKTINBpaIte HOBATA Bpb3Ka Ipe3 BbHWeH ayDIO n3TOuHNK.ToBa Hau-yeCTO npi CMapTfoHNTEe BB3MOXHO B HAcTPOIKNTe B MeHIOToBluetooth®.PaNOTO ce NOKa3Ba KaTO HAnu-eyH n3TOUHNK NO IMETO ARAD18BCAS XXXMolra,3a CEJIta O6bpHete BHMaHne Ha IHCTpyKuaTa 3a ekCnloataqna Ha Bauny ayno n3TOUHNK/Bauny cMapTphiOH.
-AKO HAIINHNO Cbbp3BaHe KbM ayDIO N3TOUHNIpe3 Bluetooth® ce npekpaTN cTe TbcN HOBayDIO N3TOUHNIK (PAIRING),HaTNCHEte 6yToHa Bluetooth® (11) 3a NOBEe OT 0,5 s. AKTNBupaTe Bpb3KaTa, KaKTo e ONIcAHO NO-rope.
Korato e cBbp3aH ayDIO n3TOUHK ppe3 Bluetooth® , INdIKaTOPbT Bluetooth® (a) CBETN NOCTOARHO.
IMeTo Ha Cbbp3aHnI npes 3uBleoth@ ypeI ce noka3Ba B rOpHnI peHa MyTnDyHKUOHaHnI
HnDkaTOp(j).BdoHNpye ce noRBA npeda-DeHHNOT CbP3AHypeTeKCT.
Ako He Moke da ce n3rpaN Bpb3ka npes3 Bluetooth® , paNoto cne19 min aBtOMaTnHc Ce n3KJIIOUBA.
Cbpb3aHnT npe3 Bluetooth@ aydno n3TOHnK Mo-Ke da ce ynpabnaBa n npe3 paDnOTo:
-3a da n36epete 3arnaBne H da CTaptnpaTe, HaTnCKaIte 6yToHa 3a TbpceHe HAppei (9) pecn. 6yToHa 3a TbpceHe Ha3aD (10) 3a KpaTko DOKATO JKeJHOTo 3arnaBne He Ce DoCTurHe. Bb3npON3BExKDaHETo Ha JKeJHOTo 3arnaBne ce CTaptnpa aBTOMaTHUHO.
-3a da npekbchete Bb3npounBexkaheTo,HaTnCHte 6yToHa 3a 3arLyuwaBaHe (8).Ha nucnIeA ce noRBA uHnKaunTa 3a nay3a (f).
-3a npoBnKHe Bb3npOn3BExKaHHeTo, HATNCHE6yTOHa 3a3arLywaBaHe (8) OTHOBO, nPOMeHETe CnIaTa Ha 3Byka Ipe3 KOnyTeBO, nHaTNCHE6yTOHa 3a TbpceHe HAnpei (9) pecn. 6yTOHa 3a TbpceHe Ha3aD (10).
-3a npemnhabane Hanpe, pecn. Ha3aB D daHeno 3arIaBne 3aPbKTe 6yToHa 3a TbpceHe Happe (9) pecn. 6yToHa 3a TbpceHe Ha3aD (10) HaTNCHaT DOKATO JKeJHaHATA N03uN B 3aRJaBHeTO He Ce DOCTURHe.
Ako nO BpeMe Ha pa6oTa npe3 Bluetooth® ce HATNCHE eHNOT 6yTOHnTE 3a naMeT 3a nporpaMn (5), TO paNIOTo CmEH Ha CTaHcIHTa, KOrTO e 3aNaMeTeHa B NocJeHO n3NoJI3BaHnpejxMn Ha pa6oTa Ha paNIOTo.
Bb3npoN3BeKdaHe c Dual Speaker Sound (pnaydno n3ToUHKn Bluetooth®)
Ako ce Bb3npoN3Bekda ayuOnn3ToUHnK npe3 Bluetooth®,ФункцЯТa Dual Speaker Sound (DSS) можеда ceakTNbna.ПрtnTOBa 2 paJnota ARAD18BCAS cnykata KaTo DeceH nIЯВ bICOKO-ROBOpNTe 3a eEDHO n CbIo Bb3npoN3BekDaHe.
AktubupaTe yHKunraTadual Speaker Sound:
- EДНО OT ДБЕТе радиOTа ТрябВе ue Да e CBьрзАно ппeЗ Bluetooth® c ayДИNO n3TOUHnKa.
-ИЗбор на раДиOTо KaTo ДeCEн ВиСКОВОВпутел:ИЗбepeteВ MEHIO→ .
-ИЗбор Ha paДиОТо KaTO ЛЯВ BИСКОТOBOPиTeI:ИЗбepeTeВ MEHIO→ . - Bknoyete n Ha 2-To paanno pekm Ha pa6ota Bluetooth®.
-Ⅰ36epeTe Ha 2-TO paIIO B MeHIO TO cBOTBeTHO DpyrNBAICOKOROBOpuTeI. - YnpabJraBaiTe B3nPou3BeKJaHcTeo No Bluetooth® KaKTo 06uayHO.

Menu Hynipane: MoKeTe Da HyInpaTe BCnKu NaCTpoKu Ha MeHIOTo Do fapuHn NaCTpoKu
U36op Ha npHaIaJIeXHoCTn
I3noJI3BaIte cAmO opuHnHaJIHn FEIN npuHaJIeKHOCTn. PpHaJIeKHXOCTTa Tp6Ba da e npdHa3HaueHa 3a n3deJIIneTO.
TexHnuecko 06cnyXbaHe n KIneHTcKa cnYk6a
Molny, nmaTe npednD, ye n3dennrTa no npabNIO MoarT da ce peMOHTnpaT, NOIbPkaT nPoBepRaT cAmO OT eNEKtpoTeXnU, TbN KaTO HeNPaBNHnT peMOHT MoKe Da DOBeNe Do 3HaHTeHN pNCKOBe 3a NOTpe6nteJI.
Pn ektpemH yCIOBna Ha ynoTpe6a npn o6pa6oTaHe Ha metaIIN PO BbTpewHOCTTa Ha n3deJIneTo MOKe Da Ce OTNOKN TOKONPOBOJn npax. O6dyXbaTe YecTO BbTpewHOCTTa Ha n3deJIneTo Ppe3 BeHTnlaUIOHHNte OTBOpN Cbc CyxN 06e3MaclEn CbCTeH Bb3dYx.
PnO6pa60kataHa CbIbPkaaunrnc MaTepeaJn MoKeJa Ce O6pa3yBa npax.ToJ MoKe Ja Ce OTIOXKn BvB BbTpEwHOCTTa Ha N3dJIeNtO, KaKTo I NO PpeBKLIOUBAteHNHTe eEnMeHTn MOnKe Ja Ce BTBbpDn B KOM6HauCnBlaJXHOCTTa Ha Bb3- dyxa. PpeBKLIOUBAuNT MexAHn3bM MoKe Ja Ce NoBpeDiOT ToBa.O6dyXbaIte YecTo BbTpEw
HOCTTa Ha 3dEIneTO Ppe3 BeHTnlaOHHnTe OTBOpN INpeBKnIOuBAteINHnTe eIemEnTn CbC Cyx N O6e3MaCJIeH CbCTeH Bb3dyX.
PpOdyKTHTe, KOINTo Ca 6uINB KOHTaKT C a36ecT, He 6uBa Da Ce npedabat 3a peMOHT. N3XbbpJrTe 3aMbpcHIne Tc a36ecT pOdyKTn CbflaCHO BaIINHIne BCTpaHaTa npeDncaHn 3a INXbbpJrHe Ha CbDbpKaun a36ecT OTnabu.
O6pbuaTe ce KbMaBaaTa KIneHTcKa CnyK6a Ha FEIN npn HxJda OT pemOH T NO n3JeNn npHaadLeXHocTn Ha FEIN. Apeca ue oTKpneTe B INtepHET Ha
www.fein.com
CmeHnTe CTnKePHTe n ppeDynpEaTHeNHTe Yka3aHnBbpxu N3deJIneTO npOCTapraBaHe n I3HOcBAHe.
AkyHnTcncbK cpe3epBn qactHa ToBa
n3dneIe ue OTkPnTe B NHTepHeT Ha
www.fein.com
I3noJ3BaTe cAmO opnHaJIHn pe3epBHN qactN.
06e3neueaBHe rapaHnra
06e3neuabaHTo 3a n3deIeHTo Baxn CbIaCHO 3aKoHOBNTpe p3npoe6n B CTpaHaTa Ha npOdaX- 6a.OCBeH ToBA FEIN daba rapaHua CBIaCHO deKnapaTtHa npOn3BODInTeJyFEIN.
B 06ema Ha doctabkaTa Ha BaWeTo n3dJeHne Mo-Ke da Ce cbIbPka cAmO qact OT OnUcaHnte B HactoJaaTa INcTpyKu7a 3e EKcPiHaTaCu7a NIN N3o6pa3eHNTe B He npHaJaEKnOCTn.
ДeКларuaия 3a cbotbETCTBNE
ФирmaFEINДeКларupaHaCBOAOTROBOPHOCT, YeTO3nIpoDyKTOTROBAPHaNOCOueHHTpepeBaHTHn pa3Nope6bHaNocleHHTe CtpaHnOuHCTOHaTaTHCTpyKU3aEKCnloaTaU.
Texnueckn Dokymentn npn: C.&E.FeinGmbH,73529 Schwabisch Gmund, Germany
TpaHcNoptUpaHe
IpenopbunTeHNTEJNTHeBO-NOHHn Akymyata TOpHn 6aTePN Tp8Ba Da n3NbHnBaT n3NCBAHn 3a TpaHCnOpTnpaHne Ha onachn Tobapn. AkymyataToPHTe 6aTePN MoRat da 6bDat TpaHCnOpTnpaHn OT NOTpe6nteHa ny6nHn MeCTa 6eDOnbHnTeHN pa3peuNTeHN.
Pn TpaHcnopTnpaHe O TpeTn CtpaHn (Ha np. Pn B3dyuwen TpaHCnopT NIN NOJ3BaHe Ha KyPnepckn yCnyn) Ima CneuaJIHH N3NCKBaHn KbM OnakOBaHEo N 06O3HaHaBaHETo IM. 3a CEJaTa Pn NoDrotOBkata Ha NaKeTnpaHEo Ce KOChytnpauTe C eKcnept B CbOTBeTHata O6JIaCT.
N3npaauTe akymylaTopHn 6aTePn cAmo aKOpyncbT Nm He e NOBpeDeH. N3OJIpaTne OTKpNTu KOHTaKTTH KIeMn C IePaUe IeHTn U ONAKObaTe akymlaTopHnTe 6aTePn TaKa, He da He MoRaT Da ce n3MeCTBaT B ONaKOBkata cn. Mo
222
JIa, CNa3BaIte CbIO N DONbHnTeJIHn HaCNoHaJIHn PpeDnncAHn.
BpaKyBaHe
C orne ona3BaHe Ha OKoHaTa Cpea eeneKtpnuecknte ypei, O6KnHOBeHnte NnAkyMylatopHN 6aTePN, DOnbHInTeHnTe npHaIeJXHOCTN ONAKOKBnTe Tpr6Ba Da Ce npeDaBt 3a ONON3OTBOPraBaHe Ha CbDbPkaUnte Ce B Tx CypOBuHN.
He n3xBpIyTe eJekTpuecknTe ypeu n akyMylatOpHnTe 6aTePnn/ 6aTePnTe npn 6ntOBnTe OTnaBcui!
Camo 3a cTpaHn ot EC:
Cbflacno ebponeecka nIupekTnBa 2012/19/EC 3a CTapnte eIeKtpnueckn I eIeKtpoHHn ypeDN HeHNOTO TpaHCnOpTnpaHe B HauNoHaHNOTo npabo eIeKtpnueckn ypeDN, KOINTO HE MORAT da ce NOL3BAT NOBeHe, a CbflacHO eBponeNc Ka IpeKtNa 2006/66/EO NOBpeDeHN nn N3xA6EHN O6NIKHOBEHN nn akymlaTOPHN 6aTePN, Tpr6Ba Da CE Cb6upat IN ppeDaBAT 3a ONON3OTBOPRAHe Ha CbDpkaAnTE Ce B TAX CypOBHN.
Pn HnpabuHNO n3xBpIa He CTapnte eNeKtpnueckn n eKeKTPoHHn ypeDi Nopadn Bb3MOxHOTOHahnye Ha OnaChn BeIecTBA Moat Da OKaKaTBeDn BnHaHn BbpXy OkJHaTa CpeDa N OBeWkoTo 3dpabe.
AkymynaTopHN mnn 06nKHOBeHn 6aTePN: JntHeBO-IOHHN:
Moi, cna3BaIte yka3aHnraTb pa3dena TpaHc npOpTnpaHe (Bx. "TpaHcnpTnpaHe", CtpaHn- ca 221).
et 223
Volume>0030001的上口
SlopeReIeOfFtKanFpSiTnDn.拉DOnKteBnLbEo
HnNnBnBnBnBnBnBnBnBnBnBnBnBnBnBnBnBnBnBnBnBnBnBnBnBnBnBnBnBnBnBnBnBnBnBnBnBnBnBnBnBnBnBnBnBnBnBnBnBnBnBn
HNNNHNNNNNNNNNNNNNNNNNNNNNNNNNNNNNNNNNNNNNNNNNNNNNNNNNNNNNNNNNNNNNNNNNNNNNNNNNNNNNNNNNNNNNNNNNNNNNNNNNNNNNNNNN
| LED switch | |
| 5×晶圆/80-100% | |
| 4×晶圆/60-80% | |
| 3×晶圆/40-60% | |
| 2×晶圆/20-40% | |
| 1×晶圆/5-20% | |
| LED switch 1×晶圆/0-5% |
munuunw (nunnuA)
Jnwnuynnnnunnuynnnnnnnnnnnnnnnnnnnnnnnnnnnnnnnnnnnnnnnnnnnnnnnnnnnnnnnnnnnnnnnnnnnnnnnnnnnnnnnnnnnnnnnnnnnnnnnnnnnnnnnnnnnnnnnnnnnnnnnnnnnnnnnnnnnnnnnnnnnnnnnnn
nwnnnnnaaunnnaa nnnnnae 15
nwnnnnnaaannnnaaee (15)
nwnnnnnaananaanw (21) waaananaanw (20
(22) (DC IN 18V) aananaanw (15)
(21)
wun
nannnnn nnnnnnnnnnnnnnnnnnnnnnnnnnnnnnnnnnnnnnnnnnnnnnnnnnnnnnnnnnnnnnnnnnnnnnnnnnnnnnnnnnnnnnnnnnnnnnnnnnnnnnnnnnnnnnnnnnn
nnaaunnuuauanannnnnnaeunl 13
nannnnnnaaennn nnnn DAB+ nannnnae Source (7) nannnnnnnnaaennn (b) DAB
DAB2
nannnnnnnnnnnnnnnnnnnnnnnnnnnnnnnnnnnnnnnnnnnnnnnnnnnnnnnnnnnnnnnnnnnnnnnnnnnnnnnnnnnnnnnnnnnnnn
ywnnnaaunnnnnaanennnnnnnnnnnnnnnnnnnnnnnnnnnnnnnnnnnnnnnnnnnnnnnnnnnnnnnnnnnnnnnnnnnnnnnnnnnnnnnnnnnnnnnnnnnnnnnnnnnnnnnnnnnnnnnnnnnnnnnnnnnnnnnnnnnnnnnnnnnnnn
- nannnnaaunauuunnuuuuuuuuuuuuuuuuuuuuuuuuuuuuuuuuuuuuuuuuuuuuuuuuuuuuuuuuuuuuuuuuuuuuuuuuuuuuuuuuuuuuuuuuuuuuuuuuuuuuuuuuuuuuuuuuuuuuuuuuuuuuuuuuuuuuuuuuuuuuuuuuuuuuuuuuuuuuuuuuuuuuuuuuuuuuuuuuuuuuuuuuuuuuuuuuuuuuuuuuuUU
(10)
- nannnnnnaaennnnnnae annnnnne
nunnnnnnnnnnnnnnnnnnnnnnnnnnnnnnnnnnnnnnnnnnnnnnnnnnnnnnnnnnnnnnnnnnnnnnnnnnnnnnnnnnnnnnnnnnnnnnnnnnnnnnnnnnnnnnnnnnnnnnnnnnnnnnnnnnnnnnnnnnnnnnnnnnnnnnnnnn nn nannn nn nannn nn nannn nn nannn nn nannn nn nannn nn nannn nn nannn nn nannn nn nannn nn nannn nn nannn nn nannn nn nannn nn nannn nn nannn nn nannn nn nannn nn nannn nn nannn nn nannn nn nannn nn nannn nn nannn nn nannn nn nennn nn nannn nn nannn nn nannn nn nannn nn nannn nn nannn nn nannn nn nannn nn nannn nn nannn nn nannn nn nannn nn nannn nn nannn nn nannn nn nannn nn nannn nn nannn nn nannn nn nannn nn nannn nn nannn nn nannn nn nannn nn n ann
- nannnnaaennnnn nnnnnnnnnnnnnnnnnnnnnnnnnnnnnnnnnnnnnnnnnnnnnnnnnnnnnnnnnnnnnnnnnnnnnnnnnnnnnnnnnnnnnnnnnnnnnnnnnnnnnnnnnnnnnnnnnnnnnnnnnnnnnnnnnnnnnnnnnnnnnnn nn nannnnaaannn aannnnaaannn annnnaaannn anannn aaannnnaanannn anannn anannn anannn anannn anannn anannn anannn anannn anannn anannn anannn anannn anannn anannn anannn anannn anannn anannn anannn anannn anannn anannn anannn anannn anannn anannn anannn anannn anannn anannn anannn anannn anannn anennn anannn anannn anannn anannn anannn anannn anannn anannn anannn anannn anannn anannn anannn anannn anannn anannn anannn anannn anannn anannn anannn anannn anannn anannn anannn anannn anannn anannn anannn anannn anannn anannn anann
mwn: nwnwnnwnnwn
wnngnnnwnnnnwn (j) lwnnnn nn
wnu 1 4 annnuannauaanuunnnn nnwaaanang DAB+ <No DAB Station -
Please Auto Scan> 1uunlauanuaaiaaui
y/uuuunuuyFM
nunnuuunnuuunnuu 4 uuuuunnuuunnuu FM uuuu Source (7) uuuuuuuuuuuuuu FM2 uuuuuuuuuuuuuuuuuuuuuuuuuuuuuuuuuuuuuuuuuuuuuuuuuuuuuuuuuuuuuuuuuuuuuuuuuuuuuuuuuuuuuuuuuuuuuuuuuuuuuuuuuuuuuuuuuuuuuuuuuuuuuuuuuuuuuuuuuuuuuuuuuuuuuuuuuuuuuuuuuuuuuuuuuuuuuuuuuuuuuuuuuuuuuuuuuuuuuuuUU
nunnnnnaaannnnnnaanennnnnnae nnnnnnnaaannnnnnaaannnnnnae nnnnnnnaaannnnnnaaannnnnnae nnnnnnnaaannnnnnaaannnnnnae nnnnnnnaaannnnnnaaannnnnnae nnnnnnnaaannnnnnaaannnnnnae nnnnnnnaaannnnnnaaannnnnnae nnnnnnnaaannnnnnaaannnnnnaea nnnnnnnaaannnnnnaaannnnnnae nnnnnnnaaannnnnnaaannnnnnae nnnnnnnaaannnnnnaaannnnnnae nnnnnnnaaannnnnnaaannnnnnae nnnnnnnaaannnnnnaaannnnnnae nnnnnnnaaannnnnnaaannnnnnae nnnnnnnnaaannnnnnaaannnnnnae nnnnnnnaaannnnnnaaannnnnnae nnnnnnnaaannnnnnaaannnnnnae nnnnnnnaaannnnnnaaannnnnnae nnnnnnnaaannnnnnaaannnnnnae nnnnnnnaaannnnnnaaannnnnnae nnnnnnnaaann
- nannnnnnaanennnnn nnneunnnn nn nnnnnnnn (5) nnnnnnnnnnnnnnnnnnnnnnnnnnnnnnnnnnnnnnnnnnnnnnnnnnnnnnnnnnnnnnnnnnnnnnnnnnnnnnnnnnnnnnnnnnnnnnnnnnnnnnnnnnnnnnnnnnnnnnnnnnnnnnnnnnnnnnnn nn nannn nn nannn nn nannn nn nannn nn nannn nn nannn nn nannn nn nannn nn nannn nn nannn nn nannn nn nannn nn nannn nn nannn nn nannn nn nannn nn nannn nn nannn nn nannn nn nannn nn nannn nn nannn nn nannn nn nannn nn nannn nn nennn nn nannn nn nannn nn nannn nn nannn nn nannn nn nannn nn nannn nn nannn nn nannn nn nannn nn nannn nn nannn nn nannn nn nannn nn nannn nn nannn nn nannn nn nannn nn nannn nn nannn nn nannn nn nannn nn nannn nn nannn nn n ann
y
ywnnnnnuuunnnnnnnnnn (6) ynnnnnnnuu uuuu VHF nannnnnnnnnnnnnnnnnnnnnnnnnnnnnnnnnnnnnnnnnnnnnnnnnnnnnnnnnnnnnnnnnnnnnnnnnnnnnnnnnnnnnnnnnnnnnn
mnnnnaananaananaananaananaananaananaananaananaananaananaananaananaananaananaananaananaananaananaananaananaananaananaananaananaananaananaananaananaananaananaananaananaananaananaananaananaananaananaananaananaananaananaananaananaananaananaananaananaananaananaanaraannnnaaannnnaaannnnaaannnnaaannnnaaannnnaaannnnaaannnnaaannnnaaannnnaaannnnaaannnnaaannnnaaannnnaaannnnaaannnnaaannnnaaannnnaaannnnaaannnnaaannnnaaannnnaaannnnaaannnnaaannnnaaannnna
mnnn: nnnnnn nn nnnnnnnnnnnnnnnnnnnnnnnnnnnnnnnnnnnnnnnnnnnnnnnnnnnnnnnnnnnnnnnnnnnnnnnnnnnnnnnnnnnnnnnnnnnnnnnnnnnnnnnnnnnnnnnnnnnnnnnnn
AUX
3.5 uAUX (25)
AUX IN (24) AUX 17
AUX Source (7)
(b) AUX
nnuuunnuuunnuu uuuuauu uuuuuuuuuuuuuuuuuuuuuuuuuuuuuuuuuuuuuuuuuuuuuuuuuuuuuuuuuuuuuuuuuuuuuuuuuuuuuuuuuuuuuuuuuuuuuuuuuuuuuuuuuuuuuuuuuuuuuuuuuuuuuuuuuuuuuuuuuuuuuuuuuuuuuuuuuuuuuuuuuuuuuuuuuuuuuuuuuuuuuuuuuuuuuuuuuuuuuuuuuUU
- lunjuaanlauu (9) uau 1ununnu (10) nununnu bannnnn nn
- nnnnnaeannnnnneennnnnneennnnnneennnnnneennnnnneennnnnneennnnnneennnnnneennnnnneennnnnneennnnnneennnnnneennnnnneennnnnneennnnnneennnnnneennnnnneennnnnneennnnnneennnnnneennnnnneennnnnneennnnnneennnnnneennnnnneennnnnneannnnnneennnnnneennnnnneennnnnneennnnnneennnnnneennnnnneennnnnneennnnnneennnnnneennnnnneennnnnneennnnnneennnnnneennnnnneennnnnneennnnnneennnnnneennnnnneennnnnneennnn
-nnnnaaennnnae (8) 1000000000000000000000000000000000000000000000000000000000000000000
-wnnnnnaaunnuuunnuunnuun nannnnn (9) uauuuunnuu (10) uuaunn nn
luuunnuu uuuu uuuu uuuu uuuu uuuu uuuu uuuu uuuu uuuu uuuu uuuu uuuu uuuu uuuu uuuu uuuu uuuu uuuu uuuu uuuu uuuu uuuu uuuu uuuu uuuu uuuu uuuu uuuu uuuu uuuu uuuu uuuu uuuu uuu uuuu uuuu uuuu uuuu uuuu uuuu uuuu uuuu uuuu uuuu uuuu uuuu uuuu uuuu uuuu uuuu uuuu uuuu uuuu uuuu uuuu uuuu
nuau Dual Speaker Sound (nuuau
nnnnaaennnnu Bluetooth @ nnnnnnnnnu
Wntu Dual Speaker Sound (DSS) 1n
ARAD18BCAS 2 nnnnnnnnnnnae
Dua Dual Speaker Sound:
- nluuulnuuulnuuulnuuulnuuulnuuulnuu u
- 一 1 Set DSS> -Right Speaker>
- 一SetDSS> -
-BluetoothBluetooth®
- 1
W
unwnwnwnnun (8) (MENU) nnu wonwnnnnun (e) nnwnnnnnnnnnnnnnnnnnnnnnnnnnnnnnnnnnnnnnnnnnnnnnnnnnnnnnnnnnnnnnnnnnnnnnnnnnnnnnnnnnnnnnnnnnnnnnnnnnnnnnnnnnnnnnnnnnnnnnnnnnnnnnnnnnnnnn
- iouu:innu Source (7)
- 100nnn7nnyuau: 1nnnu Source (7) OK
- wauuulwuyu: hnnnju Source (7)
- 100000000000000000000000000000000000000000000000000000000000000000000000000
nnnnaeunuuluuunneonolusiaouanu lnuau uununun (ununun
山
nunnnnnnnnnnnnnnnnnnnnnnnnnnnnnnnnnnnnnnnnnnnnnnnnnnnnnnnnnnnnnnnnnnnnnnnnnnnnnnnnnnnnnnnnnnnnnnnnnnnnnnnnnnnnnnnnnnnnnnnnnnnnnnnnnnnnnnnnnnn
wuy Dual Speaker Sound: wuyuunwnwnwnny uwnwn
nannnnnnnnnnnnnnnnnnnn
w USB
wos USB 1.2 A
WuYnauuYnauuYnauuYnauu (15) WnauuYnauu YnauuYnauuYnauu USB wuuu uuuu uuuu uuuu uuuu uuuu uuuu uuuu uuuu uuuu uuuu uuuu uuuu uuuu uuuu uuuu uuuu uuuu uuuu uuuu uuuu uuuu uuuu uuuu uuuu uuuu uuuu uuuu uuuu uuuu uuuu uuuu uuuu uuuu uUU
charging)
nwnnnnnnnnnnnnnnnnnnnnnnnnnnnnnnnnnnnnnnnnnnnnnnnnnnnnnnnnnnnnnnnnnnnnnnnnnnnnnnnnnnnnnnnnnnnnnnnnnnnnnnnnnnnnnnnnnnnnnnnnnnnnnnnnn
wauuunnunnnnnnnnnnnnnnnnnnnnnnnnnnnnnnnnnnnnnnnnnnnnnnnnnnnnnnnnnnnnnnnnnnnnnnnnnnnnnnnnnnnnnnnnnnnnnnnnnnnnnnnnnnnnnnnnnnnnnnnnnnnnnnnnnnnnnnnnnnnnnnnnnnnnnnnnnnnnnnnnnnnn nn nannnne nannnne nannnne nannnne nannnne nannnne nannnne nannnne nannnne nannnne nannnne nannnne nannnne nannnne nannnne nannnne nannnne nannnne nannnne nannnne nannnne nannnne nannnne nannnne nannnne nannnnee nannnne nannnne nannnne nannnne nannnne nannnne nannnne nannnne nannnne nannnne nannnne nannnne nannnne nannnne nannnne nannnne nannnne nannnne nannnne nannnne nannnne nannnne nannnne nannnne nannnae nannnne nannnne nannnne nannnne nannnne nannnne nannnne nannnne nannnne nannnne nannnne nannnne nannnne nannnne nannnne nannnne nannnne nannnne nannnne nannnne nannnne nannnne nannnne nannnne nannn ne
younununnnn
900174
nannnnnnae nnnnne nnne (19) nnu nnu nnu nnu nnu nnu nnu nnu nnu nnu nnu nnu nnu nnu nnu nnu nnu nnu nnu nnu nnu nnu nnu nnu nnu nnu nnu nnu nnu nnu nnu nnu nnu nnu nnu nnu nnu nnu nnu nnu nnu nnu nnu nnu nnu nnu nnu nnu nnu nnu n\n
nnaaannnnnnaananaananaananaananaananaananaananaananaananaananaananaananaananaananaananaananaananaananaananaananaananaananaananaananaananaananaananaananaananaananaananaananaananaananaananaananaananaananaananaananaananaananaananaananaananaananaananaananaananaananaanaraannnna
100000000000000000000000000000
nunnnnaaannnn
nunnnnnnnnnnnnnnnnnnnnnnnnnnnnnnnnnnnnnnnnnnnnnnnnnnnnnnnnnnnnnnnnnnnnnnnnn
nnaa=naanwna=anaanwnnnn
n
nnuuunnnnnnuu uuuuuaaunw nnuuauuunnuuunnuu uuuuauuunnuu uuuuauuunnuu uuuuuuuuuuuuuuuuuuuuuuuuuuuuuuuuuuuuuuuuuuuuuuuuuuuuuuuuuuuuuuuuuuuuuuuuuuuuuuuuuuuuuuuuuuuuuuuuuuuuuuuuuuuuuuuuuuuuuuuuuuuuuuuuuuuuuuuuuuuuuuuuuuuuuuuuuuuuuuuuuuuuuuuuuuuuuuuuuuuuuuuuuuuuuuuuuUU
Tnunnnnnnnnnnnnnnnnnnnnnnnnnnnnnnnnnnnnnnnnnnnnnnnnnnnnnnnnnnnnnnnnnnnnnnnnnnnnnnnnnnnnnnnnnnnnnnnnnnnnnnnnnnnnnnnnnnnnnnnnnnnnnnnnnnnnnnnnnnnnnnnnnnnnnnnnnnnnnnnnnnnnnnnnnnnn nn nannn nn nannn nn nannn nn nannn nn nannn nn nannn nn nannn nn nannn nn nannn nn nannn nn nannn nn nannn nn nannn nn nannn nn nannn nn nannn nn nannn nn nannn nn nannn nn nannn nn nannn nn nannn nn nannn nn nannn nn nannn nn nennn nn nannn nn nannn nn nannn nn nannn nn nannn nn nannn nn nannn nn nannn nn nannn nn nannn nn nannn nn nannn nn nannn nn nannn nn nannn nn nannn nn nannn nn nannn nn nannn nn nannn nn nannn nn nannn nn nannn nn nannn nn n ann
www.fein.com
1
wunnnnnaa:lnnnaaannnnnnnnnnnnnnnnnnnnnnnnnnnnnnnnnnnnnnnnnnnnnnnnnnnnnnnnnnnnnnnnnnnnnnnnnnnnnnnnnnnnnnnnnnnnnnnnnnnnnnnnnnnnnnnnnnnn
www.fein.com
IwJlnninn
nwnnnnaaann
nunnnnnnnnnnnnnnnnnnnnnnnnnnnnnnnnnnnnnnnnnnnnnnnnnnnnnnnnnnnnnnnnnnnnnnnnnnnnnnnnnnnnnnnnnnnnnnnnnnnnnnnnnnnnnnnnnnnnnnnnnnnnnnnnnnnnnnnnnnnnnnnnnnnnnnnnnnnnnnnnnnnnnnnnnnnnn
yunnnnnae
n
FEIN 177777777777777777777777777777777
1
C. & E. Fein GmbH, 73529 Schwabisch Gmünd, Germany
#
nnaananaananaananaananaananaananaananaananaananaananaananaananaananaananaananaananaananaananaananaananaananaananaananaananaananaananaananaananaananaananaananaananaananaananaananaananaananaananaananaananaananaananaananaananaananaananaananaananaananaananaanaraannnnnnnnnnnnnnnnnnnnnnnnnnnnnnnnnnnnnnnnnnnnnnnnnnnnnnnnnnnnnnnnnnnnnnnnnnnnnnnnnnnnnnnnnnnnnnnnnnnnnnnnnnnnnnnnnnnnnnnnnnnnnnnnnnnnnnnnnnnnnnnnnnnnnnnnnn
#
aunnwn, uwnneuwn/wnne, unnnw: nnuu uunn nnuunuunuunuunuunuunuunuunuunuunuunuunuunuunuunuunuunuunuunuunuunuunuunuunuunuunuunuunuunuunuunu
ywnnwnwua=uuu#nn/ uuaanannu
山山山
aannn
276
JUJI UUGALL JUUGLLJUSSJUSSJUSSJUSSJUSSJUSSJUSSJUSSJUSSJUSSJUSSJUSSJUSSJUSSJUSSJUSSJUSSJUSSJUSSJUSSJUSSJUSSJUSSJUSSJUSSJUSSJUSS
g FM g DAB2 g DAB U g all J Lao caliX
bdo zolgo bag u U,coIgU 1u FM2
. dol!
JILL JI LJI POJSSWU (A oJgJl jai) wlaJI
auiJSEJU L
aaiiI Uolgall gjgSdJI aawlal
JUJI JIJI JIJI JIJI JIJI JIJI JIJI JIJI
U!aJ≤J
gssalullgo lll gio gglb. .wlll jyjolil qolj gao
JUg.15)uogul JauLaaLacg 1w!JUJUJUJUJUJU21jU
aJgJJI Jaiy loic JuaawX
Jg jw k Jw Jj 1j 0d
15
(Blueoth®üguljDSS>
: Dual Speaker Sound aoi
aIgI gIg
.
cJgJUddjIooJgJgJl
USB aLog
J 1 J 1 J 1 J 1 J 1 J 1 J 1 J 1 J 1 J 1 J 1 J 1 J 1 J 1 J 1 J 1 J 1 J 1 J 1 J 1 J 1 J 1 J 1 J 1 J 1 J 1 J 1 J 1 J 1 J 1 J 1 J 1 J 1 J 1 J
DAB Station - Please Auto Scan> Mlad
FM-riiay dtaamiatr k oot karana/bsa kcarna
Aaiiy FM-riay dtaamiatr k oot lamiikkt kcarneke 1
Aasbiy (7) 2tni n i r a 2dva, jav tuk f k Aaiiy aoy stata
(6) FM AF FM2 diaa n
Bnann nnnn nnnn nnnn nnnn nn nnnn nnnn nnnn nnnn nnnn nnnn nnnn nnnn nnnn nnnn nnnn nnnn nnnn nnnn nnnn nnnn nnnn nnnn nnnn nnnn nnnn nnnn nnnn nnnn nnnn nnnn nnnn nnnn nnnn nnnn nnnn nnnn nnnn nnnn nn
TayyamgymiriyalnkepaoyamMajabuotntarresoaonanohne nokai kshyati me,
Rieioyao aadomatetekk kuype mse rereo aorssxan parr budelta h,
dikpoe me sttaree aorssxan ndiokp (h) dkiiaai e tata h. meky
Pakkshann mnrssxan k a prkrarra manonoi rereosxan parr bndalz jia
muklata h!
- 57487777777777777777777777777777777777777777777777777777777777777777777777777777777777777
- 一 财安·贝多夫·贝多夫·贝多夫·贝多夫·贝多夫·贝多夫·贝多夫·贝多夫·贝多夫·贝多夫·贝多夫·贝多夫·贝多夫·贝多夫·贝多夫·贝多夫·贝多夫·贝多夫·贝多夫·贝多夫·贝多夫·贝多夫·贝多夫·贝多夫·贝多夫·贝多
- Jajyadana Majaburohul Simegul Prarvahara Laiavahs Mahiotu Dusammasmatisri kki sachek lalai kukuzs mamasny tarkk nani chey ki tarsk 2 (10) iisak bataan aay jupar kki tarsk 2 (9) iisak bataan kki ahya scknd se jayadva kumay kki lai dduhao raha aaramamud drasammasmitar koi 5 s ke lai prarnut kikay yiaagma, iisaks kabi araknoknem beeke k ant tark manjia rra rahti hui dusammasmitar kami oerkanne k e lai, kukzss mamasny kki naiv chki tarsk (10) iisak bataan kki ay uppar kki tarskr (9) iisak bataan kki da
- 5eot kieuy gay dty aamniot kcoa sokkranne k e lai r aanditat
mamorarre rupnss k prayomam mermaiorare btan (5) kai tuv teuk dnuay,
jubt teuk kim marmarre rupnse ka nabur marmarre rupnse imrle (c)
me diivahia i ne
J 4 5 6 7 8 9 10 11 12 13 14 15 16 17 18 19 20 21 22 23 24 25 26 27 28 29 30 31 32 33 34 35 36 37 38 39 40 41 42 43 44 45 46 47 48 49 50 51 52 53 54 55 56 57 58 59 60 61 62 63 64 65 66 67 68 69 70 71 72 73 74 75 76 77 78 79 80 81 82 83 84 85 86 87 88 89 90 91 92 93 94 95 96

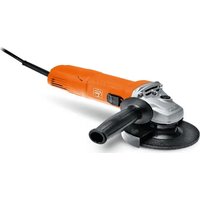


- Original instructions
- Safety instructions
- Products sold in GB only:
- WARNING
- Product Description and Specifications
- Product Features
- Display Elements
- Technical Data
- en
- Radio Energy Supply
- Operation with Battery Pack
- Replacing a Rechargeable Battery
- Battery Charge Indicator
- Battery Charge Indicator in the Display
- Battery Charge Indicator on the Rechargeable Battery
- Battery model GBA 18V...
- Operation with power supply (see figure A)
- Changing the coin cell
- Operation
- Audio Operation
- Switching On and Off
- Adjusting the Volume
- Selecting an Audio Source
- Setting/saving DAB+ radio stations
- Setting/Saving FM Radio Stations
- Setting the Rod Antenna
- Connecting External Audio Sources via AUX
- Playing Back/Controlling External Audio Sources via Bluetooth®
- Playback with Dual Speaker Sound (with Bluetooth® audio source)
- Changing Menu Settings
- Menu Options
- Time menu:
- Power Supply of External Devices
- USB Port
- Working Advice
- Utility hook
- Recommendations for Optimal Handling of the Battery
- Maintenance and Service
- Maintenance and Cleaning
- Range of accessories
- Maintenance and After-Sales Service
- www.fein.com.
- Warranty and Guarantee
- Declaration of Conformity
- Transport
- Disposal
- Only for EU countries:
- Only for United Kingdom:
- Battery packs/batteries:
- Li-ion:
- fr 23
- Notice originale
- Movo yia xwpeTNC EE:
- Preehravani's Dual Speaker Sound (u audiozdroju Bluetooth®)
- XpaHeHne
- TpaHcnoptnpoBka
- Yka3aHnI NO TexHnKe 6e3oNaCHOCTN
- PNEyIpyEKdEHNE
- Onncannne npoodykTa n ycnyr
- 1306paXKeHHbIe COCTaBHbIe qACTn
- 3nemeHTbIMHdkaun
- TexHnueckne daHHbIe
- HnKaTOp 3apXeHHoCTNaKkymyIToPa
- HnkaTop 3apXeHHocTn aKKymyIaTopa Ha dncnnee
- HndkaTOp 3apXeHHoCTn aKKymyIaTopa Ha aKKymyIaTope
- 3KcNpyaTaunca 6NOKOM NHTAHNA CO WTeNCenbHOB BnIKoA (cm.pnc.A)
- 3aMeHa KHONOuHoro 3JIeMeHTa NITaHn
- 3Kcnpnyataun
- Bocnpon3BeDenHe aydno
- BkIOueHme/BBKIOueHne
- Hactpoika rpongkoctn
- Bb6op aydno nctouhka
- YcTaHOBka/coxpaHeHne uΦpObblx paNoctaHmDAB+
- YcTaHOBka/coxpaHeHne FM-paNoctaHn
- HanpaBHeHne uTbIpeBoa aHTeHHbI
- IopKIOUOHeHBEWeHHxaydnoNCTouHKnOB uepe3 pa3bem AUX
- Bocnpoun3BeJeHne/ynpabLeHne BHeuHMn aydno nctouHKamn no Bluetooth®
- Bocnpon3BegeHne no TexHoIorHn Dual Speaker Sound (ecJn aydno nctouHnK noKnIOeH no Bluetooth®)
- M3MeHHeH HeCTpoe MeHIO
- MehIO onzui
- KpOyOK dIa IIOBWeuBaHH
- Yka3aHnno ONTmAlbHomy 06paueHnIO cakkyMylrTopoM
- Texo6cIyXnBaHne n cepBnC
- Texo6cIyXnBaHne nOuHCTka
- Bb6op npnHaJnxHocTei
- TexHmueckoe n cepBnchoe 06cnyXnBaHne
- www.fein.com
- O63aTeIbHn IOnONHHTeIbHa rapaHTn
- CeptnuKAT COOTBETBn
- TpaHcnpToPobKa
- YTNIN3aCnA
- ToIbKO dIa CTpaH-ueHOB EC:
- AkkymyIaTopb/6aTapeN:
- JIITM-HOHHbIe:
- NONEPEJXEHH
- EheproxNbIeHna padionpImMaua
- Ekcnnyataia BiakymytaTopho 6atapei
- 3aMiHa akMyIaTOpHoi 6aTapei
- 3akymyITopHOro BiDckiy.He 3actocobynt npu bomy cnny.
- IhdkaTop 3apxkeHoocTi akymyIaTOPhoI 6aTapei
- IhdkaTop 3apdxkHeocsti akymyIaTOPHOI 6aTapei Ha nucnnei
- IhdkaTop 3apJxHeOCTi akymyIaTOpHOI 6aTapei Ha akymyIaToPI
- Tn akymyIaTOPHO 6aTaapei GBA 18V...
- HanpaBneHHaTnpbOBoa aHTeH
- PiKIOeHH 3OBHIHix ayIOxepen uepe3 AUX
- BiTBopeHHyynpaBlinH3O8HiHIM ayioKepeIamuyepe3Bluetooth®
- BiTbOpENHa 3 Dual Speaker Sound (3 ayDioXepeIom Bluetooth®)
- 3MiHa HalaawTyBaHb MeHIO
- Onui MeHIO
- MeHou HanaTuBaHHa cacy:
- KMBLeHH3OBHiHix npnnaib
- USB-po3'EM
- Bka3iBKn zoDo po6OtN
- Tayok nijnpiBiyBaHH
- Bka3iBKn 0oO ONTmAlbHOro NOBdoXeHHa 3 akymyIaTOPOM
- Texhivhe 06cnyrobyBaHHa cepbic
- TexHicHe 06cnyroByBaHHiaOuHneHHa
- Bn6ip npnilaia
- Itochn peMOHT Ta cepbicha cnyx6a
- 3o6ob'zahhh Ta rapaHTi
- Дeкnapaia BiNobiHocti
- TpaHcnpTyBaHHa
- Ytwnizaia
- Jnne dna KpaH EC:
- AkymyIaTOPn/6aTapeiKn:
- JIiriEBO-IOHHI:
- OpunHaHa HnctpyKzna
- Yka3aHnna 3a cnryphocT
- PNEyPENPEKDEHNE
- OnncanHe Ha npOdyKta n DeHocTTa
- N3o6pa3eHn eJeMeHTn
- HdNKaTopn eJeMeHTN
- TexHnueckn daHHN
- 3axpaHbaHe Ha paINoTO
- Pa6ota c akymylaTopha 6aTepey
- CmHa Ha akymylaTopHaTa 6aTepy
- HdkaTop 3a akymylaTophata 6atepn
- HnkaTOp 3a akymylaTophata 6atepna Ha dncnne
- HnkaTop 3a akymylatophata 6atepnBbpxy 6aTepyta
- AkymylaTOPHa 6aTePna moen GBA 18V...
- AkymylaTopha 6aTePma Moel ProCORE18V...
- CmHa Ha 6yToHHata 6aTePn
- Pa6ota
- AydnopeKIM
- BkIIOUBAHe m3KIOUBAHe
- Hactpoika Ha cnilata Ha 3Byka
- H36op Ha aydno n3TOHnK
- HactpoBaHe/3aametTbaHe Ha DAB+ paNoctanu
- HactpoKa/3anametBaHe Ha YKB padnoctaHua
- HacouBaHe Ha aHTeHaTa
- Cbbp3BaHe Ha BbHnHaaynO n3ToHnI npe3 AUX
- Bb3npoun3Bexkdahe/ynpablenHe Ha BbHnHa aydno n3TouHnI npes Bluetooth®
- Bb3npoN3BeKdaHe c Dual Speaker Sound (pnaydno n3ToUHKn Bluetooth®)
- U36op Ha npHaIaJIeXHoCTn
- TexHnuecko 06cnyXbaHe n KIneHTcKa cnYk6a
- 06e3neueaBHe rapaHnra
- ДeКларuaия 3a cbotbETCTBNE
- TpaHcNoptUpaHe
- BpaKyBaHe
- Camo 3a cTpaHn ot EC:
- AkymynaTopHN mnn 06nKHOBeHn 6aTePN: JntHeBO-IOHHN:
- et 223
- munuunw (nunnuA)
- wun
- y/uuuunuuyFM
- y
- AUX
- nuau Dual Speaker Sound (nuuau
- W
- 山
- nannnnnnnnnnnnnnnnnnnn
- w USB
- charging)
- younununnnn
- 900174
- nunnnnaaannnn
- nunnnnnnnnnnnnnnnnnnnnnnnnnnnnnnnnnnnnnnnnnnnnnnnnnnnnnnnnnnnnnnnnnnnnnnnnn
- n
- nwnnnnaaann
- #
- 山山山
- JILL JI LJI POJSSWU (A oJgJl jai) wlaJI
- cJgJUddjIooJgJgJl
Brand : Fein
Model : GBA 18V
Category : Portable radio