USER MANUAL KOLSTAN 105.594.60 IKEA
Please refer to the last page of this manual for the full list of IKEA appointed Authorized Service Centre and relative national phone number
| Safety information 6 | | Power Management 20 | |
| Installation | 10 | Cookware guidance 21 | |
| Electrical connection 11 | | Care and cleaning 22 | |
| Product description 13 | | Troubleshooting | 23 |
| Indicators | 13 | Hob technical data 25 | |
| Control panel 14 | | Energy efficiency of hob | 25 |
| Power limitation 15 | | Rating plate | 26 |
| Functions | 16 | Environmental aspects | 27 |
| Cooking Table 18 | | IKEA GUARANTEE | 27 |
| User menu customization 19 | | | |
For your own safety and to ensure proper operation of the appliance, please read this manual carefully before installation and operation. Keep these instructions together with the appliance, even if it is sold or transferred to third parties. It is important that users know all the appliance's operating and safety characteristics.
These hobs have induction systems that comply with the requirements of EMC standards and with the EMF directive, and they should not interfere with other electronic devices. Pacemaker wearers and those using other electronic implants must consult their doctor or the manufacturer of the implanted device to assess whether or not it is sufficiently resistant against interference.

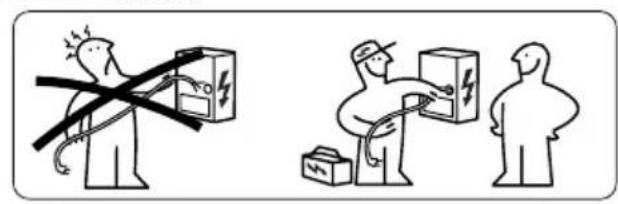
Electrical connections must be performed by a trained technician. Before making the electrical connection, please read the section on ELECTRICAL CONNECTION.
For appliances with a power supply cable, the terminals or section of wire between the cable anchor point and the terminals must be arranged in such a way as to allow the live
wires to be pulled out before the earth wire in the event of the cable coming out of its anchor.
- The manufacturer will not be liable for any damage resulting from incorrect or inadequate installation.
- Check that the mains power supply corresponds to the one indicated on the rating plate fixed to the inside of the product.
- The cut-out devices must be installed in the fixed system according to wiring system regulations.
- For class I appliances, check that the domestic power supply guarantees an adequate earthing system.
- Connect the product to the mains using an omnipolar switch.
- If the power cable is damaged, it must be replaced by the manufacturer, by an authorised service centre or by a qualified technician, to avoid any risk of danger.

WARNING: Remove the protective films before installing the appliance.
- Only use the screws and other hardware elements supplied with the appliance.

WARNING: Failure to install the screws or fixing devices as described in these instructions may mean there is a risk of electric shocks.
- Cleaning and maintenance must not be carried out by children, unless they are under the supervision of an adult.
- Children must be supervised to ensure that they do not play with the appliance.
- This appliance must not be used by persons (including children) with limited physical, sensory or mental abilities, or by inexperienced or untrained persons, unless carefully
supervised and instructed in safe use of the appliance by a person responsible for their safety.
- This appliance may be used by children over the age of 8 years and by persons with limited physical, sensory or mental abilities or with insufficient experience and knowledge, provided they are carefully supervised and instructed on safe use of the appliance and on the dangers that it involves. Do not allow children to play with the appliance.
⚠ WARNING: The appliance and its accessible parts become extremely hot during use.
Take great care not to touch the heating elements.
Keep children under 8 years of age well away from the appliance, unless they are under constant supervision.
WARNING: If the surface shows any signs of cracking, turn the appliance off to prevent any risk of electric shock.
- Do not turn the device on if the surface is cracked or any damage is visible in the thickness of the material.
- Do not touch the appliance if your hands or body are wet.
- Do not use steam appliances to clean the product.
- Do not rest metal objects such as knives, forks, spoons and pan lids on the surface of the hob, as they might overheat.
- Use the relevant control to turn the hob off after use, do not rely on the pan sensors.
WARNING: Unsupervised cooking on a hob using oil and grease may be dangerous and may cause a fire. NEVER attempt to put flames out with water; on the contrary, turn the appliance off and suffocate the flames, for example covering them with a pan lid or a fire blanket.
CAUTION: The cooking process must be supervised. A short cooking process must be constantly supervised.
- The appliance is not designed to be started using an external timer or a separate remote controlled system.
WARNING: Danger of fire: do not rest objects on the cooking surfaces.
- The appliance must be installed in such a way as too allow disconnection from the electrical power supply with a contact aperture (3 mm) that ensures complete disconnection in category III overload conditions.
- The appliance must never be exposed to weather (rain, sun).
- Keep the packing material away from children and animals.
- Make sure the device is connected directly to the power outlet.
- Do not use adapters, multiple sockets or extension cables to connect the device.
- Never use the appliance for purposes other than those for which it has been designed.
- Deep-fryers must be kept under constant supervision when in use: the oil may catch fire if it gets too hot.
- Do not operate the appliance using an external timer or separate remote controlled system.
- The appliance must never be installed behind a decorative door, to prevent it from overheating.
- Do not stand on the appliance, as this may damage it.
- Do not rest hot pots and pans on the edge, as this may damage the silicone seals.
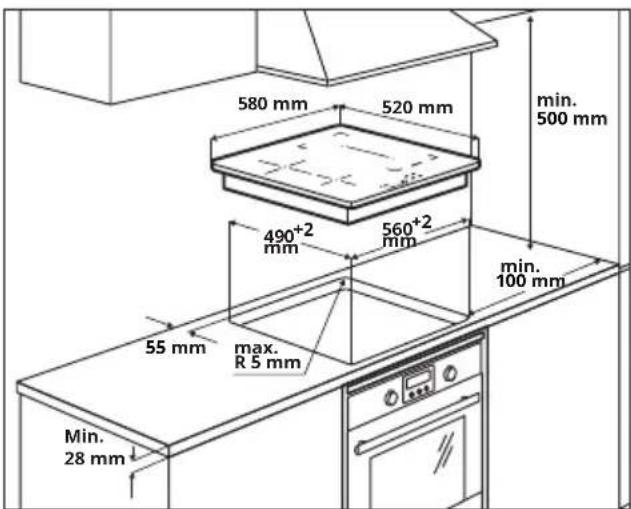
Installation
Installation process must follow the laws, ordinances, directives and standards (electrical safety rules and regulations, proper recycling in accordance with the regulations, etc.) in force in the country of use!
- For further information on the installation refer to the Assembly Instruction.
- Do not use silicon sealant between the appliance and the worktop.
- Make sure that the space underneath the hob is sufficient for air circulation. Please refer to the Assembly Instruction.
- The bottom of the appliance can get hot. If the appliance is installed above the drawers, make sure to install a non-combustible separation panel under the appliance to prevent access to the bottom. Please refer to the Assembly Instruction.
- Ventilation of the appliance must comply with the manufacturer's instructions.
- Create a front opening of at least 28 cm2 in the unit into which the hob is to be fitted, to allow aeration of the product.
Requirements for kitchen units
- If the appliance is mounted on flammable materials, the guidelines and regulations relating to low voltage installations and fire prevention must be followed strictly.
- For the fitted units, the components (plastic materials and veneered wood)
must be mounted with heat-resistant adhesives (min. 85°C): the use of unsuitable material and adhesives may result in warping and detachment.
- The use of decorative hardwood borders around the worktop behind the appliance is allowed, provided the minimum distance always complies with the indications provided in the installation drawings.
- For further information on the installation refer to the Assembly Instruction
- If there is no oven beneath the hob, install a separation panel under the appliance according to the Assembly Instruction.
Electrical connection

WARNING: All electrical connections must be carried out by an authorised installer.
- Before making the connections, check that the rated voltage of the appliance indicated on the rating plate corresponds to the mains power supply. The rating plate is affixed to the underside of the hob.
- Only use original components supplied by the spare parts service.
• The appliance is not equipped with a network cable. Purchase the correct one from a specialist dealer.
- If the cables are damaged, replace with original spare parts cables. Contact the call center of your IKEA store.

Caution! Do not solder any of the cables!
Electrical connection
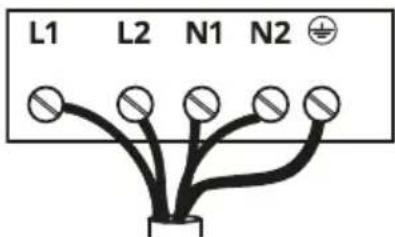
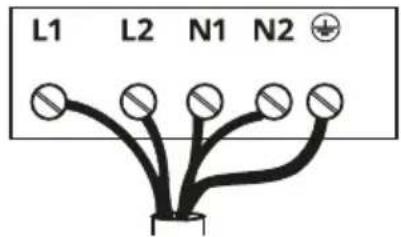
- Follow the connection diagram (on the under side of the product).
- This appliance has a Y-type connection and requires a mains cable H05V2V2-F. Cable needs mandatory sleeves. According to IEC regulations use for one-phase connection: mains cable 3 x 4 mm ^2 , for two-phase connection: mains cable 4 x 2.5 mm ^2 and for NL connection mains cable 5 x 2.5 mm ^2 . External cable diameter: min 8 mm - max 12 mm. Please respect specific national regulations in the first priority.
- The connection terminals can be accessed by removing the junction box cover.
- Check that the domestic power supply characteristics (voltage, maximum power and current) are compatible with those of the appliance.
- Connect the appliance as shown in the diagram (in compliance with reference standards in force nationally for mains voltage).
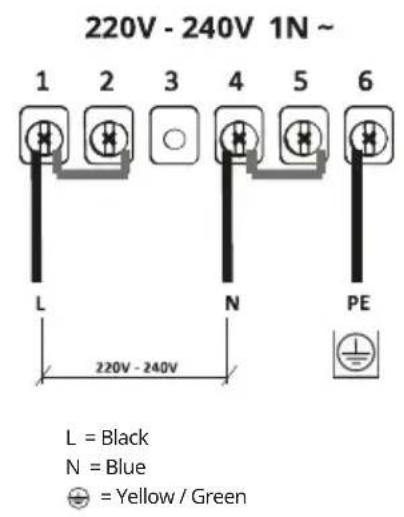
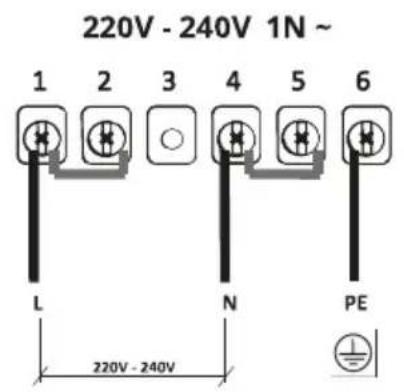
Connection diagram home side
220V-240V 1N \~
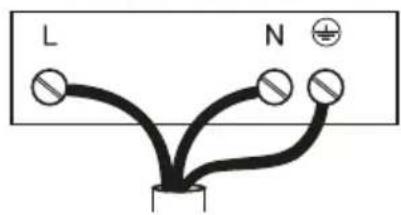
L = Black
N = Blue
= Yellow / Green
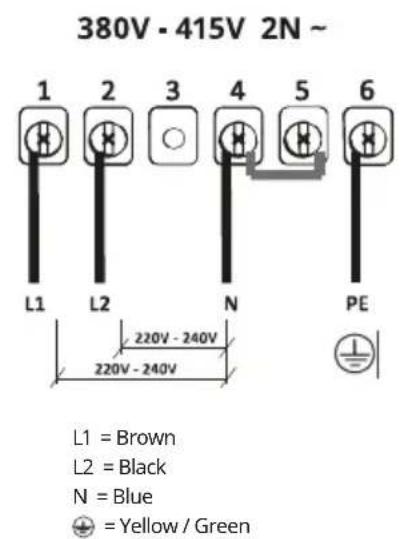
380V - 415V 2N\~
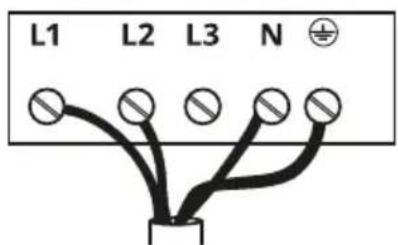
L1 = Brown
L2 = Black
N = Blue
= Yellow / Green
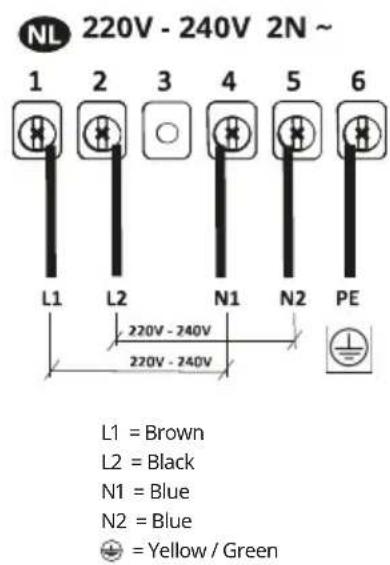
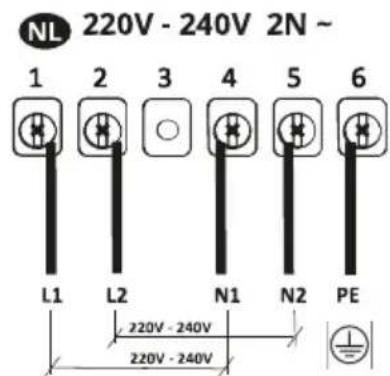
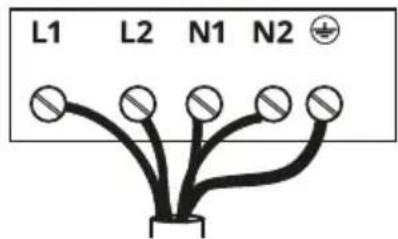
220V - 240V 2N \~
NL
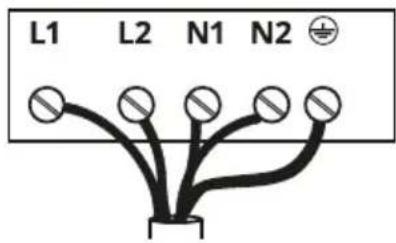
L1 = Brown
L2 = Black
N1 = Blue
N2 = Blue
= Yellow / Green
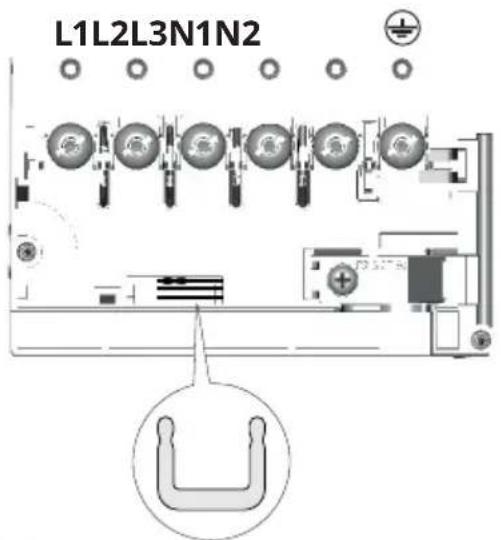
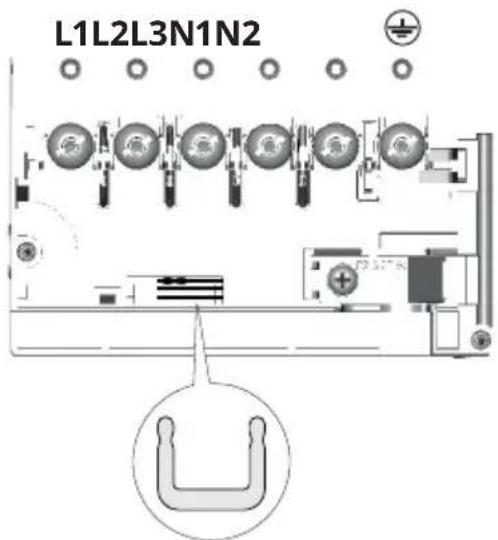
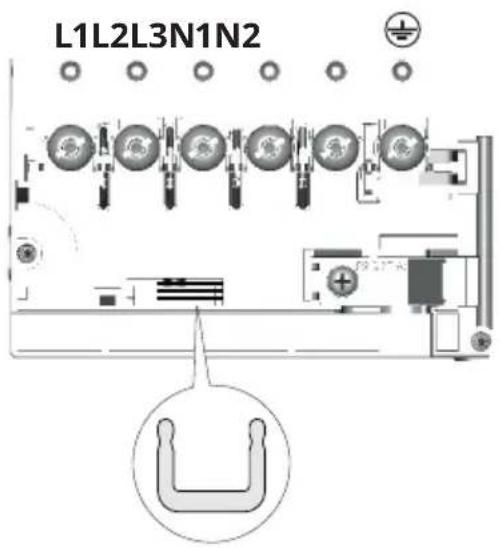
Connection diagram product side
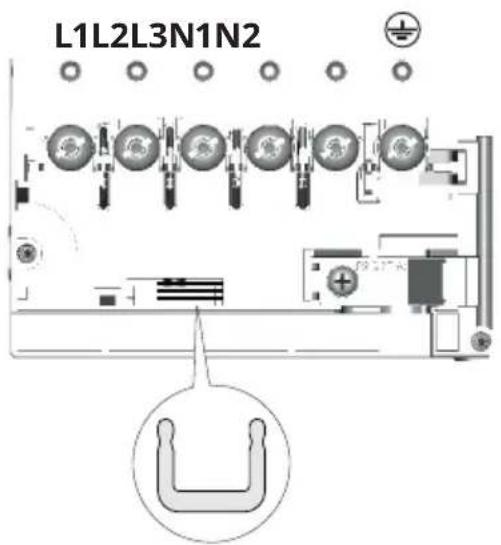
Insert the shunts between the screws as shown.
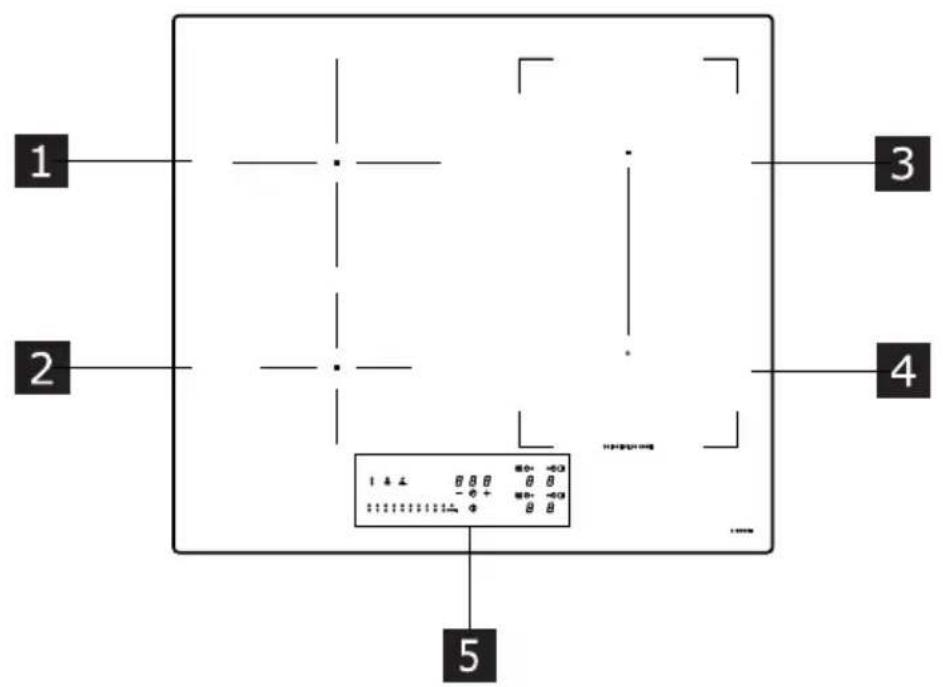
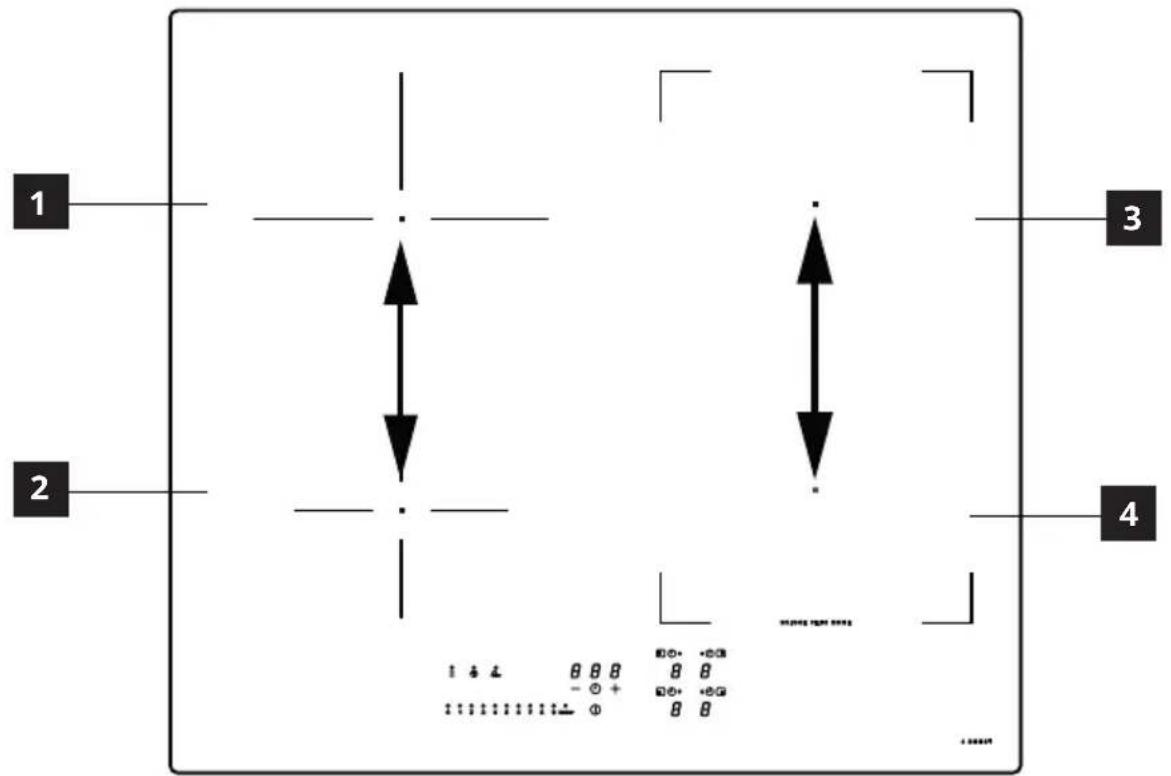
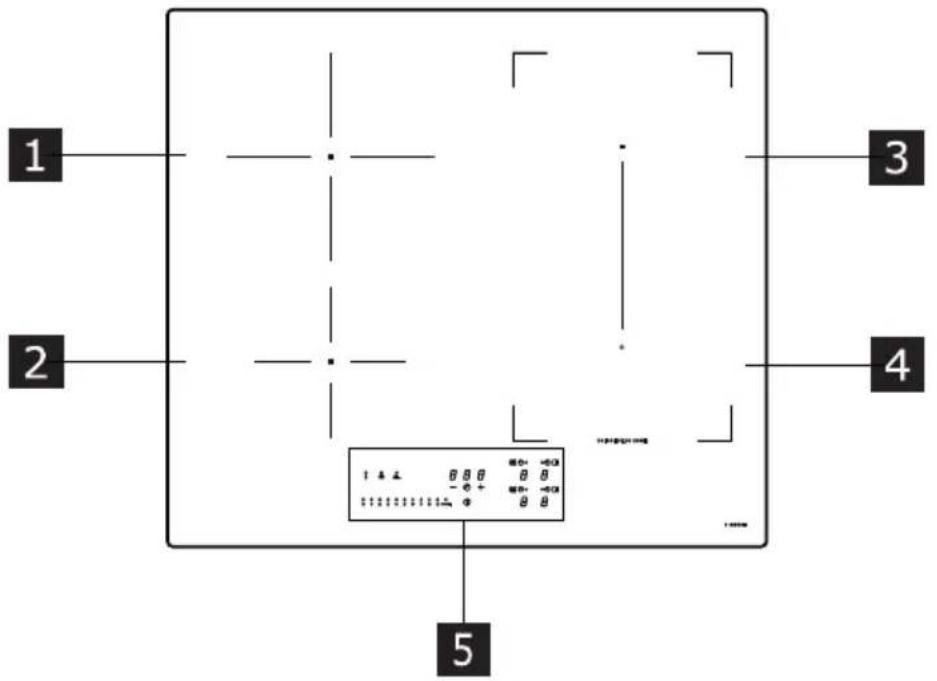
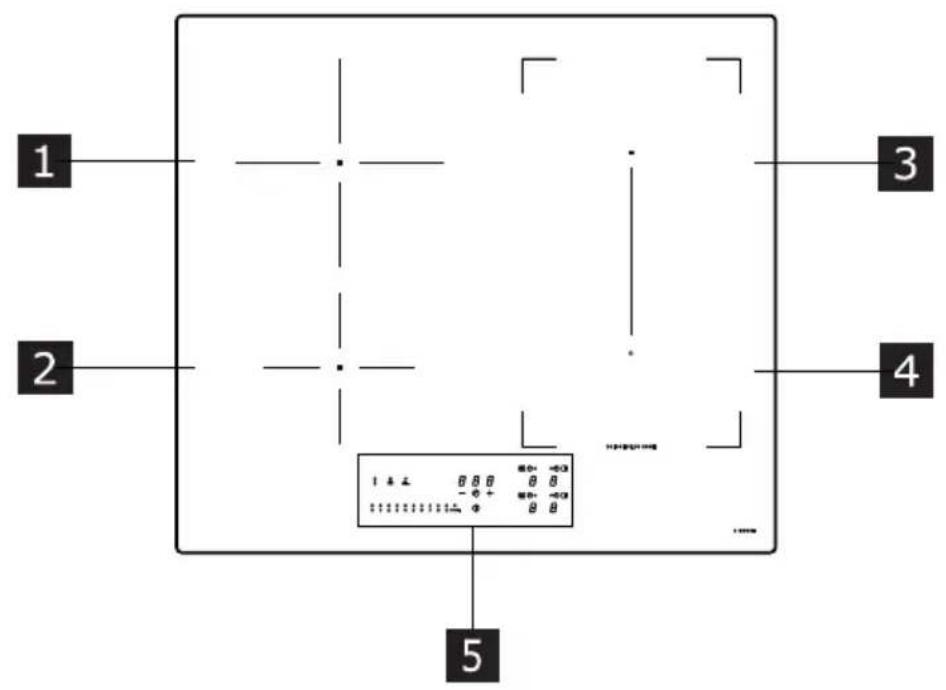
Product description
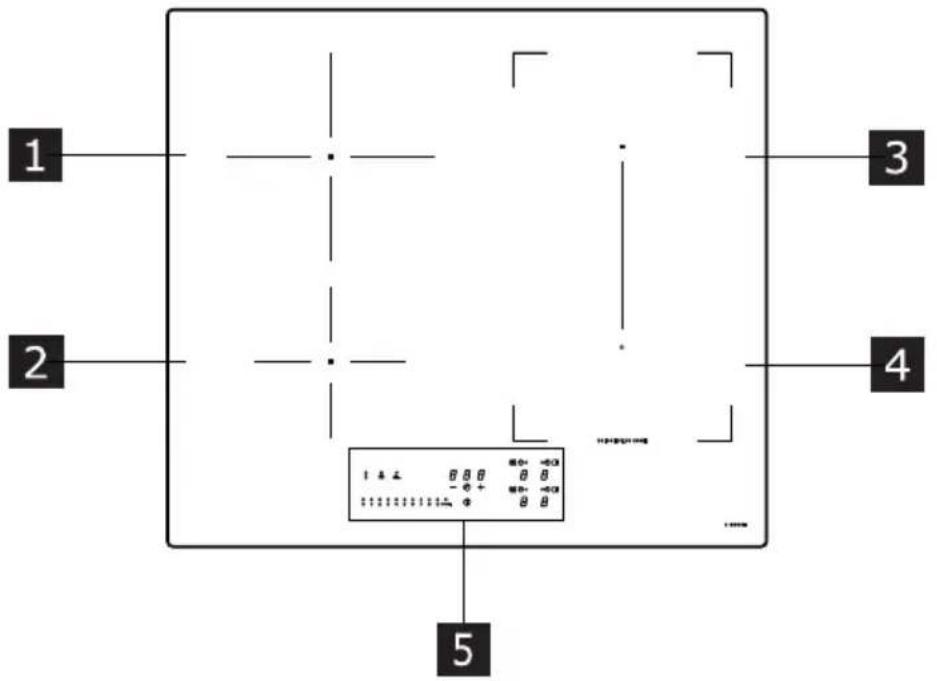
1 Single cooking area (200 mm) 2300W, with Booster 3000W.
2 Single cooking area (145 mm) 1400W, with Booster 1850W.
3 Single cooking area (210 x 190 mm) 2100W, with Booster 3000W.
4 Single cooking area (210 x 190 mm) 2100W, with Booster 3000W.
5 Control panel
3 + 4 Bridge cooking area (210 x 380 mm) 3000W, with Booster 3700W.
Indicators
Pot detection
Each of the cooking areas is equipped with a system to detect the presence of a pan.
The pan presence detection system recognises pans with a magnetisable base suitable for use with induction hobs.
If the pan is removed during operation, or if an unsuitable pan is used, the display shows the symbol ⭕
Residual heat indicator
The residual heat indicator is a safety feature, indicating that the surface of the cooking area is still at a temperature of 50^ C or above, which may cause burns if touched by a naked hand. The digit for the corresponding cooking area displays H
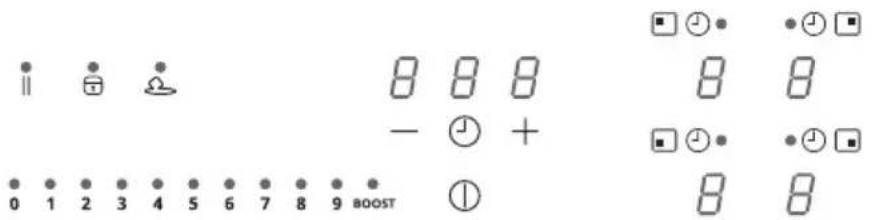
Control panel
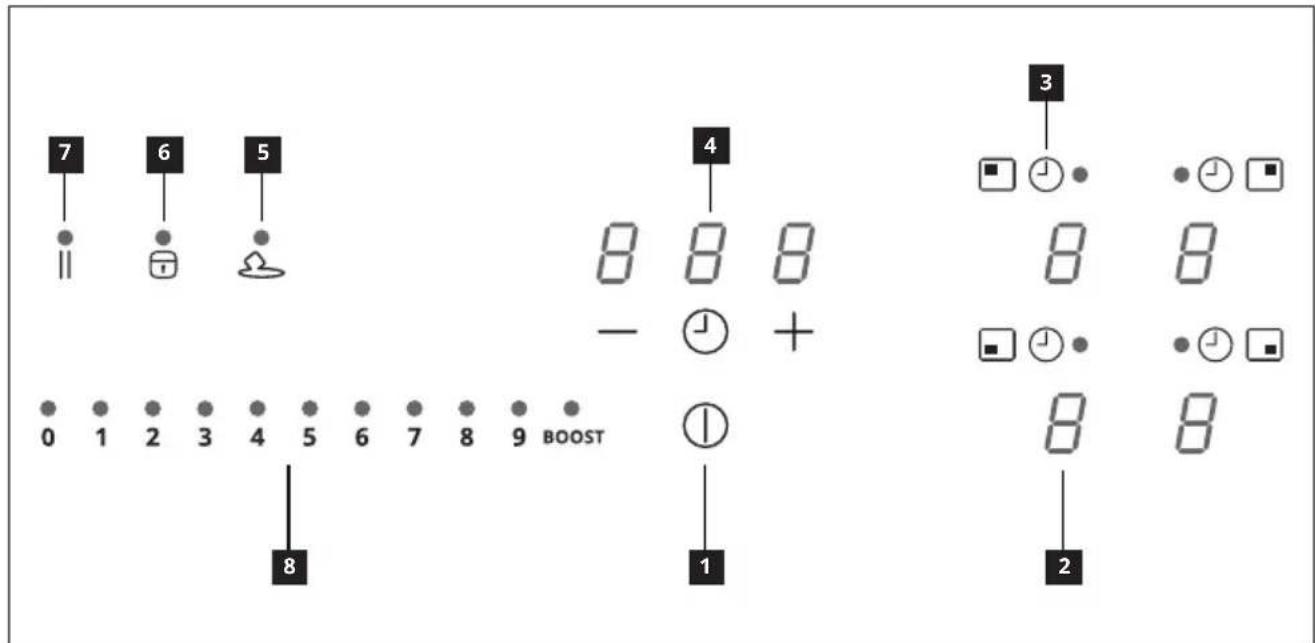
1 On/Off
2 Power level indicator
3 Timer symbol
4 Timer control and cooking time indicator
5 Melting function button
6 Lock function button
7 Pause function button
8 Scroll keypad
The cooking areas can be activated by pressing the reference digit 8. The digit lights up more intensely to confirm the operation.
When a pan is placed on one of the 4 cooking areas, the hob automatically detects its presence and turns on the corresponding digit to put it into use.
If no pans or other articles are resting on the hob, the digits will not be shown.
On the control panel, the functions that can be selected will always be the ones that are visible but illuminated at low intensity. Select the functions by touching the symbol itself.
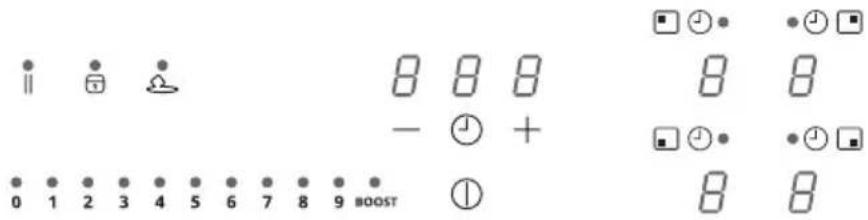
Power limitation
When first connecting to the domestic power supply, the installer must set the power of the hob cooking areas based on the actual abilities and capacity of the power supply itself.
If this is not necessary, the hob can be turned on directly using Ⓐ, otherwise, follow the operations below to access the menu.
Connect the hob to the domestic mains power
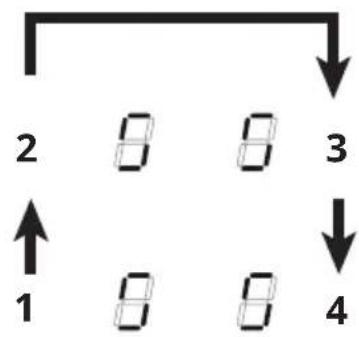
- All the digits light up for a few seconds, than they go out only the remains flashing.
- Press and hold the and digits of the zones show
- Holding start pressing the zones digitis in anticlock direction, starting from the bottom right.
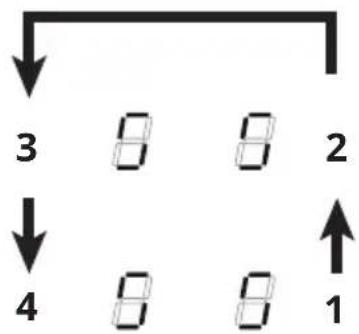
flowchart
graph TD
    A["3"] --> B["8"]
    B --> C["8"]
    C --> D["2"]
    E["4"] --> F["8"]
    F --> G["8"]
    G --> H["1"]
The back right hand digit shows and a number indicating the type of menu. The front right hand digit shows a number that depends on the parameters indicated in the selection.
Select the digit with and press "8" on the power bar.
Select the other digit and select the correct setting.
See the table below for the specifications:
| Value on the power bar | Kw Notes | |
| 0 7.4 Kw Standard initial setting |
| 1 6 Kw | | |
| 2 5 Kw | | |
| 3 4 Kw | | |
| 4 3.5 Kw | | |
| 5 3 Kw | | |
| 6 2.5 Kw | | |
Once the correct value has been entered, confirm by pressing and holding ⚠
Functions
 |
| Child lock | This function prevents an accidental operation of the appliance. |
| To activate: If the pot is placed, press and hold for 3 seconds the correspondent digit. If the pot is not placed press and hold for 3 seconds one of the 4 digits (not visible) near the dot on the left side. Release and slide your finger from 0 to 9 along the power bar which shows the operating sequence. All the digits displayLThe operations described must be completed within 10 seconds. |
| To deactivate: press and hold for 3 seconds one of the 4 digits for the cooking areas. Release and slide your finger from 9 to 0 along the power bar which shows the operating sequence.The operations described must be completed within 10 seconds. |
| Lock | It is possible to lock the hob functions during use, for example in order to clean the hob. The function remains active even if the hob is turned off and on again.If there is a power cut, the function is deactivated. |
| To activate: press and hold for 1 second. |
| To deactivate: press . |
| Boost | Each cooking area can be set to an extra power level for 5 minutes at most. |
| To activate: select one of the 4 cooking areas and select the value “BOOST” on the power bar. The corresponding digit displaysP. |
| To deactivate: select one of the other possible values on the power bar. |
| Cooking areas Timer | Timer to turn off a specific cooking area after setting the time.The cooking areas can be programmed individually, as they all have their own Timer. |
To activate: With the cooking area in operation, press on the corresponding symbolto access the Timer management commands for that area.The 3 digits will show “000”. Press "+" or "-" to set the countdown time.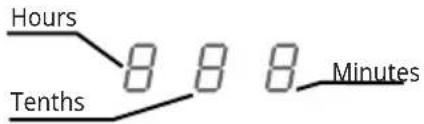 Do not touch anything for 10 seconds to confirm the time.When the countdown ends, the digits return to zero and a buzzer sounds. This can be turned off by pressing any of the buttons.If the Timer is active in more than one cooking area the 3 digits will always show the Timer that is closest to finishing. Do not touch anything for 10 seconds to confirm the time.When the countdown ends, the digits return to zero and a buzzer sounds. This can be turned off by pressing any of the buttons.If the Timer is active in more than one cooking area the 3 digits will always show the Timer that is closest to finishing. |
| To deactivate: With the cooking area in operation, press on the corresponding symbolto access the Timer management commands for that area.Set the three digits to “000” using "+" or "-" . |
| Timer(generic) | Timer with alarm for generic use. |
To activate: Turn the hob on, making sure there are no pans or active cooking areas.The 3 digits for the Timer management commands show “- - -”.Press the digit to access the Timer menu and view “000”.Press “+” or “-” to set the countdown.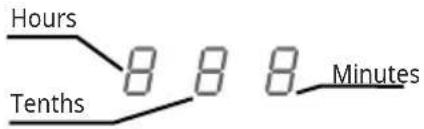 Do not touch anything for 10 seconds to confirm the time.When the countdown ends, the digits return to zero and a buzzer sounds. This can be turned off by pressing any of the buttons.Repeat the operations described to modify the countdown value. Do not touch anything for 10 seconds to confirm the time.When the countdown ends, the digits return to zero and a buzzer sounds. This can be turned off by pressing any of the buttons.Repeat the operations described to modify the countdown value. |
| To deactivate: Turn the hob on, making sure there are no pans or active cooking areas.Press the digit to access the Timer menu and use “+” and “-” to set the Display to “000”. |
| Melting | To activate: select one of the 4 cooking areas and press ↗ .The digit for the selected area will show ↘ |
| To deactivate: press ↗ or press ⏻. |
| Heat-upFunction | This function is used to heat up a pan at maximum power before continuing to cook at a selected level. The period of time the cooking area will remain at maximum power depends on the final cooking level that is set. See table:Lev. Power Time1 48 seconds2 144 seconds3 230 seconds4 312 seconds5 408 seconds6 120 seconds7 168 seconds8 216 seconds9 not availableP not available |
| To activate, with a pan on the hob and selected cooking area, press and hold for 3 seconds on the selected value (from 1 to 8) on the power bar. The Display for the corresponding area shows “A”.It is possible to increase the cooking level, but if it is decreased the function is deactivated.It can also be deactivated by pressing and holding for 3 seconds the button for the cooking area in question. |
| PauseFunction | This function allows any other active function on the hob to be paused/resumed, reducing the power in the cooking area and all the functions to zero. If the pause function is not deactivated within 10 minutes, the hob will switch off automatically. |
| To activate: With a pan on the selected hob and cooking area, press and hold the Pause button∥ for at least 1 second. All the Displays show ∥. |
| To deactivate: press and hold ∥ for 1 second until it flashes. Press any other button within 10 seconds. The function is deactivated and the hob continues with the previous setting. |
| Lev. Power Time |
| 1 48 seconds |
| 2 | 144 seconds |
| 3 230 seconds |
| 4 312 seconds |
| 5 408 seconds |
| 6 120 seconds |
| 7 168 seconds |
| 8 216 seconds |
| 9 not available |
| P not available |
| Recall Function | This function is used to recall all the hob function settings in the event of involuntary shut-down or a sudden power cut. |
| When the hob is turned off, if it is turned on within 6 seconds using 1, the Ibutton will flash for 6 seconds. Press the button Ito recover the functions set previously. A beep sounds to confirm the operation. |
| Bridge Function | This function allows 2 cooking areas to be connected, so that they can be controlled as a single, large cooking area. This means it is possible to use pans with a larger bottom.The cooking areas that can be selected for this function are only the ones on the right. |
| To activate/deactivate: simultaneously press the right cooking area digits to select the 2 areas to form a bridge, until a digit displays to indicate that the function has been activated. The other digit is used to set the power level. |
Cooking Table
| Power level Cooking method To be used for | |
| 1 Melting, | heating gently Butter, chocolate, | gelatine, sauces |
| 2 Melting, | heating gently Butter, chocolate, | gelatine, sauces |
| 3 Warming up Rice | |
| 4 | Prolonged cooking, thickening, stewing | Vegetables, potatoes, sauces, fruit, fish |
| 5 | Prolonged cooking, thickening, stewing | Vegetables, potatoes, sauces, fruit, fish |
| 6 Prolonged cooking, braising Pasta, soups, | braised meat |
| 7 Light frying | Rösti (potato fry-ups), omelettes, breaded and fried foods, sausages |
| 8 Frying, | deep fat frying Meat, potato chips | |
| 9 Quick frying at high temperature Steak | |
| P Quick heating Boiling water | |
Press ① again and hold for 3 seconds.
- The button start flashing.
- Press and hold the and digit of the zone show .
- Holding start pressing the zones digitis in clock direction, starting from the bottom left.
flowchart
graph TD
    A["2"] --> B["8"]
    B --> C["8"]
    C --> D["3"]
    D --> E["4"]
    E --> F["1"]
The back left hand digit alternately shows L and a number from 2 to 7, indicating the type of menu. The front left hand digit shows a number that depends on the parameters indicated in the selection.
Select a number on the power bar to access the settings menu and enter a value.
See the table below for the specifications:
| Menu Code Description Value | |
| U2 | Menu to manage the button sounds volume. | 0 (sound off) - 1 (min.) - 3 (max.) |
| U3 | Menu to manage the counter buzz volume. | 0 (sound off) - 1 (min.) - 3 (max.) |
| U4 Menu to | manage the display lighting level. 0 (max.) - 9 (min.) | |
| U5 | Menu to manage the countdown animation. | 0 (animation off) - 1 (animation on) |
| U6 Pan recognition function always active menu. 0 (active) - 1 (not | active) | |
| U7 Menu to | manage the end of countdown buzzer. | 0 (continuos flashes and switch off)1 (ten flashes and switch off)2 (one flash and switch off) |
Once the correct value has been entered, confirm by pressing and holding ① for 2 seconds.
To exit the menu without saving, press ↓
If no operations are carried out, the user menu will close after 1 minute.
Power Management
This product is equipped with electronically controlled Power Management. See the illustration.
This function monitors electric loading and limits the maximum power output to 3700 W for each cooking area group (1+2 and 3+4), optimizing the power distribution and preventing the system from overloading.
Hob in full power setting - the function divides the power between cooking areas belonging to the same group and automatically decreases the power of the other cooking area, if necessary (the last command has highest priority).
Hob in power limitation setting - the function divides the power between cooking areas and doesn't allow to set the power for the other cooking areas exceeding the limit (to increase the power of particular cooking area, the power setting for the other ones need to be lowered manually).
Example:
If BOOST level is selected for cooking area 1, cooking area 2 cannot exceed the level 9 at the same time and will be automatically limited.
Cookware guidance
What pots to use
Only use pots and pans with bottom made from ferromagnetic material which are suitable for use with inductions hobs:
- cast iron
- enamelled steel
- carbon steel
• stainless steel (although not all)
- aluminium with ferromagnetic coating or ferromagnetic plate
To determine if a pot or pan is suitable, check for the symbol (usually stamped on the bottom). You can also hold a magnet to the bottom. If it clings to the underside, the cookware will work on an induction hob.
To ensure optimum efficiency, always use pots and pans with a flat bottom that distributes the heat evenly. If the bottom is uneven, this will affect power and heat conduction.
How to use
Minimum diameter of pot/pan base for the different cooking areas
To ensure that the hob functions properly, the pot must cover one or more of the reference points indicated on the surface of the hob, and must be of a suitable minimum diameter.
Always use the cooking area that best corresponds to the diameter of the bottom of the pan.
| Cooking area | Cookware diameter (mm) |
| ∅ min. (recommended) | ∅ max (recommended) |
| Left rear 1 | 10 mm 200 mm | |
| Left front 1 | 10 mm 145 mm | |
| Right rear 1 | 10 mm 190 mm | |
| Right front 1 | 10 mm 190 mm | |
| Bridge right side | 190 mm 370 mm | |
Empty or thin-based pots/pans
Do not use empty or thin-based pots/pans on the hob as it will not be able to monitor the temperature or turn off automatically if the temperature is too high, damaging the pan or the hob surface. If this occurs, do not touch anything and wait for all components to cool down.
If an error message appears, refer to "Troubleshooting".
Hint/tips
Noise during cooking
When a cooking area is active, it may hum briefly. This is a characteristic of all induction cooking zones and does not impair the function or life of the appliance. The noise depends on the cookware used. If it causes considerable disturbance, it may help to change the cookware.
Normal operating noises of the induction hob
Induction technology is based on the creation of electromagnetic fields to generate heat directly on the bottom of cookware. Pots and pans may cause a variety of noises or vibrations depending on how they are manufactured.
These noises are described as follows:
This noise is produced when cooking at a high heat level. It is based on the amount of energy transferred from the cooktop to the cookware. The noise ceases or quiets down when the heat level is reduced.
Quiet whistling
This noise is produced when the cooking vessel is empty. It ceases once liquids or food are placed in the vessel.
Crackling
This noise occurs with cookware comprised of various materials layered one upon the other. It is caused by the vibrations of the
surfaces where different materials meet. The noise occurs on the cookware and can vary depending on the amount of food or liquid and the cooking method (e.g., boiling, simmering, frying).
Loud whistling
This noise occurs with cookware comprised of different materials layered one upon the other, and when they are additionally used at maximum output and also on two cooking zones. The noise ceases or quiets down when the heat level is reduced.
These sounds are normal
Fan noises
For proper operation of the electronic system, it is necessary to regulate the temperature of the cooktop. For this purpose, the cooktop is equipped with a cooling fan, which is activated to reduce and
regulate the temperature of the electronic system. The fan may also continue to run after the appliance is turned off if the detected temperature of the cooktop is still too hot after turning it off.
Rhythmic sounds, similar to the ticking sound of a clock
This noise occurs only when at least three cooking zones are operating and disappears or weakens when some of them are switched off. The noises described are a normal element of the described induction technology and should not be regarded as defects.
Care and cleaning
- Never use abrasive sponges, wire wool, hydrochloric acid or other products that might scratch or mark the surface.
- Food that falls accidentally or builds up on the surface, the functional or aesthetic elements of the Hob must not be eaten.
- Switch off or unplug the appliance from the mains supply before carrying out any maintenance work.
- Clean the appliance after every use, to prevent any residual food from burning on. It is much harder work to remove crusted and burned-on dirt.
- For day-to-day dirt, use a soft cloth or sponge and a suitable detergent. Follow the manufacturer's recommendations regarding detergents to be used. The use of protective detergents is recommended.
- Remove crusted dirt, for example milk that has boiled over, using a scraper pad suitable for vitreous ceramic, while the cooke-hob is still hot. Follow
the manufacturer's recommendations regarding scraper pads to be used.
- Remove food containing sugar, for example jam that has spilled during cooking, using a scraper pad suitable for vitreous ceramic, while the Hob is still hot. If you do not, the residue may damage the vitreous ceramic surface.
- Remove any melted plastic using a scraper pad suitable for vitreous ceramic, while the Hob is still hot. If you do not, the residue may damage the vitreous ceramic surface.
- Remove limescale using a small amount of limescale remover solution, for example vinegar or lemon juice, once the Hob has cooled down. Then clean again with a damp cloth.
- Do not cut or prepare foodstuffs on the surface, and do not drop hard objects onto it. Do not drag pans or plates over the surface.
- Do not use steam cleaning equipment.
Troubleshooting
| Error code | Description | Possible causes of the error | Solution |
| ER03 | Hob switches off after 10 sec. | Continuous key activation detected.Water or cookware placed on Control panel. | Remove water or cookware from glass and Control panel. |
| ER21 | Hob switches off. | The internal temperature of electronic parts is too high. | Let the hob cool down.Please check if the hob has sufficient ventilation.If error persists, please contact After Sales Service. |
| E2 | Corresponding cooking area is turned off. | Empty or wrong cookware.Pot or glass temperature is too high.Electronic temperature too high. | Let the hob cool down.Use appropriate cookware.Do not heat-up empty pots. |
| E3 | Corresponding cooking area is turned off. | Wrong cookware.Cookware is losing its magnetic characteristics and may lead to induction hob damage. | Use appropriate cookware.The error is automatically cancelled after 8s and the cooking area can be used again.In case of further upcoming errors cookware have to be changed.If error persists, please contact After Sales Service. |
| E6 | Cooking area cannot be turned on. | Power supply voltage and/or frequency is out of range. | Check mains voltage and/or frequency.If needed contact After Sales Service. |
| E8 | Cooking areas are turned off. | Fan failure.Fan blocked by dust or fabrics. | Clean and remove foreign bodies from fan.If error persists, please contact After Sales Service. |
| EH | Corresponding cooking area is turned off. | Temperature sensor stuck for cooking area.Not enough temperature change detected after switching on the hob. | Switch off the hob and switch it on again after cooling down.If error persists, please contact After Sales Service. |
| E4E5E7E9ER20ER22ER31ER36ER42ER47EA | Disconnect the hob from the power supply.Wait a few seconds then reconnect the hob to the power supply.If the problem persists, call the service centre and specify the error code that appears on the display. |
Maintenance and repairs
- Make sure that maintenance on electrical components is only carried out by the manufacturer or by the service technicians.
- Make sure that damaged cables are only replaced by the manufacturer or by the service technicians.
If there is a fault, try to resolve it by following the troubleshooting guidelines. If the problem cannot be resolved, contact your IKEA store or the After Sales Service.
You can find a full list of IKEA appointed contacts at the end of this user manual.
When contacting the After Sales Service please provide the following information:
- type of fault
- appliance model (Art./Cod.)
- serial number (S.N.)
This information can be found on the rating plate. The rating plate is affixed to the bottom of the appliance.
If you operated the appliance wrongly, or the installation was not carried out by an authorized installer, the visit from the After Sales Service technician or dealer may not take place free of charge, even during the warranty period.
Hob technical data
| Unit Value | |
| Type of product Built-in Hob | | |
| Dimensions | Width mm | | 580 |
| Depth mm | | 520 |
| Min./max height mm | | 54 |
| Total power W | | 7400 |
| Parameter Value | |
| Power supply voltage/frequency | 220-240 V, 50 Hz; 220 V, 60 Hz2N~380-415 V, 50 Hz; 2N~380 V, 60 Hz; |
| Weight of the appliance 8,8 Kg | |
Energy efficiency of hob
| Model identifier | KOLSTAN805.594.66105.594.60 |
| Number of cooking areas 4 | |
| Number of Bridge cooking areas 1 - Right | |
| Cooking technology Induction | |
| Dimension of Bridge cooking area | Right 210 x 380 mm |
| Dimension of cooking area | Left rear ∅ 200 mm |
| Left front ∅ 145 mm |
| Right front 210 x 190 mm |
| Right rear 210 x 190 mm |
| Energy consumption per Bridge cooking area | 192 Wh/kg |
| Energy consumption per cooking area | Left rear 185 Wh/kg |
| Left front 181 Wh/kg |
| Energy consumption of the hob (electric cooking) | 186 Wh/kg |
EN/IEC 60350-2
EN/IEC 50564

This appliance has been designed, manufactured and sold in compliance with EEC Directives.
"The technical data is provided on the rating plate affixed to the bottom of the product."
BS EN 60350-2
BS EN 50564

This appliance has been designed, manufactured and sold in compliance with Directives.
"The technical data is provided on the rating plate affixed to the bottom of the product."
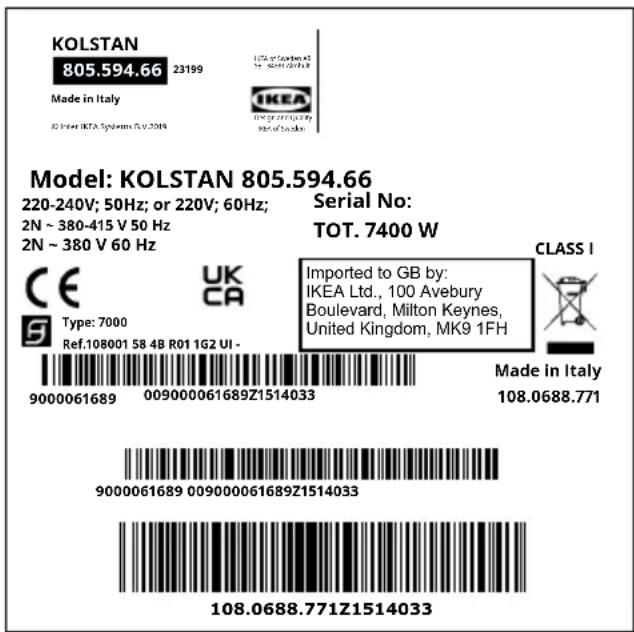
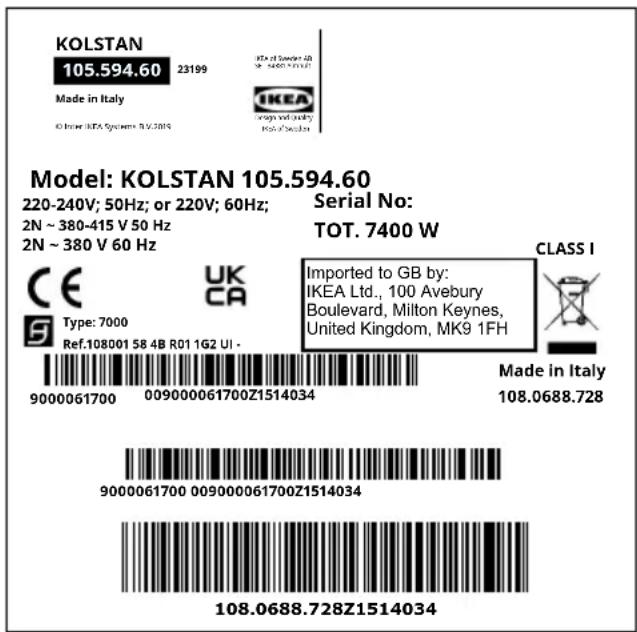
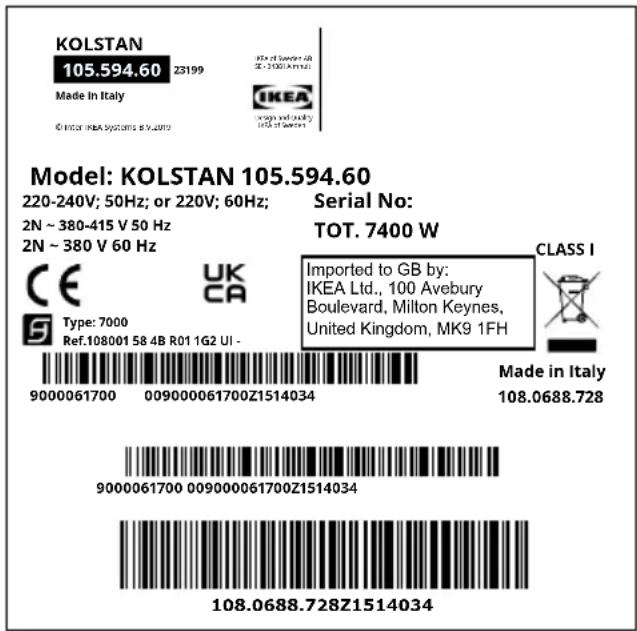
Rating plate
bar
| Model | Value |
|-------|-------|
| KOLSTAN | 105.594.60 |
| KE | 23199 |
| UK | 009000061700Z1514034 |
| CE | 9000061700 |
| Type | 7000 |
| Ref | 108001 58 4B R01 1G2 UI - |
| USA of Sweden 2B
© Inner IKEA Systems N.V.2015
IKEA
design and quality
Rust of Sweden
Imported to GB by:
IKEA Ltd., 100 Avebury Boulevard, Milton Keynes, United Kingdom, MK9 1FH
Made in Italy
108.0688.728
108.0688.728Z1514034
The graphic above represents the rating plate of the appliance.
The serial number is specific to each product.
Dear Customer, keep the additional rating plate attached to the cover of Safety booklet. This will allow us to assist you better by identifying precisely your hob, in case you need our assistance in the future.
Thank you for your help!
Environmental aspects
Your obligations as an end-user

This electrical or electronic equipment is marked with a crossed-out wheeled bin. The equipment may therefore only be collected and returned separately from unsorted municipal waste, i.e. it must not be disposed of with household waste. The equipment can be returned, for example, to a municipal collection point or, if applicable, to a distributor (see below for their take-back obligations in Germany). This also applies to all components, sub-assemblies and consumables of the old equipment to be disposed of.
Before the old equipment may be disposed of all old batteries and old accumulators that are not enclosed by the old equipment must be separated from the old equipment. The same applies to lamps that can be removed from the old equipment without destroying them. The end-user is also responsible for deleting personal data from the old equipment.
Notes on recycling

Help recycle all materials marked with this symbol. Do not dispose of such materials, especially packaging, in the household waste but via the relevant containers provided or the appropriate local collection systems.
Help to protect the environment and human health by recycling including waste of electrical and electronic appliances.
The following additional information applies in Germany
Take-back obligations of distributors
Anyone who sells electrical and electronic equipment on a sales floor area of at least 400 m^2 or oth-erwise supplies it to end users on a commercial basis is obliged, when supplying a new equipment, to take back at the place of supply or in the immediate vicinity thereof free of charge an old equipment belonging to the end user of the same type of equipment which fulfils essentially the same functions as the new equipment. This also applies to distributors of groceries with a total sales area
of at least 800 m ^2 who offer electrical and electronic equipment several times a calendar year or on a permanent basis and make it available on the market. In addition, such distributors must, at the request of the end-user, take back in the retail shop or in the immediate vicinity free of charge old equipment that does not exceed 25 cm in any external dimension (small electrical equipment) thereof; in this case, take-back may not be linked to the purchase of an electrical or electronic equipment but may be limited to three old equipment per type of equipment.
The place of delivery is also the private household if the new electrical or electronic equipment is de-livered; in this case the collection of the old equipment is free of charge for the end user. The above obligations also apply to distribution using means of distance communication if the distributors maintain storage and dispatch areas for electrical and electronic equipment or total storage and dispatch areas for groceries that correspond to the sales areas mentioned above. However, the free collection of electrical and electronic equipment is then restricted to heat transmitters (e.g. refrigerators), screens, monitors and equipment containing screens with a surface area of more than 100 cm ^2 and equipment where at least one of the external dimensions is more than 50 cm. For all other electrical and electronic equipment the distributor must ensure appropriate return facilities within a reasonable distance from the respective end-user; this also applies to small electrical equipment (see above) that the end-user wishes to return without purchasing a new equipment.
Energy saving
You can save energy during everyday cooking if you follow below hints.
- When you heat up water, use only the amount you need.
- If it is possible, always put the lids on the cookware.
- Before you activate the cooking area put the cookware on it.
- Put the smaller cookware on the smaller cooking areas.
- Put the cookware directly in the centre of the cooking area.
- Use the residual heat to keep the food warm or to melt it.
IKEA GUARANTEE
How long is the IKEA guarantee valid?
This guarantee is valid for five (5) years from the original date of purchase of Your appliance at IKEA. The original sales receipt is required as proof of purchase. If service work is carried out under guarantee, this will not extend the guarantee period for the appliance.
Who will execute the service?
IKEA service provider will provide the service through its own service operations or authorized service partner network.
What does this guarantee cover?
The guarantee covers faults of the appliance, which have been caused by
faulty construction or material faults from the date of purchase from IKEA. This guarantee applies to domestic use only. The exceptions are specified under the headline "What is not covered under this guarantee?" Within the guarantee period, the costs to remedy the fault e.g. repairs, parts, labour and travel will be covered, provided that the appliance is accessible for repair without special expenditure. On these conditions the EU guidelines (Nr. 99/44/EG) and the respective local regulations are applicable. Replaced parts become the property of IKEA.
What will IKEA do to correct the problem?
IKEA appointed service provider will examine the product and decide, at its sole discretion, if it is covered under this guarantee. If considered covered, IKEA service provider or its authorized service partner through its own service operations, will then, at its sole discretion, either repair the defective product or replace it with the same or a comparable product.
What is not covered under this guarantee?
• Normal wear and tear.
- Deliberate or negligent damage, damage caused by failure to observe operating instructions, incorrect installation or by connection to the wrong voltage, damage caused by chemical or electro-chemical reaction, rust, corrosion or water damage including but not limited to damage caused by excessive lime in the water supply, damage caused by abnormal environmental conditions.
- Consumable parts including batteries and lamps.
• Non-functional and decorative parts which do not affect normal use of the appliance, including any scratches and
possible color differences.
- Accidental damage caused by foreign objects or substances and cleaning or unblocking of filters, drainage systems or soap drawers.
- Damage to the following parts: ceramic glass, accessories, crockery and cutlery baskets, feed and drainage pipes, seals, lamps and lamp covers, screens, knobs, casings and parts of casings. Unless such damages can be proved to have been caused by production faults.
- Cases where no fault could be found during a technician's visit.
- Repairs not carried out by our appointed service providers and/or an authorized service contractual partner or where non-original parts have been used.
• Repairs caused by installation which is faulty or not according to specification.
- The use of the appliance in a non-domestic environment i.e. professional use.
- Transportation damages. If a customer transports the product to their home or other address, IKEA is not liable for any damage that may occur during transport. However, if IKEA delivers the product to the customer's delivery address, then damage to the product that occurs during this delivery will be covered by this guarantee.
- Cost for carrying out the initial installation of the IKEA appliance. However, if an IKEA service provider or its authorized service partner repairs or replaces the appliance under the terms of this guarantee, the service provider or its authorized service partner will re-install the repaired appliance or install the replacement, if necessary.
This restriction do not apply to fault-free work carried out by a qualified specialist using our original parts in order to adapt the appliance to the technical safety specifications of another EU country.
How country law applies
The IKEA guarantee gives You specific legal rights, which covers or exceed local demands. However these conditions do not limit in any way consumer rights described in the local legislation
Area of validity
For appliances which are purchased in one EU country and taken to another EU country, the services will be provided in the framework of the guarantee conditions normal in the new country. An obligation to carry out services in the framework of the guarantee exists only if the appliance complies and is installed in accordance with:
- the technical specifications of the country in which the guarantee claim is made;
• the Assembly Instructions and User Manual Safety Information;
The dedicated After Sales Service for IKEA appliances:
Please do not hesitate to contact IKEA After Sales Service to:
- make a service request under this guarantee;
- ask for clarification on installation of the IKEA appliance in the dedicated IKEA kitchen furniture. The service won't provide clarifications related to:
- the overall IKEA kitchen installation;
-
connections to electricity (if machine comes without plug and cable), to water and to gas since they have to be executed by an authorized service engineer.
-
ask for clarification on user manual contents and specifications of the IKEA appliance.
To ensure that we provide you with the best assistance, please read carefully the Assembly Instructions and/or the User
Manual section of this booklet before contacting us.
How to reach us if You need our service
Please refer to the last page of this manual for the full list of IKEA appointed contacts and relative national phone numbers.
Important! In order to provide You with a quicker service, we recommend that You use the specific phone numbers listed at the end of this manual. Always refer to the numbers listed in the booklet of the specific appliance You need an assistance for. Before calling us, assure that You have to hand the IKEA article number (8 digit code) for the appliance of which you need our assistance.
Important! SAVE THE SALES RECEIPT!
It is Your proof of purchase and required for the guarantee to apply. Note that the receipt reports also the IKEA article name and number (8 digit code) for each of the appliances you have purchased.
For any additional questions not related to After Sales of your appliances. Please contact our nearest IKEA store call centre. We recommend you read the appliance documentation carefully before contacting us.
Verzeichnis
L1 = Braun
L2 = Schwarz
N1 = Blau
N2 = Blau
⊕ = Gelb / Grün
L1 = Braun
L2 = Schwarz
N = Blau
⊕ = Gelb / Grün
L1 = Braun
L2 = Schwarz
N1 = Blau
N2 = Blau
+ = Gelb / Grün
Produktbeschreibung
L1 = Marron
L2 = Noir
N1 = Bleu
N2 = Bleu
= Jaune/Vert
flowchart
graph TD
    A["1"] --> B["2"]
    B --> C["3"]
    C --> D["4"]
L1 = Marrone
L2 = Nero
N1 = Blu
N2 = Blu
⊕ = Giallo / Verde
Elektrisk tilslutning
L1 = Brun
L2 = Sort
N1 = Blå
N2 = Blå
+ = Gul / Grøn
Tilslutningsskema for produktet.
Tryk på ⏰
Billedet viser apparatets typeskilt.
L1 = Brun
L2 = Sort
N1 = Blå
N2 = Blå
= Gul/Grønn
Sähköliitäntä
L1 = ruskea
L2 = musta
N1 = sininen
N2 = sininen
Elanslutning
L1 = Brun
L2 = Svart
N1 = Blå
N2 = Blå
⊕ = Gul / Grön
Kopplingsschema produktsidan.
Rafmagnstenging
L1 = Brúnn
L2 = Svartur
N1 = Blár
N2 = Blár
=Gulur / Grænn
Tengimynd, vöruhlið
bar
| Product | Code | Price (EUR) |
|---------|------|-------------|
| KOLSTAN | 805.594.66 | 23199 |
| UKCA | Type: 7000 | 9000061689 |
| UKCA | Ref:108001584B R011G2 UI - | 009000061689Z1514033 |
| IKEA | Imported to GB by: IKEA Ltd., 100 Avebury Boulevard, Milton Keynes, United Kingdom, MK9 1FH | 108.0688.771 |
| IKEA | Made in Italy | 108.0688.771 |
| IKEA | 108.0688.771Z1514033 | 108.0688.771 |

Ligação elétrica
L1 = Castanho
L2 = Preto
N1 = Azul
N2 = Azul
= Amarelo / Verde
Insira shunts de corrente entre os terminais como mostrado.
A garantia cobre as avarias do aparelho
Conexión eléctrica
⊕ = Amarillo / Verde
220V - 240V 2N ∼ NL
L1 = Marrón
L2 = Negro
N1 = Azul
N2 = Azul
⊕ = Amarillo / Verde
flowchart
graph TD
    A["1"] --> B["2"]
    B --> C["3"]
    C --> D["4"]
Ηλεκτρική σύνδεση
L1 = Καφέ
L2 = Maúpo
N1 = Mπλε
N2 = Mπλε
Πατήστε ①
L1 = Bruin
L2 = Zwart
N1 = Blauw
N2 = Blauw
⊕ = Geel / Groen
L1 = Brązowy
L2 = Czarny
N1 = Niebieski
N2 = Niebieski
+ = t o - Z i e l o n y
Elektrik bağlantısı
L1 = Kahverengi
L2 = Siyah
N1 = Mavi
N2 = Mavi
= Sarı / Yeşil
L1 = hnedá
L2 = čierna
N1 = modrá
N2 = modrá
= žltá / zelená
Elektros prijungimas
L1 = Rudas
L2 = Juodas
N1 = Mélynas
N2 = Mélynas
⊕ = Geltonas / žalias
Prijungimo schema ant produkto šono.

L1 = коричневий
L2 = чорний
N1 = синий
N2 = синий
L1 = Hnědý
L2 = Černý
N1 = Modrý
N2 = Modrý
+ = Zlutý/zelený
L1 = Barna
L2 = Fekete
N = Kék
⊕ = Sárga / Zöld
220V - 240V 2N \~ NL
L1 = Barna
L2 = Fekete
N1 = Kék
N2 = Kék
⊕ = Sárga / Zöld
bar
| Model | Value | Description |
|-------|-------|-------------|
| KOLSTAN | 105.594.60 | 23199 |
| KEA | Not specified | Not specified (not labeled) |
| UK | Not specified | Not specified (not specified) |
| Algeria | Not specified | Not specified (not specified) |
| Italy | Not specified | Not specified (not specified) |
| Belgium | Not specified | Not specified (not specified) |
| Spain | Not specified | Not specified (not specified) |
| France | Not specified | Not specified (not specified) |
| Germany | Not specified | Not specified (not specified) |
| Netherlands | Not specified | Not specified (not specified) |
| Poland | Not specified | Not specified (not specified) |
| Czech Republic | Not specified | Not specified (not specified) |
| Hungary | Not specified | Not specified (not specified) |
| Romania | Not specified | Not specified (not specified) |
| Bulgaria | Not specified | Not specified (not specified) |
| Serbia | Not specified | Not specified (not specified) |
| Malta | Not specified | Not specified (not specified) |
| Cyprus | Not specified | Not specified (not specified) |
| Latvia | Not specified | Not specified (not specified) |
| Lithuania | Not specified | Not specified (not specified) |
| Estonia | Not specified | Not specified (not specified) |
| Croatia | Not specified | Not specified (not specified) |
| Slovenia | Not specified | Not specified (not specified) |
| Montenegro | Not specified | Not specified (not specified) |
| Belarus | Not specified | Not specified (not specified) |
| Ukraine | Not specified | Not specified (not specified) |
| Iceland | Not specified | Not specified (not specified) |
| Norway | Not specified | Not specified (not specified) |
| Sweden | Not specified | Not specified (not specified) |
| Finland | Not specified | Not specified (not specified) |
| Denmark | Not specified | Not specified (not specified) |
| Iceland | 108.0688.728 | Made in Italy |
| Iceland | 108.0688.728Z1514034 | Made in Italy |
| Iceland | 108.0688.728Z1514034 | Made in Italy |
| Iceland | 108.0688.728Z1514034 | Made in Italy |
| Iceland | 108.0688.728Z1514034 | Made in Italy |
| Iceland | 108,0688.728Z1514034 | Made in Italy |
| Iceland | 108,0688.728Z1514034 | Made in Italy |
| Iceland | 108,0688.728Z1514034 | Made in Italy |
| Iceland | 108,0688.728Z151,4034 | Made in Italy |
| Iceland | 108,0688.728Z151,4034 | Made in Italy |
| Iceland | 108,0688.728Z151,4034 | Made in Italy |
| Iceland | 108,0688.728Z151,4034 | Made in Italy |
The chart contains two sets of data: one for the first label and one for the second label. The first label contains the same label and the second label contains the same label. The second label contains the same label and the second label contains the same label. The third label contains the same label and the third label contains the same label. The fourth label contains the same label and the fourth label contains the same label. The fifth label contains the same label and the fifth label contains the same label. The sixth label contains the same label and the sixth label contains the same label. The seventh label contains the same label and the seventh label contains the same label. The eight labels contain the same label and are not explicitly provided in the image. The last label contains the same label and is not explicitly provided in the image.
L1 = Кафяв
L2 = Черен
N1 = СИН
N2 = Син
=Жълт/Зелен
Legături electrice
L1 = Maro
L2 = Negru
N1 = Albastru
N2 = Albastru
⊕ = Galben / Verde
flowchart
graph TD
    A["1"] --> B["2"]
    B --> C["3"]
    C --> D["4"]
bar
| Model | Value | Description |
|-------|-------|-----------|
| KOLSTAN | 105.594.60 | 23199 |
| KEA | (Not labeled) | (Not labeled) |
| UK | (Not labeled) | (Not labeled) |
| CE | (Not labeled) | (Not labeled) |
| Type | 7000 | Ref:108001 58 4B R01 1G2 UI - |
| UK | (Not labeled) | (Not labeled) |
| Class I | (Not labeled) | (Not labeled) |
| Added to GB by: IKEA Ltd., 100 Avebury Boulevard, Milton Keynes, United Kingdom, MK9 1FH | 108.0688.728 | Imported to GB by: IKEA Ltd., 100 Avebury Boulevard, Milton Keynes, United Kingdom, MK9 1FH |
| Output | 108.0688.728Z1514034 | (Output) |
| Label | 9000061700 | 009000061700Z1514034 |
| Label | 9000061700 009000061700Z1514034 | (Output) |
| Label | 108.0688.728Z1514034 | (Output) |
The label 'Made in Italy' appears twice in the image.
Important! PĂSTRATI BONUL FISCAL!
L1 = Smeda
L2 = Crna
N1 = Plava
N2 = Plava
+ = Zuto / zelena
Dijagram povezivanja na strani proizvoda.

Opis proizvoda
1 Pojedinačna zona za kuhanje (200 mm) 2300 W, s funkcijom Booster od 3000 W.
2 Pojedinačna zona za kuhanje (145 mm) 1400 W, s funkcijom Booster od 1850 W.
3 Pojedinačna zona za kuhanje (210 x 190 mm) 2100 W, s funkcijom Booster od 3000 W.
4 Pojedinačna zona za kuhanje (210 x 190 mm) 2100 W, s funkcijom Booster od 3000 W.
5 Kontrolna ploča
3 + 4 Zona kuhanja s mogućnošću kombiniranja (210 x 380 mm) 3000 W, s funkcijom Booster 3700 W.
Indikatori
Prepoznavanje prisutnosti lonca
L1 = Rjav
L2 = Črn
N1 = Moder
N2 = Moder
= Rumen / Zelen
Л1 = Браон
Л2 = Црна
H1 = Плава
H2 = Плава
⊕ = Жуто / зелена
L1 = brūns
L2 = melns
N1 = zils
N2 = zils
= dzeltens/za|š
Elektriühendus
L1 = pruun
L2 = must
N = sinine
⊕ = kollane/roheline
220V - 240V 2N \~

L1 = pruun
L2 = must
N1 = sinine
N2 = sinine
= kollane/roheline
Toote kirjeldus