
DML810 - Lighting MAKITA - Free user manual and instructions
Find the device manual for free DML810 MAKITA in PDF.
| Product Type | LED Construction Light |
| Brand | Makita |
| Model | DML810 |
| Light Source | 202 LEDs of 0.2 W each |
| Luminous Flux (max) | 5,500 lm |
| Luminous Flux (medium) | 3,000 lm |
| Luminous Flux (min) | 1,500 lm |
| AC Power Supply | 100-240 V AC, 50/60 Hz |
| Battery Power Supply | 14.4 V DC or 18 V DC (Li-ion) |
| Compatible Batteries | BL14xx, BL18xx (Makita series) |
| Runtime (BL1860B x2, 5500 lm) | 4 hours |
| Runtime (BL1860B x2, 1500 lm) | 18 hours |
| Max Number of Interconnected Devices | 8 |
| Dimensions (L x W x H) | 420 x 420 x 787 mm |
| Weight (without battery or cord) | 13.9 kg |
| Protection Rating (DC) | IP54 |
| Protection Rating (AC) | IP20 |
| Operating Temperature | 0 °C to 40 °C |
| Storage Temperature | -20 °C to 60 °C |
| Adjustable Lighting Zones | Yes (multiple selectable zones) |
| Brightness Variation | 3 levels (5500/3000/1500 lm) |
| AC Output for Interconnection | Yes (power outlet) |
| Transport Handle | Yes |
| Anti-Theft Lock Hole | Yes |
| Overload Protection | Circuit breaker with reset button |
Frequently Asked Questions - DML810 MAKITA
User questions about DML810 MAKITA
0 question about this device. Answer the ones you know or ask your own.
Ask a new question about this device
Download the instructions for your Lighting in PDF format for free! Find your manual DML810 - MAKITA and take your electronic device back in hand. On this page are published all the documents necessary for the use of your device. DML810 by MAKITA.
USER MANUAL DML810 MAKITA
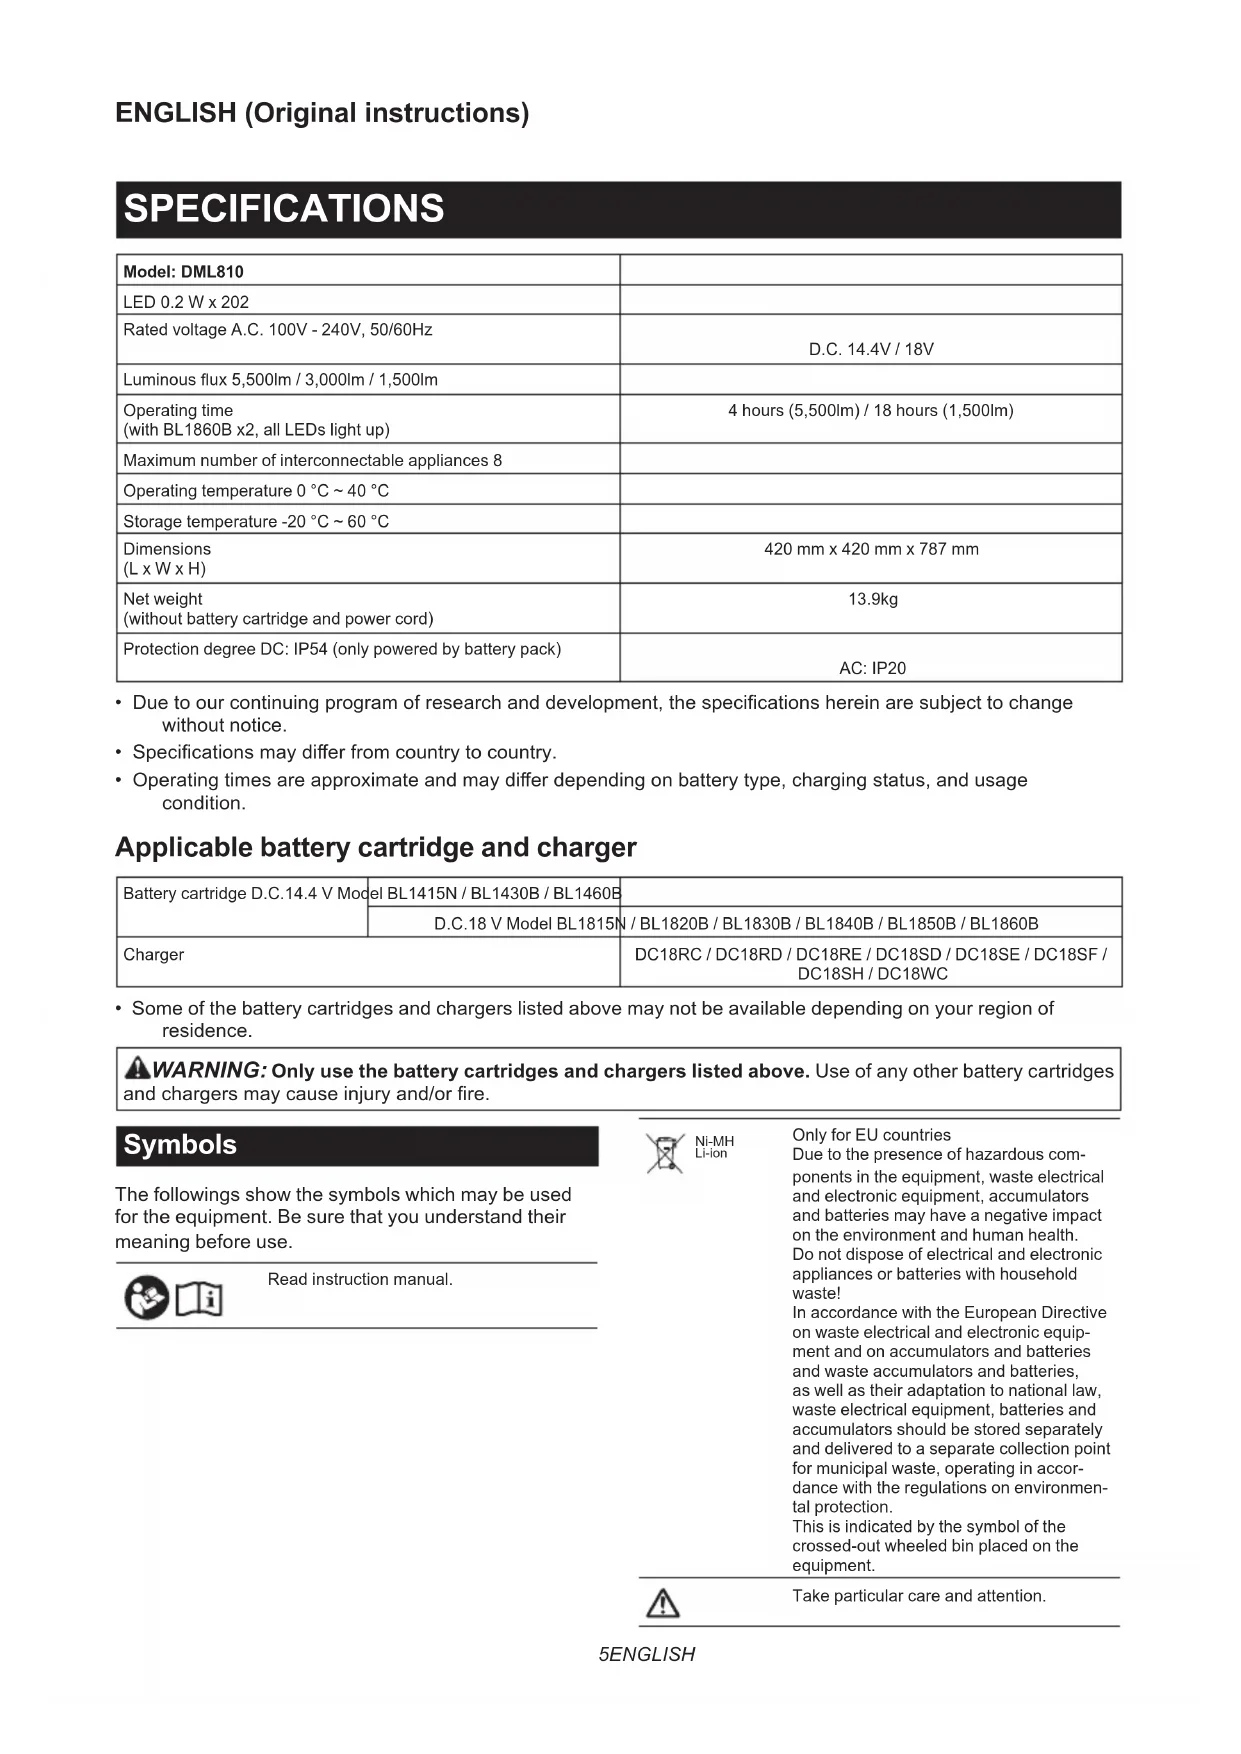
| Model: DML810 | |
| LED 0.2 W x 202 | |
| Rated voltage A.C. 100V - 240V, 50/60Hz | D.C. 14.4V / 18V |
| Luminous flux 5,500lm / 3,000lm / 1,500lm | |
| Operating time (with BL1860B x2, all LEDs light up) | 4 hours (5,500lm) / 18 hours (1,500lm) |
| Maximum number of interconnectable appliances 8 | |
| Operating temperature 0 °C ~ 40 °C | |
| Storage temperature -20 °C ~ 60 °C | |
| Dimensions (L x W x H) | 420 mm x 420 mm x 787 mm |
| Net weight (without battery cartridge and power cord) | 13.9kg |
| Protection degree DC: IP54 (only powered by battery pack) | AC: IP20 |
- Due to our continuing program of research and development, the specifications herein are subject to change without notice.
- Specifications may differ from country to country.
- Operating times are approximate and may differ depending on battery type, charging status, and usage condition.
Applicable battery cartridge and charger
| Battery cartridge D.C.14.4 V Model | EL BL1415N / BL1430B / BL1460B | |
| D.C.18 V Model BL1815N / BL1820B / BL1830B / BL1840B / BL1850B / BL1860B | ||
| Charger | DC18RC / DC18RD / DC18RE / DC18SD / DC18SE / DC18SF / DC18SH / DC18WC | |
- Some of the battery cartridges and chargers listed above may not be available depending on your region of residence.

WARNING: Only use the battery cartridges and chargers listed above. Use of any other battery cartridges and chargers may cause injury and/or fire.
Symbols
The followings show the symbols which may be used for the equipment. Be sure that you understand their meaning before use.


Read instruction manual.

Ni-MH Li-ion
Only for EU countries
Due to the presence of hazardous components in the equipment, waste electrical and electronic equipment, accumulators and batteries may have a negative impact on the environment and human health.
Do not dispose of electrical and electronic appliances or batteries with household waste!
In accordance with the European Directive on waste electrical and electronic equipment and on accumulators and batteries and waste accumulators and batteries, as well as their adaptation to national law, waste electrical equipment, batteries and accumulators should be stored separately and delivered to a separate collection point for municipal waste, operating in accordance with the regulations on environmental protection.
This is indicated by the symbol of the crossed-out wheeled bin placed on the equipment.

Take particular care and attention.
| Optical Radiation (UV and IR). Minimize exposure to eyes or skin. | |
| Do not stare at operating lamp. | |
| Use appropriate shielding or eyes protection. | |
| Do not use the appliance in the rain or snow when using with AC power. | |
| Breaker restart button. |
Remark
This product contains light sources of energy efficiency class < C > and < D > .
Power supply
The tool should be connected only to a power supply of the same voltage as indicated on the nameplate, and can only be operated on single-phase AC supply. This tool should be grounded while in use to protect the operator from electric shock. Use only three-wire extension cords which have three-prong grounding-type plugs and three-pole receptacles which accept the tool's plug.
SAFETYWARNINGS
IMPORTANT SAFETY INSTRUCTIONS
WARNING: Read all safety warnings and all instructions. Failure to follow the warnings and instructions may result in electric shock, fire and/or serious injury.
READ AND FOLLOW ALL SAFETY INSTRUCTIONS.
- When the appliance is not in use, always switch off, and unplug / remove the battery cartridge from the appliance.
- Do not cover the lamp, or clog the vent of the appliance with cloth or carton, etc. Otherwise it may cause a flame.
- When using the appliance with AC power, do not use the appliance in damp or wet locations.
- Do not expose the appliance to rain or snow. Never wash it in water.
- Do not use the appliance in explosive atmospheres, such as in the presence of flammable liquids, gases or dust.
- Appliance plugs must match the outlet. Never modify the plugs in any way. Use of unmodified plugs and matching outlet will reduce risk of electric shock.
-
When operating the appliance, avoid body contact with earthed or grounded surfaces such as pipes, radiators, microwave ovens, or refrigerators. There is an increased risk of electric shock if your body is earthed or grounded.
-
Do not abuse the cord. Never use the cord for carrying, pulling or unplugging the appliance. Keep cord away from heat, oil, sharp edges or moving parts. Damaged or entangled cords increase the risk of electric shock.
- If the external flexible cable or cord of this luminaire is damaged, it shall be replaced by a special cord or cord exclusively available from the manufacturer or his service agent.
- Do not stare at the source of light directly.
- Do not handle the plug with wet or greasy hand.
- Always place the appliance on a level and stable place. Otherwise a falling accident may occur.
- Always place the appliance in upright position.
- The light source contained in this luminaire shall only be replaced by the manufacture or his service agent or a similar qualified person.
- Do not leave the power cord disconnected from the appliance while the power is supplied from an outlet. Doing so might cause an electric shock.
- Do not use the carrying handle any other purpose than carrying the appliance, such as hoisting.
- Do not expose the appliance to sparks or corrosive atmosphere, etc.
Battery tool use and care
- Recharge only with the charger specified by the manufacturer. A charger that is suitable for one type of battery pack may create a risk of fire when used with another battery pack.
- Use power tools only with specifically designated battery packs. Use of any other battery packs may create a risk of injury and fire.
- When battery pack is not in use, keep it away from other metal objects, like paper clips, coins, keys, nails, screws or other small metal objects, that can make a connection from one terminal to another. Shorting the battery terminals together may cause burns or a fire.
- Under abusive conditions, liquid may be ejected from the battery; avoid contact. If contact accidentally occurs, flush with water. If liquid contacts eyes, additionally seek medical help. Liquid ejected from the battery may cause irritation or burns.
- Do not use a battery pack or tool that is damaged or modified. Damaged or modified batteries may exhibit unpredictable behaviour resulting in fire, explosion or risk of injury.
- Do not expose a battery pack or tool to fire or excessive temperature. Exposure to fire or temperature above 130^ may cause explosion.
- Follow all charging instructions and do not charge the battery pack or tool outside the temperature range specified in the instructions. Charging improperly or at temperatures outside the specified range may damage the battery and increase the risk of fire.
SERVICE
- This appliance service must be performed only by qualified repair personnel. Service or maintenance performed by unqualified personnel could result in a risk of injury.
- When servicing this appliance, use only identical replacement parts. Use of unauthorized parts or failure to follow maintenance instructions may create a risk of electric shock or injury.
- Do not incinerate this appliance, even if it is severely damaged. The batteries can explode in a fire. Dispose of the appliance in accordance with the local regulations.
Important safety instructions for battery cartridge
- Before using battery cartridge, read all instructions and cautionary markings on (1) battery charger, (2) battery, and (3) product using battery.
- Do not disassemble or tamper with the battery cartridge. It may result in a fire, excessive heat, or explosion.
- If operating time has become excessively shorter, stop operating immediately. It may result in a risk of overheating, possible burns and even an explosion.
-
If electrolyte gets into your eyes, rinse them out with clear water and seek medical attention right away. It may result in loss of your eyesight.
-
Do not short the battery cartridge:
(1) Do not touch the terminals with any conductive material.
(2) Avoid storing battery cartridge in a container with other metal objects such as nails, coins, etc.
(3) Do not expose battery cartridge to water or rain.
A battery short can cause a large current flow, overheating, possible burns and even a breakdown.
- Do not store and use the tool and battery cartridge in locations where the temperature may reach or exceed 50^ (122^) .
- Do not incinerate the battery cartridge even if it is severely damaged or is completely worn out. The battery cartridge can explode in a fire.
- Do not nail, cut, crush, throw, drop the battery cartridge, or hit against a hard object to the battery cartridge. Such conduct may result in a fire, excessive heat, or explosion.
- Do not use a damaged battery.
- The contained lithium-ion batteries are subject to the Dangerous Goods Legislation requirements.
For commercial transports e.g. by third parties, forwarding agents, special requirement on packaging and labeling must be observed.
For preparation of the item being shipped, consulting an expert for hazardous material is required. Please also observe possibly more detailed national regulations.
Tape or mask off open contacts and pack up the battery in such a manner that it cannot move around in the packaging.
- When disposing the battery cartridge, remove it from the tool and dispose of it in a safe place. Follow your local regulations relating to disposal of battery.
- Use the batteries only with the products specified by Makita. Installing the batteries to non-compliant products may result in a fire, excessive heat, explosion, or leak of electrolyte.
- If the tool is not used for a long period of time, the battery must be removed from the tool.
- During and after use, the battery cartridge may take on heat which can cause burns or low temperature burns. Pay attention to the handling of hot battery cartridges.
- Do not touch the terminal of the tool immediately after use as it may get hot enough to cause burns.
- Do not allow chips, dust, or soil stuck into the terminals, holes, and grooves of the battery cartridge. It may cause heating, catching fire, burst and malfunction of the tool or battery cartridge, resulting in burns or personal injury.
-
Unless the tool supports the use near high-voltage electrical power lines, do not use the battery cartridge near high-voltage electrical power lines. It may result in a malfunction or breakdown of the tool or battery cartridge.
-
Keep the battery away from children.
SAVE THESE INSTRUCTIONS.
CAUTION: Only use genuine Makita batteries.
Use of non-genuine Makita batteries, or batteries that have been altered, may result in the battery bursting causing fires, personal injury and damage. It will also void the Makita warranty for the Makita tool and charger.
Tips for maintaining maximum battery life
- Charge the battery cartridge before completely discharged. Always stop tool operation and charge the battery cartridge when you notice less tool power.
- Never recharge a fully charged battery cartridge. Overcharging shortens the battery service life.
- Charge the battery cartridge with room temperature at 10^ - 40^ (50°F - 104°F). Let a hot battery cartridge cool down before charging it.
- When not using the battery cartridge, remove it from the tool or the charger.
- Charge the battery cartridge if you do not use it for a long period (more than six months).
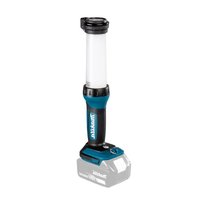
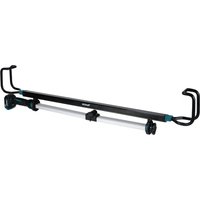
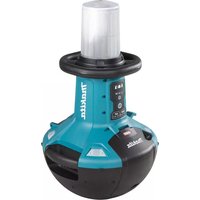
PARTS DESCRIPTION
Fig.1
| 1 | Carrying handle | 2 | Brightness indicator | 3 | Brightness change button |
| 4 | Power switch button | 5 | Lighting area change button | 6 | Hole for padlock |
| 7 | Battery cover | 8 | Cover lock | 9 | Power cord |
| 10 | Hook for power cord | 11 | Socket cover | 12 | AC outlet |
| 13 | Breaker restart button 14 AC inlet -- |
NOTE: The shape of the plug of the power cord varies from country to country.
FUNCTIONAL DESCRIPTION
CAUTION: Always be sure that the appliance is switched off and the battery cartridge is removed before adjusting or checking function on the appliance.
Installing or removing battery cartridge
CAUTION: Always switch off the appliance before installing or removing of the battery cartridge.
CAUTION: Hold the appliance and the battery cartridge firmly when installing or removing battery cartridge. Failure to hold the appliance and the battery cartridge firmly may cause them to slip off your hands and result in damage to the appliance and battery cartridge and a personal injury.
CAUTION: Be careful not to trap finger(s) between the appliance and battery cartridge when loading battery cartridge as well as between the appliance and the battery cover when closing the battery cover.
To install the battery cartridge, release the cover lock, and open the battery cover.
Fig.2: 1. Cover lock 2. Battery cover
To install the battery cartridge, align the tongue on the battery cartridge with the groove in the housing and slip it into place. Insert it all the way until it locks in place with a little click.
Then close the battery cover.
Fig.3: 1. Button 2. Battery cartridge
To remove the battery cartridge, slide it from the appliance while sliding the button on the front of the cartridge.
CAUTION: Always install the battery cartridge fully. If not, it may accidentally fall out of the appliance, causing injury to you or someone around you.
CAUTION: Do not install the battery cartridge forcibly. If the cartridge does not slide in easily, it is not being inserted correctly.
NOTE: Up to two battery cartridges can be installed, although the appliance uses one battery cartridge for operation.
Indicating the remaining battery capacity
Only for battery cartridges with the indicator
Fig.4: 1. Indicator lamps 2. Check button
Press the check button on the battery cartridge to indicate the remaining battery capacity. The indicator lamps light up for a few seconds.
| Indicator lamps | Remaining capacity | ||
| Lighted | Off | Blinking | |
| 75% to 100% | |||
| 50% to 75% | |||
| 25% to 50% | |||
| 0% to 25% | |||
| Charge the battery. | |||
| The battery may have malfunctioned. | |||
NOTE: Depending on the conditions of use and the ambient temperature, the indication may differ slightly from the actual capacity.
NOTE: The first (far left) indicator lamp will blink when the battery protection system works.
Appliance / battery protection system
The appliance is equipped with the protection system. This system automatically cuts off power to extend appliance and battery life. The appliance will automatically stop during operation if the appliance or battery is placed under one of the following conditions.
Overload protection
When the appliance is operated in a manner that causes it to draw an abnormally high current, the appliance automatically stops without any indication. In this situation, remove and install the battery cartridge when using with DC power, or push the breaker restart button when using AC power. Then turn the appliance on to restart.
Fig.5: 1. Breaker restart button
Overdischarge protection
When the battery capacity becomes low, the LED lights go out except a part of LEDs as illustrated. Then approximately five to ten minutes later, the system automatically cuts off power. In this situation, remove the battery cartridge from the appliance and charge it.
Fig.6
Hole for padlock
For anti-theft of battery cartridges, hole for padlock is provided.
Fig.7: 1. Hole for padlock
OPERATION
CAUTION: This appliance is intended for commercial use. Do not use the appliance for household purpose.
Turning on / off the appliance
Press the power switch button to turn on the appliance. Press the power switch button again to turn off the appliance.
▶ Fig.8: 1. Power switch button
NOTE: The appliance turns on at the same mode as the last setting.
Changing brightness
Press the brightness change button while the appliance is operating. The brightness decreases every time you press the brightness change button. The brightness will return to the highest when operating in the lowest brightness.
Fig.9: 1. Brightness change button
Changing lighting area
Press the lighting area change button while the appliance is operating.
Fig.10: 1. Lighting area change button
The lighting area changes every time you press the lighting area change button as illustrated.
Fig.11
Using with AC power
Optional accessory
WARNING: Never use the appliance when the cord or plug is damaged.
WARNING: Do not handle the plug with wet or greasy hand.
WARNING: Do not leave the power cord disconnected from the appliance while the power is supplied from the mains. Small children may put the live plug in their mouth and cause injury.
WARNING: Do not put the live plug or cord into your mouth. Doing so might cause an electric shock.
WARNING:Make sure that the voltage rating of the main power supply corresponds with that of the appliance.
WARNING: An outlet that is plugged must be grounded.
When using the appliance with AC power, use the power cord supplied with the appliance.
Insert the plug to AC inlet of the appliance and then insert the other end to an outlet.
Fig.12: 1. Power cord 2. Socket cover (AC inlet) 3. Plug (for the appliance) 4. Plug (for an outlet)
CAUTION: Be sure to insert the plug into the appliance first, then insert the other end to an outlet.
CAUTION: Always close the socket cover firmly when the power cord is not plugged.
NOTE: Even operating in DC power, the appliance automatically changes to AC power when the power cord plugged in.
NOTE: The AC power does not charge the battery inserted to the appliance.
NOTE: The shape of the plug of the power cord varies from country to country.
Interconnected use
Optional accessory
CAUTION: Do not connect any appliance other than DML810 to AC outlet.
CAUTION: Always use the power cord supplied with the appliance.
CAUTION: Do not interconnect appliances beyond the maximum number of interconnectable appliances specified in the instruction.
When using the appliance interconnected with other appliance, connect them with the power cord.
Insert the plug into the AC inlet of the appliance to be powered, and then insert the other end to the AC outlet of the appliance to power.
Fig.13: 1.AC outlet
NOTE: When using the appliances interconnected, operations such as turning on / off, changing brightness, and changing lighting area are not linked. Each appliance needs to be operated.
Organizing the power cord
Coil the power cord on the hook for power cord tightly.
Fig.14: 1. Power cord 2. Hook for power cord
MAINTENANCE
CAUTION: Always be sure that the appliance is switched off, unplugged, and the battery cartridge is removed before attempting to perform inspection or maintenance.
NOTICE: Never use gasoline, benzine, thinner, alcohol or the like. Discoloration, deformation or cracks may result.
To maintain product SAFETY and RELIABILITY, repairs, any other maintenance or adjustment should be performed by Makita Authorized or Factory Service Centers, always using Makita replacement parts.
OPTIONAL ACCESSORIES
CAUTION: These accessories or attachments are recommended for use with your Makita tool specified in this manual. The use of any other accessories or attachments might present a risk of injury to persons. Only use accessory or attachment for its stated purpose.
If you need any assistance for more details regarding these accessories, ask your local Makita Service Center.
- Makita genuine battery and charger
NOTE: Some items in the list may be included in the tool package as standard accessories. They may differ from country to country.
SPECIFICATIONS
ACCESSIONS EN OPTION
VEILIGHEIDSWAARSCHUWINGEN
BELANGRIJKE VEILIGHEIDSVOORSCHRIFTEN
Beveiling against ver ontladen
OPTIONELE ACCESSOIRES
▶ Fig.3: 1. Knap 2. Akku
Abra3: 1. Gomb 2. Akkumulator
DÔLEŽITÉ BEZPEČNOSTNÉ POKYNY
TIETO POKNY USCHOVAJTE.
TEXHIUHIXAPAKTEPNUCTNKN
BnKOpNCTaHH Ta o6cnyroByBaHH aKymyTOpHnx iHCTpyMeHTIB
- Npe3apJxJaTe akymyIaTOp nHwe 3a DOnOMOrO 3apJHoro npunctpo, Bka3a-Horo BnPo6HnKOM. 3apJHn npunctpi, kNn NiIXoJntb IJIr OJHO rTIny akymyIaTOpIB, MOKe npIN3BeCTn Do NOXeKi npu BnKOpncTaHHi 3 akymyIaTOpom iHoro TIny.
-
BnKOpNCToByTe eNeKTpoiHcTpymeHTN JnWe 3 aKymyIaTOpAMn TOro TnNy, AKN npn3Ha- Yehn camE dnn cux eNeKTpoiHcTpymeHTiB. BnKOpNCtAHH YA KymyJIaTOpIB INuX TnINb MOKe npn3BeCTn Do OTpMaHH TaPbM i BnHnKHeHHa IooKexi.
-
Konn akymyIaTOp He BnKOpNCToBcTbc, TpmaTe NOro Noadani BiD TaNX MeTaNEBX npedMeTIB, kCkpINK, MoHETN, KNoCu, ZbAxu, Wypyn ToIO, kI MoKyTB 3akopOTTu KNeMn akymyIaTopa. 3amukAHH KEm akymyIaTopa MOKe npn3BeCTn Do OtpMaHH onikib a6o do nokeki.
- 3a HeHaJIeKHHx yMOB 36epiraHn 3 akymyIaTopa MoKe BnteKTH pIDnHa, KOHTaKTy 3 kOIO cIid yHnKaTH. Y pa3i BnnaKOBOro notpanJHnHa pINnHa TINO BIDNObIDHy qACTHy TINA cIid npomTu BOIO. JaIO pIDnHa NotpanNa B Oci, iX cIid npomTu BOIO, nICr yORo Heo6xIdHO 3BepHyTcra Do Nikapr. PInHa, 10 BoITkAe 3 akymyIaTopa, MoKe CnpuHNHTn NOpa3HeHH a60 onIKN.
5.He KopnctyTebc akymyIaTOpom a6o IHcTpymENTOM, k6yNo 3mHeNo nn NowkoDKeHo. EKcnnyatauia akymyIaTOpib, 0io ix 6yNo nowkoDKeHO a6o Do KOHCTpykuii JkNx 6yNo BHeceHO 3miH, MoKe 6yTu He6e3neuHO IO MoKe cnpuHHTN NOxExky, BN6yx a6o TpaBMy. - He nidaabaTe akymyIaTOp a6o iHcTpymeHT BnINBy BORHO uHaMipHOiT TempePaTyPi. BnINB BOrHIO a6o TempePaTyPi Buue 130° C MoKe cnpuHHITn BN6yx.
- DToTpmyTeCb ycix BkazIBOK i3 3apJxHnHe 3apJxKaIte aKymyIaTOP a60 IHCTpyMeHT 3a TempePAtypn 3a MexAMn 3a3HaueHOro B IHCTpyKuII diana3OHy. HenpaBnIbHe 3apJxKaHHa60 3apJxKaHHa 3a MexAMn BkazAHO TEMpePaTyphoro Diana3OHy MOKe npN3BeCTn Do NOWkoJxHe HnAkyJIaTOpa N iINBnIHTn He6e3NeKy 3aMaHHa.
OBCLNYTOBYBAHNA
- Cepbiche 6cbnyrobyBaHHa npnaay Mae BnKohyBataCnAne KbaJIiΦIKOBaHUM peMOHTHM nepcoHaIOM.Cepbiche a6o TexHiue 6cbnyroByBaHHa npnaady nepcoHaJOM, 0 He Mae HaJeXHoI KBaJIiΦikaJI, MoKe npNBecTn Do TpaBM.
2.ПдчacobcnyroByBaHHn npuJaDy BnKOpncToBMyTe TINbKn iJeHTNuHi 3aunactHn.BNKOpncTaHHa HecTaHdapTHnx aactHn a6o HeDoTpumHaHHa IHCTpyKzIi 3ObcnyroByBaHHMoKyTB npu3BecTu Do TpaBM a6o ypaXeHH eNEkTpUnHM ctpymom. - 3a6bopohraeTbcra cnaHOBaTu npnla,HaBt bKaIO Bih CnIbHO N0WkoJKeHH. AkymyIaTOpN MoKyTb Bn6yXHyTu y BorHi. Ytni3yTe npnlaD 3riHo 3 BmOramM MicueBHX HopM.
Baxnbi iHctpykuii 3 6e3neKn dJa kaceTu 3 akymyIaTOPoM
- Npeed TnM JK KOpNCTyBaTnC KaceToO 3 aky MyJrTOPOm, cIi npouHTaTN Bci IHcTpkykii Ta 3acTepeXHi 3nKn 0do (1) 3apdHoro npn- CTOAkyMyJrTOpa, (2) akyMyJrTOpa Ta (3) Bnpo6IB, 0npauHOtB BiD akyMyJrTOpa.
- He po36bpaIte kaceTy 3 akymyIaTOpom i He 3mHIOte II KOHcTpkyciIO. Ie moKe npu3BecTu Io nokeki, neperpiBy a6o Bu6yxy.
- Raio nepioo po60n dyke nokopoTwaB, cnid heraiHo npnnHHTN KOpNCyBaHHa. Ce moe npn3BeCTn do BnHNKHeHH p3NKy neperpiBy, oniKy Ta HabItb Bn6xy.
-
Y pa3i notpannHnEJekTpOJity B oci cnid npomTN iX uNCToHO BOIO TO hEraiHO 3BepHyTcA do NiKApA. Ye MoKe npu3BeCTn Do BTPaTH 3OpY.
-
He 3akopoitib kaceTy 3 akymyIaTOPOM.
(1) He cniTopkataNcKJem 6yDb JKM CtpymonpoBIDHM MaTepiJOM.
(2) He cniD 36epiratn kacety 3 akymyIaTOpom y cMHOCTi 3 iHUNM MeTaJIeBIMN npEIMeTam, TaKIMN JK CBxN, MOHeTTOso.
(3) He 3aJIHuaIte KaceTy 3 akymyIaTOpom NiI dOuIeM, 3ano6iraIte KOHTaKTy 3 BOIOU.
Kopotke 3amkaHHa MoKe npn3BecTu DO NOBn 3HaHoro CtpMy, neperpiBy, MOxJIbNx Onikib Ta HabiB bnxOdy 3 naDy.
- He cnid 36epiratn BnKOpncTOByBatn iHcTpymenti kaceTy 3 akymyIaTOpom y Micux, de TempepaTypa moKe cRHyTu nnpeBnCHTN 50^ (122 F).
7.He cnid cnaIOBaTu KaceTy 3 akymyIaTOPOm, HABITb kkuo BOHa 6yJa HeoHopa3OBO NooKoDxKeHa a6o NobHicTc npaocBoHa. KaceTa 3 akymyIaTOPOm MoKe Bn6yXHyTu y BorHi. - 3a6opoheho 3a6nBaTu CBxu B KaceTy 3 akymyIaTOpOM, piaTu, naMaTu, kndaTu, BnyCKaTu KaceTy 3 akymyIaTOpOM a6o BdapTu II TBepdIm npedMeTOM. Lc MoKe npn3BecTu do noKexi, neperpiBy a6o Bu6xy.
- He cnid BnKOpncToBvBaTn nouKoJKeHn akyMylrTop.
- Jitin-iohhi akymyIaTOpN, 0oMiCTbCBAHCTpyMeHti, MaOTb BiIDNoBIdaTn BmOram3aKOHIB npo He6e3neHi TOBApN.
Плд ус Транспортуваань 3а дОиOMою KOMepuHINx npebe3eHb, HanpNKJaI 3aanyaHHaM TpeTboi CTopoHn Ta EKcneIHTOpIB, Heo6xIDHO DToPmYBaTncb OO6JIINBnx BUMOR, BkA3aHnx Ha nakyBaHHi y MapkyBaHHi.
Плд ac NiDrOTyBaHnno3uII Do BiInpabIeHnHa Heo6xIDNo npOKOHcyNbTyBaTncb 3i CneIaIcTOM 3 He6e3NeuHn MaTepiAnib. Kpim TorO, cIiD BVKOHyBaTn 6iNbSdoKNaDiHaIoHaJIbHi HacTaHOBn, RaKIO taki e.
3akNeIte BiIDkpNTI KOHTKn CTpIckOHO a60 3axoBaIte ix I 3anaKyIte akMyJrTOp TaKIM YHOM, 5O6 Bin He mir pyxaTncB NakyBaHHi.
11.ДЯутNiI3auii kaceTu 3akymyIaTOPOM BnTARHITb II 3InCTpyMeHTa Ta yTuNl3yUTe 6e3neuHm CnOcO6oM.DOTpMMyTEcH HOpM MicueBOrO 3aKOHoDaBCCTBa UoDo yTuNl3auii akymyIaTOPiB.
12. BnKOpncToByTe aKymJrTopn Nnwe 3 Bnpo6amn, yka3aHmM KOMnAhiCIO Makita. YcTaHOBHeHHaKymJrTopiB y HeBiNObiDiHi Bnpo6n MoKe npu3BeCTn Do noXeKi, HAdMpHoro HarpiBaHH, Bb6yHy nBtOKy eNeKTpOniity.
13. RaKIO iHCTpymENTOM He KOpNcTyBaTHMyTbCn npOTyROM TpNBaJOrO nepioy yacy, BnMITb akymyIaTOP 3 iHCTpymENTa.
14.ПдчacicnlaBVKOpncTaHnKaCeta3akymyIЯTOPOMMOKeHarpiBaTnca,IOMOKeCTaTN npuHHoOnikIBa6OHN3bKOTempeNepaTyPhNX onikIB.BybTeobepexHi ndacNOBOJxehn3 rapauoKaceto3akymyIЯTOPOM.
15. He TopkaTecKa KOHTaKtIb IHCTpyMeHa BIDpa3y nICJBA NKOpNCTaHH, OCKJIbKn BIH MOKe 6yTN DOcNTb rapYHM, 0oB BnKJlnKaTH OnIKN.
- He donyckaIte, 06 yamKn, nI a6o 3emn npnnnna nn do kOntakTIB, OTbOpiB i na3iB Ha Kaceti 3 akymyJrTopom. Lc moKe np3BeCtn Do nepeRpiBy, 3aMmHn, Bu6yxy Ta BxOyo 3 NaDy IHCTpyMeHTa a6o KaceTN 3 akymyJrTopom i cnpuHHnTo onIKn a6o TpaBMn.
- RaKIO iHCTpymEn He po3paxObaHo Ha BnKOpnCTaHHNo6N3y BnCOKOBoThnx NiHi eNeKTponepeau, He BnKOpNCTOByte KaceTy 3 aKymJrTopom No6N3y BnCOKOBoThnx NiHi eNeKTponepeau. Lc MoKe np3BeCt N Do HecnpabHocTi, NOIOMKn IHCTpymEnTa a6o KaceTn 3 aKymJrTopom.
- TpmaTe akymyIaTOp y HeoctynHOMy dna Diteu Micui.
36EPIAITE LIBKA3IBKN.
OBEPEXHO: BnKOpncToByte TInbKn aKyMy- JIaTOpN Makita. BnKOpncTaHHa akymyJrTopiB, iHxix HIX opriHaJIbHi akymyJrTopiN Makita, a6o akymyJrTopiB, KOcCTpyKciIO kNx 6yNo 3mHeHO, MoKe np3BeCTn Do Bn6Byx akymyJrTopa i CnpuHHTn NoKExy, TpaBMy a6o noUkoDjKeHHa. Y 3B'3kY 3 cMm TaKoK 6yde anhBoaHo rapaHTIO Makita Ha IHCTpymeHt Makita i Ha 3apdHn npctpii.
Iopadn 3 3a6e3neueHnMaKcNMaJbHorO cTpOKy ekCnIyaTauii akymyIaTopa
- KaceTy 3 akymyIaTOPom cniD 3apJxKATn Do TORO, kB HPO3PAnTbCn NOBHCtH. 3aBXKn CnID 3ynHnTn PO60Ty IHCTpMeHTa Ta 3apA DNTu akymyIaTOP, kkuo BN NOMITnN 3MeHN HeHH NoTyXHoCTi IHCTpMeHTa.
- Hikon He cnid 3apnKATN NOBTOPO NOBHCTIO 3apnKcEHy Kacety 3akymyIaTOPOM.Ipe3apnKeHHckopooyc cPOK ekCnnyataaikymyIaTopa.
- 3apnKaTe KaceTy 3akymyIaTOpom npn KimHaTHiH TemnepaTypi 10^ - 40^ (50^ - 104^) Ipeed TmM Jk 3apJxKaTu KaceTy 3 akymyIaToPOM, cniD 3aueKaTu, DOKN BOHa OXOJIoHe.
- KOnKaceta3akymyIaTOpOMHeBnKOpNCTOBycTBc, BnMaTe ii 3 iHcTpMeHTa a6o 3apAHorO npCtpoU.
- RaKuo KaceTa 3 akymyIaTOpom He BnKOpncToBByBaJacr TpNBaJIn Yac (noHaJ WicTb Micra-izB), II cNl3apdntn.
ONIC DETAJEIN
Pnc.1
Pnc.4: 1. INdkaTophi Jann2. Khonka nepeBipkN
HaTnchItb KhONky nepeBipKn Ha kaceti 3 akymyIaTOpom dIa BINO6paXeHHa 3aJIuWkoBOr o pecypc akyMnyIa-Topa. HndkaToPHi NaMn 3aropTaBc Ha KInbKa ceKyHd.
PIMMITKA: 3aIexHo BiD yMOB BnKOpncTaHH Ta TempepaTpyo OTOuyUOHO CEpeoBOuHa NOKa3aHH MoKyTb He3Haunm YHOM BiDiPi3HrTNC Bd DiiCHOro pecypcy.
3axnct BiD haMipHoro po3pIxKeHHa
Y pa3i BuuepepnaHraJy akymyIaTopa CbITNOIOHIn iHNkATOpn rachTy, 3a BuHrTKOM DeKnx CbITNOIOIDIB, ROKa3aHO Ha pucHyK. NToIM, np6bn3Ho uepe3 5-10 XBnHn, cnCTema ABTomTuHo BiKKnOHTb KINBHeHH. Y ciu CUYaQII BNTARHiTb KaceTy 3 akymyIaTOpom i3 npncTpOu HzapdItb II.
Pnc.6
OTBip dJa 3aMka
BnKOpncTaHn3XnVBJIeHHaM BiId Mepeksi 3MiHHoro cTpymy
Dodamkoepnpuaadda
ANONEPEDKEHHr:HeBnKOpncTOByTe npna,raKIO WHyp XnVBneHHa BNky noWkoDKeHo.
ANONEPEJXEHH:He TopkaTecBnKn MOKPOUyMaCHOIO pyKOHO.
A NOPEPDXEHH: He 3aIiwaTe uHyp XnBJIeHH NiKIIuOeHm Do MepeXi BiD'cHaHN M Bi npuaNy. Mani DiTu MoKyb y3rTu BNky, 10 nepe6yBa e Ni d HappyroIO, 10 poTa, 10 pni3BeDe DO TpaBMvBaHH.
ANONEPEJXEHHr:He6epitbdo pota shyp a6o Bnky nId HanpyroIO. Lc MoKe npN3BecTn do ypaXeHHra eNEKTPuHIM CTpyMOM.
ANONEPEDXEHH:PepeKoHaTeC8B TOMy,0 Hanpyra MepeXi BiNoBidaac npaMeTpam npucTroO.
ANONEPEJXEHHr:Po3eTKa,do koi niD'cHaHO BnIKy,Mac 6yTu 3a3emneHa.
PiJ cac po60n BiD MepeKi 3MiHoro CTpyMy BIKOPnCTOByIe UHyp KINBHeHHa OIO Ie B KOMNKeTl. BCTABTe BNky y BXid 3MiHoro CTpyMy npCtpoIu BCTABTe BNKy Ha iHwOmy KINCi B po3ETky.
Pnc.12: 1. Hyp xnbHnna 2. Kpnka rHizda (Bxid 3miH. cTpymy) 3. Bnka (Jnra npncptpo) 4. Bnka (Jnra pozetkn)
OBEPEKHO: CnoaKy BCTaBTe BNky B npncptpi, nicra zboro BcTaBTe BNky Ha iHwomy KInci B po3eTKy.
AOSEPEXHO:3aBxDn uiNbHO 3akpNaBte KpnkU rhizda, kOnu Hyp xNBHeH He nid'cHaHo.
PIMITKA: Habitb niac pobotn BiD jkepe na noctiHoro ctpmy npictpi ABtomTuHO nepemukaetcbraHa po6Oy biD mepeksi 3miHHoro ctpmy 3a niKIOueHHuHypa.
PIMITKA: Jxepeno 3miHHoro CTpyMy He 3a6e3neue3apJkaHnAkyMylTopa, BCTabNeHOrB npiNaI.
PIMITKA:ΦOpMa BnIKN Ha IUnHypi JINBNeHHa MoKe pi3HHTNc4 3aJIeKHO Bi KpaIHn.
BnKOpncTaHnB 3aem03'cHaHnx npncTpoIB
Dodamkoepnpunaadda
OBEPEXHO: He niD'eHnyTe xoAnx npn-ctpoiB, okpim DML810, do po3etkn 3miHHoro ctpymy.
O6EPEXHO:BnKOpncTOByTe TINbKN WHyp KINBHeHH, kNIOCTaBJIeTcBc 3 npNJAdOM.
OSEPEXHO: He 3'eDHyTe pa3om 6Ibwe npictpoIB, HIX yka3aHO B IHCTpyKci.
Пд ус викорпостангу 3' endahnx npuctpoB 3' endhyte ix shypom kNBleHH.
BctaBte Bnky y Bxid 3miHHoro ctpymy npncptoIO,do koro notpi6HO noDaTN XNBHeHH, i BCTaBTe BNky 3 IHoro KInu B po3eTKy 3MiHHoro ctpymy npncptoIO dny XNBneHH.
Puc.13: 1. P03etka 3MiHHoro ctpymy
PIMITKA:Пд уac ВИКОпстання 3' endanx npictpoiB onepaui, HanpNKnad yBIMKHeHHa / BIMKHeHHa, 3MiHHeHHЯ RckpAbOcTi n 3MiHHeHH o6nacti OCBITNeHHa, He BIVKOHyOTbCЯ H BCix npicTpOax OndoHocHo. Taki onepaui Heo6XiHO BIVKOHyBaTn Ha KOKHOMy npictpoi OKpeMo.
YknaaHnHa Zhypa XNBHeHHA
JINbHOHAMOTaIteUHypXnBHeHHHa raK dIa Whyp XnBHeHH.
Pnc.14: 1. Hyp xHbneHHa 2. TaK dna shhpa XNBHeHHa
TEXHlYHE OBCJlyrOByBAHHa
OBEPEXHO: NepeBnKoHaHHm nepeBipKn 06cnyroByBaHH cIid nepeKoHaTnc, 0 npuJaBnMKHeHo, a KaceTy 3 akymyJrTOpOM 3HrTO.
YBAG: HikoJIH He BnKOpNCToByte ra30JIH, 6eH3HH, po3piJxgyBaU, cnIPT Ta noDi6Hi peyoBHN. IX BnKOpNCtAHH MoKe npN3BeCTn Do 3MiHN KOJIbOpy, DeΦOpMaqui a6o NOrBn TpiuH.
ДязбeпeуннБE3ПЕКТаHДИHOCTI npo-укii, ii peMOHT, a TAKOx po60Tu 3 obcnyroByaHHa6peyIIOBaHHЯ NOBHHI BIKOHyBaTncb yNOBHOBAKeHMMa603aBOdcbKIMn cepBICHmU ceHTpAmN Makita i3 BIKOPINCTaHHaM 3aPuaCTIH BInpo6HnTBA KOMNaHII Makita.
ДОДATKOBE ПИЛадя
OBEPEXHO:Le doaTKoBe Ta donomixHe 6nadhaHH peKoMeHDoBAHO BnKOpNCTOByBAtn 3 IHCTpyMeHTOM Makita,3a3NaueHm y iin Hctpykuii 3 ecnnyatauii. BnKOpNCtHaHH 6yDb- koro IHworo DoaTKoBOrTa DonomixHo rO 6nAdHaHH MoKe CTaHOBTN He6e3neky TpaBMvaHH. BnKOpNCToByte DoaTKoBe Ta donomixHe 6nAdHaHH NIIwe 3a npn3HaueHHM.
Y pa3i Heo6xHocT oTpMaTu Donomory B 6inbI DeTaJIbHOMy O3HaNoMNeHHI 3 OChaUeHHaM 3BepTaI-TeCb Do MicuEBOrO cepBichoro UeHTpy Makita.
OpurihbHn akymyIaTOp Ta 3apAHN npucTpiMakita
PIMITKA: DieeKeIeMeHTn CnNCKy MOxTy BxOaNTu DO KOMJIeKTy IHCTpyMeHTa JK CTaHApTHe npunaDra. BOH NMOxTy BiDiPI3HrTncr 3aJExKHO BiKpaIHn.
SPECIFICATI
Fig.7: 1. Hål for hanglas
ANVÄNDNING
NocTabrHe N3BaxDaHe Ha akymyIaTOPHaTa 6aTepe
BHUMAHNE:BnHaHn n3KJIouBaIte ypeDa npdeN noCTaBHe HnN n3BaXdaHe Ha akymyNaTOPHaTa 6aTePn.
BHIMAHNE:Korato nHctanipate nn n3Bax-date akymylatopnata 6aTepe,dpbXte 3dpaBo ypeDa n akymylatopnata 6aTepe. Ako He dbpknte 3dpaBO ypeDa n akymylatopnata 6aTepe, Te MOrat da Ce n3nbl3nat OT pbcTe BN n da DOBeDat DO NOBpeJdaHe Ha ypeDa n akymylatopnata 6aTepe nn HapaHbaHe.
BHIMAHNE:BHMaBaTe Da He npuunneTe npbcta(nte) cn Mekdy ypeDa n akymyNaTopHaTa 6atepna, KORAto noCTABraTe akymyNaTopHaTa 6atepna, KaTOn mMekdy ypeDa n Kanaka Ha 6atepna, KORAto 3aTBaprTe Kanaka Ha 6atepnaTa.
3a noctabrHe Ha akymylaTopHaTa 6aTePnIbPBO OCbo6oDeTe KIOUeTo Ha Kanaka N OTBopeTe Kanaka 3a akymylaTopHaTa 6aTePnI.
Φur.2: 1. KIIOue Ha KaNaka 2. KaNak Ha akymyta-TopHaTa 6aTePnA
3a da nocTabnte akymynatopHaTa 6aTePn, n3paBHeTe e3uHTo Ha akymyNatopHaTa 6aTePn C XNe6a B Kopnyca I rO nIb3Hete Ha MCTOTo My. BmBkHete T DOKpA, DOKaTO KIOUHaNkAra TaDbPxN Ha MCTO C neKo UpaKaBaHe.
CneTob3aTBOpTe Kanaka 3a akymlyaTophata 6atepna.
Φn.r.3: 1. ByToH 2. AkymyIaTOpHa 6aTePnIa
3a da n3BaAnTe akymyIaToPHaTa 6aTepeR, anb3HeTe n3BbH ypeDa, n1b3raKn CbueBpeMeHNo 6yToHa B npedHaT aact Ha akymyIaToPHaTa 6aTepeR.
BHIMAHHE:BunHn noCTaBnTe aKymyNaTOpHaTa 6aTePnA DOKpa.B npOTuBEN CnyaI TMOKe HEBONHO Da N3npHe OYpeDa, KOeTO MOKe DaHapAHN BAC INN HAKOIT OKOHNTe.
BHIMAHHE: He nHCTaInpaIte aKymy- naTopHaTa 6aTePnBa CbC cUnA. Ako 6aTePnraTa He ce DnXn CBO6oDHO, TRe He e 6uNa nOcTaBeHa npabnHo.
3ABENEKKA: Morat da ce noctabrt Do De bAkyMynatopn6aTePnn, Bbnpekn Ye ypeBt N3No13Ba eHa akymyNatopHa 6aTePna 3a pa6ota.
HdkaunHa ocTaBaun KaanuTeHa akymyNaTOPHaTa 6aTepn
Camo 3a akmyamopHu 6amepuu c uhdukamop
Φur.4: 1. CBeTnHHn HnDnKaTopn 2. ByToH 3a npoBepka
HaTnchete 6yToHa 3a npoBepka Ha akymylaTopHaTa 6aTePna 3a NOKa3BaHe Ha OCTabaUHs 3apJd Ha 6aTePnTa. CBeTINHHNTe INHdkaTopn Ue CBeTHat 3a HraKOJIko CeKHyDN.
| Сbvетлини по Оставаш | Заряд на батерияа | ||
| Сbvети Истrel. Мога | |||
| 75% до 100% | |||
| 50% до 75% | |||
| 25% до 50% | |||
| 0% до 25% | |||
| Зар每一天е батерияа. | |||
| Батусятаможе за празвлино. | |||
3A6ELEKKA: B 3aBucmocT O yCIOBnTa Ha yNtpe6a n OKoJHaTa Tempepatya e Bb3MOxHO NOKa-3aHnra Ta IeKo Da ce pa3JIuHaBaT O DeIcTBnteJIHnKaNaUTeT.
3A6ELEKKA:ПьрвгТ(KpaehЯВ)CBeTЛинен
ИнДИКaTOОЕМУА, KOraTOСИСTeMaTA3a3aUNTaHa
6aTePryTaФуHKUOHIPA.
Cnctema 3a 3aunTa Ha ypeDa/ akymylaTopHaTa 6aTeprna
UpeTc6aBcCnCTema3a3aunTa.Ta3n CnCTema ABTomatuHO npeKbCBA 3axpaHbaHeTO,3a Da OcnpynNo-DbNbrXNBOT Ha ypeHa n akymyIaTOPHata 6aTePna.YpeTtue cnpe abTomatuHo NO Bpeme Ha pa6ota,aKo TOn nn6aTePnra Ca noctabeHn B eHNO OT CneHNHTe CbCTOARHn.
3aunTa Cpeu npetOBapBaHe
Korato ypeTcNnON3BaNoHaunH, KOITOBDo HeoBnauHO BnCOKa KOHCmaucna Ha TOK, TOn CNIPA aBTOMaTHNO 6e3 HnKaKbA uNnKaucna. B TaKb Cny-ayn 3BaTe NocTabeTc AkyMylatOpHata 6aTePnra, KORATO n3NON3BaTe 3axpaHbAte C NoCToRHeH ToK, INn HAtncHete 6yToHa 3a PneKcbuN pectapTnpaHe, KORATO n3NON3BaTe npOMEHNIBOTOKOBO 3axpaHbaHe. CneTobA BKnIOUeTe ypeDa, 3a Da ro cTapTpate OTHBO.
Φur.5: 1. ByToH 3a npekbcbau n pectapTnpaHe
3aunTa cpeu npekomephopa3pekdaHe
Korato kanaTetbHa akymyataopHata 6aTepe naHaMaee, CBeToNDnHnTE CBeTnHHn3rCaBtOCBeH qactOT T8X, KaTo e NOKa3aHO Ha NIOCTpaunraTa. Pn6n3nteHnO nT Do Decet MNHyTn NO-KbCHO CnCTemata aBTOMaTHNO pekcbBa 3axpaHbaHeTo. B To3n cnUyai n3BaTe Ae kymyataopHata 6aTepe naYpeDa Ia3apeDeTe.
Φur.6
OTBOP 3a kaTnHap
3a npedna3BaHe ot kpaX6a Ha akymyNaTopHnTe 6aTePnn e npedBnDeH OTBOP 3a KaTnHap.
Φn.r.7: 1. OTbop 3a kaTnHap
Ekcnnoataua
BHIMAHHE:To3n ypeE npedHa3NaueH 3a npomuIeHa ynoTpe6a.He n3non3BaIte ypeDa 3a 6ntoBa ynoTpe6a.
BknouBaHe / n3KnIOUbaHe Ha ypeDa
HaTnCHHeTe KInOuHa 3axpaHbAHeTo, 3a Da BkNIOUHTe ypeJa. HATnCHHeTe KInOuHa 3axpaHbAHeTo OTHOBo, 3a Da n3KnIOUHTe ypeJa.
Φnr.8: 1. Kπιου Na 3axpaHbAHeTo
3ABENEXKA:YpeTceBKNIOUBA BnoCneHnna 3aandaen peKm.
PpomHa Ha npKocTtA
HaTnchete 6yToHa 3a npomHa Ha npKocTta,doKaTo ypeBt pa6OtHa pKocTtHa HAMJIbA npu BCaKO HaTnCKaHe Ha 6yToHa 3a npOMHa Ha npKocTta. npKocTta ige Ce BbpHe KbM Hau-BucOKOTO HBO npn pa6Ota npn Hau-HnCKa npKocT.
Φur.9: 1. ByToH 3a npomraHa Ha rpKoCTTa
PpomraHa Ha CBeteaTa 3OHa
HaTnchTe 6yToHa 3a npomHa Ha CBeteuata 3oHa, DOKaTO ypeBt pa60Tu.
Φn.r.10: 1. Byton 3a npomra Ha cBeTeaTa 3oHa
CBeTeUaTa 30Ha Ce npOMeH pRn BCaKO HaTnCKaHe Ha 6yToHa 3a IpomHa Ha CBeTeUaTa 30Ha, KaKTo e Noka-3aHO Ha INIOCTpaunraTa.
Φn1.11
I3noJ3BaHe c npOMEHnBOTOKOBO 3aXpaHbaHe
DonbHumenua akcecoapu
ANPEyPPEKDEHNE: Hkora He n3noJ3BaIte ypea, Korato ca noBpeHn Ka6bT nn nenceBt.
ANPENEYNPEXKDEHNE:He nunaiTe uencena c MOKpa nn HaMaCNeHa PbKa.
A PEPENPEXDEHNE: He octabnTe 3axpaHbau nkaen OTkayeh OT ypea,doKaTo ce noDaBa 3axpaHbAhe OT eNektpueckata MPeka. ManKeIte deca MoKe da noctabTt cencena B yctata cn da nonyat HapaHbaHe.
A PEPENPEXEHN: He noctabraTe ence na nn Ka6ena B yctata cn, Korato ca nOd HanpeXeHne. B npOTnBEn cnyaM MoKe da ce noJyN eJIeKTPnueckn ynap.
ANPENEYNPEXKDEHNE:YBepete ce,ye HaneXeHHeTO Ha Mpekata CbOTBeTCTBa HA TOBa Ha ypeda.
A INPEDYINPEXDEHNE: ENEKTPnuecknT KOHTaKT, B KOITo e BKNIOueH ypeDbT, TpR6Ba da 6bJe 3a3eMeH.
Korato n3no13BaTe ypeDa c npomeHJINBOTOKOBO 3axpaHbaHe, n3no13BaIte npedocTabeHnC hero 3axpaHbaU Ka6JI. BkJIOUeTe uenCeLa BBB BXoJa 3a npomeHJINBOTOKOBO 3axpaHbaHe Ha ypeDa n CneD TOBA BKJIOUeTe Dpyrna KpaHa Ka6EJa B eJeKtpuYeCKn KOHTaKT.
Φur.12: 1. 3axpaHbau Ka6e2. Kanak Ha eJekTpuecko rHe3do (BXoD 3a npomeHnBOtOKOBo 3axpaHbaHe) 3. Uencel (3a ypeDa) 4. Uencel (3a eJektpueckn KOhtaKt)
BHIMAHNE:ПьрвВКнчeteцencena Bуpeдаи спед TOBa BKnHcTe Дугma Краи В eJeKtpnueckn KOHTaKT.
BHIMAHNE:BunHarn 3aTbapnTe 3dpaBO kanaKa Ha eNeKtpnueckKTo rHe3do, KoraTO 3axpaHbauinr Ka6e H e BkIoueH.
3A6EJEXKKA: Iopn IBpexHM Ha 3axpaHbaHe C NOCTOReH ToK ypeIbT aBtOMaTHUHO IpemHaBa B peXHM Ha IpOMeHJIb TOK, KOrATo 3axpaHbaUHT Ka6eI e BKNIOueH.
3ABENEXKA:IOCTOHHOTOKOBTO 3axpaHbHe He 3apeKda 6aTepeYta, NOCTaBeHa BypeJa.
3A6EJEXKKA:ΦopMaTa Ha Μεncela Ha 3axpaHb-aunKa6eI e pa3nUHa B pa3nUHnTe DbpXkABN.
Cbbp3BaHeHa ypeNi
DonbHumeHn aKcecoapu
BHIMAHHE: He cBp3BaTe KbM KOHTaKT 3a npomeHnIBOTOKOBO 3axpaHbaHe ypeI, pa3nueH OT DML810.
BHIMAHHE: BnHaHn H3noJ3BaIte nOxOJa- 13aXpaHbAa Ka6eI, DocTaBeH cypeda.
ABHIMAHHE:He cBbp3BaTe NOBeue OT MAKcMaHnIg 6pOi CBbp3aHn ypeN, NocOueH B INHCTpykUnTe.
Korato n3non3BaTe ypeDa, cBbP3aH C dpyr ypei, CBbpXeTe rncbC 3axpaHbaunKaBen. BkIIOyete uencena BB BxOda 3a npOMEHNIBOTOKOB 3axpaHbaHe Ha ypeDa, KOITo Iue 6bJe 3axpaHbaH, INcEToBA BkIIOyete Dpynra KpaB BxBxOda 3a npOMEHNIBOTOKOB 3axpaHbaHe Ha ypeDa, KOITo Iue NODABA 3axpaHbaHe.
Φnr.13: 1. KoHTaKT 3a npOMEHJIIBOTOKOBO 3axpaHbaHe
3A6ELEKKA: Korato n3non3BaTe ypeDa, CBbp-3aH cBc dpyrN ypeDn, onepaun, KaTO BKNIOUbaHe/ N3KJIIOUBAHe, npOMraHa Ha JPKOCTTa I npOMraHa Ha CBeteuata 3oHa He ca CBbp3aHn. BCEKn ypeTpr6BaDa 6bDe ynpablaBaH.
Ioppejdahe Ha 3axpaHbau nka6eJ
HabnTe 3dpaBO 3axpaHbauЯ Ka6eI Ha KykaTa 3a Hero.
Φn.r.14: 1. 3axpaHbau Ka6eN 2. Kyka 3a 3axpaHBaui Ka6eN
ПОДДРьЖКА
BHIMAHNE:Ппетдяпровьateин 3BbPWBATE NOdprkkaHa ypeda,ce ybepeTe, YeToe n3KIOUeHOT ppeBKnIOUvBaTeIa OT KOHTAKTa n AkymylaTophata 6aTePnE n3BaDeHa.
BENEXKA: He n3noJ3BaIte 6eH3nH,HaΦTa, pa3peIaTeI, cnpT n dp. Ndo6Hn. ToBa MoKe Da npuHHo6e3UBeTBAHe, DeΦopMaunu nnnyKHaTHnH.
3a da ce noDbpxka BE3OJACHOCTTA n HADEXJHOCCTTHa npOdykta, pemOHNTe, noDpBXK kaTa nn perynipaHeTo Tpr6Ba Da ce n3BbPwBAT O ynbHOMOueh cepBn3 nn fapuHn cepBn3Hn CEHTPOBE Ha Makita, kato BNHarn Tpr6Ba Da n3NoJ3BaTe pe3epBn Yactn OT Makita.
ДОПьЛнITEЛНИ AKCECOAPN
BHIMAHNE: IpenopbUba ce n3non3BaHeto Ha Te3n akcecoapu nn HakpaHnC Baunn HNCTpymEnt Makita, onncan B hactoJTO pkoBODCTBO. N3non3BaHeTo Ha npyru akcecoapu nn HakpaHnMoKe da doBeDe Do onaCHOCT OT TeJeCHn NobpeNi. N3noJ3BaTcBoTBeTHna akcecoap nn HakpaHnk cAmO no npedHa3NaueHne.
Ako imate Hxka ot nomoa 3a noBuepe npo6hocn OTHOCHO Te3n akcecoapn, ce oBpHete KbM MeCTHn cepBn3eH ueTbp Ha Makita.
- OpiuHaJIHa akymyIaTopHa 6aTePnI y3apJHO yctpoIcTBO Ha Makita
3ABENEXKA: HЯkon apTnkyJIo NT cnncbKa moKe Da ca BKJIIOUeH N KOMNJIeKTA Ha nHCTpyMeHTa, KaTO cTaHApTHN akCEcoapn. Te MoKe Da ca pa3JIuH N B pa3JIuHnTE dIbpXaBn.
SPECIFIKACije
| Model: DML810 | |
| LED 0,2 W x 202 | |
| Nazivni napon AC 100 V - 240 V, 50/60 Hz | DC 14,4V / 18V |
| Svjetlosni tok 5.500 lm / 3.000 lm / 1.500 lm | |
| Vrijeme rada (Uz BL1860B x2, sve LED Žarulje uključene) | 4 mata (5.500 lm) / 18 sati (1.500 lm) |
| Maksimalni broj urežaja koje je moguce medusobno povezati 8 | |
| Radna temperatura 0 °C - 40 °C | |
| Temperatura skladištenja -20 °C - 60 °C | |
| Dimenzije (D x Š x V) | 420 mm x 420 mm x 787 mm |
| Neto težina (bez baterijskog uloška i kabela za napajanje) | 13,9 kg |
| Stupanj zašite DC: IP54 (radi samo na baterije) | AC: IP20 |
VAŽNE SIGURNOSNE UPUTE
AUPOZORENJE: Procitajte sva sigurnosna upozorenja i sve upute. Nepridržavanje upozorenja ili uputa moze rezultirati strujnim udarom, požarom i/ ili ozbiljnom ozljedom.
PROČITAJTE SVE SIGURNOSNE UPUTE I PRIDRžAVAJTE IH SE.
MeIyce6HNO NOBp3aHO KOpncTeHbE
Onuohane np6op
ABHIMAHNE: He noBp3yBaJTe HneDeH npyr ypeD ocBEN DML810 BO uTeKeP 3a DBOHacOuHa cTpyja.
BHIMAHNE: Cekoraш kopncTe ro ka6eNoT 3a HanojyBaHe wTo e DocTaBeH co ypeNoT.
BHIMAHNE:He noBp3yBajTe MeIyce6Ho ypeiHaMakcImaHnOT 6poj ypeiHaMeIyce6HO IOBp3yBaHBe HabeJeH BO yNaTCTBOTO.
Kora ro kopncntte ypeoT o e meryce6no noBp3aH co npyr ypei, noBp3e Tn co ka6en 3a hanojybahe. BmetheTe ro npknkyokot BO DOBOOT Ha DBOHACOHa ctpya Ha ypeoT 3a da ce HanojyBa, a nToa BmetheTe ro dpyrnot Kpaj BO uTEkepot 3a DBOHACOHa ctpya Od ypeoT 3a HanojyBaHe.
Cn.13: 1. ΜιTeKερ 3a ΑνθοHαcoUHa cΤργja
HANOMEHA: Kora ng KopnCTne ypeinte wTO ce MeYce6No NOBp3aH, ONepaunTe KaKo BKNyBaHe/ NCKnyBaHe, MeHyBaHe Ha OCBETJeHOCTa N MeHyBaHe Ha npocToPOT 3a OCBETNyBaHe He ce NoBp3aH. Tpe6a Da ce pa60Tu co cekoj ypei.
Opran3npaBe Ha Ka6eIOT 3a HanojyBaBe
LbpcTo HamotajTe ro Ka6eIOT 3a HanojyBaHe Ha Kykata 3a Ka6eIOT 3a HanojyBaHe.
Cn.14: 1. Ka6e n3a HanojyBaHbe 2. Kyka 3a Ka6eNoT 3a HanojyBaHbe
OДРЖУBAИБЕ
BHUMAHNE:прд cekoja npobepka nIIN ODPKByBaHe,cekoraшnpobepyBajTe dann ypeDo T e NCKlyuHn Kacetata 3a 6aTepnjata e N3BaDeHa.
3A6ENEWKA: 3a qncTeHbe, He KopncTeTe HaФTa, 6eH3nH, pa3peDyBaU, aIkoXoI nIi cnuHo. Tne cpeDCTba ja Baat Bojata mOke da npedn3BnkaaT deΦopMaun nIi nyKHaTnH.
3a da ce odpxN 5E35EДHOCTA n CnYPHOCTA Na npoI3BOIoT, nonpaBknte, odpxyBaHbata nn DoTepyBaHbata Tpe6a Da ce BpwaT BO OBnacteHc cepBnCHn nn fa6pnKu cHTpn Ha Makita, cekoraw co pe3epBn DeNoBn od Makita.
ОПЦИНОЙЕН ПРИБОР
A BHUMAHNE: Oboj npnbop nnn doaTOCu ce npenopaYbaat 3a KopncTeBe co aNaTOT od Makita deHnnpan BO ynatCTBOTO. Co KopncTeBe dpyr npnbop nnn DoaToOn MOKe Da ce n3NoKnte Ha pn3NK oD TeNeChn NobpeDi. KopncTeTe r nnp6bOpOt IdoaTOUte caMo 3a HNBHaTa Ha3HaueHa HaMeHa.
Ako Bn Tpe6a NOMO 3a NOBeKe DeTaN 3a npnbopot, npaaajTe BO NOKaHnOt cepBuceh ueTap Ha Makita.
OpunnHaJa 6aTepuja n noHaay Ha Makita
HANOMEHA: Hekon CTaBn Ha IncTaT a MoKe da ce BkIyueHc co anatot kako cTaHapdien np6op. Tne MOKe da ce pa3NkYbaaOt dPkaBa do dpkaBa.
TEXHnUKNIODAuN
| Modél: DML810 | |
| LED 0,2 W x 202 | |
| Номинални наюн AC 100 V - 240 V, 50/60 Hz | DC 14,4V / 18V |
| Сbeltлосни Флькс 5.500 lm / 3.000 lm / 1.500 lm | |
| Вре'mе рада(ca BL 1860B x2, сbeltпе сBLE LED сиалице) | 4 сата (5.500 lm) / 18 сати (1.500 lm) |
| Мakсималан б Proj мeйсьбно поевэнх урэнja 8 | |
| Радна Temпература 0 °C ~ 40 °C | |
| Temпература складштова -20 °C ~ 60 °C | |
| Дименzeиje(Д x US x B) | 420 MM x 420 MM x 787 MM |
| Нeto Тенин(aьз улоча батериjs и[elektpruchник кабla) | 13,9 кr |
| Стени зашипITE DC: IP54 (напaja ce самоSBатериема) | AC: IP20 |
Ha ochoby hawer he npectaHor ictpaxkBaHa pa3boja 3aapkaBAMO npabo n3meHa HabeDeHx TexHHKnx noataka 6e3 npetXoJHe Hajabe.
Cneunpkaune mory da ce pa3nkyj y pa3nuytnm 3eMbaMa.
BpeMe paJa je npn6JIINKHO mOKe da ce pa3JIkye y 3aBnCHocTn od Tnna 6atepej, cTaTyca HanyHeHocTn uycnoBa KopuShheHa.
PpimHeBv yloXak 6aTepeNje n nyBaay
| Уложак батериje DC 14,4 V моддя | Бел BL1415N / BL1430B / BL1460В | |
| DC 18 V моддя BL1815 | N / BL1820B / BL1830B / BL1840B / BL1850B / BL1860B | |
| Пунач DC18RC / DC18RD / DC18RE / DC18SD / DC18SE / DC18 | SF / DC18SH / DC18WC |
- Hekn ropehabeene Hnyoosn 6aTepnja n nybaun MOkda Hehe 6ntuyny 3aBnchoctno MecTa CTahOBaHa.

KOpHCTe cmo ropeHaBeDeHe yIouke 6aTepuJe n nyBaue. KopuShHe dpynx
CnM6oJIN
Y hactaKy cy npka3aHn cM60NI KoJn ce OdHoce Ha onpemy. Ipe ynoTepe6e ce o6abe3Ho yno3HajTe ca HbHXOBIM 3HaueHeM.


Ipoountajte ynytCTBO 3a ynotpe6y.

Ni-MH Li-ion
Camo 3a 3emjbe EY
360r npncyctba 1TeTHNX KOMnHOHeHaTa
OBoJeHOIOCTaBN ODoBoJeHOMcBipanuHTy
3a KOMyHaJIH NoTnKaJn paJn y cKnJaNy ca
IpoHNCIMaO3aHTNTJXMBOTHe CpeDInHe.
To 03haaba cmmbo npceuptahe KaHTe 3a
Cmehe Ha onpemn.

Bdynte HapouHTo paKbnuN uOnpe3Hn.

OnTuKa paJauaunja (UVnIR)
MHHMaHNO n3JaXnTe OHN NIN Koxy.
| Hemojte HeTrepeMnue da rIeIaTe y yKJbUyeHу IamNpy. | |
| KopncTnte OndroBapajyHn Bn3np iIi 3aStNTy 3a OCh. | |
| AC | Hemojte Da KopncTnte ypeHaj ha KIuSi nIi cheny KaJa je yKJbUyeH na AC HanajaJIbe. |
| Дугme 3a ПОнВHо yKJbUyHBaJIbe празидачa. |
HanomeHa
Obaj npo3BOD caPKN H3BOpe cBeTIOCT eHepreTCKe KJace eФИКaCHOCn
Mpexho Hanajahe
Anat cme da ce npnkbyu caMoHa MOHOpa3Hn 13BOp MPexkhor Hanoha KoJn Ondrobapa Nodaumca HaTnnche nnoiue.Anat Mopa mAtu y3embeHe kao 6n ce pykoBaIau 3aWHTnO od CtpyjHor ydapa.Kopnstte camo TpoxnHe npdyxHe ka6NoBe koJn majy TpOnHHcky yTuKaUcCa y3eMbeHem uYTuHnUcCa Tpr IOna Koja ondrobapa yTuKaUcAy anata.
БЕЗБЕДноCHAУПОЗЕВА
BAKHA B3BEOCHA YIYTCTBA
Ayn03OPEHbE: IpoUHTajte cBa 6e36eHocHa yno3opeha n cBa ynyTcTba. HenoHTobHe yno3opeHa n ynyTCTaBA MoKe n3a3BaTHn CtpjuHn ydap, noXap n/nn Teuke Teneche nobpeDe.
ПОНТAJTE И ПРATITE CBАБЕЗДНОCHA YИNTCTBA.
- Kaia ce ypehaj He Kopnctn, yBek ra NCKbYuHTe n 3ByuNTe n3 cTpyje / n3BaAnTe yloXak 6aTepeNje n3 Hera.
- HemojTe Da NOKPnBaTe NaMny IIN Da 3arIaBbByjete BeHTnlaauOnH O'TBOp ypehaja Kpnom IIN KapToHOM, nTd. Y cynpoTHOM, moKe doHn Do noxapa.
- HemojTe Da KopnCTHe ypehaj Ha BnaJxHm nn MOKpIM MeCTHa KaJa je yKbUeyeHa AC HanajaHe.
- HemojTe da n3naKeTe ypehaj Knwn nn chery. HemojTe Hnkada da ra nepete BODom.
- HemojTe Da KopncTnTe ypehaj y OkpyxeHbMa rDe MoKe Da DoHe Do EKcnNo3nJe, Ha npMep, y npCycCTBy 3anaJbBnX TeuHocTn, racOba nn npaunHe.
- YtkaaynyejamaMopajyda6ydyykbyeHny odrobapajyheytuynche.Hemojte Hkada da npenpaBbaTe ytkayeha 6nlo kakab HauH. Pn3nk od ctpjhor ydapa je MaBn aKO ce KopncTe HnpenpaBbeHNytkaunOndrobapayheytuynne.
-
Ппннkom ркваьа урehajem n36eraBJte KOHTaKT ca y3eMJIbeHIM NOBpUHama, KAO uTo cy ueBn, paNJatOpN, MKNpotanache neHnue HnФрnxupeRn. Ako je BaSe TeNo y3eMJIbeHo, nobehaba ce pN3NK Od cTpyjHor ydapa.
-
HemojTe da 3noynoTpe6bAbate Ka6n. HemojTe NkkaJa nomohy ka6na Da HocHTe,ByuteN nckIbuyjete ypehaj.Ka6m mopa da 6yde ydaJIbeH od n3Bopa tonNoTe,yBa,Owtpnx IBuca nn nokpeTHnx DeNoBA.OwTeHHn nn 3aneTbaHn Ka6NoBn noBeHaBJay pnsK od cTpJHor yapa.
- Y cnyajy owtheha cnojbaawber fJekcn6nHOR Ka5na OBe CBeTnJbKe, Kao 3aMeHa he ce Kopnctntu CneunjaHH Ka6n Hn Ka6n DocTynaH NCKJbUHyBO KO npou3BohJaayu nn cepBnCHor nocpeHNka.
- HemojTe HeTpemnue da rIeJaTe dIpeKTHO y n3BOp CBeTIOCTN.
- Hemojte da pykyjeTe yTnKaayem MOKpIM nIM MachHM pykama.
- YBeK NoCTaBnTe ypehaj Ha paBHO n Cta6HNO MeCTO. Y cynpoTHOM MoKe Da naHe.
- YBeK noCTaBtyepehaj ycnpaBHO.
- 3BOp CBETNOCTn OOJ CBETNbKn 3aMeHbyj y cAmo npOn3Bohaj, cepBnCHn NocpeDnK nn CnHuHO KBaJIncNKOBaHo Jnue.
- EneKtpnHn Ka6J KoJn je yKbByeH y TnHnUy He CMe OcTaN n3ByeH n3 ypehaja. To moKe da npoy3pOkye cTpyjHn yap.
- HemojTe da KopnCTnte pyky 3a HoWebe y 6nlo Koje dpyre cBpxe ocm 3a HoWehe ypehaja, peuMo, KaJa XeJInte Da ra NODurHete.
- Hemojte da n3naKeTe ypehaj BapHncaMa nn Kopo3NBHOJ atmocpepn, nTd.
Kopnshene n odpkaBahe a naTa ca 6aTepnjom
- Nyhnte 6aTepejny NcKbIyUHBO nomohy nyBaaya koju je Habeo npon3Bohau. Ako ce nyBaay koju je Hameheh 3a odpeheny Bpcty 6aTepejne KopnCTn ca pyrom 6aTepnjom, Moke da doHe do OnachOCTn od noxapa.
- EneKtpnue he aIaTe Kopncntte caMo ca 6aTeepnjaMa Koje cy npedBnheJe 3a Hux. KopuHene dpynx BpcTa 6aTeepna MoKe da n3a3OBe pN3NK Ond nobpeDe n noxapa.
- KaDa ce 6atepnja He KopncTn,dpxnte je daJIbe od Dpyrnx MeaHnx npedMeTa, nonyt cnajannca, HOBnuHa, KByeBa, ekcepA, 3aBpTaHa n Dpyrnx MaNX MeaHnx npedMeTa KOJ Mory Da npecnoje Dba npKbUyka.Kpatac cnoj n3MeHy npKbUyaka 6atepnje MoKe Da DoBeDe do oneKOTHa nn noXapa.
- Y cnyajy 3nooyntpe6e 6aTepnje n3 He MoKe Hcuyptn TeuHocT. Y TOM cnyajy, na3nte da He dohete y DoOp C hOB. Ako cnyajho dohete ydoOp C 6aTepnom, nCepnTe MeTo DoOpa BOOM. Ako TeuHocT Docne y OOn, notpaXnTe n nomoh nekapa. TeuHocT Koja NcUpyn n3 6aTepnje MOKe Da n3a30Be npTuauJy nnoneKOTnHe.
- HemojTe da KaopnCTte 6aTepnjy nn anat kojn cy oWtehennn moNnKOBAH.N OwTehe nnn MoNnKOBaHe 6aTepeJe mOry nCNoBnTn HnpeDbNnBO noHaAhaBe Koje moKe doBecTdo noXapa, ekCnNo3nJe nn pN3nKa od 3aDobnJaBa nOBpea.
- HemojTe da n3naXeTe 6aTeepnju nn anat BAtpn nn Bucokoj Tempepatyn. N3naRahe BAtpn nn Tempepatynn3n4n 130^ MoKe DoBecn do EKcnno3neJc.
- IpndpjkaBJte ce CBnX ynyTcTaBa 3a nybeHe n HemojTe da nyHnte 6atepjuy nn anat n3HaD oncera TemnepaType koJi je habeDen y ynyTCTBnMa. HenCnpaBHO NyBeHe nn nyBeHe Ha TemnepaTypama n3HaD habeDeHOr oncera MoKe OwTeiTn 6atepjuy n NOBeHaTn pN3NK od noxapa.
CEPBUNCUPAHE
- Camo KBaHnФuKOBaHO cepBnCHO oO6JIe CME da cepBncupa ypehaj. Ako cepBnC nIN OJpxKaBaHe Bpwe HeKBaHnФuKOBaHe oO6e, moryh je pu3NK od nobpeJe.
- 3a cepBncipahe ypehaja KopnCTnte nctOBeThe pe3epBHe deIOBe. Ako KOpNCTne HeoO6pehe DeIOBE uIN aKO ce He npndpkabate ynyTcTaBA 3a oDpKaBaHe, mory he pniIK od ctpyjHor ydapa nn noBpeIe.
- HemojTe da cnaIte ypehaj, qak n ako je TeuKo owtehen. BaTepuJe mory da ekcnnoDupajy y nnamEny. Ondoxte ypehaj ha otnaJy cknaNy ca nokanHm nponucma.
Baxha 6e36eHocHa ynyTCTBa koja ce oDHOce Ha yIIOXak 6aTepeNiJe
- Пpe ynoTppe6e ylooka 6aTepnje, npoHTajTe Cba ynyTCTBa n 6e36eHocHe 03HaKe Ha (1) nybayu 6aTepnje, (2) 6aTepnju n (3) npon3Body kojn KopncTn 6aTepnjuy.
- He pactabjbajte n He moHnФkyjTe yIoxak 6atepnje. Tmme MoKeTe Da n3a3OBeTe noXap, npekomepeHo 3arpeBaHe nn EKcNIO3njuy.
- Ako ce BpeMe paDa 3HaTHo cKaPaTHIO, OdMax npctaHnte ca KopuShHeBem. To MoKe da DOBeDe Do pn3nka Od nperpeBaHa, Moryhnx ONeKOTnHa, Na YAc N EKnIIO3nJe.
- Ako eIeKtpoJNT DocNe y OCh, nCnepe NTx HnCTOM BODOM N OdMax 3atpaxNte NOMOH nekapa.To MoKe Da DoBede do r6bntka Bnda.
- HemojTe da n3a3nBaTe kpaTak cnoj ynooka 6atepne:
(1) HemojTe DoOpnBaTu npKJbUyKe 6HNO KOJIM nPOBOdHM MaTepNJaJOM.
(2) 136erabajte cknadnWTehe yIouka 6aTepejye kyTnjna ca pyrMM MeTaHMM npedmetma kao wTo ekcepH, HOBunH nTd.
(3) HemojTe da n3JaXeTe yIoxak 6aTepeJbeBODn nn KnN.
KpataK cnoj 6aTepeJne moKe da DoBeDeDo BeJIHKor npotoKa cTpyje, nperpeBaHa, Moryhnx oneKOTnHa, na qak n pereopeBaH;
- HemojTe da cknadnTne n Kopncntte anat ynoxak 6atepuje Ha MeCTnMa rde TemnepaTypa moKe da doctnrHe nn npemaun 50^ (122°F).
- HemojTe da nannte ynoxak 6atepnje qak Hn KaJa je 03bNoOwTeHEn NIn NotnyHO noxa6an. Ynoxak 6atepnje MoKe da ekcnloDnpa y BaTpN.
- HemojTe Da 3akBaTe, ceYeTe, nomTe, 6aate nnHcnyuTate yIoxKa 6aTepeJne, nnDa Hbme yDapate No YBpcToj NOBpUHHn. Ha Taj NaHH MoKeTe Da n3a3OBeTe noXap, ppeKoMeepHO 3arpeBaHe nnEcknNo3nju.
- HemojTe da KopnCTne owTeheHy 6atepny.
- CaDpKaHe JNTnJym-JoHcKe 6aTepeJne noDnExy 3aKoHy o npeBO3y onachnx MaTepuJa. PnIHKOM KomepUjAnHor npeBO3a, Hnp. Od cTpaHe TpehN Xuca N npeBO3HnKa, Mopa ce 6bpaTtN Noce6Ha NaXbHa Ha CneuJanHe 3axTeBe NaKOBaHa u ObeJexKaBaHa.
PpnnKOM npnpeme MaTepnjana 3a npBo3, nOtp6Ho je cabetobatn ce ca cTpyuHaKOM 3a onache MaTepnje. Takohe obpatnte naXbY ha eBeHTyaHHe daJIbe HaunOHAnHe npOnice. OmoTajTe TpaKom nn npKepnjTe OTBopHe KOHTAKTE n 3anakyjTe 6aTepnjY taKo da CE He MOKe NOpepaTu yHyTap NaKOBaHa.
- KaJa oJnJaXeTe yJIoXaK 6aTepnJe Ha OTnaI, n3BaJnte Ra n3 anata N OJNoXHTe Ha 6e36eHNO MecTo. PnpIpxKaBajTe ce IOKaJIHnx npOnica y Be3u ca OJnaraHbem 6aTepnJe.
- BaTepeJJe KOpNCTnTe cAmO ca npOn3BODmAb Koje je HabeJa KOMnaHnJa Makita. NocTabBaHe 6aTepeJJe Ha npOn3BOe KoJn Hncy ycarnaWeHN MoKe Da DOBeDe Do nOxapa, ppeKoMepeH eTonnote, ekCnNo3Ne JIn Uu cypeHa enekTpOnIta.
- Ako ce aJat He KOpNt ToKOM dUyKe ter nepnoDa, 6aTepejna Mopa da Ce n3BaAnn 3 aJata.
- Tokom n HakoH KopuheHa, yIoxK 6aTepnje MoKe Da aKymUnpa TOnNKo TOnNtPe Da To MoKe DOBecTu Do ONEKOTnHa, yObuaJehnx HnCKOTempePtypHx. PAnKbNo pyKyjTe BpyHm yloUzma 6aTepnje.
- He DoOpjTe KOHTaKe aJaTa OdMax HAcOH KopuShHeBa jep cy MoXda TOnIKo BpyHn Da Mory da 3a3OBy ONEKOTInHe.
- BoInTe paUHa da ce cTpyrotHa, npaunHa nJn 3emba He 3arNaBe y KOHTaKtMa, pyuNcaMa n JkIe6OBMa ylooka 6aTepeJe.To MoKe npoy3pOKoBaTu 3arpeBaHe, 3anaJbNuBaHe, nycaHe n HEnCnpaBHOCT anata nn ylooka 6aTepeJe, To MoKe Da DOBeDe Do ONEKOTHa nn TeLeChnx NOBpeJa.
- OcHm aKo anaTo He noDpxkAba, HEmoJTe Da KopnCTnte yNoXak 6aTepeNje 6n3y BnCOKHOHcKnx pa3BOdHx JInHja eNeKtpnHe cTpyje. Y cynpOTHom moKe doHn Do KBapa nnn nperopeBaHa anaTa nn yNooka 6aTepeNje.
18.ДрхиTe 6aTepnjy BaH Domaшaja Deue.
CAUYBAJTE OBO YNYTCTBO.
A PAXHB: Kopncnte camo opunnahe Makita 6atepne. Kopuwebe Makita 6atepnja koje Hcy opunhahe nn 6atepnja koje cy n3mehe moKe da doBe de npcaBa 6atepnje, Koje MoKe da n3a0Be noXap, Teneche nobpe de nn wTeTy. To he takohe noHnTtRu rapanujiy komnHnJe Makita 3a Makita anat nybau.
CabeTN 3a MaKcHMaJHo TpajaHe 6aTepnje
- HanyHnte yIoxk 6aTepeJne npe Hero wTo ce notnyHO uCnpa3Hn. CBakn npT npeKHHte paCa aIaNatom HanyHnte yIoxk 6aTepeJne KaJa npImeTne da je cchara anata cna6nja.
- HkaJaHemojTe Da NOHOBO NyHnTE notnyHo HanybeHN yNoXaK 6aTepeNje. IpenyBaBaHe ckpaHyje paDNbEN BEK 6aTepeNje.
- Nynhte ynoxak 6atepnje ha co6hoj temnepatypu n3mehy 10^ n 40^ (n3mehy 50^ n 104^) .Caekajte da ce bpyhnyoxak 6atepnje oxnaHn ppe nyheHa.
- KaJa He KopnCTNe yIIOXaK 6aTepeNje, n3BaAnTe ra n3 anata nn nybaya.
- HanyHnTe yNoXak 6aTePnje aKo ra Hehete KopnCTnT dyXe BpeMe (Bnwe od wecr Meceu).
Опс дЕлобА
Clnka1
| 1 | Ручka 3a Ночеве | 2 | Индikatop сбетлиne | 3 | Дугme 3a помену сбетлиne |
| 4 | Гиме за укльуноваBE/ искльуноваBE | 5 | Гиме за помену обл actи OCBeTьbeBA | 6 | Вор за катанц |
| 7 | Поклonaц bateprije | 8 | Браза роклonaц | 9 | Е点点头ни Кабл |
| 10 | Кушиц за[elekntrpuihni Ka6bl | 11 | Поклonaц priNKlbuchnue | 12 | AC утунциа |
| 13 | Гугme за поювно укльуноваBE пекидачa | 14 | С утукay -- |
HANOMEHA: O6nK yTnKa7a eNeKtpnHOr Ka6na ce pa3nKyje y 3aBnCHocTn oD 3eMJIbe.
AkkymyITop KapTpndxIhe apHaIFaH MaHbI3dbl KayiNci3diK HycKayIapbl
- AkkymyIaTOP kapTpndxin naIaIaN6ac 6ypbH, (1) akKymyIaTOPdbIH 3apIaTay KypblrfbicbHaFbI, (2) akKymyIaTOPdaFbIXeHe (3) akKymyIaTOPbI naJaIaNHaTbIH eHIMderi 6aplbIK Hcckaynap MeH eCKepTy 6ilrinepi OHbIN WbIFbIHbI3.
-
Akymyntop Kaptpdxin 6eIweKtemei3 Hemece 03 6etih3we aubin XeHdemehi. OepT, wamadaan TBIC kb13y Hemece kapbiny KaadnnapbHa anbIn Kenyi MymkH.
-
ErepakymyIop KaptpnDxJin naIaIahy yaKbITb6iptana KbICkapFaH 60nca, naIdaIaNHydbI Depey TOKtaHBi3. ByI KbI3bIN KeTy, bIKTmAlN KyIKTeP Hemece TiTi KaPbInbc KayniH TyDbipybl MymKiH.
- Erep 3neKtpnT Ke3iH3re Tureh 6onca, Ke3iH3di Ta3a Cyme HwaBbHb3 XHe Depey MeuHaJIbK KEmekk KyrHIn3. ByN Kepy Ka6inTeHn aeBipbIyra eken cokTbipybl MymkiH.
- AkkyMnyTop KapTpNdxKdIn KAnracynapbH 6ip 6ipimeH MaTAcTbIpMaHbI3:
(1) KneMaIapBbKe3 KeIReH ToK eTki3riu MaTePnaIaPra Tnri36eHi3.
(2) AkkymyIaTOp KapTpIaXiH iwiHde Wererepe, TbIHap, T.6. 6aca MeTaJI 3aTTapbl 6ap KOHTeHepDe caKTaMaHbI3.
(3) AkkymyIaTOp 6norbIH cyra caImHaI3 Hemece XaHbIP acTbIHda KaIdbIpMaHbI3. AkkymyIaTOp tyicnepeiH tybIKtanybl YNKeH TOK aFBiHBiHbIN naJa 6OlybHa, Kbl3bIn KeTyre, bIKTmAn KYiIKTepre XHe Tinti 6y3bIyFa ce6en 6OlybIMyMKIn.
- KypaIbI JxHe aKkMyJrTop 6nOrbIH TempeatypacbI 50^ -den (122 F ) WAmacbIHah acaTbIH XepJIepDe caKTaMaHbI3 XHe naJaIaN6aHbI3.
- AkkymyIaTOp 6Iorbl KaTbI 3aKbIMdaIraH Hemece ToIbIfbImeH To3FaH 6OJa, OHbI OTKa XaKnaHbI3. AkkymyIaTOp 6Iorbl OTTa XapblIn KeTyI MymKinH.
- AkymyIaTOp KapTpNdxH Wereneyre, Kecyre, 6acyra, NaKtbyPfya, KynatYFa Hemece OHb KaTb3aTneh Cofyra 60nMaIdb.Iy nppekeTTep eT, WamaHaH Tbc Kbl3y Hemece Xapblny KaFdaNapbHa anBIn KeNyIMMKIN.
- 3aKbIMdaJFaH aKKyMnyTopDbI naJaJaHa6aHbI3.
- KInhaKa kipetin nHTn-NOHdbi
aKKymyIaTOpnap DeHCayNbIka XHe
KOpShaRAn OpTaFa 3NHaDbI 3aTTap 3aHMaCbI
TaIaTApbHa CaiKeC KapacTbIPbIaNbI.
KomMepuIbIK TacsbImaJday ywiH, MbicaJIb, ywiHwi
TapanTAP, 3KcneIITOpnap ywiH KanTaMaJa XHe
TaHbIaYda apHaJIbI TaIaNTap caKTanybl Tnic.
Xi6epiNETIH eHIMdi DaBbIHday ywiH Kayinti 3aTTap
BoBHua capanbIbMaMAHMeh KeHecy Kepek.
CoHbIMe KaTAP YNTbIK epexeepDi de ToNbIK
Kapan WbIfbIHb3.
AusbIK Tyicnepepi Jxaybl, aKKymyIaTOpdbI
KANTamara Ko3raImaTbIHdae etin
opHaIaCTbIPbIHb3. - AkkymyIaTOp KapTpNdxKIN Kdere JapaTkah Ke3de OHbl KypanDaH WbIrapBn anbl, Kayinci3 Kepde Kdere JapaTbHbI3. AkkymyIaTOpDbI Kdere JapaTyra KaTbICTbI JeprinikTi epexeJepDi opbHdaHbI3.
- AkkymyIaTOpnapbI TeK Makita komnHaNcBi KepceTKeH eHIMdepmH 6ipre naJaHaHaHbIHbI3. AkkymyIaTOpnapdbI yInecimDi emec eHImdepRe opHaTy eptKe, Kb3bIN KeTyre, XapblbCKa HEmece 3JIeKTpOJNT aFybHa eKeI cOKTbIpByI MymKIn.
-
Erep kypaI y3ak yaKbIT 6oNbl naIdaIaNbIMMaTbIH 6OJca, KypaIaFbI aKKymyIaTOPdbI anBIn Tactay Kepek.
-
AkymyIaTOp KapTpJxHn naJaIaNHy KeiHne XHe naJaIaNHaHHaH KeiH, on KbI3bIn, Kyikke Hemece TeMeH TempepaTyIbI Kyikke eKeNyi MymKIn. bIcTbIK akymyIaTOp KapTpJxJepImeH KymbIC icTeReHde caK 6OJIbHbI3.
- KypaJIbIH KJIeMMacBn NaJdaJaHaHHaH KeiH, OHbI 6ipDeH yCTaMaHbI3, ON KYIOre ce6en 6oJatbIHdai bICTbIK 6Ojybl MymKiH.
- AkkymyIaTOp KapTpNdxiHIn KneMmaIaPbHa, caHbIaynapbHa XaHe OYbIKTapbHa KOHka, WAn HeMece KipdiN TypbIN KaNyBH 6oNDbIpMaHbI3. Byn KypanDbIH KbI3ybiHa, TyTaHyBaHa, XapBlyBaHa XaHe 6aTaper KaTpNdxiHIn icTeH WbIrFyBaHa eKein, KyiK Hemece Xapakat anyFa ce6en 6onyMiymKiH.
- Erep Kypan Kofapbl BOnbTTb3JekTpNIk Kyat Xeinepi XaHbIHda naIdaIaNHyfXapaMdbI 6oImaca, aKcMyIaTOpJIbIK KapTpNdxKi Xofapbl BOJIbTTb3JekTpNIk Kyat Keiinepi XaHbIHda naIdaIaN6aHbI3. ByI KypaIbIH Hemece akKymJIaTOp KapTpNdxKHHICTEH bIybiHa Hemece cbHybHa anBn KeNyI MymKH.
- AkymyTopb6aJapdaH aynak yctahbi3.
OCbI HYCKAYLAPDbI CAKTAHbI3.
CAK BOJIbIbI3: Tek TynHycKa Makita akymIaTOpnapbIH naJaHaHaHbIHbI3. TyNHycKa emec Makita akymIaTOpnapbIH hemece e3reptinreH akymIaTOpnapdbI naJaHaHy hTeNKeCiHde ept, JapaKaT any HeMece 3aBIMdaNyFa ce6en 6oNaTbIH akymIaTOp kapblybiHa eKeNyi MymKiH. On coHdai-ak Makita Kypanbi MeH 3aprTaY KypblfbcI ywiH Makita KeiIndiirH KywH XOraDbI.
AkkymyIaTOPdbIH MaKcImaIaIbIKbI3MeT eTy Mep3iMIn caKtay6oYbIHwa KeHeCTep
- AkkymyIaTOp KapTpduXin KyaTbI ToIbIbImeH TaycblMaC 6ypbIH 3apraTaHbI3. 3neKtp KypaIbHbIH KyaTbI a3 eKeHdirIH 6aKaRaH Ke3de, KypaJI KymbcIH TOKtaTbIn, AKKymyIaTOp KapTpduXin 3apraTaHbI3.
- TOnbIbIme3aprAdTalraH aKkymyIaTOp KapTpndxih ewkaWah KaTa 3aprAtaMaHaB13. ApTBiK 3aprAaTay aKKymyIaTOpDbIH KbI3MeTe tMy Mep3imH KbICaP TaDbl.
- AkkymyIaTOp KapTpndxih 10°C - 40°C (50°F - 104°F) 6eJme TemnepaTypaCbIHda 3apraTaHbI3. 3apraTamaC 6ypbIH akKymyIaTOp KapTpndxih cybltbHbI3.
- AkkymyIaTOp KapTpNdxH naDanaHaY yaKbITTa OHbl KypaIaN Hemece 3aprTay KypbIFbICbIH aNbIN TaCTaHbI3.
- ErepakkymyIop KaptpnIxH y3aK yaKbIT 6oynbl (aJtbl aHaapTbIK) naJaHaH6aFaH 6oJcaHb13, OHbl 3aprTaHb13.
AkkymyIaTOpdbIH KaIHaH KyaTbIH KepeTy yuH IN AkkymyIaTOp KapTpIaXiHderI TeKcepy TyImeCIN 6acbIb3. HndkAtop Wamapbl 6ipHeWe cekyHd KaHbI TpyaDbI.
| Инданахоршamдары Калган Куаг | ||
| Жанын Туру | Бширuti | ЖынынБлбтay |
| 75% - 100% | ||
| 50% - 75% | ||
| 25% - 50% | ||
| 0% - 25% | ||
| Аккулаяторы зарядунь. | ||
| Аккулаятораразулы相关内容. | ||
ECKEPTNE:KoJdaHyKaFdaIapbHaJaHe KOpwaHOpTaHbIH TempepaTypacbHa KaPai KepcTeKiHaHaTbI KyaTTaH 6ipwAm epeKweJeHyi MymkiH.
ECKEPTNE: AkkymyIaTOpdbH KOPfAhbC Jxyneci XyMbIC icTeReHne, biPiWi (Wetki CoJ KaK) INDnKaTOp Wambl KblbIbIKTaIbI.
KypblfblbH/aKKymyTOpdbH KoprahbicXyneci
KypbInfbl KoprA hIC KyIecimHe Ka6bIKTaIHaH. Byn Kyye KpybInfbl MeH AkkMyIaTOpDbH Kb3MeT ety Mep3iIM H3apTy yuiH, Kyat Ke3IH ABTomAtbI Type de eWipeDi. Erep KpybInfbl Hemece AkkMyIaTOp TeMeHderi Ka4aInapdbH 6ipeYHe Tan 6oNca, KpybInfbl Kymbic 6apbcihda aBOMaTTbI Type ToKtaIbI.
Uamadan TbIC KYKTeMeDeH KopFaHbIC
KypbIfbl TOkTbTBIM KEN TYTBHy KyiHde XyMbIC icTeReH Ke3De, on eW6ip KepcetkiuCi3 aBTOMaTTbI Tpye ToKtaDbI. ByJ KaJaDa TT KyaTbIme naDanaHaHda, akMyJrTop KapTpJxIH anBtB13 xe He opHaTbHb3 Hemece AT KyaTbIH naJaHaHaHa, axbIpaTkbIHTbIH KaTa IcKe KocTyMecih 6acbIHb3. Codan Kein KaTa icKe Kocy yuH KypblfblbIKocbIHb3.
Cypet5: 1. AxbipaTkbIbTBIn KaNTa icKe Kocy TYImeci
3aprntbIH,waMaHaTbIC TaycblIybiHaH KopFaHbIC
AkkymyIaTOpdbIH KaIraH KyaTbI TeMeHderEHe, JapbIK dIOaTbIH 6eIikTepeHcBaKa JapbIK dIOaTbI WAMdApbl cypETte KepcetinreHcEHei. CoaH KeiH WAMaMeH 6ec-OH MInyTTaH KeiH Kyne ABToMaTbI TypDe KyaATbI eWipei. ByJ kArDaJa aKKymyIaTOp KapTpndxH IN KypaIaN aNbI, 3aprTaHaB3.
Cyper6
Acnablkylnbinka apHaanfah cahblay
AkkymyIaTOp KapTpIaXJIepiH yPbIKTaH Kopfay ywiH, acnabl Kynblina apHaIraH caHbIay 6epinei.
Cyper7: 1. Acnably Knybinka aphanfah caHbiny
ПАДАЛАНУ
CAK BOJIbIHbI3: Kypblfbl KOMMepunlBk naaDanahyra apHaIraH. KypblrHbI TyPmbICTbIK MaKaTt naaDanahyra 6oJMaIbI.
KypbINfbiHbIKocy/ewipy
KypbInfblHki Kocy yiwih Kyat aybICTbipin-KockblWBih H TyImeCIN 6acblH3. KypblFbHBI eWipy wiuH Kyat aybICTbipIN-KOCKblWBih H TyImeCIN KaTadaH 6acblH3.
Cypet8:1.KyaataybcIpbIn-KockblbHbIH TYmeci
ECKEPTNE: Kypblfbl coHfbl npaMeTp Ke3iHderi peKIMde Kocblnabl.
XapbIKTBikTbi 03repty
KypbInfbl Kymbic icTeEN KaTkaHda, XapblkTBkTBl e3repy TyImeCih BacBhl3. KApblkTBkTBl e3repy TyImeCih BacKaH caBn JXapblkTBfbl TeMeHdeNdi. EH TEmeH XapblkTBkNeH Kymbic icTey Ke3IHDe, eh Xorapbl XapblkTBkKa opanaDbI.
Cyper9: 1. KapbIKbIKTbI e3repty TynMeci
Wam aMafbIH e3repty
KypbIfbl Kymblc icTeN kAtKaHda, WAM aMafbln e3repty Tynmecin Gacblb3.
Cyper10: 1.Шамаимагьн eз reapу ТуМeci
Uam aunmafbH e3repty Tynmecin 6acKaH caBbH UAM aunmafbCypeTTe KepcetTInrReHdien e3repeDi.
Cyper11
AT kyatbI apKblnbI naJaHaHy
KocbImwa Kepek-kaapan
ECKEPTY:KypblfblHbHcBIMbHeMece aWacbl 3aKbIMdaJraH 60Jca, OHJI naJaIaNHa6aHbI3.
ECKEPTY:AaHbI DbIMKbI Hemece Iac KOJMeH YcTaMaHbI3.
ECKEPTY: Kyat 3neKtp Xenici apKbIbI KaMTaMaCbI3 etINReH Ke3De, Kyat CbIMbIH KpyblfBdAn aXbIpaTbINFaH KyiHde KaNDbIPMaHbI. KiXKeHTa BanaIap aHaHbI aybi3dApbHa caBbI, JapaKaT aJybl MyMKH.
ECKEPTY:3neKtp xenicine Kocynb aawaHbI Hemece cbIMdb ay3bHb3ra caMaHb3. TOK cOfybl MymKH.
ECKEPTY:Keinik Kyat Ke3iH HOMHaIbI KepHeyi KypblfnHbH HOMHaIbI KepHeyiHe caiKec KeletiH IN TekcepipH3.
ECKEPTY:KocbInraH po3eTKa Xepre TybIKTanybl Tnic.
AT KyaTbI apKbIbI KypblfBhl naJdaNaHaHa, KypblfBIme6epJIire KyaT cbIMbH naJdaNaHbIb3.
KypbIhBih AT kipicihe aHaHbIKocblHb3, cOaH KeiH KeJIeCi yHbIH po3ETkara KocblHb3.
Cyper12: 1. KyaT cbIMbI 2. BactneK KaKaNaBfI (AT Kipici) 3. Awa (Kypblrfa apHaJraH) 4. Awa (po3eTKara apHaJraH)
CAK BOJIbIHbI3:AnDbIMeHaahbl KypblfbiRa KockaHbIHbI3ra Ke3 XeTki3iHi3,coaH Kein Keneci ywbihpo3eTKara KocbiHbI3.
CAK BOJIbIHbI3: KyaT cbIMbl XaJFaH6aHaH Ke3e, 6actneK KaKaNarBH epKaWaH MbIKtan Xa6bIHbI3.
ECKEPTNE: TT KyaTbH naJdaHaH Ke3De De, KyaT CbIMbI KocBIfraH Ke3De, Kypblfbl AT KyaTbHa aBTOMaTTbI TypDe aybicaDbI.
ECKEPTNE:AT KyaTbI KpypbIrfBa eHri3iInre h aKkyMnyTOpDbI 3aprTaMaJNbI.
ECKEPTNE: KyaT cbIMbIH awa niWi im ep ende eptypni bonyi MymkiH.
O3apa 6aJnHaHbICTbI naJaHaHy
KocbImwa Kepek-kaapan
CAK BOJIbIbI3: DML810 6aca KaHdaa da 6ip KypblfnbHbAT po3etkacbHa KocnaHbI3.
CAK BOJIbIHbI3: ΘpKaaHaN KypblfBIMeH 6epinre Hkyat cbIMbIH naNdanaHbIHbI3.
CAK BOJIbIbI3: BepinreH HcyckayIbIKta e3apa 6aIIaHbICTbI KypblfblapdIH MaKcImaJNbI caHbI KepceTInMece, KypblfblapdI e3apa KocnaHbI3.
Baca KypblfbiMeH e3apa 6aJnHaBicKaH KypblfBiHbI naJdaanHaHa, OJapbl Kyat CbIMBeH KOcbHb3. AwaHb Kyat 6epetIH KypblfBiHbIH AT KipiciHe KOcbHb3, cOaN KeiH Kyat 6epy yuHbAcka Ywbl H KypblfBiHbIH AT po3eKacbiHa KocbiHbI3.
Cyper13: 1. AT po3etKacbl
ECKEPTNE: 3apa 6aunhaBicKaH KypblnflapDbI naDanaHaHa, Kocy/ewipy, XkapbIKTBkTb E3repTy Xane WAM aMarmh E3repTy cekinDi apeketTep 6aunhaBicNaDbI. Op KypblnflKymbic icteyi KaKeT.
KyaT cbIMbIH petTey
KyaT cbIMbi yuH imMeKteri KyaT cbIMbiH TbIfbI3 opaHbI3.
Cyper14: 1. KyaT cbIMbi 2. KyaT cbIMbHa apHaJIfAH inriu
TEXHINKAJIbIK KbI3MET KOPCETY
CAK BOJIbIbI3: Tekcepy Hemece TexHnKaJIbIK KbI3MeT Kepcety KymbIcTapbIH Kypri3yre apeKeTTeH6ec 6ypbIH, apaIbIM KypblrBbIH oWipyni eKeHHe, KeiJeH aXbIpaTbIrlFaHbHa XaHe aKKMyJrTOp KapTpndxhiH aJIbIHraHbHa Ke3 KeTeKi3iHi3.
HA3AP CAJIbIbI3:KaHApMaIdbI,6eH3nHdi, cyblITkbIUtbl,CnnpTl Hemece corah YKcac 3aTTapDbI eWkaawn naDanaHaB13. HtNHexciHe Tyci3deHy,6yInHy Hemece KApblKTap naIda 6onybHa aKeenyi MymkiH.
EHIMH KAYINCI3IIMeH CEHIMIIIINH KaMTaMaCbI3 eTy yWIn, XeHDey KxMbICTapbl, Ke3 KeJIreB 6acka TexHnKaJbIK KbI3MeT KepcTeY Hemece petTey apdaiMakita Kocalkb6JIWeKTEpi naidanayy apkblbMakita KomnaHncaBHBiN oKiineTTi Hemece 3aybITbIK KbI3MeT KepcTeY OPTaJIbIKTapbl TapanbHaH opbHdaNyblKepeK.
KOCbIMWA KEPEK-ЖAPAKTAP
CAK BOJbIHbI3: Byn Kepek-JkapakTap MeH KOHdbIpMaJap Ocb HycKayNbIKTa KepceTInreH Makita KypaJIbIme 6ipre naJaAnaHyra YcbHbIaNbI.Ke3 KeIReH 6acka KepeK-JkapakTap MeH KOHdbIpMaJapDbI naJdaHa y aadMapDbIH JapaKaTTaHbHa eKeJyIMyMkiH.KepeK-JkapakTbI Hemece KOHdbIpMaHbI TEK e3 MaKcaTbIHda fHa KaJDaHbIHbI3.
Ocbi Kepek-KapakTap TypaIbI KocbIMwa MAnimet any yuH IN KEMK KaKeT 6oNca,KeprinikTi Makita KbImet KepcTeOpTaIbIFbHa xa6apNaCbIHbI3.
- Makita TynHcyka aKKyMylrTopbI xHe 3apdTay Kypblfblcbl
ECKEPTNE: Tizimderi keibip 3neMeHTTep cTahapTTbKepek-kaapakTap petIHde KypaIdbH KanTaMaCbIHda 6Olyb MyMkiH. OJap enre 6aJINaHbICTb eptpJI 6Olyb MyMkiH.
規格
| 型號: DML810 | |
| LED 0.2 W x 202 | |
| 額定電壓 A.C. 100V - 240V, 50/60Hz | D.C. 14.4V / 18V |
| 光通量 5,500lm / 3,000lm / 1,500lm | |
| 操作時間 (包含 BL1860B x2, 所有 LED 亮起) | 4小時(5,500lm)/18小時(1,500lm) |
| 最大可互連器具數量 8 | |
| 操作溫度 | 0°C~40°C |
| 存放溫度 | -20°C ~ 60°C |
| 尺寸 (長×寬×高) | 420 mm x 420 mm x 787 mm |
| 淨重 (不含電池組及電源線) | 13.9 kg |
| 防護等級 DC: IP54 (僅限由電池組供電) | AC: IP20 |
- Symbols
- Remark
- Power supply
- SAFETYWARNINGS
- IMPORTANT SAFETY INSTRUCTIONS
- READ AND FOLLOW ALL SAFETY INSTRUCTIONS.
- Battery tool use and care
- SERVICE
- Important safety instructions for battery cartridge
- SAVE THESE INSTRUCTIONS.
- Tips for maintaining maximum battery life
- PARTS DESCRIPTION
- FUNCTIONAL DESCRIPTION
- Installing or removing battery cartridge
- Indicating the remaining battery capacity
- Only for battery cartridges with the indicator
- Appliance / battery protection system
- Overload protection
- Overdischarge protection
- Hole for padlock
- OPERATION
- Turning on / off the appliance
- Changing brightness
- Changing lighting area
- Using with AC power
- Optional accessory
- Interconnected use
- Organizing the power cord
- MAINTENANCE
- OPTIONAL ACCESSORIES
- ACCESSIONS EN OPTION
- VEILIGHEIDSWAARSCHUWINGEN
- BELANGRIJKE VEILIGHEIDSVOORSCHRIFTEN
- Beveiling against ver ontladen
- OPTIONELE ACCESSOIRES
- DÔLEŽITÉ BEZPEČNOSTNÉ POKYNY
- TIETO POKNY USCHOVAJTE.
- BnKOpNCTaHH Ta o6cnyroByBaHH aKymyTOpHnx iHCTpyMeHTIB
- OBCLNYTOBYBAHNA
- Baxnbi iHctpykuii 3 6e3neKn dJa kaceTu 3 akymyIaTOPoM
- 36EPIAITE LIBKA3IBKN.
- Iopadn 3 3a6e3neueHnMaKcNMaJbHorO cTpOKy ekCnIyaTauii akymyIaTopa
- ONIC DETAJEIN
- 3axnct BiD haMipHoro po3pIxKeHHa
- OTBip dJa 3aMka
- BnKOpncTaHn3XnVBJIeHHaM BiId Mepeksi 3MiHHoro cTpymy
- BnKOpncTaHnB 3aem03'cHaHnx npncTpoIB
- YknaaHnHa Zhypa XNBHeHHA
- TEXHlYHE OBCJlyrOByBAHHa
- ДОДATKOBE ПИЛадя
- ANVÄNDNING
- NocTabrHe N3BaxDaHe Ha akymyIaTOPHaTa 6aTepe
- HdkaunHa ocTaBaun KaanuTeHa akymyNaTOPHaTa 6aTepn
- Camo 3a akmyamopHu 6amepuu c uhdukamop
- Cnctema 3a 3aunTa Ha ypeDa/ akymylaTopHaTa 6aTeprna
- 3aunTa Cpeu npetOBapBaHe
- 3aunTa cpeu npekomephopa3pekdaHe
- OTBOP 3a kaTnHap
- Ekcnnoataua
- BknouBaHe / n3KnIOUbaHe Ha ypeDa
- PpomHa Ha npKocTtA
- PpomraHa Ha CBeteaTa 3OHa
- I3noJ3BaHe c npOMEHnBOTOKOBO 3aXpaHbaHe
- Cbbp3BaHeHa ypeNi
- Ioppejdahe Ha 3axpaHbau nka6eJ
- ПОДДРьЖКА
- ДОПьЛнITEЛНИ AKCECOAPN
- VAŽNE SIGURNOSNE UPUTE
- PROČITAJTE SVE SIGURNOSNE UPUTE I PRIDRžAVAJTE IH SE.
- MeIyce6HNO NOBp3aHO KOpncTeHbE
- Opran3npaBe Ha Ka6eIOT 3a HanojyBaBe
- OДРЖУBAИБЕ
- ОПЦИНОЙЕН ПРИБОР
- CnM6oJIN
- HanomeHa
- Mpexho Hanajahe
- БЕЗБЕДноCHAУПОЗЕВА
- BAKHA B3BEOCHA YIYTCTBA
- ПОНТAJTE И ПРATITE CBАБЕЗДНОCHA YИNTCTBA.
- Kopnshene n odpkaBahe a naTa ca 6aTepnjom
- CEPBUNCUPAHE
- Baxha 6e36eHocHa ynyTCTBa koja ce oDHOce Ha yIIOXak 6aTepeNiJe
- CAUYBAJTE OBO YNYTCTBO.
- CabeTN 3a MaKcHMaJHo TpajaHe 6aTepnje
- Опс дЕлобА
- AkkymyITop KapTpndxIhe apHaIFaH MaHbI3dbl KayiNci3diK HycKayIapbl
- OCbI HYCKAYLAPDbI CAKTAHbI3.
- AkkymyIaTOPdbIH MaKcImaIaIbIKbI3MeT eTy Mep3iMIn caKtay6oYbIHwa KeHeCTep
- KypblfblbH/aKKymyTOpdbH KoprahbicXyneci
- Uamadan TbIC KYKTeMeDeH KopFaHbIC
- 3aprntbIH,waMaHaTbIC TaycblIybiHaH KopFaHbIC
- Acnablkylnbinka apHaanfah cahblay
- ПАДАЛАНУ
- KypbINfbiHbIKocy/ewipy
- XapbIKTBikTbi 03repty
- Wam aMafbIH e3repty
- AT kyatbI apKblnbI naJaHaHy
- KocbImwa Kepek-kaapan
- O3apa 6aJnHaHbICTbI naJaHaHy
- KyaT cbIMbIH petTey
- TEXHINKAJIbIK KbI3MET KOPCETY
- KOCbIMWA KEPEK-ЖAPAKTAP
Brand : MAKITA
Model : DML810
Category : Lighting