ML010G - Lighting MAKITA - Free user manual and instructions
Find the device manual for free ML010G MAKITA in PDF.
| Product type | Construction lighting |
| Brand | Makita |
| Model | ML010G |
| Maximum luminous flux | 5,500 lumens |
| Brightness levels | 3 (5,500 lm / 3,000 lm / 1,500 lm) |
| Power supply | AC 100-240 V, 50/60 Hz or Makita battery 14.4 V / 18 V / 36 V-40 V max |
| Number of compatible batteries | Up to 4 (one used at a time, automatic switching) |
| Battery life (with BL4080F x2 and BL1860B x2) | 15.0 h (5,500 lm) / 52.0 h (1,500 lm) |
| Maximum number of interconnectable devices | 8 |
| Dimensions (L x P x H) | 490 mm x 490 mm x 814 mm |
| Net weight (without battery or power cord) | 14.1 kg |
| Protection rating (DC) | IP54 |
| Protection rating (AC) | IP20 |
| Operating temperature | 0 °C ~ 40 °C |
| Storage temperature | -20 °C ~ 60 °C |
| Adjustable lighting area | Yes, by zone change button |
| Light source | LED (non-replaceable, replace entire light fixture) |
| AC input/output | Yes, with power cord and AC outlet |
| Automatic self-righting function | Yes, up to 80° tilt |
| Included accessories | Power cord, battery covers, carrying handle |
Frequently Asked Questions - ML010G MAKITA
User questions about ML010G MAKITA
0 question about this device. Answer the ones you know or ask your own.
Ask a new question about this device
Download the instructions for your Lighting in PDF format for free! Find your manual ML010G - MAKITA and take your electronic device back in hand. On this page are published all the documents necessary for the use of your device. ML010G by MAKITA.
USER MANUAL ML010G MAKITA
natural_image
Technical line drawing of a mechanical component with radial supports and central hub (no text or symbols)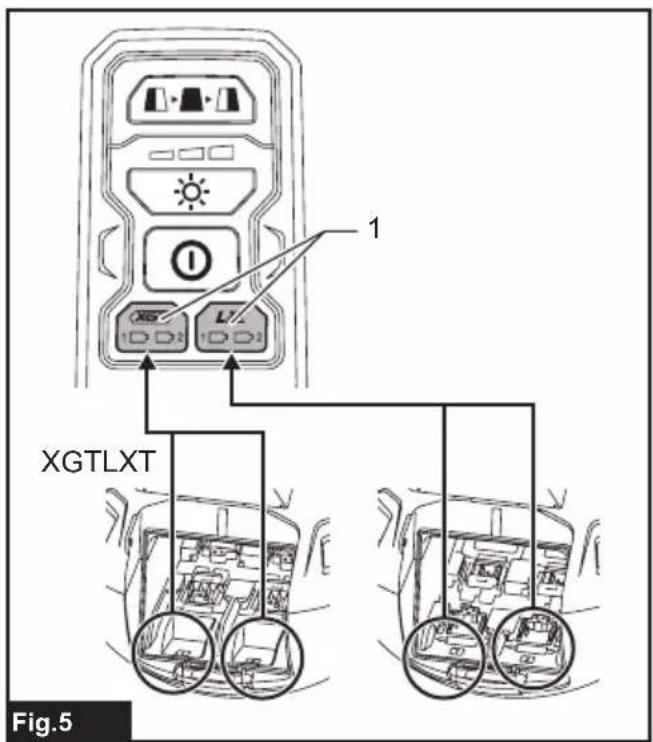

natural_image
Diagram showing three identical cylindrical structures with radiating lines and arrows indicating motion or flow, labeled Fig.13 (no text or symbols on the structures themselves)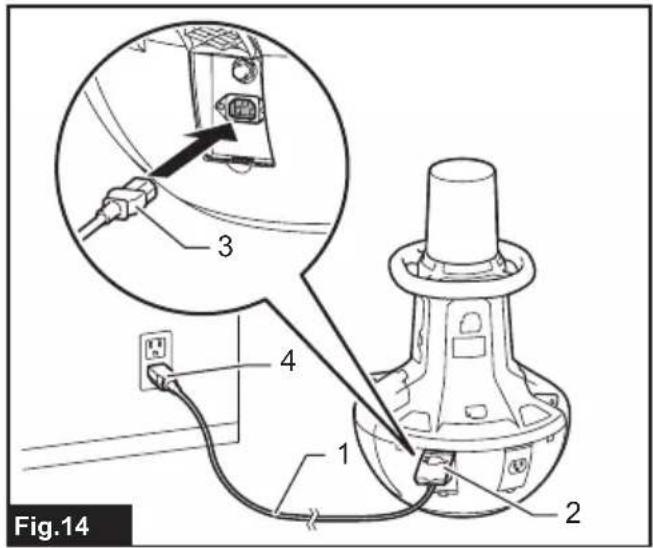
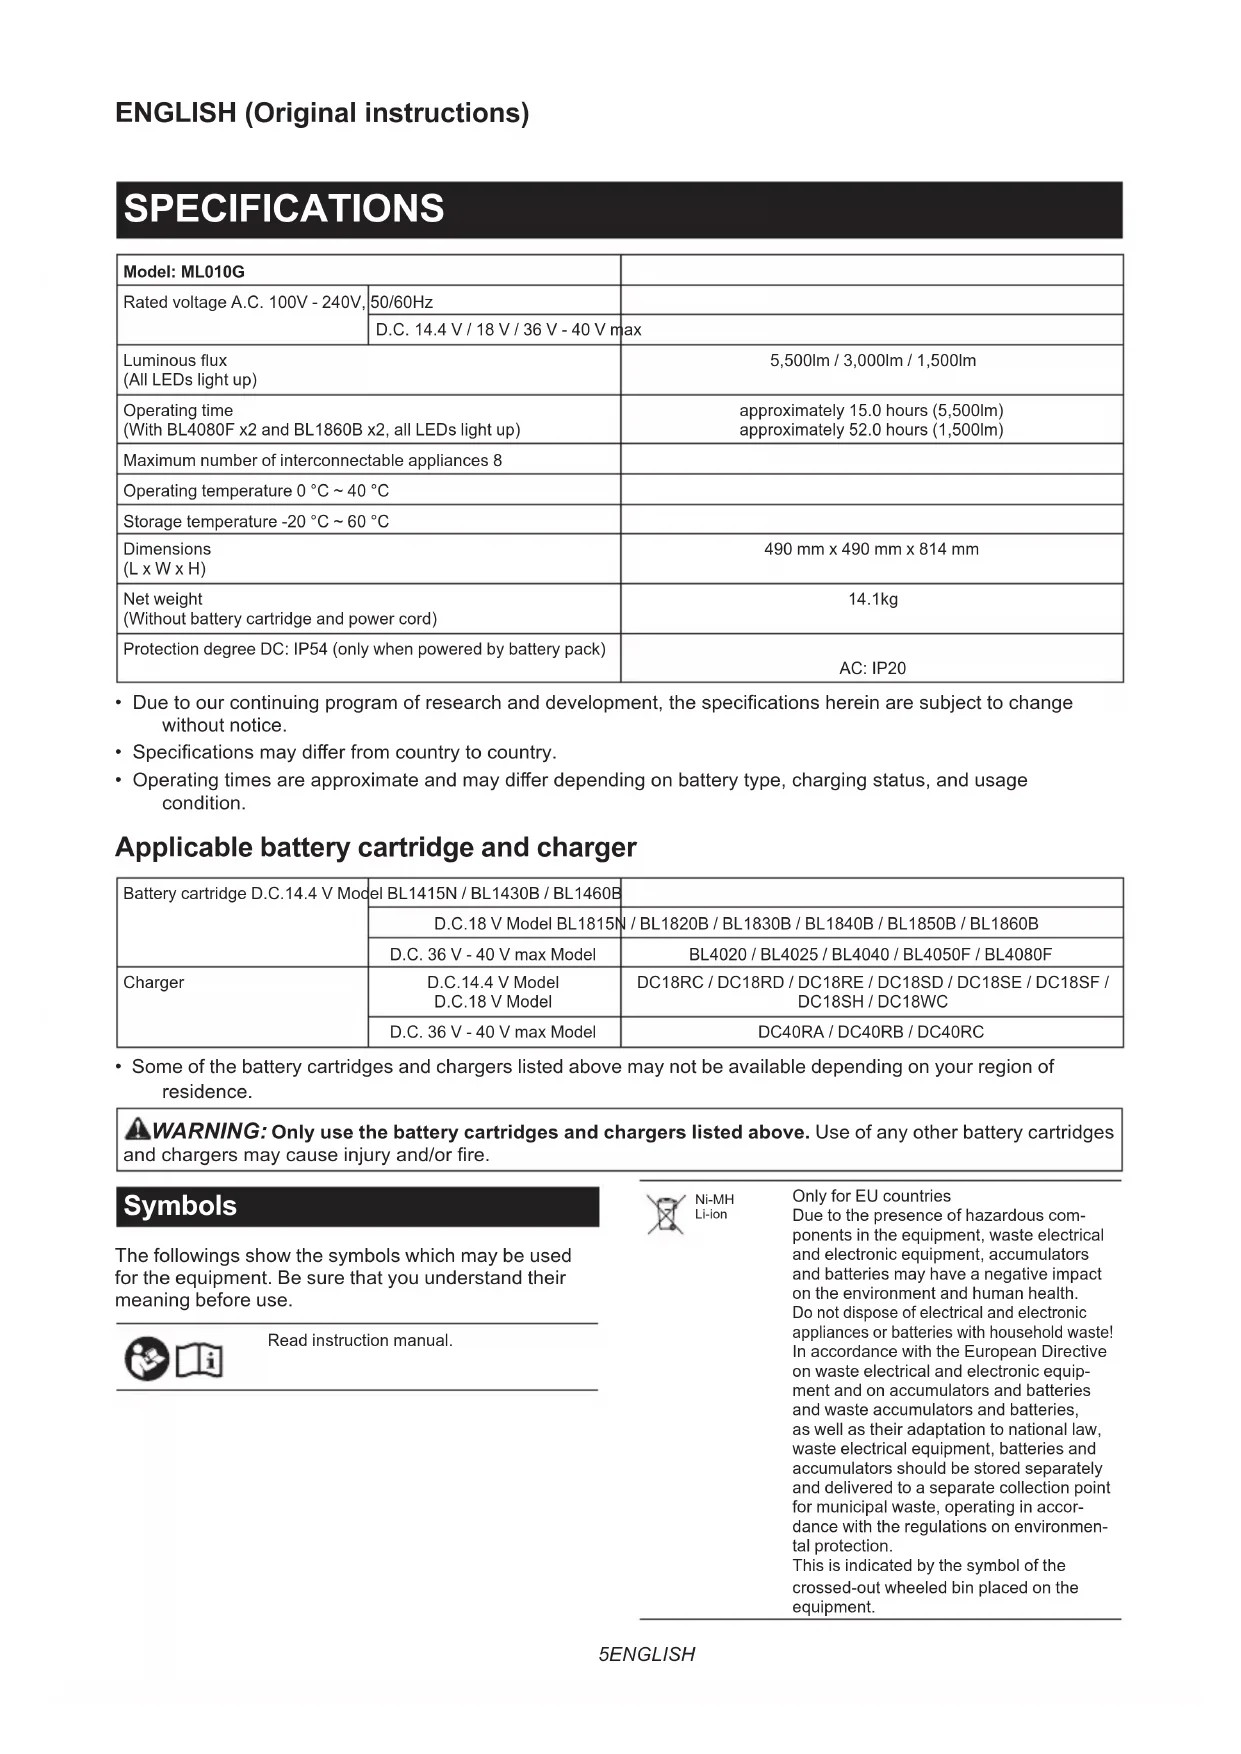
SPECIFICATIONS
| Model: ML010G | ||
| Rated voltage A.C. 100V - 240V, | 50/60Hz | |
| D.C. 14.4 V / 18 V / 36 V - 40 V max | ||
| Luminous flux(All LEDs light up) | 5,500lm / 3,000lm / 1,500lm | |
| Operating time(With BL4080F x2 and BL1860B x2, all LEDs light up) | approximately 15.0 hours (5,500lm)approximately 52.0 hours (1,500lm) | |
| Maximum number of interconnectable appliances 8 | ||
| Operating temperature 0 °C ~ 40 °C | ||
| Storage temperature -20 °C ~ 60 °C | ||
| Dimensions(L x W x H) | 490 mm x 490 mm x 814 mm | |
| Net weight(Without battery cartridge and power cord) | 14.1kg | |
| Protection degree DC: IP54 (only when powered by battery pack) | AC: IP20 | |
- Due to our continuing program of research and development, the specifications herein are subject to change without notice.
- Specifications may differ from country to country.
- Operating times are approximate and may differ depending on battery type, charging status, and usage condition.
Applicable battery cartridge and charger
| Battery cartridge D.C.14.4 V Model | el BL1415N / BL1430B / BL1460B | |
| D.C.18 V Model BL1815N | / BL1820B / BL1830B / BL1840B / BL1850B / BL1860B | |
| D.C. 36 V - 40 V max Model | BL4020 / BL4025 / BL4040 / BL4050F / BL4080F | |
| Charger | D.C.14.4 V ModelD.C.18 V Model | DC18RC / DC18RD / DC18RE / DC18SD / DC18SE / DC18SF / DC18SH / DC18WC |
| D.C. 36 V - 40 V max Model | DC40RA / DC40RB / DC40RC |
- Some of the battery cartridges and chargers listed above may not be available depending on your region of residence.
WARNING: Only use the battery cartridges and chargers listed above. Use of any other battery cartridges and chargers may cause injury and/or fire.
Symbols
The followings show the symbols which may be used for the equipment. Be sure that you understand their meaning before use.

Read instruction manual.

Ni-MH Li-ion
Only for EU countries
Due to the presence of hazardous components in the equipment, waste electrical and electronic equipment, accumulators and batteries may have a negative impact on the environment and human health.
Do not dispose of electrical and electronic appliances or batteries with household waste! In accordance with the European Directive on waste electrical and electronic equipment and on accumulators and batteries and waste accumulators and batteries, as well as their adaptation to national law, waste electrical equipment, batteries and accumulators should be stored separately and delivered to a separate collection point for municipal waste, operating in accordance with the regulations on environmental protection.
This is indicated by the symbol of the crossed-out wheeled bin placed on the equipment.
| [cx3T] | Take particular care and attention. |
 | Optical Radiation (UV and IR).Minimize exposure to eyes or skin. |
 | Do not stare at operating lamp. |
 | Use appropriate shielding or eyes protection. |
 | Do not use the appliance in the rain, snow, humid or wet condition when using with AC power. |
 | Breaker restart button. |
Remark
This product contains light sources of energy efficiency class
Power supply
The tool should be connected only to a power supply of the same voltage as indicated on the nameplate, and can only be operated on single-phase AC supply. This tool should be grounded while in use to protect the operator from electric shock. Use only three-wire extension cords which have three-prong grounding-type plugs and three-pole receptacles which accept the tool's plug.
SAFETY WARNINGS
IMPORTANT SAFETY INSTRUCTIONS
WARNING: Read all safety warnings and all instructions. Failure to follow the warnings and instructions may result in electric shock, fire and/or serious injury.
READ AND FOLLOW ALL SAFETY INSTRUCTIONS.
- When the appliance is not in use, always switch off, and unplug / remove the battery cartridge from the appliance.
- Do not cover the lamp, or clog the vent of the appliance with cloth or carton, etc. Otherwise it may cause a flame.
- Do not use the appliance in the rain, snow, humid or wet condition when using with AC power.
- Do not expose the appliance to hard rain or snow. Never wash it in water. Otherwise water may get in to the appliance and malfunction result.
- Do not use the appliance in explosive atmospheres, such as in the presence of flammable liquids, gases or dust.
-
Appliance plugs must match the outlet. Never modify the plugs in any way. Use of unmodified plugs and matching outlet will reduce risk of electric shock.
-
When operating the appliance, avoid body contact with earthed or grounded surfaces such as pipes, radiators, microwave ovens, or refrigerators. There is an increased risk of electric shock if your body is earthed or grounded.
-
Do not abuse the cord. Never use the cord for carrying, pulling or unplugging the appliance. Keep cord away from heat, oil, sharp edges or moving parts. Damaged or entangled cords increase the risk of electric shock.
-
If the external flexible cable or cord of this luminaire is damaged, it shall be replaced by a special cord or cord exclusively available from the manufacturer or his service agent.
-
Do not stare at the source of light directly.
-
Do not handle the plug with wet or greasy hand.
-
Always place the appliance on a level and stable place. Otherwise a falling accident may occur.
-
Always place the appliance in upright position.
-
The light source of this luminaire is not replaceable; when the light source reaches its end of life the whole luminaire shall be replaced.
-
Do not leave the power cord disconnected from the appliance while the power is supplied from an outlet. Doing so might cause an electric shock.
-
Do not use the carrying handle any other purpose than carrying the appliance, such as hoisting.
-
Do not expose the appliance to sparks or corrosive atmosphere, etc.
-
Do not handle the appliance roughly. When the appliance return to the upright position from the tilt position, the appliance may hit a person and cause an injury.
Safety warnings for battery-operated appliance
Battery-operated appliance use and care
- Prevent unintentional starting. Ensure the switch is in the off-position before connecting to battery pack, picking up or carrying the appliance. Carrying the appliance with your finger on the switch or energizing appliance that have the switch on invites accidents.
- Disconnect the battery pack from the appliance before making any adjustments, changing accessories, or storing appliance. Such preventive safety measures reduce the risk of starting the appliance accidentally.
- Recharge only with the charger specified by the manufacturer. A charger that is suitable for one type of battery pack may create a risk of fire when used with another battery pack.
-
Use appliances only with specifically designated battery packs. Use of any other battery packs may create a risk of injury and fire.
-
When battery pack is not in use, keep it away from other metal objects, like paper clips, coins, keys, nails, screws or other small metal objects, that can make a connection from one terminal to another. Shorting the battery terminals together may cause burns or a fire.
- Under abusive conditions, liquid may be ejected from the battery; avoid contact. If contact accidentally occurs, flush with water. If liquid contacts eyes, additionally seek medical help. Liquid ejected from the battery may cause irritation or burns.
- Do not use a battery pack or appliance that is damaged or modified. Damaged or modified batteries may exhibit unpredictable behaviour resulting in fire, explosion or risk of injury.
- Do not expose a battery pack or appliance to fire or excessive temperature. Exposure to fire or temperature above 130 °C may cause explosion.
- Follow all charging instructions and do not charge the battery pack or appliance outside the temperature range specified in the instructions. Charging improperly or at temperatures outside the specified range may damage the battery and increase the risk of fire.
- Have servicing performed by a qualified repair person using only identical replacement parts. This will ensure that the safety of the product is maintained.
- Do not modify or attempt to repair the appliance or the battery pack except as indicated in the instructions for use and care.
Important safety instructions for battery cartridge
- Before using battery cartridge, read all instructions and cautionary markings on (1) battery charger, (2) battery, and (3) product using battery.
- Do not disassemble or tamper with the battery cartridge. It may result in a fire, excessive heat, or explosion.
- If operating time has become excessively shorter, stop operating immediately. It may result in a risk of overheating, possible burns and even an explosion.
- If electrolyte gets into your eyes, rinse them out with clear water and seek medical attention right away. It may result in loss of your eyesight.
- Do not short the battery cartridge:
(1) Do not touch the terminals with any conductive material.
(2) Avoid storing battery cartridge in a container with other metal objects such as nails, coins, etc.
(3) Do not expose battery cartridge to water or rain.
A battery short can cause a large current flow, overheating, possible burns and even a breakdown.
- Do not store and use the appliance and battery cartridge in locations where the temperature may reach or exceed 50 °C (122 °F).
- Do not incinerate the battery cartridge even if it is severely damaged or is completely worn out. The battery cartridge can explode in a fire.
- Do not nail, cut, crush, throw, drop the battery cartridge, or hit against a hard object to the battery cartridge. Such conduct may result in a fire, excessive heat, or explosion.
- Do not use a damaged battery.
- The contained lithium-ion batteries are subject to the Dangerous Goods Legislation requirements.
For commercial transports e.g. by third parties, forwarding agents, special requirement on packaging and labeling must be observed.
For preparation of the item being shipped, consulting an expert for hazardous material is required. Please also observe possibly more detailed national regulations.
Tape or mask off open contacts and pack up the battery in such a manner that it cannot move around in the packaging.
- When disposing the battery cartridge, remove it from the appliance and dispose of it in a safe place. Follow your local regulations relating to disposal of battery.
- Use the batteries only with the products specified by Makita. Installing the batteries to non-compliant products may result in a fire, excessive heat, explosion, or leak of electrolyte.
- If the appliance is not used for a long period of time, the battery must be removed from the appliance.
- During and after use, the battery cartridge may take on heat which can cause burns or low temperature burns. Pay attention to the handling of hot battery cartridges.
- Do not touch the terminal of the appliance immediately after use as it may get hot enough to cause burns.
- Do not allow chips, dust, or soil stuck into the terminals, holes, and grooves of the battery cartridge. It may result in poor performance or breakdown of the appliance or battery cartridge.
- Unless the appliance supports the use near high-voltage electrical power lines, do not use the battery cartridge near high-voltage electrical power lines. It may result in a malfunction or breakdown of the appliance or battery cartridge.
- Keep the battery away from children.
SAVE THESE INSTRUCTIONS.
CAUTION: Only use genuine Makita batteries.
Use of non-genuine Makita batteries, or batteries that have been altered, may result in the battery bursting causing fires, personal injury and damage. It will also void the Makita warranty for the Makita appliance and charger.
Tips for maintaining maximum battery life
- Charge the battery cartridge before completely discharged. Always stop appliance operation and charge the battery cartridge when you notice less appliance power.
- Never recharge a fully charged battery cartridge. Overcharging shortens the battery service life.
- Charge the battery cartridge with room temperature at 10 °C - 40 °C (50 °F - 104 °F). Let a hot battery cartridge cool down before charging it.
- When not using the battery cartridge, remove it from the appliance or the charger.
- Charge the battery cartridge if you do not use it for a long period (more than six months).
SERVICE
- This appliance service must be performed only by qualified repair personnel. Service or maintenance performed by unqualified personnel could result in a risk of injury.
- When servicing this appliance, use only identical replacement parts. Use of unauthorized parts or failure to follow maintenance instructions may create a risk of electric shock or injury.
- Do not incinerate this appliance, even if it is severely damaged. The batteries can explode in a fire. Dispose of the appliance in accordance with the local regulations.
PARTS DESCRIPTION
▶ Fig.1
| 1 | Lighting area change button | 2 | Brightness indicator | 3 | Brightness change button |
| 4 | Power switch button | 5 | Battery indicator | 6 | Carrying handle |
| 7 | Hole for padlock | 8 | Battery cover (XGT battery) | 9 | Cover lock |
| 10 | Battery cover (LXT battery) | 11 | Breaker restart button | 12 | AC inlet |
| 13 | AC outlet | 14 | Hook for power cord | 15 | Reflector |
| 16 | Socket cover | 17 | Power cord | - | - |
NOTE: The shape of the AC inlet, AC outlet and power cord plug varies from country to country.
FUNCTIONAL DESCRIPTION
⚠️CAUTION: Always be sure that the appliance is switched off and the battery cartridge is removed before adjusting or checking function on the appliance.
Installing or removing battery cartridge
⚠️CAUTION: Always switch off the appliance before installing or removing of the battery cartridge.
CAUTION: Hold the appliance and the battery cartridge firmly when installing or removing battery cartridge. Failure to hold the appliance and the battery cartridge firmly may cause them to slip off your hands and result in damage to the appliance and battery cartridge and a personal injury.
⚠️CAUTION: Be careful not to trap finger(s) between the appliance and battery cartridge when loading battery cartridge as well as between the appliance and the battery cover when closing the battery cover.
To install the battery cartridge, release the cover lock, and open the battery cover.
▶ Fig.2: 1. Cover lock 2. Battery cover
To install the battery cartridge, align the tongue on the battery cartridge with the groove in the housing and slip it into place. Insert it all the way until it locks in place with a little click.
Then close the battery cover.
▶ Fig.3: 1. Button 2. Battery cartridge
To remove the battery cartridge, slide it from the appliance while sliding the button on the front of the cartridge.
CAUTION: Always install the battery cartridge fully. If not, it may accidentally fall out of the appliance, causing injury to you or someone around you. CAUTION: Do not install the battery cartridge forcibly. If the cartridge does not slide in easily, it is not being inserted correctly.
NOTE: Up to 4 battery cartridges can be installed, although the appliance uses one battery cartridge for operation.
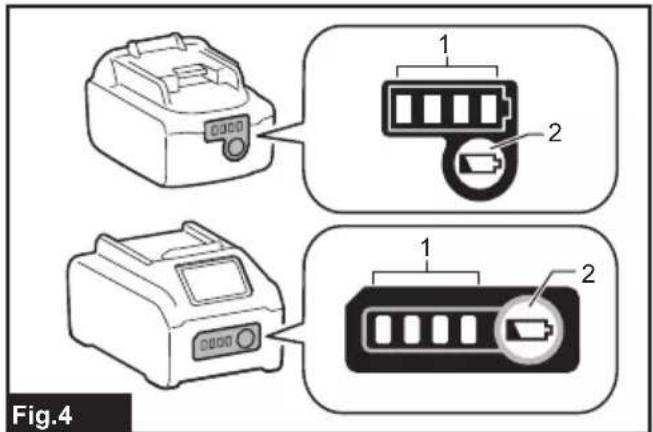
Indicating the remaining battery capacity
Only for battery cartridges with the indicator
▶ Fig.4: 1. Indicator lamps 2. Check button
Press the check button on the battery cartridge to indicate the remaining battery capacity. The indicator lamps light up for a few seconds.
| Indicator lamps Remaining | capacity | ||
| Lighted Off | Blinking | ||
| 75% to 100% | |||
| 50% to 75% | |||
| 25% to 50% | |||
| 0% to 25% | |||
| Charge the battery. | |||
| The battery may have malfunctioned. | |||
NOTE: Depending on the conditions of use and the ambient temperature, the indication may differ slightly from the actual capacity.
NOTE: The first (far left) indicator lamp will blink when the battery protection system works.
Battery indicator
This indicators show the battery in use or the remaining battery capacity.
The indicators correspond to each battery as shown in the figure.
▶ Fig.5: 1. Battery indicator
Indication of the battery in use
When turning on the appliance, the indicators of the installed batteries light up.
Few seconds later, the indicator of battery currently in use will light up.
| Color of the indicator Battery capacity | |
| Green Battery capacity is remaining. | |
| Red There is no battery capacity. | (Run out of battery) |
Indication of the remaining battery capacity
When the battery in use runs out, the appliance switches to another battery automatically. When switching the battery, the all indicators of the installed batteries will light up.
| Color of the indicator Battery capacity | |
| Green Battery capacity is remaining. | |
| Red There is no battery capacity. | (Run out of battery) |
When all of the batteries run out, the indicator of the last one will blink in red.
Appliance / battery protection system
The appliance is equipped with the protection system. This system automatically cuts off power to extend appliance and battery life. The appliance will automatically stop during operation if the appliance or battery is placed under one of the following conditions.
Overload protection
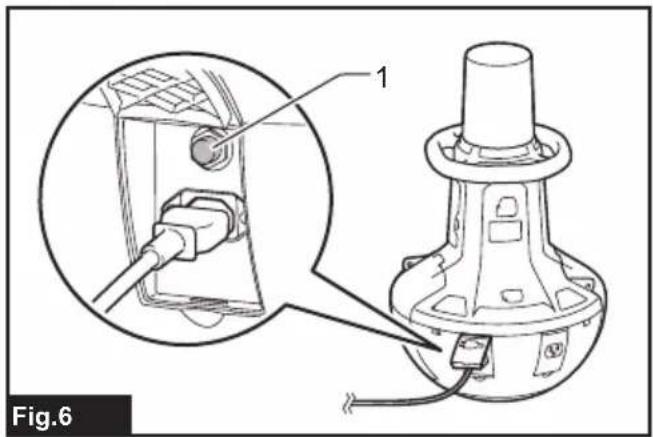
When the appliance is operated in a manner that causes it to draw an abnormally high current, the appliance automatically stops without any indication. In this situation, remove and install the battery cartridge when using with DC power, or push the breaker restart button when using AC power. Then turn the appliance on to restart.
▶ Fig.6: 1. Breaker restart button
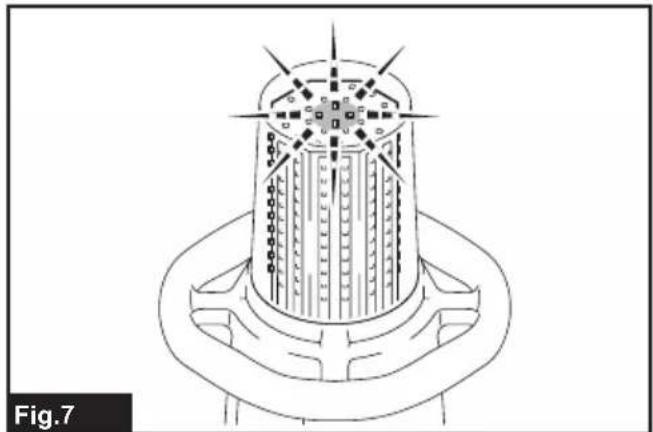
Overdischarge protection
When the battery capacity becomes low, the LED lights go out except a part of LEDs as illustrated. Then approximately five to ten minutes later, the system automatically cuts off power. In this situation, remove the battery cartridge from the appliance and charge it.
▶ Fig.7
Self-righting design
The appliance can recover from the tilted position if the angle is 80 degrees or smaller from the perpendicular position. The standing angle of the appliance varies depending on the conditions of the ground and the power supply to be used.
▶ Fig.8
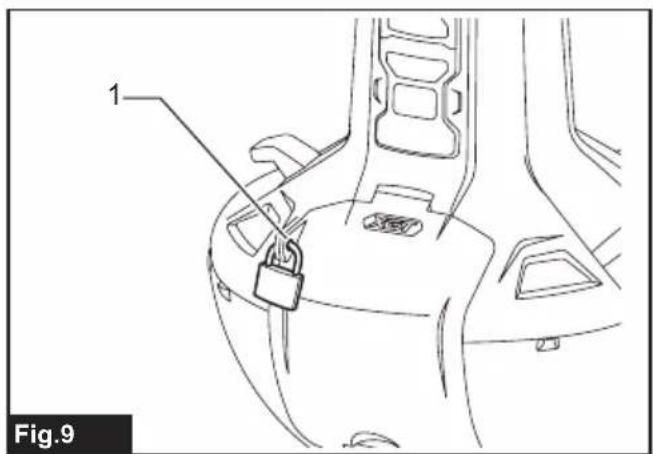
Hole for padlock
For anti-theft of battery cartridges, hole for padlock is provided.
▶ Fig.9: 1. Hole for padlock
OPERATION
CAUTION: This appliance is intended for commercial use. Do not use the appliance for household purpose.
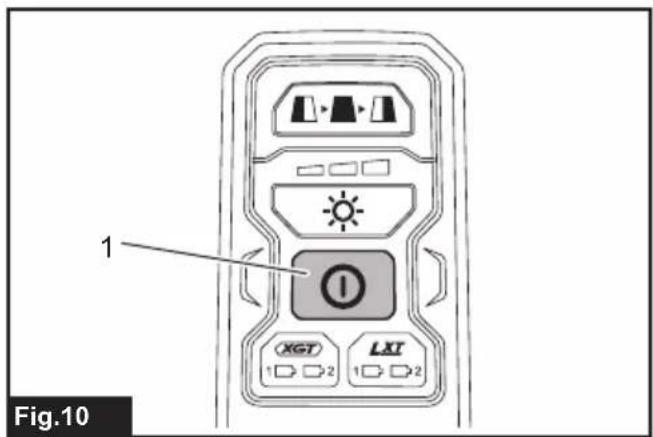
Turning on / off the appliance
Press the power switch button to turn on the appliance. Press the power switch button again to turn off the appliance.
▶ Fig.10: 1. Power switch button
NOTE: The appliance turns on at the same mode as the last setting.
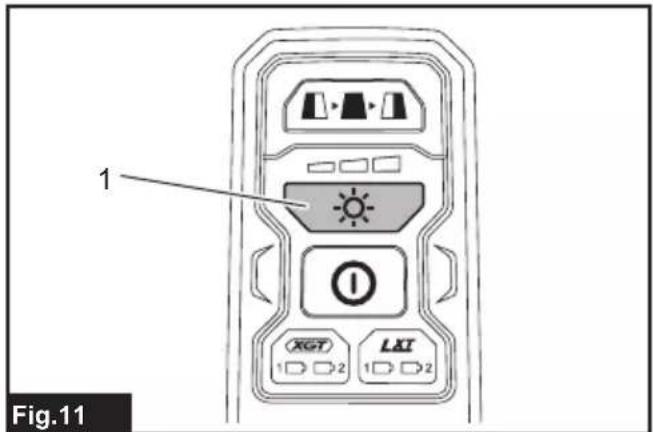
Changing brightness
Press the brightness change button while the appliance is operating. The brightness decreases every time you press the brightness change button. The brightness will return to the highest when operating in the lowest brightness.
▶ Fig.11: 1. Brightness change button
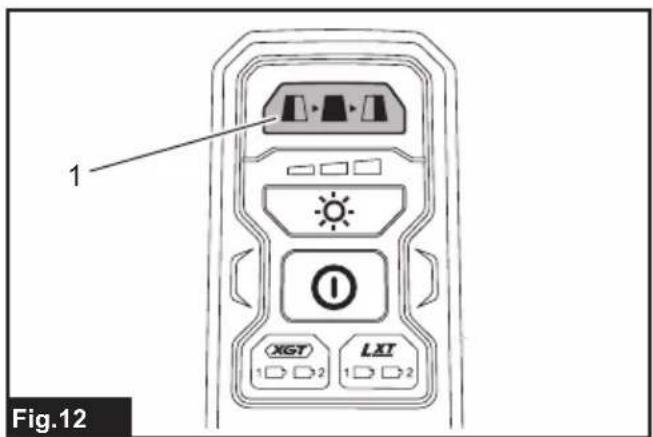
Changing lighting area
Press the lighting area change button while the appliance is operating.
▶ Fig.12: 1. Lighting area change button
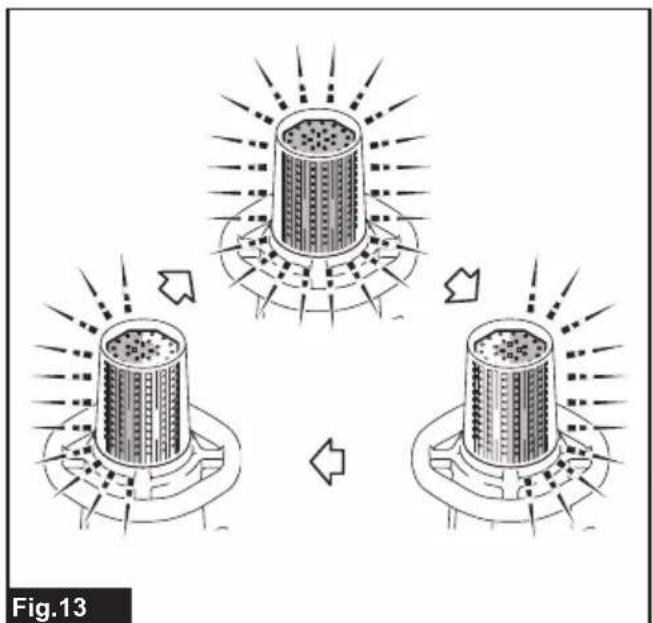
The lighting area changes every time you press the lighting area change button as illustrated.
▶ Fig.13
Using with AC power
WARNING: Never use the appliance when the cord or plug is damaged.
WARNING: Do not handle the plug with wet or greasy hand.
WARNING: Do not leave the power cord disconnected from the appliance while the power is supplied from the mains. Small children may put the live plug in their mouth and cause injury.
WARNING: Do not put the live plug or cord into your mouth. Doing so might cause an electric shock.
WARNING: Make sure that the voltage rating of the main power supply corresponds with that of the appliance.
⚠ WARNING: An outlet that is plugged must be grounded.
When using the appliance with AC power, use the power cord supplied with the appliance.
Insert the plug to AC inlet of the appliance and then insert the other end to an outlet.
▶ Fig.14: 1. Power cord 2. Socket cover (AC inlet) 3. Plug (for the appliance) 4. Plug (for an outlet)
⚠️ CAUTION: Be sure to insert the plug into the appliance first, then insert the other end to an outlet.
⚠️ CAUTION: Always close the socket cover firmly when the power cord is not plugged.
NOTE: Even operating in DC power, the appliance automatically changes to AC power when the power cord plugged in.
NOTE: The AC power does not charge the battery inserted to the appliance.
NOTE: The shape of the AC inlet, AC outlet and power cord plug varies from country to country.
Interconnected use
CAUTION: Do not connect any appliance other than ML010G to AC outlet.
⚠️ CAUTION: Always use the power cord supplied with the appliance.
CAUTION: Do not interconnect appliances beyond the maximum number of interconnectable appliances specified in the instruction.
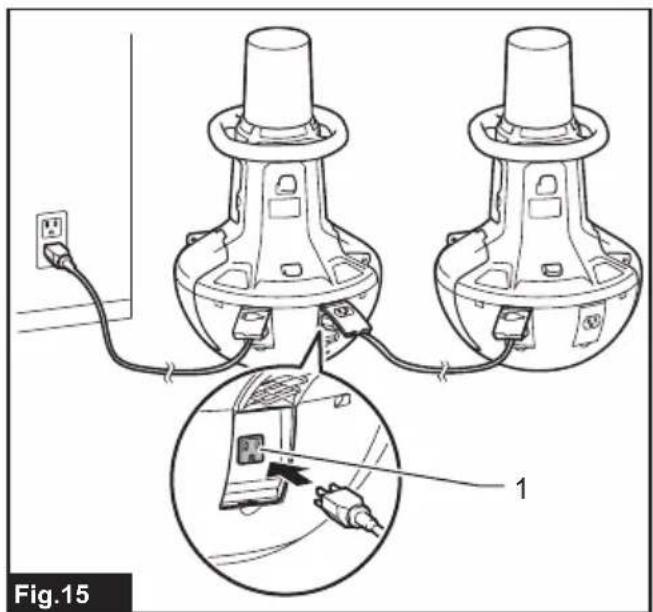
When using the appliance interconnected with other appliances, connect them with the power cord. Insert the plug into the AC inlet of the appliance to be powered, and then insert the other end to the AC outlet of the appliance to power.
▶ Fig.15: 1. AC outlet
NOTE: When using the appliances interconnected, operations such as turning on / off, changing brightness, and changing lighting area are not linked. Each appliance needs to be operated.
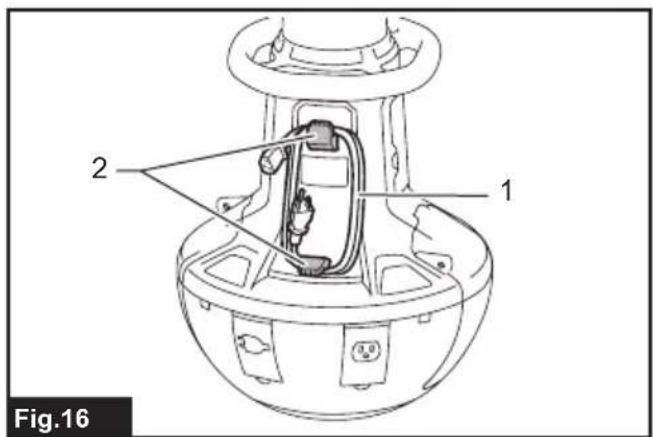
Organizing the power cord
Coil the power cord on the hook for power cord tightly.
▶ Fig.16: 1. Power cord 2. Hook for power cord
MAINTENANCE
⚠️ CAUTION: Always be sure that the appliance is switched off, unplugged, and the battery cartridge is removed before attempting to perform inspection or maintenance.
NOTICE: Never use gasoline, benzine, thinner, alcohol or the like. Discoloration, deformation or cracks may result.
To maintain product SAFETY and RELIABILITY, repairs, any other maintenance or adjustment should be performed by Makita Authorized or Factory Service Centers, always using Makita replacement parts.
OPTIONAL ACCESSORIES
⚠️CAUTION: These accessories or attachments are recommended for use with your Makita tool specified in this manual. The use of any other accessories or attachments might present a risk of injury to persons. Only use accessory or attachment for its stated purpose.
If you need any assistance for more details regarding these accessories, ask your local Makita Service Center.
- Makita genuine battery and charger
NOTE: Some items in the list may be included in the tool package as standard accessories. They may differ from country to country.
SPÉCIFICATIONS
▶ Abb.3: 1. Knopf 2. Akku
VEILIGHEIDSWAAR- SCHUWINGEN
BELANGRIJKE VEILIGHEIDSVOORSCHRIFTEN

▶ Fig.3: 1. Knop 2. Accu
OPTIONELE ACCESSOIRES
▶ Fig.3: 1. Knap 2. Akku
▶ Rys.3: 1. Przycisk 2. Akumulator
DÔLEŽITÉ BEZPEČNOSTNÉ POKYNY
TIETO POKYNY USCHOVAJTE.
TYTO POKYNY USCHOVEJTE.
VOLITELNÉ PŘÍSLUŠENSTVÍ
▶ Fig.15: 1. Priza AC
VAŽNE SIGURNOSNE UPUTE
⚠UPOZORENJE: Pročitajte sva sigurnosna upozorenja i sve upute. Nepridržavanje upozorenja ili uputa može rezultirati strujnim udarom, požarom i/ili ozbiljnom ozljedom.
PROČITAJTE SVE SIGURNOSNE UPUTE I PRIDRŽAVAJTE IH SE.
Indicator accumulator
▶ Fig.5: 1. Indicator accumulator
3-11-8, Sumiyoshi-cho,
Anjo, Aichi 446-8502 Japan
www.makita.com
ML010G-
31L(CE)-2210
EN, FR, DE, IT, NL,
ES, PT, DA, EL, TR,
SV, NO, FI, LV, LT,
ET, PL, HU, SK, CS.
SL, SQ, BG, HR.
MK, SR, RO, UK.
RU, KK, ZHTW
20220921