Stretch B - Car seat BESAFE - Free user manual and instructions
Find the device manual for free Stretch B BESAFE in PDF.
| Product Type | Child car seat |
| Brand | BeSafe |
| Model | Stretch B |
| Category | Group 0+/1 (rear-facing) |
| Usage | From birth up to 125 cm or 36 kg (whichever comes first) |
| Maximum child weight | 36 kg (including clothing) |
| Maximum child height | 125 cm |
| Maximum shoulder height | Must be below the highest shoulder harness position |
| Orientation | Rear-facing only |
| Restraint system | 5-point harness with central buckle |
| Vehicle installation | 3-point seat belt + support leg + lower anchor connectors (ISOFIX compatible via included supports) |
| Side impact protection | Removable SIP+ on door side |
| Adjustments | Headrest and harness height (tool-free), recline angle, front support position (leg space) |
| Infant insert | Included, usable up to 87 cm or 61 cm if baby cannot sit unassisted |
| Support leg | Mandatory, with contact indicator and audible alarm (on some models) |
| Cover material | Washable fabric (follow care label) |
| Care | Machine wash cover at 30°C, do not use harsh products |
| Spare parts | Available from retailer (harness, buckle, supports, straps, etc.) |
| Warranty | 2 years (excluding cover and straps) |
| Maximum service life | 15 years from date of manufacture |
| Standards | UN/ECE Regulation No. 16 or equivalent |
Frequently Asked Questions - Stretch B BESAFE
User questions about Stretch B BESAFE
0 question about this device. Answer the ones you know or ask your own.
Ask a new question about this device
Download the instructions for your Car seat in PDF format for free! Find your manual Stretch B - BESAFE and take your electronic device back in hand. On this page are published all the documents necessary for the use of your device. Stretch B by BESAFE.
USER MANUAL Stretch B BESAFE
UN regulation no. R129


2
5 positions
3
4
5

6
7
8
9
12
13
14
15
16
17
18
19
2021
23
24
Thank you for choosing BeSafe Stretch B

It is important that you read this user manual BEFORE installing your seat. Incorrect installation could endanger your child.

! Vital information
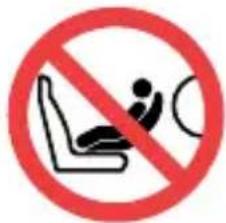
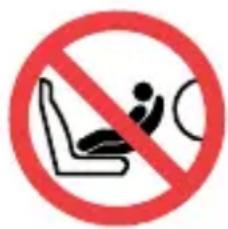
- The child seat MUST NOT be installed in a front seat WITH AN ACTIVATED AIRBAG or on a vehicle seat position with a belt airbag.
-
The car list provided for this seat can serve as a guideline for which positions in your vehicle the seat can fit. But you must always check your vehicle manual if child seats of this type are allowed to be installed. The vehicle manual is the leading guideline and must always be followed.
-
This seat must be installed rear facing with a 3-point vehicle belt, approved according to UN/ECE Regulation No.16 or other equivalent standards.
-
The floor support must always be used. Make sure that the floor support is fully pushed down until it touches the floor of the vehicle in front of the seat and that the indicators on the floor support are always showing green.
-
The harness straps must always be locked when the child is in the seat.
-
The harness straps must be tightened without slack and not twisted.
-
Make sure to tighten the harness extremely well, so that you can no longer make a horizontal fold in the belts. When you tighten the harness, make sure that the child is positioned well against the backrest.
-
The shoulder pads contain magnets. Magnets can influence electronic equipment such as pacemakers or other medical devices.
-
Protect any part of the child's body which is exposed to the sun.
-
Always dress your child in a thin layer of clothes to avoid direct contact between harness belts and skin. Avoid puffy clothes since this prevents being able to tighten the belts fully.
-
We recommend to use the baby shell only in the most reclined position till a stature height of 87~cm .
-
Remove the baby shell when the child is taller than 87~cm .
-
You must stop using this seat and change to the next suitable seat when ONE of these conditions is met: 1) The child is taller than 125~cm ; 2) The child incl. clothes weighs more than 36~kg ; 3) The shoulder height exceeds the highest position of the shoulder belts; 4) The top of the ears is above the highest point of the headrest in the highest position.
-
Replace the seat if it has been in a collision where the speed was 10 km/h and above or if there is a suspicion that the seat has been damaged
for whatever reason. Although it may look undamaged, if you were to have another accident, the seat may not be able to protect your child to the level to which it was designed.
- Prevent the seat from becoming trapped or weighed down by luggage, seats and/or slamming doors.
- DO NOT attempt to dismantle, modify or add any part to the seat. Warranty will be void if non-original parts or accessories are used.
- Never leave your child unattended in the seat.
- Make sure all passengers are informed about how to release your child in case of emergency.
- Make sure luggage or other objects are properly secured. Unsecured luggage may cause severe injuries to children and adults in case of accidents.
- Never use the seat without the cover. The cover is a safety feature and may only be replaced by an original BeSafe cover.
- Do not use any aggressive cleaning products; these may harm the construction material of the seat.
- When washing the seat cover, make sure to follow the wash label on the inside of the cover.
- BeSafe advises that child seats should not be bought or sold secondhand.
- KEEP this user manual for later use with the seat. Store it in the user manual pocket on the bottom side of the front brace.
- DO NOT use the seat for longer than 15 years. Due to ageing, the quality of the material may change.
- DO NOT use at home. It has not been designed for home use and can only be used in a vehicle.
- When the child seat is mounted in the car check all the areas where the child seat might touch the interior. We recommend using a (BeSafe) protection cover in these places to avoid cuts, marks or discolouration to the interior of the vehicle, especially in vehicles with leather or wooden interiors.
- If in doubt, consult either the car seat manufacturer or the retailer.
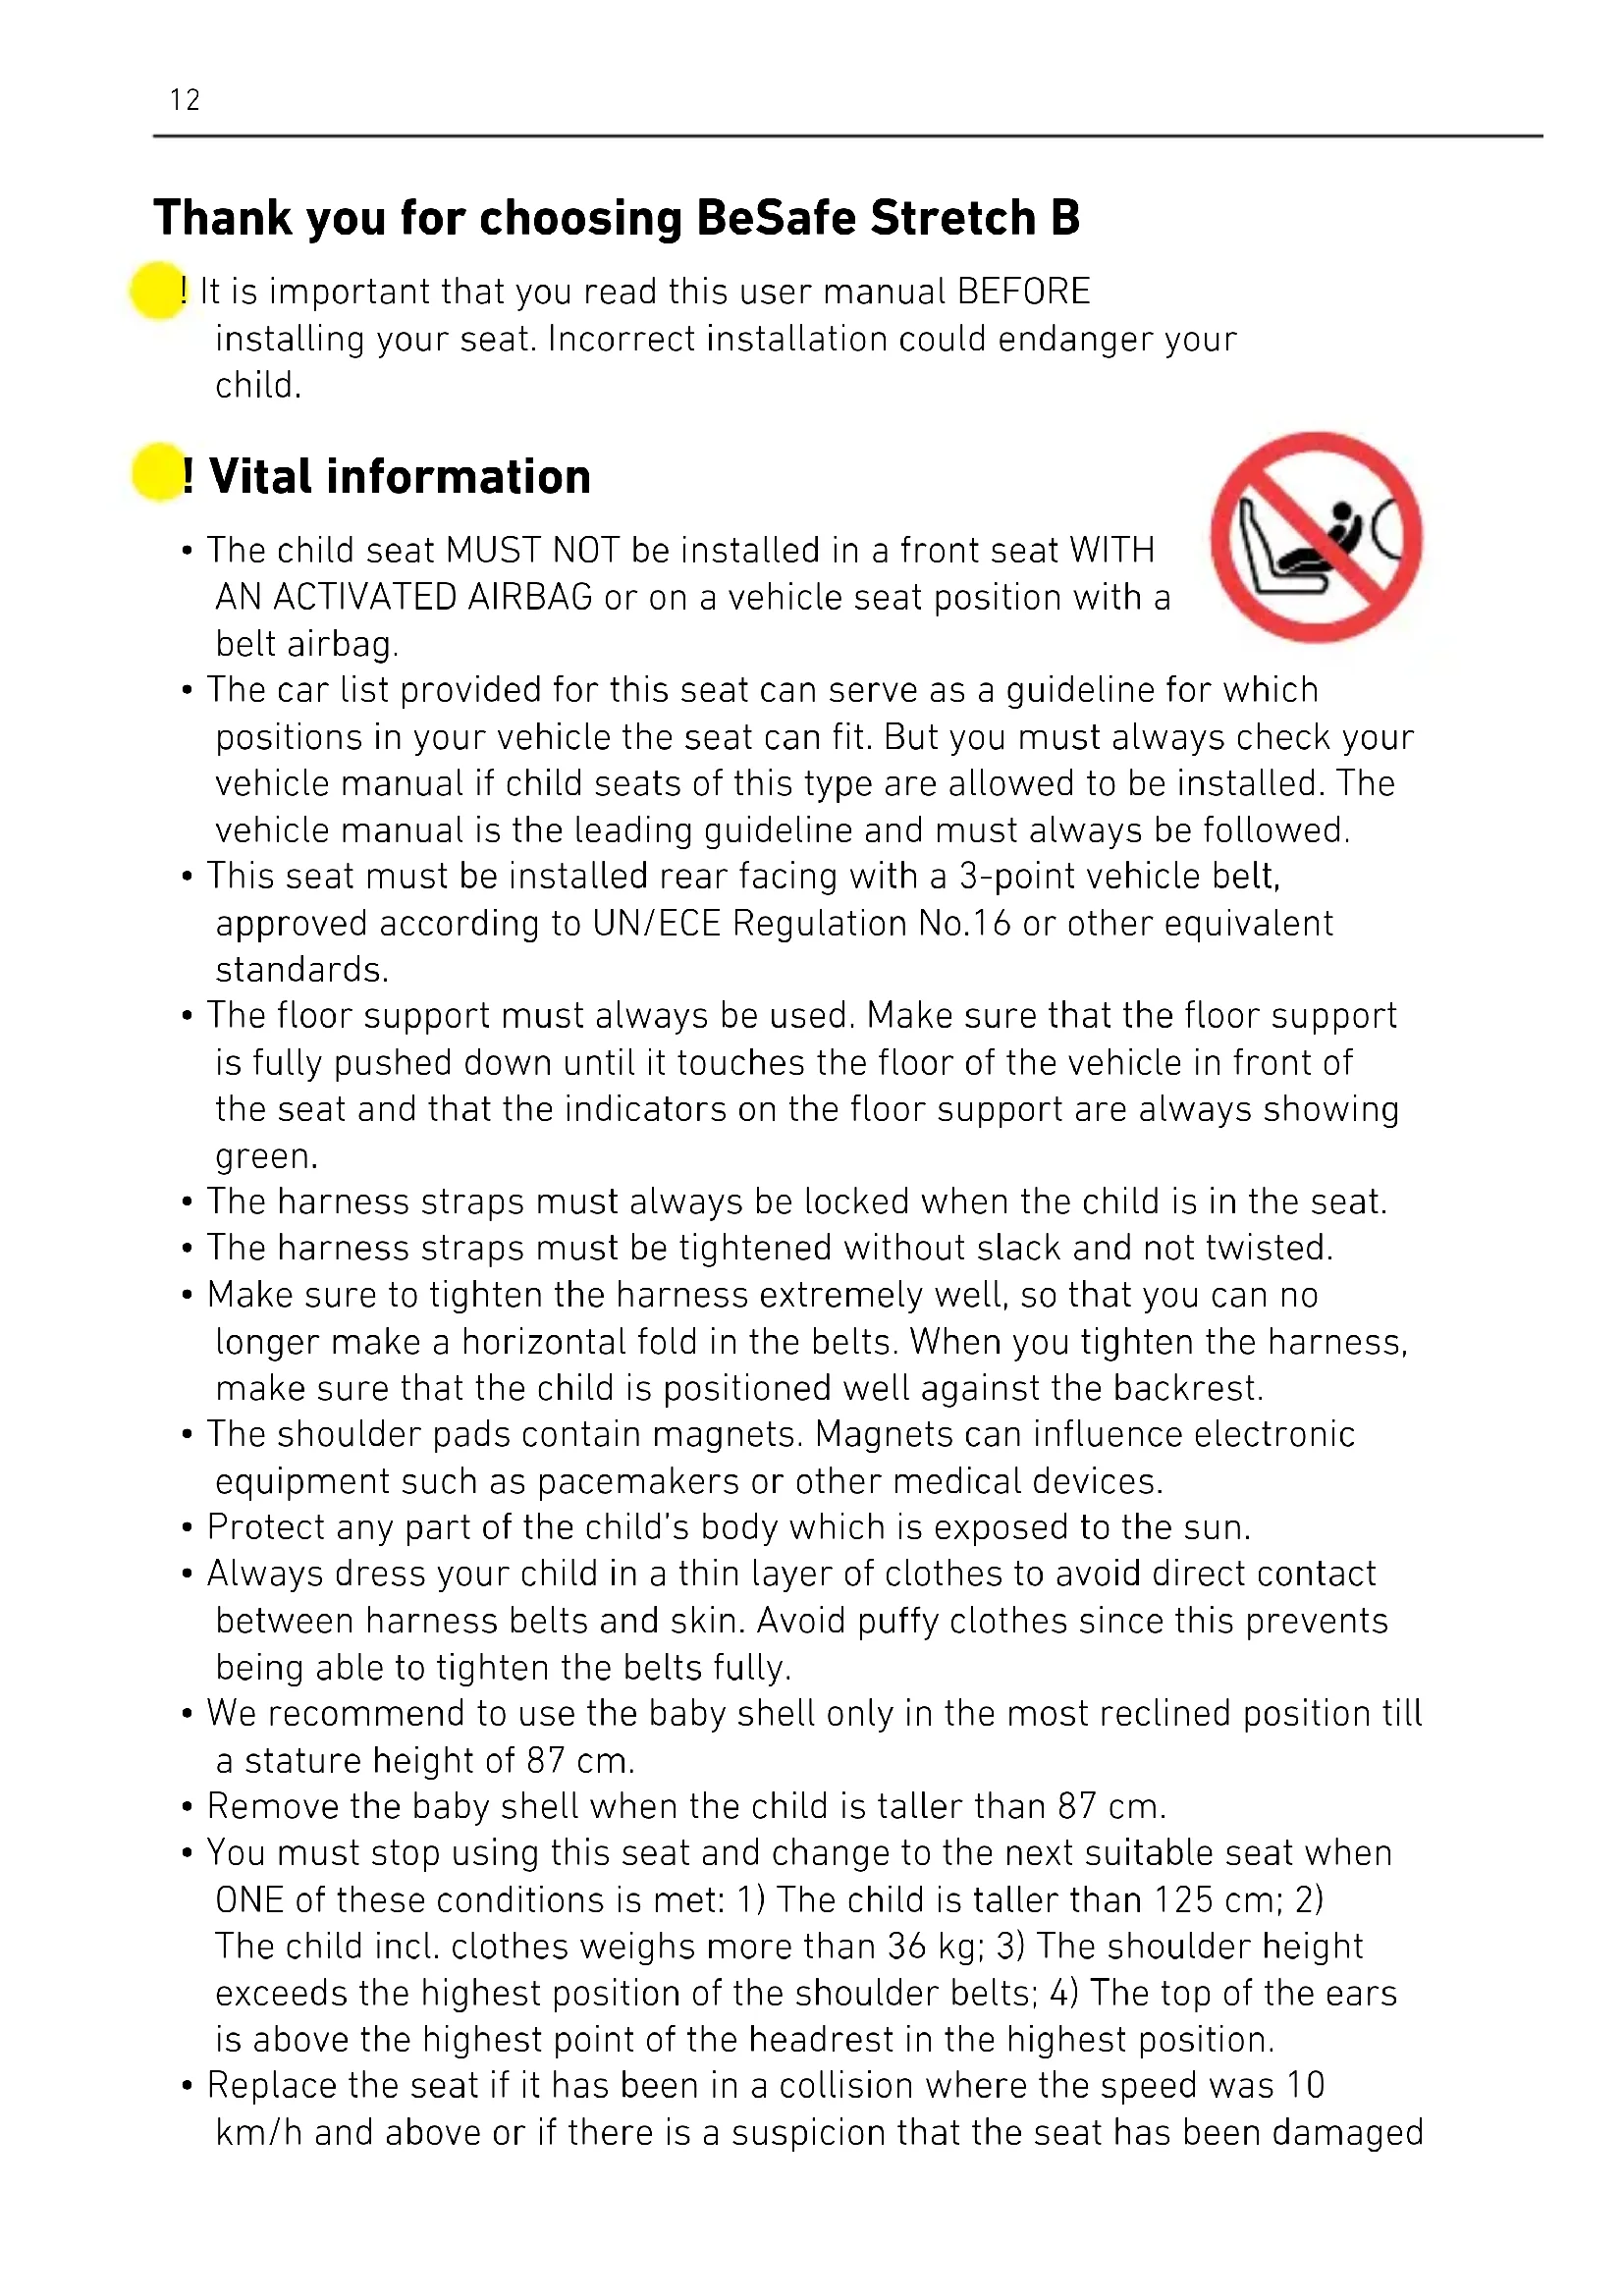
Components
1a Headrest
1b Baby shell
1c Front brace
1d Front brace handle
1e User manual pocket
1f SIP+
1g Belt guider (2x)
1h Floor support
1j Floor support adjuster
1i Floor support indicator
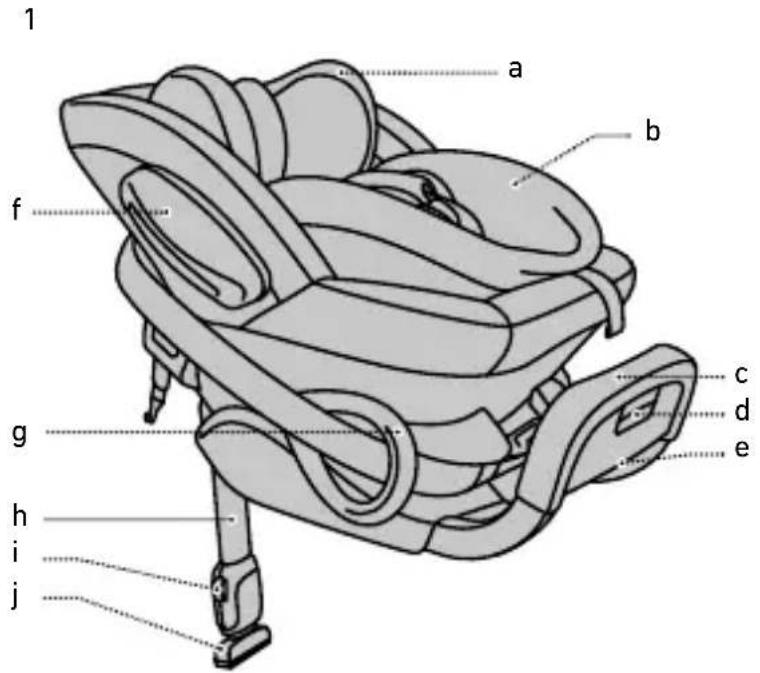
1k Shoulder pads (2x)
11 Shoulder belts (2x)
1m Hip belts (2x)
1n Harness buckle
10 Central adjuster button
1p Central adjuster strap
1q Headrest handle
1r Tensioner knob
1s Lower tether (2x)
1t Lower tether release button (2x)
1u Lower tether strap (2x)
1v Lower tether hook (2x)
1w Recline handle
1x Tensioner lock-off
1y Lower tether anchorage points in the vehicle
1z Bolt(2x)
1aa Washer M6 (2x)
1ab Shoulder washer (2x)
1ac Lower tether bracket (2x)
1ad Anchor strap (2x)
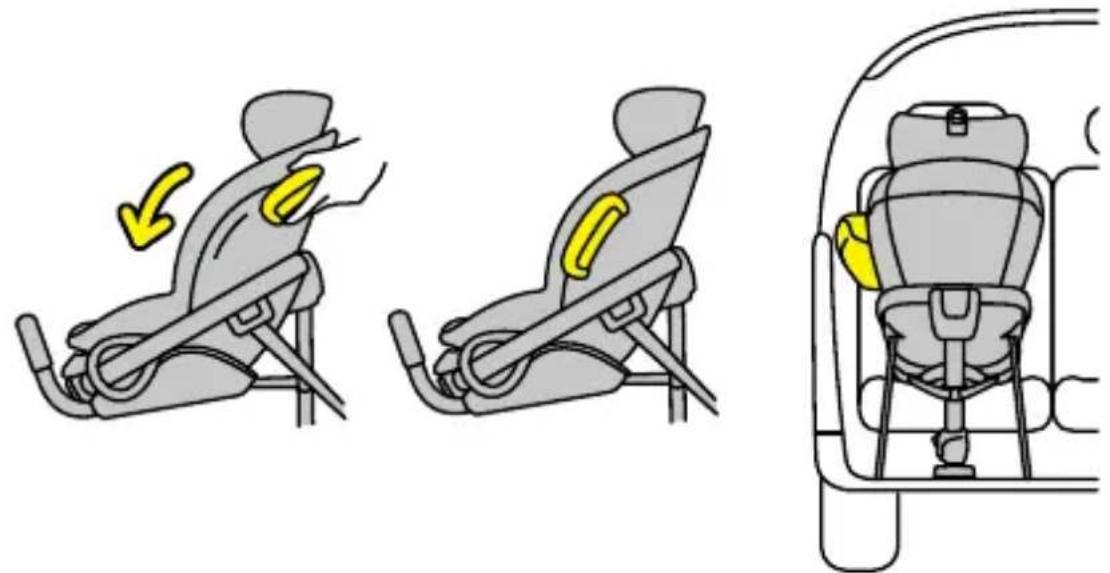
Preparing the child seat for installation
- The front brace is delivered as a separate part and must be mounted to the seat before using the seat in a vehicle. Once installed, the front brace can only be taken off with the correct tools.
- To mount the front brace: Keep the front brace handle pushed in while sliding both tubes into the openings in the seat base on both sides. Slide them all the way in. (2)
- Decide with how much leg space you want to install the seat by adjusting the position of the front brace. To do so, push the front brace handle in
and slide the front brace in or out and let it click into place. (2)
- Tip: It's easiest to adjust the front brace position already outside the vehicle.
- Move the floor support away from the seat and upwards until it locks into the usage position and does not dangle anymore. (10)
- For an easier installation once in the car, bring the seat into the most upright position with the recline handle, and keep the floor support in the shortest position.
Preparing the vehicle for installation on the back seat
- Bring the backrest of the back seat into upright position (if applicable to your car).
- To give yourself space for the installation, move the front seat forward as far as possible and put it into upright position if needed.
- If your vehicle is equipped with lower tether anchorage points, you don't need further preparations and can start with installing the child seat. Check your vehicle manual to ensure that the anchorages are allowed to be used with lower tethers. (3, 4)
- If your vehicle is not equipped with built-in lower tether anchorage points, you can use the lower tether brackets provided with the seat or available as a service part to create an anchorage point. This should be done by qualified persons.
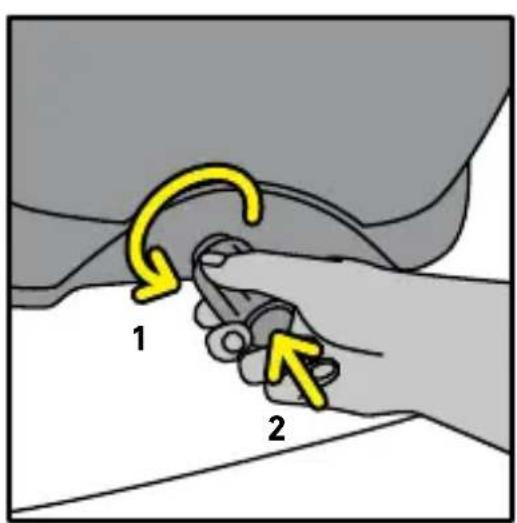
- Locate the opening in the rails of the front seat that is furthest to the back (nearest to the back seat), accessible from beneath, large enough and symmetric on both rails. From the inside of the rail, slide the lower tether bracket underneath the rail, so that the holes of the bracket and rail align. You can choose to have the angled part of the bracket point upwards or downwards. (5)
- Put the washer over the hole on top of the rail and put the bolt through from above. For a hole with a diameter of 6mm , you can use the M6 washer. For a hole with a diameter of 8mm or more, you can use the shoulder washer. Use a Hex key (Allen key) size 4 to tighten the screw. Make sure it is fully tight, with a torque of at least 5Nm . (5)
- Repeat on the other side.
- Check that the brackets do not interfere / get moved or damaged by the vehicle seat. Regularly check that the bracket still sits tight and as positioned, or re-tighten the bolt if needed.
- If your vehicle does not have built-in lower tether anchorage points and the lower tether brackets cannot be fitted either, you could use the anchor straps accessory as an alternative. Please check the anchor strap's user manual for how to use them.
Preparing the vehicle for installation on the passenger seat
- Adjust the backrest of the front seat into an upright position.
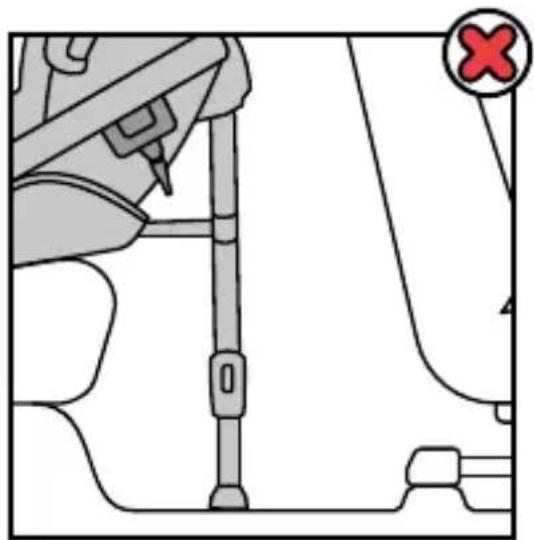
- ALWAYS deactivate the front airbag. If this is not possible in your vehicle, you cannot install this seat on the front seat.
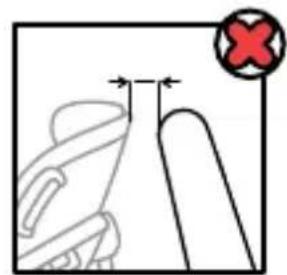
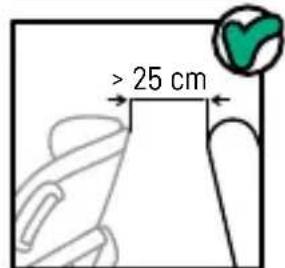
- Move the front seat and/or adjust the front brace position, so that the back of the child seat will be in contact with the dashboard. If having contact is not possible, then you should move the front seat as far back as possible, so that you have a preferable minimum distance of 25 cm between child seat and dashboard. (6)
- If your vehicle is equipped with lower tether anchorage points, you don't need further preparations and can start with installing the child seat. Check your vehicle manual to ensure that the anchorages are allowed to be used with lower tethers. (7)
- If your vehicle is not equipped with built-in lower tether anchorage points, you can use the lower tether brackets provided with the seat or available as a service part to create an anchorage point. This should be done by qualified persons.
- Locate the large-enough opening in the rails of the front seat that is furthest to the front (nearest to the dashboard), accessible from beneath and symmetric on both rails. From the inside of the rail, slide the lower tether bracket underneath the rail, so that the holes of the bracket and rail align. You can choose to have the angled part of the bracket point upwards or downwards. (8)
- Put the washer over the hole on top of the rail and put the bolt through from above. For a hole with a diameter of 6mm you can use the M6 washer. For a hole with a diameter of 8mm or more you can use the shoulder washer. Use a Hex key (Allen key) size 4 to tighten the screw. Make sure it is fully tight, with a torque of at least 5Nm . (8)
- Repeat on the other side.
- Check that the brackets do not interfere / get moved or damaged by the vehicle seat. Regularly check that the bracket still sits tight and as positioned, or re-tighten the bolt if needed.
Installing the child seat into the vehicle
- Once the anchorage points for the lower tethers are in position, the installation can continue.
- Place the child seat onto the vehicle seat with the front brace positioned against the backrest of the vehicle seat. (9)
- Remove the yellow cap from the floor support. The alarm sound will stop when the seat is installed correctly with the floor support in contact with
the floor of the vehicle.
- Extend the floor support with the floor support handle, so that it is in contact with the vehicle floor while the child seat sits flush on the vehicle seat. This prevents the child seat from tipping backwards. (10)
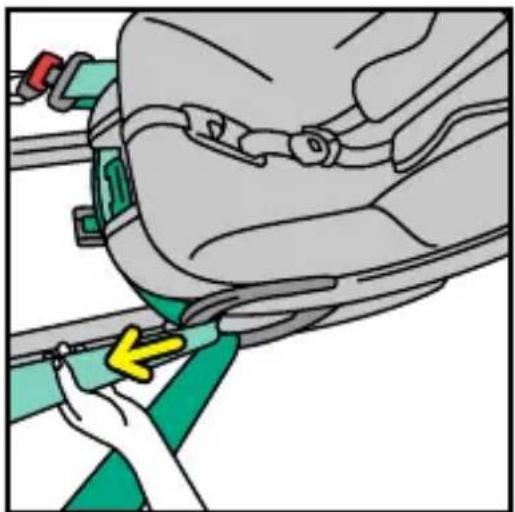
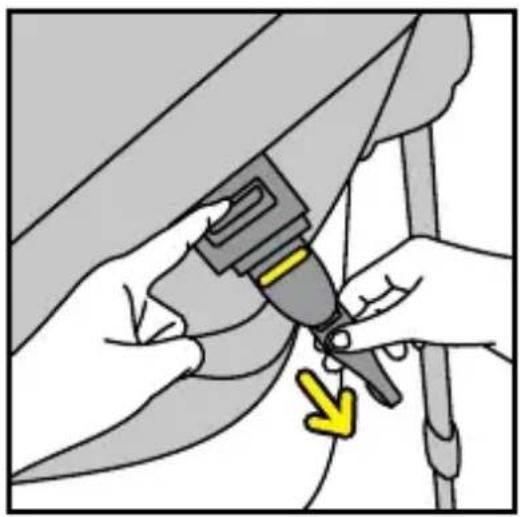
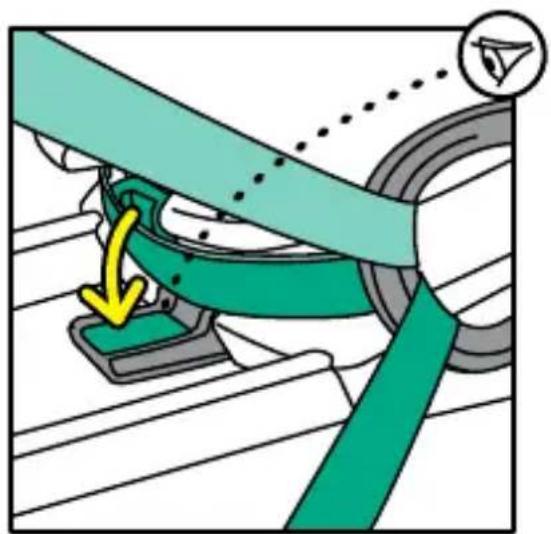
- Pull the vehicle belt out long and combine shoulder belt and lap belt with one hand. With the other hand, guide the belt tongue through the first belt guider, through the tensioner-lock-off, through the second belt guider and click it into the buckle. Make sure both belts sit underneath the ledge on the base and fully inside the tensioner-lock-off. (11, 12)
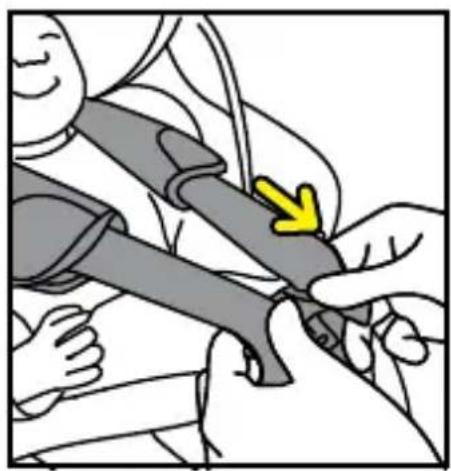
- To remove slack in the belt, first pull on ONLY the shoulder belt near the buckle. Then, pull on the shoulder belt on the door side while making sure the child seat does not move. (13)
- When all slack is removed, rotate the tensioner knob clockwise at the backside of the seat. When doing so, the tensioner-lock-off at the front side will close. Continue rotating the knob to tension the belt. You can rotate until the knob will click and doesn't tension any further. (14)
- Note: check that the vehicle belt buckle is not in conflict with the belt guider. Should this be the case, you need to install the seat with a larger front brace position.
- Check that the floor support is still in contact with the vehicle floor and adjust if needed.
- The height indicator of the floor support shows green when the floor support is in contact with the floor.
- The alarm sound stops when the floor support height indicators show green and it is in contact with the floor (not on all models).
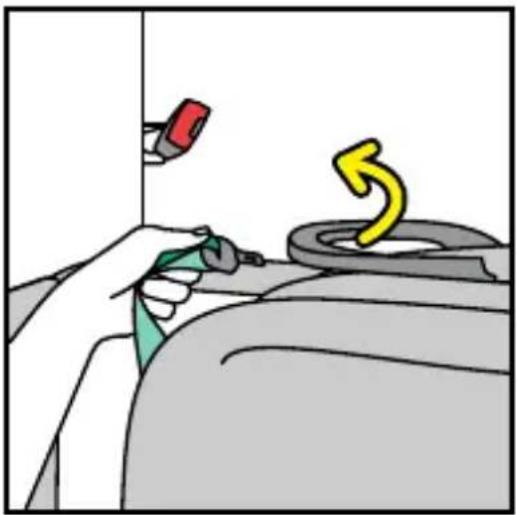
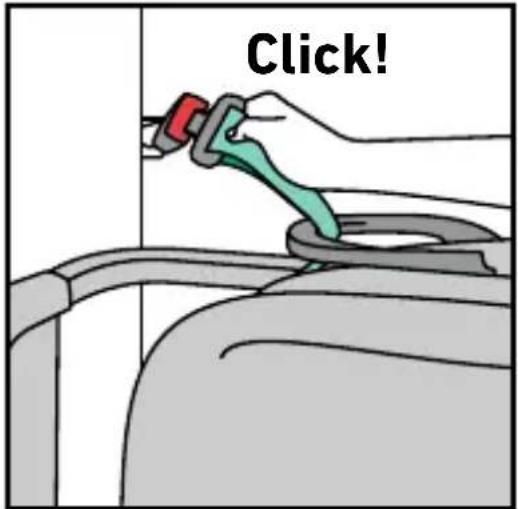
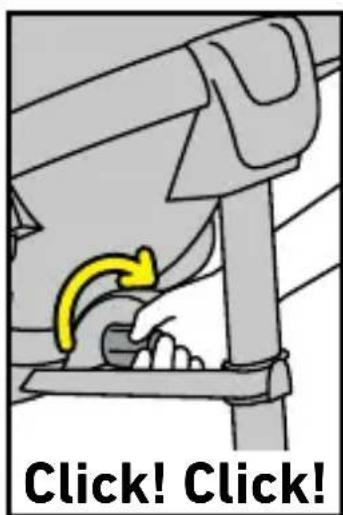
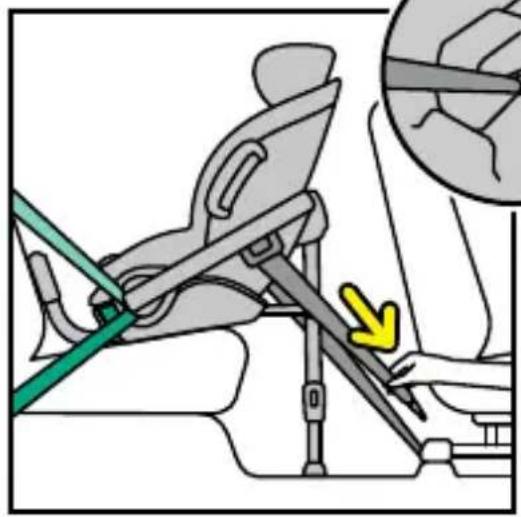
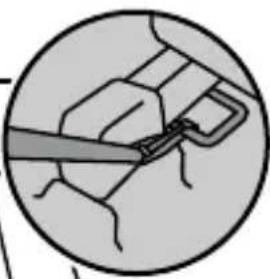
- Push down the lower tether release button and pull out the lower tethers. Connect the hook to the lower tether anchorages of the vehicle. Repeat the same procedure on the other side. (15)
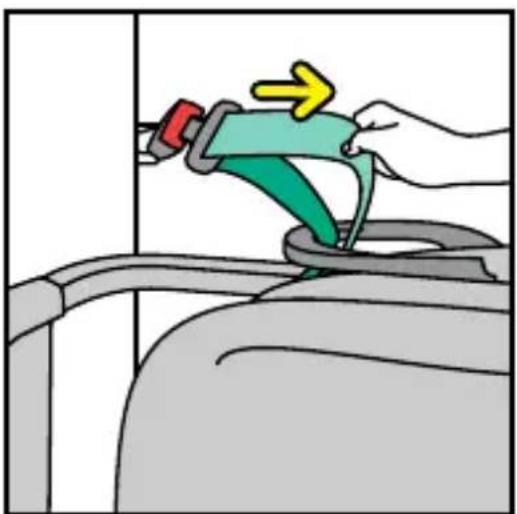
- Ensure that both lower tethers are connected and tight. By wiggling the seat from side to side, they will become more tight.
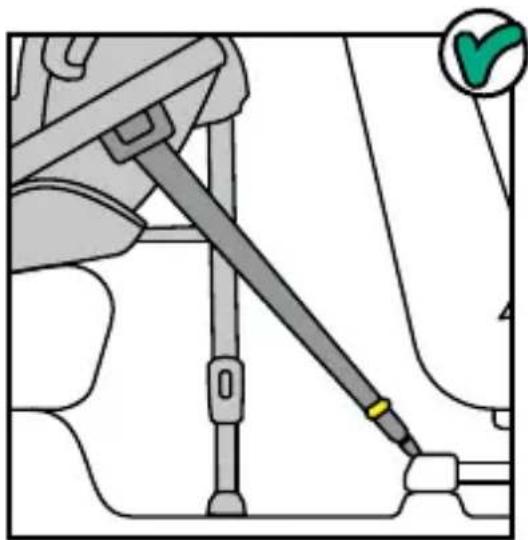
- Make sure that you can still see the yellow line on each lower tether strap. If you cannot see it, there is not enough tension on the tethers. (16)
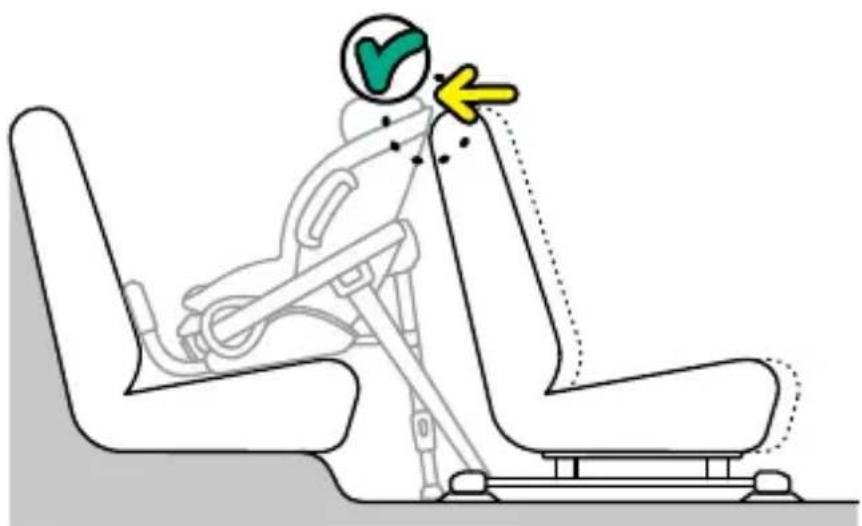
- If you have installed the child seat on the back seat: Move the front vehicle seat backwards, so that it is in light contact with the child seat. If this is not possible, then move the front seat forward to create as much distance as possible between the child seat and front seat, preferably at least 25 cm. (17)
-
Check if the installation is tight and stable: the vehicle belt should be very tight without slack and locked by the tensioner-lock-off. Both lower tethers should be connected and tight and have the yellow line visible, and the floor support should be in contact with the vehicle floor. Repeat the same installation if necessary.
-
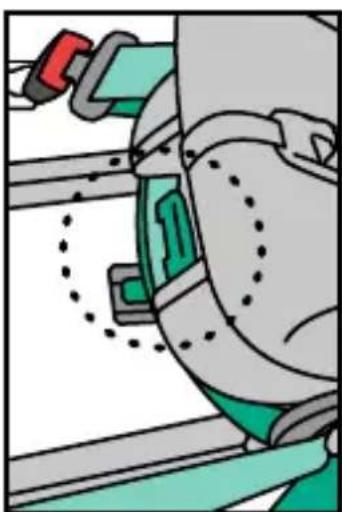
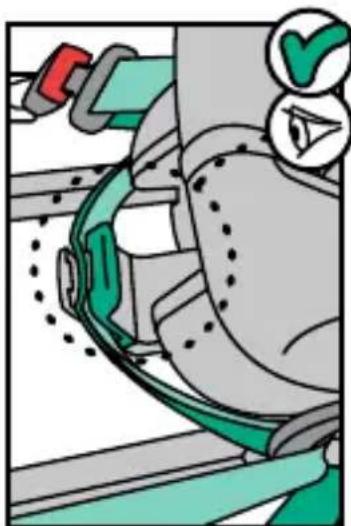
The seat is delivered with removable SIP+ (side impact protection +). This extra side impact protection should be used on the doorside of the vehicle. To connect your SIP+ version, follow the instruction drawings on the SIP+ included with your seat. The seat already offers high level integrated side impact protection. This extra side impact protection improves the protection in the side impact still further. (18)
- Do not use the SIP+ on the seat when the space between seat and door of the vehicle is too small, which might lead to a situation where the seat is not positioned correctly on the vehicle seat.
- In case the SIP+ sits at the height of the door window and your car is equipped with side curtain airbags, then do not use the SIP+ if there is less than 10cm distance between the SIP+ and the window.
Removing the child seat from the vehicle
- To remove the seat from the vehicle, first release the lower tethers with the release button and hook off the lower tether hooks.
- Release some of the tension of the tensioner by turning the tensioner knob counter-clockwise. Then you can push the knob towards the seat to open the lock-off. If pushing is difficult, turning the knob further counterclockwise releases the tension and opens the lock-off at its end position. Make sure that the tensioner is totally back to its starting position with an open lock-off at the front. (19)
- Release the vehicle belt from the buckle and guide the belt back through the belt guiders.
- Bring the floor support into its shortest position while pressing the floor support adjuster button.
- Take the seat out of the vehicle.
- If you want to store the seat, you can bring the floor support into transport position by pulling it downwards and pushing it against the seat.
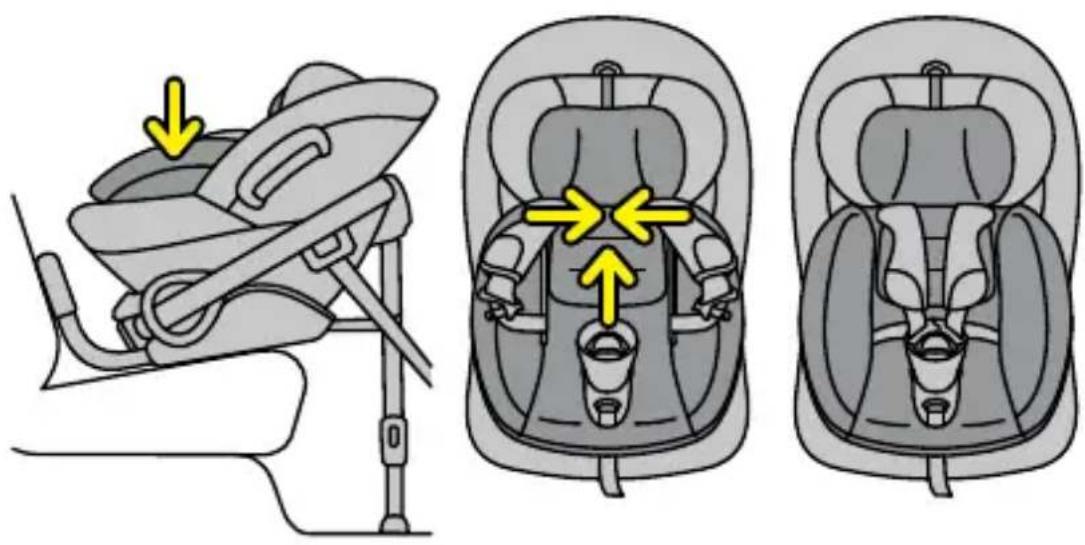
Placing the child into the seat
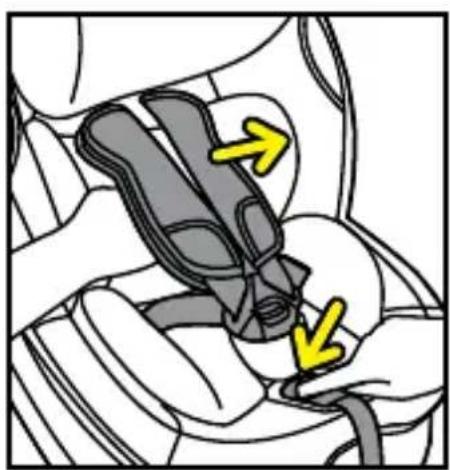
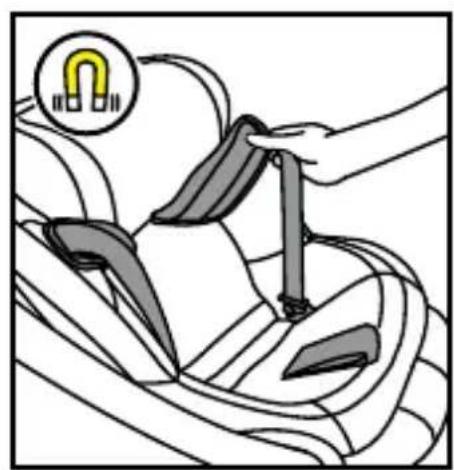
- While pressing the button of the central adjuster, pull the shoulder belts away from the seat with a flat hand. Make sure to pull the belts evenly so that they stay at the same length. Do not pull on the shoulder pads, as they are fixed and cannot move. (20)
- Open the harness buckle.
- To keep the straps out of the way, place the shoulder pads onto the magnets on each side of the seat shell. (21)
- Place your child into the seat and adjust the position of the shoulder belts and headrest if needed - see section "Adjusting to the growing child".
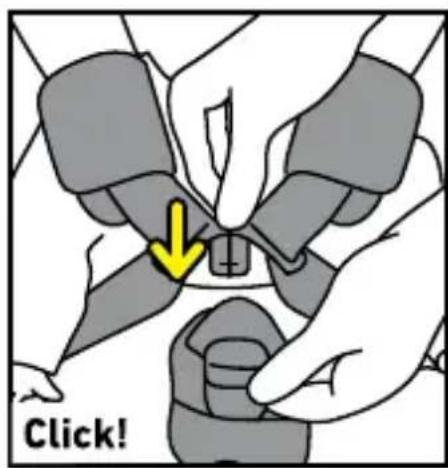
- Place the shoulder belts over the child's shoulders and close the buckle:
CLICK! (22)
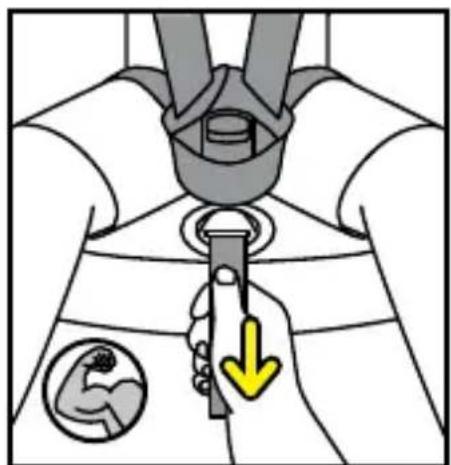
- Pull the central adjuster strap straight away from the seat to tighten the harness. Make sure to tighten the harness extremely well, so that you can no longer make a horizontal fold in the belts. When you tighten the harness, make sure that the child is positioned well against the backrest. (23)
Adjusting the seat to the growing child
Shoulder belt/headrest height
- The height of the shoulder belts and the headrest can be adjusted by pulling the headrest handle upwards at the back of the headrest and moving the headrest up or down. To be able to do so, the harness buckle has to be opened and the straps have to be pulled out. (24)
- To find the right height for your child, move the headrest all the way up, place your child into the seat, and then move the headrest downwards until it sits directly on your child's shoulders.
- Important for use on the front seat: you should always have a minimum distance of 5 cm between the car's front shield and the top of the child's head or headrest, whichever is higher. If your car does not enable this for the highest headrest positions, you need to move the seat to the back seat instead.
Recline angle
- The recline angle can be adjusted to how it is comfortable for your child. To do so, access the recline handle at the underside of the seat shell. (25)
Leg space
- You can decide with how much leg space you want to install the seat by adjusting the front brace position. This needs to be done before installing the seat. See section "Preparing the child seat for installation".
Baby shell
- The baby shell must be used from birth and can be used until a stature height of 87~cm . Don't take the baby shell out before the baby is 61~cm tall and can sit upright by themselves.
- The baby shell can be taken out of the seat shell by guiding the harness through the slots of the baby shell.
- The baby shell can be positioned back in the seat shell by guiding the harness through the slots of the baby shell. Use the baby shell only in the most reclined position of the seat. Make sure the harness is positioned correctly, so the harness can be pulled tight without twisting. (26)
Removing and refitting the cover
- Do take care when you remove the cover, as re-fitting the cover is done in reverse.
- The cover of the headrest can be taken off separately.
- For further instructions, please visit www.besafe.com
- When washing the seat cover, make sure to follow the wash label on the inside of the cover.

Warning: potential misuse
- The child seat MUST NOT be installed in a front passenger seat WITH AN ACTIVATED AIRBAG.
- The child seat MUST NOT be installed in a position where the vehicle belt is equipped with a belt airbag that cannot be deactivated.
- The floor support must always be used. Make sure that the floor support is fully pushed down and in full contact with the vehicle floor.
- Make sure that the vehicle belt is installed tight, the lock-off is closed and tensioned and that both lower tethers are connected with the vehicle and tensioned tight.
Guarantee
- Should this product prove faulty within 24 months of purchase due to materials or manufacturing fault, except covers and harness straps, please return it to the original place of purchase.
- The guarantee is only valid when you use your seat appropriately and with care. Please contact your retailer, they will decide if the seat will be returned to the manufacturer for repair. Replacement or return cannot be claimed. The guarantee is not extended through repair.
- The guarantee expires: when there is no receipt, when defects are caused by incorrect and improper use, when defects are caused by abuse, misuse or negligence.
IMPORTANT: Before disposing the seat at the end of its lifetime
- By ensuring that the product, batteries, and electronic parts are disposed of correctly, you will help to prevent potentially negative consequences for the environment and human health which could be caused by inappropriate waste handling.
- Please contact your local authority for further details about your nearest designated collection point.
Disposal of product, waste batteries, and electronic parts (applicable in the EU and other countries with separate collection systems)
-
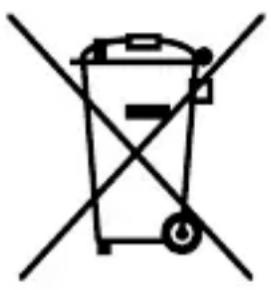
This symbol on the product or on accompanying documents indicates that the product, the batteries, and electronic parts should not be treated as general household waste.
-
Please remove any waste batteries and electronic parts before the disposal of the child seat. Follow the instructions for removal on the part or on the product.
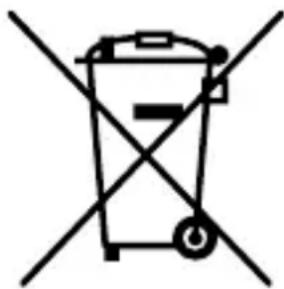
- This seat has an electronic unit on the inside of the floor support (not on all models). You find the removal instruction sticker on the backside of the floor support.
- Please hand in any waste batteries and electronic parts at a designated collection point for handling and recycling electrical and electronic waste.
Disassembly & disposal of the child seat
- This product can be dissassembled in different materials for waste handling; please visit www.besafe.com for detailed instructions.
- Please hand in the child seat at a designated collection point for handling non-general household waste.
Disposal of the packaging
- The packaging of this product contains a PE plastic bag and carton, please seperate these materials and hand them in the designated collection points in your area.
Takk for at du valgte BeSafe Stretch B

3APPEUCAETCyaTaHaBnBaTbKpeCNo Ha nepeHem
naccaxnpckom cndeHbe,ecnno OHO OCHaueHo
AKTINBUNPOBAHHOI NOJUHKOJI BE30PACHOCTNI.
-Детскoe кесло 3APPEUJAETCЯ устанавл�ьВТakOM
IIOLOXKeHn, KOrdapeMeHb6e3OpaCHOCTNaBtOMo6nlaOBOpydoBaH
NoDyUshKoB 6e3OpaChOCTn, KOTopyu HeIb3a OTKJIIOuHTb.
Bcerda Heo6xOIMO nCnoIb30BaTb onOpy B noJ. Y6eIntecb, yTO
OnonpaBnoI noJIHOCTbIO OnyuIeHa N COnpNKACAETcC NOIOM
ABTOMOUIJIA.
- Y6eIntecb B TOM, yTo peMeHb aBTOMO6nla HaTaNHT, fNkcaTop
3aKpbIT nHaTaryT, a 06a HnXHHx CtpaxOBOUHbIX peMeuKa CBra3aHbIC
aBTOMO6nIeM N Tyro HaTaNHyTbI.
TapaHTn
- Ecni B teueHne 24 mecaeB c MOMeHTa nokyn y n3deJna 6yndet
BbIaBHeN DeΦeK T MaTePnAla NII npOn3BoDCTBeHHbI 6paK (3a
nCKJIoueHneM ueXIOB nIpeueBbIX peMHei), noKajyucta, BepHnte
eRO B MaRa3nH.
-「rapaHTnJaIeNCTByeTToJIbKOBTOMcLyuae,ecnBbINCNoJb3yeTe
aBtOKpeCNo HndJeKaIIm n 6epeKhbIM o6pa30M. PoJkaIyIcTa,
CBAKNTecb C dIJIepOM, OH npIMeT peWeHne, cJeDyET IIN BepHyTb
aBTOKpeCNo npOn3BODInTeJIO dIpa pEmoHTa. 3aMeHa NJI B03BpaT He
ocuueCTBIAOTc. Nocle peMOHTa rapaHTn He npoJneBaetc.
-「rapaHTnyaYtpaunBaet CBOU cnIy: npn OTCytCTBn TOBapHoro yeKa,
ecnn neeKtbl Bbl3BaHbI HnnpaBnIbHO nn HeHaIJIeKaIeJ
3Kcnpnyatauanei,ecnndeΦeKtBbI3BaHbI 3KcnpnyatauaneiC
HapyuheHnem HOpM n npaBnI nn He6peXHoCTn.
BAJKHO: Ipeed ytni3auee Kpecla no nCTeehn cpoka cnjx6bl
- 06ecneuBra npaBnIbHyU yTnIIN3aunIO npOdyKTA, 6aTapei
I 3JIeKTPoHHbIX KOMNoHErTOB, Bbl NOMOKeTe IpeIoTbpaTITb
noTeHcuaJIbHo HeRaTINBHeIe NocLeIDCTBnIa OKpyKaIOSe cpeIbI
3ДОРOBьЯЧЕLOBEKa,КOTOpbIe MOrTy 6bITb Bbl3BaHbI HeHaДлЕжСИМ
obpaueHnemCOTXoJamn.
- IozkanyiCTa, CBxHTEcB C MeCTHbIMN yIOnHomOueHHbIMN opraHAMN
3aBxHn Heo6xIDHO BnKOpncTObyBaTn onOpy B nIqIory.
Ipekehntec, 0o onopa nobHicTIO BucHyTa Bn3 i TOpKaetbcraPiIIOr n ABTomO6iJa.
- IpekehauTeCra, 0 pemihb aBTOMobiJa HadiiHOBHeHn, iKcatop 3aKpnti i HATaHTn, a ObndBa HxKHXCTpaxOBOuHnx peMeHa 3'edHaHi 3 aBTOMoBilem i Tyro HaTAYtI.
Гаразия
-Якwo npotrom 24 micaiv i3 datn npndbaHn B cboMy Bnpo6i 6ydyb bnaBnehi defeektn MaTepiaiB a6o BuroTOBHeHHn (Kpim nokpnTTa paemeHIB 6e3neKn), 6ydI naKa, nobepHITb Bnpi6 npodabu.
- Покуше мае паво на rapантулше за умов дбайloro ta habeжно вкористаня кPICla. Bydь lacka, 3BepHITbcЯdo npodabca.Пробavenь визначас,чи сдд поberphуtn кpiclo Bnpo6nkoBI ДЯ Виправлени.deфektib.Претeh3i BiDnocho 3amihnx abo nobephenx врobig He npimmaotbcЯ.пicя усуненя deфektig rapaHTiHn Tepmin He npodovkyeTbca.
-「rapaHTia Ha Bnpi6 Btpauec uHHicTB HacTyHnx BnnaKax: kUo BiidcyTHiyeK Ha npD6aHHra Bnpo6y; kUO deΦeKTn CnpuHneHo HeHaJIeJHKHM BnKOpNCtAHNm; kUO DeΦeKTn E HacJIIDKOM HeIpaBnIbHOrO BnKOpNCtAHN a6o HeIb6aNoCTi.
BAJKINBO: Npeed ytni3aicio Kpicna nicra 3akihuen TepmiHy noro cnjx6n
3a6e3neuBwn npabnIbHy ytnIizauio Bnpo6y, 6atapei Ta eJeKtpoHHnx KOMnoHentB, BN dOnomOKeTe 3anobirn noTeHciH NOHTN HcTAtNBHOy BnINBy Ha IOBkiJIra Ta 3dOpOB'JIOJe, kKi MoKyTB 6yTu cnpuHHeH HeHaJIeXHM NOBODKeHNrM 3 BiIXoDAMN.
- Дя отpresmaня iHфорmaцii npo haN6nKчи nyHKT 360py taKnx BiXODiB 3BepHiTbcra Do MicceBOrO opraHy BnaI.
Ytni3aia Bnp06y, ynaKOBKn, BiDnpaCboBAnx 6aTapei Ta eIeKTPoHHnx KOMnoHENTIB (3actocobycTBcra y EbponeiCbKomy Co03i Ta iHnX kpaIHax i3 cnCTeMaMu po3dIInbHorO 360py)
- Léen cimboJnHa Bnpo6i a6o B cynpobiDnHex DoKymehtaxdo Hb0rO Bka3ye Ha Te, 1o Bnpi6, 6aTapei Ta eJeKtpoHniKOMnoHeHTn He cnid yTuJIi3OByBatn pa30m 3 NObyTOBmNBIXxOdaMn.
- Ipeed ytni3aicio dntyoro kpicna BnmiTyci Biinpaobahi 6atapei Ta eelktpoHni KOMnoHENTN. DToPmYtecb iHCTpyKci 3 BndaJIeHHa, 0Bka3aHI Ha deTajx abo Bnpo6i.
- Lékpicno Maé eIeKtpoHnBLOK Ha BHyTpipHi CTOpOHi ONOPN B nIyIory. Bn 3HaJTe HakJeKY 3 iNCTpyKciA M N ODo BnJaJIeHHa 3aHni CTOpOHi ONOpN B nIyIory.
3dabai Te BnKopncTahi 6aTaapei Ta eJeKTpoHni DeTani B CneiaIbHo BiDBeHeHX nyKtax 360py IJI nepepO6Kn i yTuJI3aui eJeKTpnUHorO i eJeKTpoHHoro yCTaTKyBaHHra.
P036npaHn i ytni3aizia nTayoro Kpicla
- Zei Bnpi6 moxHa po3bupatn Ha pi3Hi MaTepiAIn ДЯ nepepo6Kn BiXoIIB; DeTaIbHi iHcTpyKciMoXHa 3HaNTn Ha caTi www.besafe. com.
-Будьласka,ЗдайтдntячekpicnoВспeцiaльно ризнayени pyнкT 360py OkpeMo BiД 3aragbHnx NO6yTOBnx BiДхODIB.
Ytulizia ynapokobkn
- Ynakobka zufo npodykty miCTntb noJIeTnJIeHOBni paKeT i KapToHHy Kopo6ky. Po3diIitb zui matepiJIi i nepeaIte ix do cneiaJIbHOro npInomHoro nyHKTy B bawomy paOHi.
BeSafe Stretch B- nwnn
.
n nn nnnnnnnnnnnnnnnnnnnnnnnnnnnnnnnnnnnnnnnnnnnnnnnnnnnnnnnnnnnnnnnnnnnnnnnnnnnnnnnnnnnnnnnnnnnnnnnnnnnnnnnnnnnnnnnnnnnnnnnnnnnnnnnnnnnnnnnnnnnnnnn
.
!N7i
1
wnn nnn nn nnnnn (Tether) nnn nnnn 13
.
. ninnn (Tether) nn nynn 7y nn nn nn nn nn nn nn nn nn nn nn nn nn nn nn nn nn nn nn nn nn nn nn nn nn nn nn nn nn nn nn nn nn nn nn nn nn nn nn nn nn nn nn nn nn nn nn nn nn nn nn nn nn nn nn nn nn nn nn nn nn nn nn nn nn nn nn nn nn nn nn nn nn nn nn nn nn nn nn nn nn nn nn nn nn nn nn nn nn nn nn nn nn nn nn nn nn nn nn nn
(16).Tether) nn nn nnnn nn nn nn nn nn nn nn
nNn nn nnn nn nn nn nn nn nn nn nn nn nn nn nn nn nn nn nn nn nn nn nn nn nn nn nn nn nn nn nn nn nn nn nn nn nn nn nn nn nn nn nn nn nn nn nn nn nn nn nn nn nn nn nn nn nn nn nn nn nn nn nn nn nn nn nn nn nn nn nn nn nn nn nn nn nn nn nn nn nn nn nn nn nn nn nn nn nn nn nn nn nn nn nn nn nn nn nn nn nn nn nn
n nn nnnnnnnnnnnnnnnnnnnnnnnnnnnnnnnnnnnnnnnnnnnnnnnnnnnnnnnnnnnnnnnnnnnnnnnnnnnnnnnnnnnnnnnnnnnnnnnnnnnnnnnnnnnnnnnnnnn
ninn nnn nn nnnnnnnnnnnnnnnnnnnnnnnnnnnnnnnnnnn
(17).n"o 25
16
Dnnn (Tethers) nnn .(nx) lock-off -nnnn
yynnnn nn nnnnnnnnnnnnnnnnnnnnnnnnnnnnnnnnnnnnnnnnnnnnnnnnnnnnnnnnnnnnnnnnnnnnnnnnnnnnnnnnnnn
.7n nn nn nn nn nn nn nn nn nn nn
n nn qnn nnnn (Tnnn) SIP+ ynnnn.17
n nn nnnnnnnnnnnnnnnnnnnnnnnnnnnnnnnnnnnnnnnnnnnnnnnnnnnnnnnnnnnnnnnnnnnnnnnnnnnnnnnnnnnnnnnnnnnnnnnnnnnnnnnnnnnnnnnnnnnnnnnnnnnnn
(18).nN nN nn nnn nnn nnn nnn nnn nnn nnn nnn nnn nnn nnn nnn nnn nnn nnn nnn nnn nnn nnn nnn nnn nnn nnn nnn nnn nnn nnn nnn nnn nnn nnn nnn nnn nnn nnn nnn nnn nnn nnn nnn nnn nnn nnn nnn nnn nnn nnn nnn nnn nnn nann nn nn nn nn nn nn nn nn nn nn nn nn nn nn nn nn nn nn nn nn nn nn nn nn nn nn nn nn nn nn nn nn nn nn nn nn nn nn nn nn nn nn nn nn nn nn nn nn nn nn nn nn nn nn nn nn nn nn nn nn nn nn nn nn nn nn nn nn nn nn nn nn nn nn nn nn nn nn nn nn nn nn nn nn nn nn nn nn nn nn nn.
ninnnnnnnnnnnnnn
Tether) n nn nn nnnn nn nnnn nn nnnn nn nnnn nn nnnn nn nnnn nn nnnn nn nnnn nn nnnn nn nnnn nn nnnn nn nnnn nn nnnn nn nnnn nn nnnn nn nnnn nn nnnn nn nnnn nn nnnn nn nnnn nn nnnn nn nnnn nn nnnn nn nnnn nn nnnn nn nnnnn nn nnnn nn nnnn nn nnnn nn nnnn nn nnnn nn nnnn nn nnnn nn nnnn nn nnnn nn nnnn nn nnnn nn nnnn nn nnnn nn nnnn nn nnnn nn nnnn nn nnnn nn nnnn nn nnnn nn nnnn nn nnnn nn nnnn nn nnnn nn nnnn nn nnn. 2
0,77777777777777777777777777777777777777777777777777777777777777777777777777777777777777777777
ninnnnnnnnnnnn
.1
(20) 2 .n
(21).
.4
(22)!7777777777777777777777777777777777777777777777777777777777777777777
Tn nn nnnnn
yNn /n nnnn nn nnnn nn nnnn nn nnnn nn nnnn nn nnnn nn nnnn nn nnnn nn nnnn nn nnnn nn nnnn nn nnnn nn nnnn nn nnnn nn nnnn nn nnnn nn nnnn nn nnnn nn nnnn nn nnnn nn nnnn nn nnnn nn nnnn nn nnnn nn nnnn nn nnnn
y nnnn nn nn nn nn nn nn nn nn nn nn nn nn nn nn nn nn nn nn nn nn nn nn nn nn nn nn nn nn nn nn nn nn nn nn nn nn nn nn nn nn nn nn nn nn nn nn nn nn nn nn nn nn nn nn nn nn nn nn nn nn nn nn nn nn nn nn nn nn nn nn nn nn nn nn nn nn nn nn nn nn nn nn nn
05 5 n nn nnnn nn nnnn nn nnnnnnnnnnnnnnnnnnnnnnnnnnnnnnnnnnnnnnnnnnnnnnnnnnnnnnnnnnnnnnnnnnnnnnnnnnnnnnnnnnnnnnnnnnnnnnnnnnnnnnnnn
JN1
·7n:
n
(25) winn noyn uinnnn
D17
"nnn nn nnn" yoo iN .uinn nnn nnn 97 niynn nnr .n nn .nnn .nnn
T
n"o 87 w nn nnnn nnnn nnnn no nnnn nn nnnn nnnn nnnn nnnn nnnn nnnn nnnn nnnn nnnn nnnn nnnn nnnn nnnn nnnn nnnn nnnn nnnn nnnn nnnn nnnn nnnn nnnn nnnn nnnn nnnn nnnn nnnn nnnn nnnn nnnn nnnn nnnn nnnn nnnn nn
nnnnnnn nn nnnn nn nnnn nn nnnn nn nnnn nn nnnn nn nnnn nn nnnn nn nnnn nn nnnn nn nnnn nn nnnn nn nnnn nn nnnn nn nnnn nn nnnn nn nnnn nn nnnn nn nnnn nn nnnn nn nnnn nn nnnn nn nnnn nn nnnn nn nnnn nn nnnn nn
nnnnnnn nn nnnn nn nnnn nn nnnn nn nnnn nn nnnn nn nnnn nn nnnn nn nnnn nn nnnn nn nnnn nn nnnn nn nnnn nn nnnn nn nnnn nn nnnn nn nnnn nn nnnn nn nnnn nn nnnn nn nnnn nn nnnn nn nnnn nn nnnn nn nnnn nn nnnn nn
UINNINXNIIOI
.719
.791
- www
.10
11
.
·
n
. 1970
(Tether) nn nnnn nn nnnn nn nn nn nn nn nn nn nn nn nn nn nn nn nn nn nn nn nn nn nn nn nn nn nn nn nn nn nn nn nn nn nn nn nn nn nn nn nn nn nn nn nn nn nn nn nn nn nn nn nn nn nn nn nn nn nn nn nn nn nn nn nn nn nn nn nn nn nn nn nn nn nn nn nn nn nn nn nn nn nn nn nn nn nn nn nn nn nn nn nn nn nn nn
#
1X 24- nnnn nn nnnn nn nnnn nn nnnn nn nnnn nn nnnn nn nnnn nn nnnn nn nnnn nn nnnn nn nnnn nn nnnn nn nnnn nn nnnn nn nnnn nn nnnn nn nnnn nn nnnn nn nnnn nn nnnn nn nnnn nn nnnn nn nnnn nn nnnn nn nnnn nn nnnn
·
ninn nnn nn nnn nnn nn nnn nn nnn nnn nnn nnn nnn nnn
X71N 11
n nn n nn nn nn nn nn nn nn nn nn nn nn nn nn nn nn nn nn nn nn nn nn nn nn nn nn nn nn nn nn nn nn nn nn nn nn nn nn nn nn nn nn nn nn nn nn nn nn nn nn nn nn nn nn nn nn nn nn nn nn nn nn nn nn nn nn nn nn nn nn nn nn nn nn nn nn nn nn nn nn nn nn nn nn nn nn nn nn nn nn nn nn nn nn nn nn
IINIOJUINN NINN 197:1iUN
·170n, n
n
.0D'7N
DIOX D7N1 N7ION 709,NTX,INN 7O IOX N7YN DY INNX N7N TINX nn) (NIINN
n77n7109 7x 77n77n77n7
,
.
·
-7n)
·
nun nn 109
ninnnnnnnnnnnn
www.besafe.com 197
.
·NNU
n770
n nn noyn
·
.
Joo 11 Jn Jowll 1 Jn bai ojo 1jw w 13
(4,3).aIoullllojIgJyOoJyIyIyIyIyIyIyIyIyIyIyIyIyIyIyIyIyIyIyIyIyIyIyIyIyIyIyIyIyIyIyIyIyIyIyIyIyIyIyIyIyIyIyIyIyIyIyIyIyIyIy1
.4
clu yooagaiol g oogajall aalw yagai I yagai .
abawlg yaaon bynb.
aboi
5
.6
8
.9
ollll lccnnn nn nnnn nnnn
1 . 1
.2
.3
.2
(6)
.4
(7).5
.5
.6
.6
.6
.6
.6
.6
.6
.6
.6
.6
.6
.6
.6
.6
.6
.6
.6
.6
.6
.6
.6
.6
.6
.6
.6
.6
.6
.6
.6
.6
.6
.6
.6
Jlll jll lss. a5wIg wgoll 100
(8)
aic 100 go aowll lalbln jg .1
.
o aoloI I aolcI I g j b Jyj OJyI 2
(9).ooJusll JgJlIiwo agolgo
oogug jilg aial Jn .aJll aoLball lljlo .3
a a a a a a a a a a a a a a a a a a a a a a a a a a
.oo
aJ 1000 4
cIw.oo o 1c abuoo J5wJbll 200 g Iai oJswll
(10).
I 5
oljlll llll 1c pllll lal g y dss
pJg 10 abg jll pJlAaI JI I Jg, JI
ooclll lcc aolal jowl joljoljoljoljolj. ooi ooi gaw
(12,11).JolJI Joo
Igfo 100
Joo 1000000000000000000000000000000000000000000
(13)
aclll lcc 1g ool j 0o 0000000000000000000000000000000000.7
Joo gllc pww, lly pllall ydoaal no ool jiljll (i)
g 150 .oljll jw l jg w o jaiw .oloill il
(14).
aJlI JI 100 8
aoc go go aall w 15 ggl 1g .p
.
Igbuolg oJusll aJj J awo Jlo Jj J aoc Jil 1o 0oo .9
.
aJll aolcll aa oioi ic jolw Jl Jll aoLglojI wgo 10
Jblll
jbllll 10000000000000000000000000000000000000000000000000000000000000000000000000000000000000000000000
auij oIcIg cIbJl aIIjI
.aauc
. Jnoeio
. www.b
. c g
.
J
J
! aloi
.bw
jglg
·oJUwJl
·
山
.1gbuuuee 10oJ LpJ aIgao oLwog Igjo 11 JyBn .0jusll aJ gO pLwU
.
jlaJI
24 111111111111111
JlllulssaullgclcIjIoo,ababjlgac Jlllo.
ballia. lolbunllinaa oaoalooecljulllojjwagg, jll
.111111111111111111111
aJli
wllcwlglcwllicaiuugoligloicgl,wwllgblolol.
. Jlaalglol
jIJIIOJACgJfJooJl:pa
aill lcl alaiall aulllll glllln n y jgjll .llo 10o oJc JsWbI I 100
山 aoo aboi
aIgsslll lIbIg g aai IJg JgJg jgjll (alnoio aabilg y gjll augjll
aigjlllglg lalbllg aall aloloo jogd .aoIc aJjio Ilaio
Ic gl clj Jll lc aaiall allj ll lal b jil .JbJl 200 .aill
I 1111111111111111111111111111
.
ao jllg jbll 0
f facebook.com/BeSafe
@besafeinternational