iZi Flex S FIX - Car seat BESAFE - Free user manual and instructions
Find the device manual for free iZi Flex S FIX BESAFE in PDF.

| Brand | BeSafe |
| Model | iZi Flex S FIX |
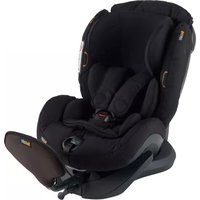
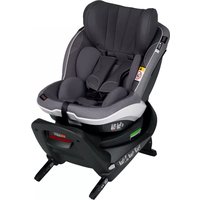
| Product type | Car seat group 2/3 (15-36 kg), forward-facing |
| Standards | i-Size, UN/ECE R44.04 or higher |
| Installation | ISOFIX + 3-point seat belt or only 3-point seat belt |
| Orientation | Forward-facing |
| Headrest adjustment | Yes, via height adjustment handle |
| Side protection | SIP (Side Impact Protection) removable on the inner side |
| Shoulder belt guide | Yes, with closure |
| ISOFIX indicators | Green indicate correct locking |
| Child weight | 15 to 36 kg |
| Recommended age | Approximately 3 to 12 years (depending on height) |
| Maximum child height | 135 to 150 cm (check compatibility with vehicle roof) |
| Lifespan | Maximum 8 years after manufacture |
| Maintenance and cleaning | Machine-washable cover (follow label), no harsh chemicals |
| Safety | Mandatory replacement after any accident, not for domestic use |
| Spare parts | Original BeSafe covers and accessories only |
| Warranty | 24 months on material defects (excluding cover and straps) |
| Warning | Never leave child unattended, secure luggage |
| Use with airbag | Consult vehicle manual for front seats |
Frequently Asked Questions - iZi Flex S FIX BESAFE
User questions about iZi Flex S FIX BESAFE
0 question about this device. Answer the ones you know or ask your own.
Ask a new question about this device
Download the instructions for your Car seat in PDF format for free! Find your manual iZi Flex S FIX - BESAFE and take your electronic device back in hand. On this page are published all the documents necessary for the use of your device. iZi Flex S FIX by BESAFE.
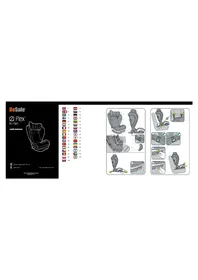
USER MANUAL iZi Flex S FIX BESAFE
bar
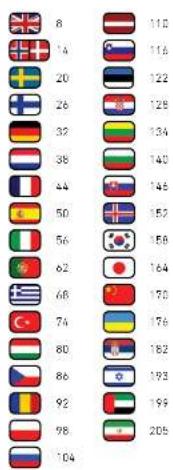
| Country | Value | |---|---| | United Kingdom | 8 | | Switzerland | 14 | | Sweden | 20 | | Finland | 26 | | Denmark | 32 | | Austria | 38 | | Germany | 44 | | France | 50 | | Italy | 56 | | Spain | 62 | | Greece | 68 | | Turkey | 74 | | Hungary | 80 | | Czech Republic | 86 | | Romania | 92 | | Poland | 98 | | Russia | 104 | | Latvia | 110 | | Slovenia | 116 | | Lithuania | 122 | | Paraguay | 128 | | Lithuania | 134 | | Iceland | 140 | | Japan | 146 | | South Korea | 152 | | United States | 158 | | China | 164 | | Ukraine | 170 | | Israel | 176 | | United Arab Emirates | 182 | | Iran | 193 | | Saudi Arabia | 199 | | Jordan | 205 |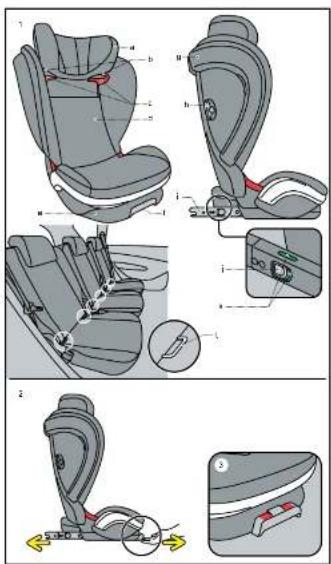
Thank you for choosing BeSafe IZI Flex S FIX
It is important that you read this user manual. H--OH- (excelling your seat increased) install on could enlarge your child.
! Vital Information
- For the correct usage of the airbag in combination with the seat, read the vehicle handbook.
- For the suitable positions in the car, we are the vehicle handbook.
- BeSafe recommends to install the seat in all vehicle seat positions which are intended to be used and check installation, available space in the vehicle and position of the ship, to verify if the seat is acceptable for your situation.
- I2I Flex 5-FIX can be installed forward facing with the SOFTX anchorage in a vehicle equipped with ISCHX anchorage points, in combination with a 3-point belt, approved to UNICE Regulation No.16 or other. When there are no SOFTX anchorage available in the vehicle position, I2I Flex 5-FIX can be installed forward facing with a 3-point belt, approved to UNICE Regulation No.16 or other.
- iZ Flex S-TIX is approved in group 2.3, forward facing from 16.35 kg.
- When used for stability heights between 135 cm and 150 cm iZ Flex S-TIX might not fit in all vehicles, due to a low position of the vehicle roof at the side.
• Before every use make sure that the 3 point belt is not damages or twisted and installed first. - When use without the roof anchorages connected, the seat should always be restrained by the vehicle sell when it is transported without the child.
- When the child weights own 36 kg or the shoulders exceed the highest position of the shoulders belt Guiders, he child must charge to a seat, but able for children with a weight score 36 kg, normally the vehicle seat.
- If it is accident, the seat must be replaced. Although if may have undamaged, if you were to have another accident, the seat may not be able to protect your child to the base to which it was designed.
- I cannot get a seat from someone's guard or winner, because
• The first time is the following: a day, 18:00, 20:00, and 3:00. - DO NDI attamor to dishandle a part, which is not infected to be removed, modified or used any part in the seat. War safety will be used for non-original parts or accessories are used.
• Never leave your child unattended in the past.
• Make sure all passengers are informed about how to release your child in case of emergence.
• Make sure luggage or other objects are properly secured. Unsecured luggage may cause severe injuries in children and adults in case of accountants.
- Never use the seat without the cover. The cover is a sandy feature
and may only be replaced by an original bouse cover.
• No nor use any aggressive clearing products; these may harm the
construct on material of the seat.
• He/she advises that child sears should not be bought or sold recent head.
• 1987.15.06
- DC NOT use the seat for larger than 8 years. Due to ageing, the
quality of the material may change
- Do not use a home. That has been designed to have the use and properly be used in a vehicle.
- When the child seat is installed in the car shock all the cross where the wild spot wind is built, the inside 'the commnent drive a
The car is not only a case the interior. We recommend using a [DeSafe] protection cover in these places to avoid cuts marks or disclosures, so the interior of the vehicle, especially in vehicles with leather or wooden interiors.
- If induct, consult either the car see, manufacture or the reader.
Preparing to install
| Adjustable headrest | (1a) |
| Shoulderbelt lock | (1b) |
| Shoulderbelt guider | (1c) |
| Backrest | (1d) |
| Base | (1e) |
| ISOfix release handle | (1f) |
| SIP bumper | (1g) |
| Height adjustment handles (2x) | (1h) |
| ISOfix connectors (2x) | (1i) |
| ISOfix release buttons (2x) | (1j) |
| ISOfix indicators (2x) | (1k) |
| ISOfix vehicle anchorage (2x) | (1l) |
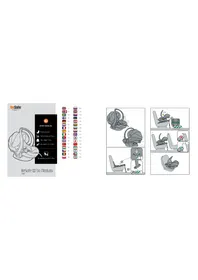
Installation
- When installing the seat in the front vehicle seat make sure the backrest of the vehicle seat is in an upright position.
- Position the seat inside the vehicle.
- Pull the ISOfix release handle to release the ISOfix connectors. A button on top of the handle will keep the handle in the released position and locks the ISOfix connectors from sliding back into the base again. The ISOfix arms lock only in the position where they are extended completely. In this locked position 2 red marks next to the button on the handle will become visible. (2, 3)
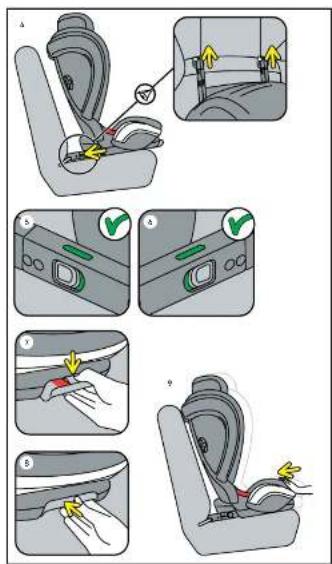
- Click the ISOfix connectors onto the ISOfix anchorage points in the vehicle seat. Make sure that all ISOfix indicators are GREEN. (4, 5, 6)
- Press the button down on top of the ISOfix release handle (located between the red marks) and push the handle back into the base. Push the seat back as far as possible towards the backrest of the vehicle seat. (7, 8, 9)
- Make sure the back of the seat is touching the backrest of the vehicle seat. If the headrest of the vehicle is pushing the seat away from the backrest, adjust the headrest. (9)
- If the seat cannot be used in combination with ISOfix anchorage points in the vehicle seat, the ISOfix connectors can be stowed inside the seat and the seat can be used in combination with the 3-point belt only.
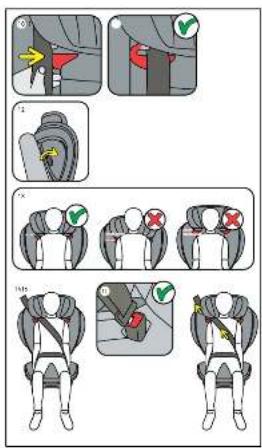
- Slide the shoulderbelt into the shoulderbelt guide. Make sure the belt is not twisted and that the shoulderbelt guide is closed again to keep the belt inside. (10, 11)
Positioning of the child
- Adjust the headrest to the correct height by turning the height adjuster handle. Make sure that the shoulder belt is level with your child's shoulder. (12, 13)
- Position the vehicle belt in front of the child and lock the belt into the buckle of the vehicle. (14, 15)
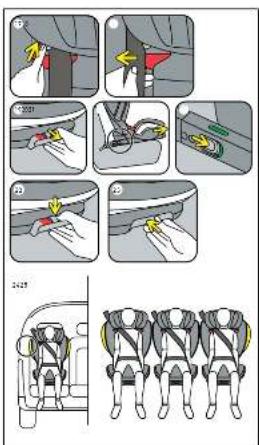
- Remove slack in the belt by pulling the belt towards the retractor. (16)
Removing the seat
- Remove the shoulderbelt out of the shoulderbelt guide by pushing the shoulderbelt lock in the guider up and slide the belt out. (17, 18)
- Pull the ISOfix release handle to release the ISOfix connectors. In this way the base of the seat can move forwards and the ISOfix release buttons can be operated. (19, 20)
- Release both ISOfix connectors, by pushing down the release buttons. (21) Slide the arms with ISOfix connectors inside the seat before you remove the seat from the vehicle. To be able to slide the arms with ISOfix connectors inside the seat, press the button down (between the red marks) on top of the ISOfix release handle. (22, 23)
- Remove the seat from the vehicle.
Installation of 3 car seats
- The SIP bumper on the inner side of the vehicle can be removed from the seat to create more space next to the seat for an additional car seat in the middle position of the vehicle. Remove a side bumper only on the inner side of the vehicle and never on the door side. (24, 25)
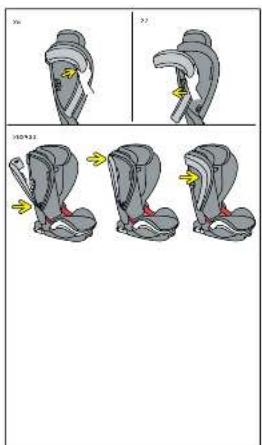
- To remove a SIP bumper, push the button and move the bumper sideways and to the back, to hook it out of the fabric hooks. Keep the SIP bumper for later usage. (26, 27)
- To install a SIP bumper, first hook in the lower hook, then hook in the upper hook and finally secure the bumper in the middle by pushing the button first and releasing it when it is positioned against the seat. Check if the SIP bumper is connected correctly. Use the SIP bumper only on the door side of the vehicle. (28, 29, 30)
Removing and refitting the cover
- Do take care when you remove the cover, as re-fitting the cover is the reverse process.
- Start to take off the backrest part first and re-fit the backrest part as the last part.
- For washing instructions, see the washcare label on the inside of the fabric cover.
! Warning: potential misuse
- For the correct usage of the airbag in combination with the seat read the vehicle handbook.
- Make sure the indicators are green before you drive.
- Make sure the back of the seat is touching the backrest of the vehicle seat and the isofix connectors are pushed inside the seat as far as possible. The red surface on top of the ISOfix release handle must not be visible during driving.
- Make sure that the SIP bumpers are always connected with the seat on the doorside and connected with the seat on the inner side of the vehicle when there is enough space available.
Guarantee
- Should this product prove faulty within 24 months of purchase due to materials or manufacturing fault, except covers and harness straps, please return it to the original place of purchase.
- The guarantee is only valid when you use your seat appropriately and with care. Please contact your retailer, they will decide if the seat will be returned to the manufacturer for repair. Replacement or return cannot be claimed. The guarantee is not extended through repair.
- The guarantee expires when there is no receipt, when defects are caused by incorrect or improper use, when defects are caused by abuse, misuse or negligence.
Takk for at du valgte BeSafe iZi Flex S FIX
Det er meget viktig at du leser denne bruksanvisningen F∅R du begynner å montere barnestolen. Feilmontering kan i verste fall skade ditt barn.
Preparing to install
| • Justerbar hodestøtte | (1a) |
| • Skulderbeltelås/lås til skulder sele | (1b) |
| • Skuldebelteføring/skulderseleføring | (1c) |
| • Rygg | (1d) |
| • Sokkel | (1e) |
| • Utløserhåndtak ISOfix/ håndtag til at frigive ISOfix | (1f) |
| • SIP Støtdemper | (1g) |
| • Håndtak for høydejustering (2x) | (1h) |
| • ISOfix armer (2x) | (1i) |
| • ISOfix utløserknapper (2x) | (1j) |
| • ISOfix indikatorer (2x) | (1k) |
| • ISOfix forankringspunkter (2x) | (1l) |
Montering
.תְבָרִיַעֹרְה-תְבָרִיַעֹרְה-תְבָרִיַעֹרְה-תְבָרִיַעֹרְה-תְבָרִיַעֹרְה-תְבָרִיַעֹרְה
BeSafe® SCANDINAVIAN SAFETY