iZi Turn B i-Size - Car seat BESAFE - Free user manual and instructions
Find the device manual for free iZi Turn B i-Size BESAFE in PDF.

User questions about iZi Turn B i-Size BESAFE
0 question about this device. Answer the ones you know or ask your own.
Ask a new question about this device
Download the instructions for your Car seat in PDF format for free! Find your manual iZi Turn B i-Size - BESAFE and take your electronic device back in hand. On this page are published all the documents necessary for the use of your device. iZi Turn B i-Size by BESAFE.
USER MANUAL iZi Turn B i-Size BESAFE
BeSafe®
Scandinavian Safety

SCAN ME


It is important that you read this user manual BEFORE installing your seat, mechanical installation, and end-to-date your unit.
! Vital information
- The child must not be sealed when passengers
and Q1:ANACTAP 15-41:42,
• In fact that the following is a result of
other courses are standardized
• Farilis su belengui ar sui liu sa, and the spicat hucia
• Here, the set list is limited to a set of items in the next list this
not. The latest modern the top rank is unclear the Delinariaria
www.essafe.com, if your car is not present in the carist, please contact
Because for in that manner
• iZi Turn B i Size is approved rear lacing for children with a status being
cm = 0.15 cm with a -arcum-weight up to 15 g and (crav
- Using for child or with a stable e.g. from 0 to 105 cm with a
(1) act as a sign up to 18 at
• 1° participant. Do not use forward facing 20 arc the child is over 15 o this.
- When driving with a c-ho setting in the seat, the seat - out 21=35 is to be
The first technology of the 70% of the 120% of the 120% of the 120% of the 120% of the 120% of the 120% of the 120% of the 120% of the 120% of the 120% of the 120% of the 120% of the 120% of the 120% of the 120%.
- 2007-10-25, 2008-10-26, 2009-10-27, 2010-10-28, 2011-10-29, 2012-10-30, 2013-10-31, 2014-10-32, 2015-10-33, 2016-10-34, 2017-10-35, 2018-10-36, 2019-10-37, 2020-10-38, 2021-10-39, 2022-10-40, 2023-10-41, 2024-10-42, 2025-10-43, 2026-10-44, 2027-10-45, 2028-10-46, 2029-10-47, 2030-10-48, 2031-10-49, 2032-10-50, 2033-10-51, 2034-10-52, 2035-10-53, 2036-10-54, 2037-10-55, 2038-10-56, 2039-10-57, 2040-10-58, 2041-10-59, 2042-10-60, 2043-10-61, 2044-10-62, 2045-10-63, 2046-10-64, 2047-10-65, 2048-10-66, 2049-10-67, 2050-10-68, 2051-10-69, 2052-10-70, 2053-10-71, 2054-10-72, 2055-10-73, 2056-10-74, 2057-10-75, 2058-10-76, 2059-10-77, 2060-10-78, 2061-10-79, 2062-10-80, 2063-10-81, 2064-10-82, 2065-10-83, 2066-10-84, 2067-10-85, 2068-10-86, 2069-10-87, 2070-10-88, 2071-10-89, 2072-10-90, 2073-10-91, 2074-10-92, 2075-10-93, 2076-10-94, 2077-10-95, 2078-10-96, 2079-10-97, 2080
in the case intended that to drive limit of a 2017 state to the State in the
• Refs' recommendations to use the next for 31,000 as possible in the year
Lai guo dian
• The hercess straps must always be located when the child is in the seat.
• The harness straps must be tightened without slack and not twisted.
• The shoulder pads contain magnets. Magnets can influence electron
equipment such as pacemakers
- Protect any part of the child's body which is exposed to the sun
• The floor support must always be used. Make sure that the floor support
is fully pushed down and it touches the floor of the vehicle in front of the
year 3-8 that the year is posted on horizontal in the series with the epic.
57014798
- In the case
- The baby model in the past, I have 40% of the child's age. It is a thin line most refined condition of the rest.
- P.M.S.
- 10.25% - 10.30% - 10.35% - 10.40% - 10.45% - 10.50% - 10.55% - 10.60% - 10.65% - 10.70% - 10.75% - 10.80% - 10.85% - 10.90% - 10.95% - 11.00% - 11.05% - 11.10% - 11.15% - 11.20% - 11.25% - 11.30% - 11.35% - 11.40% - 11.45% - 11.50% - 11.55% - 11.60% - 11.65% - 11.70% - 11.75% - 11.80% - 11.85% - 11.90% - 11.95% - 12.00% - 12.05% - 12.10% - 12.15% - 12.20% - 12.25% - 12.30% - 12.35% - 12.40% - 12.45% - 12.50% - 12.55% - 12.60% - 12.65% - 12.70% - 12.75% - 12.80% - 12.85% - 12.90% - 12.95% - 13.00% - 13.05% - 13.10% - 13.15% - 13.20% - 13.25% - 13.30% - 13.35% - 13.40% - 13.45% - 13.50% - 13.55% - 13.60% - 13.65% - 13.70% - 13.75% - 13.80% - 13.85% - 13.90% - 13.95% - 14.00% - 14.05% - 14.10% - 14.15% - 14.20% - 14.25% - 14.30% - 14.35% - 14.40% - 14.45% - 14.50% - 14.55% - 14.60% - 14.65% - 14.70% - 14.75% - 14.80% - 14.85% - 14.90% - 14.95% - 15.00% - 15.05% - 15.10% - 15.15% - 15.20% - 15.25% - 15.30% - 15.35% - 15.40% - 15.45% - 15.50% - 15.55% - 15.60% - 15.65% - 15.70% - 15.75% - 15.80% - 15.85% - 15.90% - 16.00%

taller than 50 cm or close than 4 months
- Remove the baby insert, when the child is taller than 0.5 cm
• After he attacked, the end until he replicate. Albiaphil may have
undamaged, if you were to have another accident. The seat may not be
Figure 24.30:1 May 2015 to the end of 2015, it was the first.
The following table is provided in the image.
• Mio. mio. in the bioposanay-xy mill called cauern
Large water school in the field, 6500 km higher than 300 m, makes a
that the child's purchased well opened the hardest
* DO NOT all be-pit in diameter is usually at solid angle per in the end.
Warranty will be written on the park or accessories are lost
• These show your child into a hospital in the world.
• Make sure all, passe gers are informed about how to release your child in
1000-10000000
• Make sure language or other objects are properly secured. Unsecured
Lipadu
accd.n.2
• Have used a board without interest. The zone is along the submural
may only be replaced by a original E-Safe cover.
- Du-nu nuc-sy appaion-charing graduate. Passomay-nu-m
to construct on material of the seat
- Besire deviates that this seals should not be sought or sold second head.
1930.
• When us on the last time, we can be better in
with a little day, what is the best man all - ways.
* Even was the installation screen is no functioning.
us., when installation is done, searching for user instructions and all
indicators show green dots on all measures
• The 2 x A1_60 (15-9) can be replaced from
the contents of the battery compartment. Do not use
rechargeable batteries (not on all models)
• Keipal
Mcbeis
• Do not use a line between 125 or 34.27 € or 3.00 € show signs of
18.56e of crisce, 24t on st. mcdel
The 2015 annual report
the 24.8 may change
be used a vehicle.
5.24: the cost and

child seat might touch the interior. We recommend using a (BeSafe) protection cover in these places to avoid cuts, marks or discolouration to the interior of the vehicle, especially in vehicles with leather or wooden interiors.
- If in doubt, consult either the car seat manufacturer or the retailer.
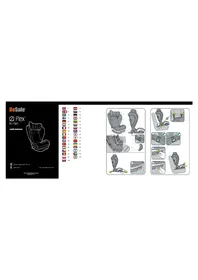
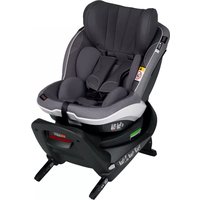
Preparing to install
| • Adjustable headrest | (1a) |
| • Shoulder straps | (1b) |
| • Baby insert | (1c) |
| • Baby cushion | (1d) |
| • Harness buckle | (1e) |
| • Central adjuster | (1f) |
| • Reclining handle | (1g) |
| • Release handle headrest | (1h) |
| • Installation screen | (1i) |
| • Spirit level | (1j) |
| • Battery compartment | (1k) |
| • Floor support | (1l) |
| • Floor support height indicator | (1m) |
| • Height adjuster floor support | (1n) |
| • Rotation release handle | (1o) |
| • Switch for ISOfix connectors (2x) | (1p) |
| • ISOfix connectors (2x) | (1q) |
| • ISOfix release switch | (1r) |
| • ISOfix indicators (2x) | (1s) |
| • ISOfix car anchorage (2x) | (1t) |
Installation
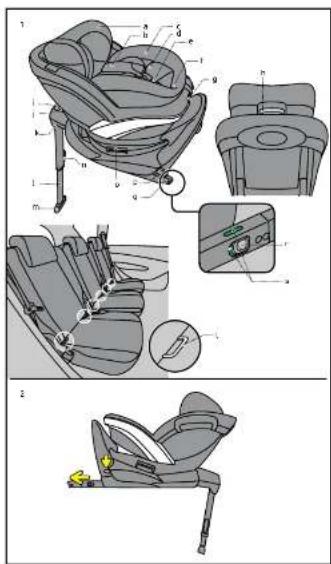
- When installing in the back seat of the vehicle, push the front seat of the vehicle forward as far as possible and adjust the back rest into an upright position (if it can be adjusted).
- When installing in the front seat of the vehicle, adjust the back rest into an upright position.
- Position the vehicle on a horizontal surface when installing the seat.
- When the base is lifted the floor support should fall downwards from underneath the base. Do this outside the car.
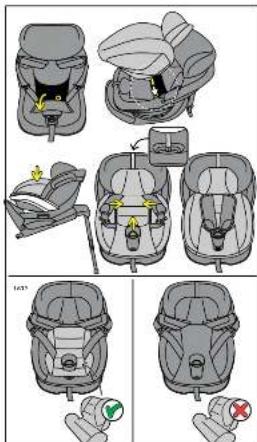
- Push down the switch for the ISOfix connectors at both sides to release the ISOfix connectors. (2)
- Position the base on the vehicle seat. Click the ISOfix connectors on to the ISOfix anchorages on the vehicle seat. Make sure that both ISOfix
indicators are green. (3)
- Push the seat towards the backrest of the vehicle seat until it touches the backrest. (4)
- The ISOfix connectors will have resistance sliding in, in the most outward positions, before they are connected with the ISOfix anchorage of the vehicle.
- Tip: once the ISOfix connectors are installed, the seat can be turned towards the door of the vehicle to get a better view on the installation display.
- Remove the yellow cap from the floor support. Adjust the floor support, so it is in contact with the floor of the vehicle. (5)
- The height indicator of the floor support shows green when the floor support is in contact with the floor. (5)
- Lift the base at the front side (near the spirit level) and extend the floor support till the spirit level is in the middle, indicating a horizontal position of the base. (5)
- Tip: place one foot onto the bottom end of the floor support while lifting the base to make adjusting the length at this step easier.
- The alarm sound stops when the floor support indicators show green and it is in contact with the floor and (not for all models) when the spirit level shows a horizontal position of the seat. (5)
- When having the child seat installed rear facing in the back, it is recommended to position the front vehicle seat in a way that it is close to the touchpoint with the child seat. Make sure that the child seat can still rotate freely. When having the child seat installed rear facing on the passenger seat in the front, it is recommended to position the passenger seat in a way that the dashboard is close to the touchpoint with the child seat. Make sure that the child seat can still rotate freely.
- Tip: If you feel like the base has too much side movement, you can install the seat tighter against the vehicle seat backrest. Make the support leg short, grab the base and push it against the vehicle backrest with more force. Move it side to side until you hear one more 'click' per side, then lift the base into horizontal position again.
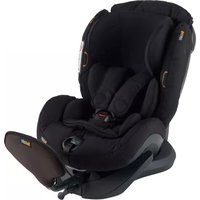
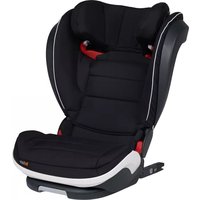
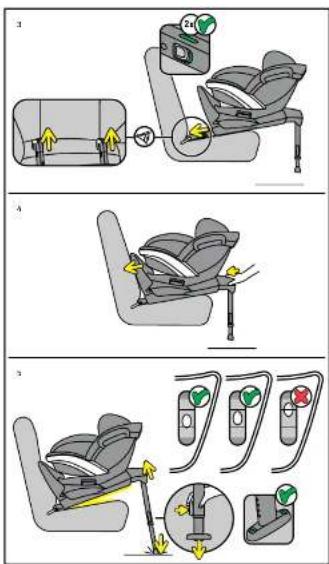
- The seat is delivered with removable SIP+ (side impact protection +). This extra side impact protection should be used on the doorside of the vehicle. To connect your SIP+ version, follow the instruction drawings on the SIP+ included with your seat. The seat already offers high level integrated side impact protection. This extra side impact protection improves the protection in the side impact still further. (6)
-
Tip: For an optimal height of the SIP+, position it between the two raised dots on the side of the seat shell.
-
Do not use the SIP+ on the seat when the space between seat and door of the vehicle is too small, which might lead to a situation where the seat is not positioned correctly on the vehicle seat. (6)
Removal of the seat from the vehicle
- To remove the seat from the vehicle, turn the seat rear facing and push the seat upwards while adjusting the floor support to its shortest length.
- Release the ISOfix connectors out of the seat by pushing down the switch for the ISOfix connectors on both sides. Pull the ISOfix release switch on both sides to disconnect from the ISOfix car anchorage.
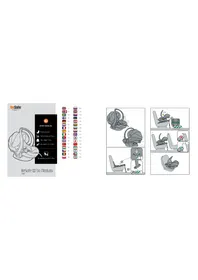
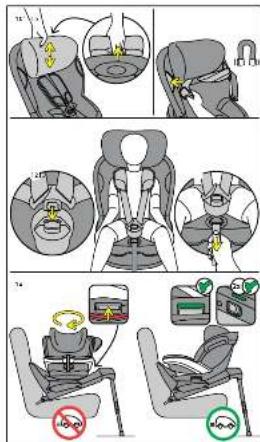
Positioning of the child
- Turn the seat towards the door while you pull the rotation release handle upwards.
- Check that the shoulder strap slots are level with your child's shoulders. (7)
- While pressing the button of the central adjuster, pull the shoulder straps away from the seat with a flat hand. Make sure to pull the straps evenly so that they stay at the same length. (8)
- Open the harness buckle. (9)
- The height of the shoulder straps and the headrest can be adjusted by pulling the release handle upwards at the back of the headrest and pulling the headrest up or down. (10)
- Position the shoulder straps over the marking at the sides of the seat to use the magnets to keep the harness open while you position the child. (11)
- When the child is positioned, place the shoulder straps over the child's shoulders and close the buckle: CLICK! (12)
- Pull the harness strap through the central adjuster in the direction of the arrow straight up/forwards. Continue pulling until the harness is a comfortable but a firm fit. (13)
- Turn the seat against or with the driving direction before driving and check if the release handles show green and the seat is locked into the driving direction. (14)
Baby insert
- The baby insert must be used from birth and can be used until a stature height of 87 cm. Don't take the baby insert out before the baby can sit upright by itself.
- The baby insert can be taken out of the seatshell, by guiding the harness through the slots of the baby insert.
- The baby insert can be positioned back in the seatshell, by guiding the
harness through the slots of the baby insert. The baby insert can only be installed and used in the most reclined position of the seat. Make sure the harness is positioned correct, so the harness can be pulled tight without twisting. (15)
Baby cushion
- The baby cushion offers extra comfort for young babies.
- < 60 cm (16)
-
60 cm (17)
Removing and refitting the cover
- Do take care when you remove the cover, as re-fitting the cover is done in reverse.
- The cover of the headrest can be taken off separately by disconnecting the beads at the back and pulling off the fabric towards the front.
! Warning: potential misuse
- The child seat MUST NOT be installed in a front passenger seat WITH AN ACTIVATED AIRBAG.
- The floor support must always be used. Make sure that the floor support is fully pushed down and that the seat is positioned horizontal with the spirit level in the middle.
- Never drive with a child in the seat if the seat is rotated to the side.
- Make sure the indicators are green before you drive.
Guarantee
- Should this product prove faulty within 24 months of purchase due to materials or manufacturing fault, except covers and harness straps, please return it to the original place of purchase.
- The guarantee is only valid when you use your seat appropriately and with care. Please contact your retailer, they will decide if the seat will be returned to the manufacturer for repair. Replacement or return cannot be claimed. The guarantee is not extended through repair.
- The guarantee expires: when there is no receipt, when defects are caused by incorrect and improper use, when defects are caused by abuse, misuse or negligence.
The Ground Truth image displays a single, solid horizontal line. According to Rule 2 (UNDERSCORE & LINE RULES), this is a stylistic or background line, not a placeholder underscore. Therefore, the OCR result must ignore it. The provided OCR content is "____", which consists of four underscores. This is an incorrect interpretation of the line as a placeholder, violating the rule that stylistic lines must be ignored. The OCR has hallucinated underscores where none should exist based on the GT's visual context. Hence, the OCR result is inconsistent with the Ground Truth.
[Non-Text]
HTS BeSafe AS
NO-3535 Krøderen
Norway
Visit us: besafe.com
f facebook.com/BeSafe
@besafeinternational
BeSafe®
Scandinavian
Safety