Solo Energy Flex 4232 Li SP - Lawn mower AL-KO - Free user manual and instructions
Find the device manual for free Solo Energy Flex 4232 Li SP AL-KO in PDF.
| Technical specifications | AL-KO Solo Energy Flex 4232 Li SP lawn mower |
|---|---|
| Engine type | Wireless electric motor |
| Cutting width | 32 cm |
| Cutting height | 3 positions (25-65 mm) |
| Grass collection box capacity | 30 liters |
| Weight | Approximately 12 kg |
| Autonomy | Variable depending on the battery used |
| Usage | Ideal for small and medium surfaces |
| Maintenance | Clean the blade after each use, check the battery regularly |
| Safety | Equipped with a safety switch, do not use in the rain |
| General information | Compatible with other devices in the AL-KO Energy Flex range |
Frequently Asked Questions - Solo Energy Flex 4232 Li SP AL-KO
User questions about Solo Energy Flex 4232 Li SP AL-KO
0 question about this device. Answer the ones you know or ask your own.
Ask a new question about this device
Download the instructions for your Lawn mower in PDF format for free! Find your manual Solo Energy Flex 4232 Li SP - AL-KO and take your electronic device back in hand. On this page are published all the documents necessary for the use of your device. Solo Energy Flex 4232 Li SP by AL-KO.
USER MANUAL Solo Energy Flex 4232 Li SP AL-KO
AL-KO KOBER GROUP Kottz, Germany
This documentation or excerpts therefrom may not be reproduced or disclosed to third parties without the express permission of the AL-KO KOBER GROUP.

3.10 "maxRun & smart-drive"-Cockpit (04)* 11
3.8 "AL-KO inTOUCH Smart Garden" App*
3.10 "maxRun & smart-drive"-Cockpit (04)*
1 Special safety instructions 25
2 About these operating instructions 25
2.1 Symbols on the title page 25
2.2 Legends and signal words 25
3 Product description 25
3.1 Designated use 26
3.2 Possible foreseeable misuse 26
3.3 Residual risks 26
3.4 Safety and protective devices 26
3.5 Symbols on the appliance 26
3.5.1 Safety signs.. 26
3.5.2 Operating signs 27
3.6 Product overviews 27
3.6.1 Product overview (01) - AL-KO... 27
3.6.2 Product overview (02) - solo by AL-KO 27
3.7 Scope of supply 28
3.8 "AL-KO inTOUCH Smart Garden" app* 28
3.9 Smart Button (03)* 28
3.9.1 Display of the charge status 28
3.9.2 Connecting the lawnmower to the AL-KO Smart Cloud 28
3.9.3 Starting actions in the "Smart Home" or "Smart Garden" (IF-TTT) 29
3.9.4 Activating the lawnmower 29
3.9.5 Resetting WiFi name and password 29
3.10 "maxRun & smart-drive" cockpit (04)* 29
4 Safety instructions 30
4.1 Safety instructions for lawnmowers.... 30
4.1.1 Training 30
4.1.2 Preparatory measures 30
4.1.3 Handling 30
4.1.4 Maintenance and storage 31
4.2 Vibration load 31
4.3 Noise pollution 32
4.4 Safety notes for rechargeable battery and charger 32
5 Installation 32
6 Start-up. 32
6.1 Charging the rechargeable battery .... 32
6.2 Inserting and removing batteries (05). 32
6.3 Switching the power supply to the mower mechanism ON and OFF (06) 32
6.4 Switching the cockpit ON and OFF* ... 33
7 Operation 33
7.1 Setting the cutting height (07) 33
7.2 Mowing with grass catcher (08, 09).... 33
7.3 Mulching with mulching insert (10, 11) 33
7.4 Mowing with side discharge unit (12)^34
7.5 Adjusting the handlebar to your body size (13)^ 34
7.6 Starting and stopping the mower mechanism (14) 34
7.7 Switching the wheel drive ON and OFF (15) 35
7.8 Changing the wheel drive speed (16)^ .35
7.9 Switching Eco mode ON and OFF (16) 35
8 Work instructions. 35
9 Maintenance and care. 36
9.1 Regular maintenance work 36
9.2 Cleaning the appliance and mower mechanism 36
9.3 Checking and renewing the cutting blade 36
9.4 Adjusting the Bowden cable of the wheel drive (17) 36
9.5 Repair work 37
9.6 USB port (18) 37
10 Help in case of malfunction 37
11 Transport. 38
11.1 Transporting the appliance 38
11.2 Transporting batteries 39
12 Storage 39
12.1 Storing the rechargeable battery lawnmower 39
12.2 Storing the rechargeable battery and charging unit 39
13 Disposal 40
14 After-Sales/Service 40
15 Guarantee 41
1 SPECIAL SAFETY INSTRUCTIONS
This appliance can be used by children of 8 years and older and by persons with reduced physical, sensory or mental capabilities, or those lacking experience and knowledge, if they are supervised or have been instructed with regard to the safe use of the appliance and the ensuing risks. Children must not be allowed to play with the appliance. Cleaning and maintenance must not be carried out by children without supervision.
People with very strong and complex restrictions may have needs that exceed the instructions described here.
2 ABOUT THESE OPERATING INSTRUCTIONS
The German version is the original operating instructions. All additional language versions are translations of the original operating instructions.
Always safeguard these operating instructions so that they can be consulted if you need any information about the appliance.
Only pass on the appliance to other persons together with these operating instructions.
Comply with the safety and warning information in these operating instructions.
2.1 Symbols on the title page
Symbol Meaning

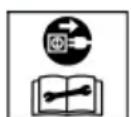
It is essential to read through these operating instructions carefully before start-up. This is essential for safe working and trouble-free handling.

Operating instructions
Symbol Meaning

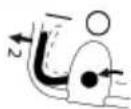
Handle Li-Ion rechargeable batteries with care! In particular, observe the notes on transport, storage and disposal in these operating instructions!
2.2 Legends and signal words
DANGER! Denotes an imminently dangerous situation which will result in fatal or serious injury if not avoided.
WARNING! Denotes a potentially dangerous situation which can result in fatal or serious injury if not avoided.
CAUTION! Denotes a potentially dangerous situation which can result in minor or moderate injury if not avoided.
IMPORTANT! Denotes a situation which can result in material damage if not avoided.
NOTE Special instructions for ease of understanding and handling.
3 PRODUCT DESCRIPTION
This operating manual describes various models of AL-KO and solo by AL-KO pedestrian-controlled battery-powered lawnmowers with different configurations. The configurations of the individual models are presented in the technical data of the assembly instructions.
The appliance may only be used together with the lithium-ion rechargeable batteries and chargers specified in the technical data. See the separate operating manuals for further information on rechargeable batteries and chargers:
Operating manual 441630: Li-ion rechargeable battery B150 Li (B05-3640G), B200 Li (B05-3650G)
Operating manual 441633: charger C130 Li (C05-4230)
IMPORTANT! Danger of damage to the appliance and battery. If the appliance is operated with unsuitable batteries, both the device and the batteries may be damaged.
Operate the appliance only with the specified rechargeable batteries.
3.1 Designated use
This appliance is intended for the mowing of lawns and may only be used on dry grass.
This appliance is intended solely for use in non-commercial applications. Any other use as well as unauthorised conversions or modifications are regarded as contrary to the intended use and will result in voiding of the warranty as well as loss of conformity; the manufacturer will thus decline any responsibility for damage and/or injury suffered by the user or third parties.
3.2 Possible foreseeable misuse
The tool is designed neither for commercial use in public parks and sports facilities, nor for use in farming and forestry.
- Do not use the appliance in the rain or on wet grass.
There must be no foreign objects on the area to be mowed, e.g. stones, pieces of wood, bottles.
3.3 Residual risks
Even during correct use of the appliance, there is always a certain residual risk that cannot be excluded. Depending on the use, the following potential risks can be derived from the type and construction of the appliance:
- Throwing out of cuttings, soil and small stones.
Inhalation of cuttings particles if no breathing protection is worn.
Lacerations from reaching into the rotating cutting blade.
3.4 Safety and protective devices
WARNING! Risk of injury. Defective and disabled safety and protective devices can result in serious injury.
Have any defective safety and protective devices repaired.
Never disable safety and protective devices.
Safety key
The appliance is provided with a safety key to prevent inadvertent switching on. Switch off the appliance before maintenance work and always remove the safety key.
Safety handle/operator presence control
The appliance is fitted with a safety handle/ operator presence control. In an emergency, simply release the safety handle/ operator presence con
trol. The motor and mower mechanism are stopped.
Start button (on the handlebar)
The start button must first be pressed before the motor can be switched on by means of the safety handle/operator presence control.
Baffle
The baffle offers protection against e.g. material particles and stones which can be flung out.
3.5 Symbols on the appliance
3.5.1 Safety signs
Symbol Meaning

Pay special attention when handling this appliance!
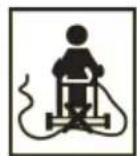
Read the operating manual before starting operation!

Risk of injury! Keep your hands and feet away from the mower mechanism!
Not applicable, used only with petrol mowers.
Disconnect the spark plug connector before any maintenance and cleaning work!
Danger due to objects being thrown out!

Keep other people out of the danger area!
Not applicable, used only with electric mowers.
Before starting maintenance and repair work, switch off the appliance and disconnect the mains plug from the mains!
Symbol Meaning
Not applicable, used only with electric mowers.
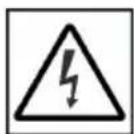
Danger of electric shock if the mains cable is damaged!
Not applicable, used only with electric mowers.
Keep the mains cable away from the mower mechanism and do not drive over it!
Remove the deactivation device before starting maintenance work!
3.5.2 Operating signs
Symbol Meaning
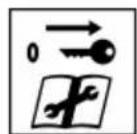
Procedure for starting the motor (see chapter 7.6 "Starting and stopping the mower mechanism (14)", page 34)
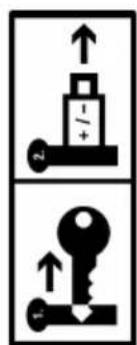
When not in use: Remove the safety key and pull the battery out of the appliance.
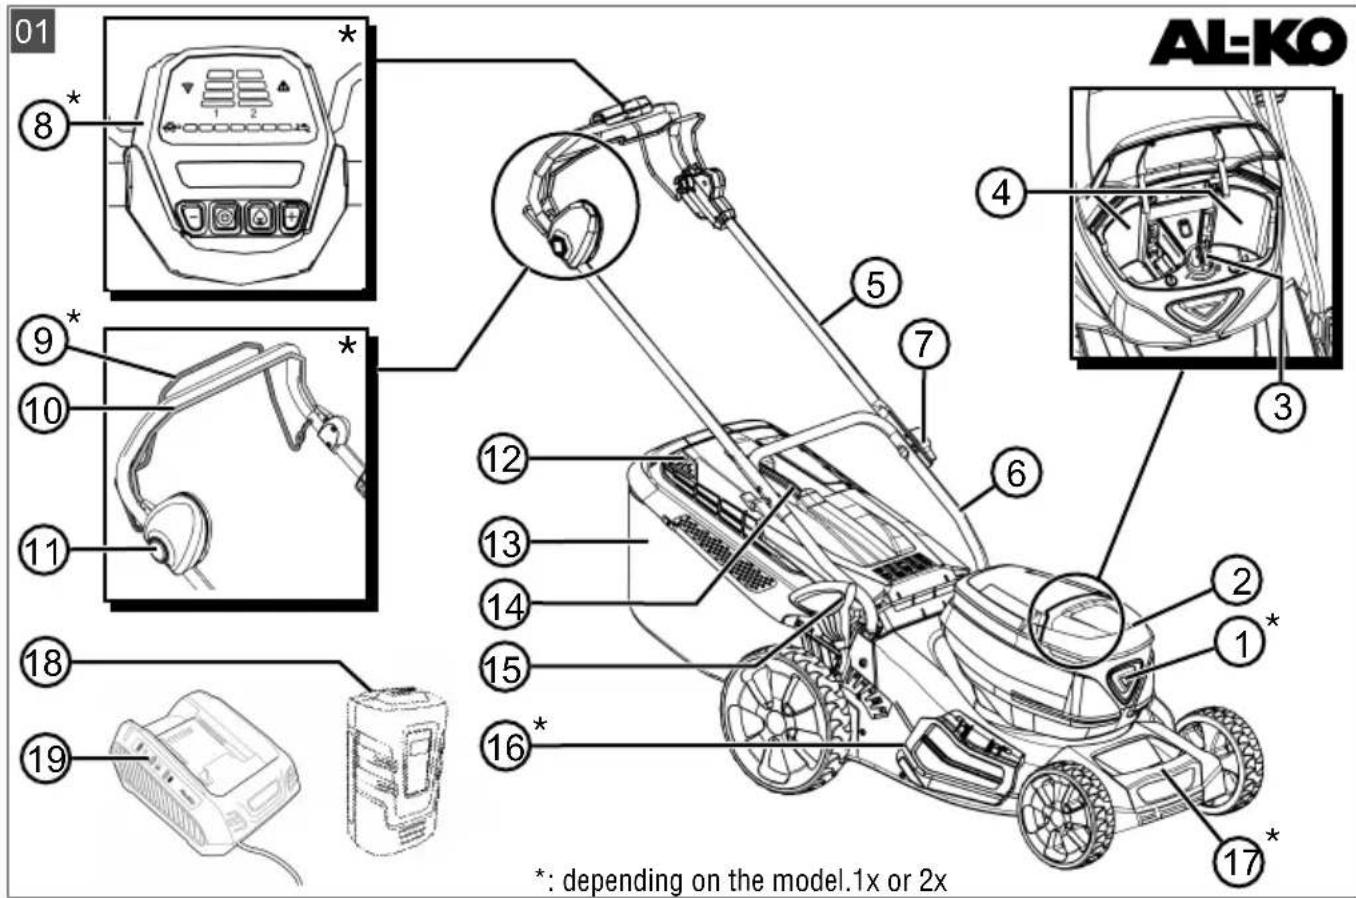
3.6 Product overviews
3.6.1 Product overview (01) - AL-KO
No. Component
1 Smart button
2 Battery compartment cover
3 Key switch with safety key
4 Battery compartment 1 and 2
Folding handlebar, consisting of:
5 Upper brace
6 Lower brace
7 Wing nuts (2x)
8" "maxRun & smart-drive" cockpit*
No. Component
9 Gear engagement bar for wheel drive
10 Operator presence control
11 Start button
12 Fill-level indicator
13 Grass catcher
14 Handle of grass catcher
15 Central cutting height adjustment
16 Side discharge flap
17 Front carrying handle
18 Rechargeable battery (1x or 2x)
19 Charger
- depending on the model, see assembly instructions.
3.6.2 Product overview (02) - solo by ALKO
No. Component
1 Smart button
2 Battery compartment cover
3 Key switch with safety key
4 Battery compartment 1 and 2
Height-adjustable and folding handlebar, consisting of:
5 Upper brace
6 Lower brace**
7 Swivel joints for quick adjustment
8" "maxRun & smart-drive" cockpit
9 Gear engagement bar for wheel drive
10 Operator presence control
11 Start button
12 Fill-level indicator
13 Grass catcher
14 Handle of grass catcher
15 Central cutting height adjustment
16 Side discharge flap
17 Front carrying handle*
- depending on the model, see assembly instructions.
** tubular steel or aluminium, depending on the model.
3.7 Scope of supply
The items listed here are included in the standard scope of supply. Check that all items are present:
| No. Component |
| 1 Lawnmower |
| 2 Grass catcher (unassembled/partially assembled)* |
| 3 Handlebar (unassembled/partially as-sembled)* |
| 4 Side discharge insert* |
| 5 Mulch insert* |
| 6 Bag with nuts and bolts |
| 7 Rechargeable battery* (1x or 2x)* |
| 8 Charger* |
- depending on the model, see assembly instructions.
3.8 "AL-KO inTOUCH Smart Garden" app*
- depending on the model, see assembly instructions.
The lawnmower is equipped with a WiFi radio module. This allows convenient control, adjustment and monitoring via app from a mobile device (smartphone, tablet, etc.).
NOTE The mobile device needs an Internet connection for the use of the app.
The "AL-KO inTOUCH Smart Garden" app can be downloaded for Android-based devices from the Google Play Store and for iOS-based devices from the Apple App Store.

GETITON
Google Play

Available on the
AppStore
After installing the app, you first have to register or log in. Follow the "step-by-step" instructions.
The app offers a wide range of functions such as product registration, gardening tips, gardening manual or push notifications in the event of a fault.
Further information on the "AL-KO inTOUCH Smart Garden" app can be found at: https://alko-garden.com/smart-connect/

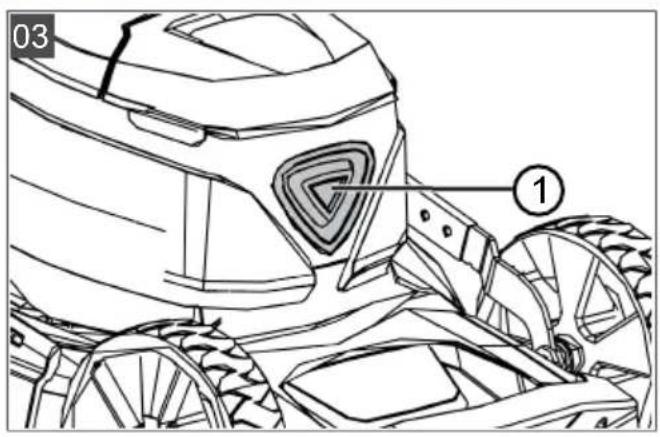
3.9 Smart Button (03)*
- depending on the model, see assembly instructions.
The Smart Button connects your lawnmower to the AL-KO Smart Cloud and to the various possibilities of smart gardening:
https://alko-garden.de/smart-gardening-mit-alko/

NOTE Information on WiFi:
In order to be able to use AL-KO Smart Gardening, the lawnmower must be within the range of your WiFi network.
- Keep the name and password of your WiFi network ready.
3.9.1 Display of the charge status
The Smart Button signals the charge status of the batteries even from a distance.
Smart Button Meaning
Lights up green. Batteries charged.
Lights up red. Batteries flat.
3.9.2 Connecting the lawnmower to the ALKO Smart Cloud
NOTE Information on IT security. The
lawnmower automatically receives the latest software updates from the AL-KO Smart Cloud in order to avoid security gaps. Internet access via WiFi is required for this.
Connect the lawnmower to the Internet only via a secure WiFi network.
Select a secure WiFi password.
- Prepare your smartphone:
Install the "AL-KO InTOUCH Smart Garden" app (see chapter 3.8""AL-KO inTOUCH Smart Garden"app**, page 28).
Start the app.
- Start the setup wizard: Hold the Smart Button pressed for approx. 3 seconds.
3. In the setup wizard:
Connect the smartphone to the lawnmower's WiFi network.
Change the name of the lawnmower (optional).
Enter the name and password of your WiFi network. The lawn mower connects to the AL-KO Smart Cloud.
Smart Button during setup
No. Smart Button Meaning
Connection to the app:
a. Pulses blue. Setup wizard started,
b. Steady blue Setup wizard connect- light. ed to the app.
Connection to the AL-KO Smart Cloud via the user's WiFi network:
c. Lights up blue, rotating in clockwise direction. Attempting to connect
d. Flashes blue. Connected.
e. Alternating between green and blue. Connected to the ALKO Smart Cloud.
f. Alternating between red and blue. Not connected. Name and password of your WiFi network not entered correctly.
Smart Button during operation
Smart Button Meaning
Lights up blue (fading). Connected to the AL-KO Smart Cloud. Sufficient WiFi reception.
Lights up blue, rotating. Connection to the ALKO Smart Cloud interrupted.WiFi reception interrupted.
3.9.3 Starting actions in the "Smart Home" or "Smart Garden" (IFTTT)
The Smart Button can be used to start up to 3 IFTTT actions (IFTTT: If This Then That). These actions have to be defined beforehand at https://ifttt.com/ (e.g. control of appliances in the "Smart Home" or "Smart Garden", switching on the watering system, opening the garage door). IFTTT
actions can be free or chargeable, depending on the provider's subscription model.
NOTE More detailed information on IFTTT can be found at: https://alko-garden.de/ifttt-de/
- Press the Smart Button 1x, 2x or 3x in quick succession to start IFTTT action 1, 2 or 3.
Smart Button Meaning
| Flashing alternately green and blue. | IFTTT action has been started. |
| Flashing alternately red and blue. | IFTTT action could not be started. |
Due to the access to the Internet and to "Smart Home" and "Smart Garden" functions, the appliance must be stored in a secure location (see chapter 12.1 "Storing the rechargeable battery lawnmower", page 39).
3.9.4 Activating the lawnmower*
- depending on the model, see assembly instructions.
If the lawnmower is not used for 10 minutes, it switches to the energy saving mode. The cockpit is switched off.
To activate the lawnmower: see chapter 6.4
"Switching the cockpit ON and OFF*, page 33.
3.9.5 Resetting WiFi name and password*
-
depending on the model, see assembly instructions.
-
Hold the Smart Button pressed for approx. 10 seconds:
Smart Button Meaning
Lights up blue. Then Resetting fading in anti-clockwise direction.
Flashes blue. Resetting completed.
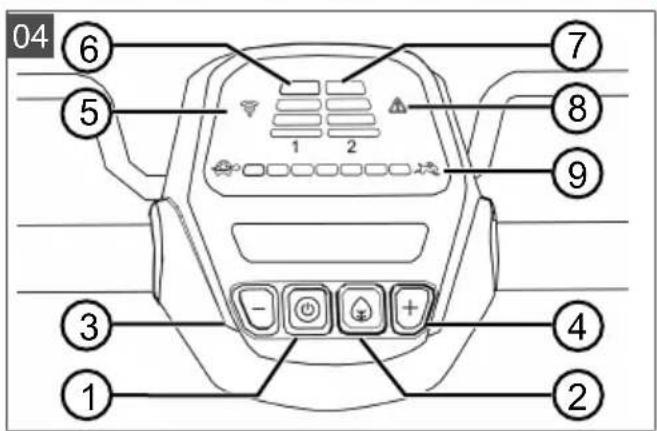
3.10 "maxRun & smart-drive" cockpit (04)*
- depending on the model, see assembly instructions.
Buttons
No. Meaning
1 ON/OFF button for the cockpit
2 "Eco mode" button
No. Meaning
3 Minus button: Reduce the speed of the wheel drive.
4 Plus button: Increase the speed of the wheel drive.
Displays
No. Meaning
5 WiFi connection indicator
6 Charge status indicator for battery 1
7 Charge status indicator for battery 2
8 Error display
9 Set speed of the wheel drive (7 steps)
4 SAFETY INSTRUCTIONS
4.1 Safety instructions for lawnmowers
4.1.1 Training
- Read the operating manual carefully. Familiarise yourself with the control devices and the correct use of the appliance.
- Never allow children or other persons who are not familiar with the operating manual to use the lawnmower.
Children should be supervised so that they do not play with the appliance.
Cleaning and maintenance must not be carried out by children.
Local regulations may specify the minimum age of the user.
- Never mow when there is anyone, especially children or animals, in the vicinity.
Remember that the user is responsible for accidents involving other persons or their property. - Do not operate the appliance if you are under the influence of alcohol, drugs or medication.
4.1.2 Preparatory measures
Always wear sturdy shoes and long trousers when operating the appliance. Do not operate the appliance when barefoot or wearing light sandals. Avoid wearing loose clothing or clothing with dangling cords or belts.
Check the area where the appliance is being used and remove any objects that could be picked up and flung out by the appliance.
Before using the appliance, always check if the cutting blades, fastening bolts and the entire mowing unit are worn or damaged. Worn or damaged cutting blades and fastening bolts must only be replaced as a set to avoid unbalance. Worn or damaged information signs must be replaced.
4.1.3 Handling
Only mow during daylight hours or with good artificial lighting.
If possible, avoid using the appliance on wet grass.
Always make sure that you have a good standing position on slopes.
Only operate the appliance at walking pace.
Mow across the slope, never up or down.
- Be especially careful when changing the direction of travel on a slope.
Do not mow on very steep slopes.
Be especially careful when reversing or pulling the lawnmower towards you.
- Stop the cutting blade(s) if the lawnmower needs to be tilted for transport over areas other than grass and when the lawnmower is being moved to and from the area to be mowed.
- Never use the appliance with damaged protective devices or protective grilles or without mounted protective devices, e.g. baffle plates and/or grass catcher. Damaged protective devices and covers must be replaced, missing protective devices and covers must be correctly fitted.
Start the engine with care and in accordance with the manufacturer's instructions. Ensure that your feet are at a sufficient distance from the cutting blade(s).
- When starting the engine, do not tilt the lawnmower unless the lawnmower needs to be raised during the process. In this case, tilt it only as far as is absolutely necessary and only lift up the side facing away from the user.
- Do not start the engine when standing in front of the discharge channel.
- Never put your hands or feet on or under rotating parts. Always keep away from the ejection opening.
- Never lift or carry the appliance with the engine running.
- Switch off the engine and remove the safety key. Make sure that all moving parts have come to a complete stop:
whenever you leave the lawnmower,
before removing blockages or clogging in the discharge channel,
before inspecting, cleaning or working on the lawnmower.
after encountering a foreign object. Check for damage to the lawnmower and carry out the necessary repairs before restarting and working with the lawnmower.
An immediate check is required if the lawnmower starts to vibrate in an unusual way:
Check for damage.
- Carry out the necessary repairs of damaged parts.
Make sure that all nuts, bolts and screws are firmly tightened.
- Do not work with the appliance in bad weather conditions, especially when it is raining or when thunderstorms are approaching.
4.1.4 Maintenance and storage
Make sure that all nuts, bolts and screws are tightened and the appliance is in a safe working condition.
Regularly check the grass catcher for wear or loss of functional capability.
Replace worn or damaged parts due to safety reasons.
On appliances fitted with several cutting blades, note that the movement of one cutting blade can cause the other cutting blades to rotate.
- When adjusting the appliance, make sure that your fingers are not trapped between moving cutting blades and stationary parts of the appliance.
- Allow the engine to cool down before storing the appliance.
- When maintaining the cutting blades, be aware that the cutting blades can be moved even when the power supply is switched off.
- Replace worn or damaged parts due to safety reasons. Only use original spare parts and accessories.
4.2 Vibration load
Danger due to vibration
The actual magnitude of the vibration emissions during the use of the appliance may de
viate from that stated by the manufacturer. Observe the following influencing factors before or during use:
Is the appliance being used as intended?
Is the material being cut or processed in the proper manner?
Is the appliance in a proper condition of use?
Is the cutting tool properly sharpened or is the correct cutting tool installed?
Are the handle grips and any optional vibration grips mounted, and are they firmly attached to the appliance?
Only operate the tool at the motor speed required for the respective work. Avoid using the maximum speed in order to reduce noise and vibrations.
The noise and vibrations of the tool may increase due to improper use and maintenance. This leads to health damage. In this case, immediately switch off the tool and have it repaired by an authorised service workshop.
The degree of stress due to vibration depends on the work to be performed or on the use of the tool. Estimate the stress and plan appropriate work breaks. This considerably reduces stress due to vibration over the entire working time.
- Extensive use of the tool exposes the operator to vibrations, which can lead to circulatory issues ("white fingers"). To avoid this risk, wear gloves and keep your hands warm. If any symptoms of "white fingers" occur, immediately consult a physician. These symptoms include: Numbness, loss of feeling, tingling, itching, pain, reduced muscular strength, changes in the colour or condition of the skin. Normally these conditions affect the fingers, hands or pulse. The risk increases at low temperatures.
Take long breaks during your working day so you can recover from the noise and the vibrations. Plan your work in such a way that the use of appliances that generate strong vibrations is spread over several days.
If you notice an unpleasant sensation or discoloration of the skin on your hands when using the tool, stop work immediately. Take sufficient work breaks. Without sufficient breaks, a hand/arm vibration syndrome can occur.
- Minimise your risk of being exposed to vibrations. Maintain the tool according to the instructions in the operating instructions.
If the tool is used frequently, contact your dealer to purchase anti-vibration accessories (e.g. handles). - Avoid working with the tool at temperatures below 10^ . Define how the vibration load can be limited in a work plan.
4.3 Noise pollution
A certain level of noise exposure from this appliance is inevitable. Carry out noisy work at approved and specified time periods. Observe rest periods as necessary and restrict the duration of the work to a minimum. For your personal protection and protection of persons in the vicinity, appropriate hearing protection must be worn.
4.4 Safety notes for rechargeable battery and charger
Heed the safety instructions for the rechargeable battery and for the charging unit in the separate operating instructions.
See:
Operating instructions 441630: Li-ion rechargeable battery B150 Li (B05-3640G), B200 Li (B05-3650G)
Operating instructions 441633: charger C130 Li (C05-4230)
5 INSTALLATION
Assembly: See assembly instructions.
WARNING! Danger if assembly is not carried out completely! Use of an incompletely assembled appliance can result in serious injury.
Operate the appliance only when it is fully assembled!
- Do not insert the batteries into the appliance until it is fully assembled!
6 START-UP
6.1 Charging the rechargeable battery
NOTE For detailed information, heed the separate operating instructions for the rechargeable battery and for the charging unit.
6.2 Inserting and removing batteries (05)
You can operate your lawnmower with one or two batteries. The use of two batteries increases the
operating time and thus the movable area significantly.
Batteries can be used with different charge statuses. The fuller of the two batteries is discharged first until it has the same state of charge as the second battery. Then both batteries are discharged at the same rate.
IMPORTANT! Risk of damage to the batteries. If the batteries are left in the appliance after use, they could be damaged.
Take the batteries out of the appliance immediately after use and store in a frost-protected area.
Install the batteries in the appliance only immediately before starting work.
Installing the battery
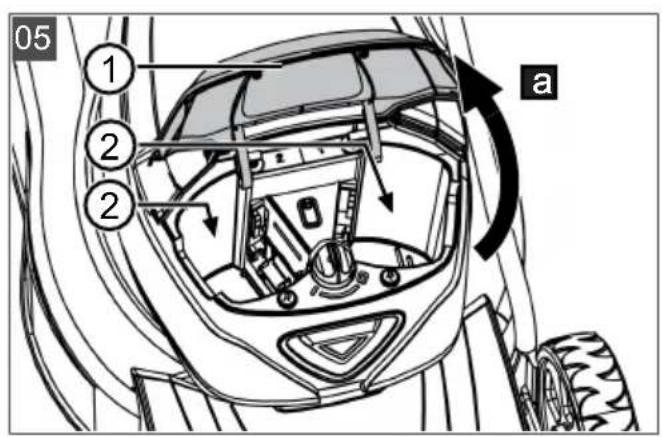
- Open the battery compartment cover (05/1) (05/a).
- Push the battery into a battery slot (05/2) from above until it engages.
- Close the battery compartment cover.
Removing the battery
- Press and hold the unlock button on the battery.
2.Pull out the battery.
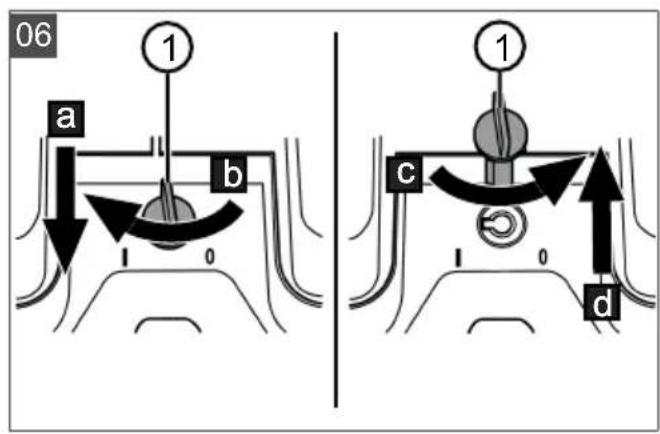
6.3 Switching the power supply to the mower mechanism ON and OFF (06)
The power supply to the mower mechanism motor is switched on and off with the key switch. The key switch is operated with the safety key.
WARNING! Risk of injury. Unintentional switching on can lead to serious injuries.
Each time before work breaks and maintenance work: To turn off the power, turn the safety key to the 'Off' position and then remove it.
Switching on the power supply
- Open the battery compartment cover.
- Insert the safety key (06/1) into the key switch (06/a).
- Turn the safety key to the ON position (position 1) (06/b). The mower mechanism motor is supplied with operating voltage, but does not yet start to operate.
- Close the battery compartment cover.
- Switch on the mower mechanism: see chapter 7.6 "Starting and stopping the mower mechanism (14)", page 34.
Switching off the power supply
- Turn the safety key to the OFF position (position 0) (06/c) and remove it (06/d).
- Immediately after use, remove the batteries from the appliance, charge and store in a frost-protected area. Insert the batteries into the appliance only immediately before the next use.
6.4 Switching the cockpit ON and OFF*
- depending on the model, see assembly instructions.
Precondition: At least 1 battery is installed.
NOTE The safety key does not have to be turned to the ON position (position I) for power to be supplied to the cockpit and the wheel drive.
The cockpit can be switched on in two ways:
Press the ON/OFF button (04/1) on the cockpit.
Press the Smart Button (03/1) briefly.
The cockpit switches on automatically when the mower mechanism motor starts (see chapter 7.6 "Starting and stopping the mower mechanism (14)", page 34).
7 OPERATION
WARNING! Risk of injury! Defective and disabled safety and protective devices can result in serious injury.
Before switching on, check that all safety and protective devices are in place and functioning correctly!
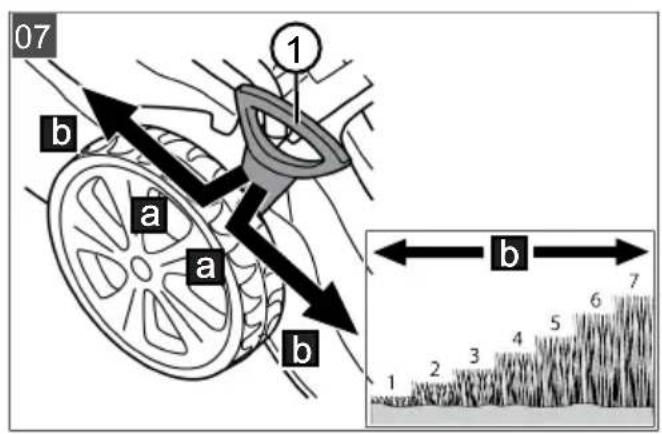
7.1 Setting the cutting height (07)
CAUTION! Danger of lacerations. Danger of lacerations when reaching into the running mower mechanism.
Only adjust the cutting height when the motor is switched off and the mower mechanism is stationary.
- Press the release lever (07/1) outwards slightly (07/a) and hold it.
For short grass, push the lever towards the front wheel (07/b).
For longer grass, push the lever towards the rear wheel (07/b).
- Release the lever until it engages at the required level.
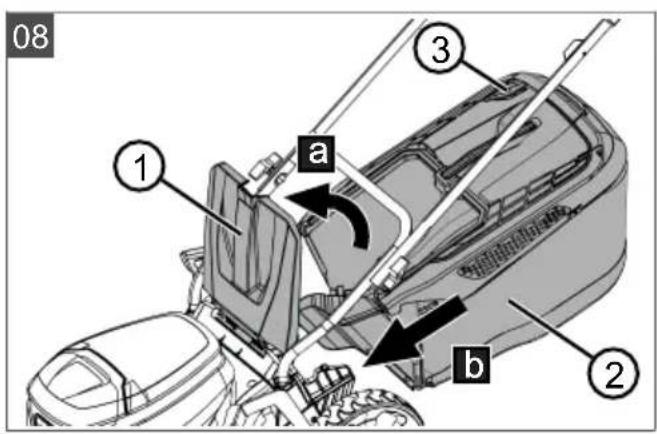
7.2 Mowing with grass catcher (08, 09)
The appliance can be operated with and without a grass catcher.
Hooking in the grass catcher
- Make sure that the appliance is switched off and the mower mechanism has come to a standstill.
- Raise the impact flap (08/1) (08/a).
- Hook the grass catcher (08/2) into the holders (08/b).
- Release the impact flap.
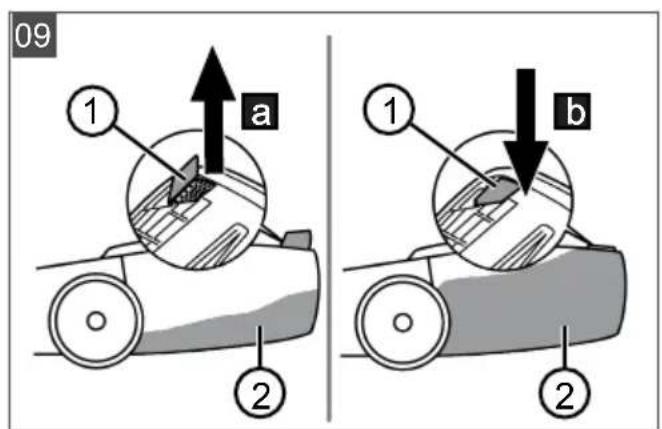
Checking the fill level
The fill-level indicator (09/1) is pressed upwards by the air stream when mowing (09/a). If the grass catcher (09/2) is full, the fill-level indicator is in contact with the grass catcher (09/b). The grass catcher must be emptied.
Unhooking and emptying the grass catcher
CAUTION! Danger of lacerations. Danger of lacerations when reaching into the running mower mechanism.
Only remove the grass catcher when the mower mechanism has stopped.
- Make sure that the appliance is switched off and the mower mechanism has come to a standstill.
- Raise the impact flap (08/1).
- Lift the grass catcher (08/2) out of the holders and take off to the rear.
- Empty the grass catcher.
- Clean the air outlet holes (08/3) under the fill-level indicator.
- Hook in the grass catcher (see above).
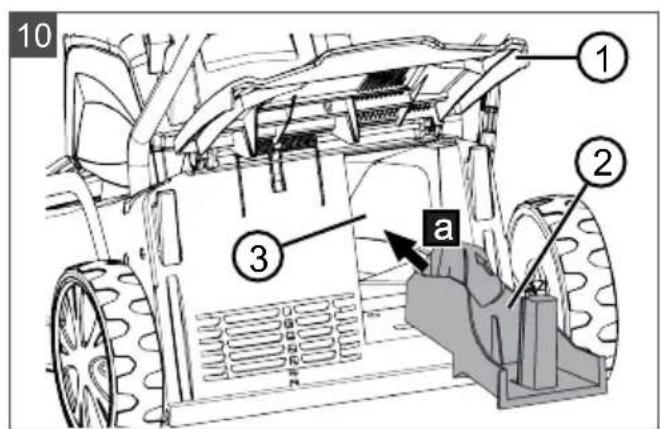
7.3 Mulching with mulching insert (10, 11)*
- depending on the model, see assembly instructions.
When mulching, the cuttings are not collected but remain on the lawn. The mulch protects the ground from drying out and supplies it with nutrients. The best results are achieved through regularly cutting back by approx. 2cm . Only new grass with soft leaf tissue rots quickly.
Grass height before mulching: max. 8 cm
Grass height after mulching: min. 4 cm
NOTE Adjust the stepping speed of the mulching, do not go too quickly.
Installing the mulching insert
CAUTION! Danger of lacerations. Danger of lacerations when reaching into the running mower mechanism.
- Switch off the appliance and remove the safety key before inserting or removing the mulching insert.
- Switch off the appliance: Turn the safety key to the OFF position (position 0) and remove.
- Unhook the grass catcher.
- Lift the baffle (10/1) and insert the mulching insert (10/2) in the discharge channel (10/3) (10/a). The locking mechanism must engage.
IMPORTANT! Danger of damage to the appliance. If the mulching insert does not engage, the mulching insert and mower mechanism can be damaged.
Make sure that the locking mechanism engages.
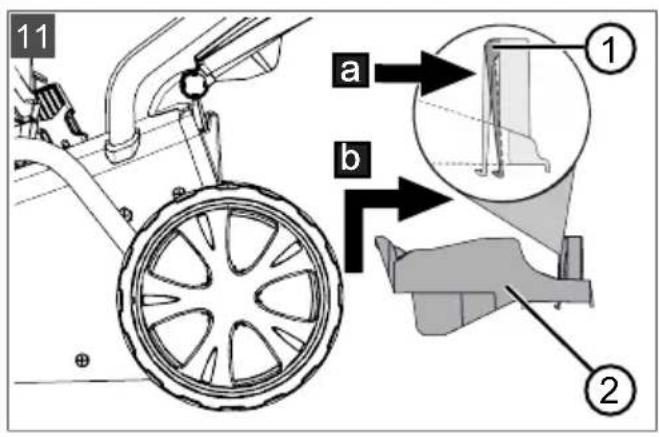
Removing the mulching insert
- Switch off the appliance: Turn the safety key to the OFF position (position 0) and remove.
- Lift the baffle.
- Release the locking mechanism (11/1) on the mulching insert (11/a).
- Pull out (11/b) the mulching insert (11/2).
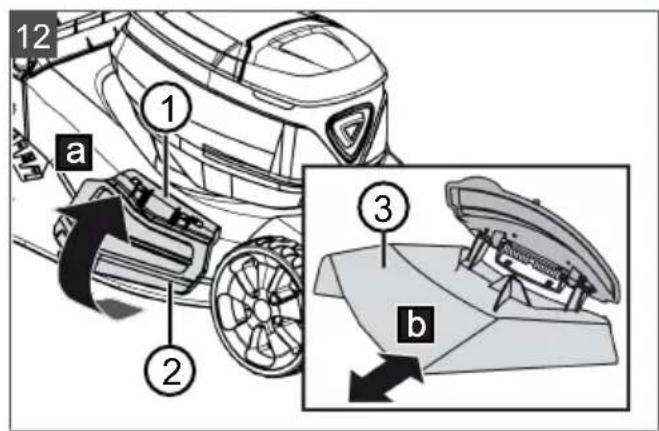
7.4 Mowing with side discharge unit (12)*
- depending on the model, see assembly instructions.
CAUTION! Danger of cuts and lacera
tions. Danger of lacerations when reaching into the running mower mechanism.
Only install or remove the side discharge insert when the motor and mower mechanism have come to a standstill.
Installing the side discharge insert
- Switch off the appliance: Turn the safety key to the OFF position (position 0) and remove.
- Remove the grass catcher and fit the mulching insert, see chapter 7.3 "Mulching with mulching insert (10, 11)*", page 33.
- Press the release lever (12/1) of the side discharge flap.
- Open the side discharge flap (12/2) (12/a) and hold.
-
Push in the side discharge insert (12/3) (12/b).
-
Slowly close the side discharge flap (12/2). The side discharge flap secures the side discharge insert to prevent it from falling out.
Removing the side discharge insert
- Switch off the appliance: Turn the safety key to the OFF position (position 0) and remove.
- Open the side discharge flap and hold.
- Pull out the side discharge insert and close the side discharge flap.
- Remove the mulching insert and attach the grass catcher.
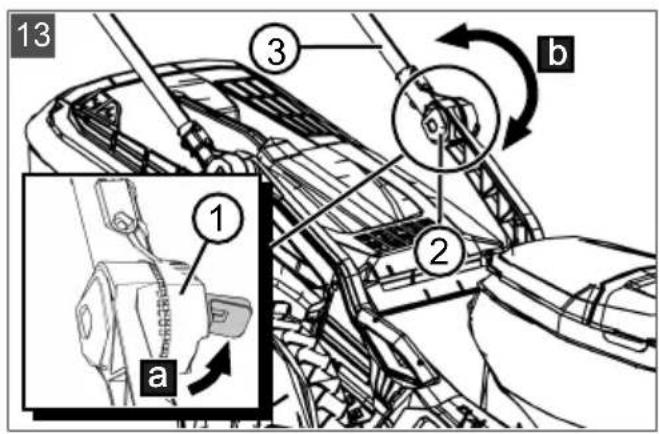
7.5 Adjusting the handlebar to your body size (13)*
- depending on the model, see assembly instructions.
- Open the quick-release fasteners (13/1) on the swivel joints (13/2) (13/a).
- Rotate the handlebar (13/3) around the swivel joints until its has the desired height (13/b).
- Close the quick-release fasteners.
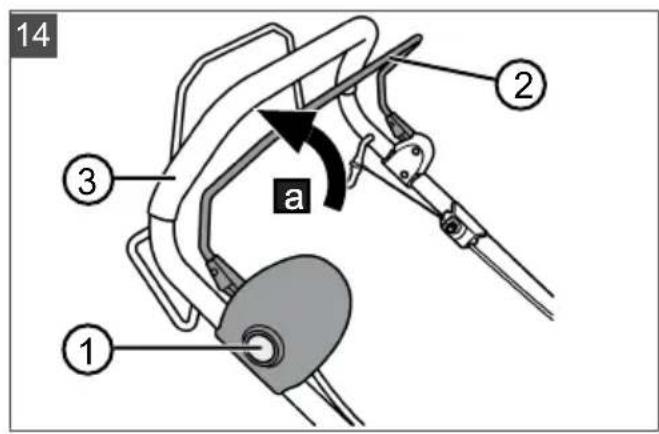
7.6 Starting and stopping the mower mechanism (14)
Start the mower mechanism on level ground and not in long grass. The ground must be free of foreign bodies such as stones. Do not lift or tilt the appliance to start it.
Starting the mower mechanism
- If you have not already done so: Switch on the power supply (see chapter 6.3 "Switching the power supply to the mower mechanism ON and OFF (06)", page 32).
- Press the start button (14/1) and hold.
- Pull the operator presence control (14/2) towards the handlebar (14/3) (14/a). The mower mechanism is started.
- Release the start button and keep holding the operator presence control.
NOTE The operator presence control does not lock in place. Hold it tight against the handlebar during the entire working period.
Stopping the mower mechanism
- Release the operator presence control. It automatically returns to its starting position.
- Wait for the mower mechanism to come to a standstill.
- Switch off the power supply (see chapter 6.3 "Switching the power supply to the mower mechanism ON and OFF (06) page 32).
CAUTION! Danger of lacerations. Danger of lacerations when reaching into the running mower mechanism.
Wait until the mower mechanism has stopped.
Before all maintenance and care work: Switch off the appliance and wait until the mower mechanism has stopped. Remove the safety key, and remove the rechargeable batteries.
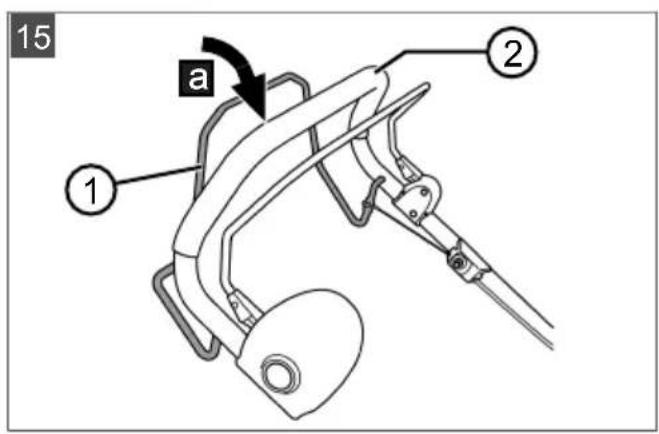
7.7 Switching the wheel drive ON and OFF (15)*
- depending on the model, see assembly instructions.
You can switch on the wheel drive to move the lawnmower between two working areas or to its storage location. It is not necessary to switch on the mower mechanism for this.
NOTE The safety key does not have to be turned to the ON position (position I) for power to be supplied to the cockpit and the wheel drive.
Starting the wheel drive
- Install a battery.
- Pull the gear engagement bar (15/1) towards the handlebar (15/2) and hold (15/a). The gear engagement bar does not lock in place.
Stopping the wheel drive
- Release the gear engagement bar. It automatically returns to its starting position.
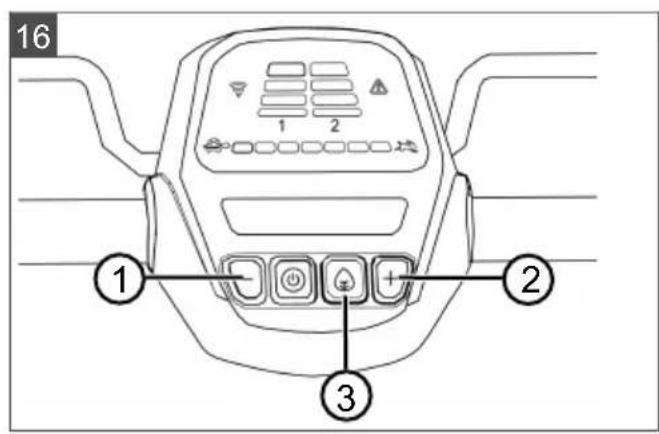
7.8 Changing the wheel drive speed (16)*
- depending on the model, see assembly instructions.
The ground travel speed of the lawnmower can be varied in 7 steps via the cockpit. The wheel drive must have previously been switched on, see chapter 7.7 "Switching the wheel drive ON and OFF (15)*", page 35.
- Switch on the cockpit (see chapter 6.4 "Switching the cockpit ON and OFF*, page 33).
- Decrease speed: Press the minus button (16/1). Or:
- Increase speed: Press the plus button (16/2).
7.9 Switching Eco mode ON and OFF (16)*
- depending on the model, see assembly instructions.
The motor speed is reduced in Eco mode. This prolongs the operating time of the batteries.
- Switch on the cockpit (see chapter 6.4 "Switching the cockpit ON and OFF**, page 33).
- Switch on Eco mode: Press the "Eco mode" button (16/3). The button lights up.
- Switch off Eco mode: Press the "Eco mode" button again. The light in the button goes out.
8 WORK INSTRUCTIONS
Observe the safety instructions!
NOTE Comply with the local regulations as to when a lawnmower may be operated.
Watch out for objects in the grass and remove them from the working area.
Only mow when visibility is good.
Only mow with a sharp cutting blade.
Only control the appliance by the handlebar.
Only move the appliance at walking speed.
Always move the appliance across the slope. Do not mow up or down the slope, or on slopes with a gradient of more than 10^ . Exercise particular care when changing direction.
Cutting performance or operating time of the battery
The cutting performance or the area that can be mown depends on the properties of the grass. Factors such as the length of the grass, the grass density, the selected cutting height and wet grass affect the cutting performance.
Optimum operating time is achieved by frequent mowing and keeping the grass short.
Frequently switching the lawnmower on and off during the mowing process reduces the cutting performance as does a non-fully charged battery.
Starting the wheel drive reduces the cutting performance or the operating time of the battery.
To optimise cutting performance, it is recommended to mow the grass often, to set a high cutting height and to move the appliance at walking speed.
NOTE To prolong the operating time, an additional battery can be purchased.
Tips for mowing
- Maintain a constant cutting height of 3 - 5cm ; do not mow the grass to less than half its original height.
- Do not overload the lawnmower! If the motor speed drops noticeably because of long, thick grass, increase the cutting height and mow in several passes.
Wind and sun can dry out the lawn after mowing so it is better to mow in the late afternoon.
9 MAINTENANCE AND CARE
WARNING! Danger of cuts and lacerations. Danger of cuts and lacerations when reaching into sharp-edged, moving appliance parts and into cutting tools.
Before maintenance, care and cleaning work, always switch off the appliance. Remove the batteries.
Always wear protective gloves during maintenance, care and cleaning work.
9.1 Regular maintenance work
Make sure that all nuts, bolts and screws are tightened and the appliance is in a safe working condition.
Check the grass collector regularly for correct operation and wear.
9.2 Cleaning the appliance and mower mechanism
IMPORTANT! Danger from water. Water in the appliance causes short-circuits and destroys electrical components.
Do not spray the appliance with water.
Only use a broom or a brush for cleaning.
- Stop the motor.
2.Pull out the batteries. - Unhook the grass catcher.
- Tilt the appliance and clean the mower mechanism.
9.3 Checking and renewing the cutting blade
WARNING! Severe injuries due to blade parts being flung out. A worn, cracked or damaged cutting blade can break, and its parts can become dangerous projectiles.
Regularly check the cutting blade for damage.
Do not use the lawnmower if the cutting blade is worn or damaged.
Have blunt or damaged cutting blades sharpened or replaced only by one of the manufacturer's service centres or an authorised specialist company.
To avoid vibrations, the cutting blade and blade bolt must always be replaced together.
- Resharpened cutting blades must be balanced. Unbalanced cutting blades cause strong vibrations and damage the appliance.
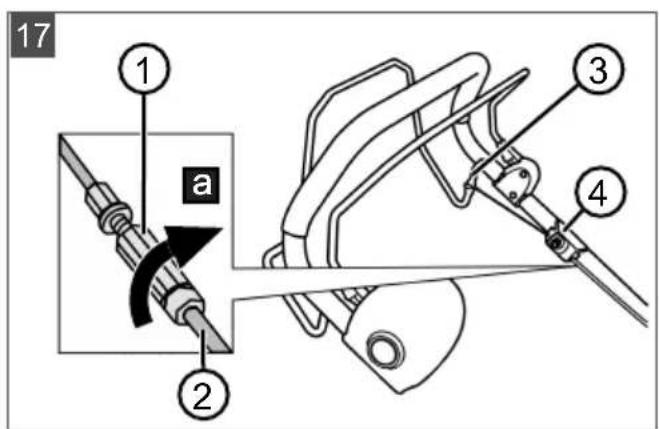
9.4 Adjusting the Bowden cable of the wheel drive (17)
The Bowden cable of the wheel drive lengthens over time. If the wheel drive can no longer be switched on with the motor running, the Bowden cable has become too long and must be tightened.
CAUTION! Risk of injury. Sharp-edged and moving appliance parts (e.g. cutting blade) as well as a suddenly starting lawnmower can lead to injuries.
Only adjust the Bowden cable when the motor is switched off and the mower mechanism has come to a standstill.
1. Switch off the power supply and remove the batteries (see chapter 6.3 "Switching the power supply to the mower mechanism ON and OFF (06)", page 32).
2. Turn the adjusting part (17/1) on the Bowden cable (17/2) in the direction of the arrow, i.e. anticlockwise until the Bowden cable is taut between the gear engagement bar (17/3) and holding point (17/4).
3. To check the Bowden cable setting: Switch on the appliance, start the motor and try to switch on the wheel drive.
4. If the wheel drive does not switch on: Repeat the previous steps.
If the adjustment of the Bowden cable is not successful: Contact a service centre of the manufacturer.
9.5 Repair work
WARNING! Risk of injury during repair work. Improper repairs can lead to serious injuries and damage to the appliance.
Have repair work performed by the manufacturer's service centres and authorised specialist companies only!
In the following cases, contact one of the manufacturer's service centres:
Motor no longer starts.
Appliance has moved onto an obstruction.
Cutting blade and/or motor shaft are bent.
Appliance vibrates and does not run smoothly.
Batteries are discharged or damaged.
9.6 USB port (18)
The USB port (18/1) is installed on all the lawnmowers described in this operating manual, but can only be used for software updates on smart
lawnmowers. It is not suitable for use for charging of batteries.
IMPORTANT! Risk of damage to the appliance. The batteries of mobile devices (e.g. smartphones) will be destroyed if they are plugged into the USB port.
- Do not plug any mobile devices with battery into this port.
10 HELP IN CASE OF MALFUNCTION
CAUTION! Risk of injury. Sharp-edged and moving appliance parts can lead to injury.
Always wear protective gloves during maintenance, care and cleaning work!
NOTE For malfunctions that are not listed in this table or that you cannot resolve yourself, please contact our customer service.
| Malfunction Cause Remedy | ||
| Engine does not start. | The power supply is switched off at the key switch. | Switch the power supply on at the key switch. |
| Rechargeable battery missing or not seated correctly. | Install the battery correctly. | |
| Rechargeable battery is flat. Charge the battery. | ||
| Cutting blade is blocked. | Free the blade of obstructions. Start the lawnmower on short grass. | |
| Cables or switches are defective. | Do not operate the appliance! Contact a service centre of the manufacturer. | |
| Engine loses power. | Rechargeable battery is flat. Charge the battery. | |
| Cutting blade is blunt. Have the cutting blade sharpened at one of the manufacturer's service centres. | ||
| Too much grass in the ejector. | Remove the grass. Clean the impact flap. | |
| Motor stops during mowing. | Cutting blade is blunt. Have the cutting blade sharpened at one of the manufacturer's service centres. | |
| Motor is overloaded. Switch off the battery lawnmower, set on level ground or short grass and restart. | ||
| Grass catcher is not filled sufficiently | Grass is wet. Allow the lawn to dry. | |
| Grass catcher is clogged. Clean the grid of the grass catcher. | ||
| Too much grass in the discharge channel or housing. | Clean the discharge channel/housing Correct cutting height | |
| Cutting blade is blunt. Have the cutting blade sharpened at one of the manufacturer's service centres. | ||
| Rechargeable battery operating time is significantly shorter. | Cutting height is too low. Raise the cutting height | |
| Grass is too long or too wet. Improve the conditions: Let it dry, set a higher cut | ||
| Mowing speed is too high. | ■ Reduce the mowing speed ■ Clean the discharge channel/housing, the cutting blade must rotate freely. | |
| Mowing with full grass catcher Empty the grass catcher and clean the discharge channel. | ||
| The service life of the battery has expired. | Replace the battery. Use only genuine accessories from the manufacturer. | |
| Rechargeable battery cannot be charged. | Rechargeable battery contacts are dirty. | Clean the battery contacts with a non-metallic object and spray with a contact spray. Important: Do not short-circuit the battery contacts with a metallic object! |
| Battery or charger is defective. Order replacement parts from the manufacturer. | ||
| Battery is too hot. Allow the battery to cool down. | ||
| Cockpit is switched on, but the motor is not running. | The power supply is switched off at the key switch. | Switch the power supply on at the key switch. |
| Error display on the cockpit lights up. | Battery not installed correctly. Install the battery correctly. | |
| Error messages on the Smart Button | Causes and remedies: see chapter 3.9 "Smart Button (03)**, page 28. | |
11 TRANSPORT
11.1 Transporting the appliance
IMPORTANT! Risk of damage to the mower mechanism. At the lowest cutting height, the mower mechanism can be damaged by driving over steps, edges or kerbs.
Set the cutting height to the highest level for transport.
- Stop the mower mechanism and wait until it has come to a standstill.
- Set the highest cutting height.
- Turn the key switch to the OFF position (position 0).
Transporting the appliance between two working areas
- Move the appliance to the working area with the mower mechanism set to the highest cutting height.
Engage the wheel drive for easier manoeuvring.
Use the handlebar and front carrying handle to carry the appliance. - depending on the model, see technical data.
Transporting the appliance in a vehicle
Remove the batteries.
Fold down the handlebar.
- Secure the appliance in the vehicle against falling over and sliding.
Secure the appliance against impacts from loose objects.
Do not place objects on the appliance.
11.2 Transporting batteries
Before transporting, carry out the following measures:
- Switch off the appliance.
- Remove the batteries from the appliance.
- Pack the batteries properly (see below).
NOTE The nominal energy of the rechargeable battery is more than 100 Wh. Therefore, observe the following transport instructions.
The li-ion rechargeable battery contained in the appliance is subject to the hazardous goods law, but can be transported under simplified conditions:
The rechargeable battery can be transported on public roads by the private user without further conditions provided it is packaged for retail sale and the transport serves personal purposes.
- Commercial users who carry out the transport in connection with their main activity (e.g. delivery from and to building sites, or demonstrations) can also take advantage of this simplification.
In both cases, it is essential to take the mandatory precautions mentioned above to prevent any leakage of the contents. In other cases, it is essential to comply with the regulations of the hazardous goods law. In the case of non-compliance, severe penalties can be imposed on the sender and possibly the transporter.
Additional notes on transport and shipment
Only transport or send the li-ion rechargeable battery in an undamaged condition.
For transporting the rechargeable battery, only use the original cardboard box or a suitable hazardous goods cardboard box (not required for rechargeable batteries with a nominal energy less than 100 Wh).
Tape off exposed rechargeable battery contacts to avoid a short circuit.
- Secure the rechargeable battery against shifting in the packaging to avoid damage to the rechargeable battery.
Ensure the correct marking and documentation of the shipment for transport or shipping (e.g. by parcel service or freight forwarding).
Check in advance that transport with the selected service provider is possible and indicate the shipment.
We recommend involving a hazardous goods specialist in preparation of the shipment. Also heed any further national regulations.
12 STORAGE
Thoroughly clean the appliance after each use and - if present - attach all covers. Store the appliance in a dry, lockable place out of the reach of children.
12.1 Storing the rechargeable battery lawnmower
CAUTION! Risk of injury during storage. There is a risk of injury from sharp parts on the stored appliance.
Store the appliance out of the reach of children and unauthorised persons.
Store the appliance only when the batteries have been removed.
IMPORTANT! Risk of burglary and loss of personal data. The lawn mower accesses the Internet and can control devices in the "Smart Home" and "Smart Garden".
Store the appliance only without batteries and well secured against access by unauthorised persons.
- Switch off the appliance: Remove the safety key.
- Set the cutting height to the highest level.
- Pull out the batteries.
- Allow the motor to cool down.
- Thoroughly clean the device.
- Rub a thin coat of oil or silicon onto all metal parts for corrosion protection.
- Fold down the handlebar.
- Store the appliance in a dry, clean location protected from frost. Cover with a breathable tarpaulin to protect against dust. Do not use plastic film in order to avoid the accumulation of moisture.
12.2 Storing the rechargeable battery and charging unit
NOTE For detailed information, heed the separate operating instructions for the rechargeable battery and for the charging unit.
13 DISPOSAL
Information on the German Electrical and Electronic Equipment Act (ElectroG)

- Electrical and electronic appliances do not belong in household waste, but should be collected and disposed of separately.
Used batteries or rechargeable batteries that are not installed permanently in the old appliance must be removed before disposal. Their disposal is regulated by the battery law.
- Owners or users of electrical and electronic appliances are obliged by law to return them after use.
The end user bears personal responsibility for deleting his personal data from the old appliance to be disposed of.
The symbol of the crossed-through rubbish bin means that electrical and electronic appliances may not be disposed of in the household rubbish. Electrical and electronic appliances can be handed in at the following places at no charge:
Public service disposal or collection points (e.g. municipal building yards)
Points of sale of electrical appliances (stationary and online) provided traders are obliged to take them back or offer this voluntarily.
These statements only apply to appliances that are installed and sold in the countries of the European Union and are subject to European Directive 2012/19/EU. Different provisions may apply to the disposal of electrical and electronic appliances in countries outside the European Union.
Information on the German Battery Act (BattG)

Used batteries and rechargeable batteries do not belong in household waste, but should be collected and disposed of separately.
For safe removal of batteries or rechargeable batteries from the electrical appliance and for information on their type or chemical system, follow the further information within the operating or installation instructions.
- Owners or users of batteries and rechargeable batteries are obliged by law to return them after use. Return is limited to the handover of customary household quantities.
Used batteries can contain harmful substances or heavy metals that can cause damage to the environment and human health. Reuse of the used batteries and use of the resources contained therein contributes to the protection of these two essential commodities.
The symbol of the crossed-through rubbish bin means that batteries and rechargeable batteries may not be disposed of in household rubbish.
In addition, if the symbol Hg, Cd or Pb appears under the rubbish bin, this stands for the following:
Hg: Battery contains more than 0.0005% mercury
Cd: Battery contains more than 0.002% cadmium
Pb: Battery contains more than 0.004% lead Rechargeable batteries and batteries can be handed in at the following places at no charge:
Public service disposal or collection points (e.g. municipal building yards)
Points of sale of batteries and rechargeable batteries
Disposal points of the common take-back system for the used batteries of appliances
Disposal point of the manufacturer (if not a member of the common take-back system)
These statements apply only to rechargeable batteries and batteries that are sold in the countries of the European Union and that are subject to European Directive 2006/66/EU. Different provisions can apply to the disposal of rechargeable batteries and batteries in countries outside the European Union.
14 AFTER-SALES/SERVICE
In the event of questions of warranty, repair or spare parts, please contact your nearest ALKO Service Centre. These can be found on the Internet at:
www.al-ko.com/service-contacts
15 GUARANTEE
We will resolve any material or manufacturing faults on the appliance during the legal warranty period for claims relating to faults, in accordance with our choice either to repair or replace. The legal warranty period is determined by the legislation of the country in which the appliance was purchased.
Our warranty promise applies only if:
The warranty becomes void in the case of:
These operating instructions are heeded
Unauthorised repair attempts
The appliance is handled correctly
Unauthorised technical modifications
Original spare parts have been used
Non-intended use
The guarantee excludes:
Paint damage that can be attributed to normal wear and tear
Wear parts that are marked with a frame xxxxx (x) on the spare parts card
The guarantee period commences with purchase by the first end user. The date on the proof of purchase is decisive. In the event of a guarantee claim, please take this guarantee declaration and the original proof of purchase, and contact your dealer or the nearest authorised customer service centre. This statement does not affect the purchaser's statutory claims for defects against the vendor.
VERTALING VAN DE ORIGINELE GEBRUIKERSHANDLEIDING
Inhoudsopgave
3.10 "maxRun & smart-drive"-cockpit (04)* 48
3 PRODUCTOMSCHRIJVING
3.8 "AL-KO inTOUCH Smart Garden" app*
3.9.3 Acties in "Smart Home" / "Smart Garden" activeren (IFTTT)
3.10 "maxRun & smart-drive"-cockpit (04)*
11.2 Accu's transporteren
3.10 Cockpit "maxRun & smart-drive" (04)* 67
Available on the AppStore
3.10 Cockpit "maxRun & smart-drive" (04)*
www.al-ko.com/service-contacts
15 GARANTIE
3.10 Cockpit "maxRun & smart-drive" (04)* 105
Cockpit "maxRun & smart-drive"
9*
3.8 App "AL-KO inTOUCH Smart Garden"
3.10 Cockpit "maxRun & smart-drive" (04)*
www.al-ko.com/service-contacts
15 GARANCIJA
11.2 Transport akumulatora
Prijete transporta provedite sljedecke korake:
- Iskligute urejad.
- Izvadite akumulatore iz uredaja.
- Zapakirajte akumulator na propisani nacin (pogledajte dolje).
NAPOMENA Nazivna energia akumuladora je veca od 100 Wh! Stoga uzmite u obzir sljedece napomene za transport!
Sadržani litij-ionski akumulator podlijje ze pravilima o opasnom teretu, no moze se transportirati prema smanjenim zahtjevima:
www.al-ko.com/service-contacts
15 JAMSTVO
Možebitne greške u materijalu ili proizvodnji na urešaju uklonit Čemo tijekom zakonskoga roka zastare za jamstvo na nedostatke prema vlastitom izboru popravljanjem ili zamjenskom dostavom. Rok zasta-re odrešuje se prema pravu države u kooj je urešaj kuplejen.
A yIIO3OPEHbE! Onacnoct oI nobpeJe.
HeicnpaBn n DeakTbBpaHn cnrgpHocn n 3aHTnTHn ypehajn Mory da doBey do TeWKx NOBpeDa.
JajTe HEnCnpaBHe CnrypHOCHe 3aWtTHe ypehaje Ha nonpaBky.
HnkaJa HeMoJTe DeaKTbNpaTn cnrypHoche n 3aWTnThe ypehaje.
Be36eHocn KJbuy
Kako 6n ce n36eIIO HeHamepHO yKbUyNBaHe,ypehaj je onpeMbeH 6e36eHocHM KbUyem.ypehaj nckbUyHTe ppe padoba oJpxkabHa uYBeK n3BaNTe 6e36eHOCN KbUy.
Бe36eHocHa pyka/NoIyra
Ypehaj je onpemrben 6e36eHochom pykOM/ nonyrom. Y TpeHyTKy onachocTN jeHOCTabHO ncytnte 6e36eHocHy pykry/nonyry. MoTop i MexAHn3am 3a KOseHe ce 3ayCTabbajy.
Tactep 3a nokpeTaHe
Ia 6n ce MOTOP Mora yKbUHTN 6e36eHOCOM pykOM/NoIyROM, npeTXoJHO ce Mopa npITNCHyTN TAcTeP 3a NOKpeTaHe.
3awtntHa KlaNaHa
3a06JIbeHn NOKIOnaU 7HTTN Hnp. OJ YecTua MaTePnJaNA KOJN CE PEXE IN KAMEHa KOJN CE n36aujy.
3.5 CmboHn Ha ypehajy
3.5.1 Be36eHocHa 03NaKa
3.8 "AL-KO inTOUCH Smart Garden" anlkaunja*
- 3auecho od modena, noznejme yynmcmgo 3a MOhmaxy.
Kocniluca je onpeMbeHa 6exnHm paHNO MOnynom. OH omoryhaba ydo6Ho ynpaBbahe, NDoeShaBaHe n HAd3Op npTeM anNkauJe ca Mo6nHOr ypehaja (nameTHn TepeOH, Ta6IeT).
HANOMEHA Mo6nHOM ypehajy je 3a KopnshHe be annkauJe noTpe6Ha nHTepHET Be3a.
AnlkaJa "AL-KO inTOUCH Smart Garden" docTyHa je 3a ypehaje ca cncTeMOM Android y npodabHnCi Google Play Store n 3a ypehaje ca cnctemom iOS y npodabHnCi Apple App Store:


Iocne nHcTanaJJe aannkaJJe npBO Mopate da ce npjabnte nn peRnctpyjete. 3aTNM cJeDNTe yNtCTBO "kopak no Kopak".
Annkaunja Hydn pa3HOBpche yHKnje kao To je Hnp. pernctpaunja npon3bOda, cabetn 3a 6awty, cabetnK 3a 6nbke nnn Push oabewteba y cnuyajy rpewke.
ДоаТHE Инфорmaциjee y Be3n ca anЛикauиюm "AL-KO inTOUCH Smart Garden" можete дapnohaheTe по: https://alko-garden.com/smart-connect/

3.9 Smart Button (03)*
*3aucno od modena, nozneajme yynmcmbo 3a MOHmaxy.
Помоу Smart Button-a доовдпe своу косишиу y AL-KO Smart Cloud иdoespojmх могуностn Smart Gardening-a: https://alko-garden.de/smart-gardening-mit-alko/
HANOMEHA HanomeHa o 6eknUhoj Mpekn.
Да бисте моглд Кориспгte AL-KO Smart Gardening, косницma Морда се наразу домашajy ваше бжочne мржс.
UybaJTe cnpemHO KOpncnHcKO Ime INo3nHKy 3a Bauy 6exnHy Mpexy.
3.9.1 Ppka3 cTaHa HanyheHocTn
Smart Button Behn3daIeKa CnHn3yJe cTaBe HanyHeHOCTn AkymylaTopa.
Smart Button 3hauehe
CBeTn 3eJeHo. AkymyIaTopu cy HanyHbeH.
CBeTnIuPBeHo.AkymyIaTopn cy npa3Hn.
3.9.2 Поветаье ca AL-KO Smart Cloud-OM
HANOMEHA HanomeHa o NT
6e36eHocTn. 13 AL-KO Smart Cloud-a KocnnaayTomatckn dobnja HajnoBna aXypnpaHa coTbepa, da 6n ce cnpeynn 6e36eHocn npOnyctn. 3a To je notpe6an pncTy nHTepHeTy peko 6exnue Mpeke.
Camo npecko 6e36eDHe 6eKnUHe MpeKe NOBe3yjTe KocNJInuCy ca INHTepHEtOM.
OndeIte 6e36eHny lo3nHky 3a 6eknHy mpeky.
- Ppnpema nameTHor TeNeoHa:
Inctanpajte annkaunjy "AL-KO inTOUCH Smart Garden" (BnDn PoanaeBe 3.8""AL-KO inTOUCH Smart Garden" annkauja**, cmpaHa 157).
IokpeHnte anJnkaunjy.
2.ПokpeHnTe acnCTeHT 3a ypeHnBaHbe: PnTnCHnTe Smart Button oko 3 cekyHne.
3.Y acnteHTy 3a ypeHnBaHe:
NoBeknte NametHn TelefoH ca 6exuHOMMpexkOMKocnInue.
PpomeHnte nme KocnInce (onCnoHO).
YheCnTe nme nIoo3nKky 3a Bauy 6exuHy mpexy. KocuNua ce noBe3yje ca AL-KO Smart Cloud-om.
Smart Button npNJIKOM HameuTaHa
Бp. Smart Button 3начени
Pobe3nBaHe ca annkaunom:
a.Писupa палов.Аспент 3а
HameuTaHe je NOKpeHyT, Yeka Ha ycNoCTaBbAbe Be3e.
- TpajHo CBETnI nlaBO.
AcnCTeHT 3a HameuTaBe je NOBe3aH ca anNkaujom.
NoBe3nBaHe ca AL-KO Smart Cloud-om npeko 6exnHe Mpexe Kopncnka:
Бp. Smart Button 3начени
U. CBeTnn nnaBO, potnpajyHn y cMepy ka3aJIbKe Ha caty.
Pokwaj noBe3nBaHa
3.10 "maxRun & smart-drive" koknT (04)*
- 3a6ucho od Modena, no2nejme yynmcmgo 3a MOHmaxy.
Tacstepn
Bp. 3HaueHe
1 TacTeP 3a yKb./nCKb. 3a KOKNT
2 TacTeP "Eko peKIMM (Eco-Mode)"
3 MInHyc Tactep: CmaHbnte 6p3nHy noroHa ToUka.
4 Pnyc Tactep: NobehajTe 6p3nHy noroHa Toyka.
HdkaTopn
Бр.Знанец.
5 INHnKaTOp Be3e ca 6eknHOM MPekom
6 INHnKaTOp HnBoa HanyBHeHoctn aKymyNaTopa 1
7 HnkaTop HbOa HanybeHocTn akymyataopa 2
8 INdkaTop rpeke
9 NoideWeHa 6p3nHa noroHa TocKa (7 HNBOa)
4 B6E6EДHOCHE HANOMEHE
4.1 Be36eHocHe HAnomeHe 3a KocnIuCy
4.1.1 06yka
I PanJBnBO npOHTajTe ynyTCTBa 3a ynoTpe6y. Yno3HajTe ce ca KOMaHNm eJeMeHTnMa n npabINHom ynoTpe6bom ypehaja.
HnkaHa He 03BOJNTe Da Deca Hn Dpyr, KOJI He N03Hajy yNyTCTBa 3a yNtpe6y, KOpNCTe KocNJnCy.
I Deua Mopajy Da 6dy NOD cTaNHM HAn3Opom I Tpe6a IM 3a6paHHTn Da ce Irpajy ypehajem.
UshheI OndpaBaHe He Cmej Da Bpwe deca.
IokanHn nponnc Mory da nponncjy MNHmAlHy CTapOCT KOpNCnka.
Obaj ypehaj mory da kopncte ocobe ca cmaHbeHIM qn3nKIM, ceH3OpHM nIIM MeHTaHIM CNOCO6HOCTMa IIN ca HeIOBOJbHO NCKyCTBa u 3HaBa, aKO cy noI NaI3OpOM u aKO cy uyhe y 6e36eHy ynoTpe6y ypehaja u aKO pa3ymej onaCHOCTu Koje Hactajy ycnei Tora.
HkaHa He Kocnte Kaa cy lyu, a noce6Ho Deza nn JnBOTnHe, y 6n3nH;
IImajTe Ha yMy Da je KopnCHNK OndroBopan 3a He3roDe y KoJIMa cy kJbUyeHn dpyrN JbYdIN INI HbNXOBA IMOBuHa.
Hemojte pykoBATn ypehajem noJ yTucajem aIKoxoJa,dpora nn JekBa.
4.1.2 PnpnpemHe Mepe
Ipn pady ypehaja yBek Hocnte YBpcTy obyHy n dyre xnaue. Ypehaj hemojTe norohnTu 6ocn Hn y naHm caHaanama. N36erHnTe
Houhe He Jia6abe Oehe ca 0eHeHm KaHaHMa Hn noJaceBMa.
IpoBepuTe Tepen,Ha Kojem Ce KopnCTn ypehaj uYkNoHTe CBe npEmdTe koje ypehaj MOKe Da 3axBaTu n N3baU.
Ipe cBaKe ynpTpe6e ypehaja npoBepnte da nn cy pe3aun, npuBpcn CbOpbaun I KOMnTeHa pe3Ha jeDHHua nCtpoWeH nn OwTeHeH. NcTpoWeH nn OwTeHeH pe3aun I npuBpcn CbOpbaun CMejy da ce 3ameHe caMo y KOMnPeTy KaKo 6n ce n36erla HeueHTpnpaHocT. Notpe6Ho je 3ameHnTu nCtpoWeH nn OwTeHeH pNoye ca HanomeHaMa.
4.1.3PykoBaHe
Kocnte cmo npn dHeBHom CBeTny nIIN do6pOM oCBeTneHy.
Ako je To Moryhe, n36erHnTe npmEnHyypehaja KoD BnaXHe TpaBe.
Ha npaHama yBek n3nte Ha do6py cta6nHocT.
Ypehaj BoDInTe cAmo 6p3nHOM Kopaka.
Kocnte nonpeuHo npema naHn, a Hkaa paBHO H36pDo nHn y36pDo.
Ioc6Ho nataTe kada npomeHnte cmepe BoXhBe Ha Hn36pDnCn.
Hemojte KocHTn Ha npTepeHo CToPMm NaINHaMa.
Будnte noce6Ho onpe3Hn KaJa KocuNtuOkpehete nn je ByyTe npema ce6n.
Pe3a3ayctabnte ako Tpe6a hargnyt Kocnilu cy paTn TpaHcnpTa npeko dpynx NOBpUnHa OCIM TpaBe Te KaJa ce Kocnilu cy NOMue npema NOBpUnHn KoJy ce Kocn Od He.
Upehaj HnkaJa HeMoJTe KOpuctHTn ca OuTeHeHIM 3aWTtHm HappaBama Nn 3aWTtHm peWeTkama nn63 yrpaJehnx 3aWTtHx HApPbA, Hnp. NIMoBa 3a 3aWTtY KoD ydapaCa n/nn MexAHN3MMA 3a cakynbaBe Tpabe. OuTeHe 3aWTtHe CKnONOBe I NOKNONCe Notpe6Ho je 3ameHNTu, a CBe HeNoctajyhe 3aWTtHe CKnONOBe INOKNONCe HaOnyHNTu.
Onpe3Ho nokpeHnTe MoTo p y cKnaDy ca ynyTCTBnMa npOn3Bohaja. Na3Ne Ha DOBOJbHO paCtoJaHbe Hory od pe3aHa.
KoI nOKpeTaHa MoTopa KocnJInca ce He CMe HarnBaTu, OcIM KaJa je Tpe6a noDnHHTn npi nOKpeTaHy. Y Tom cnyajy HarHnte je
cMo KOJINKO je HeONXoDHO Te je NOdHnTe cMo CtpaHOM OKpeHyTOM OKOPNCnKa.
He nokehnte MOTOP kada ctojnte ncped KaHana 3a n36aunBaIbe.
HnkaHa He cTAbbajTe pyKe Hn Hore Ha potnpajyHe DeNoBe IIn NcNoI hNx. YBeK cTojTe DaJIe Od OTBopa 3a n36aunBaHbe.
Upehaj HkaJaHemojTe NOn3aTu Hn npehocntu DOK MOTOp paN.
Ickbuynte MOTOp n 3ByuTe 6e36eHocn Kjyu. IobpinHe ce da ce cBn poTnpajyHn DeJOBn 3ayctabe:
KaIrOHaNyUaTeKocnInuCy,
npe otnytaHa 6nokaHa nIn yKnaHbHa3aenJbeHa y KaHany 3a n3BaunBaHe,
Ipe Hero To 3aOnuHHe KOHTpOy KocnIInCe, uNshHeBe nn Dpyre paDoBe Ha MaunHn,
HakOH HauJaCKa Ha CTpaHO TeIIO. IotpaxKeTe OwTeHeHa KocNlnci N n3BpWnte Notpe6He nonpaBke npe NOHOBHor NOKpeTaHa i paDa ca KocNlncOM 3a TpaBy.
Ako KocnIina NoyHe Bn6pnpaTH Heo6uHOn CHaxHo, nOTpe6Ha je xHTHa npOBepa:
IotppaKnTe oWteHeBa.
I3BpWnte noTpe6He nonpaBke ouTeHEnx deNoBa.
IopnHnte ce 3a To da CBe HABpTke, CBOpHaun BnJUn 6ydy YBpCTO npnterHytn.
Ypehajem HemojTe paHTu y loUIM BpeMeHcKm ycNoBIma, nOroTObY nO KUNI INI rPMJbAHH.
4.1.4 OndpkaBaHe ncklaAnWTeHbe
Iopnnte ce da cy cBe HABpTke,KnHOBu N BuJcN YBpTo 3aTeHyTu N da je ypehaj y 6e36eHOM paHOM cTaHbY.
PeIOBHO npOBepaBajTe nCTpoIeHocT IIN r6ntak fynKuJe mexAHn3Ma 3a OdBajaHe TpaBe.
I36e36eHochnx pa3Jora 3aMeHnte nCTpoWeHe nn OoTehe HeJeNoBe.
I Na3nte Ha To Da KOD ypehaja ca Bnue pe3aay KaTeTbaj eJdHor pe3aay MoKe nokpeHyTu ocTane pe3aye.
I Na3nte KoJ NpOeShaBaHa ypehaja Ha To da ce Baun npCTn He 3aRnaBe n3Mehy NOMuHnx pe3aHa nФNKCHnx DeNoBa ypehaja.
PnuekajTe da ce motop pacxnaI npe Hero ycknaIuNTIte ypehaj.
KoI OdpJkaBaHa pe3aHa y3MnTe y 063np To da ce pe3aH Mory HacTaBnT KpeTaTn HAKOH NCKbVyNBaHa HanajaHa.
I36e36eHochnx pa3nora 3aMeHnte nCTpoWeHe nn OwTehe He DeNoBe. Ynotpe6nte NCKbUHyBO opRnHaJIHe DeNoBe n np6Op.
4.2 Ontepehebe Bn6paunjom
OnachocT od Bn6paunja
Cmebapha epehocm bubpauohux emucuja npunukom ynompebe ypehaja moke da odcmyna od haeedehe epehocmu npou3oHaqa. Ipe oH. y Toky Kopnsheha obpatnte naKbhy Ha cneDehe faktope yTucaja:
Да Ли ce ypehai kOpuctn HameHckn?
Да Ли се матерпал сеve oJH.обpaHyje Ha npabnHaun?
Да Ли ще урегaj уnpонсом vnotpe6HOM CTaHy?
Ja JI je pe3Hn anat nponncHO haoHTpen Ond. Ja JI je yrpaJen Ondrobapajyn pe3Hn anat?
Да Ли су монтуране пидрхнe и eВeHTyaJIHNo OПцИОпЕ BИбpaцИОнe pyчke, И да Ли су оHe YВрсTO сноJEHe ca ypehajem?
Upehaj cme da paan ca mo ca 6pojem o6pTaja MOTopa notpe6nM 3a OndroBapajyHn paI. N36erabajte makcmaHn 6poj o6pTaja, kaO 6nCTe CMAHnN 6ky N Bu6paunje.
UcneHnpaBnHOR KopuheBa n Odpkaaba,6yka N Bn6paunje ypehaja ce Mory nobehatn.To Bodn Do 3dpabCTBeHnx npo6nema.Y Tom cnuyajy odmax nckbutyte ypehaj n dajTe ra Ha nonpaBky y obnausheny cepBnchny paDnOHnCy.
CTeHOnTepeHeHOCTN Bn6paJOM 3aBncn od paJa KoJn Tpe6a Da ce n3BpUn ODN. YnoTpe6e ypehaja. IpoueHnte ra HapPabITE oDRObApajyhe na3e y Toky paJa. Ha taj hauHn Ce 3NaUajHo CmaHyje onTepeHeHOCT Bn6paJOM y Toky ueKoYNHOr PaDHOR BpeMeHa.
Dyka ynoTpe6a ypehaja n3naKe pykoBaoza Bn6paunjama n MoKe Da npoy3pOkyje npo6neme ca znpkynajom ("6en npct"). Da 6n ce cmaHNO pN3NK, Hocnte pykabue n OdpXkabajTe pyke TOnnIM. Ako ce npeno3Ha CmMTOM "6enor npCTa", OdMax nOTpaxKe
Iekapa.Y Te CImNTOME cnaajy:Y6nTak Ocehaja, r6nTak ceH3n6nHocTn, je3a, CBpa6, 601, cna6JIbeHe TeNEcHc Hare, npomeHa 6oJe nHn CTaHa Koxe.ObuHcO Ce OBn CImNTOMN OndOce Ha npCTe, Wake nHn Ha npLC.KoD HnCKnx TempepaTypa ce NOBeHabOnaCHOCT.
Y TOKy paHOR daHa npaBInTe dUke nay3e, KaKo 6nCTe MoTn Da ce onopabInTe oD 6yKe n Bn6paunja. Baw pad nCnnaHnApajTe Tako Da ce ynoTpeBa ypehaja KoJn CTbapajy jaKe Bn6pauije pacnoJe Hn BnSe daHa.
AkoHa Baunm wakama yTbpnte Hnpijatah ocehaj nnn npomeHy boje koke y TOKy Kopuheha ypehaja, odmax npeknHnte ca paDom. HanpaBHTe DOBObHO dyre naye. Be3 DOBObHO dYrnx nay3a moKe doHn Do CnHpOMA B6paunie wake-pyke.
MHHIMN3yjTe cBoj pnsnK n3naRaHaB Bn6paunjama. OndpkaBajTe ypehaj ycknaDy ca nHCTpykuniama y nyTCTBy 3a ynoTpe6y.
Ako ce ypehaj YecTo KOpuctn, KOHTaKTnpajTe BaWeer DnCTpN6yTepa Da 6nCTe HababuHn aHTn-Bn6paunHO npemy (Hnp. pyKe).
I36erabajTe da paanTe ca ypehajem Ha TemnepaTypama MaHbIM o1 10^. Y npaHy paada deHNHHTe kaKo onTepeheBbe BnpaunjOM MoKe Da ce orpaHnU.
4.3 Ontepehehe 6ykom
I3BecHO ONTepeheJe yCne6yKe 360r OBorypehaja He MoKe Da ce n36eHHe. Ipe6aunTe paOBe ca INHTeH3NBHom 6yKom Ha DO3BOJbEne H 3a To npEdnHe BpemeHa. No Notpe6n Ce npDpXkABajTe BpemeHa OabE3He TUnHe N orpaHnUte TpajaBe pada Ha OHO HajHyxHnje. PaN BaWe Nnue 3auntte N 3auntte oco6a Koje ce Hana3e y 6n3HH, Mopa Da ce Hocn ODroBapajhya 3auntTa od 6yke.
4.4 Be36eHocHe HAnomeHe 3a 6aTepnjy nnybau
Bodnte paUHa o 6e36eHOCHM HAnomeHaMa 3a 6aTepnjy n npbau y noce6Hm ynyTCTBnma 3a ynoTpe6y.
Budn:
UnyTCTBO 3a ynoTpe6y 441630:Jntnjym johcka 6aTepnja B150 Li (B05-3640G), B200 Li (B05-3650G)
YnyTCTBO 3a ynoTpe6y 441633: Nya C130 Li (C05-4230)
5 MOHTAXA
MOHTaKa: IorIeJaTe ynyTCTBO 3a MOHTaKy.

YIIO3OPEHbE! Onacnoctn ycJeI
HENOTnyHe MoHTaxe! PaI HEnOTnyHO MOHTnpaHor ypehaja MoKe Da DoBeDe Do TEUKX NOBpeDa.
Ca ypehajem paAnTe cAmo aKO je notnyHO MOHTnpaH!
AkymyaTope yMeTHnTe yypehaj TeK KaJa je NOTnyHO MOHTupaH!
6 NUYIHTAHE Y INOHO
6.1 HanyHnTu akymyIaTop
HANOMEHA 3a DeTaBHe INHOpMaunJe nOrIeJaTe Noc6Ha yNtCTBa 3a yNtpe6y akMylaTopa I NyBa4a.
6.2 CtaBbaHe n Bahebe akymyntopa (05)
IIO n360py Kopnctnte BaWy KocuNcy ca jeHIM nn Dba akymnatopa. Kod dBa akymnatopa ce TpaJaBe paDa NOBeha, a TIme ce N NOBpUnHa Koja MoKe Da ce NOKOc 3HaTHo NOBeha.
MoKeTe Da KOpNCTnTe aKymyNaTope ca pa3nHtIM CtaBem HanyHeNoCTn. IpBO ce npa3HN NyHnjN Od DBA aKymyNaTopa, Dok He 6ynde mao nCTO cTaHbe HanyBeHoCTn KaO dpYrN aKymyNaTop. NocTe Tora ce oBa aKymyNaTopa paBHomepHO npa3He.
IAXHbA! OnachocT od owTeheBa
akymyNatopa. Ako ce akymnatopn nocne
ynotpe6e octabe yypehajy, mory da ce owTeTe.
HenocpeNo nocne ynoTpe6e n3ByuTe akymyIaTope n3 ypehaja u YyBajTe ux 3austnhe oMpa3a.
UmetHnTe akymyIaTope yypehaj Tek HENOCpeDHO npe NOeTka paJa.
3aMeHa akymyNaTopa
- Поклonaц перраде за akумунатор (05/1) оTKлонит (05/a).
- AkymynaTop odo3ro rypaTu ydy6JbeHe 3a akymynaTop (05/2) cBe DoK He HaJIeHrHe.
- 3aklonnte noknonau nperpade 3a akymylaTop.
Bahebe akymyntopa
PpIINKOM MyJnHpaBa ce NOKoUeHN MaTepnjAn He CkyIba, Beh octaje Ha TpaBbaky.
MynupaHn MaTepujaI WITN TIO ON CuyuBaHa N Cha6deBa rXpaHbNBIM MaTepujama. Haj6oJb N pe3yIaTn Ce noCTnxky peoOBHM CKpaHbBaHem 3a OKO 2 m.Camo Mna Ta TpaBa Ca BnaKHMa JInCTa 6p30 TpyNJ.
BucnHa TpaBe npe MyIuHpaHa:MaKc.8U
BucnHa TpaBe nocJe MyunpaHbA: MNH. 4 cM
HANOMEHA Bp3nHy Kopaka npnilarOndTe MaNHy, HemoJTe Da xOdaTe npe6p30.
YMeTaHBe KInHa 3a MyJnHpAHe
ONPE3! OnachocT od noceKOTnHa.
OnachocT OJ NOCEKOTnHa y cnuyajy XBataHa 3a MexAHn3am 3a KOWeHBe KOj npa.
Nckbvyte ypehaj n n3ByuTE 6e36eHocnnytunHN KJbyU, npe Hero uTo yMeTHeTe nnynKKnOHHTe KInH 3a MaNNuHaBe.
- NckbyuBahe ypehaja: OkpeHnte cnrypHocn KByu y noLoxaj Nckb. (Off) (no3.0) n 3ByuTe ra.
- OTkaUHe Kytjy 3a ckynJaHbTe TpaBe.
3.Поинnte OбojHy 3aklonky (10/1)и кlnH 3a MyJnnpaHe (10/2)y OkHo 3a n36aunBaHe
(10/3) ymeTHyTu (10/a).БlokaJa Mopa da HaneIHe.
PAXHbA! OnachocT od owteheba ypehaja.
YKoNko Ce KInH 3a MaIupaHe He yrIaBn,KnH 3a MaIupaBe n MexAHn3am 3a KoWeHe MOy Da ce OwTeTe.
I Na3nte Ha To da ce 6noka ana yrnaBn.
YknaBaHbe KInHa 3a MyJUnpaHBe
- NcKbUyHbAHe ypehaja: OkpeHnte cnrgpHocn KJbUy y noNoXaj Nckb. (Off) (no3.0) n 3ByuNTe ra.
- PoiirnHnte oD6oJHy 3aklonky.
- OTnycTnte 6IOKaIy (11/1) Ha KJIInHy 3a MyJnHpaIbe (11/a).
- Kπιν Θa мυλυκραῦbe (11/2) έπυγή (11/6).
7.4 Kowene ca 6oUHM n36aunBaHem (12)*
* 3aBucHO od modena, noznejme yynmcmeo 3a MOHmaxky.
ONPE3! OnachocT od noceKOTnHa.
Onachoct od nocekotnHa npi ce3aHy pykama y MexaHn3am 3a KoWeHe KoJn paDi.
UMeTak 3a 6oUHO n36aunBaHe KOpNCHTe camO,ODH.yKIOHnTe rCa camO KaJa MToP mExaHn3am 3a KOSeHBe Mpyjy.
YMeTaHBe yMeTka 3a 6oUHO n36aunBaHbe
- NckbyuBaHe ypehaja: OkpeHnte cnIpynOCHN KByu y noIooJy Nckb. (Off) (no3.0) n 3ByuTe ra.
- CkHnTe KyTuJy 3a cKynJaBe TpaBe n yMeTHnTe KnIH 3a MyuNpaHe, BnI IooJIaeJIe 7.3 "MnyUpaHe ca KluHOM 3a MyuNpaHe (10, 11)*", cmpHa 163.
3.ПиТиСнITEpyuCy3aДe6ЛКИра№(12/1) 3aklonke3a6oHNoN36aUNBa№. - 3aklonky 3a 6oHNO n36aunBahe (12/2) OTKJONNTN (12/a).
- TpyhTu (12/6) yMeTaK 3a 6oUHO n36aunBaHe (12/3).
- Полако 3aTbOpTN 3aklonky 3a 60uHo n36aunBaHe (12/2). 3aklonka 3a 60uHo n36aunBaHe ocirypaba yMeTaK 3a 60uHo n36aunBaHe od nCpadaHa.
YknaBaHbe yMeTka 3a 6oUHO n36aunBaHBe
1.ИckbyuBaHe ypehaja: OkpeHnte cnrypHocn KByuy noIooJy Nckb. (Off) (no3.0)ии3ByuNTe ra.
2. OTKJIOHITN uYBpCTO dpKaTn 3aKnONky 3a 6oUHO n36aunBaHe.
3.ИЗВУЦИТЕ yMeTak 3a 6очно n3бациВа№ n 3aTBOPHTe 3aklonky 3a 6очно n3бациВа№.
4. YKNOHnTe KINH 3a MyuHpaIbe N yMeTHnTe KyTnjy 3a CkyNJbaIbe TpaBe.
7.5ПиларогаьаheBodeherctyba Telechoj BucHHn (13)*
-
3abucno od modena, noznejme ynymcmeo 3a MOhmaxy.
-
OTKJIoNHTn (13/a) 6p3n 3aTe3aU (13/1) Ha o6pTHHM 3rIIO6OBUMa (13/2).
2.BoeHn cTy6 (13/3) oKO oBpTHnx 3rno6oBa OKpeHyTdo JeJbeHe BnCnHe (13/6). - YBpCTo cknonHTn 6p3n 3aTe3a4.
7.6 NokpeTaBe n 3ayctaBbaHbe MexaHn3Ma 3a KoWeHe (14)
IokpeHnte MexaHn3am 3a KoSeHe cAmo Ha paBHOJ NOIO3N, He y BncoKoJ TpaBn. IOpnora Mopa 6bTN OChuShHeHa OD CTpaHx TeNa nonyT Hnp. KameBa. He noIN3ATn INn INpeBpHytn ypehaj padn NOKPeTaHa.
PokpeTaBe MExaHn3Ma 3a KoWeHe
- Ako ce jow Hnje Decnlo: PpNKbYuBaHbe ctpyJHor HanajaHa (BnDn NpOaJaBe 6.3 "YKbYuBaHbe u UcKnbYuBaHbe cmpyJHo2 HanajaHa MexaHu3Ma 3a KoWeHbe (06)," cmpaHa 162).
2.ПиТИСЧУТЯТСЕРЗА NOKpeTaHBe (14/1) nДрЖATN RA ПИТИСCHYTOR. - Повун (14/a) сигруносу руну (14/2)
празma вODEнem стубу (14/3). Мханзам за
9.5 PaobnHa nonpaBcN

YNO3OPEHbE! OnachocT od nobpeDe
KoI nonpaBKn. HenpaBnHe nonpaBKe Mory n3a3BaTn TeUke nobpeDe n OuTeHeHa ypeHaja.
PaOBe nonpaBKe cMejy da BpSe caMo AL-KO cepBnCn nIbOblaunHe cTpyHne cnprme.
Y cneJeHm cnyaJebMa nOtpaxnTe cepBnchHy Iokaunj npOn3Bohajya:
MToTOp ce Bnue He nokpehe.
Ypehaj je Hanwao Ha npenpeky.
Hok 3a cehebe n/nn BpaTnIO MoTopa cy cabnjeH.
Upehaj Bn6pupa n Hemnpno paan.
AkymylaTopn cy nCcypeN nn oWTeHEn.
9.6 YCb nHTeppejc (18)
YCb nHTeppejc (18/1) noctojn kOJ CBHX Kocniluca onncahnx y OBOM ynyTCTby 3a
ynoTpe6y, aann ce moKe KOpNCHTn CaMo KoJ nameTHnx Kocnnuca 3a axypnpaHa coPbepa. Hnje noroan 3a nyhebe akymynatopa.
PAXHb! Onacnoct od owteheba ypehaja.
AkyMaTOpN Mo6uHnX ypehaja (Hnp. NaMeTHnx TelefoHa) he 6HTn pa3opeHn, aKO ce npNKbUye Ha YCb nHTeppejc.
Hemojte da npikkbyyjete mo6nne ypehaje ca akymynaTopom Ha obaj nHTeppejc.
10 NOMOY CJYAJY CMETHBn
ONPE3! OnachocT od nobpeJe. Owtpn n NOKpETHn DeIOBn ypehaja Mory da doBedy do NOBpeJa.
IpnikompaObaOdpkaBaHa,Here n uHHeBa yBek Hocnte 3austnthe pykabuie!
HANOMEHA KoCmEtBu Koje HnCy
HabeHe y OoJ TaBeJIu JIe He MoXeTe Da OTKIOHnTe cam, ce o6paTnte HaJo cnyx6n 3a KOpNCnKe.
3.10 Kokpit "maxRun & smart-drive" (04)*.196
8 Kokpit "maxRun & smart-drive"
9 Trmen previdovky pro pohon kol
3.10 Kokpit "maxRun & smart-drive" (04)*
www.al-ko.com/service-contacts
15 ZÁRUKA
4 BEZPEČNOSTNÉ POKNY
4.3 Zatazenie hlukom
www.al-ko.com/service-contacts
15 ZÁRUKA
3.8 "AL-KO inTOUCH Smart Garden" app*
Available on the AppStore
3.10 "maxRun & smart-drive"-cockpit (04)* 250
11.1 Transport of maskinen 259
11.2 Transport of battery 259
12 Opbevaring 260
12.1 Opbevaring af batteridrevne pleneklippere 260
12.2 Opbevaring af batteri og oplader..... 260
13 Bortskaffelse 260
14 Kundeservice/service 261
15 Garanti 261
1 SÄERLIGE
SIKKERHEDSANVISNINGER
3.8 "AL-KO inTOUCH Smart Garden" app*
Smart button under drug
3.10 "maxRun & smart-drive"-cockpit (04)*
11.1 Transport of maskinen
11.2 Transport of battery
Udfor falgende tiltag for transporten:
www.al-ko.com/service-contacts
15 GARANTI
3.10 "maxRun & smart-drive"-Cockpit (04)* 267
4 Sakerhetsanvisiningar 267
4.1 Sakerhetsanvisningar for grasklippare 267
Smart Button under drift
3.10 "maxRun & smart-drive"-Cockpit (04)*
- beroende på modell, se monteringsanvisning.
Knappar
Nr. Betydelse
1 TILL/FRÄN-knapp for Cockpit
2 Knapp Eco-Mode
3 Minusknapp: Sanka hjuldriftens hastighet.
4 Plusknapp: Oka hjuldriftens hastighet.
Indikeringar
Nr. Betydelse
3.9 Smart-knapp (03)*
- Modellavhengig, se monteringsanvisningen.
Med Smart-knappen tar du plenklipperen din til AL-KO Smart Cloud og til de mange mulighetene i Smart Gardenings:
https://alko-garden.de/smart-gardening-mit-alko/
Smart-knapp under innstilling
Smart-knapp under drift
9 VEDLIKEHOLD OG PLEIE
www.al-ko.com/service-contacts
15 GARANTI
3.9 Alypainike (03)*
www.al-ko.com/service-contacts
15 GARANTII
www.al-ko.com/service-contacts
15 GARANTIJA
Available on the AppStore
Pec lietotnes instalësanas vispirms japiesakas
vai jaregistrejas. Pec tam izpildiet "soli pa solim"
noradijumus.
3.9.3 Darbibu ieslegsana "Smart Home" / "Smart Garden" (IFTTT)
www.al-ko.com/service-contacts
15 GARANTIJA
lespejamos materiala vai razoanas brakus iekarta mes noversisim atbilstoik likumanaoteiktajam noilguma terminam attieibaz uz garantijas prasibam, paturot tiesibas izveleties remontu vai jaunas preces piegadi. Noilguma temijs tiek noteikts, vadoties pec tas valsts speka esosas likumdoanas, kur aierice tika nopirkta.
3.8 Aplicatia "AL-KO inTOUCH Smart Garden"*
*in functie de model, vezi manualul de montaj. Masina de tuns iarba este dotata cu un modul radio WLAN. Acesta permite controlul, setarea si supraveghereacomfortabila printr-o aplicatie pe un disposizitiv mobil (smartphone, tablet).
INDICATIE Indicatie despite WLAN.
9 INTRETEREA $I INGRIJIREA
A VERTISMENT! Pericol de provocare de taieturi. Pericol de taiere la apucarea pieselor ascutite aflate in miscare si a cutitelor.
www.al-ko.com/service-contacts
15 GARANTIA
3.9.3 CtaptnpaHe Ha DeiCtBnB Smart Home/Smart Garden (IFTTT) 390
3.9.4 AkTbBnpaHe Ha rpaDnHcKaTa Ko-caUka* 390
3.9.5 HynipaHe Ha ImeTo n napoNaTa 3a WiFi* 390
3.10 Kontrponen 6nok maxRun & smartdrive (04)* .390
4 Yka3aHn 3a 6e3oNaChOcT. 390
4.1 Yka3aHnna 3a 6e3oNaChoc npn pa6o-Ta c rpaDnHcKa KocauKa 390
4.1.1 Obuyene 390
4.1.2 NpOdrToBnteHn DeiCTBna 391
4.1.3 IV3noJ3BaHe 391
4.1.4 PoiDpBxkca ncbxpaHHe 392
4.2 Bn6paCIOHNO HaTObapBaHe.....392
4.3UymoBo 3aMbpcaBaHe 393
4.4 Yka3aHnna 3a 6e3oNaChOCT BvB Bpb3- Ka c akymyNaTopHaTa 6aTePnI n 3a- PraHnTo yCtpoiCTBO .393
5 MoHTax 393
6IyckaHe B eKcnNoatau.. 393
6.1 3apejdahe Ha 6aTepeyTa. 393
6.2ПocTaBЯнeиИЗВаЖдaHeHaбaTePnIte(05). 393
6.3 BkIIOUbaHe n N3KIOUbaHe Ha eJIeK- Tpo3axpaHbAteTo Ha KocauHn MaXaHN3bM (06) 394
6.4 BkIIOUBaHe n I3KIOUBaHe Ha KOH- TpOJIHHa 6JOK* .394
7 O6cnykBaHe 394
7.1 HacpoKa Ha BucOuHaTa Ha KocHe (07) 394
7.2 Kocene c KOHTeHep 3a cb6bpaHe Ha TpeBa (08, 09). 395
7.3 MyuynpaHe Ha OKoCeHaTa TpeBa c npncTabka 3a MyuynpaHe (10, 11)* ....395
7.4 Kocene cbc cTpaHnUHO n3XBbPnAHe (12)* 395
7.5 PerynipaHe Ha oChOBHaTa dpbXka cnopei BncounHata Bn (13)* 396
7.6 CtaptnpaHe n cnpaHe Ha KocauHn mexaHn3bM (14) 396
7.7 BkIIOUBaHe n 3KIOUBaHe Ha 3aBnKBaHeTo Ha KoJIeNaTa (15)* 396
7.8ПомянаHa ckopocTtHa 3aДВИK-BAHe Ha KОЛЯТa (16)* 397
7.9 BклioчBaHe И n3KlIOUBaHe Ha EcopeЖIMa (16)* 397
8 Yukazanna 3a pa6oTa 397
9 PpBxKa n nouchTaHe 398
9.1 PepnoDnUHa noDpBxKka. 398
9.2ПочиствануuropeиHaKocayHmexaHn3bM 398
9.3Пюверки и помяна на ржесия HOX... 398
9.4 HacrpoKa Ha JnIoTO 3a 3aBnKBa- HeTo Ha KoneJaTa (17) 398
9.5 PemOHTHn pa60Tu 399
9.6 USB nopT (18) 399
10IOMOu npn HEn3npaBHOCTN 399
11 TpahcnpTupahe 401
11.1 TpaHcnpTupaHe Ha ypeHa. 401
11.2 TpaHcnpTupaHe Ha akymyIaTopHn 6aTeepu.. 401
12 CknaIpaHe 402
12.1 CbxaHHeHa akyMylaTopHaTa rpaHnKcKa Kocayka 402
12.2 CbxaHHeHa akyMaJatOpHaTa 6aTePnI 3apdHTo yCTpoiCTBO... 402
13 N3XbBpJrHe 402
14 Pndpbkka/CepBn3. 403
15Fapanu 404
1 CNEUJIH NHHCTPYKUN 3A BE3OJACHOCT
To3n ypeM MoXe Da 6bDe ynoTpe6BAAH O T deca Ha Bb3pact HAd 8 roDHH NOCBeH TOBa OT IINCA C ORpaHnueHN Fm3NueCKn, CeH3OpHN IIN yMCTBeHN cNoC06HOCTN, INI C IINCA Ha ONIT NIO3HaHHe, CAMO AKO Te 6bDaT HAn3uPaBAHN KOHtPOJInpAHn IIN 6bDat IHCTpyKTIpaHn OTHOCHO 6e3OnaChata ynoTpe6Ba HA To3n ypeN n pa3bnpat npo3TuAunTe OT TOBa ONaCHocTN. DeCuTa He Tp8Ba Da nIrpaT C MaunHata. PoounCTBaHTo N IOdApBXkata OT CTpHa Ha NoTpe6BnteJe He Tp8Ba Da 6bDat N3PbJIHBAHn OT DeCa 6e3 HAD3Op.
JIuca c MHoro rOleni N KOMnIeKCHN ORpaHnueHn HMorat Da ImaT Notpe6HoCTN,HaXbPnA uOxbata Ha Tyk ONncAHnte Yka3aHn.
2 OTHOCHO INHCTPYKUNRA 3A EKCINPOATAU
Hemckata Bercn e opunnaHaata nHctpkyKzra 3a eknpoatau. Bcnk noctahn Bercn ca npboHa oPunHaHaTa nH-CTpyKzra 3a eknpoatau.
CbxpaHraBaIte BnHaT Ta3n HNCTpyKuINa 3a ekCnloatauN NO HauIN, NO KOITo Da MoKeTe Da yHeTe, KOrATo CE HyXdaTe OT INH-ΦopMaun 3a To3n ypeD.
IpeaBaTe yepaHa npyrn Iuca cmo 3a- eHcTa3n HNCTpyKunr.
Ipooyete n c6bIIOaBaIte nHcTpyKuHITe 3a 6e3Oanachocn npedynpeDHTeHNHTe CBeTN B Ta3n INHCTpyKUra 3a eKcnloaTaun.
2.1 CnmbonHa HaayanHaTa cTpaHua
CnMBoJ 3HaueHne

Henpemehno npoheTe BHNMaTeIHO Ta3n INCTpyKu7a 3a EKcNlOaTa-ua npedny NysKaHeTO B EKCnloaTa-ua. Toba e npednoctabkata 3a 6e3onacha pa6ota n 6e3npobJeMHO 6opabe He cypea.

PbKOBOcTBo 3a eKcnnoaTaun
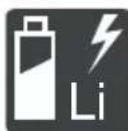
BHHMaTeJHO 6cnyBaIte JNTneBO- OHOHnTe 6aTeepu! Po cneuaHIO Cna3BaIte npedncaHnraTa 3a TpaHCnOpT,cbxpaHeHne nOTCTpaHnBAHe KATO OTNaDbK, ONUCAHN B TOBa pkoBoODCTBO 3a ekCnloatauia!
2.2 Pa3aCheHna Ha yCNoBHnTe 06o3HaueHnN n CnHnHTe dymn
ONACHOCT! Obo3Haayaba HenocpeDCTBeHo Onacha CHTyaqna, KOrTO - aKO He 6bJe n36eHrHata - MoKe Da UMa KaTO NocneDCTBne CmbpT IIN TeKko HapaHraBaHe.
PENyPExEHNe!O6o3NaHaBa NotehuHa OnaHa CHTyaCn, KOTo - aKO He 6bDeH36erHaT-6n MOrna Da DoBeDe Do CmbpT HnTeKko HapaHBAHe.
BHIMAHNE! O6o3NaUaBa nOteHuaJIHo OnaHa CnTuaUa, KOrTo - aKO He 6bJe N36eHa-Ta - MoKe Da UMa KaTo CneDCTBne JIeKO IIN UMepeHO HapaHraBaHe.
BHHMAHNE! O6o3NaHaBa cTuyaun, KOaTO - aKO He ce n36eHHe - MoKe Da npEiN3BnKa MaTePpnaHn 5eTn.
yKA3AHNE CneuHaHn yka3aHna 3a no-do-6po pa3bnpaHe n 6opabeHe.
3 OПИСАНЕ HA ПОДУКТА
ToBa pBKOBOcTBo 3a pa60Ta onnCBA pa3nUHMoJeI rpaHnCKn KocauKn C pbuHO ynpabHeHneOT mapKeTE AL-KO n solo by AL-KO c pa3nUHOobopydBaHe.ObopydBaHeTo Ha OTdeJIHnTe MoJeI e IpeDCTaBeHO B TexHnuecknTe DaHHN HaNHCTpyKcUInTe 3a MOHTax.
UpeBt MoKe Da 6bDe n3No13BaH eINHCTBeHO C IINTHeBO-NOHHTe aKymyNaTOPn 6aTePn N 3a-paHNHe yCTpoiCTBa, NocOeHN B TexHueCKnTe DaHHN. 3a NOBee INΦopMaunr 3a aKymyNaTOPn HnTe 6aTePn N 3apdHnTe yCTpoiCTBa BNKeTe OTdeHNHe pBKOoDcTBa 3a pa60Ta:
PbkoBoDCTBO 3a pa6oTa 441630:JIuTneBo- noHna akymylaTopHa 6aTeprnB B150 Li (B05-3640G), B200 Li (B05-3650G)
PbkoBoDCTBO 3a pa60Ta 441633:3apAnHo yctpoiCTBO C130 Li (C05-4230)
BHIMAHHE! OnachocT OT NOBpeHa Ha ypeDa Hn aKymyIaTOPHaTa 6aTePnA. Ako ypeDbT ce n3no3Ba C HeNoDxOJaU N 6aTePn, e Bb3-MoXHo ypeDbT n aKymyIaTOPHnTe 6aTePn Da 6bDat NOBpeDeHn.
I3noJ3BaIte ypeDa cMoC npEtncaHITe akymyIaTOPn 6aTePN.
3.1 N3noJ3BaHe no npedHa3HaueHne
To3n npOdyKT e npedHa3Hauen 3a KoceHe Ha TpeBHN PLOUIN Tp8Ba Da ce N3PON3Ba cAmo npn cyxa TpeBa.
To3n ypeE npedHa3NaueH cAmo 3a yacTHa ynoTppe6a. Bcya dpyra ynoTppe6a KaKTo n HEno3BOJenH peKoHCTpyKUIN IIN BHaC8nHe Ha DoNbHNTeHH enemeHTn Ce CHTA 3a ynoTppe6a He no npedHa3NaueHne, IN BOiN KATO NocPeICTBne DO OTnadaHETO Ha rapaHcYrTa, KaKTo n 3ary6aTa Ha CbOTBeTCTBNETo (06o3NaueHNeTO CE) n OTka3o OT OTROBOPHOCT Ha npoN3BOJnteJIa 3a UetN, npuHHeH Na Notpe6nteJIy IIN Ha TpeTA CTpHa.
3.2 Bb3MOxHa npeBnDmHa HenpaBnHa ynoTpe6a
YpeBt He e npoeKtnpaH 3a npocecnoHaHa yNoTpe6a B OTkpTN napKObe N cNoPTHN cbOpb-KeHn, HnTO 3a yNoTpe6a B ceJcKOTO n ropcko CTOnaHCTBO.
He n3noJ3BaIte ypeJa, KOraTo BaJIu nn JInn Bbpxy BlaJxHa TpeBa.
IpeDnA3HnTe yCTpOcTbA He Tp8Ba Da ce DEMoHTnpaT Nn Da ce 3aO6nKaJnT.
3.3 OCTaTbUHn pncKOBe
IopnKoratoobopydBaHeToceH3noJ3Ba npaBnHOBHHaOMa ONpeJeHcOCTaTbueH pNCK,KOHTo He MoKe Da 6bDe N3KnUoyeH.CneHNITeNOTEHuaJIHOn OAnCHOCTMORaDa Bb3HnKHATOTTNa IN3aAHHa Ha ypeDa,B 3aBNCIMOCT OTnpINLOXKeHNeTO:
N3XbPJIaHTo npn BbPTeHe Ha OKoCeHa TpeBa, nPbCT N MaJKN KaMbHn.
BdNWBaHe Ha YactnU O TOpra3Ha TpeBa, aKO He Ce Hocn PecnnpaTopHa 3aunTa.
Iopra3BaHe npxXbaaane Ha BbptraunT cepekeu HOK.
3.4 3aunTHn npedna3Hn yctpOuCTBa
PENyPExEHNe!OnachocT OHaHnBaHe. DeKTHIe N 3KIOUeHN yCTPOINCTBa 3a 6e3oNacOcT N 3aUNTa MOrat Da IOBeaT Do cepNo3HN HapaHbAHn.
PemontpaTe DepeKTHnte npeJa3Hn 3a- uHTHu yCTpoiCTBa.
Hikora He npemaxBaIte 3aunTHnte n npedna3Hnte yCTPOICTBa.
CekpeTeH KIIIOU (OcNrypnteJIHO 3aKIIIOuBaHe)
3a da ce n36eHHe HeyMnUHeHTo BkNIOUBaHe Ha ypeDa, PPOyKTbTe cHa6DeH CbC CeKePeTeH KNoU. PpeDn Da 3aNoOHTe IpoUeDpyn No NODpBxKkata, N3KIOUeTe ypeDa INBHaRn N3TeTJnTe OcNHyPntEINHOTo 3aKlIOUBaHe.
PpeDna3eH rnpf / npedna3Ha peIca
YpeDbTe o60pyDbaH c npEpa3eH rnpf / npedna3Ha peIca.B MOMENT Ha onaCHOCT, npocTo OCBO6OeTe npEpa3HNrT rnpf uIN CTpeMeNo-Do6Ha peIca.MOTOpBT N KocauHnT MExaHn3bM ce cnipat.
CTapT-6yToH
3a da MoKe Da ce N3KJIIOUH MOTOpbT NocpeiCTBOM npeIpa3HnA rPnΦ / npeIpa3HaTa dpbKka, npeI TOBa Tp8Ba Da ca HaTnCHe cTapT-6yTOHa.
IperpaHa nloa
IperpaHaTATA PLOa 3aunTaba Hanpimep OT KaMbHn N OKoCeH Yactu, KOnTO bNxA MoRn Da6bDat N3XBbPHeH HAcTpaH N pN BbPTeHe.
3.5 CnmboJn no ypeJa
3.5.1 3NaCl 3a 6e30NaCHOCT
CnmboJ 3HaueHne

Oco6eNo BnmaHne npa6oTa!

Ipei BbBexKaHeTO B eKcnnoaTa- u npoyeTePe bKOBoCTBOTo 3a pa6ota!

Onachoct ot hapaHrahe! Na3eTe pbuete N KpaKaTa daJeU OT KocauHnMexAHN3bM!

Henpnnoxmo, n3noJ3Ba ce camo npn 6eH3nHOBn Kocaykn.
Ppei BcKaBn pa60tn no pemOH Ta nnoDpBkKaTa n3BaTe ukepa 3a 3anaNTenHaT a Cbeu!
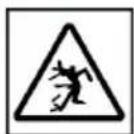
OnachocOT n3XbPJIHN npedMeTn!
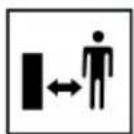
ДрькTe octaHaJIte xopa daJIeU OT onaChata 3OHa!

HenpnoKmo, n3noJ3Ba ce camo npn eNeKtpuYeCKN KocayKn.
Ipei pa6oTa no nOdpbXkata npemOnTa n3KnHcTe ypea n N3BaDeTe eenceTa ot 3axpaHbaHeTo!
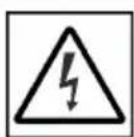
HenpnoKmo, n3NoJ3Ba ce camo npn eNeKtpuYeCKn KocayKn.
PnCK OT TOKOB ynap, aKO 3axpaHbauT Ka6e n eoBpehen!
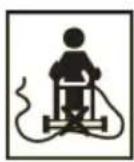
HenpnoKmo, n3NoJ3Ba ce camo npn eNeKtpuYeCKN KocayKn.
ДрьжTe 3axpaHbuaиKa6eI daJIeU OT peKeu INHcTpymEt N HeMnHaBaIte Bbpxy Hero!
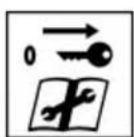
OTCTpaHraBaIte DeaKTbIpaUTo yCTpoIcTBo np pa6Ota no nOd- dPbXkata!
3.5.2 3Haun 3a 06cnykBaHe
CnMBOJ 3HaueHne
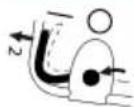
IpoeDpya 3a cTaptnpaHe Ha DnBraTeTn (Bnx 2naBa 7.6 CmApmupeu cnupaHe Ha KocauHua MexaHu3bM (14),cmpaHuca 396)
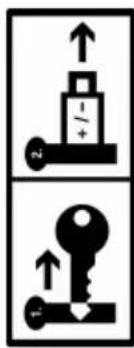
Korato He e B ynoTpe6a: N3BaTe ceKePETHN KIOU H OTCpaHete akyMynaTophata 6aTePN oT ypeA.
3.6ПергелиHa npoДукта
3.6.1 Перлеси на рожукta (01) - AL-KO
No KOMTOHeHT
1 Smart 6yToH
2 Kanak Ha otdeJeHneTo 3a 6aTepeyraTa
3 KIIOOIB npeKbcBaC bC cekpeTeH KIIIOU
4 OtndeJeHne 3a akymyIaTopHaTa 6aTepe n1n2
CrbBaema OCHOBHa IpbKka, CbCTOa ce ot:
5
TogHa npbXka
6
DOnHa DpbXkKa
7
Kpniluatarra (2x)
8 KoHTpOJIeN 6JOK maxRun & smart-drive
9 Pēncā 3a BkIIOUbaHe Ha 3aDbNIXBaHéTo HA KONeJIATA
10 PpeDn3Ha peIca
11 CtapTOB 6yToH
12 INHdkaTop 3a HanbIbaHe
13 KoHTeHep 3a cBbpaHe Ha TpeBa
14ДрьжkaHa KOHTeHepa 3a Cb6npaHe Ha TpeBa
15 LcHTpaHa HacTpoKa Ha BncoUnHaTaHa KocHe
16* Kanak 3a cTpaHnUHO nXbPJIaHe
No KomnoHeHT
17 Ппедна дрьжka за Носец
18 AkymynaTopha 6aTeprna (1x nnn 2x)
19 3apAДNo yCtPoIcTBo
*e 3aBucumocm om Modena, bux uHcmpykuura ma 3a MOhmaxk.
3.6.2 Перлеси на позукта (02) — solo by AL-KO
No KomnoHeHT
1*Smart 6yToH*
2 Kanak Ha otdeJeHneTo 3a 6aTepeyraTa
3 KIIOOvB npeKbcBaC bC ceKeTeH KIOU
4 OtdeJeHne 3a akymyIaTopHaTa 6aTepe 1 n 2
Perynnpyema no Bncoyna n Cbbaema OCHOBHa dpbkka,cbctoana ce ot:
5 TogHa dpbkk
6 10JHa dpbXka
7* 1sapnnp3a6bp30peynpahe
8 KoHTpOJIeH 6JIoK maxRun & smart-drive
9 PeIca 3a BkJIIOUbaHe Ha 3aIbNIXBaHcToHa KOneJaTa
10 PpeDn3Ha peIca
11 CnapTOB 6yToH
12 HdkaTop 3a HaiblaBaHe
13 KoHTeINHep 3a cb6bpaHe Ha TpeBa
14ДрьжkaHaKoHTeHepa3aCb6npaHeHa TpeBa
15 LéHTpαnHa HacTpoiKa Ha BncoUHata Na KocHe
16 Kanak 3a cTpaHnUHO nXbPJIHe
17 Претпа дрьжka 3a HOceHe*
*6 3aBucumocm om Modena, bux uHcmpykuura ma 3a MOhmax.
**cmomahaena unu anymunueea mpb6a 3aucumocm om modena.
3.7 OkomJIeKToBka Ha doCTaBkata
KbM 6xBaTaHa DoCTaBkata npHaadnexKaT nocoueHnte Tuk nO3uun. PpOBepTe, daN BcNKnIO3uun ca BKIOUeHN:
No KomToHoHeT
1「paHnKKaKocayka
2 KoHTeHep 3a cb6npaHe Ha TpeBa (HEMOHTnpaH/uaCTnHNO MHTnpaH)*
3 OchoBHa npbKka (HemOHtnpaHa/acyTnHOMHTnpaHa)
4Ппставka 3a cТpaHичHo n3XbBpJЯHe
5Писта вka 3a муниранe*
6 Top6a c 6oITOBe n raikn
7 AkymytaTopHa 6aTepeia* (1x nIin 2x)*
8 3aprHNo yctpoiCTBO*
*6 3aBucumocm om Modena, bux uHcmpykuja-ma 3a MOHmaxk.
3.8 Пиюхене AL-KO inTOUCH Smart Garden*
*e 3aBucumocm om Modena, bux uHcmpykuura ma 3a MOHmaxk.
Граинскata кocа e obopydbaHa c 6e3KuYeH WiFi moyn. Toba no3BoJraBa yO6Ho ynpaBLeHne, NaCTpoiBaHe n H6JIIOdeHne Ype3 npINOxKeHneTO, INCTaIIpAHO Ha MO6UHNO yCTpoiCTBO (cMapTfoH, Ta6Jnet).
YKA3AHNE Mo6nHOTO yCTpoiCTBO ce HxKdae OT nHTepHeT Bpb3ka 3a N3NoJ3BaHe Ha npINOKeHneTo.
Прилwx�енeto AL-KO inTOUCH Smart Garden Moxe da ьдe CBaNeHo Ha yctpoiCTBa c Android ot Google Play StoreиHa yctpoiCTBa c iOS ot Apple App Store:

GETITON
Google Play

Available on the
App Store
CneHCTaInpaHe Ha npINOxKeHnETo nbpBO Tp6Ba da ce perncTpnpate nn BnWseTe. CneDbaIte HNCTpyKUnTE CTbNka no CTbnKa.
PpHNOxHeHTo npEaRa 7nPOK dnaNa3OH OT cyHKuN, KaTO HApnPmep perncTpnpaHe Ha npOdyKtA, CbBETn 3a rpaHnHapCTBOTo, HapbYnK 3a pacTeHnra nPi Push n3BeCtny B cIyuaHa rpewka.
Повец Информаця за пионжени.To AL-KO inTOUCH Smart Garden ue hamepnte Ha: https://alko-garden.com/smart-connect/

3.9 Smart 6yToH (03)*
*83abucumocm om Modena, bux uHcmpykuja-ma 3a MOhmaxk.
Smart 6byToHbT Cbbp3Ba BaWata rpaDnHcKa Kocauka c AL-KO Smart Cloud n c pa3nHnTe Bb3-MoXHOCTn Ha cMaprpaDnHapCTBOTO: https://alko-garden.de/smart-gardening-mit-alko/
YKA3AHNE Yka3aHnna 3aWiFi.
3a da e Bb3MOxHo Da n3nOJI3BaTe AL-KO Smart Gardening, rpaHnckata Kocauka Tp6Ba Da 6bDe B oxbata Ha Baata WiFi Mpeka.
I OndrotBete MeTo n napOnata 3a BaWata WiFi mpeka.
3.9.1 Poka3aHne Ha CTeneHTa Ha 3apd
Smart 6byoHbT CnHaHn3npa 3a CTeneHTa Ha 3apd Ha akymyIaTOPHnte 6atepnn daxe ot pa3-CTOHNHe.
Smart 6yToH 3HaueHne
CBeTN B 3eIeNo. BaTePmnte ca 3apeDeHn.
CBeTN BuepeBHeO. BaTeepnTe ca n3ToUeHn.
3.9.2 Cbbp3BaHe Ha rpaHnckaTa Kocayka c AL-KO Smart Cloud
YKA3AHNE Yka3aHnna 3a NT cnryphocT.
IpaHnckata KocauKa noyuaba aBTOMaTHNO Hain-HOBITE cooTyeepn AKTyaN3aun ot AL-KO Smart Cloud, 3a da ce npedotbpaTBAt npOnycKn B cnypHOCTTa. 3a Ta3n cen Ce n3nCKBa DOCTbI Do nHTepHeT Upe3 WiFi.
Cbbp3BaIte rpaAnHcKaTa KocauKa c INTepeHET camo ype3 cnrypha WiFi mpeka.
I36peTe cunpyHa napona 3a WiFi mpekata.
1. PnroTBeCBOBcMapTfoH:
InhctanipaTe npunoKeHneTo AL-KO inTOUCH Smart Garden (BxK aea 3.8 "PpunoKeHue AL-KO inTOUCH Smart Garden**,cmpaHua 388).
CTapTnpaIte npnIOxKeHHeTo.
- CtrapTnpaIte NOMOuNka 3a HacTpoBbHe: HatncheTe Smart 6yToHa 3a Okono 3 cekyHdN.
3. B nOMOuNHa Ka 3a HAcTpoNBaHe:
CbpxTe CmapTfoHa KbM WiFi mpeka-Ta Ha rpaHnckata Kocayka.
PpomeHeTe HMeTo Ha rpaDnHcKaTa Kocacka (no JeJahne).
BbBeTe HMeTo n napolata 3a BaWata WiFi MpeXa. TpaHnckata Kocauka ce cBbP3Ba c AL-KO Smart Cloud.
Smart 6yToHbT npn HacTpOuBaHe
NoSmart6yToH3HaueHne
Cbbp3BaHe c npJIOKeHneTo:
a.ПулсupaВсиьо.
IOMOuHnKbT 3a Ha-CTPOBBAHe e CTAptNaH, n3yaKBa Ce Bpb3Ka.
- CBETN NOCTOHNHO B CINHbO.
IOMOuHnKbT 3a Ha-CTPOBaHe e Cbbp3aH C npINOxKeHneTO.
Cbbp3BaHe c AL-KO Smart Cloud ue3 WiFi Mpexkata Ha noTpe6nteJ:
B.CBETN B CnHbO, BbPTN Ce NO NO-COKa Ha YacOB-HNKOBaTa CTpeJIka.
Ont3a Cbbp3BaHe.
I. PpemnBBA BCnHbO.
Cbbp3aH.
I.PeNyBa ce 3eJIeHO cINHbO.
Cbbp3aH c AL-KO Smart Cloud.
e.PeNyBa ce cepBEno N CnHbO.
He e cBbP3aH. NMeTo n napoIata 3a BaWaaT a WiFi mpeXa He ca BbBeDeHn npabuNHO.
Smart 6yToHbT npn pa6ota
Smart 6yToH 3HaueHne
CBeTN B CnHbO (n36- neDnHa).
Cbbp3aH c AL-KO Smart Cloud.ДобразВрьзкa c WiFi.
CBETN B CnHbO, BbPTN CE.
Bpb3kata c AL-KO Smart Cloud e npeKbchata. Bpb3kata C WiFi e npeKbchata.
3.9.3 Cтартупане на.DeиствяВ Smart Home/Smart Garden (IFTTT)
CbC Smart 6yToHa MoKeTe Da cTapTnpaTe Do 3 DeiCTBnI IFTTT (IFTTT: If This Then That) (Ako TOBa, Toraba OHOBA). Te3n DeiCTBnI Tp8Ba Da 6bDat DeoHnpann npedBapnteHNo Ha https://ifttt.com/ (Hanp. ynpabNeHne Ha ypeu B Smart Home nni Smart Garden, BKIOUbaHe Ha HanOraBaHTo, OTBapRHe Ha rapaxHaTa BpaTa). DeiCTBnIa IFTTT MoKe Da ca 6e3nPaTHn nII nIaTeHN B 3aBNCIMOCT OT BnDa a6OHaMeHT Ha dOCTaBvNka.
YKA3AHNE No-noPpO6Ha INHΦopMaζηa 3a
IFTTT MoKe HaMePnTe Ha:
4.2 Bn6paunHNOHaTObapBaHe
Onachnoct OT Bn6paun
DeucmbemnHama cmoHocm Ha emucuume Ha b6pauu no bpeMe Ha u3non3baHemo Ha ycmpoucmbomo moke da ce omknHOu om nocoeyama om npou3bodumela cmoHocm. CneTe cneHNte faKTOpnHa Bb3dEiCTBne npedn nIIN NO BpeMe Ha ynoTpe6a:
I3noJ3BaJIncceypeBbTno npedHa3Ha-ueHne?
Pexe Jn ce pecn. o6pa6oTba Jn ce maTepeNaIbT no npaBUNHna HauH?
Hamnpa Jn ce ypeDbTe n3npabHo cbcToHHe 3a ynoTppe6a?
PexeIHT HCTpyMeHT npabINHO Jn e 3aToueH peCNI. NOCTaBeH JN e npabINHNrT peXeU NHCTpyMeHT?
MOnTnpaHn Jn Ca dpbXkNte n eBeHT. onuHaJIHnTe Bn6paCIOHn DpbXkN n Te Cbbp3aHn Jn Ca cTa6nHc ypeda?
EkCnIIOaTnpaIte ypeDa cAmO c Heo6xOdInMnte 3a CbOTBcTHata pa60Ta o6OpOTn. N3-6yBaIte MaKcImaJIHnTe o6OpOTn, 3a DaHaMaJIrTe Wyma n Bn6paunTe.
Iopadn HnnpabunHaTa ynoTpe6a n noDdpbXka Moat Da ce NobuWAT Wyma N Bu6paunTe Ha ypeDa. ToBa BOnn Do BpeN 3a 3dpaBeTo. B To3n Cnyauh n3KnUoye ypeDa He3a6abHo n rO npdaaiTe 3a peMOHT Ha OTOpni3napcepBn3.
CTeneHTa Ha HatoBapBaHe OT Bn6paun 3aBnCn OT pa6oTata, KOrTO Tp86Ba Da ce n3-BbpHn nn OT yNtpe6bata Ha ypeHa. IpeuheTe r Hnnpabete CbOTBeTHnte Na3n NO BpeMe Ha pa6ota. NTo3n Haunn Ce HaMaJraBa 3HaunTeJIHO Bn6paUOnHOTo HatoBapBaHe No BpeMe Ha cIanoTO pa6oTHO BpeMe.
IpoobnjiTeHaTa ynoTppe6a Ha ypeDa n3- nara noTppe6nteHa Bn6paunu MoKe da npuynH np6bnm B KpbBOO6paueHneTo ("6en npbctn"). 3a Da HamaNte To3n pnc, HocTe pKabuN u NpDlbPkaJte PbceTe cn TOnnn. Ako 6bJe pa3No3HaT CmNTom Ha "6eJIte npbctn", He3a6abHNO NotbpcTe ne
kapcka nomo. KbM Te3n CmNTOM npHaJnHexaT: 3ary6a Ha yBCTBNTENHOCT, n3TpbnBaHe, cbp6ek, 6o1ka, 3ary6a Ha cnla, npomra H CBeta Nn CbCTOHNTO Ha KOxata. O6nKHOBeHO Te3n CmNTOM 3acraT npCTnte, pbcTe nn ny1ca. PnHnckn Tempeatypn pnckT HapactBa.
IpaBete NO-DbJrN NoOuVBKn NO BpeMe Ha pa60THnA DeH, 3a Da ce Bb3CTaHOBInTe OT Wyma N Bn6paunTe. PnaHpaTte pa6oTaTa cnTaka, Ye n3NoJ3BaHeTo Ha o6OpyDbaHe, Koeto reHepnPa CnHn Bn6paun, Da ce pa3npedJeB INpOdbJxKeHne Ha HkOJIko DnH.
Ako yceTnte duCKOMΦoPT uHn npomHa B UBeTa Ha KOkaTa Ha pBuTe cN, DOKaTO n3- NOI3BaTe ypeDa, cnpTe pa6Ota He3a6abHo. PpaBete DoCTaTbUHn Na3n No Bpeme Ha pa6Ota. Be3 DoCTaTbUHNo Na3n No Bpeme Ha pa6Ota MoKe Da BB3HNKHe CnHdPOM Ha BN6paunr PbKa-pAMo.
HamaIe pIcKa OT n3IarAHe Ha Bn6paun. POndIbpxaIte ypeDa B cBOTBeTCTBne C nH-CTpyKuNTe B pBkoBOdCTBOTO 3a eKcnnoata-
Ako ypeIbT ce n3noI3Ba yeCTO, CBbPjKeTe ce c DnCTpN6yTopa cn, 3a Da 3akynTe aHTN Bn6paCIOHn npHaIeXHOCTn (HaNP. npBxKn).
I36raBaiTe pa6oTa c ypeDa npi TemnepaTyPn no1 10^ . B pa6oTeH nnAn onpeJeTe KaK Bn6paUHOHTo HATOBapBaHe MoKe da 6bnde orpaHnueHo.
4.3 WymoBO 3ambpcBaHe
OnpeIeHIO 3aMbpcBaHe qpe3 To3n ypeI He MoKe Da Ce N36erHe. N3BbPbBaIte WymHInTe pa6OTn ppe3 DOnyCTNmITE n PpeHa3Ha-ueHInTe 3a TOBa YacOBe Ha DeH.AKO e Heo6xOdIMo CnA3BaInTe YacOBeTe 3a NouVBka N OrpaHuaBAInTe npOdbJnxInTeHnOCTTa Ha pa6OTata Do Hau-Heo6XoDnMTo. 3a BaWata NnUHa 3aunTa n 3a PpeIa3BaHe Ha HamnpaUnTe ce Ha6n3o Xopa Tp86Ba Da HocIne 3aUnTa Ha cnYxa.
4.4 Yka3aHnna 3a 6e30nacHOCT BbB Bpb3Ka c akymyIaTOPHaTa 6aTePnI N 3apAnHOTo yCTPOIcTBO
Cb6HnOdaBaTe yKa3aHnraTa 3a 6e3oNaChocT 3a
akymyIaTopHaTa 6aTepeHra T 3apJHOto Yc-
TPOIcTBO, KOITcB OTOENH PbKOBODCTBa 3a
ynoTpe6a.
Bnx:
PbKOBOCTBO 3a pa6Ota 441630:JIITHeBOnHa akymyIaTopHa 6aTePnB B150 Li (B05-3640G), B200 Li (B05-3650G)
PbkoBOCTBO 3a pa60Ta 441633:3apAnHO yctpoiCTBO C130 Li (C05-4230)
5 MOHTAK
MOHTaX: BIXK INHCTpykCnraTa 3a MOHTaX.
I P E D U N P E X J D E H N E! O n a c h o c t n nopa- d H e n b l e n M o n t a x! P a b o t a t a c H e n b l n H o C r n o b e n y p e d m o k e da d o b e d e do c e p n o 3 Hn H a p a h r a B a H N.
I3no3BaIte ypeIa cAmO, KOrato e HAnbJNHO crNo6eH!
IocTaBete 6aTeepnTe BypeDa,camo cneKaTo e HAnbJHo Crtlo6eH!
6 NYCKAHE B EKCPIIIOATAUIA
6.1 3apekdahe Ha 6aTepeyraTa
YKA3AHNE 3a DeTaNHa INHΦopMaζηce OTHeCte KbM OTdEJIHnTe INHCTpyKuN 3a yNtpe6a Ha akymyNaTOPHaTa 6aTePnI N 3apJnHOTo YcTPOIcTBO.
6.2 NocTaBЯHe n 3BaXdaHe Ha 6aTepeHnte (05)
Mоже да n3нолзВate BaшаТа Гадинсka kocayka c eдна Илис дve akymуларон 6aTeри.Ако n3нолзВate dve 6aTeри, ce ybeNiuhaba3naHTeJIHNO npOДьЖИТeЛHOCCTTа Ha pa6Ota, KaKTo IПLOUТа 3a KOCeHe.
Mоже диилбВATE akymlyaTOpHn 6aTePnC pa3nUHa CTepeHn Ha 3apd. ПьрBO ue 6bde n3pa3XoDAHа NO-3apeDeHATA OT DBete 6aTePnI, IDOKATO He IOCTINHE CbUaTc AtepeHn Ha 3apd KaTO Ha BTOpTa aKymlyaTOpHn 6aTePnI. CneT OToBa DBeTe akymlyaTOpHn 6aTePnI ue 6bDaT I3pa3XODAHn paBHOMepHO.
BHIMAHHE! Onacnoct ot nobpeHa aky MylatopHnte 6aTeepn. Ako 6bDat octabeHn Bypeda cneuotpeba, akymylatopHnte 6aTeepn Moke da 6bDat NOBpeHn.
HenocpeDCTBeHO cIeI ynoTpe6a, n3BaTe aKymyNatOpHnTe 6aTeepn OT ypea n IcBxpaHeTe Ha MAcTo, 3aUHTeHO OT 3aMpb3BaHe.
HenocpeDCTBeHO npedn 3anOuBaHe Ha pa6oTa, noCTaBeTe akymyIaTOPHIne 6aTePnB VypeHa.
NoctabrHe Ha akymyIaTOPHaTa 6aTepe
- OTbopete (05/a) Kanaka Ha otdeJeHneTo 3a 6aTeepn (05/1).
2.Пиьзhteа Akymу latopнata 6atepy ot rope NaOly B HЯкoe OT OTeJIeHnra (05/2),doKaTO ceФИКсИра. - 3aTbopete kanaka Ha otdeJeHneTo 3a 6aTe-pn.
I3BaXdAHe Ha akymytaTopHaTa 6aTepe
- HATnucheTe De6Jokupaun 6yToH Ha aKymyIaTopHaTa 6aTePnI n 703aDpBXTe HAtnc- Hat.
2.Изва对接а akymулаторнataбateрия.
6.3 BkIIOUBaHe n N3KIOUBaHe Ha eJIeKToP03aXpaHbAHeTO Ha KocauHn MExaHN3bM (06)
EJIeKtpo3axpaHbAHeTo Ha MOTopa Ha KocauHHaMEXaHN3bM Ce BkIIOUyBa N I3KIIIOUyBa Upe3 KIOuOyOB npeKbcBau. KIOUOByr T ppeKbcBau ce 3a-DeiCTBa CbC cekpeTHnKIOU.
I PEPDyPPEKJDEHNE! OnachocT OT HapaHЯBaHe. HeCb3HaTeJIHOTO BKIIIOUbaHe MoKe Da IOBede Do TeKKn HapaHЯBaHry.
BHaHn npeI npekbcaHna pa6oTaT a nn npn npoueDypn no noDpBkKaTa: 3aBbPTeTe ocNpynteJHnna KNoU Ha no3u n "n3Kn," 3a da n3KNoHTe eJeKtp03axpaHbAHeTo n cnei TOBa r O3BaTe.
BknuBaHe Ha eNeKtpo3axpaHbHaTeO
- OTbOpTe KaIaKa Ha otDeneHneTo 3a 6aTePn.
2.Пьхhte cekeptня KIOU (06/1)ВКIOUOBNI npekbcBau (06/a). - 3aBbptete cekpeTHnHa nO3nua "BKn." (no3.1) (06/b). ItoTo3n HauH MToOpbT Ha KocayHm MexaHn3bM Ue e 3axpaHeH C HanpeXeHne, HO BCE OUe HЯMa Da 3anoyHe da pa6oTu.
- 3aTbOpTe Kanaka Ha OTdeneHneTo 3a 6aTePnN.
- BkIIOUeTe KocauHnMexaHn3bM:BIX 2JIaBa7.6 "Cmapmupe u cnupaHe Ha KocauHnMeXaHu3bM (14) ,cmpaHua 396.
N3KJIIOUBAHe Ha eJekTpo3axpaHBAHeTo
- 3aBbptete cekpeTHna KIOUHa nO3nua "n3-KI." (no3.0) (06/c) I ro n3BaTe (06/d).
- HenocpeidBeHo CneI ynoTpe6a, n3BaJeTe akymylatopHnte 6aTeepnO typea, 3apeTe r Iy cxbxpaHeTe Ha Macto 3auNTeHO OT
3ampb3BaHe. NocTaBeTe 6aTepeHte B ypeDa, eDbHa HnOcpeIcTBeHO npei Da 3anOHTe pa60Ta.
6.4 BkIIOUBaHe n 3KIOUBaHe Ha KOHTpOJIHHa 6JOK*
* 3abucumocm om Modeja, bux uHcmpykuura ma 3a MOhmaxk.
UcIobHe: MoHTnpaHa e noHe 1 akymyIaTopHa 6aTepeH.
YKA3AHNE He e HEO6xOДmO cKepeTHnIa Ⅰ, 3a da 6bde 3aBbPTaH Ha N03uNra „BKnI." (N03.1), 3a da 6bde OcInypeHo eNeKtpo3axpaHbaHe Ha KOHTpOJIHH 6bok 3aDbVXBaHeTo Ha KOneJaTa.
KoHTpoJIHnIa 6JOK MoKe Da 6bJe BKnIOueH no CNeIHNTe HaUNH:
HaTnchete 6yToHa 3a BkI./m3Kn. (04/1) Ha KOHTpOJIHnA 6JIOK.
HaTnchHeTe 3a KpaTko Smart 6yToHa (03/1).
KoHTpoHnIaT 6JOK Ce BKNIOUcBa aBtOMaTHuHO npi cTApTnpaHe Ha Motopa Ha KocauHnMaexAH3bM (BnK aNaBa 7.6 "CmApmuaHe u cnupaHe Ha KocauHnMaexaHu3bM (14)cmpaHua 396).
7 OBCJNYKBAHE
PENyPExEHNcOCTOTHapaHbAHe!DeΦeKTHIteuN3KnUoyEHNyCTpOYCTBa3a6e3oNaCHOCTN3auNTaMOratdaIOBeaTDOcepno3HN HapAHBaHn.
Ipei Da BkIIOUHTe, npOBepTe BCnKu npEJa3Hn 3aIHTn yCTpOyCTBa, 3a Da ce yBepTe, Ye Te ca HAnuHN n OyHKUHOHaJIHn!
7.1 Hactpoika Ha BncoounHaTa Ha Kocene (07)
BHIMAHNE!OnachocTOTHapaHbHaBn BcJIeDCTBHe cPra3BaHe.OnachocTOTHapaHbAHHBAeBCJeDCTBHe cPra3BaHe pnpNoCpRaHe CpKa KbM DBrXKeUne Ce KocayehMexaHn3bM.
HactpoBbATE BnCOUHATA Ha KocHe cAmO npN 3KJIIOueH MOTOp N HeNoDBrXKeH KocaueH MExaHN3bM.
- 3a De6IoknpaHe HaTncHeTe (07/a) Jeko IocTa (07/1) HABbH n rO 3aApbXkTe.
3a no-Hncka TpeBa n36yTaIe NoCTa no Nocoka Ha npedHTo KOJIEno (07/b).
3a no-BnCoka TpeBa n36yTaIe NocTa no nocoka Ha 3aHTo KOJeNo (07/b).
2.Ocbo6oTe JocTa,Tka Ye da ce fNknpa BKeJahata CTeneH.
7.2 Kocene c KOHTeHep 3a cb6npaHe Ha TpeBa (08, 09)
YpeBt MoKe Ia pa6OTn C KOHTeHep 3a cb6npaHe Ha TpeBaT a nn 6e3 TaKbB.
3aKaUBaHe Ha KOHTeHepa 3a Cb6npaHe Ha TpeBa
- YBepeTe ce, ye yPeIbTe n3KnHoueH nye KocauHnT MexaHn3bM e cnpraJ.
2.Повдигнелte (08/a)пpeДпа3нота пррадa(08/1). - 3aKaYeTe KOHTeHepa 3a Cb6upaHe Ha TpeBa (08/2) Ha NbPkaUte (08/b).
4.Ocb6o6eTe npedna3HaTa nperpapa.
PpOBepka Ha HanbJbHaHeTo
INHnKaTOpbT 3a HnBJIbAHe (09/1) ce n36yTba HABhN OT Bb3dUshaTa Ctpya npu Koche (09/a). Ako KOtEnHepbT 3a Cb6paHe Ha TpeBa (09/2) e NpJeH, INHnKaTOpbT 3a HnBJIbAHe e OnpH Do Hero (09/b). KoHTeHepbT 3a Cb6paHe Ha TpeBa Tpr6Ba Da ce n3npa3HN.
OTkaUBaHe Hn3npa3BaHe Ha KOHTeHepa 3a Cb6InpaHe Ha TpeBa
BHIMAHHE! Onachoct ot nopra3BaHe.
OnachocOT nopra3BaHe npn PbXaHe Ha pBkataB DnHexueCe Kocayeh MexaHn3bM.
CbaIaTe KOHTeHepa 3a Cb6paHe Ha TpeBa cAmO npu cnprn Kocayen MexaHn3bM.
- YBepete ce, ye ypeIbTe e n3KIOUeH N ye KocauHnT MExaHN3bM e cnpJ.
2.Повдиггелпpeнданота npperpa(Da (08/1). - OTKaueTe KOHTeHepa 3a Cb6npaHe Ha TpeBa (08/2) OT DbpxaHTe ITO N3BaTe Ha-3aD.
4.ИЗпраЗнete кОтTeиHepa 3a CBбираHe Ha BO-da.
5.Почисте OTВОРпTe 3a ИЗДУХВаHe (08/3) НИнДИКАТОРа 3a HAнБЛВаHe. - 3akaueTe KOHTeHepa 3a Cb6npaHe Ha TpeBa (BIX No-rope).
7.3 MylunupaHe Ha OkocehaTpeBa c npncTabka 3a MylunupaHe (10, 11)*
*83abucumocm om Modena, bux uHcmpykuja-ma 3a MOhmax.
Ipn MyuynpaHe OkocHaTa TpeBa He ce cb6npa, a octaba Ha 3emra. MyuBt npedna3Ba noyBaTa OT n3cbXbaHe I r Cha6dJaBC xpaHHTeHNi Be
IeCTBa.Ha-IO6pnpe3yNTaTnce nOnyabat nppeoBHO KOCHe Ha OKONo 2cm.Camo MnaDaTa TpeBa C MeKa CTpykTypa Ha Ntctata 6bp30 Ce IpeBpbua B Myu.
BucounHa Ha TpeBaTa npei MynuipaHe: MaKc.8cm
BucounHa Ha TpeBaTa cneM MyuHpaHe: MaKc.4 CM
YKA3AHNE PerynpaTe ckopocTHa Ha Xo-DeHe cnopeM yIuHpaHeTo, He XoJeTe TBbpDe 6bp30.
IocTaBHe Ha npCtBaKaTa 3a MyuHpaHe
BHIMAHHE! OnachocT OT nopra3BaHe.
OnachocOT nopra3BaHe npn PbXaHe Ha pKaTaB DnKcHNe CE Kocayeh MexaHN3bM.
IpeDn Da NoCTaBNTe, pecn. Da n3BaNITe npNCtBAkata 3a MyJnHpaHe, n3KJIuOte ypeDa n n3BaDeTe npEdna3Hn KJIouh.
1.ИЗклочеу урета:3abbpTece cekpeTHN KIIOH Ha no3nua „n3KЛ." (no3.0) n ro n3Ba- dete.
2. OTKaYeTe KOHTeHepa 3a Cb6npaHe Ha TpeBa.
3.Повдигн electe npeДиаЗИТа npERpaDA (10/1) n NOCTaBete npICSTaBkata 3a MyIuHpaHe (10/2)В OTbopa 3a ИЗVBpJIЯ He Ha OKOceHa- Ta TpeBa (10/3) (10/a).БлОКИРOBkATA Tpr6Ba Da ceФИКсИра.
BHIMAHHE! OnachocT OT NOBpeHa Ha ype-da. Ako npicTabkata 3a MyuHpaHe He ce Kcnpa, TOBa MoKe Da DOBeDe Do NOBpeHa npicTabkata Ha KocauHmexaHn3bM.
BHHMaBaIe 6JIOKInpOBKaTa da ceΦnKcnpa.
OTcTpaHЯBaHe Ha npncTaBkaTa 3a MyIuHpaHe
1.ИЗклочеуpeDA:3aBbptTeceKepetHnKaIIOUHaNo3uINy „N3KJI.“(no3.0)IroN3Ba-DeTe.
2.Повдигнелпpeлna3наТа npperpaДa.
3. Ocbo6oxJaBaHe Ha 6IOKIpOBkata (11/1) Ha npicTaBkata 3a MyJnHpaHe (11/a).
4.ИЗВаде (11/b) npicTaBkaTа 3a MyJUHpaHe (11/2).
7.4 Kocene cbc cTpaHnUHO n3XBbPJIHe (12)*
*83abucumocm om Modena, bux uHcmpykuura ma 3a MOhmax.
BHIMAHNE! Onachoct OT nopra3BaHe.
OnachoctOTnpa3BaHe npn PbXaHe Ha pbkataB DvNKeuCe Kocayeh MexAH3bM.
IocTabraIte n OTcpaHbAite npuctabkata 3a cTpaHnHNO N3XBbPJIne camo KOrato MToTOpbT IN KOCaHnT MExaHn3bM ca cnpeJIi.
IocTabrHe Ha npctabkata 3a cTpaHnUHO n3XBbPnHe
1.ИЗкlioуeteуpeа:3aBbptetecekeptnna KIIOUHaNo3nuaN3Kl."(no3.0)игои3Ba- dTe.
2.ИЗвадеTe KOHTeHepa 3a cБираHe Ha TpeBa nIOCTaBeTe npIcTbKaTa 3a MyIчираHe, BIX 2JIaBa 7.3 "MyluPapHe Ha OKOceHama mpeea c npucmaeka 3a MylUpuAne (10, 11)*,cmpaHuca 395.
3. Hatnchete locta 3a de6nokupahe (12/1) ha kanaka 3a cTpaHnUHO n3xBbPnHe.
4. OTbopete (12/a) Kanaka 3a cTpaHnHo n3-xBbpJHe (12/2) n ro 3aDpBkTe.
5. BkapaTe (12/b) npicTaBkaTa 3a cTpaHnUHO n3xBpIne (12/3).
6. 3aTBOpTe 6abHo KaNaKa 3a CtpaHnUHO n3- XBbPnHe (12/2). KanakbT 3a CtpaHnUHO n3- XBbPnHe npedna3Ba npicTabkata 3a CtpaHnUHO n3XBbPnHe OT nadaHe.
OTcTpaHЯBaHe Ha npucTaBkaTa 3a cTpaHnUHO n3XBbPJIHe
1.ИЗКЛЮЧЕТуpeда:3aВьрTeTe cekpeTHNЯ KПЮч Ha NO3иця „ИЗКЛ.“ (no3.0) И Го ИЗВа-дeTe.
2. OTbOpTe KaNaka 3a cTpaHnUHO n3XBbPJIHe n ro 3aDpbKTe.
3.ИЗВаДЕТЕпиСТАВКATAЗТРАнчHоИЗ- XВьрЛЯНУИЗТВОРЕТЕkanaka3aCTPанчHо I3XBьрЛЯНE.
4. OTCpaHeTe npnCTaBkata 3a MyJnHpaHe n NOCTaBeTe KOHTeHepa 3a Cb6nPaHe Ha TpeBa.
7.5 PerynnpaHe Ha ochOBHaTa npbKka cnopei BncOuHnata Bn (13)*
*6 3aBucumocm om ModeJa, buX uHcmpyKuura ma 3a MOHmaxk.
1. OTbOpTe (13/a) NOcToBeTe 3a 6bP30 OCBO-6oxkDaBaHe (13/1) Ha waHnpuTe (13/2).
2.3aBbPTeTe (13/b) OCHOBHaTa DpbXka (13/3) OKOJIo 7apHnpuTe Do JeelaHaTa BncoUHa.
3. 3aTbopeTe JocToBeTe 3a 6bp30 ocBo6oxJaBaHe.
7.6 CtrapTnpaHe n cnnpaHe Ha KocauHn mexAHn3bM (14)
KocaynT MexaHn3bM Tp86Ba da ce cTapTnpa camo Ha paBHa OCHOBA, pRn HeBnCoka TpeBA. NobbpXHOCTTa Tp86Ba Da 6bJe YnCTa OT yJxN TeNa KaTO HAp. KambHn. He NobdIraTe n He HAKnaHnTe yPeDa, 3a da ro cTapTnpate.
CTapTupaHe Ha KocayHnMexaHn3bM
- Ako Beue He Cte HnpaBnI ToBa: BkHouTe eJekTpo3axpaHbAHeTo (Bnx 2naea 6.3 "BknOyeaHe u u3KnOyeaHe Ha eJekmpo- 3axpaHbAHeMo Ha KocayHua MxaHu- 3bM (06)", cmpaHua 394).
- HatncheTe cTapTOBn 6yToH (14/1) n ro 3a- DpbkTe HaTnCHaT.
3.Издьрайte(14/a)пpeДиаЗнata penca (14/2)КьМ OсHOBHaТ ДрБЖka(14/3).Kocay-HNYT MExaHn3bM Ue ce CTapTnpa.
4.Пусhte CTapTOBnI 6yToH n npOdbJxKeTe daDbpxKITe npedna3HaTapeLca.
YKA3AHNE PpePna3HaTapeIca He MoKe Da ce pKnpa. IpbXTe npE3 UAnTo Bpeme, DOKATO pa6OTte, NbTHO Do OCHOBHata dpkKa.
CnnpaHe Ha KocayHmexaHn3bM
1.Ocb6oTe npeIpa3HaTa peIca.Ta aBToMaTHUHO 3aema N3XoJHO NOLOKeHne.
2.ИЗчakайда спpe кocayнг МханзьM.
3. ɪЗклоче TE eNEKтpo3axpaHbaHeTo (BnK 2na-ea 6.3 "Вклочанe u uzклочанe Ha eNeKmpo3axpaHaeHemo Ha KocayHua MexaHu-3bM (06)", cmpaHua 394).
BHIMAHHE! OnachocT ot nop3BaHe.
OnachoctOTnpra3BaHe npn PbXaHe Ha pbkataB dBNKeunCe Kocayeh MexaHn3bM.
I3yaKaITe DOKaTO KocauHnT MexaHn3bM cnpe.
Ipeu BcKaBn pa6oTu no nOndpBkKaTa n rPjKata: N3KnUoyTe ypea Nn3yakaiTe doKATO KocauHnT MExAHn3bM cnpe. N3BaJeTe ceKePTHn KIOU N OTCpaHeTe akymyNaTopHnTe 6aTeepuN.
7.7 BkIIOUBaHe n N3KIIIOUBaHe Ha 3aDbNIXBaHeTo Ha KOJIeJaTa (15)*
*6 3abucumocm om modena, bux uHcmpykuura ma 3a MOhmaxk.
Moxete Da BKNIOHTe 3aDbNKBaHTo Ha KOJIeNaTa, 3a Da IpeDnKITE rpaDNHCKaTa KocayKaMeJy DBe pa6OTHN PLOUIN NIN DO MCTOTO i 3a
cbxpaHHe. He e Heo6xoDIMO da BKJIOvBaTe Kocaynma MexaHn3bM 3a Ta3n cen.
YKA3AHNE He e Heo6xOJIMo CeKpeTHnIa KIOUda 6bDe 3aBbPTaH Ha N03uNra „BKN. " (No3. I), 3a Da 6bDe ocNpyeHO eNeKTpo3axpaHbaHe Ha KOHTPOJIHH 6bOK n 3aDbNkBaHeTo Ha KOJIeNaTa.
CtaptnpaHe Ha 3aDbNkBaHTo Ha KOJIetaTa
- NocTaBeTe akymylaTOpHa 6aTepeHnA
- HatncheTe peIcTa 3a BkIOUcbHe Ha 3aBnKBaHTo (15/1) KbM OCHOBHaTApbXka (15/2) n 3aPbXKe 3dpaBo (15/a). Pecata 3a BkIOUcbHe Ha 3aDbNKBaHTo He MoKe Da ce fIKcnpa.
N3KJIIOUBAHe Ha 3aBnXBaHeTo Ha KOJEnJaTa
- Ocbo6oTepeIcata3aBkIIOUbaHeHa3aBnXBaHTo.TaABTomTuH03aemaN3XoJHO NOIOXeHHe.
7.8 Помяну На чорocTTа Ha 3aДВиЖВаHe Na KoJelenata (16)*
*6 3aBucumocm om Modena, bux uHcmpykuja- ma 3a MOhmax.
CkopoocTtA 3a npDnBnXBaHe Ha rpaHnHcKaTa Kocauka MoKe Da Ce npomeHa 7 CTepe H KOHTpOJIHHa 6NOK. 3aDnBnXBaHeTo Ha KOJIeJaTa Tp8Ba Da e 6nIO BKNIOUeHO pEiBapntHo, BnK 2IaBa 7.7 "BKnIOUeBaHe u U3KnIOUeBaHe Ha 3aDeuXbaHemo Ha KOJIeNaMa (15)*,cmpaHu-ua 396.
- BkIIOUeTe KOHTpOINHn6Iok (BIX 2naBa 6.4 "BkIIOUeAHe u U3KIIIOUeAHe Ha KOHmpoINHn6Iok**, cmpaHuua 394).
2.3a HamaIbAhe Ha CKOpocTtA:HaTnChTe 6yToHa MmHyc (16/1). Nnu: - 3a yBéniuvaBaHe Ha CKOpocTTa: HATnChTe 6yToHa nnIoc (16/2).
7.9 BключBaHe n n3КлючBaHe Ha Ecopeжma (16)*
*e 3aucumocm om Modeja, bux uHcmpykuura ma 3a MOhmax.
CkopoctTHa ha motopa ce hamaIbBA B Eco peKIM. ToBa yIbIkaB npOdbJXnTeJIHocCTTa Ha pa60Ta Ha akMyIaTopHnTe 6aTePnN.
- BkIIOUeTe KOHTpOHHa 6Jok (BnK 2naBa 6.4 "BkIOUeAHe u U3KIOUeAHe Ha KOHmpoHHa 6JOK*, cmpaHuca 394).
- BkIIOUbaHe Ha Eco peXIMa:HaTnCHte 6yToHa 3a Eco peXIM (16/3). ByTOHbT CBeTBA.
3.ИЗКПИОВАнеHaEcopeхиM:HaTиСHTeOTHOBO6yToHa3aEcopeхиM.ByTOHbTn3racBa.
8 YKA3AHN 3A PABOTA
Cna3BaIte HNCTpyKunTe 3a 6e3onacHocT!
YKA3AHNE Cb6HnDaBaIte MeCTHnTe pa3- nope6n OTHOcHO TOBA KORA MoKe Da ce ynoTpe6Ba rpaDHnCKa Kocayka.
Ha6IIOdaBaIte 3a npEIMeTN B TpeBaTa I rN OTCTpaHЯBaIte OT pa6OTHaT a 30Ha.
Kocete camo npn do6pa BnuIMOCt.
Kocete camo c octbp HOX.
UnpabnBaIte ypea cMo C OCHOBHata npkka.
PnBKBaTe KocayKaTa cMo XoOM,B 6aBHO TEMNO.
BnHaN npiDvXBaIe ypea cAmo HappeuHO Ha cKNoHa. He n3noJ3BaIte rpaHnckata Kocayka HaOJy IIN Harope no cKIOHa IIN npi HaKnOHN OT NOBeue ot 10^ . BbTe oco6eHo BHIMATEJIHn pni CmHa Ha paBoTHaT a NOCOKA.
PpOn3BODHTeJIHOCt Ha KOceHe, pecn. npOdbJxKTeIHHocT Ha pa6oTa Ha akymyNatopHaTa 6aTepe
Ipn3BOJNTeJIHOCTTaHaKoCeHe,peCn.IIOuTa,KoTOMOKeJa6bJeOKoCeHa,3aBNCnOTXapaKTepNCTNKITEHaTpeBaTa.ΦaKTopi KaTO BnCOUHaNIIbTHOCHTHaTpeBaTa,N3-6paHa BnCOUHaHaKOceHe,KaKToBnaKHOCTTaHaTpeBaTa,IMatBnRnHneBbpxy Ipn3BOJNTeJIHOCTTaHaKoCeHTo.
OnTImaJIHo BpeMe Ha ynoTppe6a MoKe da ce nocTnRHe npn no-yeCTO KOceH N oNDbPkaHe Ha No-HNcKa TpeBa.
Ipn3BODnteHocCTTa Ha KocHe ce peDuypa npu YecTo BkNIOUbaHe N N3KIOUBAHe Ha KocaHHa MExAHn3bM B Ipoueca Ha KocHe, KaKTO n PnI HeHaNbJHO 3apeDeHa aKyMyNaTOpHa 6aTePn.
BKnHouBaHeTo Ha 3aDnBxBaHeTo Ha KOneNaTa HAmalra NpOu3BOiNTeJIHOCTTa Ha KocHe, pecn. npOdbJnxTeJIHOCTTa Ha pa6oTa Ha akymyIaTOPHaTa 6aTePn.
3a ONTUMN3npaHe Ha npOn3BOJNTeHOCCTTa Ha KocHe, ce npenOpbYBa YecTo KocHe, HAcTPOkHa rOJIyMa BnCOUHa Ha KocHe n PnpDnBnKBaHe Ha ypeDa B 6abHo TEMNo.
YKA3AHNE 3a da ce ydIJIKN IpoIbJIKNTeHIOCTTa Ha KOceHe, MOKe Da ce IODcNHyprIN DonblHNTeJHa akymyNaTOPHa 6aTePn.
CbBET 3a KocHe
IocToHHa BnCOUHa Ha KocHe 3-5 cm, He KocTe NOBue OT NIOOBnHaTa Ha BnCOUHa-ta Ha TpeBaT.
He npetobapbaTe rpaHnckaTa Kocayka! Ako o6opotte Ha BbptHe Ha MOTopa cnaHaT OueBnHO nopadn No-dbIra N no-TeKKa TpeBa, yBeNueTe BnCOuHaTa Ha KOceHe N OKoCeTe HrKOJIKKoPaTHO.
BraTbPbT n CnBHeTo MoaT Da n3CywaT TpeBaTa cIeD KocHe, IopaN ToBa KocTe B KbCHNr cIeDo6eI.
9 NOДРьЖKA И NOЧNTBAHE
PNEyPExEHNc!OnachocT ONo- p3BaHe. OnachocT OT HapaHraHnRA BcneDCTBHe Cp3BaHe npx XbaaHe Ha cactn C octpn Pb6OBe IIN DnBKeUeCe qactn, KaKTo n Ha peXeU INCTpyMeHTn.
BnHaH npEi pa60I NO pOДрБЖkaT, 6CJIyXBAHTo I NOUcTBaHTo N3KJIIOuBaIte ypeIa. OTePAnTe aKymJaTOpHInTe 6aTePnn.
BnHaH npaPabOTn no NOdApbXkKaTa, 6CnyKbaHeTo n NouchTbaHeTo HocTe 3auntHn pKaBn.
9.1 PepnoDnUHa noDpBkKa
IorpnkeTe ce 3a TOBa BCnUKN rAkn,6oTObE n BnHTOBe da 6bDat 3dpABO 3aTeHATN uypeBt Da 6bDe B 6e3OnaCHO OepaTHBHO CbCTOJHHe.
PeIOBHO npOBepaIte cyHKnraTa n n3HocBaHeTo Ha KOHTeHepa 3a cb6npaHe Ha TpeBa.
9.2 NocntBaHe Ha ypeDa Hn Ha KocauHn MExaHN3bM
BHIMAHHE! Onachoct ot Boda. Boda no- napaHaJa BypeJa MoKe Ja DoBeJe Do KbcN CbeDInHeHnI NOBpeJa Ha eNeKtpnuecknte Yactn.
He npbckaTe ypeDa c Boda.
3a NOUcTBAHe N3NOJ3BaITe cMo YeTka 3a Cb6npaHe Ha CMeTn IJIu YeTka 3a NoUcTBAHe.
-
CnpTe MoTopa.
2.ИЗваде te akумунatopнite 6aTeprn. -
OTKaYeTe KOHTeHepa 3a Cb6npaHe Ha TpeBa.
- HakoHeTe ypeDa n noUcTeTe KocaHnMaMeXaHN3bM.
9.3 PpOBepKa n NOdMaHa Ha peKeuHa HOX
PNEpyPEXKDEHNE! TeKKn HapaRaBHaNRA BCJIeDCTBHe Ha OTXBPbKHaHn peKeu Ch.3HOceHNrT, HanyKaH NII NOBpeDeH peKeU HOK MOKe Da ce CuyN U cactNTe My da Ce PpeBbPhAT B ONaCHN XBpCuAaN PpeDMeTu.
PeioBHO npOBepaItepeXeunT HOX 3a noBpeN.
He n3noJ3BaIte rpaAnHcKaTa Kocayka, KoraTo peKeuT HOKe e n3HOceH uNyBpeJeH.
3aTbneIyI INI NOBpeH pexeH HOX MoKe Da 6bIe HAOCTpeH, peCn. CMeHeN cAmO B cepBn3 Ha AL-KO INI B OTOpN3npaH cNeuaJIIN3npaH cepBn3.
3a da ce n36erhat Bn6paun,pexeuT HOK IN BnHTbT Ha HOxa Tp8Ba BuHaT da ce CMeHrT 3aeDHO.
IpehaToeHnT peXeH HOK Tp8Ba Da 6bde 6aHaCnpaH. He do6pe 6aHaCnpaHnte peXeHn HOKOBe BOJr DO CINH BnBpaunn Ido NOBPeHa Ha ypeHa.
9.4 HactpoIka Ha XnIIOTo 3a 3aBnXBaHeTo Ha KOnenata (17)
JNIO TO 3a 3aBnXBaHe Ha KOJIeNaTa ce yIbI Jxaba C BpeMeTo. Ako npu pa6Oteu, MOTOp 3aBnXBAHTo Ha KOJIeNaTa He MOKe Da CE BKJIIOU, TOBa 3HaUn, Ye JNIOTo e CTaHAno TBbPDe IbIIO N Tp6Ba Da Ce Ckbcn.
BHIMAHNE!OnaCHOCTOTHapaHyaBe.
Yactn Ha ypeda c octpn p60be nnn DnBxkeu ce Yactn (Hanp. pekeun HOXOBe), KaKTo N BHe3aHNO TpbTBAHe Ha KocayKaTa MoraT da DOBeDaT Do HapaHyaHna.
HactpoBaTe XJNOTO cAmO npn N3KJIHOueH MOTOp IN pRcPJI KOCaUeH MExaHN3bM.
1.ИЗклоче eJelKtpo3axpaHbAteToи nI3BaTe aKymyIaTOpHnTe 6aTePmN (BIX 2naea 6.3 "BkIIOUeHa u 3KIIIOUeHa Ha eJIeKmpo- 3axpaHbAHeMo Ha KocauHua MexaHu- 3bM (06) ,cmpaHua 394).
2. Bbptete perynata (17/1) Ha xinnoTo (17/2) no nocoka Ha yacobnkoBata cTepeIka nn o6paTHo,doKATO xinnoTo MeKny peIcaTa 3a BkInouBaHe Ha 3aDbNkBaHeTo (17/3) N Toykata Ha 3axBaUaHe (17/4) He ce o6TerHe.
- 3a npOBepKa Ha HAcTpoKkata Ha JxNtOTo: BKIOUeTe ypeDa, CTaptnpaIte MOTopa I Ce ONITaIte Da BKIOUHTe 3aADBIXBaHETO Ha KOJIenlata.
4.AKo 3aBnXbaHTo Ha KoneJaTa He Ce BKJIIOu: NOBTOpe TpeINuHNHe CTbNKn.
Ako HacTpoiKaTa Ha XnITo He ycneuHa:
CbpxKeTe ce cbc cepBn3 Ha npOn3BOOnTeJIa.
9.5 PemOHTHpa6OTn
I PENEYPPEKDEHNE! OnachocT OT hapa-HaBAnHa NO BpeMe Ha peMOHTHa DeHOCt.
HenpaBnHnTe peMOHTn DeHocTn MOraT da IOBeDaT Do TeKKn HapaHbAHn I Do NOBpeN Ha ypeDa.
PemOHHTHe pa6OTn MORaT da ce n3BbPWBAT cAmO OT cepBn3HnTe ueHTPOBE Ha IpOn3BO-DITeJIy HII OT OTOpN3nPaHN CneuAn3npa-HnΦnPM!
B cneHnTe cnyuAn ce CbpxKeTe cbc cepBn3 Ha npOn3BOuNTeIa:
MToOpbT He cTApTupa.
YpeIbTe npemHaBbpx npenTCTBne.
Pexeunr HOX n/nn MToOpHnT BaI ca OgbHaTn.
UpeBbT Bn6pnpa npapOHTMmUHO.
AkyMylaTopHnTe 6aTeepn ca n3ToUeHn nn noBpeDeHn.
9.6 USB nopT (18)
Ha BCnUKNrpaDnHcKIN KocauKn,OnncAHNTOBa pBkoBOcTBo 3a pa6oTa,eMOHTnpAH USB npT (18/1),HO ToN MoKe Da 6bJe n3NoI3BaH cAmO 3a coΦTyepnAkTyAun3aunn Ha CMapr rpaDnHcKn KocauKn.ToN He e NODXODaU 3a 3apeJdaHe Ha akymyNaToPn 6aTepn.
BHIMAHNE! OnachocT OT NOBpeHa Ha ype-da. Mo6nHnTe yctpoiCTBa c akymyIaTOPn 6a-ternn (Hanp. cMaprfoHn) ue 6bDat NOBpeHn, aKo 6bDat Cbbp3aHn KbM USB npTa.
He cBb3BaIte Mo6nHn ycTpoCTBa c akyMynaTopHn 6aTepeHn KbM To3n nopT.
10 NOMOUIPNHEIN3PABHOCTN
BHIMAHHE!OnachocOT HapaHBAHe.
OcTpopb6ecTn n DnBxkeu n Ce yactn Ha ypea MoT Da DOBeDaT Do HapaHraBaHna.
BnHaH npaPbOTo nNo pOdApbXkKaTa, 6CJIyXBaHeTo n NOuNCtBaHeTo HocTe 3aUHT-Hn pKabu!
YKA3AHNE Ipn HEn3npaBHOCTN, KOINTo He Ca NocOeHn B Ta3n Ta6nua Nn KOnTO He MoXeTe Da OTcPaHnTe CamOCToRrHNO, MOJIO6bPHeTe Ce KbM HaWata KOMNeTeHTHa KIneHTcKa CnyK6a.
| Немправноct Причona ATСТРANЯВанe | ||
| Моторьт не паво- TN. | Ельектохраразовноуе из- Клочево OT Клочовnia пекьс- Вач. | Вклочete щелковтохраразовно пост- стВOM Клочовnia пекьсвач. |
| Актулаторна за对接а липсва илп He постavenа правлно на място. | Поставete правлно за对接а. | |
| Баторята e паразна. 3аредete | балерияа. | |
| Рекшиял пож e бл_OKиран. | ■ OсвобODEte пожа OT слOKираше ro еlemente. ■ Стат彦е косашия менизьм Върху Н stickа Трав. | |
| Кабельт ил певкlioчbate- лая садефектни. | He paoboteTe c урEDA! Сьржete ce сьс серВиЗ на позИЗВODИТЕЯ. | |
| Мош noc_STТа на дв- гателя пада. | Баторята e паразна. 3аредete | балерияа. |
| Рекшиял пож e тьп. Нatoчete | рекшия пож в серВиЗ на по- иЗВODИТЕЯ. | |
| Helen III ppabnocst Пличinas ATCTPANRAHe | ||
| Пrelakално Mного Трева в OT-bopa 3a ИЗвьрлгп. | ОТстразе Трева. Почисту пождзата пождзата. | |
| Motopbyt спima noВраиме на косе. | Ржесшиот пох e тьп. Нatoчete ржесшиот пох в серви з на по- из Bodinтел. | |
| МOTOPBYT e npetobapen. ИЗклочe.Te rapiindhckata kocayka c przeza- рждаца се батеря, по taberte я вьрух rabha поьрхост уллни песка Трева и OT- нову CTaptnupaite. | ||
| Кontайнерыза сь- биране на Трева не се заюлва дoctа- Тьчно | Тревата e влajхна. Octabete Трева да ИЗсьхne. | |
| Кontайнерыза сьбиране на Трева e zanuшen. | Почисту решета на Контейнера 3a сьбиране на Трева. | |
| В овекданашиотьор улл в kopунca imma пжалени Mho- ro Тревa. | Почисту овекданашиотьор / корпу- са Коригирaite Височида на КOSTЕ | |
| Ржесшиот пох e тьп.Нatoчete ржесшиот пох в серви з на по- из Bodinтел. | ||
| Проблжитelnoc- TTa Ha paobota Ha akymylatopnata 6batrye e 3abele- ЖIMо NO-MaIka. | Височида на Косены Тревата e пжалени ИССК. Битуп Трева e пжалени Bлajxna. | Рergулару te Na lo-Bvscoka Stojnoct Bvsc- Чинatura на КOSTЕ |
| Сокорstт ha Косены e пжал- псero Битуп Трева Битуп Битуп Битуп Битуп Битуп Битуп Битуп Битуп Битуп Битуп Битуп Битуп Битуп Битуп Битуп Битуп Битуп Битуп Битуп Битуп Биту? Биту? Биту? Биту? Биту? Биту? Биту? Биту? Биту? Биту? Биту? Биту? Биту? Биту? Биту? Биту? Биту? Биту? Биту? Биту? Биту? Биту? Биту? Биту? Биту? Биту? | Падобреве усановая: OCTaberte ДуИЗ- Сыхne, рergулару te Височида на КOSTЕ | |
| Сокорstт ha Косены e пжал- псero Битуп Битуп Битуп Биту? Биту? Биту? Биту? Биту? Биту? Биту? Биту? Биту? Биту? Биту? Биту? Биту? Биту? Биту? Биту? Биту? Биту? Биту? Биту? Биту; Биту? Биту? Биту? Биту? Биту? Биту? Биту? Биту? Биту? Биту? Биту? Биту? Биту? Биту? Биту? Биту? Биту? Биту? Биту? Биту? Биту? Биту? Биту? Биту? Биту; Биту? Биту? Биту? Биту; Биту? Биту? Биту? Биту? Биту? Биту? Биту? Биту? Биту? Биту? Биту? Биту? Биту? Биту? Биту? Биту? Биту? Биту? Биту? Биту? Биту; Биту? Биту? Биту? Биту. Биту? Биту? Биту? Биту? Биту? Биту? Биту? Биту? Биту? Биту? Биту? Биту? Биту? Биту? Биту? Биту? Биту? Биту? Биту? Биту? Биту? Биту? Биту? Биту? Биту. Биту? Биту? Биту? Биту? Биту? Биту? Биту? Биту? Биту? Биту? Биту? Биту? Биту? Биту? Биту? Биту? Биту? Биту? Биту? Биту? Биту; Биту? Биту? Биту? Биту: Биту? Биту? Биту? Биту? Биту? Биту? Биту? Биту? Биту? Биту? Биту? Биту? Биту? Биту? Биту? Биту? Биту? Биту? Биту? Биту? Биту? Биту? Биту? Биту? Биту Биту? Биту? Биту? Биту? Биту? Биту? Биту? Биту? Биту? Биту? Биту? Биту? Биту? Биту? Биту? Биту? Биту? Биту? Биту? Биту? Биту? Биту? Биту? Биту? Бити? Бити? Бити? Бити? Бити? Бити? Бити? Бити? Бити? Бити? Бити? Бити? Бити? Бити? Бити? Бити? Бити? Бити? Бити? Бити? Бити? Бити? Бити? Бити? Бити? Бит. Бит. Бит. Бит. Бит. Бит. Бит. Бит. Бит. Бит. Бит. Бит. Бит. Бит. Бит. Бит. Бит. Бит. Бит. Бит. Бит. Бит. Бит. Бит. Бит. Бит. Бит. Бит. Бит. Бит. Бит. Бит. Бит. Бит. B B B B B B B B B B B B B B B B B B B B B B B B B B B B B B B B B B B B B B B B B B B B B B B B B B B | Почисту рушета. Почисту рушета. Почисту рушета. Почисту рушета. Почисту рушета. Почисту рушета. Почисту рушета. Почисту рушета. Почисту рушета. Почисту рушета. Почисту рушета Почисту рушета. Почисту рушета. Почисту рушета. Почисту рушета. Почисту рушета. Почисту рушета. Почисту рушета. Почисту рушета. Почисту рушета. Почисту рушета。 Почисту рушета. Почисту рушета. Почисту рушета. Почисту рушета. Почисту рушета. Почисту рушета. Почисту рушета. Почисту рушета. Почисту рушета. Почисту рушета, Почисту рушета. Почисту рушета. Почисту рушета. Почисту рушета. Почисту рушета. Почисту рушета. Почисту рушета. Почисту рушета. Почисту рушета. Почисту рушета; Почисту рушета. Почисту рушета. Почисту рушета. Почисту рушета. Почисту рушета. Почисту рушета. Почисту рушета. Почисту рушета. Почисту рушета. Почисту рушета、 Почисту рушета. Почисту рушета. Почисту рушета. Почисту рушета. Почисту рушета. Почисту рушета. Почисту рушета. Почисту рушета. Почисту рушета. Почисту рушетa. Почисту рушета. Почисту рушета. Почисту рушета. Почисту рушета. Почисту рушета. Почисту рушета. Почисту рушета. Почисту рушета. Почисту рушета. Почисту рушетa Почисту рушета. Почисту рушета. Почисту рушета. Почисту рушета. Почисту рушета. Почисту рушета. Почисту рушета. Почисту рушета. Почисту рушета. Почисту рушетा. Почисту рушета. Почисту рушета. Почисту рушета. Почисту рушета. Почисту рушета. Почисту рушета. Почисту рушета. Почисту рушета. Почисту рушета. Почисту рушетा Почисту рушета. Почисту рушета. Почисту рушета. Почисту рушета. Почисту рушета. Почисту рушета. Почисту рушета. Почисту рушета. Почисту рушета. Почисту рушет; Почисту рушет; Почисту рушет; Почисту рушет; Почисту рушет; Почисту рушет; Почисту рушет; Почисту рушет; Почисту рушет; Почисту рушет; Почисту рушет; Почисту рушет; PCHINATLO PCHINATLO PCHINATLO PCHINATLO PCHINATLO PCHINATLO PCHINATLO PCHINATLO PCHINATLO PCHINATLO PCHINATLO PCHINATLO PCHINATLO PCHINATLO PCHINATLO PCHINATLO PCHINATLO PCHINAPOL PCHINAPOL PCHINAPOL PCHINAPOL PCHINAPOL PCHINAPOL PCHINAPOL PCHINAPOL PCHINAPOL PCHINAPOL PCHINAPOL PCHINAPOL PCHINAPOL PCHINAPOL PCHINAPOL PCHINAPOL PCHINAPOL PCHIPAL PCHINAPOL PCHINAPOL PCHINAPOL PCHINAPOL PCHINAPOL PCHINAPOL PCHINAPOL PCHINAPOL PCHINAPOL PCHINAPOL PCHINAPOL PCHINAPOL PCHINAPOL PCHINAPOL PCHINAPOL PCHINAPOL PCHIMAPOL PCHINAPOL PCHINAPOL PCHINAPOL PCHINAPOL PCHINAPOL PCHINAPOL PCHINAPOL PCHINAPOL PCHINAPOL PCHINAPOL PCHINAPOL PCHINAPOL PCHINAPOL PCHINAPOL PCHINAPOL PCHINAPOL CITILY CITILY CITILY CITILY CITILY CITILY CITILY CITILY CITILY CITILY CITILY CITILY CITILY CITILY CITILY CITILY CITILY CITILY CITILY CITILY CITIL Y CITILY CITILY CITILY CITILY CITILY CITILY CITILY CITILY CITILY CITILY CITILY CITILY CITILY CITILY CITILY CITILY CITILY CITILY CITILY CITIL1 CITILY CITILY CITILY CITILY CITILY CITILY CITILY CITILY CITILY CITILY CITILY CITILY CITILY CITILY CITILY CITILY CITILY CITILY CITILY CITILLY CITILY CITILY CITILY CITILY CITILY CITILY CITILY CITILY CITILY CITILY CITILY CITILY CITILY CITILY CITILY CITILY CITILY CITILY CITILY CITILIY CITILY CITILY CITILY CITILY CITILY CITILY CITILY CITILY CITILY CITILY CITILY CITILY CITILY CITILY CITILY CITILY CITILY CITILY CITILY CITL1 CITL2 CITL3 CITL4 CITL5 CITL6 CITL7 CITL8 CITL9 CITL10 CITL11 CITL12 CITL13 CITL14 CITL15 CITL16 CITL17 CITL18 CITL19 CITL20 CITL21 CITL22 CITL23 CITL24 CITL25 CITL26 CITL27 CITL28 CITL29 CITL30 CITL31 CITL32 CITL33 CITL34 CITL35 CITL36 CITL37 CITL38 CITL39 CITL40 CITL41 CITL42 CITL43 CITL44 CITL45 CITL46 CITL47 CITL48 CITL49 CITL50 CITL51 CITL52 CITL53 CITL54 CITL55 CITL56 CITL57 CITL58 CITL59 CITL60 CITL61 CITL62 CITL63 CITL64 CITL65 CITL66 CITL67 CITL68 CITL69 CITL70 CITL71 CITL72 CITL73 CITL74 CITL75 CITL76 CITL77 CITL78 CITL79 CITL80 CITL81 CITL82 CITL83 CITL84 CITL85 CITL86 CITL87 CITL88 CITL89 CITL90 CITL91 CITL92 CITL93 CITL94 CITL95 CITL96 CITL97 CITL98 CITL99 CITL100 CITL101 CITL102 CITL103 CITL104 CITL105 CITL106 CITL107 CITL108 CITL109 CITL110 CITL111 CITL112 CITL113 CITL114 CITL115 CITL116 CITL117 CITL118 CITL119 CITL120 CITL121 CITL122 CITL123 CITL124 CITL125 CITL126 CITL127 CITL128 CITL129 CITL130 CITL131 CITL132 CITL133 CITL134 CITL135 CITL136 CITL137 CITL138 CITL139 CITL140 CITL141 CITL142 CITL143 CITL144 CITL145 CITL146 CITL147 CITL148 CITL149 CITL150 CITL151 CITL152 CITL153 CITL154 CITL155 CITL156 CITL157 CITL158 CITL159 CITL160 CITL161 CITL162 CITL163 CITL164 CITL165 CITL166 CITL167 CITL168 CITL169 CITL170 CITL171 CITL172 CITL173 CITL174 CITL175 CITL176 CITL177 CITL178 CITL179 CITL180 CITL181 CITL182 CITL183 CITL184 CITL185 CITL186 CITL187 CITL188 CITL189 CITL190 CITL191 CITL192 CITL193 CITL194 CITL195 CITL196 CITL197 CITL198 CITL199 CITL200 CITL201 CITL202 CITL203 CITL204 CITL205 CITL206 CITL207 CITL208 CITL209 CITL210 CITL211 CITL212 CITL213 CITL214 CITL215 CITL216 CITL217 CITL218 CITL219 CITL220 CITL221 CITL222 CITL223 CITL224 CITL225 CITL226 CITL227 CITL228 CITL229 CITL230 CITL231 CITL232 CITL233 CITL234 CITL235 CITL236 CITL237 CITL238 CITL239 CITL240 CITL241 CITL242 CITL243 CITL244 CITL245 CITL246 CITL247 CITL248 CITL249 CITL250 CITL251 CITL252 CITL253 CITL254 CITL255 CITL256 CITL257 CITL258 CITL259 CITL260 CITL261 CITL262 CITL263 CITL264 CITL265 CITL266 CITL267 CITL268 CITL269 CITL270 CITL271 CITL272 CITL273 CITL274 CITL275 CITL276 CITL277 CITL278 CITL279 CITL280 CITL281 CITL282 CITL283 CITL284 CITL285 CITL286 CITL287 CITL288 CITL289 CITL290 CITL291 CITL292 CITL293 CITL294 CITL295 CITL296 CITL297 CITL298 CITL299 CITL300 CITL301 CITL302 CITL303 CITL304 CITL305 CITL306 CITL307 CITL308 CITL309 CITL310 CITL311 CITL312 CITL313 CITL314 CITL315 CITL316 CITL317 CITL318 CITL319 CITL320 CITL321 CITL322 CITL323 CITL324 CITL325 CITL326 CITL327 CITL328 CITL329 CITL330 CITL331 CITL332 CITL333 CITL334 CITL335 CITL336 CITL337 CITL338 CITL339 CITL340 CITL341 CITL342 CITL343 CITL344 CITL345 CITL346 CITL347 CITL348 CITL349 CITL350 CITL351 CITL352 CITL353 CITL354 CITL355 CITL356 CITL357 CITL358 CITL359 CITL360 CITL361 CITL362 CITL363 CITL364 CITL365 CITL366 CITL367 CITL368 CITL369 CITL370 CITL371 CITL372 CITL373 CITL374 CITL375 CITL376 CITL377 CITL378 CITL379 CITL380 CITL381 CITL382 CITL383 CITL384 CITL385 CITL386 CITL387 CITL388 CITL389 CITL390 CITL391 CITL392 CITL393 CITL394 CITL395 CITL396 CITL397 CITL398 CITL399 CITL400 CITL401 CITL402 CITL403 CITL404 CITL405 CITL406 CITL407 CITL408 CITL409 CITL410 CITL411 CITL412 CITL413 CITL414 CITL415 CITL416 CITL417 CITL418 CITL419 CITL420 CITL421 CITL422 CITL423 CITL424 CITL425 CITL426 CITL427 CITL428 CITL429 CITL430 CITL431 CITL432 CITL433 CITL434 CITL435 CITL436 CITL437 CITL438 CITL439 CITL440 CITL441 CITL442 CITL443 CITL444 CITL445 CITL446 CITL447 CITL448 CITL449 CITL450 CITL451 CITL452 CITL453 CITL454 CITL455 CITL456 CITL457 CITL458 CITL459 CITL460 CITL461 CITL462 CITL463 CITL464 CITL465 CITL466 CITL467 CITL468 CITL469 CITL470 CITL471 CITL472 CITL473 CITL474 CITL475 CITL476 CITL477 CITL478 CITL479 CITL480 CITL481 CITL482 CITL483 CITL484 CITL485 CITL486 CITL487 CITL488 CITL489 CITL490 CITL491 CITL492 CITL493 CITL494 CITL495 CITL496 CITL497 CITL498 CITL499 CITL500 CITL501 CITL502 CITL503 CITL504 CITL505 CITL506 CITL507 CITL508 CITL509 CITL510 CITL511 CITL512 CITL513 CITL514 CITL515 CITL516 CITL517 CITL518 CITL519 CITL520 CITL521 CITL522 CITL523 CITL524 CITL525 CITL526 CITL527 CITL528 CITL529 CITL530 CITL531 CITL532 CITL533 CITL534 CITL535 CITL536 CITL537 CITL538 CITL539 CITL540 CITL541 CITL542 CITL543 CITL544 CITL545 CITL546 CITL547 CITL548 CITL549 CITL550 CITL551 CITL552 CITL553 CITL554 CITL555 CITL556 CITL557 CITL558 CITL559 CITL560 CITL561 CITL562 CITL563 CITL564 CITL565 CITL566 CITL567 CITL568 CITL569 CITL570 CITL571 CITL572 CITL573 CITL574 CITL575 CITL576 CITL577 CITL578 CITL579 CITL580 CITL581 CITL582 CITL583 CITL584 CITL585 CITL586 CITL587 CITL588 CITL589 CITL590 CITL591 CITL592 CITL593 CITL594 CITL595 CITL596 CITL597 CITL598 CITL599 CITL600 CITL601 CITL602 CITL603 CITL604 CITL605 CITL606 CITL607 CITL608 CITL609 CITL610 CITL611 CITL612 CITL613 CITL614 CITL615 CITL616 CITL617 CITL618 CITL619 CITL620 CITL621 CITL622 CITL623 CITL624 CITL625 CITL626 CITL627 CITL628 CITL629 CITL630 CITL631 CITL632 CITL633 CITL634 CITL635 CITL636 CITL637 CITL638 CITL639 CITL640 CITL641 CITL642 CITL643 CITL644 CITL645 CITL646 CITL647 CITL648 CITL649 CITL650 CITL651 CITL652 CITL653 CITL654 CITL655 CITL656 CITL657 CITL658 CITL659 CITL660 CITL661 CITL662 CITL663 CITL664 CITL665 CITL666 CITL667 CITL668 CITL669 CITL670 CITL671 CITL672 CITL673 CITL674 CITL675 CITL676 CITL677 CITL678 CITL679 CITL680 CITL681 CITL682 CITL683 CITL684 CITL685 CITL686 CITL687 CITL688 CITL689 CITL690 CITL691 CITL692 CITL693 CITL694 CITL695 CITL696 CITL697 CITL698 CITL699 CITL700 CITL701 CITL702 CITL703 CITL704 CITL705 CITL706 CITL707 CITL708 CITL709 CITL710 CITL711 CITL712 CITL713 CITL714 CITL715 CITL716 CITL717 CITL718 CITL719 CITL720 CITL721 CITL722 CITL723 CITL724 CITL725 CITL726 CITL727 CITL728 CITL729 CITL730 CITL731 CITL732 CITL733 CITL734 CITL735 CITL736 CITL737 CITL738 CITL739 CITL740 CITL741 CITL742 CITL743 CITL744 CITL745 CITL746 CITL747 CITL748 CITL749 CITL750 CITL751 CITL752 CITL753 CITL754 CITL755 CITL756 CITL757 CITL758 CITL759 CITL760 CITL761 CITL762 CITL763 CITL764 CITL765 CITL766 CITL767 CITL768 CITL769 CITL770 CITL771 CITL772 CITL773 CITL774 CITL775 CITL776 CITL777 CITL778 CITL779 CITL780 CITL781 CITL782 CITL783 CITL784 CITL785 CITL786 CITL787 CITL788 CITL789 CITL790 CITL791 CITL792 CITL793 CITL794 CITL795 CITL796 CITL797 CITL798 CITL799 CITL800 CITL801 CITL802 CITL803 CITL804 CITL805 CITL806 CITL807 CITL808 CITL809 CITL810 CITL811 CITL812 CITL813 CITL814 CITL815 CITL816 CITL817 CITL818 CITL819 CITL820 CITL821 CITL822 CITL823 CITL824 CITL825 CITL826 CITL827 CITL828 CITL829 CITL830 CITL831 CITL832 CITL833 CITL834 CITL835 CITL836 CITL837 CITL838 CITL839 CITL840 CITL841 CITL842 CITL843 CITL844 CITL845 CITL846 CITL847 CITL848 CITL849 CITL850 CITL851 CITL852 CITL853 CITL854 CITL855 CITL856 CITL857 CITL858 CITL859 CITL860 CITL861 CITL862 CITL863 CITL864 CITL865 CITL866 CITL867 CITL868 CITL869 CITL870 CITL871 CITL872 CITL873 CITL874 CITL875 CITL876 CITL877 CITL878 CITL879 CITL880 CITL881 CITL882 CITL883 CITL884 CITL885 CITL886 CITL887 CITL888 CITL889 CITL890 CITL891 CITL892 CITL893 CITL894 CITL895 CITL896 CITL897 CITL898 CITL899 CITL900 CITL901 CITL902 CITL903 CITL904 CITL905 CITL906 CITL907 CITL908 CITL909 CITL910 CITL911 CITL912 CITL913 CITL914 CITL915 CITL916 CITL917 CITL918 CITL919 CITL920 CITL921 CITL922 CITL923 CITL924 CITL925 CITL926 CITL927 CITL928 CITL929 CITL930 CITL931 CITL932 CITL933 CITL934 CITL935 CITL936 CITL937 CITL938 CITL939 CITL940 CITL941 CITL942 CITL943 CITL944 CITL945 CITL946 CITL947 CITL948 CITL949 CITL950 CITL951 CITL952 CITL953 CITL954 CITL955 CITL956 CITL957 CITL958 CITL959 CITL960 CITL961 CITL962 CITL963 CITL964 CITL965 CITL966 CITL967 CITL968 CITL969 CITL970 CITL971 CITL972 CITL973 CITL974 CITL975 CITL976 | |
| Hem3npaBnocT Причина OtrctpaHЯВанe | ||
| Актулароната батерияе пекалениcopeца. | Оставete я за се охлади. | |
| Коюняг 6лok e влочен, HO мо-торьт He paBOTи. | Е lektro3axpaHbaHeTo e n3-Kлочени OT клочовяпръс-BaY. | Влочete[elektro3axpaHbaHeTo поpeД-CTВOM клочовяпръсВач. |
| ИдikatopbT 3a гөшки Ha KOюн-Nня 6лok CBETBA. | Баатерята He e постavenа правлино. | Поставete правлино сaitерийт. |
| Сыбшиета 3a гөшки 3a Smart 6у-TOHA | Причини и OTстаняванe: ВЖ олаea 3.9 "Smart bymoN (03) ", cmpaHu-ua 389. | |
11 TPAHCSIOPTIUPAHE
11.1 TpahcnptnpaHe Ha ypeHa
BHIMAHNE! OnachocT OT NOBpeHa Ha Kocaunna MexaHn3bM. Pn Hau-NuCKaTa BnuCOnHa Ha KocHe Kocaunr MexaHn3bM MoKe Da 6bJe NOBpeHn Prn DvNkeHne Bbpxy CTbNaJa, Pb6OBe nIe bOpIpn.
IocTaeBnCOunHaTaHaKoCeHeHaHaBnBCOKaTcTepeH npTpaHcnpTupaHe.
- Cnpete KocauHn MexaHn3bM n N3aKaIte DOKaTO cnpe.
- HacptpoTe Ha-rotjMaTa BnCOuHa Ha KocHe.
- 3aBbptTe KInOyOBn IpeKbcBaH Na N03N URA " (no3.0).
TpaHcnpTnpaHe Ha ypeDa MeKdy DBe pa60THN 30HN
IpnBnKeTe ypeDa Do pa6oTHaTa 30Ha, Ha- cTpoEHa Hau- roJMaTa BucOuHa Ha KoceHe.
3a no-NeCHO npINBnKBaHe BKNIOueTe 3aINBnKBaHETo Ha KOJIeNaTa.
3a HocHe Ha ypeHa n3non3BaIte oChOBHaTa dpbKka n ppeHaTa dpbKka 3a HocHe.
*83aBucumocm om Modena, buX mexHuuecku me daHHu.
TpaHcnpOpTnpaHe Ha ypeDa B npeBO3Ho cpeDCTBO
OTcTaHeTe aKymyIaTopHnTe 6aTepeHn.
CrbHeteOCHOBHaTa npbJka.
OcnrgypeTe ypeBa B npeBO3HOTo cpeIcTBO npOTnB npeo6pbuahe nnnoDxNb3BaHe.
Ocnyperte ypea npotnb yapn ot cbo6oHN npedmetn.
He noctabraTe npedMeTu Bbpxy ypeda.
11.2 TpaHcnpTnpaHe Ha akymyIaTopn6aTePnn
B3eMeTe cIeHnTe MepKn IpeN TpaHcnpTnpaHe:
1.ИЗКЛЮЧЕурда.
2. OTeTaHTe aKymyIaTOpHnTe 6aTePmN OT ypeHa.
3. OnakobaiTe 6aTeepnTe npabuJHo (BuxTe no-dony).
YKA3AHNE HomHaHaTa eHepnHa ha ayMyIaTopa Bb3n3a Ha no-MaNko ot 100 Wh! 3aTOBa cna3BaIe CneHNte yKa3aHnra 3a TpaHCnopTnpaHe!
CbIbpxaata ce IITnEBO-IOHna 6atepy no- nada NOd IOPNCdkuYra Ta Ha 3aKHOdaTeJICTBOTO 3a ONACHN TOBAPn, HO pRn BCE TOBa MOKe Da CE TpaHCnpTnpa npn ONPoCTeHN ycNOBnA:
AkymylaTOPbT MoKe Da Ce TpaHcnpOptnpa O T qactnna Notpe6nte1 6e3 DoNbHnTeHN yCIOBn, CTnra Da e NaKeTpnap 3a TbproBn Ha Dpe6Ho N TpaHcnpTbT Da Ce N3BbpWBa 3a Niuchn UeJI.
IpocecnoHaHnTNotpe6nten, KOITo n3BbPbBa TpaHCnOpTa BbB Bpb3ka C OCHOBHaTa cn npocnoHaHa 3aetoc (HaNP. DocTabKN OT Ha CTponteHN NIOUaKn ININnpedCTabHn),MOKe CbIo TaKa Da Ce Bb3-NOJ3Ba OT Ta3N ONpOcTeHa pOceDypa.
I B Dbata ropeonncanH cnuya Tp6Ba Da ce B3eMaT 3aBnKntenHnTe npedna3n Mepkn 3a npedotbpaTBAHe Ha pa3nJraBaHe Ha cbdpkaHneTo. B dpyrn cnyaan e 3aBnKntenHO cna3BaHeTo Ha npedncaHnTa Ha 3aKOHOaTeJICTBOTo 3a onacn ToBapn! Pnp HeCn3BaHe KaKTo n3-
Ppaua, Taka n TpaHcnpTupaTnT ca 3acTpa-WeHn OT 3NaHTeHHrno6n.
IOnbJHHTeJIHn CbBETn 3a npEBo3 n ekCneDnpaHe
TpaHcnpTnpaIte,pecn.eKcneInpaIte IIN THeBO-IOHH aKymyIaTOPHbATEpHcAmoB HEnOBpeDeHO cbcToHHe!
3a TpaHcnpT Ha aKymyIaTOPHb6aTePnN 13- NOI3BaIe cAmO opuHaJIHaTa KapTOHeHa ONAKOBA HIN NODXODJa KaTOHeHa ONaKOBKa 3a ONaCHn TOBapN (He e 3aJbIXkITeH No 3a aKymyIaTOPHb6aTePnC HOMHaJIHa eHeprna no-MaIko OT 100 Wh).
3aIeneTe OTKpNTnTe KOHTaKTn Ha Ipe3apexJaauata Ce aKymylaTopHa 6aTepy, 3a Da npedna3nTe OT KbCO CbeDInHeHne.
Bbtpe B onakOBkata, ochnypTe akymyntopHaTa 6aTePnO rN3MeCTBaHe, 3a Da npeD0TBPaTne yBpeKdAne Ha 6aTePnra.
Obe3neyeTe npabunHTo 06o3naueHne ndoKymentaun Ha npatkata npu TpaHcnpTnpaHe, pecn. ekpeDnpane (HaNP. c KypnepcKa cnjkb a nn n CpeDnua).
HnΦopMnpaIte ce npedBapnteHNO daHne Bb3MOxHe TpaHCnOpT c n36paHnJa DOCTaBvNK n 06o3NaYe npaTkata.
PpenopbUbAme anraxnpaHeTo Ha CneuAnIcT No ONaCHn TOBapN 3a NODrTOBka Ha npaTKata. Cna3BaIte cBso n EBeHTyaHnTe DoNbHNHTeHN HaauNoHaHn PpeDnucHn.
12 CklaIpaHE
CneBcKa ynoTpe6a Ha ypeDa ro nooNCTBaIte OCHOBHO I NOCTABRAIte BCNUKn 3aunTHn NOKPITNA (aKO ca HAnuHn TaKNa). CbXpaHraBte ypeDa Ha cyxo, 3aKnUOVAuO Ce MAcTO n N3BbH Obcera Ha Deua.
12.1 CbXpaHeHne Ha akymyIaTOPHaTa rpaDHcKa KocauKa
BHIMAHHE! OnaCHOCT OTHapaHBAHe.
Ako no Bpeme Ha 3apekdahe ypeT e DocbneH 3a Deua nn HeOTOpn3npaH Nua, MoKe da ce CTnHe Do HapaHBAHn.
3apekdaTe ypeHa HneocTbHNO 3a deua HNEOTOpn3npaHINIINa MrcTo.
OCTaBraIte ypeHa hCbXpaHeHne cAmo, KOrato 6aTePnTa e OTCpaHeHa.
BHIMAHHE! OnachocT OT kpaX6a n 3ary6a Ha NnHn DaHH. RaHnckata Kocayka mHa DoCTbN DO nHTepHeT n MOKe da ynpaBnBa ycTroPcTBa B Smart Home n Smart Garden.
CbxpaaBaIte ypea cmo 6e3 6atepnn n do6pe ocnpyen npotnbdoctbna Ha HeynblHOMOseHN Iuca.
1.ИЗКПЮЧЕуpeда:ИЗВаде Te npeДпа3нЯ KЛЮч.
2. HacptpoTe Ha- roJMa BnCOuHa Ha KoceHe.
3.ИЗbaTe ekумлаTopHnTe 6aTepeHn.
4. Octabete MoTopa da ce oxnaI.
5.ПочирTe OCHOВно урEDA.
6. 3a 3aunTa OT KOpO3nHaMaXeTe BCnUKN MeTaNH YactN C TbHbK CNOI MaCIO NIN CNNI-KOH.
7. CrbHete OCHOBHata dpBxka.
8. CknaIpaIte ypeDa Ha cyxo, YnCTO MxCTO, 3aInteHO OT 3ampb3BaHe. NOKpInTe C Dn- Wau 6pe3eHT, 3a Da rno ppeIpa3nte OT HApaaWBAHe. He n3no3BaIte NOKpInTn o TnKycTBeHn MaTePnAaN, 3a Da n36eHete akyMynipaHTo Ha Bnara.
12.2 CbXpaHeHne Ha akymyIaTOPHaTa 6aTePnI N 3apAHOTo yCTpOiCTBO
YKA3AHNE 3a DeTaNHa HOpMaunCe OTHeCte KbM OTdJIHnTe NHCTpyKUn 3a yNOTpe6a Ha akymyNaTOPHaTa 6aTePnI n 3apAnHOTo ycTPOINCTBO.
13 N3XBbPJIaHE
Yka3aHnO OTHOCHO HeMckn 3aKoH 3a eNeKtpnueeCKn H eNeKtpoHHuypei (ElektroG)

CTapnte eIeKtpnueckn n eIeKtpoHHn ypeHn He npHaJnEkaT KbM DOMaKNHCKnte OTnaDbu, a HAnpoTb HanaRaT OTdeJHo c6bnpaHe n 3XbPnHe!
CTapnte 6atepnn nnn akymynaTopn, kouto He ca Brpaedn B CTapn ypeD, Tpr6Ba da ce n3BaXdA TneDn OTdaBaHe! N3xBbPnHaTe To mC pepynpa ot 3akoha 3a 6atepnnte.
IpnTeXkATEJIaT,peCnEeKTHBHO non3BaTeJIaT Ha eJNeKTPnueckn H eJKeKTPoHHn ypeHn e 3a- DbJxeh NO 3aKOH Da rN npeJaDe o6paTHO cJeD ynoTpe6bata m.
KpaHnT nOtpe6nten Hocn nnHa OTROBOPHOCT 3a n3TpnuBaHe Ha nnHnTe CN daHHN OT CTapnYypeD, KOTo e 3a n3XBpPnHe!
CnmboIbT Ha 3aDpaKanHna KOHTeHep 3a CMeT O3Haayaba, Ye eNeKtpnuecknte N eNeKtpoHHnte ypeN He Tp6Ba Da ca n3XbPnT 3aeHNO CdoMaKNHcKNTe OTnAdbuN.
EneKtpnuecknte n eNeKTpoHHnte ypeNi MOraT Da 6bDaT 6e3nNaTHO BbPHaTN Ha cJeDHnTe nyH-KTOBe:
ObseCTBeHnTe cnyx6n 3a cb6npaHe Ha ot- nAdbu -peCn. NyHKTOBe 3a cb6npaHe (Ha- np.KOMyHaJIHnTe pIoouaKn)
IpyHKTOBTe 3a npoJax6ha ha eJekTpoypei (cTaunOHapHn nn OHnaH), KaKTo n TbproBcHTe ca 3aDbNKeHN da B3emat o6paTHO eJekTpoypei nn Do6pOBJHO ro npedna- rAT.
Te3n n3aBJIeHn BaxaT cAmo 3a ypeN, KOnTo ca npOdaHeH n HcTaInpaHb N DbpxKaBn OT Ebponeckn CbIO3 n NOJNeKgAT Ha IOpNCdNKcUNTe Ha Ebponeckn DaIpeKTnBa 2012/19/EC. B cTpaHn n3BbH Ebponeckn CbIO3 MoKe da BaxaT pa3JInuHN OT TOBa NoCTaHOBJeHn 3a N3XBbPJIaHE Ha CTapn eNEKtpoypeN n eNEKtpoHnka.
Yka3aHnO OTHoCHO HEmCKn 3aKOH 3a 6aTePnTe (BattG)

CTapnte 6aTeepn n akymyIaNTopnte He npHaJIeKAT KbM IOMAKINCKNTe OTnAdbu, a HApOTNB HaIarat OTdEINHO cb6upane Nn3XbPnHe!
3a 6e3oNaCHO n3BaXdaHe Ha 6aTePnIte nnn aKymyIaTOPiTE OT eJKeKTPoypeda n 3a nH-ΦopMaζηr OTHOCHO TnA n CbOTBeTHO XmNueCKn I M CbCTaB, B3EmTe NOD BHUMAHne DOnbHnHTeHNHTe yKa3aHnB PbKOBOCTBOTO 3a yNotpe6a nnn B pKOBODCTBOTO 3a INHCTaJIaζn.
I IpnTeXaTeJIrT,peCneKTHBHO NOJ3BaTeJIrT Ha 6aTeepnN aKymyNaTopn e 3aJbJxKeH No 3aKoH Da rN ppeJaDe o6paTHO cJeD yNoTpe-6bTa Nm.BpBuaHeTo o6paTHO ce orpaHnuABA Do npedeBaHaTeO OT CtpaHa Ha DOMaKInHCTBaTa.
CTapnte 6atepn MoRaT da CbIbpxKaT BpeHn BeIecTba IIN TeKKn MetaII, KOUTo Morat Da
PnunHrBpeHnHa 3paBeTo Ha OKoHnTa CpeHa. Ytnn3aunraHa CTapnte 6atepnu Hn3- nON3BaHeTO Ha cBbpxkauntce Ce Tbx pecypcn DOnpHacrt 3a 3auHTata Ha Te3n DBe 6nara ot CbueCTBeHa BaxHOCT.
CnMBOJbT Ha 3aDpaKAnHa KOHTeHep 3a CMeT O3NaUba, Ye 6aTePnIte N aKymyNAtOpNTe He Tp8Ba Da ce N3XBpIaT 3aeHDo C DOMaKInHCKn- Te OTnaDbuN.
Ako OcBeH ToBa NOd KOHTeHepa 3a CMeT ce HaMnpat 6o3HaueHnra Hg, Cd, nPi Pb, To Te ce OTHacr DO cneHOTO:
Hg: BaTePnIa cIbIpbXa nobEue ot 0.0005% KINBAK
Cd: BaTepeRyTa cBDbpxKa nobYe ot 0,002 % KaDmN
Pb: BaTepeyTa cIbpxa noBce oT 0,004 % OIOBO
AkymyaTopnte n 6aTeepnnte Morat da 6bDat 6e3nlaTHO BbpHaTn Ha CJeDnTe NyHKTObE:
OeCTBeHnTe cnyk63a cb6npaHe Ha ot- nAdbu -pecn. nyHKTOBE 3a cb6npaHe (HaNP.KOMVHaHnTe PNOsAkn)
IpyHKTOBe 3a TbproBnC 6aTeepuN akyMyJatOpu
OBeKTH, qactn OT cncTeMaTa 3a cb6bnpaHe Ha OTnaDbu, 3a BpbUaHe Ha CTapn ypeDn-6aTeepu
O6eKtn 3a Cb6npaHe OT CtpaHa Ha npOn3BO-DntTeIy (B HraKo CnyuAn N3BbH O6uTa CnCTema 3a Cb6npaHe Ha OTnaDbu)
Te3n n3aBHeHn Baxat cmo 3a akymyIaTOPn H6aTePnN, KOTo ca npOdaHeHn INHCTaJInpaHn BDbPxAbN OT EbponeeCKn CbIO3 n NOJNeKAT HaOpncDnKUInTe Ha EbponeeCKa DnpeKtNbA 2006/66/EC.B CTpaHn n3BbH EbponeeCKn CbIO3 MoKe Da Baxat pa3nHn OT TOBa NOCTaHOBHeHn 3a n3XBpLnHe Ha akymyIaTOPn N 6aTePnN.
14 NOДРьЖKA / CEPBN3
3a Bbnpocn OTHOCHO rapaHcnaTa,peMOHTa NIN NOdMaHaT a Ha YactN, MoJ, CbPKeTe Ce c Hau6bnKna cepBn3eH ceHTbp Ha AL-KO. Ie ro otKpneTe B nHTepHet Ha CneHNra aDpec: www.al-ko.com/service-contacts
15 TAPAHUN
BcKaKbMaTePnAaHn nn npOn3BOcTBeHn DepeKTn no ypeHa ce OTCTpaHraBaT OT hac npe3 3aKoHOBnnaBbOCTeH cPoK 3a npTeHcun 3a HeIOCTaTbU, NO Hau N36Op Ype3 peMOHT nn 3aMeCTBaUaДocTaBA.ДabHOCTHnT cPoK ce onpeJeIeNcBoTBeTHO cNopeI 3akOHHe Ha CTpaHaT, KbIeTo e npOdaEN ypeDbT.
Haata rapaun Baxn camo npi:
Cn3BaHe Ha Ta3n HNCTpyKzna 3a ekcnnoatau
PpaBnHa ynoTpe6a
3no3BaHe Ha opnHaHn peepBHu actu
TapaHcIyTa cTaBa HeBaJIuHa npi:
OHTN3a cAMOBONH peMOHTN
CamaBoJHnTexHnueckn H3MeHeHnA
YnoTpe6a He no npedHa3HaueHne
OT rapaHnraTa ce n3KnIOyBaT:
LTeTn no JAKOBOT NOKPITNE, Bb3HnKHaJI N BCJeCDTBne Ha HOpMaJHO 3HOCBaHe
БьрзИЗнOCВаши ceЧаCTи,КоNTоHa KapTaTcpe3epBHTe ChACTn ca O3HauEHn C paMkaXXXX (x)
IapauHIOHNnT nepno3aNoBa da Teue cneI NOKyNkata OT CtpaHa Ha IpbBna Kpaen Notpe6nte. OnpeJeIa e DaTaTa Ha DOKymEnTa 3a NOKynka. MoJ, o6bpHeTe ce c Ta3n DeKnapaun OpuHnHaNNn DOKymENT 3a NOKynKa KbM Baunr TbproBcN npeDCTabNTeJ nn Hain-6nn3kn YeHTbP 3a O6CnyXbaHe Ha KNIneHTN. 3aKOHOBnTE IpTeHUn 3a DeEeKTN OT CtpaHa Ha KynBaay KaM npOdaBaay OCTaBat HeIpomHeHH ot Ta3n DeKnapaun.
IPEBOD OPINHJIbHORO PYKOBODCTBA NO 3KcIIyATAUIN
OrnabJeHne
1 Oc06bIe npaBnTaTexHnKn 6e3oNaChOCTn406
2 INHOpMaunOpyKOBoDCTBeNo3KcNly-atau.. 406
2.1 CmboJbHa TnTyJbHoi CTpaHnue....406
2.2 YcnoBhpie 6o3HaueHn n CnHaJIb-HbIe cNoBa... 406
3 OnicaHne npOyKta 407
3.1 NcnoB3OBAHHe no Ha3HaueHnIO .... 407
3.2 Cnyuany npeDycmOTpeHHoro npimeHeHnra 407
3.3 OcTaToUHbIe pUckn.. 407
3.4 PpeOxpaHnteNbHbIe n 3aunTHbIe y- cTpoiCTBa .407
3.5 CmBoJI Ha ycTpoIcTBe 408
3.5.1 MeTkn 6e3oNaChOCTn 408
3.5.2 CmBoJIbI 3KcPnLyatau.. 408
3.6 O63opbln3deJnn 408
3.6.1 O63op n3denn (01) - AL-KO .... 408
3.6.2 O63op n3dJIy (02) — solo ot AL-KO 409
3.7 KomnJIeKTI noCTaBKn 409
3.8Пиложенue《AL-KO inTOUCH Smart Garden》* 409
3.9 MHorOfoyHKUHOHaJIbHaJa KHOnKa (03)* 410
3.9.1 INHdkauia coctoHna 3apKn..410
3.9.2 YctaHOBka CoeINHeHnMaMeKdY ra3oHokocnIkoN AL-KO Smart Cloud 410
3.9.3 AktubpoBaTb DeiCTBnB B «Smart Home》/«Smart Garden》(IFTTT) 411
3.9.4 AKTUBINPOBaTb ra3oHOKOcNkY* ... 411
3.9.5 C6pocntb nma npoJIb 6ecnpoBODHOH cetn* 411
3.10 CnCTema ynpaBneHna «maxRun &smart-drive»-Cockpit (04)* 411
4 Yka3aHnno TeXnke 6e3oNaChocTn..... 412
4.1 Yka3aHnno no TexHnke 6e3onacHOCTn IJIra3OHOKOcNIKU 412
4.1.1 Obuyehne 412
4.1.2 POnIroToBnTeNbHbIe Mepbl 412
4.1.3Испльбоване устpoиства.....412
4.1.4 Texo6cnyxuBaHne n xpaHeHne ...413
4.2 Bn6paunHna Harpy3ka. 413
4.3 Akyctnecekaj Harpy3ka... .414
4.4 Yka3aHnno NO TexHnke 6e3oNaCHOCTN DnA aKKMyJrTopa n 3apdHoro y- CTpoiCTBa... .414
5 YcTaHOBka 414
6 BbO D E KcNJIyatauio 415
6.1 3apka akkymyIaTopa. .415
6.2 YctaHObKa n 13BJIeHeHne aKKMyJnraTopoB (05). .415
6.3 BkIIOueHne N BBKJIIOueHne NITaHn KocnIbHO r MexaHn3Ma (06) 415
6.4 BkIIOueHne N BBKIOUoyHne CnCTeMbI ynpabJeHnCockpit* 415
7 YnpaBneHne 416
7.1 PerynipobKa BbICOTb cpe3a (07) ....416
7.2 CkaunBaHne c TpaBoc6opHnKOM (08, 09) 416
7.3 MylbHPOBaHHe c nOmoUbIO KJIHa dIy MylbHPOBaHn (10, 11).416
7.4 CkaunBaHne c 6okobon pa3rpy3koi (12)* .417
7.5 PerynipoBaanHe HanpaBnaIooien py-KoRTKn COOTBeTCTBeHNO POCTy NOb-3OBaTeJIa (13)^ 417
7.6 NycKIOCTaHOB KocnIbHoro Mexa-Hn3Ma (14) 417
7.7 BkIIOueHne N BbIKIOueHne KOIeCHO- ro npNbOda (15)* 418
7.8 Konechbni npnBOd - CMeHa ckOpocTn (16)* 418
7.9 BkIIOueHne N BBKJIIOueHne peXIMa ECO (16)* 418
8 Yka3aHnno 3Kcnpnyatau.. 418
9 TexobcnykubHne uyxo.. 419
9.1 PeryIpaHbI pa6Otbl no Texo6cIy- XnBaHHIO... .419
9.2 OuNTka yCTpoiCTBa N KocnIbHoro MexaHn3Ma 419
9.3ПоверкииЗаменаха.. 419
9.4 Perynipovka 6oydeHOBCKORo Tpoca Konechoro npB0da (17) 420
9.5 PemOHThbpepa60Tbl 420
9.6 INHTeppec USB (18) 420
10 YcTpaHHe HencnpaBHOcteI 420
11 TpahncnopTnpOBka 422
11.1 TpaHcnpTnpoBka yctpoiCtBa.... 422
11.2 TpaHcnpTnpoBka aKkymyIaTOp 423
12 XpaHeHne 423
12.1 XpaHeHne aKKyMnyTOpHoI ra3oHo-KocnIKN 423
12.2 XpaHHeHne aKKymyIaTopa n 3apJHo- ro yCTpOiCTBa . 424
1 OCObIe IINPABUNa TEXHnKn B3OpACHOCTN
DaanHoe yctpoiCTBO He npedHa3haueHO nI NcIIOJIb3OBAHnI DeTBMN B Bo3pacte Do 8 Iet NIIuAMC OrpaHnueHHbIMN pH3nueCKMn OuyueHnAIMN UINYMCTBHeHHbIMN CnOCo6HOCTaMn, aTaKKe C HeIOCTaTOUHbIM ONbITOM N 3HaHnAIMN, KpOME cIyuaeB, eCNn OHn HaxoJrTCr NOd Ha-6bnOHeHem Niua, OTBeTCTBeHHoro 3a INx 6e30NaCHOCTb, INI npOIIN IHCTpykTakn IO NKcNlyaTaunu YcTPOiCTBa. DeTm 3anpeuaeTc rIrpatb C yCTPOiCTBOM. DeTm 3anpeuaeTc rOuTuMb INBbIOJIHrTB ObcIyXKBaHne 6e3 npICMOTpa.
IInca c OueHb CnIbHbIMN n CIOXHbIMN ORpaHnueHnA Mn TAKKe DOJXHbI 6bITb O3HaKOMJIeHbIC ONNcAHHbIMN 3deCb IHCTpyKUyMn.
2 INHΦOPMAÇI N O PYKOBODCTBE NO 3KCPJIYATAÇI N
HemeizkaBepncoepKNTOpunHaNbHoe pykoBOcTBO nO 3KcnnyatauIN.Bce ocTaIbHbIe 3bIKOBbIE BepCN — 3TO nepeBObl OpunHaJIbHO rpoKoBOcTBA nO 3KcnnyatauIN.
Bcerda depknte 3to pykoBOcTBo no 3Kc- nnyatau nn pkyo, TTo6bl npouHTaTb erO,
ecnBamnoTpe6yeTcHΦopMauno6 yCTpOncTBe.
IpeepaBae yctpoNCTBO dpym Iuam TOJIbKO BMeCTe C 3TUM pKOBODCTBOM NO 3Kc- nnyataun.
Ipoptyte n co6louaite yka3aHnno TeXHHke 6e3oNaChocTn n npedynpeJxdeHnnpuBeDeHHbE B daHHom pykoBODCTBe noKcnnyataun.
2.1 CmboJIbHa TtTyIbHOcCTpaHnue
CnmboJ 3haeHne

O63aTeIbHO npouHTaTe daHHepeyKOBoCTBO NO 3KcPnPyatauNnepeB B0oDM B 3KcPnPyatauN.3To Heo6xOIMO dIg 6e3OpacHOn I 6e3OTKa3HO pa6oTbl.

PykoBoCTBO no 3KcnnyatauN
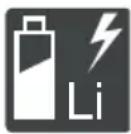
OcToPOxHo 6bpaaTecb cIHTnHNoHbIMn aKKyMylTOpAMn! B qactHOCTn,co6JIoDaIte yka3aHnI NO TpaHCnOpTnpOBKe,xpAHEnIO uYtIN3aCmN B DaHHOM pyKOBODCTBe nO kcnPnyatauN!
2.2 YcNoBHbIe 06o3HaueHn I cnHaJIbHbIe CNoBa
ONACHOCTb! Yka3bIbaeT Ha onaChyIO CHTyaUIO, KOtOpAra, ecn ee He n36ExKaTb, npNBO-DNT K CMEptn INIc cepBe3HbIM TpaBMam.
I PNDYNPEXDEHNE! Yka3bIbaeT Ha noTeHuaJIbHO ONaCHyU CnTuaCnIO, KOTopA, ecnIe He n36ExKaTb, MOKeT npNBecTn K CMePTu IINCEpbE3HbIM TpaBMam.
OCTOPOXHO! Yka3bIbaeT Ha NOTeHcuaJIb-HO ONaCHyIO CNTyaCNIIO, KOTOPA, ecNn ee He N3-6exKaTb, MOxET PnVBecTN TpaBMam JERKoN i CpeDHeN TjXkectN.
BHHMAHNE! Yka3bIbaeT Ha cnTyaunIO, KOTOpa, ecn ee He n36eKaTb, MoKeT npNBecTu KIMyueCTBeHHOMy yuep6y.
IINPIMEYAHNE CneuaJIbHbIe yka3aHnA IJyO6JIeUeHnI NOHmAHnI N 3KcNPyTauN.
3 OПИСАНUE ПОДУКТА
DaHoe pyKOBOCTBO NO 3KcNpyatauIN COdepXHT ONICAHNE pa3HbIX MOeJIeI pyHbIX aKKyMyJITOPHBIX r3OHOKOCINOK MAPOK AL-KO u solo ot AL-KO B pa3NIuHbIX KOMnEKeTAUx. KomnEKeTAUIN OTdJIbHbIX MOeJIeI ppeCTaBJIeHbIBTexHuecknx XapaKTepNCtIKax pyKOBOCTBaNo yCTaHOBKe.
YcTpoNCTBO pa3peWaeTcN CNOJb3OBAbT TOJbKO BMeCTe C NITn-NOHbIMN aKKymyIaTOPAMN 3aPraHbIMN YcTPOINCTBaMn, yKa3aHHbIMN B TexHueCKNX xapaKTePncTnKax. DOnONHIneNbHbIe CBeDeHnraOB aKKymyIaTOPaX n 3apJdHbIX YcTPOINCTBAX CM. B OTJeNbHbIX INHCTpyKUHX:
pykoBOdCTBO no 3Kcnpnyatau441630:Jntn-NOHHbAkkymyIaTOp B150 Li (B05-3640G),B200Li(B05-3650G)
pykoBOcTBoNo3Kcnnyatau441633:3apraHoe yctpoiCTBO C130 Li (C05-4230)
BHIMAHHE! OnacnocTb NOBpeXdeHn y-CTpoiCTBa n aKKymJyTopa. Ecnn ycTpoiCTBO pa6oTaet C HeNoDxOJaIuMn aKKymJyTopamN, To yCTpoiCTBO n aKKymJyTopbl MOYt 6bITb NOBpeXJeHbl.
UcTpoiCTBO pa6oTaET ToIbKO C npEHa3Ha-ueHHbIMN dIe 3TOrO aKKyMylrTopaMn.
3.1 NcnoJb3ObaHne no Ha3NayeHIO
3TO yCTPOIcTBO npeHa3HauEHO dJa KOUeHnA depHO-rrEBOI NOyBbI M0KeT 6bITb NcNoJb3OBAHO TOJIbKO Ha BBICyUeHHOM Ra3OHe.
3TO yCTPOINCTBO npedHa3NaYeHO dIyacTHORO nCNoB3OBaHnI. IIO6oe dpyroe nCNOB3OBaHne, a TAKKe HecAHKUHOHPOBAHHbIe MOINKauu nn DOnONHeHnPAccMaTPNBaOTcKa KHeHaJnEkaue HcNtB3OBaHne N pINBOJr K Pn3HaHnIO HeJeCTBHTbHOr rapaHTnn, a TAKKe K NOTepe COOTBETCTBnI OTKa3y OT IIO6oI OTBeTCTBeHHOCTn 3a yUeep6 NtB3OBaTeHIO INI TpeTbIM JInCaM CO CTOpOHb IpON3BODNTeJIa.
3.2 Cnyan npdeymcMoTpeHHoro npmehnna
YcTpoIcTBo He npEHa3NaYeHO dJa KOMMepueCKOrO NcNoJIb3OBaHnB O6UeCTBeHHbIX NapKax, Ha CnOpTINBbIX PIOuaKaX, B CeJIbCKOM I neCHOM XO3raCTBaX.
He nCnoJIb3yIte yCTpoIcTBO IOI DOxKdEm IJn Ha MOKpOM rA3OHe.
3anpeuaeTcJeMoHTnpoBaTbnnnepeMbikatbpdeoxpaHntBhIe npncnoc6neHna.
3.3 OctaTochBie puckn
JaKe ecn ycTpoNCTBO nCnoJb3yETcHaJnEkaHm o6pa3OM, Bcerda cyuaceCTByeT onpeJeHnBn ocTaToHbI pNCK, KOtOpbI He MoKet 6bITb NCKIOUeH. Bo3MOXHbI cNeDyUOuNE noteHuaNBhIE onaCHOCTn Ha OCHOBE TnPa I KOHCTpyKlun YcTPOINCTBa B 3aBNCIMOCCTN OT nCNoJIb3OBaHnA:
OTo6paCbIbAHHe cpe3aHHOro MaTePnJa, 3eMnN He6oJIbXuKamHei.
BbixaHne yactnCpe3aHHoro MaTepuana npn OTCyTCTBn peCnnpaTopa.
HaHeceHne nope3OB npn KOHTaKTe C DBNKy- UIMNcA DeTaJAMN HOKa.
3.4 PpeOxpaHNTeNbHbIe n 3aunTHbIe yctpoiCTBa
I PENEYIPEXKDEHNE! Onacnoctb TpaB-MnpoBaHn. HencnpaBHOCTb nIN 6e3dienCTBne IpeOxpaHnteNbHbIX IN 3aUNTHbIX yCTPOJCTB MOrTy CTaTb npuHHoTpaBM.
HeincpaBhpie npdoxpaHnteNbHbe n 3a- uHTbIe yCTpoiCTBa noJnxKaT peMOHTy.
HnKoHa He BbIOHTe n3 CTPO npEOxpaHnTeIbHbIe n 3aUNTHbIe yCTPOINCTBa.
PpeoxpaHnteIbHbI KnIOU
YTO6bI N36ExaTb HnpeHaMepeHHoro BKJIOueHnra, yCTPOINCTBO CHa6KeHO npeOxpaHNTeHBHbIM KJIIOvOM. NepeD O6cIyKbAHneM BbIKIOHTe yCTPOINCTBO IN BCERda BbIHMaHTe npeOxpaHNTeHBHbIKJIOU.
PpeoXpaHnTeIbHa pyKoTka/duyra
YcTPOIcTBO OCHaUeHO npEdoXpaHnteNbHO pyKoRTKO/duRo. B MOMENT ONaCHOCTN IpocTo OTNyCTnTe npEdoXpaHnteNbHyO pyKoRTKy/Dyry. DBuRatJIb N KOCUNbHbIMexAHN3M OCTaHOBraTcR.
Khonka «Nyck»
YTo6bI 3aynCTnTb DBrTaTeNb C NOMOuI npedoxpaHnteHbHOpyKoRTKn/DyRn, Chauana HaxMITE KhONkY «NycK».
OtpaxaTeIbHa 3acNoHka
OtpaxaTeIbHa 3acNoHka o6ecneuBaet 3aunTy, HapnMpE, ot YactnC cpe3aHHoro MaTePnaJaN KAMHei, KOToPbIe MOrYt OTo6paCbIbTaBcR.
3.5 CnMBOJIbI Ha yCTpOJCTBe
3.5.1 Metkn 6e3onacchoctn
CnmboJ 3haueHne

CneNyet co6nIopdaTb oc6yO octoPoxKHOCTb npn nCNoJIb3OBaHn y-ctpoiCTBa!

Ipeed BBODOM B 3KcNpyaTauHIO npouTte pyKOBOCTBO NO 3KcNpyaTaun!

Onachocb TpaBMnpoBaHna! BepeIte pyKN HOrN OT KOCINbHoro MeXaHN3Ma!
He npimehmo. NcnoB3yeTcra TOnbKO dIJI 6eH3OKOCINOK.
Ipeed npoBeHnem IIO6bIX pa60 TPO TexHnueckomy 6cnyKbAHnO n YnCTKe CHMaTe KOJIpaOK CBeu3aXnraHnI
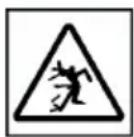
Onachoctb OT O7paacbBaembIX npedmetOB!
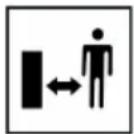
BbBeIte noCTOpOHnX nIu n3 O-nachOy 30HbI!
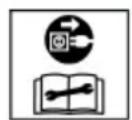
He npimehmo. Ncnoj3yeTcra TOJbKO dIa 3NeKTPOKOCNIOK.
Ipeed BbINOJIHeHEm pa6oT no TexHnueCKOMy O6cIyXnBaHnIO npemOHTy OTKIIouHTe CeTeBOJ UTeKePOT cETn NITaHnI
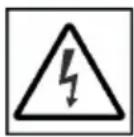
He npimehmo. NcnoB3yeTcra TOnbKO nIa 3NeKTpOKOcnIOK.
Onachocb npaxeHn 3JekTpueckm TOKOM npn NOBpeXdEHN cTeBOrO ka6en!
He npimehmo. NcnoB3yeTcra TOnbKO nIa 3NeKTPOKOcnIOK.
Дерхи-te ceTeBOI Ka6eNb BdaHn OT pexyUeO annapaTn He Hae3XaI-Te Ha Hero!
CnmboJ 3haueHne
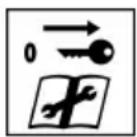
Ipeed BbINOJIHeHnEm pa6oT no TexHnueCKOMy oBcIyXnBaHnIO y6ePnte yCTpOINCTBO dIra DeaAKTNBaCnI n!
3.5.2 Cnmbolblkcnnyataun
CnmboJ 3haueHne
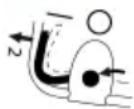
Heo6xOIMbIe DeiCTBnIy nyca Dnuratena (cm. 2na7a 7.6 "Nyck u OcmaHO8 KocunbHOzO MexaHu3Ma (14), Cmp. 417)
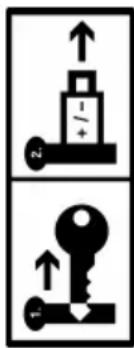
Ecni obopyoBaHne He nCnoB3y- etc: BbInbTe npedeoxpaHnteIbHbI KJIou N I3BNeKInTe aKKymyIaTOp n3 ycTpoiCTBa.
3.6 O63opbI n3denn
3.6.1 O63op n3deleny (01) - AL-KO
HoMep
KOMNOHEHTa
1 MHoroФункционаьная кногka
2 Kpbiika OTecka dЯakymyIaTOPOB
3 3aMOK-BbIKIIOUaTeJIb C npeDOxpaHNTeJIbHbIM KJIOHOM
4 OTeK dIa kkyMnyTopoB 1 n 2
OTKnHnHa HnpaBnIooa pyKoTka, coCTOa n3:
5
BepxHn 3neMeHT pyKoRTKn
6
Hnxn 3JeMeHT pyKoTkn
7
Taikn-6apaaKn (2 wT.)
8 CnCTema ynpaBneHnra «maxRun &smart-drive»-Cockpit
9*PykoTka pbiura nepeKIOUeHnnepeDaay dny KOleCHoro npBODa*
10 PpeoXpaHnTeIbHaJ dyra
11 KhoNka «Iyck»
HoMep
KOMNOHeHTa
12 INHdkaTop ypoBHa 3arpy3kn
13 TpaBoc6opHnK
14 Puyka-depkaTeNb TpaBoc6OpHnKa
15 LcHTpaIbHa perynpoBka BbcOTbI cpe3a
16 3acNoHka 6okOBo pa3rpy3kn
17 PpeHnry pyka nla nepeHoCKn*
18 AkkymyTOp (1 wt. nIn 2 wt.)
193apraHoe ycTpoiCTBO
*8 3abucumocmu om modenu, CM. uHcmpykuuio NO MOHmaxky.
3.6.2 O63op n3denn (02) - solo ot AL-KO
HoMep
1 MhorofoyHKUHOHaNbHaKa
2 KpbIka OTeKa dЯ aKKMyJrTOPOB
3 3aOK-BbIKIQUaTeJB C npedoxpaHn-TeJIbHbIM KJIOHOM
4OTceKdnaakymyIaTOPOB1n2
Perynpyemar no BbICote OTKnHnHa HnpaBJIoua pyKoTka, COCTOua n3:
5 BepxHn 3JemeHT pyKoTkn
6 HxHn 3JIeMeHT pyKoTkn**
7* ! HapnHbIe CoeHHeHna IJIa 6bl- cTpoH hAcTpoKn*
8 CnCTema ynpaBneHnra «maxRun &smart-drive»-Cockpit
9* PykoTka pbUara nepeKnIOueHnna nepeDaIy KoneCHoro npNBOda
10 PpeoXpaHnteIbHaI dyra
11 Khonka «Nyck»
12 INHdkaTop ypoBHa 3arpy3Kn
13 TpaBoc6opHnK
14 Puyka-derpkaTeIb TpaBoc6OpHnKa
15 LcHTpaIbHa peryI npOBKa BbcOTbI cpe3a
Ho- kOMnOHeHTa Mep
16 3acloHka 6okobon pa3rpyzkn
17 PpeHnry pyuKa IJIa nepeHoNCKn
^* 8 3aBucumocmu om Modenu, CM. UHcmpykuuio NO MOHmaxky.
**e3a8ucumocmu om Modenu KOHcmpkyuua 3cmalbHO mpy6bu unu aniUMHua.
3.7 KomIIeKTe NOCTaBKn
KOMnNeKT NOCTaBKn BkIIOuAeT B Ce6a nepeuNcJIeHHbIe N03uCNI. PpOBepbTe, BkJIIOUeHbI JN BCE I03uCNI:
Ho- kOMnOHeHTaMep
1 Tα3OHOKOKNka
2 TpaBoc6opHnK (He yCTaHOBneHa/ya-CTnUHO yCTaHOBneHa)
3 HanpaBnIoua pyKoRTka (He yCTaHObJIeHa/uaCTNuHO yCTaHOBNeHa)
4 BcTaBka dna 6OKOB pa3rpy3kn
5 Klinн Дя млььчировая
6 NaKeT C 6oJtAmN
7 AkkymyraTop* (1 wT. nIin 2 wT.)*
83apraHoe yctpoNCTBO*
*83aBucumocmu om Modenu, CM. UHcmpykuuHO NO MOHmaxky.
3.8 Пиюжень «AL-KO inTOUCH Smart Garden»*
* 3abucumocmu om modenu, cm. uHcmpykuuio NO MOHmaxy.
a30HOKO OcnaOca 6ecnpoBnHbIM paNOModyem.3TO nO3BOJAEyO6HO ynpabTb ra3OHOKOJIKO, BbIOnHraTbe ee peryIpOBky N KOHTpOB c NOMOsbIO npINOxKeHn Ha MObNb-HOM yCTPOJCTBe (cMapTfoHe, PnAhnTe).
IINIOJXHNOBHO HIOJIPOKHeM MObHoe yCTPOIcTBO DOJXHO 6bITb NOIKIOUeHO K INHTepHety.
CoeHHeHHe He yCTaHOBHeNo.IMn npoBbAweN 6ecnpoBOHOH CeT N BBeDeHbI HepaBnBHO.
MHoroФункционьног Khonka npn 3KcnnyatauN
MHoroФункуновь-наг KMONKa
3haueHne
TOpNT CnHm UBeTOM (TyckHeeT).
YcTaHOBJeHO coeDiHeHne c AL-KO Smart Cloud. PpIeM DaHHbIX no 6ecnpoBOdHO CE-TN DOCTaTOUHbI.
TOpNT CnHm UBeTOM, Bpaaaetc.
CoeHHeHne c AL-KO Smart Cloud npepBaHo. PpHem DaHHbIX NO 6ecnpoBOHOcETn npepBaH.
7.6 NycK N OCTaHOB KOCnJIbHOro MexaHn3Ma (14)
3anyckaTe KocnBbI MExaHn3M TOJbKO Ha POBHO NOBepxHOCTN, a He B BBICOKO TpaBe. Ha NOBepxHOCTn HE DOJNXHO 6bITb NOCTOPOHNX PpeDMTOB, TaKnx KaKamHN. PpN 3anycke He PpINODHMaHTe N He HAKJIOHNArTe yCTPONCBO.
NcK KocnIbHOro MexaHn3Ma
- Ecni eue Hnue Ro He npOn3oJIo: BKnIOuHte nIITaHne (cm. 2naea 6.3 "BKnIOUeHue u 6blKJIIOUeHue NImaHua KOCUNbHOzO MExaHu3Ma (06), Cmp. 415).
- HaxmTe KhONky Nycka (14/1) u ydepxuBaI-Te ee B HaxaTOM NOLOKeHHN.
3.ПижмITE(14/2)ppeOxpaHnTeIbHyu dIyry (14/3)K HanpaBnaHouSei pykoarTke (14/a).KocnJIbHbIMexaHn3M 3aNyCKaetcra.
4. OTnycntte KhoNky nycka, npn 3TOM ydepxnBa npeOxpaHHTeBHyIO dyry.
H PIMMEUAHNE PpeOxpaHnteIbHaIyra He fukcnpyetc. PnDepKnBaIte ee Ha HapablaIOuSeI pyKoTKe Ha npOTXKeHN BceI pa60tbl.
OctaHOB KOCINbHORo MExaHn3Ma
- OTnyctnte npedeoxpaHntbHyu duyr.Oha aBTOMaTnueckn BepHeTcB NcXoJHoe nOIOxHHe.
2.ДождnteсьпОЛHон OCTaHOBKN KOCnJIbHOrO MExaHn3Ma. - BbIKIOHTe NITaHne (cM. 2naBa 6.3 "BKnIO-ue Hue U bIKIOUeHue NumAHUR KOCUNbHOzOMexaHu3Ma (06), Cmp. 415).
OCTOPOXHO! Onachoctb nope3OB. O- NaCHOCb nope3OB npn kacaHn pa6oTaUoJero KocnIbHoRO MExaHN3Ma.
IOXINTEcB OCTaHOBKN KOCNbHOro MexaHn3Ma.
Ipeed Bcemn pa6oTAMn no Texo6cnyxnbAHnO u yxoNy: BbIKIOUHTe ycTPOINCTBO n DoJXNTecb OCTaHOBKn KOCINbHOro MExaHN3Ma.OTcoEINHInTe npedeoxpaHntenbHbI KNIOu N BbIHbTe aKKMyJATOpbl.
7.7 BkIIOUeHne N BbIKIOUeHne KOJecHO npNBOda (15)*
^* 6 3aucumocmu om Modenu, CM. UHcmpykuuno MOhmaxky.
Konechb npBOD MOXHO 3aJeCTBOBaTb JnI nepemeueHnra30HOKOcNIkMexdy DBympa6oHm3OHAMn Nm K Mecty XpaHEn. BKnIOyeHne KocNbHOrO MExAHN3Ma dIg 3TOrO He Tpe6yETcR.
H NITaHn CNTeMbI y- npabHeNn Cockpit n Konechoro npBOna npedeoxpaHntbHbKnOu He HxKHO NOBopauBaTb B noJoxHe «Bkn.» (noJoxHe I).
BkIoueHne KOlechoro npNBOda
- YctahOBuTe aKKyMnyTOp.
2.ПрижмITEpyKOTkypbIyarapeKIOUeHnpepea(15/1)KnappaBIAOSei pyKoTKe(15/2)(15/a)u ydeXnBaIte.PyKoTka pIyarapeKIOUeHnpeJaueHeФИКСИPyETcra.
BbIKIIOyeHne KOJecHOro npNBoDa
- OTnyctnte pykoTky pbiura nepeKluoyehnnepea. OHa abTomatueckn BepHeTcB nCXoHoe noIooKeHne.
7.8 KonechbI npBOD - CMeHa ckOpocTn (16)*
^* 8 3aBucumocmu om Modenu, CM. UHcmpykuuno MOHmaxky.
Для рулроваяня скорости DBижehня ra30HOKocnKN B cnCTeme ynpaBneHЯ DoCTynHbI Cockpit 7 ypOBHe.пeped этUM коессь npINBOДdoJIЖeH HaxODITbcR B BBIKHQUeHHOM COCTOJAHN, CM. zana 7.7 "BKnIOUeHue u bIKHQUeHue Konechozo npueoda (15)*, Cmp. 418.
- BkIouHte cncTemy ynpaBHeHnra Cockpit (cm. 2naea 6.4 "BkIouHeHue u ebIKIOueHue cu-cmembl ynpaBHeHnra Cockpit*, Cmp. 415).
- UTo6bI CHN3NTb CkOPOCTb: HaxMMTe KHOJky «MnHyc» (16/1). Nnu:
- YTo6bI yBEnuHTb CKOpOCTb: HaxMnte KHONKy《NIOc》(16/2).
7.9 BkIIOueHne N BbIKIOueHne peXnMa ECO (16)*
^* E 3aBucumocmu om Modenu, CM. UHcmpykuu no MOhmaxy.
B pexime ECO ckopocb TBnrgateTn CHnxaeTc. 3TO n03BOJAE TnpoDnITb BpeM pa6Otbl aKkMyIaTOPa.
1. BkIIOUHTe cncTemy ynpabHeHnra Cockpit (cM. 2na6a 6.4 "BkIOueHue u ebIKIOueHue cu-cmembI ynpabHeHnra Cockpit*, Cmp. 415).
2. UTo6bI BKNIOUHTb peXmE CCO: Haxmnte KhoNky «Eco-Mode» (16/3). Khonka 3arOpntCra.
3. YTo6bI BbIKIOUHTb peKIM ECO: ChOba Ha- KMMTe KONky «Eco-Mode». KONka norac- Het.
8 YKA3AHNIO 3KCNJYATAUIN
Co6IIOaIte yka3aHnno TeXnke 6e3oNaCHOCTN!
R PnmueyHne Co6JIOdaTe MeCTHbIe npedncaHnOTHOCHTeNbHO NcNoB3OBaHnra- 3OHOKOJIKN.
O6paTHe BHMaHne Ha npeDMeTbI B TpaBe u ydaJIte n3 pa6oey 3OHbl.
Kocnte ToIbko npx XopoWe m OcBeuHn.
Kocnte TOnbko OctpbIM HOXOM.
Unpabnayte yctpoiCTBOM TOnbKO Ha Hapabnauoju pykOaTke.
IepeMeaTe yctpoNCTBO TOnbKO B npory
Bcerda nepemeaute yctpoictBO nonepek cknOHa. He nepemeaute ra3oHokocnky Bn3 n BBepx no cknohy, a TaKke Ha cKnohax c yrnom 6oJee 10^ . Co6IouaTe oc6yU o- ctopoxhoctb npu n3MeHeHH pa6oery HapabNeHna.
Pexyuza cnocoboctb nI np cpoK cnjx6bl aKKymyTopoB
Pexyua cnoc6HocTb nnnn pioaad, KOtopa moKet 6bItb cKOWeHa, 3aBncrT OT xaPakTepcntk ra3oHa. Ha pekyuO cnoc6HOCTb BInraHOT TaKe NaKTopbl, KaK dInHa TpaBbl, PNOTHOCb TpaBbl, BbIbpaHHa BbICota Cpe3a N BlaxHoCTb Ra3oHa.
OttmaJIbHOe Bpempa60TbI DOCTnraetc 3a CHT qACTORO KOWeHnN I, CNeIOBaTeJbHo, NOdepKahn Hn3KoB BBICOTbI Ra3OHa.
Yactoe BKNIOUeHne N BbIKIOUeHne Ra3OHOKOCNIKBO BpEMKoUeHnRAkKe yMeHbShaetpeKyUyO CNOco6HOCTb, KaN He NOJHOCTb03apXeHHbAKKYMJIATOP.
BkIIOueHHe npIBOda KOJec yMeHbuaeT peKyuCnOCo6HOCTb N CpOK cnYk6bl aKKMyJIaTopa.
TO6bI ONTUMN3HPOBaTb peKyUIO cnocO6-HOCTB,peKOMeHNyEM qacto KocNTb ra3OH,yCTaHaBnBA Tb BlicOTy Cpe3a N nepMeuTaYb YCTPOINCTBO BNPOrYIOuHOM TEMNE.
R PnmuMeUHHe UTo6bI npOAnITb cpoK cnYx6bI, MoXHo npNo6peCTn DOONHTeNbHbI aKKMyJrTOp.
COBeTbI NO KOWeHnIO
BbICota Cpe3a TpaBbl OCTaETcH Ha ypOBHe 3-5cm, He BblIOJIHnIe KOUeHne Ha ypOBHe, KOTOpBn IpeBbIaet NOLOBHy OT 3TOrO 3HaueHn.
He neperpykaite ra3oHokocnky! B cnyuae IINHHO IN TJeKOITpaBbI cactota Bpaue-HN 3aMeTHO CHXKaETcR, BbICOTbI Cpe3a TpaBbI NOBbIaETCr IN PpHXoDNTcR KOCNTb HeCKOJIbKO pa3.
Betepe n coHne Moryr BbicyuHTb ra3OH noCJIe Kooehn, NO3TOMy KOcIte B KOHcE DHA.
9 TEXOBCLNYKINBAHNE N YXOД
I PENEYNPEXDEHNE! Onacnoctb nope3OB. Onacnoctb nope3OB npn KOHTaKTe C OCTpbIM N DBNkUyMmCRA DeTaNMy UcTPOJCTBa I peKyuSMM INCHTpymeHTOM.
Bcerda BbIKHouaTe yCTpoiCTBO Do TexHHueCKoro N cepBnCHoro 06CnyXnBaHNr N O-uctkn. CHIMTE aKKyMylTOp.
Bcerda Hocnte 3aunTHbIe nepuATkn BO BpeMraTexHnueckoro OBCnyKuBaHn, yXoJa nOyNCTKn.
9.1 Perynephe pa6oTbI no texobcnyXnBaHnIO
Y6eHNTecb, YTO BCE rAikn, 6oNTbl N BnHTbl IIOTHO 3aTMyTbI, a yCTpOJCTBO HAXoDITcB B 6e3oNaCHOM paOoyem COCTOAHIN.
Perynapno npOBepa pa6oTocnoc6Hocb Hn3HOC TpaBOc6OpHnka.
9.2 OuInCTka yCTpoiCTBa N KocnJIbHOro MExaHN3Ma
BHIMAHNE! OnachocTb BCNeIcTBnne nonaDaHnBaOdbI. IOnaHaHne BoDbI B yCTpOiCTBOMOxET npNBecTN K KOpOTKOMy 3AmbIkaHNIO nIOBpeXdEHHo 3JIeKTPnueckNX KOMNoHETOB.
He paCbIJaTe Ha yCTpoCTBO BODy;
IcnoB3ynteJnOuNCTKNUCKJIHOHTeJIbHO 电TKCpyKoNJTNpIKY.
1.OctaHOBNTe DBnraTeJIb.
2.ДocTaHbTe aKKyMnyTOpbl.
3. CHIMNTE TpaBoc6OpHnK.
4. HakoHte yctpoCTBO N OCHNTe KocnIbHbIMexAHN3M.
9.3ПоберкиЗамеHa HOxa
PPEyPPEXDEHNE! Cepbe3HbIe TpaB-Mbl OT DnKxxCa DeTaneH HOxA. N3HOWeHbI, NOTpeCKaBmncrNIO NOBpeXdeHHbI HOX MOKeT cNoMaTbCra, a erO DetanMOryt CTaTb O-nachbIMn ChapdAmn.
Perynapno npOBepaTe HOx Ha npEmdT noBpeKdHIn.
He nCnoB3yIte ra3oHOKocnky,ecJIN HOK N3HOwe HJN NOBpeXDeH.
3ataaHBatb Hn 3ameHrT tynoi nn NOBpeKdHHbI HOK pa3peWaeTc TOnbKO pa60TNHKam cepBnCHOrO ueHtpa AL-KO nn aTOpU3OBaHHoro dJIepa.
YTo6bI n36ExKaTb Bn6paUH, HOX NHOKeBOB BnHT BcERda Heo6xOJMo 3aMeHrTb Bmecte.
Ipe3aTaunBaembH OXdoJxKeH 6bITb c6a- nHaHcnpoBaH.Pa36aHaHCnpoBka HOxMa MoKet npuBeCTN K CnIbHO Bn6paCmN NOBpeXeHnU yCTPOINCTBa.
9.4 PerynnpoBka 6oydeHOBCKoro Tpoca KOlechoro npNbOda (17)
Co BpemeHem 6oydeHOBCKn Tpoc KOJecHOro npBODa pactaRnBaetc. Ecn npaPabotao- uem Dniratene He BKIOUaETcK OJecHbI npBOD,3TO O3HauaeT,HTO 6oydeHOBCKn Tpoc CTan CnIWkOM DnINHHbIM n eHOeOxOdmo HaTAYtB.
OCTOPOXHO! OnachocTb TpaBMnpoBaHna.Двикушиеся DeTaII N DeTaII C OcTpblMKnpaAMN (HaNPIMeP, HOK), a TaKKe BHe3aHNO npBVeDEHHa B DvIXKeHne Ra3OHOKOCUJIka, MOryT npNBecTI K TpaBMam.
Perynpye Topmo3HOn Tpoc ToIbKO npn BbIKHouEHOM DIBraTeJe HEnoDBrXHOM KOCINbHOM MExaHN3Me.
- OTKJIIOUHTe NITaHne u n3BNeKInTe aKKMyJnTOp (cM. 2IaBa 6.3 "BKnIOueHue u 6bIKIOueHue nUmAHua KocunbHOzO MexaHu3Ma (06) ", Cmp. 415).
2.Повернite рergyларову деталь (17/1) Na boуденOBСКOM TPOCE (17/2)В habралпи CTpeJIKN,Т.е.npoTINB YacOBОN CTpeIKN, noka boуденOBСКИ TPOC He bdyET HATry MExJy pyKoTkoI pbIuara nepeKlnOчЕнЯ NepeJaU (17/3)иToUKOfФИKcaUIN (17/4). - Yo6bI npOBepntb HaTaeKeHne 6oydeHOBCKO-TO TPOCA: BKIOHTe yCTPOiCTBO, 3aNyCTnTe DBURAteIb I NONbITaIyTEcB BKIOHTb KOJecHbI pINBOd.
- Ecni KJIeChbI npuBOJ He BkJIouyaeTc: NOBTOPe IpeDbIyUne WArN.
Ecn He ydaocb OTPerynipoBaTb 6oydeHOBCKn Tpoc: o6paTntecb B cepBnchbl ueHTp n3rTOBNTeJIa.
9.5 PemOHThbIe pa6oTbI
PNEyPExEHE!OnacHocTb TpaB-MnpOBaHn BO BpempeMOHTbIX pa6OT.HeHaJIeXaIpupeMOHT MoKET npINBeCTN K cepbe3-HbIM TpaBMam NIOBpeXdeHIO yCTpoiCTBa.
IpoBedeHne pemOHThbIX pa60 pa3peWaaTcra TOnbKO cepBnCHbIM ceHTpam npOn3BOiTeJIaNJn aBTOpN3OBaHHbIM CneUaJIN3INOBaHHbIM KOMNaHnA!
B HnKepeuNCHeHHbIX cIyuaX cIeMyET o6paTITbc8 B cepBnCHbI ueHTp N3rOToBnteJIa:
DnBraTeIb 6oIbIe He 3aynckaETc.
yctpoictBO HaexaIHO Ha npEIMeT.
HOXN (INN) BAN DBNrAteJe N3OrHyTbI.
yctpoiCTBO Bn6pnpyeT n He pa6oTaet c nepe6oMn.
yTeUka IINI NOBpeJdeHne aKKymyTopa.
9.6 INTepeic USB (18)
HHTeppeic USB (18/1) DocTypeH Ha Bcex ra30-HOKOJIkax, ONIcaHHbIX B DaHHOM pyKOBOdCTBe NO 3KcIIpyatauH, HO OH npEHa3HaueH ToIbKOДЯ obHOBHeHnI pOrpamMHorO oEeNeHnHa INTeJIKeTMyaIbHbIX ra3OHokOciKax. Ero HeIb3a IcNoJIb3OBaTb DnI 3apJKn aKKyMylrTo-pa.
BHIMAHNE! Onacnoctb noBpeXdeHn y-CTpOyCTBa. B cnyae nokloueHn K nHTep-phiency USB moNlbhix yCTpoiCTB C aKKymJr-Topamn (HaPmEp, cMapTFOHOB) cyueCTByeT pNCK IN NOBpeXdeHn.
He nodknouaTe K 3ToMy nHTeppecy Mo-6nIbHbIe yCTpoiCTBa c aKKyMnyTOpom.
10 YCTPAHEHNE HENCPABHOCTEIN
OCTOPOXHO! OnachocTb TpaBMnpoBaHn.ДВИЖУПЕСЯЧТи N DeТАЛС OCTpbIMKpaAMMOrT npVBecTи K TpaBMam.
Bcerda Hocnte 3aunTHbIe nepuATKn BO BpeMraTexHnueckoro o6cnyKnBaHn, yXoJa n O-uctkn!
HINPMEYAHNE B cIyue Bo3HnKHOBENH HeNCnpaBHOCTe, KOToPbIe He yka3aHbI B DaHHoT a6JIuCe nJIc C KOTOpbIMN Bbl He MoKeTe CnpaBnTbcra CamOCToRrTeNbHO, O6paUaITeCb BHaUy cepBnCHyIO cIyX6y.
AkkymyIaTopbI 6aTapeuKMOxHO 6ecPiNaTHO CdaTb B cNeDyUoX MeCTax:
TocydapctBeHHa cnj6a no ytnn3aun nn nyHKt c6opa (HaNPmep, MyHnuaIbHbie CKnaDb)
Mara3nHb6aTaapeek n aKKyMnyTOpOB
IyHKtbl npHema o6uei cnCTembl BO3BpaTa NCNoJIb3OBAHHbIX 6aTapeek yCTpoIcTB
IpyHKtbl npnema n3rOToBnteTne (ecnn OH He YBJIaETcYJIeHOM ObBeaINHeHHoN CNTeMbI BO3Bpata)
3TN 3aBHeHn DaNCTBnTeNbHbToNtBko DnA kKymyIaTOPOB N6aTapei, KOTopbie npOdaIOTCB
ctpaHax Ebponeckoro Co103a n COOTBETCTBYOT DnpeKtIbe 2006/66/EC. B cTpaHax 3a npedeMaMn Ebponeckoro Co103a MOyT DeNCTBOBaTb Dpyrne npabnla, kacaUuuecra yTuIn3aun 6aTapei n aKKymyJrTOPOB.
14 CEPBnCHOE OBCJyKINBAHNE
Ecni y Bac ecTb BOpocbl OTHOCNTBHO rapaHTn, peMOHTa nIN 3anachbIX qacteIN, o6paTnTEcB B 6JInxKaIshn cepBnchbl ueHtp AL-KO. AApdec MOxHo hAIITN B INHTepHeTe NO cNeDyUoMeMy aDpecy:
www.al-ko.com/service-contacts
15 TAPAHTIN
MbI yCTpaHReM BO3MOXHbIe DepeKtbl MaTePnaIOB nII npOn3BOJcTBA B TeueHne Cpoka DaBHocTN, yCTaHOBJIeHHoro 3aKOHOM B OTHOWeHn peKnamaun No KaYeCTBy, nyTeM peMOHTa nII 3aMeHbI n3DeJIy. CpOK DAHOCr ONpeDEnraTcra KOHOJaTeNbCTBOM CTpaHbI, B KOTOpO bblno npNo6peTeHo y-CTPOINCTBO.
Hahe rapaHTnHoe o63aTeNbCTBO deiCTBnteJb- rapaHTn aHHyInpyeTc npn:
HO TOJIbKO pN:
CobIIOdaIte daHHoe pyKOBOcTBO no 3Kcnnyatau
cAmOCToTeJIbHbIXNONbITKaXpeMOHTa;
CAMOCTOReTEnbHbIXTEXHNueCKNXN3MeHeHnX;
ICNPOJB3OBAHHHeNoHa3HaueHIO.
Haadnejkaaem o6paueHn;
NcNoJIb3OBaHnOpuHaJIbHbIX 3aNaChbIX Ya-CTeI.
TapaHTnHe pacnpocTpahreTcHa:
IOBpeKdEHHJNaKOKpaCOHOrO NOKpbITnBbI3BaHHbIe HOpMaJIbHbIM n3HOCOM;
n3HaunBaHounecyactn,0o3HaueHHbE B BeDOMOCTN 3aNaChbIX qacteyn paMKoXXXXXX (X).
IapaHTnHbI cPOk HaunHaTcN pOcJIe NOKyIKN NEpBBIM KOHeuHbIM NOJb3OBaTeJIeM. OnpedeJIIOUIM
ΦaKTopoM cIyXHT dAta Ha DoKymHe, NODTBepxJaIOUeM NOKynKy. ObpaaaiTeCb C HAcToaUM
cepTnΦnKaTOM n DOKyMeHToM, NODTBepxJaIOUeM NOKynKy, K CBOeMy DInIepy INN B 6bnKaIshn AB-
TOPn3OBaHHbI cepBnCHbI CEHTp. HAcToaIeN cepTnΦnKaT He KacaETcR rapaHTnpyeMbIX 3aKOHOM
npab Ha npTeH3nn NOKyNaTeJI K npOdaBuY.
IPEKJIAD OPINIHJY NOCIBHnKA 3 EKCIIyATAUII
3mict
1 Oco6nbi npabuIa texhki 6e3nekn ....427
2IhOpMaui npo noci6HnK i3 ekcnnyatauii 427
2.1 CnMBOJn Ha TntTybHi cToPiHci 427
2.2 yMOBHI NO3HaueHHa Ta CnHaNbHi cNoBa 427
3Onnc npuctpo 427
3.1 BnKOpncTaHHa npn3HaueHHaM 428
3.2 MoxJIuBe nepeIb6aueHe BnKOpncTaH Hr 428
3.3 3aIIuKoBi pU3nKn 428
3.4 3anobixkhi Ta 3axnchi eJeMeHTn ....428
3.5 YMOBHI no3HaueHHa npncTpoi..... 428
3.5.1MiTkn6e3neKn 428
3.5.2 Cnmboln ekcnnyaTauii 429
3.6OrnAnBnpo6iB 429
3.6.1OrnBvpo6y(01)-AL-KO 429
3.6.2OrnBvpo6y(02)-solo BiAL-KO 430
3.7 KomnneKT noctabkn 430
3.8ДодаТOK «AL-KO inTOUCH Smart Garden»* 430
3.9 BaratofoyHKioHaJIbHa KhoNka (03)*.. 430
3.9.1 IIndkaia cTaHy 3apAkn 431
3.9.2 BCTaHOBJIeHHa 3'EDHaHHa mix ra-30HOKocapKOIO AL-KO Smart Cloud 431
3.9.3 AKTINByBAtn Iii B «Smart Home»/«Smart Garden» (IFTTT) 432
3.9.4 AKTINByBaTn Ra3OHOKocapKy* 432
3.9.5 CkHyTn im' Ta napoJIb 6e3dpoToBOoi Mepeksi* 432
3.10 Cnctema ynpabJIHHra «maxRun &smart-drive» -Cockpit (04)* 432
4ПравILA texhikn 6e3nekn 433
4.1ПравILA texHika 6e3nekn dnyra30-Hokocapok .433
4.1.1 HauHHa 433
4.1.2 IidroToBvI 3axoN 433
4.1.3 KopncTyBaHH npncTpoem 433
4.1.4 Texhichne o6cnyroByBaHHra Ta 36epirAHn
4.2 Bi6paizIHe HabaHTaKeHHra. 434
4.3 AkyctUnHe HaBaHTaKeHHra. 435
4.4Правидахнicken6e3neknдяakymлаятopaизарdHoropnictpoi.....435
5 MoHTax 435
6 BBeDeHHB eKcnnyTauiio. 435
6.1 3apäπiTb akymyIaTOp... .435
6.2 BcTaHOBJIeHHa Ta BnIMaHHa aKymy- JIaTopa (05) 435
6.3 YbIMKHeHHa Ta BmKHeHHa XnBJIeHHa KocnIbHoro MexaHi3My (06) 435
6.4 YbIMKHeHHa Ta BmKHeHHa CnCTeMnypaBlinHra Cockpit* 436
7 Eknpnyataua 436
7.1 HanaHTyBaHHBnCOTn 3pi3y (07) ....436
7.2 KocHHa 3 TpaBO36ipHnKOM (08, 09)...436
7.3 MylbUyBaHHa 3a DonomoroIO KInHa DnMyIbUyBaHHa (10, 11)* .437
7.4 CkoUyBaHHa 3 6iUHM po3BaHTaXeHNm (12)* .437
7.5 PerynIOBaHHaHnPmHOi 6aIKN BiIIOBIDHO do 3poCTy KopncTyBaHa (13)* .438
7.6 3anyck Ta 3yynHka KocnIbHoro Me- xahi3my (14). 438
7.7 YbIMKHeHHa Ta BImKHeHHa KOiICHO npNbOda (15)* 438
7.8 Konichi npBOD 3MiHa WbNko- cti (16) 438
7.9 YbIMKHeHH Ta BmKHeHH pexmy ECO (16) 439
8Bka3iBkn 3 BnKOpncTaHHra. .439
9 Texhiuhe obcnyroByaHHra Ta dOrnla.439
9.1 PeriodynHi pOboTu 3 TexHiuHoro o6CnyroByBaHHa 439
9.2 OuHHeHH npIcTpoTo Ta KocnJIbHoro MexaHi3My... 440
9.3 IpebeBipka Ta 3aMiHa HoXa. 440
9.4 HanaTsyBaHHa 6oydeHicBcKoro Tpo- ca konichoro npuBoy (17) 440
9.5 PemOHTHi po6oTu 440
9.6 IHTeppec USB (18) 440
10 YcyHeHH HeCnpaBHOCTe 441
11 TpahcnopTyBaHHra 442
11.1 TpahcnopTyBaHH npncTroio 442
11.2 TpaHcnpTyBaHHaKymyIaTopa.....443
12 36epirahnna 443
12.1 36epirahnna akymyIaTOpHoI ra3oHo-Kocapkn 443
12.2 36epirahnny akymyIaTopa Ta 3apJHoro npncTroIO....444
13 Ytuniaui 444
14 Cepbiche o6cnyroByaHH 445
15Fapantia. 445
1 OCOBJNBI INPABUNA TEXHIKNBE3NEKN
Ley npncptiH ne npn3haueHn dIy BnKOpNCtAH Hn DiTbMn y BiCi Do 8 pOKIB Ta OcO6aMn 3 O6Me-KeHmN f3NCHMn BiDyTTaMn YN PO3ymOBUM 3Di6HOCTaMn, a TAKoK 6e3 HaneXHoR OocBidy Ta 3HaHb, KpIM BnnaDkIB, kUIO BOHN 3HaxOJaTBcR niHrAdom OcO6n, BiNObiDaJIbHOi 3aixHO 6e3NeKy, a60 npoiuIn IHcTpkyTak 3 ekCnpyatauii npncptpo. DITAM 3a6bOpHeNo 6abNTncs 3 npncptoem. DIy 3a6bOpHeNo OOnuAtn i BnKOHyBatn 06cnyroByBaHHra 6e3 HaJMyd.
Oco6n 3 dyxke cnIbHmN i cKnadHmN o6MeXeHNrMn TAKoK NOBHHi 6yTu O3HaNoMJIeHi 3 ONncaHMMn TyT IHCTpykciJMy.
2 IHΦOPMAUJI IPO NOCI6HNIK I3 EKCPIYATAUII
Himeczka Bepcia miCTnTB opurihalbHn noC6nK i3 ekcnnyatauii. Bci iHsi MOBHi BepciI 1e nepeknaOpurihalbHoro noci6nka 3 ekcnnyatauii.
3aBXn TpImaTe uei nocibnk i3 ekcnnyatauiPi pyko,io6 npouHTaNoro,kaoBam 3naOobTbca iHopmaia npnpctpi.
IpepaBaiTe npncTpi iHsIM oco6am TiNbKn pa30m 3 cIMNoci6HnKOM i3 ekcnnyatauii.
IpouHTaTe Ta DOTpMuyTEcBkazIBOK 3 texhikn 6e3neKn Ta nonepedKeHb, 0o MiTAYBCB YbOMy Noci6Hnky 3 ekcnnyataii.
2.1 CnmbonHa TntybnHi CTopinci
yMOBHe n03ha- qHH
3haueHH

O6OB'3KOBO npoHTaTe uei noC6HnK i3 ekcnpyatauii nepeB BBeDeHHrM B eKcnnyatauio. Lc e He06xIDHOIO yMOBOIO 6e3neuHOI Ta 6e3BiIMOBHOI pObToN.

Посibнк 3 ekcnnyataць
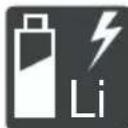
ObepeKHO NOBODbTeC3 3iTi-iOHnHMn aKymyTOpamn! 3okpema,doTPmMyTEcI IHCTpyKuI 3 TpaHcnoptyBaHHN, 36epirAHnTa yTuNi3auiB VcbOMy Noci6Hky 3 ekcnnyataui!
2.2 YMOBHnO3HaueHH Ta CnHnBHi CIOBa
HE6E3NEKA! Bka3ye Ha He6e3neHy cnTy-aizio, kka, kkuo II He yHnKHyTN, npn3BOOnTb Do Cmepti a60 cepno3Hx TpaBM.
NONEPEDXEHH!Bka3yeHa noTeHciHo He6e3neuHy cHTyaCiIO,Ia,KIO II He yHNKHyTN MOKe npn3BeCTn Do Cmepti a6o cepno3Hx TpaM.
OBEPEXHO! Bka3ye Ha noTeHciHo He-6e3neuHy cnTuayi,ЯKa,ЯKIo II He yHnKHyTu, MoKe npN3BecTn TpaBMyBaHHaJeKoTa cepeHbOIT TaKKOCTi.
YBAGA! Bka3ye Ha cnTyauciIO, kka, kkuo II He yHnKHyTN, MoKe npN3BeCTN Do MaHOBOrO 36NTKy.
HINPIMITKA CneuaJIbHi Bka3IBKn dIra Kpa- uOro po3ymHH Ta noJereHH po6OTn.
3 OINC INPNCPOHO
LcH Noci6HnK 3 ekCnIyatauicMiCTb ONc pi3Hnx MoJeNe pyuHnx akymyTOpHnx ra3oHOKocapok Mapok AL-KO i solo BiD AL-KO B pi3Hnx KOMnKeTcaixx. KomnKeTauic Okpemnx MoJeN npedctaBHeHi B TexHiHnx XapaKTepncTkax KePbHnU TBA 3i BcTaHOBHeHH.
Pnncptpi CnD BnKOpNCTOBvBaTn TINbKn pa3oM 3 nii-iOHHmN aKymyIaTOpamN i 3apAHNm npnCTpOMN, 3a3NaHeHmN BTexHiHx XapaKepepnctkax. DOnaTKoBI BiOMocTi npo akymyIaTOp i 3apAHNn pncptpi DN.B. B OKpeMNX IHCTpyKcJx:
He 3actocobyetbcB. BnKOpncTOby-etbc TINbKn dIe eNktpokocapok.
He6e3neKa ypaXeHHra eJekTpnuHm ctpymOM y pa3i noKoJxehnHa MepeXeBOrO ka6eIIO!
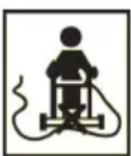
He 3actocobyctbca. BukopncTOByeTbc TINbKn dIra eNekTpOKocapok.
TpmaTe MepeXeBn Ka6enb no-dani BiD pixyoro IHcTpyMeHTa Ta He HaixkJaTe Ha Hboro!

Ipeed BnKoHaHHa m po6it 3 texhiHoro o6cnyroByBaHH np6epiB npucpii dna deakTbauii!
3.5.2 CmboJn ekcnjyaTauii
CnmboJ 3HaueHHa
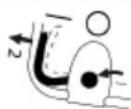
Heo6xidi iI dIy ncy dyBnryHa (iVB. po3di 7.6 "3anyck ma 3ynuHa Ka KocunbHOzO MexaHi3My (14)," cmopiHka 438)
CNMBON3HaueHH

KuO 6nHaHHe BkOpncToBcBbIMtB 3aNo6xHn KIOU Ta 3HIMt bakymyIaTOp 3 npucpo.
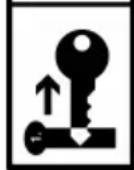
3.6 OrlaBn Bnpo6ib
3.6.1OrnayBnpo6y(01)-AL-KO
Homep
KOMNOHEHTa
1* BaratoyHKcioHaJIbHa KHONKa
2 AkymyIaTOPnBiDcIK
3 3aOK-BMnKau i3 3ano6iXHM KJIOyem
4 BiDcik dny akymyIaTOpiB 1 i 2
BidknHa HanpMa H6aKa, 0cKnaJaetcb3:
5 Bepxna nonepuHa
6 HxHn nonepuHa
7 Raikn-6apauci (2 oD.)
8 CnCTema ynpabniHna «maxRun &smart-drive» -Cockpit
9*PykoTka BaxeJn nepemKanHn nepeDaay nla KOniChoro npNbOda
10 3an06ixHa cko6a
11 KhoNka «Nyck»
12 IhDnKaTOp pIBHr HAnOBHeHHr
13 TpaBo36ipHnK
14PyuKa-tpImaT TpaBO36ipHnKa
15 L'entpaIbHe peryIIOBaHHB BUCOTn 3pi3y
16 3acniHka 6iUHoro po3BaHTaxeHHra
17 Pēpečný pyčka dě na nepeheceHHa*
18 AkymyIaTOp (1 oI. a6o 2 oI.)
19 3apdHn npucTpi
3.6.2 OrlaBvpo6y (02) - solo BiA L-KO
4.2 Bi6paiziHe HabaHTaXeHHA
He6e3neka uepe3 Bi6paquio
Фakmuhe 3HaenHb i6pauiuHoi emici nD
yac bukopucmaHH npucmpo MOKe bip3-HmucBid 3aeneHO2 BupobHKOM 3Ha-ueHH. CnoctepiraTe 3a HabeJeHmN HJK-ue fakTopAMn BnNBy Do a6o niD yac BuKOpNCtAHH:
Yn BnKOpNCToByeTbcra npncTpim 3a npn-3HaueHHm?
Yn MaTepiAoi po3pi3aHni a6o o6po6neHn npaBnJIbHo?
U npictpi nepe6ybae B po6oomy ctaHi?
YnpabnIbHO 3aOcTpEHn a6o BCTaHOBJIeHN pI3aIbHN IHCTpymEnT?
Yn BCTaHOBJIeHI KPOHSTeHNI i, JAKUO NOTPI6HO,doataKOBi Bi6pauiHi pyuKn,i YN IIbHO BOHN 3'EDHaHI 3 npNCtpoem?
EkCnIpyaTyIe npIcTpi TINbK3 uactoTOO O6epTaHnB DnRgamma, Heo6xIDHO DnRA BnKOHaHHa OKpeMoI pOBoTI. YnKaIte MaKcMaJIbHOJ UAcTOTN O6epTaHn, 0o6 3HN3NTPiBeHb Wumy I Bi6paui.
Yepe3 HnpaBnIbHy ekCnIpyataciIO taTexHicHe 06cIyroBvBaHHaI yM i Bi6paia npICTPOU MoKByiDnUIuNTncs. Lc 3aBdae ShKOIN 3dOpOB'IO JIoDHN. Y TaKx BnPaIckx HeraInHO BmKHiTb npNCtpi i 3BepHiTc8 3a NOro peMOHTOM B aBTOpN3OBaHni cepBicnI cHTp.
CTyInb Bi6pauiHoro HabaHTaxeHHra3aneKINb BiD BnKOHyBaHOi po6OTn a6o BnKOpNCTAHNNI pncTPO. OciHt i BcTAHOBITb BiNDiHi nepeBn Bpo6Ot. B pezylbTaTI bi-6pauiHe HabaHTaxeHH npOTrOM BCbOTo po6OHorO yAcy 6yde 3HaUHO 3HNKeHo.
Tpmbana ekcnnyataia npnctroo napaxae onepatopa Ha Bi6paui i moxe BnknkaTu np6lemn 3 KPOBOO6irom (CmNTOM «6iNOro nalbura').Uo6 3meHunTu ue pn3NK, Hocitb pykabuizi Ta Tpmaite pkyB Te nn. Y pa3i BnABHeHHa CmNTOMy «6iNOro NaIbca» HeraH0 3BepHITbcrdo Iikapr. Do uix CmNTOMIB HaIeXaTB: OHIMHHa, BTPaTa yUTNbOCtI, NOKOIUBAHn, CBeP6IX, 6Jb, cna6KiCTb, 3MiHa KOblopy afo cTahy shkpri. 3a3Bnuay ci CmNTOMn BVIIINBAIOTh Ha naIbci, pyKn abo nyIbc. 3a Hn3bKx Tempepatypn3NK 3po-ctae.
Poib nb iad yac pooboro dHr trpbani nepeBn, 0o6 BiDnoHTN BiD wmy i Biopaui. IlnaHyTe cBOIO po6Oy TaK, 0o6 po3dIInTu ekCnlyatauio npucTPOIB, kci CTBOPIOtB cnIbHi Biopaui, Ha KINbKa DnIB.
KU Bo Bn BiDyBaTe DnCKOMpOr a6o KU Bo Hnkae DnCxPOMia Wkipn NiJ Yac BnKOpNCTAHH npNCtpoB pykax, HeraHNo npnnHITb po60Ty. BcTaHOBItb DoCTaTHi nepePBn Bpo60Ti. Po60Ta 6e3 DoCTaTHix nepePB MoKe npn3BeCtn Do MicceBoi Bi6pauiHoi XbOp6n
Minimi3yTe pN3NK BnNBy Bi6paqii. BnKohnyTe o6cnyroBvBaHH npncTroIO BiINOBIHO do IHCTpykui B noci6Hky 3 ekcnnyatauii.
Ko oBnHaHn BnKOpNCTOBycTaCTo, 3BepHiTbcrdoDnIepa,O6 npndaTu aHTN-Bi6pauiHi akcecyapn (HanpNKlaD,pyKn).
YHnKaItepoBOTN3PnucTPOcM3aTeMnepa-TypuHHXue 10^ YnJIaHIpoBOTNB3Ha-HTe,AKMOxHaOBmExKITNBipauiHeHaBaH-TaXKeHHJ.
4.3 Akcyctnue He hBaHTaXeHHr
DeaKoro akyctuHoro HabaHTaxeHHra, cnpnueHero zim npncTroem, He moXHa yHnKHyTu. BkoHyte uymHi poBOTu y BCTaHOBneHi i BN3HaueHi TepmiH. 3a notpe6n cnid BpaxoByBaTu Bka3iBKn UOdo «TnxNX roINH» i O6MeKyBaTu TPNBaJIcTB poBOTu HaibbH Heo6xIDHOU. Dna 3a6e3neHn OocNcTOrO 3axnCTy Ta 3axnCTy oci6, kI pepe6ybaOTb NO6n3y, Heo6xIDHO HOCNTn HabyuHNKN.
CKnpaHn:INB.KepiBnTBO3i BCTaHOBneHH.
PONEPEDKEHH! He6e3neka uepe3 He-NOBHN MOHTax! BnKOpncTaHn npNcTpo, 3-MOHTOBaHOrHe B NOBHOMy o6c3i, MoKe pN3BeCTn Do cepNo3Hx TpaBM.
Ipnctpii cnid BnKOpncTOByBaTu TiNbKn 3a yMOBn 3aBepWeHHa MOHTaKy B NOBHOMy o6cra3i!
BcTabnTe aKymyTOpN TiNbKn B nobHicTo 3i6paHn npncTp!
6 BBEDEHHB EKCNJYATAUIO
6.1 3apädɪt b akymyntop
8 NPMITKA DnB. DeTaIbHy iHΦopMaciIO B OKpeMnx noci6HnKax dIy aKymyTopa i 3apdHoro npicrpoio.
6.2 BCTaHOBJIeHH Ta BnMaHH aKymyIaTopa (05)
BnKOpNCToByIte ra3oHokocapKy 3a Bn6opom 3 oHIM a60 dBOMa akymyIaTOpAMn. Pid Yac BNKOpNCtAHNr DBOX akymyIaTOpIB icTOTHO 36iNb- WyeTbCra Yac po6OTn i B ToJ Xe Yac NIOUa CKoUyBaHHra.
Bn MoKeTe BnKOpNCToBvBaTu aKymJrTopu 3 pi3Hm pIBHeM 3ap4y.CnoaTky po3p4xJaTbcra aKymJrTop 3 BeNIkUM pIBHeM 3ap4y, NOKn HeDocRHe TOrO X pIBH3ap4y, Uo i npyrn aKymJrTop. Pic7y OTOO6nDbA aKymJrTopa po3p4xKaIObCp IBHomipHo.
YBAGA! He6e3neKa NOsKOJxHnA kymyIaTOpiB. JkUo nicra BnKOpNCtAHn 3aNnHTn AkyMylrTopn B npCtpo, BOHn MoKyb 6ytN NOnkoDxKeHi.
Bidpa3y nicra 3aBepweHnpo6oTn cnId BNTrN akymyJrTopn 3 npncptoI p03micTiB Ha 36epirAHn BytneHe Micce.
BctabnTn akymyIaTOPn B npncptpi CnID 6e3nocepEnHbO nepeD po6oToIO.
BcTaHOBJIeHHaKymyJrTopa
- BiDknHbTe KpnuKy aKymyTOpHOro BiDciKy (05/1) (05/a).
- BCTaBTe akymyIaTOp 3Bepxv B BiDcik (05/2)do 3auePHeHHa.
- 3akpnTe KpUkky aKymyIaTOpHoro BiDcIky.
BnMaHHaKymyIaTopa
- HatnchItb Ta yTpmyIte HaTnchHyToIO KhoNky po36loKyBaHHa akMyJrTopi.
- BnIMiTb akymyJrTop.
6.3 YbIMKHeHH Ta BmKHeHH XnBnEHH KocnIbHoro MexaHi3My (06)
Дя yBIMKHeHHЯ Ta BUMKHeHHЯ XNBHeHHЯ DBNHyHa KOCINbHOrO MExaHi3My BNKOpNCToBvIte 3aMOK-BUMKaay. 3aMK-BUMKaay npaIcE 3 aNo-6IXHM KInOyem.
NONEPEDXEHH! He6e3neKa TpaBMyBaHH. HecaHKioHOBaHe yBIMKHeHH MoKe npuBecTu Do cepNo3Hx TpaBM.
3aBxDi nepei neepBaMn Ta Texo6cnyroByBaHHaM: 06 BmKHyTu XnBJeHHa, NOBepHiTb 3aNo6ixHn KIOUy B NoJoxeHHa «BmK.》,a NOTIM BnIMtB Ioro.
YbIMKHeHHXnBJIeHHH
- BɪdɪkɪnɪbTe kɒpɪsʌkʊy aKʌymuŋaTɒpHɔrO bɪdciKy.
- BCTaBTe 3anobixhnn KJIIOU (06/1) B 3amOK-BnMnKaU (06/a).
- Поверпь заобійн КИОУВ NOLOJOKeHЯ «УВIMК.» (noLoJKeHЯ I) (06/b).Пися zuBOrO B DBuRyH KocnJIbHOro MExaHi3My NoUHe NOdaBaTUCЯ рoboya Hanpyra, npote BiH He noUHe npaцюВати.
- 3aKpNiTe KpIuKy aKymyIaTOpHOrO BiDciKy.
- YbIMKHeHHa KocnIbHOro MexaHi3My: INB. po3di 7.6 "3anyck ma 3ynuHa KocunbHo2o MexaHi3My (14)cmopinka 438.
BmKHeHH XnBJIeHH
- Поверніт b 3анобixни Клочь положеня «Вимк.» (паложеня 0) (06/c) i вийmitb (06/d).
- Bida3y nic7aBepWeHH np60Tu cnid BVnTn aKymyIaTOPn 3 npncTroO, 3apdntu Ta 36epiratno Ioro B 3axnueHomy BiD BnNBy Hn3bKnx TemnepaTy Micci. HactynHoro pa3y aKymyIaTOP cnID BCTabnTn B npncptpi 6e3- nOcepeDnbo nepeD BkOpNCtAHNM.
6.4 YbIMKHeHHa Ta BmKHeHHa CnCTeMn ynpaBniHra Cockpit*
- 3aJexHo Bid ModeJI, duB. KepieHuImeo 3i BCmaHOeJIeHHra.
YMoBa:BCTaBHeHnIrkMIHIMyM1akymyJrTop.
8 NPNIMTKA Jnra KINBHeHHcNCTeMn ynpab- nHnCockpit i konicHoro npBOda 3an6iHNkHn KnOu He Notpi6HO NOBepTaTb NNOXeHHa «YBMK.» (noNoxehn I).
IyBIMKHeHHcNCTeMn ynpaBnHnCockpit Hadaotbca Taki MOxJnBOcTi:
HaTnCHiTh Ha KhONkY yBIMKHeHHy/BUMKHeHHy (04/1) B cnCTemi ynpabJIHHa Cockpit.
Kopotko HaTnCiHbHa 6araToOpyHKcioHaJIbHy KHOIky (03/1).
CnCTema ynpablinHna Cockpit BMnkaetbcra ABTomatuHNo nIac 3anucy duBnurya KocnIbHoro Mexahi3My (nVB. po3din 7.6 "3a
nyck ma 3ynuHka KOCUJbHOzO MExaHi3My (14)cmopiHa 438).
7 EKCJIYATAUIA
NONEPEJXEHH! He6e3neKa TpaBMyBaanH! HecnpabHicb a6o BiCyTHicTb 3an06iKHNx Ta 3axnCHnx eJeMeHTIB MOKyTb npu3BeCTNu Do cepno3Hnx TpaBM.
Ipeed yBIMKHeHHm nepeBipTe HaaBHicThb i cyHKioHaJIbHicTh Bcix 3anO6iXnIX i 3axnc-Hnx npncTpoIB!
7.1 HanautyBaHHBncoTn 3pi3y (07)
OBEPEXHO! He6e3neka nopizib! He6e3neka nopizib y pa3i KOHTaKtpyk i3 npaiouHIM KocnIbHM MExaHi3MOM.
HanauToBvIe BnCOTy 3pi3y TiIbKn 3 BN-MKHeHIM DBNrHyOM i 3yNInHeHIM KOCINbHIM MExaHi3MOM.
1. 3nerka npntncihb (07/a) BaXjNb (07/1) H3oBhi i yTpmyTe, o6 po36JokyBatn noro.
BctaHOBJIeHHBCTaBKnIJa6iHoro po3BaHTaxKeHH
- BmKHeHn npucTroIO: NobepHiTb 3anobixHn KIOU B NOIOKeHHRA «BmK.» (NOIOKeHHA0) i BmMiTb.
- 3HIMITb TpaBO36ipHnK N BCTaBTE KINH INMyIbUyBaHHN, INB. PO3di7.3 "MylbUyBaHN Hra 3a DOIOMO2OIO KNUHa DnA MyIbUyBaHHN (10, 11)*", cmopIHka 437.
- Hatncihb po3yinHn BaxiNb (12/1) 3acnIHKn 6iHoro po3BaHTaXeHHr.
- BiDknHbTe 3acnHky 6iYHoro po3BaHTaXeHHra (12/2) (12/a) iYtpmMyIte II.
- BCTaBTe BCTaBky dIy 6iHoro po3BaHTaKeHH (12/3) (12/b).
- Nobinbno 3akpnTe 3acnHky 6iHoro po3BaHTaxKeHH (12/2). 3acnHka 6iHoro po3BaHTaXeHHraXuJaBCTaBky dna 6iHoro po3BaHTaxKeHH BID BnadaHH.
3HATTT BCTABKN Dn8 6iHORo po3BaHTaXeHHA
-
BnMKHeHH npucptpo: NobepHtB 3an06iX-Hn KIOU B NOIOKeHHA «BnMK.» (noIOKeHHa 0) i BNMItB.
-
BiDknHbTe 3acnHky 6iHoro po3BaHTaKeHHaI yTpmyte II.
- BnmiB BCTaBky dny 6iHoro po3BaHTaXeHN Hn 3akpnTe 3acniHKy 6iHoro po3BaHTaXeHHra.
- 3HIMITb KINH IJIa MyIbUyBaHHa N BCTaBTe TpaBO36ipHNK.
7.5 PerynobHHn HapmHoi 6aKn BiIOBIDHO Do 3poCTy KopncTyBaHa (13)*
-
3aIeJHo iD ModeJI, duB. KepeHuImeo 3i EcmahOBeHHe.
-
CknaiItb WbNdkopo3'emHi 3'eHaHHa (13/1) Ha wapHipnX 3'eHaHHax (13/2) (13/a).
- Поветашипапрмну бankу (13/3) садошарних 3'Еднань до Notpiбно ВисOTN (13/b).
- 3aunnntynte wBndkopo3'emHi 3'edHaHHa.
7.6 3anyck Ta 3yynHka KocnJbHoro MexaHi3My (14)
3anyckaTe KOcHbHm MexaHi3M TiJIbKn Ha pIBHni NOBepxHi, a He y Bucoki TpaBi. NOBepXHIO cnID OYNCHTn BiD CTOpOHIX npeDMeTIB, HApNIKnaI, KAmehIB. He niDiHIMATu Ta He HaxNJrTu npicTpri dNra 3anycky.
3anyck kocnIbHoro MexaH3My
1.Якwoи He HIOHO He cTANOc:YbIMKHiTB XNBJIeHHa (nB.po3di 6.3"YbIMKHeHHma EUMKHeHH JUBEHnK KOCUJbHO2O MExaHi3My(06)cmopIHka435).
2. HATnCHiTb KhoNkCy nycy (14/1) i yTpmyTe II B HATnCHyToMy NOIOKeHHI.
3.ПиТиСИТь(14/2)ЗanOбIxKHy cko6y (14/3)do HanpЯMHOI 6aJIKN (14/a).KocnIbHm mexaHi3M 3aNycKaεTbcra.
4. BiDnyctiB kHONky nyCKy, BOdHoc yTpmyIoun 3anobixkHy ckoby.
8 NPNMITKA 3aio6iXHa cKo6a He φikcyetb-cra. HanpymHy banky cnid miHc yTpmyBaTu npotrrom BcBOrn pOucey o6p6kn ra30Hy.
3ynnHka KocnIbHoro MexaHi3My
- BiDnyctiB 3anobixkHy ckoby.BoHa aBTomatNtUHO NOBepHeTbCBy B NOpaTKOBe NIOJoxeHn.
- Дочаимпеся поьови 3унинки Кослб Horo MexaHi3My.
- Bumkhitb xnbeneHn (nVB. po3di 6.3 "YeimKHeHH ma BumKHeHH JxueNeHH KocuNbHo2o MexaHi3My (06),cmopihka 435).
OBEPEXHO! He6e3neka nop1iB! He6e3neka nop1iB y pa3i KOHTaKtPy k i3 npauoUHM KocnblHm MexaHi3MOM.
Heo6xioHO Oouekatncn 3OBHO 3yHKn KocnIbHorO MexaHi3My.
Ipeed npoBeeHnM 6ydb-axnx po6it, nob'3aHnx i3 TexHiuHm o6cnyroByBaHHm Ta dOrJaOM: BumKhtb npncptpi i 3aueKaTe,doKN KocNbHm MexaH3M 3ynHHTbcr. BnIMtB 3anobixhnn KInoui akymyIaTOpn.
7.7 YbIMKHeHH Ta BmKHeHH KOJIICHO npB0da (15)*
- 3aJexHo Bid Modeni, du8. KepieHuImeo 3i EcmahOeJIeHHra.
Koicn npBOD moXHa 3aiaTn dna nepemi- uHHra30HOKocapKn MIX DbOMa pOboUHMN 30- HAMn a6o Do Micu 36epirAHn. YbIMKHeHHa KOcINbHOro MexaHi3My dna Uboro He Notpi6Ho.
R NPPIMTKAДяжИВлЕнгССТЕМУпав-ЛINHЯ Cockpit i KoJIICHO rPnBOda 3anO6iKHN KJIIOU He NOTPI6H NOBepTaTb N NOJIXeHHA «YBIMK.» (noJoxeHHa I).
YbIMKHeHHKoJIcHOrO npNbOda
- BctaHOBiBt akymyIaTOp.
2.ПиТИСИТБ pyKoTky BaKeJЯ nepeMnKaHnJa nepea(15/1)do HapPmHOi 6aNK (15/2) (15/a)iYtpuMyTe.PyKoTka BaKeJЯ nepeMnKaHHa nepeaue He φikcyetbcra.
BmKHeHH KOnichoro npNbOda
- BiДиCyTiB pyKoTky BaxKeIЯ nepeMnKaHnЯ nepeDauch.BoHa abTomaTuHNo nobepHeTbcr B noUaTKOBe nIoXKeHHra.
7.8 Konichny npBOD - 3MiHa WBNKoCTi (16)*
*3aJexHo Bid Modeni, duB. KepiBuumgo 3i BcmaHOeJIeHHr.
Для Perулованнашвидкостi pyxу ra3ohokocapknВсистemi упавлиня Cockpitdoctynhi 7 pibHIB.ПередцIMКOLICHNI npBOD nobINeH 3HaXOДNTUCY BUMKHeHOMy CTaHI,ДИB.po3diN 7.7"YbIMKHeHnma BumKHeHnKOnicHO2O npuboda(15)*,cmopihka438.
-
YbIMKHiTb CnCTeMy ynpaBniHna Cockpit (DnB. po3di 6.4 "YbIMKHeHHma BumKHeHHcucmemu ynpaBniHna Cockpit*,cmopinka 436).
-
Σo6 3Hn3ntu WbNdkicTb:HaTncHITb KhoNky «Mihyc» (16/1). A6o:
- Σοδ 36iNbWntu WbUdKicTb: HaTnchItb KHO- nky «Плс» (16/2).
7.9 YbIMKHeHH Ta BUMKHeHH pexmy ECO (16)*
- 3aJexKHO Bid Modeni, duB. KepiEhuUmeo 3i BCmaHo6JeHHra.
Y pexmi ECO wBnKicTb DnHyHa 3HnKyEcTbcra.
Le do3BoJre npoobxntu cac po60Tu akymyIa-Topa.
- YbIMKHiTb CnCTemy ynpabInHna Cockpit (nVB. po3di 6.4 "YbIMKHeHHma BumKHeHHcucmemu ynpabInHna Cockpit**,cmopinka 436).
- ξόδ yBIMKHyTn peχm ECO: HaTnchIb Kho-nkγ «Eco-Mode» (16/3). Khonka 3aropntbcra.
- Κοδ ВИМКHyТи ржIM ECO: 3HOBу haTnC-HITь KhoNkY «Eco-Mode». KhoNka 3rache.
8 BKA3IBKN 3 BUKOPNCTAHH
DotpmytepaBnTexhki6e3nekn!
9 PnIMtKA DoTpmyIeCb MicueBux npnnnciB 0do BVkOpNCTaHHra3OHOKocapKn.
Ipn6epitb i3 ra30Hy cTOpOHnI npeMeTu, kKi 3haxoJrTaBcB po6oHi 30Hi.
Kocitb tInbKn npx xopoWomy ocBtiJeHHI.
KociB tINbKN rOCTpIM HOXeM.
KepyBaTu npncTroeem cnid TinbKn TpMaHOuHcB 3a HnpanMHy 6aIky.
IpeemieHn npocpo no ra3ohy cnid 3diinchOBaTu y nobilbHomy temni.
Pnictpi 3aBxKn cPi nepemiuatn nonepeckxny. 3a6oponeHO BnKOpncTOByBaTn ra30Hokocapky Ha cxnax i3 haxnIom 6iNbwe 10^ a taKoJ npauOBaTn, pyxaOuNc b nTopy a6o Bn3. DToPmUyTeCb oO6nBOoi oBepekHoCTi nD qac 3miHn pobOOro HaprMky.
Pikyu3aTHicTb a6o TepmiH cIyX6n akymyIaTOPiB
Pikyu3aTHictb a6o nloua,ka Moke 6yTn cKoWeHa, 3aHexaTb BiX xapaKTepncTnKa30Hy. Ha pikyu 3aTHictb BnNBaOTb Taki KaTOpN, kU IIhHCTb TpaBn, BN6pHa BnCota 3pi3aHH Ta BOIoricr Ra30Hy.
OnTImaJIbHn Yac pOBoTu DoCraTaBc3a paxyHok YacToRo CkOuYBaHHa, a OTKe, nID- TpIMKn Hn3bKoI BNCOTn Ra3OHy.
UacTe BMnKaHH Ta BmNkAHHra3OHOKocapKnPiJ Yac KocHH TaKoX 3MeHwE pIXy-yy 3daTHicTb, kI HEnOBHicTIO 3apJxHeHn aKymyIaTOP.
YbIMKHeHH npBOby KOic 3MeHsye pixyUy 3daTHiCtb i TepMIn cnyx6n akymyIaTopa.
Ioo6 ONTm3yBaTu pixyuy 3daTHicTB, peKoMeHdyEmO yacto KocHTn Ra3OH, BCTaHOBJIIOBaTN BUCOTy 3pi3aHHra TApemiTaN npICtpiB NOBilbHomy Temni.
RnPIMITKA 6o6 npoobkntu Tepmin cnyx-6n, moXHa npi6aTn doatKOBn akymyIaTOp.
Iopadn 0oO kocHHa
Bucota 3pi3y TpaBN 3aJIuHaTbCn Ha pIBHi 3-5cm,He BnKoHyTe KocIHnHa pIBH,JaNn nepeBnUye NIOBnHy BiD cIbOrO 3NaueHHa.
He nepeBaHTaJyIte ra3oHOKocapKy! y pa3i DOBROI Ta BaxkoI TpaBn Yactota o6epTaHHa NOMITHO 3HxkyETbcra, a Bucota 3pi3aHHa TpaBnPiDnUyETbcra, i DOBOdntbcKOCNTN KJIbKa pa3IB.
Bitep i coHcE moKytb BnCyuHTn ra3OH nicJ KociHH, TOMy KociTb y KiHci DnH.
9 TEXHlUHE OBCJyROBYAHHЯ TA DOrJaI
I NOPEKEXEHRA! He6e3neka nopizib!
He6e3neka OTPMaHHpaHn paH niD yac KOHTaKTy 3 roCTpIMn pyXOMMn DeTaIaRm npNcTpoI o pIXyUIM iHCTpyMeHTOM.
3abxdi Bmkaite npncpii neped texhiHn i cepbichm 06cnyrobyaHHaM Ta ouH-ueHHaM. 3himt b akymyIaTOp.
3abxHn Hocitb 3axnChi pykabuCi NiJ Yac Tex-HiHOrO o6cnyroByBaHHa, DOrJaTy Ta OUn-
9.1 PepioDnHi pO6OtN 3 TexHicHoro 06cIyROByBaHHa
IpekehntecraBcraKn6oHTTa TBnHTu 3aTMyto, a npucpi 3HaxoDntbcB6e3neHomy po6Omy cTahi.
Perynapno npebipnyte npaee3daTHictb i 3HOweHHr TpaBO36ipHnka.
9.2 OuHsEHHa npncToPO Ta KocnIbHoro mexaHi3My
YBAFA! He6e3neka uepe3 noTpapanJHHN BO. IoppanJIHHB ODN Ha npnCTpiI npn3BOuNTb DO KOpOTKOrO 3aMnKaHH Ta NOnKoDKeHH eNeK- TpUHNX KOMNoHEHTIB.
YHnKaIe nOtpaJIaHHa 6pN3OK BoIHa npIcTpi.
Дя OушениnpстpoI cIд ВИКОпСТОВВВATN ьИТКY.
- 3ynnHiTb DnHyH.
- BnIMiTb akymyIaTOPn.
- 3HimiTb TpaBO36ipHNK.
- HaxujiB npucpii oocTItb KocnIbHm MeXaHi3M.
9.3 IpepeBipka Ta 3aMiHa HoKa
PONEPEDXEHH! Cepno3Hi TpaBMn BiD puyomux DeTaleh Hoxa. 3HOWeHni, NotpickaHn a6o NOKdoXeHNI HIX MOxE 3JaMaTucra, a Ioro deTani MoKyTB CTATN He6e3neHUMn ChapdAm.
PeryJnpho npeBipTe Hix Ha npEmdet no-
He BnKOpNCToBvIte ra3oHokocapKy, JaKIO HIX 3HOSeHn a6o NOxKOJKeHn.
3aToCyBaTu a6o 3amInHOBaTu Tynu a6o no- uKOJKeHn HIX Do3BOJeHO TiIbKn IpauiBnKam cepBicHO qENTpy AL-KO a6o ABTopu30BaHOrO dJIepa.
Uo6 yHnKHyTu Bi6pauii, Hix i HOXOBuI rBnHT 3aBXdN cIId 3amIHOBaTu pa3OM.
Ipe3aToCyBaHn HIX NOBHeH 6yTu 36a- IaHcOBaHn. Po3bAnaHcyBaHHa HOxa MoKe npu3BeCTn Do CInbHOi Bi6paui Ta NoUkoDxKeHHn IpNCtPOU.
9.4 HanaTuBaHHa 6oyHeHcBko Tpoca Konichoro npuBoy (17)
3roDOM 6oydeHicbKn Tpoc KOiichoro npnbOda po3Taryetbcra. RaKIO npn npaiouOmy DBNyHI KOiichn npBID BKe He BMkAcTbCRA, 6oydeHicbKn Tpoc CTAB HADTO DOBmI i Noro cnId HATarHyTN.
OBEPEXHO! He6e3neka TpaBmyBaHHra. Tcpi Ta pyxomi yactnH npncTpoH (HaPnKnaI, pIjKyuHoiKi), a TAKoR ra3OHOKocapKa, 10 paTTOBHa6n3nJaCRA, MoKyTB Pn3BeCTN Do TpaBM.
PeryniTe raIbMiBn Tpoc TiIbKn y pa3i BUMKHeHOrO DnBryHa N HepyxOMoro KocNb-Horo MexaHi3My.
- Bumkhitb Ta BnnyiB akymyIaTOp (DVB. po3- din 6.3 "YeimKHeHHma BumKHeHHa KU6NeH H KocuIbHo2o MexaHi3My (06),cmopiHa Ka 435).
- NobephiB perynIOBaIbHy DeTaNb (17/1) Ha 6oydeHicbKOMy Tpoci (17/2) y HaprMky cTpiKN, To6To npOTn rOAnHHKOBoi CTrPkn, nOKn 6oydeHicbKn Tpoc He 6ynde HATaRHTN mIX pykoTko IO BaxeJI NapeMnKaHH napeDaU (17/3) i TockoIO pfikcau (17/4).
- οοδ πepebipntu haTg 6oydehiBckoTpoCa: yBIMKHiTb npnctpi, 3aNyCTiB dBNHyI cnpo6yTe yBIMKHyTn KOiChn npBOd.
4.ЯкwoKJIichn npINbOHe BMnKaeTbcra: NOB-TopiTb nonepaHki KpOKn.
KaHcHe BdaNoCByBdpeRyIbAtn BoydeHiBcKm Tpoc: 3BepHiTbcra B cepBicn ueHtp Bnpo6nka.
9.5 PemOHTHi po6oTu
NONEPEIXEHH! He6e3neka TpaBMyBaHH naC peMOHTHnx po6it. HeNaIeKHipeMOHT MoKe IpruBeCTn do cepNo3Hx TpaBM iInpuyHeb HopMaJIbHOi po6OTn.
IpoBedeHnpeMOHTHX po6it Do3BOJRAeTb- cTilbKn cepBicHm ceHTpam BnPob6Hnka a- 6o ynoBHOBaXeHnM CneiJIaI3OBaHnM KOMnaHiaM!
Y nepeniiuehnx HnKxue BnnaKax cniD 3BepHyTncB cepBicHn yentp Bnpo6nka:
BnHy3anyckaetbcra.
PiD npncptpi noTpanNB cToPOHHi npedMeT.
Hixi (a6o) BaI dBnryHa 3irHyTI.
Ipnctpii Bi6pye Ta npaue 3 nepe6oamn.
Bntik abo nouskokxeHHa kymyTopa.
9.6 IInTepeC USB (18)
IHTeppec USB (18/1) DocTyHnHa BCix ra3oHOKocapkax, OINcaHnx B daHomy KepiBnTbi 3 ekCnnyatauii, ane BiN npn3haeHn TInbKn dIn OHOBHeHH nporpaMHorO 3a6e3neueHH Ha iHTeKeKtyaIbHnx ra3oHOKocapkax. Ioro He MoXHa BIKOPNCTOByBatn DnA 3aprKn akymyIaTopa.
YBAI! He6e3neka noxokxeHH npnctropo. Y pa3i niKlouehnYo INTepeey USB mo- 6ilbHnx npncTPOIB 3akymyTopAMN (Hanpknad, cMapTfoHIB) icHy e pn3NK ix noxokxeHH.
He niklouaTe do zboro iTepcecy Mo-6inbHi npncTrooi 3 akymyIaTOPOM.
10 YCYHEHHA HECNPPABHOCTE
O6EPEXKHO! He6e3neKa TpaBMyBaHHa.
Pyxomi Detani Ta Detani 3 roctpIMN KpaMIMOxyTb npn3BecTN Do TpaBM.
3abxHn Hocitb 3axnchi pykabuCi NiJ YacTexHiHOro i cepBichoro o6cnyroByBaHHra Ta OunueHHa!
H PIMITKA Y pa3i BnHKHeHH NOKoDKeHb, kI He 3a3HaueHi B ciN Ta6nci, a6o no-koJKeHb, 3 KIMN KOpNCyBaH He MoXe BnopaTncsCaM, cnid 3BepHyTuscdo HaOoi Cnyx6n niIDTPmKn.
11.2 TpaHcnpTyBaHHaKymyJToPa
IpepeTpaHcnpTyBaHHm BnKoHaTe HaBeJeHi HxKYe 3axOy:
- BmKHiTb npucTpii.
- BnIMtB akymyJrTop 3 npncTpoI.
- PpaBnIbHo ynaKyIe akyMylrTop (INB. HIX-ye).
I NPMITKA HomiHaJIbHa NotyXHicTb akymyJIaTopa cKnaJaE 6IbSe 100 BTo-rod! Tomy cnId DoTPMByBaTncb HAcTyNHx npaBnI TpaHCnOpTyBaHHra!
Iit-iOHnAkymnyTop nIDyrae 3aKohny npo nepeBe3eHHn He6e3neuHx BaHTaXiB, aJe Noro MOxHa TpaHCnOpTyBaTn 3a cnpoueHx yMOB:
3 MToIO npIBaTHORO BnKOpNCtAHN KOpNCyBauMoKyTb TpaHCnOpTyBaTu aKymyIaTOPdoPOxHIM TpaHCnOpTOM 6e3 6yDb-aynx Do-DAtkOBHX 3axoDIB 6e3neKn, aJe B ynaKOBciДЯ po3dpi6HOrO npOdaKy;
KomepuHnI KOpNCTyBaYi, kI BIKOHyOTb IpeBe3eHHaB 3B'ra3ky 3i CBOEIO OCHOBHOO DiJaIbHiCTU (HaPnPKnaI, NoCTaBKn Ha 6yDiBeJIbHi MaJdaHUnKn a6o Miczra HabaHTaxKeHNr Ta 3 Hx), MoKyTb TakoX CKOpNCTaTINcA cIMCnpOSeHHaM.
B 06ox Bnue3raDaHnx BnuaKax cIiD BxNTu npMycobux 3axoDiB, uO6 3anobirn BVtOKy BMicty. B iHux BnuaKax cIiD cyBopo dOpTpMByBaTncr npaBnI npo He6e3neHi BaHTaxi! HeodTpMaHHa 3arpoKyu BiInpaBHNky i, MOKnIBO, nepeBis3Hnky cyBopm nokapAHm.
Ihwi BkazBkn 0do TpaHcnpTyBaHHaHaCnlaHHa
TpaHcnpTyBaTu Ta HAdCnIaTu NiTi-iOHHi aKymyJrTopu Do3BOJAreTbcra TiJIbKn y HeyUkoDKeHomy cTaHI!
ДяТраHCnOpTuBaHнAkyMЛrToPa BnKOpuCTOByBaTи BnKnHouHO OpurHaJIbHy yNaKOBKy a6o BiIIOBiDHy yNaKOBky IЯ He6e3neuHoro BaHTaKy (He CTocyeTbcAkyMЛrToPiB 3 HomiHaJIbHOI NOTyXHICTU MeHWe 100 Bt-roD).
Heo6xio 3akneiTn Biikpnti KOHTaKTn akyMnyToppa, uOb yHnKHyTu KopoTKoro 3amKaHHra.
Heo6xio 3axnCTnTn akymyIaTOp BiKOB3aHnB BCEpeDnHi ynaKOBKn, Ioo6 yHnKHy- Tn NOsKOJKeHb.
B pa3i TpaHcnpTyBaHHa6o HaDCnHaHH Heo6xidno nepeBipNTn npaBnIbHicTb MapkyBaHH Ta DOKyMeHTaui BiDbaHTaKeHHa (Ha-npIKna, Kyp'epcbkoIO a6o ekCneIITOpcbKOcIyKboIO).
Heo6xio 3a3dneriDb i3HaTnC8, yu MoKJIbBe TpaHcnpTyBaHH 3 o6paHm NoCTa-uaNbHKOM nocnyr, i NOBIOMNTn npo HaDCnJaHH.
PekomeHdyEmo 3BepHyTnCnDo faxibu3 He6e3- neuHnx BaHTaXIB nIgroTyBaHHn npncTpOIO do HAcnHaHH. CniD oTpMByTaNc6yDb-aknx Dioux HaioHaBnX npinnCIB.
12 3БЕPIГАHHЯ
Iicra KOKHO BnKOpNCTaHHpeTeJIbHo OuH ⅢaAte npncpti i 3a NotpeBn BcTaHOblnoTe Bci 3axNCHI KpUKN. 36epiraTne npncpti y cyxomy Micci, 0o 3akPnBaEcTbcra, HeIOCTyINHomy dIaTei.
12.1 36epiraHnAkyMnyTopHoI ra3OHOKocapK
OBEPEXHO! He6e3neka TpaBMyBaHHa.
KIO nIac 36epiraHn npncptpiDocTyHn Ia DITE Ta HeynOBHOBXeHX KOpNCyBaHiB, ue MoKe npu3BeCTn Do TpaBM.
Ipnctpii cni36epiratyn HeoctynHomy dna iTeT a HekomnteHTnX ocic miCi.
36epiraTe npicTpi TINbK 3 BuaJeHmna akymyIaTOPamn.
YBAI! He6e3neka KpaiaKKn i BtpaTn oco-6nctnx daHx. Yra3oHokocapKn E doCTyn Do IHTepHeTy. PnpCTpoem MoKHa KepyBaTuB «Smart Home» abo «Smart Garden».
LcienBnpi6cni36epiratntinbkn6e3akymyIaTopaIBmicui,do6pe3axnueHomyBidOctyny cstopoHHixoci6.
- BümkHzHeHH pyncItroH: BnMItb 3aNo6ixHn TopceBn KIIou.
- HanaIyTe BnCOTy 3piAHHHa MaKcMajbHO BnCOKn PiBeHb.
- BnIMtB akymyIaTOpn.
4.ДаTe DBnHyH OXoNoHyTN. - PeTeIbHO ouHcTiB npncTpIi.
-
Дял зхисту BiД корози Ha Bci MeТаи Bi DeTJI NaHaHecitb ToHKn Iap Macna abo cnNi-KOHy.
-
CknaDiTb HanpMaMHy 6aJIky.
- 36epiraTe npucptiB cyxomy, uCTOMy Ta 3axuheHomBy BID BnINBy Hn3bKnx TeMnpa- typ micui.ДЯ 3axncty BiD nIpy hakpniTe NOBITPONPOHKNHM TeHTOM.3 MeTOO 3anobi- raHHaKoNueHHIO BONOr He cIiD BIKOpocTObyBaTu NOnietnHeOBy nnIBky.
12.2 36epiraHnHa kymyIaTopa Ta 3apAnHoro npncTropo
8 NPMITKA DnB. DeTaIbHy iHΦopMaciIO B OkpeMIX noci6HnKax dIЯ akymyIaTopa i 3apd-Horo npicTpoI.
13 YTNJI3AUJIA
Bka3iBkn 0do eNeKtpnHoro i eNeKtpoHoro obnaHaHHa (ElektroG)


EneKtpoHHi Ta eNeKtpuHi npucTrooi He HaIeXaTb Do 3BnuaHnx NObyTOBux BiXoDIB. Ix cIiD 3bnpaTu Ta BnKnDaTu OKpeMo.
BukopncTaHi 6aTapeKn a6o akymyJrTopn, kI BKe He BkOpncTOByOTbcra B CTapomy npncTrooi, cnid 6ytu BnaJIeHI nepei BkUdAHNm! IxHry yTuNi3aui perynIOCTbcra 3akoHOM npo akymyJrTopn.
BlaChnKn a6o KopncTyBaqi eJeKtpnHOro Ta eJeKtpOnHOro 06IaHaHHra 3O6OB'3yIObCra NOBePtaTn Ioro BiINObiIDHO do 3aKOHOaBCTBa NiCnBnKOpNCtAHn.
KinueBn KopntyBaH Hece BiDnOBiDaIbHiCTb 3a CTnpaHH CBOIX nepcoHaNbHnx DaHnx 3i CTaporo 6bnHaHH nepey yTnI3aicciO!
CnmboJ 3 nepekpcJeHOro cmITHnka 03Haaye,
Ioo eJIektpnHi Ta eJIektpOnHi npncTpOi 3a6OpOHeHO yTNIi3yBaTn pa3OM 3 IHsIMN No6yTOBmN BiIXoDAMN.
EneKtpnHi Ta eNeKtpoHHi npncTrooi MOxHa 6e3-KoHTOBHO B TAKNX MiczX:
Державна служба 3 видалениняabo 3бору (Hapнклад,Myhiцпальни ckлади)
MaRa3HnEneKtpo06NaHaNHa (ctaiohapHi Ta iHTepHeT-Mara3HN) 3a yMOBn, IIO npOdaBci 3o6OB'3aHI npiMaTHn IX nn npOnHyBaTN IX Ha Do6pOBIbHi OCHOI.
Li 3aBn 3actocobybctiNb dI npucptoB, BCTaHOBneHx i npoDAHnx y kpaIHax Ebponec bKoro CoO3y, BiIOBIDHO Do InpeKTHBn EC 2012/19/EC. Y kpaIHax 3a Mexamn Ebponec bKoro CoO3y MoKyb diItn iHwi npabnla zuo do
yTnIi3aui eNeKtpuHnx Ta eNeKtpoHHnx npNCTpoIB.
PpIMITKn 0oO 3aKOHy npo akymyJrTopn (BattG)

CTapi 6atapei Ta akymyIaTOpn He Ha- neKATb IIO 3BnuaHnX NO6yTOBnx BiDxOJIB. IX CnID 3bnpaTN Ta BnKnJaTn OkpeMo.
INB. IHOpMaIIO npo 6e3neUHe BnDaJIeHNN 6batape a6o akymyIaTopiB i3 eJekTpUHoro nn eJekTPOHHO npuCTpO, a TAKoX IHOpMaIIO npo TnBnKOpNCTOByBaHOI CnCTEmN (HaPnKNaD, xIMiUHNI TnN), y Noci6Hnky 3 ekCnIpyatauii a6o BCTAHOBNeHHN.
Blachnikn a6o kopncTybacyi 6atape n6o aKymyIaTopiB 306OB'3yOHTbcra NOBepTaTu No- ro BiIOBIAH Do 3aKHOdABCTBa NiCra BVKOpncTahHH. NOBepHeHH oMExyEeTbcra NocTa- yAHm HeBeJIKNIX KInbKOcTei.
CTapi 6atapei MOkyTB MiCTNTu WKIDNJBI peOBOHN a6o BaxkI MetaII, kI MOxyTB 3aBdaTI uKO-dn DOBKJIIO i 3dOpOB'U. YtNiI3aUI BiINpaBObAHNX 6atapei I BUKOPNCaHHra pecypcIB, IO MICTA TBCR B HIX, cnpNRe 3axNCTy Ux DBOX BAXJNBHX AKTNBiB.
CmBoJ 3 nepeKpcJeHOro CmTHnka O3Haaye, 06aTaapei Ta akymyIaTOpn 3a6bOpHeNo yTuJI- 3yBaTN pa3OM 3 iHsIMN NObYTOBUMN BiXoJaMn. Kpim TORO, nID cmITHNKOM e CmBOJn Hg, Cd a6o Pb, 0uBnJaIOb TaKIM YHOM:
Hg: 6ataperaMiCTnTb nOHaD 0,0005 % pTyTi
Cd: 6atapery mictnb noHaD 0,002 % kaMio
Pb: 6atape mictnb noha 0,004 % cbinuio
AkymyJrTopn Ta 6aTapei MOxHa 6e3KoITOBHO B TaKnx Miczrx:
Дерхавна служба 3 видальеняabo 3бору (наррклад, м尼ипальни ckлади)
Mara3HH6atapeiakymyIaTOpIB
nyHKT 36opy 3araIbHOI CnCTeMn NOBepHeHHa BIDnpaCboBaHnx akymyIaTopiB
nyHKT 360py Bnpo6nka (KIO Bin He e cneHOM 3araIbHOI CnCTeMn NOBepHeHHa)
Li 3aBn 3actocobytoBc TINbKn DnAkymnyTopiB i 6batape, BCTAHOBneHnx i npOdaHnx y kpaIHax CbponeeCkoRco Co03y, BiIOBIDHO Do DnapeKTHBn EC 2006/66/EC. Y kpaIHax 3a MekaMn CbponeeCkoRco Co103y MoKyTB dIaTN iHwi npabnla odo yTuNiI3aui akymyIaTOpB i 6batape.
14 CEPBICHE OBCJYROBYAHHH
KyO y BAC e nHTaHnI Odo rapaHTi, peMOHTy a6o 3anachnx qactnH, 3BepHITbcra Hna6bnxKny
cepBicn ueHtp AL-KO.ADpcy MoKHa 3HaHTN B lItePHeTI 3a NocnnaHHM:
www.al-ko.com/service-contacts
15「APAHTI
До 3akihueHЯ CTPOky DaBHOCTi peKnaMaui, yctaHObNeHoro 3a 3akoHOM, Bnpo6nK yCyBaE MOxNBI DeΦeKTH MaTePiaIy Ch BnPo6HnHi 6paK IJnxom pEmOHTy a6o 3amHn (Ha cBm Bn6ip). CToPK daBHOCTI Bu3Haayetc3aKOHOdaBCTBOM KpaIHn, y kki npinad 6byNo KynneHo.
TapaHTi36epiraetbcnIe 3a TaKnx yMOB:
IOTpmyTeCyaBoro noci6Hnka 3 ekcnnyataaui
BukopncTaHH npUaTy 3a npu3NaeHHnM
BukopncTaHHOpriHaJIbHx3aunactNH
TapaHTia anyHIOeTbcra 3a TaKnx yMOB:
CamaobinbHn peMOHT
CamaBihha 3MiHa TexHiuHx XapaKTepunctIK
BnKOpncTaHH He 3a npn3HaeHHm
IapaHTiHa NouHIOeTbCn Ha:
I OwkoJxehnJaKoap6oBOrO NOKpTTT, CnpuHHe 3BnuaHm 3HOswBaHHM
YactHH, 3HOyOTbcra, n03HaueHi y BiDOMOCTi 3aNaCHNX YactHn paMKo; XXXXX (X)
Bidnik rapaHTiHoro TepmiHy po3noUHaecb8c 3 daTn npud6aHHra Bnpo6y nepuHm KInueBm CNOXNaYem. Data npud6aHHRAkazHa ByeKy. Y pa3i BUNHKHeHHra rapaHTiHoro BnnaDky 3BepHiTbc8 3ieHO 3aBOIO Ta opurHaiom KBNTaHci, lo NiTBePdxKy e NOKyny, do CBORO DNlepa a6o B Hau6JnxKyu ABTOpN3OBaHy cepbichy cny6y. Lc rapaHTiHre 306ob'3aHHra He 3MiHOC BCTAHOBJIeHi 3aKOHOM ppeTeH3ii NOKynrdo npodabz.
METAΦPA∑H TQN ΓN'HEIΩ OΔHΓIΩN XP'HΣH
Iivakac TepieXouevwV
Idaiitepn Tpooxn kaTa to Xeipiao!
Σμβoλo Σημασiα
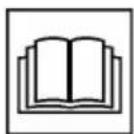
AiaBaote Tc obnyies Aeioupyiac TTpv aTTO th eon 0e Aeioupyia!

Kivduoc tpaupatioou! Kpatate μakpiα ta xépiα kai ta πóia ato Tov μnxaviokoTnç!

Mn eapuoso, xnoiiooieitai mOvo oXLOOKOTIKcS uXavcBevzivns.
Piv aTó oAe TIC epyaOiec ouvtnpnOg kai kaOapiaou, aTouuvdEeTE TIV TiTa Tou pouzi!
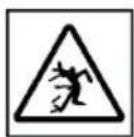
Kivouco aTo EKoovoiOeva aVTiKeiEvA!

Kpatateptiouc paikia atro Tnv Tpiox kivouvou!
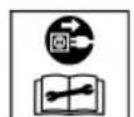
Mn eapuosoio, xpooiotoiietai mOvo o nEKTPIKcs XLOOKOTTIKEs unxavc.
Piv EKTEAeTe EPyaoieouTnpnOns KAI ETIOKEUns, aTVEpyoTOIN-OTe TO mXavma KAI aTOOuvDeote To qic aTTO TpOPOoTiko!
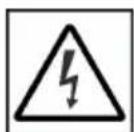
Mn evapuosoio, xpnoiotoiitai mOvo e nAekptikex lookottikec unxAvec.
Kivouoc nEeKtpoTAnxiac eav exi UTOTEI Znmuic TO KAwio DIKTuO UeUaTOc!
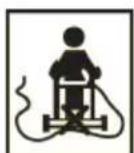
Available on the App Store
Meta tny ekyataoTaon TnC eapuoync, Tpenei Tnpota va ouvdetheta n va eyypaepite. Tn ouveXia, akoalouhnte Tc obnyies "Bna poc hma".
H eapouyn ppoepe i evu eupu paosa aetoupviw, oTWC. Kataxwpion TPOIOVTOG, ouBouAe KNToupiKNC, ouBouAe yia quta n EIDtoiOnc push oTpeTTWAn aalatoC.
Eeeyxos oTaeunns nnpwns
H evdEiEg OTaOmG PAnpwns (09/1) TIEcETai
TPOC TA EAVW MEoW TnG POnG TOU aepa KATA Tn
XLOOKOTN (09/a).Eav O Kaoc G uAloxoyng xoptou
(09/2) Eivai YEmuTOG, UAPxE I EvdEIG N tAOu
PANPwONG OTov KaO (09/b).IpeTIeV a aediaoe
O Kaoc SuAloxoyng Xoptou.
Ataykiotpwon kai aediaogka koudouoanns xoptou
NPOEXH! Kivouoc Tpaumatouw aTOKn. Kivouoc Tpaumatouw aTIO KOtt av aTAAWouv ta xepia eoa oTov mXavioo KOtnc Tnv wpa Tnou aeitoupyeI.
Apaipiete Tov kado o ulloyns xoptou, mvo otav o unxaviogos kottnc evai akivnttoinmuevoc.
EuouleysiaTnXlookotn
Συνεύμενο ὄρος Καπής 3-5 cm, μην κόβετε περισσότερο από το μίσο του ὄψους του γρασίδιου.
Mny UTEPPOPTWVE Tn XLOOKOTTIKn unxavn! EAv o apiOc OToPoWv Tou KInTnpa eIw- 0Ei Emuavoc EaiaC aKpIoU, BApIoU ypaaiDIOU, auHote To uoos KOINc Kai KAVTE ETTaVIIANmuEvA TEPaOmuTa.
O aveioc kai o nioic mtopei va oteywouv to ypaoi i e ta tn xlookotn, ia auto paymuatoTIOIETE Tnv KOTn apy to aIoyeuca.
9 ΣYNTHPHEH KAI ΦPONTIΔA
IPOEIAOIOIHsH! Kivduoc TpaumatI Ouv aTIO KOIN. Kivduoc TpaumatIaWv aTIO KOIN otav bace ta xepia oac oe aixnpa kai ki VouuEvA eapntmuata tou uynavnauoC, KaWc KAI OE Epyaieia KOINCS.
A Tepeytoie To nXavna Tavta Piv aTTO Epyaoies ouvtnpnons, povtida c Kai Ka-Thetaou. Apaipote Touc Nktpkooc uoOwpeutec.
Kata nTv EKTLEeON epyaowv ouvtnpnons,
povtidaac kai kathetaapiaou opate TavtoTe
TPOOTATEUTIKA yavia.
9.1 Taktikéç εpyaioε σuvtnphon
ΦpoVTIOE wOTE oλa Ta TnAxiμáδia,oi Tneipoi kai oi Biδεç va εivai kaλo σφiμεva kai n μnxavn va βpiokετai oε μia aσφαλn katασtaon λεitoupyiac.
ELeyXETe TAKtiká Tov Káðo Suλloync Xóptou ωs προς ηειουργia kai γia φθopécs.
9.2 Kaαρισμός μnxavnμatoc kai μnxavioμooukotns
PPOOXH! KivduvoaTTO vepo. Nepo stn unxavn Tpokaie bpaxukkawata kai kata- oTpoqntwv nEKTPIKWv Eaptnmuatwv.
Mny nXavn vepo.
XpnoiouoieYiaTovKaθapioaTOKεIσtikαμaOouπaχεipocnμaBoptσa.
- Θεοτε Tov KIVητήρα εκτός λειουργίας.
- ApaipéoTe Touc nEeKpiKouC ouaoWpeutεs.
-
ATTaykiotpwote Tov kadoouanyn xóptou.
-
AvatpeyTe To mnxavnma Kai Katheta Tov mnxavioKoTns
9.3 'EeYxoc kai avTKaTaoTaon maXaipivw KOtns
NPOEIAONOIHSH! Ooapoi Tpaumaiogoi aTIO EKQeovioTepaxiwvTwvmaiaipw. Eva oapévo,payiou n xaaouevo aXaipi KOTnC mTopei va OTaosi kai ta Teuayia tou mTopoivva yivouv ETIKIVUva BAnata.
ELeyExTe TAKTIKA to paXaipi KOTnC yia nuiEc.
Mn xpoiooieT n Xlookottikn mnxavn, av to maiaipi kottnc evai aepv o naa-sigma.
Ta otouwéva n xaalaouéva maaxiapia kottnc Tpétnei va akoviçovtai n va avtikaθiσtavtai μovo aio Kevtpo σερβic tns AL-KO n εgouoi-odotnμevo ouvεpyio.
Tia va aTIOpeuyovtai Kpaadaooio, ta maayapiia KOITNC kai n BIDA koTTnc TpETeI VA avTKaOi- OTVAI TTAVTA aTTO KOIVOU.
Ta akovioeva maiaipia koinc npentie va eivai cuyoataoieva. Ta un cuyoataoiaoeva maaipia koinc npokalouv evtovec dovn-0eic kai znuecs ot n xavn.
9.5 Epyaiec eTIOKEuHc
NPOEIAOIOIH! KivduvoTpaumatioou epyaoiec EtnoKeuç. AkataaAaAeC ETTKeuε μTOpéi va Tpokaéouv oBapouc Tpauaioouc kai Znuec Tou nXavnatoC.
Oi epyaioec EITIOKEUcEITIPTETaV a EKTE- louvta mvo ato Kevtpa oepic Tou kata- OKEuaotn n EGSOUIOOTnueva EIIDEUEuEv a Uvepyia!
ETIKOIVWvnoTe TO oepic Tou kataoekuaotn OTi akoloueC TEPITTWOEIS:
O kivntnpac papei Emupos nEov.
To mnxavna exi TPOOkoa e eva eo
Ta maXaipia kOtns kaI/n o aOvoac KIVnTnpa exouv Luyio
To nXavna oveitai kai aitoupye i np opa
Hekpiokouoomegaeutec exouv diappoei n exouv uooTei qmuia.
9.6 USB (18)
HdiTAPn USB (18/1) evai diaoetoiun oE oAe TIC XLOOKOTTIKEc unxavec Tou Tepiypapovtai e auTEc TIC odnyies LEIToupyiaac, aaaa uTpei va xpnOIOIOTINei movo iaevnpoeic loyioikou OTIC EUGTTVEC XLOOKOTTIKEc unxavec. Aev evai kaTaALnAo ia opTion nEKTPIKWv Ouaoewpuwv.
IPOSOXH! Kivduoc 2nmuac oTo unxavna.
Oi nAekpiKoi ouoomegaetc fopntwv ouokewv (π.x. smartphone) kataoTpeovrai av eivai ouv-δεδεμevoi σtn δiεπαφn USB.
Mny ouvdeete opntec ouokeues nAekptiKouc ouoomegautecs e autyn t dieTalpha.
10 BO'HOEIA ZE INEP'INTQH BAABON
IPOZOXH! KivduvoC Tpaumatou. Ta aixunpa avtkeiEv a Ka ta kivoueva EapntmaT tou epyaieou mTopoov va Ppokaesouv TpaumaTIOUc.
Kata tynv kteleon epyaoiw ouvtnpnons, 0povtida cai kathetaipou oopate navtoe TPOOTATEUTIKA yavta!
YNOAEIEH Ia Tou dev avaepoVtai e autov tov nivaka n dev mTopeite va atokataotnoeTe mvoi oac, aneuovthe iTe OTo Tmuεu npétnonc πelatw v mac.
www.al-ko.com/service-contacts
15 EΓYH∑H
Evexoe c atoxie c uikw n kataoekuaotika eattwata atokaioiavtai evtoc nds iapkeia ts vouincs yia agwoeic npayatikwv eaattwpatwve etiokeun n avikataaotaan kat an dakpitikn mac euxepia. H pOteuia napaypaqnc twv agwaewv opizetai oupwva t n vmoeia nsc xwpac, oTnv otioa ayopaotnke n oukeun.
H dnawon yyyunong ek hepouc paocioxuei movo
H eyyunon naue i va ixuie oE:
9.1 PeoBn aKTHBHOCT Ha oDpXyBaHe.481
9.2 YnCTeHBe Ha ypeDoT n aIaNtKaTa 3a KocSeHbe. 481
9.3 KoHTpOIpaHBe n 3aMeHa Ha HOxKoT 3a ceYeHe... 481
9.4 PerynnpaBe Ha cajnaTa 3a
NobnekyBaBe Ha noroHOT Ha Tpkana
(17) 481
9.5 PnonpaBkn 482
9.6 USB nopTa (18) 482
10 TomoBcnyajHa depeKtn 482
11 TpaHcnpT 484
11.1 TpaHcnpTnpaHe Ha ypeIoT 484
11.2 TpaHcnpTnpaHe Ha akymyIaTopckn 6aTeepu.. 484
12 Cknaipahe. 485
12.1 CknaIpaIbe Ha KocauKaTa 3a TpeBa co akymyNatopcka 6aTepnja 485
12.2 CklaIpaHBe Ha aKymyIaTOPcKaTa 6aTePnja n ypeDoT 3a noJIHebe.... 485
13 OtrpaHyBaHe 486
14 KopncnueKn ceHTap/cepBnC 486
15 TapaHcuija 487
1 CNEUJALH N E3BEOCHN HANOMEHN
Oboj ypei moxe da ro kopncTaT deca Ha Bo3pact od 8 roDHH I NOCTapn I nnca Co HamaJIeHN n3uKc, cTeHNI IN MeHTaHn CNOcO6HOCTN IN CO HeIOCTaTOK HA NCKyCTBO IN 3Haehbe, camo DOKOJky Ce IOd HAD3Op INIIN 6Inne YNaTeHN BO KOPNCTeBeto Ha anapaTOT Ha 6e36eDen HauHH I DOKOJky rpa3bnpaaT MOxHNTe OAnCHOCTN. DeUata He CMeat Da CN Irpaat co ypeDoT. Deua 6e3 HAD3Op He Cmeat Da ro YnCTaT INI Da ro ODpxyBaAT ypeDoT. Nua ca MoHory rolemn I cepno3HN OrpaHnCyBaHaMoKe Da IMaAT NOTpe6n HAdBOp OD OBDe ONuShaHnte IHCTpyKUnn.
2 3A OBA YNATCTBO 3A YNOTPEBA
FepMaHcKaTaBep3nJa eOpuHaJIHoTo yNaTCTBO 3a yNoTpe6a.Cnte dpyrJ ja3nHi Bep3nCe npEBoi Ha OpuHaJIHOTo yNaTCTBO 3a yNoTpe6a.
UybajTe ro pa6oTHOTO ynatCTBO Da Bn 6nnde necho Ha DoΦaT 3a YHTaHe aKO Bn e Notpe6Ha HekoJa INΦopMaunja 3a ypeDTo.
IpeaTe ro ypeoT Ha npyn nua camo co ynatCTBOTO 3a ynotpe6a.
IpouHTajTe rHIO6pHeTe BHNMaHne Ha HAnOMeHnTe 3a 6e36eHocT INpeDynpEduBaIbe BO yNaTCTBOTo 3a yNoTpe6a.
2.1 Cm6oJn Ha HacNoBHaTa cTpaHa
Cm60J 3HaueHe

Ipei nyuTaBeTo BO pa6oTa, 3aOJXnTeHNO BnMaTeHNO npouHTajTe ro yNaTCTBOTo 3a ynoTp6a. Oba e npeducNoBt 3a ycneuHa pa6oTa n HenpeeHo paKyBaHe.

Ynata 3a pa6oTa
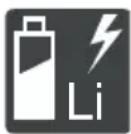
BHHMaTeJIHO paKyBaJte CO JIITnym-JOHCKnte akymyIaTOPcKn 6aTeepn! Oco6eHO BHHMaBJTe Ha yNaTCTBaTa 3a TpaHcNopt, CKnaInpaHe n OTCTpaHyBaBe BO pa60THoTo yNaTCTBO!
2.2 06jachyBaHbe Ha 3HaunTe n CnHnHnTe 36OpOBn
ONACHOCT! Покува Ненистон
Опа сизушиja, koja - по не сизерг;
Може за пedingика Смрт Или Телега Телега
nobpeda.
PNEpyPENEYBAIbE! PokaKyBa NOTeHcJAnHO onaCha cnTyauuJa, Koja - aKO He ce n36eHHe - MoKe da npedn3BnKa Cmpt nIITeUka Tenecha nobpeda.
BHIMAHNE! Pokajya NoteHunno onacha cnTuayja, koja - ako He ce n36erHe - MOKe Da npedn3Bnka mana nn ymepeHa Tepecha nobpeda.
BHIMAHHE! PokajyBa cnTyaunja, Koja - aKo He ce n36erHe - MoKe Da npedn3Bnka wTeTu no HMOTOT.
HANOMEHA CneuJaHn HAnomeHn 3a noobpo pa3bpaHe npakyBaHe.
3 OINIC HA IPON3BOJOT
Oba ynapCTBO 3a pa6oTa onnUyBa pa3Hn MOeJIHa paHb BOJeH N KocayKn 3a TpeBa Ha akymyataopckn 6aTePmN Od mapKeT AL-KO n solo by AL-KO co pa3nueHn onpem. OnpemTe Ha noeDInHeHNTe MoeJIc Ce npetCTabeHn BO TexHnKITE NOdaTOuHa yNaTCTBOTO 3a MOHTaxa.
YpeodT CMeE Da Ce KopnCTu CaMo 3aeHOb Co
IHTyM-JOHCKNTE 6aTePnn N POnHaun HabeDeH
BO TexHnKIne NoaToU. 3a NOBeKe
HHOpMaun 3a 6aTePnTe N POnHaunTe,
NoJIeDHeTe rN Noce6HnTe yNaTCTBa:
UyataCTBO 3a pa6oTa 441630:JITnym-jOHcKa 6aTepuJa B150 Li (B05-3640G), B200 Li (B05-3650G)
YnataTbO 3a pa6oTa 441633: NolnaC130 Li (C05-4230)
BHMAHNE! OnachocT od ouTeTyBaIbe Ha ypeiTe n 6aTePnIte. Ako ypeIoT ce KopncTn co HecooDbETHn 6aTePnI, MoKe Ja ce ouTeTaT ypeIoT n 6aTePnIte.
KopncTeTe ro ypeoT cmo co npOnnHaHnte akymyIaTOPcKn 6aTepn.
3.1 PpOnncha npMmHa
Oboj ypei e HameHcT cMo 3a KoceHe Ha TpeBnUcN i Cmee Da ce KopncTu cMo Ha cyBa TpeBa.
Oboj ypeE hAmHeT NCKnyuBO 3a npNBaTHa ynoTpe6a.Cekoja Dpyra npimeHa kaKo HEno3BOJeHO npenpaBaHe nIi DOrpa6a Ke ce cMeTa 3a 3NoynTope6a n Ce NCKnyuBa npABOTo Ha rapaHcNiJa KaKO n ry6BeHbTeHO HA COOBpa3HoCTa (CE-03naka) n PpON3BOJNTeNt He Chocn HNKaBA OndROBOPHOCT 3a WHTeTn HA KOpNCHKOT IIN HA TpeTI Nlca.
3.2 MoxHa npedBnIbna norpesha ynoTpe6a
YpeoT He e npeBndeH HHTy 3a KomepunjHa ynoTpe6a BO jaBN npKOBn n CnOpTcN ObjeKTn HHTy 3a ynoTpe6a BO 3emjoJeIcTBOTO n UymapCTBOTO.
Ia He ro KopnCTnte ypeoT npu DoxNnHa MOKpa TpeBa.
БeЗб endHcHte HnpaBn He cMeaT da ce demoHTnpaaT nI npemocTybaat.
3.3 Pn3nOd ocTaToCu
IcTo Taka n npn npOnnHa npmHa Ha anapaTOT octaHyBa cekoraW eJeH oJpeDeH ppeOCTaHaT p3NK KOJ He cMee Da ce NCKnyu.
OД BИДOT N KOHCTpyKUjata Ha ypeDOT MOKe Da HACTaHaT CNeHHTe NOTEHUNIJIHN ONaCHOCTN BO 3aBnCHOCT OД ПиMuMeHaTа:
OTpPnAHe Ha oTKoc, 3eMja N MaN KaMeHa.
BnIyBaHe HaYeCTNOn OJ OTKOCOT aKO He ce Hocn 3aHTNTa 3a DnWeHbe.
Iceheni npn noceHyBaBe BO DnKneKnot HOx 3a ceYeBe.
3.4 Be36eHocn n 3aHTnTHn ypeDn
I PEPdYPepyBAHbE! Onacnoct od noBpea. HencnpabHn nn ncknyeHn
6e36eHOCn 3aHTTN HAnpaBN MOKe Da IOBeDaT Do TeuKN NOBpeN.
NonpaBete rH HeNCnpaBHnTe 3aHTTHn H6e36eHOCn HnPaBn.
HnkoraaHa He nNCKnyyBaTe 3aHTnTHnTe 6e36eHNCHnTe HnpaBn.
Cnryphocen Knyu
3a n36eHnYBaHBe Ha HeHamepHO BknyuBaHBe ypeT e onpeMeH CO cnpyhOceH Kny. Ncknyte ro MOTOpI nped OndpKyBaHe n cekorauu 3BneTe ro cnpyhOCHNt Kny.
3.5 Cm6oJn Ha ypeJOT
3.5.1 Be36eHocn O3HaKn
Cm60J3HaueHe

Tpe6a da 6nndeTe oc6eHo BHIMaTeHn npn paKyBaIbeTo!
Cm60J3Hauehe
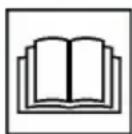
Ipei npuTaBeTo BO pa6ota npouTajTe ro ynaTCTBOTO 3a ynoTpe6a!
OnachocT od noBpea! DpxKeTe r npaute H O3eTe nOdaIeKy oJ anaTkata 3a KocHe!

OnachocT OJ CTpyeH yap npn OwTeTeH CTpyeH Ka6e!
CBeTN 3eJIeHO. AkymyIaTopCKnTe 6aTeepNc eoHn.
CBeTN UpBeHo. AkymyNaTOpCKnTe 6aTeepu Ce npa3Hn.
3.9.2 Поврете ѳ кocакта 3a ТpeBa co AL-KO Smart Cloud
HANOMEHA INΦopMaζηn 3a NT-
6e36eHocr. Od AL-KO Smart Cloud kocaykata 3a TpeBa aBtOMaTcKn rN do6uBa hajHOBHTe coTBePCKn axypnpaHa 3a da ce n36erHat 6e36eHOCn npa3HHn. 3aToa e notpe6en INTEpHET npuctan ppeky WiFi.
Iobp3eTe ja KocauKaTa 3a TpeBa cmo npeky 6e36eHa WiFi mpeKa co nHTepHeT.
CTaBete cnrypha WiFi-No3nHka.
- PioIrotBete ro nameTHnT Telepon:
Inctanpajte ja annkaunjata AL-KO inTOUCH Smart Garden" (BNDn Poanae 3.8 "Annukauja AL-KO inTOUCH Smart Garden**, cmpaHa 471).
CTapTyBajTe ja annkaunjata.
- CtrapTyBaJTe ro BOnIe6HnKOT 3a nocTaByBaHe: PpTuNCHeTe ro Cmapt konuTo OKoNy 3cekyHn.
3.Bo BoJIe6HnKOT 3a noCTaByBaHBe:
Iobp3eTe ro nameTHNOT TeNEoH CO WiFi MPekata Ha KocaykaTa 3a TpeBa.
I3MeHeTe ro IMeTo Ha KocaykaTa 3a TpeBa (n36OpHo).
BheceTe ro IMeTo n lo3nHkata 3a WiFi. KocauKaTa 3a TpeBa ce nobp3yBa co AL-KO Smart Cloud.
CmapT konue npn noctaByBaHe
- CBetn NOctojaHO CnHO.
Bolue6HnKOT 3a nocTaByBaHe e noBp3ah co annkaunja.
Nobp3yBaHe co AL-KO Smart Cloud npekyWiFi mpekaTHa KOpncnKOT:
B.CBETN CINHO, potnpaKBO HacOKa Ha CTpeJIKNTe OJ YacOBHNKOT.
O6n3a noBp3yBaHbE
r. Tpenka cno. Nobp3aHO.
MehyBa Mey 3eJHeHO n CnHO.
Nobp3aHo co AL-KO Smart Cloud.
r. MeHyBa Mery UpBeHO N CnHO.
He e noBp3aHo.
HMeTo nNo3nHKaTa 3a
WiFi He ce ToUHO
BHeceHn.
Cmapr konue npu pa6ota
CMapr konue 3Hauehe
CBETN CINHO (n36neDyBauchn).
Iobp3aHo co AL-KO Smart Cloud. 3aIOBOINTeH WiFi npneM.
CBeTN cHNO, potnpaquKn.
CTaBaHHe Ha akymyIaTOPcKaTa 6aTepeNja
- OToBopeTe ro (05/a) KanaKOT Ha JeIoT 3a 6aTeepu (05/1).
- BmetheTe ja akymynatopckaTa 6aTepuja od rope BO OTBOPOT 3a 6aTepujata (05/2) cde Odoeka He ce BKNeuTN.
- 3aTbOpTe ro kanaKoT Ha DeJIoT 3a 6aTeepn.
Baede He Ha akymylaTopcka Ta 6aTepnja
1.ПиТиСHTeTO KONчeTO 3a OTKЛуЧУВа№Ha akymулatopскata 6aTepeNiJa nДржeteTo npITnCHATO.
2.ИЗваде te ja akумuyaTOpckata 6aTepuja.
6.3 BknyyBaBe n NCKnyyBaBe Ha ctpyjHOTo HanojyBaBe Ha aJaTkaTa 3a KoceHe (06)
Co npeknHyBaOT co knyrTO BKnyyBaTe nCKnyyBaTe ctpjHTo HanojyBaHe Ha MOTOPHa aataKaTa 3a KoceHe. NpeknHyBaOT co knyCe pakyBa CO cnryphOCHNt Knyu.
I PEPDyPENYBAHbE!OnachocT oNOBpeHa. HeHamepHTo BknyuBaHe MoKe daIOBede Do TeuKn NOBpeDi.
CekoraI nped pa60THn nay3n I OdpKyuBaHa: 3a ncknyuBaHe Ha HanojyBaHTo CO cTpyja 3aBpTeTe ro CnryphOCHNt Kny BO nO3njuA 3a NcknyuBaBe (Off) a notoa n3BneYeTe ro.
14 KOPNUCHNUKI CEHTAP/CEPBNC
Ako Imate npaasaBa BO Bpcka co rapaHunjaTa, nonpaBka nn pe3epBn DeJIOBn o6paTe ce Ha Haj6nncknoT cepBnceH ueTp Ha AL-KO.
IcTnot Ke ro HajdeTe Ha INHTepHeT Ha cneHaTa aDpeca:
www.al-ko.com/service-contacts
15 TAPAHUNJA
Moxhnte MaTepujAnHrpeuKn IINrpeuKn BO npOn3BOcTBOTo nOTcTpaHyBaMe 3a Bpeme Ha 3aKOHsKn OnpedeJeHNOr rapaHTeH pOK, BO corIacHOCT co HauNt n36Op, NO nAT Ha nonpaBka IIN nCnopaka Ha pe3epBeH den. FapAHTHNOr pOK ce onpeJeLyBa 3a cekoj noeDInHeueH cnyaj, CnopeJ 3aKOHOT Ha npKaBaTa, BO koja bII KUneH npOn3BODoT.
Haata oBpcka 3a rapaHunja Baxn cmo npn:
Iapauhuijata ce noHnWtYBa npn:
NoHTyBaHe Ha yNaTCTBTO 3a yNtpe6a
O6n3a camoctojHn nonpaBkn
PpOnncho paKyBaHe
O6n3a camoctojHn TexHNyKn N3MeHN
UnoTpe6a Ha opuHaHn pe3epBHN deIOBn
Hempoinscha npmeHa
Ora npaHjata ce ncknyehn:
OwtetyBaHa ha 6ojaTa npedn3BnKaHn Od HopMaJHo aBeHe
13a6eHn DeIOBn, KOHa Ta6JIaTa 3a pe3epBHN DeIOBn Ce O3NaeHn co paMka xxxxx (x)
IrapaHTHnOT pOK 3aIOUHyBa CO KUnyBaHe OJ CTpaHa Ha npBnOT KpaEH KopncHk. MepoJaBeH e DaTymOT Ha cMeTkata 3a PnaKaHe. Obpatete Ce co OBOJ rapaHTe HnCT n Co opuHaHnHaTa CMeTKa Kaj npOdaBaYOT IIN BO Haj6JIncKATA OBnactHa Cny6a 3a ODHoc CO KOpNCnUte. Co OBaa rapaHcNJa, 3aKOHcknte npaba HA KUnyBaYOT BO ODHoc HA npOdaBaYOT OCTaHyBaAT HenpomeHETn.
Russia
HmnpTeB Poccncko Fedepaun
Imported by: AL-KO Gardentech UK Ltd, Murray way, Wincanton, Somerset, BA9 9RS / UK | +44 (0) 1963 828055
shop.uk@al-ko.com | www.alko-garden.uk