
RBV26B - Leaf blower RYOBI - Free user manual and instructions
Find the device manual for free RBV26B RYOBI in PDF.
| Brand | RYOBI |
| Model | RBV26B |
| Product type | Thermic blower/vacuum |
| Intended use | Blowing and vacuuming light debris (leaves, grass, garden waste) |
| Power source | 2-stroke mixed gasoline (50:1 ratio) |
| Engine | 2-stroke, 26 cc |
| Guaranteed sound power | 107 dB(A) |
| Spark plug | Ryobi AC00160, Champion RCJ-6Y or NGK BPMR7A (gap 0.63 mm) |
| Main functions | Blowing, vacuuming, shredding (mulching) |
| Blower mode | With assembled blower tubes and high-speed nozzle |
| Vacuum mode | With vacuum tubes, collection bag and adapter |
| Speed regulator | Speed regulator lever for maintaining speed without trigger |
| Routine maintenance | Clean air filter every 5 hours, replace annually |
| Periodic maintenance | Check spark plug, clean spark arrester, drain fuel |
| Safety | Wear eye and hearing protection, keep people away (15 m), stop engine before maintenance |
| Spare parts | Use only genuine Ryobi parts |
| Warranty | 24 months for private use, extension possible under conditions |
| Countries of compliance | EU, Switzerland, Iceland, Norway, Liechtenstein, Turkey, Russia |
Frequently Asked Questions - RBV26B RYOBI
User questions about RBV26B RYOBI
0 question about this device. Answer the ones you know or ask your own.
Ask a new question about this device
Download the instructions for your Leaf blower in PDF format for free! Find your manual RBV26B - RYOBI and take your electronic device back in hand. On this page are published all the documents necessary for the use of your device. RBV26B by RYOBI.
USER MANUAL RBV26B RYOBI
REDUCTION DES RISQUES
Position FULL (Complet)
Position mi-starter
Position Marche
APPRENEZ A CONNAITRE VOTRE PRODUIT
Voir Fig. 1a-1b.
English (Original instructions)
Safety, performance, and dependability have been given top priority in the design of your petrol blower/vacuum.
INTENDED USE
The petrol blower/vacuum is only intended for use outdoors in dry and well-illuminated conditions.
The product is not intended to be used by children or persons with reduced physical, mental, or sensory capabilities.
The product is designed for blowing or vacuuming light debris, such as leaves, grass, and other garden refuse. It is intended to vacuum and mulch debris and deposit it into the collection bag.
The product is not designed to suck in water or other liquids. Do not use the product for any other purpose.
WARNING
Read all safety warnings and all instructions. Failure to follow the warnings and instructions may result in electric shock, fire, and/or serious injury. Save all warnings and instructions for future reference.
WARNING
Never allow children or people unfamiliar with these instructions to use the product. Local regulations may restrict the age of the operator.
GENERAL SAFETY WARNINGS
Some regions have regulations that restrict the use of the product to some operations. Check with your local authority for advice.
- Do not allow children or untrained individuals to use the product.
- Read the instructions carefully. Be familiar with the controls and the correct use of the product.
- Never start or run the engine in a closed or poorly ventilated area. Breathing exhaust fumes can kill.
- Clear the work area before each use. Remove all objects such as rocks, broken glass, nails, wire, or string that can be blown a considerable distance by high-velocity air.
- Wear hearing protection at all times while operating the product. The product is noisy, and permanent hearing injury may result if precautions to limit your exposure, reduce noise, and wear hearing protection are not strictly adhered to.
- Wear full eye protection at all times while operating the product. The manufacturer strongly suggests a full face mask or fully enclosed goggles. Normal spectacles or sunglasses are not adequate protection. Objects can be thrown at high speed by the powerful air jet at any time and may rebound from hard surfaces toward the operator.
While operating the product, always wear substantial footwear and long trousers. Do not operate the product when barefoot or wearing open sandals. Avoid wearing clothing with loose fitting or that has hanging cords or ties. - Do not wear loose clothing or jewellery that can be drawn into the air inlet. Secure long hair so it is above shoulder level to prevent entanglement in moving parts.
Beware of thrown objects. Keep all bystanders, children, and pets at least 15m away from work area. - Operate the product only at reasonable hours - not early in the morning or late at night when people might be disturbed.
Use rakes or brooms to loosen the debris before operating the product. - Never operate the product in an explosive atmosphere.
- Never use the product when you are tired, ill, or under the influence of alcohol, drugs, or medicine.
Before each use, ensure that all controls and safety devices function correctly. - Operate the product in a recommended position and only on a firm and level surface.
- Do not operate the product on a paved or gravel surface where ejected material could cause injury.
Before each use, always inspect the housing for damage. Ensure that guards and handles are in place and properly secured. Replace worn or damaged components in sets to preserve balance. Replace damaged or unreadable labels. - Keep all cooling air inlets clear of debris.
- Never operate the product while people, especially children, or pets are nearby.
- Avoid using the product in bad weather conditions especially when there is a risk of lightning.
- Do not operate in poor lighting. The operator requires a clear view of the work area to identify potential hazards.
- Operating similar tools nearby increases both the risk of hearing injury and the potential for other persons to enter your working area.
Always be sure of your footing on slopes. Walk, never run.
FRENDEESITPTNLSVDANOHUCSRUROPLSLHRETLTLVSKBGUKTR
English (Original instructions)
- Keep proper footing and balance. Do not overreach. Overreaching can result in loss of balance.
- Do not allow hands or any other part of the body or clothing inside the feeding chamber, discharge chute, or near any moving part.
- Never use the product with defective guards or shields, or without safety devices, such as debris collector, in place.
- Do not modify the product in any way or use parts and accessories that are not recommended by the manufacturer.
WARNING
Before using the product in vacuum mode, you must assemble the upper and lower vacuum tubes together. This is a one-time operation only. Never operate the vacuum with only the upper vacuum tube fitted. The risk of personal injury is signifi cantly increased if you fail to follow this warning.
A WARNING
If the product is dropped, suffers heavy impact, or begins to vibrate abnormally, immediately stop the engine and inspect for damage or identify the cause of the vibration. Any damage should be properly repaired or replaced by an authorised service centre.
- Do not touch the area around the silencer or engine of the product. These parts get hot during operation.
- Stop the engine and allow the product to cool down before refuelling.
For refuelling and fuel mixing, chose an area that is well-ventilated, and is away from ignition sources, such as sparks or flames, and flammable materials. - Do not smoke when mixing fuel or filling the fuel tank.
-
Mix and store fuel in a container approved for fuel. Keep an appropriate type of fire extinguisher nearby for dealing with fuel fires.
Remember to securely refit the fuel tank cap before starting the engine.
Wipe away any fuel spillage. Move 9 m away from refuelling site before starting engine.
To reduce the risk of injury associated with contacting rotating parts, always stop the engine and disconnect the spark plug boot. Make sure all moving parts have come to a complete stop before: -
leaving the product unattended
clearing blockages or unclogging chute -
checking, cleaning, or working on the product
-
inspecting the product after striking a foreign object
-
Immediately stop the engine in an event of accident or breakdown. Do not operate the product again until it has been fully checked by an authorised service centre.
BLOWER SAFETY WARNINGS
Wear a face filter mask in dusty conditions to reduce the risk of injury associated with the inhalation of dust.
Slightly dampen surfaces in dusty conditions.
- Do not use the product near open windows.
Use the full blower nozzle extension so that the air stream can work close to the ground and perform effectively.
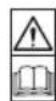
In blower mode, use the product with the vacuum tubes fitted, or you may choose to remove them and close the fan guard. You must never separate the vacuum tubes and operate with only the upper tube fitted. These tubes are designed to be a one-time fit. If you attempt to separate the fitted vacuum tubes, the tubes will be damaged. This significantly increases the potential for serious injury by contact with the rotating fan.
- Do not point the blower nozzle in the direction of people or pets.
- Never place objects inside the blower tubes.
- Do not place the product on top of or near loose debris. Debris can be sucked into the intake vent, resulting in possible damage to the product.
VACUUM SAFETY WARNINGS
WARNING
Never operate the vacuum with only the upper vacuum tube fitted. Failure to follow this warning increases the risk of personal injury.
NOTE: Without the lower vacuum tube fitted, it is much easier to reach up inside the tube towards the fan blade.
- Do not operate the vacuum without the debris collector bag assembly installed. Flying debris could cause serious injury. Make sure that the debris collector bag is in good condition and completely closed before operating the product.
- Move the vacuum from side to side along the outer edge of the debris. To avoid clogging, do not place the vacuum tube directly into the debris pile.
FRENDEESITPTNLSVDANOFHUCSRUROPLSLHRETLTLVSKBGUKTR
English (Original instructions)
Hold the engine higher than the inlet end of the vacuum tube.
- To avoid serious injury to the operator or damage to the product, do not try to vacuum up rocks, broken glass, bottles, or similar objects.
- Avoid situations that could cause fire in the debris collector bag. Do not operate the product near an open flame. Do not vacuum up warm ash from fireplaces and barbecue pits. Do not vacuum up discarded cigars or cigarettes unless the cinders are completely cool.
- Keep all parts of your body away from any moving part. Rotating fan blades can cause severe injury. Stop the engine and ensure that fan blades have stopped rotating before opening the vacuum door, installing or changing tubes, or opening or removing debris bag.
- When feeding material into the product, make sure that the pieces of metal, rocks, bottles, cans, or other foreign objects are not included.
- Do not allow processed material to build up in the discharge zone. This may prevent proper discharge and can result in kickback of material through the intake opening.
If the product becomes clogged, stop the engine and remove the spark plug boot before cleaning the debris.
RESIDUAL RISKS
Even when the product is used as prescribed, it is still impossible to completely eliminate certain residual risk factors. The following hazards may arise in use, and the operator should pay special attention to avoid the following:
Injury caused by vibration
- Always use the right tool for the job, use designated handles and use the lowest speed necessary to achieve the task.
Hearing injury caused by exposure to noise
- Wear ear protection and limit exposure.
Injury from flying objects from the blower tube airflow if the debris collection bag is not fitted or is damaged
Wear eye protection at all times.
RISK REDUCTION
It has been reported that vibrations from handheld tools may contribute to a condition called Raynaud's Syndrome. Symptoms may include tingling, numbness, and blanching of the fingers, usually apparent upon exposure to cold. Hereditary factors, exposure to cold and dampness, diet, smoking, and work practices are all thought to contribute to the development of these symptoms. There are measures
that can be taken by the operator to possibly reduce the effects of vibration:
- Keep your body warm in cold weather. When operating the product, wear gloves to keep the hands and wrists warm.
After each period of operation, exercise to increase blood circulation.
Take frequent work breaks. Limit the amount of exposure per day.
If you experience any of the symptoms of this condition, immediately discontinue use and see your physician.
WARNING
Injuries may be caused or aggravated by prolonged use of a tool. When using any tool for prolonged periods, ensure you take regular breaks.
MAINTENANCE
WARNING
Use only original manufacturer's replacement parts, accessories, and attachments. Failure to do so can cause possible injury and poor performance, and may void your warranty.
WARNING
Servicing requires extreme care and knowledge and should be performed only by a qualified service technician. For service, bring the product to an authorised service centre. When servicing, use only original replacement parts.
- Stop the engine, allow the product to cool down, and make sure all moving parts have come to a complete stop. Disconnect the spark plug boot before conducting any maintenance or cleaning work.
- You may make adjustments and repairs described in this manual. For other repairs, contact an authorised service centre.
After each use, clean the product with a soft, dry cloth. - Check all nuts, bolts, and screws at frequent intervals for proper tightness to ensure that the product is in safe working condition. Any part that is damaged should be properly repaired or replaced by an authorised service centre.
- Bring the product to an authorised service centre to replace damaged or unreadable labels.
English (Original instructions)
CLEARING A BLOCKAGE
To reduce the risk of injury associated with contacting rotating parts, always stop the engine, and make sure all moving parts have come to a complete stop.
- Remove the blower tubes to inspect for blockage. Clear the tubes if required.
Remove the debris collector bag. Check that the bag adaptor is free from obstruction.
Inspect the opening to the fan enclosure and the tube to the debris bag for evidence of a blockage. Keep fingers away from the fan or mulching blades at all times.
- Do not attempt to remove the fan or mulching blade. If it is necessary to remove the fan or mulching blades, bring the product to an authorised service centre.
- Reinstall the tubes and the debris collector bag before starting the product.
CLEANING THE AIR FILTER
See figure 12-13.
A wet or dirty air filter causes starting difficulty, loss of performance, and shorten the life span of the engine. The air fi iter should be checked and cleaned after 5 hours of operation. Inspect and clean more frequently if used in dusty dirty conditions.
For best performance, the air filter should be replaced yearly.
- Remove the air filter cover by turning the dial counter clockwise while gently pulling out the cover.
Rinse the filter with clean water.
Gently squeeze filter until excess water is removed. Replace the filter. - Place the air filter cover back on the product. Turn dial clockwise until the cover is secured.
NOTE: Make sure the filter is seated properly inside the cover. Installing the filter incorrectly will allow dirt to enter the engine, causing rapid engine wear.
CLEANING THE EXHAUST PORT, MUFFLER, AND SPARK ARRESTOR
NOTE: Depending on the type of fuel used, the type and amount of lubricant used, and/or your operating conditions, the exhaust port, muffler, and/or spark arrestor screen may become blocked with carbon deposits. If you notice a power loss with your petrol-powered product, you may need to remove these deposits to restore performance. We highly recommend that only quali ed service technicians perform this service
The spark arrester must be cleaned or replaced every 50 hoursoryeartoensureproperperformanceofyourproduct. Spark arrestors may be in different locations depending on
the model purchased. Please contact your nearest service dealer for the location of the spark arrester for your model.
WARNING
To avoid a fire hazard, never run the blower without the spark arrestor in place.
FUEL CAP
WARNING
A leaking fuel cap is a fire hazard and must be replaced immediately.
The fuel cap contains a sealing gasket and a check valve to allow air in. A clogged check valve will cause poor engine performance. If performance improves when the fuel cap is loosened, the check valve may be faulty. Replace fuel cap if required.
When refi tting the fuel cap ensure it is not cross-threaded, otherwise it will leak.
VACUUM BAG
A dirty bag will reduce performance. To clean the bag, turn it inside out and shake. Wash the bag in soapy water at least once a year.
FUEL FILTER
The fuel supplied to the engine is passed through a filter to remove any contaminants from entering the engine. Contaminants in the fuel can cause poor performance and damage to the engine.
The fuel fi ler is a non-serviceable item and, if needed, should be replaced by an authorised service centre.
SPARK PLUG REPLACEMENT
This engine uses a Ryobi AC00160, Champion RCJ-6Y, or NGK BPMR7A spark plug with a 0,63 mm (0,025 in.) electrode gap. Use an exact replacement and replace annually.
- Remove the spark plug boot.
Loosen the spark plug by turning it counter-clockwise with a socket.
Remove the spark plug.
Inspect the new spark plug. The spark plug must be properly gapped and free of deposits in order to ensure proper engine operation. The correct gap is 0,63 mm (0,025 in.). To widen gap, if necessary, carefully bend the ground (top) electrode. To lessen gap, gently tap ground electrode on a hard surface.
FRENDEESITPTNLSVDANOFHUCSRUROPLSLHRETLTLVSKBGUKTR
English (Original instructions)
- Hand thread the new spark plug into the cylinder, turning it clockwise.
- Tighten with a socket. Torque to 24,40 Nm (216 lb.in.) minimum, 29,82 Nm (264 lb.in.) maximum. Do not over-tighten.
TRANSPORTATION AND STORAGE
- Stop the engine and allow the product to cool down before storing or transporting.
Clean all foreign materials from the product.
Drain all fuel from the tank into a container approved for petrol. Remember to properly replace and tighten the fuel cap. - Run the engine until it stops, this will remove all fuel that could become stale and leave varnish and gum in the fuel system.
If applicable, drain all lubricant from the engine into a container approved for lubricant. Remember to properly replace the lubricant cap.
Store the product in a cool, dry, and well-ventilated place that is inaccessible to children. Keep away from corrosive agents, such as garden chemicals and de-icing salts.
Do not store outdoors. - When transporting the product in a vehicle, secure it against movement or falling to prevent injury to persons or damage to the product.
- Never transport the product while the engine is running.
- Abide by all government and local regulations for the safe storage and handling of petrol.
Short term (less than 1 month)
- Stop the engine and allow the product to cool down before storing or transporting.
Clean all foreign materials from the product.
Store the product in a cool, dry, and well-ventilated place that is inaccessible to children. - Keep away from corrosive agents such as garden chemicals and de-icing salts.
Do not store outdoors.
SYMBOLS
Some of the following symbols may be used on this tool. Please study them and learn their meaning. Proper interpretation of these symbols will allow you to operate the tool better and safer.


Read this safety and operating instructions in this manual and keep it in a safe place for future reference.
Beware of thrown or flying objects. Keep all bystanders at least 15 m away.
Wear eye protection.
Wear ear protection.
Do not run product without the tubes in place.
Risk of long hair being drawn into the air inlet.
Risk of loose clothing being drawn into the air intake.
To reduce the risk of injury or damage, avoid contact with any hot surface.
Warning! Hot surface.
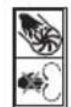
Dangerous feed orifice and rotating fans. Keep hands and feet out of the openings while the product is running.
Use unleaded petrol intended for motor vehicle with an octane rating of 91 ([ + ] / 2) or higher.
Use 2-stroke oil for air-cooled engines.
Mix the fuel mix thoroughly before refuelling.
Full choke
Half choke
Run position
Unlock the cruise control lever.
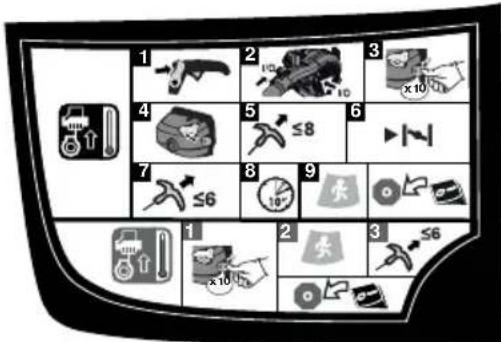
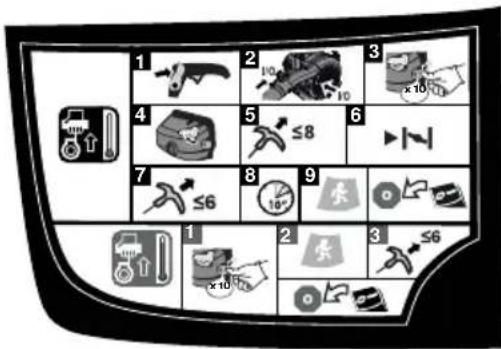
Pull the starter grip until the engine attempts to start. Do not pull the starter grip more than 8 times.
Pull the starter grip until the engine attempts to start. Do not pull the starter grip more than 6 times.
Press the primer bulb 10 times.
FRENDEESITPTNLSVDANOFHUCSRUROPLSLHRETLTLVSKBGUKTR
English (Original instructions)

Allow the engine to run for 10 seconds before using the product.

To start a cold engine

To start a warm engine

Blower mode
If the quick change lever is pointing on this symbol, the product operates in blow mode.

Vacuum mode
If the quick change lever is pointing on this symbol, the product operates in vacuum mode

Conforms to all regulatory standards in the country in the EU where the product is purchased.

EurAsian conformity mark

Ukrainian mark of conformity

Guaranteed sound power level is 107 dB.
KNOW YOUR PRODUCT
See Fig 1a and 1b.
- Lower vacuum tube
- Vacuum bag
- Adaptor
- Cruise control
- Throttle trigger
- Upper vacuum tube
- Fuel cap
- Starter grip
- Choke lever
- Upper handle
- On/Off switch
- Positive switch at blowing side
- Primer bulb
- Vacuum handle
- Upper blower tube
- Door tab
- Inlet cover
- Lower blower tube
- Positive switch at vacuuming side
- Raised slot
-
Adaptor installed in vacuum bag
-
Raised locking tab with switch insert metal plate
- Vacuum bag assembly
- Vacuum Inlet cover tab
- Vacuum opening
- Locking tab
- Vacuum tube assembly
- Screw for holding vacuum tube assembly
- Quick start label
- High velocity nozzle
- Air filter cover
- Air filter dial - turn to open or close air filter
- Air filter
- Wrench
ASSEMBLY
UNPACKING
This product requires assembly.
Carefully remove the product and any accessories from the box. Make sure that all items listed in the packing list are included.
WARNING
Do not use the product if any parts on the packing list are already assembled when you first open the box. The parts on the packing list are not assembled by the manufacturer and require customer installation. Use of a product that may have been improperly assembled could result in serious personal injury.
Carefully inspect the product to make sure no breakage or damage occurred during shipping.
- Do not discard the packing material until you have carefully inspected and satisfactorily operated the product.
If any parts are damaged or missing, please call your Ryobi service centre for assistance.
PACKING LIST
Blower/vacuum
Blower tube
Nozzle
Upper blower tube
Lower blower tube
Adaptor installed in vacuum bag
Upper vacuum tube
Lower vacuum tube
Bottle of 2-stroke lubricant
Operator's manual
English (Original instructions)
Figure sheet
NOTE: Read and remove all hang tags and store with your operator's manual.
ASSEMBLING THE BLOWER TUBES
See figure 2.
- Close the vacuum inlet cover securely. Make sure the metal contact on the inlet cover is inserted into the positive switch.
Align the raised tabs on the blower housing outlet to the slots at the upper tube; slide and tighten securely by twisting; press slider plate into the slot of the positive switch to make sure the switch is engaged and ready to operate.
Connect the lower and upper tubes together.
Connect the nozzle.
To remove the blower tube, pull out the slider from the positive switch, then rotate the tubes to remove them from the blower housing outlet.
INSTALLING THE VACUUM BAG
See figure 3-4.
- Unzip the vacuum bag and place the adaptor inside as shown. Push the vacuum bag adaptor through the opening in a direction opposite to the zipper. The wider end of the adaptor will remain in the vacuum bag when installed properly.
Align the raised slots on the vacuum bag adaptor with the raised locking tabs on the blower housing outlet; push the bag adaptor onto the housing. Twist to lock into place, press the metal contact into the positive switch slot to make sure the switch is engaged and ready to operate. - Rotate the vacuum bag until the shoulder strap is upright.
Make sure the vacuum bag is zipped and closed before starting the product.
INSTALLING THE VACUUM TUBES
See figure 5-6.
WARNING
Rotating impeller blades can cause severe injury. Always stop the engine and ensure impeller blades have stopped rotating before opening the vacuum door or installing/changing tubes. Do not put hands or any other object into the vacuum tubes while they are installed on the product.
INSTALLING THE VACUUM TUBES
- Secure the upper and lower vacuum tubes together by aligning the raised locking tabs with the matching orifice on the upper vacuum tube. The two tubes become one tube assembly after inserting them together.
Depress door tab using a flathead screwdriver to open the vacuum inlet cover.
Align tabs on housing with the tube assembly. - Tighten screws on the upper vacuum tube to secure to the blower housing. Make sure the metal contact on the vacuum tube is inserted into the positive switch.
REMOVING THE VACUUM TUBES
- Loosen screws of the upper vacuum tube by turning counterclockwise.
Remove the vacuum tube assembly from the blower housing. - Close the vacuum inlet cover securely. Make sure the metal contact on the inlet cover is inserted into the positive switch.
OPERATION
NOTE: The product has positive switches at the blowing and vacuuming opening sides. The product will only run if both the metal contacts are inserted into the positive switches. When running the product in blower mode (Fig. 8), the metal contact on the blower tube and the inlet cover must be inserted into their respective positive switches. When running the product in vacuum mode (Fig. 11), the metal contact on the adapter tube and the vacuum tube must be inserted into their respective positive switches.
WARNING
Petrol is extremely flammable and explosive. A fire or explosion from petrol will burn you and others.
MIXING THE FUEL
The product is powered by a 2-stroke engine and requires pre-mixing petrol and 2-stroke oil. Pre-mix unleaded petrol and 2-stroke engine oil in a clean container approved for petrol.
The engine is certified to operate on unleaded petrol intended for automotive use with an octane rating of 91 (R + M) / 2 or higher.
- Do not use any type of pre-mixed petrol/oil from fuel service stations, this includes the pre-mixed petrol/oil intended for use in mopeds, motorcycles, etc.
FRENDEESITPTNLSVDANOHUCSRUROPLSLHRETLTLVSKBGUKTR
English (Original instructions)
Use synthetic 2-stroke oil only. Do not use automotive oil or 2-stroke outboard oil.
Mix 2% synthetic 2-stroke into the petrol. This is a 50:1 ratio.
- Mix the fuel thoroughly and also each time before refuelling.
- Mix in small quantities. Do not mix quantities larger than usable in a 30-day period. Synthetic 2-stroke oil containing a fuel stabilizer is recommended.
FILLING THE TANK
Clean surface around fuel cap to prevent contamination.
- Loosen the fuel cap slowly to release pressure and to keep the fuel from escaping around the cap.
Carefully pour the fuel mixture into the tank. Avoid spillage. Prior to replacing the fuel cap, clean and inspect the gasket.
- Immediately replace the fuel cap and hand tighten. Wipe away any fuel spillage. Move 9m away from refuelling site before starting engine.
NOTE: It is normal for smoke to be emitted from a new engine during and after first use.
WARNING
Always shut off engine before fuelling. Never add fuel to a machine with a running or hot engine. Move at least 9 m from refuelling site before starting engine. Do not smoke!
STARTING AND STOPPING
WARNING
Never start or run the engine inside a closed or poorly ventilated area. Breathing exhaust fumes can cause death.
To start a cold engine:
- Lock the cruise control.
- Press slider plate into positive switch's slot to allow the positive switch to engage and be ready to work.
- Press the primer bulb 10 times.
- Set the choke lever to choke position.
- Pull the starter grip until the engine attempts to start. Do not pull the starter grip more than 8 times.
- Set the choke lever to choke position.
- Pull the starter grip until the engine starts. Do not pull the starter grip more than 6 times.
- Wait 10 seconds.
- Set the choke lever to choke position.
To start a warm engine:
- Press the primer bulb 10 times.
- Set the choke lever to choke position.
- Pull the starter grip until the engine starts.
To stop the engine:
Press the on/off switch to off position (O).
Fuel system damage or performance problems resulting from the use of an ethanol-blended fuel containing a percentage of ethanol more than the stated below are not covered under the warranty.
Petrol containing up to 10% ethanol by volume (commonly referred to as E10) or 15% ethanol by volume (commonly referred to as E15) are acceptable. Do not use E85 fuel, it will void your warranty.
BLOWER OPERATION
See figure 8-9.
FRENDEESITPTNLSVDANOFHUCSRUROPLSLHRETLTLVSKBGUKTR
English (Original instructions)
WARNING
Do not place blower on top of or near loose debris or gravel. Debris may be sucked into the blower intake vent resulting in possible damage to the product and serious personal injury.
Operate power equipment at reasonable hours only not early in the morning or late at night when people might be disturbed. Comply with the times listed in local ordinances.
To reduce sound levels, limit the number of pieces of equipment used at any time.
- Operate the blower at the lowest possible throttle speed to do the job.
Check your equipment before operation, especially the muffler, air intakes, and air filters.
Use rakes or brooms to loosen the debris before operating the product. Slightly dampen surfaces in dusty conditions.
- Conserve water by using power blowers instead of hoses for many lawn and garden applications, including areas such as gutters, screens, patios, grills, porches, and gardens.
Watch out for children, pets, open windows, or freshly washed cars, and blow debris safely away.
NOTE: The high velocity nozzle is specifically designed for wet sticky leaves. It allows you to scrape wet leaves or debris while operating the blower.
CRUISE CONTROL
See figure 10.
The cruise control can be used to operate the blower without holding the throttle trigger.
To engage the cruise control, pull the cruise control lever back towards the user and stop at the desired throttle setting.
To release the cruise control, push the cruise control lever all the way towards the front of product.
VACUUM OPERATION
See figure 11.
WARNING
Keep the silencer and all hot surfaces of the blower/ vacuum away from your body. Failure to do so could result in possible serious personal injury.
Install the vacuum tubes and the vacuum bag. Refer to the As sembly section earlier in this manual.
Start the engine. Refer to the Starting and Stopping section earlier in this manual.
- Place the vacuum bag strap over your right shoulder. Hold the upper handle with your left hand and the vacuum handle with your right hand.
- Move the product from side to side along the outer edge of the debris. To avoid clogging, do not place the vacuum tube directly into the debris pile.
Hold the engine higher than the inlet of the vacuum tube.
Always point the vacuum tube downhill when working on a hillside.
- To avoid serious injury to the operator or damage to the product, do not attempt to vacuum up rocks, broken glass, bottles, or other similar objects.
If the vacuum tubes get clogged, stop the engine, ensure the impeller blades have come to a complete stop. Disconnect the spark plug wire before cleaning out the obstruction. Remove the vacuum tubes and clear the debris from the fan housing. Remove the bag and clear the tube. A small rod or stick may be required to clear the entire tube length. Ensure that all debris has been cleared before reassembling the vacuum tubes.
English (Original instructions)
TROUBLESHOOTING
If these solutions do not solve the problem contact your authorised service dealer.
| PROBLEM POSSIBLE CAUSE SOLUTION | ||
| Engine will not start. | No spark | Check spark. Remove spark plug. Reattach the spark plug cap and lay spark plug on metal cylinder. Pull the starter rope and watch for spark at spark plug tip. If there is no spark, repeat test with a new spark plug. |
| No fuel | Push primer bulb until bulb is full of fuel. If bulb does not fi ll, primary fuel delivery sys tem is blocked. Con tact a servicing dealer. If prim e bulb fills, engine may be flooded, proceed to next item. | |
| Engine is flooded. | 1. Remove spark plug, then turn the product so the spark plug hole is aimed at the ground. 2. Set the choke lever to « B » position and pull starter cord 10-15 times. This will clear excessive fuel from the engine. 3. Remove any fuel from the product. 4. Clean and reinstall the spark plug. 5. Clean up any spilled fuel and move at least 9 m away before restarting. 6. Pull starter handle 3 times with the choke lever at « B » position. 7. If the engine does not start, set the choke lever to « B » choke position and repeat the normal starting procedure. 8. If the engine still fails to start, repeat the procedure using a new spark plug. | |
| Starter rope is hard to pull. Contact a servicing dealer. | ||
| Engine starts but will not ac cel er ate. | Engine requires approximately three minutes to warm up. | Allow engine to completely warm up. If engine does not accelerate after three minutes, contact a servicing dealer. |
| Engine starts but will only run at high speed at half choke. | Carburettor requires adjustment. | Contact a servicing dealer. |
| Engine does not reach full speed and emits excessive smoke. | Lubricant and fuel mixture is incorrect. | Use fresh fuel and the correct 2-stroke lubricant mix. |
| Air fi Iter is dirty. | Clean air fi Iter. Refer to Cleaning the Air Filter section earlier in this manual. | |
| Spark arrester screen is dirty. Contact a servicing dealer. | ||
| Engine starts, runs, and accelerates but will not idle. | Idle speed screw on carburettor requires adjustment. | Contact a servicing dealer. |
English (Original instructions)
MAINTENANCE SCHEDULE
| Before each use | After first month or 20 hours of operation | Every 3 months or 50 hours of operation | Every 6 months or 100 hours of operation | Every year or after 300 hours or operation | |
| Check engine lubricant■ | |||||
| Change engine lubricant■ | ■ | ||||
| Check air fi ler■ | |||||
| Clean air fi ler■ | |||||
| Change air fi ler■ | |||||
| Check or adjust spark plug■ | |||||
| Replace spark plug■ | |||||
| Check or adjust idle speed■ | |||||
| Clean spark arrester1 | ■ | ||||
| Replace spark arrester1 | ■ | ||||
| Check or adjust valve clearance1 | ■ | ||||
| Clean fuel tank and filter1 | ■ | ||||
| Check fuel hose■ | |||||
| Inspect fuel filter■ | |||||
| Replace fuel filter■ | |||||
| Check all hose connections■ | |||||
| Inspect fuel tank vapour vent (if equipped) | ■ | ||||
| Inspect carbon canister (carburettor models only) | ■ |
- These items should only be carried out by an authorised service centre.
NOTES:
- Maintenance should be performed more frequently when product is used in dusty areas.
- When product has exceeded the maximum figures specified in the table, maintenance should still be cycled according to the intervals of time or hours stated herein.
FRENDEESITPTNLSVDANOFIHUCSRUROPLSLHRETLTLVSKBGUKTR
MACHEN SIE SICH MIT IHREM PRODUKT VERTRAUT
ALGEMENE VEILIGHEIDSWAARSCHUWINGEN
TRANSPORT OCH FÖRVARING
Advarsell! Varm overfl ate
Farlig foringshulrom og roterende blad.
Hold hender og føtter unna apninger mensprodukter i gang.
KJENN PRODUKTET DITT
Se fi g. 1a-1b.
- Nedre stovsugingsr
- Stovsugingsbag
- Adapter
- Cruise control
- Gasshendel
- Øvre stovugingsrør
- Lokk til drivstofftank
- Starthandtak
- Chokehendel
- Øvre handtak
- Av/PA-bryter
- Positiv bryter pa blasesiden
- Pumpeblase
- Støvsugehandtak
- Øvre blaserør
- Dörflik
-
Innlopsdeksel
-
Nedre ror
- Positiv bryter pa stovsugesiden
- Hevet slisse
- Adapter installert i sugepose
- Hevet lasefl ik med koblingsinnsats-metalplate
- Stovsugeposemontering
- Dekseflik, stovsugeinnlp
- Sugeapning
- Laseflik
- Sugeposemontering
- Skrue for holding av sugepose
- Hurtigstartetikett
- Hoyhastighetsmunnstykke
- Luftfi Iterdeksel
- Liftfiltergelger-virundt for a apne eller lukke luftfilteret
- Luftfilter
- Skrunogkkel
MONTERING
OPPAKING
Dette Produktet krever montering.
INSTALLLERESTVVSUGERPOSEN
Se fi g. 5-6.
ADVARSEL
tavolsagra fujhat el.
OBsNE INPABUNBAE30NACHOCTN
B HeKOTOpbIX pernoHax cyueCTByHT orpaHneHnHa nOJIb3OBaHHe HeKOTOpbIX onepaCn C daHHbIMycTPOIcTBOM. IpOKOHcyIbTIpyuTEcb C MeCTHBIMOpraHAMn Bnactn.
He no3BOJnTe NOb3OBaTbcr yCTpOInCTBOM DeTm HIN He oByeHHbIM nUcAm.
BHHMaTeJIbHo npOHTte DaHHbIe HcTpyKuIN. O3HaKoMbTeCb C 3JIeMeHTaMn ynpaBHeHn I npaBnIbHbIM NcONb3OBaHmE yCTpOCTBa.
HnKorda He BKnIOuayIe DnRaTeJIb B 3aMKHyTOM nII nIOxo BeHTUNpemyom npoctpaHCTBe. BdbxAHne BbIXIONhIx ra3OB DnBraTeJI npedctabJAre ONaCHOCTb IJI XN3HN.
Ipeed Kaxdbm NcNoB30BaHnEm npOBepaObyo 30Hy. Y6epnte TaKne O6bekTb, KaK KaMHN, OCKONK CTkna, TBO3Dn, nPOBOda HnN uHypbl, KOtOpbie MOryT dAneko OTNeTeb NoD BO3DeiCTBnEM 6bICTporo NOTOKaBO3dyxa.
O63aTeJbHo Hocnte CneLnaJIbHbIe yCTpOcTBA 3aunTbCnyxa. DAnHoe n3deJeNc CnIbHO 5yMNT, IN dInTeJbHoe BO3dEcnCTBnE 5yMa MoKET npNBecTN K NOBpeXKeHIO Cnyxa, ecN He co6IOnDaTB INCTpyKUnn No ORpaHNueHIO BpeMeH N BO3dEcnCTBnR 5yMa, CHINKeHIO yPobHry 5yMa n 3aunTe OprAHOB Cnyxa.
O63aTeJbHo Hocnte cneuaJIbHbIe ycTpoIcTba 3aUHTb 3peHn. Ipon3BODnteJIb HAcTOrTeJIbHO peKOMeHdyET HOCNTb UJEM-MACKy NIN 3aUHTbIE OUKN 3akpblTO Tnna. O6bUHbIe OCHN NIN COJHcE3aUHTbIE OOKn HE RAJIYOTc HAdJNeKaUeN 3aUHToN. MoUHaN CTpyR BO3dYxa MOKeT npNBecTN K 6bICTPOMy OTJetaHIO NOCTOpOHnX INpeDMToB INx OTCKOKY OT TBepdbIX NOBepxHocTeB CTOPOHy ONepaTopa.
Bo Bpem 3Kcnnyataun H3deJnB CERda Hocnte cneuaIbHyO ObyBn DnHHbIe 6pKn. He pa6oTaIte CInHCTpyMeHToM 6OCNKOM NIN BOTKpbItbIX caHaIaInx.He HaedeBaIte CBO6OHyO OExdy NnOexky Co CBnCAIOUIMN UHPKaMn NIN y3nAmN.
He Hocnte npoctoHyo odexdy nnIOBepnHbIe ykpaueHn, KOtOpbie MoryT 3aTHybCBA BO3dyxo3a6ophoe OTBepCTne. Co6epnte dINHHbIE BOIOcBi Bblie nJe, YTO6bi ppeoTbpATnTB IN nonadaHne B DnKxuNecs qactn.
OcteperaTecb otIetaoHx npedMetOB. He donyckaute np6bnHexnnoCTopoHHnx niu, 0co6eHNO DeTeN I DOMaHHX XINBOTbIX K pa6oey 3OHe 6nXe Yem Ha 15 M
Icnoj3yntye yctpoiCTBO TOnbKO B pa6oee Bpem, a He paHO yTpOM NIN N03dHO Beepom, KOrda 3TO MOKeT MeaTaB OKpykaHouIM.
IpepeHcnoB3OBAHnEM H3dEINr pa3pbixnTe Mycop rpa6nMn nn MeTIOJ.
Hikorda He nCnoB3yIte I3JeJIe BO B3pblBOOnaCHO aTMocpepe.
He pa6oTaIe C n3dennem, ecnn Bbl yTomIeHbI, 60JIbHbI, HaxOaNTecB B COCTOHN aJIKORoNBHO, HApKOTuYeCKOrO ONbHarHn IIN NIOB BO3JeNCTBnEM JeKapCTBeHHbIX cpeICTB.
Y6eIntecb nepe KaKdbIM nCNoJb3OBAHnEM,TO BCE 3IeMeHTbl ynpaBHeHn I npEdoXpaHNTenbHbIe yctpoIcTba φyHKUOnHpyOT npaBnIbHO.
FRENDEESITPTNLSVDANOFIHUUCSRUROPLSLHRETLTLVSKBGUKTR
Pycckn (IpeBOD n3 nepBOHaayaHbHbIX INHCTpyKcN)
Pa6oTaIe c yCtpoiCTBOM,3aHIMa peKOMeHdyemoe noJoxKeHne n TOJIbKO Ha TBepdoN, POBHOn NOBepxHOCTn.
He pa6oTaIe C nHCTpyMeHTOM Ha MoUeHOu INn NOKpbIToR rpaBnEM NOBepXHoCTN, TAK KaK npN 3TOM Bbl6pacbIbAembM MaTePnAn MOKeT pNBeCTN K TeJIecHbIM NOBpeXJeHnM.
PpOBepeIe KOpNc H3dennn Ha PpeMet NOBpeKDeHn nepeKaKdbIM NcNoJIb3oBaHneM. Y6eNTecb B TOM, yTO 3aUNTHbIE npCnOC6JIeHnry n pyuKn HaxOJrTcHn HA MeCTe n HaDEXHO 3aKePENHeHbI. 3aMeHInTe N3HOseHHbI e JIN NOBpeKDeHHbIe, 4TO6bl O6ecNeHTb 6aJAHcnpOBky. 3aMeHInTe NOBpeKDeHHbIe INJ HeHTaEMbIe HAKJeKN.
OuHauTe ot Mycopa BeHTnJIaOnHHbIe OTBepCTna DnAoxJaXdHn DBuratEn.
He pa6oTaIe c yCTpOInCTBOM, ecIn pRdOM npCcyTCTByOT noCTOpOHnE Jnca, ocObeHNO Detn, a TAKKe DOMaUHnE XJNBOTHbIe.
H36eraTe nCNoB3OBAHn yCTpoNCTBa B NIOxN NOOrDnBix ycIbOnx,OCo6eHNO KOrDa cyUeCTByET PnCK nonaDaHnMoJHn.
He pa6oTaTe npn HeOCTaTOHOM OcBeueHnn. OnepatOp DonKeH YeTko BnDEtbp a6oyu 30Hy B cIeJAX BbIaBHeHn NOTeHuaJIbHbIX ONaCHOCTe.
3KcNlyataa ananorHbix yctpoCTB B6n3pa6oey 30hbl NOBbIaet pck NOBpeXdHn Cnyxa nOnachOCTb NOBJIeHn NOCTOPOHnx JnC B BAwe pa6oey 30He.
OBeCneBte yToOnuBocb Hor npn pa6oTe Ha ckNoHax. IpeEbnraItecb 1aROM, He 6eraTe.
CtapaTecb coxpaHrTb ycTouNBOCTb n noDbicknBaIte TBepdyIO onopy. He nepeHanpraTb. IpeHAnpJKeHne MOKET KOHcTaBcnoTepei 6aHaHca.
He donyckaTe nonadHnpyK n Dpynx qacteTeta nn OdekB B 3arpy3oHyu Kamepy, BbInyckHOJnotOK nn B 3OHy dpynx DBNkyuxxCqacteN.
3anpeaetcna knnyataun npdykta C HeNCnpaBbIMn 3aunTHbIMn yCTpoNCTBaMn Nnnu TKAm, a TaKke 6e3 npedoxpaHNTeJbHbix ycTPOICTB, HApnmep, 6e3 yCTaHOBJEHHorO Mycopoc6opHnka.
3anpeaetc KaKIM-JI6O 6pa3OM n3MeHrTB KOHCTpykUHO yCTpOJCTBA NnN nCNOJIb3OBAHnA DeTaN IN pINHaJNeXKHOCTN, He peKOMEHDoBaHHbIe IPOUN3BODHTeJIEM.
OCTOPOXHO
Ipei nCnoB3OBaHnem n3JeNnB PexKmE nbinecoca Heo6xoDIMO coeDHHb BepxHIO HnXHIO Tpy6blneococa. IpeHa3NayeHo TOnbKO dIy OndopaaBOrnpimHeHnKOrDa He BKnOuaTe nbinecoc,ecnYctaHOBHe OAHa TOnbKO BepxHra BCacBaHOaT py6ka. OnachocTb NonyeHn TpaBMbl 3HaunTeNbHO Bo3pactaet, ecn BB He 6yndeTe Co6NdoTa bTo npedynpeKdHeHn
OCTOPOXHO
EcnyyctpoiCTBO yPOHnN, OHO n3daet rPOMKn CTyk Nn HaunHaET Ype3MepHo Bb6pnpoBaTb, HEmeJneHHO OCTaHOBNTe erO npoBepbTe Ha HAnuye NOBpeKdEHN Nn BbIChHTe npuHy Bb6paun. JIObIe NOBpeKdEHbIe DetAIn DoJIKNbI 5bITb HADJIeXaUm Obpa3OM OTPMOHTnpOBaHbl Nn 3aMeHeHb B aBTOPI3OBaHHOM CEPBCHOM cHTpe.
He npikacainTecb K obnaCTn pRdOM C rnyuHTeIeM uCINHpOM HcTpyMeHTa, TAK KAK BO BpeMa pa60tbl 3TN DeTaN HarpeBaIOTCra.
Ipepe3anpaBko BbIKIOHTe DBnraTeN n daTe N3dennIO OCTblb.
ДяЗпаьи ИсмшениТОПИВаБИбраITExopoJOBEHTUNIPyEMbI yactOK BDAJI NOTNCTOCHIKOB BO3ROPaHЯ, TAKNX KAK NCKpbI NПамЯ, NOT JERKOBOCnAmEHryUxCR MaTePnaJIOB.
He kypnte npnpnroTOBHeHn TOnnBHOm Cmecn nn 3anpaBKe TOnnBHorO 6aka.
ToTOBbTe TOnJIINBHyIO CmEcB n XpaHnTe ee B npedHa3NaeHHoI dIa 3TOrO KaHnCTpe. ObecneYbTe HaJInuHe OrHeTyUInTeJI, NOxOJaIeero Ira TySeHn 3aropeBWeERO TaNlBa.
■ Npeq 3anyckOM Dnuratne npOBepte, nIOTHO nn 3akpyeHa Kpbuka 6eH3o6aka.
BbItnpaIte pa3nmbuee cera ropuee. Pepe 3anyckom DBratena nepemecnttecb Ha 9 metpoB OT Mecta 3anpaBkn.
YTO6bI CHN3NTb PNCK NOJUyeHn TpaBMbl OT KOHTaTc C BpaUoUIMNCr DeTajmM, BIKLNHOHTe DBnraTeNb n pa3beHNHTe KOHTaKT CBeu 3axnraHn. Y6eINTEcb B TOM, YTO BCE NODBnKhbIe DeTaN INONHOCTbO OCTaHOBNNCb nepei:
OcTabHeHne H3eJIIN6e3 npNCMOToPa
- OYNCTKOJ 3acopOB
- npOBepKa, TexO6cnyKbHne n 3KcnIyatauyn yCTpoNCTBa
- OCMOTpOM INHCTpyMeHTa nocne ydapa o KaKoIJI6O npedmet
FRENDEESITPTNLSVDANOFIHUCSRUROPLSLHRETLTLVSKBGUKTR
Pycckn (IpeBOD n3 nepBOHaayaHbHbIX INHCTpyKcN)
B cnyuae noIomKn nn HeNCnpaBHocTn np6opa BbIKIOHNTe DBNATeNB HEmeDneHHo. He IcNOJb3yInTe yCTpOInCTBO, 6bpaNTecB rapaHTnHoe 06cnykBaHne dJaJIbHeNeI npOBepKn.
IPEIOCTEPEXEHN OTHOCNTIELHO B3ONACHORO NOLb3OBAHN BO3DyXODYBKO
Dn CHIXKeHn ONaCHOCTn TpaBMIpOBaHHN, CB3aHHORO C BbIxHaHem Nbln npn NOBbIeHHo3AnbJIeHHOCTn, HadeBaNTe Ha JNIO 3aUNTHyIO Macky.
Cnerka cmoHTe noBepxHOCTN B yCIOBnX CnIbHO 3aIbJIeHHOCTN.
He pa6oTaIe cyCTpoNcTBOM B6Jn3n OTkpbTbIX OKOH.
HcnoJb3ynte DONoJIHnTeJbHyIO HacaIky BO3dyXoOyBKN, YTO6bl NOTOK BO3dyxa 6bln6n3ko K 3emJne DnMaKcImaJIbHOJ 3000
B pexkme Bo3dyxOyBkN cNoIb3yIte n3dJIeNc yCTaHOBNEHbIMn Tpy6kAMn BCaCbIBaHn NnCHmnte nx n 3akpoIte peWetky KpbILbYaTkn. 3anpeuaeTcra OTcoEINHrTB Tpy6Kn BCaCbIBaHn N 3KcNJyaTnpoBaTb nbIEcOC C OJHOI TObKO BepXHeN Tpy6KoBcAcbHn. KOHCTpyKUg NpDpa3ymBaET oDHOKpatHyO yCTaHOBky. JIO6a NOnbITKa pa3dEnNTb yCTaHOBNEHHbIe Tpy6Kn BCaCbIBaHn NOBpeiNTnx. 3TO 3HaHTeJIbHO NOBbIaET BepoTHocTb cepBe3HOI TpaMbI np KacaHN BpaUaOJeC KpbILbYaTkn.
H e HappaBnAeHoe OTBepCTne B pexKMe BByBaHnHa JHOe NIM DOMaWHNX XNBOTHbIX.
He donyckaIte nonaHaHn noCTopoHHnx npEdMeTOB B Tpy6Kn BO3dyXoDyBKn.
He nomeuTe HNCTpymeHT Ha cbinyuMycop nn pIOM C Hm. MycOp MoKet 3aTHyTbcra B BO3dyx03a6OpHnK n npNBecTN K NOBpeXKeHHIO yCTpoiCTBa.
IPEIOCTEPEXEHN OTHOCNTIELbHO B3ONACHOIOJIb3OBAHN IbJIIECOCOM

OCTOPOXHO
HnkOrda He BkIouaTe nbIeoc, ecIn yctaHOBneHa Onda ToIbKO BepXnRA BCacblBaIOua Tpy6ka. HecobJIOHeH eToro npedynpexKdHn noBbIaet onaChOCTb nIoUyeHn TpaBMbl.
PIMMEAHNE: Be3 yctaHOBHeHHo HnKHe Tpy6bl nbIeNcoca HamHoro IerYe do6paTbca No BHTpeHHen qactn Tpy6bl KNONACTN BEHTINATopa.
He nCnoIb3yIte nbIeCoc 6e3 Mycopoc6OpHoro MeuKa, JETaun MyCop MOKeT CTaTB npuHOn cepBe3hBx TpaBM. Y6eIITecb, yTO Mycopoc6OpHbI
MeWOK B HAdnEkaueM COCTOHN I NOJIHOCTbIO 3aKpbT Do hauana pa6oTbI.
IpepeMaIe nIeNoc n3 cTOpHb B cTOpOHy BIOB BHeuHero KpaMycopa. UTo6bln36ekaTb 3acopeHna, He NOMEaIte BCacbIbAIOUyTOpy6ky npraMo B Kyu Mycopa.
- Depxknte yctpoCTBO TAK, qTO6bl DnBirateJIb 6bln Bblwe kpar BO3dyx03a6OpHnKa Ha Tpy6ke dnn BCacbIBAHJ.
Bo n36ekahne cepbe3HOn TpaBMBI onepaTopa nnIOBpeKdEHHy yCTPOINCTBA He ybnpaTb NbIeCOCOM KAMHN, 6nTOe CTEKNO, 6yTBInKN I TOMy NOo6hBeO6BeKTbl.
He donyckaTe cntyaun, KOtOpbIe MOrT npnbecn K Bo3rOpAHIO B MycOpoc6OpHom MeuKe. He pa6oTaIe pAOM C OTKpbITbIM OrHem. He ouHuaTe BCacbIbAHmE TropaNe KOCTpNua, JMBI dJa 6ap6ekHo, 060XkeHHbIe KcyTbI N.T.. Noka neNe IOKOHaTeNbHO He octbInet. He 3acacbIbAte 6poWeHHbIe OkypKn Cnrap nJn Cnrapet.
He donyckaite nonadHna qacte Tena B DnKyuuece TaTaN. Bpaauounece IOnactu KpbIbYaTKn MOrYT CtaTB npuHNO TjKeNoi TpaMbbl. OctaHOBITE DBnraTeJB y6eDntecb, YTO Bpaauounece IOnactn OCTaHOBUNCb, PpeJde YEM OTkpBaTb DBepuy nbinecoca, yCTaHaBnBaTb/ MeHrTb Tpy6Kn,OTkpBaTb INN CHMaTb MEwOk dJa Mycopa.
Pnnoahe MaepnaIb HNCTpymENT CneIte 3a TEM, yTO6bl TaM He 6blIO MetaJIINueCKNX npeDMeTOB, KAMHei, 6yTbINOK, JxecTReHbIX 6aHOK I Dpyrnx NOCTOPOHHNx npeDMETOB.
Cneinte 3a TEM, TTo6bI o6pa6oTaHHbIM MaTePnAn He 3a6BnAan 3OHy Bb6pOca. 3TO MOKeT NOMeWAsTb npabNtBHomy c6pocv Otpa6oTaHHoro MaTePnAna n Bb1BaTb 6paTHbIn BB6pOC BCacbIBaEMOROMaTePnAna.
PnO6pa3oBaHn 3acopa neped TEM, kak erOpouNCTntb BbIKJIOHTe DBIRaTeIb N OTKJIIOHTe KOHTAKT CBeHn 3aXnraHn.
BYDbTE BcERda OCTOPOXHbI
JaKe KOrDa N3DeJIne NcNoB3yIOr COrNaCHOHCTpyKUma, HeBO3MOxHO NOJIHOCTbO yCTpaHHTb PaKTOpbI pNcKa. Pn 3KcNlMyatauM MOrT BO3HNKHyTb CNeDyUoUne CuTyauuN, KOtOpbIM NOnb3OBaTeB DoJIKeH yDJIaTb Oco6oe BHMaHHe, YTO6bI N36ExKaTa Ipo6JeM:
TpaBmbl, Bb3Baemble Bn6pauee.
- PpimEnHnTe INHcTpymeHT OJIbKO NO CBOemy Ha3HaueHnIO, NcIOnb3yIte HAdNExKaUne pyKu n Co6JIoDaIte pa6OuH peKm.
FRENDEESITPTNLSVDANOFIHUUCSRUROPLSLHRETLTLVSKBGUKTR
Pycckn (IpeBOD n3 nepBOHaayaHbHbIX INHCTpyKcN)
IIOBpeXdEHNcnyxA,Bbl3bBAeMOe BO3deNCTBnEM 乌Ma.
HocTe yctpoNCTBa 3aunTbI cnyxa n orpaHnUBAe IpOdoJXHTeJIbHOCTb WymOBOro BO3deJeCTBna.
TpaBma ot pa3JeTaIOxxCaYCTnU, BbI3BaHbIXNOTOKOM BO3Dyxa n3 Tpy6Kn BO3DyXoYBKN, ecnnMeIouk IINcBopA MyCopa He yctaHOBneHnnIOBpeKDeH
- O6raTeJIbHO HOCHTe yCTPOINCTBa dIaIITbI rJa3.
CHNXEHNPENUCKA
CunTaETc,TO Bn6paqna pyHOro HnCTpyMeHa MoKet npBecTn K npOBHeHNO y OTdeJIbHbIX IINu TAK Ha3bIaEMoB 6OJe3Hn PeIno (Raynaud's Syndrome).K CmTTOMAM MOryT OTHOCITc NOKaJIbBaHne, OHemHne n NOBeHne NaJIbueB (Kak np NepeoxJaXDeHN). CunTAOT,TO HacJedCTBeHHbIe paKTopbl, OxJaXdHne IN BlaXHOCTb, Dneta, KypeHne IN pKaTnueckn ONbIT CNOC6CTByOT pa3BNTnIO 3TNx CmTTOMOB. HnKe npBODrTc MEPbl, KOtOpblE MOKet npNHTb OepaTOP dAN CHNXHn BO3DeICTBn Bn6paqnn:
OdeBaIteCb Tennee B xOnoHyo norody. PnE KcNpyataunn H3dennn Hocnte nepyatkn, TTo6bcoxpaHHTb pyKn n 3aIaCTb B tenne.
Iocne kaxdoro 3Tana pa60tB BbINOHTe ynpaxkHeHn dny ycnJeHn KpOo6paueHn.
Haue deaute nepepbIbB pafoe. Cokpatnte DInTeJIbHOCTb exEHNHeBHOro npe6bIBaHn Ha OTKpblOM BO3DyXe.
Pn noBHeHn KaKx-Jn6o n3 yKa3aHHbIX CmITOMOB cpa3y Je npekpatnte pa60ty n obpatntecb no nx NOBOy K Bpauy.
A OCTOPOXHO
CnIuKOM npoJOnJxNteJbHoe nCNoJIb3OBAHne HNCTpyMeHTa MoKeT npNBecTn K TpaBMe. PpN IcNOJIb3OBAHmN INCTpyMeHTa B TeueHHe dNITeJIbHOrO BpeMeHn DeaTe peryJrpHbIe nepepbIBbl.
TEXHINCHECKOE OBCJNYXUBAHNE
A OCTOPOXHO
NcnoB3yIe TOJbKO opnHaJIbHbIe 3aNuactn, akceccyapbl HacaKn OT npOn3BOdnteTn. HeBbIOJIHeHne 3tOro Tpe6OBaHH MoKeT npNBecTn K TpaBMe, K CHIKKeHHIO npOn3BOdnteJIbHOCTn I K aHHyIpOBAHH rapaHTn.
A OCTOPOXHO
06cnykubahne Tpe6yet Ype3BbUaHNo 3a6Ot b H3aHHN I DOJXHO 6bITb BbINOHHeo TOIbKO KBAINHcnpOBaHHbIM TexHNKOM 06cLyKuBaHnra.
06patntecb B aTOpN3OBaHHbI cepBnCHbI cHTp dna TexO6cLyKuBaHnra. Ppi BbINONHeHm TexHNueCKoro
06cNyKuBaHnra NcNOJb3yTe ToJIbKO OpUNHaJIbHbIe
3aunactn OT npOn3BODInTeJI.
BbIKHouHTe DBnIaTeJIb, DaIte N3deJIHIO OCTbITbN y6eIITecb, YTO BCE DBNKyUncEra DeTaN IONHOCTbO OCTaHOBUNICb. Nepei npoBeJeHMeM TexHNHeCKORO 06cnyKuBaHnI INN OuncTKN N3deJIHnPa3bEduHNTe KOHTAKCBEHn3aXnRaHn.
Bbl MoXeTe TaKxE BbINOJHnTb DpyrHe BNDbpeRyIInpOBKN IN peMOHTbIe pa60TbI, ONNCAHHbIEB DaHHOM pyKOBOcTBe. NObnpocy peMOHTaobpaauTeCb B aBTOp3INpOBAHHbI CepBNCbIuCEHTp.
IocneKaKdOrIO nCnObl3OBaHnI npoTnpaTe H3dennr MAnKoN CyXOn TKAHbIO.
PpOBepuB BCE 60JIbI, 3aDnKnn, n BnHTbI, uepe3 KOpOTKne INHTepBaJIbI, Ha HAnJExKaUyIO NIOTHOCb, YTO6bl y6eINITbcra, yTO N3DeIeHnE HaxOInTCB B 6e3OnachOM, pa6oem coCToRHN. B CnYuae NOBpeXdEHNA KAKON-Ni6o DetanN HeoBXOIMO 6paTtBcB AABTOPn3OBaHHbI CEPBnCHbI CEHTp DnBbINOJIHeHnHaDnExaUero peMOHTa NN 3AmHebl.
O6paHTeCb B aBTOpN3OBaHHbI cepBnCHbI ueHtp 3aMeHbIOBpeKdEHHbIX ININ HeHTaEMbIX 3TtKeTOK N3DeNIA.
OCHCTKA 3ACOPEHNA
YTO6bI CHN3NTb PNCK NOLyHEnr TpaBMbl PnKoHTaKe C BpaUOUMNC DeTaJAMN, BcerDa BblKnIOuaTe DBuRaTeNb n yBeDInTEcb, YTO BCE DnBxKyuneCer TaJIIOCTAOHOBJeHbI.
OToeHNHTe BO3dyHbIe Tpy6Kn n OcMoTpnte nx Ha npEaMeT 3acopeHn. OChCTnTe Tpy6Kn, ecnn He6xOJImO.
FRENDEESITPTNLSVDANOFIHUCSRUROPLSLHRETLTLVSKBGUKTR
Pycckn (IpeBOD n3 nepBOHaayaHbHbIX INHCTpyKcN)
CHIMITE Mycopoc6opHbI MeWOk. Y6eINTecb, yTO aaantep MeUKa He 3acopeH.
Ocmotpnte OTBepCTne B KOpnyce BeHTnIaTopa n Tpy6kn no BCen dInHe, YTO6bl npOBepNTb, He 3acopeHb JIN OHn. He donyckaTe nonadHna NaIbueB B 3OHy BpaueHnKpbJbYaTKn MynbUnpyuMxJe3BN.
He nbTaTecb CHImaTb KpbIbTuATky IIN MylbChpyIOoee Je3Bne. Ecn Heo6xOmo ChrTb KpbIbTuATKy IIN MylbChpyIOoee Je3Bne, 6paTtTeCb B ABTOpN3OBaHHb CepBcHbIeHTP.
Ipepe3anyckom HnHCTpymehTa yCTaHOBNTe Tpy6bIMewoK dnn c6opa Mycopa.
CHCTKA BO3DyUHHO ΦNJIbTPA
Cm.pnc.12-13.
BnaKbI nnr rpa3HbI Bo3dyuHbI FnIbTp MoKeT CTaTb npuHHO CNOXHOCTe npu 3anycke n3deJn, NOTepn npo3BOUHTeNBHOCTn u cokpaueHn Cpoka cnky6bl DnuratEn. Ypeez kaxdble 5 yacob pa60tbcne dyet npoBOuNTb npOBepky OCHKTy BO3dyuHORO fNtpa.Bcnyae pa60tbl BycnoBNx 3anblneHHOCTN 3arpy3HeHHOCTH npOBepky OChCTKY CNeDyET npoBOuNTb qae.
IЯ obecneueHn JyUwero KahecTa pa6oTb I3denn B03duhbl nBtp Heo6xOuMo MeHrTb exeOJHO.
CHIMMTE KpbIHKY BO3dyuHoro 1nBtpa, NOBOPaUNBaCyeTHbI DNCK NO YacOBOc TpeJKe N OCTOPOXHO OTTARNBaKpbIHKy.
PpOMOHTe qHJIbTp YnCToB BODoI.
OCTOPOXHO COXMNTe FnIbTp, YTO6bl ydaNtB JINHIOBOy. YCTAHOBNTe BO3DyHbI FnJIbTp.
IocTaBbTe Ha MeTo KpbUk Ky Bo3dyuHoro fumnbTpa. IOBepHnte CHTbN DnCK NO YacOBoC TpeJKe dnn Kcun N KpbUkN.
INPMUEAHNE:Y6eHNTecb,HTOfNtBnT npaBnBHO yCTaHOBnEN B KpbIuKE. HeKOppeKTHaY yCTaHOBka fNtPOB MoKeT CTaTB nPunHOn PpOHKnHOBeHn B DnRaTeNb rpa3n, CnOCo6CTByr YbeHneHn oero mHOca.
OuNCTKA BbIXIONHOrO OTBEPCTnI,ITyUHTENJI NCKPORACNTENJ
INPMUEAHNE: B 3aBnCIMOCn OT NcNoJb3yEmoTtNa TOnNtBa, Tnna N KOJIYeCTBa MaCn n (nJN)ycNobn 3KcPnyatauNN BbIXONHoe OTBepCTne, rJyWnteNb H/NI NCKporacHTeNB MOrY 3acopA TcHarapom. Ecnn 6eHcOIna TepreT MoUHOCTb, ydaJInteCKONHBsyOcR OKaJIHy. PekOMeHdyETcR npoyaTb3Ty Opeauu KBAIINuIUPOBAHHom CneuaJIACNTV.
Ira oecneeyncooTBETCTBYIOeKaeeTba pa60tbi N3dEINN OUcTky INN 3aMeHy NCKporacNTen Heo6xOIMO BbINOJHrTb KaKdIe 50 YacOB pa60tbi
n nn exeroiHO. NckporacnteMoryt pacnojaraTbcB pa3hbx MecTax, B 3aBNCIMOCTN OT MOden INHCTpyMeHTa. Obpatntecb B 6nXaui CepBnchbI CEHTp Dnnpno6peTeHH NCKporacnteN JnBaew MoDen.

OCTOPOXHO
Bo n36exaHne nojapa 3anpeuaetcNcnoJb30BaTb BO3DyXoYBky 6e3 NCKporacraIero 3KpaHa.
KPbIiKA TOnJIINBHOBOBAKA

OCTOPOXHO
PpoTeKaIOUa KaIbIka TOnJIbHOrO 6aka IOXapoonacha N DoJxHa 6bITb 3AmHeHa IcnpaBHO HEmeJeHHo.
Ha TOnnBHO KnbIke IMeETcYINOTHIneBna HApOKnAkaN KOHTpOBHbIKaNAH DnBnyCKa BO3dyxa. BnOKIpOBaHne KOHTpOBHoro KNAnaHa BeDet K NaDeHHo npON3BOIDTeJbHOCTn DBrAteJI. EcnN KaueCTBO pa60tBu N3dEHN NOBbIaaeTc npn OTKpyeHHo KpbIuHE TOINNBHO 6aka, 3TO MOKeT CBNDTeJBcTBoBAtBo O HeNCnPabHOCTN KOHTpOBHoro KNAnaHa. Pn HEO6XODIMOCTN 3aMeHIne KpbIwky TOnnIBHO 6aka.
Pn yctaHOBKe TOnnBHO KnbIKu Y6eUNTeCB B TOM, YTO OHa 3aKpyeHa No pe3b6e, B IpOTnBHOM Cnyuae MoKET PON30Tn VTEyka.
MELIOK IIbIECOCA
Tpy3HbMewOK CHNkaeT npOn3BOOHTeNbHOCTb. 706bl OCHNTb MeWOK, BbBepHnte ero Hau3HaHKy N BbITpXHnTe. CTpaIte MeWOK MBbIBHoH BoE He pexe ODHoro pa3a B rOJ.
TONINBHyIΦNJIbTP
TOnnIBo NodaetcB DNBATenbYepe3 FnIbTp BO n36eKaHne nonaDaHnB Hero rpa3n. Ppa3b B TOnnIBe MOKET cTaB npuHnO HnAdeHn npou3BOaNTbHOCTN IN NOJOMKn DNBATen.
TOnnBbHbI ΦnIbTp He 06cnyKuBaETcN npn Heo6xOaMIOCTn NOJLeXeNT 3aMeHe B aBTOpN3OBaHHOM cepBnCHOM ueHTpe.
3AMEHA CBEUH 3AKIAGHNA
B Dniratene nCnoIb3yIOTc CBeu 3aXnraHnryoBCAC00160, Champion RCJ-6Y, NGK BPMR7A c 3a3opomMejdy 3JeKtpOdAmn 0,63 MM. POnIb3yItecb TOnIbKO 3ToOMoDeJIbIO CBeu N MeHrTe CBevy pa3 B rOd.
CHIMITEyexoJcBeyn3aXnraHn.
BbIePHnTE CBeU KJIIOvOM, NOBOpaUNBaA ee BJIeBO.
FRENDEESITPTNLSVDANOFIHUCSRUROPLSLHRETLTLVSKBGUKTR
Pycckn (IpebeoN3 nepBOHaJaNbHbIX nHcTpyKcn)
CHIMNTEcBeyu.
OcmotpTe HOByo CBeuy 3axnraHna. CBeya 3axnraHna DoJxHa NMeTb npaBnBbHbN 3aOp n 6bItb YnCToI DnIy ObecneueHn HOpMaNBHO pa60tbl DBnraTeJI. Hadnexkaun 3aOp:0,63 mm. 4To6bl yBeInuHTb 3aOp B Cnyuae Heo6xoDnMoCtN, octopoxHo OTOrHnTe 3emnHO (BepxHn) 3JeKtpoI. 4To6bl yMeHbUnTb 3aOp CnErKa NoctyUHe 3emnHbIM 3JeKtpoDM NO TBepDoN NobepxHOCTN.
BkpyTnte Cbeyu 3aKnHaHnB B cnnHdp, nobopauBaar ee no yacoboi ctpeJIke.
3aTnTe ee KIOyOM. 3aKpyTnTe Do 24,40 Nm MHHMym, 29,82 Nm MaKcMym. He nepetraBaIte.
TPAHCIOPTNPOBKA IN XPAHEHNE
OCTAHOBITE n3dJIne, daIe emy octbITb nepei NOCTAHOBKO HA xpaHeHne IIN TpaHCnOpTnpOBKoN.
OuHCTHe yCTPOHCTBO OT BCEX NOCTOPOHHX MaTePnaJIOB.
CneTe BCE TOnnIBO n3 6aka B KaHnCTpy dna 6eH3nHa. He 3a6bIbaIte TuaTeNbHO 3akpbIbAtb KpbIky TOnnnBHorO 6aka.
DaiTe MOTopy npa60TaTb, noka OH cam He octaHOBNTcra. 3TO N03BOJNT H36abNTbcr OCTAPOTo TOnJIbBa, ppeCTaBnHIOeO ONaCHOCTb 3arp3HeHnA TOJIINBHO CnCTembl Harapom mCMoJAMn.
Ecn npmeHmo, cne Te BCE macno n3 DnBraTeIa B npedHa3NaeHHbI dIg Macna KOHTeHep. He 3a6ydbTe 3akpbItb KpbIuKy MaCJHoro 6aka.
XpaHnTe ero B npoxlaHOM, cyxom, xopoio npoBeTpnaeMOM n HeDocTyHOM dIra DeTeMecTe. He depKnTe 6eH30nny prdom C Koppo3nHbIMn BeueCTBaMn, TaKIMn KaC aDOBbie XmNKaTbI nn pa3MopaxnBAHOa corb.
He xpaHnTe Ha oTKpbITOM BO3dyxe.
I TpaHcnpTnPOBKn 3aKpeNtne n3dennr TaK, 4TO6bI OHO He MOrNo NepemEuaTBCr IIN yNaCTb BO n36exKaHHe TpaBMnPoBaHnre nepcoHaHa IIN NOBpeXKeHnra n3dennr.
He nepebo3nte n3dJIne BO Bpempa60bI Dniratena.
Co6nJaTe rocyapCTBeHHbIe MeCTHbIe HopMbIXpaHeHr TOnnBa.
KpaTkoPouHoe xpaHenHe (do 1 meca)
OctaHOBtE n3dJIne, daTe eMy octbIb nepei NOCTaHOBKOHa XpaHeHne IITpAHCnOpTIpOBKoN.
OuHCTnTe yCTPOINCTBO OT BCEX NOCTOPOHNX MaTePnaJIOB.
XpaHnTe ero B npoxnaHOM, cyxom, xopoio
IpoBETpBaEMOM HNeOCTyHOM DJI DeTei MeCeT.
He depknte 6eH30nny praOM c Koppo3nHbIMn BeueCTBaMn, TAKmN KaK caObIe XmNKaTbI nn pa3MopaxNbAioa cor.
He xpaHnTe Ha OTKpbITOM BO3dyxe.
YCIOBHBIE OBO3HAUHIN
Ha daHHOM nHCTpyMeHTe mOryt npCytCTBOBaTb HeKOTOpBte n3 cneDyUoInx 063NaueHn. N3yUte nx n 3aONMHTE, yTO OHN O3HaayAOT. PpaBnJIbHOe NOHMaHne daHHbIX 063NaueHn No3BOJNT Bam lyUwe N6e3OnaChee NOJIb3OBaTbCRA daHHBM INHCTpyMeHTom.
PpoHTte HnCTpyKuIN No TexHnke 6e3oNaChocTn n EKnIyatauN, npBedeHHbE B HactToaem pyKOBoDCTBe n CoXpaHnte nx dnn 6dyuero NCNoJIb3OBAHn.

POMHnTe 06 onaCHOCTN, KOtOpyo npedctabJrOT cOboi OTbpaCbIbAemblc yCTpOINCTBOM NIN BbInetaUcne n3- noI Hero npedMetbl. He noDnyckaiTe nocToPOHHnx Jnuc 6nHexe Yem Ha 15 MetpoB.

IcnoJb3yIte cpeIcTba 3aunIbI opraHOB 3peHnIa

CneNyET HaneBaTb CpeIcTBa 3auNTbI opraHOB cnyxa

He 3KcnIpyaTnpyTe yCtpoNCTBO, He ycTaHOBb Tpy6Kn Ha CBOe MeCTo.

Onachoctb nonaHaHn DnHHbIX BOIOC BBO3dyx03a6OpHNK

Onachoctb 3aTARnBaHnCBO6oHbIX yHaCTKOB OeKDbB BO3dyx03a6OpHoe OTBepCTne.

Bo n36eKaHne TeJeCHOro NobpeKdEHHn nn NobpeKdEHnOBOpyDoBaHHn, He DonyckaIte KacaHHc HArpeToH nobepxHOCTbIO.

OctopoxHo! HarpeToH noBepxHOctbIO
HacaKa DnAnonachbIX MaTePnaNoB n BpaAuaOnuecea NOnactn. He np6JnxKaTecb K OTBepCTnM BO BpeMa pa60tby yctpoiCTBa.
IOnb3yntecb aBTOM6nJbHbIM He3TUNIPOBaHHbIM 6eH3nHOM OKTaHOBBIM YNCnOM 91 ([R + M] / 2) nIN Bblie.
FRENDEESITPTNLSVDANOFIHUUCSRUROPLSLHRETLTLVSKBGUKTR
Pycckn (IpeBOD n3 nepBOHaayaHbHbIX INHCTpyKcN)

H


ДЯ DBuratene C BO3dUHbIM OXJaXDeHnEM NcNoB3yIte MacNo DJIa 2-TaKTHbIX DBuratene.
Ipeed 3anpaBko TuaTeNbHO CMeuAaTe TOONIBHYIO CMEcb.
PonoxeHne "FULL" (NoIhble o6opoTbI)
HanoOBHy 3aKpbIToe nOKeHne npocceJia
NooxeHne Bk
Pa36nokpyte pykOaTKy Kpyu3-KoHTpOJa.
DepraTe 3a pyky cTapTepa, noka DnBraTeIb He 3anyCTntc. He depraTe pyky cTapTepa 60JIbwe 8 pa3.
DepraTe 3a pyKy cTapTepa, noka Dniratelb He 3anyctntc. He depraTe pyKy cTapTepa 60JIbwe 6 pa3.
Haxmnte 10 pa3 KhoNky noDcoca.
IpeepHaayanom NcnoB3oBaHnna 13eJNaTe DnraTeNIO npa6OtaTb B TeueHne 10 cekyHd.
3anyck xoJIOHOrO dBiratTeTn
3anyck nporpertoro DnurataTna
Pekim Bo3dyxOyBkn
Ecnnpbuvar6bICTpOncMeHbIyKa3bIBaET Ha 3TOT CnMBOJ, 3HaayNT N3dennE cyHKUHOHPyET BpeXmME BO3dyXoDyBKN.
Pexm BCacbBaHn
EcnnpbUar 6bICTpOcMeHbIyka3bIBaET Ha 3TOT CmBOJ, 3Haunr N3dJIne cyHKUHOHpyET B pexKIme nbInecoca.
HactoIin HnCTpymENT OTBeHaET Bcem OoHnAInbHbIM CTaHdpTAM CtpaHbI EC, B KOTOpO OH 6bln npNo6peTeH.
3NaK EBya3nCKOrO COOTBeTCTBn
Ceptndkat COOTBETCTBNA
No TC RUC-DE.AE11.B.04160
Cpok deyctbnr CeptnnkaTata
COOTBETCTBnI No 11.08.2020
Hekommepecka opraHHaia
UypekjdeHne
ceptnokauu nn kcneptn3bl
TapaHTnpyEmbI ypoBeHb 3BykoBO MOuHOCTn COCTaBnEeT 107 n5.
N3YUHTE YCTPOICTBO
Cm.pnc.1a-1b.
- HxHry Tpy6ka BCacbHaHn
- MeioK nbinecoca
3.Перекховник
4.Cta6n3atopckopoctn - Kypok akcepepatopa
- BepxHra Tpy6ka BCacbBaHHa
- KpbIka TOnnINBHorO 6aka
- Pунka 3аицka
- Pbyar 3acNoHKN
- Bepxny pyka
- BbIKIOUaTeJIb BKJ/BbIKJI
12.ПинHynteьньпpekeHuaTeьHa cTopoHe BO3dYxOyBKN
13.Подсoc - Pучka nbilecoca
- BepxHra Tpy6Ka BO3dyXoYbKn
16.OTCEK DBepn
17.Kpbioka Bnycka - HnKnra Tpy6ka Bo3dyXoYbKn
- PnHynteHbHn nepeKIOaTeIb Ha cTOpOHe nJIeCocA
- YBeHnueHHbI cERMeHT
- NepexoHnK yCTaHOBneH MeuKe nbIeCoca
22.ПиИОДнЯТь 6NOKIpyUOuBbICTyN CO BCTpoEHbIM BBKJIIOYaTEJEM -MetaJIINueCKO INaCTHHO
23.Блok мewska дя сбopa мсора
24.OTCEK Kpbilikn BakyymHoro Bnycka - BakyymHoe oTBepcTne
- OTeCek 6JnokIpOBKn
27.БнokТубкn nbinecoca - BnHT KpennneHn 6noka Tpy6bl nIeNecoca
- Ta6nukka 6bictporo nycka
- BbICOKOcKOpocHoe cinn
FRENDEESITPTNLSVDANOFIHUCSRUROPLSLHRETLTLVSKBGUKTR
Pycckn (IpeBOD n3 nepBOHaayaHbHbIX INHCTpyKcN)
- KpbIshka Bo3dyuHoro fInbTpTa
32.3acnoHka Bo3dyuHoro fniIbTppa-nOBepnHTe,TO6bl OTKpbITb INN 3aKpbITb BO3dyuHbI fniNbTp
33.Bo3dyuHbIΦnIbTp - Raeyhbl KJIOU
CBOPKA
PACNAKObIBAHNE
DaHHoe yCTpOINCTBO Tpe6yET c6OpKN.
OcToPoxHo n3BLeKeHte yCtPoIcTBo n BCE npucno6JIeHn I3 Kopo6Kn. IpOBepeTe HAnuHc BcEx DeTaIe, NepeHcJIeHHbIX B yNaKOBoCHOM JInCTe.
QTOPOXHO
He nCnoJb3yIte n3dennie, ecn KaKne-Jn6o DeTaJI, yKa3aHHbIe B yNaKOBOUHOM NICTe, npn nepBOM BCKpItTN BamN Kopo6Kn 6ydyT O6hApYKeHbI yKe yCTaHOBJIeHHbIMn Ha n3dennie. DeTaJI, yKa3aHHbIe B yNaKOBOUHOM NICTe, He yCTaHaBJIbNAOTcnpOn3BOIDTeJIem. NOKynateJIb nx ycTaHaBJIbAet Ha MeCTe. IcNoJIb3OBAHHe HENpaBUNbHO cO6paHoro yCTpOINCTBa MOKeT pINBEcTNI K cepBe3HOJ TpaBMe.
BHHMaTeJIbHO OCMOTpIe yCTpoINCTBO Ha HAnuHne DeΦeKToB IIN NOBpeXdEHN, BO3HnKUnx npn TPAHCNOPTNPOBKe.
He BbIbpaCbIbAaTe MaTePnAaYnaKOBKn, Noka He BbINOHNHTe TuaTeJIbHbIn OCMOTp Hye6eINTEcB HOpMaIbHOpaOte VCTPOINCTBa.
Ecn KaKaJ-Ni6o Detanb NOBpeKdeHa NnO TcyTCTByET, 6paTntecb Cnyk6y pa60TbC KIneHTAMN KOMNaHH Rvobi 3a NOMouIbIO.
YNAKOBOUHbIJINC
Bo3dyxOyBka /nbIeoc
Tpy6ka BbIyBaHnIa
Hacaika
BepxHra Tpy6ka Bo3dyXoYbKn
HxKnTpy6Ka BO3dyXoYbKn
IpehexoHnK yCTaHOBNeH BMeUke nJIeOca
BepxHra TpyKa BcacbBaHn
HnKnra Tpy6ka BcacbBaHn
BytbIka MOTOPHOro Macna 2-takThbx INBnrgatenei
PykoBODCTBO noIb3OBaTeJIa
Tabnua pncyHkoB
PIMMEUHNE: PPOUTTE IN CHUMITE BCE HABECBIE
ApIbIKXpaHHTe INx BmecTe c pyKOBOCTBOM onepaTopa.
MOHTAX TPYBOK BO3DyXOyBKN
CM.pnc.2.
TuaTeNbHO 3aKpOIne KpbUkY BakyMHoro Bnycka. MetaIINueckn KOHTAKr Ha KpbUke Bnycka DOJxeh 6bITb BCTABHeB INPHUYNTJIbHbB BBIKIOuATeNb.
BbipOBHnTe npINOHrTbIe BbICTyNbHa BbInyCKHOM OTBepCTm BO3dyXoYbKn C npope3mHa BepxHe Tpy6ke; BcTaBbTe H NaExKHO 3aФNKcnpyTe CKpyuBaHem; BdABnTE CdBnKHyO nlaCTnHy B npHyDnTeJbHbB BkJIIOUaTeJb, YTO6bl y6eINtbcA, YTO BBIKNoHTeNb AKTINBnPOBaH N rTOB K pa6Ote.
CoeHHHeBepxHIOHNKHOIO Tpy6Kn.
BcTaBbTe HaKoHeuHnK.
BbITAHNTe N03yHOK N03nUHOHHORo NepeKIOuHaTeTEn I NOBepHNTe Tpy6Kn, YTO6bl N3BNEyB INx IN3 BbIyCKHOrO OTBepCTNBA03DyXODyBKN.
YCTAHOBKA MEUKA IIN C6OPA MYCOPA
CM.pnc.3-4.
PacCTeHnTe MeoK dIra c6opa Mycopa N BCTaBbTe B Hero nepexoHNK, KAK NOKa3aHO Ha pncyHKe. IpoTOJKNHe nepexoHNK Upe3 OTBepCTne B HAnpaBJeHHN, npOTBONIOXHom MOJHHN. Ipn IpaBnJIbHOYCTaHOBKe WnPOKNI KOHeU nepexoHNKa DOJXeH OCTaTbCBy MEuKE.
BbipOBHnTe npnOHDHTbIepope3Ha nepeXoDHnke C npnOHDtBIMN BbICTyNamn Ha BblnyCKHOM OTBepCTn BO3dyXoDyBKn; npOTOnKHnTE nepExoDHnK MeuKa B Kopync. NObepHnTe, YTO6bI 3a6nOKnpOBaTb, BDaBnTE MetaNNueckn KOHTAKT B npope3b npHyDnTeJbHO BbIKNoYaTeJy, YTO6bI y6eINTbcA, YTO BBKNIOYaTeJb AKTNIBPOBaH nTOTOB Kpa6Ote.
IIOBepHnTe MeWOK dЯ c6opa Mycopa, noka IIpeeBOI peMeHb He 6yEdT pacNoJoxEH BepTKaJIbHO.
Y6eNTecb, yTO MycOpoc6OpHbM MeWOk IIOHOCTbHO 3aKpbIT HA MOHNIO DO HAUYANA pa6Otbl.
YCTAHOBKA TPY6 NbJIIECOCA
CM.puc.5-6.
CTOPOXHO
BpaaHouuiecnaonactn KpbIbUyatkn Moryt CtaTb npunHoi TjKeNo TpaBMbl. Npeed Tem, KaK OTkpItb DBepu NyIeocca HIn yCTaHOBHTb / 3ameHHTb Tpy6Kn Bcerda OTKIouaHte DBnIateN b y6eIntecb, YTO IonaTn paOoero KOleca nepectann BpaauTaCra. He nomeaTe pykN nIN kakne-Nn6o ppeMetbl BHytpb Tpy6 NbIeocca, eCnOn OHn yCTaHOBHeHb Ha HHCTpyMeHTE.
FRENDEESITPTNLSVDANOFIHUCSRUROPLSLHRETLTLVSKBGUKTR
Pycckn (IpeBOD n3 nepBOHaayaHbHbIX INHCTpyKcN)
YCTAHOBKA TPY6 NbJIIECOCA
CoedHnTe BepxHIO HnKHO Tpy6Kn bIInecOca, BbipabHBnBa QHKcnpyUQne BbICTynC COOTBeCTBHyUQmN OTBepCTnMn Ha BepxHeN Tpy6Ke bIInecOca. Iocne BCTaKn OOnH Tpy6Kn B Dpyryo OHa CTAHOBnTcOdHOn Tpy6Kn B c6ope.
HaXMMTe cerMeHTDbepn,OTKpbIB KpbIuKy BaKyMHO Bnycka IIOCKO NTBePTKoN.
BbipOBHnTe BbIcTynbl Ha Kopnyce c 6JIOKOM Tpy6.
3aTnHTe BnHbI Ha BepxHe Tpy6Ke nbInecoca, UTo6bl 3akpenntb ee Ha Kopnyce BO3dyoxOyBKn. MetaJInuueckn KOhtkHa Tpy6e nbInecoca DoJXeH 6b1b BCTabHe H pNHyDnteHbH bIKNIOuOaTeHb.
CHRTNE TPYB NbJIIECOCA
Ocna6bTe BnHTbl BepxHei Tpy6bl nbinecoca, NOBepHyB IN pOTNB YacOBN CTpeJIKN.
CHIMTe 6IOK Tpy6 nbinecoca c Kopnyca BO3dyXOyBKN.
TuaTeNbHO 3aKpOIne KpbIuKy BaKyymHoro Bnycka. MetaIINueckn KOHT Ka H KpbUKe Bnycka DOJXeH 6bITb BCTABHeB INHyDnteHbHb BbIKIOyateJIb.
3KcnnnyATAUa
INHCTpyMeHT OCHaueH npHyDInTeBbIMn BbIKIOuATEJMaH Ha CTOpOHAX BO3dyXoYbKN IbIeNcoCA. INHCTpyMeHT 6yDet pa6OtaTb, TOJIbKO ECNI Oba MetaJIINueCKNX KOHTA T BCTABNeHbIB pInHyDInTeBbIE BbIKIOUaTEJN. PpN NCNOb3OBAHm INHCTpyMeHTA B peKIMe BO3dyXoYbKN (Pnc.8) MToaJIINueCKN KOHT AHa Tpy6Ke BO3dyXoYbKN IN KpbIbKa BnyCkdoJHKbI 6bITb BCTABNeHbIB COOTBeTCTByIOUne INpHyDInTeBbIE BbIKIOUaTEJN. PpnpaboTe yCTPOINCTBA BpeKIMe BCacBaHnM MetaJIINueCKN KOHTA H NaepexOHO Tpy6Ke N BCacBaIOUaT py6Ka DoJxHbI 6bITb BCTABNeHbIB COOTBeTCTByIOUne NO3NUOHHbIe nepeKIOUaTeJN (Pnc. 11).
A OCTOPOXHO
BcH3nK paiHe rpoU H B3pboOnaceH. Bo3ropaHne 6eH3nHa nn B3pB erO npOB MOrY npuHHntb Oxorn KaKa6oTaioUcEmy C 6eH3nHOM, TaK N OkpykaioUIM.
TONJIINBHAR CMECb
Motop HhctpyMeHTa - DByXTakTHbH, OH pa6oTaET Ha Cmecn 6eH3nHa n Macna dIyDByXTaKTHbIX DBiRaTeNe. CmeuBaIte He3TINpOBaHHbI 6eH3nC MaIOM dIyDByXTaKTHbIX DBrarTeJe B uNCTOc TcAHdAPTHoKAHNCtpe dIg 6eH3nHa.
Motop pa6oTaET Ha aBTOMo6nHOM He3TnIupOBaHHOM 6eH3nHE C OKTaHOBBIM YNCJOM 91 INI BblE.
He noIb3yIteCb cMecmN 6eH3nHa n Macna, npednaraeMbIMn Ha 3anpaBOHybIX CTAHcIrx, OHn npedha3HaueHbI dIra TAKOI TexHnKn, KaK MoneDbI N MOTOUCIKJIbI.
IOnb3yntecb TOJbKO CnHTeTneckm Macnom DnA BByXTakTHbIX DBuRatene. He nCnoJIb3ynte aBTOMO6nJIbHOe MaCIO NIM Macna dNn NOBecHbIX DByXTaKTHbIX DBrarTeNei.
ДобавытБбeн3иH2%-Hoe cHTeTneckoe Macno DnA 2-TakTHoro DBuratena.Пponopun1:50.
XopoOo CmeuBaTe ToTnIBo nepeKaKdo3anpaBkoI.
CmeunBaHTe TOnnBO B He6oBbux KOnuYeCTBax: He 60nee yem Ha MecaI pa6Otbl. PekomeHyetyTcra NOJb3OBaTbcra CnHTeTuYeCKIM MacJOM JnA DByXTaKTHbIX DBrIaTeJIe, COdePkaUIM cTa6nH3atop 6eH3nHa.
3ANPABKA 6AKA
Bo n36exkaHne 3acopeHn TaonJIbBa npoTpnte 6ak BOKpyr KpbIuKn.
MeHnHOOTBHTnTe KpbIky 6aKa.
OcToPOxHo 3aJeTe TOJIINBHyIO CMeCb B 6aK. CtapaTecb He npoINBaTb ee. PpeKe De yem 3aBNHnVBaTb KpbIuKy, pnoBepbTe COCTOHNe npOKJaKn.
HaHeHbTe KpbIbky Ha TropNoBHy n KpeNko 3aBnHTnte ee. BbTnpaIte pa3JIbUweecr rOpiOee. Npeed 3anyckOM DnIraTeJn nepemecNTeCb Ha 9 MeTPOB OT MecTa 3anpaBKn.
PIMMEUAHNE: Bo Bpemn n noce nepBoro NcnoJb3OBAHnMOTOp MOKeT DbIMNTb.
FRENDEESITPTNLSVDANOFIHUCSRUROPLSLHRETLTLVSKBGUKTR
Pycckn (IpeBOD n3 nepBOHaayaJIbHbIX nHcTpyKcn)
CTOPOXHO
BcerdaIpyuHnTe DnuratEnb nepe3anpaBkoH. HnKOrDa He 3anpaBnIte HnCTpyMeHT C pa6oTaIOUIM HnI ropAum MOTOpOM. Iocne 3anpaBKn 6aka OTOnIITe He MeHee Yem Ha 9 m ot MecTa 3anpaBkn, npEke Yem 3anyckatb MOTop. He Kypnt!
3ANYCKIOCTAHOB
ACTOPOXHO
HnKOrda He BkIIOaHte DbIraTeB 3AMKHyTOM nIN nIOXo BEHTUNIPyEMOM npoctpaHCTBe. BdbixaHne BbIXONHBx Ra3OB dBIRatEn npedctabnreT onachOCTb dJRA3HN.
3anyck xonoDnHO OdBnraTeJ.
- 3a6nokpyIte c7a6nIIm3atop ckopocTn.
2.BdaBte CdBnKHyo nnactHy B npope3b npHdynteHBO BbIKHOaTeJy,TO6bl AKTNBupOBaTb erO nNOIROTOBtB K pa6ote. - HaxMnte 10 pa3 KhoNkY noDcoca.
- YctaHOBnTe pblayaxok npocceB nnoxehne H (NoHbIe o6opoTbI).
- DepraTe 3a pyKy cTapTepa, noka dBnraTeNb He 3anyctntc. He depraTe pyKy cTapTepa 6oIbwe 8 pa3.
- YctaHOBnTe pbHaxKoK IpocceB B IonoXeHne (IIOJOBnHa o6opoTob).
- DepraTe 3a pyKy cTapTepa, noka dBnraTeNb He 3anyCTntc. He depraTe pyKy cTapTepa 60nbwe 6 pa3.
8.Пождente10сeкун.
9.YcTaHOBnte pbUaXoK DpocceBpa6OeE NOIOXKeHn
Data n3roTOBHeHn (KoI DaTbI) OTUaTAMNoBaH Ha NOBepxHOCTN KOpNyCa n3JeIN.
Ppimep:
W17 Y2015, rnde Y2015 - roD n3roTOBJIeHn
W17-HeDnIu3roTOBneHn
OnpeDenb Mecau N3roTOBneHn MOxHO cornaCHO npBeHHo HNKe Ta6nue,Ha npImepe 2015 roda.
06patte BHMmaHne! KoJIyecTBo HeJeB B Mecaepa3IyaeTc r O rOa B ro.
CINCOK OBCJNYXNBAHNA
ZAPOZNAJ SIE ZE SWOIM PRODUKTEM
He n3noN3BaIe ypea 3a 3acMyKbaHc, aKO yBaIbT
3a OTnabuH He e MOHTnpaH; JETRAUte OTLOMKMORAT Da npuHnT TeKKn HapaHbAHn. IpeDnpaBota ce yBepTe, Ye CyBaJIbT 3a Cb6pHaHe HaOTnabuH e Bdo6Po cBCToHnE n 3aTBopeH n3qJIO.
BpeKIM Ha 3acMyKBaHe npedBnXBaIe MaunHaTa OT KpaI DO KpaI, 3anOuBaIKN OT BbHUNHa KpaI Ha nPoCTpaHCTBOTO 3a NoUcTBAHe. 3a Da n36erHete 3anyuBaHe Ha 3acMyKBaUaTApb6a, He r HAcOyBaTe DnpeKTHO KbM KynHnHaTc OtnaDbu.
IpykTe DnuratEna NO-BUCOKO OT BXODAUNA OTBOP Ha BCMykaTeHATA Tpb6a.
3a da n36erHete HapaHbAhe Ha onepaTopa nn nobpeHa Ha MaunHaTa, He 3acMyKBaTe KaMbHn, CuyeneHn CTbkna, 6ytnIkn nn npDpyr noo6Hn npedmetn.
1368BaIe CITyaun, KOTo MoT a npednBnKaT noKap B CyBaIa 3a OTnaDbu. He n3non3BaIe Ta3n MaunHa B 6n3OCT DO OTKPNT ORbH. He 3acMyKBaIe T Opeua nenei OT KAMHN, ckap 3a 6ap6ekIO, KynHH Cbc cyxnpactEHn I dp. Noo6Hn. He 3acMyKBaIe pacOBe OT uRapn INn npyN,OCBeH aKO He CTe y6edeHN, Ye Ca HnblHO n3rachAn.
DpbjTe DnBxKeUInTe ce qactn Ha pa3ctOraHne ot TAnoto cn. BbptAunata ce nepka Ha potopa moKe Da HHece TeKKn KOHTy3nn. Cnpete DnBraTeJn N3yaKaIte nepkata Ha potopa da cnpe da Ce BbpTN, npden Da OTBOpTE peWetkata Ha BCMykATEHOTO yCTpOCTBO NN da MOHTnpate/cmHeNTe Tpb6nte.
Korato nodaBate MaepnauB npdykta,ceybepeTe, Ye B Tx Hma YactuOT MeTaN,KambH,6yTNKn, MeTaN KytN INI Dpyn UyKIN OBeKTN.
He no3BOJBAIte MaTePnAnITE, KOITo 6pa6OTBaTe, Da ce HATpyNBaT Ha MCTOTO Ha n3XBpNHe. TOba MoXe Da nonpeuHa npaBnHOTo n3XBpNHe N da DOBeDe Do OTKaT Ha MaTePnAnJa Ppe3 BCMyKaTeHnO r OTBOp.
Ako npodykTBt ce 3aDpBCTn, cnpTe DnBnraTeTn n3BaTe Te CTapTepa Ha CBeuTa, npEn Da noNCTnTe OTnaDbuNTe.
HENPEBVDENPNCKOBE.
DopnKorato npOdykTc Ce n3noJ3Ba no npedHa3haueHne, e HeBb3MOxHO HaBJIHO Da c Ce orpaHHu BInraHHeTo Ha onpeDeHen PnCKOBn PaKTOpN. PnCKOBete, OnicaHn NO-dony, MoKe Da Bb3HNKaT no Bpeme Ha yNoTppeBa n onepatOpbT Tpr6Ba da BnImaba 3a n36rBaHeto Ha CneIHDOTO:
HapaHbAHe, npuHHeO OT Bn6paIa.
BnHaHn H3NOJ3BaIte NOxOJ4uIN HNCTpyMeHTn 3a CbOTBeTHaTaeHOCt, DpbXkTe ypeIte 3a npEHa3HaYeHIne PbKOXBaTKN 3aDaBaIte Bb3MOXHO HAI-HNCKaTc CKOPoCT, N03BOJRAUa
FRENDEESITPTNLSVDANOFIHUCSRUROPLSLHRETLTLVSKBGUKTR
He pa6oTeTe cMaunHata, aKO Tpb6nTe He ca MOHTnpaHn.
OnachocOT 3acMyKBaHe Ha DbJrKa Kocot BXOJaBnBb3DyWeH OTBOp.
OnachocOT 3acmykBaHe Ha uPOKn OT BXOJUINBEHTUNaUHOHEOHOTBOP.
3a Da HamaIte ONaCHOCTTa OT HapaHbAHe Nn NOBpea, n36rBaTe KOHTAKT C HarOpeueHte NOBbPxHOCTN.
PpeDynpexKeHene! Topeua noBbpxHocT
Onaceh 3axpaHbau OTBOp IN BbptraUc CE nepKn.ДрькTe KpaHnCte Cn DaIeHe OT OTBOpNT, DOKATO npOdyKTbT pa6OtN.

N3no3BaIte 6e3oIOBEN 6eH3nH 3a ABTOMO6nn, C OKTaHOBO YNCNO 91 (IR+MI/2) nn no-BuCOKO.
N3no3BaTe MacNo 3a 2-TAKTOBn DBnraTeJI C Bb3dUshO OxJaKaHe.
FRENDEESITPTNLSVDANOFIHUCSRUROPLSLHRETLTVSKBGUKTR
POnuH "Half choke" (POny- 6nokupahe")
BkJIOUeHO NOIOXeHne
Ocb6oTeIocTa3aKpyn3 KOHTpOJI.
N3bpaNaTe DpbKkata 3a cTapTupaHe, DOKATO BnIgATEJr3apa60tn. He NbpnaTe pBkoXBatkata Ha cTapTepa NOBeue ot 8 nTu.
N3dbpnaTe Dpbkkata 3a CTaptnpaHe, DOKATO DBnrgateT 3apa60t. He NbpnaTe pBkoXBatkata Ha CTapTepa NOBEe OT 6 nTn.
HaTnchete nomnata 3a noKauBaHe Ha roPnBTo 10 nTn.
OcTaBeTe MOTopa BKNIOUeH 3a 10 ceKyuHn, Ppeu Da n3noJ3BaTe npOdykTa.
3a da cTaptnpate CtyeH DnBraTeN
3a da cTaptnape ToNbI DnBraTeI
PexnHa o6yBaHe
Ako noctb3a 6bp3o npebknoybaHe COU KbM To3n 3HaK, npOdyKTbT pa60Tu B peXMM Ha o6dyXbaHe.
PexMM Ha 3acMyKBAHe
Ako nocbT 3a 6bp30 npebKnIOUbaHe COu KbM To3n 3HaK, npOyKbT pa6oTu B peXIM Ha BCMyKBaHe
Ta3n MaunHa e B cbOTBETCTBne C HopMaTnBHata ype6a Ha Dbpxkabata OT EC, KbTeo e 6nna 3akyneha.
EurAsian 3nak 3a cbotBetCTBne
YKpaHnCKn 3HaK 3a CbOTBcTCTBnE
TapaHTnpaHTo HnBO Ha yM e 107 dB.
ONO3HAITEBAUNIPODyKT
Bux ΦuRpya 1a-1b.
-
Bb3dyeuen dntbp
-
Faeyeh KIIOH
CITIOBABAE
PA301NAKOBAHE
To3n npOdyKT n3nckBa crno6yBahe.
BHHMaTeJIHo 3BaJeTe npOdyKta n npHaJaIeJXHOCTNe OT KyTnTa. YBepeTe ce, ye ca HaJIuHn BCnKn eIemEHn, BKnHoueHN B Onica Ha naKeTa.
Hnkora He cTaptnpaTne Dnuratena Ha 3aTbopeHo Hnn He do6pe npoBeTpeno MrcTo. BnuWbaHeTo Ha Otpa60TeHN ra3OBe MoKe Da DoBede Do Cmbpt.
3a da cTaptnpate cTydeH dBnraTeI:
- 3aKJIIOyTe TEMNOMATA.
- Hatnche Te nIb3raaata Ce nIacTHa B Jxne6a Ha noJoxKInTeHHn IpeBKnIOuBaTe, 3a da ro fNkCnpate n Da 6bDe roTOB 3a pa6Ota.
- HATNCHETe NOMnata 3a NOdkaUBAHe Ha rOpNBOTO 10 NbTu.
- NocTabete npocenHnna noCT Ha no3nna (PbIHO).
5.ИЗдрайтdpьжката3a cTaptnupaHe,ДOKATO DBNarATEJIrT 3apa6OTn.HeДьрайтpepbkoXBaTKaTaHa CTapTepa NOBEe OT 8 nTn. - NocTabete DpoceHnna NoCT Ha No3nna (Hanonobnha).
7.ИдьрайтpepbkoxbatkataHa CTapTepa,ДOKATO DBnraTeTЯte CTapTnpa.He Ibpnaite pbkoxbatkata Ha CTapTepa NOBHe OT 6 nbTn.
8.ИЗчakайTe 10cekyHДN. - NocTabete IpoceHnna IocT Ha I03nna (Pa6oTu).
3a da cnapate tonbn DBnraTeJ:
- Hatahe nomnata 3a nokauehe ha ropmboto 10
- NocTabete DpocenHnna NoCT Ha no3nua (Pa6oTu).
3.ИЗдьрnaite рькхВаTkata Ha CTapTepa,ДOKATO DBNarATEJIAT ce CTapTupa.
3a da cnpe TeBnraTeTn:
HaTncheTe npeBkIOuBaTeJra 3a BkIOUBaHe/N3KIOUBaHe Ha no3nue (O).
CMECEH CETAHOJ TOPNBA
IrapaHnraTa He nokpmba etsn no ropnbatha cnctema nn np6bemn B pa60tata, npuHHeHn OT n3no3BaHeto Ha cmeHo C eHaONrnpBO, CbDpbXaUo NO-rotJm npoehr eHaONOT NOCOeHnno-DOny.
Donycka ce ynoTpe6aTa Ha 6eH3nH CbC cbDbpxKaHne Ha eTaHOJ Do 10% (N3BcTeH NOd HAnMeHOBaHHeTo E10) INI cBC cbDbpxKaHne Ha eTaHOJ Do 15% (E15). He n3No3BaIte rOpBO E85, TbK aTO ToBa ue anyInpa BaWata rapaHnI.
PABOTA C YPEDA 3A OБДУXBAHE
BnKΦnpya8-9.
PDEyPExEHHe
He octabraTe ypeDa 3a obdyxbHe Bbpxu nn 6bn3o Do xna6abn OTNOMKn nn Yakbl. BxOJaunr BEHTnlaCIOHOH OTBOP MOKe Da 3acMye OTIOMKNe T Te da yBpeTnpoDyKTa, KOeTO MoKe da DOBeDe Do cepno3HN qn3nueckn HapaHraBaHH.
Pa6oTe c MaunHaTa cAmO B NOxOJaIO 3a TOBa BpeMe - N3BbH paHHnte cyTpeuHN KbCHnte BeeepHn YacObE, Korato e Bb3MOXHO da IpeuHte Ha dpyn Xopa. Cb6pa3raBaIte ce C yka3aHInTe B MeCTHIne HapeD6YacObE 3a NouBka n pa6ota.
3a Da HamaHNTe HbTa Ha UyMa, orpaHnYe 6pOHa H3NoJ3BaHnTe Yactn OT O6OpyDbaHeTo.
N3noJ3BaIte npOyKTA Ha MNHmAlHaTAt MOU, KOrTo e DoCTaTbUHa, 3a Da CbPun daJeHa pa6ota.
IpeDn da 3anoHete pa6ota npoBepete O60pydBaHeto,OC6eHO 3aJywnTeN, BXOJaunn BENTINaCIOHEOTBOp Nb3dyHnA qntbp.
N3noJ3BaIte rpe6na nn MeTn, 3a da pa3poHnte OTnAbuTe, npEn Da 3anoHete pa60Ta cypea. HabnaXHBAIte neko nobbpxHocHTe npn pa60Ta B npaunyycNOBnA.
CnecTe TE B0a, KaTO BmecTo Mapkyu H3NoJ3BaIte ypei 3a 06DyXbaHe, 3a Da NoUcTbATE rpaHIn, IINBaN, KaHaBKn, npaBAHN, BbTpEUnH IN DBOPOb, cKapN, BepaHn N dp.
Korato nouctBaTe OTnAbuCn Upe3 06dyXbaHe, ce cTapaTe Da He e No Nocoka Ha Deca, KINBOTH, OTBOpeHN npO3OpCu HnnpaCHO n3MTN KOJI.
3A6EJEXKKA: BncoKoHaOpHata IIO3a e CneuaHNO npoeKtnpaHa 3a nouNCTBaHe Ha MOKpn IeKnabn INuCTa. Upe3 He r MoKeTe Da n3cTbPkeTe MOKpnte INuCTa n OTnaDbU, DOKato 6opabNTe cypeDa 3a O6dyXbaHe.
KPYN3 KOHTPOJ
BnKΦnIpya 10.
HIOOCa, BCTaHOBHTN/3amIHNTn Tpy6KN, BiKpnTn a60 BmHHTN MIOK nIg CMITT.
KoJn 36npaete MaTepiAn 3a Donomoro npncTpo, nepekoHaTeCra, 0 MeTaneBi cactHn, KaMHn, nIyHKn, 6aHKn Ta iHwi CTOPOHHi PpeDMeTN BIDcyTHi y cmitti.
He Do3BOJnTe 6oPo6JIHOBaHOMy MaTepiany 36npatncr y 30Hi BnBaHTaKeHHr. Lc MoKe 3aBaKaTn HopMaJIbHOMy BnBaHTaKeHHIO Ta CnpuHHTN 3BOPOTHy BiDnay MATEpiaNy Upee BnYCKHn OTBip.
Ku npctpi 3a6nBC, 3yHnHb DnHyT a 3HIMtB KOBnaQOK CBiKN 3anaeHHNpeed Tm, k nepeTN Do np6npaHH CMTTA.
HENPEDEBAUEHIN3NKN
Habib 3a Hanexhoro BnKOpCTaHHI hCTpyMeHaHEMOXNBO NOBHCIO HeITpAli3yBaTu NEbHI qakTopu 3aJIuKOBOro pniKy. HAcTyNH Ie6e3neKn MOxyTB BHNKaTI npn BnKOpCTaHHI npOdykTy Ta onepaTopy cIid 3BepHyTN OocblBy ybary, uOb yHnKHyTN HAcTyHOrO:
TpaBMn cnpuHHei Bi6paueio.
-Пд уac po60TN 3aBXdN BnKOpNCToBvYTe CneuaJIbHe yCTaTKyBaHHra, KOpNCTuTEcR npu3HaueHMMpyKaMn Ta 3actOCOBvTe HauHnXy WbUdKiCTb, Heo6xIDHy dIy BnKOHHaHHa 3abDaHHa.
■PiBnBOM Wmy MOKe BnHnKHyTN NOWKoJKeHHcIyxy.
HaarraTe 3axnt dIpyopraHIB cyxy Ta nimitye BnNB.
KuO Miok dIa 360py CmTTa He BcTaHOJIeHn a6o noKOdKeHm, MoKnBt TpaBMyBaHHa BID neTHoux qactnHOK NOBITpRAHOro NOTOK Ty6b NOBITPOyBKN
Hocitb3axctdIyOeyvBecbyac.
3HIXEHHPn3IKY
BiDomi BnnaKn, KOJI Bi6paJia Bi pyHnx iHcTpymEnTIB cnPnRE nOaBI TAK 3BaHOro CnHdPOMy PeHNo. CmNTOM CXOXi Ha TI, 3'ABJHO TBcR NiD BnNbOM XoNoy, BKIOUaOH NOKOIBOAHN, OHIMHH Ta 36NiIHeHH naIbciB. BbaxKaETbcR, 0CnAkoBI qHHNkri, BnNtXoNoy i CnpOCTi, XapUyBAHH, KpyIHr i DeKe I 3BVKnpo60tncnpyIOb pO3BNTky cNCHMNTOMiB. MoKHa npInHrTi DeKe 3axOOn, kki MoKyTB 6yTN npInHrTI onepatopom, 063MeHNHTBnNB Bi6paQii:
PiTpmyBAtn Temnepatpy Tina B XOIOHy norOy. PnBnKOpncTahHi IHCTpyMeHTy HaIraTe pyKaBnKn, 06 TpMaTHn pyKn Ta 3an'AcTK n y TenJI.
Bnpaba dna akTnBaui KpOBoo6iry nicra koxhoro 3anycky.
FRENDEESITPTNLSVDANOFIHUCSRUROPLSLHRETLTLVSKBGUKTR
yKpaIHcBka MOBa (pepeKnaI opnirHaJIbHnx iHCTpyKci)
Perynnpno Ndytb Ha nepepy. JimityTe KjkbkiTb po60Tu Ha deHb.
KIO BINBIAIb6yIb-3xN CmNTOMIB,HERaHO npnnHtB BnKOpNCtaHHa 3BepHiTbc DO BaWOrO Nikapr 3iDHO LNX CmNTOMIB.
NepeDxKeHHA
TpBaNe BnKOpNCTaHHI HcTpyMeHTy MoKe npu3BcTeN Do TpaBMyBaHH a6o 3arOcTpeHH iChyOoi TpaBMn. Pn BnKOpNCTaHHI npnady npotraom TpNBanoro nepiody yacy, yacti nepeBn.
TEXHUIHE OBCNYROBYAHHH
PonepeJxHn
BnKOpNCToByntiIbKn opnirHaJIbHi 3anaChi
aactHn, akceCyapn Ta o6naHaHnB BID Bnpo6HnKa.
HeBnKOHaHH nieBIMOrn MoKe npNBecTn Do
MOKNBOI TpaBMn, noraHOIpnoyKTNBHOCTTa MOKe
PpN3BeCTn DO BTPaTN rapaHTII.
PonepeJxKeHHa
06cnyrobybaHHB Bmarae KpaHbOi obepeXhOcti i 3HaHH I NOBHHO 6yTN BIKOHane TINbKN KBaJIidikOBaHUM φaxibem.ДЯ O6cnyrobyBaHH, DOCTaBbTe npOdyKT Do ABTOPn3oBaHOro cepbichoro ueHTpy. Pn O6cnyrobyBaHHI BIKOPNCTOByte BKNJIOUHO opriHaJIbHi 3anuactnH, akcecyap Ta npnnaJa.
BumkhItb Dnuryh, daite iHCTpymEnTy oxonohytni nepekoHaTeCg, 0o Bci YactuH NoBHicTOn3ynHHncb. 3aBXd BiEeHyte CBiKy3anaIIOBaHHN nepu, HIX npOBoNTu 6yDb-ki po60Tu 3 o6cnyroByBaHH a6o uNCTKn.
Bn moxete 3po6ntn peyIHOBAHH Ta peMOHT, onncahi B cboMy noci6Hky KopnctyBaHa. IIna IHnx peMOHTHX po6it, 3BepHiTbcra Do aBTOpN3OBaHORO cepbichoro areHTa.
■ Picn KoxHoro BnKOpNCTaHHa, Ounctitb Bnpi6 M'koHO CyXOIO TKAHHoIO.
Ipepebipte Bci raikn, 6oTn i rBHTn nicra KopoTko npomixka yacy Ha npabunbHy repMeTuHicTB, uo6 3a6e3neuTu npOdykT y 6e3neuHOMy po6oHOMy cTaHI. ByNb-ka noKoJKeHa deTaIb, Mae 6yTu npabunbHo BiDpemOnTOBaHa a6o 3aMIHeHa B aBtOpN3OBaHOMy cepBichOMy ceHTpi.
PpHecitb npOdyKT B aBTOpN3OBaHn cepBicHn ceHTp DnI 3amHn NOsKOJKeHnx a6o HeuNTaEMnx etIKeTOK.
UCYHEHHBLOKYBAHH
1063MeHUnTN pN3NK TpaBMyBaHHB Biq qactnH, 0o o6epTaOtbcra, 3aBXKn nicra BmKHeHHr DnHyHa nepekOHyIteCra, 10 puyXomi qactnH NOBHCIO 3ynnnncra.
BiEHaIe Tpy6ky NOBITPOyBk Ta nepeBipTe II Ha npEaMeT 3akynopKn. PpOuNCTiB Tpy6Kn, kKuo noTpi6Ho.
3HIMITb MiOK KOJKTOPa CMITRA. IpekoHaTeCra, aanTep CymKn BInh N BiN nepekoD.
Ornhe OTBip B KopnycBeHTnTotaipi Tpy6Kn Do CMITTEBOI MIIka Ha npNBI3akynopKn. YBeCb Yac TpMaIte naIbci noDani BiD BeHTnTOpIB i MylbYBaJIbHorO ne3a YBeCb Yac.
He HamaraiTecra 3HrTu BEHTnIaTOp a60 MylbUyBaJIbHi ne3a. RaKIO Heo6XiHO 3HRTu BEHTnIaTOp i MylbUyBaJIbHi ne3a,doCTaBbTe npOdyKT Do abTOPn3OBaHOrO cepBicHOrO ueHtpy.
IpepeBCTaHOBtBtpy6nTaMiWokDn836OpycmITTnepe3anyckomnpntpo.
YUHENH NOBITPRAHORO FJIbTPA
ДИВITбСТОПИКIN 12-13.
Mokpn a6o 6pydHn noBITpHn pInbTp npu3BODntb Do ycknaedHn 3anycky, BtpaN npOdyKTNBHOCT Ta ckopooye Tepmin Cnyk6n DnHyNA. NobitprHn pInbTp Heo6xIDHO nepeBipTa Ta npouHsATn nicra 5 roHH po60tN. PpeBipTe Ta npouHsAte Noro qactiwe npn EKcnIyatauB 3anopoeHN 6pydHx yMOBax.
IiTpMaHHaONMaJIbHOeepKTHBHOCTIOBITpHn
fInbTp cniMiHTn pa3 Ha pik.
3HIMITb KpNkUy NOBITPraHOrO pINbTpa, NOBEPHyBUn npOTn rOAnHHNKOBoi CTpiKN Ta oBepeXHO NOTARHyBUn KpNkUy Ha ce6e.
PpomnTe pInbTp uNCTOIO BOIOIO.
ObepeXHo CTnCKaIte fIbTp, nOKn He BnDaBnTe Bci HaJINuKn BOiN. BcTaHObitb nobITpHn fIbTp.
IocTaBte KpNk Ky NOBITpyHO pHy Ha Micye y npucpii. NObepHb 3a rOHHNKOBIO CTpiKIO, nOKn Kpnka He 6yde HadiHO 3aΦikCObaHa.
PIMITKA: PepeKoHaTecra, 100 fipbtp BCTaHOBJIeHn npabNtHo BCEpeDHI KpnuKn. HenpabNbHna yCTaHOBka fipbtpa DO3BOINr bny /cmTTIO NOTpAnNTu B DnHy, pnp3BOJqH Do WBNkOro 3HOCy DnHyHa.
yKpaIHcBka MOBa (pepeKnaI opnirHaJIbHnx iHCTpyKci)
OuHHeHHBUNyCKHOOTBOPY,JIYUHnKA TA ICKPOrACHNKA
INPMITKA: 3anexho BiD Tnny BnKOpNCbByBaHoro nanaBa, Tnny Ta KInbKOCTi MaCTnna Ta/a6o yMOB eKcnNyatau, BnynckHm OTbip, rnywnHK Ta/a6o ekpan iCKporachnka MoKyTB 6yTN NOKpNTi Harapom. JaKuo BN NOMitnn BTPATy NOTXHOCTI BaWOrO npnAdy, MOnNBO, Heo6xidno BndaHTn ueharp, uob BiDHOBTN eKcnNyatauhi kOCTi. Mn HactiHo peKomeHdyEmo, uO6 ue BnKohyBaTin bKn KBaNiΦIKOBAH CneuiAnict. 3adnae efektnBuOI poBOTn IHcTpymEtly icKporachnk cnId cHCTnA abO mHraTI niCnRA KOxHnx 50 roDHH eKcnNyatauII. IckporachNK MOkyTB 3hAxODNTncB p3HN X MicJax B 3anexHocTi Bi Moden, Aky BN npndbaN. Bydb naCa, 3BepHITbcr DO hainbNkHOrO ABTopn3OBaHoro cepBichoro ceHTpy, uO6 3amHnTic icKporachnk dner BaWoI moDeni.
npepeXeHH
Uo6 yHnKHyTn He6e3neKn BuHnKHeHH NoXeKi, HIKOnn He 3anyckaIte NOBITpoDyBky 6e3 BCTaHOBNeHoro icKporacnka.
KPNUKA NAJIINBHO BOKA
OnepedxKeHH
Bntik nainbHoi KpuuKn noKexHo He6e3neHn i NOBUNHeH 6yTu HeraHNo 3amiHEn.
Kpnka nannBHoro 6aka Micntb yuJIbHOBaIbHy npoknady Ta 3BOPOTHI KNAANdONyCKy nobITpB CnCTemy.3acMIeHH 3BOPOTbO RKnanaHy npN3BeDe do noripseHH ekCnnyatauiHX xapaKtepcntk DBNryHa. RaIO NOBITpyBa KaNa HpaUOBaTN Kpaue np TPOXn BiKpnTIN KPNsI NaNBHorO 6aka,MOKJIbBO, BNIOW 3 naDy KOHTPONbH NKnanaH. 3amHtB KpnKky naNBHorO 6aka, kso notpi6Ho.
Pny yctahobui kpiuikn naHbHoro 6aka nepekoHaTece,
Ioo BOHa 3akpyeHa 6e3 nepekocy, B IHwOMy BnnaKdy
BOHa 6yde npotikatn.
BAKYUMHNI MILOK
BpydHniMiOK MoKe npNBecTn Do noripWeHH naape3daTHoCTi pncTpo. DnA OUnSeHHa MiKa, BnBepHiB NOro HABNBoPIT Ta notpyciB. PpOMBaTe MIwOyBODi 3 MNJOM, kHaJIMeHwe ODNH pa3 y pik.
NAJINBHNΦIbTP
PAnuBo, 1o nOaetbC y DnHy, npoxoDntb uepe3 fIbTp, 10 Buaanre 6ydb-aki 3a6pydHeHH, He donyckaUOni ix y DnHy. 3a6pydHeHH B naNBI MoKytb npBecTn Do 3HnxKeHH npOdykTnBHOCT Ta noKoJxHeHH DnHyHa.
PAnBnΦIbTp E HEnpuaTHM dny peMOHTy, TOMy, 3a Heo6xidHocTi, Ioro cniD 3amHHTu B aBTOpu3ObaHOMy cepbiCHOMy ueHpi.
3AMIHA CBIyKIN3ANJIIOBAHH
DnHy npaioe 3i CbiKIO 3anaenHra Ryobi AC00160, Champion RCJ-6Y, NGK BPMR7A6o II eKBiBaIeHTOM 3 BiCTaHHo MIX eJeKToPdAmu 0,63 MM. BnkOpncToByTe ToHy 3amHy i oopiNo 3amiHnTe.
3HIMITb KOBnaQK CBiKN 3anaJIIOBaHHa.
Iocna6te cBiyky 3anaHOBaHH, NOBepHyBun II npOTn roHNHHKOBoi CtpiIKN 3a DonomoroIO raKOBORO KIOUca.
3HIMITbCBiCy3anaHOBaHHA.
IpebeipTe Hoby cbiyky 3anaHOBaHH. 106 3a6e3neHTn HaEnkHy po6Oy DBNrhy, CbiYka 3anaHOBaHH NOBHHa Matn npabNbHni 3a3Op Ta He NobHHa Matn BiKnaJeHb. HanekHni 3a3Op 0,63 mm. 5o6 36iNbHTn 3a3Op, o6epexHo BidiHITb "3emNo" (Bepx) eNEKTPOda. 5o6 3MeHNTHn 3a3Op, o6epexHO HatNCHTb 3a3EmIOHQUM eNEKTPODOM Ha TBepdy NOBEPXHO.
PpinaTnyTe HOBy cBiKy 3anaHnB UniliHdp, 3aKpyHyIOUc 3a roDHHNKOBIO CTpiIKOIO.
3aTARHITb II y rHi3di. KpyTnIbHN MOMENT 24,40 NmmHIMyM, 29,82 Nm MaKcIMyM. He nepetaryte.
TPAHCNOPTYBAHHRA 3SEPIAHHRA
3ynHITb MaunHy i daTe i oxoNoHytn, nepei 36epirahnma60 TpaHCnoptybaHHm.
IOnuHCTiB Bci CTOpOHMiTepeiaJN 3 npOdyKTy.
3nnte Bce nainbo 36aka B KOHTeHep 3aTbepeHn Ira 6eH3nHy. PAm'taIte, tO Tpe6a 3amHtNa 3aTAYn KPNuKy nainBHorO 6aka HaleKHM YNHOM.
3anyctitb DBNrH, NOKn Bih He 3ynnnHtbcra. Lcdo3BOJNTb BNdAANTu Yce naNBO, RKe MOKe 6ytnHeCBiKIM 3aNNHTn Naik i rmyB nannBHI cnCTemi.
KuO MoKnBO, 3nBaTe BcI MaTnJIbHi MATEpIaII 3 DnryHa y npn3HaueHm dny MaTePiAB KOnTeHep. Na'raTe npo Heo6xDiHCTb 3amHn KpnKn dna MaTnJIbHoro 6aky HaneKHM YHOM.
36epiraTe npOdykTB npoxoNoHomy, cyxomy i do6pe npoBtpoBaHomy Micui, HeDocTyHOMy dIaTei. 36epiratn noDani BiD arpecnbHnx areHTib, taKnx Ra caobbi ximikatni cone npTo nObeHeHHra.
He 36epiraTe Ha BiKpnTomy nobitpi.
Ipyx a60 naHn, 063an6iTn TpaBMn IIOe a60
FRENDEESITPTNLSVDANOFIHUCSRUROPLSLHRETLTVSKBGUKTR
yKpaIHcBka MOBa (pepeKnaI opnirHaJIbHnx iHCTpyKci)
He nepeBoTec npOdyK T ToT qac k DnRyH npaioe."
I DToPmUyTeec yicx depXaBnHex i MicueBnx npabn Ta HOpM 10do 6e3neuHoro 36epiraHHra BnKOpNCtAHn HEn3nHy.
OdaTe 3axnChi okyIapn
OdaaTe 3ac06n Ira 3axncTy cnxy.
He BnKOpNCTOBynte npnna6eBcTaHOBJIeHx Tpy6.
Pn3nk B7r4yBaHHa DOBROBOLOCCB NOBITpO3a6ipHnK.
Pn3nk BTaryBaHHB BInbHoro Oqry B NOBITpO3a6ipHnK.
IIN 3MeHHeHH Pu3NkTy TpaBMn a60 NOWKoJKeHHy HnKaITe KOHTaKTy 3 rapAum NoBepxHmN.
PonepeDxKeHH!Fapya nobepxH
He6e3neuHO. OTBip noaH ta BeHTnJIaTOpN, 0o o6epTaIOTbcr TpMaIte pyK i HOrn noani BID OTbopIB y ToI qacIK npOdyKT npauoe.
BnKOpNCToByNe HeeTNoBaHm 6eH3nH, nPn3HaueHn DJI BnKOpNCaHHa MToTOPHMn TpaHCnOPTHMn 3ac06aMn 3 OKTaHOBM YncJOM 91 ([ + ) / 2] a6o BnIe.
Bukopuctobyte 2-TaKTHMacIO DnA DBUYHIB 3 NOBITPRAHM OXOIOJKeHHAM.
Ipe3a npabko pTeBHO 3MiuaTe naHBO.
PonoxeHHnoBHorO npocen
IonoBnHa noJIOKeHHa IpoCeJIa
Po6ooye noJoxeHHa
Po36nokyBaTn BaXinb CNTeMM KOHTpOJIu ⅢBvNkOCTI.
IobepHb pyky cTapTepa, nOKn DnBryH He HAMaraeTbc3anycTnc. He TargHb pyky cTapTepa 6iNbW HIX 8 paN.
NobepHb pyky cTapTepa, nOKn DnRyH He HAMaraCTbca 3anyctnc. He TReHtB pyky cTapTepa 6inbH hIX 6 pa3n.
HaTnciB rpyu 10 pa3ib.
Ipeen BnKOpncTahHm npnaNy daTe DnBryHy nnpaOBoAtn npotraom 10 ckyHd.
Lio63anyCTnTNOJHm DBNyH
ДяЗamycky tenloroDbiryHa
Pexim nobitpoyBkn
Kaio Baxinb Wbnko3mHn Bka3yHa ue CNMBOI, npncpi npaioeBpeKmi NOBITPOyBKn.
Pexn m nJocca
Kaio Baxinb WBNKOI 3MIHN Bka3ye Ha ue CNMBOJ, npncptpi npaueB pexnmi nnoocca.
Biinobiae BCIM HOpMaTHBHMcTaHapTAM B KpaIHax EC,Je Bnpi6bIIO npuDbaHO.
Ebpasiincbka3nakBIDNOIBINOCTI.
UkpaIHcbKm 3nak BiNobiHocti
yKpaIHcBka MOBa (nepeKnaI opnirHaJIbHnx iHCTpyKci)

TapaANTOBaHn pIBeH 3ByKOBoi nOtJxHOCTI 107 d6.
3HAHCBINIPODyKT
InbItbcr CTOpiHKn 1a-1b.
- HnKnBakyyMHa Tpy6ka
- BakyumniMiok
- NepexiHnK
- Kpyi3 KOHTponb
- Tpirep apocena
- BepxHbKayyMHa Tpy6ka
- Kpnska naJIINBHoro 6aka
- 3axBat cTapTepy
- Puyar npocenipobanr
- Bēpxn ypučka
11.ПеремкачУВIMК/ВИМК
12.Повни nepexiДу ржим NOBItpOdyBkn - NepBHHa lamna
- Pучka плоса
- BepxHra Tpy6a noBitpoyBkn
- BiwaJka dny Dbepei
- BnyckHa KpnIka
- HnKnTpy6a nobitpoyBkn
- NOBHn nepexid y pekM nnloocca
- PeIbEΦHn po3'EM
- NepexiHnK po3miueHn Ha miuky nIIOcoca
22.PeJIbeΦHn CTOnOpHn 3NCHOK 3 nepemKauEM BCTaBHOI MetaJIeBOI NactHH - Miok nioococa y 6opi
24.ЯзчokВиуckHoIКршкinninococa - Bakyymn noTbip
- CToOpHn J3uOk
- Tpy6ka nHnococay 36opi
28.ΓBnHT,TO Tpmae Tpy6ky nHIOcoca y 36opi
29.Позначkaшвдкогocтapy - Conno Bucokoi Wbukocti
- Kpnska noBipraHoro foIbtpa
- KpyroBa shkana nobitprHoro fIbtpy - nobepHITb DnB BIDKpTTA 60 3akpTTT NOBITPRHO fIbtpy
- NobitpHnΦijbTp
34.Гайковский
MOHTAX
PO3NAKYBAHH
Bumaraetbca camoctiHa 36ipka.
ObepekHo BnMItb npOyKt i 6yDb-aki akcecyapn 3 Kopo6Kn. NepekoHaTecra, 0o Bci nyHKTn, nepepaxoHaB nakyBaIbHOMy IncTi BKNIOeHi.
NepeDxHn
He Kopnctyte Bnpo6om, kno np nepoomy BiikpnbAHHI Kopo6kn Bka3aHi y nakyBaIbHOMy IncTi YactHHN BKE BCTaHOBJeHO. 3a3HaueHi y nakyBaIbHOMy IncTi YactHHN BCTaHOBIOJTOBcR He Bnpo6HnKOM, a KopnctyBaHem. BnkopnctaHHr npOdykTy, knn MoKe 6ytn HnPaBnJIbHo 3i6paHm MoKe npn3BeCTn Do cepno3Hnx TpaBM.
OrnHbTe npOdykT peTeIbHo, 06 nepeKoHaTcNc, 00 Hemae noIOMKn abo noUKOJKeHH He CTanocn iD Yac TpaHCnOpTyBaHH.
He BnkaaTe nakyBaHbHm MaTepiAn Do Tux nip, NOKy yBaXHo He orIaHHe i 3aOBoIbHo He npauoC npOdyKT.
Kaio khi-He6ydb yactHn noKoJxHia 60 BiCyTHi, 6yNb nacka, 3aTepeohyte B cny6y niTpumkn KniEHTB.
NAKYBAJIbHNIJNCT
NobirpoDyBka/nuJiococ
■ NobitpoMyxanbHa Tpy6ka
-ΦopcyHka
BepxHra Tpy6a NoobitpoDyBkn
HnKna noBipOyBkn
IpepeixiHnK po3miuehen Ha miuKy nJIOocca
BepxHbKayyMHa Tpy6ka
HnKHa BaKyMHa Tpy6ka
BCTAHOBJIEHHT pybok nIOOCCA
Ckpinitb BepxHIO taHnKHO Tpy6Kn nInococa pa30m, 3ictabnBUNn iINHrTI pikcatopn 3 BiinobiHNMn KNAMKAMN OTBOPy BepxHBoI Tpy6Kn nInococa. Dbi Tpy6Kn cTAOTb OndHIEO Tpy6KOIO B 36opi, nicra Toro Rk BOH N3'EDHaHI.
BnKpyTiB fikcatop BxIDHoro OTbOpy,CKOpNCtABWncBnKpyTKoIO,06B BiKpnTN BnycKHy KpUk Ky NINOOCa.
3ictabTe KJAMKn Ha OTBopi i3 Tpy6koYo y 36opi.
3aTnHbBnHTn Ha Bepxhi Tpy6u NiIOcoca, 0o6 3akpinTu y OTbopi NobitpoyBkn. IpekeHaItecb, 0o MetaneBn KOHTkHa Tpy6u NiIOcoca BCTaHOBNeHo Ha NOBHOMy pexmi.
3HATTTPYBOKNIOLOCOCA
Ocna6Te rBnHTN BepxHbOITpy6OK nNoococa, NOBepTaIOUy HAnpRMky npOTn rOuHHNKOBoCTpINK.
3HIMITb By30J Tpy6Kn NINOCoca 3 OTBOPY NOBITPOdyBkn.
HauiHo 3aknTe BakyymHy BnyckHy Kpnkny. IpekoHaTecb,IO MeTaJIeBNI KOHTaKT Ha BnyckHIN KpuuBc BCTAHOBHeHO HA NOBHOMy peKIMI.
ФУHKUIOHYBAHнЯ
PIMITKA: Pnncpti moKe BnKOpNCTOByBaTncB k y NOBHOMy peXmI NOBtPOdyBKN, TAK I B NOBHOMy peXmI nNOCoca. Pnncpti npaIOBaTMme Nnue 3a yMOBu, 0o o6nDa MetaneBi KOHTAeTN BCTABNeHO B OTbOPN NOBHorO peXmY. KOnn Pnncpti BnKOpNCTOByEeBcB PpeXmI NOBtPOdyBKn (Pnc.8), MetaneBNI KOHTAKT Tpy6kn NOBtPOdyBKN Ta BnycHa KpNiHa KpNiHa NOBHHi 6ytN BCTaHOBJIeHi y BiNobIDHI nepemika IOBHorO peXmY. KOnn Pnncpti BnKOpNCTOByEeBcY pexmI nNOCoca, MetaneBNI KOHTAKT Ha Tpy6ci nepeXiHnKa Ta Tpy6ci nNOCoca MaHOb 6ytN y NOBHeTIO 3akpinneHOMy noJoxKeHHI (Pnc.11).

NonepedxHn
PanaBt Ta Ioro napu e Hau3BuaHOBorHe-Ta Bn6yXoHe6e3neuHmN. Poxkxa 60 Bn6yx 6eH3nHy onaIb Bac ta iHux.
3MIIUYBAHHI NAJIINA
Ley npodykT po3paxoBaHn Ha JINBHeHH BID 2 TaKTHORO DnuryHa i Bmarae nonepeHboro 3miyBaHH6eHNHy i2-TaKTHORo MaCTnla. 3MiuaTe HeETNoBAHn 6eHNi 2-TaKTHe MOTOpHe MaCTnIO B YnCTI EMHOCt, 3aTBePdxKeHOI dNra 6eHNHy.
Ley DnHyn ceptnphiKOBaHn dny po60Tu Ha HeetnboBAHOmy 6eH3nHi, npn3HaueHOmy nBnKOpCTaHH B aBTOMo5iInx 3 OKTaHOBM YNCnOM 91 a6o BnIe.
He BnKOpNCTOByTe 6yDb-8Kn TnI nonepdHb0 3MiuaHnx 6eH3Hy / MaCTnla 3 naJIbO3aPabHnx cTaHci;Ce BKnIOuae B ce6e nonepdHbO 3MiuaHn 6eH3H / MaCTnlo, npn3HaueHi dIra BnKOpNCTaHHB Moedeax I MOTUKNax.
BnKOpNCTOByTe TlIbKn 2-TaKTHe CnHTeTnHc MEtOpHe MacJIo. He BnKOpNCTOByTe aBTOMo6iNbHy OINBy a6o ONuBy dJa 2-x TaKTHorO DnRyHa dInr 3OBHIuHbOro BnKOpNCTaHHa.
3MiWaiTe 2% CnHTeTnHHe 2-TaKTHe MOTOpHe MacNo 3 6eH3nHOM. Lc cymiu 50:1.
yKpaIHcBka MOBa (pepeKnaI opnirHaJIbHnx iHCTpyKciI)
3miWaiTe nainbo peTeIbHO, a TaKoK KOxHoro pa3y nepeed 3anpaBkoH.
3miwate B HeBENKx KINbKOCTx. He 3miuyte 6inbwe, HIX Ha 30-deHHN TepMH.CnHTeTNUHn 2-TaKTHN MaTUNbHm MATEpian, 1O MoCtNTb naNBHn Cta6iinitop peKOMeHdyetbcra.

1L + 20mL =
2L + 40mL =
3L + 60mL = 50:1
4L + 80mL =
5L + 100mL =
3ANOBHEHHBAKA
OuHCTIb NOBepxHIO HABKOIO naJIINBHOI KPNUK, 0o6 3ano6iTn 3a6pyDHeHHIO.
Iocna6bTe KpuKny naHnBHoro 6aka noBInbHo,06CKnHyTu Tnck i yTpMaTu naNBO BiD npOTiKaHHaHBKOJIO KpUkKn.
O6epexHo 3aIInTe nainBHy cymiu B pe3epByap. Ynkaite po3nby. Ipeed 3amHO npinBhoi KpuK, ouHCTit b orJnHbTe npoknaKy.
Bidpa3y 3amHHTN KPNKny nainBHorO 6aka i 3aTnHITb pykoIO. IpotpiB 6yNb-kynn Bntik naINBa. BiinDITb Ha 9 M Bid cicra 3anpabKn, nepez 3anyckom DnryHa.
PIMITKA:ДИМ 3 HOBOrO DBuRyHa NiI qac i nicra nepwOrO 3aCtOCyBaHHe HOpMaJIbHm.
NepeDxKeHHA
3aBxD 3ynHnTe DnRyH nepe 3anpaKoH. HikoN He oDaBaIte nAnBO Do MaunH 3 npauOuHm a6o rapaum DnRyHi. BiDiUdItb no KpaHne Mepe Ha 9 MetpiB BiD Micu 3anpaBKn, nepu Hix 3anyckatn DnRyH. He naNTn.
3ANYCKI3YUNHKA
PonepeDxHnH
He BmkaIte DnBryH B 3akpITOMy npmiueHHi a60 30Hi 3 noraHOIO BEHTINJUciHc. BnuXaHH BxJlonHnx ra3IB MOKe npNBecTn Do IetaIbHoro BNpaNDy
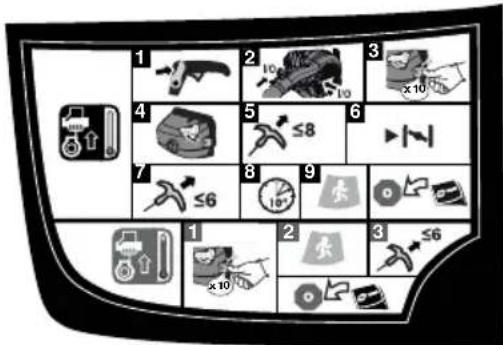
1063anyCTHTXOIODHN DBHryH:
- 3a6nokynte kpyi3-koHTponb.
- ⅢTOBxHITb pyxomy nactHy y po3'em noBHoro pexmMy dIra TORO, uo6 NOBnIPEKIM npaIOBaB Ta 6yB rOTOBn Do pO6OTn.
- Hatnchitb rpyu 10 paib.
4.BcTaHOBItb BaxJIb nobITpRAHOI 3acNIHKn B CtaHOBnue HdpocenJ. - Поверніт b pyку CTapTepa, nOKn DBuRyH He Hamaraetbca 3anycTncr. He TargHITb pykC CTapTepa 6iNbH HIX 8 pa3n.
- BcTaHOBItb BaxJIb NOBITpRAHOI 3acNIHKn B CTAHOBnue
- NobeepHb pyky cTapTepa, nOKn DnBryH He 3anyctntbcra. He TargHb pyky cTapTepa 6iNbH HIX 6 pa3n.
- POneKaIte 10 cekyHd.
- BcTaHOBtB BaXJIb NOBITpRAHOI 3acNIHKn B noNoXeHHA
Дязanycky TeNlOro DBnryHa:
- Hatnchitb rpyu 10 pa3ib.
2.BctaHObitb Baxinb nobitpHoi 3acniHKB noNoXeHH
3.Поверніт bpyку cTapTepa, nOKn DBuRyH He 3anyCTNTbCra.
ДяЗУнкDNBнга.
IpebeDitb BmNkau y noJIOKeHHra "BmKHeHO" (O).
ETNUOBAHE NAJINBO
NoKoJKeHH naHbHOi cHcTeMn a6o npo5nemn 3 npOyKTnBHCtHO, 0 BuHnKaHOt B pe3yntaI BiKOpNCaHH naHbHOi cyMiWi eTaHONY, 0o MICTNtB BiCDOTOK eHaNY 6JIbSe, HIX BkA3aHO HxKHe, He niJaHaTOh Ni dIO rapaHTII.
BéH3MH 3 BmICTOM eTahOу Do 10% BiD o6'Emy (3a3BnuaI no3HaueTbcra kE10) a6o 15% eTahOу BiD o6'Emy (3a3BnuaI no3HaueTbcra kE15) e DonyctUmMm. He BkOpncTOByte naNBO E85, ue MoKe npNBecTn Do
yKpaIHcBka MOBa (pepeKnaI opnirHaJIbHnx iHCTpyKci)
CkacyBaHHra rapaHTII.
PEKIM NOBITPOyBKN
DnBItbcr CTOpIHKn 8-9.
PonepeJxKeHHa
He po3miuyte noBtpoDyBky Ha a6o nopJd 3 cnnyHm cmTTam a6o rpaBiem. YnAMKn MOxTyb 6yTN BTRHYTUMN B BYCKHn BEHTnAuiHn OTBip NOBtpoDyBKN, IIO np3BeDe Do MoKJInBOrO N0wKoDxKeHHa BnpOby i do cepno3Hx TpaBM.
Bukopnctobyte npoaykt tibkn B po3ymHrOHNHe paHO bpaHci a60 ni3Ho BHOJI, KOJI HIOJMOxTyb 6yTN cTpNBOKeHi. DToPmYTEcB Do3BOJeHOrO rpaiky p60tN BiINOBiHO do MicueBX npaBnI.
Uo6 3Hn3HTPiBeHb Wymy,He BnKOpNCTOByTe 3a6araTo yactIN OHOyacHO.
BnKOpNCToByNe npHaad Ha HauHnKcH MoKnBm BnDkoCTi, 06 BNKoHaTn po6Oy.
Ipepebipte 06naHaHHn nepeed ekcnnyatauieo, oco6nbo rnyuHnK, nobitpo3a6ipHnKa Ta nobitprHi fiNbtpn.
Ipepeo60to3a donomoro rpa6enb a6o mtnpo3nyiTb CMIT. 3nerka 3moitb nobepxHIO B3aHJHeHX yMOBAX.
EkoHOMTe BDOy, BnKOpNCTOBHyOuN eNeKtpnHi NOBItpOdyBKN 3aMICt b INaHrib dIra3actocyBaHHa Ra3OHAX Ta B caNy, a TAKOK dIpy6, cITOK, DbOPNKIB, rpnib, BepaHd i caiib.
O6epexHo npaioHe npoI i3 DItbMn, TBapHAMn, BiKpTNMI BIKHAMn Ta HeDaBHO BIMNTMMn ABTOMOiINMn, BNDyBaOHc CMITTBCTOPHY.
PIMITKA: HacaKa DnB BucKOi WbNdkocTi, po3po6JeHa CneiaJIbHo DnA np6IpaHH BOIoro InCTra. Lc Do3BOJAE np6IpaTH BOIe NcTg a6o cmTTa Niac BnKOpNCtAHN NOBITPOyBKn.
KPYI3 KOHTPOJIb
ДиВITбСТОПИКу 10.
Cta6in3atop wBnKocT MoKe 6yTN BnKOpncTaHO nny npabJIHH NOBITPOyBko 6e3 yTpmaHn CnyckOBorO mexaHI3My dpocen.
Ibn BkHouen HcTa6in3atopa WbNdkOcti,NotrHiB BaKinb Cta6in3atopa WbNdkOcti Haad Do ce6e Ta 3ynHtB Ha 6aKaHn No3uD IpocelHoI 3acnIHKn.
06 po3iMkHyTn cta6i13atop wBnKocTi, wTOBXHtB Baxinb cta6i13atopy uBnKocTi B3doBx Do nepeDhboi yactHH npncTpOIO.
PPOUCPNIIBPAHNAIIOOCOCOM
ДиВITбСТОПИКУ 11.
PonepeDxKeHHa
TpmaTe rnyuHnKa Ta Bci rapaYi nobepxHi nobitpoDyBkn/nNlOcoca noDani BiD cboro tina. HeBkoHaHHa ciEi BkazIM MoKe npueCTn Do cepno3HOI TpaBMn abo nowkoDHT npncTpi.
BctaHObitb Tpy6kn nnococa Ta BakyMnMiok. 3BepHITbcra do po3iny 36ipka, zo po3TaWOBAHn paHlwe y uei HcTpyKuii 3 BNKOpNCtAHN.
3anyctitb DnHyH. NvB. 3anyck i 3ynHka, paHiue B cybomy KepiBHTBI.
Po3mictiB peMH BAKyyMHorO Miuka Ha CBOEmy npabomy nneui. TpmaTe BepxHIO pyky CBOcIO niBOIO pyKOIO Ta pyky NIIOCoca npaBOIO pyKOIO.
Ipepeiuyte npncpi360ky B6ik B3doBx30BHIHbOIKPOMKcMTT. 1o6 yHnKHyTN 3acMueHH,HEBCTAHOBHIOTEBAkyMHy Tpy6Ky npmao BkyN CMTT
YtpmyTe DBNyH Bnue, HIX BXiDn KHeCb BaKyyMHOI Tpy6Kn.
Pnpo60ti Ha cxnJI 3aBXKn HnpanBnTe BaKyyMHy Tpy6ky BnI3.
Uo6 yHnKHyTN cepno3HOITpABMn onepaTopa a0nOwKOdKeHHBnpo6y, He HamaarTeCnNIOOCOTnKaMeHi, 6nte cKn, nIaKu, a6o cxoxi o6'kTu.
KuO BakyumH Tpy6kn 3a6nncb, 3ynHITb DBrHy Ta nepekoHaTecra, 0o Inonacti po6oYoro KOJeca NOBHCIO 3yHHNcB. Bi'edHaHTe dpit CBiKn 3anaJIeHH Npeep OunIeHHM 3akynopok. 3HIMtB Tpy6kn NNOCoca Ta OuncITb CMTTA BEHTINruiHOrO OTbpy. BmIMtB MiOK Ta OuncITb Tpy6ky. HeBeNIkN CTpIXKeHb a6o naIka MoKe 3HaIO6nTncb, 0o6 npOnCTNTn Tpy6ky no BCIN DOBXHI. PepekoHaTecra, 0o BCE CMIT8 6yNo BVnuIeHe nepw HIX HaHOBO BCTAHOBHTN Tpy6kn Nllococa.
NOWYK I YCYHEHHA HECNPABHOCTE
Kuo npo6jema He Bnpiuetybca, 3BepHiTbc DO aBTOPOBaHOrO cepBichoro cHTpy.
| ПОНБЛЕМ A MОЖЛВИ ПРУ CHИН N I PΙΥЕНД | ||
| Двигун He 3авODиьс. | ВidсуTNЯ ICKra. | Переipte NaяВнісь ickр. 3німіть CBiЧу 3апаловань. 3нову BCTaHOBiB tskobnaчok CBiЧи 3апаловань i BCTaHOBiB CBiCHy Ha MeТалевицлійдр. Ротягіпь TrPoC STAPTepe i Cnoctepirai Te 3a ickpoIu Na roLobuiz CBiChi 3апаловань.Якso ickр Иема, nobTOpɪb TECT 3 HOBOU CBiCHO. |
| ПалIBо BiDcYTHe | Натickайte Na rpyu npaIMeperdo kOK BOHa He 3anOBHnIbCS naIINBOM.Якso rpyua He 3anOBHIOETbCS,первину Систему PodaICI naIIBa 3abNOKoBAHO. 3berhITbCS do cepBicHOrO ueHTpy.Якso rpyua 3anOBHnIaBSc, nepexodte Do NaCTUHORO pyHKTu, ockilbki naIIBO MoKe 3aIITN DEBHy. | |
| Двигун 3aIITN. | 1. Поверпіь пис tripl takim ChInHom, шоб OTbIP CBiChk 3aPallovbanry 6byB cnpramOBaHm BHN3.2.ВstANOBiB baxjILb dproceЯ y noLoXeHnRA "B" ta notrayHITb 3a TrPoC STAPTepe 10-15 pasIB.ТakIM ChINOM 3 DBIVHy BAДaJIITbCS NaIINbO MoKe 3aIIITN DEBHy.3. ВДaIITb NaIINBO 3 Prnilady.4.ПрочstITb Ta nepeBcSTAHOBiB CBiCHy 3aIaIbouHnA.5.пered NOВTOPHIM 3aNoYSCOM priбeRtB prOJIte NaIINBO, takIM ChINOM,шoc Myoro 3aIIshKiv He 6bIb B padiCy 9 MeTpIB.6.ВstANOBiB baxjILb dproceЯ y noLoXeHnRA "B" i NotrayHITb 3a ryHKy STAPTepe 3 pasI.7.Якso DBIVHy He 3aNoYSCaEcbS, BCTaHOBiB baxjILb dproceЯ y noLoXeHnRA "B" i nobTOpɪb CTaHdApTHy pIoceDpy 3aYSCy.8.Якso DBIVHy BCE OndO He 3aNoYSCaEcbS, nobTOpɪb BVIseHabeDeHi KpOKi, BCTaHOBuBsh IOBy CBiCHy 3aIaIeHnA. | |
| MOTuzKу StAPTeRa Baxko TargHuT.N. | 3berhITbCSdo cepBicHOrO ueHTpy. | |
| Двигун 3aIYSCaEtbС,ale He NaIbpae 6obert. | Двигуну Notriбно prinbni3Ho Trpi XbIINIДЯ рozirpiBv. | ДоЗВOLыte DBIVHy NOBHICTU prorpɪtscy.Якso DBIVHy He princkopriEcbS chpe3 Trpi XbIINI, 3berhITbCSdo dinepa 3 obcIyroBvBaHnY. |
| Двигун 3aIYUSeHni, ale Na HabiRik 5uZdkOci TpauOc TlIbKn Ha nOLOBnH I drcosela. | HeobxIDNo BvdpeRyIbovatn Kap6Iopatop. | 3berhITbCSdo cepBicHOrO ueHTpy. |
yKpaIHcBka MOBa (pepeKnaI opnirHaJIbHnx iHCTpyKciI)
| Двигун He пацюе на поBNIXS обор tax Ta/чи сильно димпь. | HeleniДаТна мастINьнTa палINBna symiш. | Викорисовиite CBIXe пальо 3 правINьнОю поронцieю 2-TaKTHORO macna. |
| Збруденьо NobITРЯнoi ФИБТр. | Очиренья поВITРЯнОФіпьТра ДИВITбая роздIN Oчиренья поВITРЯнОФіпьТра в цьOMу керIBNцTBI. | |
| Збруденьо ekpan IckporacNHka. | ЗberнiTьсяdoescepbicHOrO ceHTpy. | |
| Двигун заускадя, пацюе на поBNIXS обор tax,鉴定 He nepexODInь нахлост通风 xID. | HeobxIDNo BIDkOPrHyBaTN rВINTхолostToTO xOdy Na KapbIparoti | ЗberнiTьсяdoescepbicHOrO ceHTpy. |
TPAΦIK POBIT NO OECJNYTOBYBAHHK
In addition to any statutory rights resulting from the purchase, this product is covered by a guarantee as stated below.
- The warranty period is 24 months for consumers and commences on the date when the product was purchased. This date has to be documented by an invoice or other proof of purchase. The product is designed and dedicated to consumer and private use only. So there is no warranty provided in case of professional or commercial use.
- There is a possibility to extend for a part of the range of garden tools (AC/DC) the warranty period over the period described above using the registration on the www.ryobitools.eu website. The eligibility of the tools for extension of the warranty period is clearly displayed in stores and / or on packaging / and contained within the product documentation. The end user needs to register his/her newly-acquired tools online within 30 days from the date of purchase. The end user may register for the extended warranty in his country of residence if listed on the online registration form where this option is valid. Furthermore, end users must give their consent to the storage of the data that are required to be entered online, and they have to accept the terms and conditions. The registration confirmation receipt, which is sent out by e-mail, and the original invoice showing the date of purchase will serve as proof of the extended warranty.
-
The warranty covers all defects of the product during the warranty period due to defaults in workmanship or material at the purchase date. The warranty is limited to repair and/or replacement and does not include any other obligations including but not limited to incidental or consequential damages. The warranty is not valid if the product has been misused, used contrary to the instruction manual, or being incorrectly connected. This warranty does not apply to:
-
any damage to the product that is the result of improper maintenance
- any product that has been altered or modified
- any product where original identification (trade mark, serial number) markings have been defaced, altered or removed
- any damage caused by non-observation of the instruction manual
any non CE product -
any product that has been attempted to be repaired by a non-qualified professional or without prior authorization by Techtronic Industries
-
any product connected to improper power supply (amps, voltage, frequency)
-
any product used with inappropriate fuel mixture (fuel, oil, percentage of oil)
- any damage caused by external influences (chemical, physical, shocks) or foreign substances
normal wear and tear spare parts - inappropriate use, overloading of the tool
-use of non-approved accessories or parts - Any periodic adjustments to or maintenance cleaning of carburetors
-
Components (parts and accessories) subject to natural wear and tear, including but not limited to bump knobs, drive belts, clutch, blades of hedge trimmers or lawn mowers, harness, cable throttle, carbon brushes, power cord, tines, felt washers, hitch pins, blower fans, blower and vacuum tubes, vacuum bag and straps, guide bars, saw chains, hoses, connector fittings, spray nozzles, wheels, spray wands, inner reels, outer spools, cutting lines, spark plugs, air filters, gas filters, mulching blades, etc.
-
For servicing, the product must be sent or presented to a RYOBI authorized service station listed for each country in the following list of service station addresses. In some countries your local RYOBI dealer undertakes to send the product to the RYOBI service organisation. When sending a product to a RYOBI service station, the product should be safely packed without any dangerous contents such as petrol, marked with sender's address and accompanied by a short description of the fault.
- A repair / replacement under this warranty is free of charge. It does not constitute an extension or a new start of the warranty period. Exchanged parts or tools become our property. In some countries delivery charges or postage will have to be paid by the sender. Your statutory rights arising from the purchase of the tool remain unaffected
- This warranty is valid in the European Community, Switzerland, Iceland, Norway, Liechtenstein, Turkey and Russia. Outside these areas, please contact your authorized RYOBI dealer to determine if another warranty applies.
AUTHORISED SERVICE CENTRE
To find an authorised service centre near you, visit http://uk.rybitools.euheader/service-and-support/service-agents.
FR RYOIB CONDITIONS D'APPLICATION DE LA GARANTIE
RU YCJIOBNA PIMHEHNA TAPAHNTN HA IPODyKNUROYOB
NOMMO 3aOKHOHbI NpRbO,BOHHKMOHIOX pRbN OIKNYOk, daHOHe M3dEne NOKpbIbAeTCy RApaHTHN B COoBTcTBNI C PnBDEHbHMn HNKe PyHKTaMn.
- RapaHTMnHbI nePnoD nIg NOkynatEn CoCTabTne 24 Mecua c DaTb NOkynNKn INdEINIA. Data NOkYNKIO DNIXHA 6bbl TpNDBpeZHeA ChETOM HIN DPYHM CBnTeJIbCTBOM NOkynIKN. DAnHOe N3dENIE PnpDAHNe HOENO TOBKO IaCTHORIO NcONlB3OBAHNI NOkynATneEM. NToTOMy RapaHTM He pAcNPocTaPAHcTc HA INoJb3OBAHNE B IpODeCCNOHaJIbHbIX INI KOMMepueCckx CEInX.
- PnDyCMPTOpBa 03MOXHObI npOJDNHmI IaCTN HdEHNI INHEMn CAdOBbIX INCHPTymBO (AC/DC) rapAHTIWIO nepHOa C NOMOJIbEO pErHCTPcma HA canTe www.ryofoitools.eu.PapBo INCHPTyMeHMa I aPOJNOHmR papAHTINHO nepHOa YETKO yka3AO B MARAAHAX N /NN HA yNAKOBKe / n CodepkTNCB CONYTCTBvOeIe INCHPTyMeHTo DOKYMHeTAUcN KOHeHbI NOIb3OBeAtb DORJKeH 3APERNTPOBAtb CBOI pNO6PteHHN IHCPTyMeH T B TEHeMe 30 dC aDtB bOKynIKo KeHVbI NOIb3OBeAtb MOKET 3apeNTpPoBaTB cBOH INCHPTyMeH T A NOPOJHMe R apAHTIM B CTPAe CBOTo pOKxBAHn, eCNn OHa YK3Aba H aPOMe OHNaH-PERCTPaun. KpOME TORO, KOHeHVbI NOINb3OBeAtb DOJENK H aDtB CBOE CORnacme HA XpAHHeMe DaHHbIX, KOtOble Heo6XoDMBOBCTN B OHNAH-FOPMY nPiHTB nPABINl N CYONOB. NOITBpeKJHeMe PERiCTPAUcIM, KOtOpoe Bbl NONYtPE No 3NeKTOPHOH NOY oPINHAIbHBYueK, B KOTOPOM YKa3AHA data NOKYNK, B6yDT CNyKTHb Doka3aTeNbCTBM pNOIDEHNO rapaHTMN.
-
RapaHTNIO NKpblBaET B TeHeHne rapaHTMnHOro nepHOa BCE depeKtB KaecCTBA INI MATEPAPA IIA NEDe HAI DATY NOKyHM. RapaHTNr ORPAHUNe PemaTOHm I /INIM 3AmeHou H IE KBNQHaT EHKAAke DpyNe 063aTeAtbCTBa, KBNQaHAR, HO He ORpaHNUVBaC SiCyAHBMIM INI KOCBeHNbIM y6bITkAMn. RapaHTNr CTAnOBITc HNEIDCTBNTBHOI, ECNI N3DJIeN MCNOlb3OBOANcB He No HA3HaHEHIO, BOPEK INHCTPyKUAM, DAHNbIM BY PKOBODte NOIb3OBeATe INI bIbNO HnepABINbHO NOdKnloHeH. HAcToJuaR aPaHTNr HE paccpocTpaHReTc Ha:
-
liobie bpejckdienHn3dienbB pezynbTaTe HnpeBaINbHoro TexHmecKOF0 06cnykBAHAn
-ⅡObIe N3dEINr, NOBeprwnecrN3MeHnrrM N MoDnФnKaUIM
-
JIIOBIE IN3DENI, OPINHANbHbIE INDEHTIMPKAIONHOHbIE OTMEKIA KOTOPORO (TOPROBA MapKa, cepINHbHOMep) 6bll NOBpeXdHei, IN3MeHEbI ININ ydanHebI
-
liobie nobe npexdieny, blya3nHbIhe heco6bnDHeMHNCTpykui NyokoobctBa noIb30aTeJIa
JIIObIe N3dennr He OTHocuuecK CE
-ⅡH6BIE M3EINH, NOBDEPRUMIEC NONBITKAM PEMOHTA HEKBANIKPUCIPOBAHHHBM PAOOTHKOM MNN Bc3 PpEDBaPTeNbHoro YTBERPKENOMKAHNEI TeCHTNC Industries.
-Ⅱo5bIe ⅢaENnO, NOIOKIOHOHHe B K HENpABINbHOMY IcTOOHNY NITaHry (CINaTOKA,HANPRAKHEN,YACCTOTA)
JIIOBbe H3dEINMA, B KOTOpbIX HcN0Ib3ObaIINcH HeCOoTBETCTByIOUHe TOnnIBHBe CMEcN (TOnnIBO, McNo, IPOeHT MacNa)
-Ⅱo5b6 NOBPExHJIeB, B3B3AHBHcE BHEUHHMIM BO3DeCTBHHM (XMHHCKeHcE,ФИЗHcEKeHcE,уДары) ИNTOCTOPHHMIMBEUECTBABM
-HOPMaJIbHbI N3HOCnpa3pbIB 3aNaChbIX DeTanei
-HecoOTBeTCTByIOUe HcNoIb3OBAHHe, Npeerpy3Ka IHCTpyMeHTa
-NCIOJIb3OBAHHe HeyTBePJKDeHHbIX akCEccCyapOB 3aNaChbIX DeTaIeN
- liobéyepeyrnapbhepyrnpobk,TEXMHueckoe 06cbnykmbaHne INI YnCTKa KapibopatropB
KOMHOHEHbI (DeTaHnN Akecccyapbl), NOBepKeHHbIe eCTcBeHHOMy HNOCY Np3bIBy, BKNIOaY, HO He ORPAnHMBAcBpyuN ITOBOKM, PNBOHbIe PMHbIe MyObl, N3B3R TPHMMEOB Pra3OHOKOCINOK, NIIeHeBBle PemHbI, Ka6bHbI, DPOCCEnbHbI pyrJYTOp, yONbHbIe UETKn, Ka6bN NITAHN, 3y6b, BOIOHObYe IaNbbl, NaIbUcI cENKn, BEHTNIATOPbl BO3DxyOyBk, TpybK B03DxyOyBkn NIIbeNecocA, MEoKOn IIN C6Opa MyCopa N PemHn, NIMbHbIe WmHbl, NIMbHbIe CEIN, WlHaHN, COeMHInTeBHLbe DeTaN, PACbINTEBHLbe HAcADKn, KOIECA, PACbnTEBHLbe NEpeXoDNHKn, BHTpeHNHe N BHeUNHe KAtyUKn, PekyUyOccky, CBvN 3aKInAHnR, BO3DyUHbIe IN TOnnBHeBle FInbTpbl, MybNpYIOueN E3B1N IN Dp.
- npoBedHmTexnueckoro 6cbnykBaHnnn3dne HnDnne cIe dyet HanpabnTb ABtopn3oBHnBe cepBnCbeIpyRBOI, yka3aHnne IINK KaKIO CTpaHbI B pNBEHnH KNe CnCKe aDpecoB CTAnHcIepeBCHNOE6OyXnBAHnB. B HEKOToBHX cTpaHx MeCtHbe NInpehPy RBOI OtnpabnHOT n3denn B cepBncbHe opraHn3aun RYOB1 Pn OTnpaBke n3denn B cepBnChb NeTp RBOI, n3denn DoNkHO 6bl8 Beonacno Hy naKoAHO He coepKahtb HnkAknx onachbIX BeceCTa TAKX kakBeHN, doJinKe 6bl8 noDnncan adpec OTnpaBteHn INCOPOBXDaTBCK pKaTKM OHNCANHEMNCPABHOCTN.
- Pemont / 3aMeHa npoBODITcB pAmkax Hactoaei rapAHTm 6ecnnaTHO. OH He npDnBeaet rapaHIO He nHaHaeHt HOBb npaRanTmHbN nePNO. 3MaHEeHNHeIe TaIIN NHCPTyPMeHTCb TAnOHBaTc HauW eCObCTBeHHOCbIb. B HEKOTOpBx CTpaHAX OTnpaBNTb DoJIXeH ONpAHBaTb CTOnMocTb OTpAbaN. Baun 3aOKHbIe npaba, BO3NHkUne npn NOKynke IHCTpyMeHTa, OCTaOTcR hN3MeHHbIM
- DaaHra rapaHTn DeIeCTbntbHa B EbponeckOM CoobuectBe, Ibeuapm, NcHAnDn, HopBerHn, IxhTeHTHe, TypUm PocnN. Bhe yka3aHHbx TeppHTopnp ObaaTaeB CBOeMy AbotOp3oBAHOHMy dInepy RYOBl, Yto6bl yHtB, npImeHaOTcM nycOBnA kaxn-lm6 dpynx rapaHTn.
YIIOJIHOMOUEHHbI CEPBNCbI UEHTP
Yro6bHaHnTbIIMKaHmUyONHMOeHHbI cepBmHbI cHTp,OBpaTteCb KBe6caHry http://uk.ryobotools.eu/header/service-and-support/service-agents.
PL WARUNKI GWARANCJI RYOB@
npodykTN, KOnTO ca 6nnn H3MeHeHn nn MoDnFncpaHN
-
npDyK, npN KOIO TO OPINHANHITME MAPKHOBKN 3a HDEHTNPHKIAJNA (TbPROCKa Mapka, cepHEN HOMep) caM3PTHN, pONHEMN HIN NpEmaxnat - NOBPEda, pPNTHNEAOT HECNBa3AHe h P5KOBOCTBOTo C nHCTPYKUN
-
npodykT 6e3 CE MapKnpOBka
-
npOdyKT, 3a KOITo e HApBaH eONIT 3a peMOHT OT HeKBaHmPunpa nceuaNCT mN 6e3 npEbaPteTHe paopeHne ITechtronic Industries.
-
npOdyKT, CbBp3aH KbM HEnoIxOJaIe oEnekTpO3axpaHbaHe (amnepax, BONTaqK, Yectota)
-
npOdykT, n30n3BaH c HEnoOxOJaIa rOpBHa CMEC (rOpBO, MaCNO, npOteH MaCNo)
-
Uyckdu BueCTBa
HOPMaHHO 3HOCBaHe Ha pe3epBHN qACT
HnOxOyA ynoTpe6a, npTeOBapBaHe Ha HnCTpyMeHTa
H3nOJ3BaHe Ha HeoO6peHN akcecoap Nm YactN
BcaknBn pnoDmHn HactpoKn nnn noNtcbTaBaH c eIe N3bpuBaHa na npdppKaHa kaKpypatopn
KOMIOHEHTN (HACT N A KCECOAP), NOJNOEHN HA ECTCCTBEHO IHCOCBAHe, BKNHOHTENHO, HO CE HAMO, KOHETA 3a TNACKAHE, 3aDNBKKBaUN pEBuH, CbeDNIMENT, OCPBHTA HAOHKUIN 3a XJBN PNET JN KOCQKIN 3a TPEA, INpe3pAMKn, Ka6eHN DPOCEIN, KAPBOHOBN YETKN, 3axPAHBAU qABEN, OCTPbETA, FNIIOOBI MAHIN, OCNRPTENH NIKPTOBE, BEHTNATOPIN HA YPeDn 3a O6DyXbaNE, TpbN 3a O6DyXbaNE HBCMKAIBAN, TOp6A 3a OTiADbUN iPbMbUN, BODEUN SHINH, BEPIN 3a TPNOH, MApKByH, fHTNH H A KOHEKTOPIN, IIO3N, KOJIENA, NpBcKANK, BtTpeuHN N BtHUMH MAKAPIN, PEXeIO BnAknHO, 3anaNTINEN CBEUN, Bb3dYJHM FmITPN, RopNBH FmITTPN, OCTPbETA 3a MYTNVPAE H dP.
4.3a 6cbnybahe npdykTBt Tp8bda ae ce n3npaTn m3aHece Ha otOpn3upan cepBmHa RYOBi, nooc0e Ta Bc9ka DpbKaa B cneHnna CnCbck C aDpeca H cepBmN, B HnkO DpbKABM MECTHNT TbpRoBuHa R YOBi Noema OTROBOPHOCTT da n3npaTH npdykTa do cepBm3e Hentbp Ha RYOBi. Pn npn3paUha H npDyKT Do cepBm3 Ha RYOBi ToT Tp8bDa da e onakobah 6beonaccho 6e3 onaccho bDpKhanie, Hanp. 6e3HH, da e MapkpuaH cAdpeca Ha noDatena n npDpyKeH oT kpatKO onncnA hae nopeData.
5.PemOHbT/3aMaHaTaNo CnIaTa Ha TaI rapaHua Ca 6e3PiAtn. Te He BoJrDo yDbIxAbaHe IIN NOHOBBABe HrapaHIOHHcPcK. CMeHEHIne Tachm IIN INCTpyMeHT CTaBa HA co6CTbeHoCT. B HKOHN DpKABn TAOKTEA 30 DaCTBaKn IIN IIIN p3aAnHe TpBa6 Da cePiATr OT NdoTeaR. 3akoHOyCTAHOBEHIne BN npBa, IpOn3TuHauN O3akTyBaHeTo HA INHCTpyMeHTa, OCTabat HE3acERHaTH
- Taan rapaun e bannnna B Eeponeckata oouhoct, Ubeauapn, Ucnanhnn, Hopene, JnxTeuHn, Typn n Pycnn. N3bN Te3n O6NaCTe CcbpKete C ytnHNOoJeHH TpbroBeu ha RYOBI, 3a da ce yctaHOBn dAn e npinokmna Dpyra rapanu.
YIbJIHOMOIUEHCEPBNU3EHUHTBp
3a da Hamepnte ytbnHmncn cepBnEh ueBtp 6n30 do Bac, nocetete http://uk ryobitools.eu/header/service-and-support/service-agents.
UK TAPAHITHI YMOBUNIYROB
Okpim 3araIOM yCTaHOBneHIX 3AKOHOM npab, 10C tOcyHbCn OKynKn, Cn npctpiNOKPBAeTcR rapAHTiCIO 33HAeHO HmKue.
- 7apaHTiHn Hneipod nIra cnoKbAHIB cKaIi IOnHaeTc3 MoMeHTy npD6aHHN IbOrO npCTpOIO. LdaTata NoBHnHA 6ytN 3aoKMeHTOBaH y HAKnADHn ABO IHUOMY DOKUMEHTI, IO nITBpePckye NOkynK. Iei npCtpi BvB po3po6NeHN i pINHauhen Hn TIlKN dI cNoXNBHO Ta nPiBaTHOR BVKOpCTAHN. Y pa3i npocecimHoro a60 KomeuHoro BHKOPCTAHN IbOro pncTPO, BIh BTPaAe rapaHTIO.
- lchy moxNmbictb npodBkntn rapaHTHHn nepio, noHa nepio onncAHm Bnue, dnaactHNI liHIMC cadOBHX hctpyMeHTB (nepeMHHO/NoCTHIHO ctpyM) 3a donOMoro peeeTpaHJI caHtI Wryobitools eu.PnpCTpo, kai MaToB npABO ha npoDBXeHNRAPaHTHORO nepIOY, MaTOB tkiN OTHaHcuO duO BO rMa3INhAX i / a6o Ha ynakobU / Ta DokyMeHTaJI Do npCTpo. KIncEbn KOpNCYbaH NOHN HApocCTpyBaTNO pOABpNDaHn PNPCTPI ONnH NPOTRAM 30 nHB 3 datn nOKynKn. KIncEbn KOpCByBaM oKe 3apeCTpyBaTNCr Dn oDopKBHe HapaTHiHO nepIOY b CBOI KPAlH NoCTHIHO nepe6yBuHN, kauo BOH e DoctynHO y BiINOBIHOn OnLI OHnHn POpMN PeC7PaJI. Kpm TOrO, KIncEbn KOpNCYbaH NOHN Hdtu CBOO 3Oyo HA 36epirHH DAHN, kia Heo6XiHd I nB BBeHn OHnA, a TAKOX BOH NOBNHn pniHn PAWbNA ta YMOB. OTPMAHN niTbepKHeH NpeCTpaJI, kae BiPpABnTeCB HA apDecy eNePtoHOH nNTn, ta OpiRiHan HAnKaHIOI 3 3aHAeHHO DaTO NOKNynB 6Je cyTyrBaTH DOAKoan NODooKHeOH rapaHTII.
- RapaTria nooipoebTaHa BcI deFeKTH npCtPO IpOraOM rapaHTIHoro TepMIHy
Udo HeDOTPMMAHn CHaTAPBIB BIVo6hNTBa 0a MotepiAIB Ha DAty npDdAHHa.
RapaTria o6MekYeB pEMOTOH aObA ZAMiHO, Ta HE BKNHae C 6e6 6dyb- jAXN
IHxN 3608a3Hb, B TOMy HcNl, Ane HeoMeKexa y pa3i BNnAdKOBnx TA noadJIbXu
nooiKOJxHb. RapaTria He Die, KAnO npCtPI BIKOPCtOByBaCS HeNAleKHIM
HINOM, BCynepeh IHcTpkyi3 E cKInyatai aio 6yB HenpabInbHo nikKnouhen Do
mepKeXI. Dana RapaTria No noipoeBcHa:
-mpntpo, 60 6ynn noxkoJkehi y pe3ynbtai HnnpabnIbHoro texHnhoro 6cbnyrobyaHHa;
- npncptoi, 0o 6ynn BnO3mHeH i a6o MoDnFikOBaH;
- pnpctpoi, opriHaihbe idehtnphiakuihe (Tobapnn 3nak, cepiHni Homep) MapkyBaHHaXbIyNoNtKoDkeHe, 3mHe He a60 BuaanEHO;
-6ydu-ki nowkdojehn,3anodjhi HeDToPMaHHm IHCTpykui 3eknnnyatau; - npncptpoI, 00 He MaHb MapkyBaHHa CE;
- npmtpo, 60 Bytn BipemnoBaHn HeKbaniPkoBAM phaxiBcM abo 3a bidyto nonepenboro do3bony Bi Techronic Industries;
- npntpoi, nkiKIOHeni Do HeBIDNOIIBHO DKepeNa XMBHeHHa (CNNA TOKy, HAnpyKeHHA, Yactota);
- npiCTPOT, 5UO BIKOPCOTOBAYBnCb 3I HEBNIOBIOHIOO PAINBHNOO CMIUIKHO (PAINBOOM, OBNIOHO, BIDCOTKOBOK ACTKTOO OBNIM);
-6ydb-ki NOJIOKOJKeHn CnpNHyHeH 30BHIuHIM BnIbOM (XiMHM, pI3HMM, CTPi6kAM HAnpyH) aO bO cTOPOHHIM peOBOHAMM;
-HOpMaIbHy amOpTu3aIu 3aIacNHx YAcTHH;
-HEBIDNOIBHENBIKOPNCaHHNpeBaHTaKeHHN pNCTpO;
-BNKOPICTaHHH HeniTBepeXeHX 3aIacnHX qacTNH aOaKceCyapB;
-Буд-якперiodинкоруваньабоTeXHNe OuHSeHnKap6kpaTopiB
KOMNOHEHTN (aactHn Ta akcceyapn) 3ypaxyBaHHM HopMaIbHorO 3HOUYBAA, BPAXOBYQm ae 63eOBMeKHeHn HA IMNYbChi KHNKn, pemeHi npBHyDy, 3eHNNEHn, Ie3a KyOpJia 4a0 Ra3oHOKocAPKn, pemeHi, TpOcH dpocEnbHoro KNanhy, ByrInhbluTtKn, UHypn XMBNeHn, 3y6U, FeTPOBI nIKNaqKn, 3HINHI WTHPi, BEHTNIArTOpi NOBITPOyBKn, TpyBKn NINOncOca Ta NOBIPoDyBKn, BAKYHMH MIuKi TA HkNAdKn, HApRPMH, NaHOpri, NHyki WlnAHn, 3eHyBaJIbHI FIHTHn, PO3NIOBAbHni HAcAKn, KOneCa, XopCtki COnna, BHTyPIHi KOTyUkn, 3OBHIuH 3OToTHMn, Pjxuy BONcHb, CBiKN 3AnaneHHN, NOBITPNIbTPn, PNPITRAObi FiTpN, MByyBaJIbHI Ne3a, T.d. - Dn86cnyBaaHn, npctpi Mae 6ytn BInpapBneHH a6o noaHmdo OOnHoro 3 abTOpnoBaoHNxCepBHXIeHTPB RYOB1, kki nepiHnI dNnKooHk pauH y HactynHom npenlky apnc cepBixnx HeptHy. YdKeHH KpaHxM CieBbM nIep RYOB1 06bO'ay3eBcra BInpapBnTnpCTPn do cpeBicHO eHTpy RYOB1. Pn BInpapBneHI npctpo DO ceBipCHOro HeTpy RYOB1, npctpMae 6ytn HadiHo ynaKoBOH m636yB-aKO He6eNeHORo BMCTy, HnapKnad bEh3Hy, 3 No3aHeHOApdecoHO BInpapBnHAKHa T cy npOBoDyBqATCn KOPKTOm ONOMC HecnPabHOCTi.
5.PemohIT/3aMHaBIDIOHOdoueI rapAHIT3dHIOCTbCBA63KoHTOBHO.Le He cOCHBOIOIINPOJIOKEHHA 600NATKY HOBOI RAPAHITINOHOpeiOy.3aMHeHi ACTINH A60 npnIaNDI NEPEXOABT Do BNAcHOt KOMnHI.Y DEKIMK KpAIHX BAPTCTb DCABKN 60 NTOBI BNTPAH NOBHNI 67n CnAneH IBDPnBBNKOM. 3aRabHo BCTAHOBHEPiPabaOKNJHa HnpCTPIAaHOTCBE3MHHHMM - La rapaTria Die BcponeiBcKomy CoKoi, Uaeuapaii, IcaHdi, Hopseri, liXTeHnTnei, TypeuCnT Pocii. 3a Mexamun xin 30, 6yI naLacka, SbRHeTbCdo OphiHoroDnepa RYOB1, uOb BnAHAUYIN, yNactocobeyCnIHua rapaTH.
ABTOPN3OBAHI CEPBICHI LHTPN
Дпглгшнг OOBнELHOrO nepenika ABTOPI3OBaHmX cepBcHmX ceHTpI8, BiDJaTe http://uk.ryobiltools.eu/header/service-and-support/service-agents
TR RYOBI GARANTI UYGULAMA KOSULLARI
EC DECLARATION OF CONFORMITY
Techtronic Industries GmbH
Max-Eyth-Straße 10, 71364 Winnenden, Germany
Herewith we declare that the product
Blower / Vacuum
Brand: Ryobi
Model number: RBV26B
Serial number range: 46208101000001-46208101999999
is in conformity with the following European Directives
2006/42/EC, 2014/30/EU, 2000/14/EC, 2005/88/EC, 97/68/EC,
2002/88/EC, 2004/26/EC, 2010/26/EU, 2011/88/EU, 2012/46/EU,
EN 15503:2009+A1:2013, EN ISO 14982:2009, EN ISO 3744:2010
Measured sound power level: 106.2 dB (A)
Guaranteed sound power level: 107 dB (A)
Conformity assessment method to Annex V Directive 2000/14/EC.


Floyd Jeffrey Nesom (BSME)
Senior Director of Engineering
Authorised to compile the technical file:
Alexander Krug, Managing Director
Techronic Industries GmbH
Max-Eyth-Straße 10, 71364 Winnenden, Germany

Max-Eyth-Straße 10, 71364 Winnenden, Germany
Max-Eyth-StraBe 10, 71364 Winnenden, Germany


DÉCLARATION DE CONFORMITÉ EC
Techtronic Industries GmbH
Max-Eyth-Straße 10, 71364 Winnenden, Germany
Max-Eyth-Straße 10, 71364 Winnenden, Germany

Max-Eyth-Straße 10, 71364 Winnenden, Germany
Director seniorde Ingenieria
Max-Eyth-Straße 10, 71364 Winnenden, Germany

Max-Eyth-StraBe 10, 71364 Winnenden, Germany
Max-Eyth-Straße 10, 71364 Winnenden, Germany
PT DECLARACAO EC DE CONFORMIDADE
Techtronic Industries GmbH
Max-Eyth-Straße 10, 71364 Winnenden, Germany
Pelo presente declaramos que os produits
Soprador / Aspirador
Marca: Ryobi
Numero do Modelo: RBV26B
Intervalo do numero de series: 46208101000001-4620810199999
Max-Eyth-StraBe 10, 71364 Winnenden, Germany

NL EC CONFORMITEITSVERKLARING
Techtronic Industries GmbH
Max-Eyth-StraBe 10, 71364 Winnenden, Germany
Max-Eyth-Straße 10, 71364 Winnenden, Germany
DA EC OVERENSSTEMMELSESERKLERING
Techtronic Industries GmbH
Max-Eyth-Straße 10, 71364 Winnenden, Germany
Max-Eyth-Straße 10, 71364 Winnenden, Germany


EC-KONFORMITETSDEKLARATION
Techtronic Industries GmbH
Max-Eyth-Straße 10, 71364 Winnenden, Germany
Senior Director of Engineering
Max-Eyth-Straße 10, 71364 Winnenden, Germany

EC-SAMSVARSERKLIERING
Techtronic Industries GmbH
Max-Eyth-Straße 10, 71364 Winnenden, Germany
Herved erklaerer vi atproduktet
Max-Eyth-StraBe 10, 71364 Winnenden, Germany


EC-SÄÄNNÖSTEN NOUDATTAMINEN
Techtronic Industries GmbH
Max-Eyth-Straße 10, 71364 Winnenden, Germany
Max-Eyth-Straße 10, 71364 Winnenden, Germany

3AABBIEHNE O COOTBETCTBUN TPEBOAHNIMEC
Techtronic Industries GmbH
Max-Eyth-StraBe 10, 71364 Winnenden, Germany
HactoIIMMb3aBnem,TO daHHbI npOdyKT
Tbilecoc/Bo3dyxOyB
Mapka: Ryobi
Homep moen: RBV26B
Dnana3OH 3aBODCKNX HOMePOB:46208101000001-4620810199999
COOTBETCTByeT CneDyIoum DnpeKeTnBaM EC
2006/42/EC, 2014/30/EU, 2000/14/EC, 2005/88/EC, 97/68/EC,
2002/88/EC, 2004/26/EC, 2010/26/EU, 2011/88/EU, 2012/46/EU
EN 15503:2009+A1:2013, EN ISO 14982:2009, EN ISO 3744:2010
13MepeHHbI ypoBeHb 3ByKOBO MOUHOCTn: 106.2 dB (A)
TapaHTpyeMbI yPOBeH 3ByKOBO MOUHOCTn:107 dB (A)
Cnocob oueHKn COOTBETCTBnI, npJIOXKeHne V K dIpEKTNBte 2000/14/EC.


Floyd Jeffrey Nesom (BSME)
CTapssnTexHneckn DnpeKTop
Max-Eyth-StraBe 10, 71364 Winnenden, Germany


DEKLARACJA ZGODNOSCI EC
Techtronic Industries GmbH
Max-Eyth-Straße 10, 71364 Winnenden, Germany
Max-Eyth-Straße 10, 71364 Winnenden, Germany

EC MEGFELELOSEGI NYILATKOZAT
Techtronic Industries GmbH
Max-Eyth-Straße 10, 71364 Winnenden, Germany
Max-Eyth-StraBe 10, 71364 Winnenden, Germany


PROHLASENI O SHODE EC
Techtronic Industries GmbH
Max-Eyth-StraBe 10,71364 Winnenden, Germany
Rozsah seryovych cisel: 46208101000001-46208101999999
ze tento vyrobek je v souladu s evropskymi
2006/42/EC, 2014/30/EU, 2000/14/EC, 2005/88/EC, 97/68/EC,
2002/88/EC, 2004/26/EC, 2010/26/EU, 2011/88/EU, 2012/46/EU,
EN 15503:2009+A1:2013, EN ISO 14982:2009, EN ISO 3744:2010
Zméréná hladina akustického vykonu: 106.2 dB (A)
Max-Eyth-StraBe 10,71364 Winnenden, Germany


DECLARATIE DE CONFORMITATE EC
Techtronic Industries GmbH
Max-Eyth-StraBe 10,71364 Winnenden, Germany
Prin prezenta, declaram ca produsele
Suflanta / Aspirator
Marcà: Ryobi
Numar series: RBV26B
Gamā numār serié: 46208101000001-46208101999999
Alexander Krug, Director General
Techtronic Industries GmbH
Max-Eyth-Straße 10, 71364 Winnenden, Germany

EC ATBILSTIBAS DEKLARACIJA
Techtronic Industries GmbH
Max-Eyth-Straße 10, 71364 Winnenden, Germany
Ar so pazijojoam, ka produkti
Putejs / Sucjoys
Zimols: Ryobi
Modela numurs: RBV26B
Serijas numura intervals: 46208101000001-46208101999999
atbilst sim Eiropas direktivam
2006/42/EC, 2014/30/EU, 2000/14/EC, 2005/88/EC, 97/68/EC
2002/88/EC, 2004/26/EC, 2010/26/EU, 2011/88/EU, 2012/46/EU,
EN 15503:2009+A1:2013, EN ISO 14982:2009, EN ISO 3744:2010
Izmertitas skanas jaudas limenis: 106.2 dB (A)
Garantêais skanas intensitates limenis: 107 dB (A)
Atbilstibas novertesanas metode direktivas 2000/14/EK V pielikumā


Floyd Jeffrey Nesom (BSME)
Inzienieru nodajas vadilajs
Max-Eyth-Straße 10, 71364 Winnenden, Germany

EC VASTAVUSDEKLARATSIOON
Techtronic Industries GmbH
Max-Eyth-Straße 10, 71364 Winnenden, Germany
Kinnitame, et see toode
Puhur /Imur
Mark: Ryobi
Mudeli number: RBV26B
Seerianumbri vahemik: 46208101000001-46208101999999
Max-Eyth-Straße 10, 71364 Winnenden, Germany


EC ATITIKTIES DEKLARACIJA
Techronic Industries GmbH
Max-Eyth-Straße 10, 71364 Winnenden, Germany
Max-Eyth-Straße 10, 71364 Winnenden, Germany


EC IZJAVA O USKLADENOSTI
Techronic Industries GmbH
Max-Eyth-Straße 10, 71364 Winnenden, Germany
Max-Eyth-StraBe 10, 71364 Winnenden, Germany

SL
IZJAVA ECO SKLADNOSTI
Techtronic Industries GmbH
Max-Eyth-Straße 10, 71364 Winnenden, Germany
Izjavlamo, da je izdelek
Puhalnik / Sesalnik
Znamka: Ryobi
Stevilka modela: RBV26B
Razpon serijskih stevik: 46208101000001-46208101999999
Max-Eyth-Straße 10, 71364 Winnenden, Germany
BG
EC DEKNAUPAUN HA 3A CbOTBETCTBNE
Techtronic Industries GmbH
Max-Eyth-Straße 10, 71364 Winnenden, Germany
C HacToaTeTo DeKnapnPaMe, Ye npOdykTnTe
06dyXbaHe /3acMykBaHe
Mapka: Ryobi
HomepHa moena:RBV26B
06xBaT Ha cepHmH Homepa: 46208101000001-46208101999999
E B CbOTBETCTBnE CbC CneHnTe DnpeKTHnHa EC
2006/42/EC, 2014/30/EU, 2000/14/EC, 2005/88/EC, 97/68/EC,
2002/88/EC, 2004/26/EC, 2010/26/EU, 2011/88/EU, 2012/46/EU,
EN 15503:2009+A1:2013, EN ISO 14982:2009, EN ISO 3744:2010
N3MepeHo HnBO Ha yM: 106.2 dB (A)
TapaHTnpaHO HnBO Ha yM 107 dB (A)
MetoHa OueHReBaHe Ha cBcTBeTCTBnETo Cb6pa3Ho npINOKeHne VOT
Директва 2000/14/EC.


Floyd Jeffrey Nesom (BSME)
Ctapwn DnpeKTop MaunHOCtpoeHe"
Max-Eyth-Straße 10, 71364 Winnenden, Germany
SK
PREHLASENIE O ZHODE EC
Techronic Industries GmbH
Max-Eyth-Straße 10, 71364 Winnenden, Germany
Alexander Krug, Generally Riaditel
Techronic Industries GmbH
Max-Eyth-Straße 10, 71364 Winnenden, Germany
UK
EC DEKJIAPAUJI NPO BIDNOBIDHCTb
Techtronic Industries GmbH
Max-Eyth-Straße 10, 71364 Winnenden, Germany
PnBOMy M3aBnEMO, 0npOpyKT
NOBITPOyBkA /BaKyyMHa
Mapka: Ryobi
Homep Modeni: RBV26B
Diana30H cepiHoro HOMepy:46208101000001-46208101999999
y BiNDOBiHDocTI 3 HAcTyHnHMN cBpOeNcBKMn DnpeKTHBaMn Ta
rappMOHI3OBAHIMN CTaHdapTaMn
2006/42/EC, 2014/30/EU, 2000/14/EC, 2005/88/EC, 97/68/EC
2002/88/EC, 2004/26/EC, 2010/26/EU, 2011/88/EU, 2012/46/EU,
EN 15503:2009+A1:2013, EN ISO 14982:2009, EN ISO 3744:2010
BumipraHH pibHeB 3BykoBoI NoTyKHOCTI: 106.2 dB (A)
TapaHTOBaHm pIBeH 3ByKOBoI nOryKHOCTi: 107 dB (A)
MeToD ouiHKn BiJIOBIOHocTi Annex V Directive 2000/14/EC 3 nonpaKamn
BHeceHMM 2005/88 / EC.


Floyd Jeffrey Nesom (BSME)
CTapuN TeXHnHm DnpeKTop
Max-Eyth-Straße 10, 71364 Winnenden, Germany

EC UYGUNLUK BEYANI
Techtronic Industries GmbH
Max-Eyth-Straße 10, 71364 Winnenden, Germany
Alexander Krug, Idari Mudur
Techtronic Industries GmbH
Max-Eyth-Straße 10, 71364 Winnenden, Germany


RYOBI.
Techtronic Industries GmbH
Max-Eyth-Straße 10,
71364 Winnenden, Germany
960725052-01


- REDUCTION DES RISQUES
- APPRENEZ A CONNAITRE VOTRE PRODUIT
- English (Original instructions)
- INTENDED USE
- WARNING
- GENERAL SAFETY WARNINGS
- FRENDEESITPTNLSVDANOHUCSRUROPLSLHRETLTLVSKBGUKTR
- A WARNING
- BLOWER SAFETY WARNINGS
- VACUUM SAFETY WARNINGS
- FRENDEESITPTNLSVDANOFHUCSRUROPLSLHRETLTLVSKBGUKTR
- RESIDUAL RISKS
- RISK REDUCTION
- MAINTENANCE
- CLEARING A BLOCKAGE
- CLEANING THE AIR FILTER
- CLEANING THE EXHAUST PORT, MUFFLER, AND SPARK ARRESTOR
- FUEL CAP
- VACUUM BAG
- FUEL FILTER
- SPARK PLUG REPLACEMENT
- TRANSPORTATION AND STORAGE
- Short term (less than 1 month)
- SYMBOLS
- KNOW YOUR PRODUCT
- See Fig 1a and 1b.
- ASSEMBLY
- UNPACKING
- PACKING LIST
- ASSEMBLING THE BLOWER TUBES
- INSTALLING THE VACUUM BAG
- INSTALLING THE VACUUM TUBES
- REMOVING THE VACUUM TUBES
- OPERATION
- MIXING THE FUEL
- FILLING THE TANK
- STARTING AND STOPPING
- To start a cold engine:
- To start a warm engine:
- To stop the engine:
- BLOWER OPERATION
- CRUISE CONTROL
- VACUUM OPERATION
- TROUBLESHOOTING
- NOTES:
- FRENDEESITPTNLSVDANOFIHUCSRUROPLSLHRETLTLVSKBGUKTR
- MACHEN SIE SICH MIT IHREM PRODUKT VERTRAUT
- ALGEMENE VEILIGHEIDSWAARSCHUWINGEN
- TRANSPORT OCH FÖRVARING
- KJENN PRODUKTET DITT
- MONTERING
- OPPAKING
- INSTALLLERESTVVSUGERPOSEN
- ADVARSEL
- OBsNE INPABUNBAE30NACHOCTN
- FRENDEESITPTNLSVDANOFIHUUCSRUROPLSLHRETLTLVSKBGUKTR
- Pycckn (IpeBOD n3 nepBOHaayaHbHbIX INHCTpyKcN)
- OCTOPOXHO
- IPEIOCTEPEXEHN OTHOCNTIELHO B3ONACHORO NOLb3OBAHN BO3DyXODYBKO
- IPEIOCTEPEXEHN OTHOCNTIELbHO B3ONACHOIOJIb3OBAHN IbJIIECOCOM
- BYDbTE BcERda OCTOPOXHbI
- CHNXEHNPENUCKA
- A OCTOPOXHO
- TEXHINCHECKOE OBCJNYXUBAHNE
- OCHCTKA 3ACOPEHNA
- CHCTKA BO3DyUHHO ΦNJIbTPA
- OuNCTKA BbIXIONHOrO OTBEPCTnI,ITyUHTENJI NCKPORACNTENJ
- KPbIiKA TOnJIINBHOBOBAKA
- MELIOK IIbIECOCA
- TONINBHyIΦNJIbTP
- 3AMEHA CBEUH 3AKIAGHNA
- Pycckn (IpebeoN3 nepBOHaJaNbHbIX nHcTpyKcn)
- TPAHCIOPTNPOBKA IN XPAHEHNE
- KpaTkoPouHoe xpaHenHe (do 1 meca)
- YCIOBHBIE OBO3HAUHIN
- N3YUHTE YCTPOICTBO
- CBOPKA
- PACNAKObIBAHNE
- QTOPOXHO
- YNAKOBOUHbIJINC
- MOHTAX TPYBOK BO3DyXOyBKN
- YCTAHOBKA MEUKA IIN C6OPA MYCOPA
- YCTAHOBKA TPY6 NbJIIECOCA
- CTOPOXHO
- CHRTNE TPYB NbJIIECOCA
- 3KcnnnyATAUa
- TONJIINBHAR CMECb
- 3ANPABKA 6AKA
- Pycckn (IpeBOD n3 nepBOHaayaJIbHbIX nHcTpyKcn)
- 3ANYCKIOCTAHOB
- ACTOPOXHO
- 3anyck xonoDnHO OdBnraTeJ.
- ZAPOZNAJ SIE ZE SWOIM PRODUKTEM
- HENPEBVDENPNCKOBE.
- FRENDEESITPTNLSVDANOFIHUCSRUROPLSLHRETLTVSKBGUKTR
- ONO3HAITEBAUNIPODyKT
- CITIOBABAE
- PA301NAKOBAHE
- 3a da cTaptnpate cTydeH dBnraTeI:
- 3a da cnapate tonbn DBnraTeJ:
- 3a da cnpe TeBnraTeTn:
- CMECEH CETAHOJ TOPNBA
- PABOTA C YPEDA 3A OБДУXBAHE
- PDEyPExEHHe
- KPYN3 KOHTPOJ
- HENPEDEBAUEHIN3NKN
- 3HIXEHHPn3IKY
- yKpaIHcBka MOBa (pepeKnaI opnirHaJIbHnx iHCTpyKci)
- NepeDxKeHHA
- TEXHUIHE OBCNYROBYAHHH
- PonepeJxHn
- PonepeJxKeHHa
- UCYHEHHBLOKYBAHH
- YUHENH NOBITPRAHORO FJIbTPA
- OuHHeHHBUNyCKHOOTBOPY,JIYUHnKA TA ICKPOrACHNKA
- npepeXeHH
- KPNUKA NAJIINBHO BOKA
- OnepedxKeHH
- BAKYUMHNI MILOK
- NAJINBHNΦIbTP
- 3AMIHA CBIyKIN3ANJIIOBAHH
- TPAHCNOPTYBAHHRA 3SEPIAHHRA
- yKpaIHcBka MOBa (nepeKnaI opnirHaJIbHnx iHCTpyKci)
- 3HAHCBINIPODyKT
- MOHTAX
- PO3NAKYBAHH
- NepeDxHn
- NAKYBAJIbHNIJNCT
- BCTAHOBJIEHHT pybok nIOOCCA
- 3HATTTPYBOKNIOLOCOCA
- ФУHKUIOHYBAHнЯ
- NonepedxHn
- 3MIIUYBAHHI NAJIINA
- yKpaIHcBka MOBa (pepeKnaI opnirHaJIbHnx iHCTpyKciI)
- 3ANOBHEHHBAKA
- 3ANYCKI3YUNHKA
- PonepeDxHnH
- 1063anyCTHTXOIODHN DBHryH:
- Дязanycky TeNlOro DBnryHa:
- ДяЗУнкDNBнга.
- ETNUOBAHE NAJINBO
- PEKIM NOBITPOyBKN
- KPYI3 KOHTPOJIb
- PPOUCPNIIBPAHNAIIOOCOCOM
- PonepeDxKeHHa
- NOWYK I YCYHEHHA HECNPABHOCTE
- AUTHORISED SERVICE CENTRE
- FR RYOIB CONDITIONS D'APPLICATION DE LA GARANTIE
- RU YCJIOBNA PIMHEHNA TAPAHNTN HA IPODyKNUROYOB
- YIIOJIHOMOUEHHbI CEPBNCbI UEHTP
- PL WARUNKI GWARANCJI RYOB@
- YIbJIHOMOIUEHCEPBNU3EHUHTBp
- UK TAPAHITHI YMOBUNIYROB
- ABTOPN3OBAHI CEPBICHI LHTPN
- TR RYOBI GARANTI UYGULAMA KOSULLARI
- EC DECLARATION OF CONFORMITY
- DÉCLARATION DE CONFORMITÉ EC
- PT DECLARACAO EC DE CONFORMIDADE
- NL EC CONFORMITEITSVERKLARING
- DA EC OVERENSSTEMMELSESERKLERING
- EC-KONFORMITETSDEKLARATION
- EC-SAMSVARSERKLIERING
- EC-SÄÄNNÖSTEN NOUDATTAMINEN
- 3AABBIEHNE O COOTBETCTBUN TPEBOAHNIMEC
- DEKLARACJA ZGODNOSCI EC
- EC MEGFELELOSEGI NYILATKOZAT
- PROHLASENI O SHODE EC
- DECLARATIE DE CONFORMITATE EC
- EC ATBILSTIBAS DEKLARACIJA
- EC VASTAVUSDEKLARATSIOON
- EC ATITIKTIES DEKLARACIJA
- EC IZJAVA O USKLADENOSTI
- SL
- IZJAVA ECO SKLADNOSTI
- BG
- EC DEKNAUPAUN HA 3A CbOTBETCTBNE
- SK
- PREHLASENIE O ZHODE EC
- UK
- EC DEKJIAPAUJI NPO BIDNOBIDHCTb
- EC UYGUNLUK BEYANI
- RYOBI.
Brand : RYOBI
Model : RBV26B
Category : Leaf blower