Pixma iP3300 - Printer CANON - Free user manual and instructions
Find the device manual for free Pixma iP3300 CANON in PDF.
User questions about Pixma iP3300 CANON
0 question about this device. Answer the ones you know or ask your own.
Ask a new question about this device
Download the instructions for your Printer in PDF format for free! Find your manual Pixma iP3300 - CANON and take your electronic device back in hand. On this page are published all the documents necessary for the use of your device. Pixma iP3300 by CANON.
USER MANUAL Pixma iP3300 CANON
KpaTkoe pykoBODCTBO no hauany pa6oTbI
| Introduction | 1 |
| Preparing the Printer 2 | |
| Installing the Printer Driver 3 | |
| Loading Printing Paper 4 | |
| Basic Printing 5 | |
| Printing Photographs Directly from a Compliant Device 7 | |
| Replacing an Ink Tank 11 | |
| Reading the On-screen Manuals 13 |
Exif Print
This printer supports ExifPrint.
Exif Print is a standard for enhancing the communication between digital cameras and printers. By connecting to an Exif Print-compliant digital camera, the camera's image data at the time of shooting is used and optimized, yielding extremely high quality prints.
Canadian Radio Interference Regulations
This digital apparatus does not exceed the Class B limits for radio noise emissions from a digital apparatus as set out in the interference-causing equipment standard entitled "Digital Apparatus," ICES-003 of the Industry Canada.
As an ENERGY STAR® Partner, Canon Inc. has determined that this product meets the ENERGY STAR guidelines for efficiency.

The International ENERGY STAR® Office Equipment Program is a global program that promotes energy saving through the use of computer and other office equipment. The program backs the development and dissemination of products with functions that effectively reduce energy consumption. It is an open system in which business can participate voluntarily. The targeted products are office equipment such as computers, monitors, printers, faxes and copiers. Their standards and logos are uniform among participating nations.
Power Requirements
Never use a power supply voltage other than that supplied in the country of purchase. Using the incorrect voltage could cause a fire or electric shock. The correct power supply voltages and frequencies are as follows:
AC 100-240 V, 50/60 Hz
About Consumables
Consumables (ink tanks / FINE Cartridges) are available for 5 years after production has stopped.
Safety Precautions

Warning
- Never attempt to plug the power cord into the power outlet or unplug the power cord when your hands are wet.
- Never damage, modify, stretch, or excessively bend or twist the power cord. Do not place heavy objects on the power cord.
- Never use any power supply other than the standard power supply available in the country of purchase. Using the incorrect voltage and frequency could cause a fire or electric shock.
Always push the plug all the way into the power outlet.

Caution
- For safety reasons, store ink tanks out of the reach of small children.
- Do not drop or shake ink tanks as this may cause the ink to leak out and stain your clothes and hands.
Also read the Safety Precautions in the User's Guide on-screen manual. Observe the warnings and cautions to avoid personal injury or damage to the printer.
Introduction
Thank you for purchasing a Canon Inkjet Printer.
This Quick Start Guide uses the following symbols to indicate important information. Always observe the instructions indicated by these symbols.
Warning
Instructions that, if ignored, could result in death or serious personal injury caused by incorrect operation of the equipment. These must be observed for safe operation.
Caution
Instructions that, if ignored, could result in personal injury or material damage caused by incorrect operation of the equipment. These must be observed for safe operation.
Important
Instructions that must be observed for safe operation.
Trademark Notices
- "Windows" and "Internet Explorer" are trademarks of Microsoft Corporation, registered in the United States and other countries.
- "Macintosh" and "Mac" are trademarks of Apple Computer, Inc., registered in the U.S. and other countries.
- "Adobe" and "Adobe RGB (1998)" are either registered trademarks or trademarks of Adobe Systems Incorporated in the United States and/or other countries.
Copyright ©2006 CANON INC.
All rights reserved. No part of this publication may be transmitted or copied in any form whatsoever without the express written permission.
Preparing the Printer
Be sure to read your Easy Setup Instructions (Setup Sheet) first for setting up your printer and getting it ready for use.
1 Turn on the printer.

Caution
Be sure to remove the tapes before you turn on the printer.

Note
The tape position is subject to change.
- Plug the power cord all the way in, since it may be difficult to plug.
2 Install the Print Head.

Caution
Do not touch internal parts other than the Print Head Lock Lever.

Important
If the Top Cover is open for more than 10 minutes, the Print Head Holder moves to the right side. In this case, close the Top Cover, and open it again.

Note
- There might be some transparent or light blue ink on the inside of the bag the print head comes in, or the inside of the protective cap - this has no effect on print quality. Be careful not to get ink on yourself when handling these items.
- Do not reattach the protective cap once it has been removed.
3 Install the ink tanks.

Important
- Make sure that all the ink tanks are installed in the correct position, matching the label. The printer cannot be used unless all the ink tanks are installed.
- Once you have installed the ink tanks, the POWER lamp will flash green. Wait for about 2 minutes, until the POWER lamp stops flashing and changes to steady, non-flashing green and the printer has stopped making operating noises, before proceeding.

Note
- Be sure to remove the clear film from the ink tank in the exact order as shown in step 3 of your Easy Setup Instructions (Setup Sheet).
- Do not squeeze the side of ink tanks as this may cause the ink to leak out and stain your clothes and hands.
- Do not reattach the protective cap once you have removed it.
- The ALARM lamp on the printer still flashes orange if an ink tank is not installed properly. Open the Top Cover and make sure that position of all the ink tanks match the label.
Installing the Printer Driver
Information Common to Windows® and Macintosh®
Notes on the Installation Process
- If the Select Language screen appears, select a language, then click Next.
- If the Select Your Place of Residence screen appears, select your place of residence, then click Next.
- There are two ways of installing the printer driver and other software:
Easy Install: the items included on the Setup CD-ROM are installed automatically
Custom Install: you can select particular items to install
- When the User Registration screen appears, click Register. If your computer is connected to the Internet, the on-screen instructions to register your product will appear.
Information for Windows

Note
- When installing the printer driver in Windows XP or Windows 2000, log on to the system as a member of the Administrators group.
- Before installing the driver, disable all anti-virus programs and automatically loading programs.
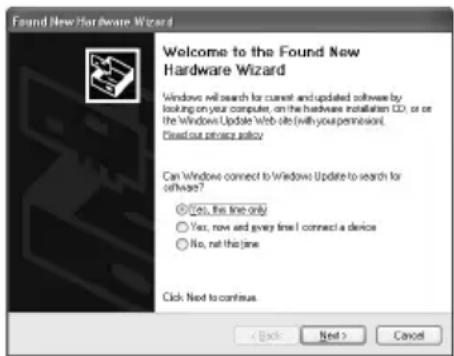
- If the following screen appears automatically, remove the USB cable connected to your computer. Next, click Cancel to quit the screen and turn off the printer. Then start the installation process again. For details on the installation process, refer to your Easy Setup Instructions (Setup Sheet).
- To install PhotoRecord and Adobe RGB (1998), click Custom Install and follow the instruction on the screen.
- Adobe RGB (1998) cannot be installed in Windows Me and Windows 98.
- When a message asking for your confirmation to restart your computer appears during the installation process, click OK. The system is restarted automatically.
- If the connection is not recognized, refer to "Cannot Install the Printer Driver" in the User's Guide on-screen manual.
Information for Macintosh

Note
- Do not remove or insert the USB cable during installation, as this may result in the computer or printer not operating normally.
- Before installing the driver, disable all anti-virus programs and automatically loading programs or remove them from your system folder.
- To install the User's Guide on-screen manual in a language other than the installed one, double-click the Manual folder in Setup CD-ROM, Canon folder, and then copy a language folder to your hard disk.
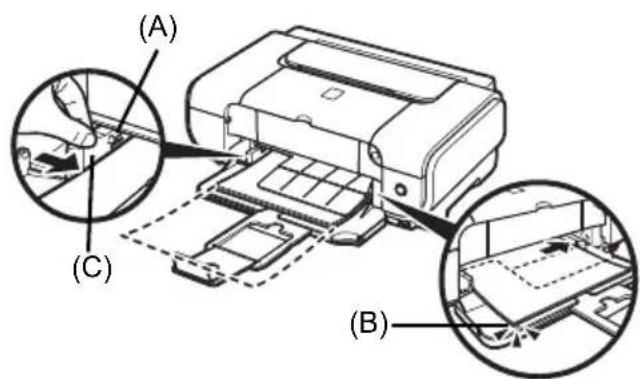
Loading Printing Paper
You can load A4, Letter, or B5-sized plain paper in the Front Feeder. You cannot load any other paper in the Front Feeder. For information on loading paper in the Auto Sheet Feeder, refer to the User's Guide on-screen manual.

Important
- If you cut plain paper to 4'' × 6'' / 101.6 × 152.4 ~mm, 5'' × 7'' / 127.0 × 177.8 ~mm , or 2.13'' × 3.39'' / 54.0 × 86.0 ~mm (credit card-size) for a trial print, it can cause paper jams.
- Always load paper in portrait orientation. Loading paper in landscape orientation can cause the paper to be jammed.
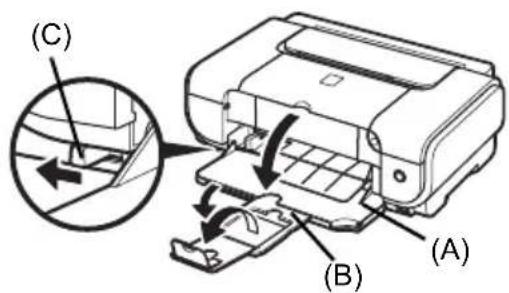
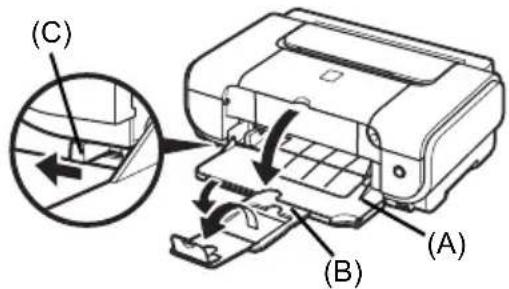
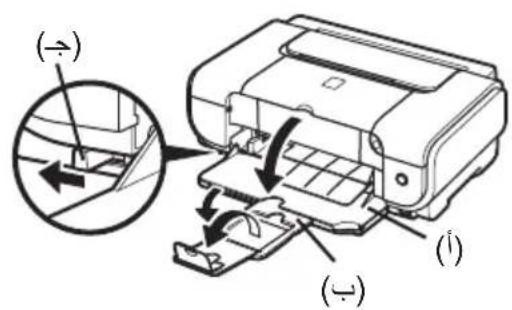
1 Open the Front Feeder (A).
2 Extend the Paper Output Support (B).
3 Set the Paper Thickness Lever (C) to the left.
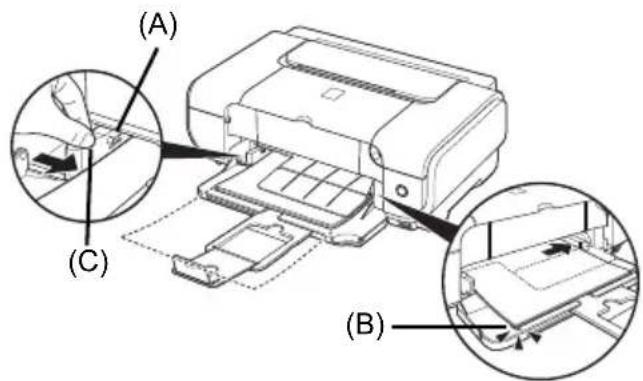
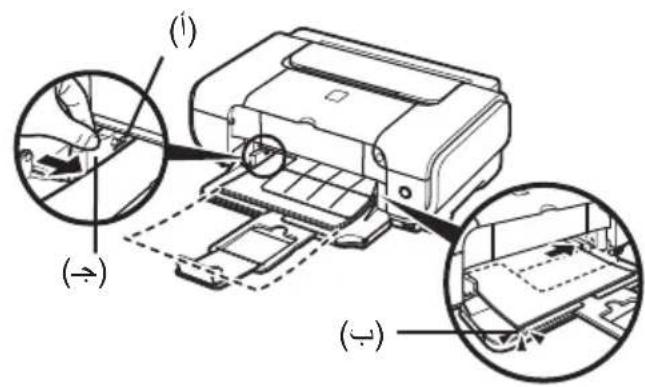
4 Load the paper in the Front Feeder with the print side facing DOWN and the leading edge to the far side. Do not load higher than the Load Limit Mark (A).
5 Align the right edge of the paper stack against the inner face of the Front Feeder, and the near and left edges with the Paper Size Mark (B).
6 Pinch the Paper Guide (C) and slide it against the left side of the loaded paper stack.
7 In the printer driver, select Front Feeder for Paper Source.
Basic Printing
This section describes the procedure for basic printing.
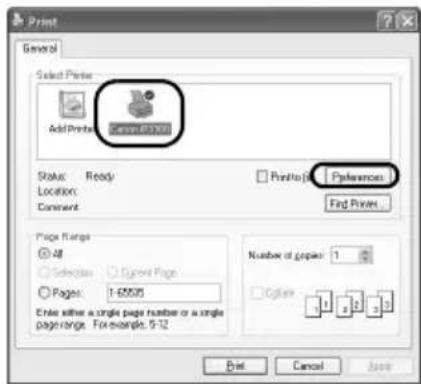
Printing with Windows
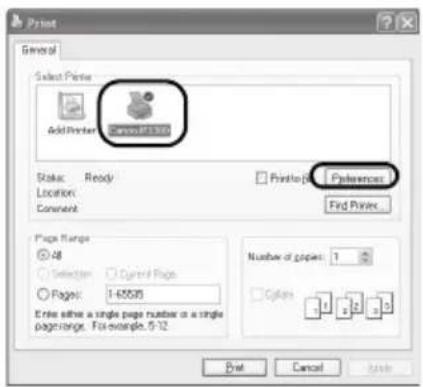
1 Turn on the printer and load the paper in the printer.
2 Create a document or open a file to print using an appropriate application software.
3 Select Print on the application software's File menu.
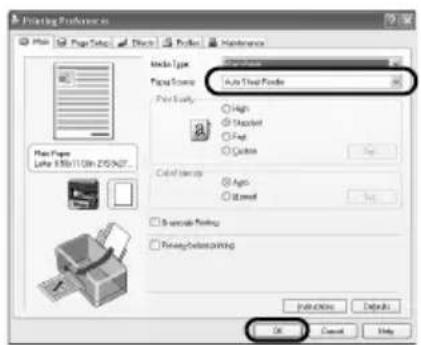
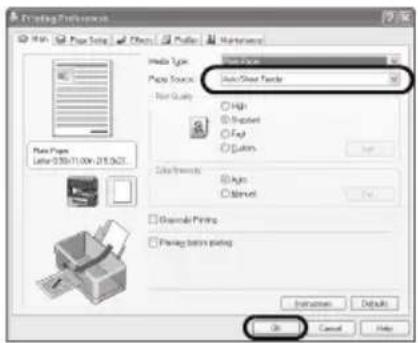
4 Make sure that Canon iP3300 is selected, and click Preferences (or Properties).

5 Specify the required settings and click OK. Make sure that the proper paper source is selected in Paper Source.

Note
- If you select Front for Plain Paper, the printer will automatically switch to the Front Feeder only when Plain Paper is specified for Media Type. You cannot load paper other than A4, Letter, or B5-sized plain paper in the Front Feeder.
- For details on other printer driver functions, click Help or Instructions to view the online help or the Printer Driver Guide on-screen manual. Instructions is only displayed when the on-screen manuals are installed.
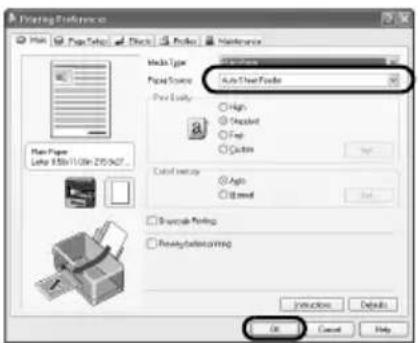
6 Click Print (or OK).
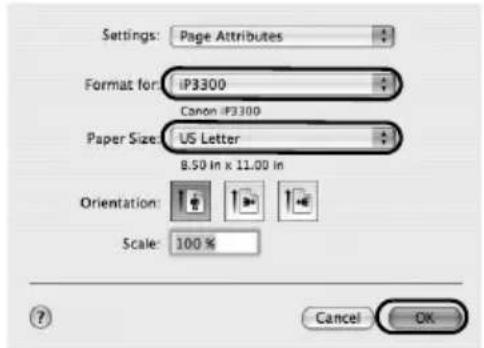
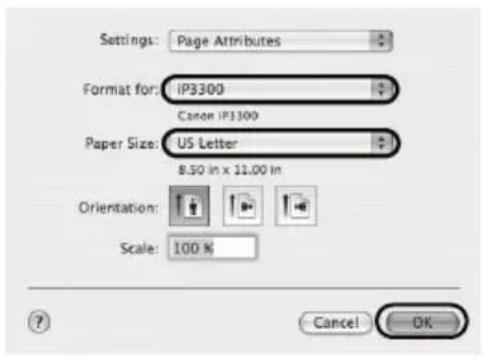
1 Turn on the printer and load the paper in the printer.
2 Create a document or open a file to print using an appropriate application software.
3 Select Page Setup on the application software's File menu.
4 Confirm that iP3300 is selected in Format for.
5 Select the desired paper size in Paper Size.
6 Click OK.
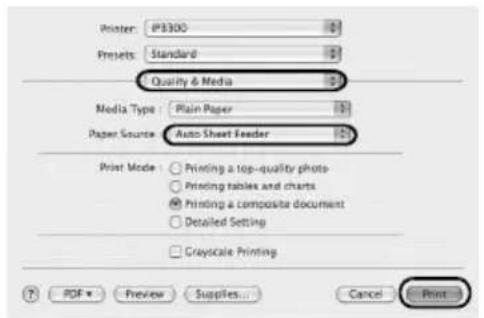
7 Select Print on the application software's File menu.
8 Select Quality & Media in the pop-up menu.
9 Specify the required settings.
Make sure that the proper paper source is selected in Paper Source.


Note
- If you select Front for Plain Paper, the printer will automatically switch to the Front Feeder only when Plain Paper is specified for Media Type. You cannot load paper other than A4, Letter, or B5-sized plain paper in the Front Feeder.
- For details on other printer driver functions, click to view the Printer Driver Guide on-screen manual. If the on-screen manuals are not installed, the Printer Driver Guide on-screen manual is not displayed even if it is clicked.
10 Click Print.
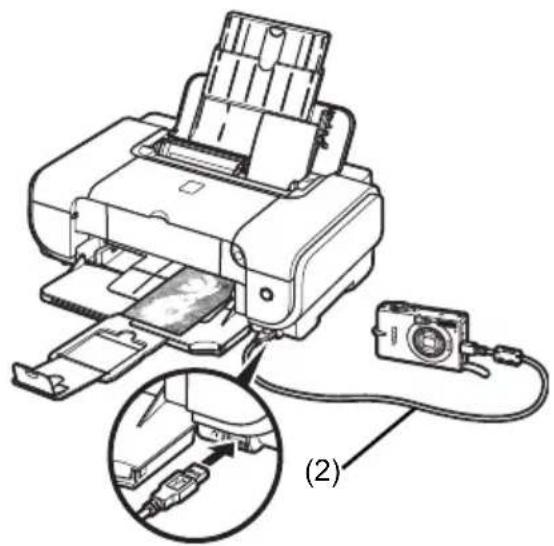
Printing Photographs Directly from a Compliant Device
Printing from a PictBridge Compliant Device
You can connect a PictBridge compliant device such as a digital camera, camcorder, or mobile phone and print recorded images directly without using a computer.
Note
- PictBridge is an industry standard enabling a range of digital photo solutions, including the direct printing of photos from a digital still camera, camcorder or mobile phone* without the need to use a computer. A device can be connected to this printer for direct printing regardless of the manufacturer or the model as long as it complies with the PictBridge standard.
- You can select the images to print and specify various print settings from your camera or mobile phone. * PictBridge compatible digital still cameras, digital camcorders, and camera-equipped mobile phones are hereafter collectively referred to as "PictBridge compliant device".

A device with this mark is PictBridge-compatible.
- Connecting a PictBridge Compliant Device
To connect a PictBridge compliant device to this printer, use a USB cable recommended by the device's manufacturer.

Caution
Do not connect any equipment other than PictBridge compliant devices to the Direct Print Port of the printer. If you do so, electric shock, fire, or damage to the device could result.

Note
When printing photos with the digital device connected to the printer, we recommend the use of the AC adapter supplied with the device. If you are using the device battery, be sure to charge it fully.
1 Set up the printer.
Refer to the Easy Setup Instructions (Setup Sheet) to set up the printer and make it ready for printing.
2 Turn on the printer and load the paper in the Auto Sheet Feeder.

Note
When printing directly from a PictBridge compliant device, you can only use the Auto Sheet Feeder as the paper source. Do not load paper in the Front Feeder.
3 Connect the PictBridge compliant device to the printer.

Note
Depending on the model or brand of your device, you may have to select a print mode compliant with PictBridge before connecting the device. You may also have to turn on the device or select Play mode manually after connecting the device to the printer.
Perform necessary operations on the PictBridge compliant device before connecting it to this printer according to instructions given in the device's instruction manual.
(1) Make sure that the PictBridge compliant device is turned off.
(2) Connect the PictBridge compliant device to the printer using a USB cable recommended by the manufacturer of the device.
The device turns on automatically.
If your device does not turn on
automatically, turn it on manually.
(3) Set up the PictBridge compliant device for direct printing.
will appear on the LCD of the device when the printer is correctly connected.

Note
If does not appear, refer to "Cannot Print Properly from a Digital Camera" in the User's Guide on-screen manual.
■ Printing Photographs Directly from a PictBridge Compliant Device
When operating the device, be sure to follow the instructions given in the instruction manual of your PictBridge compliant device. This section describes the page size, media type, layout, image optimization modes, and date printing mode that can be set on a PictBridge compliant device connected to the printer.
- Confirming or Changing PictBridge Print Settings from Your Camera
To change the page size or media type, operate the device to select the PictBridge print setup mode and confirm or change the settings.
About the Settings Explained Below
Some setting items explained below may not be available on some devices. In this case, the Default setting explained below is applied for the setting item.
- In the following description, names of settings items are given according to those used in Canon-brand PictBridge compliant devices. Setting item names may be different depending on the brand or model of your device.
- Printable Image Data Format
This printer prints images taken with a DCF® (Design rule for Camera File system)-compatible digital camera*, as well as PNG files.
- Exif2.21 compliant
- Paper size and Paper type Settings
If these settings are set to Default (the setting to follow that of the printer) on the PictBridge compliant device, 4'' × 6'' is applied for Paper size and Photo (Photo Paper Plus Glossy) is applied for Paper type.
The following sizes and types of printing paper can be loaded according to the Paper size and Paper type settings.
| Paper size Setting Paper type | Setting Loadable Paper | |
| 10 x 15 cm/4" x 6" Photo Photo | Paper Plus Glossy | |
| Fast Photo Photo Paper Pro | ||
| Photo Photo Paper Plus Semi-gloss | ||
| Photo Glossy Photo Paper | ||
| Glossy Photo Paper "Everyday Use" | ||
| Photo Stickers*1 | ||
| 13 x 18 cm/5" x 7"*2 | Photo Photo Paper Plus Glossy | |
| A4/8.5" x 11" (Letter)*3, *4 | Photo Photo Paper Plus Glossy | |
| Fast Photo Photo Paper Pro | ||
| Photo Photo Paper Plus Semi-gloss | ||
| Photo Glossy Photo Paper | ||
| Glossy Photo Paper "Everyday Use" | ||
| 5.4 x 8.6 cm/Credit card Photo | Glossy Photo Paper |
1 Exclusively used to print photo stickers. When printing on sticker paper, select 10x15 cm/4" x 6" in Paper size.
2 Can be selected only on certain Canon-brand PictBridge compatible devices.
3 Plain Paper can be selected for Paper type only when Paper size is set to A4 or 8.5" x 11" (Letter). When Paper type is set to Plain Paper, borderless printing will be disabled even when Layout is set to Borderless.
4 You can print in 4-up layout when Paper size is set to A4 or 8.5'' × 11'' (Letter).
- Layout and Trimming Settings
If these settings are set to Default (the setting to follow that of the printer) on the PictBridge compliant device, Borderless is applied for Layout and Off (No trimming) is applied for Trimming.
When printing onto Photo Stickers (PS-101), select N-up for Layout, then select 16-up.
- Some PictBridge compliant devices may display the Layout option 2-up, 4-up, 9-up, and 16-up. In this case always select 16-up.
- If there are no options on the PictBridge compliant device that correspond to 16-up, printing on stickers is not possible.
- When printing on Photo Stickers (PS-101), do not set Layout to Borderless.
- Image Optimize Setting
If Image optimize is set to Default (the setting to follow that of the printer) on the PictBridge compliant device, ExifPrint is applied.
If you are using a Canon-brand PictBridge compatible device, additional options of VIVID, NR, or VIVID+NR may be available, depending on the model.
- VIVID prints green and blue portions of photos more vividly.
NR (Noise Reduction) reduces noise in blue portions, such as the sky, and dark portions.
VIVID+NR is a combination of the VIVID and NR functions.
- Date/File No. Print Setting
If Date/File No. print is set to Default (the setting to follow that of the printer) on the PictBridge compliant device, Off is applied.
If the images already have dates superimposed when shot, set this PictBridge setting item to Off. If you select Date, File No., or Both, the date and/or file number will be printed over the date printed by the camera's function.

Note
- Never disconnect the USB cable during printing unless when explicitly allowed to by the PictBridge compliant device.
When disconnecting the USB cable between the PictBridge compliant device and printer, follow the instructions given in the device's instruction manual.
-
You cannot set or do the following by operating on the PictBridge compatible device.
-
Print quality setting
- Printer maintenance
- Confirming and Changing PictBridge Print Settings on the Printer
You can confirm and change the default settings for items such as media type and size that are preset to the printer and applied to PictBridge printing. To change the settings, you need to install the Canon Setup Utility from the Setup CD-ROM and connect the printer to your computer. For details, refer to the User's Guide on-screen manual.
Replacing an Ink Tank
When ink tanks run out of ink, replace them using the following steps.
1 Open the Front Feeder.
2 Make sure that the printer is on, and then open the Top Cover.
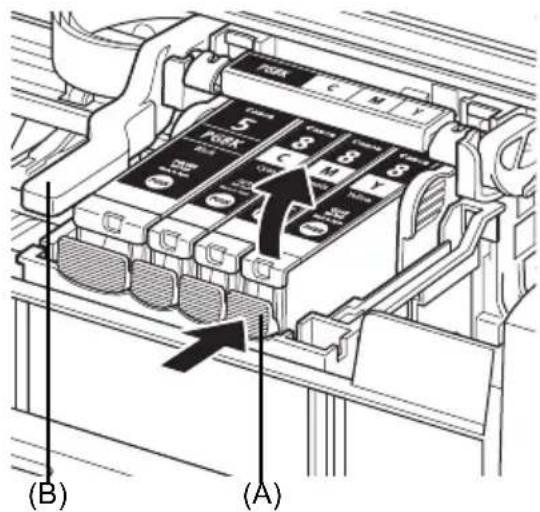
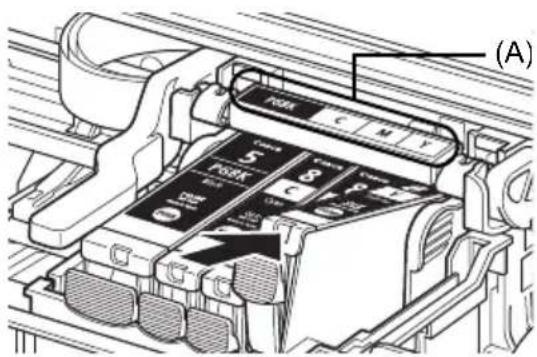
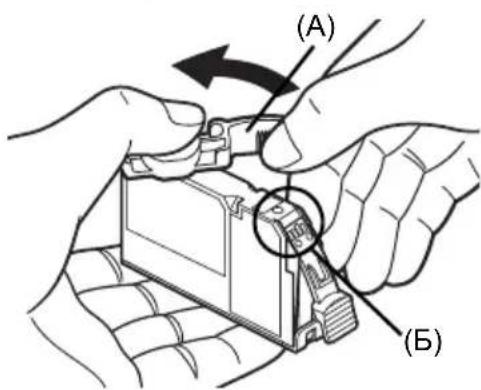
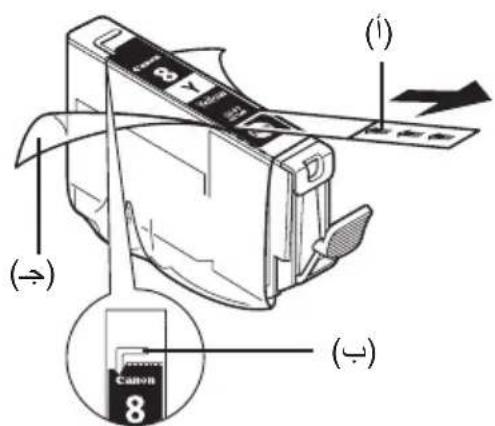
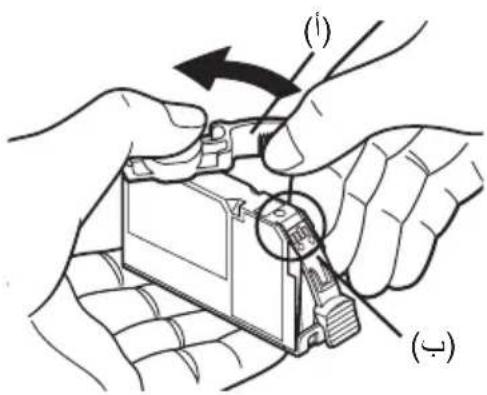
3 Push the tab of the ink tank whose lamp is flashing fast (A) and remove it. Do not touch the Print Head Lock Lever (B).
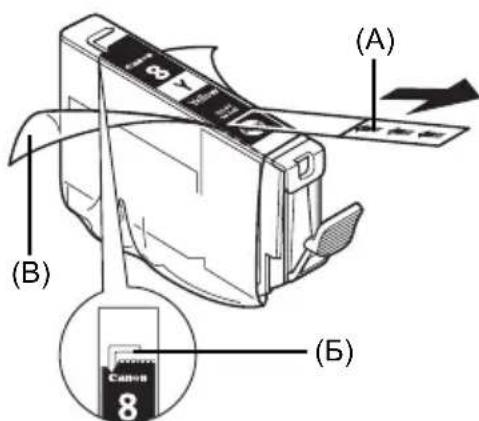
4 Remove the new ink tank from its packaging, then pull the orange tape in the direction of the arrow (A) so that the protective film does not remain on the air hole (B). Then remove the film completely (C).

5 Remove the orange protective cap (A) from the bottom of the ink tank.
Carefully hold the protective cap when removing it to prevent the ink from staining your fingers.
Discard the cap once it is removed.

Important
Do not touch the electrical contacts (B) on the ink tank. Doing so can cause the printer to malfunction or become unable to print.

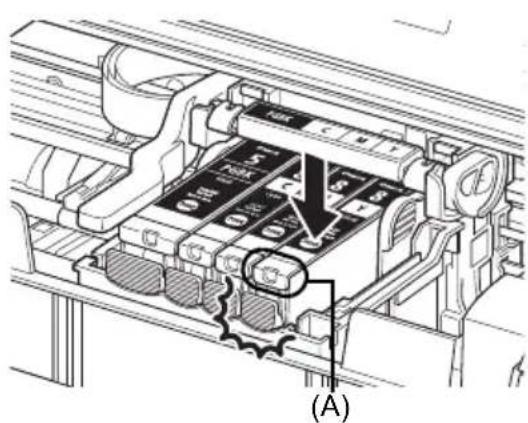
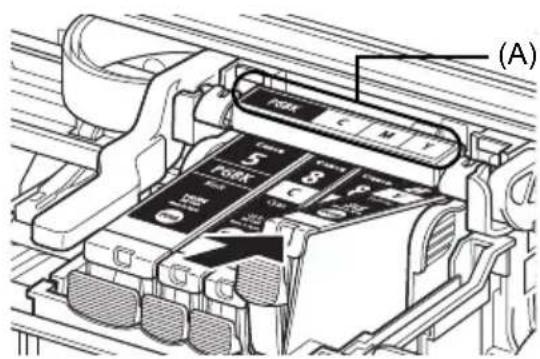
6 Insert the front end of the ink tank into the Print Head.
Make sure the position of the tank matches the label (A).
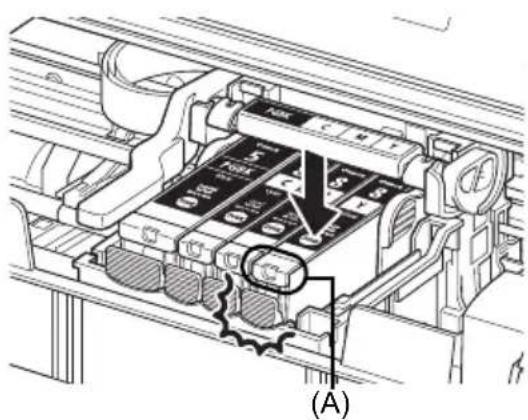
7 Press on the mark on the ink tank until the ink tank snaps firmly into place. Confirm that the ink lamp (A) lights up red.
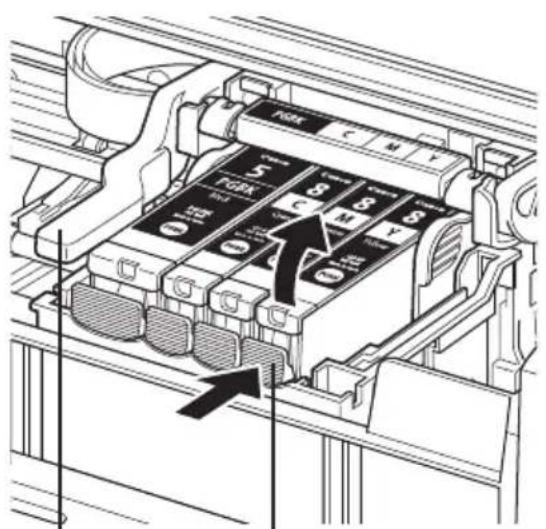
8 Close the Top Cover.
Reading the On-screen Manuals
Along with this Quick Start Guide, on-screen manuals are also supplied with your printer. For detailed instructions on installing the on-screen manuals, refer to your Easy Setup Instructions (Setup Sheet).
You can view the on-screen manuals in the following way:

To view the on-screen manual, double-click the iP3300 On-screen Manual shortcut icon on the desktop, or click Start > All Programs (or Programs) > Canon iP3300 Manual > iP3300 On-screen Manual.
System Requirements
Browser: Windows HTML Help Viewer

Note
- Microsoft Internet Explorer® 5.0 or later must be installed.
- The on-screen manual may not be displayed properly depending on your operating system or Internet Explorer version. We recommend that you keep your system up to date with Windows Update.

To view the on-screen manual, double-click the iP3300 On-screen Manual alias on the desktop.

If you installed the User's Guide from the Manual folder in the Setup CD-ROM, open the folder in which you copied the User's Guide and double-click top.htm.
System Requirements
Browser:HelpViewer

Note
- The on-screen manual may not be displayed properly depending on your operating system. We recommend that you keep your system up to date.
- We recommend using Safari as your Web browser to view the HTML format on-screen manuals. If Safari is not installed on your computer, download it from Apple Computer, Inc. website and install it.

This symbol indicates that this product is not to be disposed of with your household waste, according to the WEEE Directive (2002/96/EC) and your national law. This product should be handed over to a designated collection point, e.g., on an authorized one-for-one basis when you buy a new similar product or to an authorized collection site for recycling waste electrical and electronic equipment (EEE). Improper handling of this type of waste could have a possible negative impact on the environment and human health due to potentially hazardous substances that are generally associated with EEE. At the same time, your cooperation in the correct disposal of this product will contribute to the effective usage of natural resources. For more information about where you can drop off your waste equipment for recycling, please contact your local city office, waste authority, approved WEEE scheme or your household waste disposal service.
For more information regarding return and recycling of WEEE products, please visit www.canon-europe.com/environment.
(EEA: Norway, Iceland and Liechtenstein)
For Customers in Europe, Middle-East, Africa and Russia only
For Canon Customer Support contacts, please see the back cover of the European Warranty Systems (EWS) Booklet or visit www.canon-europe.com.

A846
Canon Europa N.V., Bovenkerwerweg 59-61, 1185 XB Amstelveen, The Netherlands
PIXMA iP3300
Copyright ©2006 CANON INC.
Copyright ©2006 CANON INC.
Canadian Radio Interference Regulations
Copyright ©2006 CANON INC.
Canadian Radio Interference Regulations
Copyright ©2006 CANON INC.
Installation of printerdriven
Copyright ©2006 CANON INC.
Aattnoeic Hktpikns Tpopoobooia
Mnv xnpoiotoinote nlektpi kn tpoopodogia me taon diapopetikn aTTO autny Tou ioxuei yia tn xwpa ayopac tou kntwn. H xpion naovn saon mTpei va Tpokalee ITPkayia n nektpotanxiia. H ootn taon kai ouxvtta tpoopodogiac eiva o Engc:
AC 100-240V, 50/60Hz
Pnpoopiecs yia tα avawoiμa
Ta avalawoi (doxieia eIavn / Duoiyyia FINE (FINE Cartridges)) diatioevta yia 5 xpovia aTTO n dakotn TnC npaywync.
Ppoulaeic aσφaλεiα

PnoεiδoToinσn
MnV ETIxEIPnoTe TOTe va OuvdeoTe n va aTouovdeoTe TO kAkwio Tpoopodooiaoc OTnv Ppica e BpeyuEvaxepia.
- Atopuyete Tn Opa, Tny TpoTOnToin, To TeVTwma n To UTepeBolko Auyioa n OtpiipuO Tou Kaawdiou pEuupatoC. Mny toTOtheTEIe Bapia avtkeieva Tavw oTo Kaawdo Tpopoooiac.
MnV xnpoiotoinote nE kpiK npopooia e taon diaopoptik aTo autny Tou ixue iT xopa ayopac tou kTun. H xpion avoaevnc taonc kai ouxvtnta c TIOpei va Tpokaleoie TUPKayia n nEKTPOTTNxiia.
Na otpiowxve Teavote To qic mexpo Tepua eoa otnv pia.

Ppoooxn
- Iia loyouc aopalaia, ta doxieia eavnc npetee va atoohkeuvotai o wpo otou ev exouv paoaon iikpa taiia.
Mny nTeTATE kai mny avatapacet e ta doxieia eAavns, yiati unapxei kivduvoC va diappueo eI eAavn kai v a Lepwoei ta pouxka kai ta xepia oac.
i i n TIC PPOUALAEIG AOPAIAIAC OTO NkTPOVIKO EYXEPIDIO OBNyOc AIToupyiaS. TIA VA aTPOUYE TPAUATIOPO H CNIJA OTOV EKTUTWNT, PPETIE TAVTA VA TNPTE TIC TPOEIDOTIOINOEIC KAI TIG TPOUALAEIG.
Eioaywyn
Zaç Euxapiotoué γi tny ayopá tou kTUTIWIn Inkjet Tnc Canon.
Copyright ©2006 CANON INC.
Me eTikuAeN kAe voumuou dikaiwauo. Kaveva heoC TnC TAPUoaC Ekooanc dev mTopei va
muTaOe i naavvayipae ie oTOiaDhnte popknai e OTOIOBNTOTE tpoTTO xwpic nptn ypaTTN
aEia.
Copyright ©2006 CANON INC.
- [Date/File No. Print / Stampa data/n file]
Copyright ©2006 CANON INC.
Copyright ©2006 CANON INC.
Nettleser: Windows HTML Help Viewer
Merk
- Microsoft Internet Explorer® 5.0 eller nyere på vår installert.
- Avhengig av operativsystemet eller Internet Explorer-versionen du har, er det ikke sikkert den elektroniske manualen vises på riktig@mæt. Vi anbefaler at du holder systemet oppdatert med Windows Update.

Hvis du vil vise den elektroniske manualen, dobbeltklikker du pa snarveien til [iP3300 On-screen Manual / iP3300 Elektronisk manual] pa skrivebordet.
Merk
Nettleser: Help Viewer
Merk
Copyright ©2006 CANON INC.
Copyright ©2006 CANON INC.
Information for Macintosh
Obs!
Copyright ©2006 CANON INC.
Copyright ©2006 CANON INC.
Satted [Layout/Paigutus] ja [Trimming/Karpimine]
Sate [Date/File No. Print/Kuupaeva/failinumbri printimine]
Brauser: Help Viewer
![CANON Pixma iP3300 - Sate [Date/File No. Print/Kuupaeva/failinumbri printimine] - 1](/content/2026/02/376419/images/12f603f2ee53690c4e075251f84008250b8bc9cc763656bc161678d3d8b2df48.jpg)
Markus
Copyright ©2006 CANON INC.
Visos teisés saugomos. Né vientos sio leidinio dalies negalima siusti arba kopijuoti kokia hors forma be rastiško leidimo.
Copyright ©2006 CANON INC.
Copyright © 2006 CANON INC.
KpaTkoe pyKOBoIDCTBO no haay pa60tbi
Copepknne
3 YcTaHOBnTeYeepHnIbHNuIbI.

BaxkHo
- 6eDnTecb, YTO BCE YepHnJIbHnCbl YcTaHOBnEhbl B npaBnJIbHOe NOJoxKeHne B COOTBeTCTBm C MapKnipOBkO. PnHTep HeIb3ra NcNoJIb3OBA Tb, ecJIH ne yCTaHOBnEhbl BCE YepHnJIbHnCbl.
- Nocne yctahOBKn YepHnIbHnU INDkaTOp [POWER] (NITAHNE) Mrraet 3eJIeHbIM UBeTOM. NdoXdnte np6n3nteBHO 2 MNHytBI, NOKA INDkaTOp [POWER] (NITAHNE) He nepeCTaHET Mrratb H He 3arOpNTcR POBbIM 3eJIeHbIM CBeTOM, a npHTep nepeCTaHET npoIN3BOuNTb pa6OuM Wym NepeD HauaON BblONHeHn 3aDaHn.

PnmeaHne
- Y6eIHTecb, yTO npo3paHna JIeHTa ydaJIeHa C uePHINbHnUcbl B TOM nopraKe, KAK NOKa3aHO Ha pncyHke B WARE 3 KpaTKoI INCTpyKUIn NO yCTaHOBKe (JIncTa HAcTPOuKn).
He CximMaTe 6oka YepHnIbHuNcbl, NocKoJIbky 3TO MOKeT pINBeCTn K BbITEKaHIO YepHnI, KOtOpBle MOry T nCnaKaTb OeKdY n pyKn.
He nbitaTeCb 3aHOBO yCTaHOBnTb 3aHTbIK KONaOK. - Ecni YeprHnJIbHnIa yctaHOBHeHa He npabNtBHo, INdNKaTOp [ALARM] (TPEBOrA) npoJOnKaet Mrratb opaHKeBbIM. OTKpoIte BepXHIO KoIbIKy n y6eINTeCb, YTO NpOKeHne BCex YeprHnJIbHnIc COOTBeTCTByET MapKIpOBke.
YcTaHOBka IpaIbepa npHTepa
067ne cBeHnA dJa Windows® n Macintosh®
Ppimmeahne OTHOCHTeJIbHO npocecca yctaHOBN
- Пи появлени Крана [Select Language/Bыборязka] Bыберпгуязьк, 3aTeM haЖмITE KhoIGNky [Next/Danee].
- Пи появлени Крана [Select Your Place of Residence/Bыберпге Pernoн Baшero npoxnBaHna] Bыберпге MeCTO pa3MeUeHry, 3aTeM HaЖмпге KHOngKy [Next/Danee].
CuyectbyOT dBa cnocoba yctaHOBKn dpaiBepa npHTepa n pyrTO nporpaMMHOro oecneueHn.
[Easy Install/Постая установka]: BCE nporpaMMbl, IMeHouneCЯ HA KOMnKT-DINCKE [Setup CD-ROM/YcmaHOBOHbI KOMnKaM-dUck], 6ydyT yCTaHOBJIeHbI ABTOMaTHueCKN [Custom Install/BbIbOpOuHaY cTaHOBKa]: MOxHO BblbPaTb nporpaMMblДлЯ yCTaHOBKN
Korda noBntcA kpaH [User Registration/PernctpaunnoB30BaTeI], HaKMITE KHOKNy [Register/Pernctpaun]. Ecn BaW KomnbToep mMeet BbIXoD B INTepHeT, Ha 3kpaHe nOraTc HnCTpyKuIN no pernctpaun BaWero annapata.
CbeHnna nra Windows

PnmeaHne
- Пи установке драьера пинтера в Windows XP ид Windows 2000 Heo6xOДМо ВОТИВ СИСТЕМСУЧETНОЗДANICSBU, BXODЯЦЕВ Г рупни [Administrators/AdmHnCtpaTOpbl].
- Pered yctahOBKO npaBepa OTKIOHTe BCE aHTNBpyChbI e npNJIOXeHn I aBTOMaTHeCKN 3anyckaemblpnppaMMbl.
- EcJIN NOKa3aHHbI 3KpaH Bbl3bIbAeTcA bTOMaTHueCKN,OTCOEHNHTe USB-Ka6BeNb OT BaWero KOMNbIOTepea.3aTeM 3akpoIte erO, Haxab KHOIpKy [Cancel/OTMeHa],N BblKnHouHTe npntep. Iocne 3TOrO CHoBA 3aNyCTnTe npocecc yCTaHOBKn. IOpno6Hee o npoceceyCTaHOBKn CM.B KpataKo INHCTpyKuIN NOyCTaHOBKe (JIncTe HAcTPOKn).
- Д�� установки поррамм PhotoRecord и Adobe® RGB (1998) нахшто Кногку [Custom Install/Bыборочая установka] и седуну указаим Ha зкраи.
- YctaHOBka nporpamMbI Adobe RGB (1998) B OC Windows Me n Windows 98 HeBO3MOXHa.
- EcIn B npouecce yctaHOBKn NOABnTcra3anpoc Ha NODTBepXdHne Heo6xOIMOCn nepe3arpy3kn KOMNbIOTepa, HAXMNTe KHONky [OK]. KOMNbIOTep 6ydet nepe3arpyKeH ABTOMATueeCKn.
- EcIn noIqKIIIOueHHe paCnO3HaETc, cm. pa3JeJ «HeBo3MOxHO yCTaHOBtB dpaiBep npHTepa» B 3JIeKToPHHom PykoBODcmbe nonb30aMeIra.

CbeHnJaMaicintosh

PnmeaHne
He n3BnekaaTe n He BCTabnIte Ka6enb USB B npouece yctahOBKn, NCKOJIbky 3TO MOKET npNBecTN K HEnpaBnHbHO pa6Ote KOMNbIOTepa nnnpHTepa.
- Ipeed yctahOBKO npaBepa OTKIOHTe BCE aHTNBpCyHbI pnpJIOXeHNn n ABTOMaTHueCKN 3anyckaeMbI IpORpaMMbl Nn ydaJInte INN 3CNCTeMHOn nnKn.
-Дя установки лесковогуPykoedcmeа nonьзамени на дуromязбды
шелкнгтпankу [Manual/PykoBoDCTBO] на Компakт-Dисcke [Setup CD-ROM/YcmaHoeOчьКOMпakm-duck], пankу [Canon], a 3aTe m cKoПуNTe пankу hyxHOrоязбka на ќecTkн ДИСК.
3arpy3ka 6ymarnдя peatn
B nepeedhe yctpoiCTBO noaun moxno 3arpykaTb obiyu 6yumary fopmaTa A4, Letter nnn B5. 3arpy3ka npyro 6ymarn B nepeedhe yctpoiCTBO noaun He donyckaetc. Hfopmauio no 3arpy3ke 6ymarn B yctpoiCTBO aTOIOaun cM. B 3neKTPOHOM Pyko0odcmee noIb3oamena.

BaxHo
- IcnoIb3OBAHHe InI np6HOH NeaHTN O6bUHoi 6yMaH, Hape3aHHo HA JInCTbI fOpMaTa 4" x 6" / 101,6 MM x 152,4 MM, 5" x 7" / 127,0 x 177,8 MM uIN 2,13" x 3,39" / 54,0 x 86,0 MM (KpeDITHaJ KAPTOUka), MOKET pINBECTN K 3AMTNU 6yMaH.
Bcerda 3arpykaTe 6ymaIy, nCnoJIb3y KHNKHyIO opneHTaunIO. 3arpy3ka 6ymarN c anb6omHOnOpneHTaunE MoKeT Bbl3BaTb 3amrTne 6ymarN.
1 OtkpoTe nepedHee ycIpoNCTBO nOdaun (A).
2 BbIBINHbTe onopy IJIy BbIBOda 6ymar (B).
3 YcTaHOBnte pbIyaxok Bbl6opa ToJIuINbI bymaN (C) B neBoe nIOJKeHne.
4 3arpy3nte bymary B nepeDhee yCTPOIcTBO IOdaun CTOpOH O IaNeTu BHN3 n BepxHm Kpaem OT ce6ra. CToIka 6yMaHn He DoJXHa 6bITb BblJe MeTKMakCmMaJIbHOH 3arpy3kn (A).
5 CoBmecTHe npaBbI Kpa Nauchn 6yMaRn C BHyTpEHHeN CTOpOHo NpeEdHero yCTpOiCTBa Noaun, a 6JnxHn n npaBbI Kpa - c MetKo fOpMaTa 6yMaRn (B).
6 Haxmte Ha HnpaBnaIouyIO 6ymar (C) n npDnHbTe ee K JneBOMy KpaO cTOnKn 6ymar.
7 BdpaBpe npHTepa BbIbepnte IJI npaMeTpa [Paper Source/IVctOuHn6ymarn] 3HaueHne [Front Feeder/PepeDhee ycTpoiCTBO noDaun].
Ochobhble onepaun neyaTn
B 3tOM pa3dJe npNBOJrTa HnCTpyKun No OCHOBHbIM OpeaunM neaTn.
Пechтв Windows
1 BknIOuHTe npInTe npnTep n 3aRpy3nte B Hero 6ymary.
2 Co3daTe DOKymeHT NIN OTKpoTe npedHa3HaeHHbI DnA neaTn paN C NOMOuBIO COOTBeTCTByUoSe npNKnaHO nporpaMMbl.
3 BbI6epnte nyHKT [Print/NeuataB] B MeHIO [File/ФaI] npKJaADHO npOrpaMMbl.
4 Y6eIntecb, yTO BblpaH npnTep [Canon iP3300] n HaxMITE KHOJky [Preferences/ HactpoJa] (nII [Properties/CboiCtBa]).
5 Yukknte Tpe6yemble napametpbn nueKHTe Ha KhoNke [OK].
Y6eHNTecb, YTO B Cnncke [Paper Source/ NcToHHK 6yMaRn] Bbl6paH npabNJIbHbI INCTOHHK NOaH 6yMaRn.

PpmeHne
- Ecni BbIbpaH BapnaHT [Front for Plain Paper/ Npeedhee JnO6bUHNo 6yMaHn], npInTeP aBTOMaTHueCKN peeknOuaeTcHa npeedhee yCTPOIcTBO NOaHn TOJbKO B TOM Cnyae, ecni dJa napameTpA [Media Type/Tin Hocnte] BbIbpaHO 3NaueHne [Plain Paper/O6bUHnA 6ymara].B nepeedheye cTpoiCTBO noDaHm MOKHO 3arpyKaTb TOJbKO 6bUHy 6yMaY φOpMaT A4, Letter nn B5.
- Дя получени Инфорmaци Opyrinх Функцядраиьера пиHTepa HabKMITE KhoNKу [Help/Cnpabka]ИИ [Instructions/HHcTpyKu]ДЯ npocmOTpa INHTepaKTINBHOINpapBkn INI INJI 3NEKtpoHHoro pykoBOdCTBaPyko6OcMBo no Opauepe npuHmepa.KhONka [Instructions/HHcTpyKu]ОTO6paxKaetc TOLbKO B TOM Clyuae ecnY yCTaHOBJehbl 3NeKTPoHHbe pykoBOdCTBa.
6 HaxmTe KhoNky [Print/Neuatb] (nIe [OK]).
1 BkIIOUHTe npINTEp n 3aRpy3nTe B Hero 6yMaIy.
2 Co3daIe DoKymeHT nIN OTKpoTe npedHa3HaeHHbI dJIaNeaTn paJNC NOMOUI COOTBeTCTByIOUeI npIKNaHOI nporpaMMbl.
3 BbIbePte NyHKT [Page Setup/napaMeTpbl cTpaHnCu]B MeHIO [File/ФaIn] npNKJaADHO nporpaMMbl.
4 Y6eIITecb, yTO B napaMeTppe [Format for/ΦopMaTnpoBaTb dIЯ] Bbl6paH npnHTep [iP3300].
5 Bb6epnte Tpe6yembl oopMaT 6ymaBn B npametpe [Paper Size/Pa3mep 6ymaru].
6 HaxmTe KhoNky [OK].
7 BbI6epnte nyHKT [Print/NeuataB] B MeHIO [File/ФaI] npKJaADHO npOrpaMMbl.
8 Bo BCnIbIbAIOUeM MeHIO BbI6epNTe NyHKT [Quality & Media/KaueCTBO n HocnteIN].
9 3aJaITe Tpe6yEmbIe 3HaueHnI npaMeTpOB. Y6eIITecb, yTO B cNcKe [Paper Source/ IcToUHk 6ymaru] BblpaH npaBnIbHbI INCTOuHnK IOdaH cyMaRn.


PpmeaHne
- Ecni BbIbpaH BapnaHT [Front for Plain Paper/ Npeedhee dJa OBtuHOn 6yMaru], npntep aBTOMaTnueCKN peeknOuaeTcHa npeedhee yCTPOINCTBO NOaHr TOJIbKO B TOM Cnyae,ecNI dJa napaMeTpA [Media Type/Tn HocnteJ] BBbpaHO 3NaueHne [Plain Paper/ObTuHAR 6ymara].B nepeDhee ycTpoiCTBO NoDaH MoXHO 3arpyKaTb ToJIbKO O6bUHyo 6yMaRy fOpMaT A4, Letter nn B5.
Дяпolyчени подробьх сбendeи Opyrinx Функцядраиьера NeЧати УЕнКНИТе 7 Дя посмOTра олктpoHHOrO pykoBoIDCTBa [Printer Driver Guide/PykoSoDcmeo no dpauepey npuHmepa].EcINиЗлктpoHHbIe pykoBOIDCTBa He уctahOBNeHbI,pykoBoIDCTBO [Printer Driver Guide/ PykoSoDcmeo no dpauepey npuHmepa] He OTobpaNTcЯ дaxe nocle ueNchka Ha 7.
10 HaxmTe KhONky [Print/Neuatab].
PpMaJ neaTb foToRpaФn C COBMeCTmOro yCTpoIcTba
Peeatb c PictBridge-coBmecTnMoro yctpoNCTBa
Mожно habрamyю посоединтук приntеру PictBridge-coBmecTUMoe yctpoiCTBO (hanpimep, cnфpoByu kamepy, Bndeokamepy nIIM MObNbHbI TelefoH) n NeaTaTB cHrtbIe foToIrpapmN 6e3 nCNoJIb3OBAHnRA KOMMbIoTepa.
图PpIMeuaHne
PictBridge - 3TO OTPacneBOI cTahdapt, ppeocTabnIOuI pya peHn IJRA zuΦpOBoI φOTORpaΦn, BKNIOUa IPRMyo neaTb φOTORpaΦn C uΦpOBOI KAMepbl, BNDEOKAMepbl INIM MOBnIBHO TeJeΦoHa 6e3 NcNOb3OBAHN KOMNbIoTepa. EcIN yCTpoiCTBO COOTBeCTByeT cTaNdapTy PictBridge, erO MoXHO NOCoEHNHTK DaHHOMy pInHTepy dJIra pRMOI neaTN He3aBNCIMO OT npON3BOOnTEJI NII MoDeNI yCTPOICTBa.
B KaMepe INI MO6NJbHOM TeNEOHe MOXHO BblpaTb N3OpaXeHNr IIN PeaTNn 3aJaTb pa3JIuHbIE npamETpbI neaTN.
Далee PictBridge-coBmecTbIe LcHpOBBe foTOkAmepbI, LcHpOBBe BnDeOKaMepbI n OchauSeHHbIe Kamepoi MObJIbHbIe TeJefoHbI Ha3bIBaOTcR co6npaTeJIbHbIM TepMnHOM «PictBridge-coBmecTbMOe yCTPOINCTBO».

YcTpoIcTBOC3TUMCIMBOJOMABNIErTaPictBridge-coBmecTnMbIM.
■Подклочене PictBridge-coBmecTmoro yctpoiCTBa
Дя подклоченя PictBridge-coBmecTUMO yctpoiCTBa K daHHOMy npHTepy nCnoJIb3yIte Ka6eIb USB, peKomeHDoBaHHb I npOn3BOIDNTeIem yctpoiCTBa.

BHHMaHHe!
NoKIOuayTe K npTy npAton npHtepa TOnbko PictBridge-coBmecTMBie ycToiCTBa. B npOTUBHom Cnyae BO3MOXHO npaKeHne 3JIeKtpnueckm TokOM nIN NOBpeJdeHne ycToiCTBa.

PpimmeaHne
Pn neatn foTOrpaFni c NOMOsbIu cHpOBoro yCTpoNCTBa, NOKlnHueHHoro K npHTepy, peKOMeHNdyETcA NCNoJIb30BaTb aADANTep nepMeHHoro TOka, pNlraaembl K yCTpoNCTBy. Ecnn NCNoJIb3yETcAKKMyJrTOP yCTpoNCTBa, O6ra3aTeNbHO NOJIHoCTbIO 3apJrnte erO.
1 UcTaHOBnTe npHTepe.
Iopraok yctaHOBKn npHTepa n noTROBKn ero K neaTu cM. B KpamKo uHcmpykuuu no ycmaHOBe (Jucme hacmpouku).
2 BkIIOHTe npHTe npHep n 3aRpy3nTe 6yMa r yctpoNCTBO aBTONoaHu.

PnmeaHne
Pn npraMoN neaTu C PictBridge-coBmecTUMO yCTpoiCTBa B KaueCTBe nCTouHnka 6ymarM MoXHO NcPOJIb3OBA Tb TOnbKO yCTpoiCTBO aBtOnoDaH. He 3aRpyKaIe 6yMaY B nepeJHee yCTpoiCTBO noJaH.
3 IopKIOUHTe PictBridge-coBmecTnMOe ycTpoNCTBO K npHTepy.

PpimmeaHne
B 3aBnCmOCTN OT MOJIEN IIN MapKu yctpoiCTBa nepeI ero NOKJIIOUeHHeM, BO3MOXHO, 6yTeT Heo6xoJIMO BbIbpaTb peKIM neaTn, COBMeCTnMbIc PictBridge. Bo3MOXHO, nocne IOkJIIOUeHnRA yCTPOICTBA K pInHTepy npIDeTCra TAKKE BKJIIOUHTb yCTPOICTBO IIN BpyHyIO BblpaTb peKIM BOCIPON3BeDEHnA.
BbINOHNHe Ha PictBridge-coBmecTmOM yCTpoNCTBe BCE Heo6xOIMbIe Oepaunnepeedero NOcOeINHnEM K npHTepy B COOTBeTCTBn C IHCTpyKUIMN, pnpBeDeHHbIMN B pyKOBOdCTBE NO 3KcPnYatauyn yCTpoNCTBa.
(1) y6eIntecb, yTo PictBridge-coBmecTmOe yCTPOIcTB0 BblKlIOyeHO.
(2)ПодсоeДинTe PictBridge-coBmecTnmoe yctpoiCTBO K npHTEpy C nOMOuIko Ka6eJIa USB, peKOMeHDoBaHnHO npOn3BOdnteJIem yctpoiCTBa. YcTpoiCTBO BKIOUaETcA ABTomaTnueckN. EcIn yctpoiCTBO He BKIOUaETcA aBTOMaTnueckN, BKIOUHTe erO BpyHyIO.
(3) HactpoTe PictBridge-coBmecTnmoe yCTPOICTBO dIa npAOM neaTN. nOBtca Ha KK-ducnnee ycTPOIcTBa npn npabNbHOM noDKIOUHeHH npInTEpa.


PpimmeaHne
Ecnn He noBnAETc, cm. pa3JeJ"He ydaetc npabunbHO paCneuatab H3o6paKeHn C nOdkHoueHHo UnpoBoKamepbl" 3JIeKTPOHnORo Pyko8odmea nonb30aemena.
EcnB PictBridge-coBmecTumom yctpoiCTBe nI npaMeTp a [Date/File No. Print/NeuTaB DaTbI/HomepaФaIIa] 3aHaHO 3NaueHne [Default/Ba3oBbIe] (HAcTpoIka, COOTBeT-CTByUOaJy3aDaHHbIM B npnHTpe npaMeTpam), npimHeJrC3NaueHne [Off/BbIKn.]
Ecn npn cbeMe n3o6paKeHna Hrero yxe 6bIHa HaHeceHa daTa, yCTaHOBNTe dIy 3TOrO napameTp a neatn PictBridge 3NaueHne [Off/BbIKn.]. Ecn BbIpaTb 3NaueHne [Date/Data], [File No./Homep paJna] nn [Both/O6a], daTa nn nn Homep paJna 6ydet pacneuATbIBaTbCn NOBEx DaTbI, HaneuTaHHoN Kamepoi.

PnmeaHne
- HNKoRda He OTKHouaTe USB-Ka6eB Bo BpeM NeHaTn, 3a NCKHoueHHeM CnyaEB, KOJa 3To pa3peSeHo yCTpoiCTBaMn, NOdepKbBAIOUmN φOpMaT PictBridge. Ppi OTKJIHOeHN USB-Ka6eMa Mekdy PictBridge-COBMeCTHMbIM yCTPOINCTBOM IN pPHTepOM cJeDyTe IHCTpyKqIaM n3 pyKOBoOCTBa NOJb3OBaTeJIy yCTpoiCTBa.
B PictBridge-coBMeCTUMOM yCTpoIcTBe HeJIb3a3aBaTaYka3aHHbIe HIXe npaMeTpbl IIN BbIOJHrTB nepeuNCJIeHHbIe HIXe OIepaUIN. -HAcTpoJa KaueCTBa NeaTu -O6cIyKbAHne npHTepa
7 HaxmTe Ha OTMeTky PUSH YepHnIbHNubl, Noka OHa He BCTaHeT Ha MecTo.
Y6eIntecb, YTO INHnkaTop [Ink] (Uepnna) (A) 3aRopeJIcKpaChbIM UBeTOM.

8 3akpoTe BepxHIOKpbIuKy.
CbeHnO6 3JIeKToHHbIX pyKOBoDCTBax
Copyright ©2006 CANON INC.
Vse pravice so pridržane. Brez izrecnega pisega dovoljenja ni dovoljeno prenesti ali kopirati nobenega dela tega dokumenta.
Priprava tiskalnika
Copyright ©2006 CANON INC.
Canadian Radio Interference Regulations
Copyright ©2006 CANON INC.
Ley npnTep niTpmye cTaHdapt Exif Print.
Exif Print - cTaHdapT, kKn po3WnpIOE MOKINBOcTi 3B'3Ky MIX UΦpOBIMN φoToanapaTAM Na npInTePAM. PnEiHaBw n pInTEp Do BIDNOBIDHO rO uΦpOBoro φoToanapaT, kKn NiItpmYe cTaHdapt Exif Print, npInTEp MoKe OTpMByaTn 306paXeHHa 3 φoToanapaTb63nocepEnhbo Ni d Yac 3YOMKn Ta ONTMi3yBaTn iX, CTBOPIOUCh BiDbNTKN HAd3BnuAHHo BUCOKOI JAKOCTI.
PoiokhenKaHaAno po padionepeko
LeyuPobn anapat He nepeBunye DonyctmmejI yObnHaHnKlacy B zoOpiBn BnnpomHHBaHHpaDionepeKoD uPobmAn apapaTAMN, BN3NaueHi y cTaHdapti oBnAdHnH, BnnpomHooQo nepeKoOn (KaHada) - "Digital Apparatus", ICES-003 - KaHaDCbKn npomncNoB n CTaHdapt.
Copyright ©2006 CANON INC.
Yci npaba 3actepekeHo. KoHy yactnHy ciie i nybniKaui He moKHa nepeDaBaTu Y koniHOBaTu y 6yDb-ayi KOpMi 6e3 uITKO cΦopMynBoHOrO NcMbMOBOrO Do3BOny.
He TopkaTecBHyTpIiHix YactnH npntepa, Okpim Baxkena 6nokyBaHHa pykyuOoi roIOBkn.

Baxknbo
KuO BepxHa KpuKa BiKpTa 6iJbWe DecaTn XBnH, YtpmBya DpyKyUooi rnoBKn nepemictnbCBA npabo. Ucbomy BnnaDky 3akpnTe Ta ue pa3 BiKpInTe BepxHIO KpuKh.

PnMItka
Ha BHytpiun Hi CTOpOHyNAKOBn DpykyuOIO rONOBKn a6o 3axnCHOro KOBnauKa MoKe 6yTn npo3ope a6o Cbitio-6naKNTHe yOpHnIO -e HiaK He BnInHe Ha kicb dpyKy. BybTe oBepeXHi, uo6 He po3JntuOpHnIO Ha ce6e.
He haidBaIte 3axnCHN KOBnaOK 3HOBy nCnToro, kB BIn 6yB 3HrTn.
3 BcTaHOBITb EMHOCTi 3 YOpHNOM.

Baxnbo
- Ipepebipte, yu yci emhocti 3 oOpHnIOM BCTaHOJIeHi y npabunbHOMy NonoJxehHi, kNoka3aHo Ha etnkeTci. PpHTEp He MoXHa BnKOpNCTOByBaTu, NOKn He 6ydyb BCTaHOJIeHi yci emHOCTI 3O pHNIOM.
Bidpa3y nicra BCTaHOBHeHHcMHOCTe 3 cOpHnIOM IHnKaTOp [POWER] (KNBLEHHa) NOUHe 6nMaTn 3eNEHM CbitlOM. Iepu HIX npoOBXHTN, NoeKaTe np6Jn3HO 2 XBNiHN, NOKn IHnKaTOp [POWER] (KNBLEHHa) He npINnHtB 6nMaTn i He noChne nOCTiHo CBiTNTCA 3eNEHM CbitlOM, a npInTpE He npINnHtB BnDaBaTn po6OHi yMn.

PnMItKa
- O6ob'zkoBO BndaJIbIb np03opy 3axuChy nIIIBky 3 EMHOcme TaK, kONHcHo y nyHKti 3 y Baui KopoTki IHCTpykii 3 HAcTPOKn (apkysi HAcTPOKn).
He cTnCKaIe eMHocTi 3 yOpHInOM, ockIbKn YOpHIno MoKe BnteKtn i 3a6pydHnTn OJaT Ta pyKn.
He HamaraTeC3HOBy 3aKpInNTn 3axnChn KOBnaOH nicra TORO, k BIn 6yB 3HATNI. - RaKIO eMHiCTb 3 YOpHInOM He BcTaHOBJeHO HaNeXKnHM YUnHOM, INDnKaTOp [ALARM] (NONEPEdXeHHa) Ha npHTepi 6nMaTme opaHXeBm. BiKpnTe BepXHIO KpNkky i nepeBipTe, YI BiINObIaAc NOJoxKeHHy ycix EMHOCTe 3 OOpHInOM HAKneKam.
BctaHobIeHnI dpaIbepa npntepa
InΦopmaúri, cnilbna dπa Windows® ta Macintosh®
Ppimitkn 10do npoccy BcTaHOBJeHHA
- YKUO 3'YBIAETbCBAIKHO Bn6Opy MOBn [Select Language/Bn6ip MOBn], Bn6epiTb MOBy, a NOTIM HATNCHITb KONKy [Next/Dani].
- YKsqo 3'ABnEbCBAkHO Bn6Opy MOBn [Select Your Place of Residence/Bn6epitb perioh Baaworo npoxnbAHn], Bn6epiB CbiH perIOH, a NOTIM HATNCHTb KONky [Next/Dani].
- Дразовер пинтepа та iHwe nporpaMHe 3a6e3neueHHЯ MOKHa BCTaHOBHTn DBOMa cnocO6amn:
[Easy Install/nerke BCTaHOBneHna]: eIeMeHTn, 10 NOCTaHaOTbcra Ha [Setup CD-ROM/Komnakm-ducky 3 npoepamO ycmaoEku], BCTaHOBIOHObTa cABTOMaTHNO
[Custom Install/Bu6ipKObe BCTaHOBneHna]: eIeMeHTn dJa BCTaHOBNeHHa MoXHa Bu6upatn
- KONI 3'ЯВИТьСЕ Кран [User Registration/Peεстраця кориТУВач], HATNCHITb [Register/ Peεстраця].Якso Baшkomп'teРпгднано Do IntePheTу, Ha ekpaHI 3'ЯВЛЯТьСЕ ekpaHHi IHCtpyKci 3 peεстрацiy BaWOrO Bn6opy.
InopmaiaJa Windows

PnIMtka
BCTaHOBIOHOnUdpaBep npInTepa dna Windows XP a6o Windows 2000, ybiDiTb do cnCTeMn JK YHeI rpyu [Administrators/AdmiNictpaTopu].
- Ipepe TUM YK BCTaHOBHTN DpaBep, BiDJIIOyIb yci aHTNBipychi nporpamn Ta nporpamn, k3BaHTaXyIOTbcr ABtOMaTHUHO.
- RaKUO uekpan 3'ABNTbCABTOMaTHNO, BiD'EDHaHTe Ka6eJIb USB, npNEdHaHn Do KOMN'IOTepa. NICJzBOrO HaTNCHTb KHONKY [Cancel/CkacyBatn], Uo6 3akpntu ekpan Ta BmMKHyTN npInTEp. Notim NoCHITb pOuec BCTAHOBJIeHHRA 3HOBy. IINr OTPMaHHra DOKJaADHiooi IHOpMaIqI IOdo pOuecy BCTAHOBJIeHHRA 3BepHITbcr DO CBOei KOPOTKOI IHCTpyKlI 3 HAcTpoiKn (apKywa HAcTPOiKn).
- Κιοδ BCTaHOBιTη προργαmy „PhotoRecord" Ta „Adobe RGB (1998)“, Ḥατικιβό [Custom Install/Bu6ipKoBe BCTaHOBJIeHЯ] i BVΚΟΗΑΙΝΕΒΑλείΒΚΑ Ḍα εκραΗ.
- Поррamy „Adobe RGB (1998)“ HEMOЖЛИВО BCTaHOBITN
На систем Windows Me Тa Windows 98.
KoIi nizac npocecy BCTaHOBneHna ekpaHi 3'ABITbcra 3anT npo nepe3aBaHTaxeHHRA KOMnIOTepa,HaTNCHTb [OK].CnCTema nepe3aBAHTaxNTBCra ABTomATNUHO.
- RaKIO npEHaHn npHTep He po3i3HaetbC, nIB. po3in Cannot Install the Printer Driver B eNeKtpoHHOMy NocibNky [User's Guide/NoC6Huk KopucmyBaHa].

IhopmaiaJMa Macintosh

PnIMtka
He BMnkaTe i He BMnkaTe Ka6eNB USB nIac BCTaHOBHeH, OCKINc Me MoKe np3BeCTn do npuyweHH HaJexHoI pObToN KOMnIOTepa a6o npHTepa.
- Iepw HIX BCTaHOBtUN dpaIbep, BIMKHiTb yci aHTNBipcHl nporpamn Ta nporpamn, k3aBaHTaXVIOTBcA BOMATNUHO, a6o BuaJIITb iX i3 CNTeMHOI nANKN.
- Κιδ BCTAHOBHTM MOBy eNEKTPOHHO nociHnka [User's Guide/1oci6nK Kopucmyea], BiDMHHy BiD BCTAHOBNeHOI, DBiCi KnauchIb Ha nanzi [Manual/1oci6nK] B nanzi [Setup CD-ROM/Komnakm-duck 3 npoaspamO ycmaHo8ku], nanka [Canon], a notim ckoniohte nanky MOBn Ha CBIJ JxOPCTKn DnCK.
3aBaHTaxeHЯ nanepy dnydpyky
Y nepehdni npncptpi nodaabaHn moxha 3aBaHTaxybaTn 3Bnuahn nnip fopmaty A4, Letter cn B5. 3aBaHTaxybaTn y nepehdni npncptpi nodaabaHn nanip iHoro fopmaty He moxha. Dn oTpmaHH daKnaadHiwoi IHfOpMauii zoDo 3aBaHTaxeHHn panepy B JOTOK aBTOMaTHHOI nodaHi panepy dNb eneKTPOHn noc6Hnk [User's Guide/NoC6Huk Kopucmyea].

Baxnbo
- Obpi3yBaHHra [Plain paper/3BnuaHoro nanepy] do po3mipy 4" x 6"/101,6 MM x 152,4 MM, 5" x 7"/127, 0 x 177,8 MM a6o 2.13" x 3.39"/54,0 x 86,0 MM [Credit card/KpeiHTha KapTKa] dans npobHoro dpyky MOKe npu3BeCTn do 3MnHaHHra nanepy.
3aBxN 3aBaHTaKyIe nanip y "KNHXKOBOMy" cnpMyBaHHi. 3aBaHTaxeHHn panepy y ,aJIb6omHOMy" cnpMyBaHHIOKe npu3BecTu Do 3MHaHHn panepy.
1 BiikpnTe nepeDiHn npncpti npdaBaan (A).
2 Побжte onopyдя вихidHoro napepy (Б).
3 BctaHObitb peryIaTOp uINbHocTi nanepy (B) BnIBO.

4 3aBaHTaxTe nanip y nepeHn i npncTpii noDaBaHHcSTOpHOIO dIyDpyKy DOHN3Y, nepeHim Kpaem Do daNbHbOro 60ky. He 3aBaHTaxKyTe nanip noHaad no3NaKy MaKcImaJIbHOro DOnyCTmORO 3aBaHTaxKeHHA(A).
5 BupiBnIte npaBn KpaN CTocy panepy BiHOCHO BHyTpiHbOi CTOpOH NpeDhBOrO NOTka, a 6bnKHI i IIBN Kpa - BiHOCHO n03HaKn FopMaTy panepy (5).
6 CTnchitb HapmHK nanepy (B) ta nocyhte no ro do IIBoro 6oky 3aBaHTaxeHoro cTocy nanepy.
7 Y dpaBepi npntepa Bn6epitb [Front Feeder/PepeHi npucptpi noDaBaHna] dIra [Paper Source/Dxepeno nanepy].
OchOBHn IpyK
Ucbomy po3diIOnncyEtbc npOeDypa OCHOBHOro dpyky.
10HaTnCHiTb [Print/Dpyk].
Празмий друк Фотографій 3 cymichoro празсторо
Друн 3 пистою 3 пдтpreskoю PictBridge
До пиHTepa moXHa npEДнATn npICTpii 3 NiItpIMKIO PictBridge, HanpNKlaI, zuΦpoBni ΦOTOanapaT, BiDeOKaMepy a6o MoBiHn TeleФoH, Ta dpyKyBaTu ΦOTorpaФiI 6e3nocepEnHbO 6e3 BnKOpNCtAHNk KOMn'IoTepa.

PnMItka
PictBridge e rany3eBIM cTahapTom, 0o DO3BOJAE BIKOPNCTOByBaTH uiny Hn3ky piweh b unpoBoi foTOrpaipii, y TOMy uncni npmni dpyk foTOrpaipin 3 unpoBoro fotoanapata, BiJeokamepn a6o MobilbHoro TenefoHy* 6e3 BIKOpNCaHHKOMI'OTepa. Do Uboro pinnHTepa MOxHa npneDHyBaTN 6ydb-aki npnstpo dny npmoro dpky He3aneXHO Bd BInpO6HnKa uMOneNi 3a yMOBN, 0o BOHN iIDTPnMyIOB cTahdapt PictBridge.
- MoXHa Bn6bupatn 3o6paKeHHa IpyKy Ta Bu3NaCuTn Pi3Hi npaMeTpN dpyKy 3i CBOrO fotoanapatau nn MO6IbHoro Tepeohy.
* LcfoBio fotoanapatn, BiEokamepn Ta Mo6IbHi Tepeohn 3 BMOHTOBaHIMN KamepaMn, IIO nTpmyoTb CtaHdapt PictBridge, HadaJI pa30m imeHyBaTMyTbcra "PnpCTpoi 3 niTpumkoO PictBridge".

Ppncptpi 3 TaKoIO No3HaUKOIO cymicn 3i cTaHapTom PictBridge.
Jkuo He 3'ABnEbCn, nepeDITb do pozdiy "Cannot Print Properly from the Digital Camera" y ekpanHomy noci6Hky [User's Guide/Noi6Huk Kopucmya].
- NapaMeTpN [Layout/KomnoHyBaHn] Ta [Trimming/O6pi3yBaHn]
Якwoу npictpoi 3 niДТрмКою PictBridge zu napaMeTpBCTaHOBNeHi ha [Default/3a 3amOByBaHHm] (uce O3Haue, zu 6dyTb BnKOpncTOByBaTnCra napaMeTpN npHTepa), To Дя [Borderless/Be3 noiB] 6yde 3actocOByBaTnCra [Layout/KomnoHyBaHHa], aДя [Trimming/O6pi3yBaHHa] - [Off (No trimming)/BmK. (Be3 o6pi3yBaHHa)].
Пд часдуку на [Photo Stickers/Фотонакпeн] (PS-101) ВиберiTb [N-up/No N] Дя [Layout/KomnohyBaHЯ], a notIM ВиберiTb [16-up/No 16].
Дякі пистpoі 3 підгимкою PictBridge можуь Biіобрахату takі onці [Layout/KoMPnoHyBaHnər]: [По 2], [По 4], [По 9] ta [По 16].У takOMу випаду 3авжди вибираіte[16-up/По 16].
Ykso y npncpoi 3 niTpumkoio PictBridge hemae onui, yi6 biDnoBidaHn [16-up/No 16], dpyk Ha hakneikax bye hemoxknBn.
* Плес дуку на [Photo Stickers/Фотонakлейки] (PS-101) не зааваite дяnapаметра [Layout/KomnohyBaHHa] 3наченя [Borderless/Бe3 nonib].
- NapameTp [Image Optimize/OnTmiaζi3o6paxeHη]
Якuto y npncTooi 3 NiДtpmKoIO PictBridge napamTp [Image optimize/OnTmiauia 306paXeHHa] BCTAHOBJIeHn Ha [Default/3a 3amOByBaHHaM] (ue O3Haay, zu BnKOpNCTOByBaTMyTbCra napameTpni npInTepa), 3aCTOCOBytbcr Exif Print.
KuO BVKnOpNCTOByeTbcra npncpi 3 niTpumkOio PictBridge mapKn Canon, MoJnBO, 6yDyTB Doctyni doaTkobi onui [VIVID], [NR] nn [VIVID+NR] B 3anexHocTi BiD moJeI.
*B pexmi [VIVID] 3enehi Ta cniH iJRAHNK FOToRpaFii DpykyBaTmYbC8 6iNbI aCKpBO. B pexmi [NR] (3MeHweHHa Wmy) 3MeHwEeTBcA Wym y 6nakTHnx dInraHKax FOToRpaFoi, k HapnKnaIad He6o, Ta TeMHnx dJIAHKax. [VIVID+NR] ABJIe CO6OIO NOEDHaHHa FyHKci IVID ta NR.
- NapameTp [Date/File No. Print/Dpyk dαtn/Homepa φaɪna]
Якwo y npucptoi 3 niTpumkoio PictBridge napametp [Date/File No. print/Dpyk daTn/Homepa phaINa] BCTaHOBJIeHn Ha [Default/3a 3amOByBaHHaM] (ue O3Haae, lo BVKNOPNCTOBYaTbCra napameTpnpnHTepa), 3actOCOBytbcr [Off/BmK].
Якwo niД.Yac 3iOMKn Ha 3O6paXeHHx Bxke E NaKlaDeHa DaTa, BCTaHOBITb ueE eJIeMeHT HAcTpoIOBaHnR PictBridge Ha [Off/BmK].Якwo Bn6paTu [Date/Data], [File No./Homep fain] a60 [Both/O6nDb], dta Ta/a6o Homep faJna 6ydyTB dpyKyBaTncn NOBepx daTu, 7O dpyKyEcTbcf yHKciEo KaMepu.
![CANON Pixma iP3300 - - NapameTp [Date/File No. Print/Dpyk dαtn/Homepa φaɪna] - 1](/content/2026/02/376419/images/7bd78e23d04d9b967e4bf421270ecfc58a80152fd5af3aad1dd3835aeb784688.jpg)
PnIMITka
Hikon He BiD'EnHyTe USB-Ka6eB nID qac dpyky, kIIO TiIbKn CE He Do3BOJeHO B npncTpoi, cymicHomy 3i cTaHdaptom PictBridge.
Uo6 BiD'EnHATn Ka6eB USB, 00 3EHNye npncTpi 3 niTpIMKOIO PictBridge Ta npncTpi, BIKOHnyTe BkazIBKN, HabeHeBI IHCTpyKuII 3 ekCnnyatauII npncTpoio.
3 npucpo 3 niDtpmkoio PictBridge HEmoxnBO BCTaHOBHTN UH BIKOHATN HAcTynHe:
- HanaaTyuBaHHЯKoctiДpyky
-TexhiHHe o6cIyroByBaHH npHTepa
He TopkaTecE eNEKTPuHnX KOHTaKtIB (B) Ha EMHOCTI 3 OOpHnOM. Lc MoKe Ipn3BeCTn Do He npabnBHOI pO60r npHTepa YH HEmoKJInBOcTI dpyk.
6 BCTaBTe EMHicTb 3 YOpHnIOM nepeHIM KInuem y dpykyooy roNoBky. IonoXeHHra EMHOCTi Mae cniBaTaN 3 HaKneKOHO (A).
7 HaTnckaIte Ha No3HaCyu PUSH Ha OOPHnIbHnUi, DOKN BOHa He 3aΦikcyetbcr BCEpeDnHi. [Ink lamp] (INdkatop YOpHnla) (A) MaE Cbitntncr YepBOHIM.
8 3akpnTe BepxHIO KpNkU.

O3naHOMJIeHHJ 3 eJIeKTpOHnMn noci6HnKaMn
Pa3OM 3 Kopomkoio ihcmpykuieo 3 KopucmybaHHa 3 npHtepOM TaKoX NOCTaUoTbcra eNeKTPOHHIOci6HNKn. DnO OTPMaHHdoKnaadHiux Bka3IBOK 0oO BCTaHOBHeHHeNEKTPOHHNX Noci6HNkIB 3BepHtbcrdo CBOei KOPOTKOI IHCTpykuii 3 HAcTPOHKn (apkywa hAcTPOHKn).
EneKtpoHHi noci6HNKm MOnHa nepeTJadatn TaKIM YHOM:
Windows
Для поерлаяу сектоною посиka DBiCi KnaCHiTb 3NaOc [iP3300 On-screen Manual/ EneKToHnNoci6HnK iP3300] Ha po6oOmy cToJI a6o HATncHiTb KhoNky [Start/Pnyck] > [All Programs/Yci nporpamn] (a6o [Programs/Пportpamn]) > [Canon iP3300 Manual/ Пoci6HnKdo Canon iP3300] > [iP3300 On-screen Manual/EneKToHnNo noci6HnK iP3300].
BnMOrn Do cnCTeMn
Бpayзер: nporpama Windows дя порлду dobiку Форматi HTML

PnIMtKa
Maé 6byTn BCTaHOBJIeHm Microsoft Internet Explorer5.0 HOBiOoi BepciI.
- EnejkpoHHn noc6Hm MOKe BiO6paKaTncs HnpeBnIbHo, 30 3aJIeKHTb BID BaIoI onepauiHOi CnCTemu HBepcII Internet Explorer. Mn peKomeHnyEmo peryIrpHO OHOBJIIOBaTn CBOIO cnCTeMy 3a DOnOMrOIO cLyXbN OHOBJIENHRA Windows Update.
Macintosh
Ioo6 nepernnytn eJeKToHHn noci6Hnk, DbiCy KnaCHiTb no [iP3300 On-screen Manual/ EJeKToHHn noci6Hnk dnn iP3300] Ha po6Oohmy cToJI.

PnMItka
R KIIO Bn BCTaHOBNI [User's Guide/Noici6Huk Kopucmyea] 3 nankn [Manual/Noici6Hnk] Ha [Setup CDROM/KomnaKm-ducky 3 npoepamoio ycmahOBku], BidkpniTe nanky, B kky Bn ckoniiobann [User's Guide/ Noci6Huk Kopucmyea], i dbi ci Klaunihb top.htm.
BnMOrn Do cnCTeMn
Бpayзер: nporpama neperлду doBikn

PnMItka
- EJektpoHHn Noc6HmK MoKe BiO6paKaTcHr HenpabNtB Ho, 00 3aJIeKHTb BID BaHOI OepauiHoI CnCTemM. MpeKOMeHdyEm peryJrpHO OHOBnBaTu CBOIO CNTEmy.
- Дяпсяду eнктpoHHx noci6HnKb y φopMaTI HTML peKOMeHdYcTBcB BKNOpuctOByBaTn Be6-6pay3ep Safari.Якso Be6-6pay3ep Safari He BCTaHOBJeHn y BaWOMy KOMN'OTepi, 3aBaHTaXTe NOrO 3 Be6-By3na KomnHaII Apple Computer, Inc. i BCTaHOBiTb.
Tilbkn dny kpaH CbponeeCboKoro coH3y (Ta CbponeeCboKoi eKOHomiUHOi 30HN).

LЯ поначka вka3уе на Te, сц ць Вибп He можну утлізУВаТи ра3OM 3 xaTHIM cMIITYAM 3riДNo 3 dinpeKtUBOO WEEE (2002/96/EC) ta MiccyeBx 3akOHIB. LcE Bvip6 HeobxIDHO nepeDaTn y cneuaIi3OBaHn nyHK T3bupAHNRA, HAnpIKJaI,do ABTOPn3OBaHOrO nyHKTy obmiHy BInpo6IB,de Bn moKete npnd6atn HOBn CXoxn Bvpi6,afo do ABTOPn3OBaHOrO nyHKTy 3bupAHNReNEKTPuHOro Ta eNEKTPoHOrO yCTaTKyBaHHdЯ nepePo6Kn. HeaJIeXHa yTuI3aIg TaKoro Tnny CMITr MOKe MATn HerATNBn BnINB Ha OTouyUoycepeIOBnue Ta 3DopOB'Я lIoDNH Npe3 NoteHIO He6e3NeHi peOBoHN, 10 MoKyTB MICTNTSCB ENEKTPuHOMy Ta eNEKTPoHOMy yCTaTKyBaHHI. Do Toro J, Ba7a Donomora y HanexkHni yTuI3aIci IIbOro BInpo6By cnpyTIme eFekTINBHOMy BVKOpNCtAHHIO npnpOHNx pecypCIB. IdoTaKOBiy INfopMaIIO npo Te, Kdyn MOxHa BiDe3TN CTape yCTaTKyBaHHdЯ npepeO6Kn, 3BepHITbc4 do MicSeBOrO oprAhy BnaDi, NyHKTy yTuI3aIiBiIXODIB a6o CnyKbB VBe3eHnR XaTHbORO cmITTBA. Bn TaKox MoKTe Di3HaTncr npo ce i3 3aTBePdxJHeoi cxemn yTuI3aIci IIeNEKTPuHOrO Ta eNEKTPoHOrO yCTaTKyBaHHra.
Дokладишу inhopmaцю BiДнOCHO nobepHeHHЯ Ta nepepo6kn BИКористаноу eNEKtpnUHOrO ta eNEKtpoHHOrO yCTaTKyBaHHЯ Bn 3haIdTe Ha Be6-By3ni www.canon-europe.com/environment.
(Брпська ekOHOMiHa 30Ha: Hopberi, IcnaHДЯ ЛixTeHшТeн)
JgJnJnJnJnJnJnJnJnJnJnJnJnJnJnJnJnJnJnJnJnJnJnJnJnJnJnJnJnJnJnJnJnJnJnJnJnJnJnJnJnJnJnJnJnJnJnJnJnJnJnJ. www.canon-europe.com 1 (EWS)

A846
Canon Europa N.V., Bovenkerwerweg 59-61, 1185 XB Amstelveen, The Netherlands
i j 1
y
Easy Setup Instructions (Setup Sheet)]
( 21 + 1) + ( 1 - 21) = 21 + 21 - 21
yUser's Guide] [d/Setup CD-ROM]
[top.htm]
Help Viewer:
2x - y = 8
目
p 1
S APQ = S AQP + S_ PQQ
l_g( 1) < 0
1 1 (1) [Ink]
sall lalil
A

J
aiee eae
a
slll lll j 1
aall jy yll aal bj jw lwl biol (1) 4e wu wu wu
()a
()
(1)
e 10000000000000000000000000000000000000000000000
( 2) A. 曲线 y = x^2 - 2x + 1
.
y j 40 jie jie jie jie jie jie jie jie
a 1
a 1000
aIbll 15 oJz Jc
(PS-101) [ps/Photo Stickers]
[Tabl/Borderless] [TablLayout]
Image Optimize]
PictBridge JJJIJIJIJIJIJIJIJIJIJIJIJIJIJIJIJIJIJIJIJIJIJIJIJIJIJIJIJIJIJIJIJIJIJIJIJIJIJIJIJIJIJIJIJIJIJIJIJIJIJIJIJIJIJIJIJIJIJIJIJIJIJIJIJIJIJIJIJIJIJIJIJIJIJIJIJIJIJIJIJIJIJIJIJIJIJIJIJIJIJIJIJIJIJIJIJIJIJIJIJIJ
.[Exif Print] jI (aIblll 124! b) [Default]
Ji 1
.1111 [VIVID+NR] [NR] [VIVID]
J 1
1ggs
j 1 j 1 j 1 j 1 j 1 j 1 (NR] J
A · S · D
[NR] J [VIVID] J [VIVID+NR] J
[Date/File No. Print]
J 1/Date/File No. print]
[1/Off] p 2 (4a! 0 Default] PictBridge
e 12 PictBridge 12y jiaie jai y iaglaillie jnall gaoa a
[Both] [File No.] [Date]
1 1
2x - y = 8
目
jll jll jll jll jll jll jll jll jll jll jll jll jll jll jll jll jll jll jll jll jll jll jll jll jll jll jll jll jll jll jll jll jll jll jll jll jll jll jll jll jll jll jll jll
.PictBridge
i 1
jglly jalil llll 1
.PictBridge Jgao gai jia jia jia elil ay plal lo nuii
a1 + a2 + a_3 = 6
aill 1
[PictBridge /PictBridge Print Settings]
a111 1
1
[Canon Setup] PictBridge
J [J] /Setup CD-ROM] [Canon J/Utility
aill lgl jkiyjlll jlll jalil jall . jgssll jlg aibll
![CANON Pixma iP3300 - [PictBridge /PictBridge Print Settings] - 1](/content/2026/02/376419/images/df15eb779e40b4ec651eeae6d67e6e64a12f3589bde19880669797e7d72a4728.jpg)
| الترجمة الحرفية | [الإستعمال/Paper Type] | [الإستعمال/Paper Size] |
| /Photo Paper Plus Glossy][عَلُّلّْلِي | [سورعَفَتَعَلّْلِي/Photo] | \(10\times 1\cdot/10\times 15cm/4''x6''\) [مَبُسَنْعَلّْلِي/\(مَبُسَنْعَلّْلِي/Photo |
| /Photo Paper Pro][عَلُّلّْلِي | [سورعَفَتَعَلّْلِي/Fast Photo] | |
| [سورعَفَتَعَلّْلِي | ||
| [عَلُّلّْلِي | [سورعَفَتَعَلّْلِي/Photo] | [Glossy Photo Paper] |
| [عَلُّلّْلِي | [سورعَفَتَعَلّْلِي/Photo] | |
| [Glossy Photo Paper "Everyday"] | ||
| [عَلُّلّْلِي/Use]"[الإستعمال/lbumi" | ||
| /[Photo Stickers] | \(1^*[[S_LS_RF_GI_GI_GI_GI_GI_GI_GI_GI_GI_GI_GLLLLLLLLLLLLLLLLLLLLLLLLLL]\) | |
| /[Photo Paper Plus Glossy][عَلُّلّْلِي | [سورعَفَتَعَلّْلِي/Photo] | \(1 x r/13x18cm/5''x7''*2\) [مَبُسَنْعَلّْلِي/\(مَبُسَنْعَلّْلِي/Photo |
| /Photo Paper Plus Glossy][عَلُّلّْلِي | [سورعَفَتَعَلّْلِي/Photo] | /[A4]/[8.5''x11''(Letter)*3,\(4\) ]\(YV,9\xi x Y1,09/\text{a}_{\text{b}_{\text{c}_{\text{d}_{\text{e}_{\text{f}_{\text{g}_{\text{h}_{\text{i}_{\text{j}_{\text{k}}}}}}}}}}\)\(t^{*,r^{*}}[(\text{Letter})\text{m}\) |
| /Photo Paper Pro][عَلُّلّْلِي | [سورعَفَتَعَلّْلِي/Fast Photo] | |
| [سورعَفَتَعَلّْلِي | ||
| [عَلُّلّْلِي | [سورعَفَتَعَلّْلِي/Photo)] | [Glossy Photo Paper] |
| [عَلُّلّْلِي | [سورعَفَتَعَلّْلِي/Photo] | |
| [Glossy Photo Paper "Everyday"] | ||
| [عَلُّلّْلِي/Use]"[الإستعمال/lbumi" | ||
| [عَلُّلّْلِي" | ||
| /агrique صور/Glossy Photo Paper][عَلُّلّْلِي | [سورعَفَتَعَلّْلِي/Photo] | \( [5.4 \times 8.6 cm/Credit card] \)\(x0,\xi/\text{a}_{\text{b}_{\text{c}_{\text{d}_{\text{e}_{\text{f}_{\text{g}_{\text{h}_{\text{i}_{\text{j}_{\text{k}}}}}}}}}}\)\(x\),\(r\),\(r\wedge\eta \times \xi\),\(r\wedge\eta\)/[مَبُسَنْعَلّْلِي/\$(مَبُسَنْعَلّْلِي/Photo |
e aie bll . [gulal gagall g / Photo Stickers ] aelb lalssi j 1*
[Paper size] [10x15cm/4" x 6"]
V,9x1,0/ (Letter) 8.5" x 11"[A4] [Paper size]
[Letter)
[12] [b/Borderless] [b/biLayout]
[A4] [Papers size] [4-up]
.[(Letter) 一 ^ 一 一 ^ 一 x 11,0a/aa 11xA,o]/[(Letter)8.5''x11"]
[Trimming] [Layout]
[Trimming] [(U/Off (No trimming)]
[(PS-101)[Photo Stickers]
[16-up] [bbsl]/Layout]
[1/4-up] [1/2-up] PictBridge
[1/16-up] [Layout] [16-up], [9/9-up]
[1/16-up] PictBridge
aai 1i i j j 1ie ai bll
![CANON Pixma iP3300 - [PictBridge /PictBridge Print Settings] - 2](/content/2026/02/376419/images/851fc23eda8f1e500158b238636b8882f5912bbec8465255779faf665a7d8a47.jpg)
Jg 1. PictBridge
PictBridge JgJgJgJgJgJgJgJgJgJgJgJgJgJgJgJgJgJgJgJgJgJgJgJgJgJgJgJgJgJgJgJgJgJgJgJgJgJgJgJgJgJgJgJgJgJgJgJgJgJgJg
[ai] /LCD] aolj j
2x - y = 8
目
y j 11111111111111111111111111111
PictBridge Jg jn nn nnnnne
Jgagagagagagagagagagagagagagagagagagagagagagagagagagagagagagagagagagagagagagagagagagagagagagagagagagagagagagagagagagagagagagagagagagagagagagagagagagagagagagagagagagagagagag
[PictBridge /PictBridge Print Settings]
PictBridge jy aaii aiei i 1g g y jglal jilj gbi jil gll ggi jai jai jai jai jai jai jai jai jai jai jai jai jai jai jai jai jai jai jai jai jai jai jai jai jai jai jai jai jai jai jai jai jai jai jai jai jai jai jai jai jai jai jai jai jai jai jai jai jai jai jali
y j 1 y 1 1 1 1 1 1 1 1 1 1 1 1 1 1 1 1 1 1 1 1 1 1 1 1 1 1 1 1
J 1 1 1 1 1 1 1 1 1 1 1 1 1 1 1 1 1 1 1 1 1 1 1 1 1 1 1 1 1 1 1 1
[laiaaie aiee aeeae /Printable Image Data Format]
DCF® jaae aagaiy aagj r Jnals* pldiuily lglalil p jss aee bjaalll oia gaii ([Jolal cala aibiy aalil yadill /Design rule for Camera File system]) .PNG cala sSg Exif2.21 2
[ng/Paper Type] [Papcr Size]
[(Default] PictBridge mge gglg jybnn nnnn nn nnnn nnnn nnnn nnnn nnnn nnnn nnnn nnnn nnnn nnnn nnnn nnnn nnnn nnnn nnnn nnnn nnnn nnnn nnnn nnnn nnnn nnnn nnnn nnnn nnnn nnnn nnnn nnnn nnnn nnnn nnnn nnnn nnnn nnnn nnne nnnn nnnn nnnn nnnn nnnn nnnn nnnn nnnn nnnn nnnn nnnn nnnn nnnn nnnn nnnn nnnn nnnn nnnn nnnn nnnn nnnn nnnn nnnn nnnn nnnn nnnn nnnn nnnn nnnn nnnn nnnn nnnn nnnn. [Papert Plus Glossy)] [Ss/Paper] [Papert type] [Papert type]
a
PictBridge JgJgJgJgJgJgJgJgJgJgJgJgJgJgJgJgJgJgJgJgJgJgJgJgJgJgJgJgJgJgJgJgJgJgJgJgJgJgJgJgJgJgJg
Jolllg joi joliljolil jolil
aaii
[(y)]Easy Setup Instructions (Setup Sheet)]
aIyall Jzjg ayIyall
ailllll llllll 11111111111111111
ab = 12

aas baa aalil 2gall aiae alid PictBridge gao jao jao ae bllie
y
PictBridge
ab = 10

jglal jg PictBridge jgs g qg jg aag g g g g g g g g g g
ailll jlll lgl [Jli/Play] gll l jll l jll
Lae aalal oaiy PictBridge Jaoa jaii jaii jaii jaii jaii jaii jaii jaii jaii jaii jaii jaii jaii jaii jaii jaii jaii jaii jaii jaii jaii jaii jaii jaii jaii jaii jaii jaii jaii jaii jaii jaii jaii jaii
Jy Jy

1
aill [al/Page Setup] 12
/Format for] [iP3300]
/Paper Size] 1y
[0/OK] gJ 1
zal [File] aIJIJI J [a/b/Print] 2
.
aai [bilwglg/Quality & Media] A
yI 15y1 2
yI yI yI yI yI yI yI yI yI yI yI yI yI yI yI yI yI yI yI yI yI yI yI yI yI yI yI yI yI yI yI yI yI yI yI yI yI yI yI yI yI yI yI yI yI yI yI yI yI yI yI. [Papser Source]
四四四 四四四
yFron for Plain Paper] 1111111111111111111111111111111
/Media Type] [g/Plain Paper]
Lg A4 1 [Jl/Plain Paper]
B5
Printer Driver] 1
Cuiiie 111.40111111111111111111111111111
[411/Printer Driver Guide]
[4/Print]
Windows
1
a 1
[File] aJol [a/Print]
.
[Canon iP3300]
.([Properties] [Preferences]
[0g/OK] g q 1
1 1
[Paper Source]
边

Fronf for Plain Paper]
y
/Plain Paper] 1ie ellis baa aalaiy
Y.[bilwglEg/Media Type] [y
[gl/Plain Paper]
Aalaalai B5 Letter A4
g j 1
[clalb/Help] g jai aai lai
j 1 [Instructions]
Jy/Printer Driver Guide]
[Instructions]
A
.([O/OK])[Print]


aclbglg
J 20 B5 J A4 11 [glll/Plain Paper] 11
1V, /aay V x 0 y 10y, x x 1.7/aaay 7 x 2 pall [sall glll/Plain Paper] aill
.
oJaiil g a jll aljll g Jgll lssydd. gall oal y g a d
(1) = ( x1,y1) , = ( x2,y2)
()
1
JU [a] /Front Feeder] .[Papr Source]

a
Macintosh® & Windows®
Cuiiui iuee ieie
[Next] [Select Language]
J 1
[Next]
:
Setup CD-ROM] 1: [Easy Install]
1
<1i: [C/Custom Install]
[注册/Register] [Pd/User Registration]
iill jy iaiy aaiy yjkiy lalj yjkiy jy jiy jnil
Windows
2x - y = 8
目
Windows 2000 Windows XP Jai jai jai jai jai jai jai jai jai jai jai jai jai jai jai jai jai jai jai jai jai jai jai jai jai jai jai jai jai jai jai jai jai jai jai jai jai jai jai jai jai jai jai jai jai jai jai jai jai jai jai
[1] [1]
aallll 1
aill 2i1s
Easy Setup Instructions (Setup Sheet)]
( 21 × 2^12^1 · 2^1 · 2^1) · 2^1 · 2^1 · 2^1 · 2^1 · 2^1 · 2^1
Adobe RGB (1998) PhotoRecord
jai [u/Custom Install]
a
Adobe RGB (1998)
Windows 98 Windows Me
Jieiie oie! 1le 5iiy iai bai aiil gie aill jaii loie
[0a/OK] gai aai aiac ai jai
y
aaii jiee
ailll llll 11111111111
Macintosh Jp
2x - 6 = 2 + 2k ,
目
1 1 1 1 1 1 1 1 1 1 1 1 1 1 1 1 1 1 1 1 1 1 1 1 1
J 1
J 1
JGg Jg Jg Jg Jg Jg Jg Jg Jg Jg Jg Jg Jg Jg Jg Jg Jg Jg Jg Jg Jg Jg Jg Jg Jg Jg Jg Jg Jg Jg Jg Jg Jg Jg Jg Jg Jg Jg Jg Jg Jg Jg Jg Jg Jg Jg Jg Jg Jg Jg Jg
y

[(dL)]Easy Setup Instructions (Setup Sheet)]
1


aaii jia jia jia jia jia jia jia


.
J 1
aalil


aIbI aI J 12 Lgai I jai


ailll 1


- 1 1 1 1 1 1 1 1 1 1 1 1 1 1 1 1 1 1 1 1 1 1 1 1 1 1 1 1 1 1 1 1
.


aal 10000000000000000000000000000000000000000000000
aaii iiaai jaii (A) [POWER] caa aee eae aee aee aee aee aee aee aee aee aee aee aee aee aee aee aee aee aee aee aee aee aee aee aee aee aee aee aee aee aee aee aee aee aee aee aee aee aee aee aee aee aee aee aee aee aee aee aee aee aee aee aeee


gall gall y jll lal jll aagj jn glaill 1/Easy Setup Instructions (Setup Sheet)]
a 1
a 1 a 1 1 1 1 1 1 1 1 1 1 1 1 1 1 1 1 1 1 1 1
.Canon Inkjet
Microsoft Corporation "Internet Explorer" , "Windows"
1
d d . Apple Computer, Inc. 45
.
"Adobe RGB (1998)" and "Adobe"
Adobe Systems Incorporated
Copyright ©2006 CANON INC.
a
Exif Print
Exif Print.
a a a a a a a a a a a a a a a a a a a a a a a a a a a a a a a a a a a a a a a a a a a a a a a a a a a a a a a a a a a a a a a
aLdIi Cgall iAiiaai aiisii
Regulatory Information
FCC Notice (U.S.A. Only)
For 120V, 60Hz model
Model Number: K10280
This device complies with Part 15 of the FCC Rules. Operation is subject to the following two conditions: (1) This device may not cause harmful interference, and (2) this device must accept any interference received, including interference that may cause undesired operation.
Note: This equipment has been tested and found to comply with the limits for a Class B digital device, pursuant to Part 15 of the FCC Rules. These limits are designed to provide reasonable protection against harmful interference in a residential installation. This equipment generates, uses and can radiate radio frequency energy and, if not installed and used in accordance with the instructions, may cause harmful interference to radio communications.
However, there is no guarantee that interference will not occur in a particular installation. If this equipment does cause harmful interference to radio or television reception, which can be determined by turning the equipment off and on, the user is encouraged to try to correct the interference by one or more of the following measures:
Reorient or relocate the receiving antenna.
- Increase the separation between the equipment and receiver.
- Connect the equipment into an outlet on a circuit different from that to which the receiver is connected.
■ Consult the dealer or an experienced radio/TV technician for help.
Use of a shielded cable is required to comply with Class B limits in Subpart B of Part 15 of the FCC Rules. Do not make any changes or modifications to the equipment unless otherwise specified in the manual. If such changes or modifications should be made, you could be required to stop operation of the equipment.
Canon U.S.A., Inc.
One Canon Plaza
Lake Success, NY 11042
1-516-328-5600
Users in Canada

Caution
Customer Technical Supports
Canon Canada Inc., offers a full range of customer technical support* options:
■ For interactive troubleshooting, e-mail technical support, the latest driver downloads and answers to frequently asked questions (www.canon.ca)
■ Automated interactive telephone support on most current products 24 hours, 7 days a week (1-800-OK-CANON)
Free live technical support Mon - Fri 9am-8pm EST (excluding holidays) for products still under warranty (1-800-OK-CANON)
The location of the authorized service facility nearest you (1-800-OK-CANON) If the problem cannot be corrected by using one of the above technical support options, repair options are available at the time of your call to the Free live technical support number above or via the website at www.canon.ca
- Support program specifics are subject to change without notice.
CANON CANADA INC.
1-800-OK-CANON (1-800-652-2666)
24 HOURS A DAY, SEVEN DAYS A WEEK
http://www.canon.ca
The following ink tanks are compatible with this product.