HT 700 - Hedge trimmers AL-KO - Free user manual and instructions
Find the device manual for free HT 700 AL-KO in PDF.
User questions about HT 700 AL-KO
0 question about this device. Answer the ones you know or ask your own.
Ask a new question about this device
Download the instructions for your Hedge trimmers in PDF format for free! Find your manual HT 700 - AL-KO and take your electronic device back in hand. On this page are published all the documents necessary for the use of your device. HT 700 by AL-KO.
USER MANUAL HT 700 AL-KO
INFORMATION I MANUALS I SERVICE
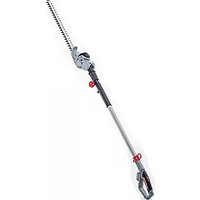
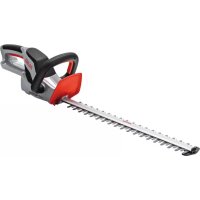
HT 600 FLEXIBLE CUT HT 700 FLEXIBLE CUT
Gebrauchsanleitung


D: Gebrauchsanleitung 4 DK: Brugsanvising. 108
GB: Instruction manual 12 S: Bruksanvisning 116
NL: Gebruikshandleiding 20 N: Bruksanvisning 124
F:Mode d'emploi 28 FIN:Kayttoohje 132
E: Instrucciones de uso 36 EST: Kasutusjuhend. 140
P: Manual de instruções 44 LV: Lietošanas instrukcija 148
I: Istruzioni d'uso LT52 Naudojimo instrukcija 156
SLO: Navodilo za uporabo 60 RUS: PukoBocBo no ekplyaTaun.164
HR: Upute za uporabu 68 UA: Ihctpyckia 3 ekcnnyataci..172
PL: Instrukcja obslugi...76 BG: PbkoBODCTBO 3a ekcnloatauia 180
CZ: Návod k obsluze .84 RO: Instruetiuni de/utilizare 188
SK: Návod na použitie 92 GR: Oδnyiες χρήσης 196
H: Hasznalati utmutató. 100 TR: Kullanim kilavuzu 204
SRB: ynytcBa 3a ynoTpe6y 212
MK: YnataBo 3a pa6ota.220


Zudiesem Handbuch
Antonio De Filippo, Managing Director
Garantie
Read these operating instructions before starting operation. This is a precondition for safe working and flawless operation.
Observe the safety warnings in this documentation and on the machine.
The operating instructions must be kept in a safe place for future reference and passed on to any subsequent operators.
Explanation of symbols

Caution!
Following these safety warnings carefully can prevent personal injury and/or material damage.

Special instructions for greater ease of understanding and improved handling.

The camera symbol refers to illustrations.
Contents
About this handbook 12
Product description 12
Safety and protective equipment 12
Technical data 14
Safety instructions 14
General Power Tool SafetyWarnings 14
Assembly 17
Operation 17
Repairs 17
Maintenance and care 18
Troubleshooting 18
Storage 18
Disposal. 18
Warranty. 19
Product description
Designated use
This hedge trimmer is intended exclusively for non-commercial trimming of hedges, shrubs and bushes.
Using this machine for any other or additional purpose is considered contrary to its designated use. The manufacturer cannot be held liable for any damage resulting from such use.
Incorrect use
Safety equipment must not be removed or by-passed, e.g. by tying down the switches on the hand grips.
Do not use the machine in the rain or on wet hedges and bushes.
The machine must not be used commercially.
Safety and protective equipment

Danger - risk of injury!
Safety and protective equipment must not be disabled!
Child-proof lock
A hole (5 mm) is provided on the rear actuating lever for fitting a padlock* (5). The padlock prevents the machine from being switched on unintentionally.
- Not supplied
Handguard

Caution!
Risk of injury if the handguard is not installed! Never start up the machine without the handguard.
Two-hand operation
The hedge trimmer can only be operated using both hands at the same time.
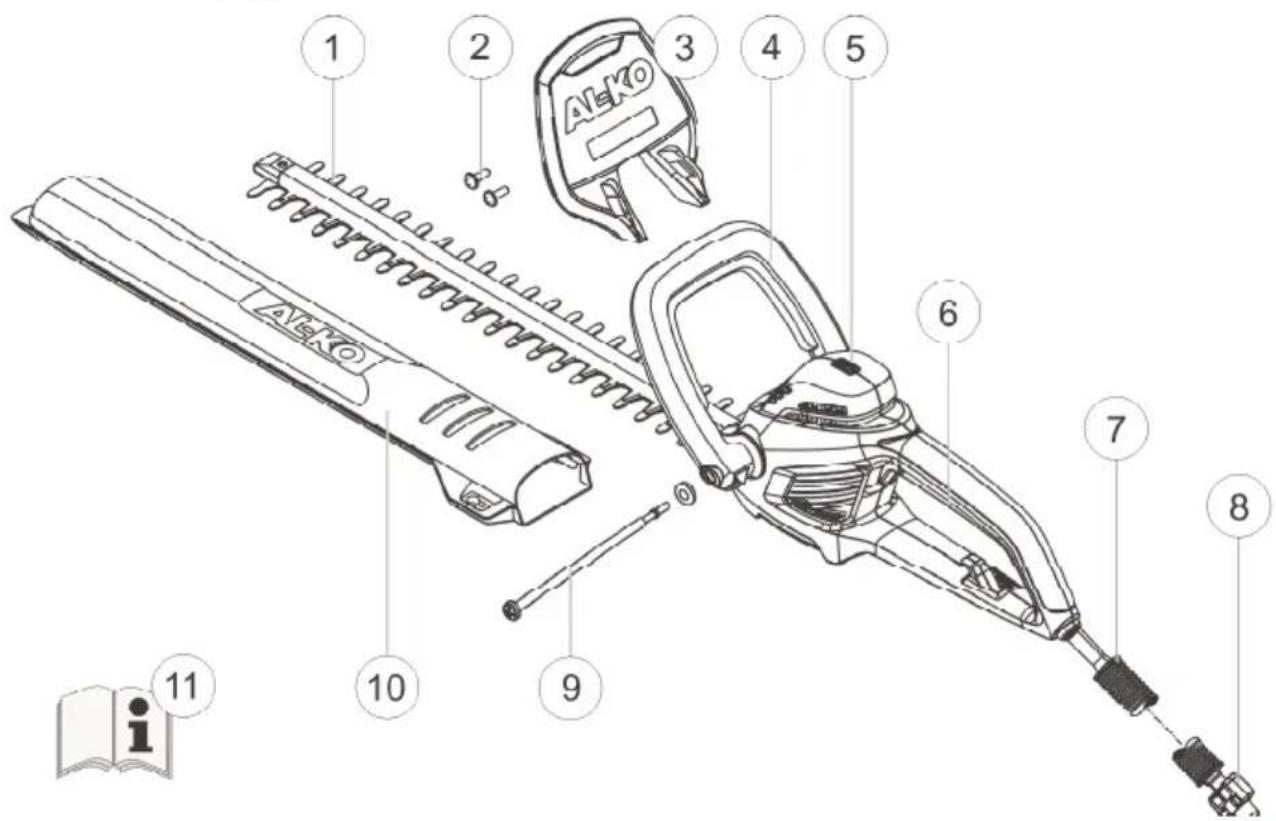
Product overview

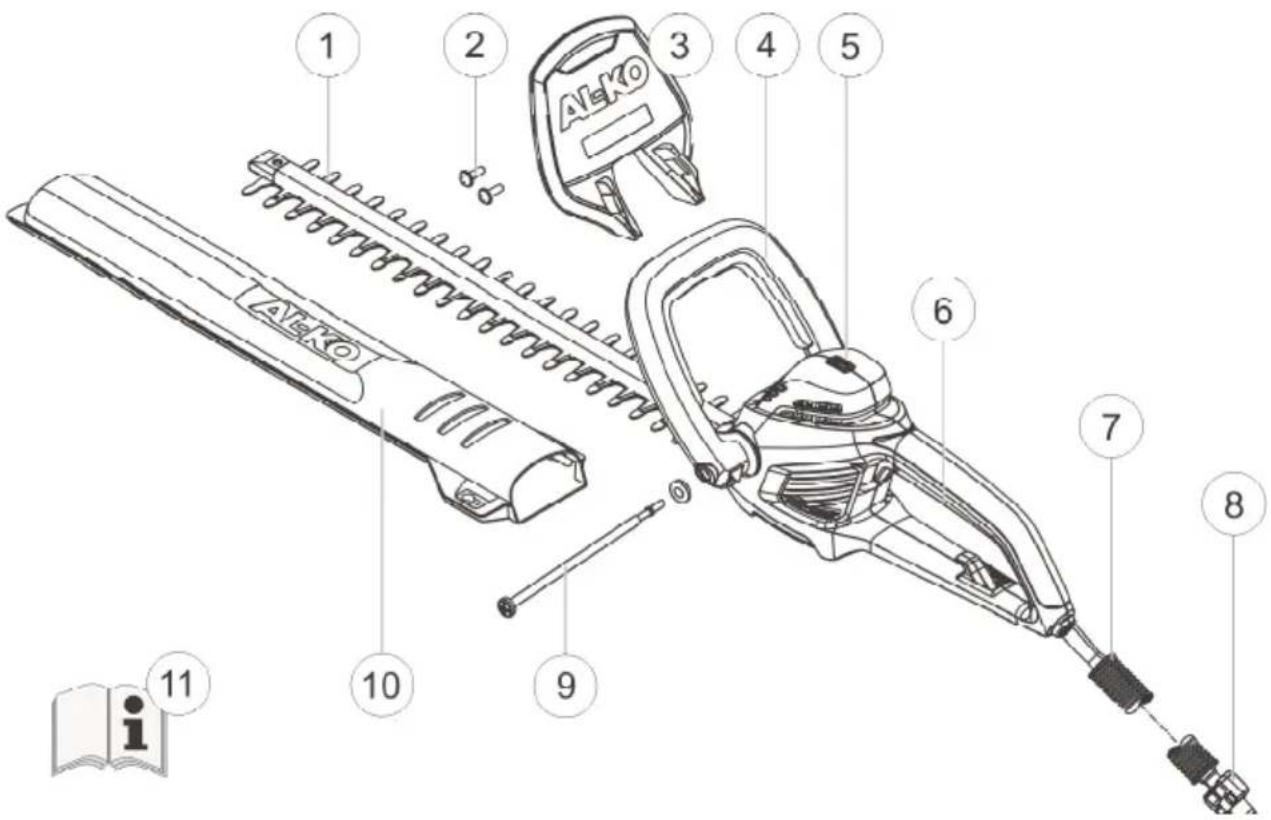
| 1 Blade 7 Safety cable | ||
| 2 Screws for fastening the handguard 8 Cable strain relief | ||
| 3 Handguard 9 Clamping bolt & washer for adjustable hand grip | ||
| 4 Front hand grip with switch 10 Blade cover | ||
| 5 Spirit level 11 Operating instructions | ||
| 6 Rear hand grip with switch |
Meaning of symbols on the machine

Wear safety goggles.

Caution! Handle carefully.

Read the operating instructions and operate the machine accordingly

Immediately disconnect the plug from the mains if the cable is damaged or severed!

Do not expose the machine to rain.
Technical data
| Technical data HT 600 Flexible Cut HT 700 Flexible Cut | ||
| Power consumption 600 W 700 W | ||
| Blade length 600 mm 650 mm | ||
| Cutting thickness 24 mm 24 mm | ||
| Total weight 4.1 kg 4.5 kg | ||
| Vibrations measured at hand grip* 4.8 m/s² 4.1 m/s² | ||
| Mains voltage 230 V ~ 240 V / | 50 Hz | 230 V ~ 240 V / 50 Hz |
| Insulation class | ☐/II/II | ☐ |
| Stroke rate at no load 1,700 min | -1 | 1,700 min-1 |
| Noise level LPA | 90 dB (A) | 94 dB (A) |
- The declared vibration total value has been measured in accordance with a standard test method and may be used for comparing one tool with another.
Safety instructions
General Power Tool SafetyWarnings
Warning!
The vibration emission during actual use of the power tool can differ from the declared total value depending on the ways in which the tool is used..
Caution!
Read all safety warnings and all instructions.
Failure to follow the warnings and instructions may result in electric shock, fire and/or serious injury.
Save all warnings and instructions for future reference.
Caution - Risk of injury!
Safety/protection devices should not be disabled!
Caution - Danger of electrocution!
If the cable has been cut or is damaged, disconnect the plug from the mains supply immediately.
Caution!
Use the equipment only if it is in correct operating condition! Before using, check the machine, cable and plug for damage; any damaged parts must be repaired or replaced at a specialised repair centre.
Work area safety
Keep work area clean and well lit. Cluttered or dark areas invite accidents.
Do not operate power tools in explosive atmospheres, such as in the presence of flammable liquids, gases or dust.
Power tools create sparks which may ignite the dust or fumes.
Keep children and bystanders away while operating a power tool.
Distractions can cause you to loose control.
Electrical safety
Power tool plugs must match the outlet. Never modify the plug in any way. Do not use any adapter plugs with earthed (grounded) power tools.
Unmodified plugs and matching outlets will reduce risk of electric shock.
Avoid body contact with earthed or ground- ed surfaces, such as pipes, radiators, ranges and refrigerators.
There is an increased risk of electric shock if your body is earthed or grounded.
Do not expose power tools to rain or wet conditions.
Water entering a power tool will increase the risk of electric shock.
Do not abuse the cord. Never use the cord for carrying, pulling or unplugging the power tool. Keep cord away from heat, oil, sharp edges and moving parts.
Damaged or entangled cords increase the risk of electric shock.
When operating a power tool outdoors, use an extension cord suitable for outdoor use.
Use of a cord suitable for outdoor use reduces the risk of electric shock.
If operating a power tool in a damp location is unavoidable, use a residual current device (RCD) protected supply.
Use of an RCD reduces the risk of electric shock
Personal safety
Stay alert, watch what you are doing and use common sense when operating a power tool. Do not use a power tool while you are tired or under the influence of drugs, alcohol or medication.
A moment of inattention while operating power tools may result in serious personal injury.
Use personal protective equipment. Always wear eye protection.
Protective equipment such as dust mask, non-skid safety shoes, hard hat, or hearing protection used for appropriate conditions will reduce personal injuries.
Prevent unintentional starting. Ensure the switch is in the off-position before connecting to power source, picking up or carrying the tool.
Carrying power tools with your finger on the switch or energising power tools that have the switch on invites accidents.
Remove any adjusting key or wrench before turning the power tool on.
A wrench or a key left attached to a rotating part of the power tool may result in personal injury.
Do not overreach. Keep proper footing and balance at all times.
This enables better control of the power tool in unexpected situations.
- Dress properly. Do not wear loose clothing or jewellery. Keep your hair, clothing and gloves away from moving parts.
Loose clothes, jewellery or long hair can be caught in moving parts.
If devices are provided for the connection of dust extraction and collection facilities, ensure these are connected and properly used.
Use of dust collection can reduce dust-related hazards.
Power tool use and care
- Do not force the power tool. Use the correct power tool for your application.
The correct power tool will do the job better and safer at the rate for which it was designed.
Do not use the power tool if the switch does not turn it on and off.
Any power tool that cannot be controlled with the switch is dangerous and must be repaired.
- Disconnect the tool from the power source before making any adjustments, changing accessories, or storing power tools.
Such preventive safety measures reduce the risk of starting the power tool accidentally.
Store idle power tools out of the reach of children and do not allow persons unfamiliar with the power tool or these instructions to operate the power tool.
Power tools are dangerous in the hands of untrained users.
Maintain power tools. Check for misalignment or binding of moving parts, breakage of parts and any other condition that may affect the power tool's operation.If damaged, have the power tool repaired before use.
Many accidents are caused by poorly maintained power tools.
Keep cutting tools sharp and clean.
Properly maintained cutting tools with sharp cutting edges are less likely to bind and are easier to control.
Use the power tool, accessories and tool bits etc. in accordance with these instructions, taking into account the working conditions and the work to be performed.
Use of the power tool for operations different from those intended could result in a hazardous situation.
Service
Have your power tool serviced by a qualified repair person using only identical replacement parts.
This will ensure that the safety of the power tool is maintained.
Safety instructions for operation
Always operate the machine with both hands.
Keep body and clothing away from cutting parts.
Do not remove cut material while the motor is running.
When leaving unattended / transporting the machine:
Switch the machine off.
Pull out the mains plug.
Push on the safety cover.
Never hold the machine by the blade.
Only carry the machine by the hand grip.
The domestic mains voltage must match the mains voltage specifications in the technical data.
Always use the special cable strain relief for the extension lead.
Always keep the cable out of the cutting area and routed away from the machine.
Assembly
The camera symbol refers to illustrations on page 3.
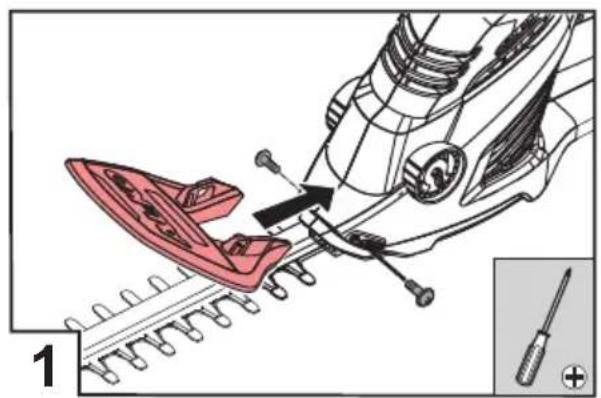
- Fasten the handguard to the housing using the screws provided (O 1).
- Pull the hand grip apart slightly and push it onto the housing (2a). The toothing must click into place.
- Pull out the quick-release lever on the hand grip and hold it in place.(2b)
- Push the clamping bolt through the hand grip and housing and screw it into the quick-release lever by hand. (2c)
- Screw the clamping bolt in so far that the quick-release lever can be pushed against the hand grip with little force.
- Route the extension lead through the strain relief ( 3).
Operation
Danger - risk of injury!
The machine must not be operated before assembly work has been completed!
Observe the safety instructions for operation!
Adjust the front hand grip.1.
Pull out the quick-release levera.
Move the hand grip to the desired positionb.
Push the quick-release lever back inc.
- Plug the power cable into the mains power supply.
- Grip the front hand grip with one hand, then grip the rear hand grip with the other hand.
- Press the switches on both hand grips ( 4) - the machine will start.
- Keep both switches pressed while working.
- The hedge trimmer will stop immediately if one of the switches is released.
Work instructions
Always cut both sides of the hedge first, before cutting the top.
This will prevent cut material from falling into areas that have not yet been cut.
The built-in spirit level facilitates cutting along a straight line (C3).
Hedges should always be cut in a trapezoid shape. This prevents the lower branches from becoming bare (C).
Repairs
Repair work may only be carried out by competent specialist workshops or our AL-KO Service Centres.
Maintenance and care

Danger of electrocution!
Always unplug from the mains before commencing any maintenance or preventive maintenance work!

Danger - risk of injury!
Always wear protective gloves when carrying out maintenance or preventive maintenance work on the blade!
- Always clean the blade and housing with a brush or cloth after use. Do not use water and/or aggressive cleaning agents - risk of corrosion!
- Lightly oil the cutter bar with a suitable preservative oil.
- Check that all screws are tightened securely.
- Check blade regularly.
Contact AL-KO Service Centre in the case of:
defectiveblade
bluntblade
Excessive wear
Storage

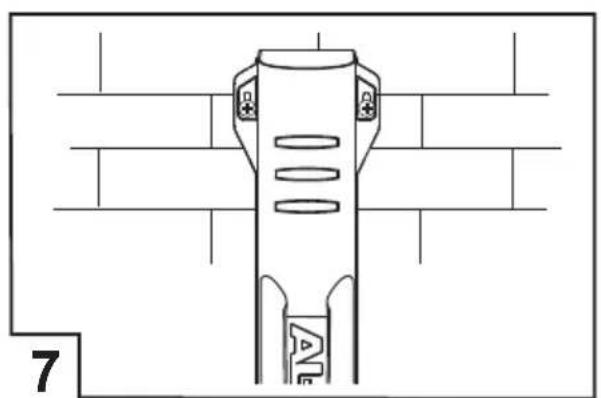
The blade cover can be used as a wall-mounted holder for the hedge trimmer.
Make sure that the screws are tightened securely! (7)
Always unplug the machine from the mains for storage.
Always attach the blade cover before storing the machine.
Store the machine in a dry condition and out of reach of children and unauthorised persons.
Secure the machine with a padlock* 6
- Not supplied
Disposal

Machines, batteries and rechargeable batteries that are no longer required must not be disposed of with household waste!
Packaging, machine and accessories are manufactured using recyclable materials and must be disposed of accordingly.
Troubleshooting
| Fault Possible cause Solution | ||
| Machine does not work No | power supply Check fuse / extension | lead |
| Machine cable defective Contact AL-KO Service Centre | ||
| Machine cuts out intermittently | Extension lead damaged Check extension lead | |
| ON/OFF switch defective Contact AL-KO Service Centre | ||
| Internal fault Contact AL-KO Service Centre | ||
| Motor runs but blades do not move | Internal fault Contact AL-KO Service Centre | |
| Blades get hot Insuffcient | ubrication Lightly oil blades | |
| Blades blunt Contact AL-KO Service Centre | ||
| Notching on blades Contact AL-KO Service Centre | ||

In the case of faults that are not listed in this table, or faults that you cannot rectify without assistance, please contact our customer service department.
EC Declaration of Conformity
We hereby declare that this product, in the form marketed by us, meets the requirements of the harmonised EU directives, the EU safety standards and the product-specific standards.
| Product | Manufacturer | Authorised representative | |
| Electric hedge trimmer | AL-KO Geräte GmbH | Anton Eberle | |
| Serial number | Ichenhauser Str. 14 | Ichenhauser Str. 14 | |
| G 2402405 | D-89359 Kötz | D-89359 Kötz | |
| Type | EU directives | Harmonised standards | |
| HT 600 Flexible Cut | 98/37/EC | (until 28.12.09) | EN 60745-2-15 |
| HT 700 Flexible Cut | 2006/42/EC | (from 29.12.09) | |
| 2006/95/EC | |||
| 2004/108/EC | |||
| 2000/14/EC | |||
| Sound power level | Conformity assessment | ||
| measured / guaranteed | 2000/14/EC, Annex V | ||
| HT 600 Flexible Cut | 107 / 107 dB(A) | ||
| HT 700 Flexible Cut | 103 / 103 dB(A) | ||
Kotz, 20.10.2009
Antonio De Filippo, Managing Director
Warranty
We will eliminate any material defects or manufacturing defects in the machine during the statutory period of limitation for warranty claims; at our discretion, this will be effected either by repair or replacement. The period of limitation is determined in accordance with the laws of the country in which the machine was purchased.
Fulfi lment of our warranty obligations is conditional on: The warranty is nullifi ed in the following cases:
| Correct use of the machine | Attempted repairs to the machine |
| Observation of the operating instructions | Technical modifications to the machine |
| Use of original spare parts | Incorrect use |
| (e.g. commercial or municipal use) |
The following are not covered by the warranty:
| Damage to paintwork attributable to normal wear |
| Wearing parts indicated by XXX Xon the spare parts card |
Internal combustion engines - These are covered by the separate warranty provisions of the relevant engine manufacturer
In the event of a warranty claim, please contact your dealer or local authorised customer service centre with this warranty declaration and proof of purchase. The statutory rights of the purchaser with respect to claims against the vendor in the case of defects are not affected by this warranty declaration.
Over dit handboek
defect snijmes
stomp snijmes
Overmatige slijtage
Opslag

Antonio De Filippo, Managing Director
Garantie
Antonio De Filippo, Managing Director
Garantía
Antonio De Filippo, Director Gerald
Garantia
Antonio De Filippo, Managing Director
Garanzia
2000/14/ES, Dodatek V
Kotz, 20.10.2009

Antonio De Filippo, direktor
Garancija
2000/14/ES, priloha V
Kotz, 20.10.2009

Antonio De Filippo, riaditel podniku
Záruka
Antonio De Filippo, Managing Director
Garanti
Fäll in vippspakenc.
Antonio De Filippo, Managing Director
Garanti
Antonio De Filippo, Managing Director
Garanti
Antonio De Filippo, Managing Director
Takuu
IpeinCIOBne KpyKOBoDCTBy
IpounTaIte daHHepykoBOcTBO no 3KcnIyatauNnepeHaJOnm pa6oTbI. 3TOaBnEeTcyaCIOBnem 6e3OanChn I 6e3OTka3HOpa6oTbI
CobnDaIte yka3aHn IIO 6e3oNaChOCTn INpeDynpexKdEHHN, CoepKaUneC B DaHHOM DOKymHe N Ha IHcTpymHe
CoxpaHnte pyKOBOCTBO NO 3KcNpyaTauu INIaIbHeIeRo IcNoIb3OBAHnI nepeaIte erO cNeDyUoIeMy NOnb3OBATeIIO
YcnoBhble 06o3HaueHnA
BHHMaHHe!
ToHoe cIeIOBaHne 3Tm npeDynpexJeHNaM MoKet npeDOTBpaNTb TpaBMnPOBaHne IIOdeN/UNMaTePnaNbHbYuep6.
CneuaNbHbIe yka3aHnI dIyUwero NOHMaHnI NcNoJIb3OBAHnI.
Cnmbon KaMepbI yKa3bIBaET Ha nJIIOCTpaUIN.
CopepxaHne
PpeinncIOBne KpykoBoIDCTBy. 164
Onucanhe n3dennr 164
IpeoxpaHntbHbIe H 3aHTbIe npncno6nneHna 164
TexHnueckne xapaKTepeNCTnKn 166
Yka3aHnno6e3oNaChOcTn 166
Montax 169
Kcnnyataua 169
PemOHr 169
TexobcnyxibAHne u yxo.. 170
YcTpaHHe HEnCnpaBHoCTeI 170
XpaHeHne 170
Ytuln3a.. 170
ДeКларачи O COOTBETCTBn CTaHdapTaM EC ....171
TapaHTy 171
Onncanne n3delen
IcnoB3OBaHne no Ha3HaueHnIO
3NeKtpnueckn KcyTope3 npeHa3HaueH NCKIIOHTeJIbHO dIy o6pe3Kn JKNBOI N3rOpOIn N KyCTapNkA Ha YacTHOM caIobOM yUactKe.
NcnoIb3ObaHne HnCTpyMeHTa BdpyHX ueJX RAJIeTcRcNcNoJIb3ObaHnEM He No Ha3NaYeHnIO. 3a y6bITKn,BO3HnKaHOUne BCNEdCTBnE 3TOrO, N3ROTOBNTeNbOTBETCTBeHHoCTn He Hecet.
Bo3MOxHbIe BapHaNTbI HeHaJIeXaUero NCNoJIb3OBAHn
3anpeaetcJ demoHTnpOBaTb nIuSyHTnpOBaTb npedoxpaHnteHbIe npncnoc6JeHnHa npumep, npBra3bBaKHOKN BKNIOueHn KpykOATkAm
3anpeaaetcncnoIb3ObaTbHCTpyMeHTIOJdoXdEmN/nnnDnnaobep3KnBnaXHOJNBOIN3rOpOInKycTapnka
3anpeaaetc npimehaTb HnHCTpyMeHTB npomblIeHHbIX ceJAX
IpeoxpaHntBhIe n 3aunTHbIe npncnoc6nneHna
BnmaHne! Onachocb IOnyuyeHnraTpaBM! He otKlouaTe npedoxpahntbHbIe n 3aunTHbIe npncnocobHeHnra!
YcTpoNCTBO3aunTbIOTTeTe
B 3aHem pbyare ynpabJeHnI npedymoTeHO OTBepTne (5 MM) nJa HabeCHoro 3aMKa* 5). HabeCHO 3AMOK npenTCTByeT HepeHaMepeHHOMy 3aNYCKY INHcTpymEHTa.
*He exodum e komnnekm nocmaeku
YcTPOINCTBO DnA 3aunntby pyK
BHMaHne!
Ecnu yctpoiCTBO Dnla 3aunTbI pyK He
yctaHOBJeHO, cyueCTBye TOnaCHOCTb
noyuHnra TpaBM!
HnkOrda He 3anyckaIte HnCtpymENT 6e3
yctpoiCTBa Dnla 3aunTbI pyK.
DBypyuHoe ynpaBHeHne
3JIeKtpnueckn Kcytope3 MoXHO pNBeCTN B DeIcTBNe TOJbKO DByMpaYkAMN ODNHOpeMeHNO.
OnncanHe n3dennr
*Yka3aHHa BeHnHa Bn6paunn H3MepeanacB COOTBeTCTBUN CO CTaHapTHoM MeTOHKo NcblTaHNI MOKET IcNoJIb3OBAtbcdIe CpaBHeHn 3JeKtpOnHCTpyMeHTOB.
YkaHnno 6e3onachoctn
06uye yka3aHnno 6e3oNaChOCTn dny 3NeKtpOnHcTpyMeHTa

BhimaHne!
B npoecce 3Kcnpnyatau n 3JIeKTPoHnHCTpyMeHTa BeJInuHnHa Bn6paun MOKeT OTnUaTbCra OT yKa3aHHOrO 3NaueHnB 3aBnCmOCTn OT pIpMHeHn yCTpoNCTBa.

BHHMaHHe! Onachocb noIyueHnTpaBM!
He oTKIouaIte npeOxpaHITbHbIe n 3aHTbIe npncocobnna!

BhimaHne!
IpoTuTe Bce yka3aHnN n HcTpkykunn no 6e3OnacHOCTn.
He6peKHOCTb npu co6JIIODeHn yka3aHn n HNCTpyKcI N O 6e3ONaCHOCTn MOKeT cTaB npuHNo IopaxeHna 3NeKtpueckm TOKOM, NOXapa N/IN TJxKeJIbIX TpaBM.
CoxpaHnte Bce yka3aHHn HnHCTpyKcnn No 6e30napocHT nIJI NcNoIb3OBaHHN B 6yduem.

BHHMaHHe! OnachocTb nopaxeHn3JIeKTPnuecknM TOKOM!
Ecnn əIeKTpOPOBOD nobpeXdEn nnn nepepe3aH, HEmdJIeHHo I3BJIeKNTe WTeKepe n3 cEtN!

BhimaHne!
IcnoJb3yIte HnCTpyMeHrTOJIbKO B TexHnueckn 6e3ynpeHOM coCToHnn!
Ipeed nCNoJb3OBAHnEm npOBepaTe HnCTpyMeHT, Ka6eJIb uTKepeHa NaHnUHe NOBpeXdEHH. NOBpeXdEHbIe DeTaJIH Heo6xOIMo OTrpEMOnTHuPoBaTb B CneuaJIIN3uPObaHHoM MaCTepcKo IIn 3aMeHHTb.
Be30nacHocTb Ha pa6ooyem MeCTe
Copejnte paooee MeTO B uCTOTE n oecneyTe xopoOee OCBeUeHHe. BeocnpaOK nn HeoctatoOHoe OCBeUeHne paooero yactka MOrT cTaB npuHoi HecuaCTbIX CnyAeB
He pa6oTaIte C 3JIeKTPoHnHCTpyMeHTOM BO B3pbIBOONaChbIX 30Hax, B KOTOpbIX npncyTCTByOT rOpUOHe XnDkoCTN, Ra3bl NnI NBilb.
3NeKTPoHCTpyMeHTbI ABJIOTcN ICTOHHKOM NCKP, KOTOpBIE MOrYT pINBECTN K BO3ROPaHIIO Nblnn nnpOB
He donyckaite npncytCTbna dete H noctopOHnX B 30he pa6oTbI 3JeKtpOnHcTpymeHa. Ipn n3MeHeHH HnpaBJIeHnBAbl MoKTe yTpaNTb KOHTpOJIb HaN HCtpyMeHToM
3NeKtpo6e3onacHocTh
Pa6ota BbINOJIHReTcH HAn6OJee 3ΦΦeKTHBHO n 6e3oNaCHO npu NcNoIb3OBaHn NOxOJaTeO 3NeKTPoHHCTpyMeHTa COOTBETCTByIOSeero dHaNa3OHa MOUHOCTN
He nCnoB3yIe 3JIeKTPoHCTpyMeHT C HeNCpBaHBbIM BbIKJIOUaTeJeM.
3NeKtpoHCTpyMeHT, KOTOpbI HEB03MOxHO BKIOUHTb INN BbIKIOHTb, ONaceH N Tpe6yET peMOHTa
IpeepperynopobHnem,cmehon npHaJnxKHOeN HINOTKJaBIBaHnEM nHCTpymeHTa B CTOpOHy BbIHbTe WTeKeP n3po3eKn.3Ta Mepa npedocTopoxHOCTn npedOTBpaAaeT HenpeHaMepeHHbI 3anyck 3JIeKTPoHnCTpyMeHTa
XpaHnTe HeNCNoJIb3YeMbI 3NeKTPoINHCTpyMeHT B HeDocTyHOM dIЯ DeTei MecTe. He No3BOJrTe POJIb3OBAtbc 3NeKTPoINHCTpyMeHTOM JIuCaM, KOToPbIe He 3HaKOMbl C Hm NIIH He IpOuJI N daHHbIe yKa3aHnI.
3NeKtpOnHCTpyMeHTbI npeDCTaBnIOT onaCHOctb, ECIN OHN NcONlb3yIOTc HEONbITHbIMN IIOdbM
06ecnebyte TsaTeIbHbI yXoD 3a 3JIeKTPoHHCTpymeHToM. Y6eIntEcB, YTO DBNxUyIeCraJcTn pa6OtaOT 6eZynpeHNo I He 3aeJaOT, OTCyTCTByIOT cLOMaHHbIe NII NOBpeXdEHHbIe YAcTn, a TaKke HApUSeHn B pa6Ote 3JIeKTPoHHCTpymeHTa. IpeEd npIMMeHHeM INcTpyMeHTa OTpeMOHTnpYInTe NOBpeXdEHHbIe YAcTn.
PnHmMnHX HeCuaCTbIX CnyaEB
YBnEeTc HHeAJIeXaIy yXoD 3a
3JeKTPoINHCTpyMeHTOM
PexyuHnHCTpymENTdoJxeh6bItbBCerda octpbIMuHCTbIM.
IoiBepraUuHcTtataTeHOMy yXOdy 3JIeKTPoINHCTpyMeNT C OCTpbIMN peKyuUMN KpOMkAMn pExe 3aEdaet n 60one JeroK B ynpabJIeHN
IprimeHne Te 3eKtpOnHcTpyment, npHaJnEJXHOCTN, BCTaBHO INHcTpymeHT nT. n. B COOTBeTCTBn C daHHbIMn INHcTpYkUyMn. YuHTbIBaTe yCIOBn I BnD BBINOLHReMoPa6Obl.
IcnoIb3OBAHHe 3JIeKTPoIHCTpyMeHTa He no Ha3HaueHIO MOKeT CTaTb IpruHoi ONaChbIX CNTyaU
06cnyxmbHne
PemOH3JIeKTPoHnCTpymeHTa DOJXeH BbIIOJIHrTbcra TOIbKO KBaIIuΦNcIpuBaHHbIM NepcoHaIOM C HcNoJIb3OBAHNem OpiRHaJIbHbIX 3aNaChbIX YacTei.
Pn3TOM CneIyET ObecneuHT coXpaHHeHc 6e30nacHOCTn 3NeKTPoHHCTpyMeHTa
Yka3aHnnoTexHnke6e3onacHOCTn npn 3KcNpyatauHnHcTpymeHa
Bcerda ynpabnIte nHcTpymeHTOM dByMa pykam
Дерхи tepekyu mexaHn3Ma paCCToHn ot TeJa n OeXdbI
He ydaIaIe Te o6pe3Kn npn pa6oTaIoIeM DBIrataTe
EcnHHeo6xOJIMO OCTaBnTb NHcTpymENT Hnn nepeBe3Tu erO B dpyroe MeTo:
OTKNHOUHTe INCHTpymENT
13BbKeNTe TEKep 13 p03ETK
HaDeHbTe 3aUHTbI KOKyX
He npnkacaiTecb K HOxam HnHcTpymeHa
ДерхитЕ ИСТPyМЕТTOЛБКО 3a pyKoTky
HanpЯЖeHne cETn DoJXHO COOTBeTCTBOBaTb ceTeBOMy HapЯЖeHnO, yKa3aHHOMy B texHuYeCKnx XapaKTePncTnKax
Bcerda nCnoIb3yIte cneuaIbHoe yCTpoIcTBO dIocna6JIeHnHaTJKeHnYdINHHTeNbHorO Ka6eIa
Te Ka6eB BHe 30HbI cpe3a, Bcerda HnpaBnIte erO B CToHy OT MaunHbI
MOHTAX

CnBON kamepbI yka3bIbaeT ha nllnoctpaun, npuBeHeHbIe Ha cTp. 3.
- Ппкpenite yctpoiCTBOДЯ 3auntbypyK KkopnyCy C NOMOuB BnHTOB (1).
- Cnerka pa3BeNTe pyKoTky B CTOpOHbI N BCTaBbTe ee B Kopnyc(2a). 3y6bI DOJXHbI BOITN B 3auePJIeHne.
- ПовернITE наружу посядно рьчаг на руковке и почу уdeckиваite erо. (2b)
- BcTaBbTe cTAAHOH 6oNT B pyKoAry u KOpnyc n OT pky npKpyTne er O K nepeKnDHomy pbHary. (O 2c)
- 3aTHeCTxHcHbOHTHaCToNbKO,TO6bIMoXHO 6bIIO npTAYb nepeKnDHO pHuAr K pyKoTKe C He60JIbUIM ycINnEM.
- Пюдь Te ydINHITeNBi KaBéb chepe3 yCTpoIcTBO dIЯ ocJIa6JIeHn erO HATJKeHn (3).
3Kcnpnyataza

BhimaHne! Onachocb nonyuHn TpaBM!
Hctpyment pa3peaetcra nOb3OBaTb TOnbKO nocne noHnOc6Opkn!
Co6nOdaIte yka3aHnno TeXnKe 6e3oNaChocTn npn EKnIyatau nInHCTpymEnTa!
PerynipoBaHne nepedHe pyKoTkn1. OTKInbTe nepeKeuDHO npUaHa.
b. YcTaHOBInTe pyKoRTky B XeJaEmoe IIOJXKeHne
c. BepHnTe nepeKnIHoN pbuHa MeCTO
- PoiocoeHHte cTeBOJ Ka6eJIb K cTeN.
- Bo3bMntecb OndHoi pyKoI 3a nepeHIO, 3aTeM 3a 3aHIOpyKoTky.
- Haxmte Ha obe KhoNk BbIKNoeHnHa pyKoRTkax (4) - INCTpyMeHT 3anyCTNTcR.
5.BoBpempaobtbyydepknaIteoBeKHOKN HaxKaTbIMN. - Пи OTnyckaHm OJHOI n3 KHOnOK INHCTpyMeHT BbIKIOUHTcI.
Yka3aHnno 3KcnJyatauHnHcTpymeHtA
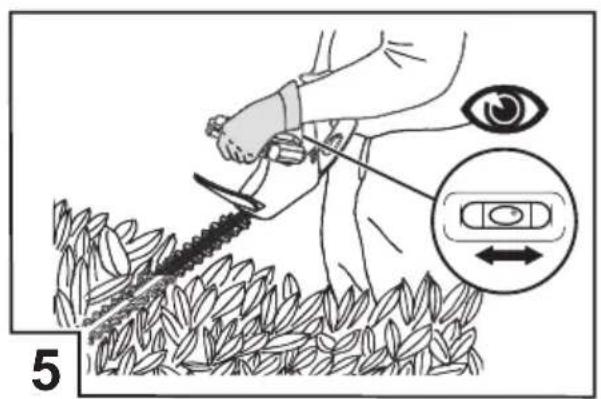
Bcerda cneyuET cpe3aTb cnaHana o6e 6OKOBbie CTOpONbIXINBOI IN3rOPOn, a 3aTeM - ee BepxHIOU YAcTb.
Elaorapra 3Tomy 6pe3Kn He 6yDyT IOnaDaTb Ha eue He 6pa6oTaHHbIe yAcTkN.
BCTpoeHHbI yPOBeHb oBnErYaET noNyuHeHne npraMOrO cpe3a (C)
KnByu n3rOpobcneDyET Bcerda o6pe3aTbB BnDe Tpaneun.3To npedotBpaaaet cpe3aHHe HxNHX cybeB (8)
PemOH
PemOHThbIe pa60TbI pa3pe7aaeTc npoBOHnTb TOJbKO B KOMnTeHThBIX CneuNaHn3npoBaHHbIX MaCTepCKNX Nn CepBnCHbIX cEHtpax KOMnaHN AL-KO
TexobcnyXnBaHne n yxoD

BHHMaHHe! OnachocTb nopaxeHn3JIeKtpnueckm TOKOM!
Ipepe npoBeHnem texO6cnyxuBaHnB BceRda n3BneKaIte uTeke p3 cetn nITaHnra!

BHHMaHHe! OnaChocb nonyuHn TpaBM!
PnTexo6cnyxuBaHn HOKei BcerTaHaDeBaTe paOChne nepaTkn!
- KaЖдьп pa3 nocle pa6OТы Heo6xOДИМо ЧИСТИТь HOЖИ KОРПУС C ПOMOДьU ΜEТКИ ИЛN TKaHи. He npIMeHЯITE BODY I/IIN arpeCCNBHbie ЧИСТЯШе cpeDCTBA - onaCHOCTb KOPP03И!
- Cma3bIbaIte HOXeByo peIky He60JIbIIMKOLINueCTBOM COOTBeTCTByIOJIeeroaHTNKoppO3NHOHOrO MaCJa.
- PpOBepeIe, Bce IIN BnHTbl 3aTMyTbI.
- PeryIpaHNO npOBepaIte HOxN. O6paauTecb B cepBnchbI ueHTp AL-KO ecn:
HOXHNHeNCpabHbI
HOXN 3aTyININCb
PnN36bIToHOM N3HOce
XpaHeHne

Kyctope3 MoXeT 6bITb NOBWeH Ha CTeHe, B 3TOM Clyuae 3aUHTbI KoxyHX HOxAMoXe T Cnykntb B KaueCTBe KpeJIeHnI.
PpOBepbTe NIOTHOCTb 3aTAKKN BHTOB! (7)
XpaHnTe HnCTpyMeHT TOnbKO npN OTKJIuOeHHOM uTekepe
XpaHNTe HNCTpyMeHT TOnbKO C yCTaHOBJIeHHbIM 3aUHTbIM KOxYXOM
XpaHnTe HnCTpyMeHT B cyxOM MeCTe, HeIOCTyINHom DnIa DeTeN Hne yNOJHMOUeHHbIX NIIc
3aФИКСИРУЛТЕ ИНСТРУМЕNT C ПОМОЦБЮ HABECHORO 3aMka* (6)
- He exodum e komnnekm nocmaeku
yTnIn3aun

3anpeaetcaytunn3aun npnweuNX B Herodnoctb HNCTpymehTOB,6aTapei NN aKKymyIaTOPOB BMeCTe C 6bITOBbIMN OTXoamn!
HCTpyMeHT, eO ynaKOBka n npHaJnEJXHOCTn 13rTOBJIeHbI n3 MaTePnAIOB, NOJnx BTOpUHOn nepepa6oTKe, nO3ToMv nx CJeNyET yTNIN3NPOBaTb COOTBeTCTByUOIM O6pa3OM.
YcTpaHHeH HeNCnPaBHOCTeI
| Henschprabnoctb Bo3moXhajn pruchna Peushne | |
| Инст阴阳 He pa60aet | Осутствует захочабжени |
| Кабел Ист阴阳повөдөн | |
| Инст阴阳 pa60aet cpe60amn | Удзинөл bкав bьповөдөн |
| Былkuчateь повөдөн | |
| Виутөнгя ошбka | |
| Двигаел pa60aet,ODнako HOЖи HENODBIXHbI | Виутөнгя ошбka |
| Hoxи harpebaotc | Hedocstakok sma3kn |
| Hoxи 3atuyninncs | |
| Ha HOЖа пявлincs 3azbprnbl |

EcnB03NkUne HeNCpabHocTn He npnbdeHb I DaHHo Tabnue Hn Bbl He MoKeTe yCTpaHHTb camOCTeJIbHo, NOxanyIcTa, ObaTntecb Hnaw cepBnchbI ueHtp.
ДeКларачи O COOTBeTCTBn CtaHdapTaM EC
HactoIIM DOKyMeHTOM Mbl 3aBnE, YTO DaHHoe CnpoeKTHPOBaHHoe HAMN N3dJIne COOTBeTCTByET Tpe6oBaHnM rapMOHN3nPoBaHHbIX dIpuKeTnB EC, cTaHdaptam 6e30nacHOCTn EC, a TaKke IpyrIM CTAHdApTAM, pImHeREmblk K DaHHOMY N3dJIIO.
N3denn
3πeKtpnueckn KycTope3
CepinHbIM Homep
G 2402405
Tm
HT 600 Flexible Cut
HT 700 Flexible Cut
PpOIN3BODNTenb
AL-KO Geräte GmbH
Ichenhauser Str. 14
D-89359Kotz
DnpeKTHBbIEC
98/37/EG (do 28.12.09)
2006/42/EG (c 29.12.09)
2006/95/EG
2004/108/EG
2000/14/EG
YnONHMOeHHbI npeCTaBtTeMb
Anton Eberle
Ichenhauser Str. 14
D-89359Kotz
YpOBeHb 3Byka
I3MepeHHbI/rapaHTnpOBaHHbI
HT 600 Flexible Cut 107 / 107dB (A)
HT 700 Flexible Cut 103/103dB (A)
OueHka COOTBETCTBNA
MoxnBi BapiaHTn HeaJexHoro BnKOpncTaHHa
3a6opohcBcA demoHTyBaTu a60 nepemKATn 3ao6ixHi npucTpoI, HapnKJaD, npVB'3yUOuN KHOKN yBIMKHeHHr DO pyKOrTOK
3abopohraTbca BnKOpNCtOByBaTu IHCTpyMeHTiDdoUem Ta/a6o DnO6p3Kn BOJororoXNBONLOTy NharapNky
3abopohraetbca 3actocobybatn iHctpymeHT y npomncnoBux uJnx
3anobixhi ta 3axnchi npncptoi

YBara! He6e3neka OTPmaHnTpaBM! He BiKluOaIte 3anobixkhi 3axnChi npncTrooi!
Pnctpi 3axnty Bid ditei
OTbip (5 MM) y 3aHbomy BaxeJI kepyBaHHn np3HaueHn IJI BCTaHOBHeHH BNCaYOrO 3Amka*
(5). BucrauH 3amok nepeWkoJkaE HeHaBMnCHomy 3anycky iHcTpymeHTa.
- He exodumb do Komnnekmy nocmaaahna
PnctpiJ 3axnty pyK

ybara!
Якwo npucptiДЯ 3axuCTy pyK He BCTaHOBNeHc, icHyc He6e3neKa OtpMaHHa TpaBM!
HikonHe 3anyckaIte iHcTpyment 6e3 npncpoIO dIra 3axncty pyk.
Дворуне Керваимя
EneKtpnHn KyuOpi3 MoXHa 3aNyckaTn TInbKn o6oma pykami.
Onnc npoodykTу

He 3aIIuIaIe iHCTpyMeHT nID doUeM.
TexhiHi xapaKTepeNtIKn
| Texhічни[xapakтеристик] HT 600 Flexible Cut HT 700 Flexible Cut | ||
| Стоожива на:[notужнICTь 600ВТ 700ВТ] | ||
| Довхина:[noxiv 600 MM 650 MM] | ||
| Товшина:[pi3y 24 MM 24 MM] | ||
| Загалына:[bara 4,1 кг 4,5 кг] | ||
| Знayеня:[bpaцii ha руковцi* | 4,8 M/c² | 4,1 M/c² |
| Нарuya:[mepexi] | 230 ~ 240 B/50 Φι | 230 ~ 240 B/50 Φι |
| Клас:[izolaцii] | ☐ / II / II | ☐ |
| Число:[xoloc'tnx xodiv 1700 m] | -1 | 1700 m⁻¹ |
| Ровь:[byky, LpA] | 90 дБ(A) | 94 дБ(A) |
*Bka3aHa BeiunHb Bicpaui BmipioBanacy BiinobiHocTi Do cTaHapTHoi MeToDnK BuNPo6yBaHb i MoKe BkOpncTObyBaTnCnI nopibHHnEneKTPOIHcTpymeHTIB.
Bka3iBkn 6o0o 6e3neKn
3araIbHI Bka3iBKN 3 6e3neKn dny eNeKTpOIHCTpyMeHTy

yBara!
Пд уас ekcnnyataquii eNeKTpoiHcTpymeHaBelenuHa Bi6paquMoKe BiDpi3HЯTnCByBkA3aHOrO 3HaueHHB 3aIexKHOCTi Bi3aCTocyBaHHn npNCTpO.

Ybara! He6e3neka OTPMaHnTpaBM!
He BiKIOUaIe 3anO6IXHi Ta 3axnChi npictpoi!

YBara!
IpoHTaTe Bci Bka3iBKn Ta iHcTpkykui 3 6e3neKn.
He6aicbBdoTpmaHbK3iBok Ta iHCTpykui 3 6e3neKn MoKe cnpuHHTn ypaXeHH eJeKTPuHm CTPyMOM, NoXeKtTa/ a6o BaXKi TpaBM. 36epexiTb BcI Bka3iBKn Ta iHCTpykui 3 6e3neKn dJa BnKOpncTahnBa Ma6yThbOmy.

Ybara! He6e3neka ypaxeHHa eJIeKtpnHm cTpymom!
JaKuo eJeKtpo npobid yUkoJxHn a6o nepepiAHH, HeaHNO BNTrHiTb WTeKeP 3 MepeXi!

yBara!
BnKOpncToByTe npncTpii liuwe y texHiHo 6e3dOraHHOMy cTaHi!
Ipeed BnKOpncTaHHm nepeBipraIte iHCTpyMeHT, Ka6eJI b I WTeKeP Ha HaaBHicTb yWkoJxHeB, yWkoJxHei DeTani Heo6XiDHO BiDpeMOHTyBaTN B CneuiaI3ObaHm MaIcTePHi a60 3amHtN.
Be3neka Ha po6ooy Mici
Utpmytepo6oeymiceBnuctotiTa 3abe3neyTe DocTaTHcOCBITHeHH.
Be3naT a HeocTaHe cBtJehnHpo6oOi dInaHK MoKe Ipn3BecTn Do HeuaChNX BnapKIB
He npaioTe 3 eNeKtpoHcTpymeHTOM B Bn6yxoHe6e3neuHnx 3OHaX, B kNx npCytHi 3aMncti piDHH, ra3n a6o nII.
EneKtpoiHCTpyMeHTn yTBOpIOJb icKpN, kIMOxyTB cnpuHHNT 3aImaHHa Nny a6o BUnapIB
He donyckaTe npucythocTi ditee Ta ctopoHHix ocio B 30hi po60Tu
eNeKtpoHcTpymeHTa. Pn 3MiHi HappMky pyxy Bm MoKTe BTPaTHTN KOHTpoNb HaIHCtpyMeHTOM
Enektpo6e3neuHictb
I ITekepe nEeKtpoiHcTpymEnTy NOBHeH BiNobiDaTH po3eTu. 3MiHOBaTH uTekep He Do3BOJЯcTbcra. He BnKOpNCToByuTe aAnTeprn 3 3a3emJIeHmM eKeKtpoiHcTpymeHTamn.
He 3mHeHi WTeKeepi po3eTKI, 10 iM BiINOBIaHTb, 3HnKyOtbpN3NK ypaKeHH eJIeKTPuHIM CTpyMOM
VHnKaIe KOHTaKTy 3 3a3eMJIeHnMM NOBepXHЯMn, HApNkJaD, Tpy6aMn, ONaJIbOaJIbHnMM npNJadaMn, KxOHnMM PJIHTaMn Ta XoJODINbHnKamn.
Y Bnnpky 3a3eMneHnBaWOro Tina icHyecPiBnueHa He6e3neKa ypaKeHH eJeKtpnHmCTpyMOM
BaxnauTe eNektpoiHcTpymEnT BIDdiDoyu Ta BOJOrn. IpoHKeHHBaOINBeleKtpoiHcTpymeHTPiBnuye p3NK ypaXeHHYeNEKtpuHm CTrpymOM
He BnKOpNCToBnyTe Ka6eJb DnI nepeHeceHHa 6o NiDiBiWyBaHnI HcTpymEHTy Ta He BnMaIte WTeKeP 3 po3eKn 3a Ka6eJb.
3axnauTe ka6enb BiD iI TeNna, Macna, roctpnkpaIB a6o pyxomnx yactnh IHctpymenta.
Pn3NK ypaKeHH eNekTpHMM cTpyMOM
Pnpo60ti 3 eIektpoiHcTpymeHTOM 3OBHI 3aCTOCOByIte Inse noDobKyBaIbHi Ka6eni, npn3NaHcHl dnn po60t 3OBHI.
3acToCyBaHHNoOBKyBaIbHOro Ka6eIIO, npn3HaueHOrO dnnpo60Tu 3OBHI, 3HNKyepn3NK ypaKeHH eNeKTpUHM CTpyMOM
Kho HEmoXnBO yHnKHyTu po6OTn
eJeKtpoiHcTpymeHTa B BOJoromy
cepeoBnui, BnKOpncTOByTe
aBTOMaTHuH 3aNo6ixHn BmKkaU, 0o diC
pni nOraBi cTpyM ByToKy.
3actocybaHHa 3anobixHoro BmHKaay 3nKycpNik ypaXeHHa eKeKtpuHm Ctpymom
Be3neKa JIOdei
Будte yBXaXHi, cIikyIte 3a cBOIM dIaMn i KepuTeCs3DopOBm rIy3dOm npn po6oTi 3 eJekTpoIHcTpymeHToM. He KopncTyIeCs eJekTpoIHcTpymeHToM, kUO BV CTOMJIeHi a6o 3haxOHTecsPiBnVBom HApKOTnHnx 3ac0iB, aIKORIoA6o MeMNkAmEHTiB.
CekyHdHa HeyBaXHicTb NiD Yac po60Tu 3 eJekTpOiHCTpyMeHTOM MOKe CnpuHNHTU cepNo3Hi TpaBMN
KopncTyItec3acobamn iHdNbIdyaJIbHoro 3axncTy i 3aBXd n pauioTe B 3axncnX OKyIpaX.
KopncTyBaHH TaKIMN 3acobam iHdNbIyayalbHoro 3axncty, kNIIIO3axncha MaCKa, 3axnche B3yTTA, 10 nonepedkae cKB3aHH, 3axnCHNI 10JOM a6o 3acobn 3axncty cnxy y BiINOBIDHOCTI Do 3actocyBaHH eNEKTPOIHCTpyMeHTa 3HNKye pN3NK TpaBM
HnkaTe HeymchOro BMkAHn.
Ipeed npncdHaHHm Do dXepepa
XNBHeHH, pIHrTAM a6o nepeHeceHHaM
eJIeKtpoiHcTpymeHTa, nepeKoHaTecra, 0o
BIn BmKHeHn.
JaKIO npn nepenecehhi eJekTpoiHcTpymHa naIe3haxOHTbcra Ha BmNKaui, a60 IHCTpMeHT BBIMKHeHni npn npncdHaHHI do DxKepeJa XnBJIeHHa, ce MoKe npn3BecTu Do HeuacnX BnnaDkiB
Ipn6epitb peryIIOBaIbHm iHcTpymeHT a60 KIOUpeD BMKAHHaM eJeKtpoIHcTpymeHTa. IHcTpymeHT a6o KIOU, 3NaXOHTbcR B IHcTpymeTI, kNIObePtaCTbcR, MoKe CTaTn IpnuHO TpaBM
YHnkaTe HnpaBnIbHO rnoJoxeHHr Tina. PnIMiTb CTiKe noJoxeHHr i 3aBXdN 36epiraTe pIBHOBy. Lc Do3BOJIHTb KpaSe KOHTpOJIbAtn eJeKtpoiHCTpyMeHT B HenpeIbauEHnx CITyaCiJx
Ipaoute y BiDnoBIDHomy oJ3i. He hocitb shpOKn oJr a6o npKpacn. Bolocc, oJr ta pykABuChn He nobHHi 3HaXoHTncn no6n3y pYxOMnx qactnH.
Iupokn oJr, npKpaacn a6o doBre BOLOccm MoKyTB 6yTN 3axOpJIeH i pyXOMMn YactINHaMn
Kuo e MoxNIBicTb BCTaHOBHeHH npNCtpoiB DnB iDcMOKtyBaHH Ta yNOBIOBaHH nIy, nepeKaHteCg, 0o BOH NiKluOeHi Ta npaBnIbHo BVkOpncTOByIbCra.
3actocybaHH npncptoIB BiDCMOKtyBaHH
Hny 3HnKc p3NK, 0BHNKaTb BHaCJIIOK
3aHJHeHocti
3aTocyBaHHra Ta NOBdoXeHHra 3 eNeKTpoHCTpyMeHTOM
He nepeBaHTaxKyIe iHCTpyMeHT. BnkOpncToBMyTe Bpo6Ot npn3HaueHm dJa Hei eNeKtpoiHcTpyMeHT.
Po6oTa BnKOnHyEcTbc8 HaIbIbIe eΦeKTnBHO Ta 6e3neuHo npBnKOpncTaHHi npdaTHoro eNeKtpoiHcTpymEtBy BiNobIDHoro diana3OHy NOTyXKnOCTi.
HekopncTyuTecraeKtpoiHcTpymeHTOM3 HecnpaBHm BmNkaYeM.
EneKtpoiHCTpymeHT, kI HEMoXJIuBO BBIMKHyTu a6o BmKHyTu, He6e3neuHn i nOTpe6yec peMOHTy
Ipeed perylIOBaHHm, 3amHOIO npnaIaIa a6o BiKlaadHnM IHCTpymeHT BuIMiTb wTekep 3 po3eTK. Cey 3anobixn H 3ac6 3anobira Heymchomy 3anycky eKeTpoIHCTpymeHTy
36epiraTe eNeKtpoiHCTpymeHT, 90 He BnKOpncTOBycTbC8, B HeOocxHOMy dIaIteMicci. He Do3BoJnTe KopncTyBaTncr eNeKtpoiHCTpymeHTom ocobam, kKi He 3Haomi 3 Hm a6o He npouHTanu i Bka3iBkn.
EneKtpoiHCTpymeHTn CTaHOBnTb He6e3NeKy, KUO BOHN BIKOPNCOTByIOTBcH HeDCBIDueHIMN IIOdbM
3a6e3neuTe peTeIbHn DOrIaD 3a eIektpoiHcTpymENTom. IpekeOnaIteCra, 1o pyxomi YacTHNI npauIOHTb 6e3dOraHHo i He 3aJaOTb, BiDCyTHi 3JAmahi a6o NowKOJKeHi YactHn, a TakoX nopuyenHn B pO60i eJeKtpoiHcTpymENTy. Ipeed BvKOpncTaNHaM IHcTpymENTy BiDpemOHTuIte NOnKoXJdeHI YacTHN.
Причною baratbox Heцachnx BnpankiB e Hehanexhni DORIa 3a eNeKTpoiHcTpymeHTOM
PikyuH iHcTpymeHT NOBHeH 3aBXdN 6yTu ChCTM Ta TocTpM.
Petelbno DOrIaHyTn eJeKtpoiHcTpymeHT 3 roctpmm pixyumn KpomkampiDwe 3aiaae i 6iNbJneKnB KepyBaHHi
3actocobyte eIektpoiHctpyment, npnada, BCTaBnH iHctpyment Too y BiinobiHocti do unx Bka3iBok. BpaxobyTe yMOBN Ta BnD pO6OTn, 00 BnKOHyEcTbcra.
3actocybaHHeNEKtpoiHCTpyMeHTy He 3a npn3haueHHm MOKe CTaTN npnuHIO He6e3neuHX cnTuayi
06cnyroByaHHa
Pemont eIeKtpoiHcTpymeHa NOBHeH BIKOHyBaTnCJIuSe KBAJIΦiKOBAHM nepcoHaJOM 3 BIKOpNCTaHHaM opurihAusbHx 3anachnx YacTHN.
Pn cmy cnid 3a6e3neuHTn 3bepeXeHHN 6e3neKn eJekTpoiHCTpymEnTa
Bka3iBkn 0oTo texhikn 6e3neKn iD yac ekcnnyatauii hctpymenta
3aBxKn KepyIte IHCTpyMeHToM DbOMa pyKaMn
TpmaTe pixyuM mexaHIm Ha BicTaHi BiD tina Ta odary
He BuaJnTe o6pi3K niD qac po6oTn DnRyHa
Kkuo Heo6xidno 3aannnntn iHctpymeHT a60 nepebe3tn Ioro B iHwe Micce:
BiDKnIOuIb IHCTpyMeHT
BNTaHITb WTekep 3 Mepexi
HaIaIgHiTb 3axnchm KOxuyx
He TopkaTecn HOXIB IHCtpymeHa
TpMaTe iHcTpymeHT tIbKn 3a pykoRTky
Hanpyra domaunboi MEPexi nobuHa BiNobiDatn napametpam Hapyrn MEPexi, HabeHeM y texhuiHx xapaKtepnctnKax
3aBXdN BnKOpNCToByTe CneuaIbHn npncTpii DnO cIa6JIeHH HaTAY NOOBxByBaIbHOrO Ka6eJIIO
TpmaTe Ka6eNb no3a 30HOo 3pi3y, 3aBXdN HnpaBnTe NOro BiD MaunHn
MOHTAXK
3HaOK KaMepn Bka3ye Ha iJIocTpaui, HabeJeHi Ha cTOp. 3.
- Ппкріпіть ппсстрий дя зхисту рукdo корnyca 3a donomoroIO rBnHTIB (O 1).
- 3nerka po3BvItb pykoTky i BCTaBte ii B kOpnyc (2a). 3y6ui NOBHHI BBiTN B 3aayenneHn.
- Поверніт b ha3OBHи nepeknDn BaxiNb ha pykoTci Ta miUHO yTpmyTe moro. (2b)
- BCTaBTe cTJxHn 6oNT B pyKoAry Ta KOpny C i BiD pyKn npKpyiTb Ioro Do nepeKnIHO BAKeJIa. (2c)
- 3aTARHITb CTJXHH 6oNT HAcTIbKN, 0o6 MoXHa 6yNo npTAYrHyTN nepeKnDHN BaxiNb do pyKoTkn 3 HeBeJIHKIM 3ycNJlJam.
- PpocMnKHTb noOBoKyBaIbHn Ka6eIbYepe3 npucTpiI Dna Ocna6JeHHa Noro HataRy (3).
Ekcnnyatazaia
YBara! He6e3neka OTPMaHHa TpaBM!
IhctpymEnTdo3BOJraEbCra eKCNlyaTyBaTN tInbKn nicn rOBHOro MoHTaxy!
Iodpmyteb Bka3iBOK 0do texhikn 6e3nekn iid yac ekcnnyataaii iHcTpymenta!
PeryIIOBaHHnpeepHbOoi pyKoTkn1.
BiKnHbTe nepeKnHn BaJIbA.
b. BctahOBiB pyKoRtky B notpi6He noJoxeHHa
c. NObepHiTb nepeKnHn BaKInb Ha Micce
2Пдкнioчтka6eьжИВпeннЯdo eJektpomepexi.
3 06xonitb odhioc pykoio nepedHIO, a iHWOO pykoIO 3aHIO pyKoTky.
4 HaTnCHiB 6nDi KhoNk yBIMKHeHH, po3TaWobahi Ha pykoRTkax (4) - IHCTpyMeHT 3anyCTNTbcr.
5ПдчасpoBOTnyTpmyTeobnDiKHOKNyBIMKHeHHa.
6 RaK TiIbKn OJHa 3 KHOJOK 6yJe BiDnyuJea, IHCTpyMeHT BiKNIQUHTbcr.
Bka3iBkn 0do eKcnnyataaii iHctpymeHTa
3abxdi BapTO 3pi3aTn CnoaTky o6nDi b6iHi CTOpOHJ KINBOIIOTy, a NotIM NOro BepXHIO qactHy.
TakIM YINHOM 6oPi3Kn He notpanJyTb Ha HeonpaIbOBAhi DInHKn
3aBnBbYIOBAHOMy pIBHO MOKJIINBO JERKO pO6HTn npAmm 3pi (14)
KuBONlit BapTO 3aBXKn O6pi3ATn y BuTnaI tranei. 3a paxyHOK cboRo nCTraHn NOKPnB HxHix rINOk He piDwae (8)
PemOH
PemOHTHi pO6OTn DO3BOJAEbCpIPOBOHTN TINbKIN B KOMNeTeHTHnx CneJIaJI3OBaHnx MaIcTePnHex a6o cepBicHnx CEHTpax KOMNaHII AL-KO
YcyHeHHa HecnpaBHOCTe
| Hecnpabnictb MoxjlnBa II pruynHa PIIeHnHa | |
| IHCtprument He npaIoE | BicSythc eIeKtpoNocTauHnHa IpeBeIpTe 3aIobixnKm DomaunBoe IeKtpomepexi/IOobXyBaJIhN KabeIb |
| KabeIb IHCtprumenta uShKOdJeHn 3BepHITbcra Do cepBicHorO ceHTpy KOMnAHII AL-KO | |
| IHCtprument npaIoE 3 nepe6oMn | IoiOBxUBAJIbHn KaIeIb yShKOdJeHn IpeBeIpTe IOOBxUBAJIbHn KaIeIb |
| BIMnKaU yShKOdJeHn 3BepHITbcra Do cepBicHorO ceHTpy KOMnAHII AL-KO | |
| BHyTpIiShn IOMnIka 3BepHITbcra Do cepBicHorO ceHTpy KOMnAHII AL-KO | |
| ДВИгУн npaIoE,ODnAkh Hoxi He puXaIOTbcR | BHyTpIiShn IOMnIka 3BepHITbcra Do cepBicHorO ceHTpy KOMnAHII AL-KO |
| Hoxi HarpIbAOTbcr HeDolik | 3MaueHnra 3MaXte Hoxi HeVeIbIKoU KIbKICTrU MaCTnla |
| Hoxi 3aTyPnIncs r 3BepHITbcra Do cepBicHorO ceHTpy KOMnAHII AL-KO | |
| Ha HoxaX 3'ЯВПиСя 3a3bIInr 3BepHITbcra Do cepBicHorO ceHTpy KOMnAHII AL-KO |

Y pa3i BnHKHeHHeCnpabHocte, kI He HabeDeHi y ciN Ta6nCi, a6o Tnx HecnpaBHOCTe, kI Bn He MoKeTe yCyHyTu CamOciHIO, bdy Iacka, 3BepHITbCra Do HaIoro cepBichoro ceHTpy.
Ieknapaia npo BiinobiHictb ctaHapTaM CC
LIM DOKyMeHToM M3aBnEMo, 10 DaHm CnpoeKTOBaHm HAM Bnpi6 BiNobiae BmOram rapMOi3OBAHX DnpeKTHB EC, cTaHdaptAm 6e3neKn EC, a TAKoX iHWM CTaNdaptAm, 3actOCOBaHm Do daHoro npodykTy.
PpOdyKT
EneKtpnHn KyucOp3
CepiHm HOpem
G 2402405
Bnpo6HnK
AL-KO Geräte GmbH
Ichenhauser Str. 14
D-89359Kotz
YnoBHOBAxHn npedTaBNK
Anton Eberle
Ichenhauser Str. 14
D-89359Kotz
Ttn
HT 600 Flexible Cut
HT 700 Flexible Cut
DnpeKtBnE C
98/37/EC (do 28.12.09)
2006/42/EC (3 29.12.09)
2006/95/EG
2004/108/EG
2000/14/EG
Norodxehi HOpMn
EN 60745-2-15
EN 60745-2-5/AB
Pibehb 3Byky
BmipraHn/rapaHToBaHn
HT 600 Flexible Cut 107/107 dB (A)
HT 700 Flexible Cut 103/103 έδ (A)
OuHKa BiIDNOBIDHOCr
2000/14/EC,ДодаТOK V
Kotz, 20.10.2009

Antonio De Filippo, reHepaIbHn dIpeKToP
TapaHTi
IpoTAROM BCTAHOBHeHOrO 3aKOHODaBCTBOM CTPOKY DaBHocTi InJa npTeH3i NcOdo JAKoCTi npNCTPOHO Mm yCyHEmo MoxJIbI DepeKTu MaTePiany a6o BnPo6HuN bpaK ShJaxom pemOnTy a6o 3aMInn (Ha Hau Po3cyd). CToPK daBHocTI Bu3HaayAc npaBOBmH HopMaMn Tiie MiceBOcTi, de 6yNo KynneHo npNCTpi.
Hawi rapaHTiHi 306OB'raHHaHnI dIiChi IINe B TaKnx BInpaKaX:
TapaTirBtpaueCnnyB TaKx BnnaKaX:
Halekha ekcnnyataia npnctpoI
y pa3i cnpo6n peMOHTy IHcTpymeHa
DToPmAHnIHCTpyKJI3 3ekcnnyataa
TEXHIN3MIHNPNCPTPOIO
BVKOPINCTaHHOpHHaJIbHnX3anachnx 却ACTH
y pa3i HeHaleXHoro BnKOpNCtAHnIHCTpyMeHTa (HapnPKlaI, y npomncIOBnx a6o KOMyHaJIbHnx ciJnx)
TapaHTria He po3IOBcIoxJxueTbcS Ha Taki BUNaIK:
Ha noWKoJKeHHaJIakOBaHOI NOBepxHI,aki yTBOpNJncb yHacJIIOK 3BnauHoro 3HOUyBaHHA
Ietani, 30 3HOuyIOb8c (no3HauHepamKoIO XXX XXX XHa KapTi 3aTachnX qactnH)
a DnHyHn BHyTpiiHbOro 3rOpHHa - Ha Hnx po3noBcIqKyIObCra OkpeMi rapaHTiHi HopMN BiNobIDHO Bnpo6HnKa DnHyHb
Y BnnaKy, 10 notpe6yec HadaHra rapaHTi3 3BepTaTeCb 3 cHm rapaHTiHMM JNCTOM Ta DOKymeHOM, kHn niTBePdxye aKT KynibI, Do CBOrO DNHepea abo do HaobnKHyoro ABTOpN3ObaHOro cepBicHOcHTpy. Li rapaHTiHi 306OB'3aHH He po3IOBcIOxkyIbCra Ha npabOBI npeteH3II KJIeHTa do npOdaBzra CTOCOBHO kKocTI npOdaHOro npunctpoI.
3a TOBa pBkoBOdCTBO
Ipooyete TOBa pBkoBOdCTBO 3a pa6oTa npedn NyskaHeTo Ha MaunHaTa B ekCnpoatau. Toba e ycNoBne 3a 6e3OnacHa n 6e3abapnHa pa6oTa
CnataBaiTe yka3aHnraTa 3a 6e3oNaCHOCT IN ppeDynpexKeHnraTa B Ta3N DOKyMeHTaUry Bbpx MaunHaT
Bana3eTe HNCTpyKuYraTa, 3a DaЯ NOI3BaTe npi pa6Ota nЯ npedaiTe Ha cJeDbaUy naI3BaTeJ
JereHda
BHHMaHHe!
ToHOTcIeDbaHe Ha Te3n npedynpeiTeHNyka3aHm MOKe Da npedotbpaT eBENTyaJIHnTeJeCHN IIN MaTePnaHNI 1eTn.
CneuaHn yka3aHna 3a NOBueYe JCHOTA INpabINHa ynoTpe6a.
CnmboT ha kamepa npepaqa KbM cnrgynte.
CbDbpxaHne
3aToBa pBkoBOOCTBO. 180
OncanHe Ha npOyKTa 180
O6opyDbahe 3a 06e3neuBaHe Ha 6e3oNaChocTta 180
TexHHueckn daHHN 182
HCTpykUm 3a 6e3oNaChoc. 182
Montax 185
Pa6ota 185
PemOHr 185
Texnuecko 6cbnykbahe n noDpBkka. 186
POMOUIIIOBpei 186
CbxaHbaHe 186
I3xBbpnaHe 186
EO Dekauna 3a CbOTBcTbne 187
TapaHua 187
Oncsahne Ha npodykta
- He e eKlIoUeH e KomnIeKma Ha docmaBkama
3aunTa 3a pBcTe
BHMaHne!
OnachocT OT HapaHbAhe, aKO 3aunTaTa 3a pbcTe He e MOHTnpaHa!
Hnkora He nyckaIte MaunHaTa B ekcnloataa 6e3 3aunTaTa 3a pbcTe.
3aEeCTBaHe c DBe pBce
Xpactope3bT MoKe Da ce 3aDeiCTBa cMo C DBeTe pBue eHOBpeMeHHo.
OnncanHe npoDyKta
| 1 Hox 7 06e30anachen ka6en | ||
| 2 BnHTObe 3a MoNTax Ha 3aunltata 3a pbuTeTe | 8 | Писпособлие 3a п徳пазане Ha Ka6ena OT onlbvane |
| 3 3aunlta 3a pbuTeTe | 9 | Зaterагелен 6oJt Ишайba 3a Perugлуремата Дьгоobpa3ha ръкoxВаТka |
| 4 П徳нabрькoxВаТka c 6byToH 3a ВКlnOчВаHe | 10 | П徳пазен калak 3a HOxHa |
| 5 NivBelenp | 11 | Рьковдстvo 3a ekspлantoataця |
| 6 3aДнabрькoxВаТka c 6byToH 3a ВКlnOчВаHe |
3HaueHHe Ha cMbONITE Bbpxy MaunHaTa

Hocete 3aunTHn OuHa.

BHHMaHHe! BbTeOc6eNo npEJa3JINBn npn pa6oTa.

Ppoetete npa6oTe cbyIacHO nHctpyKnraTa 3a pa6ota.

I3KJIIOUBAIte IeNcEJa BeHara OT KOHTaKa, aKO Ka6eJIbTe e NOBpeDeH NII INpeKbChA.

He n3naTte MaunHaTa Ha dBxqI.
TexHnueckn daHHN
| Текнистданны | HT 600 Flexible Cut | HT 700 Flexible Cut |
| Консуmpлaria мошноct 600 W 700 W | ||
| Дължина на пома 600 mm 650 mm | ||
| Дебелina на ряазане 24 mm 24 mm | ||
| Ов钮 тетло 4,1 kg 4,5 kg | ||
| Вибрацни на ръкхbatкata* 4,8 m/s² 4,1 m/s² | ||
| Мреково наразожене 230V~240V / 50Hz 230V~240V / 50Hz | ||
| Клас наизолаця | ☐/II/II | ☐ |
| Оьогotи на празен xo:d | 1700 min-1 | 1700 min-1 |
| Нимо нашиma LpA | 90 dB (A) 94 dB(A) |
*IocouheHaTcOHTHOCT3aBn6paunTe eN3MepeHaNo cTaHapTeH MeToD 3a TecTbaHe NMOKe Da Ce N3NON3Ba 3a cpabHraBe Ha eNEKTPoUHCTpyMeHTn.
HctpyKu 3a6e3oNaCHOCT
067yka3aHnna 3a 6e3onacHocT 3a eNektpoHHCTpyMeHTn

BhimaHne!
CTOINOCTTa Ha Bn6paunnte no BpeMe Ha pa6ota c eIeKtpoHnCtpymenta MoKe da ce pa3nUaBa OT NocOeHaTa CTOINOCCT, B 3aBNCIMOCT OT yNtpe6aTa Ha MaUNHaTa.

BHMaHne - OnachocT ot HapaHyaHe!
O6opyDbaHeTo 3a 06e3neuBaHe Ha 6e3oNaChocTt He Tp8Ba Da ce N3KnHouBa!

BhimaHne!
IpoyeTe BCnUknyka3aHn8 3a 6e3oNaChOCT N HNcTpkyu.
Hecna3BaHeTo Ha yka3aHnraTa 3a 6e3oNaChocT n HNCTpyKcHte MoKe Da npuHH ToKOB yDap, noKap N/INn TeKKn HapaHbAHn. 3ana3ete BCNUk yka3aHnra 3a 6e3oNaChocT n HNCTpyKcHn 3a 6bDeesa ynotpe6a.

BHHMaHHe - OnacHOcT OT TokOB yap!
I3KIIIOUBAIte IeIeCENa BeDnara OT KOHTaKTa, aKO Ka6eJIbTe nOBpeH eNn npEkbchat!

BhimaHne!
N3noI3BaIe MaunHaTa cMo B n3npaBHO cbCToHne B TEXHuecko OTHouHne!
Ipeu ynoTpe6a npOBepaBaiTe MaunHaTa, Ka6eNa u eceela 3a noBpeu, nobpeHnTe Uactu Tp6Ba da ce peMOHTnpaT B CneuaN3npan cepBn3 nIn da ce CMeHrT.
БezonaCHOCT Ha pa6oTHOTOMrTO
IopoIbpxaIte pa6OTHOTo cN MxCTO YnCTO Ndo6pe oCBeTeHo.
Bé3npaTnHeocBeTeHn pa6oTHn yacTbMOrat Da DOBeDat Do 3IonoJyKn
He pa6oTeTe c eIeKtponHcTpymeHTa B nOTeHuaJIHO eKcIIIO3NBHa CpeDa, B KOrTo mMa 3anaJIMn TeUHOCTn, Ra3OBe nn npaxOBe.
EneKtpOnHCTpyMeHTnte o6pa3yBaT NCKpn, KONTO MORaT Da 3anaJr npaxa nn Hn3napeHnraTa
PbXTe Deua n Dpyrnxopa Ha pa3ctOHaNe IIO BpeMe Ha pa6oTa c eNEKtpOnHcTpyMeHa.
Pn pa3ceBae MoKeTe Da 3ary6nte KOHTpOHaMaunHata
EneKtpo6e30nachocT
I UeNcTbHa eEKeTPOHCTPymeHTa Tp6Ba Da e NODXODA 3a eEKeTPhueCKn KOHTAKT. Ioo ceNa He Tp6Ba Da ce npabrt HnKaBn npomEn. He n3NoJ3BaTe npexOHN 3aeDHO c eEKeTPOHCTPymeHTn Cbc 3aunTHo 3a3emBAHe.
OpunnHaHnTe eencen n noxoaduHTe KOHTaKTn HaMaJIraBt pNcKa OT TOKOB yap
36raBaeTcHnueckn KOHTaK TcBc 3a3eMeHn NOBbpxHOCTN KaTO Tpb6n, paHaTOPn, neyKn XJaADJIHNu.
CbueCTByBa IOBnweH pNCK OT TOKOB yDap, aKo TaJIoTO Bn e 3a3eMeHo
Ta3eTe eNeKtpOnHCTpyMeHTnte OT bXd n Bnara. IpoHnKBaHeTo Ha BOda B eNeKtpOnHCTpyMeHTa NOBnBaBa pUcKa OT TOKOB ynap
He donyckaite ynoTpe6a Ha Ka6ena He no npedHa3HaueHne, 3a Da HocHTe N OKaYBaTe eNEKTPoHHCTpyMeHTa NN 3a Da N3KNIOHTe Uencena ot KOtAKTa. Na3eTe Ka6ena daJeche OT BnCOKn TEMpeaTyprN, MacNo, OCTPN p6OBe Nnn DnBxEun Ce Yactn Ha MaunHaTa.
IobpeHnTe nnn 3aannTeHN Ka6eIN NOBnBaBAT pCKa OT TKOB yap
Korato pa6oTHe c eIeKtpOnHcTpyment Ha oTKpHTO, n3NoJ3BaIte caMo ydJIxHtTeJI, KOHTO cBso ca noDxOJaU 3a pa6oTa Ha oTKpHTO.
YnoTpe6aTa Ha noDxOJa3a pa6oTa Ha OTKPnTO yDbJnxTeJI HamaIraBa pNcKa OT TOKOB ynap
Ako He MoKe Da ce n36erHe pa6oTaTa c eJeKTPoHnCTpyMeHTa BbB BnaXHa CpeDa, n3NoI3BaIte aBTOMaTneH npeKbCBAu C deFeKTHOtOKOBA 3aunTa.
I3no3BaHeTo Ha aBTOMaTnueH npeKbCBAc C DeΦeKTHOtOKOBa 3aUHTa HamaJIra Ba PnCKa OT TOKOB yap
JnUHa6e3onacHOCT
Бьдete npedna3nBn, BHMabaTe KaKBO npaBnte n noDxoxJaTe pa3ymHO KbMa pa6otata c eNeKTponHCTpyMeHTa. He n3noI3BaIte eNeKTponHCTpyMeHTa, aKO cTe yMopeHn Hn CTe NOD Bb3dEyCTBneTo Ha HApKOTnU, anKoxOJ nJIM MeDnKaMeHTN.
EINH MOMENT HeBHMaHne npn pa6oTa c eIeKTPoIHcTpymeHTa MoKe Da DoBeDe Do cepNo3H HapaHraBaHna
N3noJ3BaITe JnUHn IpeJna3Hn cpeIcTba N BuHaHn HocTe 3aunTHn OuJa.
N3noJ3BaHeTo Ha IunHn IpeJna3HN cpeIcTbKaTO npOTuBOpaxoBa MaCKa, Hennb3raUe Ce 3auHTH NoyBKn, 3auHTHa KACKa Nn aHTFOHn, B 3aBNCIMOCT OT BnDa n yNoTpe6aTa Ha eJeKtpOnHCTpymEHTa, HAMJIyBa PnCKa OT HapaHBAHn
368BaTe HeBOJHo nycaHe. YBepeTe ce, Ye eNeKtpOnHCTpyMeHTbTe n3KnIOueH, npei Da ro BKIOUHTe KbM eNeKtpo3axpaHbAHeTo, npei Da ro B3eMeTe Hn HOCHTe.
Ako DoKATO HOCITE eJektpoHCTpyMeHTa, Dbpxnte npbcta cn Ha KJIouca NIN BKNIOHTe MaunHaTa KbM eJekTpO3aXpaHBAHeTo npi HaTNChat KJIouy, TOBa MoKe da DOBeDe Do HapaHraBaHna
OTcTaHЯBaIte HNcTpymeHTIte 3a HAcTpoJa IINrAeUHITe KJIIOUObE, ppei Da BKNIOUHTe eNEKTPoHNCTpymeHTa.
HCTpymeHT NIN KIOU, KOITo Ce HAMnpa BBB BbptTaa ce yact Ha MaunHaTa, MOKe da DOBeDe Do HapaHraHn.
368raBte HeHOpMaJHa No3a Ha TAnTo. OcnrgpeTe cn Cta6nHocT n Na3eTe BnHar npabHOBeCne.
Taka B HeoayKaBaN CNTyaCNI Ue MoXeTe Da KOHTpOINpaTe No-Do6pe eNeKTPoHnCTpyMeHtA
Hocete noxdxogso obnekno. He hocete shipokn dpexn nnn 6nxkyta. Dpxbxte kocnte, dpexnte npbkabuunTe daene oe ot dvnkeu ne ce yactn.
Iupoknte dpexn, 6xkytaTaNIN Dblrnte Kocn MORaT da ce 3axBaHAT OT DBNXeUNTe ce qactn
AkoMoraTdaCeMOHTnpaT npncnoc6leHna 3a H3cMyKbaHe n cb6npaHn npaxa, Tp6Ba da ce y6eHnTe, ye Te ca CBbp3aHn n ce H3noJ3BaT npabuJHo.
I3no3BaHTo Ha acnnpupaO yCTpoiCTBO 3a npaxa MoKe Da HamaJIn OnaCHOCTNe, PpUHHBAHN OT npaxa
Ynotpe6a npa6ota c eJeKtpoHcTpyMeHTa
He npetobapBaIte MaunHaTa. 3a pa6oTaTa cn n3no13BaITe npedBndeHaTa 3a Hey MaunHa.
C noxodya eJektpoHcTpymeHT Bne pa60nte no-dObe n no-6e3onacHO b daHehata cpepa Ha deHocT
He n3noJ3BaITe eJeKtpOnHcTpymeHT, YnITo KJIoue noBpeDeH.
EneKtpoHCTpyMeHT, KOITO He MoXe Da ce BKNIOUvBa Nn3KJIIOUvBa, e ONaCeH n TpR6Ba Da ce peMOHTnpa
I3KIOUByTe ⅢeCena OT KOHTaKtA, npedn da npabTe HacTPOkN Ha MaunHaTa, npedn Da cMeHrTe akcecoapu IIN npedn da OCTaBte MaunHaTa. Ta3n npedna3Ha MApka npedOTbpaTBA HeBOJHo NyckaHe Ha eJIeKTPoHNCTpymeHTa.
CbxaHraBaTe He3nO3BaHnte eKtpOnHCTpyMeHTn H3BbH o6cera Ha deca. He no3BoJraBeHa Xopa, KOnTo He ca 3aNo3HaTc MaunHaTa N He ca npOyeN Te3n HnCTpyKcUn, Da n3nO3BaT MaunHaTa.
EneKtpoHCTpyMeHTte ca onaCHn, aKO ce n3NoI3BaT OT HeONITHN Xopa
TpnxTe ce cTapaTeHNo 3a eNekTpOuHcTpymeHTne. IpOBepaBaiTe daNN dBNxKeUte ce qactn fynKcnoHnpaT npabNJHO n He 3aJxDaT, daNN HMa CuyneHn nn IOBpeDeHN qACTn, KOHTO BInraT OTpuCaTeJIHO Ha fynKcnoHnpaHeTo Ha eNekTpOuHcTpymeHTa. DaBaIte NOBpeDeHnTe qactn Ha peMOHT, ppeDN da N3PON3BaTe MaunHaTa.
PnHata 3a MHO 3IOnOyKn ca looIOIbpxAH eEeKTPOHNCTpyMeHTN
IodbpxaTe pexeunTe nHctpymEnIOCTPN uNCTn.
CTapaTeHNo NOdIbPkaHntepeXeUINHCtpymEnTcOcTpnpexEu np6oBe 3aJxDaTNO-MaIKO INCe ynpabnBaT No-NeCHO
N3noI3BaIte eJektpOnHcTpymeHTa, akcecoapnte, hakpaHnUte n dp. cbo6pa3Ho Te3n HcTpyKuNN. B3emaTe npD BHMaHne pa6oTHnte ycIOBnI N 3BbPwBaHaTaNeHocT.
YnoTpe6aTa Ha eJekTpOHHCTpymeHTnte 3a npyIuCeJI, pa3JIuHrO NT ppeBnDEHNTe, MOKe daIOBeEe Do ONaCHN CNTyaUIN
CepBn3
Даразе Baшя eilektpoHcTpymeHT Ha peMOHT npi KBaHnФицранn cneuaJIncTn, KOnTO pa60rT C opRHaJHn pe3epBHN qacTN.
Taka ce rapaHTnpa 3ana3BaHeTo Ha 6e3oNaChocCTTa Ha eNeKTPoHcTpymeHTa
Yka3aHnna 3a 6e3onacnoct npnpa6oTa
BnHaHpa6oTeTcMaunHaTaCdBeTe pbcu
ДрьктETANOTOиOBLEKNOTOdaJeueOTpexeшmaMexaHn3bM
He oTcTaPraBaIte OTp3aHnMaTePnA1 npu pa6oTeU DBnRaTeI
Korato octaBte Hn npenacTe Ha MaunHaTa:
N3KnHouTe ypeDa
N3KJIIOHcTe UeIeNceJa
NocTabeTe 3aunTHnKaapan
Hnkora He XbaaajTe MaunHaTa 3a HOxa
Hocete MaunHaTa 3a pkoXBaTkata
MpekoBO HanpexeHne Tp6Ba Da CbOTBeTcTBa Ha daHHnte 3a MpekoBTo HappeKeHne B TexHHueCKte DaHHN
BnHaHn H3noJ3BaIte CneuaJIHOTOpnpncnoc6bIeHne 3a npedna3BaHe Ha Ka6eNaOT ONbBAHe
ApbXte KaBeNa BnHaN daJeY OT 3oHaTa Ha pR3aHe N MaunHaTa
MOHTAXK
CnmboTHaKaMepa npeppa KaM cnpynte Ha ctpaHua 3.
- 3aKpenete 3aunTaTa 3a pbuTe KbM Kopnyca c npINOxKeHnTe BnHTOBe (1).
- Pa3terHeTe IeKO Ibfo06pa3HaTa pkoXbaTka nЯ noCTaBeTe Ha Kopnyca (#). 3b6nte Tp86Ba da 3aueIPT.
3.Obbphete nocta Ha pbkoxbkata HABbH Iro dpbxTe 3dpaBO. - ΠbXheTe 3ateraTeHnna 6oNT npe3 pkoXBtKaTa N Kopnyca n ro 3aBnTe Ha pbKa B loCTa.
- 3aterheTe 6oTtA ToJkoBa, Ye da MoKeTe Da nocTabrTe NoCTa C MaNko ycInne Ha pBkoXBATkata.
6.пекаарудьлкintela пe3 npucno6neHneTo 3a npedna3BaHe OT onbBaHe (2/03).
Pa6ota
BnMaHHe - OnaCHOCT OT HapaHbAHe! MaunHaTMOKe Da ce n3noJ3Ba cMo cnei KaTo e MOHTnpaHa HaIbIHO! Cna3BaTe yka3aHnraTa 3a 6e3oNaCHOCT npu pa6ota!
- PerynipaHe Ha npedHaTa pkoXbTaKa OTbOpTe IocTaa.
b. NocTaBete pbKoxBaTkata B XeHaHOTO NOIOXeHne 3aTBopeTe IocTac. - BknHcyTe Ka6eNa KbM eJekTpueckKaTa Mpeka.
- 06xbaheTe c eHa pKa npedHaTa n cneTob3aHaTa pkoXBaTKa.
- Hata Ta 3a BknoBaHe Ha pkoBtKe (4) - MaunHaTa ce nycka.
- ПО ВЕME на paбotingа дрьхтдвата 6утона за вклоча He HATINCHATN.
- Ⅲom ce OTnyche HЯко IT ByToHInTe 3a BKIOUBAHe, XpactOpe3aUKaTa ce N3KIOUBA.
Yka3aHn3a pa6oTa
Iopra3BaIte XINBnI pIe TBnHaI NbPBO OT DBeTe CtpaHn I cIeT TOBa OT rOpHaTa CtpaHa. Taka OTPzAn MaTePnA1 He MoKe da nonaHe B OSe Heo6pa6OteHa Yact
BrgaHnT HnBeNp yIeChraBa npaBOTo p3aHe
TneBt Tp86Ba Da ce NOpPra3Ba BnHaRn TpaneOuBnHOb. ToBa IpeIOTbPaTaRa BbNHO n3Pra3BaHe Ha DoJHInTe KNoHn (8)
PemOHr
PemOHHTe pa6oTu Tp6Ba Da ce N3BbPWBAT CAMO OT KOMTeHTHn CneuaJIn3npaHn QnpMN INN B HauNTe cepBu3n AL-KO
TexHnuecko obcnyXBaHe n npOdpbXka
BHHMaHHe - OnachOcT OT TOKOB yI
Ipei pa6oTnte no TexHnueckOTo obcJyXBaHe I npdpbXkata BnHaRn N3KnHouBaTe uenceNa!
Bнмане - Onachoct ot hapaЯBaHe!
Ipi pa6oTnte no TexHnueckOTo 6cnyXbaHe nnoDpBxKkata Ha HOka BnHaRn N3NoJ3BaNTe pa6oTHn pBkABuCi!
- Cnéвсякayuotpeba nouchteBaite HoKa n Koprnyca c Chetka nIkn Kbpna.He n3noI3Baite Boa n/IIn arpecNBn nouchteBaun npenapatn -OnachocT ot Kopo3n!
- CmaXeTe IeKO rpeIaTa Ha HOxacnOxOraMacNo 3a3aUHa.
- PpOBepeTe DaJIIN BCNUK BnHTObe Ca 3aTeHaTn.
- PpOBeRbAaTe peoBHO HOxa.
OpbuaTe ce KbM cepBn3a Ha AL-KO npi:
TepeKTeH HOX
TbH0X
IpekomepHo 3HOCBaHe
CbXpaHЯBaHe
KanaKbT Ha HOka MoKe da ce 3aKaUn Ha CTeHaTa KaTo DbPkau 3a XpacTope3a.
BHHMaBaIte BCnUKN BnHTOBe Da ca 3aTeHaTn do6pe! (7)
CbXpaHraBaTeMaunHaTaBnHaRcN3KIOueH 1ePceI
CbXpaHbAaTe MaunHaTa CnOCTaBEn 3aunTe H Kanak
CbXpaHraBaIteMaunHaTaHaCyxoNHeIOCTbHnHO3a DeuaNBbHUnNIMCaMRCTO
0630naceteMaunHaTa C KaTnHap* 6
- He e kIIOUeH e KOMnIeKma ha docmaKaama
N3XBbPnIe
He n3xBpIaTe n3Ie3IITe OT ynoTpe6a MaunHn, 6atepn nn aKymyIaTOPn 3aeDnO C 6bntOBtE otnaDbu!
OnakOBkata, MaHHaTa n akcecoapnte ca npon3BeHn OT MaTePnaHn, NOJIeKaUHa peKlnpaHe n Tp6Ba Da ce N3XbPnT KaTO TaKnBa.
Pomou npn noBpei
HnBOHa3BykoBa MoUHOCT
n3MepeHo/ rapaHTnpaHo
HT 600 Flexible Cut 107 / 107 dB(A)
HT 700 Flexible Cut 103 / 103 dB(A)
OueHka Ha cboTBetCTBneTo
2000/14/EO, AHeKc V
Kotz, 20.10.2009 r.

Antonio De Filippo, YnpabnBaun DnpekTOp
TapaHczna
EbeHTyaHnTe MaTePnAnHn Hn npOn3BOcTBeHn DeFeKTH Ha ypeHa ce OTcpaHbAT - B pAMKeT Ha 3aKOHnJaabHOCTeH cPok 3a PpeJraBaHe Ha nckaHe 3a OTcpaHbAHe Ha HeIOCTaBn - No HaW n36Op Ype3 peMOHT nn 3AmHa. JaBHOCTHnRT cPok ce OnpedEn Cnoepd 3aKoHOdaTeNCTBOTo HA cTaHata, B KOrTo e 3aKyPeHa MaunHata.
HaheTo cbrnace 3a noemaHe Ha rapaHua Baxn camo npi:
TapaunraTa e HeBaJIuHa npi:
PpabuHa pa6ota C MaunHaTa
ONITN 3a peMOHT Ha MaUNHaTa
CnAsBaHe Ha HNCTpyKunraTa 3a pa6oTa
TEXHnueckn 3MeHeHn No MaunHaTa
ynoTpe6aHaOpuHnHaJIHpe3epBn qactN
H3noJ3BaHe He no npedHa3HaueHne (HaNP. npoepocnoHaHa ynoTpe6a nIy ynoTpe6a 3a KOMyHaJIHN HxKdN)
TapaHuaTa He noKpNbA:
NOBpeHnHa6oTa,KOToCape3yIITaTHaHOpMaIHOu3HOCBaHe
HOCBaUNCe YacTN,OBo3HaueHN B KapTaTaN Ha pe3epBHTe YacTN C cOpMaT XXX XXX (X)
DvBraTeN C BbTpEshO rOpHe - 3a TEx BaXaT OTdEHNte rapaHcNOHH yCIOBnHa CbOTBeTHn npOn3BOInTe Ha DvBraTeN
PnBb3HnKBAHe Ha rapaHIOHO C6bNTne ce o6bpHeTe c Ta3N DeKnapaun 3a rapaun n Kacobata beNeKka KbM Baunr TnBp nn Hn H-6nn3kn OTOPI3npan cepbn. CbrnaceTo 3a NoemaHe Ha rapaun He n3KnUohBa 3akOHnTe npTeHUn 3a OTcTpaHraBe Ha HeoCTaTbUn OT cTpaHa Ha KyuBaau KbM npOdaBaay.
Despre acest manual
Eviecs UTOBcEIG aOgAeiaG yia nEktpiKa epyaEia
Inpocoxn!
H tiñ ékTIOUINCS doVnOnc kata Tn xphoTou nAekTPIKOU epyaIou mTOpEi va diapepei aTNO tvN dnwOeioa tiñ, avaloya e Tn xphoTnC oukeuç.
Ppoox- Kivduoc tpaumatou!
Oi diataeic aopaaiaac kai pooataiae a npetie va tioevtaik EKTOG AIToupyia!
I npooxni!
Aiaaote oaes TIG UTODeiEeic aOgaaeaic kai OynieS.
Napaahyic stnv npon twv utodieewv aqaaia c kai odnyiw mnpov va tpokaeouv nektpoanxi, TUPKAYIA kai/n oapouc Traupaatioouc. Duale 0Aec Ttus utodieic aoaaleia c kai odnyiec yia to eAiov.
Aoalεia oTo xwpo epyaoiac
2006/42/EG (29.12.09'dan
itibaren)
2006/95/EG
2004/108/EG
2000/14/EG
Karma normal
EN 60745-2-15
EN 60745-2-5/AB
Ses gucu seviyesi
olçulen / garanti edilen
HT 600 Flexible Cut 107 / 107 dB(A)
HT 700 Flexible Cut 103 / 103 dB(A)
Antonio De Filippo, Managing Director
Garanti
Ypehaj He n3JaXHTe KINH.
TexHnUKNIpoaun
| Текникий поаци HT 600 Flexible Cut HT 700 Flexible Cut | ||
| ПOTROSHьа с Hedge 600 W 700 W | ||
| Духина Ножа 600 MM 650 MM | ||
| Jaшина розаьа 24 MM 24 MM | ||
| УкучнаTekина 4,1 кг 4,5 кг | ||
| Вибрационе вреadingости на ручки * | 4,8 m/s² | 4,1 m/s² |
| Мржни наюн 230V~240V / 50Hz 230V~240V / 50Hz | ||
| Класа пазациje | ☐/II/II | ☐ |
| Б Proj помау слообODnom XOу | 1700 m-1 | 1700 m-1 |
| НИВО 3ВУЧЕ с Hedge LpA | 90 dB (A) | 94 dB (A) |
* Ncka3aHa Bn6paHOna BepdNocT 6bna je n3MepeHa y cKnady ca CtAnapdHIM MeToDm TecTnpBa I MoKe da ce KopnstI 3a nopeHebe eEnktpuHnx anata.
Cnryphoche Hanomehe
OnuTe cnryphoche Hanomehe 3a eNeKtpnue aNaTe

Paxhba!
Bn6paHOna BpeHocT 3a BpeMe ynoTpe6e eIekTpUHOr aIaTa MoKe Da ce od nCKa3aHe BpeHocTn pa3NIkyje 3aBnCHO od npIMHe ypehaja.

Paxha - onachocT od nobpea!
CnrgpnoCHN 3aHTTNH ypehajn He cmejy da ce ohecnoc6jbabajy!

Paxhba!
IpoHTajTe CBe cnrypHocHe HAnomeHe n ynyTCTBa.
Iponyctn y npndpkaBaHy cnryphocnHex
HaonomeHa n ynyTcTaBa Mory y3pokOBaTN
eNeKtpuHn ydap, noXap n/nn TeWke
noBpeJe.CaYbajTe cBe cnryphocHe
HaonomeHe n ynyTcTaBa 3a KacHnjy ynotpe6y.

Paxha - onachoct od ctpyje!
Ytkauch oJmax nckbuynte n3Mpexe ako je BOD 6no owtehen nn pa3dojeH!

Paxhba!
Ypehaj KopnCTte cMo y TexHnUKN CnpaBHom cTaHy!
Ipe cBaKe ynoTepeI npOBepTe MoryHnOCT OwTeHeBa ypeJaja, KaBna N yTuKaUa, OwTeHeHn DeNoBm Mopajy ce IOnpaBHTu y CTrpyHoJ paNHOHcN INN 3AmEHNTN.
Бe36eHocT ha paHOM mecTy
Cboje noopyupe paada dpknte uictHM n do6po ocBETbeHm.
Hepd nn HeocBtJbEHa npDpyja paJa Mory DOBeCTn Do Hecpeha
Ca eIeKtpnHm aIaTOM He paInte y ekCnNo3nBHO yrPoXeHoJ OKoJIHH y KoJo j cHaIa3e 3anaJbHe TeUHocTH, racOBn Hnn npaunHe.
EneKtpnHn anatn CTbapajy BapHnue Koje Mory 3anaHTn npaunHy nnn nncapeBa
Ieun npyum ocobama He Do3BOJNTe npncTyn 3a BpeMe Kopuheha eEnktpnHOr anata. Y cnuyajy ckpeta naXbe moxete n3ry6ntu KOHTpOHy Hd ypehajem
EneKtpnHa 6e36eHocT
PpNKbUyHn yTnKauch eNeKtpnHOr aJata Mopa npncTajatu y TnChu. YtKau He cme da ce npenHaCyje Ha 6nlo KoJn HauHH. He ynoTppe6bAbajte adanTepcKe yTnKaue 3ajeHNo ca y3eMBeHm eNeKtpnHm anatima.
Hennmehen ytnkaun noodrobapajyhe ytnuHnue cmahyj np3nk eJektpnHOr ydapa
36erabajte KOHTaKT TeNa ca y3eMJIbeHm NOBpUnHaMa NOnyT ueBn, paAnjaTopa, neHn nФрnxNepa.
IoctojnoBehaHn p3NK od eNeKtpuHOr ydapa ako je Baue teNo y3Embeto
EneKtpnHe aIaTe dpXnTe daBe od Knwe nnBnare. PpOnpaBe BOe y eNeKtpnHn anat noBeHaBa pN3NK eNeKtpuHr yDapa
Ka6n He KopncTnte 3a HoWeHe, Be7aBe eNeKtpnHOr aIaTa nIi 3a I3BnAueHe yTuKaHa u3 yTuChnCe. Ka6n dpXnTe daJIe od BpyHnHe, yJa, oUtpnx pyoBa nIi DeNoBa ypehaja KoJn ce noKpeHy.
OwTeHeHn Hn 3aNetbHaHn Ka6NoBn noBeHabajy pn3nk eNeKtpuHOr yapa
Ako ca eIeKtpnHm aJaTOM paNTe Ha OTBOpeHOM, KopnCTte cAmo npOdyXHe Ka6NoBe KoJn cy HameHbEn 3a paN HanoBy. KopuShneBe npOdyxHor ka6Na HameHbEHor 3a paN HANOBy cMaHyje p3NK eIeKtpnHOr ydapa
KoJIko ce paad eNeKtpnHOr aHaTa y BnaJHoj OKOJIHH He MoKe n36eH, yNoTpe6IbAbajTe npEKnDaU 3a 3auTHTy od cTpyje KBapa.
Ipimeha npekndaa 3a 3aunty od ctpye KBapa cmaByje pnsik ekeTpnuHor ydapa
Be36eHocT JbUdN
Будnte пжьин, паNTe Ha oho шTO qHnte n npOMnJIbeHo paNTe ca eNEKtpnHm anatom.ЕNEKtpnHn anat He ynotpe6babajte aKO cTe yMOPHN nIN ce HaIa3NTE NOd yTncajem dPora, ankoXoJa nIN neKOBa.
TpeHytak HenaxHbe npuNkOM ynoTppe6e eNeKtpnHOr aJaTa MOKe DoBecTu DO 03bHnx Nobpeda
Hocnte JnHy 3aHTnTHy onpemy n yBek 3aHTnThe Haoyape.
HoWeHe JnUHe 3aWtHThe Onpeme nOnyT MaCKe 3a npaunHy, cnryphocnX cInneJa OTNopHnx Ha Kln3aBe, 3aWTTHor IJema HnI WtNTnKa 3a Cnyx 3aBnCHO OD BpCTe IN npIMHe eNeKtpnHOr aNaTa CmAbyje pN3NK OD NOBpeDa
36erabajte Hexotnno nytahe y pad.YBepnte ce da je eJektpnHO aNat NCKbyeH npe Hero wTo ra npNKbuyjete Ha HanajaBe ctpjom, dNkTe Hn Hocnte.
YKoJIko npNJIKOM HOWeHb a eJekTpnuHor anata npCT mate Ha npKeuJaU nn Yupehaj YKbUyeH npNKbUyJeTe Ha HanajaHe cTpyjom, TO MOKe DOBeCTn Do HecpeHa
OndtpaHnTe aIaTe 3a nopeuBaHe nIn KbUyeBe 3a3aBpTbe npe yKbUyNBaHa eKeKtpuHOr aIata.
Anat nnn Kbyu Koju ce hana3n y deny ypehaja Koju ce o6phe moxe doBecTu noBpeDa
36erabajTe HeOpMaJHo dpXaBe TeJa. NopnHnte ce 3a 6e36eNo ynpuTe n yBek OndpaBajTe paBHOteKy.
Ha taKaB heTe hauHH eJeKtpuHn anat 6oJbe KOHTpOJIncaTn y HeoueKINBaHm CNTyaUjama
Hocnte npiknaHy odehy. He hocnte shnpoky odehy nnn haKNT. Kocy, odehy npykabuie dpxnte daBe od deNoBa koJn ce nokpehy.
IeNoBn KoJn Ce NOKpeHy Mory Da 3axBaTe Ia6aby OdeHy, HAKIT INN DyraUky Kocy
KoIko Ce Mory MoHTnpaTu HnpaBe 3a ycncBaBe n NOKynBaHe npauHne, yBepnte ce Da cy npNKbUyeHe n Da ce HcnpaBHO KopncTe.
YnoTpe6a ycncabaa MoKe CMaHbHTn YrpoXeHOCT npaunHom
YnoTpe6a nocTynaBe ca eIeKtpnHm aJatOM
He npeontepehjyte ypehaj. 3a cboj pad yBek KOpNCHTTe 3a To HameHbeH eIeKtpnHH anat.
Ca oIroBapajyHm eIeKtpnHm aIaTOM paIiHete 60JIe I 6e36eHNJe y HabeJeHOM npDpyjy cHare
He ynoTpe6JIaBajTe eJekTpHn aIaT uJn npekndaue je nOKbapeH.
EneKtpnHn anat koJn ce Bnwe He MoKe yKbUyHTn nnn NCKbUyHTn onacah je n Mopa ce nonpaBtu
3ByuTe yTuKaU n3 yTuHnU enpe 6aBbAba noDeuBaHa yPehaja,3aMeHe DeNoBa np6opa HnOdnaRa yPehaja.Ta Mepa onpe3a cnpeuaba HexOTNuHO NOKpeTaHbe eNeKtpnHOr aJaTa
Hekopnshhe eIeKtpnHe aIaTe yUbajTe BaHdoXBata Deue. He Do3BOnITE da ypehaj KopncTe ocObe Koje ca HbIM HnCy yNo3HaTe nn Koje HnCy npouHTane OBa yNyTCTBa.
EneKtpnHn aIaTn onaChn cy aKO nX KOpncTe HeNCKyche ocobe
Бржьнво HeryjTe eNeKtpnue He anate.
Конт polишte Дд Лп NOKpeTJBuB N DeJOBu
Функционшу Испавно Iд a Hncy
Заглавен, Дд Лс cy DeJOBu N yKln Nlln
Оштeheni Tako Да ce Ometa DeJOBaHbe
eNeKtpnHor anata. OwTehe DeJOBe
dajTe nonpaBtN npe ynoTppe6 ypehaja.
Y3pOK MHOrIM Hecpehama cy IIOwe ODPXaBAHn eJektpuHn aIaN
Anate 3a pe3aBe dpXnTe OwTpM N YNCTHM.
BpIXJBnBO HerOBaHn aIaTn 3a pe3aIbe ca OuTPm CeyNBMa MaIbe ce 3arNaBbIyjN I NaKUn cy 3a BOHeIe
EneKtpnHn anat, npnbop, ycaHe anaTe n.T.D. ynoTpe6bAbajte y cKnJaCy ca OBm ynyTCTBIma. Pnp TOME BOInTe paUHa o ycNoBnMa pada n DeJaTHoCTN Koja ce N3BOHN.
YnoTpe6a eNeKtpnHnx anata 3a dpyrauJe annkaunje od npedBHeHnx MOke doBeCTn Do onacnX cnTuauja
CepBnC
NonpaBak CBora eNeKtpnHor anata npenyctnte camo KBaIINΦNKOBaHOM cTpyHOM oO6bBy ca OpiRHaJIHm pe3epBHM DeIOBIma.
Tme ce 06e36ehyje da he ce ouybaTu 6e36eHocTeJeKtpnHOr anata
Cnryphoche Hanomehe y3 pykoBaHe
Ypehajem yBek pykyjTe o6m pykama
TeNo n OdeHy dpKInTe daJIbe oMexaHn3Ma 3ape3aHe
Odpe3aHm MaTePnJaH He OndcTpaHyjTe KoJ yKbUyeHOr MToTopa
KoD HanyuTaHa / TpaHcnOpTa ypehaja:
NCKBbyuTe ypehaj
N3ByLnte MpeXHN yTnKaU n3 yTnHnIe
HaTakHInTe 3aUHTTN NOKJIONaU
Ypehaj HnkaJa He XBaTajTe 3a HOX 3ape3aHe
pehaj Hocnte caMo 3a pyky
KyuHn MpeXn HAnOM Mopa Ce NOpyDapatn Ca NpdaUma O MpeXHom HanoHy y TexHNuKIM NpdaUma
VBeK KopnCTnTe CneuJANHO pactpehebe Ka6na 3a npOdyxHn Ka6n
Kabn dpxnte dahe od npdpuyja pe3aHa n yBek ra npOBeNTe dahe od MaunHe
MOHTaxa
CnmboJ kamepe ynyhye Ha cInke Ha cTpaH 3.
- PnUyBpCTnTe 7TnTHNK 3a pyKe ca npNIOxKeHMM 3aBpTHbMa Ha KyHnTe (C).
- LaRaHo pa3ByuIte pyKy nHaTKHnTe je Ha kyHnTe (2a).O3y6JIbe He Mopa yckOHTn y leXnTe.
- OTKJIOJIte IpeKpeTHy NOIyry Ha pyuKn Ipema cnoJa u YBpCTo je dpxKeTe. (2b)
- YtakHnTe cTe3Hn 3aBpTaH Kpo3 pyKu N KyHnIe Te rpa ykom 3aBpHnTe y npekpeTHy nOlyry. (2c)
- CTe3Hn 3aBpTaH 3aTeKHTe TOnIKo Da npEkePteHy nOlyry y3 He3HaTHy yNoTpe6y cnJe MOKeTe OcNoHHTn O pyKv.
- Побете пордухни ka6л кро3 pactepeнь (3).
PykoBaHe
Paxha - onachocT od nobpea!
Ypehaj cme da ce nokpehe TEK HAKOH notnyHe MOHTaKe!
PnpdpkaBajte ce cnryphocnX HanomeHa 3a pykoBaHe!
PpemeuTaBe npedbe pyke1.
Packnonnte npekpETHy noIyra.
b.ДовдиTepykyyxebeHn noJoxaj
Cknonnte npkepeTHy nOlyryc.
- Cnojnte mpexkn Ka6n ca cTpyjHOM mpexom
- JeHOM pyKOM oByXBaTInTe npeIbY, a 3aTm 3aIbY pyKy.
4.ПиТиСнITEобап配电Дача3aукБуЧИВаьe На рун (O 4)-урajce поpehe. - 3a BpeMe paJa IpxnTe npTncHyTa oba TaCTepa 3a yKbYuBaHe.
- YIM nyCTnte jeDaH Tactep 3a yKbYuBaHBe, NCKbYuyjCe MaKa3e 3a XnBy orpaDy.
Hanomehe o paay
Hajnpe yBek pexnte oBe cTpaHe xNBE orpaDe, a 3aTm TOpHy cTpaHy. Ha Takab Naun H Ondpe3aH MATEpnjAn He MoKe nactn y jow Heo6paJHa npDpyja
YrpaheHaIi6eNaOnakuaba paBHOpe3aHe
KnBe orpaDe yBek peKnte y obNky Tpane3a. TIme heTe cnpuNTI da ce doBe rpaHe orone
NonpaBbahe
Ypehaj yBek cKnapuTte ca n3ByeHIM MpeXHM yTuKaYeM
Vpehaj cknapnHTte camo ca HaTaKHyTM 3aWTNTHM NOKNONcEM
Upehaj cknaiunHTte Ha cyBOM n 3a Deuy n Heobnauhehe ocobe HeoctynHom Mecty
Ypehaj oBe36eDnte kaTahcEm* (O 6)
*On hije cacmaehu deo obuma ucnopyke
OdctpaHnBaHe

Ictpowehe ypehaje,6atepnje nnn akymytaope He ondctpaByjTe npeko kyhor otnda!
AmbaJaxa, ypej n np6op npOn3BeHn cy od MaTepujana koJn ce Mory peuKIOBAtn paNX je Notpe6Ho npKJaHO oDCTpaHtN.
Pomoh kOa cMeTHbN
| Сmetъа Могун уз现代物流 | Решende | |
| Урегaj не Phукционише | Hema habajábaструюm | ПроберITE куни осигурач / поcodжни кабл |
| Кабл урегajа оштейен | Потравочite AL-KO сервисно место | |
| Урегaj ради са пекидима | Прodожни кабл оштейен | ПроберITE поcodжни кабл |
| Прекидач за укльунове/пскльунове пokваpec | Потравочite AL-KO сервисно место | |
| Иntерна грешика | Потравочite AL-KO сервисно место | |
| Motopradи, пох OCTAJда стои | Иnterph纳 грешиka | Потравочite AL-KO сервисно место |
| Ножеви постaju вруи | Нedoстатak помазиваьa | Лагано hayы ntе пожевe |
| Нож тун Потравочite AL-KO сервисно место | ||
| Нamyklине у пожу | Потравочite AL-KO сервисно место |

Y cnyajy smetbni koje hncy habeene y TaBei nn Koje He mokeTe oDcTpaHnTc camn obpaNTte ce Haooj naIeXhoj cepBnchoj cnK6n.
N3jaBaE3 o KOHΦopMnTeTy
Obime n3jabbyjemo da OBaj npoN3BOd y n3BEd6n KoJy cmo nyCTuNN y npomEt oDRObapa 3aXTeBIMa xapMOH3OBAHnx CmePHNuCA EY, cnryphocnHex CTaHdApda EY n CTaHdApda CneuΦnHnx 3a npoN3BOd.
Pon3B0d
EneKtpnHe MaKa3e 3a KInBy orpaNy
Cepnjckn 6poj
G 2402405
Pon3Boha
AL-KO Geräte GmbH
Ichenhauser Str. 14
D-89359Kotz
ObnaheHa ocoba
Anton Eberle
Ichenhauser Str. 14
D-89359Kotz
Tm
HT 600 Flexible Cut
HT 700 Flexible Cut
Cmepnue E3
98/37/E3 (do 28.12.09)
2006/42/E3 (OД 29.12.09)
2006/95/E3
2004/108/E3
2000/14/E3
XapMOHN3OBAHe HopMe
EN 60745-2-15
EN 60745-2-5
HnBO 3ByuHcHare
Измерен / rapаHTOBaH
HT 600 Flexible Cut 107 / 107 dB(A)
HT 700 Flexible Cut 107 / 107 dB(A)
Oueha KOHΦopMnteTa
2000/14/E3, npnior V
Kotz, 20.10.2009

Antonio De Filippo, renepanh n dnpekTop
Tapaanuja
EbeHTyaHHe rpeIke y MaTePnJIaNy IINI pOn3BODbI Ha ypehajy yKnIOHHeMo 3a BpeMe 3aKOHcKOr Poka 3actape rapAnJcknx npaba Y cKaIady ca HauIM N36Opom Tako da n3 nonpaBmO nn Da nCnpuymo HOBe DeNoBe. Pok 3actape yBek ce odpehjye npema npaby dpXkabe y kojoj yepehaj 6no KynIbeH.
Haata rapaunjcka n3jaba Bpei camo KoI:
CTpyuHOr pykoBaHa ypehajem
nowtubha ynyTCTaba 3a ynotpe6y
ynoTpe6e opuHaHnX pe3epBHX DeNoBa
TapaHunja ce racn KoI:
TOKyuwa nonpaBbaHa Ha ypehajy
TexHnUKNx N3MeHa Ha ypehajy
HeHamecke ynoTepe6e (Ha np. npoepceNoHaJHor nnn KOMyHaJIHor KopuSheHa)
TapaHmja He oByxBata:
OuTeHeBa NaKa KoJe npou3Na3e 13 HopMaJIHe IcTpOWeHOCTN
IOTPOsHe DeIOBe KoJn Cy Ha KapTun pe3epBHX DeIOBa 03HaueHn OKBnPOM XXX XXX (X)
a MOTope ca yHyTpaUHbIM n3rapaHbEM BpeDe nOce6He rapaHcuijcke odpeIbe nojeHNHX npOn3BOJhaMoTopa
Y cnuyajy n3 rapaunje o6paTte ce ca OBom rapaunjckom n3jabOM n NOTBpOM O KynbN CBOME npoabaCy nn Hajbnkoj OBnauhehoj cepBnchoj cnKb. OBom rapaunjckom n3jabOM He Mehajy ce 3akoHcKa npaba Ha rapaunjy 3a HeNoCTaTe KUnca npema npoBaay.
3a ynatcTBOTO
IpeiJa ja nyuTnte MaunHaTa BO pa6oTa, BHIMATEJIHO IpOuytajTe ro Oba yNaTCTBO.Toa e ycNoB 3a 6e36eHa pa6oTa n 3a paKyBaHBe 6e3 npeyKn
IpnipkxyBajte ce KOH 6e36eHocnTe n npdeynpeDyBauchte COBETN BO Obaa DOKymentaunja Hn Ha camnot ype
HybajTe ro OBA yNaTCTBO 3a paKyBaJIe 3a INHnIOTpe6n I npedajTe My ro Ha eBENTyaJIHnOT HapeDen KOpNCnK
06jachyBaBe Ha 3HaunTe
BHHMaHHe!
CnepeheTo Ha OBHe COBTe 3a npedypeDyBaBe MoKe Da CnpeY TeJeCha nobpeDa IIN MaTepnjAnHa WTeTa.
Cneujiann coBte 3a noobpo pa3bnpahe npakyBaHe.
CnmboJOT Ha foToanapaT yKaKyBa Ha cNIKN.
Copxina
3a yntCTBOTO 220
Onnc Ha npoN3BOIoT 220
Bε36eHocn n 3aHTnTHn ypeu. .220
Texnukn nodaToun 222
Бe3бEdHocn coBETN 222
Montaxa 225
PaKyBaHe 225
NonpaBka. 225
OdpxByBaBe n Hera 226
Pomoi npn ppekn 226
UyBaHe. 226
OTcTpaHyBaHe 226
EY-n3jaba 3a ycorlaceHocct 227
Tapaanuja 227
OncnHa npOn3BODOT
PpOncHa npImeHa
ObaMaHHa e HamaHeTa NCKnyuBO 3a KaCTpeHe JxBa orpa, K6yHOBn I rpmuKn BO npBaTHOTo PndpaJe.
CekakBa Dpyra npimeha ce cmeta 3a HnponncHa. POn3BODNTeNt He rapaHTnpa 3a WTeTata wTo Ke HaCTaHe KaKO NocneDnca Ha Toa.
Moxha norpeuHa npImeHa
Be36eHochnTe ypeiNe He CMeaT da ce DEMoHTnpaaT nIa Ce npemocTybaaT,Ha np. CO NOBp3yBaHe Ha npekInHyBaunTe Ha paKnTe
He KopncTeTe ro ypeoT npn DoxN n/nnn ha MOKpn XNBn OpraN nn rpmuKn
YpeoT He cMee da ce KOpuctn 3a KomepujanaHa npImeHa
Be36eHocn n 3aHTTNuypei
BHMaHne - OnachocT od nobpeDa! Be36eHochnTe n 3aHTnTHte ypeN He cMeat da ce ncknyybaaT!
Блokада за Deca
Dynkata (5 mm) Ha 3aHaTa paKa 3a aKTHBnpaHBe e npEdBndeHa 3a KaTHeu* (5). KATAHeoT ro CnpeyBa HecaKaHTo aKTHBnpaHBe Ha ypeIoT.
He n3noKyBajTe ro ypeDoT Ha doxkD.
TexHnUKN noDaToCuN
| Текникий поадатои | HT 600 Flexible Cut | HT 700 Flexible Cut |
| ПOTROSHУВACHA на стуja 600 W 700 W | ||
| Должина на поожот 600 mm 650 mm | ||
| ДебелINA на материаловшто моче на то песец | 24 mm | 24 mm |
| Вкупна тешени 4,1 kg 4,5 kg | ||
| Вreedности на вибрациja kaj рачкatable* | 4,8 m/s² | 4,1 m/s² |
| Мржень наюн 230V~240V / 50Hz 230V~240V / 50Hz | ||
| Класа на ИзOLAциja | ☐/II/II | ☐ |
| Бpoj на удariно вор пазен od | 1700 min-1 | 1700 min-1 |
| Нимо на звuchEN рpitисOK LpA | 90 dB (A) 94 dB(A) |
* HabeJeHaTa BpeHocTe n3MepeHa cnopei CTaHapHaT a MeToDa 3a TeCTnpHe i MoKe da ce Kopucn 3a cnope6a Ha eNeKtpuHn anaTK.
Бe36eHocn COBETN
OnuTn 6e36eHocn COBETn 3a eNeKtpuHn anatkn

BhimaHne!
BpeHocTa Ha Bn6paunTe Bo TeKOT Ha KopncTeHbeto Ha eJNEKtpuHnot aIaT MoKe, BO 3aBnCHoCT Od HerOBaTa PpIMeHa, Da ce pa3NIkyBa OD HabeDeHaTa BpeHocT.

BHHMaHHe - OnachocT od nobpeDa!
Бe3бeнocнITEи 3aHTNTHnTe ypeiNe He cMeaT da ce ncknyBaat!

BhimaHne!
IpoHTajTe rncnTe 6e36eHocn COBETn ynatCTBa.
HenouHTyBaIbeTo Ha 6e36eHOCHTe COBETn yNaTCTBaTa MoKe Da npEiN3BnKa cTpyEn yAp, noXap N/IIIN TeuKn NobpeNi. CyBajTe rN CITE 6e36eHocHn COBETn yNaTCTBa 3a INHn noTpe6n.

BHHMaHHe - OnaCHOcT oD cTpyja!
BedaHn3BneyeTe ro uTekepoT, aKO dojde do oTuTyBaHe nnn Do npeknHyBaBe Ha ka6eIot!

BhimaHne!
KopncTeTe ro ypeoT cmo Bo 6ecnpekOpHa coctoj6a!
Ipecekoja ynoTpe6a npOBepyBajTe rHypeoT, Ka6eNoT uTKeepoT, da He ce OwTeTeHn. OwTeTeHnTe DeIOBn Mopa Da ce nonpaBaat nIn 3aMeHyBaat BO CneuJaIN3npaHa pa6OtnHnua.
B36eHocT Ha pa6oTHoMecTo
Pa6oTHOTo MeTo ceKOraTu Tpe6a Da 6nIe UInCTO N Do6po OcBtJeHo.
Hepen HeocBetIeHO pa60THo MeCTO MoKe da IOBeDat Do Hecpeka
He pa6oTeTe co eNeKtpnHnot anat Bo noOpauja Kaede wTo BnaDee onaChocT od ekCnNo3nJa, BO KoJaSto NMa 3aNaJNB TeuHOCTn, racOBn nI npaBOBn.
EneKtpuHnot aJaT co3daBa nckpn, KOnuTo
MOKAT Da Tn 3anaTn npaBOT UIN NcnapyBaHaTa
PjxTe rN DeaTa n Dpyrnte Nua noaneky DoKeKa KopnCTnte eNeKtpuEn anat. Ako Bu Iro OdBLeuAT BHMaHneTo, Moxe Da n3ry6nte KOHTpOJa Bp3 HrO
EneKtpnHa 6e36eHocT
PnKnyHnot Tekep Ha eJekTpnuHnot anat Mopa Da nacyBa BO npKnyokot 3a ctpya. Tekepot He cMee da ce n3MeHyBa Ha HnKaOB hauH. He KopncTeTe aDaNTepcKn Tekepn co anat KoJwTo mHa 3aWHTHO 3a3eMjyBaHe.
HEn3MeHeTne Te TKeepn COoDbETNHTe npKnyOuCi 3a Ctpyja ja HamaNyBaat ONaCHOCTa OD CtpyeH yap
36erHyBajTe TeIeceH KOHTaKT CO 3a3emjeHnOBpHH, KaKo ueBKn, paAnjaTopn, WnpetnN cPnXnepn.
Kora BaIeTo TeNo e 3a3emjeHo, NocToH 3rolemHa onachOCT Od CTpyen yIap
BaHTntTe ro eNeKtpnHnot anat OddoXn Blara.HaBneryBaHeto Ha Boda BoeNEKtpnHnot anat ja 3ronemyBa onachocta odctpyen ynap
He KopncTeTe ro Ka6eNoT 3a da ro HocnTe nn Da ro 3akaYBaTe eNeKtpnHnO t anat, nn 3a Da ro n3BneKyBaTe wTeKePOT od npNKnyOkot. YyBajTe ro Ka6eNoT noJaNeky od XeHTHa, MacNo, ocTpni pa6OBu nn Ond NOdBnXnTE DeIOBn Ha ypeDoT.
OwTeHnTe nn 3aannetKaHnTe ka6nn ja 3roJeMyBaat onaCHOCTpyen yap
Kora pa6oTnte co eIeKtpnueH anat Ha OTBOpeHo, KOpNCTeTe cAmO Ka6n 3a npOIoJxUyBaHbe kon ce nOrOHN 3a pa6oTa Ha OTBOpeHo.
KopncTeHbTo Ha cooDbTeH ka6eI 3a npOOnKyBaHbe ja HamaLyBa onacHOCTpyeH ydap
AkoBeKe He MoXeTe Da H36erHeTe pa6oTa co eJekTpHnO t aIaT BO BnaXHa cpeINHa, KopncTeTe 3aHTTHa CtpjHa CKNONKa.
KopncTebeTo Ha 3aUHTHa ctpyjHa cklonka ja HamaNyBa onaCHOCTo OD ctpyen yap
Be36eHocT Ha lyreTo
Бидete BHNMaTeJIHn, BHNMaBajTe ⅢTO npaBnte n pa3ymHo npnoJate n Ha pa6oTata co eNeKtpuye anat. He KOpNCTeTe eNeKtpuye anat KoI cTe n3MopeHn nII KOra cTe nOd BInjahnHe ha dpora, aJIkoXoJI nII neKOBn.
CamaeHMaHa HeBHMaHne npn KopnteHbTo Ha aIaTOT MoKe Da DoBeDe Do cepNo3Hn NOBpeN
Hocete onpema 3a JnUHa 3aHTnTa n CeKoraw Hocete 3aHTnTHn OuHa.
Bo 3aBnCHoCT OJ BnOTo I npImeHaTa Ha eJIekTpNHyNOT aJaT, HocHeTo ONpeMa 3a JIuHa 3aHTNa, KAKO MACKa 3a IpaB, 6e3BeHOCnObYBKn 7TO He Ce JIN3raaT, 7JIem NII 3aHTNa 3a CnyXOT, Ja HAManyBa ONaCHOCTa OJ NOBpeNi
CnpueTe HecaKaHO BknyuBaIbe. PpeDa ro BKnyuTe BO cTpyJa, nII nped ra roKpeBaTe nII Hocnte, ocHypete ce dekaeNeKtpnHnot aIaTe ncknyuH.
Ako npn Hoche Ha aIaTOT ro dpxnte npCTOT Ha npeKNHyBaHT OINn AKO rnpNKnyHTe BKnyehnoT anat BO ctpyja, MoKe da Dojde Ho Hecepeka
IpeD da ro BknyuHte eJeKtpnHnot aanT,OTcTpaHete rncnte aataKN 3a perylnpahe nnu wpaqunrepi.
Aanatka nnnu paqurrep konwto ce haoaat BO nppaue To Ha Hekoj BPTnVB DeI od ypeDoT, Moke da npedn3BnKaat Nobpei
36erHyBajTe HeHOpMaJIHo DpXeHe Ha TeNoTo.BoTe CMeTKa Da CTOnTe CTA6NJHo N cekoraaw ODPxuBajTe paMHOTeka.
Ha Toj Haun Ke MoKeTe NDo6po DaTo KOHTpOIpaTe eNeKtpuHnOT aJaT BO HeouekyBaHn CInTuaCIN
Hocete cooDbetHa obNeka. He hocete shnpoka obNeka nHn HauKt. Dpxkete rN Kocata n paKaBnUte POnaIeKy oN OOBHXHTe DeIOBn.
IoBxHnTe DeIOBm MoKe Da rN 3aΦaTaT na6aBaTa obLeKa, HAKITOT INN DOJrata Koca
Ako moxe da ce MOHTnpaaTdoaTOU 3a BwmykyBaBe Ha npaBt an 3a 3afoKaBe Ha OTceHnot MaTepnjaJ, yBepTe ce deKa Tne ce npKnyeHn N DeKa npaBnHo ce KOpuctat.
KopncTeHbTo Ha IodaTOK 3a BwMykyBaHe npab MOKe Da Hn HamaNn ONaCHOCTNe OD npabTa
KopncTeHe n TpeTnpaBe Ha eNeKtpnHNOt anat
He npeonTobayBajTe ro ypeoT.
KopncTeTe eNeKtpnueH anat koj odroBapa Ha notpe6nte Ha pa6oTata.
Co cooDBeTHNO t anat ke pa6OTte noDobpo nno6e36eHNO BO hAbeHTo NOpaue je Ha onTOBAPyBaHe
He KopncTeTe eJekTpueH aHaT, uJwTo npeknHyBaU He e nCnpaBeH.
EneKtpuueh anat Kojsto Beke He MoKe da ce BknyyBa nn NcknyyBa e onaceH mopa da ce nonpaBn
I3BnekyBaJTe ro wTekepot nped da n3BeyuBaTe 6nlo KaKBO perynipaB ypeoT, nped Da 3aMeHyBaTe DeNoB od npnbopot nnn nped da ro cnyuT
Obaa Mepka Ha npetna3nIBOCr O cnpeyuBa HecaKaHOTo CTapTyBaHe Ha eNeKtpnHnot aHaT
HybajTe ro eNeKtpnHnot anat KoJwTo He ro KopnCTnte nOdaNeky od doPaT ha deuata. He do3BOJyBajTe ypeDor da ro Kopnctat NmuTa KOnWTo He ce 3aNo3HaEHn co Hea HIn KOnWTo He ro npOHTane yNaTCTBOTO.
EneKtpnHnot aIaTe oNaceH Kora ro Kopnctat HENCKyCHNIuca
TpIXNBO ODPxByBajTe ro eJektpnHnot aanat. PpOBepyBajTe daJI NIOdBHXHNTe DeJIOBN yHKUHOHPaAT HepeHcHo, Da He 3arJaBYBaAT HeKaade, daJI NMa CkPseHN IIN OWTeHNI DeJIOBN I daJI N e DOBeHEn BO ppaHaBe yHKUHOHPaHeTo Ha eJektpnHnot aanat. NOnpaBajTe ro OWTeHHTe DeJIOBN ppe Da ro KopNCHTe ypeDor.
Mhory Hecekei ce noceiHa looO odpxybaH eektpueH anat
OdpjyBajTe rnaIaTnTe 3a ceYeHe ocTpnn n.
PnKJINBO OndpKyBaHnte anatn 3a ceuehe, co octpn ceuHa, nMaIky ce 3aIabyBaaT n IoneCHO ce BOaT
KopncTeTe rnaT, npnbopoT, dONOHnTeJHaTa ONpema nTH. BO cOrJaChOCT co yNaTcTBaT. PnpdpxyBajTe ce npTuo a KOH ycNoBte 3a pa6ota n KOH pa6otata wTo Tpe6a da ja n3BpuInTe.
KopncTeHbTo Ha eJekTpnuHnO aIaT 3a npyTu ceni,OCBeH npeBnDeHnte,MoKe da DoBeede DO onaCHN CNTyaucn
CepBnC
EneKtpnHNoT anat Tpe6a da ro nonpaBa camo KBaINΦnkyBanh CtpyuH nepcoHaJI TOa CO opnInHaJIH pe3epBHN DeIOBN.
Co toa ce 06e36eYBa 3aApKyaBHe Ha 6e36eHocTa Ha eNeKtpuHnO aNat
6e36eHocn COBt 3a paKyBaHe
Pakybajte co ypeoT cekoraw co dBeTe paue
I DpKTe rN TeJIoTo n ObNeKaTa noJaIeKy oN IOROHOT 3a CeYeBe
He oTcpanhybajTe ro otceueHnot MaTepnjAndoeka MoTopoT pa60Tu
Pn HanyuTaBe / TpaHcNopt Ha ypeDoT:
IcknyteTe roypeDToT
13BJIeYeTe ro 1TeKepot
CTaBeTe ja 3aUHTnTHaTa Macka
He phakajte ro ypeoT 3a HOXOT
HocTe ro ypeDoT cmo 3a paKaTa
HANOHOT Ha Domaunata HnctanaJma Mopa da odrobapa Ha 6apabata 3a HanoHOT, HabeHeN BO TEXHnKHTe NODaTOU
Cekoraaw KopucTeTe ro cneunjahnHnot enemEn 3a ona6aByBaHe Ha Ka6eIOT 3a npoJnxyBaHe
Држete ro KaбелOT noДанeу od noДрачeTo Ha ceuHe b N BODeTe ro cekoraw BO Hacoka CnpoTnBHa Ha MaunHata
MOHTaxa
CmboJOT Ha foToaIapat yKaKyBa Ha cnKITe Ha cTpaHnca 3.
- PnucBpctyBaJTe ja 3aWntTata 3a paue co nCnpaahnte WpaOBN Ha KykntTeTo (01).
- Iecno pa3Bneye te ja paKaTa n BMeTHeTe ja Bo KyKnIeTo (2a). 3anuTe mOp a da ce BKnonat.
- OTKNONeTe ja npeKNONHaTa paKa KOH HaDbOp I dpXKeTe ja CBpCTo. (2a)
- BmETHe Tn 3aBPTkata 3a 3aterahe Hn3 paKaTa N KyKuWTeTo N co paka 3aupaPaeTe ja BO npeknonHaTpaKa.(2b)
- 3aterajte ja 3aBpTKata DoeKa npeKnONHaTa paKa He MoKe da MaIKy cna da ce npNKOnn Ha paKaTata. (2c)
- CnpoBeTe ro kaBcIOT 3a npOOnKyBaHbe Hn3 eIemEHTOT 3a ONaBabYBaHe (3).
PaKyBaHbe
BHHMaHHe - OnachocT od nobpeDa!
YpeoT cMee NyTa BO paOTo dypn no KOMPteHa MOtaja!
PnpjkyBajTe ce KOH 6e36eHOCHTe COBeTn 3a paKyBaHe!
- NomectyBaHe Ha npedHaTa paKa
a. OTKNONeTe ja npeknonnHaTa paKa
b. NocTaBeTe ja paKaT a Bo cKaHaT a noJIOX6a
c. Cklonete ja npeknonHaTa paKa
- PnKnyeTe ro Ka6enot Bo ctpya.
- Co eHata paka paTe je npedHata paKa, a cn dpyra tpa ka paTe ja 3aHaTata paKa.
4.ПиТиСHTe TnДВaTaNpeKInHyBaunHa paKaTa (4)-ypeDOT ce nann. - Bo TeKoT Ha pa6oTaTa DpXeTe rN Dbata npeknHyBaun npuTncHaTn.
- ⅢTOM ce OTnyuTn eDeH oD npeKInHyBaHTe, MaunHaTa 3a KaCTpeHe ce NCKnyuBa.
Cobetn 3a pa6oTa
Cekoraш npBO nckactpeTe rN cTpaHnUte Ha XNBata orpada, na Ha KpajOT nckactpeTe ja Odo3ropa. Ha Toj hauHH He MoKe Da ce cnUyN OTceueHnOT MaTePnJaI da NaDHe BO Heo6pa6OteHnTe noDpaJa
BrpaeHataIb6ena roonechyba pAMHOTo ceyehe (6)
KINBNTe orpaTn Tpe6a cekoraAa da ce kactpaT BO BnHa Tpan3. Co Toa ce cnpeyuBa coronyBaBe Ha donHnTe rpaKn (8)
NonpaBka
NonpaBKeTe CMeaT Da rN n3BeDyBaat cMo KOMnTeHTHn CTpyuHN IIOHOH NIN HAnITE AL-KO cepBnCHn CTahnU
OdpxByBaBe n Hera

BHHMaHHe - OnachocT od ctpya!
Ipei ciTe pa6oTn Ha oDpKyBaHe n Hera ceKoraaw n3BneKyBajTe ro wTekepoT!

BHHMaHHe - OnachOcT od nobpeDa!
Pn pa60n Ha oDpxyBaBe n Hera Ha HOxOT 3a ceyebe cekoraaw HocTe pa60TH paKaBnU!
- No cekoe kopncTeHbe nCnCteTe rH HOKOT N KyKnWTeTO co YeTka nn Kpna. He KopncTeTe BOda n/nn CpeDCTBa 3a YnCteHe wTo Harpn3yBaat - onachOCT od Kopo3nja!
- Jecho noMaKyBaJTe ro nCTOT od HOKOT CO COODBETHO 3aHTHTHO MacNo.
- Поверете дади ситewрobи ce 3aterhata.
- PeDobHNo npOBepyBaJTe rN HOKeBnTe. N6apajTe AL-KO cepBncha pa6oTnHnua aKO:
HOKOT OWTETEH
HOKOT uCTaNEH
ce jaByBa npTepaHo a6eHe
UyBaHe

3aHTnTaHa HOKOT MOKe Da ce MoHTnpa Ha
SNDOT KAKO DpXaY 3a MaUNHaT a KaCTpeHBe.
BHHMaBaJTe WpaPObNTe Da 6uDat Do6po
3aTeHATn! (7)
UybajTe ro ypeoT cekoraaw co n3BneueH wTekep
Uybajte ro ypeoT cmo co cTaBeHa 3aHTHMa Macka
UybaTe ro anapaTOn Ha cyBO MecTo, KaTe UTo DeaTa N HeOBNaCTeHIne Tnua Hemaat npuctan
Obe36eTe ro ypeoT co kaTaHeu* (6)
HnBO Ha Charata Ha 3ByKOT
PpoeHka Ha ycorlaceHocta
2000/14/E3,Пилог V
Kotz, 20.10.2009
Antonio De Filippo,
Из蜱шеничектор
Tapaanuja
EbeHTyAnHnTe No6apyBaHa nopAa NrpeuKb BO MaTepnjAnOT HnB O npO3BOdCTBOTO Ha anapaTOT, 3a no HaHn3bOp rN OTcPAnHyBaMe BO TeKOT Ha 3aKOHcknOT rapaHTeH pOK co noppaBka HnN cnpopaHa den. TapaTHnOt pOK cekoraaw Ce yTbpdyBa CnopeD 3aKOHOT Bo 3emjata BO Koja e KyneH anapaTOT.
Haata rapaunja baxn camo npn:
IpoTncho TpeTnpaHBe Ha anapaTOT
PnndpkyBaHe KOH ynaTCTBaTa 3a paKyBaHe
ynoTpe6a Ha opuHnHaJIHn pe3epBHN DeIOBN
「rapaunjata ce noHnHTyBa npn:
obu3a nonpaBka Ha anapaTOT
TexHnKn npomeHH Ha anapaTOT
He npnnc HO Kopnte He (Ha np. KomepujaHNO HIN KOMyHaHHO)
TapaHnjuTa He onpaKa:
OwTeTyBaHa Ha 6oJaTa KOI ce NocLeiHa HOpMaIIHO a6eHBe
NotpoHn DeIOBn, KOn Ha Ta6eJaTa 3a pe3epBn DeIOBn Ce O3HaueHb Bo paMKTe Ha XXX XXX (X)
MOTOPU CO BHaTpeuHcOROpyBaHe - 3a HnB BaXn Noce6Ha rapaHcNiJa Ha COoDbETHNO TPOIN3BOIDTeJHa MOTOPOT
Bo cnuyaj ha rapaunjia obpatete ce co OBOJ rapaHTEN INC T CO CMeTKATA KAJ npoDAbaOT NIN BO Haj6nCKata OBnacteHa cnjx6a 3a Ondocn CO Kopncnnte. Obpckata od rapaunja He nNCKnyBa 3aKOHCKnte npaba 3a NobapybaHa Ha kynBaYcOT Bo oDHoc Ha npoDaBaOT BO cnuyaj Ha steta.
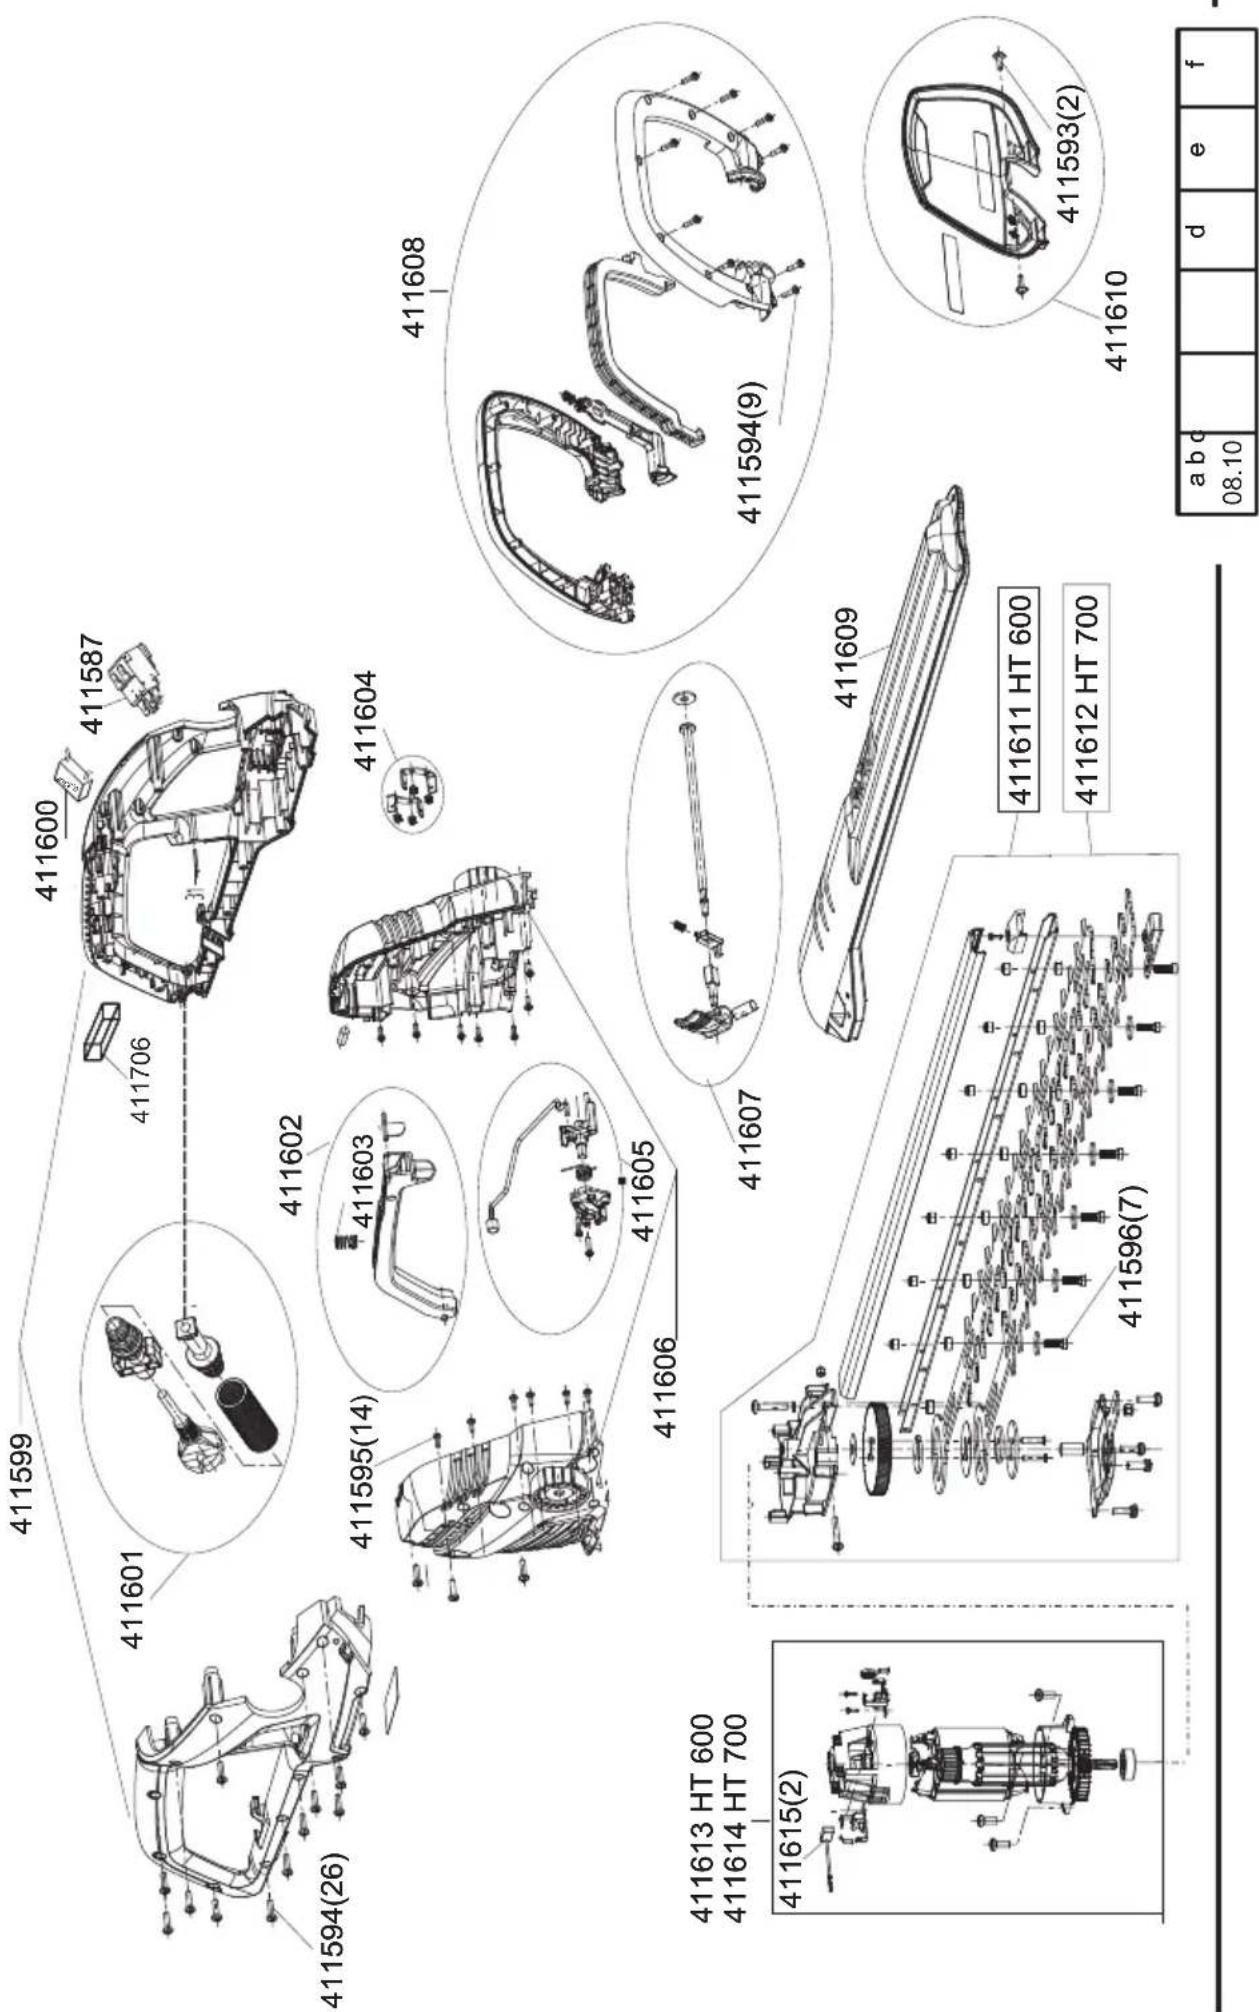
Notice
Country Company Telephone Fax
A AL-KO Kober Ges.m.b.H. (+43)3578 / 2 5152 27 (+43)3578 / 251538
AUS AL-KO International PTY. LTD (+61)3/9767-3700 (+61)3/9767-3799
B/L Eurogarden NV (+32)16/805427 (+32)16/805425
BG Valerii S&M Group SJ (+359) 2 942 34 02 (+359) 2 942 34 10
CH AL-KO Kober AG (+41)56/4183150 (+41)56/4183160
CZ AL-KO Kober Spol.sr.o. (+420)382/210381 (+420)382/212782
D AL-KO Gerate GmbH (+49)8221/203-0 (+49)8221/203-138
DK AL-KO Ginge A/S (+45)98821000 (+45)98825454
EST/LT/LV AL-KO Kober SIA (+371)67409330 (+371)67807018
F AL-KO S.A.S. (+33) 3/85-763540 (+33) 3/85-763588
GB Rochford Garden Machinery Ltd. (+44)1963/828050 (+44)1963/828052
H AL-KO KFT (+36)29/537050 (+36)29/537051
HR Brun.ko.-prom d.o.o. (+385)1 3096 567 (+385)1 3096 567
AL-KO Kober GmbH / SRL (+39)039/9329311 (+39)039/932 9390
IN AGRO-COMMERCIAL (+91)3322874206 (+91)3322874139
IQ Gulistan Com (+946) 750 450 80 64
IRL Cyril Johnston & Co. Ltd. (+44) 2890813121 (+44)2890914220
LY ASHOFAN FOR AGRICULT. ACC. (+218)512660209 (+218)512660209
MA BADRA Sarl (+212)022447128 (+212)022447130
MK Techno Geneks (+389) 2 2551801 (+389) 2 2520175
N AL-KO GINGE A/S (+47)64862550 (+47)64862554
NL O.DE LEEUW GROENTECHNIEK (+31)38/444 6160 (+31)38/444 6358
PL AL-KO Kober z.o.o. (+48)61/8161925 (+48)61/8161980
RO OMNITECH Technology SRL (+4) 021 326 36 72 (+4) 021 326 36 79
RUS 000 AL-KO Kober (+7)499/1688718 (+7)499/96600-00
RUS AL-KO St. Petersburg GmbH (+7)812/4461075 (+7)812/4461075
S AL-KO Ginge Svenska AB (+46)(0)31573580 (+46)(0)315756 20
SK AL-KO Kober Slovakia Spol.s.r.o. (+421)2/45994112 (+421)2/45648117
SLO DARKO OPARAS.P. (+386)17225858 (+386)17225851
SRB Agromarket doo (+381)34/30800 (+381)34/30816
TR ZIMAS A.S. (+90) 2324580586 (+90) 2324572697
UA TOV AL-KO Kober (+380)44/4923396 (+380)44/4923397