
0 603 B02 000 - Scie BOSCH - Free user manual and instructions
Find the device manual for free 0 603 B02 000 BOSCH in PDF.
Download the instructions for your Scie in PDF format for free! Find your manual 0 603 B02 000 - BOSCH and take your electronic device back in hand. On this page are published all the documents necessary for the use of your device. 0 603 B02 000 by BOSCH.
USER MANUAL 0 603 B02 000 BOSCH
OBJ_BUCH-2325-003.book Page 1 Monday, October 24, 2016 11:12 AM2 |
OBJ_BUCH-2325-003.book Page 2 Monday, October 24, 2016 11:12 AM| 3 Bosch Power Tools 1 609 92A 1KU | (24.10.16)
OBJ_BUCH-2325-003.book Page 3 Monday, October 24, 2016 11:12 AM1 609 92A 1KU | (24.10.16) Bosch Power Tools
OBJ_BUCH-2325-003.book Page 4 Monday, October 24, 2016 11:12 AM| 5
OBJ_BUCH-2325-003.book Page 5 Monday, October 24, 2016 11:12 AM1 609 92A 1KU | (24.10.16) Bosch Power Tools 6 |
A OBJ_BUCH-2325-003.book Page 6 Monday, October 24, 2016 11:12 AM| 7
B C D E OBJ_BUCH-2325-003.book Page 7 Monday, October 24, 2016 11:12 AM1 609 92A 1KU | (24.10.16) Bosch Power Tools 8 |
F2 OBJ_BUCH-2325-003.book Page 8 Monday, October 24, 2016 11:12 AM| 9 Bosch Power Tools 1 609 92A 1KU | (24.10.16) +
F4 OBJ_BUCH-2325-003.book Page 9 Monday, October 24, 2016 11:12 AM1 609 92A 1KU | (24.10.16) Bosch Power Tools 10 |
F6 OBJ_BUCH-2325-003.book Page 10 Monday, October 24, 2016 11:12 AM| 11
OBJ_BUCH-2325-003.book Page 11 Monday, October 24, 2016 11:12 AM1 609 92A 1KU | (24.10.16) Bosch Power Tools 12 |
J OBJ_BUCH-2325-003.book Page 12 Monday, October 24, 2016 11:12 AM| 13
OBJ_BUCH-2325-003.book Page 13 Monday, October 24, 2016 11:12 AM1 609 92A 1KU | (24.10.16) Bosch Power Tools
O P Q R S OBJ_BUCH-2325-003.book Page 14 Monday, October 24, 2016 11:12 AMDeutsch | 15 Bosch Power Tools 1 609 92A 1KU | (24.10.16) Deutsch
WARNUNG ACHTUNG OBJ_BUCH-2325-003.book Page 15 Monday, October 24, 2016 11:12 AM16 | Deutsch
OBJ_BUCH-2325-003.book Page 16 Monday, October 24, 2016 11:12 AMDeutsch | 17
OBJ_BUCH-2325-003.book Page 17 Monday, October 24, 2016 11:12 AM18 | Deutsch
OBJ_BUCH-2325-003.book Page 18 Monday, October 24, 2016 11:12 AMDeutsch | 19
Executive Vice President
Head of Product Certification
OBJ_BUCH-2325-003.book Page 19 Monday, October 24, 2016 11:12 AM20 | Deutsch
OBJ_BUCH-2325-003.book Page 20 Monday, October 24, 2016 11:12 AMDeutsch | 21
belschlüssel (12 mm) fest.
OBJ_BUCH-2325-003.book Page 21 Monday, October 24, 2016 11:12 AM22 | Deutsch
OBJ_BUCH-2325-003.book Page 22 Monday, October 24, 2016 11:12 AMDeutsch | 23
OBJ_BUCH-2325-003.book Page 23 Monday, October 24, 2016 11:12 AM24 | Deutsch
OBJ_BUCH-2325-003.book Page 24 Monday, October 24, 2016 11:12 AMEnglish | 25 Bosch Power Tools 1 609 92A 1KU | (24.10.16) Luxemburg
General Power Tool Safety Warnings
Read all safety warnings, instructions,
illustrations and specifications provid-
ed with this power tool. Failure to follow all instructions list-
ed below may result in electric shock, fire and/or serious inju-
Save all warnings and instructions for future reference.
The term “power tool” in the warnings refers to your mains-
operated (corded) power tool or battery-operated (cordless)
When using electric tools basic safety
precautions should always be followed
to reduce the risk of fire, electric shock and personal inju-
ry including the following.
Read all these instructions before attempting to operate
this product and save these instructions.
Keep work area clean and well lit. Cluttered or dark areas
Do not operate power tools in explosive atmospheres,
such as in the presence of flammable liquids, gases or
dust. Power tools create sparks which may ignite the dust
Keep children and bystanders away while operating a
power tool. Distractions can cause you to lose control.
Power tool plugs must match the outlet. Never modify
the plug in any way. Do not use any adapter plugs with
earthed (grounded) power tools. Unmodified plugs and
matching outlets will reduce risk of electric shock.
Avoid body contact with earthed or grounded surfaces,
such as pipes, radiators, ranges and refrigerators.
There is an increased risk of electric shock if your body is
earthed or grounded.
Do not expose power tools to rain or wet conditions.
Water entering a power tool will increase the risk of electric
Do not abuse the cord. Never use the cord for carrying,
pulling or unplugging the power tool. Keep cord away
from heat, oil, sharp edges and moving parts. Damaged
or entangled cords increase the risk of electric shock.
When operating a power tool outdoors, use an exten-
sion cord suitable for outdoor use. Use of a cord suitable
for outdoor use reduces the risk of electric shock.
If operating a power tool in a damp location is unavoid-
able, use a residual current device (RCD) protected
supply. Use of an RCD reduces the risk of electric shock.
Stay alert, watch what you are doing and use common
sense when operating a power tool. Do not use a power
tool while you are tired or under the influence of drugs,
alcohol or medication. A moment of inattention while op-
erating power tools may result in serious personal injury.
Use personal protective equipment. Always wear eye
protection. Protective equipment such as dust mask,
non-skid safety shoes, hard hat, or hearing protection
used for appropriate conditions will reduce personal inju-
Prevent unintentional starting. Ensure the switch is in
the off-position before connecting to power source
and/or battery pack, picking up or carrying the tool.
Carrying power tools with your finger on the switch or en-
ergising power tools that have the switch on invites acci-
Remove any adjusting key or wrench before turning
the power tool on. A wrench or a key left attached to a ro-
tating part of the power tool may result in personal injury.
Do not overreach. Keep proper footing and balance at
all times. This enables better control of the power tool in
unexpected situations.
Dress properly. Do not wear loose clothing or jewel-
lery. Keep your hair and clothing away from moving
s. Loose clothes, jewellery or long hair can be caught
If devices are provided for the connection of dust ex-
traction and collection facilities, ensure these are con-
nected and properly used. Use of dust collection can re-
duce dust-related hazards.
Do not let familiarity gained from frequent use of tools
allow you to become complacent and ignore tool safety
principles. A careless action can cause severe injury with-
in a fraction of a second.
Power tool use and care
Do not force the power tool. Use the correct power tool
for your application. The correct power tool will do the
job better and safer at the rate for which it was designed.
WARNING WARNING OBJ_BUCH-2325-003.book Page 25 Monday, October 24, 2016 11:12 AM26 | English
1 609 92A 1KU | (24.10.16) Bosch Power Tools
Do not use the power tool if the switch does not turn it
on and off. Any power tool that cannot be controlled with
the switch is dangerous and must be repaired.
Disconnect the plug from the power source and/or re-
move the battery pack, if detachable, from the power
tool before making any adjustments, changing acces-
sories, or storing power tools. Such preventive safety
measures reduce the risk of starting the power tool acci-
Store idle power tools out of the reach of children and
do not allow persons unfamiliar with the power tool or
these instructions to operate the power tool. Power
tools are dangerous in the hands of untrained users.
Maintain power tools and accessories. Check for mis-
alignment or binding of moving parts, breakage of
parts and any other condition that may affect the pow-
er tool’s operation. If damaged, have the power tool re-
paired before use. Many accidents are caused by poorly
maintained power tools.
Keep cutting tools sharp and clean. Properly maintained
cutting tools with sharp cutting edges are less likely to bind
and are easier to control.
Use the power tool, accessories and tool bits etc. in ac-
cordance with these instructions, taking into account
the working conditions and the work to be performed.
Use of the power tool for operations different from those
intended could result in a hazardous situation.
Keep handles and grasping surfaces dry, clean and free
from oil and grease. Slippery handles and grasping sur-
faces do not allow for safe handling and control of the tool
in unexpected situations.
Have your power tool serviced by a qualified repair per-
son using only identical replacement parts. This will en-
sure that the safety of the power tool is maintained.
Safety Warnings for Mitre Saws
Mitre saws are intended to cut wood or wood-like prod-
ucts, they cannot be used with abrasive cut-off wheels
for cutting ferrous material such as bars, rods, studs,
etc. Abrasive dust causes moving parts such as the lower
guard to jam. Sparks from abrasive cutting will burn the
lower guard, the kerf insert and other plastic parts.
Use clamps to support the workpiece whenever possi-
ble. If supporting the workpiece by hand, you must al-
ways keep your hand at least 100 mm from either side
of the saw blade. Do not use this saw to cut pieces that
are too small to be securely clamped or held by hand. If
your hand is placed too close to the saw blade, there is an
increased risk of injury from blade contact.
The workpiece must be stationary and clamped or held
against both the fence and the table. Do not feed the
workpiece into the blade or cut “freehand” in any way.
Unrestrained or moving workpieces could be thrown at
high speeds, causing injury.
Push the saw through the workpiece. Do not pull the
saw through the workpiece. To make a cut, raise the
saw head and pull it out over the workpiece without
cutting, start the motor, press the saw head down and
push the saw through the workpiece. Cutting on the pull
stroke is likely to cause the saw blade to climb on top of the
workpiece and violently throw the blade assembly towards
Never cross your hand over the intended line of cutting
either in front or behind the saw blade. Supporting the
workpiece “cross handed” i.e. holding the workpiece to
the right of the saw blade with your left hand or vice versa
Do not reach behind the fence with either hand closer
than 100 mm from either side of the saw blade, to re-
move wood scraps, or for any other reason while the
blade is spinning. The proximity of the spinning saw blade
to your hand may not be obvious and you may be seriously
Inspect your workpiece before cutting. If the work-
piece is bowed or warped, clamp it with the outside
bowed face toward the fence. Always make certain that
there is no gap between the workpiece, fence and table
along the line of the cut. Bent or warped workpieces can
twist or shift and may cause binding on the spinning saw
blade while cutting. There should be no nails or foreign ob-
jects in the workpiece.
Do not use the saw until the table is clear of all tools,
wood scraps, etc., except for the workpiece. Small de-
bris or loose pieces of wood or other objects that contact
the revolving blade can be thrown with high speed.
Cut only one workpiece at a time. Stacked multiple work-
pieces cannot be adequately clamped or braced and may
bind on the blade or shift during cutting.
Ensure the mitre saw is mounted or placed on a level,
firm work surface before use. A level and firm work sur-
face reduces the risk of the mitre saw becoming unstable.
Plan your work. Every time you change the bevel or mi-
tre angle setting, make sure the adjustable fence is set
correctly to support the workpiece and will not inter-
fere with the blade or the guarding system. Without
turning the tool “ON” and with no workpiece on the table,
move the saw blade through a complete simulated cut to
assure there will be no interference or danger of cutting the
Provide adequate support such as table extensions,
saw horses, etc. for a workpiece that is wider or longer
than the table top. Workpieces longer or wider than the
mitre saw table can tip if not securely supported. If the cut-
off piece or workpiece tips, it can lift the lower guard or be
thrown by the spinning blade.
Do not use another person as a substitute for a table ex-
tension or as additional support. Unstable support for
the workpiece can cause the blade to bind or the work-
piece to shift during the cutting operation pulling you and
the helper into the spinning blade.
The cut-off piece must not be jammed or pressed by
any means against the spinning saw blade. If confined,
i.e. using length stops, the cut-off piece could get wedged
against the blade and thrown violently.
OBJ_BUCH-2325-003.book Page 26 Monday, October 24, 2016 11:12 AMEnglish | 27
Bosch Power Tools 1 609 92A 1KU | (24.10.16)
Always use a clamp or a fixture designed to properly
support round material such as rods or tubing. Rods
have a tendency to roll while being cut, causing the blade
to “bite” and pull the work with your hand into the blade.
Let the blade reach full speed before contacting the
workpiece. This will reduce the risk of the workpiece be-
If the workpiece or blade becomes jammed, turn the
mitre saw off. Wait for all moving parts to stop and dis-
connect the plug from the power source and/or remove
the battery pack. Then work to free the jammed mate-
rial. Continued sawing with a jammed workpiece could
cause loss of control or damage to the mitre saw.
After finishing the cut, release the switch, hold the saw
head down and wait for the blade to stop before remov-
ing the cut-off piece. Reaching with your hand near the
coasting blade is dangerous.
The power tool is provided with a laser warning label
(marked with number 2 in the representation of the
power tool on the graphics page).
If the text of the warning label is not in your national lan-
guage, stick the provided warning label in your national
language over it before operating for the first time.
Do not direct the laser beam at persons
or animals and do not stare into the di-
rect or reflected laser beam yourself, not
even from a distance. You could blind
somebody, cause accidents or damage
If laser radiation strikes your eye, you must deliberate-
ly close your eyes and immediately turn your head
Do not make any modifications to the laser equipment.
Never make warning signs on the machine unrecognis-
Store the machine in a safe manner when not being
used. The storage location must be dry and lockable.
This prevents the machine from storage damage, and from
being operated by untrained persons.
Never use the machine with a damaged cable. Do not
touch the damaged cable and pull the mains plug when
the cable is damaged while working. Damaged cables in-
crease the risk of an electric shock.
Check the cable regularly and have a damaged cable re-
paired only through an authorised customer service
agent for Bosch power tools. Replace damaged exten-
sion cables. This will ensure that the safety of the power
Do not use dull, cracked, bent or damaged saw blades.
Unsharpened or improperly set saw blades produce nar-
row kerf causing excessive friction, blade binding and kick-
Never operate the machine without the insert plate.
Replace a defective insert plate. Without flawless insert
plates, injuries are possible from the saw blade.
Do not use high speed steel (HSS) saw blades. Such saw
blades can easily break.
Always use blades with correct size and shape (dia-
mond versus round) of arbour holes. Blades that do not
match the mounting hardware of the saw will run eccentri-
cally, causing loss of control.
Make sure that the guard operates properly and that it
can move freely. Never lock the guard in place when
Keep the floor free of wood chips and material remain-
ders. You could slip or trip.
Do not touch the saw blade after working before it has
cooled. The saw blade becomes very hot while working.
Never leave the machine before it has come to a com-
plete stop. Cutting tools that are still running can cause in-
Guide the saw blade against the workpiece only when
the machine is switched on. Otherwise there is danger of
kickback when the saw blade becomes wedged in the
Never stand on the power tool. Serious injuries can occur
when the power tool tips over or when inadvertently com-
ing into contact with the saw blade.
Products sold in GB only:
Your product is fitted with a
BS 1363/A approved electric plug with internal fuse (ASTA
approved to BS 1362).
If the plug is not suitable for your socket outlets, it should be
cut off and an appropriate plug fitted in its place by an au-
thorised customer service agent. The replacement plug
should have the same fuse rating as the original plug.
The severed plug must be disposed of to avoid a possible
shock hazard and should never be inserted into a mains
Products sold in AUS and NZ only:
Use a residual current
device (RCD) with a rated residual current of 30 mA or less.
The following symbols can be important for the operation of
your power tool. Please memorise the symbols and their
meanings. The correct interpretation of the symbols helps
you operate the power tool better and more secure.
Symbols and their meaning
Keep hands away from the cutting
area while the machine is running.
Danger of injury when coming in con-
tact with the saw blade.
Wear a dust respirator.
OBJ_BUCH-2325-003.book Page 27 Monday, October 24, 2016 11:12 AM28 | English
1 609 92A 1KU | (24.10.16) Bosch Power Tools
Product Description and Specifica-
Read all safety warnings and all instruc-
tions. Failure to follow the warnings and in-
structions may result in electric shock, fire
and/or serious injury.
The power tool is intended as a stationary machine for making
straight lengthways and crossways cuts in wood. In this, mitre
angles from –48° to +48° as well as bevel angles from 0° to
The capacity of the power tool is designed for sawing hard-
The power tool is not suitable for cutting aluminium or other
non-ferrous metals or alloys.
The numbering of the components shown refers to the repre-
sentation of the power tool on the graphic pages.
2 Laser warning label
3 Lever for releasing the tool arm
5 Retracting blade guard
15 Scale for mitre angle
16 Fastening screw for stationary saw-table extension 17
17 Saw-table extension (stationary)
24 Adjusting screw of depth stop
28 Laser on/off switch (for marking of cutting line)
30 Tilt-protector bar
32 Locking lever of slide device
33 Mounting holes for material clamp
34 Opening for stationary saw-table extension 17
35 Transport safety-lock
36 Opening for flexible saw-table extension 48
39 Clamping lever of the adjustable fence
41 Scale for bevel angle
43 Hex socket screw for mounting of saw blade
ear ear protectors. Exposure to
noise can cause hearing loss.
Do not stare into beam
Class 2 laser product
Danger area! Keep hands, fingers or
arms away from this area.
The adjustable fence
must be pulled outward
when sawing bevel an-
Observe the dimensions of the saw blade.
The hole diameter must match the tool
spindle without play. Do not use reducers
The cutting line can be in-
dicated by the laser beam
on either the left or right
Symbols and their meaning
OBJ_BUCH-2325-003.book Page 28 Monday, October 24, 2016 11:12 AMEnglish | 29 Bosch Power Tools 1 609 92A 1KU | (24.10.16) 48 Saw-table extension (flexible)
49 Opening for flexible saw-table extension 48
(on the stationary saw-table extension 17)
50 Slider for laser unit
51 Fastening screw for insert plate
Accessories shown or described are not part of the standard deliv-
ery scope of the product. A complete overview of accessories can
be found in our accessories program.
Sound emission values determined according to
Typically the A-weighted noise levels of the product are:
102 dB(A). Uncertainty K =3 dB.
Wear hearing protection!
Declaration of Conformity
We declare under our sole responsibility that the product de-
scribed under “Technical Data” is in conformity with all rele-
vant provisions of the directives 2011/65/EU, until
19 April 2016: 2004/108/EC, from 20 April 2016 on:
2014/30/EU, 2006/42/EC including their amendments and
complies with the following standards:
EN 61029-1, EN 61029-2-9, EN 60825-1,
70538 Stuttgart, GERMANY Robert Bosch Power Tools GmbH70538 Stuttgart, GERMANYStuttgart, 01.01.2017 Assembly
Avoid unintentional starting of the machine. During as-
sembly and for all work on the machine, the power plug
must not be connected to the mains supply.
Please also observe the representation of the
delivery scope at the beginning of the operat-
Before starting the operation of the machine
for the first time, check if all parts listed be-
low have been supplied:
– Sliding mitre saw with mounted saw blade
– Stationary saw-table extension 17 (2 x),
Fastening screws 16 (2 x)
– flexible saw-table extension 48 (2 x)
– Tilt-protector bar 30 with fastening screws 42
Additional components on PCM 8 ST (tool version with
–Leg profiles F, C (4 of each)
– Connecting profiles E, D (2 of each)
–Head profiles A, B (2 of each)
– Fastening screws power tool j (4 x)
Note: Check the power tool for possible damage.
Before further use of the machine, check that all protective
devices are fully functional. Any lightly damaged parts must
be carefully checked to ensure flawless operation of the tool.
All parts must be properly mounted and all conditions fulfilled
that ensure faultless operation.
Damaged protective devices and parts must be immediately
replaced by an authorised service centre.
Additionally required tools (not in delivery scope):
– Box-end or open-end spanner (size 12 mm)
for assembly of the base unit
Divergence of laser line
/II /II * Tool version with base unitPermissible workpiece dimensions (maximum/minimum) see page 32. The values given are valid for a nominal voltage [U] of 230 V. For differ- ent voltages and models for specific countries, these values can vary. Dimension of suitable saw blades
Mounting hole diameter
Executive Vice President
Head of Product Certification
OBJ_BUCH-2325-003.book Page 29 Monday, October 24, 2016 11:12 AM30 | English
1 609 92A 1KU | (24.10.16) Bosch Power Tools
Mounting Individual Components
– Carefully remove all parts included in the delivery from
– Remove all packaging material from the machine and the
accessories provided.
– For easier working when mounting the supplied product
features, please observe that the machine is in the trans-
Mounting the Tilt-Protector Bar (see figure A)
Before using the power tool for the first time, the tilt-protec-
tor bar 30 must be mounted.
– Turn the power tool over and place it carefully on the blade
guard 4 and the saw table 8.
– Insert the tilt-protector bar 30 into the mounting holes pro-
vided in the base plate until the threaded holes of tilt-pro-
tector bar and base plate are flush.
– Insert the fastening screws 42 into the threaded holes and
tighten them using the hex key 38 provided.
– Turn the power tool over so that it is back in the correct po-
Never remove the tilt-protector bar. Without the use of
the tilt-protector bar, the machine does not stand safely
and can tip over, especially when sawing at maximum mi-
Mounting stationary saw-table extensions (see figure B)
The stationary saw-table extensions 17 must be screwed to
the left and right of the saw table 8 with the power tool.
– Insert one saw-table extension 17 using the fastening
screws 16 forward into the opening 34 on the power tool.
– Tighten the fastening screws 16 with the hex key 38 pro-
Stationary or Flexible Mounting
Mounting without Base Unit (see figure C)
– Fasten the power tool with suitable screw fasteners to the
working surface. The mounting holes 9 serve for this pur-
Flexible Mounting (not recommended!) (see figure D)
In exceptional cases, when it is not possible to mount the ma-
chine onto a level and stable work surface, it can be set up us-
ing the tilt protector.
Without the use of the tilt protector, the machine does
not stand safely and can tip over, especially when saw-
ing at maximum mitre/bevel angles.
– Screw the tilt protector 12 in or out until the machine is po-
sitioned level on the working surface.
PCM 8 ST: Mounting with Base Unit (see figures F1–F6)
– Place one plastic cap on a leg profile F.
– Insert two carriage bolts g through a long leg profile F, a
short leg profile C and a short connecting profile E. Secure
the carriage bolts loosely with the flange nuts h.
– Connect a second leg (long leg profile F, short leg profile C)
to the short connecting profile E. Secure the carriage bolts
loosely with the flange nuts h.
– Repeat both of the previous steps with the remaining pro-
– Connect each of the now assembled side sections of the
base unit with a long connecting profile D. Secure the car-
riage bolts loosely with the flange nuts h.
– Place the long head profiles A on the leg profiles C and
screw them tight to the base unit.
– Place the short head profiles B from the outside on the long
head profiles A (mounting holes upward) and screw them
tight to the base unit. Make sure that the mounting holes of
both head parts are flush.
– Place the shims i all the way onto the short head profiles B.
Make sure that the mounting holes of the shim and those of
the head part are flush.
–Insert one carriage bolt g through the square hole of the
shim i and head profile B. Secure the carriage bolts loosely
with the flange nuts h.
– Tighten all flange nuts h with a box-end or open-end span-
lace the power tool on the shims i. Make sure that the
mounting holes 9 on the power tool are flush with the
mounting holes of the shim and those of the head part.
– Screw the power tool to the base unit using the fastening
screws j, the washers k and the flange nuts h.
Dust/Chip Extraction
Dusts from materials such as lead-containing coatings, some
wood types, minerals and metal can be harmful to one’s
health. Touching or breathing-in the dusts can cause allergic
reactions and/or lead to respiratory infections of the user or
Certain dusts, such as oak or beech dust, are considered as
carcinogenic, especially in connection with wood-treatment
additives (chromate, wood preservative). Materials contain-
ing asbestos may only be worked by specialists.
– Always use dust extraction.
– Provide for good ventilation of the working place.
– It is recommended to wear a P2 filter-class respirator.
Observe the relevant regulations in your country for the mate-
The dust/chip extraction can be blocked by dust, chips or
workpiece fragments.
– Switch the machine off and pull the mains plug from the
– Wait until the saw blade has come to a complete stop.
– Determine the cause of the blockage and correct it.
Integrated Dust Extraction (see figure E)
–Mount the dust bag 23 onto the chip ejector 29.
During sawing, the dust bag must never come into contact
with the movable machine parts.
Always empty the dust bag in good time.
External Dust Extraction
For dust extraction, a vacuum hose (size Ø 35 mm) can also
be connected to the chip ejector 29.
The vacuum cleaner must be suitable for the material being
When vacuuming dry dust that is especially detrimental to
health or carcinogenic, use a special vacuum cleaner.
OBJ_BUCH-2325-003.book Page 30 Monday, October 24, 2016 11:12 AMEnglish | 31
Bosch Power Tools 1 609 92A 1KU | (24.10.16)
Changing the Tool (see figures G1–G4)
Before any work on the machine itself, pull the mains
When mounting the saw blade, wear protective gloves.
Danger of injury when touching the saw blade.
Use only saw blades whose maximum permitted speed is
higher than the no-load speed of the power tool.
Use only saw blades that correspond with the characteristic
data given in these operation instructions and that are tested
and marked in accordance with EN 847-1.
Use only saw blades recommended by the tool manufacturer,
and suitable for sawing the materials to be cut. This prevents
overheating of the saw teeth during sawing.
Removing the Saw Blade
– Bring the power tool into the working position.
–Turn the hex socket screw 43 with the hex key 38 provided
and at the same time press the spindle lock 37 until it en-
–Hold the spindle lock 37 pressed and unscrew the hex
socket screw 43 in clockwise direction (left-hand thread!).
– Remove the clamping flange 44.
– Press lever 3 and swing back the retracting blade guard 5
– Hold the retracting blade guard in this position and remove
– Slowly guide the retracting blade guard downward again.
Mounting the Saw Blade
If required, clean all parts to be mounted prior to assembly.
– Press lever 3, swing back the retracting blade guard 5 to
the stop and hold it in this position.
– Place the new saw blade onto the interior clamping flange
When mounting the saw blade, pay attention that the
cutting direction of the teeth (arrow direction on the
saw blade) corresponds with the direction of the arrow
– Slowly guide the retracting blade guard downward again.
– Place on the clamping flange 44 and the screw 43.
Press the spindle lock 37 until it engages and tighten the
screw turning in anticlockwise direction.
Before any work on the machine itself, pull the mains
Transport Safety (see figure H)
The transport safety-lock 35 enables easier handling of the
machine when transporting to various working locations.
Releasing the Machine (Working Position)
– Push the tool arm by the handle 1 down a little in order to
relieve the transport safety-lock 35.
– Pull the transport safety-lock 35 completely outward.
– Guide the tool arm slowly upward.
Securing the Machine (Transport Position)
– Release the locking lever 32, if it is locking the slide device
31 . Pull the tool arm fully forward and press the locking le-
ver backward again to lock the slide device.
– Screw adjusting screw 24 completely upward.
– To lock the saw table 8, tighten the locking knob 11.
– Press lever 3 and at the same time, push the tool arm by
handle 1 downward until the transport safety-lock 35 can
be pushed completely inward.
The tool arm is now securely locked for transport.
Clamping the Workpiece (see figure I)
To ensure optimum working safety, the workpiece must al-
ways be firmly clamped.
Do not saw workpieces that are too small to clamp.
– Press the workpiece firmly against the fences 18 and 7.
– Insert the material clamp 19 provided into one of the holes
– Loosen the wing bolt 46 and adapt the material clamp to
the workpiece. Tighten the wing bolt again.
– Firmly clamp the workpiece by turning the threaded rod
47 in clockwise direction.
Loosening the Workpiece
– To release the material clamp, turn the threaded rod 47 in
anticlockwise direction.
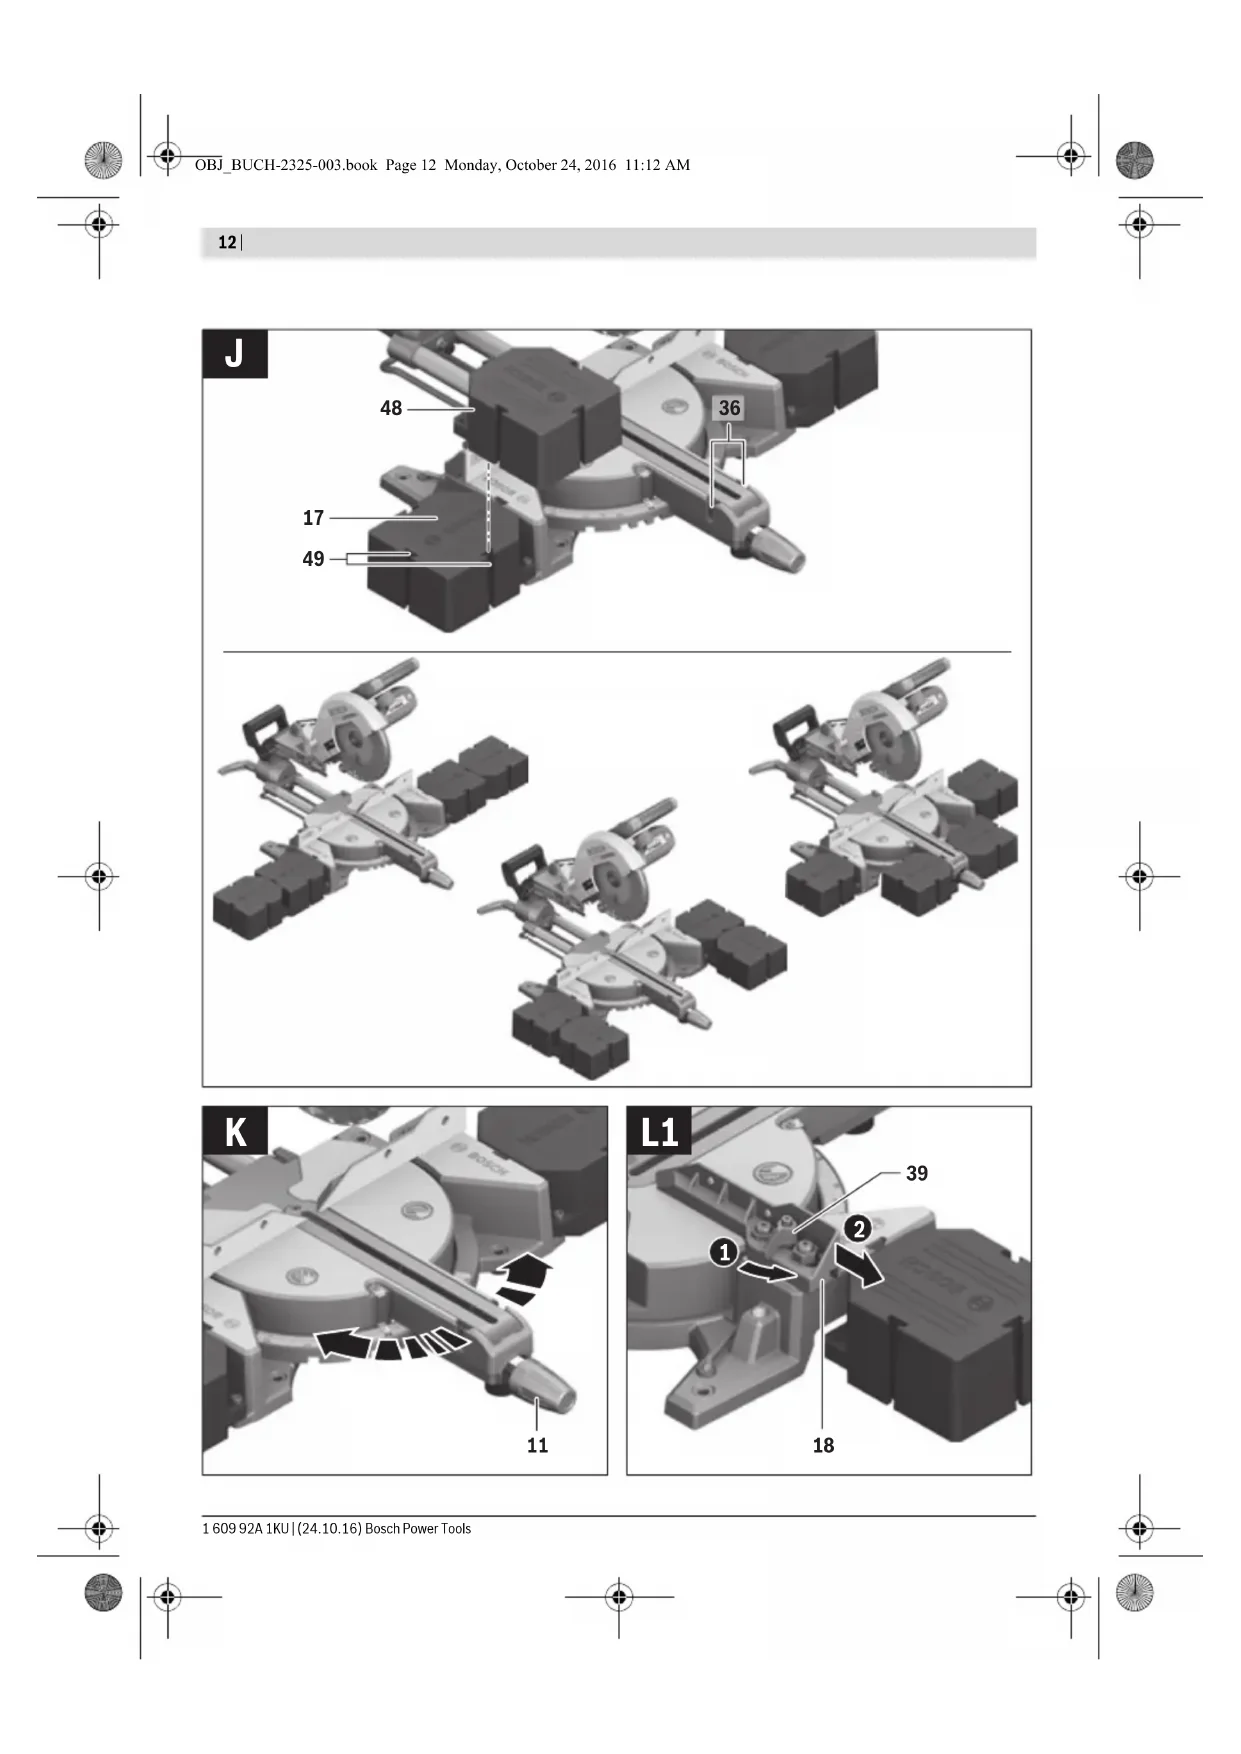
Extending the Saw Table (see figure J)
The flexible insertion system of the saw-table extensions 48
provides you with a wide variety of extension alternatives.
– Insert as required the two flexible saw-table extensions 48
into the openings 36 on the power tool or into the openings
49 of the mounted saw-table extensions.
Adjusting the Cutting Angle
When adjusting the cutting angle, never actuate the
On/Off switch 27. Danger of injury if the machine should
Adjusting Mitre Angles (see figure K)
The mitre angle can be set in the range from 48° (left side) to
– Loosen the locking knob 11 in case it is tightened.
– Turn the saw table 8 left or right by the locking knob until
the angle indicator 13 indicates the requested mitre angle.
– Tighten the locking knob 11 again.
For quick and precise setting of often used mitre angles,
the saw table 8 engages at the detents of the following stand-
Adjusting Bevel Angles (see figures L1–L2)
The bevel angle can be set in the range from 0° to 45°.
– Loosen the clamping lever 39.
– Pull the adjustable fence 18 completely outward.
OBJ_BUCH-2325-003.book Page 31 Monday, October 24, 2016 11:12 AM32 | English
1 609 92A 1KU | (24.10.16) Bosch Power Tools
– To lock the adjustable fence, re-tighten the clamping lever
– Loosen the lock lever 21.
– Tilt the tool arm by the handle 1 until the angle indicator 40
indicates the desired bevel angle.
– Hold the tool arm in this position and retighten the clamp-
For quick and precise setting of the standard angles 0°
and 45°, end stops are provided on the housing.
– Loosen the lock lever 21.
– For this, tilt the tool arm by the handle 1 to the stop toward
the right (0°) or to the stop toward the left (45°).
– Retighten the lock lever 21 again.
Observe correct mains voltage! The voltage of the pow-
er source must agree with the voltage specified on the
nameplate of the machine. Power tools marked with
230 V can also be operated with 220 V.
Switching On (see figure M)
–To start the machine, press the On/Off switch 27 and keep
To save energy, only switch the power tool on when using it.
Note: For safety reasons, the On/Off switch 27 cannot be
locked; it must remain pressed during the entire operation.
The tool arm can only be guided downward when pressing le-
–For sawing, you must additionally press lever 3 in addition
General Sawing Instructions
Always firmly tighten locking knob 11 and lock lever 21
before sawing. Otherwise the saw blade could become
jammed in the workpiece.
For all cuts, it must first be ensured that the saw blade
at no time can come in contact with the fence, screw
clamps or other machine parts. Remove any mounted
auxiliary stops or adjust them accordingly.
Make sure that the retracting blade guard operates properly
and that it can move freely. The retracting blade guard must
open when the tool arm is guided downward. When the tool
arm is guided upward, the retracting blade guard must close
again over the saw blade and lock in the uppermost position
Protect the saw blade against impact and shock. Do not sub-
ject the saw blade to lateral pressure.
Marking the Cutting Line (see figures N1–N2)
A laser beam indicates the cutting line of the saw blade. This
allows for exact positioning of the workpiece for sawing, with-
out having to open the retracting blade guard.
– For this, switch the laser beam on with the switch 28.
– Slide the laser unit 20 using the slider 50 to the left or right
depending on the preferred viewing direction. As a result,
the cutting line will be indicated by the laser beam on ei-
ther the left or right of the saw blade.
– If the cutting line is indicated by the laser beam on the left
of the saw blade, align your mark on the workpiece with the
right-hand edge of the laser line.
If the cutting line is indicated by the laser beam on the right
of the saw blade, align your mark on the workpiece with the
left-hand edge of the laser line.
Position of the Operator (see figure O)
Do not stand in a line with the saw blade in front of the
machine. Always stand aside of the saw blade. This pro-
tects your body against possible kickback.
Permissible Workpiece Dimensions
Maximum workpiece sizes:
Minimum workpiece sizes (= all workpieces that can be
clamped left or right from the saw blade with the supplied ma-
terial clamp 19): 100 x 40 mm (length x width)
Cutting depth, max. (0°/0°): 50 mm
Sawing without Slide Movement (Cutting Off)
– To perform cuts without slide movement (small workpiec-
es), release the locking lever 32, if it is locking the slide de-
vice 31. Slide the tool arm all the way toward the fences 18
and 7 and press the locking lever backward again to lock
– Firmly clamp the workpiece as appropriate for its dimen-
– Set the desired mitre angle.
– Switch on the machine.
– Press lever 3 and slowly guide the tool arm downward by
– Saw through the workpiece applying uniform feed.
– Switch off the machine and wait until the saw blade has
come to a complete stop.
– Guide the tool arm slowly upward.
Sawing with Slide Movement
– To perform cuts with the help of the slide device 31 (wide
workpieces) release the locking lever 32, if it is locking the
– Firmly clamp the workpiece as appropriate for its dimen-
– Set the desired mitre angle.
– Pull the tool arm away from the fence 7 far enough so that
the saw blade is in front of the workpiece.
– Switch on the machine.
and slowly guide the tool arm downward by
OBJ_BUCH-2325-003.book Page 32 Monday, October 24, 2016 11:12 AMEnglish | 33
Bosch Power Tools 1 609 92A 1KU | (24.10.16)
– Press the tool arm in the direction of the fence 7 and saw
through the workpiece applying uniform feed.
– Switch off the machine and wait until the saw blade has
come to a complete stop.
– Guide the tool arm slowly upward.
Adjusting the Depth Stop (Sawing Grooves) (see figure Q)
The depth stop must be adjusted when a trench gap is to be
– Swivel the depth stop 25 outward.
– Press the lever 3 and swing the tool arm to the required po-
– Turn adjusting screw 24, until the screw end touches
– Guide the tool arm slowly upward.
Replacing the Insert Plate (see figure R)
The black insert plate 10 can become worn after prolonged
use of the power tool.
Replace a defective insert plate.
– Bring the power tool into the working position.
– Unscrew the fastening screw 51 using the hex key 38 and
remove the old insert plate.
– Insert the new insert plate and screw the fastening screw
Sawing Profile Strips
Profile strips/mouldings can be sawn in two different ways:
In addition, the cut can be perfomed with or without slide
movement depending on the width of the profile strip/mould-
Always make trial cuts with the mitre angle setting first on
Transport (see figure S)
Before transporting the power tool, the following steps must
– Bring the machine into the transport position.
– Insert the flexible saw-table extensions 48 into the open-
ings 36 of the power tool.
– Remove all accessories that cannot be mounted firmly to
If possible, place unused saw blades in an enclosed con-
tainer for transport.
– Always carry the power tool by its transport handle 22.
When transporting the power tool, use only the trans-
port devices and never use the protective devices.
Maintenance and Service
Maintenance and Cleaning
Before any work on the machine itself, pull the mains
If the replacement of the supply cord is necessary, this has to
be done by Bosch or an authorized Bosch service agent in or-
der to avoid a safety hazard.
For safe and proper working, always keep the power tool and
its ventilation slots clean.
The retracting blade guard must always be able to move freely
and retract automatically. Therefore, always keep the area
around the retracting blade guard clean.
Remove dust and chips after each working procedure by
blowing out with compressed air or with a brush.
Clean the roller 6 regularly.
After-sales Service and Application Service
Our after-sales service responds to your questions concern-
ing maintenance and repair of your product as well as spare
parts. Exploded views and information on spare parts can al-
so be found under: www.bosch-pt.com
Bosch’s application service team will gladly answer questions
concerning our products and their accessories.
In all correspondence and spare parts orders, please always
include the 10-digit article number given on the nameplate of
Robert Bosch Ltd. (B.S.C.)
UB 9 5HJ At www.bosch-pt.co.uk you can order spare parts or arrange
the collection of a product in need of servicing or repair.
Tel. Service: (0344) 7360109
– Placed against the fence
–Lying flat on the saw table
Saw blades for hardwood and composite materials
Saw blade 216 x 30 mm, 60 teeth 2 608 640 433
OBJ_BUCH-2325-003.book Page 33 Monday, October 24, 2016 11:12 AM34 | Français 1 609 92A 1KU | (24.10.16) Bosch Power Tools Australia, New Zealand and Pacific Islands
Robert Bosch Australia Pty. Ltd.
Customer Contact Center
Republic of South Africa
Hotline: (011) 6519600
35 Roper Street, New Centre
E-Mail: bsctools@icon.co.za
KZN – BSC Service Centre
Unit E, Almar Centre
E-Mail: bsc.dur@za.bosch.com
Western Cape – BSC Service Centre
Democracy Way, Prosperity Park
The machine, accessories and packaging should be sorted for
environmental-friendly recycling.
Do not dispose of power tools into household waste!
Only for EC countries:
According to the European Directive
2012/19/EU for Waste Electrical and Elec-
tronic Equipment and its implementation
into national right, power tools that are no
longer usable must be collected separately
and disposed of in an environmentally cor-
rect manner. Subject to change without notice. Français
Avertissements de sécurité
AVERTISSEMENT AVERTISSEMENT OBJ_BUCH-2325-003.book Page 34 Monday, October 24, 2016 11:12 AMFrançais | 35
OBJ_BUCH-2325-003.book Page 35 Monday, October 24, 2016 11:12 AM36 | Français
OBJ_BUCH-2325-003.book Page 36 Monday, October 24, 2016 11:12 AMFrançais | 37
OBJ_BUCH-2325-003.book Page 37 Monday, October 24, 2016 11:12 AM38 | Français 1 609 92A 1KU | (24.10.16) Bosch Power Tools Description et performances du pro-
OBJ_BUCH-2325-003.book Page 38 Monday, October 24, 2016 11:12 AMFrançais | 39
Executive Vice President
Head of Product Certification
OBJ_BUCH-2325-003.book Page 39 Monday, October 24, 2016 11:12 AM40 | Français
OBJ_BUCH-2325-003.book Page 40 Monday, October 24, 2016 11:12 AMFrançais | 41
OBJ_BUCH-2325-003.book Page 41 Monday, October 24, 2016 11:12 AM42 | Français
OBJ_BUCH-2325-003.book Page 42 Monday, October 24, 2016 11:12 AMFrançais | 43
ADVERTENCIA ADVERTENCIA OBJ_BUCH-2325-003.book Page 44 Monday, October 24, 2016 11:12 AMEspañol | 45
OBJ_BUCH-2325-003.book Page 45 Monday, October 24, 2016 11:12 AM46 | Español
OBJ_BUCH-2325-003.book Page 46 Monday, October 24, 2016 11:12 AMEspañol | 47
OBJ_BUCH-2325-003.book Page 47 Monday, October 24, 2016 11:12 AM48 | Español
Executive Vice President
Head of Product Certification
OBJ_BUCH-2325-003.book Page 49 Monday, October 24, 2016 11:12 AM50 | Español
OBJ_BUCH-2325-003.book Page 50 Monday, October 24, 2016 11:12 AMEspañol | 51
OBJ_BUCH-2325-003.book Page 51 Monday, October 24, 2016 11:12 AM52 | Español
OBJ_BUCH-2325-003.book Page 52 Monday, October 24, 2016 11:12 AMEspañol | 53
OBJ_BUCH-2325-003.book Page 53 Monday, October 24, 2016 11:12 AM54 | Español
OBJ_BUCH-2325-003.book Page 54 Monday, October 24, 2016 11:12 AMPortuguês | 55 Bosch Power Tools 1 609 92A 1KU | (24.10.16) México
OBJ_BUCH-2325-003.book Page 56 Monday, October 24, 2016 11:12 AMPortuguês | 57
OBJ_BUCH-2325-003.book Page 57 Monday, October 24, 2016 11:12 AM58 | Português
OBJ_BUCH-2325-003.book Page 59 Monday, October 24, 2016 11:12 AM60 | Português
Executive Vice President
Head of Product Certification
OBJ_BUCH-2325-003.book Page 60 Monday, October 24, 2016 11:12 AMPortuguês | 61
OBJ_BUCH-2325-003.book Page 61 Monday, October 24, 2016 11:12 AM62 | Português
OBJ_BUCH-2325-003.book Page 62 Monday, October 24, 2016 11:12 AMPortuguês | 63
OBJ_BUCH-2325-003.book Page 63 Monday, October 24, 2016 11:12 AM64 | Português
AVVERTENZA AVVERTENZA OBJ_BUCH-2325-003.book Page 65 Monday, October 24, 2016 11:12 AM66 | Italiano
OBJ_BUCH-2325-003.book Page 66 Monday, October 24, 2016 11:12 AMItaliano | 67
OBJ_BUCH-2325-003.book Page 67 Monday, October 24, 2016 11:12 AM68 | Italiano
OBJ_BUCH-2325-003.book Page 68 Monday, October 24, 2016 11:12 AMItaliano | 69
Executive Vice President
Head of Product Certification
OBJ_BUCH-2325-003.book Page 70 Monday, October 24, 2016 11:12 AMItaliano | 71
OBJ_BUCH-2325-003.book Page 71 Monday, October 24, 2016 11:12 AM72 | Italiano
OBJ_BUCH-2325-003.book Page 72 Monday, October 24, 2016 11:12 AMItaliano | 73
OBJ_BUCH-2325-003.book Page 73 Monday, October 24, 2016 11:12 AM74 | Italiano
WAARSCHUWING OBJ_BUCH-2325-003.book Page 75 Monday, October 24, 2016 11:12 AM76 | Nederlands
WAARSCHUWING OBJ_BUCH-2325-003.book Page 76 Monday, October 24, 2016 11:12 AMNederlands | 77
OBJ_BUCH-2325-003.book Page 77 Monday, October 24, 2016 11:12 AM78 | Nederlands
OBJ_BUCH-2325-003.book Page 78 Monday, October 24, 2016 11:12 AMNederlands | 79
Executive Vice President
Head of Product Certification
OBJ_BUCH-2325-003.book Page 80 Monday, October 24, 2016 11:12 AMNederlands | 81
OBJ_BUCH-2325-003.book Page 81 Monday, October 24, 2016 11:12 AM82 | Nederlands
OBJ_BUCH-2325-003.book Page 82 Monday, October 24, 2016 11:12 AMNederlands | 83
OBJ_BUCH-2325-003.book Page 83 Monday, October 24, 2016 11:12 AM84 | Nederlands
ADVARSEL OBJ_BUCH-2325-003.book Page 85 Monday, October 24, 2016 11:12 AM86 | Dansk
ADVARSEL OBJ_BUCH-2325-003.book Page 86 Monday, October 24, 2016 11:12 AMDansk | 87
OBJ_BUCH-2325-003.book Page 87 Monday, October 24, 2016 11:12 AM88 | Dansk
Executive Vice President
Head of Product Certification
OBJ_BUCH-2325-003.book Page 90 Monday, October 24, 2016 11:12 AMDansk | 91
OBJ_BUCH-2325-003.book Page 91 Monday, October 24, 2016 11:12 AM92 | Dansk
OBJ_BUCH-2325-003.book Page 92 Monday, October 24, 2016 11:12 AMDansk | 93
Bosch Service Center
VARNING VARNING OBJ_BUCH-2325-003.book Page 94 Monday, October 24, 2016 11:12 AMSvenska | 95
OBJ_BUCH-2325-003.book Page 95 Monday, October 24, 2016 11:12 AM96 | Svenska
OBJ_BUCH-2325-003.book Page 96 Monday, October 24, 2016 11:12 AMSvenska | 97
OBJ_BUCH-2325-003.book Page 97 Monday, October 24, 2016 11:12 AM98 | Svenska
Executive Vice President
Head of Product Certification
OBJ_BUCH-2325-003.book Page 98 Monday, October 24, 2016 11:12 AMSvenska | 99
OBJ_BUCH-2325-003.book Page 99 Monday, October 24, 2016 11:12 AM100 | Svenska
OBJ_BUCH-2325-003.book Page 100 Monday, October 24, 2016 11:12 AMSvenska | 101
OBJ_BUCH-2325-003.book Page 101 Monday, October 24, 2016 11:12 AM102 | Svenska
Bosch Service Center
ADVARSEL ADVARSEL OBJ_BUCH-2325-003.book Page 103 Monday, October 24, 2016 11:12 AM104 | Norsk
OBJ_BUCH-2325-003.book Page 104 Monday, October 24, 2016 11:12 AMNorsk | 105
OBJ_BUCH-2325-003.book Page 105 Monday, October 24, 2016 11:12 AM106 | Norsk
9 Boringer for montering
Executive Vice President
Head of Product Certification
OBJ_BUCH-2325-003.book Page 107 Monday, October 24, 2016 11:12 AM108 | Norsk
OBJ_BUCH-2325-003.book Page 108 Monday, October 24, 2016 11:12 AMNorsk | 109
OBJ_BUCH-2325-003.book Page 109 Monday, October 24, 2016 11:12 AM110 | Norsk
OBJ_BUCH-2325-003.book Page 110 Monday, October 24, 2016 11:12 AMNorsk | 111
OBJ_BUCH-2325-003.book Page 111 Monday, October 24, 2016 11:12 AM112 | Suomi 1 609 92A 1KU | (24.10.16) Bosch Power Tools Deponering
OBJ_BUCH-2325-003.book Page 113 Monday, October 24, 2016 11:12 AM114 | Suomi
OBJ_BUCH-2325-003.book Page 114 Monday, October 24, 2016 11:12 AMSuomi | 115
– laippamutterit h (30 x)
Executive Vice President
Head of Product Certification
OBJ_BUCH-2325-003.book Page 116 Monday, October 24, 2016 11:12 AMSuomi | 117
OBJ_BUCH-2325-003.book Page 117 Monday, October 24, 2016 11:12 AM118 | Suomi
OBJ_BUCH-2325-003.book Page 118 Monday, October 24, 2016 11:12 AMSuomi | 119
OBJ_BUCH-2325-003.book Page 121 Monday, October 24, 2016 11:12 AM122 | Ελληνικά
OBJ_BUCH-2325-003.book Page 122 Monday, October 24, 2016 11:12 AMΕλληνικά | 123
OBJ_BUCH-2325-003.book Page 123 Monday, October 24, 2016 11:12 AM124 | Ελληνικά
Executive Vice President
Head of Product Certification
OBJ_BUCH-2325-003.book Page 125 Monday, October 24, 2016 11:12 AM126 | Ελληνικά
OBJ_BUCH-2325-003.book Page 126 Monday, October 24, 2016 11:12 AMΕλληνικά | 127
OBJ_BUCH-2325-003.book Page 127 Monday, October 24, 2016 11:12 AM128 | Ελληνικά
OBJ_BUCH-2325-003.book Page 128 Monday, October 24, 2016 11:12 AMΕλληνικά | 129
OBJ_BUCH-2325-003.book Page 129 Monday, October 24, 2016 11:12 AM130 | Ελληνικά
UYARI UYARI OBJ_BUCH-2325-003.book Page 131 Monday, October 24, 2016 11:12 AM132 | Türkçe
OBJ_BUCH-2325-003.book Page 132 Monday, October 24, 2016 11:12 AMTürkçe | 133
OBJ_BUCH-2325-003.book Page 133 Monday, October 24, 2016 11:12 AM134 | Türkçe
OBJ_BUCH-2325-003.book Page 135 Monday, October 24, 2016 11:12 AM136 | Türkçe
Executive Vice President
Head of Product Certification
OBJ_BUCH-2325-003.book Page 136 Monday, October 24, 2016 11:12 AMTürkçe | 137
OBJ_BUCH-2325-003.book Page 137 Monday, October 24, 2016 11:12 AM138 | Türkçe
OBJ_BUCH-2325-003.book Page 138 Monday, October 24, 2016 11:12 AMTürkçe | 139
OBJ_BUCH-2325-003.book Page 139 Monday, October 24, 2016 11:12 AM140 | Türkçe
OBJ_BUCH-2325-003.book Page 142 Monday, October 24, 2016 11:12 AMPolski | 143
OBJ_BUCH-2325-003.book Page 143 Monday, October 24, 2016 11:12 AM144 | Polski
OBJ_BUCH-2325-003.book Page 144 Monday, October 24, 2016 11:12 AMPolski | 145
Executive Vice President
Head of Product Certification
OBJ_BUCH-2325-003.book Page 146 Monday, October 24, 2016 11:12 AMPolski | 147
OBJ_BUCH-2325-003.book Page 147 Monday, October 24, 2016 11:12 AM148 | Polski
OBJ_BUCH-2325-003.book Page 148 Monday, October 24, 2016 11:12 AMPolski | 149
OBJ_BUCH-2325-003.book Page 149 Monday, October 24, 2016 11:12 AM150 | Polski
Robert Bosch Sp. z o.o.
VAROVÁNÍ OBJ_BUCH-2325-003.book Page 151 Monday, October 24, 2016 11:12 AM152 | Česky
OBJ_BUCH-2325-003.book Page 152 Monday, October 24, 2016 11:12 AMČesky | 153
OBJ_BUCH-2325-003.book Page 153 Monday, October 24, 2016 11:12 AM154 | Česky
OBJ_BUCH-2325-003.book Page 154 Monday, October 24, 2016 11:12 AMČesky | 155
Executive Vice President
Head of Product Certification
OBJ_BUCH-2325-003.book Page 155 Monday, October 24, 2016 11:12 AM156 | Česky
OBJ_BUCH-2325-003.book Page 156 Monday, October 24, 2016 11:12 AMČesky | 157
OBJ_BUCH-2325-003.book Page 157 Monday, October 24, 2016 11:12 AM158 | Česky
OBJ_BUCH-2325-003.book Page 158 Monday, October 24, 2016 11:12 AMČesky | 159
POZOR POZOR OBJ_BUCH-2325-003.book Page 160 Monday, October 24, 2016 11:12 AMSlovensky | 161
OBJ_BUCH-2325-003.book Page 161 Monday, October 24, 2016 11:12 AM162 | Slovensky
OBJ_BUCH-2325-003.book Page 162 Monday, October 24, 2016 11:12 AMSlovensky | 163
OBJ_BUCH-2325-003.book Page 164 Monday, October 24, 2016 11:12 AMSlovensky | 165
Executive Vice President
Head of Product Certification
OBJ_BUCH-2325-003.book Page 165 Monday, October 24, 2016 11:12 AM166 | Slovensky
OBJ_BUCH-2325-003.book Page 166 Monday, October 24, 2016 11:12 AMSlovensky | 167
OBJ_BUCH-2325-003.book Page 167 Monday, October 24, 2016 11:12 AM168 | Slovensky
OBJ_BUCH-2325-003.book Page 168 Monday, October 24, 2016 11:12 AMSlovensky | 169
FIGYELMEZTETÉS FIGYELMEZTETÉS OBJ_BUCH-2325-003.book Page 170 Monday, October 24, 2016 11:12 AMMagyar | 171
OBJ_BUCH-2325-003.book Page 171 Monday, October 24, 2016 11:12 AM172 | Magyar
OBJ_BUCH-2325-003.book Page 172 Monday, October 24, 2016 11:12 AMMagyar | 173
OBJ_BUCH-2325-003.book Page 174 Monday, October 24, 2016 11:12 AMMagyar | 175
Executive Vice President
Head of Product Certification
OBJ_BUCH-2325-003.book Page 175 Monday, October 24, 2016 11:12 AM176 | Magyar
OBJ_BUCH-2325-003.book Page 176 Monday, October 24, 2016 11:12 AMMagyar | 177
OBJ_BUCH-2325-003.book Page 177 Monday, October 24, 2016 11:12 AM178 | Magyar
OBJ_BUCH-2325-003.book Page 178 Monday, October 24, 2016 11:12 AMMagyar | 179
OBJ_BUCH-2325-003.book Page 180 Monday, October 24, 2016 11:12 AMРусский | 181
OBJ_BUCH-2325-003.book Page 181 Monday, October 24, 2016 11:12 AM182 | Русский
OBJ_BUCH-2325-003.book Page 182 Monday, October 24, 2016 11:12 AMРусский | 183
OBJ_BUCH-2325-003.book Page 183 Monday, October 24, 2016 11:12 AM184 | Русский
OBJ_BUCH-2325-003.book Page 184 Monday, October 24, 2016 11:12 AMРусский | 185
OBJ_BUCH-2325-003.book Page 185 Monday, October 24, 2016 11:12 AM186 | Русский
Executive Vice President
Head of Product Certification
OBJ_BUCH-2325-003.book Page 186 Monday, October 24, 2016 11:12 AMРусский | 187
OBJ_BUCH-2325-003.book Page 187 Monday, October 24, 2016 11:12 AM188 | Русский
OBJ_BUCH-2325-003.book Page 188 Monday, October 24, 2016 11:12 AMРусский | 189
OBJ_BUCH-2325-003.book Page 189 Monday, October 24, 2016 11:12 AM190 | Русский
OBJ_BUCH-2325-003.book Page 192 Monday, October 24, 2016 11:12 AMУкраїнська | 193
OBJ_BUCH-2325-003.book Page 193 Monday, October 24, 2016 11:12 AM194 | Українська
OBJ_BUCH-2325-003.book Page 194 Monday, October 24, 2016 11:12 AMУкраїнська | 195
OBJ_BUCH-2325-003.book Page 196 Monday, October 24, 2016 11:12 AMУкраїнська | 197
Executive Vice President
Head of Product Certification
OBJ_BUCH-2325-003.book Page 197 Monday, October 24, 2016 11:12 AM198 | Українська
OBJ_BUCH-2325-003.book Page 198 Monday, October 24, 2016 11:12 AMУкраїнська | 199
OBJ_BUCH-2325-003.book Page 199 Monday, October 24, 2016 11:12 AM200 | Українська
OBJ_BUCH-2325-003.book Page 200 Monday, October 24, 2016 11:12 AMУкраїнська | 201
OBJ_BUCH-2325-003.book Page 201 Monday, October 24, 2016 11:12 AM202 | Українська
OBJ_BUCH-2325-003.book Page 203 Monday, October 24, 2016 11:12 AM204 | Қaзақша
OBJ_BUCH-2325-003.book Page 204 Monday, October 24, 2016 11:12 AMҚaзақша | 205
OBJ_BUCH-2325-003.book Page 205 Monday, October 24, 2016 11:12 AM206 | Қaзақша
OBJ_BUCH-2325-003.book Page 206 Monday, October 24, 2016 11:12 AMҚaзақша | 207
Executive Vice President
Head of Product Certification
OBJ_BUCH-2325-003.book Page 207 Monday, October 24, 2016 11:12 AM208 | Қaзақша
OBJ_BUCH-2325-003.book Page 208 Monday, October 24, 2016 11:12 AMҚaзақша | 209
OBJ_BUCH-2325-003.book Page 209 Monday, October 24, 2016 11:12 AM210 | Қaзақша
OBJ_BUCH-2325-003.book Page 210 Monday, October 24, 2016 11:12 AMҚaзақша | 211
OBJ_BUCH-2325-003.book Page 211 Monday, October 24, 2016 11:12 AM212 | Қaзақша
AVERTISMEN T AVERTISMEN T OBJ_BUCH-2325-003.book Page 213 Monday, October 24, 2016 11:12 AM214 | Română
OBJ_BUCH-2325-003.book Page 214 Monday, October 24, 2016 11:12 AMRomână | 215
OBJ_BUCH-2325-003.book Page 215 Monday, October 24, 2016 11:12 AM216 | Română
OBJ_BUCH-2325-003.book Page 217 Monday, October 24, 2016 11:12 AM218 | Română
Executive Vice President
Head of Product Certification
OBJ_BUCH-2325-003.book Page 218 Monday, October 24, 2016 11:12 AMRomână | 219
OBJ_BUCH-2325-003.book Page 219 Monday, October 24, 2016 11:12 AM220 | Română
OBJ_BUCH-2325-003.book Page 220 Monday, October 24, 2016 11:12 AMRomână | 221
OBJ_BUCH-2325-003.book Page 221 Monday, October 24, 2016 11:12 AM222 | Română
OBJ_BUCH-2325-003.book Page 223 Monday, October 24, 2016 11:12 AM224 | Български
OBJ_BUCH-2325-003.book Page 224 Monday, October 24, 2016 11:12 AMБългарски | 225
OBJ_BUCH-2325-003.book Page 225 Monday, October 24, 2016 11:12 AM226 | Български
OBJ_BUCH-2325-003.book Page 226 Monday, October 24, 2016 11:12 AMБългарски | 227
Executive Vice President
Head of Product Certification
OBJ_BUCH-2325-003.book Page 228 Monday, October 24, 2016 11:12 AMБългарски | 229
OBJ_BUCH-2325-003.book Page 229 Monday, October 24, 2016 11:12 AM230 | Български
OBJ_BUCH-2325-003.book Page 230 Monday, October 24, 2016 11:12 AMБългарски | 231
OBJ_BUCH-2325-003.book Page 231 Monday, October 24, 2016 11:12 AM232 | Български
OBJ_BUCH-2325-003.book Page 232 Monday, October 24, 2016 11:12 AMБългарски | 233
OBJ_BUCH-2325-003.book Page 236 Monday, October 24, 2016 11:12 AMМакедонски | 237
OBJ_BUCH-2325-003.book Page 238 Monday, October 24, 2016 11:12 AMМакедонски | 239
Executive Vice President
Head of Product Certification
OBJ_BUCH-2325-003.book Page 240 Monday, October 24, 2016 11:12 AMМакедонски | 241
OBJ_BUCH-2325-003.book Page 241 Monday, October 24, 2016 11:12 AM242 | Македонски
OBJ_BUCH-2325-003.book Page 242 Monday, October 24, 2016 11:12 AMМакедонски | 243
UPOZORENJE OBJ_BUCH-2325-003.book Page 244 Monday, October 24, 2016 11:12 AMSrpski | 245
UPOZORENJE OBJ_BUCH-2325-003.book Page 245 Monday, October 24, 2016 11:12 AM246 | Srpski
OBJ_BUCH-2325-003.book Page 246 Monday, October 24, 2016 11:12 AMSrpski | 247
OBJ_BUCH-2325-003.book Page 248 Monday, October 24, 2016 11:12 AMSrpski | 249
Executive Vice President
Head of Product Certification
OBJ_BUCH-2325-003.book Page 249 Monday, October 24, 2016 11:12 AM250 | Srpski
OBJ_BUCH-2325-003.book Page 250 Monday, October 24, 2016 11:12 AMSrpski | 251
OBJ_BUCH-2325-003.book Page 251 Monday, October 24, 2016 11:12 AM252 | Srpski
OBJ_BUCH-2325-003.book Page 252 Monday, October 24, 2016 11:12 AMSrpski | 253
OPOZORILO OPOZORILO OBJ_BUCH-2325-003.book Page 254 Monday, October 24, 2016 11:12 AMSlovensko | 255
OBJ_BUCH-2325-003.book Page 255 Monday, October 24, 2016 11:12 AM256 | Slovensko
OBJ_BUCH-2325-003.book Page 256 Monday, October 24, 2016 11:12 AMSlovensko | 257
Executive Vice President
Head of Product Certification
OBJ_BUCH-2325-003.book Page 258 Monday, October 24, 2016 11:12 AMSlovensko | 259
OBJ_BUCH-2325-003.book Page 259 Monday, October 24, 2016 11:12 AM260 | Slovensko
OBJ_BUCH-2325-003.book Page 260 Monday, October 24, 2016 11:12 AMSlovensko | 261
OBJ_BUCH-2325-003.book Page 261 Monday, October 24, 2016 11:12 AM262 | Slovensko
UPOZORENJE UPOZORENJE OBJ_BUCH-2325-003.book Page 263 Monday, October 24, 2016 11:12 AM264 | Hrvatski
OBJ_BUCH-2325-003.book Page 264 Monday, October 24, 2016 11:12 AMHrvatski | 265
OBJ_BUCH-2325-003.book Page 265 Monday, October 24, 2016 11:12 AM266 | Hrvatski
–Matice s prirubnicom h (30 x)
Executive Vice President
Head of Product Certification
OBJ_BUCH-2325-003.book Page 267 Monday, October 24, 2016 11:12 AM268 | Hrvatski
OBJ_BUCH-2325-003.book Page 268 Monday, October 24, 2016 11:12 AMHrvatski | 269
OBJ_BUCH-2325-003.book Page 269 Monday, October 24, 2016 11:12 AM270 | Hrvatski
OBJ_BUCH-2325-003.book Page 270 Monday, October 24, 2016 11:12 AMHrvatski | 271
OBJ_BUCH-2325-003.book Page 273 Monday, October 24, 2016 11:12 AM274 | Eesti
OBJ_BUCH-2325-003.book Page 274 Monday, October 24, 2016 11:12 AMEesti | 275
Executive Vice President
Head of Product Certification
OBJ_BUCH-2325-003.book Page 276 Monday, October 24, 2016 11:12 AMEesti | 277
OBJ_BUCH-2325-003.book Page 277 Monday, October 24, 2016 11:12 AM278 | Eesti
OBJ_BUCH-2325-003.book Page 278 Monday, October 24, 2016 11:12 AMEesti | 279
OBJ_BUCH-2325-003.book Page 279 Monday, October 24, 2016 11:12 AM280 | Eesti
OBJ_BUCH-2325-003.book Page 282 Monday, October 24, 2016 11:12 AMLatviešu | 283
OBJ_BUCH-2325-003.book Page 283 Monday, October 24, 2016 11:12 AM284 | Latviešu
OBJ_BUCH-2325-003.book Page 284 Monday, October 24, 2016 11:12 AMLatviešu | 285
OBJ_BUCH-2325-003.book Page 285 Monday, October 24, 2016 11:12 AM286 | Latviešu
Executive Vice President
Head of Product Certification
OBJ_BUCH-2325-003.book Page 286 Monday, October 24, 2016 11:12 AMLatviešu | 287
OBJ_BUCH-2325-003.book Page 287 Monday, October 24, 2016 11:12 AM288 | Latviešu
OBJ_BUCH-2325-003.book Page 288 Monday, October 24, 2016 11:12 AMLatviešu | 289
OBJ_BUCH-2325-003.book Page 289 Monday, October 24, 2016 11:12 AM290 | Latviešu
OBJ_BUCH-2325-003.book Page 291 Monday, October 24, 2016 11:12 AM292 | Lietuviškai
OBJ_BUCH-2325-003.book Page 292 Monday, October 24, 2016 11:12 AMLietuviškai | 293
OBJ_BUCH-2325-003.book Page 293 Monday, October 24, 2016 11:12 AM294 | Lietuviškai
OBJ_BUCH-2325-003.book Page 294 Monday, October 24, 2016 11:12 AMLietuviškai | 295
Executive Vice President
Head of Product Certification
OBJ_BUCH-2325-003.book Page 295 Monday, October 24, 2016 11:12 AM296 | Lietuviškai
OBJ_BUCH-2325-003.book Page 296 Monday, October 24, 2016 11:12 AMLietuviškai | 297
OBJ_BUCH-2325-003.book Page 297 Monday, October 24, 2016 11:12 AM298 | Lietuviškai
OBJ_BUCH-2325-003.book Page 298 Monday, October 24, 2016 11:12 AMLietuviškai | 299
OBJ_BUCH-2325-003.book Page 300 Monday, October 24, 2016 11:12 AM | 301
Head of Product Certification
Senior Vice President