USER MANUAL IMPULSO TURBOAIR
ENWarnings and installation
UK NonepeJxKeHnTa BCTaHOBJIeHnHa
KK EckenpTyIep XaHe opHaTy
SR Yno3opeha n Hnctauna
Residual Heat Indicator
Nota: Whenever you want to display a color in the form of a color image, use the Color Mode.
- Temperature manager (Worming Function)
A Anything to be done in the next few days?
Se先进技术 are used in the market.
Strictly observe the instructions in this manual. All liability is declined for any problems, damage or fires caused by failure to comply with the instructions in this manual. The device is intended for domestic use only, to cook food and extract the fumes generated by cooking. No other use is allowed (e.g. heating rooms). The manufacturer declines any liability for inappropriate use or incorrect control settings.
The device may have different aesthetic features with respect to the illustrations in this handbook, however the operating, maintenance and installation instructions remain the same.
- Read the instructions carefully: they contain important information on installation, operation and safety.
- Do not make electrical changes to the device.
- Before installing the device, make sure that none of the components are damaged. Otherwise, contact the dealer and do not continue with the installation.
- Check that the device is intact before proceeding with installation. Otherwise, contact the dealer and do not continue with the installation.

At the parts marked with this symbol can be purchased separately from specialised dealers.

t the parts marked with this symbol are optional acsories supplied only with some models and can be pursed from the websites www.elica.com and w.shop.elica.com.
1. SAFETY AND REGULATIONS

GENERAL SAFETY
Please note! Pay strict attention to the following instructions: The device must be disconnected from the mains before carrying out any installation work. Installation or maintenance must be performed by a qualified technician, in compliance with the manufacturer's instructions and local safety regulations. Do not repair or replace any part of the product unless specifically stated in the operating manual.
- By law, the product must be earthed. The power cable must be long enough to allow the product, built into the cabinet, to be connected to the mains. In order for the installation to comply with current safety regulations, an approved omnipolar switch is required that guarantees complete disconnection from the mains in overvoltage category III, in accordance with the installation rules. Do not use power strips or extension cords. Once installation is complete, the electrical components must no longer be accessible by the user. The product and its accessible parts get hot during use. Be careful not to touch the heating elements. Ensure that children do not play with the product; keep children at a safe distance and supervise them as the accessible parts may become very hot during use. For people with pacemakers and active implants, it is important to check, prior to using the induction hob, that their pace
maker is compatible with the product. Do not touch the heating elements of the product during and after use. Avoid contact with kitchen towels or other flammable materials until all components of the product have sufficiently cooled, fire hazard. Do not place flammable materials on or near the product. Overheated fats and oils easily catch fire. Supervise the cooking of fatty or oily food. If the surface is cracked, switch the product off immediately to prevent the risk of an electric shock. The product is not intended to be operated with an external timer or a separate remote control system. Unattended cooking on a hob with oil or fat can be dangerous and may cause a fire. The cooking process must be supervised. A short cooking process must be constantly monitored. NEVER attempt to put fires out using water. Instead, turn off the product and smother the flames, for example with a lid or a fire blanket. Fire hazard: do not place objects on the cooking surfaces. Do not use steam cleaners, risk of electric shock. Do not place metal objects, such as knives, forks, spoons or lids on the hob because they could become hot. Before connecting the product to the mains: check the rating plate (on the bottom of the product) to ensure that the voltage and power correspond to the mains supply and that the power socket is suitable. If in doubt, consult a qualified electrician.
Important: After use, turn off the hob using its control device and do not rely on the pot detector. Prevent liquids from boiling over; therefore, turn the heat down when boiling or heating liquids. Do not leave the heating elements turned on with empty pots and pans, or without any cookware. Switch off the relevant cooking zone when you have finished cooking. Never use aluminium foil for cooking and never place products packaged in aluminium directly on the hob. The aluminium would melt and irreparably damage your product. Never heat a tin or can containing foods without opening it first: it might explode! This warning also applies to all other types of hobs. High power levels such as the Booster function should not be used to heat certain liquids, such as oil for frying. Excessive heat may be dangerous. In these cases, we recommend the use of a lower power level. The cookware must be placed directly on the hob and must be centred. Under no circumstances may any other objects be placed between the pot and the hob. If the temperature becomes high, the product automatically decreases the power level of the cooking zones. Before doing any cleaning or maintenance work, disconnect the product from the mains by disconnecting the plug or turning off the mains switch. For all installation and maintenance operations, always use work gloves. The product can be used by children over the age of 8 and by people with reduced physical, sensory or mental capabilities or without experience or the necessary knowledge, as long as they are properly supervised or have been instructed on how to safely use the product and understand the inherent dangers. Children must be supervised to ensure they do not play with the product. Cleaning and maintenance must never be performed by children unless they are properly supervised. The room must be sufficiently ventilated when the product is used at
the same time as other appliances that run on gas or other fuels. The product must be cleaned frequently both inside and out (AT LEAST ONCE A MONTH); always follow the instructions given in the maintenance manual. Failure to comply with the rules for product cleaning and the cleaning/replacement of filters, may create a fire hazard. Flambe cooking is strictly prohibited. Using a naked flame may damage the filters and cause a fire hazard, and must therefore be avoided under all circumstances. Extra care must be taken when frying to prevent the oil from overheating and catching fire. Please note! The accessible parts of the device may become hot when the hob is switched on. Please note! Do not connect the product to the mains until the installation is complete. The regulations laid down by local authorities must be strictly followed with regard to the technical and safety measures to be adopted for fume extraction. The extracted air must not be conveyed through the same ducts used to extract the fumes generated by the combustion of gas or other types of fuels. Never use the product without the grille properly installed! Only use the fastening screws supplied with the product for installation, or if not supplied, purchase the correct type of screws. Use screws of the right length, as indicated in the installation guide. When this product is used together with other devices powered with non-electrical energy, the negative pressure of the room must not exceed 4 Pa (4 x 10⁻⁵ bar). This manual must be stored for future consultation at any time. If sold, transferred or moved, it must remain with the product.
- Range hoods and other cooking fume extractors may adversely affect the safe operation of appliances burning gas or other fuels (including those in other rooms) due to back flow of combustion gases. These gases can potentially result in carbon monoxide poisoning. After installation of a range hood or other cooking fume extractor, the operation of flued gas appliances should be tested by a competent person to ensure that back flow of combustion gases does not occur.
ELECTRICAL CONNECTION SAFETY
- Disconnect the product from the mains. - The installation must be carried out by professionally qualified personnel with knowledge of the regulations in force for installation and safety. - The manufacturer disclaims all liability for persons, animals or property if the guidelines provided in this chapter are not followed. - The power cable must be long enough to allow removal of the hob from the worktop. - Check that the voltage on the rating plate on the bottom of the product corresponds to that of the domestic environment where it will be installed. - Do not use extension cords. - The earth cable must be 2cm longer than the other cables. - If the product is not equipped with a power cable, use one with a minimum conductor diameter of 2.5 mm2 for power up to 5500 Watt; for higher power levels, the diameter must be 4mm2 . - The temperature must not reach 50^ above room temperature anywhere along the cable. - The product is intended to be permanently connected to the mains, therefore, make the connection to the mains using an approved omnipolar switch that guarantees
complete disconnection from the mains in category III over-voltage conditions, and which is readily accessible after the installation.
- Please note! The interconnection cable must be replaced by the authorised customer service representative or by a person with similar qualifications.
- Please note! Before reconnecting the circuit to the mains power supply and making sure that it is working correctly, always check that the power cable is correctly installed.
WINDOWS KIT: The product can also be used in conjunction with a Window sensor KIT (not supplied by the manufacturer). If the Window sensor KIT is installed (only if used in DUCT-OUT mode), air extraction will halt every time the window in the room, on which the KIT is applied, is closed. The KIT must be electrically connected to the device by qualified and specialised technical personnel. The KIT must be certified separately in accordance with the safety standards for the component and its use with the device. Installation must be carried out in accordance with current regulations for domestic systems.
PLEASE NOTE: the wiring of the KIT to be connected to the product must be part of a certified safety ultralow voltage (SELV) circuit. The manufacturer of this device disclaims all liability for any inconvenience, damage or fires caused by defects and/or problems associated with the malfunction and/or incorrect installation of the KIT.
INSTALLATION SAFETY
- The electrical and mechanical installation must be performed by qualified personnel.
-
Before starting the installation: After unpacking the product, check that it has not been damaged during transport and in the case of problems, contact your dealer or Customer Service, before proceeding with the installation; Check that the purchased product is the right size for the installation location; Check for accessories inside the packaging (placed there for ease of transport, such as bags containing screws, the warranty certificate, etc.). Remove and keep them safe; Also check that there is a power socket near the installation area
-
Preparing the cabinet for installation:
-
The product cannot be installed above cooling appliances, dishwashers, heaters, ovens, washing machines and dryers; Create the cut-outs in the cabinet before inserting the hob and carefully remove shavings or sawdust.
The minimum distance between the hob and the wall must be at least 50mm from the front, at least 50mm from the sides and at least 550mm from the upper wall units.
NB: when designing the space, the kitchen manufacturer's instructions must be followed.
- to optimise the recirculating installation, it is recommended to create a slot in the plinth, in which to insert a commercial grille.
- Important: use a single component adhesive sealant (S)
that can withstand high temperatures up to 250^ ; before installation, the surfaces that need to be glued must be thoroughly cleaned, removing all substances that may compromise adhesion (e.g. release agents, preservatives, grease, oils, powders, old adhesive residue, etc.); the adhesive must be evenly spread along the entire perimeter of the frame; after gluing, leave the adhesive to dry for about 24 hours.
- Please note! Failure to install screws and fasteners in accordance with these instructions may result in electrical hazards.
- Note: for correct installation of the product, it is recommended to tape the pipes using an adhesive with the following characteristics: soft elastic PVC film, with acrylic-based adhesive; complies with DIN EN 60454 regulations; flame retardant; excellent resistance against wear; resistant to temperature fluctuations; can be used at low temperatures.
END-OF-LIFE DISPOSAL

This device is marked in compliance with the European Directive 2012/19/EC - UK SI 2013 No.3113, Waste Electrical and Electronic Equipment (WEEE).
Make sure that this product is disposed of correctly. The user helps prevent potential negative consequences for the environment and for health. The symbol on the product or accompanying documentation indicates that this product should not be treated as household waste but should be handed over at a suitable collection point for the recycling of electrical and electronic equipment. Dispose of it in accordance with local regulations for waste disposal. For further information about the treatment, recovery and recycling of this product, please contact your local authority, the collection service for household waste or the shop from where the product was purchased.
REGULATIONS
Device designed, tested and developed in compliance with regulations on:
- Safety: EN/IEC 60335-1; EN/IEC 60335-2-6, EN/IEC 60335-2-31, EN/IEC 62233; Performance: EN/IEC 61591; ISO 5167-1; ISO 5167-3; ISO 5168; EN/IEC 60704-1; EN/IEC 60704-2-13; EN/IEC 60704-3; ISO 3741; EN 50564; IEC 62301. EN 60350-2; • EMC: EN 55014-1; CISPR 14-1; EN 55014-2; CISPR 14-2; EN/IEC 61000-3-3; EN/IEC 61000-3-12.
RECOMMENDATIONS FOR USE
Recommendations for correct use in order to reduce the impact on the environment: When cooking begins, the device should be turned on at minimum speed, and left on for a few minutes even after cooking is complete. Increase the speed only if there is a large quantity of fumes and steam, using the Booster function only in extreme cases. To keep the odour reduction system running efficiently, replace the carbon filter/s when necessary. To ensure the high performance of the grease filter, clean it when neces
sary. To improve efficiency and minimise noise, use the maximum duct diameter indicated in this manual.
2. USE
USING THE HOB
The induction cooking system is based on the physical phenomenon of magnetic induction. The main characteristic of this system is the direct transfer of energy from the generator to the pot.
Benefits: When compared to electric hobs, your induction hob is: Safer: lower temperature on the glass surface. Faster: shorter food heating times. More accurate: the hob immediately reacts to your commands. More efficient: 90% of the absorbed energy is transformed into heat. Moreover, once the pot is removed from the hob, heat transmission is immediately interrupted, avoiding unnecessary heat loss.
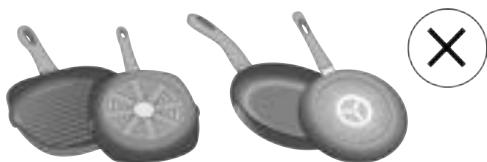
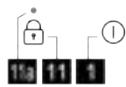
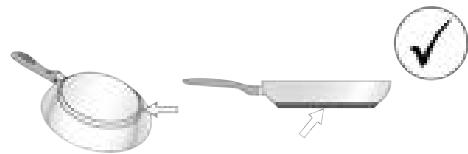
USE OF COOKWARE
Cookware

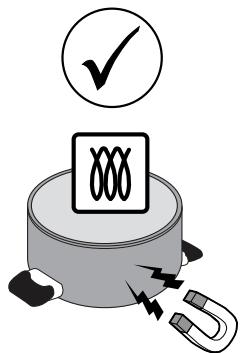
Only use pots bearing this symbol.
Important:
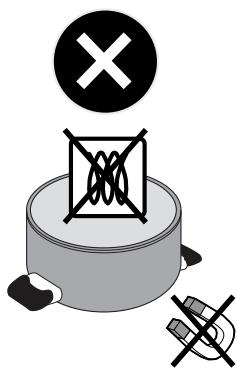
to avoid permanent damage to the hob surface, do not use:
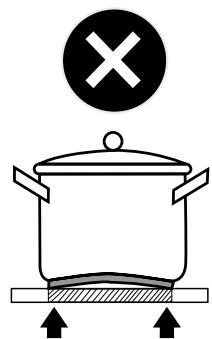
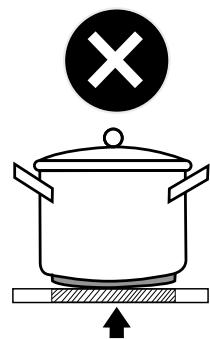
- cookware with a base that is not perfectly flat;
- metal cookware with an enamelled base;
- cookware with a rough base, to avoid scratching the hob surface;
- never place hot pots and pans on the surface of the hob's control panel.
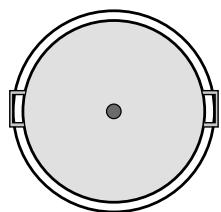
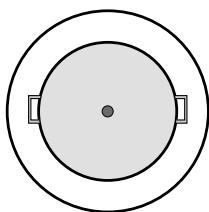
- Not all induction pots work efficiently due to the base only partially consisting of ferromagnetic material! When purchasing pots or pans ensure that:
- the base is made entirely from ferromagnetic material. If this is not the case, heat transmission and uniformity will be less efficient, and the temperatures of the pot/pan surface may not be suitable for cooking

- The base does not contain aluminium: the cookware does not heat and may not be recognised by the inductors.
- Bases that are not flat or have rough surfaces.
- These lower the contact surface area between the inductor and the cookware, reducing efficiency and harming
the cooking experience.
Pre-existing cookware
You can check if the pot material is magnetic simply by using a magnet. Pots are not suitable if they are not magnetically detectable. The indications from the previous paragraph also apply here.
- Recommended pot bottom diameters
IMPORTANT: if the pots are not of the correct size, the cooking zones will not switch on. To see the minimum pot diameters for each individual zone, consult the illustrated section of this manual.
Please note: To preserve cooking performance and product quality, the use of induction adapters is NOT recommended.
Energy saving
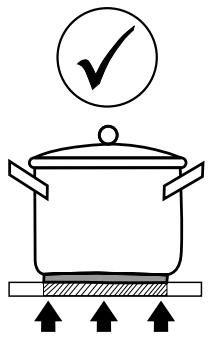
Use pots and pans with a bottom diameter equal to that of the cooking zone; Use only pots and pans with flat bottoms; - Where possible, keep the lid on pots during cooking; Cook vegetables, potatoes, etc. with a minimal amount of water to reduce the cooking time; Use the pressure cooker, as it further reduces energy consumption and the cooking time; Place the pot in the centre of the cooking zone drawn on the hob.
The extraction system can be used in the duct-out version with external evacuation, or in the recirculating version with filtering and internal recirculation.
Consult the website www.elica.com and www.shop.elica.com to view the full range of available kits for the various installations in both the recirculating and duct-out version.
Duct-Out Version:
Vapours are exhausted outside via a series of pipes (to be purchased separately). Connect the product to wall-mounted exhaust pipes and holes with a diameter equivalent to the air outlet (connecting flange). For more information on the pipes and their dimensions see the page relating to accessories in the installation manual - Duct-Out version. The use of pipes and outlet holes in the wall with a smaller diameter will reduce the extraction performance and drastically increase the noise level. All responsibility in this regard is therefore denied.
For maximum extraction efficiency: We recommend a maximum pipe route length of 7 linear metres. We recommend using no more than two 90^ bends along the entire 7 linear metres. Avoid drastic changes in the ducting dia
meter, seeking to maintain a diameter of 0.150mm (or a rectangular section of 222× 89mm ).
Recirculating Version:
The extracted air will be filtered through special grease and odour filters before being sent back into the room through the special piping (Odour filters and piping purchased separately). For more information, see the pages relating to accessories and configurations (for the recirculating version) in the illustrated part of this manual.
3. OPERATION
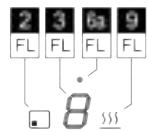
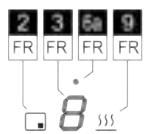
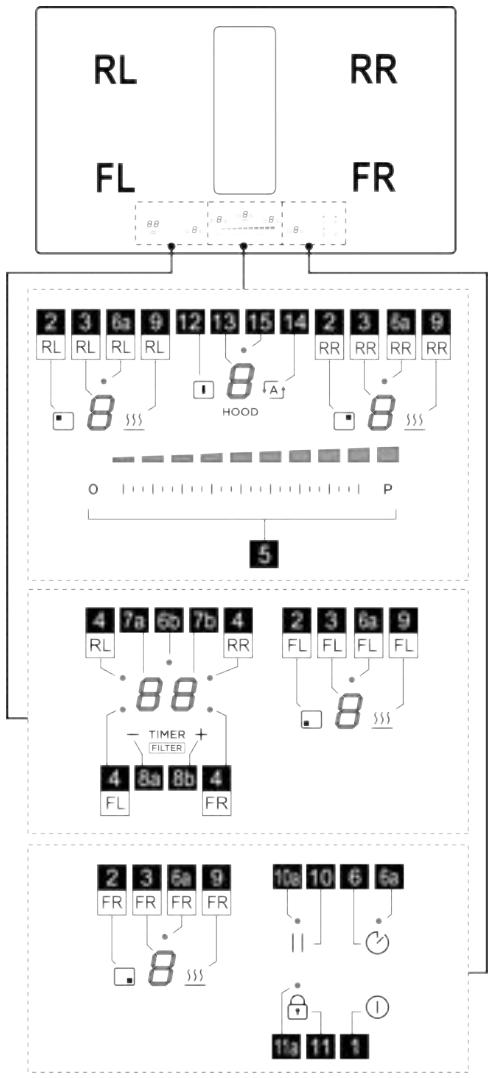
CONTROL PANEL

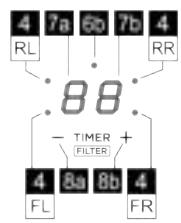
| Function |
| 1 | ON/OFF of the hob / hob extractor fan |
| 2 | Cooking zone selection key |
| 3 | Cooking zone power level display |
| 4 | Active cooking zone LED / Active filters saturation LED |
| 5 | Increase/decrease cooking power level and extraction speed (power) |
| 6 | Egg timer activation (Stand Alone) |
| 6a - 6b | Active Egg Timer LED (Stand Alone) |
| 7a-7b | Cooking zone timer display / Carbon filter satura-
tion display - Grease filter |
| 8a-8b | Timer Display Increase/Decrease |
| 9 | Temperature Manager activation (Warming Func-
tion) |
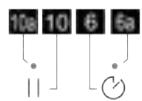
| 10 | Pause |
| 10a | Active pause LED |
| 11 | Key Lock |
| 11a | LED - Key Lock |
| 12 | Extractor selection key |
| 13 | Extractor Display |
| 14 | Extractor automatic function activation |
| 15 | Extractor delay menu LED |
THINGS TO KNOW BEFORE STARTING
WARNING: After initial connection of the product to the mains, the hob requires a RELEASE procedure. Proceed as indicated:
Connect the hob to the power supply; the display (13) will show a flashing and the LED (11a) on. Press the key (11) for a few seconds, the LED (11a) will switch off. Now it will be possible to turn on the Hob with the ON/OFF key (1).
All functions of this hob are designed to comply with the most stringent safety regulations. For this reason:
-
Some functions will not be activated, or will be automatically deactivated, in the absence of pots on the burners or when they are poorly positioned.
-
In other cases the activated functions will be automatically deactivated after a few seconds, if the specific function requires a further setting that has not been selected (e.g.: "Turning the hob on" without "Selecting the cooking zone" and the "Operating temperature", or the "Lock Function" or the "Timer" function).
Wait for the display to turn off before approaching the cooking zone.
Please note! In the case (for example) of prolonged use, the cooking zone may not immediately shut down because
it is in the cooling phase; the symbol H will appear on the cooking zone display to indicate that this phase is under way. Wait for the display to turn off before approaching the cooking zone.
COOKING ZONE DISPLAY
The following is shown on the cooking zone displays:
| Function | Value |
| Cooking zone on | 0 |
| Power Level | 1..9-P |
| Residual Heat Indicator | H |
| Pot Detector | U |
| Temperature Manager Function active | u-ov |
| Pause function | II |
| Automatic Heat UP function | R |
CHARACTERISTICS OF THE HOB
- Safe Activation
The product is activated only in the presence of pots on the cooking zone: the heating process does not start or is interrupted if there are no pots, or if these are removed.
Pot Detector
The product automatically detects the presence of pots on the cooking zones.
- Safety Shut Down
For safety reasons, each cooking zone has a maximum operating time, which depends on the power level set.
Residual Heat Indicator
When switching off one or more cooking zones, the residual heat is indicated with a specific visual signal on the display of the corresponding zone by the symbol H .
USING THE HOB
Power-on
The hob is switched on by touching the ON/OFF key (1). All the displays (3) and the display (13) will turn on and show the number zero.
To switch off the hob, press the ON/OFF key (1).
The hob switches off after a few seconds if no functions are activated.
- Cooking zone activation
Activation:
Enter the cooking zone menu by pressing one of the keys
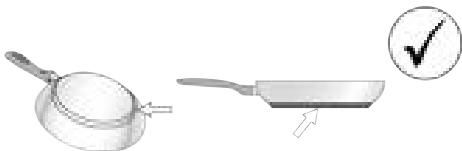
(2) corresponding to the desired cooking zone. The display (3) of that zone is the only one to be lit at high intensity.
Touch and slide a finger on the selection bar (5) to adjust the power of the previously selected cooking zone.
Note: When a cooking zone is selected, the TIMER display (7a+7b) will show this: - - - the LED (4) that turns on defines which zone has been selected, in this case the FL zone.
Deactivation:
Enter the menu of the desired cooking zone and press one
of the keys (2), The display (3) of that zone will remain the only one lit at high intensity; bring the power to Zero, or press the key (2) again, holding it down for a few seconds.
- Cooking Power Level Zone
The hob features 9 power levels. Touch and slide your fingers along the Selection bar (5):
to the right to increase the power level;
to the left to decrease the power level.
The power level set will be shown on the display (3) of the chosen cooking zone.
Power Booster
The product is equipped with 1 additional power level (after level 3), which remains active for 10 minutes, after which the power returns to the previous level.
Touch and slide your fingers along the Selection bar (5), past the level to activate the Power Booster. The Power Booster level is indicated on the Display (3) with the symbol P .
key lock
The Key Lock allows you to lock the settings of the hob to prevent accidental tampering with the same, while leaving the set functions enabled.
Activation:
To activate the key lock function, the hob must be switched on.
- press (11) for 2 sec. Repeat the operation to deactivate.
Note: if any other function is pressed while Key Lock is active, the LED (11a) will flash and the display (7b) will show a sequence of symbols 0· 6· 8 indicating that the function is in use and must eventually be deactivated in order to act on the hob.
- Temperature manager (Worming Function)
The Temperature Manager (Worming Function) is a control function that allows you to keep the heat at a constant temperature at an optimised power level; this feature is ideal for keeping ready meals warm.
Activation:
Select key (2) and then key _i = 1^n(_j = 1^n - i)n of the zone to be
used; the display (3) of that zone will show a sequence of symbols 0^0^0^ which will last for as long as the function remains active.
Deactivate:
Press the key (9) again for a few seconds to deactivate the function.
Note: the function can also be enabled in zones with BRIDGE active.
Automatic Heat UP
The Automatic Heat UP function allows the set power to be reached more quickly; with this function it is possible to cook food faster without the risk of burning it, insofar as the temperature does not exceed the set level. This function is
available for power levels from H to B .
Activation:
Select key (2) of the zone to be used then scroll with your finger in the selection bar (5). Having reached the desired level, keep it pressed for a few seconds until the
symbol appears on the display (3) of that zone, alternating with the set power.
By increasing the power level of the cooking zone, the Automatic Heat Up function remains active, with the new temperature setting;
Note: This function can be activated on several zones at the same time.
Deactivate:
Select key (2) of the zone from which the Automatic heat Up is to be removed and decrease the power level of the cooking zone.
- Pause
The Pause function allows active functions on the hob to be suspended, bringing the cooking power to zero.
Activation:
- press the key (10) the LED (10a) comes on and the
flashing symbol is displayed on the display (3) of the active zones, alternating with the temperature level set in those zones.
Deactivate:
- press the key (10) for a few seconds until the symbol disappears.
With deactivation, the hob resumes working with the settings set before the pause.
Note: if after 10 minutes, the Pause Function is not deactivated, the hob will turn off automatically.
Note: the Pause Function does not affect the extraction.
- Egg Timer
The Egg Timer function is a countdown independent of the
cooking zones (and the extraction zone).
Activation:
Exit the Suction or Cooking Zone menus so that all LEDs (3 and 13) are lit.
Press the key (6), the LED (6a) will light up and, at the same time,
the display (7a+7b) with the LED (6b) will also be activated.
It will now be possible to increase or decrease the time using the keys ^+ (8a) and - (8b). The time is expressed in minutes. If the timer reaches a time of less than one minute, the countdown continues by displaying the seconds.
When the timer has finished the countdown, an acoustic signal sounds and the cooking zone switches off.
Deactivate:
To switch off the Timer early, exit the Suction or Cooking Zone menus so that all LEDs (3 and 13) are lit and set the
Timer display to Zero with the key - (8a).
Cooking Zone Timer
The Cooking Zone Timer function is a countdown that can be set, even simultaneously, on each cooking zone. At the end of the period set, the cooking zones switch off automatically and the user is notified with a dedicated acoustic signal.
Activation:
Note: this timer can only be started if the cooking zone is active with power other than zero.
After activating the desired cooking zone key (2),
the display (7a+7b) will activate and it will be possible to program the timer. To increase or decrease the time use
the keys + (8a) and - (8b). The time is expressed in minutes. If the timer reaches a time of less than 1 minute, the count continues while displaying the seconds.
If desired, repeat the operation for several cooking zones:
Each cooking zone can have a different Timer set; the countdown of the cooking zone selected at that moment will appear on the display (7a + 7b) .
Note: After activating the Bridge zone, the timer on this zone can also be started.
Deactivate :
To switch off the Timer in advance, select the cooking zone
key (2) and press key — (8a) until the timer reaches zero. The time will deactivate.
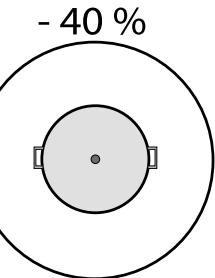
Power Limitation
The Power Limitation function allows the product to be used while limiting its maximum absorption, adjusting the absorbed power in all active cooking zones, ensuring that
the total absorbed power of the hob does not exceed the set maximum absorption level.
The Power Limitation management menu is located inside the Parameter management menu.
Disconnect the hob from the power supply, wait a few seconds and reconnect the hob to the power supply.
UNLOCK the hob by holding down the key (11) for a few seconds; subsequently, press the keys (12) + (14) simultaneously for a few seconds until the scroll bar (5) lights up. Slide your finger along the entire bar (5) from left to right. The two displays (3-RL) and (3-RR) will light up.
The Display (3-RL) indicates the parameter being modified.
Display (3-RR) indicates the set value.
By default, accessing the parameters menu, the display (3-RL) alternately shows the values and ; press the key (9-RL) several times until the display (3-RL) shows the values and alternately. ( and = Power Limitation management menu).
Set Power limitation value:
press the key (9-RR) to select the desired value from the three available, see table below:
| Zone 3-RL | Zone 3-RR | Power value (KW) |
| 0 | 0 | 7.4 |
| 0 | 1 | 4.5 |
| 0 | 2 | 3.1 |
Saving settings:
To save the selected settings, press the key (1)
Activation:
Touch (press) the key (12). The display (13) will turn on at high intensity.
Touch and scroll with a finger on the selection bar (5) to adjust the fume extraction power.
Note: unlike the cooking zones, switching off the extractor
fan cannot be programmed using a timer. Therefore the display (7a + 7b) will not activate.
Deactivation:
To turn off the extractor fan, hold down the key (12) for a few seconds or bring the extraction power to Zero.
The extractor fan is equipped with 4 extraction power levels plus a Booster.
Touch and slide your fingers along the Selection bar (4): to the right to increase the power level; to the left to decrease the power level.
The set power level will be shown on the display (13) of the extractor fan.
The product is equipped with 1 additional BOOSTER power level (over level 4) which remains active for 5 minutes, after which the power returns to the previous level.
Touch and slide your fingers along the Selection bar (5), past the level 4 to activate the Power Booster. The Power Booster level is indicated on the Display (13) with the symbol P .
Automatic mode
The product will turn on at the most suitable speed, adapting the extraction capacity to the maximum cooking level used in the cooking zones.
When the cooking zones are switched off, the hood adapts its extraction speed, decreasing it gradually, to eliminate residual vapours and odours.
Activation:
Enter the extractor Manu by pressing the key (12) then press the key (14); the letter will appear on the display (13) alternating with the fan speed value.
Deactivate:
From the extractor fan menu, press the key (14) or manually decrease the extractor fan speed from the selection bar (5).
The COOKING ZONES and EXTRACTOR must all be powered; The EGG TIMER must be Off. If these conditions are not respected, by performing the access procedure, the display (7a+7b) will indicate and it will not be possible to continue further.
To access the menu and view the status of the filters:
After complying with the input requirements indicated above, press key (12), then press (8a) and (8b) simultaneously for 4 seconds.
At this point we will find ourselves in the Filter management menu.
By default, the display (7a+7b) will show the status of the GREASE FILTER. To switch to viewing the status of the
ODOUR FILTER, press (8a) Each time this key is pressed, the display switches from one filter to another, consecutively. Below is a table of filter statuses.
| Filter Status | Display |
| ACTIVE grease filter* | .65. |
| ACTIVE odour filter* | .F3. |
| DEACTIVATED grease filter | G- |
| DEACTIVATED odour filter | F- |
*When the filter saturation indicator is ACTIVE the display (7b) will show the status of the filter with a value from 9 (maximum efficiency) to 0 (saturated filter).
To turn the filter saturation indicator on or off:
After selecting one of the two filters, press + (8b); with each press, the display switches from one state to another consecutively.
Note: Deactivating the filter and then reactivating it in the same session, the value of the filter state remains unchanged from before deactivation.
Exiting the menu after having deactivated the filter, when the filter is reactivated the filter saturation value will restart
from 3
To exit the Menu, press any key EXCEPT key - (8a) and + (8b) or wait 8 seconds without touching any other keys.
- Reset filter saturation
While one or both signals are active, it is possible to reset the filter saturation alarm. In the first 10 seconds in which the filter saturation signal appears, press (8a) and (8b) simultaneously for a few seconds.
An acoustic signal indicates the successful reset. It is advisable to perform this procedure ONLY after having replaced the filters.
Note: If both alarms are active, perform this operation twice to reset both alarms.
With this function activated, the extractor fan will remain on for a pre-set time. Once this time has elapsed it will switch off automatically. Each speed has a specific timer as indicated in the table below.
With the extractor fan running, press and hold the selection bar (5) and the LED (15) will light up, indicating that the function has been activated.
To deactivate:
simply change the extraction speed to deactivate this function. LED (15) will turn off, indicating that the function has been deactivated.
POWER TABLE
| Power level | Cooking type | Use (based on cooking experience and habits) |
| Max power | P | Heat quickly | raises the temperature of food in a short space of time to boiling point for water, or to quickly heat cooking liquids |
| 8.9 | Fry - boil | browning, starting cooking, fry frozen products, boil quickly |
| High power | 7.8 | Brown - fry - boil - grill | browning, fast rolling boil, cooking and grilling (for brief periods, 5-10 minutes) |
| 6.7 | Brown - cook - stew - fry - grill | browning, slow rolling boil, cooking and grilling (for me-dium periods, 10-20 minutes), pre-heat accessories |
| Medium power | 4.5 | Cook - stew - fry - grill | stewing, light rolling boil, cooking (for long periods), dress-ing pasta |
| 3.4 | Cooking - simmering - thickening - creaming | longer cooking (rice, sauces, roasts, fish) with accompany- ing liquids (e.g. water, wine, stock, milk), dressing pasta |
| 2.3 | Cooking - simmering - thickening - creaming | longer cooking (volumes less than one litre: rice, sauces, roasts, fish) with accompanying liquids (e.g. water, wine, stock, milk) |
| Low power | 1.2 | Melt - thaw - keep warm - stir | melting butter, gently melting chocolate, defrosting small products |
| 1 | Melt - thaw - keep warm - stir | keeping small portions of just-cooked food warm or main- taining dishes at serving temperature and creaming risot- tos |
| OFF | 0 | Support surface | Hob in stand-by or off (possible presence of residual heat from the end of cooking, signalled by H-L-O) |
4. MAINTENANCE
Please note! Before any cleaning or maintenance, make sure the cooking zones are switched off and the heat indicator has turned off.

For product maintenance, see the images at the end of the installation marked by this symbol.
HOB MAINTENANCE
- Cleaning the induction hob
The hob must be cleaned after each use.
Important:
- Do not use abrasive sponges, scouring pads. Their use, over time, may ruin the glass.
- Do not use irritant chemical detergents such as oven sprays or stain removers.
DO NOT USE STEAM JET CLEANERS!!!
After each use, leave the hob to cool and clean it to remove deposits and stains caused by food residue. Sugar or food with a high sugar content damage the hob and must be removed immediately. Salt, sugar and sand may scratch the glass surface. Use a soft cloth, paper towel or specific products to clean the hob (follow the Manufacturer's instructions).

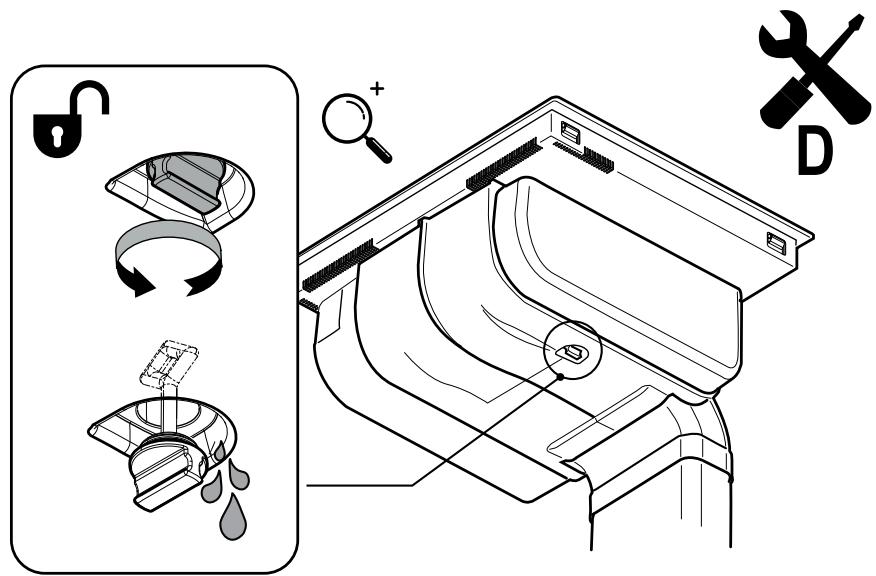
- D Cleaning the liquid collection channel :
In the event large quantities of liquids accidentally spill out of the pots, they can be drained using the drain valve on the bottom part of the product so as to eliminate any residue and ensure maximum hygiene levels.

E Cleaning the metal grille:
The grille must be washed by hand with hot water and neutral detergent, then dried thoroughly to prevent oxidation.
For cleaning, use ONLY a cloth moistened with neutral liquid detergents.
DO NOT USE CLEANING UTENSILS OR TOOLS!
Avoid the use of products containing abrasives. DO NOT USE ALCOHOL!

A Grease filter maintenance:
Traps grease particles generated by cooking.
Must be cleaned once a month (or when indicated by the filter saturation indication system), with non-aggressive detergents, either by hand or in the dishwasher at low temperatures and in a short cycle. When cleaned in the dishwasher, the metal grease filter may discolour, but its filtering characteristics remain unchanged.

Ceramic activated carbon filter maintenance (circulating Version only):
Traps unpleasant odours generated by cooking. The product comes with a set of odour filters.
The saturation of the odour filters can occur after somewhat prolonged use depending on the type of cooking and how regularly the grease filter is cleaned. The odour filters can be thermally regenerated every 2/3 months in an oven pre-heated to 200^ for 45 minutes. The correct regeneration of the filter ensures that it can constantly filter efficiently for 5 years.
Please note! Do not place the filters on the floor of the oven but rather in a tray, positioned at an intermediate height.
5. ASSISTANCE
TROUBLESHOOTING TABLE
| Informative code | Description | Possible causes | Solution |
| F | The command zone switches off due to an excessively high temperature | The temperature inside the electronic parts is too high | Wait for the hob to cool before reusing it |
| For all other error signals | Call customer service and report the error code |
CUSTOMER SERVICE
Before contacting Customer Service
- Check that the problem cannot be solved by consulting the points in "Troubleshooting".
- Switch the device off and on again to see if the problem resolves itself.
If the fault persists after the above checks, contact the nearest Customer Service centre.
DE
- Temperature manager (Worming Function)
- Residual Heat Indicator
- Temperature manager (Warming Function)
- Residual Heat Indicator
- Temperature manager (Worming Function)
- Temperature manager (Worming Function)
- Temperature manager (Worming Function)
ANOPPIYH PPOIONTOE TEO TEAO THE ZQHE TOY

H ouokun autn fepei onmuovon ouuwova u Tnv Eupwnaikn Odbnyia 2012/19/EK - UK SI 2013 Ap.3113, AtoBnTa Hktpiko Kai HktpovkoEoTlaou (AHHE).
BbaWtei OI n atoppin auto tpoiovto EkTeai ta owa. O xnoTns oubetaAeoi Tnv npolnyu w avv apntikw vtttowewy ia to nepiaalov kai tv ueia.To uubolo eTavw ot pioov h otauoovetika evypapa utooleivuei 01 to Ev lowy tpoiov dev pteite va atoppiTTaai paiz me ta oikiaka atoppmuata aIaa pteie va napabiEotai ce kalannlo onoeio ulloyng yia tv avakukawn nektpikoui kai nkelpovkoEgontlouo. H atoppniou tpoiovto gatpeie va yivetauupwva me tou tsotikouc kavoviouos diaeogtsuv atobanuw. Iia teripoootepc napopopoeic oxetikae my tne tneepyaia, avaktnaikavakukawon autnc tsucokuecn, etinkovwnote ME to apjodio ypaepio To dhmouac, tv utnpesia teripuaoyoics okiakuv attoppmuatw n ie to kataoTnaatt'ottou ayopaate tn oukeun.
KANONIEMOI
Ipokeiai yia ia ouakeun n otoia oxeiaotnke,dokiiaotnke kai kataoeuaotnke baoei Tuw kavoviouiv:
· Aogpaleic: EN/IEC 60335-1, EN/IEC 60335-2-6, EN/IEC 60335-2-31, EN/IEC 62233. · Ato8oo: EN/IEC 61591, ISO 5167-1, ISO 5167, ISO 5168, EN/IEC 60704-1, EN/ IEC 60704-2-13, EN/IEC 60704-3, ISO 3741, EN 50564, IEC 62301.EN 60350-2. EN 55014-1, CISPR 14-1, EN 55014-2, CISPR 14-2, EN/IEC 61000-3-3, EN/IEC 61000-3-12.
O△HΠΕΣ XPHΣΗ
Sigma 174 175 176 177 178 179 180 181 182 183 184 185 186 187 188 189 190 191 192 193 194 195 196 197 198 199 200 201 202 203 204 205 206 207 208 209 210 211 212 213 214 215 216 217 218 219 220 221 222 223 224 225 226 227 228 229 230 231 232 233 234 235 236 237 238 239 240 241 242 243 244 245 246 247 248 249 250 251 252 253 254 255 256 257 258 259 260 261 262 263 264 265 266 267 268 269 270 271 272 273 274 275 276 277 278 279 280 281 282 283 284 285 286 287 288 289 290 291 292 293 294 295 296
Ta eTtneBa oOpBou, xPnoiotoinote tn meyiotn diapetpo aywuyuou avaepetai oTo npov evxepidio.
2. XPHESH
XPHSHTENSENPIANEAESSTION MATEIPEMATOZ
H leitoupyia tns oukeunic baicetai oto [puakó] paivóveo ntsayvntikncs etaywyns-dnA. atny atneuθeias eTaapopa evepyiaas atto nTv npoxn iuxuos otny katopola.
IIeovekntmu: oukykpiou n Tc Koivcs nAeKtpkec
eoties uayepuato, n tayuyikn eiaivai: IIO aogaa
Inc: uipotepn bepokpaotia ot yudaiy enTtipaveia. IIO
ypynop: uipoteo xpovoia tv ceotama tou qayntou.
IIO akpibns: n 0ia vatattokpvietai aea oic ts evtoles
Oas. IIO atobtikn: to 90% ts anoppoouvevnc evpe
yeiac metapetitai oe bepouta. Etnlaov, m tnv anto
makpuon tou maeyipiko okeouc atto tny eotia, n trapoxn evpeiyiac diakottietai aoea k ETAIETITUYXAVETAI Eoi
kovouan.
XPHZH ZKEYON MATEIPIKHS
i

Xpnoiopoioite mvo katoapolec nou epouv auto to ujofo
Σημαντικό:
YIA TIV aTIOOuyN KATAOTPOOHS TNS EOTIAS, MYN XPNoIIO-TOIE:
- Okeun je baoan tou dev eivai Tealeiwc emiteo,
OTi AvTIOxEs Oboves Tuv Eotiwu MaeyipepaToC EaqaviZovtai Ta Efns:
- Temperature Manager (Warming Function)
H eitoupyia Temperature Manager (Warming Function) i
va mia eitoupyia elxyxou nou etiipentei tn diatnoan tns emuotntac oe ataepn thepokpaia, me tnyioxu va piko
kctai oto bIaio toeido. Evekvutai otav telete va
diatnpaeTe cetota ra hon eoia qaynta.
Eepyooin:
EiAeTo TnAnKtpo (2) Kai ETTaTo TnAnKtpo 9
tns ZwVns Tnou TheleTe va XpnoImuTOnOte. H oBovn (3)
tns OuykEepivnc ZwVnc, Ta eApiaei iia akolouieia
oumbaw Uoo n otioia Ta biapkeae iya ooo xpov
n Aetoupyia napaeiveEvpeyn.
Ateevepytooin:
Eaatae yia eepka deutepeaettto TAAKTPO (9) ia va attevepyotoioe tN aeitoupyia.
Enjeiwn: mtpoite va evpyoioiae Tn aeitouyia kai otic wveTPOU exou evpyn Tn aeitouyia BRIDGE.
DETTA BÖR DU VETA INNAN DU BÖRJAR
Temperature Manager (Warming Function)
DISPLAY FOR KOKESONE
pá display'ene for de ulike kokesonene vises:
| funksjon | Verdi |
| Kokesonnen er på | Ø |
| Power Level (effektivà) | 1..9-P |
| Residual Heat Indicator (restvarmeindikator) | H |
| Pot Detector (Kjeleddetektor) | U |
| Temperature Manager (Temperaturkontroll) aktiv | Uo-o |
| Pausefunksjon | II |
| Funksjon Automatic Heat UP (Automatisk oppvarming) | R |
PLATETOPPENS EGENSKAPER
- Safe Activation (sikker igangsetting)
Produktet aktiveres kun när det finnes kjeler/gryter plassert på sonene. Oppvarmingsfasen vil/DDke starte opp (eller den avbrytes) hvis det/DDke finnes gryter på platen.
- Pot Detector (kjeledetektor)
Produktet registrarer kjeler automatisk nár de plasseres i en av sonene.
- Safety Shut Down (sikker apparatstopp)
Still inn verdi for Power Limitation:
Trykk pa tasten (9-RR) for a velge onsket verdi mellom de tre tilgengelige, se tabell under:
| Sone
3-RL | Sone
3-RR | Effekt-
verdi (KW) |
| ∅ | ∅ | 7,4 |
| ∅ | ∅ | 4,5 |
| ∅ | ∅ | 3,1 |
Lagre innstlinger:
For à lagre de valgte innstillingene, trykker man pa tasten
①(1)
BRUKE AVTREKKET
VEDLIKEHOLD AV PLATETOPPEN
VEDLIKEHOLD AV AVTREKK
- Temperature manager (Worming Function)
For at forlade menuen skal du trykke pa en vilkarlig tast UNDTAGET tast -8a) og +8b) aller vents 8 sekund der uden at berere andere taster.
Nulstil filtermating
VEDLIGEHOLDELSAFKOGEPLADE
- Temperature manager (Worming Function)
- Temperature manager (Worming Function)
- PpOdykTbT He MoKe Da 6bDe INHCTaIInpaH NaD OXnAaAsuY uCtPoIcTBa, CbDOMMaHN MaUHIn, NeKIn, CyPhN, nepaHn N cyuHnN; N3BbPse TcIaNaTa pa6ota No p3aHa N shkaFpa, npEi Da noctabIne nIOna 3a RotBeHe BHNMaTeHNO OCTpaHene CTbProTHIne INN OCTaMbUte OT dPBEHN CTbProTHIne.
MIMHmAlnHata nctaHmua Mexdy rotBapcKna nnot ic stehata, Tpa6ba da 6bJe nohe 50mm ot npedHaTa cTpaHa, nohe 50mm cTpaHnHo nnohe 550mm cnpmao rohpnte ukafoBe.
NB:ВпpoeКТиранetoHa npoctpaHCTBaTа,ТябБаДа ce cIeIeBaTИNCHpyKUInTe Ha npoIN3BOuNTeNa HA KxHЯТa.
- 3a ONTMMN3IpaHHe HΦnITPnpaUaTa INHCTaIauIe CE npenOpbYBa Da Ce Cb3JaDe IpoCeN B cOkBla, KbTeTo MOKeTe Da NOCTABInTE MpeKa, HAnMHa B TbProBcKaTa
mpexa.
Baxho: n3n0n3BaIte eINH 3aJIenBaU yIbTHraBaI npOyKT MOHO-KOMNHeHT (S), KOJTO mMa yCToMHBOCT Ha TEmpepaTpydo 250^ ; npedm HcHCTaIInpaHETo Ha NOBbPbXHOCTHte, KOJTO Tp86Ba Da bDaT 3aJIeNEHn, Te Tp86Ba Da bDaT NoCtHEn CTapATEJHo, KATO CE OTcPaHN BcKIO BeueCTBO, KOEt MOKeJa NOpNeu Ha CInENBaHeTO (np.: pa3nENBaUmpOdykTN, KOHΦopMaunm, Ma3HnHi, MAcna, npax, OcTaBcuOT cTarpI JeNnua n dp.); JENNOTO ce ONara paBHOMepHO BbPx YceNIA nepIMMeTpB Ha pAMkata; cIeD 3aJIenBaHe, OCTabeTe JELNIOTo da n3cbxHe 3a OKO 24aca.
BHHMaHHe! He noCTaBHeTo Ha 6oJIbTOBeTe I KpeEnKHN eIeMeHTN B CbOTBeTcTBne C HactOaUIne INHCTpyKuIM MOKe Da DoBeDe Do pCKOBe OTe ENEKTPnuecko eCteCTBO.
3a6bexka: 3a npabnien MoTax Ha npodykta ce npenopbYBa Da ce 3aIenT TpB6Me T c IeNIO, KoTo NMa CneDnHe XapaTePrcNTM: MeK PVC enactuH eNIM, C IeNIO ha OCHObAHa hApknat; KOIT OTOBapra Ha DIN EN 60454; 3a6abuaR opeheTo; OTNUnHa yctOuNbocT Ha CTapeHHe; yCTOnuMb Ha TEMepaTyHn IpomEHn; n3NoJ3BaEM npn HNCKn TEMpepaTyPi.
OBE3BPEXDAHE B KPAR HA XN3HEHNAIKbJI

To3n ypeD e 6o63NaeH B cBtBcTCTBne C Ebponecka DnpeKtNbBa 2012/19/EC - UK SI 2013 No.3113, N3xBbPJIaNe Ha EJekTpuecko I EJekTpOHO6OpyDbAHe (WEEE).
YbepeTe Ce, Ye To3n npOdyKT Ce n3XbBpIy No npaBIneH naHH. TOpBe6ntenT nomara 3a npedOTbpaTBAhe Ha notehuJIHn OtpriatepHn NocleDmIz 3a OkONHATA cpeDa n3dpABeto.CmbOBt BbyxpyedeA nnB nnpdpykjabaaTAto DOKyMeHTaunnoCocBa, ye To3n npOdyKT He Tp86Ba Da ce TpeTnpa KaTO bINTOB OTNaDbK, a Tp86Ba Da 6bJe npdaDeH B CneUaHNO npedHa3naHeHte 3a TOBa NyHKToBte 3a peZKnIPanhe Ha eNeKTPuecko ENEKTPronHO obOpyDahe. Cna3BaIte MeCTHnE perIamEnr 3a o6e3BpExJaHe Ha otNAdbz. 3a no-NDpO6Ha HfOpMaunr BbB Bpb3ka C TpeTnpaHTo, ONN30TbOPaBHeTo nPeZKnIPanHeHa To3n npOdyKT, Bu CbBETBame Da ce ObpHete KbM KOMPiTeHTNHTE MeCTHn CnyKb, CnyKbnte 3a Cb6PAne Ha 6nbTOBn OTNaDbz INN KbM Maar3nHa, OT KOITc TE 3akynnn npOdyKTa.
CTAHДAPTN
O60pydBaHe, npoeKtnpaHo, TeCTBaHo n npo3BeJeHO B CbOTBETCTBnE CbC cTaNdapTa OTHOCHO:
- Be30napocct: EN/IEC 60335-1; EN/IEC 60335-2-6, EN/IEC 60335-2-31, EN/IEC 62233; -Pno3Bovntenhoct: EN/IEC 61591; ISO 5167-1; ISO 5167-3; ISO 5168; EN/IEC 60704-1; EN/IEC 60704-2-13; EN/IEC 60704-3; ISO 3741; EN 50564; IEC 62301. EN 60350-2; -EMC: EN 55014-1; CISPR 14-1; EN 55014-2; CISPR 14-2; EN/IEC 61000-3-3; EN/IEC 61000-3-12.
IPENDIOXEHNA 3A YIOTPE6A
Ipenopbkn 3a npabnHa yonTp6a c qen HamaJIbaHe Ha BnHnEto Bpxy OKoHnata CpeDa: Korato ce 3anOyHe ROTBeHETo, BKIOUcTe YpeDa HA MINHMaHnA CTENeH, KATO OCTaBnTE BkHOneH 3a HKOJIO MmHTn I CIEd 3aBpUbaHe Ha TOrBHeTO. YBeJIuYeTe CKOpCtTa CaMo npHnAnue Ha rONMeKoNlCeCTBa Dm Nnnpa, KaTO n30n3BaTe fHyKnua booster Camo B kpaHn ClyuAn. 3a Da CE NODbPxa B Dooba eFekTbHBOCT CNTeMaTa 3a HamaJIbaHe Ha Mnp3MnTe, KATO a HeOBxOdmo NOmEnHae KapboHHn FmITbp/KapboHHne FmITpn. PocHCTBaTe npn HyXda FmITpb 3a Ma3HNHn, 3a Da ro NOd2bPxate B Do6po paoToHO CBctOraHne. 3a Da ce ONTMn3upa eFekTbHOCCTTa n 3a Da Ce CBeDe DO MNHmym WymbT, IN30n3BaIte Bb3dyXOBOD mAKCMaEN HnAmEtbp, NOCOeH B TOBA pKOBODCTBO.
2. yNOTPEBA
YIOTPEBA HA IJIOTA 3A TOTBEHE
CnCTeMaTa 3a rotBeHc HNdyKuHc ce OCHOBaba BbpyΦHnHECKHaEHomeH Ha MaTHHTATA INdyKUHaOCHOBnHa xapaKTepNCtNa Ka Ta3n CNTema eDnpekTHOTnpexbPnHeHa eHeprnaTota OT rehepatoHaTeHNkepata.
IpeHmCTBa:AKOce cpaBHNc eNEKtpueeCKNt KOTJIOHN, BaWnT NHykUHOEN pnot e:No-cnrgypen: No-HNCKa TeMnepatypa Bpxy CtbkLeHATA NObpxHOCT. No-6bp3: No-KpATKO BpeMe 3a 3aTOJIHNe HA xpaHATA. No-ToOeH: nToTb pearnpa BeDHara Ha 3adaJeHnte KOMaHdN. No-oeHkaceh: 90% OT noRbJIHata eHeprna Ce nepeo6pa3yBa T OTONHa. OcbEn TOBa, cne d KaTo eDIN Tb CTe OTcPAnHH roTbAPckn Csb DT NNotA, npehocbT Ha TOnIIHa CNIPA He3a6abHo, N36raBauKn EbeHTyaJIHa 3ary6a HToNNHa.
I3IIOJI3BAHE HA CbIOBE 3A IOTBEHE
CbdoBe 3a rotBeHe

N3noI3BaIe cAmo CbIOBe 3a rotBEHe, KOHTO Ca OT6JIa3aHn C TO3H CNMBON.
BaxHo:
3a da 36berheTepmaHeHTn 8etn Bbpxy NOBbpxHOCTTa Ha nToA, He nNoJ3BaIte HNKora:
CbdoBe, YIeTo IbHo He E IeAnHrIaKnO;
- MTeaJIHn CbDoBe CJaKIpaHo DbHO;
- CbdoBe C rpanaba OCHOBa, 3a Da N36erHete DpaCKOTHHN NO NOBbpxHOCTTa Ha NIOTA;
- HNKORA He NoCTabYte TeHJXepuTE N TIRaHITe DOKATO Ca OUe TOIIN Bbpy NOBbpxHOCTTa Ha KOHTpOHNHa NaHeI Ha NNOTA.
He BcNcKcBcDObE, NOxOxJaIz 3a HNyKJpa6oTRe efKnacHo, nopadn TOBa, Ye DbHaTa IM ca YactuHNO n3pa6oTeHn OJKeJ3HO-MaHInTeH MaTePnAn!! BbΦa3a Ha 3aknyBaHe Ha TeHNkepn IN TmraHn, IpOBepe TaIIM:
-Дьhoe eицло OT JxeIa3HO-marHHTeH MaTePnAn. B npotuBEN cnyaJI ce HAMJBAt KaKTo epeKTHBOcTHa
TOnJIINHNO npedabaHe, Taka N HeiHOTo paBHomepHo pa3npedeIaHe, C TempeaTpyn Ha NOBbpxHOCTTa Ha TeHNIXePaTa/TnraHa, HEnOxDxoJyU 3a rotBeHETo

- IbHOTo Da He CbIbPjxA anyMnHi: CbIbT He Ce HaprBa n CbIo Taka MoKe Da He 6bJe pa3No3HaT OT INdYKTOpnte.

- He liocn dha nnc rpanaba noBbpxHOCT.
- ɪЗвajдат конткт ha NOьbpxHocT MexунИнДКТО И CBdoBE 3a XpaHene, HamaJIЯВaIGN epeKTHBHOCTTA IN BLOшаваIGN pe3yIITa Na hoTBeH.
CbdoBe 3a roTbeHe c KOHTo Beue pa3noJaTe
Moxete da npoBepnte daIIM MaTePnAJIbT OT KOITO ca n3pa60teHn CbDObETe CbIbPka JeIeI3O C NOMOHTa Ha hAI-OBIKHOBEH MaHNT. CbDObETe 3a rotBeHe, KOITo He ca NOxOJaI, He pNBIuHAT MaHNTa. I B TO3n CnyaH Baxkat HnCTpyKUnTE O TpExDnHna NaparpaΦ.
- PpenopbChteIen HnAmetbP Ha DbHaTa Ha CbDOBete 3a rotBeHe
BAXKHO: ako cIbdoBeTe 3a roTbeHe ca c nOxOJaU pa3Mepn, 30Hnte Ha roTbeHe Hma Da Ce BkIoUoyat. 3a da OTKpneTe MHNImaJIHna DnAmeTbpa Ha cIba, KOITo da ce I3noJ3Ba BBB BCsKa OTdeJIHa 3OHa, pa3rJeJaTe mIOCTpaunITE, NOMECTEH B HACTOJIOT oP bKOBOJCTBO.
BHHMaHHe: 3a da ce 3ana3n efeKtNBHocCTTa Ha roTBeHTo n KaueCTbOTo Ha npOyKta, HE ce npenOpbYBa H3NoJ3BaHeto Ha HNDyKUHOHH aadantepn.
- Ptectene Ha eheprna
N3no13BaIte TeHdxepn N TuraHn C DnaMeTbP Ha DbHOTo, PabEH HA TO3N HA 30HaT3a 3a rotBeHe; N3no13BaIte camo TeHdxepn N TuraHn C PINOCKn DbHa; - KbTeO e Bb3MOxHO, DpbXte Kanaka Bbpxy TeHdxepnTe NO BpeMe HA rotBeHe; RotBete 3eHenuyu, KapToOpn n T.H. C MAnKo KOnUcEBo BOda, 3a Da Ce HamaMn BpeMeTo 3a rotBeHe; N3no13BaHETo Ha TEnDxepa NoD HAnrAne, DOnbInHTeJIHO HamaJYBa KOHCymuaJraTHa Eheprn I
Bpemeto 3a roTbeHe; NocTabeTe TenhXepaTa B ceHTbpa Ha 3OHaTa 3a roTbeHe, HaupeTaHa Ha NlOTA.
YIOTPEBA HA ACINIPATOPA
CnCTemata 3a acnnpaunMOKe Da 6bDe n3NoJ3BaHa BvB Bercna C acnnpaun C BbHsHa EBAkyaun NIN dnTtnpnapae C BtTreSha unPKyJNaun.
Kohcyntnpaite ye6 ctpanuite www.elica.com n www.shop.elica.com 3a da npobepnte nblnata rama ha hannyH KOMPNEKTN, 3a da MOKETe da N3BbprnTe pa3nnHNTe BINOBE INCTaInpahe, KaKTo npi BepcnraTa C cnTnpape, Taka n npi Ta3n C acnpaun.

Bercna C Acnpaun:
Iapnte ce ebakynpat HabbN nocpeDCTBOM edHa rpyna Tpb6n (da ce 3aKnyTt OTdEnHO). CbpxTe IpOdykTa C Tpb6n n OTbOpn 3a pa3TObApBaHe hA CTehata C dAmaTeBp, paBnBaAaC ce Ha Tpb6aT a3 u3XoDa hA B3dUx (fPhaHeu 3a CBp3BaHe). 3a No-nOpD6Na HnΦopMaua 3a Tpb6n Te nTexHIne pa3Mepn, BnXte CTpaHnlaTata, NocBeteHa hA AkcecoaPnte hA pKBoODoCTBOTo C nHCTpyKcun -Bercnca Acnnpa. N3No13BaHeTo hT Pb6n n OTbOpn 3a pa3TObApBaHeTo 3a CTHe h C NO-MaTbK DnAmEbTpBoDn Do eHNO HamamraBeH a PnO3BODmTEhOcTta Ha acnnpaiaTra n EHD no DpaCTmHo UbeNmuabaHe h A yMa. CneobatoTeHOn ce OTBpIg BCKaKba OTRObOPHOCT OTHOCHO TOBA.
3a da ce noCTmHe MaKcImaJIHa eOpKaCHocT Ha acnnpaJra: · PpenopbYBa ce edHa MaKcImaJIHa tPaekTOpA HA Tpb6Bte OT 7 IInHeHm MeTpA. · PpenopbYBa ce Ha o6o 7 IInHeHm MeTpA da ce H3NoI3BaT MaKcMym DBe KPNBn OT 90^ - N36aRbaiTe dpaCTmHn PpOMeHN B CeeHneTo Ha Tpb6Ta, KATO BINHn ppeINOHTate CeueHne, paBnaIo ce Ha O 150 mm (IN npabobTbIHO 222 x 89 mm).

Фильтураца Версан
Ipein da 6bJe OTBeEN Do NOMEeHHeTo no CbOTBeTHNtep6n,BCMysKAnHrBb3dYx Ue ce fnnTPnpa npes CbOTBEHTNtpe fnnTPn 3a Ma3HNn HfnnTPn 3a MmP3MN (fnnTPnTe 3a MmP3MN n Tp6nTe Ce 3aknyBaT oTdeNo). 3a Noobte Hnfopmau BNXTe CTpaHnUte 3a AkeCocapn IN KOhFmpyaun (3a fnnTPrpauata Bepcra) B yactTa C mHIOCTpaun Ha TOBA pKOBODCTBO.
3.ФУнкцИОнИРАНЕ
KOHTPOJIENIHAHEN
| Функция |
| 1 | ON/OFF на плota 3a roтvehe/ acnnpatopa 3a плota 3a roтvehe |
| 2 | Бутон 3a Избор на зона 3a roтvehe |
| 3 | Ди检пей на НВOTO на моцноct на зона за ratvehe |
| 4 | СветODиOD на.akТИВнATA зона за roтvehe/
АктуBERСВETODиOD за насяшаде на ФиNTРПTE |
| 5 | Уветшиаванe/Hamajяванe на моцноctta на rotвени и скорoctta (moцноct) на acniparcaи |
| 6 | Актуваране на taiмерза ряца (самостordтелно) |
| 6a - 6b | Актувен CBETODNOD 3a taimep 3a ряца (самостordтелно) |
| 7a-7b | Ди检пей на taiмера на зоната 3a rotвенe/Ди检пей за насяшаге на Филь耗费а с akтувенВытlen - Филь耗费за мазнии |
| 8a-8b | Уветшиаванe/Hamajяванe на диспей за taiмера |
| 9 | Актуваранe (Tempepatуpen Менижър) (Warming Function) (Функция Harpopванe) |
| 10 | Пayza |
| 10a | СBetOTOID 3a akтувна пayza |
| 11 | Key Lock |
| 11a | СBetOTOID - Key Lock |
| 12 | Бутон 3a ИЗбор на acnipartop |
| 13 | Ди检пей на acnipartop |
| 14 | Актуваранe abTomatчна Функция на acnipartop |
| 15 | СBetOTOID на мени 3a забаваяне на acnipartopa |
KAKBO E HEO5XOДИМО ДА 3HAETENPEДI DA 3ANOCHETE
BHIMAHHE: CneI nbpBoto cBbP3BaHe Ha npOdyKtA KbM eEnktpnueckata MpeXa, Tpr6Ba Da ce N3BbPwN npOeUpa no PA3BLOKMPAHE Ha nNoTa. N3BbPwTe KaKTo e yKa3aHo:
Cbpxte nIOTa KbM 3axpaHbaHETo; DnCnPert (13)
nokaxe mraa n cbetOno1 (11a) cbetn. Hatachete 6ytoh (11) 3a hkyoIO cekyn, cbetOno1 (11a) ue n3rache. Cera e Bb3MOxHO da BkIIOHTe pnoTa c 6ytoH ON/OFF (1).
BcHKnФyHKmHa rotBapcknIpoT ca npoeKtupan no NaHn, no KTo Da otroBaPrt Ha Hau-CTpornte HopMn 3a cnrypnoct. IopaTn Ta3n npuHa:
- Hяkon Функин He ce akTNbupa Tnne Ce deakTNbupa ATOMaTHUHO npn JInca Ha cBdoBe 3a rotBeHe bpyx roTbapCKn nnot Nn KOrato CbdoBeTe He ca npabHnO noCTaBeHH.
B Dpyrncnyan akTbnpaHnTe yHKunCe deakTNbnpaAT ABTomauHcIe HKoJIco SeKHyDn, KOrato JeNaHaTa cyHKunCe Hkydae OT DoNtJHnTeHa NaCtpoKa, KOaTo He e daHena (HaNP:: BKnUeTe Pnota 3a roTBeHe" Be3 da "N3bnpate 30Ha 3a roTBeHe" and Pa6Otha TemnepaTypa", nn "yHKunA Lock nn yHKun TaMep").
U3yakaiTe DOKATO DnCnPeT Ce N3KlnOuH npei Da ce Do6JnxKeTe Do 30HaTa 3a rotBeHe.
BnHmHne! B cnUaH (HaNPmep) Ha npOdbJNKeTEnHO n3PON3BaHe e Bb3MOXHO 3OHATA Ha roTBHe Da He CE n3KlOuH vBdHara, Tb KaTO e B npOeC h OxnaXdaHe; Bbpy DNcNlE H 3OHATA 3a roTBHe Ce NOBBA CmMBoHa H, KOIT0 o6O3NaHauBa N3BbPwBaHnB MOMeHa npOec. N3uKaIte DOKATO DNcNlEeT Ce N3KlOuH npEi Da ce do6JInxTe Do 3OHATA 3a roTBHe.
ДИСПЛЕМ HA 3OHATA 3A FOTBEHE
HaДИСПЛЕТ,КОПТоCE OTHACTdo3OHTe3arotBeH,CE NOCOUBA:
| Фунreichnia | Стойост |
| Вкlioоча зона за roтvere | 0 |
| Power Level (Ниво на Моцноct) | 1...9-P |
| Residual Heat Indicator (Индikatop за Oстычна ТолпINA) | H |
| Pot Detector (Дetectор за kanки) | U |
| Фунreichia Temperature Manager (Temператерн Менидър) aktivba | U-0-U |
| Фунreichia Палда | II |
| Фунreichia Automatic Heat UP (Авторатуно
Harpявае) | A |
XAPAKTEPNUCTIKN HA NJOTA
Safe Activation (Бezonacho AktunBupahe)
IpoodykTbT ce akTnBnpa cAmo npn haNlUHe Ha TeHdJxepn BbyPx 30HnTe 3a roTBeHe: IpoceBt Ha HapRyBaHe He Ce CTaTpHa Nn NpeKbCBA B CnyaH Ha JInca Nn OTcPaHraBaHe Ha TeHdJxepnTe.
Pot Detector (DeteKtop 3a cBd)
IpoDyKTbT OTHaA BToMaTHNo HAniHneTo Ha TeHJKePn Bbpyx 30HInTe 3a rotBeHe.
- Safety Shut Down (Бezonacho Источа):
Iopadn npuHnN, CbP3aHn C 6e3oNaChOCTT, BCaKa 30Ha 3a rotBeHe HMa eHNO MaKcMmaHbpeMe Ha fYHKUHOHPaHE, KOEt O3aBNCn OT 3aDaJeHOTo HnBO Ha MOUHOCT.
Residual Heat Indicator (Hdikatop Ha OctaTbUHa Tonnna)
IpiuN3KJIIOUcBAHETOHaEHaIINIOBEue 3OHN3a rotBeHe, HAIUMNETo Ha OCTaTbUHa TOnLIHnA Ce CInrHAnIm3npa Cbc CneuaJHn Bn3yauJe HcRHaJn Ha DCnJIeR Ha CbOTBETHata
3OHa, NOCpeDCTBOM CIMBONA H.
YIOTPEBA HA IJIOTA 3A FOTBEHE
BkniuBaHe
ПлOTьСКOTLOнCEВКИОчБ,КATOHaTINCHETe6YTOHON/ OFF①(1).BCNKNДиCпг徳(3)иДиCпг徳(13)Sece BKNIOUHT KATO NOKAKATZIФруHуla
3a Da n3KnIOuHTe nnOta, HATnCHete 6yToH ON/OFF (1).
IIObT Ce mKJIOvBa Cnei HRAKOJIko CeKyHn, aKO He 6bDat aKTINBupanu HfHKU.
- AKTNBIPAhe Ha 30HnTe 3a rotBeHe
Akmueupahe:
BJe3Te B MeHToHa 3oHa7a 3a rotBeHe, KaTo HATnCHete
eINHOT6ytohne (2),CbOTBcTBAuHaJXeJIaHATA3OHA3aTGTBEHe.IncnnerT(3)Ba3N3OHaIe6bdeEeHNCTBeHNrT,KOITOCBETCNlHO.
Дokochete И пьз悔с с пьст no lehtata 3a n36op (5), 3aда ретуларе моцhoctт ha 3oHa t a roTbeHe, n36pana npedn TOBA.
3a6eJekka: Korato ce n36Ipa 3OHa 3a roTBeHe,
IcnpnreHa TAmEPA (7a+7b) NOKa3Ba ToBa: CBeToNDo4 (4), KOITo CBETBa, ONpeJeIy K0A 30Ha e 6nla n36paH, B TO3n cnyaH 30Ha FL.
Deakmueupane:
BJIe3Te B MeHIOTo Ha 3OHaTa 3a rotBeHe, KaTO HATnCHeTe
eMHOT6yToHnTe (2),MncnneT (3)
B Ta3n 30Ha 6e 6bJe eDINHCTBEHNrT, KOJTO CBETN CNIHO; HacptoNe Ha HyJa MOUHOCHTa INI HAuCHETe OTHOBO 6yToH (2), KATO rO 3aIbpxKeTe HaTuChAT 3a HraKoJIko CeKyHn.
Power Level (HnBO Ha MouHoc 30Hn 3a rotBeHe)
ПлOTь 3a roTBEHe e obOpyIbAH c 9 HnBa Ha MOnHocT.ДOKOCHETe nПь3Hete npbcta no IbJIkHnHa Ha JIeHTaTa 3a n36Op (5):
HaJaCHO 3a Da Ce yBEniH NBOTo Ha MoUHOCT;
Ha JIABO 3a Da CE HAMAIH NIBOTO Ha MOUHOCT.
HactpoeHOTO HNBO Ha MOUHOCT ige ce nokaxe Ha dncnnei (3)Ha n3bpaHata 30Ha 3a rotbeHe.
Power Booster (ycnBATEH Ma MouHocT)
IpoDyKbT e cHabEn c 1 HNBO Ha dOnbHnTeHa MOUHOCT (Ha HNBOTo 3), KOETO OCTaba AKTNBO 3a 10 MNHTY, CNeD KOETO MOUHOCTTa Ce BpSha Ha npEDXODHO T HNBO.
Дokochete И рөхьрлөт e с пьстп Лөнт a 3a n360p (5)
HAD HNBOTO 3a da akTINBupate Power Booster (ycnIBaTeHaMoUcHocT).HNoBo PowoBooer e noka3aHO Ha dncnnner (3) cbc CmBOna P.
key lock
Key Lock (3aKnUcbHe Ha ByToHn) no3B0JbA da ce 6bnKupat HactpoiKnTe Ha nIOta, 3a da Ce npedOTbpaTn CnyaHa Hameca, OCTabRkn AKTINBn Buee 3aJaDeHNTE fynkui.
Akmueupahe:
3a da akTbnpate dyKlmaTa 3a 6nokpae Ha 6ytoH, nIIObT 3a roTbeHe Tp86Ba Da e BkIoUeH.
- HatncheTe (11) 3a 2 cek. Повтореoningа за DeakTNbupahe.
3a6eJk: aKo no BpeMe Ha aKTbENe Key Lock, bJeHaTnCHATA HkoAOT dpyrnte yHKUIn, CBetOnIOd (11a)ue npMmIRBa n Ducnnei (7b) noka3Ba NocneDobateHnoCTOT CmBONn o68. 3a da yKaKe, ye yHKUrra ce n3PON3Ba m EBEHTyauHNo ue Ce deakTNBnpa, 3a da ce DeIcTBA NO nNOTA.
- Temperature manager (Worming Function)
Temperature Manager (TempepaTypemHeMnJxbp) (Worming Function) e edha cyHkua 3a KOHTpO, KOTo no3BONRA NOIbPjAHeTo HA TOINHaTa Ha EHa noctoHHa TempepaTpa Ha eoHO ONTIMN3npaHO HNO Ha MOuHcCT; IdeanHO 3a da ce NoIDbPjKAT TOnPi Beue npiroTBeHIne XpaHn.
Akmueupahe:
136epete 6ytoh (2) n cne ToBa 6ytoh (9) Ha 30HATA, KOrTO JKeJaTe Da mNoJ3BaTe; DcNnPeT (3) BaTa3n 3OHa 5e NOKa3Ba NocJeDoBaTeHIOCT OT CmBONi
O.O, KOrTO Oe octaHe npE3 zraNTo BpeMe, npE3 KOeTO dyHkUInyTa e AKTINBHa.
Jekmueupaime:
HaTNCHETe OTHOBO 3a HRAKONIO CekyHn6bYToH (9),3a da DeakTNBnPaTe FyHKnIyra.
3a6eJekKa:MOKTe Da BKNIOUHTe FyHKUJIraI N B 3OHNTE C BKNIOUeH BRIDGE.
Automatic Heat UP (ABTOMATNUHO HarpBaHe)
Функцята Automatic Heat UP (Автоматун Ho Harрвае) no3BONЯBa Да ce doctinrhe no-6bpr30 мошюстТа на зададеня ржим; c ta3и Функцяce pa3nOJana r c npedIMCTBOTO DA ce noCTrHne no-6bpr30 rotbeHe, Ho 6e3 pncxpanata da 6bde n3ropeHa, Tb' KaTo TempepaTypata He naXbprTЯ t3n Ha 3aZadEHO T HBO. Ta3и Функцяe
HANUHa 3a HNBaTa HA MOUHOCCT OIdo
Akmueupahe:
136epete 6byto (2) Ha 30hata, KOrTO JKeNaeTe Da n3noN3BATE, cNeT TOBa nIb3Hete C npbCT NO JeHTATA 3a n36op (5) cNeD DoCTnraHe Ha JKeNaHOTO HNBO npoDbJnkeTe Da HAtNCATE 3a HRAKOJIKO CeKHyHd, DOKATO
Icnnnert (3) B Ta3n 3OHa Ce NORBA CmBBOIbT peDyBaauCe Cbc 3aJaDeHata MoUHcT.
YBelenuabaiKn HNBOTo HA MoUHcT Ha 30HaTa 3a rotBeHe, cyHKunra Automatic Heat Up (AbTomatnuHo HarpaBaHe) OCTaba AKTNbHa, c HObTa HAcTpoJa HA TeMnepePaTypa;
3a6eJekKa: Ta3nФункLIMMOJe Da bJde aKTNBIPAHa 3a HRAKOLKO 3OHN eHOBpeMeHHO.
Jeakmueupaune:
U36epTe 6yToH (2) Ha 30HaT, B KOrTo JKeJaTe Da cnpte Automatic Heat Up (AByTomTuH HoRpaBaHe) HamaJIeTe HbTO Ha MoUHocHT Ha 30HaT3a RotBeHe.
- Pause (Паузи)
Функшета Pausa (Pay3a) no3BOLЯBa De ce npkeKbche BCЯ AkTINBHa ФунКшЯ Ha nIToA, npemeCTbaiKn Ha CTонHOCT Hуla MOUHOCCTTa Ha rotBeHe.
Akmueupahe:
- haTnCHete 6byToH (10) cBeToaNoDbT (10a) CBeTa n ce NoBRA BA CMBOJIbT /I npMmRBaUc Ha DscPien (3)Ha AKTNBHNE TcOHN, KATO CE peDyBa C HNBOTo Ha TEMnePaTypata, HAcTpoEHO B Te3n 3OHN.
Jeakmueupaune:
HaTnCHTe 6yToH II (10) 3a HraKoJIko CeKyHdI, DOKaTO CmBMOJbT N3He3He.
PnI N3KlHObBaHe roTbapcknT I NIOI Bb306HOBBA pa6oTa TcN C HAcTpoKInTe, 3aJaedHn IpedeN nay3ata.
3a6eJekka: ako cneI 10 MNHyTN, FyHKnJaTa Pausa (Pay3a) He ce deakTnBnpa, nNoTbT ce nKKnOvBa abTomatNHO.
3a6eJekka: FyHKnraTa Pany3a He OKa3Ba BnnaHne Ha acnnpaunrta.
- Egg Timer (Taimep 3a Rya)
Функцята Egg Timer (Taimep 3a рица) e endho He3aBNCIMO yctpoiCTBO 3a obpaTHO o6pOBAhe OT 3OHTE 3a rotBeHe (uOT 3OHATA 3a acnnpaIy).
Akmueupahe:
U3ne3e OT MeHOTATA Acnnpaunu 30n 3a rotbeHe, Taka ye BCNUK CBETOIOuO (3 n 13) da CBETT.
HaTHCHETe 6yToH (6) 6e CBETHe CBeToDnOu (6a) n eHOBPemHeMoC TOBa Ue Ce aKTNBnPa N
ДисплесТ (7a+7b) cbc cbetoIOnO (6b) -
Cera ue Bb3MOXHO da yBENuHTe INH HAMaNHTe BpemTo, KATO n3nON3BaTe 6yToHn + (8a) n - (8b).
BpemTo e nocoueno B mHyTu. Ako TaMepbT DoCTnHRe BpeMe, NO-MaIko OT 1 MmHyTa, bpoeheto npoIbIkaba, KaTO CE NOCUbaT CeKyHn.
Korato TaImepeBt e 3aBpHn o6paTHo Ipe6poBaHe, ce n3daBa eHN akCyCTnueH CnHaJI N 3OHata 3a rotBeHe ce n3KJIHOVA.
Deakmuape:
3a no-paHNO 3KNIUOVAHe Na TaIIMEpa 13ne3Te OT MeHIOTa ACnnpauNIA 30Hn 3a rotBeHe, Taka Ye BCNUKN
CBetOJIOI (3 n 13) da CBETT n HactpoTe DnCnpe Ha TaIMepa Ha Hyna C 6yToH - (8a).
Taimep30Hn3aTogBeHe
Функцята Таймер 3они На ГотBEhe e endo obpaTHO OБрOBaHе, KoETe E b3MOxHО Na ce HacTpon, KaKTo n eHOBpeMeHHO, 3a BCЯka 3OHa 3a rotBeHe. CJIeNnTChAne Ha 3aJaEHn NepNOd, 3OHte 3a rotBEHe CE N3KIHOuBbAT ABTomatUH No Notpe6nteJrT Ce N3BecTBa Cbc CNeuAnen akyCTmHcNfHApI.
Akmueupahe:
3a6eIekKa:To3n TaImep MoKeJa 6bDe CTapTnpaH CaMo aKO 30HaTa 3a RotBeHe e akTmbHa npu MoUHOCT, pa3InuHa OT Hyla.
CneI KaTO aKTHBnPaTe XeJHaHata 3oHa 3a rOToBeHe,6yToH (2),
Dcnnne (7a+7b) ce ce aktmbnpa n ige mokeTe da nporpaipate taimepa.3a da ybeinuite nn HaMaInTE
BpeMeTo, n3pOJ3BaIe 6yToHn (8a) n- (8b). BpeMeTo ce n3pa3aBa B mHyTn. Ako TaMepbT doCTInHe BpeMe, no-MAnIO OT 1 MmHYta, o6paTHOT 6poEne npOdbJkzaBA c NOKa3BaHa H CeKyHn.
Ako xenaete, noBtope te onepaunra 3a noBee 30Hn 3a rotbehe:
3a BcKa 3OHa 3a rotBeHe MoKe Da ce 3aJaDe pa3JIuHEn TaIMeR; Ha DnCIneR (7a+7b) ce NOKa3Ba 6paTHoTo 6poEHe Ha N36paHata B MOMHTa 3OHa 3a rotBeHe
3a6eJekKa: CnEi AKTNBIPaHe Ha 30Ha Bridge, TaIMePbT MoKeJa 6bJe CTAPtnapH N 3a Ta3n 30Ha.
Jeaekmuesupaue:
3a no-paHHo N3KIIIOUBaHe Ha TaIIMepa I36peTe 3OHata 3a
rotBeHc6yToH(2)HaTnChTe 6yToH -8a),doKaTo TaMepbT DoCTnHe Hya.BpeMeTo Ie Ce nKJIOUH.
Power Limitation (OrpanuHne Ha moUHocTtA)
Функцят Power Limitation no3B0nlaBa da ce 3aadae
Функционранeto Ha npOdykta, KaTo ce orpaHnHy
HERobata MaksimmaHa abcOp6aunr Na KaTo ce perynIpa
MOuHocTtHa abcOp6aunr Ha BCnKu AKTINBn 3oHn 3a
rotBeHe, KaTo ce HapRaBn Taka, Ye obSuaTa a6cOp6aunr
Ha nIpoTa, He naDbuIbaba MaksimmaHnTO 3aadJeHo NHBo
Ha abcOp6aunr.
MeHOTo 3a ynpablenHe Na Power Limitation ce hAmpa B MeHOTo 3a ynpablenHe Na napaMeTpnte.
3a da eene me MeHomo 3a ynpaeJeHue Ha napamempume:
N3KJIIOUHETe 3axpaHbAHeto Ha NnOta, H3yakaiTe HRAKOJIKO CekyHdN I OTHOBOCBpKxete NlOTA KbM 3axpaHbAHeto. PA3BJOKIPAAITE nIota, KaTO
3aIbpxIne HATNCHT 3a HRAKOLKO C6EYHn6byTOH (11); CneToBA HATNCHTe EHNHOpeMeHHo 3a HRAKOLKO C6EYHnD
6ytoHn (12) + A (14),doKATO ue CBeThe neHTata
3a Пьзганe (5). Пьзнete с пьст no Лента (5) OTЯBO Naясно. Дага диспег (3-RL) n (3-RR) ще CBETHAT.
Диспей (3-RL) noka3Ba napaMeTbpyT, коTo ue 6bde npomeneH.
Диспел (3-RR) указа востраетастонoct.
3a da npemuHeme KbM MeHIO 3a ynpaeIeHue Power Limitation:
По падрабиран, като влесе В мени с napаметр, Диспел (3-RL) щe поаьса с редуbaхе стонoctnu n O;Натишистен Кокогарно 6уто (9-RL)dokaTo Dиспел (3-RL)пokалжецонocnte C n C peувах. (C n = MeHIO 3a ynpablenne Power Limitation).
Hacmopume cmouhocma Ha Power limitation:
HATNCHE6yToH (9-RR),3a da n36epeTe XeJanaHaTa CTOnHOCT CpeD TPN BV3MOXHN, Bk. TaBnIuata no-dony:
| 30ha | 30ha | СтойhoeТ ha |
| 3-RL | 3-RR | МошhoeТ (KW) |
| ∅ | ∅ | 7,4 |
| ∅ | ∅ | 4,5 |
| ∅ | ∅ | 3,1 |
3ana3eane Ha Hacmpoukume:
3a da 3ana3nte n36paHnte HacTpoKn, HATNCHEte 6yTOH (1)
YIOTPEBA HA ACINPATOPA
- AktnBnpaHe Ha acnnpaTopa.
Akmueupahe:
Дokochete (HATNCHete) 6ytoh (12) dinpneT (13) ue CBetHe npko.
Дokochete nПьзHTe npbCT no JENTATA 3a n36op (5), 3a da perynpate cnilata Ha acnnpaia Ha napite.
3a6eJekka: 3a pa3nka OT 30Hnte 3a rotBeHe, n3KJIIOUbaHETO ha acnnpaTopa He MOKe da Ce npOrpaMpa ue3 TaImep. CneIOBaTeHNO dinCnnNe (7a+7b) HrMa da CE BkIIOuN.
Deakmueupahe:
3a da n3kIIOUHTe acnnpatopα, HATNCHEte 3aApbXte
6ytoHa (12) 3a HraKoIko CekyHn nn HacTpoIte MOUHOCTTa Ha zAcMyKBaHe Ha Hyna.
Power Level (HnBO Ha MouHocT) Ha acnnpaTopa
AcnipatopbT mHa 4 HnBa Ha Cnla Ha 3acmykBahe PJIoc Booster.
ДokocheteиnpexxBpIeTe c npbCTnЛentHa 3a n36op (4): NaЯCHO 3a Да се уBEJIInH NIBOTO Ha MOUHOCT; NaЯBO 3a Да се HabaIMN HIBOTO Ha MOUHOCT.
HactpoeHOTo HnBO Ha MoUHoc Tue ce NOKaKe Ha dncnner (13)Ha acnnpatopa.
Power Booster (ycnBaten Ha MouHocT) Ha acnnpatopa
IpoDyKTbTe cHa6DeHc 1 HNBO DoTbJHHTeHnHa MOUHOCT BOOSTER (PiIOc HNBO 4), KOETO OCTaba AKTNBO 3a 5 MNHyTu, CNeI KoETO MOUHOCTTa Ce BpBua Ha npExDoHOTo HNBO.
ДOKOCHEТЕ И ПЛБЗHEТЕ С пьстп no Лentata 3a n360p (5)\
над НИВО 4, за дда akTNbmpate Power Booster (ycnBaten\
ha moUHOT).НИВо Power Booster e nokazaho\
ducnner (13)cbc cIMBONA
-ФункюноранБаВТOMaTчЕнpeЖМ
IpoDyKTbT 1e CE BkJIOnUHa HAI-IOXOJaTaata CkOpOCT, CnopeJ KanaLHTeta Ha aCINPaIaHa MAKcIMMaHOTo HNBO HA RotBeHe, N3N0L3BaHO B 3OHTe 3a RotBeHe.
Korato 30HnTe 3a roTBeHe ce n3KJIuOyat, acnnpaTopb terpynnpa CBOrTa ckopoct Ha acnnpaunia, HamaIaBaiKn I noCTeNEHNO, 3a da ce OCTpaHrt napte N OCTaTBuHnTe MmPn3Mn.
Akmueupahe:
Bne3e B meHIO acnipatop, kato HATNCHEte 6ytoH (12), cne TOBa HATNCHEte 6ytoH (14); Ha DCnpeT (13) ige ce nokaxe 6yKbA , kato ce peyuBa cbc CTOnHOCTTa ha CKOpOCTTa ha acnipatopa.
Deakmueupaume:
OT MeHbTO Ha acnnpaTopa,HaTnchTe 6yToH (14) nI npBvHO HAMane TcKOpocTa Ha acnnpaJrO t JeHTata 3a n36op (5).
MeHou ynpaBneHne Ha qnItpn:
Heoodyu ycnue 3a enuane MeHomo:
BcHn 3OHN 3A TOTBEHE n ACINIPATOPbT trpa6Ba Da ca BkIIOueHn O; TAVMEpB 3A JIILA Tp8BeHa e N3KJIIOHeH; Ako Te3n ycNoBn He ca N3NbJIeHn, npn N3BbPbBAHe Ha npOeDypata 3a DoCTbn DnCnJeT (7a+7b) ue nOKa3Ba O n Hma Da e Bb3MOxHO da npoDbJnxTe No-HaTaBk.
3a docmbl do MeHOMo u nppezneHa cbcmohuemo Ha qunmpume:
CleI KaTo Cna3Ite I3NcKBaHnTa 3a BXoD, NocOueHn No
rope,HaTncHeTe 6yToH (12),CneI KoETo HaTncHeTe eHOBpeMeHHO -8a) n + (8b) 3a 4 cekyn.
TTOBA NONOJHHe 1e BNE3eM B MeHIOTo 3a ynpabJIeHne HaФnITpIte.
По подабирае диспг (7a+7b) се рokаьсьстогието на ФИЛТьPA 3A MA3HINH, 3a da npemHe KBM Bn3ayln3aцян Ha ФИЛТьPA 3A
MMPN3MN,HaTNCHeTe-8a)PnBcKaHOHaTnCKaHe Ha To3n6yToH,DnCnIeRt NocLeNoBaTeHNO 电npemHaba O TeINHΦnITbp Ha dpyr. Io-dony e nocOeHa TaBnua Ha CbCTOHNHeTO HΦnITpnte.
Ako 3ne3eTe OT MeHIO TcNE DeakTNBpuAHa
fntbpa, npn NOBtOHOaKTNBpuAHa fntbpa
TABJIIMLA 3A MOUHOCT
| НИВО на мошист | Нашин на rotbehene | Уnotpe6a (Бьз осюва на опITA и habицITE на rotbehene) |
| Мakсимал на мошист | Р | Ускорно заграванe | nobiiшete за кратуко врeme Temпера typа на Хранату do Бьрзо завирале рпи налчиме на ВODа плу за Бьрзо заграване на точостите на rotbehene |
| 8.9 | Пьрхени - кинени | Залържbane, залочibane на, пьрхени на замразецни подукт尼, Бьрзо варене |
CTOHOCTT ha hacnlahe Ha fntbpa 3aONHe ot
3a da u3ne3eme om MeHomo:
3a da n3ne3eOT MeHIOTo, HATNCHETe KOITOn I da e 6yTOH C N3KJIIOUOYEHNE Ha 6yTOH -8a) + (8b) nnu 3uKaKeTc 8 cekyn d0e3 da doKOCBATE npyn 6yTOHn.
Pecet 3anyuBaHe Ha qnntpn
IokaTo EaHa HnN DBeTe CnHnHaN3aCn ca AkTnBnM, MoKeTe Da HynPate AnapMaTa 3a HacnUaHe Ha nItpnte. B IIpbNTe 10 cekyHdi, B KOnTO ce NoRBAc HnHaN3aCnraTa 3a HacnUaHe C nItpn, HATNCheTe eHOBpeMeHHo 3a HKoJIKO cekyHdi (8a) n+ (8b). 3ByKOB CnHnYka3Ba N3BbPseHOTO HyIpnaHe. IpenOpbUa Ce da N3BbPwBate Ta3n npOeDypa CAMO cnE kaTc CmEHnN FInTpnte.
3a6enexka: Ako n DBeTe CnHaJIIm3aIIM ca aKTHBHN, n3BbPwTe Ta3n OepaIg IBaTn, 3a da HyIpnPte n DBeTe aIapMn..
3a6abareHepnH3KnHObaHeHaacnnpaunraTa
CakTNBnpaHa Ta3n FyHKnA acnnpaTobt ige octaHe BkIIOUe 3a npedbapntenHO 3aadJeHO BpeMe, CneI N3TuHahe Ha TOBa BpeMe, Iue Ce n3KIOuH aBTOMaTHO. BCka CKopoc TMA KOHKpeteH TaMep, KaKTo e yKa3aHO B TabNIzata No-dony.
| booster | V 4 | V 3 | V 2 | V 1 |
| 5 MИH. | 10 MИH. | 15 MИH. | 20 MИH. | 30 MИH. |
3a da akmueupame:
C pa6oTeu acnnpatop, HATNCHE TPOIDbJNKHTINHO leHrata 3a n36Op (5), ue CBeTHe CBeToNDIO(15), 3a da ykaxe, ye cyHKUraTa e bila aKTHBnPaHa.
3a da deakmuupame:
IocTaTbUHoe da npomeHnte ckOpocTHa ha acnnpaun, 3a da DeakTNBupate Ta3n fynHKuJ. Uce ce n3KJIIOUc CBetOIOJbT (15), 3a da ykaxe, ue fynKuJra e 6mla deakTNBupaHa.
XD IOnHCTBaHe Ha Tabata 3a Cb6npaHe Ha TeHuOCTN:
BcnyaHa cnyauHo n3TmuaHe n 6bUnH0 KOJUmecCTBO TcHocnToTe HxpeIe Bb3MOxHO da Ce N3BbpHn HAmeca Ype3 Klanana 3a pa3tobapBaHe, pa3nonoKeH Bpxy DOnHaT aCHT Ha npOyKa, 3a da MoKe da ce OCTpaHn BCEK OCTaBk NOCDnHyprBaKn MAKcMnAHa HxnnHHe 6e3onacHocT.
XEIOuHCTBaHe Ha MetaJIHATA peWetKa:
PeWetkata Tp8b7a Da 6bDe N3MmBaHa Ha p8ka C tonla B0da N HeYtpaIe Hnpapat N NOcCySeHa BHIMMaTeHNo 3a da Ce N36ErHAT RbIeHnHa OKCnDaunr.
ПОДРБЖKAHA ACПИРATOP
-ПочистваеHa acinupaTopa:
3a nouchTaBaHTo n3noJ3BaTte EInHCTBEHO edHa HABlaXHeHa C HeYtpaHn TeHn npenapatn KbPna.
HE I3IIOJI3BAIte IHCTPYMEHTN 3A IONUCTBAHETO!
U368BaTe ynoTppe6ata Ha a6pa3nBn npOdykTn. HE U3NOJ3BAHTE CmPT!
XA IoIdbpXaHe HaΦnITbP 3a Ma3HINH:
3aIbpxa qactnnte Ma3HnHa, npo3xoxdaun oT roTbeHTo.
Tpa6ba da 6bnde nouchtehen edinH nBt Ha Meceu (nIkoRATO CNTemata 3a CnHnIIm3npaHe Ha 3anyuBaHe HaΦiltpnte CnHnIIm3npa Ta3n Heo6xOdUmocT), C He
arpecnBnH nouchbtaun npenapatn, pbyho nIN B mNraIHa MaunHa HA HNCKN TEMnepatypn H KaPbK uKnbl. Pnpu3MnBaHeTO B MNRJIHa MaunHa MeTaNHHr T PhnITbp NPOTNB Ma3HNH MoKe Da Ce oBe3uBTe, HO HeoBHTe QfHJTPupaun CBOIcTBa HNKaKbB Cnyauh HMaJa da ce npomeHr.
XB NopdpbjkaΦnntbpcaktnbeH BbyIeN - KepamuHn (Camo 3aΦnntprupaBepcn):
3aIbPka HnepnAHTHne Mnpn3Mn, npOn3XoxJaun ot rotBeHeTo. PpOdyKtBt e Cha6JeH C KOMnJIeKT fNITpn 3a Mnpn3MN.
3aanyuBaHeTo Ha mInTpTe 3a MIn3Mn HAcTbNba CneEdHa 3NaUHTeHNO pOdIbXInTeHn yNoTpe6a, Cnpoe TnPa KxHy NcctOTata Ha NoCtBHe Ha mInTpa 3a Ma3HNH. FInTpTe 3a MnP3MN, Morat Da 6bDat perEHepapAHn TepMnHO Ha BceKn 2/3 Mecea B npedBaparHn HAprrata fpyna Ha 200^ 3a 45 MinHyn. IpaBnHto perEHepapane rapantmu eHa eFekTBHocCT Ha HenpeKcbHato mInTpPahe 3a 5roHNH.
BhImaHne! He noctabraIte fnnItpnte Ha nbHOTo Ha cyphata, a mnoctabraIte B taba, kato nocTaBnTe Ha meKdINHb BnCOUHa.
5. OBCJIYKBAHE
TbPCEHE HA HEN3IPABHOCTN
TEXHNUECKO OBCJNYKBAHE
Ipei Da ce CbpxKeTe Cbc cepBn3a 3aTexHnecko O6cnyKbaHe:
1.YBepete Ce,Ye He CTE B CbctOHaHne Da pa3peWite Camn IpobNeMa Ha 6a3ata Ha INΦopMaizra, nOmeTeHa B pa3deJa "YCTaHOBAHe Ha NOpeDi".
2.ИЗкю悔ети вькю悔ето代谢ура,за да ce уверпг,че Нзравнocтta e OT PharmaHa.
Ako cnei Bbnpochite npobepkn Hn3npabHocCTa e BCE oue haNue, CbpxeTe ce c hai-6nn3Kna cepBn3 a TeXnuecko obcnykBahe.
RO
Vase detinute in prealabil
- Temperature manager (Worming Function)
Temperature Manager (Worming Function) reprezinta o
functie de control, care permite mentinerea caldurii la o temperatura constanta si un nivel de putere optimat; idealà pentru a mentine calde alimentete DEA preparate.
Activare:
Selectati tasta (2) si apoi tasta (9) zonei pe care doriti sa o utilizati; afisajul (3) zonei respective va indica o seventa de simboluri ca care va dura atat tamp cat functia va ramane activa.
Dezactivare:
MHHMaJIbHoe paccToHHe Meky BApOHy NOBepxHOCTbIO HcTeKoI DoJXHO 6bITb He MeHee 50mm fpoHTaIbHo I He MeHee 50mm nO 6okam. PacToHne Do HabecbIXuKaΦOB DoJXHO 6bITb MHHIMYM 550mm.
PpimmeaHne. Ppi paCtepe pa3mepoB cIeJyET yUHTbIBaTb Yka3aHnI pOIN3BOJNTeJI KxHN.
-ПЯ ONTNMM3aUNYcTaHOBKNФINbTpUOSeBvpeKOMeHNyETCnI3rTOBnTB OTBepCTMe BLOKJIe, Kya dCneDyeT BCTaBnTB peWetKy, IMEJOUYOCB INpOdaKe.
Baxho: nCnoJIb3yIte OJHOKOMNOHEHTHbI KNeI-reMpTeNK (S), yctOuHbI bK Tempepatypam 20 250^ . NpepeytahAOBKO cKNEIBaEMbIe NOBepxHOCTN HeoBXODIMTO TuaTeJIbHO OHCTNTb, ydaJIb BCE BeueCTBa, KOtOpBe MOrYT npEeTCTBOBaTb IX aAdre3nn (HaNPmEp, AHTNaIRe3NBbl, KOHCepBaHTbl, cMa3Kn, Macna, nopOuKN, OCTaTK NKe I T.n.). KNeI HeoBXODIMo paBnHOmePacnpedeINb no BCMeY nepimETpy pAmI. PIoCe CKneIbAHn daTe KNeEO BbICOXHYb TB TeueHne pImepHO 24 YacOB.
BHNMaHHe! Heco6IHOJeHMe DaHHbIX NHCtpyKlmpn npuYcTaHOBKe BnHTOB uФmKcypyOux npCnTIOc6JIeHm MoKet TIOJIeYb 3a cO6oi pUCNI, CBraAHhIbe C3NeKTpUHe-
CTBOM.
- PnpmeuHne: IINI npabInbHOy UCTAHOBKN N3dennpeKOMeHNyTeC OBEpHyT Tpy6OpBOBdoI KNeIKo NENTO, KOTOPA IMeET CnEDyUOJIe XapAKTEPNCNTK: 3aCTNCHaN pIeHka n3 MIRKO PBX, C KNeIaUM CNOe HA oOChobe Akpnata, COOTBeTcBHe CTaNdApTy DIN EN 60454; nNoxaorropoucTb; OTNIuHAR yCTOnuHBOcTB K CTapeHIO; yCTOnuHBOcTB K Nepenpaam TEMpePaTpy; yCTOnuHBOcTB K Hn3KIM TMpePaTypam.
YTNIN3AUH NIO OKOHUAHN CPOKA CJNYKbI

3ToT annapat MapKnipoBan KnaccnФkaUHOHbIM 3HaKOM B COOTBeTCTBm C DInpeKTbBO8 2012/19/EC - UK SI 2013 No.3113, O6 oTxodaX 3NeKtpnueckoro N 3NeKtpoHHoro 06OpdyobAnH (WEEE).
KoHTpOInpyru, yTO6bI 3OT npOdyKT yTINn3nPOBaNcRdoJXHbIM oBpa3OM. POnIb3OBaTeJIb NOMaERt npEDoTbPaTNTB BO3MOxHbIe HeRaTHBbIe NocLeDCTBnI DnI OKpyKaIOUeI cpebl n3dOpOBb. 3OT CmBON Ha I3deIINuIN pInnraAeMoR K HEMy DOkymEnTAuIN yKa3bIaBET HA TO, YTO daHHOte yCTPOINCTBO HE DOJHXO yTINn3nPOBaTcBc KaK 6bITobBLE OTXoDbI.Ero CneDeYet CdaTB B COOTBeTCTByIOUIN cbOpOHb NYPKT, 3aHmIAUuNC nepepa60TK O3eKTPnueCKORIO 3NeKTOPHORO 6OpOBAHAn. YTuIN3yIte corlAChO MeCThbIM HopMaTbAM no nepepa60TK OTOxO Dob. IIN NOUYehN DonOIHNTEbHO INΦOPMaUM No 6ObpaueHIO C daHHbIM 3dENMeM, nepepa60TK u TYNIN3aUIM CneDeYet 6pAaTbCB C COOTBeTCTByIOUm MeCTHbI oprAN, B cnyk6y c6opa 6b108bIX OTXODOB INN B Mara3MH, rDE bI Ipno6pTeH np6Op.
HOPMATUBhIe DOKYMHTbI
O6bopydobahne cnpoeKtpoBaHO,ncblTaHO n3rToOBHeHO corlacho cneDyoUIM CTaHdpTAM:
- Be30napocb: EN/IEC 60335-1; EN/IEC 60335-2-6, EN/IEC 60335-2-31, EN/IEC 62233; Pa6oohne xapaKtepcntu: EN/IEC 61591; ISO 5167-1; ISO 5167-3; ISO 5168; EN/IEC 60704-1; EN/IEC 60704-2-13; EN/IEC 60704-3; ISO 3741; EN 50564; IEC 62301. EN 60350-2; -NeKtpomarHHTHnAe COBmecTmOcTb: EN 55014-1; CISPR 14-1; EN 55014-2; CISPR 14-2; EN/IEC 61000-3-3; EN/IEC 61000-3-12.
- EMKOCTN, n3rOToBneHbIe paHee
Mochno npOBepntb, obnaaet Jn MaTePnJI KAcTpOJI mArHHTbIMN CBOJCTBAMn npn NOMOu nPoCTORo MaHNTa. KaCtPOnI HEnpRIOHbI dIg NcNOJIb3OBAHn, ecNI mArHIT he pearnpyET ha HnX. IV B 30m Cnyu MeIOT cnNy yka3a-HnI npdebldyuero naparpaqa.
- PekomeHnyembleДиametpbIДиKaCTPioNb
BAXHO: npn HecooTBeCTByHooNx DnaMeTpax nocyIb BapouhIbe 30HbI He BKIOUaOTc. YTO6bI y3HaTb, KAKOB MINIMaJIbHbI DnaMeTp NocyIbI dIra ITOBKn y KAKdo OTDeJIbHOI 30HbI, CM. INJIHOCTpnpoBaHHyO qAchTb DaHHO rpyKOBODCTBa.
BHHaHHe:YtO6bIcoxpaHnTb3ΦΦeKTHBHOCTb npriTOBHeHn H KaueCTBO npOyKaT, HE peKoMeHdyETc HcNoJIb3OBAb TnHydKyIOHhBe aadantpebl.
- 3Heproc6epeXeHne
IcnoIb3yIte cKOBOPObI u KAcTpOHN C dIaMaTePOM DHa, paBbIM dIaMeTpU 30Hb BapKn. IcnoIb3yIte ToIbKO Ka-CTpOHN u CKOBOPObI C PIOCKIM DHom. Tpe 3TO BO3MOxHO, 3aKpbBaIte KAcTpOHN KpbIbKaMn B pIOceCE BapKn. TOTobTe OBOuN, KApToeJIb, n.T. D. H BeNoJbOM KOJIueCTBe BOdI, YTObI yMeHbUHTB BpEma npriOtROBHeN. IcnoIb3yIte CkOPOABKy, 3TO 3NaUHTbeHO yMeHbUaet 3HEprONtpe6bNeHne I BpEma BapKn. CTabTe KAcTpOHN B ceHTpe BapOHO3ObI, OTmeUeHHO Ha NOBepXHOCTN.
NCIOJIb3OBAHNE BbITJXKNI
CnCTema ydaJIeHnI npOB MoXeT n3rotabNbaTbCBA Bbl- TjxHOM NcONJIeHnI, C BBIOdom npOB HApKy, INI qInIbIpyUoem NcONJIeHnI, CpEunPkyJrAneH.
Cm. caHtbl www.elica.com n www.shop.elica.com yTo-6bI O3HaKOMITbCnOJIHbIM ACCOPTIMEHTOM KOMPTNEKTOBДЯ paJInuHbIX INCOJIHeHn CnCTeMbI, KaKФЛbTpYIOUeTO, TAK N BbITXHOrO.
BbIyXHaBcEpa:
Tapby ydaianpoTc Hanyky uepe3 CnCTeMbI Bo3dyXOBoDhBx
tpy6 (noJnEkaux npno6peTeHIO OTdIeBHO).NoOceHN Hte N3deJIne K BbITaXKbIM Tpy6am NTBPcTnM B CTHe, IMeHOUIM DNAMETp, KOtOpB paBeH DNAMETpy BbIXoHDoro O TBPc7Aix nx pAs3MEpax CM. CPTaHmUy AKeCCecCyapOB pyKOBOCTBA NO MOHTaXy UYCTaHOBKE -ICNOJHHeHNE BbITaKKN CyJaHHeM. IcNoJIb3ObaHme BbITaKbIX Tpy6 NTBPcTnB CTHe C MeHbUIM DNAMETpOM PnpBeTeK yXyDuHEHNO paBoOuX xapaKTEpNC tCtEMbl BbITaKKN c cyueCTBeHHOMy YbeLIueHEnIO yOpBH JyMa. PO3TOMY B noO6BHX CnyAAx POn13BODInTEL CHImaet C c6eB BcKaYIO OTBETCEBHNOCTb.
Длбобсесеня Мксимально БффektNBHOCTN BblTAKK·Рекомндуема Мк.Длина труб соctавлгет 7 no-rohhbixmetpoB.·Haобшдпнe 7 norohhbixmetpoB nCNoIb3yIte MaksymmДba Koleha 90^ -He donyckaite cyusectbeHHORO n3MehncaeeHЯ KaHana, NOdepkIMBa8Ø150MM (ИПИ KBaDpaTHoe ceHHe Na3MePOM 222x89 MM).

Фильтуюшая Версан:
BcabsBaembBo3dyxФnIbtpyETcC nOMOsbHcneaunabHyix KmPo- 3anaXoyIaIbNAIbUOxuΦnIbTPOB, a 3aTeM Bo3BpaAaETcB NOMeUeHHe YpeE3 COOTBECTCYIOue KaHAnbI (3anaXoyIaIbNAIbOuHneФnIbTPbI N KaHAnbI npNo6pTaTcO TdJIbHO).ДЯ NOJYeHnED OdoONHITeHbHO INΦopMauzoOBpaaTecbK CTrpaHuaM INIIIOCTPPOBAHNO Yactn DaHHoro pyKOboDCTBa, NOCBUeEHbIM pInHAdNEXHoCTM N KOHfrypaumrIM (dЯФnIbTpUOeBepcn).
3. PABOTA YCTPOICTBA
NAHEJIbYNPABLHeHnA
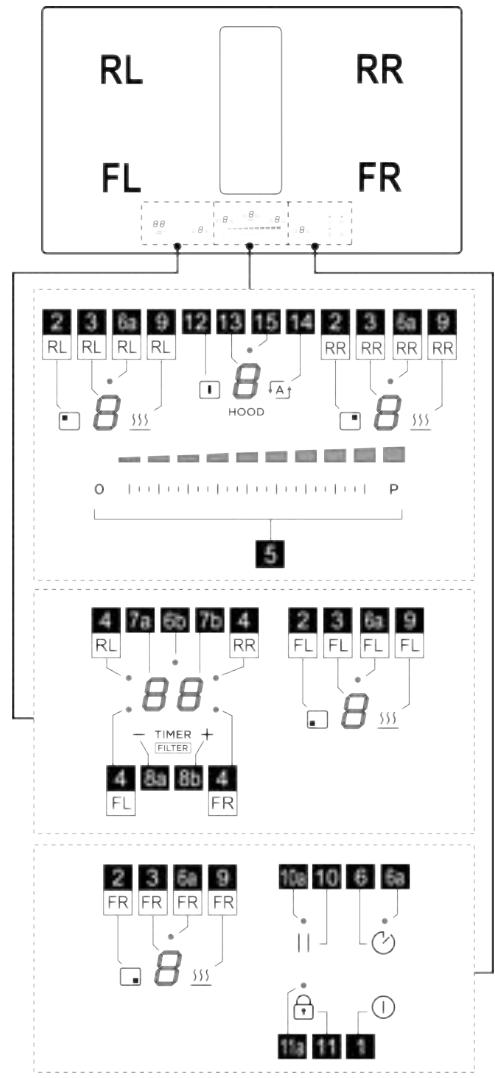
BJIeBO DnIy MeHbSeHnry YpOBHr MOUHOCTN.
YCTaHOJIeHHbI yPoBeHb MOUHOCHTn OTO6pa3NTc Ha DnC- nnee (13) BbITJAKN.
- YpobEnb Power Booster BbItTJxKn
U3dene IMeet 1 donoHnTeIbHbIypoBeHbMoOuHocTb BOOSTER(Bblue yPoBHa4),KOTOpBIAKTINBnpyETcHa5 MmHT,ncJeYero MoOuHOCt bCHNkaETc DO npeBldNyceTo ypoBHa.
KoCHITecb npOBeNTe naBcAMn BDoJI naHeHn BbIbopa (5),BbIe yOBoHra 4,ДЯ BKIOUeHnaФyHKunm Power Booster (ycnntenb mouHocTn).YpOBeHb Power Booster OTo6paKaTaHa ducnnee (13)c nOMoubno NIKTORpaMMbl
Pa6ota B aBtOMaTHueckom pexHmE
YctpoCTBO BKNIOHTC HAN6OJIe NOXODJUeIe CkopoCTbIO, INPCNOCOIBN CKOPOCTb BCaCbBaHnK MAKCMaHbHOMy YPOBHIIO MOUHOCTN, ICNIOJB3yEMOMy B BapOCHbIX 30-Hax.
Korda bapouhble 30hbl OTKIIOUaHOTCB, BbITJXKA aadantnpy- et CBOIO CKOPOCTb NocTeNEHNO ChINKaET ee, YTObI ydaJIHTb OCTaOHTbN nap n 3anaXn.
BkTIOHcHue:
BoiNTe B MeHbBbTJxKn, HaxaB KhoNky (12), 3aTeM HaxMMte KhoNky (14); Ha Dncnnee (13) NOABNTc8 6yKba , KOTOPa8bYdET UpeEdoBaTbC8 co 3HaueHHeM CKOPOCTN BbTJxKn.
OmkIouyeHue:
B MeHIO BbITaKKn HauKmTe KhoNky A (14) INI IN BpyHyO yMeHbUIne CKOpocTb BCacSbHaHnC NOMOu bIO naHEnb Bi6opora (5).
MeHNo ynpaBHeNnФиltpaMn:
YcnoaJdAnExOdaMeHIO:
BAOCHBIE 3OHbI N BbITJXKA DOJIIXHbI 6bITb BKIOHeHbE. EGG TIMER DOJIIXeH 6bITb BbIKHOeH. ECIN 3TN yCIOBnHE cOJIIOHaOTcR, pnBbINOHNHm INPOUdpybI DOCTyna Ha DmCnnee (7a+7b) 6yDet OTO6paKaTbcra IIO H bBIIOHNHe Hn DaJIbHeuNX ONEpaun HSydet HeBO3MOxHO.
YmobI nonyumb docmyn K MeHIO npocmompemb cocmoHue funbmpo:
Поссе ВьлОненя Тробовий КВХоу, уka3aHHbIX Bbl- ue,нжмITE KhoNky (12),Затем OДНOBрЕмноHa-Жимайт-e (8a) n+(8b)ВТeЧЕпЕ 4секун.
Iocne 3Toro OTKpoETcMeHyo npaBHeNnФиьтpaMm.
No yomunahmno ha dncnnee (7a+7b) oTo6paKaetc co- cTOnHHe KINPOYUABJIIBAIOUEFO ΦIINbTPA, YTO6blpeKeJIIOuHTbcra Ha npocMToP coTcOHa H3APXOUYAB
JINBAOUFO ΦNtBTPA, HAKMITE (8a). PnK KaKDM HAKATNI 30I KHOKNI DcNPIE NocJeDobATENBHO nepeKIOuYaeTc C OndHOro FOINbTpHa Na DpyrO. HnKe npBedeHa Tabmua coCToHn IINbTPOB.
TABJIULA YPOBHEM MOUHOCTN
- OTKIIOUeHHe INHdNkAToPA 3aRpa3HeHnФJIbTpOB
Ecnn OIN INI Oba CnHnAaKTHNBbl, MoXHO c6pocntb abapnHbI CNHAn 3acopeHna FInbTpa. B nepBbIe 10 ceKYnd NOBnEHHa CNHana 3acopeHna FInbTpoB HaxMnte ONDOBpeMeHHo Ha HeCKOJIbKO CeKyHd -8a) + (8b). 3BykoBoi CNHAn Yka3bBaet Ha To, YTO c6poc BblOnJIHe. DaHHyIOPOeUpy peKOMeHdyETcBblONHrTa TOJIbKO nocne 3amEHblPOB.
Pnmuemae:EcniObaabapnHbix CnHa nakAaKTHBbl, BbIOnHnTe 3Ty OnpaunIO DbaXdbI,yTo6blcPoCnTb oBa cnHana..
3aepkkaOTKnHueHnBbTJXKn
Ecnn 3taФyHKnA aKTHBnPOBaHa, BbITkKa 6yET octaBaTbCBAKIOUeHHoB TceHne 3aDaHOrO BpEmHn, NOIcTeueHN KOTOPORO OHa ABTomATNUeCKN BbIKHOHTcR. KaXdA cKOpocTb IMeet ONpeDeneHHb TaMep, kak yka-3aHO B TabNIce HIXe.
| booster | V 4 | V 3 | V 2 | V 1 |
| 5 MИH. | 10 MИH. | 15 MИH. | 20 MИH. | 30 MИH. |
ДяEkIoUeHua:
Pn pa6oTaHoue BbITxKc EINTeIbHO HaxMInTe naHEnb Bb6opa (5), Pn 3OM 3aRopntc CBetOno15) yKa3blBaBar Ha TO, YTO FyHKuN AKTBNBPOBaHa.
Дя omknquehna:
npoCTO n3MeHnTE CKoPoCTb BCaCbIbAHnry, yTO6bl OTKJIIOuHTb 3Ty fYHKUIO. CBeToDIOd (15) norachET, yka3bIbAHa To, yTO fYHKUIA OTKJIIOUeHa.
YXOD 3A BAPOUHOI NOBEPXHOCTbIO
OuNTKa HNDyKUHOHNOBepxHOCTN
Bapouhyo panenb cneyet uctntb nocne kaxdo npmehenia.
BaxHo:
- He nCnoIb3yIte jeCTKHe ry6Kn, Ckpe6Kn. VIX nCnoJIb3OBAHne, CO BVPemHeM, MOXET NOBpeNDtB CTeKNo.
-
He npimehaIte pa3npaxaIOUne XmMnueckne deTepeRHTb, TAKNE KAK CNPeIN IJI nee HNI NPTHOBbIOdTeN.
-
HE IPIUMEHAITE YCTPOINCTBA UNTCKN CTPYEI NAPA!!
Iocne kaxdoRo nCOnl3ObAHnna, daTne NOBepxHocTn OCTbIb N OCHNTte eE oT hKnInu N ocTakOBPiU. Caxap npOyKtbl C bVBCOKIM COdepXaHemc caxapa NOBpexJaOT BapOuyHyIO NOBEXHOCTb N DOJIKNbI 6bITb ydaJeHb HeMeDnenHo. CoIb, caxap n necok Moryt Ocaapanatb CTKJHnyo NOBepxHOCTb. PnpmeHnTe mRky TkaHb, 6ymaxHbe NpONToHca DnA KxHMn IIN CNEuAnhble pOdyKtbl DnA BApOvHbIX NOBepxHOCTe (coBnHOra HNCTpyKuHN pnOIN3BOIDNTe).

OuNCTKa EMKoCTn dIa C6opa XnKIOCTn:
PnCnyaHOn n CnIbHOYteUeKHe KJNKOCTn N3 KaTPOJNOxHOBOCNIOB3OBAtCBcCNIBHbIMKnIaNHO,paCNOJOKeHHbIM B HIXHe Yactn yCTPOCTBa, YTO NO3BOJRAETn3-
6exKaB OTIOXeHnI IObix OCTaKOB IN OcyueeCTBJIbTb OChcTy CcoBIOdeHem MAKCIMaIbHorO yPoBHr IINHeHbI.

EOnCTKa MetaJIInuYeCKo peWetKm:
PeWetky CLeJeYET MByTb BpyUHyIO rOpueH BeBOOc HeN- TpaIbHbIM MOOuM CpeDCTBOM N AKKypaTHO BbCyuINBaTb BO n36exAHme OKnCJIeHnI.
YXOD3A BbITJAKKOJ
OuInCTKa BbITaXKn:
ДяочNTКИ NGIOЛБ3уTe TOJILKO MЯгkyO TKAHB,CMOЧEHyO HeIТральнIM MOHQUIM CpeDCTBOM.
HE PIPMEHRAIte MHCTPYMEHTOB INI KAKNX-JINBO IPICIOCOBJEHN DJIY ONUCTKNI!
136eraIte nCnOJIb3OBAHnA abpa3nBbIX cpeIcTB. HE NCIOJIb3yTE CnIPT!
XyO3a xHPOyNAbIbAIOUHmΦnIbTpOM:
Cnyknt nIy ynaBnBaHnna qactu Knpa, o6pa3yo-uxc npn pnproTOBHeHH nn.
OcHCTky CNeJyET BbIOnJIbTb OINH pa3 B MeCzU (NII KOrla cpa6aBtIbAet CnCTema 3acOpEnHg fNlbTpOB) C NoMoubIO HearpeccNBbIX MOOxN cxPeDCTB, BpyChHyIO NBI B NOcyDomOeHHO MaHIne PN H3K0r TemNepATye B kpatKOBpemEHOM ZKJIe. Ppi MoKe B NocSyDomOeHHO MaHIne Me TaIInueckNI KInPOyNAblBaIOuOri fNltp MoKet oBeCuTeNTbCr, Ondako erO fNlbTpYUoIne XapakTePncSTKn COBepWeHNO He NImeHTc.
BxOaΦnIbTp c aKTbHbPOBaHHbIM yIeM -KePamika (ToIbKO dIaΦnIbTpyHOuei BepcN):
CnykntIy yctpaHEn HnepnTbIX 3anaxOB,6pa3yUOxnc npn npiroTOBneHNPiu. DaHHoe n3deJIne obopydObaHO Haobpom De3oOpnpuyuuxnФnbltpOB.
HacbIeHne De3oOpnpuyOuxn FmNbTPOB npOxCOaNT nOcne DInTeBHOrO NcIOJIb3OBAHnB 3aBNCIMoCTN OT TnPa KxHN pErpyAepHOCTn OcHCTKn XnpoUyBaMBAooJeO FmNbTpa. De3oOpnpuyOuNe FmNbTpbl MoXHO perEnerpuPoBaT b TepMnueckm CnOCoBOM kKdIbe 2/3 Mecza B npEdBaPntBHe HarpeToI neH npn 200°C B TeeHne 45
MnHyT. IpaBnIbHna pereHepaZna rapaHTnpyET noCToHnHYO 3pEeKtNBHOCTb PnIbTPOBaHN B TeYeHne 5 let.
BhImaHne! He KnaJnte PJIbItpbl Ha DnO dYXOBKn, a nIoXnTe INx Ha npOTnbHb, KOtOpbl Heo6XoDnMo BCTaBNb B cpeHem IIOJKeHN.
5. TEXПОДДЕРЖKA
TABJIUCA IONCKA HENCNPABHOCTEIN
- DnHlE He MICTMIO anIOMIHIO: Nocyd He po3irpibatmMetbcs iNdykTOpamn, a60 BOHn II B3arani He BnBnTb;
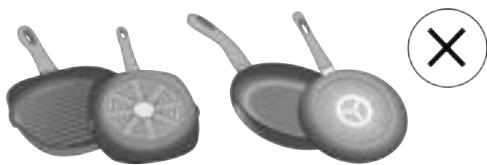
-Диша He BИЯВИПСЯ НерIBHIMN i 3 loPCTKHO NOBepxHeO;
- BOHIN 3MENUOTb NOBepxHIO KOHTaKtY iNdyKTopa 3 nocyDOM, 3NHkyOCh eFekTnBHiCTb HarpIby I noripuyOHy pe3yJbTaTn pnproTyBaHHra.
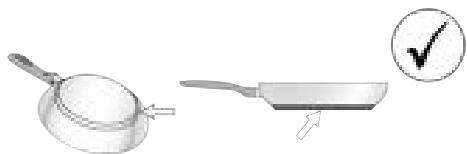
Moxha nepeBipTN, YI BONODIe MATEpian Kactpyni MarHiTHMN BnactINBOCTMn 3a DOnOMORO npocTOro MarHITy. Kactpyni, kI He MaIOb MaHTen3My, He npDAtHi dIg BnKOpNCTAHN. I B CbOMy BnPaIKy MaIOt b cNly BkazIBKn nonepEnhBo rnaparpa.
- PekomeHDoBahi DiAmetpn Dka Kactpylb
BAXJIIMBO: kkuo kactpyni He halekhnx po3mipib BapnIbHI 30Hn HE BMNAKOTbcra. Uo6 B3natn, kIMM E MiHImaJIbHNI diAMeTp nocdy dnn roTyBaHHB KOxHOI OKpeMoI 30Hn, nB. iNHOCTpOBAH yAcTHy DaHORO KepiBHNUCTBa.
Ybara: 36epeTn efeKTHBHCtB nprirotyBaHnra Ta kictb npodykty, HE pekomHeNyctbcra BnKOpNCTOByBatn iHykuiHi aanTepn.
Ehepro36epexehn
BnKOpNCTOByTe cKOBopiKn Ta KAcTpyi 3 iAmetpom DHa, 10 DopBIOe diametpy 30Hn roTybaHH. BnKOpNCTOByTe TIlbKn KAcTpyi Ta cKOBopiKn 3 pNOCKIM DNOM. - PmOxNlBOcTi HApKbAte KAcTpyi KpnUkOo NiJ cac npriroTuBaHH. ToyTe Oboyi, KaptonItoTo y HeBeJIki KjIbKOcTI BoNi, 106 cKopOTnIc cac npriroTuBaHH. BnKOpNCTaHH N CkOpOBapKn 3e GlbIe 3MeHNe cyCNoXIBAHn EhePrlTa cac npriroTuBaHH. Po3Micti b KAcTpyuB u CEHTPi 30Hn roTybaHH, no3HaueHOI ha nobepxHi.
BVKOPNCTAHH BNTXKNI
CnCTemy BnTjxKMOxHa BnKOpNCTOByBaN B pexmib BCMOKTyBaHn Ta BiDeeHn Ha3OBH a60 y pexmifilbtpaui 3 BnYtpiUnhboO peuPKyIauicio.
Див. сади www.elica.com i www.shop.elica.com, соб OЗнайомитис 3 NOВИМ acoptimentOM KOMПЕКТДпя рi3Hnx BINOHAb CNTeMn,Як ФльтчыbalbHoro,тak i BHTJXHORO.
BapiaHT i3 BCMOKTYBAHHM:
Iapn BiDdAJaHbCt ha30BHi uepe3 cnCTeMM Bo3dyXOBODnHex Tpy6 (uo nidraHob npnD6aHHo OKpEmo).PiEHaHte Bnip6 do BnT8KnHex Tpy6 i OTbopB B CTiH, 10 MaOb TdaMeTp, kAn DOpIBHoe DaMeTpny BnxiHOrO TBOPy (CNOyHoro PAnu). DetalbHnIe npo Tpy6 i ix pO3MpIn Db. CToPihky akceCyapib B KepiBnHcTBI no MOHTaxy i UctahOBu - BkOHaHN H BnT8KKn 3 BnDaJIeHNHAM. BkOpNCtAHN Tpy6 i HactIHNNx BnYcKHX N OTBopB MeHwO r daMeTpna pnp3BeDe 0 MHeUeHHn npOduKTNbHOCTi BCMOKTyBaHHa i pi3KOro 36IbLbSeHHn pIBH sMy. B CuSy My BnApKy BnPo6NHk He Hece XoDHOI BiNDoIaNbHoCTi.
Дял забзеунь Мксималь hoite eфektubhocti BtTary: - PekomehdobaHa MaKc. DoBXkHnA Tpy6 cTaHOBt7 norOHmX Meptib. - PekomehdyeTBaBKnOpriCTOByBatn MakChmym Dba KoniHa 90° Ha 3araJIbHi BIdCTaHI 7 norOHmX Meptib - YnHKaIte pi3kHx 3mH y nepepi3 KaHany, 3abZdN BiDdaOuH npebary nepepi3y, ekBbAeHTHomY 0 150 MM (a6o npraMOKyTHOMy 3 po3mpam222 x89 MM).
Bapiant3Φinltpaucio:
BcmoKryBaHe nobITpy 6yde fIpIbtpyBaTncpe3 cneiabhi aHTnxKupoBi fIpItpn Ta fIpItpn 3aTpmyBaHH 3anaXIB nepeD TUM, k anOTpAnNTn Haa3d y npMIuHnHpe3 BiNobiHi TpyOboPOBO (fIpIbTp, 10 3aTpMyOt bZanax Ta nobITponPOBOH Heo6xIdNo KynByATn OKMe).ДЯ OTPMaHH DoDAkTOBOI IHOpmaJIi DVB. CTOpIHKn, pnpCBueHni AkCecyapam Ta KOhFiYpauCiM (ДЯ Bepci 3 fIpIbTpOM) B qactNI 3 ilIOCTpaJIMn B cybomy nociBHyK.
3. POBJOTA ПИСТЮНО
IaHEnb yIPABInHH

- Temperature manager (Warming Function)
Temperature Manager (Warming Function) - ue pfynkuiy npabiniHna Ka do3BONe NiDTPMByATn TEnNo Ha noctiHni Temnepatypi Ha ONTImaJIbHOMy pIBHi notyKHO iDeaIbHO niIXxOuNTb dJa 36epirAHn rToBOoi iKi B TeNlOMy cTAHI.
Akmueaia:
Bn6epitb KhoNky (2), a notim KhoNky (9) 30Hn, kyn Bx xOyete BnKOpncTOByBaTn; Ha dncnnei (3) liei 30Hn 6yde BiO6paxatncb nocniIOBHiCTb cHMBonIB o. Jka TpNbATmE dOtN, DOKN fYHKUa 3aHnuaeTbcAkTNBHOIO.
BUMKHeHHa:
Ioo6 BmKHytn FyHKuiio, 3HOBy HaTNCiHb KhoNky (9) Haa KInbKa CeKYHd.
Pnmitka: 40 fynkliTO TAKOx MoKHa AKTNByBaTIN DnKoHOFOPOK,3aJiaHHb B AKTNBHI fynkui BRIDGE.
Automatic Heat UP (aBtomatnHni nirdpiB)
Функьг自动Heat UP (abTomatнчи niirpiB)do3BONe WbNdwe DoBecTN notyXHcIb do 6axaHoro pibH.3a DonomorOIO ueiФunKuBI Bn Matmtepebary 6blw WbNdkoro nproTGYBaHHa cTpaB, aNe He pnsKyUOnOp OTPMATNI dropiny Ctpaby, TOMy zuo TeMnepaTypa He nepeBnuSy BCtAHOBlenPiBeH. LfФunKgJIOocTyHa DnpiBHB NOTyXHcOti BiD
Akmueaia:
Bn6epitb KhoNk (2) KOHΦOpKn, kky Bn 6aKaεTe BnKOpNCtAtn, Notim npoBeiIt nbIaIeM no naHei Bn6opy (5),doCraHyBmN nOtpi6horo pIBHa, yTpImyIte II HATNCHYTOIO KINbKa CekyHd, DOKn Ha DIncPnei (3) He 3'ABNTCBa CMBON Ruiei 30Hn, NopePROBO 3i 3NaueHHaM BCTAHOBLeHOI NOTyXHOCTI.
Пи 3бьшени рibнnotукноcti конфорк,функuaAutomaticHeatUp(ABTomatuHnni nirdrip)zaHnaeTbcaakTNBHO3HOBIM HanaaHTyBaHHm Tempepatypn;
Ppimitka: Lio fpyHKlHO MOxHa aKTbByBaTN Ha KjIbKox 3OHAX OJHOaCHO.
BUMKHeHHa:
Bn6epitb Khonky (2) 30H, nIy koi cnid BmKHytnaBtOMaTnue He HarpiaHH, i 3MeHwItb pibeh NoTyXHOCTi KOHopKn.
- Nlay3a
Функія Палузд ддддддддддддддддддддддддддддддддддддддддддддддддддддддддддддддддддддддддддддддддддддддддддддддддддддд徳нгсьувимнгсьувимнгсьувимнгсьувимнгсьувимнгсьувимнгсьувимнгсьувимнгсьувимнгсьувимнгсьувимнгсьувимнгсьувимнгсьувимнгсьувимнrgcьувимнrgcьувимнrgcьувимнrgcьувимнrgcьувимнrgcьувимнrgcьувимнrgcьувимнrgcьувимнrgcьувимнrgcьувимнrgcьувимнrgcьувимнrgcьувимнrgcьи
BapinHn.
Akmueaia:
- haTnchitb KhoNky 110), 3arOpntbcra Cbitnoio (10a) aHa dncnpeax (3) akTNBHNK OHΦOPOK 3'ABNTBCr CnMBON I, 6HIMATIME noePROBO 3i 3haueHHM pIBH TeMnepatypu, BCTAHOBLeHOro dny uX KOHΦOPOK.
BumKHeHHa:
HaTnCHiB Khonky 10 npOTyrom KjIbKOx cekyH, nOK CMBOJ He 3HNKHe.
IicnB BmKHeHH BapInbHa NoBepxHb IiHOBnIOe PO6O TY 3 TMM HanaHTyBaHHMn, kki 6yJIN BCTAHOBJIe Do nay3n.
Ppimrka: kkuo 3a 10 xBmHn fynkij nay3n He 6yeB BMKHeHa, NOBepxHry BmNkaeTbCra ABTomTuHO.
PnIMITka:Функцяпay3и He BnINBaHa BNTaKky.
Функця Egg Timer-ue 3bopoTHi BIDNIK HeaAnexHOb BiD KOHpopok(TaBnTAAKKN).
Akmueaia:
BnDitb3 MeHNO «BcMOKTuBaHHa» a6o «KoHΦopKn», 106 yci cBtnoiou (3 i 13) CbTnIinca.
HaTnCHiB KhoNky (6) CbITnIMetbCBA CBITNOIOA (6a) Ta ODHoHAcHO AKTNByEeBCA TAKOX
Icnnei (7a + 7b) 3cBtIOIOOM (6b)
Tenep moXHa 6yde 36iNbUnTn a6o 3MeHUnTn yac 3a
DONOMORO KHONOK + (8a) Ta - (8b). Yac BiDobpaXaETbCBA XBnINHax. KaIO Ha TaIMepi 3aNIuINOCb MEHue 1 XBInHn, BiDlK npoDBKyETcB, BiDobpaXaOn CekyHn.
KoTn TaImeP 3aBepuTHb 3BOpOThi BiDlIK, BUnAeTbCra 3ByKObON CmHrJI KOHΦOPKa BMIMKaetbCra.
BUMKHeHHr:
Uo6 BMMKHyTN TaImep DoCTPOKO, BmDITb i3 MeHO «BcMOKOTyBaHnA» a60 «KoHΦopKn», Uo6 yCi CBTNIOJOn (3i13) yBIMKHyINc#, I BCTaHOBIT dncnnne TaIMepa Ha Hnyt 3a DOONOMOIO KhoNkn - (8a).
Taimep konfopec
MeHHo Power Limitation (ObmexeHHnoTsyKHOCTi) po3aObaHe BCEpeHHI MeHIO KepyBaHHn npaMaTePamn.
Uoyeimu e MeHIO kepyeAHnnapaempaMu:
Bic'cHnAte noBepxHIO BiD dJxepena JNbIeHHa, 3aYeKaIe KInbKa cekyHd i 3HOBy niKlOHTb BapnlbHy noBepxHIO Do dJxepena JNbIeHHa.
PO35IOKYITE BapInbHy paHHeB, yTPMMyOuN KhoNky (11) npOTaROM KJIbKOx CekyHd; PicZuBOr OJHOacHO HATNCHTb KJIaBIusi 12 +A (14) i TpIMyTe ix npOTaROM KJIbKOx CekyHd, DOKn He 3acBITnbC mByra npOKpyTK (5). IpoBeDiTb NaIbUcEM B3D0BX BCiCi CMyTR (5) 3IiBa HAnpabo. 3acBITbCBA Dua Mcnnei (3-RL) i (3-RR).
Ha dincnnei (3-RL) BiOobpaXaetbca napametp, kKni 3MiHIOCTbcra.
Ha dincnnei (3-RR) BiDopaxaCTbcra BCTaHOBnene 3NaueHH.
Uo6 nepeum do MeHIO KepyeaHn Power Limitation:
3a 3amobuybaHHm npn BXoDi B MeHIO napameptip HA
Dncnnei (3-RL) no cep3i BiO6paKaIoTBc3HaueHHa i
; HatncHtB KnaBiuW (9-RL) KJIbka pa3i, noKn Ha
Dncnnei (3-RL) He BiO6pa3raTbca 3HaueHH a i no
cep3i. (Ta = MeHIO 3a Power Limitation).
BcmaHOeJIeHHa3HaeHHa o6MeKHeHH nomyXHoCmi:
HaTnCHiB KnaBiau (9-RR), 06 Bn6paTn noTpiphe
3HaueHnra 3 TpbOx DoctyHnHex, DNB. TaBnIuHO HnXue:
| 3ona | 3ona | Знayенни |
| 3-RL | 3-RR | notuyxhocti (KBt) |
| 乙 | 0 | 7,4 |
| 乙 | 1 | 4,5 |
| 乙 | 2 | 3,1 |
36epexehnHaHaunmyaHb:
Ioo 36epertn BbpaHI hanaHTybaHHaTNCiHbKlaBiU

BVKOPNUCTAHN BNTXKKN
- AktuBaIg BnTJxKn.
Akmueaia:
TopKHTbCn (HaTmCHITb) KhONKn 12, dncnn (13) yBMkHeTbCn 3 BWCOKOHO IHTBCMHCTIO.
TopkhItcraTnpoBeiItbnaIbIeMno naHeni Bn6Opy (5), 106BidpeYIOBATNnotyKHiCTb BCMOKTyBaHNJIMMy.
PnmuTka:Ha BiDmHbI KOHΦoPOK,BMKNHeHH BITRAKKHE MoKHa 3aIporpamyBaTu 3a DOnOMOrO TaMepa.OTKe,duCnne (7a+7b) He AKTNByETcR.
BumKHeHHa:
UO6 BUMKHyTN BITJKKy, yTpMMyTe KHNky (12) npOTrOM KINbKOx CEkyHd aO bObHyNITb NOTyXHCTb BCMOKTyBaHHa.
Power Level (Pibehb notyXhocti) BuTAAKK
Bttjka ochaeta 4 pibHmN nOtJXHOCTI BCMOKTyBaHHn nnloc pibeh Booster.
TopKHTbC Ta npoBeiTb NaIbIaMn B3IOBx PAneni Bn60py (4):
y hnapmky npabopyu, 66 36iibuHTn pIBeHb notyxhOCTi; y hnapmky nIbOpuy, 66 3MeHunT pIBeHb notyxhOCTi.
BctahOBJIeHNI pIBeHb nOTyKHOCTI 6yJe BIOobpaKaTncb Ha ducnnei (13) BNTJxKIn.
OuHnHHIHyKuiHoi nobepxhi
BapnlbHy naheIb cIid YnCTNTn nicra Koxhoro BVKOPICTaHHa.
BaxJInBo:
- He BnKOpNtOByTe a6pa3mBHi 3a06b, MeTaeBi ry6Kn. IX BnKOpNtAHHa Com MoKe NIOJKOJNTn CKNo.
- He 3actocobyte noopa3hi ximiu hi mnihi 3ac6bi, taki kcnpei npeey a6o 3ac6bi npi BvBeHnHnPiym.
- HE BHKOPNUCTOBYITE PAOBI OYCHNIKII!
IicnKoKHO BnKOpNCtAnHn, 3aJIuTne NOBepXHo OxOIOJyBATncr Ta npocntItb II, 106 BvdaIITn HAKIN Ta PnMM, 10c 3'ABINICr B1d 3aIIuXkIB iXi. YCkpor Ta npOyKTn 3 BnCOKM BMCTOM yKpy NpOkoDxyOHT BApNlHy NOBepXHIO, iX npToIbHO HerAHIo BvdaIaTn. CInb, yCkpor i NicOK MoKByo NpOpaTn CkLIHy NOBepXHO. BnKOpNCtOByTe M'ky TkaHHNy, napePoi pyuHmKn dIg KxHi a6o CnelaJIbHI zacObn dIy OnuIeHnn NOBepXHi (DOTpmMyBatncr Bk3iBOK Bvpo6nHa).

DOnuHepnpe3epByapa nIy 360pypiHn:
PnBnnaKOBOMy i CINbHOMy BnTOky pIDHH 3 KAcTpyniMOxHa CkOpNCtATnCRA 3INHBHM KIIaHOM, PO3TaWObAHM B HIXHNI YactHI nPiNCTPOHO, UO Do3BOJAE YHNKHTBviDkJaDeHH 6yIb-IAKIX 3aJIuIKiB I 3dIChIOBaTN OHIeHH 3 DOTpIMaHHM MAKcIMMaNbHorO pIBH rIIEHN.

EOHnEHHMaTeNaIeBoi peWitKm:
「pata Ncii MNTu npuyhny rapaoyo BOIOO 3 NeIrpalbHMMIOUHM 3acobom i akypatHO BnCyUyBAtn UO6 yHnKHyTN OKNCJIeHHN.
DOrJI3A BNTXKIO
OuHnEHHBNTAKKN:
Плд ac Oчишени ВИКорпсову Te BИКЛЮЧО BОЛORY TkaHNY 3 Heɪтравим MInOчIM 3acOБМ.
HE BIKOPICTOBUYTE IHCTPUMEHTN TA IPIJIADNI PIIJ YAC OCHUENH
YHnkaTBe BnKOpNCTaHHa a6pa3nBnX 3ac06iB. HE BnKOpNCTOBYTE CnIPT!

Kayincizik MaKcaTapbIHda ap6ip tamak niciy aMnAfBnHa MaKcIMaNDbI XMbIC ictey yaKbITb6BenrHeNi, on opHaTbUHAN KyaT deHreHne BaanahbCTbl
60anaBbl.
Kanabik Kbi3y HnHnKaTOpbl
Bip hemec6 biphee nicipy aimakTapbH eipy keiHne
Kanblk Kb3y Tnicta aMaKTbIH DnCnIeHne6Benricimen Kepcetinei.
H
ПЛNTAHы ПАДАЛАНу
Icke Kocy
IInTaHbIKocyVuiH KOCY/0UIPY nephecin ① (1) TyptiHi3. BapNbIK dncnneep (3) MeH (13) dncnnei ickeKocblbn, HcI caHbIN KepcTei.
PnntaHb eipy yuih KOCY/0uIPy nepheci (1) 6acbHb3.
Biphee cekynd boby ewhip fyHKnna icke Kocblmaca, nnta ewei.
Pnicipy aHMaFbIH icKe Kocy
Icke Kocy:
Kanafahn nicipy aimarfaiba tneciin nephenepdin
(2) 6ipin bacy apkblnb Nicipy aimarfbihnM3sipin aabHb3. Col amakTbH raHa ducnnnei (3)XOFapFbKApKbHdbIbIKHeJxHaDbI.
BtpbH TaHdAnFaH nicipy aImaFbIbH KyatbH pettey yuih TaHday XonafbH (5) caycaKneH typtin, CbipFbITbIHbI3.
Eckeptne: Ticipy aImaFbTaHdAnFaH Ke3de TAIMEP
JinCnnei (7a+7b)MbHaHbKepeTei: - KaHFaH nHnKatop 4) Ka aMaKTbIH TaHdaIFaHbIH aKbHdaIbbl. Byn XaFdaIaFbI aMaK - anDbHbI con KaKaTafbl aMak.
Theta:
Kanaarah nicipy aymafbihin məiiphe kipin,

nephepein (2) 6acbHb3, coJ Ke3Je ocb aiMaKbTH DmcNnei (3) rHa XoRaBb KapKbHbJIbIKNeH KaHaDb; KyaTbI Henre opHaTbHb3 HEmece nepHei (2) TaBb 6acbH, bipHee cekyHd YcTan TypbHb3.
Pnicipy aHMaFbHbIH KyaT DeHreI
Tnntada 9 Kyat deHrei 6ap. CaycaKtapbIb3dbI (5) TaDay Xonarbl 60bIMeN TpyTIH 3XHe CbIPfBtBtB13: Kyat deHrein K6eBiTy yuH OHFa Kapai; Kyat deHrein aazMy yuH conFa Kapai.
OphatbIraH Kyat DeHeRei TaHaIFaH nicipy aMafbIbIH DncnneHne (3) Kepcetinei.
KyaT KyuweeTkii
BvI 6yIbIM 10 MmHyt 60bl Kocybl 60nlaTbIH (OaH KeiH Tempepatya anDbHfbl OPhaTbINFaH MHe
KaiTapbIaIbI) 1 KocbIMwa Kyat deHreImen (9 DeHreIneH KeiH) Xa6dbIKtanFaH.
CaycaKTapbIbHb3db TaHday konarbl (5) 60nbImeH -deHreJedn KeiH) XbIbKbITbIN, Kyat KyeuEeTkiwi t icke
KocbHb3. Kyat KyuweiKiwihin DeHrein Dnncnnne(3) 6Benricim Henepctinei
- nepHepeKynnbl
Iephe KynbI opHabIINFaH fHyKunnapdbI icke Kocynbl KaNbIHda KaNbIPFaH Ke3de PnITaHbIH napAmTpnepi6aikaycbI3da TIn KETy apKbIbIe Keepri KeNTipydiH anDbIH anyfMaMkiHdk 6epei.
Icke Kocy:
NepHeneKynnblfynHKnncbIH icKe Kocy yuH nIITahbl icke Kocy Kepek.
(11) TVIMecH 2 cek bacbI TpybIHb3. Owipy yuHOCbI epeKETTI KaTanaHb3.
Eckeptne: erep nephenep Kynbl Kocybl 6onfah Ke3e
6aca Ke3 KeIeHn FyHKUa nepheic bacIca, HndKATOP
(11a) XblblkTaNbl XHe DncPnei (7b) Ocb
fHyKUaHbN KOlaHbIn JxKatKaHIn XHe PnITada
KMyblic ict any yuH OHbH 6ipTe-6pTe eWipinyi
KepeKTiriH Kpcety yuiH bipHeWe TaH6anapBd o-b-8
KatapbHaH KepCetedi.
Temnepatpa peteri (eckepty yhknucya)
Temnepatypa petteri (Kblnty fynkunacbl) - Kbl3ydb ontaiNb kyat deHreinHderi typaKtbl temnpatypada caKTayfa MymkiHdk bepetih bacapy fynkunacbl; 6yI cyHKUNA daibH TamaKTapdb Jblnb KyyHinde caKTayfa eTe KOanbl.
Icke Kocy:
(2) nepheciin, cocbiH naJaIaHaJIaTbIH aiMaKTbIH nepheci (9) TaHaHb3; oCbI aiMaKTbIH dncnneHne (3) cyHKU8 BeIceHdi 6oIraH Ke3eKeipHH TpyaBH TaH6anap peti O.KepiHei.
Theta:
BnyHKnJnHbEwipy yinepheciH (9) TaBb6ipHeue cekynd bacbn typbHbI3.
Eckeptne: 6yI ΦyHKUHbI COhBImeK Katap KΘΠP peKIMi Kocylb Ke3De de aMakTapda icke KocyFa 6oana#.
- ABTomaTbI Kbl3Dbipy
Automatic Heat UP (ABTomaTbKb3dbpy) fyHKnucsbOpahtbnfah Kyat deHreInHe Te3ipeK KOJ KTeK3yReMymkndi6bepei;byf yHKnmaMeh TamaKbTy Kydipin anyKayniHci3 Te3 nicipyre 6oJaB, ce6ebi TemepatypaOpahtbnfah deHreDnacnaid. Byf yHKnja JxHe apalbfHdaFb Kyat deHreNepi YuHIN KOnKeTImdi.
Icke Koccy:
TnndanahbntbH aMaKtBn nephecin (2) TaHdAn, caYcaftbH3Db taHday konafbiHa (5) cbPfblHb13. KanarAH deHreire Kon XeTKi3reh coH, OHbl CON aMaKaTbH ducnnneiHde (3) opHaTbJFaH Kyat MHeHMeH ke3ektecin TaH6acbl naDa 6onraHwa OHbl 6iphewe cKeYHd 6acbl TpybHb13.
Ticipy aimafbihh Kyat dehreii Kofapbinafah Ke3de, "AbTomattb Kbl3bipy" cyHKuncBj KaHa TemnepaTypa MmHImen bencHei 60bn Kanada;
Eckptne: Byn fynkunha6iphee aimakta 6ip yaKbTTa icke kocyfa 60ana.
Theta:
"ABTomaTbI Kb3Dbipy" yHKmraCb eWipinTeIH aMaKTbIH nepheci (2) TaHan, nicipy aMaFbIHbIH Kyat DeHreIH a3aHTbHbI3.
Kiprty
Kidipty fynkuiuca bnicipy 6etinderi 6encendi
fynkuiuapdbki idiptyre,nicipy KyaTbH HJTre Tycipyre
ymkhiik bepeidi.
Icke Kocy:
I I nephecin (10) 6acbHb3, coHa nHnKATop (10a) KaHbIn, 6eNcHdi aMakTapdbH dncnneHne (3) Ocbai MAKTapdaft TeMnepaTpya DeHreHH MAnHMeH Ke3ekTecin / TaH6acbI KepiHei.
Theta:
-TaH6aKeipih6e KeTKeHne nepHeHi (10) 6ipHeWecekynd bacsIn TypblbI3.
AxbipatbIraH coH pInnta kiipyre deinOpHaTbIraH napametrpnepeMH xMbicih XaIrafctbipa 6epei.
Eckptne: erep 10 MNHyTTaH KeiH "KiDipTy" cyHKUcbl aXbIpaTbIMmaca, pNTka ABTomaTbI Tpyde eWedJI.
Eckptne: Pause Function (Kidipy fynkncsbl) copbln sbiFapy xyMbicbHa ecep etneid.
KymbiptKa TaImepi
Kymbiptka nicipy taImepi fynkunraicbI nicipy aamaktapbIHAN (xhe TaPTy aMaftbIH) TeyeJIc3 kepi cahak 60bn Tablaa.
Icke Kocy:
BapIbIK HnHnKaTopnap (3 KHe 13) KaHybl YuHIN "Copy" Hemece "Ticipy aHaMaFbM3eipnepiHewfBbHb3.
Nepheni (6) 6acbIb3, coHda HnDnKaTOp (6a) XaHBIn, 6ip yaKbITTa
IinCnnei (7a+7b) MeH nHnKnatop (6b) -- da icke Kocbla.
OcbiDah Kein + (8a) XeHe - (8b) nephelepi naiDanaHbIn yaKbTTb a3aHTyfa Hemece Ke6eHTyre 60nadbl. YaKbMT MHyTnEH KepcetineDi. Eere TaMME bip MNHTAH acnaiTBH yaKbTKa opHaTbIcA, OHda Kepi
caHaK cekyHnneH KepceTJIeI.
Taimep Kepy caHaydba aKaTaFah Ke3e, DbIbictb cnHan 1bIfadbXeHe nicipy aMaFbEweJI.
Axbpamy:
Taimepdi eptepek eipipy yuih "Copy" Hemece "Ticipy aMaFbI" M3zipneipieHn bIbHbI3, coHda HnHnKaTopnap
(3XHe 13) XaHbIn, TaIeMep DnCnnei - nephecimeh (8a) HEnre opHaTbIaIbI.
Pnicipy aHMaFbHbH TaHMepe
"Inicipy aMafbHbIH TaMemei" YHKUncbTi tinti ebpicipnicipy aMafbHa 6ip yaKbTTa opHATyFA 6oNaTbIH Kepi cahay MymkiHdir. Ke3e cohblnda nicipy aMaKaTapbl ABToMaTbI TpyTe oEedi XHe naJdAnaHybIfa apHaBbl dbIcTBk CnHan bepinei.
Icke Kocy:
Eckptne: 6yI TaMepdi nicipy anaHb HEnDnB 6aca Kyat DeHreinHe JxMbIC icTeer H XaFdaJa rHa icKe Kocyra 6oana.
Kanafah nicipy aMafBihbH nepheciin (2)
icke Kockan coH dncnne (7a+7b) icke Kocblbn, TaMepdi 64dapnamay MymkiHdir TybHdaNbl.
yaKbIbI a3aHny He Ke6eMy yuH 8a) xHe - (8b) nepHenepin naDanaHbIHb3. YaKbIT MNHyTneH KepcetineDi. TaMep1 MHNyTTaH a3 yaKbITka opHaTbIca, caHay cekyHdneH kAnfacaIbI.
Erep KanacaHb3, 0cb1 epekeTti 6ipHewe nicipy aHaBHa KaTanaHb3:
Taimepdi epi nicipy aimAfiba 6eJek opHaTyfa 6oJaIb; aftiMaFbTaHdAnFaH nicipy aImAfblbIH Kepi caHaFbl dncnneJe (7a+7b) Kepcetinei
Eckeptne: Kenip aMnAfBh icKe KocKaH coH ocbl aMnAKTaBt TaMep de icKe KocBnJaBl.
Theta:
Taimepdi andbih ana eipy yuih nicipy aMaBbHbH
nephecin (2) TaHdAn, 8a) nephecin Taimep Hnre KteKeHwe 6acbl typbHb3. YaKbI eupinei.
KyattblwekTey
"KyaTbI WekTey" FyHKUJcBcI KpybIfblHbIH KyaTbIMAKCMaJIbTI TybHbIH WekTey, GapbIK 6enCeHdi nicipy aMakTapbiHa TbyHbINaTBi KyaTbI petTeY, nicipy naHeHH JannbTI TybHbINaTBi KyaTbI 6enRHeH mAKCMaJIbTI TybHy DeHreInHen acnaiTbIHbIFbHa kenijik petiHne naJdaanHyfMaMKHdk 6epedi.
KyaTbI WeKeTeyDi 6actay m3ipi "Piapametpi 6ackapy" m3ipiH iuiHne opHaIacKaH.
Iapamempdi 6ackapy M3ipine kipy yuih:
ПлNTаны 3нктхжficinenaxbipatbIn,6ipheweceKyHkyTih3de,3nKtpxenicineKaetaKocbHbI3.

(11) nephecih 6ipheie cekyhd 6acbl ty py apkblbl
nIITa KYIIbIH AUIbIHbI3; ocIdaH keiH (12) +
A (14) nepHeinepi H bip yakItBaipheSe cekHyd bacIn
TypbHbI3 (XblNbITy XONaFbI (5) XaHaHua).
CaycabHbI3dbI xOJaK (5) BoHBMeH conDaH OHFa Kapai
cbIPbITbIHbI3. (3-RL) XHe (3-RR) DncPiNepePiH ekeyi
de KaHaDbI.
Диспейдe (3-RL) e3reptinin xatkan napametp kepcetinei.
Диспейдe (3-RR) opHaынFaH mн Крсети徳i.
Kyammblweekmeydi6ackapy M3zipine Emy yuiin:
ДдENKIDE napametplep Мэзірін Кіріn JжаTKан Ke3de
Дисплі徳 (3-RL) CЖэн O MэнDEperi KЗeКнEH
Керсетіпedi; SSSNephecIN (9-RL) DИСПЛЕДе (3-RL) C
Жэн O MэнDEpi KЗeKнEH KepiHrenHe 6ipHeWe pet
Басын. (CЖэн = KyaTTbI WekTeydi Backapy
m3isiPI).
KyammbIwekmeyMOnHIOphAmbIHb3:
Yu konjekimdi MHHEN KanafahbH TaHday yuhi nepheci (9-RR) 6abih3. Mha kectehi kapaHb3:
| Аймай | Аймай | IyaT |
| 3-RL | 3-RR | Mн (кВт) |
| 乙 | 0 | 7,4 |
| 乙 | 1 | 4,5 |
| 乙 | 2 | 3,1 |
Tapaemmpepdi cakmay:
TaHdaIraH npaMeTpnepi caKay ywiH ① (1) nepheciH bacbIb3
TYTIH COPFbIUtTbI PAIJaJIAHY
TytirnapKbIitblickeKocy.
Icke Kocy:
I nepheci (12) TyptiH3 (6acbHb3). Dcnnnei (13) Xofapbl KaKbIHdbIbIKta icKe KocblnabI.
TyTihdi copbin wibfapy KyatbIH petTey ywiH taHday KOnaftbIH (5) Typtin, CaycaKtbl CbIPfbTbHb3.
Eckptne:nicipy aImaKTapbIHah aIbIpMaBbIbIbI-TyTIN TaTkblTbH JENDeTkiWIn Ewipy TaMepimEn 6aFapnAmay MymKiH emc. CoHbIKTaH dncnne (7a+7b) icke KocJIIMaIbIbI.
Theta:
TyTIN TAPTkbltBIn XeJdTeKlWIn eWipy yWIn nepHeHi
(12)6ipHeSe cekyHd 6acbIn TypbHb3 Hemece Tytin copy KyaTbH HeIre opHaTbHbI3.
- Tyrih tapkblitbH Kyat deHrei
TyTIN TAPKbIbTH JENDeTIkiU 4 TyTIN UbIFapy KyaT DeHreImEH XeHE KyAT KUweTIkuIne Xa6bIbTKanFaH.
CaycaKTapbHb3db (4) TaHday xonarfb 6oBIMeh TpyTHi3 XeHe cbIPbItbHb3:
KyaT DeHReiH K6eBiTy YuHIn OHFa KaPai;
KyaT DeHrein AH aazIy yuHIn cOnFa Kapa.
OpHaBtbnFaH Kyat DeHreI TYTH TAPKbI W KeNdetKlWiHiH DnCnneHHe (13) Kepcetinei.
- Tyrih TaptKbiWtbH Kyat KweeTkiWi
Бун 6иьим 5 Мнут 6оьи Кocулб 6оаТын (Одан Кeин Temnéратура anДынФы OрнТынFaH Mэнг Кайтаблары) 1 KocbIMWA KYWEITKIИ KyaT DeHreimem (4-DeHreIeH JxOFapbI) Xa6bIkTaNFaH.
CaycaKTapbHb3db TaHday JcNafb5 60bIme (4- DeHreIeH KeiH) KblkbTbIn, Kyat KUweTIkiTi icKe KocbHb3. Kyat KUweTIkiHIN DeHreI duncnneDe(13)
6enricimeh kepcetinei.
- ABToMaTTbIpeXIM
Byb6yibimEHc0eKecXbIaMdbIKneH KocbIaNbI JxHe copcy cbIbIMdbIbIFbIH nicipy aiMaKTapbHa naaDanaHbIaNbIH MaKcImaNDbI nicipy DeHreInie cAekctehdipei.
Iicipy aimakTapbl euiipinre H Ke3de, copbln 1bIfapfbltBn XbJdAmdbfb6iptHden a3aynbIn, KaIdbK cy MeH nicti KIOU ysiH 6eimdnei.
Icke Kocy:
12) nepheciH, OaH KeiH A npheciH (14) bacy apKbIbI TyTH TapTKbIbTH JxEnDeTkiU M3piHe KipH3; Dncnne 13) TYTH TapTKbIu XeJedTkiU H KjIaMdMbFbIHbH MImHemKe3EkTeCin Apibi KepiHei.
Theta:
TytH tapTkblx JekdetKlui M3ipineH aephecin (14) 6acbIb3 Hemece TytH tapTkblx JekdetKluiHH KbldAmDbIbIh TaHday XonarfbHaH (5) KOJIme a3aIbIbI3.
Cv3riH6ackapyM3iPi:
M3ipz e kipy wapmmapb1:
IICIPY AIMAKTAPbI MeH TYTH TAPTKbll icKe KocblpykekXMyMbIPTKA TAIIMEI OUIPYJI Kynde 6onyb kepek. Erep 6yn wapTtap opbHdAmaca, kipy npoejdypacbH opbHdaFaH Ke3e DncnneJe
(7a+7b) KepiHej XHe OHbl XaJFaTbIpy MymKHi 6oImai.
Mzipae kipy KHe cy3inepeih Kyuih Kpy yuih:
Korapbda Kepcetinren eHri3y tananTapbIn opbHaar coH, nephecin (12) 6acbln, cocbln - (8a) XHe + (8b) nephelepih 6ipre 4 cekyn 6acbln TpybHbI3.
Ocbyan Kein "Cy3rihi 6ackapy" M3piIne 6oNaCbI3.
品 品 品 ducnneide (7a+7b) MAJ CY3FICIHH Kkyi Kepcetinei. IIC CY3FICIHH KyyinH Kepinicihe ety yuin
(8a) nephecih 6acihb3. Byn nephe 6acihfah caibh Dnciieh 6ip cy3ri Kepicicineh EkiHucine aybcin Otbapbl. TemeHde cy3ri KyIepiHk Kecteci KepcetirreH.
Cy3riH eipreH coH m3ipHn HbIbn, cocBn cy3riHi KaTaNoccaHbI3, cy3riHH TOny MHei 9-DeH KaTa 6actanaIbI.
Me3ipdeHwHyyuih:
Maipen HbIy yuH 8a) He + (8b) nepheciH BACKA Ke3 KeIreH nepHeH 6acblh3 Hemece 6acka nepHeepdi TpyTne 8 cekyHk KytiHj3.
Cy3riHH tonfahbH Kepcetyi Kaeta opHaTy
CnHanapdbiH 6ipeyi He ekeyi De Kocynbl 6oIaH Ke3de cy3riHH tonybl typanbl daBbIbnEwipre 6oIaBl. Cy3riHH tonFaHbI typanbl CnHAn KeipireHHe KeHH
anfawkb10cekynd iuiHne 8a) xhe + (8b) nephenepin6ipnese ckynd6ipre 6abin typbih3.
Kaeta opnaty catti opbHdAnfah Ke3e daIb6ictb cnHan
ectinei.By npoueuypanbI TK cy3rinepei aybictbipraH coH FAHA opbHdaHan KEN.
Eckenthe: Eki da6bI da Kocblca, ekeyi De ewiipy yuhi H ocbi epeketti opbHdaHb3.
Tyrin tapKbIwIbI kIdiptin 6apBIn oWipy
BynfynKunna KocnybKe3e Tytih TapKbIITbIH KeJntkiwi andbin ana opHaTbIraH yaBt iWIIHe raHa XyMbIC ictei. OcbyaBt eTIN KeTKeH COH ON ABTomattb Type eWei. TeMeHderi keCTeKe KepcetInreHne, ap6ip XbldAmdbIKTBH e3HH apHaNb TaMepi bOanbl.
Ohu valjatombega version
TOMBEVENTILAATORI HOOLDUS
- Tömeventilatori puhastamine
- Temperature manager (Worming Function)
Temperature Manager - Worming function (upravljanentelematurom - funkija grejanja) je kontrolna funkija kojadozvoljava odrzavanje topline na stalnoj temperaturi
optimizovanom nivou snage;idealna je za cuvanje spremljene hrane toplom.
Aktiviranje:
Odaberite taster (2) a zatim taster (9) zone koju zeilita da koristite; prikaz (3) ove zone prikazace asekvenciju simbola koja ce trajati za sve vreme koliko fungcija ostane aktivna.
Deaktivirati:
Ponovo pritisnite na nekoliko sekundi taster (9) za deaktiviranje funkcjie.
Zabeleska: moguce je omoguciti funkcjju Čak i u zonam dok je BRIDGE aktivan.
- Funkcija Automatic Heat UP (automatsko zagrevanje)
Funkcija Automatic Heat UP omogucije brze postizanje postavljene snage zagrevanja; s ovom funkcjijom imamo prednost brzeg kuvanja, ali bez rizika od spaljivanja hrane, jer temperatura ne prelazi postavljeni nivo. Ova funkcija jestodupna za nivoe snage od do
Aktiviranje:
Odaberite taster (2) zone koju zeilite da koristite a zatim klinzite prstom traku za odabir (5) kada dosegnete zejleni nivo odrzavajte pritisak na nekoliko sekundi dok se na prikazu (3) te zone ne pojavim symbol naizmenično s postavljenom snagom.
Povecavanjem nivoa snage zone kuvanja: funkcija Automatic Heat UP (automatsko grejanje) ostaje aktivna, s novom postavkom temperature;
Napomena: Ova fungcija se moze istovremeno aktivirati na više područja.
Deaktivirati:
Odaberite taster (2) zone kojoj Želimo ukonitii Automatic heat Up i smanjiti nivo snage zone kuvanja.
Zaustavlanje
- Residual Heat Indicator (Indikator preostale toplate)
Power Level (razina snage) zone kuhanja
Ploča za kuhanje ima 9 razina snage Dodirnite i klizite prstima po Traci za odabir (5):
prema desno za povecanje razine snage;
prema lijveo za smanjenje razine snage.
Postavljena razina snage prikazat ce se na zaslonu (3) odabrane zone kuhanja.
Power Booster (Povecanje snage)
Proizvod je opremljen dodatnom 1 razinom snage (prekora zine), koja ostaje aktivna tijekom 10 minuta, nakon cega se snaga vraca na prethodnu razinu.
Dodimite i klizite prstima po Traci za odabir (5), prek o razine 3 i aktivirajte Power Booster (povecanje snage). Razina Power Booster pri Kazana je nazaslonu (3) simbolom.
Key Lock (Zaklučavanje tipki)
Key Lock (zaključavanje tipki) omogúçuje blokiranje postavki kako bi se sprijećilo njihovo slučajno mijenjanje, ostavljajuć aktvīnma vec postavljene funkcjë.
Aktiviranje:
Za aktiviranje funkcije zakljucavanja tipki ploca za kuhanjemora biti uklucena.
Power Level (razina snage) nape
Napa ima 4 razine usisne snage plus Booster.
Dodirnite i kizite prstima po Traci za odabir (4): prema desno za povecanje razine snage; prema lijevo za smanjenje razine snage.
Postavljena razina snage bit ce prikazana na zaslonu (13) nape.
Power Booster (Povecanje snage) nape
Proizvod je opremljen s 1 dodatnom razinom snage BOOSTER (iznad razine 4), koja ostaje aktivna 5 minuta, nakon cega se snaga vraca na prethodnu razinu.
Dodimite i klizite prestima po Traci za odabir (5), preko razine 4 i aktivirajte Power Booster (povecanje snage). Razina Power Booster prikazana je nazaslonu (13) simbolom.
- Automatski rad
Proizvod se uključujene na najprikladniju brzinu, prilagodavajuči kapacitet usisavanja maksimalnoj razini kuhanja, koji se koristi nazonama za kuhanje.
- Residual Heat Indicator (Kalan Isi Gostergesi)
Temperature Manager (Warming Function) (Sicaklik
gab aac aal dla baj yj jy jai aiaa aai lgl 1
al caii ci la 1
jz gai i jy jy jay jy jay jay jay jay jay jay jay jay jay jay jay jay jay jay jay jay jay jay jay jay jay jay jay jay jay jay jay jay jay jay jay jay jay jay jay jay jay jay jay jay jay jay jay jay jay jay jay jay jay jay jjay
J 10000000000000000000000000000000000000000000000000000000000000000000000000000000000000000000000000000
AR
j 10000000000000000000000000000000000000000000000000000000000000000000000000000000000000000000
J 1
Ae cllsall jn no gai jalll 1j
. k jillacilay b y jy jll k y jy jll
. d lla .
. jilly aall jia jll aao n s
. k jillacilay b y jy jll k y jy jll
Kai logjia jao jolal qssuall cllsall 1jaiy
yjie jia jia jia jia jia jia jia jia jia jia jia jia jia jia jia jia jia jia jia jia jia jia jia jia jia jia jia jia jia jia jia jia jia jia jia jia jia jia jia jia jia jia jia jia jia jia jia jia jia jia jai www.shop.elica.com, www.elia.com
i 1
aallll al
gaiy gaiy gaiy gaiy gaiy gaiy gaiy gaiy gaiy gaiy gaiy gaiy gaiy gaiy gaiy gaiy gaiy gaiy gaiy gaiy gaiy gaiy gaiy gaiy gaiy gaiy gaiy gaiy gaiy gaiy gaiy gaiy gaiy gaiy gali y j 50mm j 50mm j 50mm j 50mm
Cllalj y jy jy Cllalal aae 1e y e ae ala.
yall ay all ay
yol
yol
yol
yol
gii yill (S) jyall yll lgl e jy piil .
yj 250 g jyall cjlal agl a
yj 250 g jyall cjlal agl a
yj 250 g jyall cjlal agl a
yj 250 g jyall cjlal agl a
yj 250 g jyall cjlal agl a
yj 250 g jyall cjlal agl a
yj 250 g jyall cjlal abl g jy
yj 250 g jyall cjlal abl g jy
yj 250 g jyall cjlal abl g jy
yj 250 g jyall cjlal abl g jy
yj 250 g jyall cjlal abl g jy
yj 250 g jyall cjlal abl g jy
yj 14444444444444444444444444444444444444444444444444444444444444444444444444444444444444444444444444444
y
CE/19/2012 3113, UK SI 2013
(WEEE)
piaiinall paiy jaiil kkiy jayl l a n yalill n qaian
aiial aaiu ie alinaa ayuui jilai yaiagll g aayjbbn oaiy
aiiail aaii gil gie g iaiiall g 2gall jayll gaiy axaill
aiig l gaii iiai oac ayai i g aaii jaii iiai iiai iiai
jiai gaii iaii uaii uaii gaii aiial ayai iaii dai
jaiia iaiia iayii sle! aiyigikly gaiy gaiy gaiy iayi
yaia jaiia jaiia i yaiil iiai iiai gali gai gai jaii
ooyaiisol aaiiai sle! aaiial iayi gaiia iiaiai glaiae
cyllaill gaaia i gaiiaiai glaiai kikally iayi
jajll iaiaiyjai iial jayiat

J 1234567890
j j j j j j j j j j j j j j j j j j j j j j j j j j j j j j j j j j j j j j j j j j j j j j j j j j j j j j j j j j j j j j j j j j j j j j j j j j j j j j j j j j j j j j j j j j j j j j j j j j j j j J J J J J J J J J J J J J J J J J J J J J J J J J J J J J J J J J J J J J J J J J J J J J J J J J J J J J J J J J J J J J J J J J J J J J J J J J J J J J J J J J J J J J J J J J J J J J J J J J J J JJJJJJJJJJJJJJJJJJJJJJJJJJJJJJJJJJJJJJJJJJJJJJJJJJJJJJJJ
y

sill 1234567890123456789012345678901234567890123456789012345678901234567890123456789012345678901234567890123456789
jlll jlll jlll jlll jlll jlll jlll jlll jlll jlll jlll jlll jlll jlll jlll jlll jlll jlll jlll jlll jlll jlll jlll jlll jlll jlll jlll jlll jlll jlll jlll jlll jlll jlll jill l l l l l l l l l l l l l l l l l l l l l l l l l l l l l l l l l l l l l l l l l l l l l l l l l l l l l l l l l l l l l l l l l l l l l l l l l l l l l l l l l l l l l l l l l l l l
p1
chuaal gbal a
aill jlll lll 1011111111111111111111111111111111
jla jla jla jla jla jla jla jla jla jla jla jla jla jla jla jla jla jla jla jla jla jla jla jla jla jla jla jla jla jla jla jla jla jla jla jla jla jla jla jla jla jla jla jla jla jla jla jla jla jla jla
.
cill 4g j alindal
gabla gjglg

:pa
i 136
taiyiswailnye glll ciil
gabla gcbw gcbw gcbw gcbw gcbw gcbw gcbw
glllallllllllllllllllllllllllllllllllllllllllllllllllllllllllllllllllllllllllllllllllllllllllllllllllllllllllllllllllllllllllllllllllllllllllllllll
ydua jzj ydaall
y 1 y
0j 1 j 1 j 1 j 1 j 1 j 1 j 1 j 1 j 1 j 1 j 1 j 1 j 1 j 1 j 1 j 1 j 1 j 1 j 1 j 1 j 1 j 1 j 1 j 1 j 1 j 1 j 1 j 1 j 1 j 1 j 1 j 1 j 1 j 1
aalll aalall

jia jia jia jia jia jia jia jia jia jia jia jia jia jia jia jia jia jia jia jia jia jia jia jia jia jia jia jia jia jia jia jia jia jia jia jia jia jia jia jia jia jia jia jia jia jia jia jia jia jia jia
H
chuaal 1
Jaiy
aalll jaae aae ae aale alal (2)
| (Jalaliyya) | Jalaliyya | 6 |
| a a a (Jalaliyya) | Jalaliyya | 6a - 6b |
| - - - - - - - - - - - - - - - - - - - - - - - - - - - - - - - - - - - - - - - - - - - - - - - - - - - - - - - - - - - - - - - - - - - - - - - - - - - - - - - - - - - - - - - - - - - - - - - - - - - - - | | |
| 7a-7b |
| c c c c c c c c c c c c c c c c c c c c c c c c c c c c c c c c c c c c c c c c c c c c c c c c c c c c c c c c c c c c c c c c c c c c c c c c c c c c c c c c c c c c c c c c c c c c c c c c c c c c c d d d d d d d d d d d d d d d d d d d d d d d d d d d d d d d d d d d d d d d d d d d d d d d d d d d d d d d d d d d d d d d d d d d d d d d d d d d d d d d d d d d d d d d d d d d d d d d d d d d d t t t t t t t t t t t t t t t t t t t t t t t t t t t t t t t t t t t t t t t t t t t t t t t t t t t t t t t t t t t t t t t t t t t t t t t t t t t t t t t t t t t t t t t t t t t t t t t t t t t t d d d d d d d d d d d d d d d d d d d d d d d d d d d d d d d d d d d d d d d d d d d d d d d d d d d d d d d d d d d d d d d d d d d d d d d d d d d d d d d d d d d d d d d d d d d d d d d d d d d f f f f f f f f f f f f f f f f f f f f f f f f f f f f f f f f f f f f f f f f f f f f f f f f f f f f f f f f f f f f f f f f f f f f f f f f f f f f f f f f f f f f f f f f f f f f f f f f f f f f F F F F F F F F F F F F F F F F F F F F F F F F F F F F F F F F F F F F F F F F F F F F F F F F F F F F F F F F F F F F F F F F F F F F F F F F F F F F F F F F F F F F F F F F F F F F F F F F F F F F f f f f f f f f f f f f f f f f f f f f f f f f f f f f f f f f f f f f f f f f f f f f f f f f f f f f f f f f f f f f f f f f f f f f f f f f f f f f f f f f f f f f f f f f f f f f f f f f f f f r r r r r r r r r r r r r r r r r r r r r r r r r r r r r r r r r r r r r r r r r r r r r r r r r r r r r r r r r r r r r r r r r r r r r r r r r r r r r r r r r r r r r r r r r r r r r r r r r r r r | | |
| 8a-8b |
| ""Temperature Manager" | 9 |
| ((Jalaliyya) |
| Pausa c c c c c c c c c c c c c c c c c c c c c c c c c c c c c c c c c c c c c c c c c c c c c c c c c c c c c c c c c c c c c c c c c c c c c c c c c c c c c c c c c c c c c c c c c c c c c c c c c c c e |
| 10 |
| 10a |
| 11 |
| 11a |
| 12 |
| 13 |
| 14 |
| 15 |
alil
gall lllb iy jy gill ylll jlll jlll jlll jlll jlll jlll jlll jlll jlll jlll jlll
aB, (13) aaii iiaii aaii
(11) 11 (11a) aabw yaa (11a) abw yag aas jnss. (11a) aay
.ON/OFF ① (1)
jg jglal jgi gll aibally jali (2) clll jil 1500000000000000000000000000000000000000000000000000000000000
abgaaal a jaiy 0jdy H jaydaii dkiy iiaai (3)
aai aai aiai jaiai iaii aai iai iai iai iai iai iai iai iai iai iai iai iai iai iai iai iai iai iai iai iai iai iai iai iai iai iai iai iai iai iai iai iai iai
jai jia bina jao jslge aialg oia Juii jay:
:
Automatic Heat all jI wlll al lal (2) 1aiall jilai baii aai iial s jill g iia (silaagjll uuiill) Up
aL aalaa aaiy aia Lac gaiy Pausa aaii aaiy aaiy aaiy
jaiy jilu 8o jia jao jolb
:
(10a) (10)
Jbbl 3)
aalll aaiiaaaaai
:lailll
. 10)
JiaabgaiiailldyJalllgaiil
gabibcagbll aaiy bgy 10 2a
i#
a
Egg Timer
gbln 1 Juae Jui Egg Timer glal al
(baillabio 0c9)
:
Aulle Akiy, Aiiinall ydi Aaiiial (3)
abio 2jbi bial. (5) jki bi jie de aaiy jy wll
joo jolal all
aaii iiaai iiaai iiaai jaii ie aia
ydi ygi 4) dll aai
FL aiaiaaill oia (iiaai iiaiaia
:
gabidally aalld (3) 1ailll jss.2
joll jll jll jll jll
Jusll cely aaln jg a2 2 (11) le bai.
cslall jss laie gai ad jle baiu pi i: abga
jia (7b) aaii jin xing. (11a) yaiy jao
y
aall
(2)
psa aab joc ojla (nssll aab) ojall aas
o 8
jaiy jalal aabbl ay g w gl bllg iu
:
aabidly 9 2 (2) 2
juaalauabialll (3) aaii
Aabaa aagaaa aagaaa aagaaa aagaaa aagaaa
:
(9) Clll 12
:5d 3d 3d 3d 3d
(RL-3) aaii jnss
9) 1555 ciee eae bce aee 0 0 nnnnll Llill lalnll (RL-3) aee (RL
()
:jdll yduu a uu b u
a a a a a a a a a a a a a a a a a a a a a a a a
| \( \mathrm{a} \) | \( \mathrm{b} \) | \( \mathrm{c} \) |
| \( (\mathrm{a} + \mathrm{b}) \cdot \mathrm{c} \) | \( \mathrm{RR}-3 \) | \( \mathrm{RL}-3 \) |
| 7.4 | 0 | 20 |
| 4.5 | 1 | 20 |
| 3.1 | 2 | 20 |
| x - 1| = | x + 2| = 1 - | x - 1|
(1)①
blall jai
:
(13) (12)
a 5
blall lal 1y y. gall glia xla glc abgala (7a+7b)
:Jaiil
.
blalil 5 jg
jzao jiaollybasi 4-2jao biall
:4)
g jall g sinnn 1
.
13 1
+
aall 1. .gaiy j.88.(8b) - (8a)
J 1 J 1 1 1 1 1 1 1 1 1 1 1 1 1 1 1 1 1 1 1 1 1 1 1 1 1 1 1 1 1
:
Abgaaalaaa (RR-3) aaii
0 1 (s w aill y jlll)9 2 3 4 5 6 7 8 9
aee aee eae ee eae eae eae
aie 8b) aie baii jai jai jai jai jai jai jai jai jai jai jai jai jai jai jai jai jai jai jai jai jai jai jai jai jai jai jai jai jai jai jai jai jai jai jai jai jai jai jai jai jai jai jai jai jai jai jai jai jai jai jali jali jali
Jaaalee! 1 aie jll Jaaal aai lla Jc jia
aannnnnne
(8a)-cL Lg 10 10 10 10 10 10 10 10 10 10 10 10
aalee 1 aae e ae e ae e ae e ae e ae e ae e ae e ae e ae e ae e ae e ae e ae e ae e ae e ae e ae e ae e ae e ae e ae e ae e ae e ae e ae e ae e ae e ae e ae e ae e ae e ae e ae e ae e ae e ae e ae e ae e ae e ae e ae e ae e ae e ae e ae e ae e ae e ae e ae e ae e aaee
- 1e jj jybjgaii jai jai jai jai jai jai jai jai jai jai jai jai jai jai jai jai jai jai jai jai jai jai jai jai jai jai jai jai jai jai jai jai jai jai jai jai jai jai jai jai jai jai jai jai jai jai jai jai jai jai jali jali jali jali jali jali jali jali jali jali jali jali jali jali jali jali jali jali jali jali jali jali
1 1 1 1 1 1 1 1 1 1 1 1 1 1 1 1 1 1 1 1 1 1 1 1 1
a 1
kiaili elal y
a 1000000000000000000000000000000000000000000000000000000000000000000
:Jyaiil Jj
(5) jybl yj 1ybj bblb, jbi, jbi, jbi, jbi, jbi, jbi, jbi, jbi, jbi, jbi, jbi, jbi, jbi, jbi, jbi, jbi, jbi, jbi, jbi, jbi, jbi, jbi, jbi, jbi, jbi, jbi, jbi
:
aaii (aii iaii aiibai 1 aaii ci baiii aiie aiiaai (15)
blalil jiejje
(4) (s i n all 2j jall gil 1-3j j (s i n all 5 sial
4 gsiall (5) jydi yjdy jydi yjdy jydi yjdy jydi
P jajl a
SulagujlaJajnil
0 0 0 0 0 0 0 0 0 0 0 0 0 0 0 0 0 0 0 0 0 0 0 0 0 0 0 0 0 0 0 0 0 0 0 0 0 0 0 0 0 0 0 0 0 0 0 0
:
4
Jaaal 7a+7b aaii jia 8a Jaaa Jaaa Jaaa Jaaa Jaaa Jaaa Jaaa Jaaa Jaaa Jaaa Jaaa Jaaa Jaaa Jaaa Jaaa
aalaii aaiia 1 aaiii aaiii aaiii y
a a a a a a a a a a a a a a a a a a a a a a a a a a a a a a a a a a a a a a a a a a a a a a a a a a a a a a a a a a a
Jbcj 1
| الله | اللهالله | الله | اللهالله |
| اللهاللهاللهاللهاللهاللهاللهاللهاللهالله | اللهاللهاللهاللهاللهالله | اللهاللهالله | الله |
gai 1
(1)
111 1
111 2
J 100000000000000000000000000000000000000
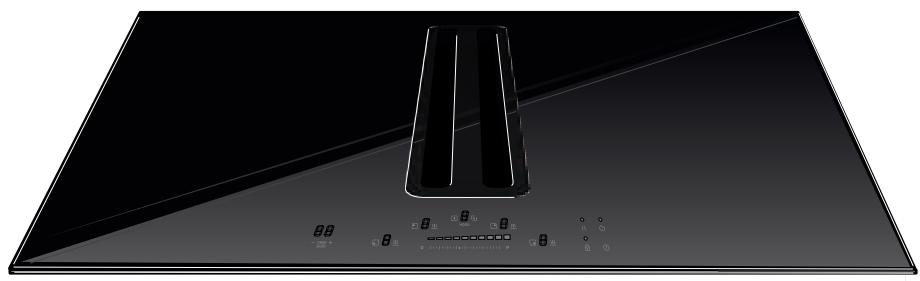


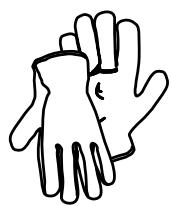

1x
2,8m

1x

1x
1x
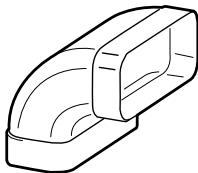
1x
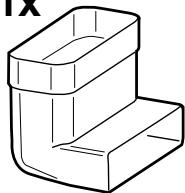

1x
M8 13 x h5

2x
M6 10 x h5

2x
M6x20mm
1x
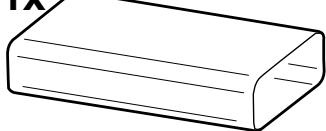
1x

1x
2x


1x
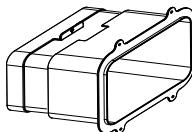
2x
2x


2x
M4x20mm
2x
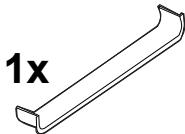


2x
03,5x13mm
*
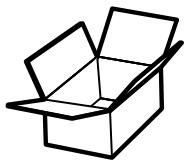

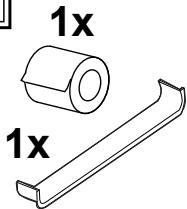
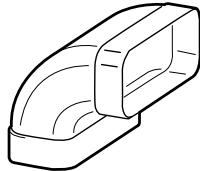
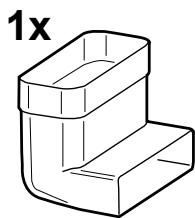
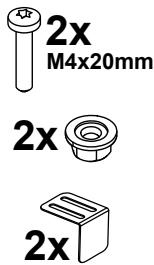


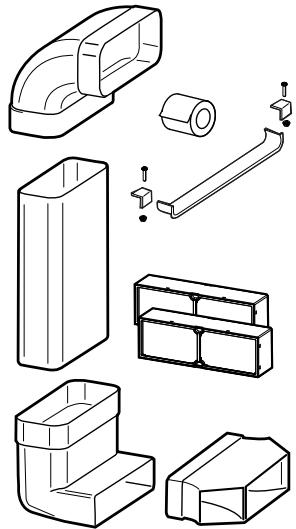
KIT0167756
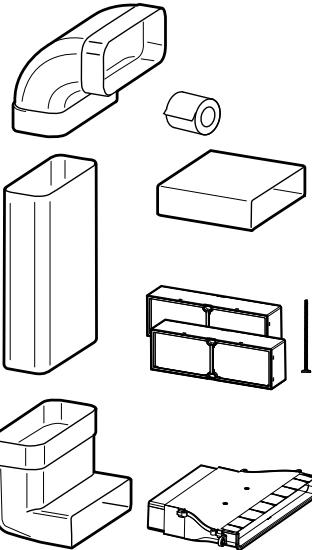
KIT0167757
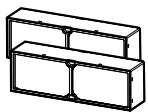
KIT0180522
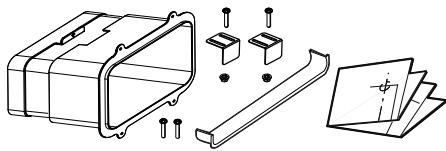
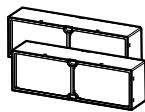
KIT0167755
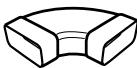
KIT0121016
90^ 218x55mm
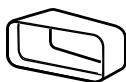
KIT0121002
15^227× 94mm
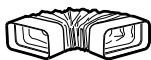
KIT0126810
227x94mm
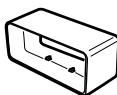
KIT0121001
227x94x80mm
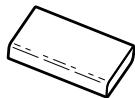
KIT0173527
222x89x500mm
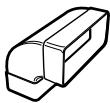
KIT0121005
90^ 227x94mm
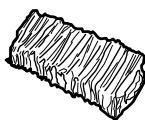
KIT0121017
218x55mm

KIT0168750
KIT0121015
223x59x72mm

KIT0121013
KIT0161453
KIT0120991
222x89x1000mm
KIT0121012
218x55x500mm
218x55x1000mm

www.elica.com
www.shop.elica.com
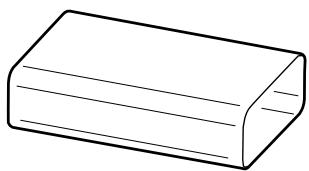
KIT0185767
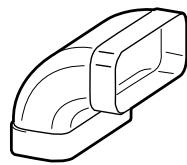


KIT0121010
190x190
0147mm
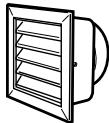
KIT0121009
INT 216x82mmEXT 290x160mm
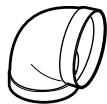
KIT0121006
90^
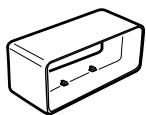
KIT0121001
227x94x80mm
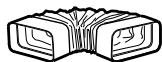
KIT0126810
227x94mm
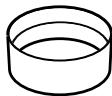
KIT0121003
0158
59mm
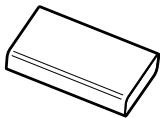
KIT0173527
222x89x500mm
KIT0120991
222x89x1000mm
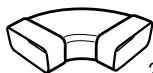
KIT0121004
90^
227x288x94mm
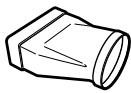
KIT0121008
227x94 0153mm
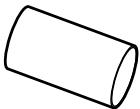
KIT0120996
0150-500mm
KIT0121000
0150-1000mm
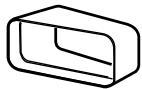
KIT0121002
15^
227x94mm
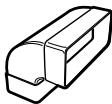
KIT0121005
90^
227x94mm

KIT0161453
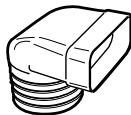
KIT0121007
227x94
0146mm
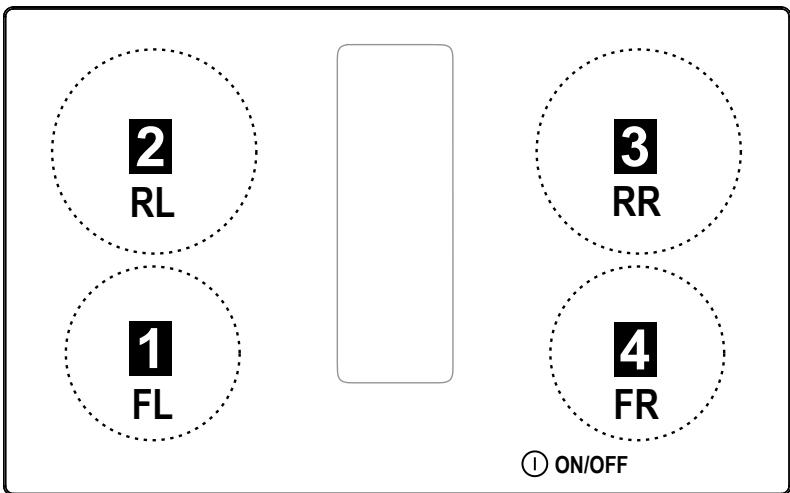
FRONT
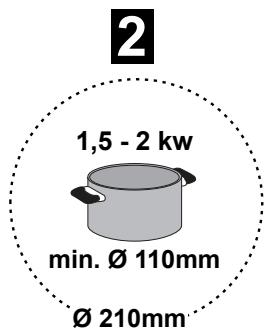
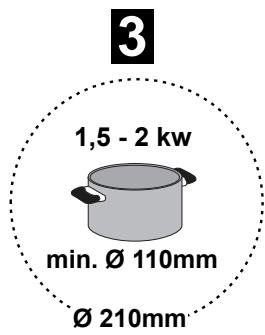
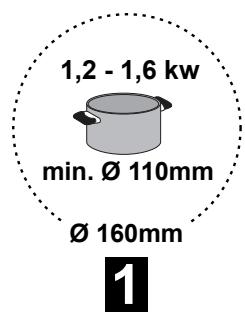
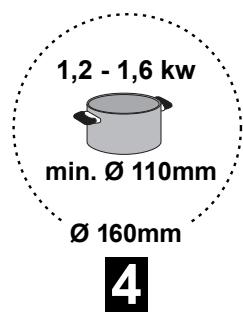

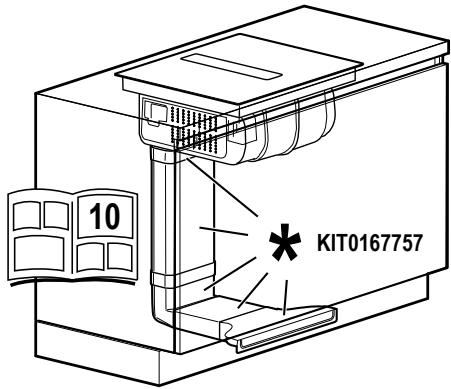
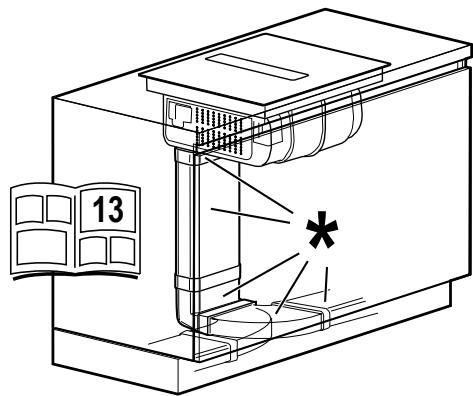
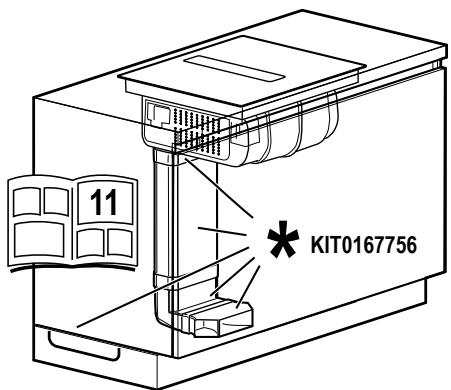

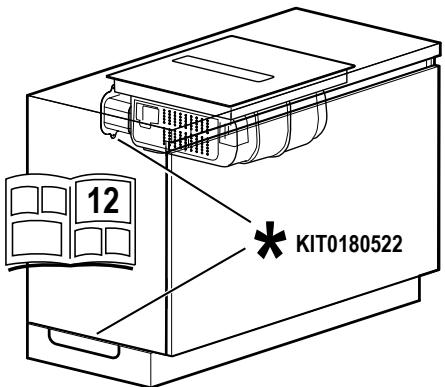
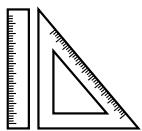
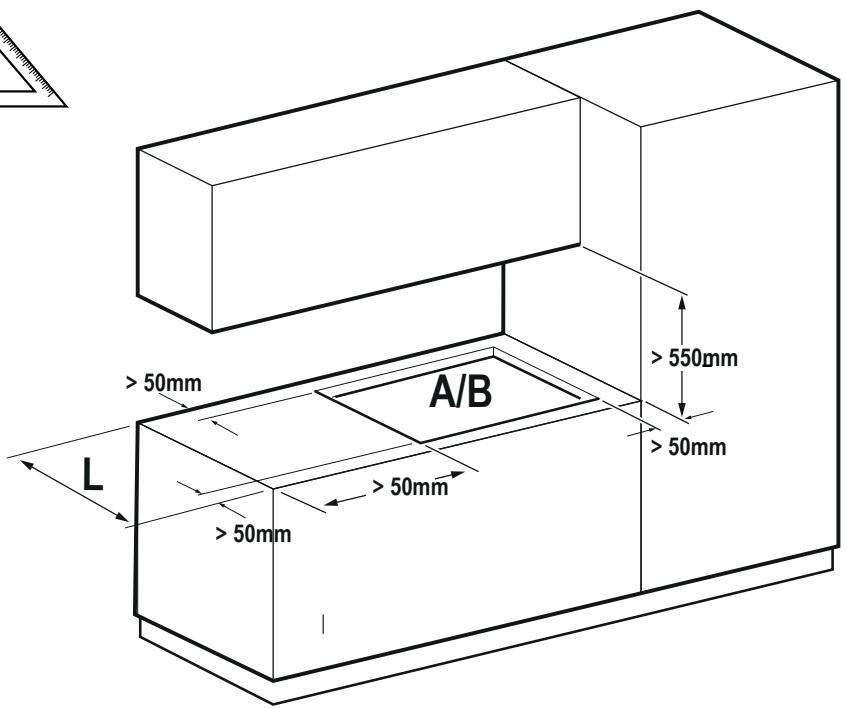
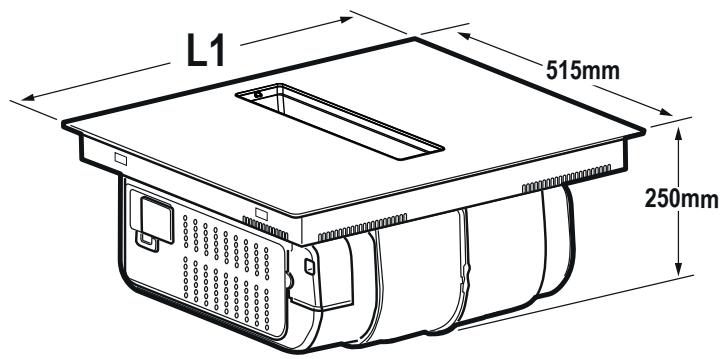
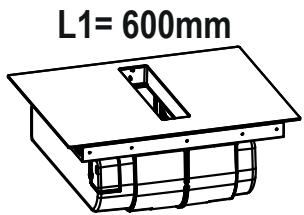
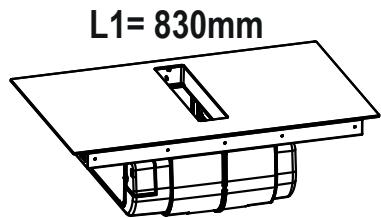
inst.A

inst.B

inst.A
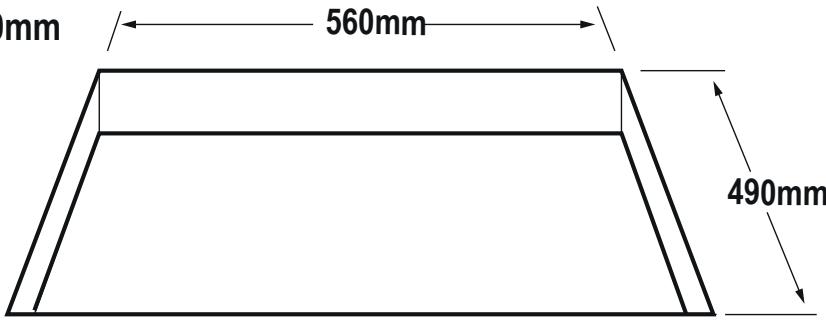
L1= 600mm
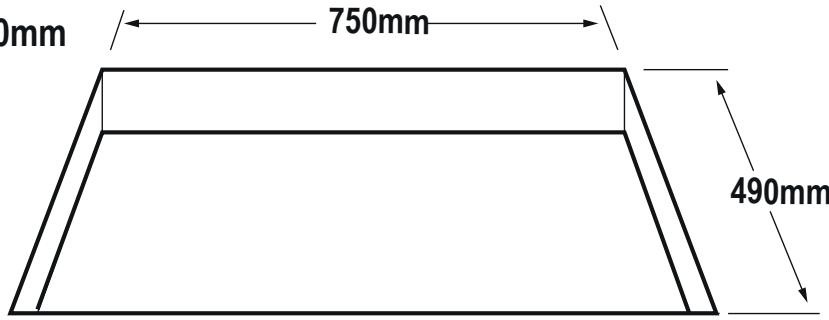
L1= 830mm
inst.B
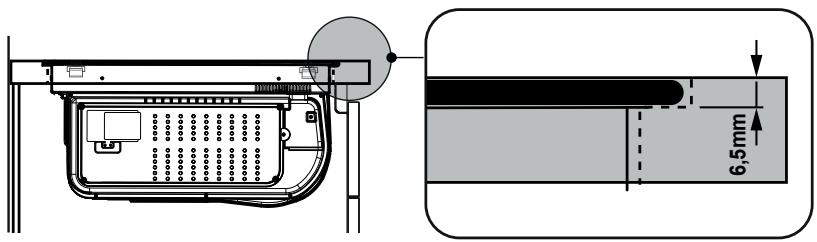
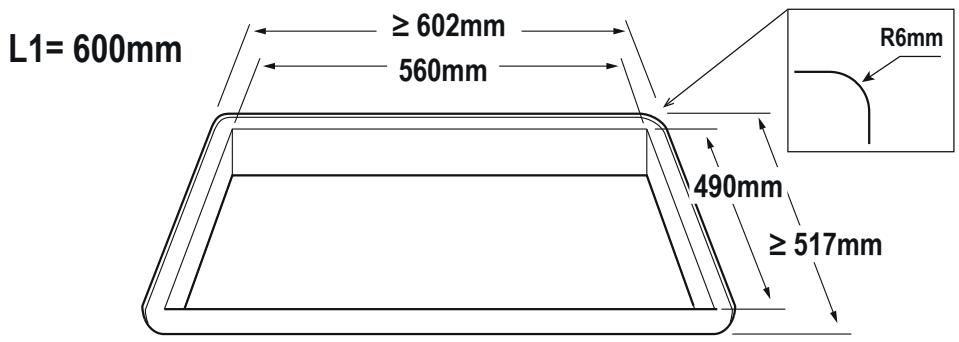
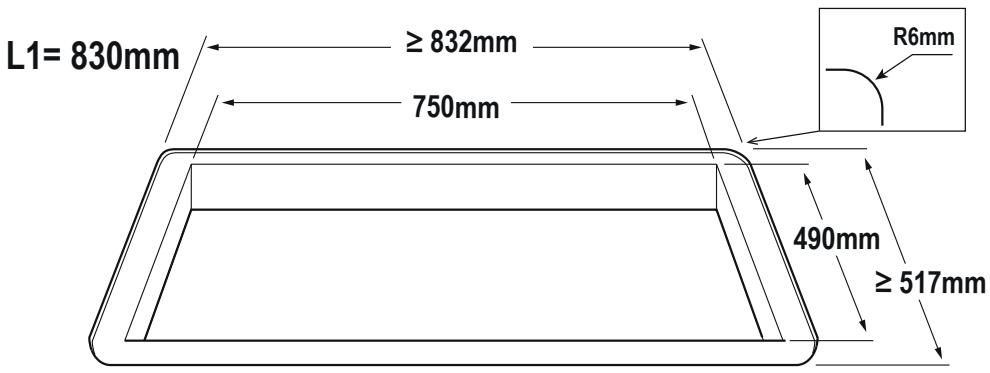
3.1
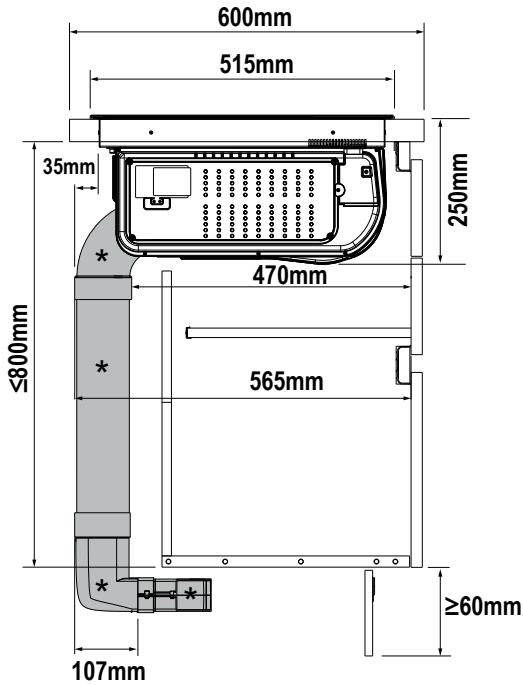


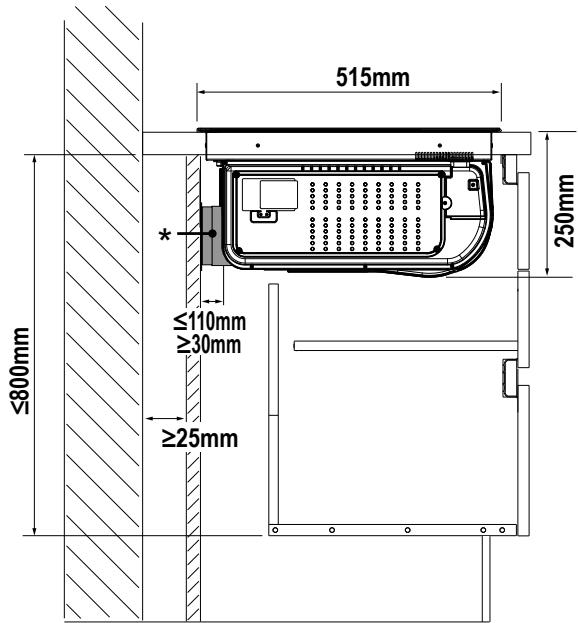
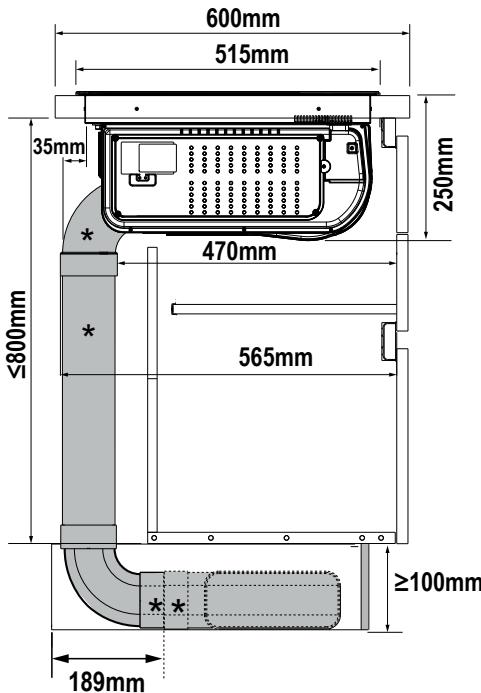
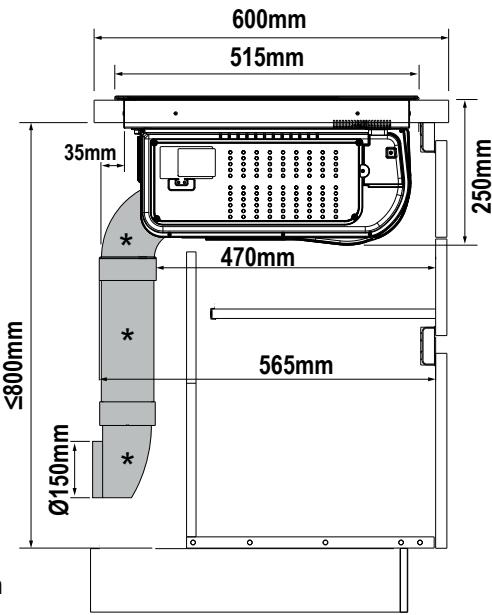

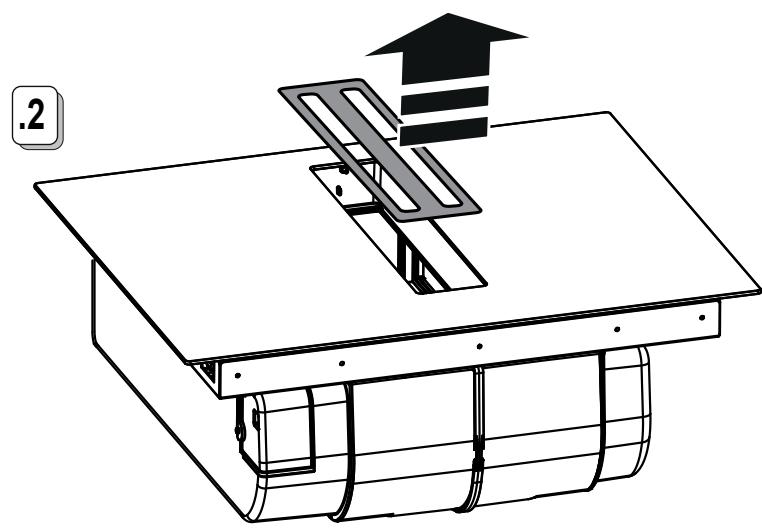

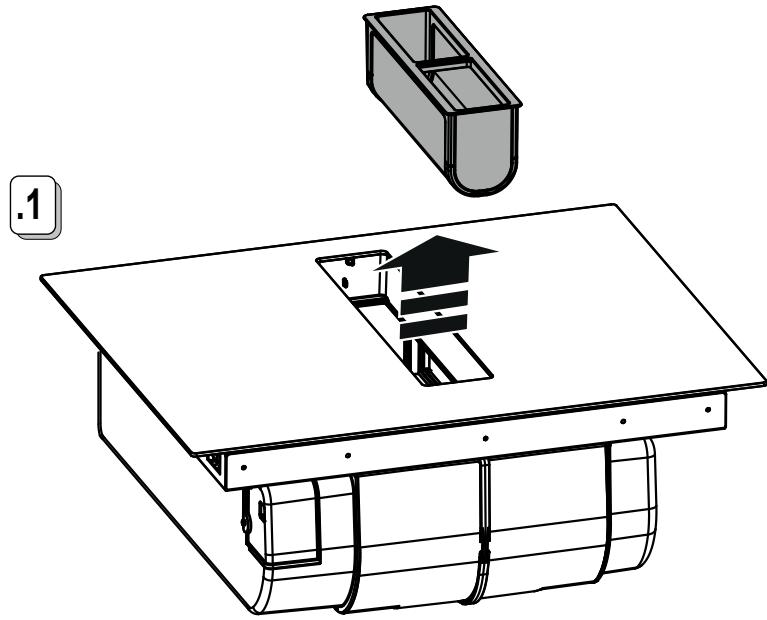

6.1

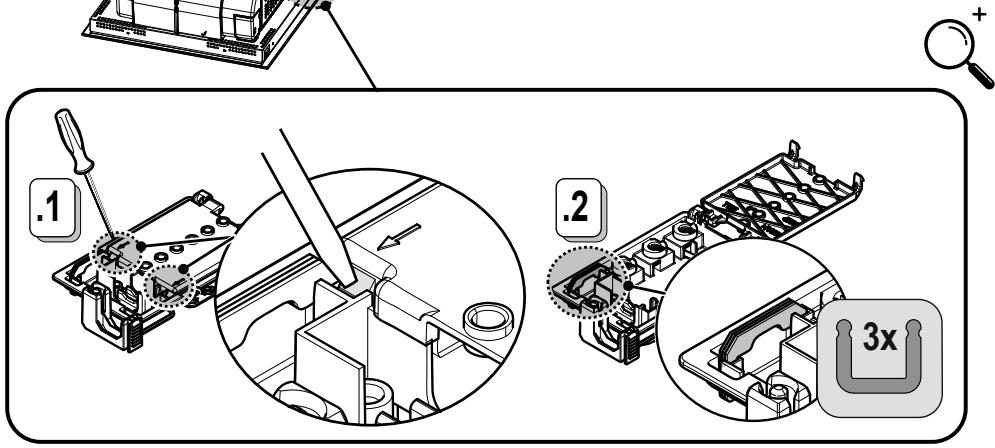
220V-240V~
50Hz/60Hz
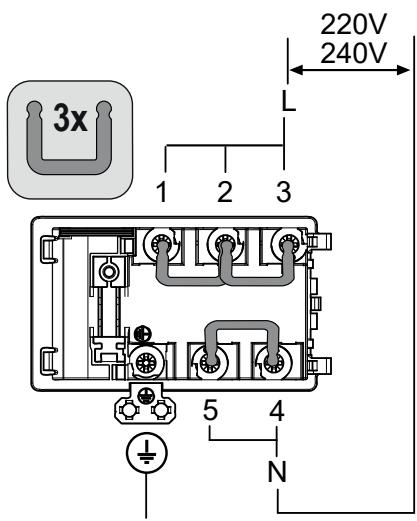
380V-415V~2N~
50Hz/60Hz
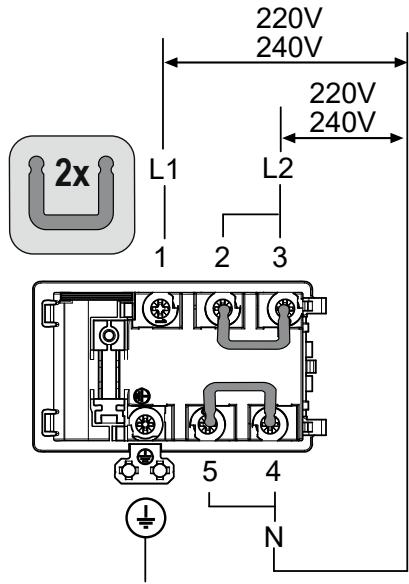
380V-415V~ 3N~
50Hz/60Hz
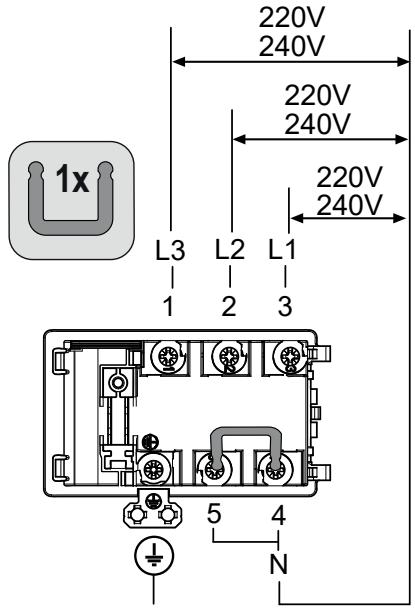
220V-240V ~ 2N 2L
50Hz/60Hz
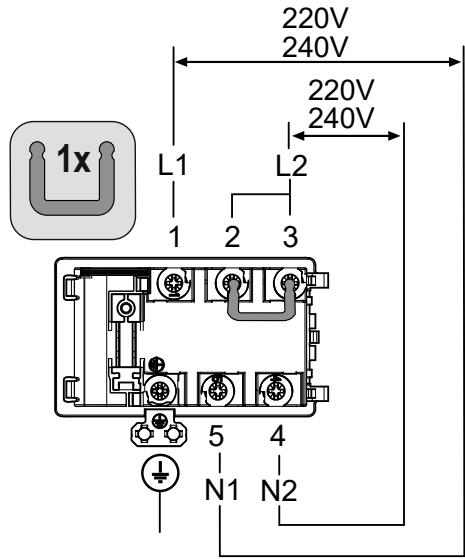

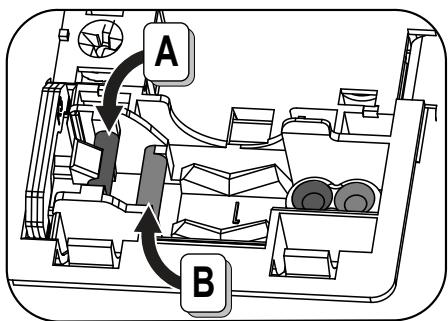


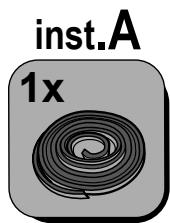

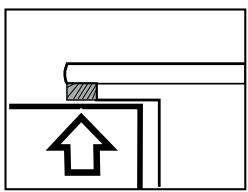
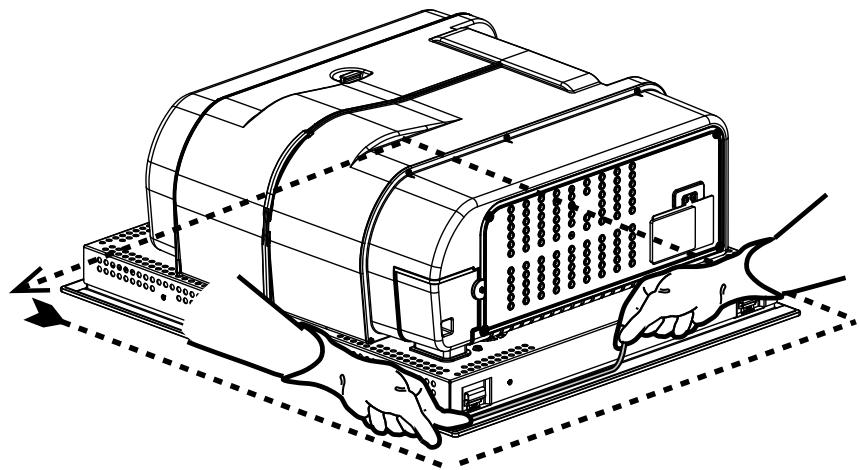
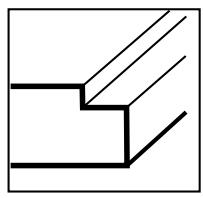
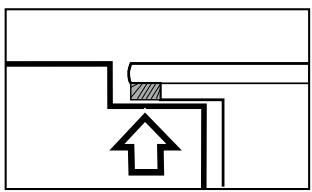
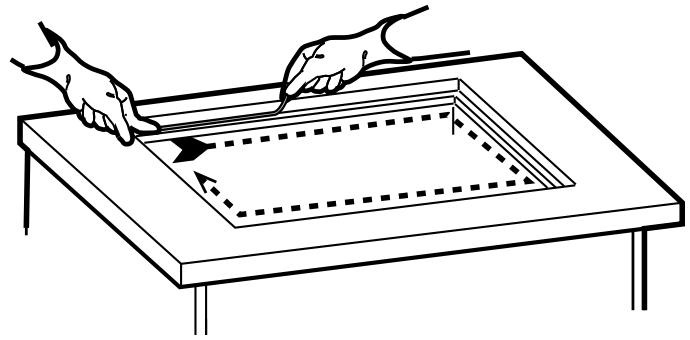
9
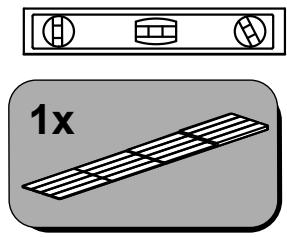
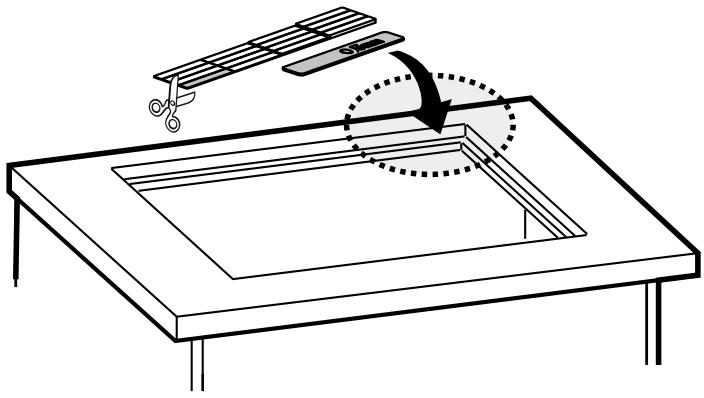
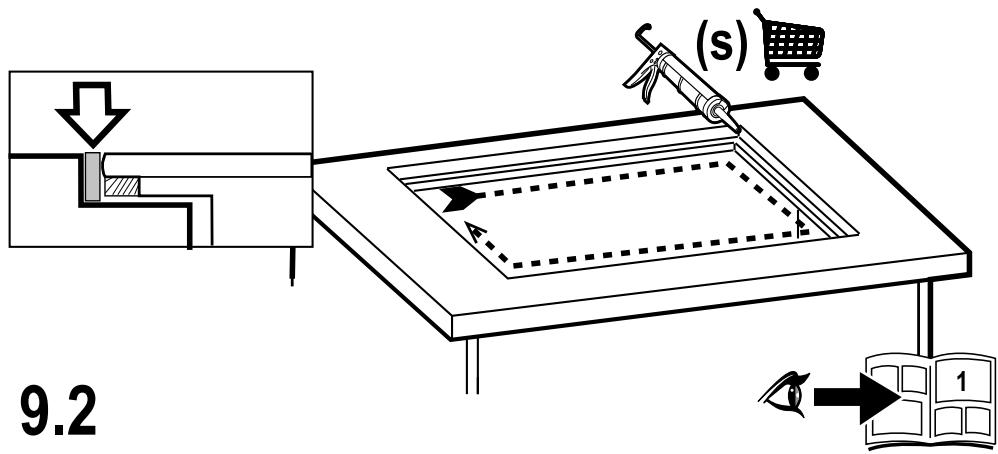
9.1
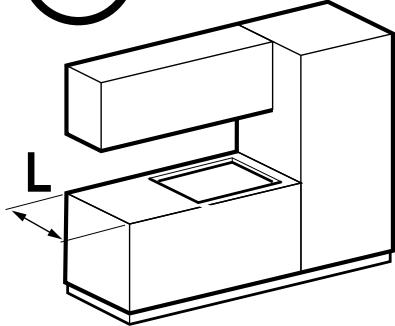
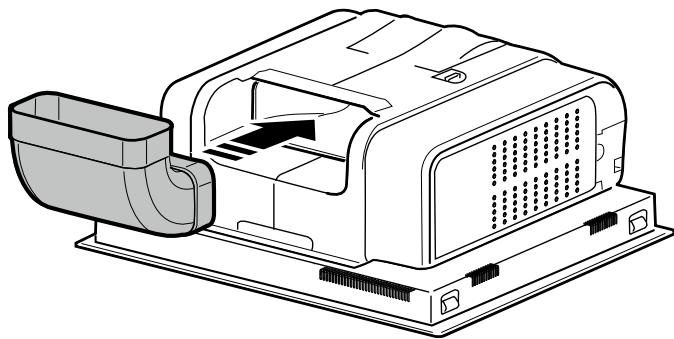
10
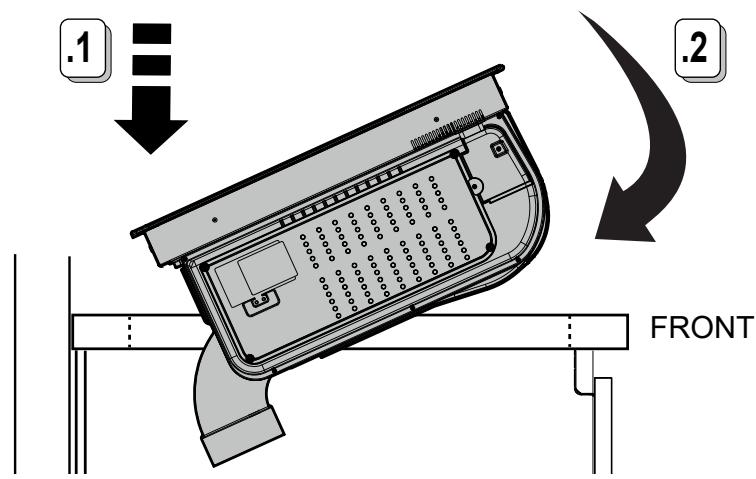
10.1
KIT0167757

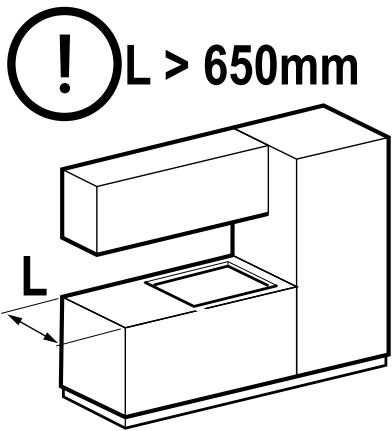
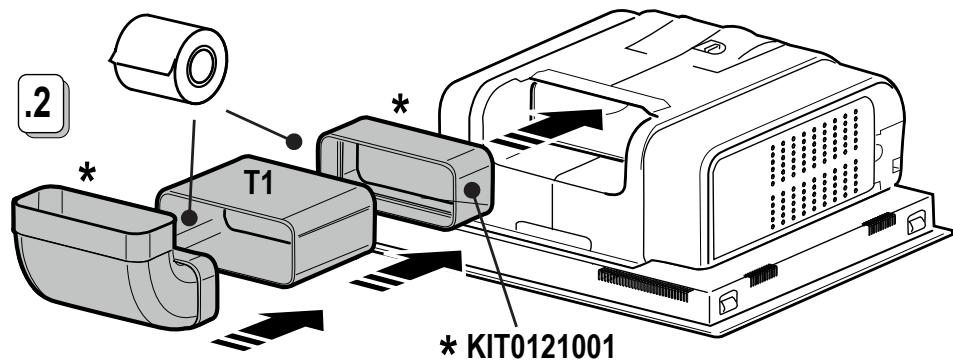
10.2
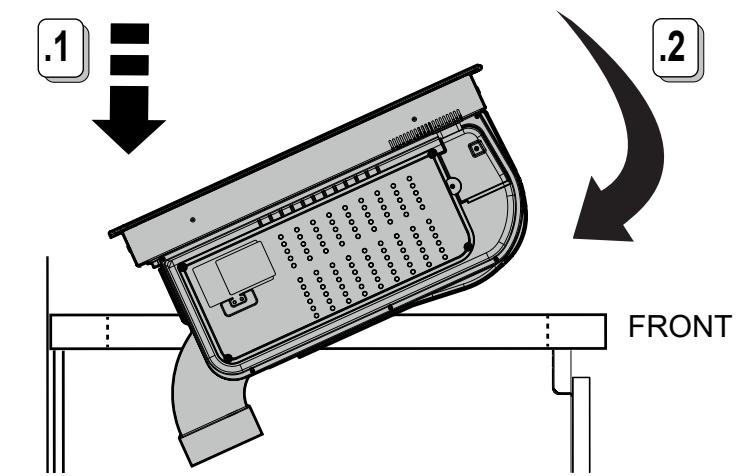
10.3
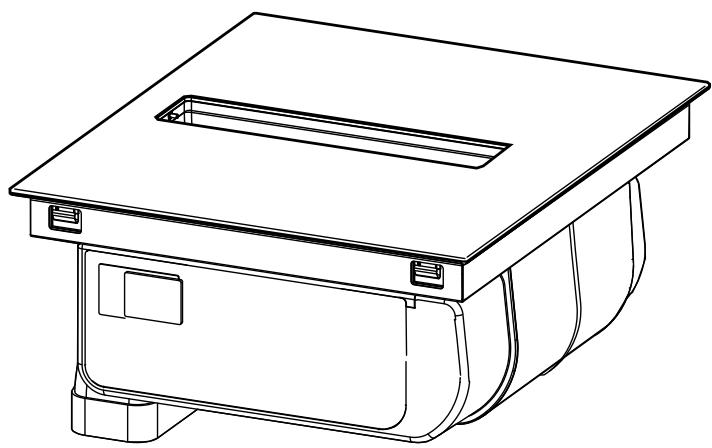
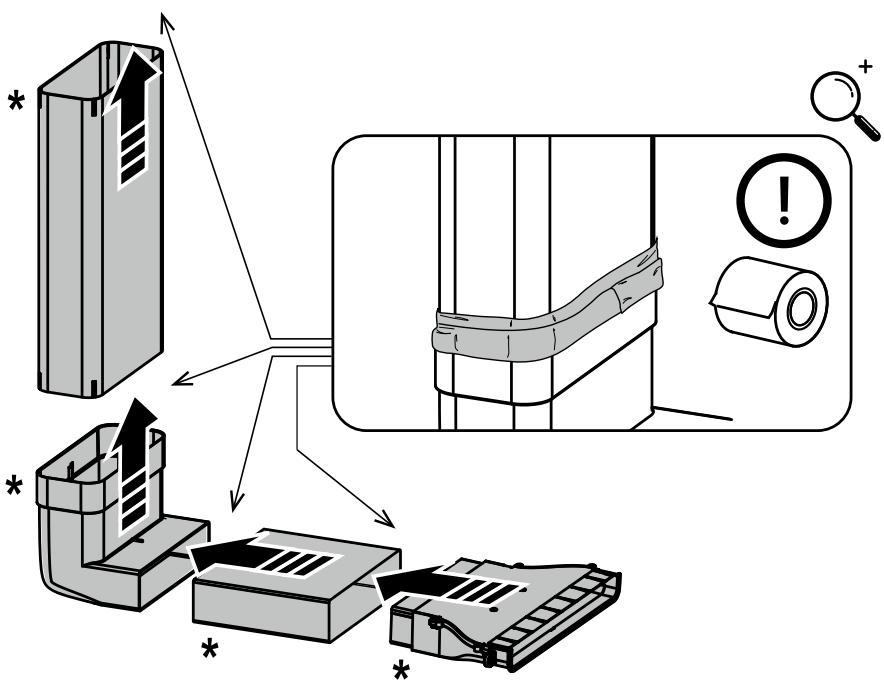
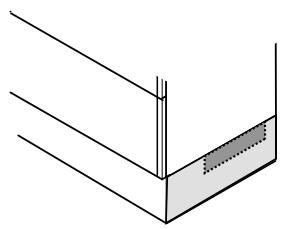
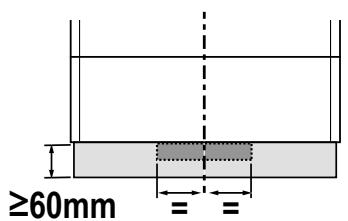

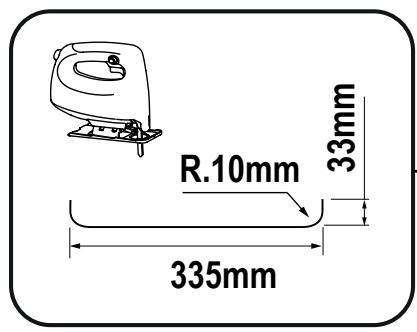
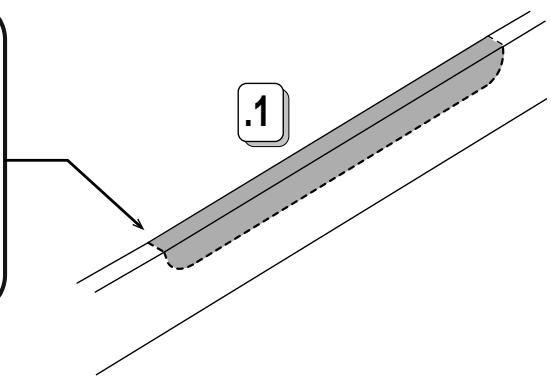
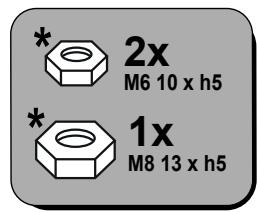
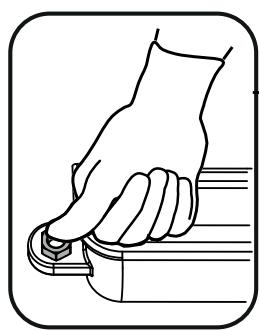
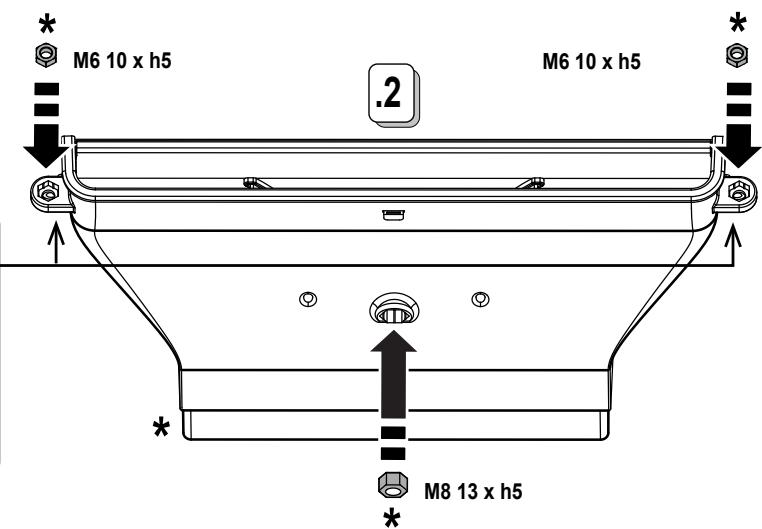
KIT0167757


www.elica.com
www.shop.elica.com

2x
M6x20mm

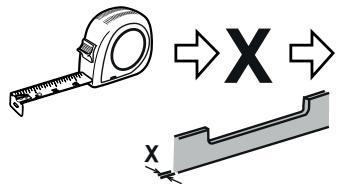
$$
X = \leq 1 8, 5 m m
$$

$$
X = \begin{array}{l} > 1 8, 5 \mathrm {m m} \ \leq 2 2, 5 \mathrm {m m} \end{array}
$$

$$
X = \leq 1 8, 5 m m
$$
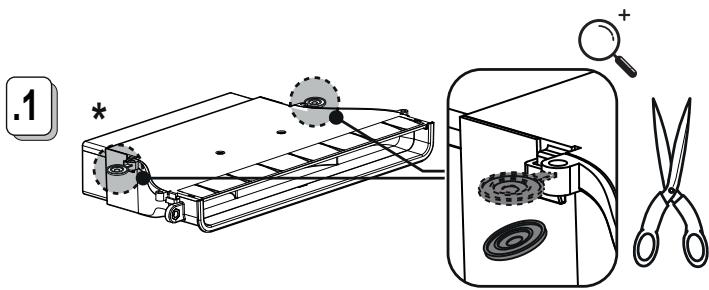
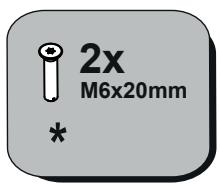
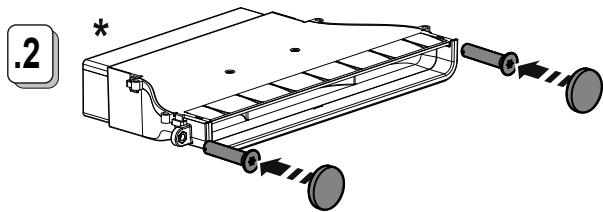
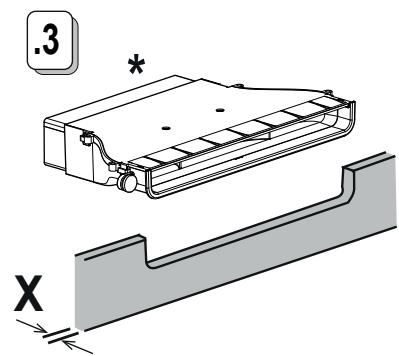
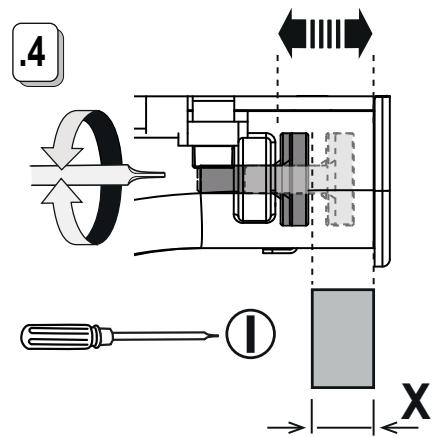
10.6
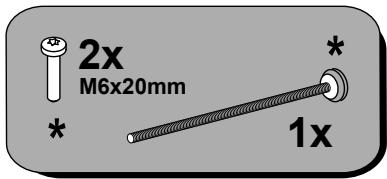
X ≥ 18,5 ~mm ≤ 22,5 ~mm
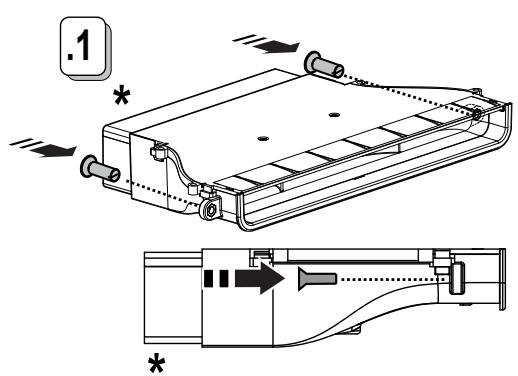
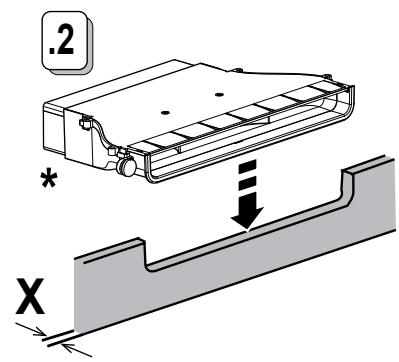
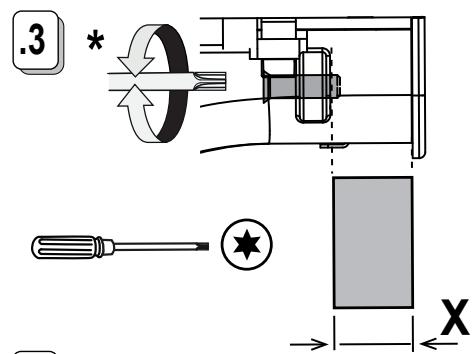
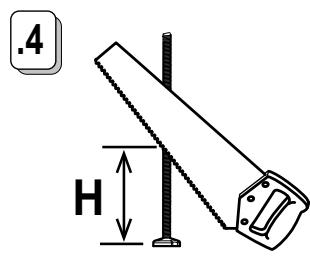
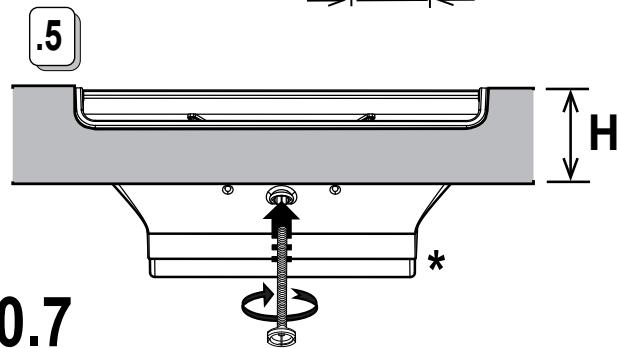
10.7
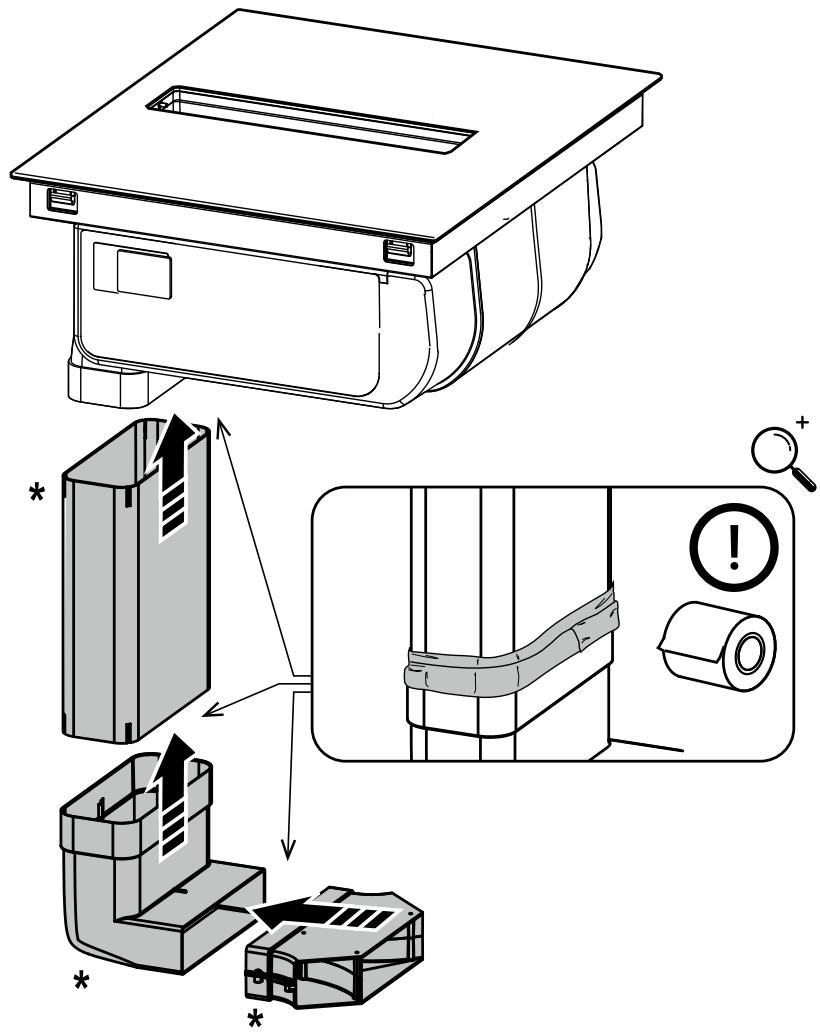
11
11.1
KIT0167756
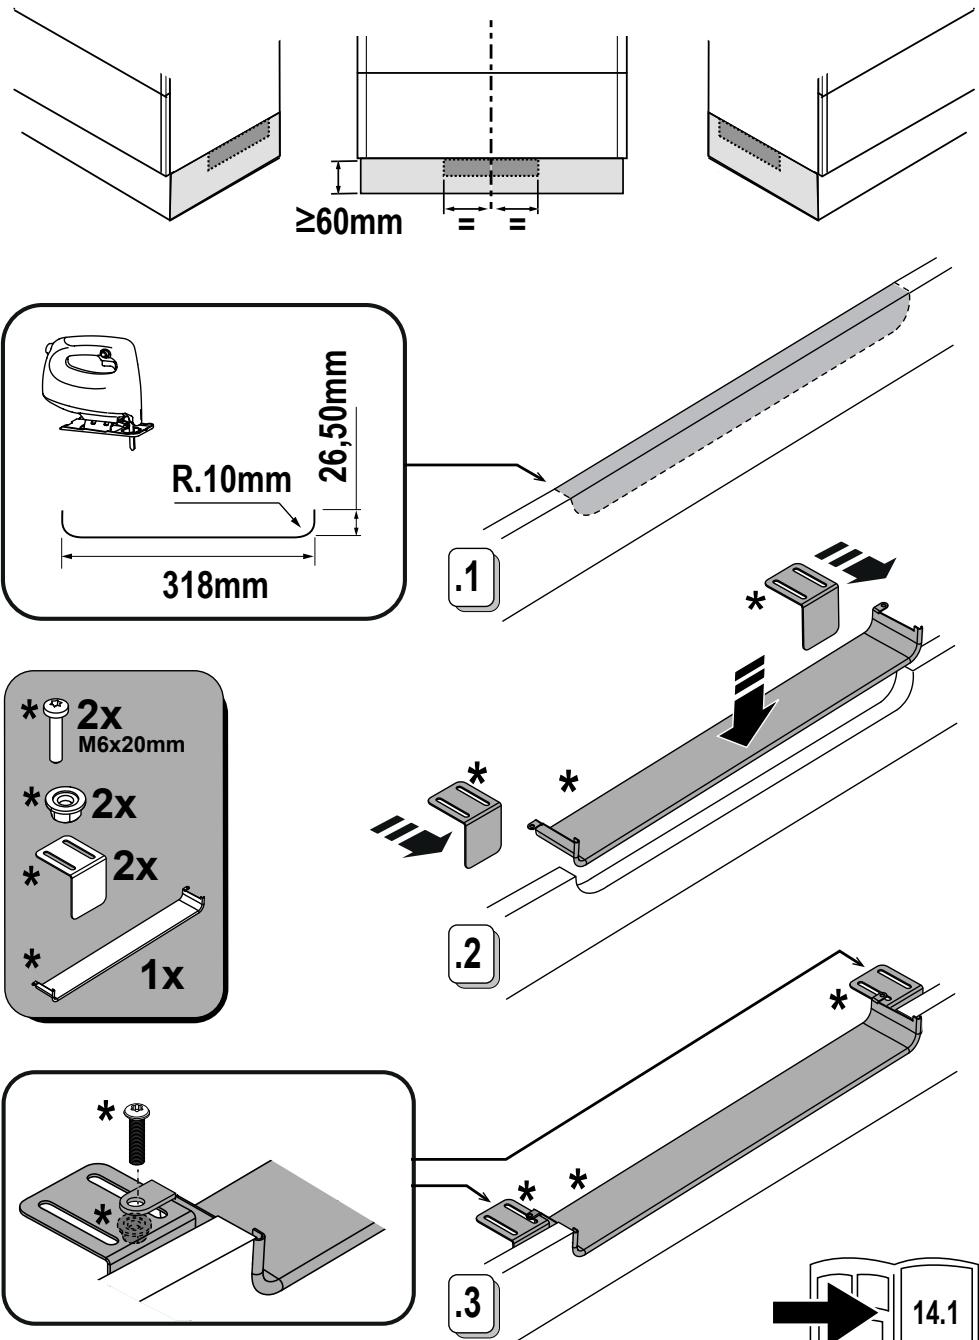
11.2
KIT0180522

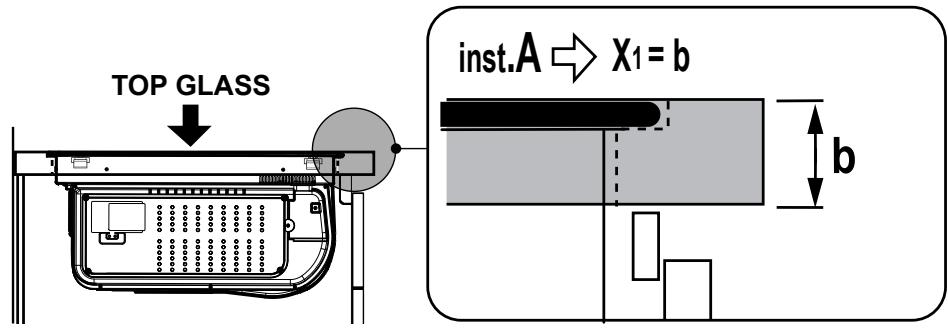
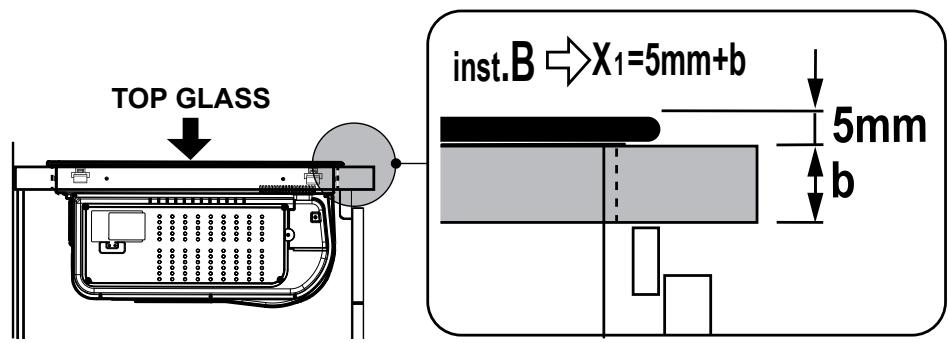
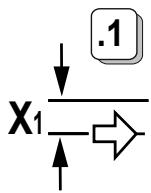
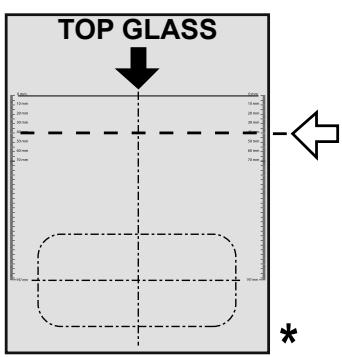
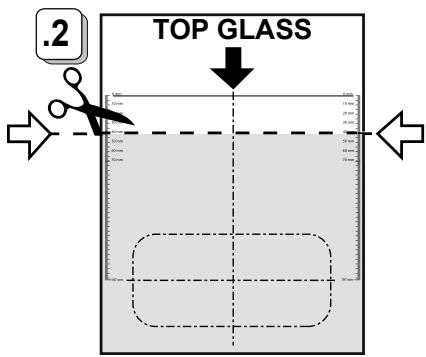
12
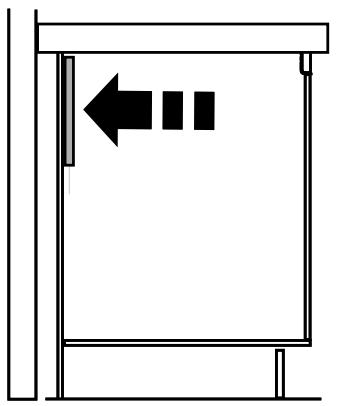
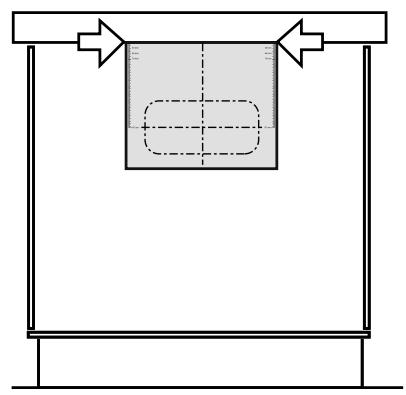
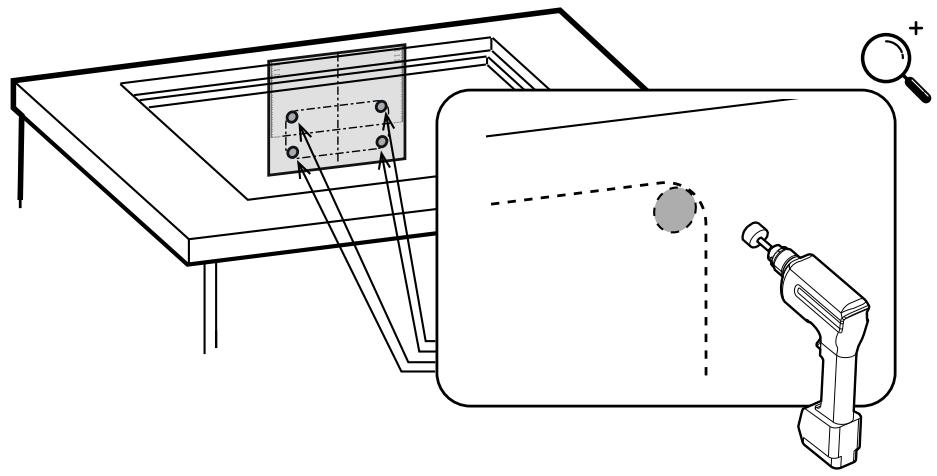
12.1
12.2
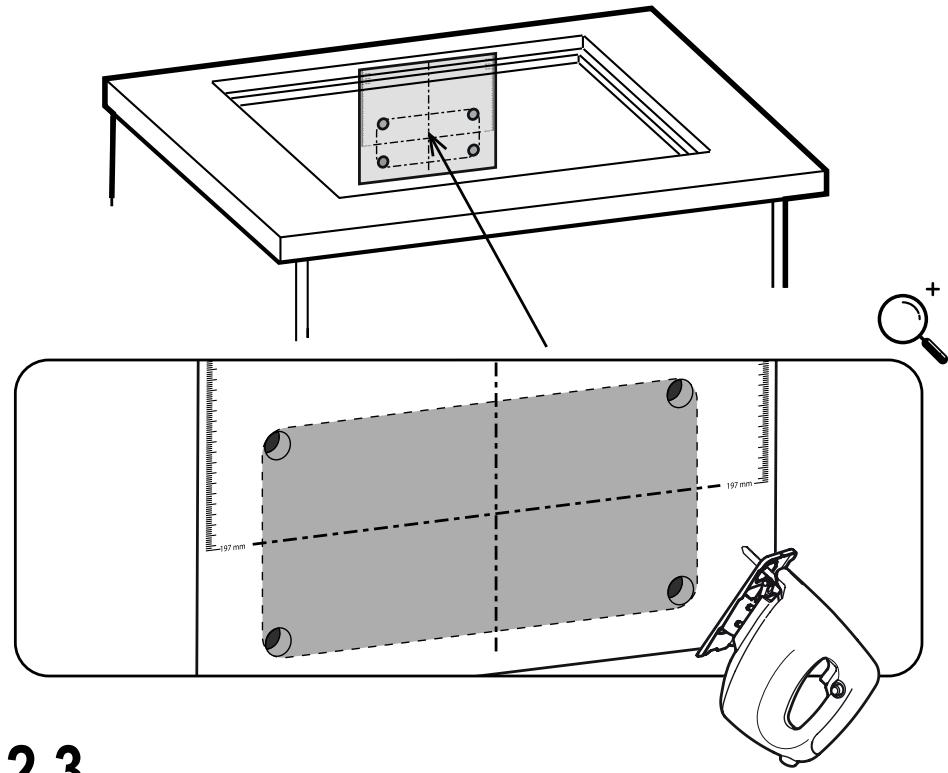
12.3
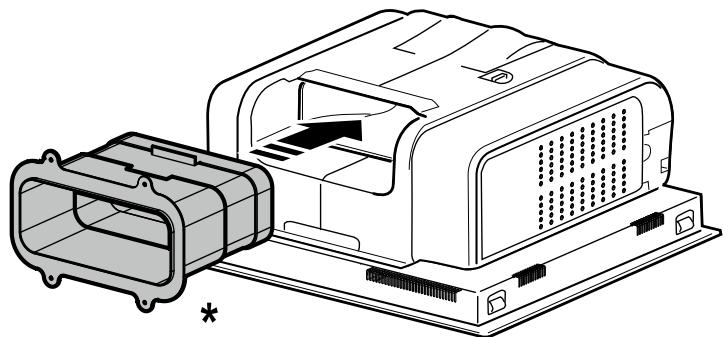
12.4
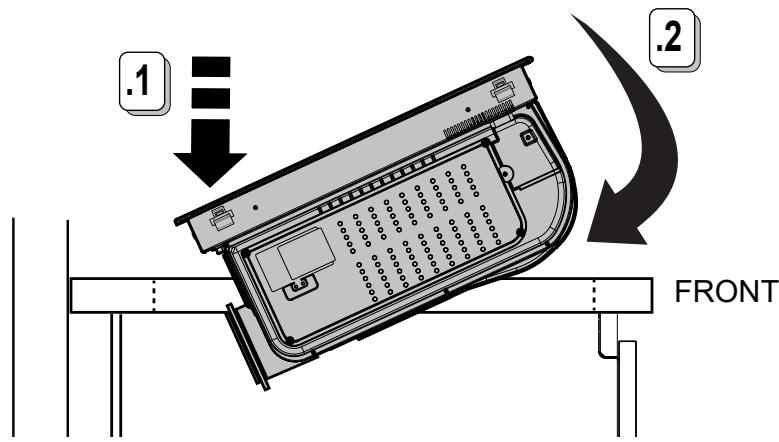
12.5

2x
03,5x13mm
12.6


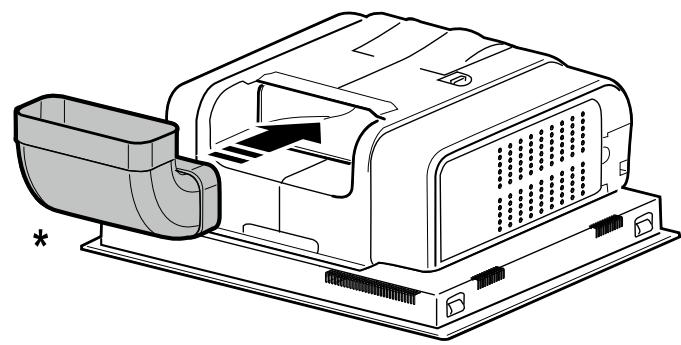
13
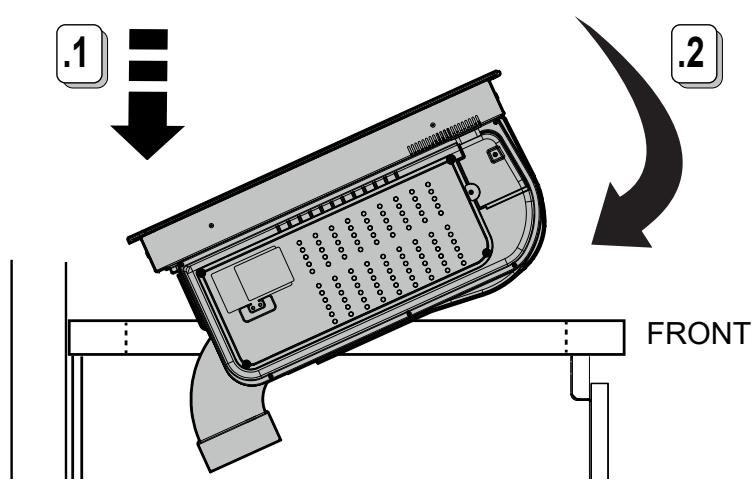
13.1
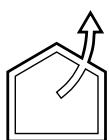

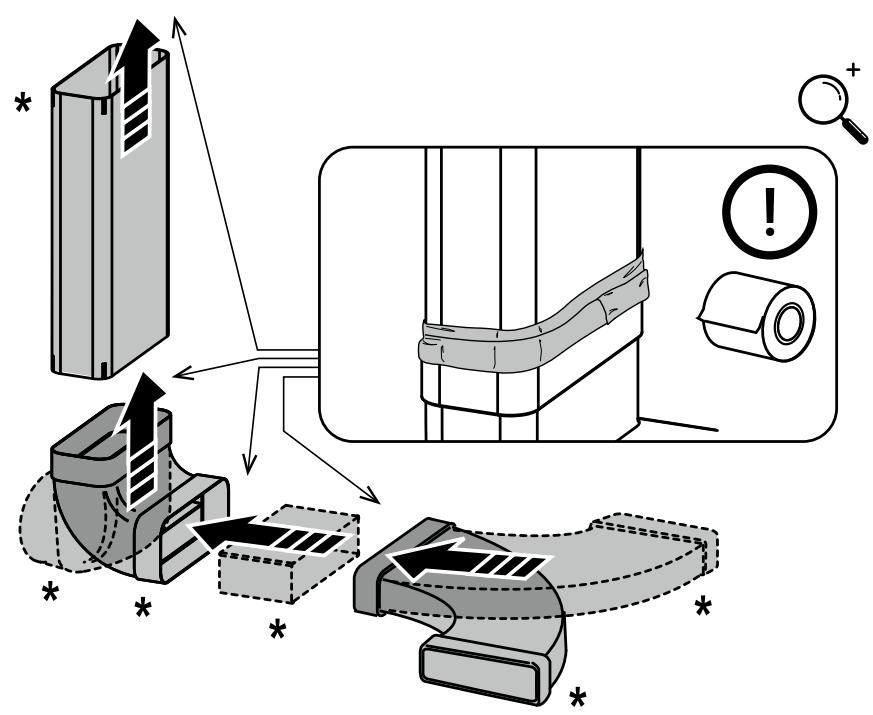


A-B
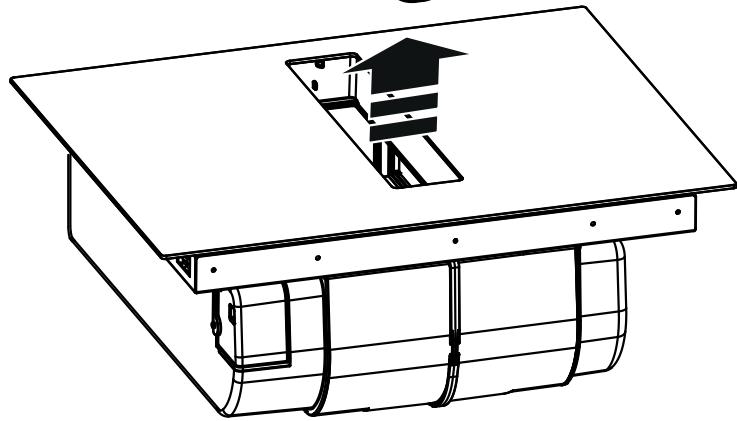
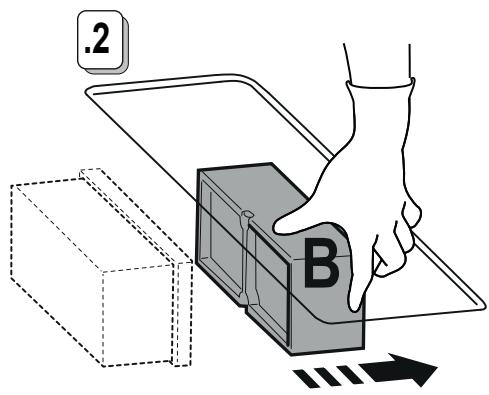
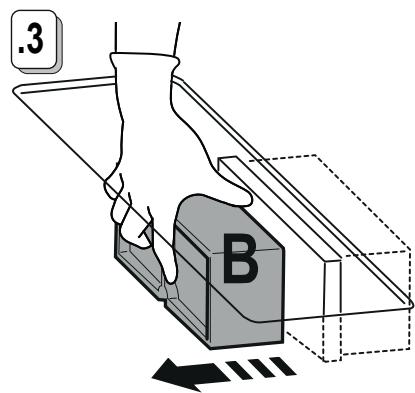
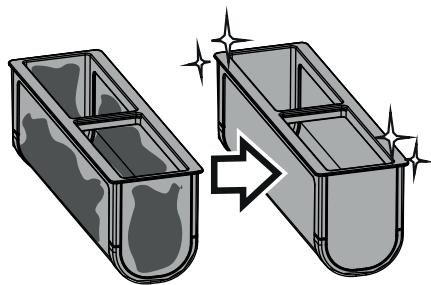
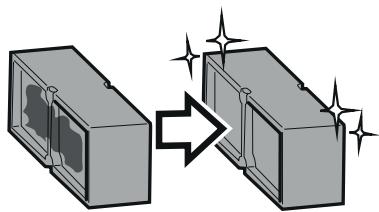
14.0


A-B
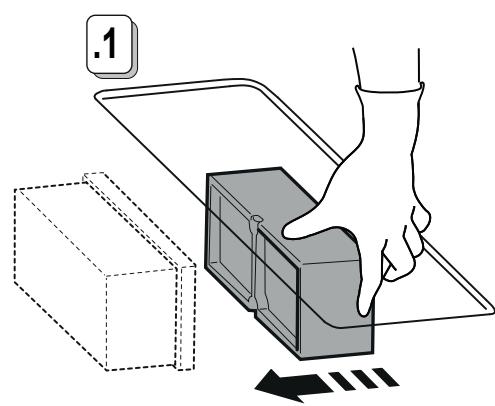
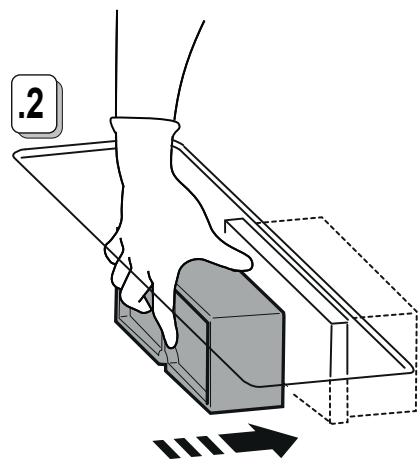
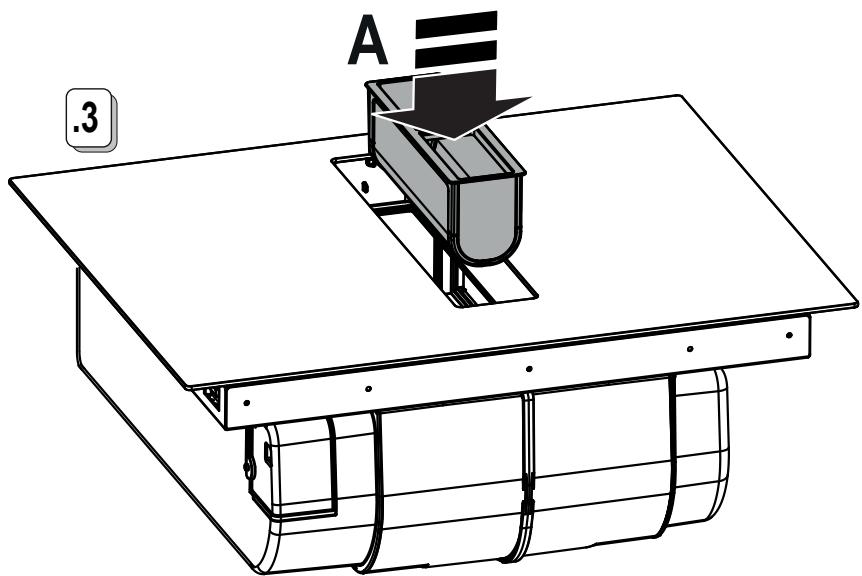
14.1
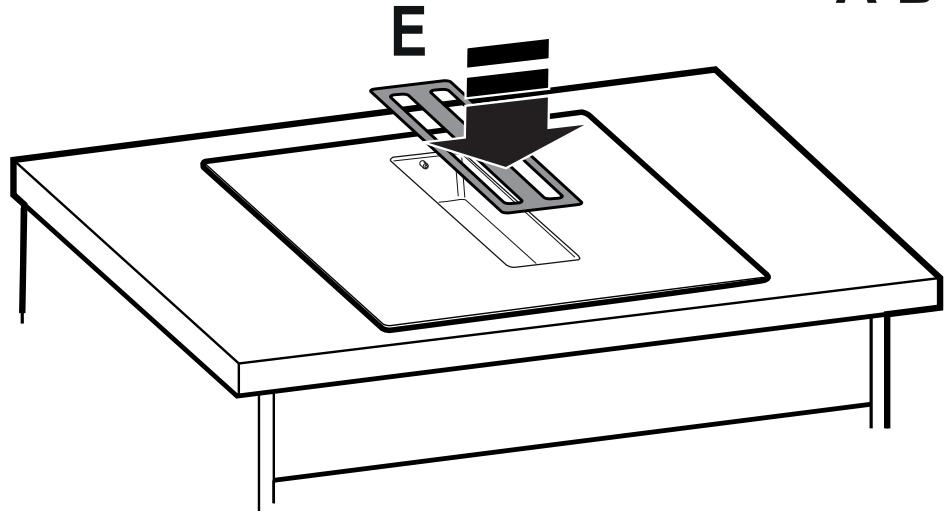
14.2