
KM 100 100 R D - Sweeper KARCHER - Free user manual and instructions
Find the device manual for free KM 100 100 R D KARCHER in PDF.
| Product type | Ride-on sweeper |
| Brand | KÄRCHER |
| Model | KM 100 100 R D |
| Dimensions (L × W × H) | 2006 × 1005 × 1343 mm |
| Empty weight | 315 kg |
| Maximum permissible weight | 535 kg |
| Engine | Yanmar L70AE, 4-stroke diesel, 4.4 kW / 6 HP |
| Fuel tank capacity | 3.3 L (diesel) |
| Battery | 12 V, 44 Ah |
| Travel speed | 8 km/h |
| Sweeping speed | 6 km/h |
| Max gradient (forward direction) | 18 % |
| Sweeping width without side brooms | 710 mm |
| Sweeping width with 1 side broom | 1000 mm |
| Sweeping width with 2 side brooms (optional) | 1290 mm |
| Dust bin volume | 100 L |
| Rotating brush diameter | 285 mm |
| Side broom diameter | 450 mm |
| Filtration area | 6.0 m² |
| Tire pressure (front and rear) | 6 bar |
| Sound pressure level | 83 dB(A) |
| Vibrations (seat) | 0.7 m/s² |
| Main functions | Projection sweeping with rotating brush and side brooms, dust suction via filter |
| Routine maintenance | Regular cleaning and emptying of dust bin, filter cleaning, maintenance according to hour meter |
| Safety | Seat switch, automatic parking brake, emergency stop, engine cut-out in case of low oil level |
| Spare parts available | Rotating brushes, side brooms, dust filters, sealing strips, belts |
| Repairability | KÄRCHER authorized service center for repairs and scheduled maintenance |
Frequently Asked Questions - KM 100 100 R D KARCHER
User questions about KM 100 100 R D KARCHER
0 question about this device. Answer the ones you know or ask your own.
Ask a new question about this device
Download the instructions for your Sweeper in PDF format for free! Find your manual KM 100 100 R D - KARCHER and take your electronic device back in hand. On this page are published all the documents necessary for the use of your device. KM 100 100 R D by KARCHER.
USER MANUAL KM 100 100 R D KARCHER

S. Reiser
Head of Approbation
71364 Winnenden (Germany)
Tel.: +49 7195 14-0
Fax: +49 7195 14-2212
Winnenden, 2010/07/14
Garantie
Please read and comply with these original instructions prior
to the initial operation of your appliance and store them for later use or subsequent owners.
Before first start-up it is definitely necessary to read the safety indications Nr. 5.956-250!
Contents
| Safety instructions | EN - | 1 |
| Function | EN - | 1 |
| Proper use | EN - | 2 |
| Environmental protection | EN - | 2 |
| Operating and Functional Elements | EN - | 3 |
| Before Startup | EN - | 4 |
| Start up | EN - | 4 |
| Operation | EN - | 4 |
| Shutdown | EN - | 6 |
| Maintenance and care | EN - | 6 |
| Accessories | EN - | 10 |
| Troubleshooting | EN - | 11 |
| Technical specifications | EN - | 12 |
| CE Declaration | EN - | 13 |
| Warranty | EN - | 13 |
Safety instructions
General notes
Your sales outlet should be informed about any transit damage noted when unpacking the product.
- Warning and information plates on the machine provide important directions for safe operation.
In addition to the information contained in the operating instructions, all statutory safety and accident prevention regulations must be observed.
Drive mode
Danger
Risk of injury!
Danger of tipping if gradient is too high.
The gradient in the direction of travel should not exceed 18% .
Danger of tipping when driving round bends at high speed.
- Drive slowly when cornering.
Danger of tipping on unstable ground.
Only use the machine on sound surfaces.
Danger of tipping with excessive sideways tilt.
The gradient perpendicular to the direction of travel should not exceed 15% .
- It is important to follow all safety instructions, rules and regulations applicable for driving motor vehicles.
- The operator must use the appliance properly. He must consider the local conditions and must pay attention to third parties, in particular children, when working with the appliance.
- The appliance may only be used by persons who have been instructed in handling the appliance or have proven qualification and expertise in operating the appliance or have been explicitly assigned the task of handling the appliance.
The appliance must not be operated by children, young persons or persons who have not been instructed accordingly.
- It is strictly prohibited to take co-passengers.
- Ride-on appliances may only be started after the operator has occupied the driver's seat.
Please remove the key, when not in use, to avoid unauthorised use of the appliance.
Never leave the machine unattended so long as the engine is running. The operator may leave the appliance only when the engine has come to a standstill, the appliance has been protected against accidental movement, and the key has been removed.
Accessories and Spare Parts
Danger
To avoid risks, all repairs and replacement of spare parts may only be carried out by authorized customer service personnel.
Only use accessories and spare parts which have been approved by the manufacturer. The exclusive use of original accessories and original spare parts ensures that the appliance can be operated safely and troublefree.
- At the end of the operating instructions you will find a selected list of spare parts that are often required.
- For additional information about spare parts, please go to the Service section at www.kaercher.com.
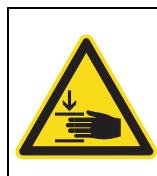
Symbols on the machine

Please do not sweep away any burning substances such as cigarettes, match sticks or similar objects.
Risk of being squeezed or hurt at the belts, sidebrushes, containers, machine cover.
Symbols in the operating instructions
Danger
Immediate danger that can cause severe injury or even death.
Warning
Possible hazardous situation that could lead to severe injury or even death.
Caution
Possible hazardous situation that could lead to mild injury to persons or damage to property.
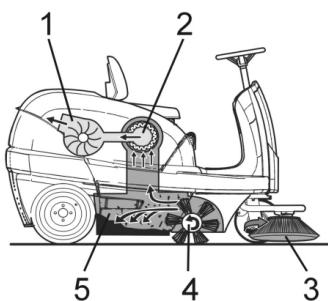
Function
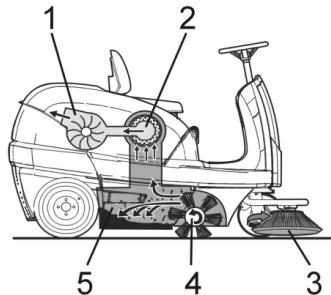
The sweeper operates using the overthrow principle.
- The side brushes (3) clean the corners and edges of the surface, moving dirt and debris into the path of the roller brush.
- The rotating roller brush (4) moves the dirt and debris directly into the waste container (5).
- The dust raised in the container is separated by the dust filter (2) and the filtered clean air is drawn off by the suction fan (1).
Proper use
Use this sweeper only as directed in these operating instructions.
The machine with working equipment must be checked to ensure that it is in proper working order and is operating safely prior to use. Otherwise, the appliance must not be used.
- This sweeper has been designed to sweep dirt and debris from indoor as well as outdoor surfaces.
- The machine is not suitable for being driven on public roads.
- The machine is not suitable for vacuuming dust which endangers health.
The machine may not be modified.
- Never vacuum up explosive liquids, combustible gases or undiluted acids and solvents. This includes petrol, paint thinner or heating oil which can generate explosive fumes or mixtures upon contact with the suction air. Acetone, undiluted acids and solvents must also be avoided as they can harm the materials on the machine.
- Do not sweep/vacuum up any burning or glowing objects.
- The machine is only suitable for use on the types of surfaces specified in the operating instructions.
- The machine may only be operated on the surfaces approved by the company or its authorised representatives.
- The machine may not be used or stored in hazardous areas. It is not allowed to use the appliance in hazardous locations.
- The following applies in general: Keep highly-flammable substances away from the appliance (danger of explosion/fire).
Suitable surfaces
Asphalt
Industrial floor
- Screed
Concrete
Paving stones
- Carpet
Environmental protection

The packaging material can be recycled. Please do not throw the packaging material into household waste; please send it for recycling.

Old appliances contain valuable materials that can be recycled; these should be sent for recycling. Batteries, oil, and similar substances must not enter the environment. Please dispose of your old appliances using appropriate collection systems.
Notes about the ingredients (REACH)
You will find current information about the ingredients at:
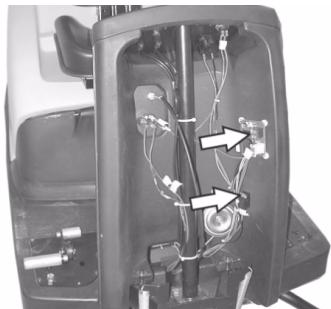
1 Ignition lock
2 Dust filter
3 Steering wheel
4 Seat (with seat contact switch)
5 Wet/dry flap
6 Cover
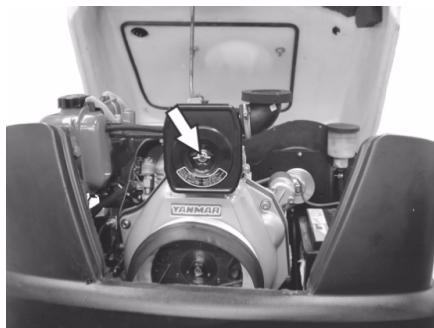
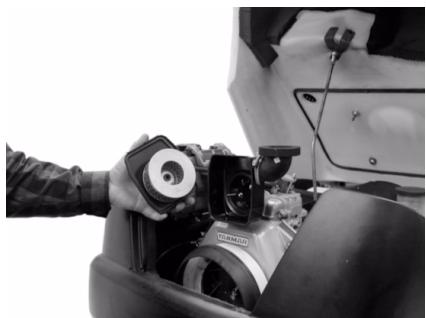
7 Air filter insert
8 Oil dipstick
9 Roller brush
10 Waste container (both sides)
11 Pedal for raising/lowering bulk waste flap
12 Side brushes
13 Drive pedal
14 Front panel
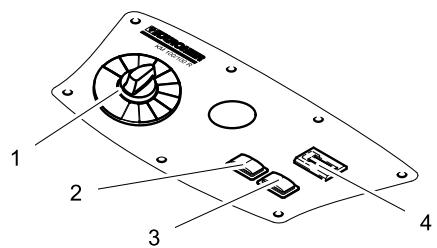
Operator console
1 Programme switch
2 Filter deducting
3 Horn
4 Operating hour counter
Colour coding
- The operating elements for the cleaning process are yellow.
- The controls for the maintenance and service are light gray.
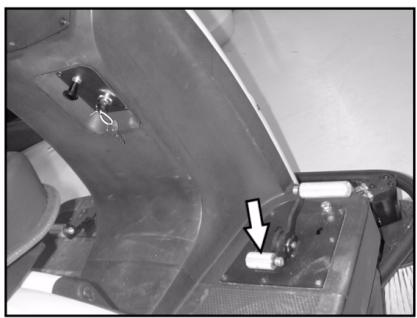
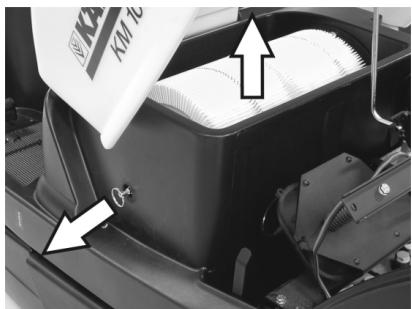
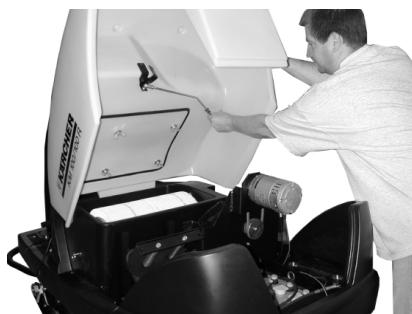
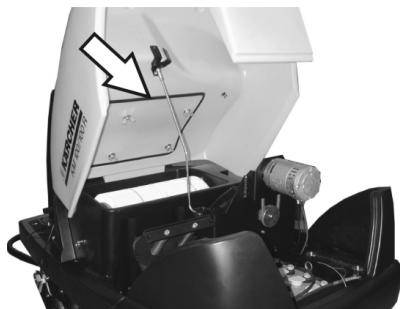
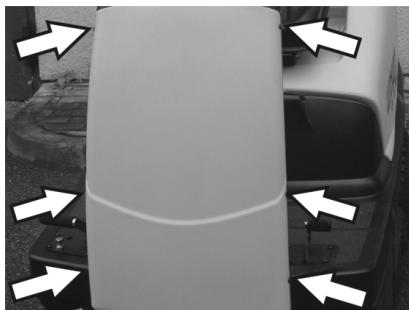
Open/ close device hood
Danger
Danger of crushing while closing the machine cover. Hence, lower the machine cover slowly.
Open the device hood at the handle slot (pull it upward).

Pull the holding bar from the holder.
Insert the holder bar into the intake on the suction fan.
To close the appliance hood, pull the holder bar out of the intake and lock the holder into the appliance hood.
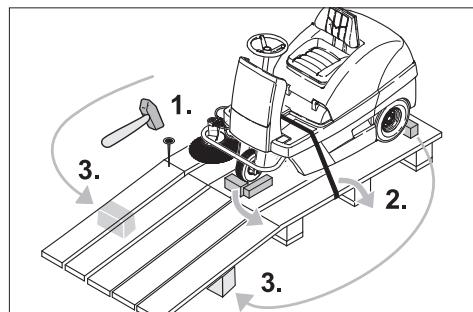
Before Startup
Unloading
Danger
Risk of injury and damage! Do not use a forklift to unload the appliance.
To unload the machine, proceed as follows:
Cut plastic packing belt and remove foil.
Remove the elastic tape fasteners at the stop points.
Four indicated floor boards of the pallet are fastened with screws. Unscrew these boards.
Place the boards on the edge of the pallet. Place the boards in such a way that they lie in front of the four wheels of the machine. Fasten the boards with screws.
Slide the four support beams included in the packaging under the ramp.
Remove the wooden blocks used for arresting the wheels and slide them under the ramp.
Moving sweeper without engaging self-propulsion

Danger
Risk of injury! Before engaging the free-wheel operation, the machine must be secured to prevent it rolling away.
Opening and securing cover
Engage freewheel lever in upper hole.
This blocks the travel drive function.
Close cover.
The machine can now be pushed.
Note
Do not move the machine for long distances without engaging self-propulsion, a speed of 6 km/h should not be exceeded.
Moving sweeper by engaging self-propulsion
Engage freewheel lever in lower hole. The travel drive is now ready for operation
Close cover.
The appliance can now be driven.
Start up
General notes
Park the sweeper on an even surface.
Remove the key.
Refuelling
Refuelling the machine
Danger
Risk of explosion!
- Only use the fuels specified in the Operations Manual.
- Do not refuel the machine in enclosed spaces.
Smoking and naked flames are strictly prohibited. - Ensure that no fuel reaches the hot open surfaces.
Switch off engine.
Opening and securing cover
Check fuel level via the tank indicator.
Open fuel filler cap.
Fill in diesel.
Fill tank to max. 1 cm below the lower edge of the filler nozzle.
Wipe off any spilt fuel, remove funnel and close fuel filler cap.
Close cover.
Operation
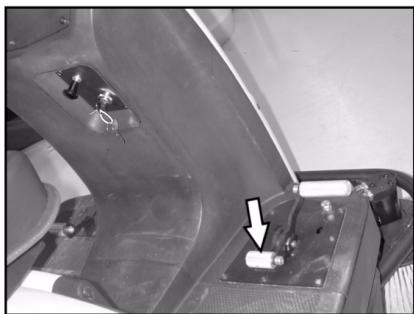
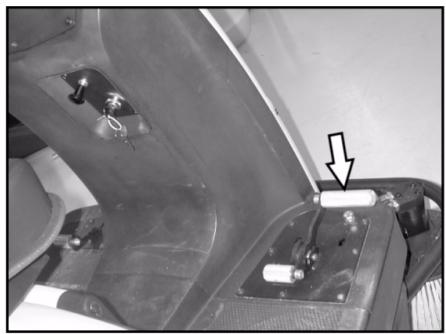
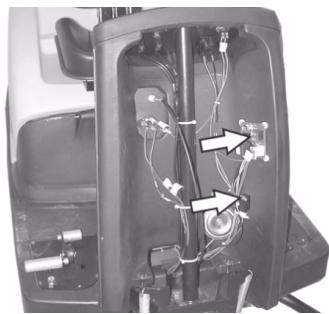
Adjusting driver's seat
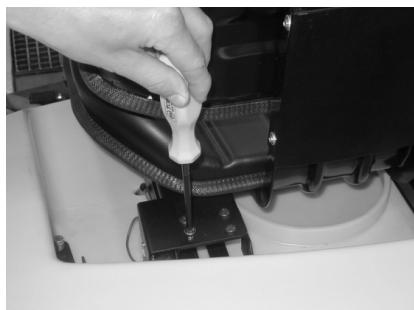
Open the hood, insert retaining rod.
Release the wing nuts from the seat rails.
Slide the seat into the desired position.
Tighten the wing nuts.
Note: If this adjustment is not enough, it can be adjusted more.

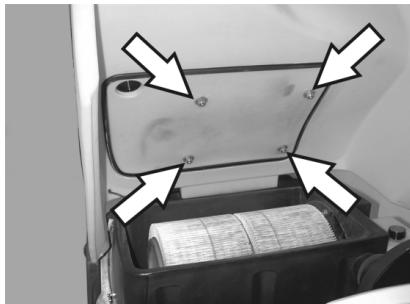
Remove 4 screws on the plate of the seat contact switch.
Remove the plate.
→ Swivel the seat to the front.
Loosen 4 screws on the seat support.
Slide the seat and tighten the screws.
Install the plate of the seat contact switch.
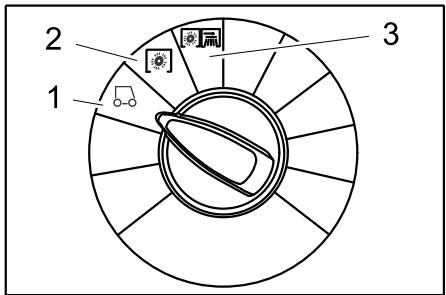
Programme selection
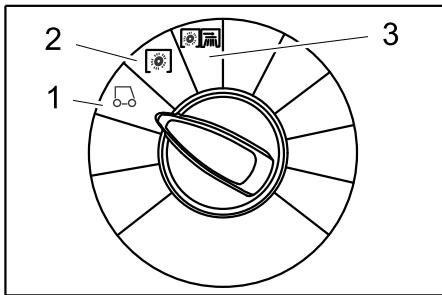
1 Driving
Driving to the Place of Use.
2 Sweeping with sweep roller Roller brush is lowered. The roller brush and the side brush will rotate.
3 Sweeping with side brushes. Roller brush and side brushes are lowered.
Starting the machine
Note
The machine is equipped with a seat contact mat. If the driver's seat is vacated, the appliance is switched off and the immobilising brake is activated automatically.
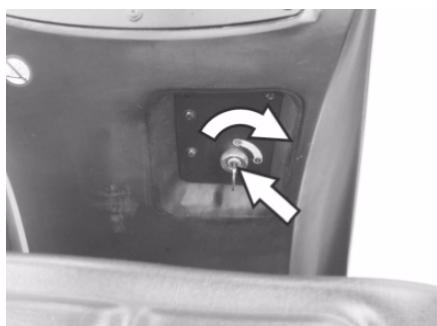
Open fuel cock
Opening and securing cover

Push lever in "ON" direction.
Close cover.
Starting the machine
Sit on the driver's seat.
Do NOT press the accelerator pedal.
Set programme switch to step 1 (driving).
Turn ignition key past position 1.
If the machine starts, release the ignition key.
Note
Never operate the starter motor for longer than 10 seconds. Wait at least 10 seconds before operating the starter motor again.
Drive the machine
Danger
Danger of falling! Do not stand up while driving.
Drive forward

Press slowly the accelerator pedal "forward".
Reverse drive
Danger
Risk of injury! While reversing, ensure that there is nobody in the way, ask them to move if somebody is around.
Press slowly the accelerator pedal "reverse".
Note
Driving method
- The accelerator pedal can be used to vary the driving speed infinitely.
- Avoid pressing the pedal suddenly as this may damage the hydraulic system.
In the event of power loss on inclined surfaces, slightly reduce the pressure on the accelerator pedal.
Brakes
Release the accelerator pedal, the machine brakes automatically and stops.
Driving over obstacles
Driving over fixed obstacles which are 50 mm high or less:
Drive forwards slowly and carefully.
Driving over fixed obstacles which are more than 50~mm high:
Only drive over these obstacles using a suitable ramp.
Sweeping mode
Danger
Risk of injury! If the bulk waste flap is open, stones or gravel may be flung forwards by the roller brush. Make sure that this does not endanger persons, animals or objects.
Caution
Do not sweep up packing strips, wire or similar objects as this may damage the sweeping mechanism.
Caution
To avoid damaging the floor, do not continue to operate the sweeping machine in the same position.
Note: To achieve an optimum cleaning result, the driving speed should be adjusted to take specific situations into account.
Note: During operation, the waste container should be emptied at regular intervals.
Note: When cleaning surfaces, only lower the roller brush.
Note: Also lower side brush when cleaning along edges.
Sweeping with sweep roller
Set programme switch to step 2. Roller brush is lowered. The roller brush and the side brush will rotate.
Sweeping with bulk waste flap raised
Note: The bulk waste flap must be raised briefly to sweep up larger items (up to 60 mm high), e.g. soft drink cans.
Raising bulk waste flap:
Press the pedal for the bulk waste flap forwards and keep pressed down.
To lower it, take foot off pedal.
Note: An optimum cleaning result can only be achieved if the bulk waste flap has been lowered completely.
Sweeping with side brushes
Set programme switch to step 3. Side brushes and roller brush are lowered.
Note: Roller brush and side brush start operating automatically.
Sweeping dry floors
Note: During operation, the waste container should be emptied at regular intervals.
Note: During operation, the dust filter should be shaken off and cleaned at regular intervals.

Close wet/dry flap
Sweep in fibrous and dry waste (such as dry grass, hay)
Open wet/dry flap.
Note: You can thus preven the filter system from getting blocked.
Sweeping damp or wet floors
Open wet/dry flap.
Note: This protects the filter from moisture.
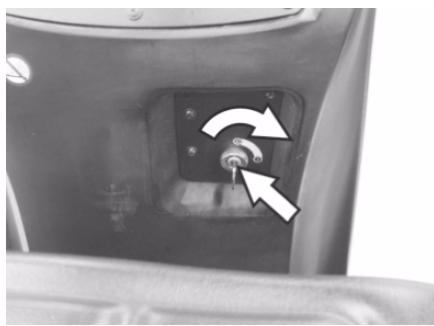
Filter deducting
- Switch on manual filter shake off.
Press Filter shake off button. The filter will be cleaned for 15 seconds.
Emptying waste container
Note: Wait until the filter shaking process is finished and the dust has settled before you open or empty the waste container.
Raise the waste container slightly and pull it out.
Empty waste container.
Push in the waste container and lock it.
Empty opposite waste container.
Turn off the appliance.
Set programme switch to step 1 (driving). The side brush and roller brush are raised.
Turn ignition key to "0" and remove it.
Note:Once the machine has been switched off, the dust filter is shaken automatically for approx. 15 seconds. Do not open the machine hood during this period.
Note: The machine has been fitted with an automatic parking brake that is activated as soon as the engine is switched off and the driver leaves his seat.
Close fuel cock.
Transport
Danger
Risk of injury and damage! Observe the weight of the appliance when you transport it.
Turn ignition key to "0" and remove it.
Secure the wheels of the machine with wheel chocks.
Secure the machine with tensioning straps or cables.
When transporting in vehicles, secure the appliance according to the guidelines from slipping and tipping over.
Note:Observe markings for fixing points on base frame (chain symbols). When loading or unloading the machine, it may only be operated on gradients of max. 18% .
Close fuel cock.
Empty fuel tank.
Storage
Danger
Risk of injury and damage! Note the weight of the appliance in case of storage.
Shutdown
If the sweeper is going to be out of service for a longer time period, observe the following points:
Park the sweeper on an even surface.
Set programme switch to step 1 (driving). The roller brush and side brushes are raised to prevent the bristles being damaged.
Turn ignition key to "0" and remove it.
Lock the sweeper to ensure that it does not roll off.
Clean the inside and outside of the sweeper.
Park the machine in a safe and dry place.
Fill fuel tank and close fuel cock.
Change the engine oil
Disconnect battery.
Charge battery approx. every 2 months.
Maintenance and care
General notes
First switch off the appliance, remove the key and remove the battery plug or disconnect the battery before performing any cleaning or maintenance tasks on the appliance, replacing parts or switching over to another function.
Pull out the battery plug or clamp the battery while working on the electrical unit.
- Maintenance work may only be carried out by approved customer service outlets or experts in this field who are familiar with the respective safety regulations.
- Mobile appliances used for commercial purposes are subject to safety inspections according to VDE 0701.
- Use only roller brushes/ side-brushes that are provided with the appliance or specified in the Operations Manual. The use of other roller brushes/ side-brushes can affect the safety of the appliance.
Cleaning
Caution
Risk of damage! Do not clean the appliance with a water hose or high-pressure water jet (danger of short circuits or other damage).
Cleaning the inside of the machine
Danger
Risk of injury! Wear dust mask and protective goggles.
Open the hood, insert retaining rod.
Clean machine with a cloth.
Blow through machine with compressed air.
Close cover.
Note:The dust filter can be rinsed with water. Dry the filter completely before reusing it.
External cleaning of the appliance
Clean the machine with a damp cloth which has been soaked in mild detergent.
Note: Do not use aggressive cleaning agents.
Maintenance intervals
Note: The elapsed-time counter shows the timing of the maintenance intervals.
Maintenance by the customer
Daily maintenance:
Check the sweeping roller and the side brush for wear and wrapped belts.
Check tyre pressure.
Check function of all operator control elements.
Weekly maintenance:
Check for smooth running of the Bowden cables and the moveable parts
Check the sealing strips in the sweeping area for position and wear.
Check dust filter and clean filter box, if required.
Check the vacuum pressure system. Maintenance to be carried out every 100 operating hours:
Check function of seat contact switch.
Check tension, wear and function of drive belts (V-belt and circular belt).
Maintenance following wear:
Replace sealing strips.
Replace roller brush.
Replace side brush.
Note: For description, see section on Maintenance work.
Note: Where maintenance is carried out by the customer, all service and maintenance work must be undertaken by a qualified specialist. If required, a specialised Archer dealer may be contacted at any time.
Maintenance by Customer Service
Maintenance to be carried out after 8 operating hours:
Carry out initial inspection.
Maintenance to be carried out after 20 operating hours
Maintenance to be carried out every 100 operating hours
Maintenance to be carried out every 300 operating hours
Maintenance to be carried out every 500 operating hours
Maintenance to be carried out every 1000 operating hours
Maintenance to be carried out every 1500 operating hours
Note: In order to safeguard warranty claims, all service and maintenance work during the warranty period must be carried out by the authorised Kärcher Customer Service in accordance with the maintenance booklet.
Maintenance Works
Preparation:
Park the sweeper on an even surface.
Turn ignition key to "0" and remove it.
General notes on safety
Danger
Risk of injury!
The engine requires 15 seconds to come to a standstill once it has been switched off. Do not open the appliance hood during that period.
Danger
Risk of injury! Allow the machine sufficient time to cool down before carrying out any maintenance and repair work.
Check the tyre pressure
Park the sweeper on an even surface.
Connect air pressure testing device to tyre valve.
Check air pressure and adjust if required.
Set air pressure for the rear tyres to 6 bar.
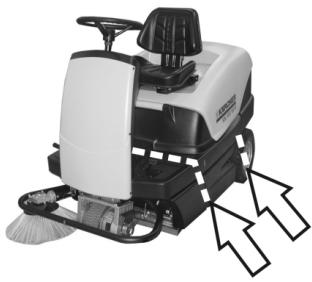
Replacing wheel
Danger
Risk of injury!
Park the sweeper on an even surface.
Remove the key.
When carrying out repairs on public highways, wear warning clothing when working close to passing traffic.
Check stability of ground. Also secure the machine with wheel chock(s) to prevent it rolling away.
Check tyres
Check tyre contact face for foreign objects.
Remove objects found.
Use suitable, commercially available materials to carry out tyre repairs.
Note:Observe the manufacturer's recommendations. The journey may be resumed providing that the directions supplied by the product manufacturer have been observed. The tyre/wheel change should nonetheless be carried out as soon as possible.
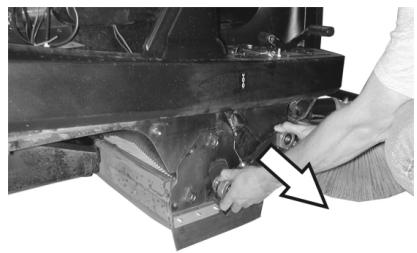
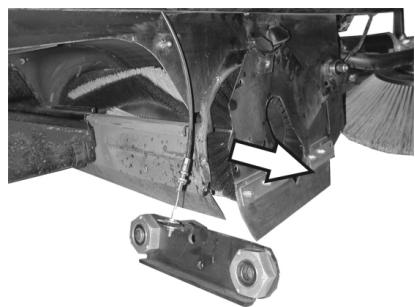
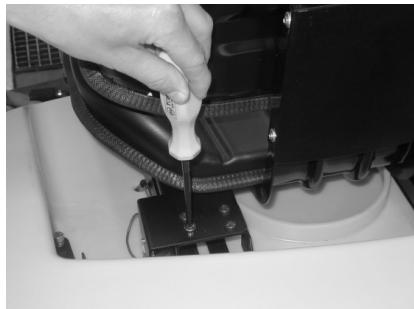
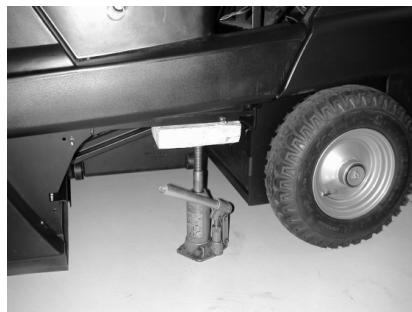
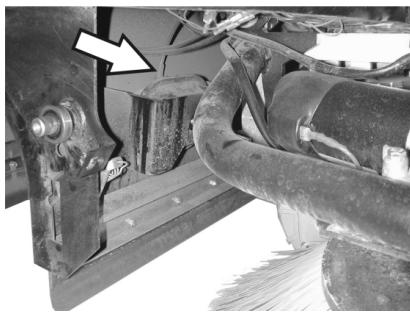
Raise slightly the waste container on the appropriate side and pull it out.
Loosen the wheel screw.
Install the jack.
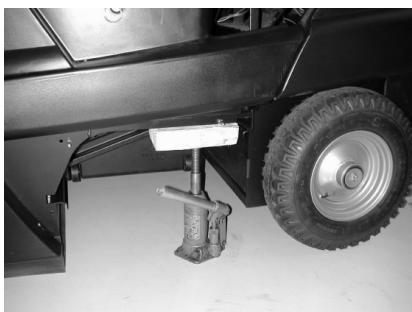
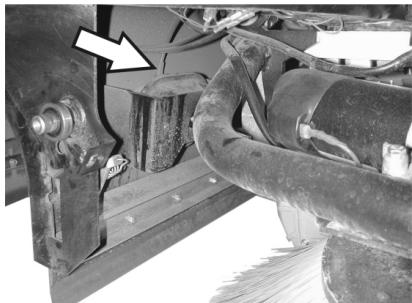
Intake point for the jack (rear wheels)
Raise machine using vehicle jack.
Remove the wheel screw.
Remove wheel.
Mount spare wheel.
Screw in the wheel screw.
Lower machine using vehicle jack.
Tighten the wheel screw.
Push in the waste container and lock it. Note: Use a suitable commercially available vehicle jack.
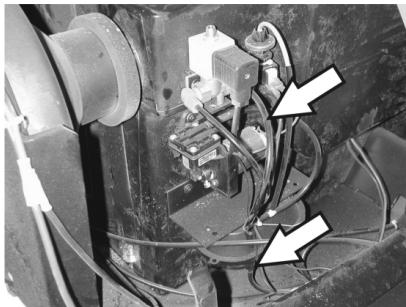
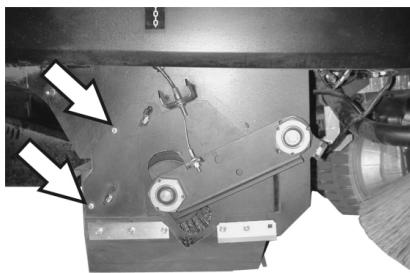
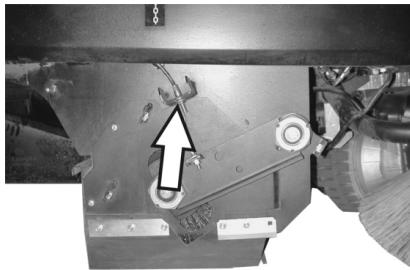
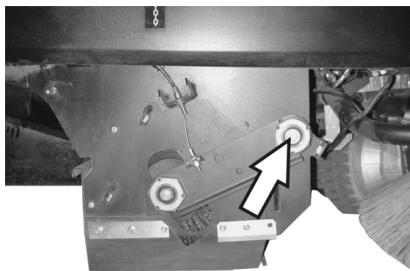
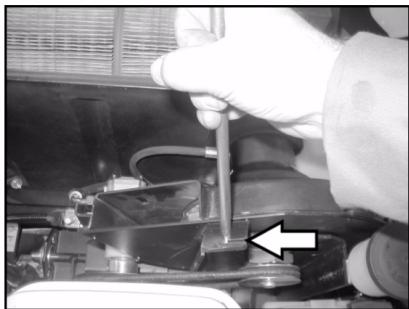
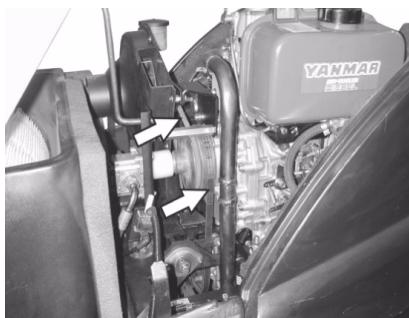
Check the vacuum pressure system
- The sweeping system is activated by means of a vacuum pressure system.
- If the side brush or the roller brush cannot be lowered, the vacuum pressure sockets must be checked for proper connection of the hoses, connect the appropriate hose if necessary.
- If the side brush or the roller brush still cannot be lowered, the vacuum pressure system has a leak. In this case, consult Customer Service.
Hose connection at the vacuum pressure socket of the side brush lowering system
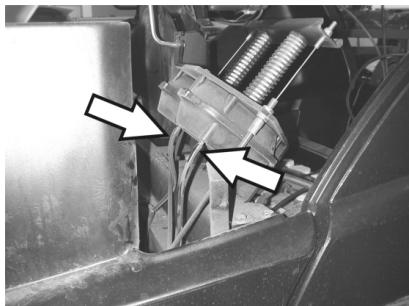
Hose connections at the vacuum pressure sockets of the roller brush lowering system
Hose connections at vacuum pressure pump and vacuum pressure socket (accumulator)
Note:The vacuum pressure pump runs only while the vacuum pressure is built up in the system. If the pump runs continuously, contact Customer Service.
Replacing side brush
Park the sweeper on an even surface.
Set programme switch to step 1 (driving). Side brushes lift up.
Turn main key to "0" and remove it.
Loosen 3 fastening screws on the underside.
Remove the worn side brushes.
Clip new side brushes on to driver and screw on.
Checking roller brush
Park the sweeper on an even surface.
Set programme switch to step 1 (driving). Roller brush is raised.
Turn main key to "0" and remove it.
Secure the machine with wheel chock(s) to prevent it from rolling away.
Raise slightly the waste containers on both sides and pull them out.
Remove belts or cords from roller brush.
Replacing roller brush
Replacement is due if a visible deterioration in sweeping performance caused by bristle wear is evident.
Park the sweeper on an even surface.
Set programme switch to step 1 (driving). Roller brush is raised.
Turn main key to "0" and remove it.
Secure the machine with wheel chock(s) to prevent it from rolling away.
Raise slightly the waste containers on both sides and pull them out.
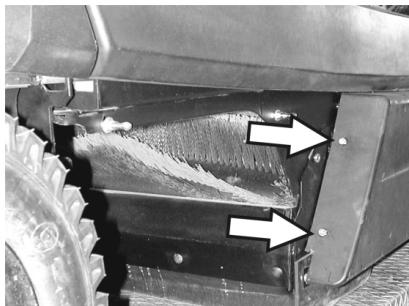
Loosen the front attachment screw of the right-hand side panel.

Loosen the rear attachment screw on the right-hand side panel.
Remove side panel.
Loosen the screws.
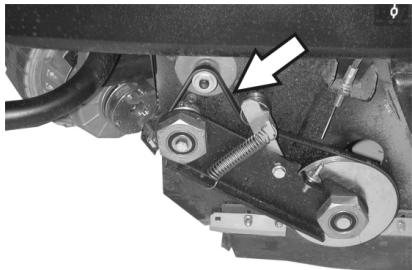
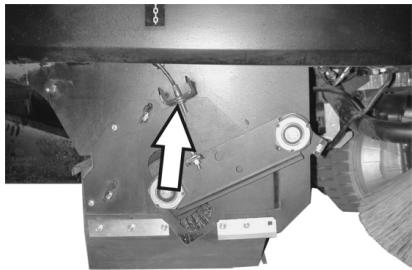
Loosen the attachment screw of the bowden cable and remove the bowden cable.
Unscrew the screw on the pivoting point of the roller brush arm.
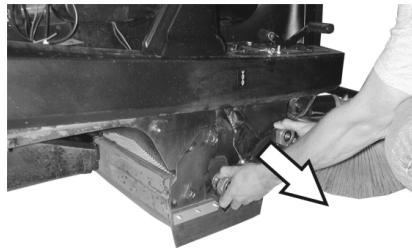
Pull out roller brush swinging arm.
Remove the roller brush cover.
Pull out roller brush.
Installation position of roller brush in direction of travel
Push new roller brush into the roller brush housing and onto the drive pin.
Note: When installing the new roller brush, ensure correct positioning of the bristle assembly.
Note: Adjust the bowden cable, so that the roller brush is lifted approx. 10 ~mm off the floor.
Position roller brush cover.
Install the roller brush arm.
Hook the Bowden cable in.
Tighten the fastening screws.
Screw on side panel.
Push in the waste containers on both the sides and lock them.
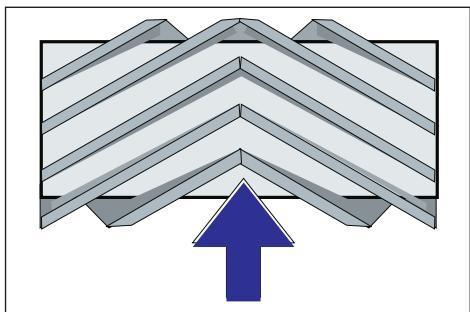
Check the sweeping mirror of the sweeping roller
Set programme switch to step 1 (driving). The side brush and roller brush are raised.
Drive sweeper on to a smooth, even surface covered with a visible layer of dust or chalk.
Set programme switch to step 2. Roller brush is lowered. Slightly press down on the drive pedal and allow the sweep brush to briefly rotate.
Raise roller brush.
Press pedal which raises bulk waste flap and keep pressed.
Drive machine backwards.
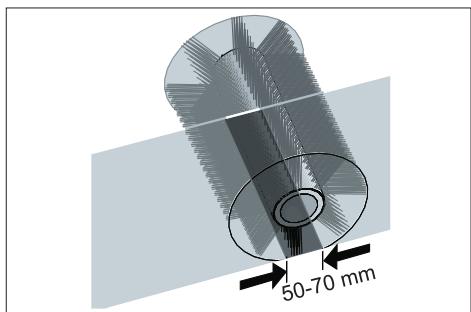
The sweeping track should have an even rectangular shape which is between 50 and 70 mm wide.
Note:The side brush floating mounting of the roller brush adjusts the sweeping track as the bristles wear down. The roller brush must be replaced if it becomes too worn.
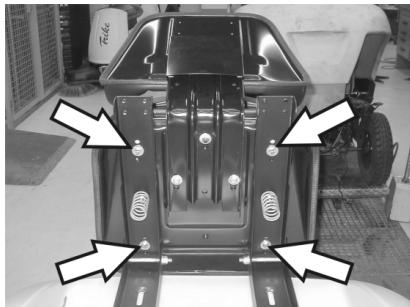
Adjusting and replacing sealing strips
Park the sweeper on an even surface.
Set programme switch to step 1 (driving). Roller brush is raised.
Turn main key to "0" and remove it.
Secure the machine with wheel chock(s) to prevent it from rolling away.
Raise slightly the waste containers on both sides and pull them out.
Open the fastening screws of the side panels on both sides.
Remove side panels.
Front sealing strip
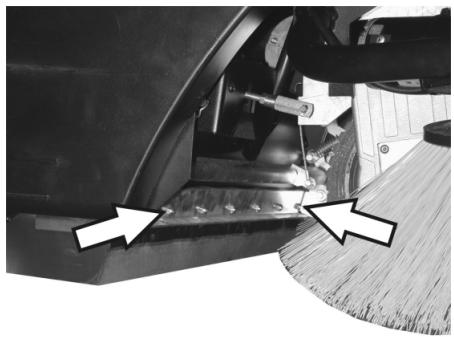
→ Slightly loosen retaining nuts for the front sealing strip; to replace, unscrew.
Screw on new sealing strip without fully tightening the nuts.
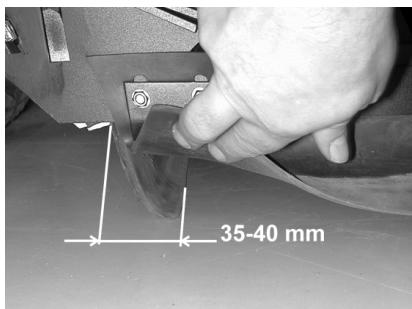
Adjust sealing strip.
Set the distance of the sealing strip to the floor so that the bottom edge trails behind at a distance of between 35 and 40~mm
Tighten nuts.
Rear sealing strip
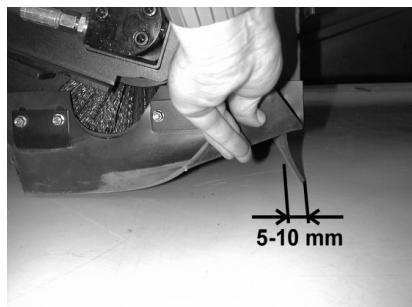
Set the distance between the sealing strip and the floor so that the bottom edge trails behind at a distance of between 5 and 10mm
If worn, replace.
Remove roller brush.
Unscrew retaining nuts for rear sealing strip.
Screw on new sealing strip.
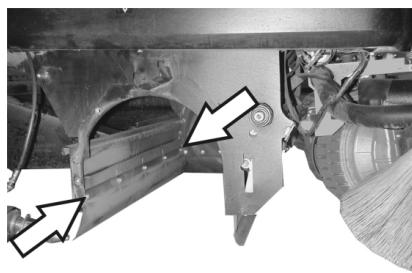
Side sealing strips
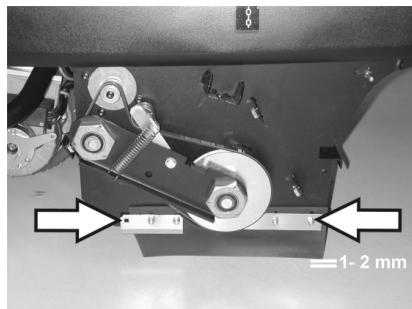
→ Slightly loosen retaining nuts for the side sealing strip (to replace, unscrew).
Screw on new sealing strip without fully tightening the nuts.
To set the floor clearance, insert a sheet with a thickness of between 1 and 2mm under the sealing strip.
Adjust sealing strip.
Tighten nuts.
Screw on side panels.
Push in the waste containers on both the sides and lock them.
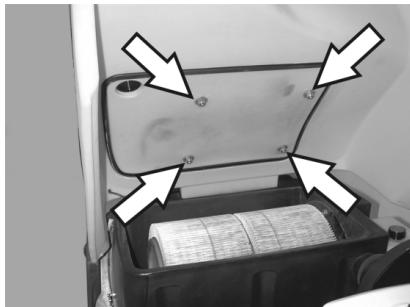
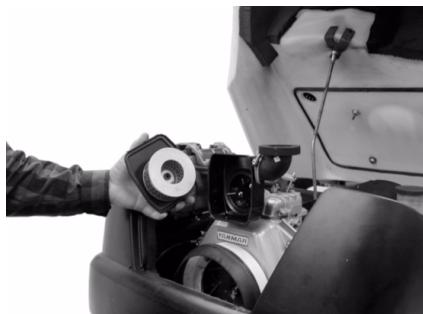
Replacing dust filter
Warning
Empty waste container before replacing dust filter. Wear a dust mask when working around the dust filter. Observe safety regulations on the handling of fine particulate material.
Turn main key to "0" and remove it.
Press emergency-stop button.
Open the hood, insert retaining rod.
Pull out the filter holder to the maximum possible extent and lock.
Remove the lamella filter.
Insert new filter.

Make sure driver engages with holes on drive side.
Lock the handle of the filter cleaner back into place.
Note: Make sure when installing the new filter that the fins are not damaged.
Replacing filter case seal

Lift filter case seal out of groove in the cover.
Insert new seal.
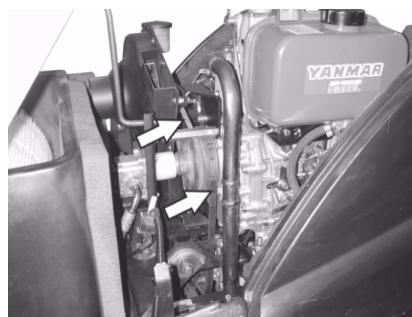
Checking drive belt
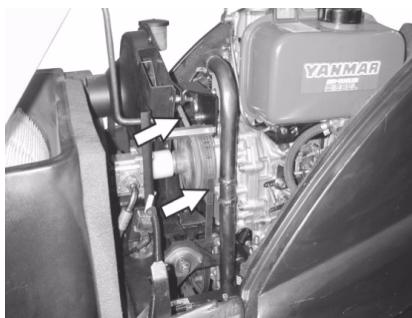
Check tension of drive belt and V-belt of the suction blower, also check for wear or damage.
Check tension, wear and damages on the V-belt of the sweep roller drive.
Check cup seal
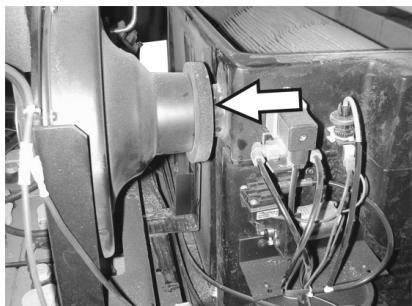
Chek the cup seal at the suction blower regularly to see that it sits properly.
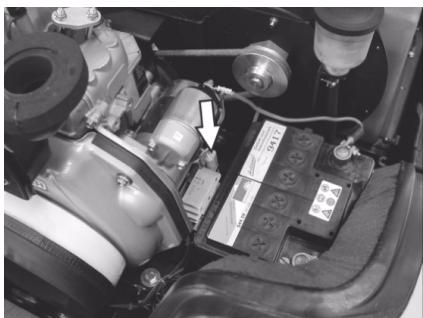
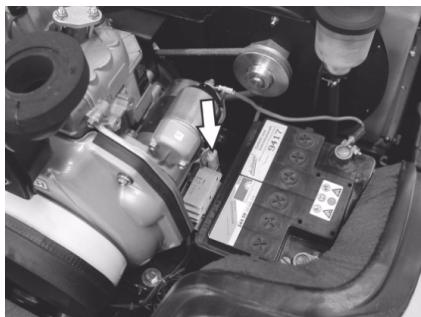
Replacing fuses

Loosen screws on both sides of the panel.
Replace defective fuses.
Replace front panel.

The fuse for the electric starter is located in the engine compartment.
Note: Only use fuses with identical safety ratings.
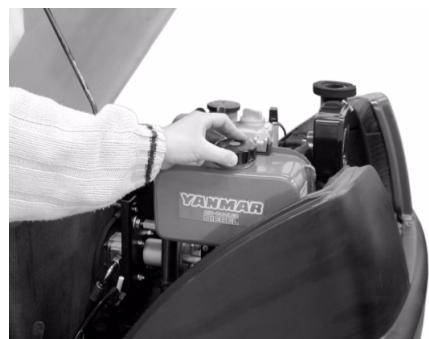
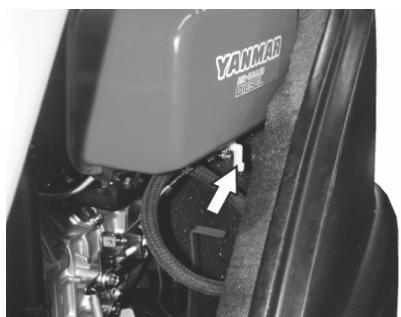
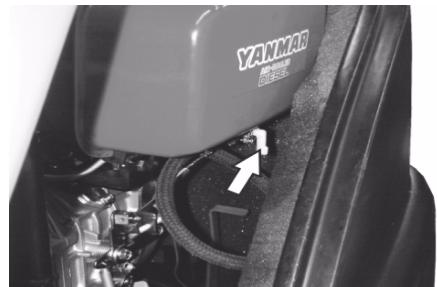
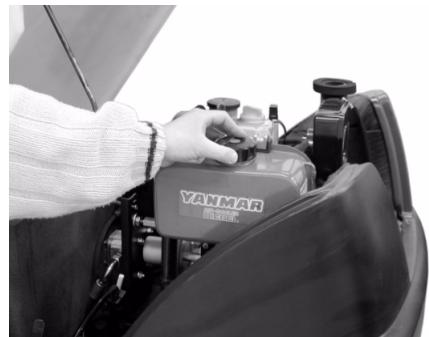
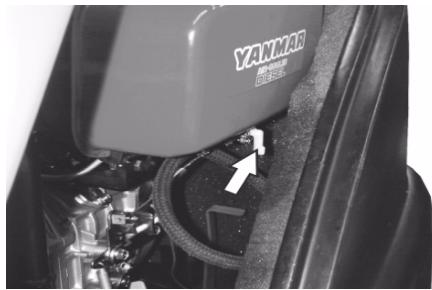
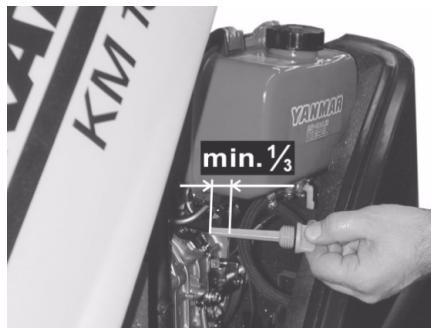
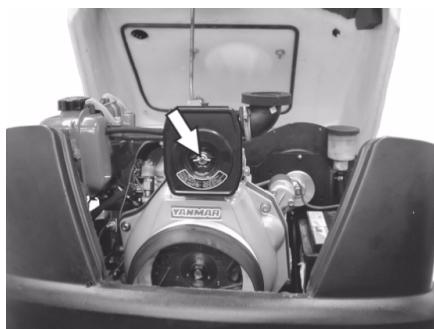
Check engine oil level and top up, if required
Note
The engine is equipped with an oil deficiency switch. When the fill level is insufficient, the engine switches off and can only be restarted once the engine oil has been replenished.
Danger
Risk of burns on account of hot surfaces!
Allow engine to cool down.
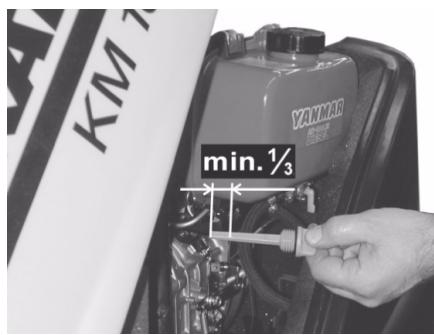
Remove the oil dipstick and check the oil level: Minimum content 1/3.
If the oil level is less than 1/3, top up engine oil until it reaches the lower edge of the filler opening.
Wait at least 5 minutes.
Check engine oil level again.
Change the engine oil
Danger
Risk of burns on account of hot surfaces!
Pull out oil dipstick.
Draw off engine oil via the oil filler neck using 6.491-538 oil-change pump.
Fill with fresh engine oil via oil filler neck using clean 6.491-538 oil-change pump.
Wait at least 5 minutes.
Check engine oil level again.
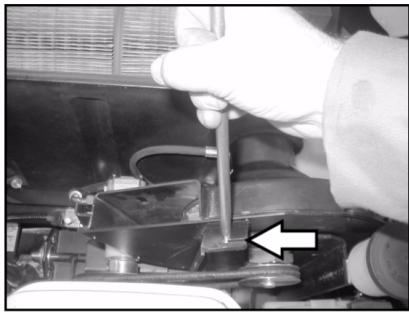
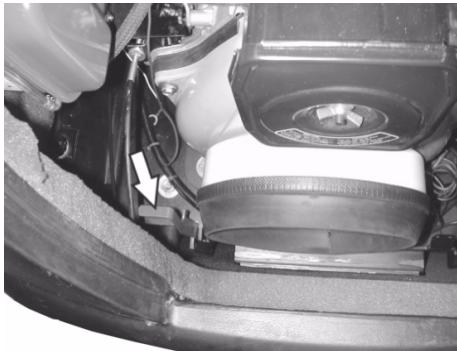
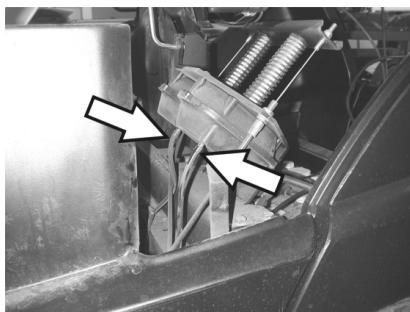
Cleaning and replacing the fuel filter
Release the wing nuts on the suction container.
Remove the filter inlay and check it.
Use either a new or cleaned filter cartridge in the vacuum container.
Screw on wing nut.
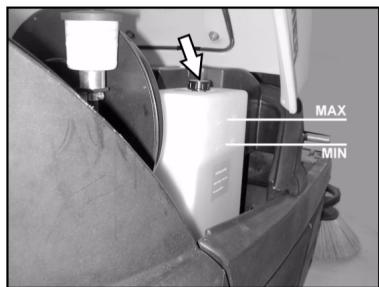
Check hydraulic oil level and refill hydraulic oil
Note
The machine has two hydraulic circuits:
Circuit sweeping hydraulics
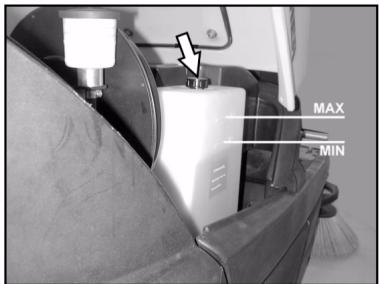
Check the hydraulic oil level on the storage container.
The oil level must lie between "MIN" and "MAX" marking.
If the oil level is too low, fill in hydraulic oil above the fill neck on the top of the container.
Circuit axle drive
Caution
This inspection may only be carried out when the engine is cold.
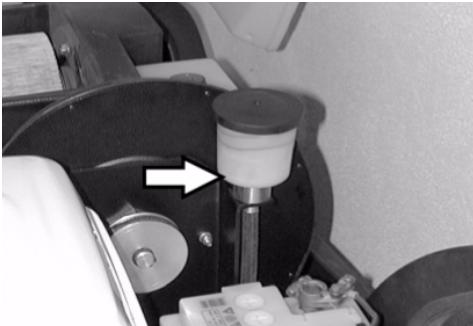
Check oil level in the equalisation container.
If required, top up oil carefully.
Accessories
| Side brushes | 6.905-986.0 |
| With standard bristles for indoor and outdoor areas. | |
| Side-brushes, soft | 6.906-133.0 |
| For fine dust on inside surfaces; wetness resistant. | |
| Hard side-brushes | 6.906-065.0 |
| For removing stubborn dirt in the external area; resistant to moisture. | |
| Standard sweep roller | 6.906-375.0 |
| Resistant of wear and moisture. Universal bristles for inside and outside cleaning. | |
| Roller-brush, soft | 6.906-533.0 |
| With natural bristles especially for fine dust sweeping on smooth indoor floors. Not resistant to wetness; not for abrasive surfaces. | |
| Roller-brush, hard | 6.906-532.0 |
| For removing stubborn dirt in the external area; resistant to moisture. | |
| Dust filter | 6.414-532.0 |
Troubleshooting
Danger
Switch off engine and remove ignition key prior to carrying out any maintenance work.
Risk of injury! Allow the machine sufficient time to cool down before carrying out any maintenance and repair work.
| Fault | Remedy |
| Appliance cannot be started | Sit on the driver seat, the seat contact switch gets activated |
| Check tank contents and oil level; refill oil and fuel. | |
| Check the fuses. | |
| Check battery; charge it if required. | |
| Inform Kärcher Customer Service. | |
| Appliance moves only slowly | Inform Kärcher Customer Service. |
| Machine is not sweeping properly | Check roller brush and side brushes for wear, replace if necessary. |
| Check function of bulk waste flap | |
| Check sealing strips for wear, adjust or replace as required | |
| Check belts of sweeping drive. | |
| Check vacuum pressure system to see it is leak-proof. | |
| Inform Kärcher Customer Service. | |
| Dust gathers in the machine | Empty waste container |
| Check suction fan drive belt | |
| Check sealing cover on suction fan | |
| Check dust filter, clean or replace | |
| Check filter case seal | |
| Close wet/dry flap | |
| Check sealing strips for wear, adjust or replace as required | |
| Inform Kärcher Customer Service. | |
| Side brush does not turn | Check the fuse. |
| Inform Kärcher Customer Service. | |
| Poor cleaning performance at edges | Replace side brush |
| Check sealing strips for wear, adjust or replace as required | |
| Inform Kärcher Customer Service. | |
| Side brush or roller brush switch-on operation is not working | Check vacuum pressure system to see it is leak-proof. |
| Inform Kärcher Customer Service. | |
| Insufficient vacuum performance | Check filter case seal |
| Check sealing cover on suction fan | |
| Check hoses of suction blower for absence of leakness. | |
| Insert lamella filter correct; see Changing dust filter | |
| Inform Kärcher Customer Service. | |
| Roller brush does not turn. | Remove belts or cords from roller brush |
| Inform Kärcher Customer Service. |
Technical specifications
| KM 100/100 R D | ||
| Machine data | ||
| Length x width x height | mm | 2006 x 1005 x 1343 |
| Unladen weight | kg | 315 |
| Transport weight | kg | 375 |
| Permissible overall weight | kg | 535 |
| Driving speed | km/h | 8 |
| Cleaning speed | km/h | 6 |
| Climbing capability (max.) | % | 18 |
| Roller brush diameter | mm | 285 |
| Roller brush width | mm | 710 |
| Side brush diameter | mm | 450 |
| Working width without side brushes | mm | 710 |
| Working width with 1 side brushes | mm | 1000 |
| Working width with 2 side brushes (option) | mm | 1290 |
| Volume of waste container | l | 100 |
| Protection type, drip-proof | -- | IPX 3 |
| Engine | ||
| Type | -- | Yanmar L70AE, 1 cylinder four-stroke |
| Cylinder capacity | -- | 296cm³ |
| Max. power | kW/HP | 4,4 / 6 |
| Fuel type | -- | Diesel |
| Tank content | -- | 3.3 l |
| Type of protection | IP22 | |
| Battery | ||
| Type | -- | 12 V, 44 Ah |
| Oil grades | ||
| Motor | SAE 15W40 | |
| Sweeping hydraulics | HVLP 46 | |
| Axle drive | SAE 10W-60 | |
| Tyres | ||
| Size, front | -- | 4.00-4 |
| Air pressure, front | bar | 6 |
| Size, rear | -- | 4.00-8 |
| Air pressure, rear | bar | 6 |
| Brake | ||
| Service brake | -- | hydrostatic |
| Parking brake | -- | automatic (with spring) |
| Filter and vacuum system | ||
| Filter surface area, fine dust filter | m² | 6,0 |
| Category of use – filter for non-hazardous dust | -- | U |
| Nominal vacuum, suction system | mbar | 12 |
| Nominal volume flow, suction system | l/s | 50 |
| Working conditions | ||
| Temperature | °C | -5...+40 |
| Air humidity, non-condensing | % | 20 - 90 |
| Values determined as per EN 60335-2-72 | ||
| Noise emission | ||
| Sound pressure level LpA | dB(A) | 83 |
| Uncertainty KpA | dB(A) | 2 |
| Sound power level LWA + Uncertainty KWA | dB(A) | 101 |
| Machine vibrations | ||
| Hand-arm vibration value | m/s² | <2,5 |
| Seat | m/s² | 0,7 |
| Uncertainty K | m/s² | 0,2 |
CE Declaration
We hereby declare that the machine described below complies with the relevant basic safety and health requirements of the EU Directives, both in its basic design and construction as well as in the version put into circulation by us. This declaration shall cease to be valid if the machine is modified without our prior approval.
Product: Ride-on vacuum sweeper
Type: 1.280-xxx
Type: 1.511-xxx
Relevant EU Directives
2006/42/EC (+2009/127/EC)
2004/108/EC
2000/14/EC
Applied harmonized standards
EN 60335-1
EN 60335-2-72
EN 61000-6-2: 2005
EN 62233: 2008
Applied national standards
CISPR 12
Applied conformity evaluation method
2000/14/EC: Appendix V
Sound power level dB(A)
KM 100/
Measured: 99
Guaranteed: 101
The undersigned act on behalf and under the power of attorney of the company management.

CEO

S. Reiser
Head of Approbation
Authorised Documentation Representative S. Reiser
71364 Winnenden (Germany)
Phone: +49 7195 14-0
Fax: +49 7195 14-2212
Winnenden, 2010/07/14
Warranty
The warranty terms published by the relevant sales company are applicable in each country. We will repair potential failures of your appliance within the warranty period free of charge, provided that such failure is caused by faulty material or defects in manufacturing. In the event of a warranty claim please contact your dealer or the nearest authorized Customer Service centre.
Please submit the proof of purchase.

2006/42/CE (+2009/127/CE)
2004/108/CE
2000/14/CE
71364 Winnenden (Germany)
Telephone: +49 7195 14-0
Winnenden, 2010/07/14
Garantie
2006/42/CE (+2009/127/CE)
2004/108/CE
2000/14/CE
71364 Winnenden (Germany)
Tel.: +49 7195 14-0
Fax: +49 7195 14-2212
Winnenden, 2010/07/14
Garanzia

S. Reiser
Head of Approbation
71364 Winnenden (Germany)
Tel.: +49 7195 14-0
Fax: +49 7195 14-2212
Winnenden, 2010/07/14
Garantie
2006/42/CE (+2009/127/CE)
2004/108/CE
2000/14/CE
71364 Winnenden (Germany)
Tfno.: +49 7195 14-0
Fax: +49 7195 14-2212
Winnenden, 2010/07/14
Garantía
Ajustar o assento do conductor
2006/42/CE (+2009/127/CE)
2004/108/CE
2000/14/CE
71364 Winnenden (Germany)
Tel.: +49 7195 14-0
Fax: +49 7195 14-2212
Winnenden, 2010/07/14
Garantia
Service after 8 drifttimer:
Udfr forsteinspection.
Service after 20 driftstimer
Service for hver 100 driftstimer
Service for hver 300 driftstimer
Service for hver 500 driftstimer
Service for hver 1000 driftstime
Service for hver 1500 driftstime
Type: 1,280-xxx
Type: 1,511-xxx
2006/42/EF (+2009/127/EF)
2004/108/EE
2000/14/EF

S. Reiser lead of Approbation
71364 Winnenden (Germany)
TIf.: +49 7195 14-0
Fax: +49 7195 14-2212
Winnenden, 2010/07/14
Garanti
2006/42/EF (+2009/127/EF)
2004/108/EE
2000/14/EF
71364 Winnenden (Germany)
TIf: +49 7195 14-0
Winnenden, 2010/07/14
Garanti
Underhäll after slitting:
Byt ut tätningslister.
Byt sopvals.
Byt sidoborstar.
71364 Winnenden (Germany)
Tel.: +49 7195 14-0
Fax: +49 7195 14-2212
Winnenden, 2010/07/14
Garanti

S. Reiser
Head of Approbation
71364 Winnenden (Germany)
Puh.: +49 7195 14-0
Winnenden, 2010/07/14
Takuu
Eapwn PLeupikecs Bouptoes
PuθμiαTEvδiaKoTTnTPOpyaμaTOCσηβaθμiδa3.OIduoπλεuρικεScOKouTTεsKaIOkUivDpOσáPωONSxμnλwovv.
EaeyTe Tov IaVta kivnons

S. Reiser
Head of Approbation
YTeUeUvoS TeKunpiwoans:
S. Reiser
71364 Winnenden (Germany)
Tnλ.: +49 7195 14-0
Φaξ: +49 7195 14-2212
Winnenden, 2010/07/14
Eyyúnon

Head of Appropriation
71364 Winnenden (Germany)
Tel.: +49 7195 14-0
Winnenden, 2010/07/14
Garanti
PpHnAdIeKHOCTN 3aNaChbIe DeTaII OnachOcMb
Bo u36exaHue onachocmu, peMoHm u ycmaHO8ky 3anachbIX demaneu doJXhbl ebInonHmmb monbko aemopuzupo8aHHbI cepeuchbIe eHmpbl.
- Pa3pe7aetcnaCnoJIb3OBAbT TOJIbKO Te npHnAJIpeXHOCTN n 3anaChbIe YAcTn, nCNoJIb3OBAHHe KOTOpbIX 6blIO oJIo6peHo n3rOToBNTeJIem. NcNoJIb3OBAHHe opRnHaJIbHbIX npHnAJIpeXHOCTe N 3anUaCTeI rapaHTnpyET Bam naExKHyU n 6ecnepe6oHyO pa60Tu np6bopa.
Bb6op Han6oJIee qacTo Heo6xOIMbIX 3aIyacte Bbl HauTe B KOHcE INCTpyKcIN NO 3KcNlyatauIN.
Дальншую Информачию 0 Запостях Вbl Ндente Ha caite www.kaercher.comВраздende Service.
CnmbonblHa npnbope
He cMemamb aopraue uIu mIeIOUe npedMembl, Hapumep, makue kac cuazapembl, cnquku umomy noodobhoe.
Onachocmb 3aueemneHua npoe3a o peMeHb,6okobie Memblpe3ep6ayap,KpbIuKy npubopa.
CnMBOJIbI B pyKOBoIDCTBe NO 3KcNpyatauN
Onachocmb
Дя Ненистену орозуон acnochocmu, komopа npubodum k mjaKeIbIM ybeeyam uIu K cmepu.
IpeynpexkdeHue
3aKpbITb/OTKpbITb KpbIuKy np6opa
Onachocmb
Onachocmb 3aueemlenu npu 3akpbimuu KpbiuK npubopa. Poamomy MedenHo onyckaume KpbuKy npubopa.
→ KpbiKhpy npnbopa oTkpBtB 3a cneuaJIbHbIe yrIy6JIeHnIa Ira pyueK (noTMyb BBepx).
→ BbIaHbФHKcnpyUoI npIurn3 depkaTeJI.
BCTaBnTbΦNkCnpyUoIpynbYar B BBITJXHOB BEHTNJTOp.
YTO6bI 3aKpblTb KpbIuKy npnbopa Heo6xoDIMO BbIDBnHyTb fNkCnpyUOu npbUar n3 bAsnyUeO 3JIemEnta n 3aΦnKcnpOBaTb erO B depKaTeJe KpbIuKn np6opa.
Ipeed hauanom pa6oTbI
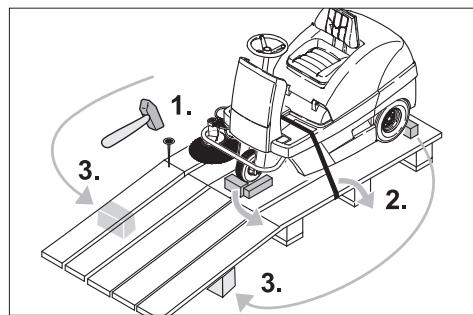
Bbirpy3ka annapata
Anachocmb
Onachocmb nonyuhenmuam u noepexdeHu!Ipy3ku npubopa ucnojb3o6aHue noapy3uKo8 He donyckaemc.
Дя Вьгузкnpибopa cneуet OcuyseCTBnTb cneDyUOuNe DeiCTBnI:
Pa3pe3aTb ynaKOBOChyI JeHTy n3 NCKyCCTBeHHOro MaTePnJa I ChrTb ynaKOBky.
→ CHaTb KpeJIeHnC TReKhbIMNXOMyTaMn B TOHKx KpeJIeHn.
YeTbIpe 06o3HaueHHbIe DOHHbIe DOCKn POnDoHa 3aKpeJIeHbI BINTaMn. DaHHbIe DOckn CJeDyET OTBnHTNTb.
ПлJOЖИТь ДОСКИ На Край РДДОHA. Пи рзOM ДОСКИ распОЛЖИТь TAK, YTOБы OНи Лжали перд КОЕсами рпбopa. 3akpeINITь ДОСКИ C NOMOUIBUNTOB.
→Для подорки подожипь раму 6алки,нходашесь унakовke.
→ CnHmnte DepeBraHHbIe KOJOnkN, PpeHa3NaueHHbIe DnA CTOnOpEnH N KJIec N IOJNOKHTe IN NOp paMny.
IpeeBnHexHe NpOMeTaIOUeMaunHbI 6e3 CO6CTBeHHOrOpnIBoDa
Onachocmb
Onachocmb tonyehu mpaem! Npeed ekluyeHcem c6o6dnozo xoda cnedyem npunmB Mepb Ipomue npou3eohnoe kaeyeha annapama.
OTkpbltne nФИKcaURA KpbIuKIN np6opa.
BCTaBnTb pbIar cB6oDnHO xOJa B BepxHee OTBepCTne.
BbIBoN3 3KcnpJyatauH
EcnnoMaTaOua MaunHa He
HcNOJIb3yETcB TeueHHe dIITeJIbHO
BpeMeHN, CneDyET cO6NIOdaTb
CneDuOuNe NyHKtbl:
IocTabntb IOnMeTaIOuMoMaUNHy Ha pOBHoi NObepXHOCTn.
IpepecTaBnTb nepeKJIIOuATEnb nporpaMM Ha CTyneHb 1 (DINKeHne). UTo6bI n36ExKaTb NOBpeJxDeHnA UeTHNbI, NODHrTB NODMeTAIOUu BAN N 6OKOBbie uETKn.
Klou3axnraHnnoBepHytB B nO3uHIO "0" n BbITaUHTb erO 3aMka,
→ПинЯть МерыnpOTиB HENpOIN3BOJbHOrO KaueHnI NODMaTeAIOUeMauINHbI.
OuHCTnTb NIOMeTaHOyMoAunHy CHAPyKIN BHYTpN.
Поставит b annapaT B 3aunueHHOM u cyxom MecTe.
→ПлнocьюзправиТьTOЛNBHbI 6akИЗakpbITьTOЛNBHbI KpaH.
3aMeHa MOTOPHOro Macna
OTCOEINHITb KJIeMMbl aKKMyJrTOPHOI 6aTapeN.
→ AkkyMnyTOp CneIyET 3apJkaTb np6JI. KaKdIbe Dba Meca.
YxOД n TeXHnueckoe 06cnyxHBaHne
06uine yka3aHnra
пегд оочисткй и пове di endem Texнческого obcnykinaь npiбopa,Заменидетаileи nln Hac troйкн Ha Дугге Функциnpiбop CneДуET BbIKIQUHTb, BbIHyTb KJIQU 3aknraHЯ ИИЗВЛeчы aKKMyJIaTOpHbI 小Tekeр Ил OTCOeDINHTb.
→Пи npOBeHnnpa6oTc 3JIeKTPuYeCKO cnCTeMoC cIeDyET OTCoEINHrTb ITeKeP nN KJIeMMbl aKKMyJrTopa.
-Проведенем ремонтных pa60Т pa3peшаETСЯЗИМATbCSТЛБКО abTOpn3OBAHHbIM cepBnCHbIM ceHTpam,IJI N CNEUHaNCTaMnВ 3TOI cΦepe,KOTOpbIe O3HaKOMJIeHbIC COOTBeTCTBYUOUMNпрдпсанямп правл ТExнки 6e3OpaCHOCTN.
-Передвижныепомышлениприборы пождгпроверку6ezonachoctn corlaacho VDE 0701.
- IcnoJIb3yIte NCKJIIOHITeJIbHO NOIMTeAIOUne BaJIbI N6OKOBbie UeTkn, yCTaHOBNeHHbIe Ha npIbope INJyKa3aHHbIe B pyKOBoDCTBe nO 3KcIIpyatauIN. IcNoJIb3OBAHHe INbIX NOIMTeAIOUxBaIOB/6OKOBbIX UeTOK He6e3OnacHo.
UcTka
BhumaHue!
Onachocmb nopejckdeHua! He
pa3pewaemc yucmumb npubop u3
6o8raHO2O wlaHaa unu cmpye bObI nod
6bICOKUM daJIeHuEM (onachocmb
KOpomko0 3AmbKaHua u dpyeux
nopejckdeHui).
Чистka annapapa n3Hytpn
Onachocmb
Onachocmb nolyeHna mpaem! Hocumb 3aumHyu Macky npomue nbiu u 3aumHbIe ONU.
→ OTKpbTb KpbIuKy npn6opa, BCTaBtB ΦKcnpyUoUm pbUar.
→ IpoTepeTb annapaT TpIaNkoI.
06dyTb annapaT cKaTbIM BO3dyxOM.
→ 3akpoTe KpbIku npu6opa.
Yka3aHHe: PbIleyIaBnBaIOUmI pINbTp MOXHO npOMbITb BOoI. IpeE IOBTOpHO YCTaHOKoI pINbTp Heo6xOIMO POJIHOCTbO BbICyIWtB.
Ynctka annapata cnapxu
OuHCTnITb aannapat, nCNoJIb3yI dIa 3TOrO BlaJxHyIO TprAnKy, npONITaHHyIO MRAKIM UeJIIOUHbIM pACTBOPOM.
Yka3aHHe: NcNoIb3OBAHHe arpeccNBbIX MOIOUm CpeDCTB He dOnyckaETcra.
OcnaBnTB BnHTbI C oBeHX CTOpOH nAHeJI.

→ HeicnpaBhIe npeOxpaHnteI 3aMeHtB.
→ CHOBa yCTaHOBnTB nepeDHHIO naHeJIb.
Ппебхарнenteь заектостарета нанодNTСВ MOTOPHOM OTCEKE.
Yka3aHHe: NcIPOJIb3OBAbTb TOJIbKO IpeIOxpaHHTeJIIn C OJINHaKOBbIM 3HaueHHeM.
3aayBJIeHHe O COOTBeTCTBnI Tpe6oBaHnIc CE
HactoI Mbl 3aBJIaem, yTO Hnkeyka3aHHbI np6op no CBOe KOnUeIuN I KOHCTpyKuN, a TaKKe B OcyIeCTBLeEHOM I dOyUeEHOM HAMK IpoJaXe NcNoJIHeHIM OTBeuaeT COOTBETCTBYUOUM OCHOBHbIM Tpe6oBaHm IIO 6e3OpacHOCTn I 3dOpOBbIO cOrNaCHO dIpeKtUBaM EC. Pn BHeCEHIN N3MeHEn, He cOrNaCoBAHHbIX C HAM, daHHoe 3aayBJIeHne TepaET CBOIO CNJly.
BHyTpIroCsyapCTBeHHbIe HOpMbI
CISPR 12
PpIMeHnHbI nopAdoK OceHKn
COOTBETCTBNA
2000/14/EC:Прилwxьенve V
YpOBeHMoUHocTn3Byka dB(A)
KM 100/100 RD
IzmepeHo: 99
TapaHTnipoBaHo 101
:
HnkeoDnncabwnecejLimaDeiCTbYOT no nopyuHnIO nO IOBepenHOctnykoBOdCTBa npdnpnTna.

H.Jenner CEO

S. Reiser
Head of Approbation
yIIOJIHOMOueHHbI NO DOKymeHTaUIN:
S. Reiser
71364 Winnenden (Germany)
Tei.: +49 7195 14-0
ΦaKc: +49 7195 14-2212
Winnenden, 2010/07/14
RapaHTnA
B kajdoi ctpahe Deicbyot COOTBeTCTBHeHNO rapaHTnHbIe ycIOBnIA, n3daHHbIe yNOLHOMOueHHo OprAHn3aunie C6bITa HaSeI npOdyKcIIIN B daHHo cTpaHe. Bo3MOxHbIe HeNCpabHOCTn np6Opa B TeueHne rapaHTnHOrO cPokaMbIyCTpaHЯEM 6ecnIaTHO, ecnnnpuHa 3akJIOUcaETcR B DeΦeKTax MaTePnaIob INI OOn6Kax pn IN3rOToBNeHIn. B Cnyae BO3NHKOBeHn IpeTeH3N B TeueHne rapaHTnHoro cPoka npoc6Ba o6paatbcra, IMe npn Ce6e Yek O NOKynke, B TOpROByIO prAhn3aCIO, npOdaBsyU BAM np6Op nIIN B 6bnjkaMuyO yN0NJHomOueHHyO cNyK6y cepBnCHOrO 6cbNyKuBaHnI.

71364 Winnenden (Germany)
Tel.: +49 7195 14-0
Fax: +49 7195 14-2212
Winnenden, 2010/07/14
Garancia
2006/42/ES (+2009/127/ES)
2004/108/ES
2000/14/ES

S. Reiser
Head of Approbation
71364 Winnenden (Germany)
Tel.: +49 7195 14-0
Fax: +49 7195 14-2212
Winnenden, 2010/07/14
Zadevne ES-directive:
2006/42/ES (+2009/127/ES)
2004/108/ES
2000/14/ES
71364 Winnenden (Germany)
Tel.: +49 7195 14-0
Winnenden, 2010/07/14
Garancija
2006/42/WE (+2009/127/WE)
2004/108/WE
2000/14/WE
71364 Winnenden (Germany)
tel.: +49 7195 14-0
faks: +49 7195 14-2212
Winnenden, 2010/07/14
Gwarancja
Directive EG respectate:
2006/42/CE (+2009/127/CE)
2004/108/CE
2000/14/CE
Norme armonizate utilize:
EN 60335-1
EN 60335-2-72
EN 61000-6-2: 2005
EN 62233: 2008
Norme de aplicare nationale:
CISPR 12
71364 Winnenden (Germany)
Tel.: +49 7195 14-0
Fax: +49 7195 14-2212
Winnenden, 2010/07/14
Garantie
2006/42/ES (+2009/127/ES)
2004/108/ES
2000/14/ES
2000/14/ES: Priloha V

S. Reiser
Head of Approbation
71364 Winnenden (Germany)
Tel: +49 7195 14-0
Fax: +49 7195 14-2212
Winnenden, 2010/07/14
Záruka
Tip: 1.280-xxx
Tip: 1.511-xxx
2006/42/EZ (+2009/127/EZ)
2004/108/EZ
2000/14/EZ
Primijenjene uskladene norme:
EN 60335-1
EN 60335-2-72
EN 61000-6-2: 2005
EN 62233: 2008
Primijenjeni nacionaln standardi:
CISPR 12

S. Reiser
Lead of Approbation
71364 Winnenden (Germany)
Tel.: +49 7195 14-0
Winnenden, 2010/07/14
Jamstvo
U svakoj zemlji vaze jamstveni uvjeti koje je izdala naša nadležna organizacija za distribuciju. Eventualne smetnje na stroju za vrijeme trajanja jamstva uklanjamo besplatno ukolko je uzrok greška u materijalu ili proizvodnji. U slučaju koji podljije garanciji obratite se, uz prilaganje potvrde o kupnj, Vašem prodavaču ili najblžoj ovlaštenoj servisnoj sluzbi.
Pregled sadržaja
| Sigurnosne napomene | SR - | 1 |
| Funkcija | SR - | 1 |
| Namensko korišćenje | SR - | 2 |
| Zašitaživotne sredine | SR - | 2 |
| Komandni i funkcioni elementi | SR - | 3 |
| Pre upotrebe | SR - | 4 |
| Stavljanje u pogon | SR - | 4 |
| Rad | SR - | 4 |
| Stavljanje urežaja van pogona | SR - | 6 |
| Nega i održavanje | SR - | 6 |
| Pribor | SR - | 10 |
| Otklanjanje smetnji | SR - | 11 |
| Tehnički podaci | SR - | 12 |
| CE izjava | SR - | 13 |
| Garancija | SR - | 13 |
Sigurnosne napomene
Opste napomene
Ukoliko prilikom raspakovavanja
ustanovite šetu nastalu tokom transporte,
o tome obavestite svog prodavca.
- Natpisi na uredaju pruzaju vaznepanomene za bezopasan rad.
- Osim ovih napomena u uputstvu za rad moraju se uvažavati i opste sigurnosne napomene kao i zakonski propisi o zašiti na radu.
Vožnja
Opasnost
Opasnost od povreda!
Opasnost od prevrtanja na prevelikim usponima.
- Dozvoljeno je savladavati samo uspone do 18% u smeru voznje.
Postoji opasnost od prevrtanja pri prebrzoj vožnji u krivinama.
2006/42/EZ (+2009/127/EZ)
2004/108/EZ
2000/14/EZ
Primenjene uskladene norme:
EN 60335-1
EN 60335-2-72
EN 61000-6-2: 2005
EN 62233: 2008
71364 Winnenden (Germany)
Tel.: +49 7195 14-0
Winnenden, 2010/07/14
Garancija
U svakoj zemlji vaze garantni uslovi koje je izdala naša nadležna distributivna organizacija. Eventualne smetnje na urežaju za vreme trajanja garancije uklanjamo besplatno, ukoliko je uzrok greška u materijalu ili proizvodnji. U slučaju koji podleže garanciji obratite se sa potvrdom o kupovini Vašem prodavcu ili najblžoj ovlašćenoj servisnoj sluzbi.

Ppei nIbPoTO n3nOJ3BaHe Ha Baunya ypei npoyeTe TOBa
OpunHaNo HnctpyKuy 3a pa6oTa,
DeiCTBaIte CnopeI Hero I ro 3ana3e Te 3a NO-KbCHO H3NOJ3BaHe IJI N 3a CJIeDbaunia npITexKaTeJ.
Yka3aHnna 3a 6e3oNaCHOCT
06и уka3aHЯ
Ako npn pa3oNaKOBaHe yctaHOBnte TpaHCnOpTHa NOBpeJa, YBeDomete Ma3uHa,OT KOITO CTE 3aKyPnJInY
- PpeynpeinteHnnte u yka3aTeHnTe Ta6eKn Ha ypeHa daBat BaxKn HnTCTBna 3a 6e3onacha pa6ota.
OcbEN yka3aHnraTa B pkoBOcTBOTO 3a ekCnIIOaTauN Tp86Ba Da ce Cna3BaT N O6uNTe HOpMaTINBHN npEiNcaHn 3a 6e3OnaCHOCT N npEiNa3BaHe OT 3JIoONyKn.
Pexim DnBxHne
Onachocm
Onachocm om HapaHaahe!
Onachocm om npeoobpuane npu mBpde 20JEMU HAKNOHU.
- По посяка на дөшөнөмо д ce npemuhaba само пи haknohu do 18%.
Onachocm om npeo6pbuahe npu 6bp30 nbmyeahe no 3aou.
Ha 3aoume da ce kapa 6aHo. Onachocm om ppeobpuhe npu Hecmabunha ochoa.
- Ypeobm da ce dbuxu cmo Ha ykpeneHa oCHO6a.
Onachocm om npoeobpuane npu mbpde 2oIem cmpaHueh HAKIOH.
- HanpèuHo ha nocokama Ha dbuxkHeue da ce npemuhaaam caMo HAKNoHu do MAKcumHn 15%.
Tp6Ba Da ce cna3BaT OCHObHO MepKInTe Ha ppeIINcAHHaT, npabINaTa n IpaBnIHnCHTe, KOITo Ca BaJIuHn 3a MOTOpHN IpEBO3Hn CpeDCTBa.
-ObcIyKBaUTo IuIe Tpr6Ba Da n3IOn3Ba yPeJa CnOpeI pIepIINcaHnra. To Tpr6Ba Da CbO6pa3Ra CTnna CN Ha KapaHe C OKoIHnTe PIpEIMeTn IN O BpeMe Ha paB0Ta Da BHIMaBA 3a TpETN IInCa N Oco6eHo 3a DeLa. - YpeIbT TpIbBa Ia Ce I3nON3Ba cAmO OT Xopa, KOITo Ca OByeHn 3a EKcIIOaTaUINrTa My N KOITo Ca DOKa3aIN CNOCo6HOCTnte Cn 3a pa6Ota C Hero, IN ca HATOBapeHn I3PnuHCO nI3nON3BaHeTO My.
- YpeIbT He TpI6Ba Da ce I3POn3Ba OT Deca N MToIeKn.
B3mHaHeTo CbC Ce6e Cn Ha npDpyKabauI Nua He ce donycka.
I03B0NEHOe3aDnKbHaHeToHa ypeNITe 3a CyaHcMoOTceJaNKata.
3a da ce n36eHHe HeKOMnTeHTHa ynoTpe6a Ha ypeDa, da ce n3BaDn KJIHOHa.
YpeIbT HnKora He TpIb6Ba Da ce octab8be3 HaI3Op, IOKaTO MOTOpBT paBoTN.ObcIyKBaUToIInCe MoKe Da HanyckaypeJa eJbTaTORBa,KORaTO MOTOpBTe yraChaI, YpeIbT e OCSIpyeH IpOTINHePpeDHaMepeHn DnBIXeHn N KJIIOHTe I3BaDeH.
PpHaJaJIeXHoCTn np3epBHN qAcTn OnaChocm
3a da ce u36e2ham ycnoxHHeHu, peMoHmume u MOHmaxa Ha pe3ep8Hu yacmu Ha ypeda da ce u36bpuueam camo om omopu3upaHua cepu3.
Morat da ce n3noJ3BaT caMo npHaJnEJXHOCTN pe3epBHN qactn,
KoNTO Ca IIO3BOJIeH N O T npOn3BOJnteJI. OpnInHaJIHnIte npHaJIeXHOCTN iOpnInHaJIHnpe3epBHN YactN daBaT rapaHcN 3a TOBa, ypeJbT Da moKe da Ce n3PON3Ba cnrypHo n 6e3 nobpeNi.
CnncbKaHa Ha-uecTo Heo6xOuMmTe pe3epBn Yactn Ue Hamepnte B KpaHa yTBAHeTO 3a EKcnloataun.
Други Информаци OТносюpeзервитЕ части можеTe дanolyчпe Ha www.kaercher.comВоблacrСервиЗ.
CnmboHa ypea

He u3muaime oopu unu mleeu npedmemu kamo hapu. uzaapu, ku6pum unu noo6hu.
Onachocm om npumuckane u npra3eahe Ha pembuc, cmpaunuHm Memnu, pe3epeoapu, KaappaHa ypeda.
CnMBoJIN B YIbTBaHeto 3a pa6Ota
Onachocm
3a Henocpedcmeho ap03a onachocm, kOmo bOu do mexku meenechu nopedu uUdo cmbpm.
IpeynpexdeHue
3a 6b3MOxHa onacha cumyaucu, KOAmo 6u moana da doeede do mexku melechu noepedu unu cmbpm.
BhumaHue
3a 6b3MOxHa onacha cumyaUa, KOAMo 6u MoZna da doSeede do Jeku menechu noepeDu unu MamepuanHu uemu.
ФУнкця
Maunha paobtn no pnhnna ha npeobpbuahe.
- CtpaHnUHnTe MeTJN (3) NOUcCTBaT bTJN IN KaHTOBe Ha NOBbPxHOCTTa 3a MeTeHe IN3nPaUaT MpbCOTnra T B KaHaJa HA BaJaKa 3a MeTeHe.
BbptraaCeBaJk3aMeTeHe(4) 13npaaMpcoTnTaDnpeKTHo B pe3epBoapa 3a n3MeTeHota (5).
3abnpxnTceBcba npax ce otdeIyOTpna (2) n pnpaH 3a npax (2) n pnpaH 3b3dyx ce n3CMyKBA OT CMyKaTeHnY yIOBnteI (1).
Ynotpe6a no
PpeHa3NaueHne
I3noJ3BaIte Ta3n MetaUHa MaUHcAMOB CbOTBETCTBNE CbC 3aDaHTe B HactoIzOTO YnbTBAHe 3a ekCJIIOaTaIy.
YpeIbT c npncnoc6JIeHnraTa 3a pa60Ta npEiN n3noJ3BaHe da ce npOBepn 3a 6e3ynpueHNo cbCToHnne I ekCnloatauOnHna cnpyhOcT. AkoypeIbT He e B OTnUHO cbCToHnne, n3noJ3BaHeTo My e 3a6paHeNo.
-Ta3n MeTaUHa MaShuHa e npedHa3NaYeHa 3a MeTeHe Ha 3aMbpceHn NOBbpxHOCTN BbTpe HABbH.
- YpeIbT He Ce IOnycka 3a DvIXeHne nO oBueCTBeHn yInuN.
- YpeIbT He e IooXoJau 3a I3cMycBaHe Ha 3acTaPawabaun 3dpabeto npaxOBe.
- Pto ypeHa He Tp86Ba da ce npednpneMaT IpomEnH.
- HNKORA He n3MNTaIte/3acMyKbaiTe ekCnIIO3NBIH N TeUHOCTN, Bb3IIaMeHReM rA3OBe, KaKTOn He pa3peDeHn KInCeJIHH IN pa3TBOpHTeIN! KbM TAn PrnHaIeJXaT 6eH3IN, pa3peDITeIN 3a 60n IN Ma3yT, KOtO npn 3aBxPraHe C Bb3dYxa 3a BCMyKBaHE MORAT Da o6pa3yBaT EKCnIO3NBn Napn IN CMecn, OCBeh TOBa aUeTOH, He pa3peDeHn KInCeJIHH IN pa3TBOpHTeIN, TbN KATO Te aTaKyBaT IN3NOI3BaHInTe 3a UpeDa MaTePnaJI.
He n3mntaTe/3acmykBaTte ropauu nn TJeeu npedmetn.
- YpeIbTe IoIXOJaIc amo 3a OINCAHIne B YnTBAHeTo 3a EKCNIOataqna NOKPITnI.
Morat da ce MnHaBa camo no NOBbpxHOCTn, PO3BOJeHr OT ppeIprnemau nJIH HerOBHTe yIbJHOMOJIeHN JIuCa 3a I3NOJ3BaHe Ha MaUNHITe.
- 3a6paHЯBa ce npecToB bOnacnOblaCTn. 3a6paHena e pa6oTaTa BbBB3pNbBOONaCHN NOMeUeHnA.
- По пинци вaxи: Лесноаалимпу materpaил да сьржатданеу ot ypeда (Опасостот ekсллозя/ пожар).
PoiXoJaun HacTnJkn
- Acpant
- INHductpnnaHn noDoBe
LIMeHTOBNIOIOBE
-BeToH - Nabeta
- Knilm
Ona3BaHe Ha OKoJHaTa cpeDa

Onapobchnte Maepnajn
MoraT da ce peuzklnpaT. MoJ
He XbprIte OnapOBKInTe npi
DomauHnTe OTnaDbu, a Tn
PpeaTe Ha BVtopuHn
CypOBuHn C cel NIOBTOpHa
ynotpe6a.

CTapnte ypeNi cblbpxKat
ceHNMaTeepnAIn, NOJIeXaU
Ha peuKlnpaHe, KOITOMorat
da 6bDat ynotpe6EH
NOBTOPOHO.BaTepnMacna n
noIObHn Ha T8x He 6bVa da
nonaDAt B OKOIHaTa CpeDa.
PiopaN ToBa MoJra
OTCTpanBaIte CTapnte ypeNi,
m3PON3BaIKn POxDoJaU 3a
ueJIta CnCTeMn 3a cbbnpaHe.
Yka3aHn3a CbCTaBknte (REACH)
AkyaHa HOpMaun 3a CbCTaBKe Tte HaMePte Ha:
Yka3aHHe: Ako Dnana30HbT Ha peryuInpaHe He e DoCTaTbYeH, CbIeCTBvBa OuIe EdHa Bb3MOJHOCT 3a peryuInpaHe.
→ Pa3BnTe 4-Te 6oJTa Ha nIIOuata Ha KOHTaKTHnI pKeKbCBAu Ha ceJaIKaTa.
OTcTaPaHeTe nloaTa.
→HaKIOHHeTe ceJaIkaTa Hanpei.
→ Pa3BnTe 4-Te 6oJTa Ha 3aKpePbHeTo Ha ceJaIkata.
→ IV3mecTeTe ceDaNkTaTu n 3aTeHHeTe.
→ MoHTnpaTe PnATkata Ha KOHTaKTTHna IpeKbCBaH Na CeJaNKata.

1 ΠbTyBaHe
Пытувае до мястOTO на приножени.
2 MeTeHe C MeTlBaIaK
MeTzurB aBanK Ce Cnycka. MeTzurBaBanK n CTpaHnHnTe MeTJnCe BbptT.
3 MeTeHe CbC CTpaHnUHn MeTnIMeTaIaIyB aJIaK n CTpaHnUHnTeMeTJN Ce CNyCKaT.
Ctaptnupahe Ha ypeda
Yka3aHue
Upebme oobopyoan c nocmenka Ha KOHmakmua npekbceau. Ipu HanyckaHa cedankama Ha bodaay upebmt ce U3kIyuea u 3acmonopraaama cnupaKa 3ambae aemomamuhyo.
OTbaprHe Ha KpaHa 3a TropuBO
OTbopeTe n ocInypeTe KaNaKa Haypea.
I36yTaIte JIOCTa B IOcoka "ON".
→ 3atBopeTe kaoka Ha ypeja.
CTapTupaHe Ha ypeDa
→ CeHHeTe Ha ceJaIkaTa Ha BOJaHa.
→ HE 3aDééɪctbaɪte neɪdəna 3a DBVIXEHNIE.
→Пограмняп配电ьсвада се постанhaСтени1(придвжваи).

3abpTeKeKnOuaHa3aapanBaHTo CneI no3n1 1.
LlOM ypeBt ce cTaptnpa, nychete KIOUa Ha 3anaJIbaHETO.
Yka3aHue
Hukoza He 3adeucmeaumecmapema noobnoom10ceyndu.Ppeu noemopno 3adeucmeahe Ha cmapepa u3yakaume nohe 10 ceyndu.
TbTyBaHe Ha ypea
Onachocm
Onachocm om cTbBahe! He ce u3npaerume npu npuduxbahe.
TbTyBaHe Hanpei

→HataChete6aBHO,HaPpeD"neJaNa3a DnBuKeHne.
Пытуван Нард
Onachocm
Onachocm om hapaheane! Ppu
PbmyeaHe Ha3ad He mpr6ea da 6b3Hukea
onachocm 3a mpemu nuca, npu
Heo6xodumocm Heka HkoB Bu daaba
yka3aHnur.
→HATINCHete6abHO,“Ha3a"peana 3aДВИЖЕнe.
yKa3aHue
IpoedeHue npu nmyahe
Cпеталіte 3a ra3ta ckopoctта на пьтуваною за ce peуліра 6e3cteneнho.
- I368raBaiTe o6paTHoTO 3aDeiCTBaHe Ha neJaIa, TbK KaTo XuDpaBInuHaTa ype6ba MoKe Da ce NOBpeNi.
- Pn cnaaHe Ha MoUHocTt a No HAKIOHN PeJaIa 3a DvIXeHne MOKe JekO Da Ce HamaJI.
CnnpaKu
Ia ce OTnyche neJaIa 3a DbNKeHne, ypeIbT cInpa caMOCToTeJIHO n OCTaBa cnpH.
PpemnHaBaHe Ha npenrTCTBna
Mnhabahe Bbpxy CTOIuHa MeCTO npenTCTBna Do 50 MM:
Ia ce HactbIbAT 6abHO IN BHIMATEJIHO B NOCOKa HAppeI.
MnHaBaHe Bbpxy CToaH Na MeCTO npTCTBna Hd 50 MM:
Moxje da ce npemnHaBa Bbpxy npenTCTBnra CaMo C NOMOuTa Ha nOxDxOJa paMa.
PexMM MeTeHe
Onachocm
Onachocm om hapaheaHe! Ppu ombopeh Klaanah 3a apbyo omnaobu Memyaum eAajk moke da u3xebpnu Hanpeq kambhu unu yaKn. Bhumaeaume da He ce 3acmpawaeam xopa, Xueomnu unu npedmemu.
BhumaHue
Да He ce Memam Nehmu 3a onakobane, men unu noobnu, moea moxe da dobe de do yepexdahe Ha MexaHukama Ha Memene.
BhumaHue
3a da ce u36eane yepexkahe Ha noda, Memauhama MauuHa da He ce 3adeucmba Ha Mecm.
Yka3aHHe: 3a da ce noCTnHRe ONTmMaJIepe3yJITaT npi NOHCTBaHe, CKOpOCTTaHa DBNKeHne Tp6Ba Da ce aJaANTnpa KbM DaJeHOCTnTe.
Yka3aHHe: NbBpeMe Ha ekCnIIOaTaunraTape3epBoapbT 3a N3MeTeHOTo Tp8Ba Da ceN3Ppa3Ba peDobHO.
Yka3aHHe:ПипочнТВане на NOBbpxHOCTN cIyChTe CamO MeTЯшь BAJK.
Yka3aHHe:PnINoiNCTBaHeHa CTrpaHnHn PbOBe DOnbJIHNTeJIHo Da ce HAKJIOHr CTpaHnHnTe MeTJI.
MeTeHe C MeTnBaNrK
→ IporpamHnI ppeKbCba Da ca neocTaBn Ha CTeHen 2. MeTauNt BaJAK ce cnYcKa. MeTauNt BaJAK n CTpaHnUHnTe MeTJIu Ce BbptT.
MeTeHe C NOBmHat KJIanaH 3a rpy6n OTnAdbu.
Yka3aHHe: 3a n3MItaHe Ha no-roJemn
chaTn Do BvCOnHa OT 60 mm, Hapr.
KytNkN OT HanITKn, 3a KpaTko Tpr6Ba Da
ce NOBdInge KlaPAnHa 3a rpy6n OTnaDbuN.
PiobDInaHe Ha KlanpHa 3a rpy6n
OTNaDbuN:
→HaTnCHeTe neJaTa 3a KnaHaHa 3a rpy6n OTnAdbuN Iro 3aIpBXTe HaTnCHaT.
3a cnyckane cbaJeTe Kpaka cn ot nejana.
Yka3aHHe: ONTImaJIeH pe3yIITaT OT NOUcCTBaHETO MOKeJa Ce NocTnRHe cMo Ipn HAnbJHo CnYcHAT KJIaNaH 3a rpy6N OTnAdbu.
MeTeHe CbC CTpaHnUHm MeTJN
→Пограмняпpeкьсвад acne noctabn ha Ctepen 3.CtpaHHuHNTe MeTJI KAKTOиMeTuaIHT BaJIrk ce cnYCKaT.
Yka3aHHe:MeTiaNtBaJIaK nCTpaHnUHnTe MeTJIn 3apa6oTBat aBTOMaTHNo.
I3MntaHe Ha cyxN IOIOBE
Yka3aHHe: IOpBpeMeHaekPnloataunraTa pe3epBoapbT3aN3MeTeHOTo Tp8Ba Da ce n3npa3Ba peDobHO.
Yka3aHHe: IOpBpeMeHaekpnoataunraTaΦnITbpyT 3a npax Tpr6Ba Da ce nouchCTBa peoOBHO.

→ 3aTbaprHe Ha Mokpa/ cyxa Kna ana.
MeTeHe Ha BnakHeCTn cUxN OTnaDbuN (Hanp. cyxa TpeBa, Cnama)
→ Oтварян ha Mokpa/ cyxa knaana.
Yka3aHHe: Taka ce n36ra 3anyuBaHe Ha ФиNTbPHaTc CnCTema.
I3MnTaHe Na BJaXHm MOKpn IIOObE
→ OtvaprHe Ha Mokpa/ cyxa Klaana.
Yka3aHne: ITo To3n HauHn FInTbPbT Ce npedna3Ba O T BnaraTa.
IpeuictBaTeJHaΦJIITbpa
BknIOUbaHe Ha pbyHOTo NOuICTBaHe HaΦnITbpa.
→HaTnCHete 6yToHa 3aNoocCTBaHe Ha cnIbpa.ΦnITbpbT ce NoocCTBa B npOdbJxKeHne Ha 15 cekyHn.
→ N3TeTJnTe IpbXkKaTa KOKToe Bb3MOxHO I qNkCpaIte.
→ CbaIeTe IaMeJIeHnI ΦIITbIp.
→IIOCTaBeTeHOBΦnITbP.

→ ΦИКСИРаПЕ мecТаТа 3a 3axBaUДHeВOTBOPиTe Ha CTpaHaTa Ha3aДВИЖBAHETO.
→ ΦИКСИРаNTe OTHOBО ДрьЖКATA Na NOΥСТВАНЕТо HaФИNTbpa.
Yka3aHne:Пи MONTaxKa Ha HOBnAФИТьр BHMaBaIte 3a TOBa,ЯМeJInteДа He ce NOBpeIaT.
CmHa Ha ynIbTHeHneTo Ha KyTna Ha cnIbpa
→ CbaIeTe yIbTHHeHEnTo Ha kyTnraHa φπIbpa oT rIb6a Ha KaIaKa Ha ypeJa.
IocTabeTe HOBO ynIbTHHeHne.
PpOBepka 3aADBKBaun peMbun
ПювереTe 3aДВИЖВациTe peMbTu (КЛИНOBи peMbTu)Ha CMyKaTeJIHЯ yIIOBITeI 3a HaPpeXeHne, ИЗнOCBaHe n yBpeXdAHHa.

S. Reiser
Head of Approbation
TbJIHOMOUIHK NIO DOKyMeHTaUNrTa:
S. Reiser
71364 Winnenden (Germany)
Ten.: +49 7195 14-0
ΦaKc: +49 7195 14-2212
Winnenden, 2010/07/14
RapaHcua
BbB BcKa CtpaHa BaXaT rapaHcIOHnTe YcNoBnI, Ny6NkYBaHn OT OToPn3nPaHaTa OT Hac DnCTpn6ByTopcka QnpMa. EBeHTyaJIHn IOBpeDi Ha BaSiy UpeJ Te OTCTpaHIM B pAMKITE Ha rapaHcIOHnC pOK 6e3PiAtHO, Ako CE Kacae 3a DeΦeKT B MaTePnAInTE nII npI pOn3BOvCTBO. B rapaHcIOHcIyauCce O6bPHeTe KbM DnCTpn6ByTopa IIN Na-6JIu3KnO rOpN3pan CepBn3, KaTO PpeDCTaBnTe KacOBaTa 6eJexKka.

Toode: Imur-puhkija istmega
Tuup: 1280-xxx
Tuup: 1511-xxx

S. Reiser
Head of Approbation
71364 Winnenden (Germany)
Tel: +49 7195 14-0
Winnenden, 2010/07/14
Garantii

S. Reiser
Head of Approbation
71364 Winnenden (Germany)
Tel.: +49 7195 14-0
Faksas: +49 7195 14-2212
Winnenden, 2010/07/14
Garantija

S. Reiser
Head of Approbation
Par dokumentăciju sastădīsanu atbildīgā persona:
S. Reiser
71364 Winnenden (Germany)
Tālr.: +49 7195 14-0
Fakss: +49 7195 14-2212
Winnenden, 2010/07/14
Garantija
PnpctpiI roTOBNI do 3aCTOCyBaHHa.
BCTaHOBHTMaHHy, 10 NiDiMiTaE, Ha pIBHi NOBepxHi.
→ BntaTn KJIIOU.
3anpaBka
3anpaBnT npnla
△ObepexHo!
He6e3neka 8u6yxy!
Heobxidno eukopucmoeyamu nueme mu mun nanbHoo, uo 3a3naeHu y ihcmpykuii 3 ekcnnyamaui.
- 3a6bopohЯembc3a npaeka Maushu 3akpumux npumiuueHHx.
3a6opohЯembca naiHnnaU po3eedeHH iaKpumoo 6oAHIO.
- Cmexme 3a mum, uo6 nanauho He nonadano Ha aapayi noepxhi.
BumKHyTN DbNHyH.
BiiKpnt Ta 3aΦikCyBaTn KpuuKy npuaNy.
IpebeBipuTn EMHICTb naJIbBa no iHdNkaTopy pIBHa nAlbHOro.
BiДкрИТи КрИшКу 6аka.
3a npabntn Dn3eIbHe nIbHe
→ 3anOBHHTn6akdo piBn1cm BiNnKhboro KpaHO 3aJIbHOro naTppyka.
→ Bnteptn paniBIO, 10 npoHnoC8, BNTaRHTn LiIKy N 3akpntN KpiuKy 6aka.
→ 3aKpntu KpnUkny npncTropoI.
Eknpnyataia
HactpoTNI NOJIOXeHHcNdiHHBODiI
→ BiДкрNTи КршКу ппау, BCTaHOBnTи WtTaHry.
→Дeшо nocla6nTn cmykOBi raIKu WH cndiHHra.
3cyHyTu CnDInHb BiIOBIDHe IIOJKeHH.
3aTgTn CmyIkoBi raIKn BkaizbKa:JaM0 MeKi perynIOBaHHn HeIOCTaTHbO, iChyE HAcTyHnMoXJIbICTb peYIOBaHH.
→ BnBnHTnTn 4 rBnHTa 3 nJaTn KOHTaKTHOrO BmMkaHa CnDiHHr.
→ BndaunntnnaTy.
→ BiDkunHyTu nCiiHnBnpePe.

→Послабин 4 rbHra kpinIeHHa cndiHHa.
→ IpeceyuHTn CnDiHnTa 3aTyrHuN NoTO.
BCTaHOBHTI PIIATy KOHTaKTTHOROBIMUKaHa CnDInH.
1 Pyx
Пд'ixatn До мсра роботn.
2 PiIMiTahHnPiIMiTaOuHM BaIOM BaI, 0oPiIMiTae, onyckaetbcra LIniINdpnuHa Ta 6iHaPiIMiTalbHa 1tKa oBeptaOTbcra.
3ПiДMiTaHЯ 3 BnKOpNCTaHHaM bIHyNX uITOK BaI, IIO pIMiTae, i bIyHi IITkn onyckaIOTbcra.
3anyctn npncpti.
Bka3ieka
Ppuad ochaueho KOHMakmHUM nepemukaem cuidHHa. Ppu 3auuweHHi cuidHHa bdoir npulad eumkaembcra a cmoaKoBia aJbMa EMUKaIOMbcra aeomamuUHO.
Bidkpntn naiNBn KpaH
BiKpnt Ta 3aΦikCyBaTn KpUkky npuJaNy.
IpeMeicTnBaxKInbHa"ON".
→ 3aKpntn Kpniu npncToPOJ.
3anyctnnpictpi.
3aHnTmMiCeHa cnDiiHHi onepaTopa.
→ HE haTnCKaTI neIaI pyxy.
→ ΠepeCTaBHTn nepemKau npoRpaH a cTyniHb 1 (pyx).
→Поверн'tи КИч 3апаловань чepeз поожжня 1.
ПлсяТOrоЯкприадзарцюe,BiДуСТИТКЛЮЧЗаалюВанн.
Bka3iKa
He hamuckamu ha cmapmep 6inbue 10 cekyh. Ipepe noemophum eKJIuoyehnram cmapmepa noeekamu npuHauiMi 10 cekyh.
IpecesyBaHnHa npuJaDi.
O6epeXHo!
He6e3neKa npekuadHn!PiO yac pyxHy ecmasa.
Ixatn Bnepe
Uo6 yHukhymu yukodkeHHa apHymnyiDimaIbHa MaWUnHa He NoBuHnHa npauObamu,cmOaru Ha odHomyMiCiJ.
Bka3iBa:ДлЯДОСЯнHЯ ONTUMaJIbHOro pe3yIbTaTy po6OToN Heo6XiHDo PO3miprTu WbUdKiCTb pyxu 3MiCzEBMn yMOBaMn.
Bka3iBa:PiJucpOboTcIiPereyIapHOBuDaJIaTI Bmict i3 pe3epByapa dЯ 360py CmITT.
Bka3iBaKa: Pnp niDmitaHHi NOBepxOHb BapTO onyckaTn TiIbKn BaJ, 0o NiDmitaE.
Bka3iBa: Pn YuIeHHi KpaIb CnId DoaTkoBO Onyckatn 6iHy nItKn.
PiДмITAHHIДMHTAQUHIMBAJOM
→ ΠepeCTaBHTn nepemHKau nporpam Ha cTyinb 2.ПiMiTaJIbHn BAN onyckaetbcra LJIiHdpuHa ta 6iHa nPiMiTaJIbHa uItkn o6epTaHOtbcra.
PiMiTaHn3 NiHrToIO 3acNlHKOIO nIeBENKnx YactOK 6pydy
Bka3ibka:ДЯЗAMITAHHBEJIKNIX
npedmetiB BnCOTOIO Do 60 MM, HAnpIKJaI,
6aHOK DnA HANOIB, HeoXiHO HeHaIOBRO
PiHNr3acNIHKy DnA BEJIKNIX YACTOK
6pydy.
PiINOM 3acNIHKn DnA BEJIKNIX YACTOK
6pydy:
HaxkTu BnpePeI neaJIb KJIanaHa IJBA BeIiKnx YacToK 6pyuY N TpImaTu II B HAtncHyTOMy NOJoxKeHHI.
Μλγ onусkaHH KπaNaHa BapTo BiDnyCTnT NeJaJIb.
Bka3iBa: ONTMaJIbHa JAKICTb 3bIpaHHa 3a6e3neUeYtbcra TlIbKn npn NobHicTHO onyueHni 3acNIHc IJn BENIKnx YactOK 6pyd.
PiDmitaHH3 BnKOpNCtAHHm 6iHnx iITOK
→ IpeceTabuTn nepeMnKaU nporpaH ha cTyniB 3. BiHi uiTk, a taKoX BaI, 0iPiMiTaE, onyckaTuBcra.
Bka3iBaKa:BaJ, 0nPiimTaie, i6iHy 1tKIN BUMNKaHtbcraabTomatuHO.
UHnHa anapaTa 3cepeHHN
O6epeXho!
He6e3neka mpa8MyBaHnHa! OdaaUme 3axuchy Macky npom nuIy i 3axuchi OKyJrpu.
Bidkpntn KpnuKy npnna, BCTaHOBHTn Wtahry.
→ IpoTeptn anapat raHuyipkoIO.
06dytn anapat noBITpM nID TnCKOM.
→ 3aKpntn Kpniu npucTropoU.
Bka3IBKa:ПиЛIOBиФiЛьТРMOKЛINBO npOMnTn BODO.Перд HOBIM 3aCTOCyBaHnMФiЛьTp Heo6xIDHO NOBHICTU BNCuShTuN.
UHHeHH anapata 3OBHi
OuHCTnTn anapaT, BnKOpNCTOBvUOny IJRAZbOro BOJOry raHvIpKy, npocOueHy Cna6kIM JnyxHmP03uHOM.
Bka3iBka: 3a6bOpHReTbcBvKOpNCTaHHarpeCnBnX MMHnx 3ac06iB.
PepioDnHicTb TexHIORO 06cIyroBvBaHHa
Bka3iBka: liuJIbHnK pObouXr roDnH nobIDOMJRE npo MOMeHT npOBeDeHHa 6cIyroBvBaHH.
TexHHe 06cJyroByBaHH, 103dIiCHIOCTbC KJIeHTOM
LQoJeHHeTexHicHeOcIyroByBaHHa:
Ipebeipntu BaI, 10 NiIMtae i 6iHyI tsITKN Ha 3NoUyBaHHa NHaBHiCTb CtrpiOK, 10 HAOTaJIncr.
→IpebeBipTN TnCK y uHHax.
IpebipuTn CTan BCix eJemeHtib ynpabNHH.
LToTnxKHeBe texHicHe o6cIyroByBaHHa:
→ IpebeipuTn JERKicTB XOy TpociB BoynHa Ta pyxNbux qactnH.
→ Ipebebipuyn yctaHObky 3HOuSyBaHHy uiiIbHIOBaJIbHnx PnaHOK y 3OHi NiDMiTAHN
IpebeBipuTn φiNbTp piny npn Heo6xidnocti OunchTu Kopo6kn φiNbTpa.
→ IpepeBipuTn BaKyyMHy cnCTemy. Koxhi 100 roDHH po60Tu:
→IpebeipntuΦyHKIOHyBaHHcNCTeMM KOHTaKTHOrO BmMkaua CndiHn.
IpepeBipuTn Hata,3HOoSeHicTb i cnpaBHCtB npNBOdHnx peMeHiB (KJIINHOvIuHOro peMeHЯ i KpyrIloro peMeHЯ).
TexHHe O6cIyroBvBaHHaCTnH, 3HOuYIObCra:
3amHItb yuJIbHIOBaIbHi nHaHKn. 3amHITb BaJ, UO niDiMaTae.
→ 3amHItb 6iHi 1tKn.
Bka3iBka:ДoknaHniue nIB.po3dIn "Texhuihe obcnyrobyBaHHa".
Bka3iBa: Bci po6oTu 3 texHicHoro
obcnyroByBaHHa 3 bOKy KJIeHTa NOBInHi
npOBOnTnC KBAJIΦIKOBAHm φaxIBcEM.
B pa3i NotpeBn B 6yd-b-kynn MOMENT
MOXHa 3BepHyTnCn no DOnOMORY B
cneiaian3OBAhy TopROBeIbHy opraHizauio
φipMn Kdrcher.
Texhne 0cbnyroBybHa, 3diChIOeTbcS cnyx6oO 0cbnyroByBaHHcNoXnBaivB
O6cIyroBvBaHnYepe38roDInpo6oTn:
→ 3po6ntn nepBnuHHy iHcneKciio.
O6cnyroBvBaHnuepe320 roDnHpo6oTn: KoxHi 100 roDnH po6oTn
KoxHi 300 roDnH po6oTn
KoxHi 500 roDnH po6oTn
KoxHi 1000 roDnH po6oTn
KoxHi 1500 roDnH po6oTn
Bka3iBaKa:ДлгЗбержнгправа на rapанTiHHe O6cIyROvBaHnB Bci p6oTn 3 texHiuHOroi npOphiIakTuHoro obcIyROvBaHnH npOTaRGM rapaHTiHoro nepioDy nobHHi npOBODITscnBIOHOKepBicHO CnyK6Oo φipMKNdcher BiIDNoBIDHOdo6poUpyn To texHiChOMy obcIyROvBaHnHIO
PnpoiakTnHi p6oTu
ПД�ROВКА:
BCTaHOBHTMaHHy, 10PiDiMiTaE, Ha pIBHi NOBepxHi.
→ Kлюч 3апаловань повернут B noЗицю "0" i витаянут Ино 3 замka.
3araIbHi Bka3iBKn ⅢoDo 6e3neKn O6epexHo!
Hebe3neKa mpaMByaHnHa!
PiCnB uKJIIOUeHN OeUayN npucmpo10
uUeHN HfIbmpa oBepmaembcra 15
cekyH no iHepui. Y ueu cac He
eiokpuamu KpuuKy npucmpo10.
△ObepexHo!
He6e3neKa mpa6MyBaHnHa! NpeoepedeHNm 6ydb-kaux poBim 3 mexHiHOzo ma npOphiIakmuHozo o6cNHyOBeYeaHnMaUHa IOBuHnOxOJOhymu.
Ipebeipntu Tnck y uHnx
BCTaHOBHTMaHHy, 10PiDiMiTaE, Ha pIBHi NOBepxHi.
ПдклочтДОВERTИЯшнINпистриДЯпегвіркіТИСКУВшнх.
IpebeBipuTn Tnck y uHnHax, npn Heo6XiDnOcTi, BiKOpuRyBaTu TnCK.
TnCK y uHax 3aHix KOJIc IOBHeH CTaHOBTu 66ap.
3aMiHa KOJIc
△O6epeXHo!
He6e3neka mpaemyeBaHnHa!
BCTaHOBHTMaHHy,IOPiIMiTae,HapibHnIOBepxHi.
→ BntaTn KJIIOU.
→Пид уас ремонту пidmitально Машину на дороз iв зои TrанспортHoro pyxu (Hebezepechni 30hi) слд Нocitn cneiaalbнй пореджвальний OДяг.
Ipebeipntu cta6ijbHictb rpyHTy. 3akpinTu npnauDЯ 3anobirHn MmOBiIbHOrO cKoyBaHHa, iKJIaBn HIO HbOro KINH.
Ipebeipka uH
IpeBepiTN pPoTeKTop uHnHa HnABhICtB HbOMy CTOpOHHX npeDMiTIB.
→ BvdaJIHTn CTOpOHHi npEIMeTn.
→ BnKOpNCToByaTu nIxDxOJaUu n CTaHdApTHN 3acio dIpypeMOHTy uHH.
Bka3iBaKa:ДOTpIMyBaTnCb peKOMeHdaCiB BiIIOBIHorO BnPo6NHa. ПОдЯlbшpyx MoKJIbNtIиSe 3ДOTpIMaHnHЯm Bka3iBOK BnPo6NHa.Прп nepшо МоКЛNbICTi npOBecTn 3amHy shHH a60 KOJeca.
3Jerka nIiHnTn Ha BiIaNobIHOMy MlCi emHiCTb Ia 36Opy cmITTu BnHrTu II.
Iocna6ntu 6oJIT KOJeca.
→ BnKopuCTaTIN DomKpaT.
Točka πίδύΟγ ὄλη δόΜκρamy (3aδHi κονεca)
→Плнгпnpстpi3a ДОПOMOROДOMKpata.
→ BnHrTn 6oJr KojEca.
→ 3HЯтNi KOJIeCo.
BCTaHOBHTn 3anaChe KOleco.
→ 3aBbHTnTn 6oJIT KoJcca.
Onyctntnpicptpi3a donomoroo domkpata.
→ 3aTn7 6oT KoIeca.
BCTaTe 3aKNaCHyTn cMHiCTb dJa 360py cMIITra.
Bka3iBa: BnKOpNCtOByBaTu NiIXoJaIcN CTaHapTHi DOMkpaT.
IpeBipTN BaKyyMHy CnCTeMy.
BbIMKHeHHcNCTeMNIiIMiTaHH 3iINCHIOCTbC3aDOnOMOIO BAKyyMHOI CNTeMn.
- Yakuo 6iHa 7tKa a6o NiMaTalbHn BaJI He OnyckaTbC8, C1iD nepeBipNTu Mem6paHHM MexAHi3M BakyUMHO perYJrTopa Ha HArBHcTb HaJeXHORO NiKlUeHHa ShaHrOpBOJD, npi Heo6xIdNoCTi NiKlUoyHTu BiNObiDNH mHaHr.
- YKIOJ K 6IuHa UtiKa a6o NiIMiTalbHn BaJI Ue He ONUcKaTbcS, To BAkyUmHa CnCTema e HerepMeTuHIO. B cBOMy BInpaJky CnID 3BepHyTuCnDo CnyKbN cepBicHOrO o6cNpyROByBaHHa
IioknueHHaHaHeB do MembpaHNOo Mexahi3My bakyMHOo peyJamopacumemu onyckannh6iHoJzimku.
Плкунецьшаланда do Мбранноу Mexahi3My eakyyMHNO peaylmaopa cucmemu onyckaHH nyimimanbHNO eana.

ПлкунецьшангдубakуMHoZO hacocyma do MembpaHnoe MexaHiz3My ekuyMHoZo peaynmaopa (pecueep)
Bka3iBk: BaKyyMnH hAcoc npaIooE IInIe ToDi, KOIN B CnCTeMI yTBOpOeTbcR BAKyyM. KaIO HACOC NoCTiHNO ppaIOe, Heo6xIdHO 3BepHyTncrdo cnyKbC cepBicHOrO obcLyroBvBaHHra.
3aMiHa 6iUHnx UITOK
BCTaHOBHTMaHHy,IOPiIMiTae,HapibHnI NOBepxHi.
IpeceTabuTn nepeMnKaun pOgrpAm Ha cTyPiHb 1 (pyx). BiUHi uItkn PiDiHIMyTbcra.
П lyckobni nepemikau nobepnyt B nO3nui0 "0" Ta BVNTIyN OTO 3aMka.
PioCna6bTu3 KpiINnBnX TBnHTuHa HnKHi CTOpOHi.
→ 3нгтп 3ношени 6ину ултк.
→ HaJaTn HOby 6iHy uItky Ha 3aIap6Hn npIcTpi i miUHO 3aTaIgTN.
Ipebeipntu Baj, 0o niimtae
BCTaHOBHTMaHHy,IOPiIMiTae,HapibHnIOBepxHi.
→ ΠepeCTaBHTn nepemikau nporpam Ha cTyniHb 1 (pyx). BAn, lo niDmitae, nDiHimaetbca.
→Пусковий перемькay nobepHyTN B NO3nJIIO "0" Ta BNTaRrN IOrO 3aMka.
→ 3a6JIokyBaTn pIpcTpI KJIINOM, IIOb yHnKHyTN MmOBIJbHOrO KoUeHHra.
→ 3JIeRka nIiHraTn 3O6ox CTopiH EMHICTbДЯ 360py CMITRA BnHHTn II.
→ BvdaJIHTn 3 BaNa, IIO NiIMiTae, CTpiUKN MOTy3Kn, IIO HAMOTaJIINcR.
3amihabana,0nipimitac
3aHa cTaE Heo6xIDHOI, kUO BhAcNIIOK 3HOuYBaHHa IITOK KICTb NiIMiTahHn NOMiTHO NOripWyETbcra.
BCTaHOBHTMaHHy,IOPiIMiTae,HapibHnIOBepxHi.
→ ΠepeCTaBHTn nepemikau nporpam Ha cTyniHb 1 (pyx). Ban, uo niDmitae, nIDHimaetbcra.
П lyckobni nepemikau nobepnyt B nO3nui0 "0" Ta BVNTIyN OTO 3aMka.
3a6IokyBaTn npicTpri KJIINHOM, IIOb yHKHTN MIMOBiJbHOrO KOeHHra.
3JIeRka nIiHaTn 3O6ox cToPih EMHicTh bIa 36OpCy cmITTu BnHraTI II.

PioaBtu nepeDHi KpiinbHn rBHT npaBoi 6iHo i naHeJI.
Pocla6nTu 3aDnHi KpiINJIbHnI rBnHT npabo6iHuOInaHeNi.
3nT6iHy naHeJIb.

→Pocna6ntn rBnHTn.
Iocla6bTu KpiInbHn rBHT Tpoca BoydeHa Ta BnHrTaTPOCBoydeHa.

→ BvBnHTtntrBnHTBceHtpi o6eTpHa 6aIaHcnpa nIdMtaiJbHorO bana.
IpebebipuHnHaTgTa3NoSyBaHHnpBODnX pEmeHIB NiDiMItaIbHOrOBaJa, a TAKOX HaABHicThy HNX NOWKoDxKeHb.
IpebeipTu yuiJIbHIOBaJIbHy MaHKeTy

peryIaRHO npeBiprTu yIbHOBaIbHy MaHKeTy Ha BCMOKTyBaJIbHOMy BeHTnJIrTOpi Ha NocAdKy HAnEJKHIM YINOM.
3amihntn 3anobixhnu
ПослабитугиHTи Ha o6ox CTopoHax naHeni.
HecnpabHI 3ano6ixHKnK 3amIHNTN.
3HOB BCTaHOBHTn nepeHIO naHeIb.
3anobixhNKeIeKtpoCTapTepa 3HaXoNDtbcB MOTOPHOMy BidineHHI. Bka3iBk: BnKOpNCTOByBaTN 3anobixhNkn JInse 3 OndaKOBIM 3HaueHHM.
Ipebipka piBn i doJlnBaHH MaTnla
Bka3ieka
Deuayn ochauehu nepemukayem KOHmpoio piHMaMuna. Ipu HeodocmamhOmy piHi MaCmuna deuayn EidKlouaembcr i Moke bymu 3HOey 3anyueHu minku nicra 3aJueaHHa Macmuna y deuayn.
OBepeKHo!
Hebezneka oniky ob zapayu nopepxnio!
→ДатиДВИRGHy OXOJOHOHTN.
→ BntaHHTn NOKaXuHK pIBHa MaCTuna Ta nepeBipuTu NiOro pIbeHb. EmHiCTb He MeHsE 1/3.
→Якшо piBHeH MaCTnJIH HnKHe 1/3,To MaCTnIHO Heo6xIDHO DoJIHTn Do HnKHB0I KpaIKN OTBOPY DnAJIbKN.
→ 3auekaTn npHaHmI 5 XBUnH.
3HOBy nepebipuPiBHeMaTnJa.
3amHHTM MOTOPHE MaCTNIO.
△O6epexHo!
Hebe3neka oniky o6 eapuy noeepxHIO!
→ BntaHHTn nokaxuK pIBHa MaTna.
→ BiДkaчати MacNo i3 ДВИгуна chepe3 nATpy6ok 3aJIbVAHnЯ Macna, BИКОРиCTOBYUOHy nДЯ CbOrO HAcOC dIЯ 3amiHiMa macna 6491-538.
Upees natapy6ok dnia 3aJIbBy 3aJIntu HOBe mactJIO 3a DOIOMORO YoCTOTO Hacocy 6.491-538 dnia 3amInm MactJa
→ 3auekaTn npHaMIM5 xBUNH.
3HOBy nepebipuPiBHeMaTnJa.
UHHeHH Ta 3aHa NOBITpHOrO fIbtpy
Iocna6nTn cmyukoI raKnHa BCMOKtyBaJbHOMy pe3epByapi.
BnHrTu Ta nepeBipuTu fiNbtpyBaJbHy BCTaBky.
BCTaBHTu BCMOKTyBaJIbHn pe3epByap OUnIeHn a6o HOBn φɪnbTp.
→MiUHO 3aTMyHTn CMyuKOByraKy.
Ipebipntu pibehripablvHOro MaCTnla Ta doJNTu Ioro.
Bka3iBa
Maunha Mae dea aiodpaNCH konmypu: IidpaBniHn KOHTyp NiMiTaHHA
Ipebeipnti piBHei rIpaBnIyHOro MaCTnla B 3aIacHomy pe3epByapi. PiBeHb MaCTnla IOBnHeH nepe6yBaTm iK BiDMiTkamN "MIN" i "MAX".
Ykso pibeh MaCTnJa DyJx He H3bKn, HeoXiHNo DoJIHTn rIpaBniUHe MaCTnIO uepe3 3aINBnH n aTpy6ok 3BepxHa pe3epByapi.
KoHTyp npNbOdy oci.
Yezaa!
Дана поевирка пошнда diuchюamucя minbku npu xonodhomy deuayhi.

Пелеверпту рibeовь мacrТиlaВpo3ширювальному pe3epByapi.
→Прин Heo6xIDHOCtI,ObepexKHOdoJNTMactnIO.
Akecysapn
71364 Winnenden (Germany)
Ten.: +49 7195 14-0
ΦaKc: +49 7195 14-2212
Winnenden, 2010/07/14
RapaHTia
Y KOKHnK kpaHn DiHOb yMOBn rapaHTi,
HaDAHOI BiIOBIAHOO φIpMOIO-
npoDaueM. HenoJaKn BpoBoTI
pNcTPOOM NycBaEMO 6e3PNaTHO
npOTaROM TepMiHy DII rapaHTi, RaIIO BOHN
BKNJIkaHI 6pakOM MaTePIaNY uN
NOMINKAMN BnROTOBHeHHy. Y BnPaKDy
UHHNoCTI rapaHTi 3BepTiTbcSd DO npOdaUca
uN B NaBIJxKuN aBTopn3OBaHNI
cepBicHn ZeHTp 3 DokyMeHTaJIbHm
PiITBeRdxKeHHa NOKyn.
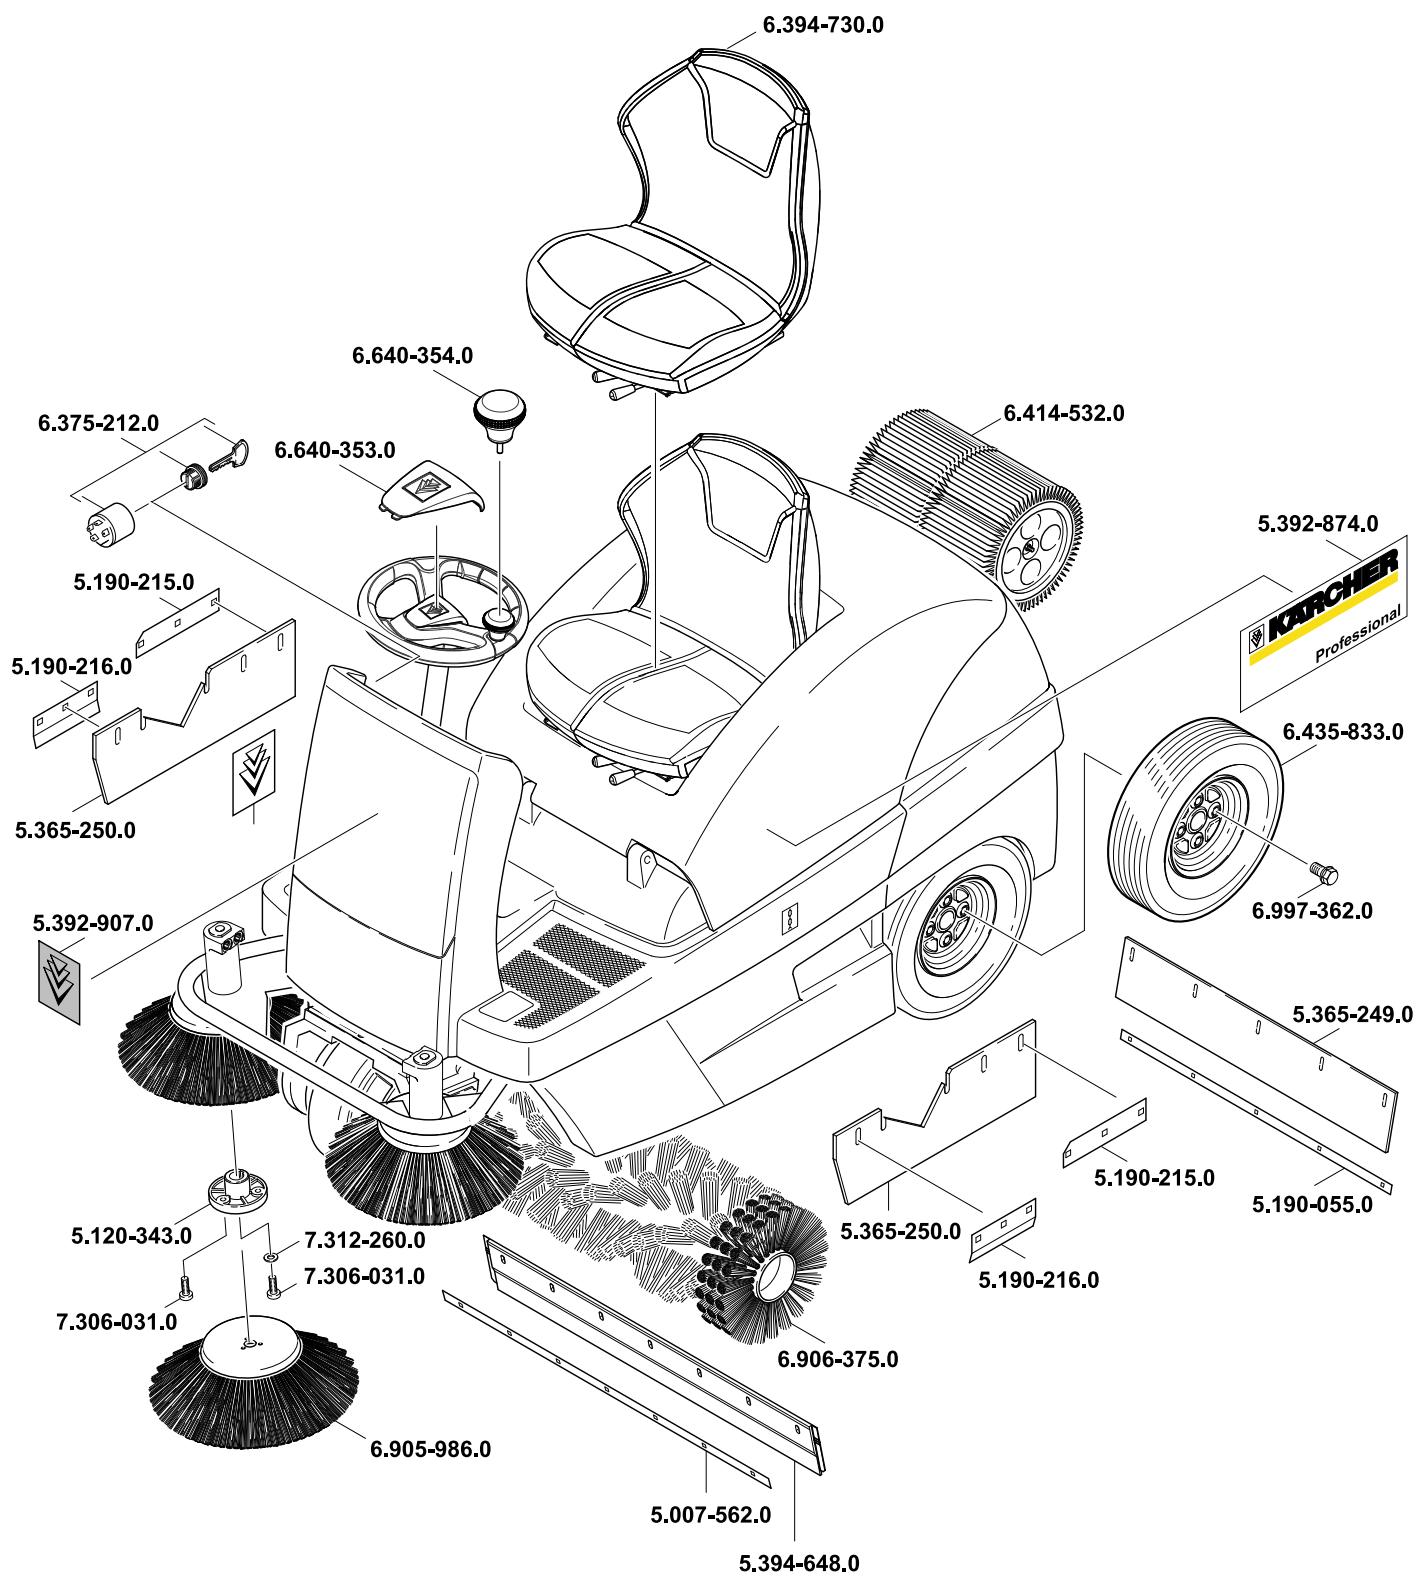
AE Karcher FZE, P.O. Box 17416, Jebel Ali Free Zone (South), Dubai, United Arab Emirates, +971 4 886-1177, www.kaercher.com
AR Kärcher S.A., Uruguay 2887 (1646) San Fernando, Pcia. de Buenos Aires +54-11 4506 3343, www.karcher.com.ar
AT Alfred Kärcher Ges.m.b.H., Lichtblaustraße 7, 1220 Wien, +43-1-25060-0, www.kaercher.at
AU Kärcher Pty. Ltd., 40 Koornang Road, Scoresby VIC 3179, Victoria, +61-3-9765-2300, www.karcher.com.au
BE Kärcher N.V., Industrieweg 12, 2320 Hoogstraten, +32-3-340 07 11, www.karcher.be
BR Kärcher Indústria e Comércio Ltda., Av. Professor Benedicto Montenegro no 419, Betel, Paulinia - Estado de São Paulo, CEP 13.140-000 +55-19-3884-9100, www.karcher.com.br
CA Kärcher Canada Inc., 6535 Millcreek Road, Unit 67, Mississauga, ON, L5N 2M2, +1-905-672-8233, www.karcher.ca
CH Kärcher AG, Industriestrasse, 8108 Dällikon, Kärcher SA, Croix du Pêage, 1029 Villars-Ste-Croix, 0844 850 864, www.kaercher.ch
CN Kärcher (Shanghai) Cleaning Systems, Co., Ltd., Part F, 2nd Floor, Building 17, No. 33, XI YA Road, Waigaogiao Free Trade, Pudong, Shanghai, 200131 +86-21 5076 8018, www.karcher.cn
CZ Kärcher spel. s r.o., Modletice c.p. 141, CZ-251 01 Ricany, +420/323/606 014, www.kaercher.cz
DE Alfred Kärcher Vertriebs-GmbH, Friedrich-List-Straße 4, 71364 Winnenden, +49-7195/903-0, www.kaercher.de
DK Kärcher Rengöringsystemer A/S, Helge Nielsens Allé 7 A, 8723 Løsning, +45-70206667, www.karcher.dk
ES Kärcher, S.A., Pol. Industrial Font del Radium, Calle Josep Trueta, 6-7, 08403 Granollers (Barcelona), +34-902 17 00 68, www.karcher.es
F Kärcher S.A.S., 5, avenue des Coquelicots, Z.A. des Petits Carreaux, 94865 Bonneuil-sur-Marne, +33-1-4399-6770, www.karcher.fr
FI Karcher OY, Yrittajantie 17, 01800 Klaukkala, +358-207 413 600, www.karcher.fi
GB Kärcher (U.K.) Ltd., Kärcher House, Beaumont Road, Banbury, Oxon OX16 1TB, +44-1295-752-000, www.karcher.co.uk
GR Kärcher Cleaning Systems A.E., 31-33, Nikitara str. & Konstantinoupoleos str., 136 71 Aharnes, +30-210-2316-153, www.karcher.gr
HK Kärcher Limited, Unit 10, 17/F., Apec Plaza, 49 Hoi Yuen Road, Kwun Tong, Kowloon, ++(852)-2357-5863, www.karcher.com.hk
HU Kärcher Hungaria KFT, Tormásrét ut 2., (Vendelpark), 2051 Biatorbagy, +36-23-530-64-0, www.kaercher.hu
I Kärcher S.p.A., Via A. Vespucci 19, 21013 Gallarate (VA), +39-848-998877, www.karcher.it
IE Kärcher Limited (Ireland), 12 Willow Business Park, Nangor Road, Dublin 12, (01) 4097777, www.kaercher.ie
JP Kärcher (Japan) Co., Ltd., Irene Kärcher Building, No. 2, Matsusaka-Daira 3-chome, Taiwa-cho, Kurokawa-gun, Miyagi 981-3408, +81-22-344-3140, www.karcher.co.jp
KR Karcher Co. Ltd. (South Korea), 2nd Floor, Youngjae Building, 50-1, 51-1, Sansoo-dong, Mapo-ku, Seoul 121-060, +82-2-322 6598, www.karcher.co.kr
MX Karcher Mexico, SA de CV, Av. Gustavo Baz Sur No. 29-C, Col. Naucalpan Centro, Naucalpan, Edo. de Mexico, C.P. 53000 Mexico, +52-55-5357-04-28, www.karcher.com.mx
MY Karcher Cleaning Systems Sdn. Bhd., 71 & 73 Jalan TPK 2/8, Taman Perindustrian Kinrara, Seksyen 2, 47100 Puchong, Selangor Darul Ehsan, Malaysia, +603 8073 3000, www.karcher.com.my
NL Kärcher B.V., Postbus 474, 4870 AL Etten-Leur, 0900-33 666 33, www.karcher.nl
NO Kärcher AS, Stanseveien 31, 0976 Oslo, Norway, +47 815 20 600, www.karcher.no
NZ Karcher Limited, 12 Ron Driver Place, East Tamaki, Auckland, New Zealand, +64 (9) 274-4603, www.karcher.co.nz
PL Kärcher Sp. z o.o., UI. Stawowa 140, 31-346 Kraków, +48-12-6397-222, www.karcher.pl
RO Karcher Romania srl, Sos. Odaii 439, Sector 1, RO-013606 BUKAREST, +40 37 2709001, www.kaercher.ro
RU Karcher Ltd. Service Center, Leningradsky avenue, 68, Building 2, Moscow, 125315 ^图 + 7 - 495 789 90 76, www.karcher.ru
SE Kärcher AB, Tagenevägen 31, 42502 Hisings-Kärra, +46 (0)31-577 300, www.karcher.se
SGP Karcher South East Asia Pte. Ltd., 5 Toh Guan Road East, #01-00 Freight Links Express Distripark, Singapore 608831, +65-6897-1811, www.karcher.com.sg
SK Kärcher Slovakia, s.r.o., Beniakova 2, SK-94901 NITRA, +421 37 6555 798, www.kaercher.sk
TR Kärcher Servis Ticaret A.S., 9 Eylül Mahallesi, 307 Sokak No. 6, Gaziemir / Izmir, +90-232-252-0708, +90-232-251-3578, www.karcher.com.tr
TW Karcher Limited, 7/F, No. 66, Jhongijheng Rd., Sinjhuang City, Taipei County 24243, Taiwan, +886-2-2991-5533, +886-800-666-825, www.karcher.com.tw
UA Kärcher TOV, Kilzeva doroga, 9, 03191 Kiew, +380 44 594 7576, www.karcher.com.ua
USA To locate your local dealer please visit our web site at http://www.karchercommercial.com or call us at 888.805.9852
ZA Kärcher (Pty) Ltd., 144 Kuschke Street, Meadowdale, Edenvale, 1614, +27-11-574-5360, www.karcher.co.za