
MX Creative Console - Keyboard LOGITECH - Free user manual and instructions
Find the device manual for free MX Creative Console LOGITECH in PDF.

| Product type | Creative console (dialpad + keypad + stand) |
| Brand | Logitech |
| Model | MX Creative Console |
| Dialpad dimensions (H x W x D) | 92.1 x 93.7 x 33.8 mm |
| Dialpad weight | 128 g |
| Keypad dimensions (H x W x D) | 91.7 x 77.9 x 25.5 mm |
| Keypad weight | 96 g |
| Stand dimensions (H x W x D) | 112.7 x 58.5 x 20.5 mm |
| Stand weight | 61 g |
| USB-C cable length | 1,500 mm |
| Dialpad power | 2 AAA batteries (not included) |
| Keypad power | USB-C (cable included) |
| Dialpad connectivity | Bluetooth and Logi Bolt |
| Keypad connectivity | Wired USB-C |
| Main features | Rotary dial, programmable buttons, screen keys, wheel, On/Off switch, Easy-Switch |
| Customization software | Logi Options+ (free) |
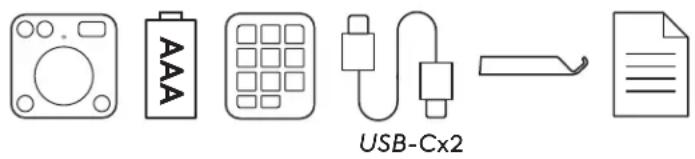
| Box contents | MX Creative Dialpad, MX Creative Keypad, stand, USB-C to C cable, documentation |
| Care and cleaning | Soft, dry cloth. Do not use liquids. |
| Safety | Use recommended alkaline AAA batteries. Do not expose to water. |
| Spare parts and repairability | AAA batteries and USB-C cable replaceable. Not user-repairable. |
| General information | Compatible with Windows and macOS. 2-year manufacturer warranty (subject to conditions). |
Frequently Asked Questions - MX Creative Console LOGITECH
User questions about MX Creative Console LOGITECH
0 question about this device. Answer the ones you know or ask your own.
Ask a new question about this device
Download the instructions for your Keyboard in PDF format for free! Find your manual MX Creative Console - LOGITECH and take your electronic device back in hand. On this page are published all the documents necessary for the use of your device. MX Creative Console by LOGITECH.
USER MANUAL MX Creative Console LOGITECH
natural_image
Two simple line drawings of a device control panel with circular and rectangular buttons, no text or symbols present.CONTENTS
English 3
Deutsch 8
Français 13
Italiano. 18
Español. 23
Português .....28
Nederlands 33
Svenska . . . . . . . . . . . . . . . . . . . . . . . . . . . . . . . . . . . . . . . . 38
Dansk 43
Norsk. 48
Suomi .....53
Ελληνικά. . . . . . . . . . . . . . . . . . . . 58
По-русски. 63
Po polsku. 68
Magyar. 73
Česká verze . . . . . . . . . . . . . . . . . . . . . . . . . . . . . . . . . . . . . . . . . . . . . . . . . 78
Slovenčina .....83
Українська .....88
Eesti . . . . . . . . . . . . . . . . . . . . . . . . . . . . . . . . . . . . . . . 93
Latviski. . . . . . . . . . . . . . . . . . . . . . . 98
Lietuvių. 103
Български. 108
Hrvatski 113
Srpski. 118
Slovenščina 123
Română 128
Türkçe 133
- . . . . . . . . . . . . . . . . . . . . . . . . . . . . . . . . . . . . . . . . . . . . . . . . . . . .
143.
简体中文 148
繁體中文 153
한국어 158
Indonesia 163
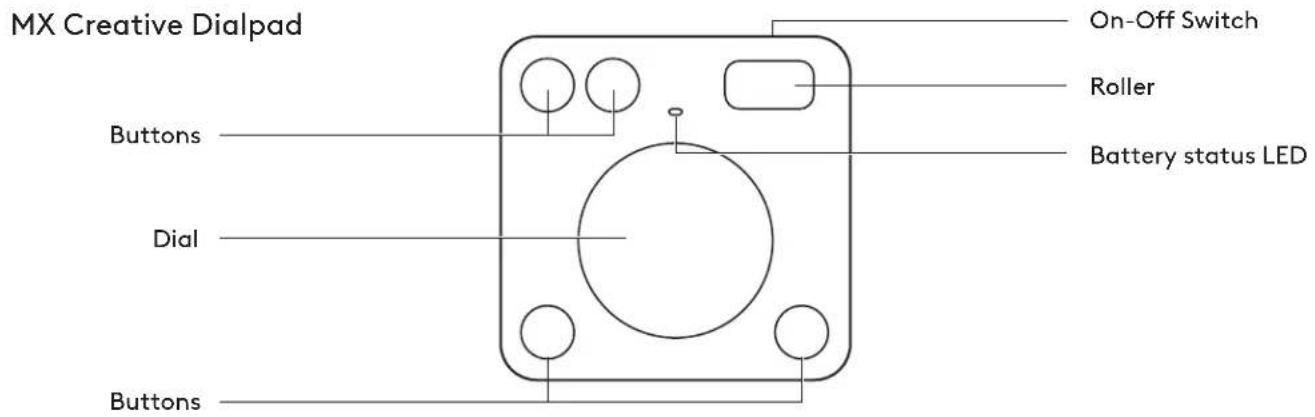
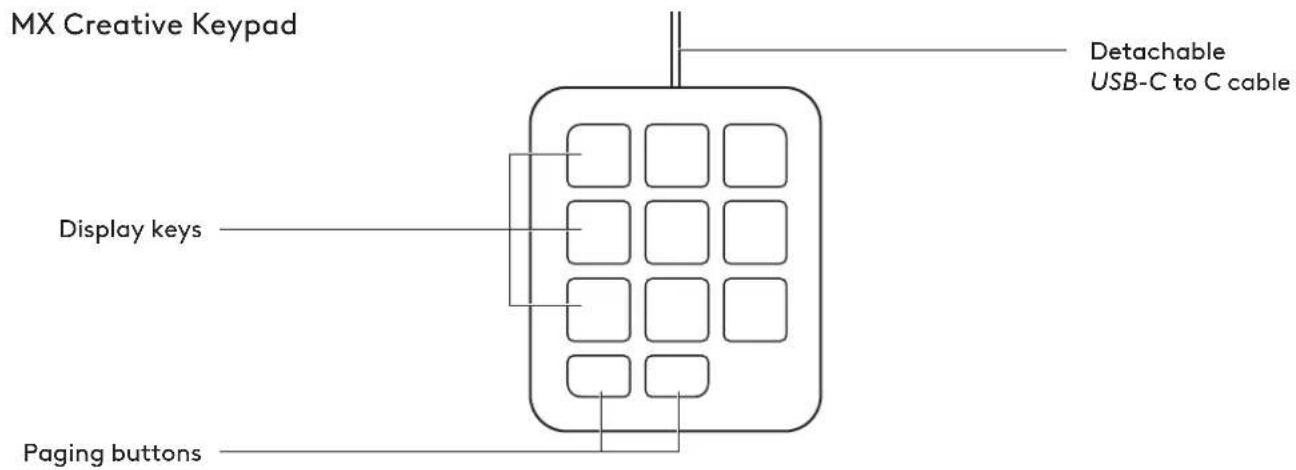
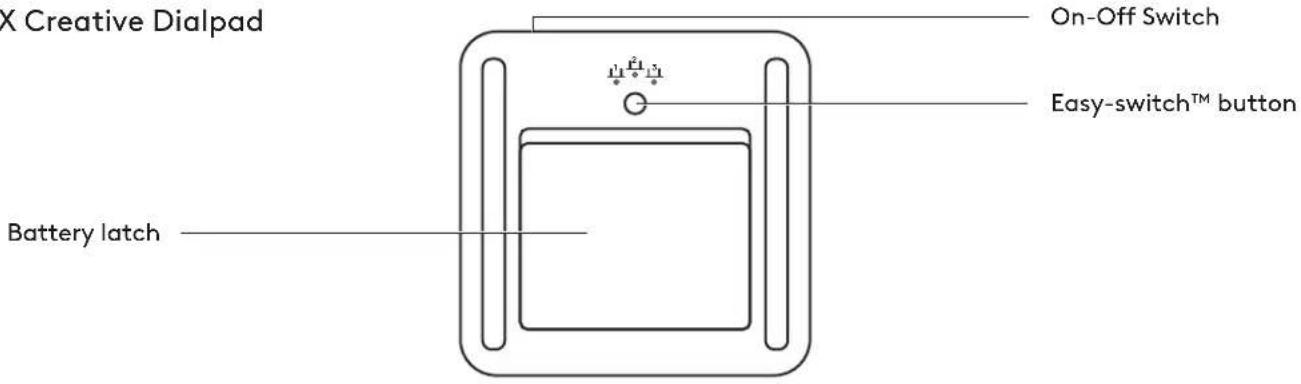
KNOW YOUR PRODUCT
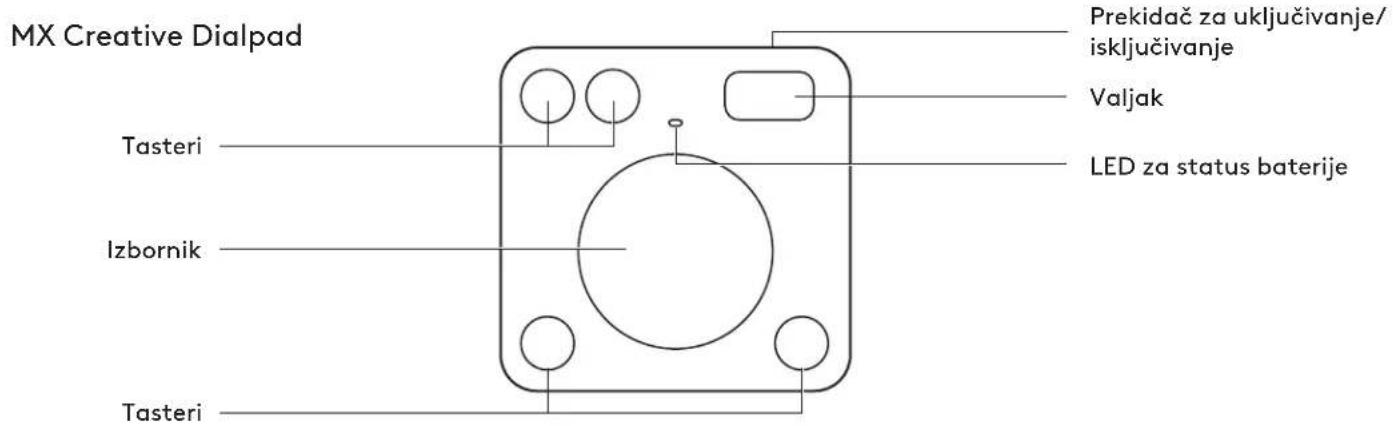
MX Creative Console front view with function indications
MX Creative Console back view with function indications
MX Creative Dialpad
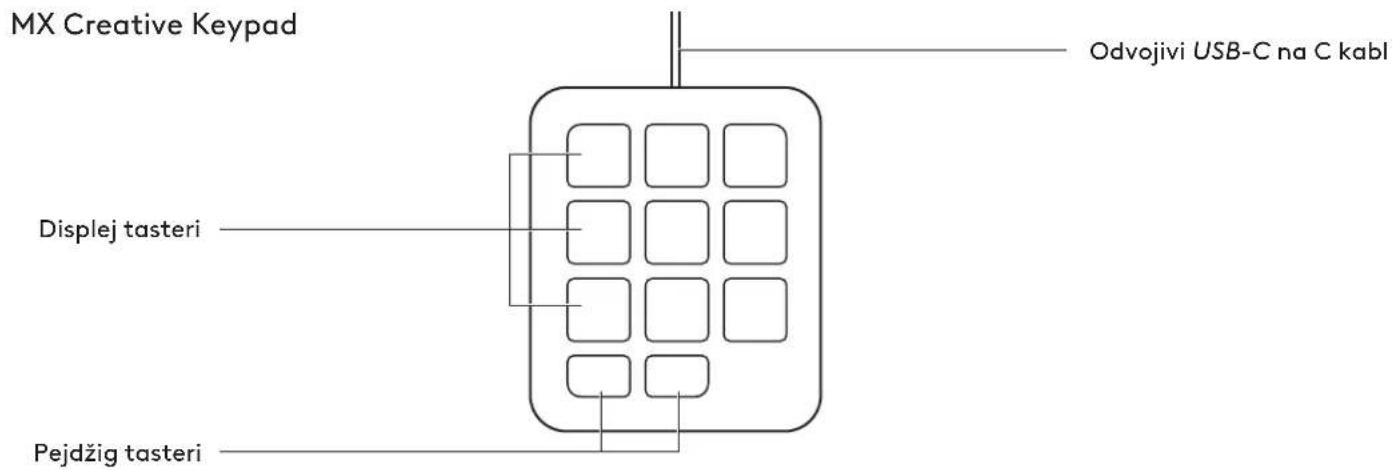
MX Creative Keypad
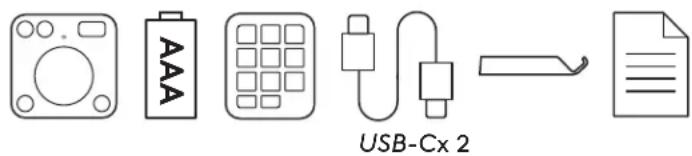
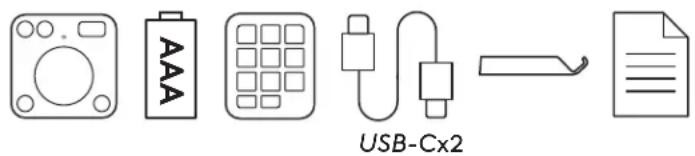
STEP 1: WHAT'S IN THE BOX
- MX Creative Dialpad
- 2x AAA batteries
- MX Creative Keypad
- USB-C to C 2.0 cable
- Stand
- User documentation
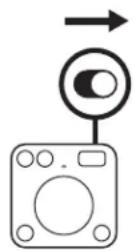
STEP 2: TURN ON YOUR MX CREATIVE DIALPAD TO CONNECT IT
Find the switch on the top of your dialpad and switch it to the ON position.
If there is no power, try replacing the 2x AAA batteries.
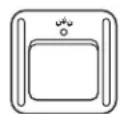
STEP 3: THE LED SHOULD BLINK FAST
If not, press and hold the Easy-Switch button (on the back of the dialpad) for 3 seconds. When the light begins blinking, the dialpad is ready to pair with your computer.
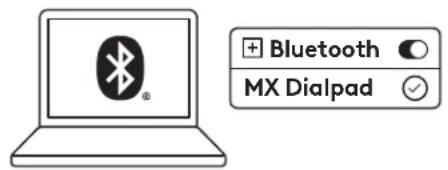
STEP 4: COMPLETE THE PAIRING TO YOUR COMPUTER
On your computer find the Bluetooth® settings menu and connect your dialpad from there.
MX Creative Dialpad is also compatible with Logi Bolt.
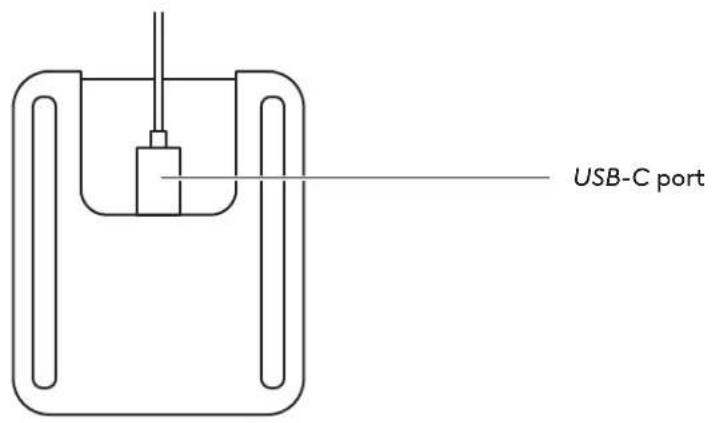
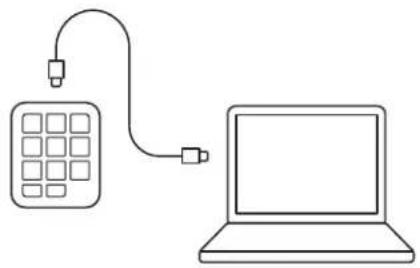
STEP 5: CONNECT YOUR MX CREATIVE KEYPAD VIA USB-C AND GET STARTED
Plug the USB-C connector into the USB-C port on your computer. Your keypad should turn on once powered.
natural_image
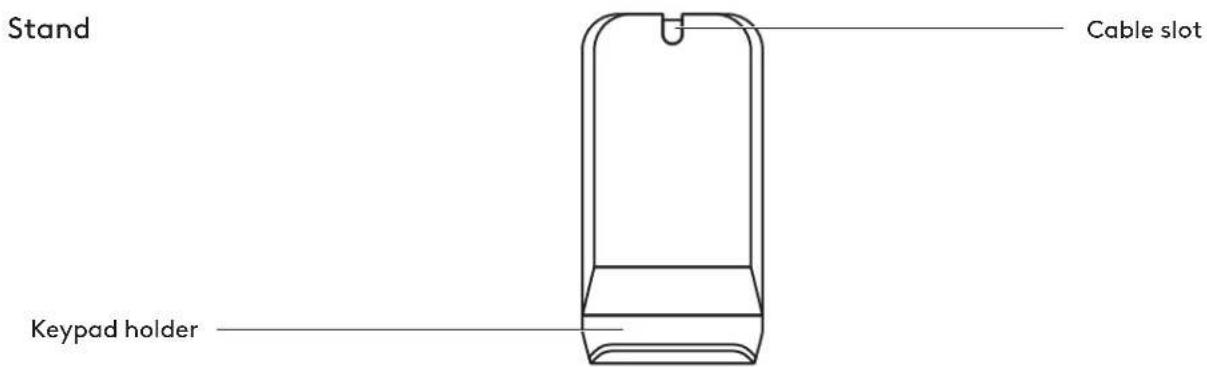
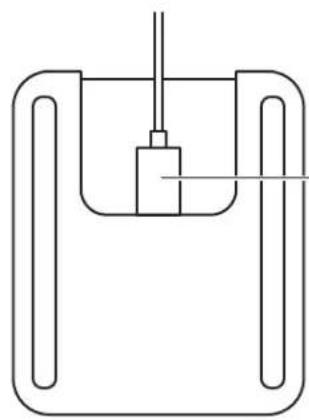
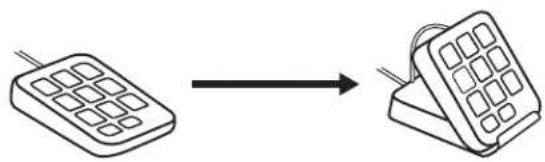
Simple line drawing of a laptop connected to a grid device via cable (no text or symbols)STEP 6: USE YOUR KEYPAD FLAT OR TILTED ON ITS STAND
You can use your keypad flat on your desk or tucked into the stand's keypad holder.
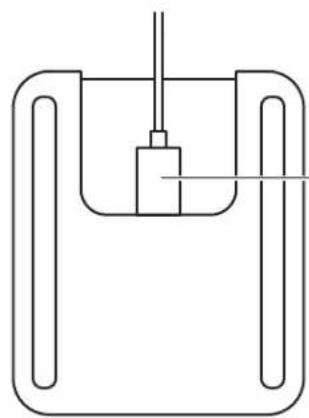
The cable can be tucked into the cable slot on the back of the stand for better cable management.

flowchart
graph LR
    A["Grid-based device"] --> B["Electronic device"]
STEP 7: INSTALL LOGI OPTIONS+
Logi Options+ is a powerful and easy-to-use application that enhances your experience using Logitech devices by enabling you to customize them to work how you want.

app.logi.com
DIMENSIONS
MX CREATIVE DIALPAD - 128 g
Height: 92.1 mm (3.62 in)
Width: 93.7mm (3.68 in)
Depth: 33.8 mm (1.33 in)
MX CREATIVE KEYPAD - 96 g
Height: 91.7 mm (3.62 in)
Width: 77.9 mm (3.06 in)
Depth: 25.5 mm (1.00 in)
STAND - 61 g
Height: 112.7 mm (4.43 in)
Width: 58.5 mm (2.30 in)
Depth: 20.5 mm (0.80 in)
USB-C 2.0 CABLE - 27 g
Length: 1500 mm (59.05 in)
www.logitech.com/support/mxcreativeconsole
PRODUKT AUF EINEN BLICK
natural_image
Line drawing of a laptop connected to a grid device via cable (no text or symbols)flowchart
graph LR
    A["Grid-based device"] --> B["Rectangular electronic device"]
SCHRITT 7: LOGI OPTIONS+ INSTALLIEREN
ÉTAPE 1: CONTENU DU COFFRET
natural_image
Line drawing of a laptop connected to a grid device via cable (no text or symbols)ÉTAPE 6: UTILISEZ VOTRE KEYPAD À PLAT OU INCLINÉ SUR SON SUPPORT
flowchart
graph LR
    A["Grid-based device"] --> B["Rectangular electronic device"]
ÉTAPE 7: INSTALLEZ LOGI OPTIONS+
natural_image
Pure technical line drawing of a rectangular frame with rounded corners and a central square, no text or symbols present.natural_image
Pure mechanical diagram showing a U-shaped component with a central shaft and vertical rod, no text or symbols present.Porta USB-C
natural_image
Simple line drawing of a laptop connected to a grid device via cable (no text or symbols)PASSAGGIO 6: UTILIZZA IL KEYPAD IN ORIZZONTALE O INCLINATO SUL SUPPORTO
flowchart
graph LR
    A["Grid-based device"] --> B["Rectangular electronic device"]
PASSAGGIO 7 INSTALLA LOGI OPTIONS+
natural_image
Line drawing of a laptop connected to a grid device via cable (no text or symbols)PASO 6: USA EL TECLADO PLANO O INCLINADO SOBRE SU SOPORTE
flowchart
graph LR
    A["Grid-based device"] --> B["Rectangular electronic device"]
PASO 7: INSTALAR LOGI OPTIONS+
natural_image
Simple line drawing of a laptop connected to a grid device via cable (no text or symbols)PASSO 6: UTILIZE O SEU KEYPAD NA HORIZONTAL OU INCLINADO NA RESPETIVA BASE
flowchart
graph LR
    A["Grid-based device"] --> B["Switched device"]
PASSO 7: INSTALE A APLICACÃO LOGI OPTIONS+
STAP 3: DE LED MOET SNEL KNIPPEREN
natural_image
Simple line drawing of a laptop connected to a grid device via cable (no text or symbols)STAP 6: GEBRUIK JE KEYPAD VLAK OF GEKANTELD OP DE STANDAARD
flowchart
graph LR
    A["Grid-based device"] --> B["Rectangular electronic device"]
STAP 7: LOGI OPTIONS+ INSTALLEREN
natural_image
Pure technical line drawing of a rectangular frame with rounded corners and a central square, no text or symbols present.På-/av-knapp
Easy-switch™-knapp
MX Creative Keypad
natural_image
Pure mechanical diagram showing a U-shaped component with a central rod and vertical shaft, no text or symbols present.USB-C-port
STEG 1: INNEHÅLL
- MX Creative Dialpad
- 2 st. AAA-batterier
- MX Creative Keypad
- USB-C- till C 2.0-sladd
- Stativ
- Bruksanvisning
STEG 2: AKTIVERA DIN MX CREATIVE DIALPAD FÖR ATT ANSLUTA DEN
natural_image
Simple line drawing of a laptop connected to a grid device via cable (no text or symbols)STEG 6: ANVÄND DIN KEYPAD LIGGANDES PLATT ELLER LUTAD PÅ SITT STATIV
flowchart
graph LR
    A["Grid-based device"] --> B["Electronic device"]
STEG 7: INSTALLERA LOGI OPTIONS+
TRIN 1: KASSENS INDHOLD
natural_image
Line drawing of a laptop connected to a grid device via cable (no text or symbols)TRIN 6: BRUG DIT KEYPAD FLADT ELLER SKRÅTSTILLET PÅ DETS HOLDER
flowchart
graph LR
    A["Grid-based device"] --> B["Rectangular electronic device"]
TRIN 7: INSTALLER LOGI OPTIONS+
BLI KJENT MED PRODUKTET
natural_image
Line drawing of a laptop connected to a grid device via cable (no text or symbols)TRINN 6: BRUK KEYPADEN DIN FLAT ELLER VIPPET PÅ STATIVET
Du kan bruke keypaden flatt på skrivebordet eller festet i keypad-holderen på stativet.
Kabelen kan stikkes inn i kabelsporet på baksiden av stativet for bedre kabelhändtering.
flowchart
graph LR
    A["Grid-based device"] --> B["Electronic device"]
TRINN 7: INSTALLERE LOGI OPTIONS+
natural_image
Simple line drawing of a laptop connected to a grid device via cable (no text or symbols)VAIHE 6: KÄYTÄ KEYPADIA TASAISENA TAI KALLISTETTUNA JALUSTASSAAN
flowchart
graph LR
    A["Grid-based device"] --> B["Electronic device"]
VAIHE 7: ASENNA LOGI OPTIONS+
natural_image
Pure technical diagram of a rectangular frame with internal components and no text or symbolsnatural_image
Pure mechanical diagram showing a U-shaped component with a central shaft and vertical rod, no text or symbols present.Θúpa USB-C
natural_image
Simple line drawing of a laptop connected to a grid device via cable (no text or symbols)flowchart
graph LR
    A["Grid-based device"] --> B["Rectangular electronic device"]
BHMA 7: EΓΚΑΤΑΣΤΗΣΤΕ ΤΟ LOGI OPTIONS+
natural_image
Pure technical line drawing of a rectangular frame with rounded corners and a central square, no text or symbols present.Выключатель питания
Кнопка Easy-Switch™
MX Creative Keypad

natural_image
Pure mechanical diagram showing a U-shaped component with a central shaft and vertical rod, no text or symbols present.Порт USB-C
natural_image
Line drawing of a laptop connected to a grid device via cable (no text or symbols)flowchart
graph LR
    A["Grid-based device"] --> B["Rectangular electronic device"]
ШАГ 7: УСТАНОВКА LOGI OPTIONS+
natural_image
Pure technical line drawing of a rectangular frame with rounded corners and a central square, no text or symbols present.Wyłącznik zasilania
Przycisk Easy-Switch™
MX Creative Keypad

natural_image
Pure mechanical diagram showing a U-shaped component with a central rod and vertical shaft (no text or symbols)Port USB-C
KROK 1: ZAWARTOŚĆ OPAKOWANIA
KROK 3: DIODA LED POWINNA SZYBKO MIGAĆ
natural_image
Line drawing of a laptop connected to a grid device via cable (no text or symbols)KROK 6: UŻYWAJ KŁAWIATURY KEYPAD NA PŁASKO LUB W POCHYLENIU PO USTAWIENIU NA PODSTAWCE
flowchart
graph LR
    A["Grid-based device"] --> B["Switched device"]
KROK 7: INSTALACJA APLIKACJI LOGI OPTIONS+
natural_image
Simple line drawing of a laptop connected to a grid device via cable (no text or symbols)6. LÉPÉS: HASZNÁLJA A BILLENTYÜZETET VÍZSZINTESEN, VAGY MEGDÖNTVE AZ ÁLLVÁNYÁN
flowchart
graph LR
    A["Grid-based device"] --> B["Rectangular electronic device"]
7. LÉPÉS: A LOGI OPTIONS+ TELEPÍTÉSE
natural_image
Pure technical diagram of a rectangular frame with internal components and no text or symbolsVypínač napájení
natural_image
Pure mechanical diagram showing a U-shaped component with a central shaft and vertical rod (no text or symbols)PortUSB-C
KROK 1: OBSAH BALENÍ
natural_image
Simple line drawing of a laptop connected to a grid device via cable (no text or symbols)KROK 6: POUŽÍVEJTE KLÁVESNICI KEYPAD NA ROVNÉM POVRCHU NEBO NAKLONĚNOU NA STOJÁNKU
flowchart
graph LR
    A["Grid-based device"] --> B["Rectangular electronic device"]
KROK 7: NAINSTALUJTE APLIKACI LOGI OPTIONS+
natural_image
Pure technical line drawing of a rectangular component with rounded corners and internal features (no text or symbols)Vypínač
Tlačidlo Easy-switch™
MX Creative Keypad
natural_image
Pure mechanical diagram showing a U-shaped component with a central rod and vertical shaft (no text or symbols)Port USB-C
KROK 1: OBSAH BALENIA
KROK 3: LED DIÓDA BY MALA RÝCHLO BLIKAŤ
natural_image
Line drawing of a laptop connected to a grid device via cable (no text or symbols)KROK 6: POUŽÍVAJTE KLÁVESNICU NALEŽATO ALEBO SKLOPENÚ NA STOJANE
natural_image
Diagram showing a device transitioning from a grid-patterned case to a rectangular case, with no text or symbols present.KROK 7: INSTALÁCIA LOGI OPTIONS+
natural_image
Simple line drawing of a laptop connected to a grid device via cable (no text or symbols)flowchart
graph LR
    A["Grid-based device"] --> B["Rectangular electronic device"]
KPOK 7. BCTAHOBITB LOGI OPTIONS+
1. TOIMING. KARBI SISU
natural_image
Simple line drawing of a laptop connected to a grid device via cable (no text or symbols)6. TOIMING. KASUTAGE KEYPADI TASAPINDSELT VÕI ALUSELE ASETATUNA KALLUTATULT
flowchart
graph LR
    A["Grid-based device"] --> B["Rectangular electronic device"]
7. TOIMING. INSTALLIGE LOGI OPTIONS+
natural_image
Pure technical line drawing of a rectangular frame with rounded corners and a central square, no text or symbols present.natural_image
Pure mechanical diagram showing a U-shaped component with a central shaft and vertical rod (no text or symbols)USB-C pieslēgvieta
1. DARBĪBA. IEPAKOJUMA SATURS
natural_image
Simple line drawing of a laptop connected to a grid device via cable (no text or symbols)6. DARBIBA. IZMANTOJIET KEYPAD LIDZENI VAI SASVERTU UZ STATIVA.
flowchart
graph LR
    A["Grid-based device"] --> B["Electronic device"]
7. DARBIBA. INSTALÉJIET LOGI OPTIONS+
SUSIPAŽINKITE SU SAVO PRODUKTU
natural_image
Line drawing of a laptop connected to a grid device via cable (no text or symbols)6VEIKSMAS.NAUDOKITE„KEYPAD“ PLOKŠČIOJE PADĚTYJE ARBA PAKREIPKITE JĄ ANT JOS STOVO
flowchart
graph LR
    A["Grid-based device"] --> B["Rectangular electronic device"]
7 VEIKSMAS. IDIEGTI „LOGI OPTIONS+“
natural_image
Pure technical line drawing of a rectangular frame with rounded corners and a central square, no text or symbols present.natural_image
Pure mechanical diagram showing a U-shaped component with a central rod and vertical shaft, no text or symbols present.USB-C nopm
natural_image
Simple line drawing of a laptop connected to a grid device via cable (no text or symbols)flowchart
graph LR
    A["Grid-based device"] --> B["Rectangular electronic device"]
СТЪПКА 7: ИНСТАЛИРАНЕ НА LOGI OPTIONS+
natural_image
Pure technical line drawing of a rectangular frame with rounded corners and a central square, no text or symbols present.natural_image
Pure mechanical diagram showing a U-shaped component with a central shaft and vertical rod, no text or symbols present.Priključak USB-C
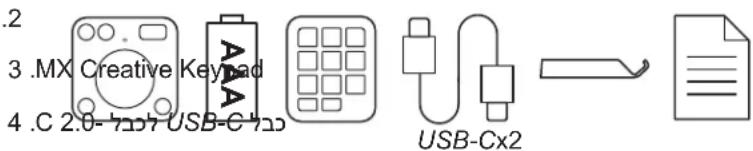
1. KORAK: SADRŽAJ KUTIJE
- MX Creative Dialpad
- Dvije baterije AAA
- MX Creative Keypad
- Kabel USB-C na C 2.0
- Postolje
- Korisnička dokumentacija

2. KORAK: UKLJUČIVANJE UREĐAJA MX CREATIVE DIALPAD RADI POVEZIVANJA
Pronadite prekidač na gornjoj strani Dialpada i prebacite ga u položaj ON (uključeno).
natural_image
Line drawing of a laptop connected to a grid device via cable (no text or symbols)6. KORAK: UPOTREBA KEYPADA KOJI SE NALAZI RAVNO ILI NAGNUT NA POSTOLJU
Možete upotrebljavati Keypad položen ravno na stolu ili umetnut u držač za Keypad na postolju.
flowchart
graph LR
    A["Grid-based device"] --> B["Rectangular electronic device"]
7. KORAK: INSTALIRANJE APLIKACIJE LOGI OPTIONS+
Aplikacija Logi Options+ moćna je aplikacija jednostavna za upotrebu kojom unapređuje vaše iskustvo pri korištenju uređajima marke Logitech omogućujući vam da ih prilagodite svojim željama.

app.logi.com
DIMENZIJE
MX CREATIVE DIALPAD - 128 g
Visina: 92,1 mm (3,62 in)
Širina: 93,7 mm (3,68 in)
Dubina: 33,8 mm (1,33 in)
MX CREATIVE KEYPAD - 96 g
Visina: 91,7 mm (3,62 in)
Širina: 77,9 mm (3,06 in)
Dubina: 25,5 mm (1,00 in)
POSTOLJE - 61 g
Visina: 112,7 mm (4,43 in)
Širina: 58,5 mm (2,30 in)
Dubina: 20,5 mm (0,80 in)
KABEL USB-C 2.0 - 27 g
Duljina: 1500 mm (59,05 in)
www.logitech.com/support/mxcreativeconsole
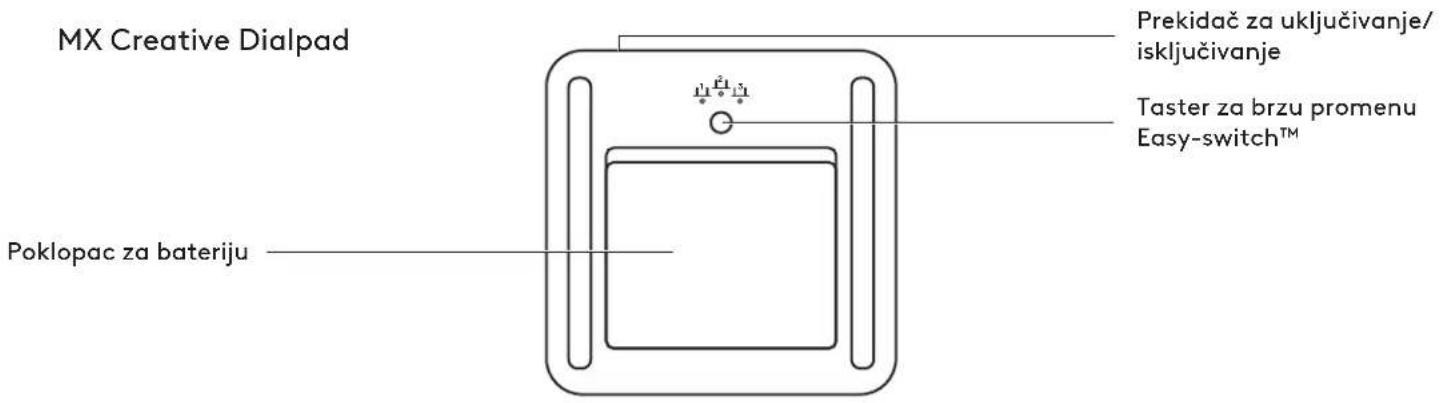
UPOZNAJTE SVOJ PROIZVOD
Prikaz prednje strane uređaja MX Creative Console sa oznakama funkcija

Prikaz zadnje strane uređaja MX Creative Console sa oznakama funkcija
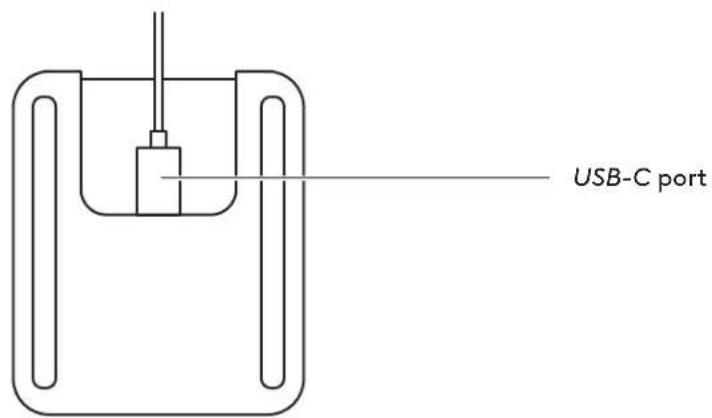
MX Creative Keypad
KORAK 1: SADRŽAJ PAKOVANJA
- MX Creative Dialpad
- 2x AAA baterije
- MX Creative Keypad
- USB-C na C 2.0 kabl
- Stalak
- Dokumentacija za korisnika

KORAK 2: UKLJUČITE MX CREATIVE DIALPAD DA BISTE GA POVEZALI
Pronadite prekidač na vrhu izbornika i prebacite ga u položaj UKLJUČENO.
Ako nema napajanja, pokušajte da zamenite 2x AAA baterije.

KORAK 3: LED TREBA BRZO DA TREPERI
Ako to nije slučaj, pritisnite i zadržite taster za brzu promenu Easy-Switch (na poledini izbornika) na 3 sekunde.
natural_image
Line drawing of a laptop connected to a grid device via cable (no text or symbols)KORAK 6: KORISTITE TASTATURU RAVNO ILI NAGNUTO NA NJENOM STALKU
Možete da koristite tastaturu ravno na svom stolu ili da je ubacite u držač za tastaturu na stalku.
flowchart
graph LR
    A["Grid-based device"] --> B["Rectangular device"]
KORAK 7: INSTALIRAJTE LOGI OPTIONS+
natural_image
Pure technical line drawing of a rectangular frame with rounded corners and a central square, no text or symbols present.natural_image
Pure mechanical diagram showing a U-shaped component with a central rod and vertical shaft, no text or symbols present.Vrata USB-C
1. KORAK: VSEBINA ŠKATLE
- MX Creative Dialpad
- 2x baterije AAA
- MX Creative Keypad
- Kabel USB-C na C 2.0
- Stojalo
- Uporabniška dokumentacija

2. KORAK: VKLOPITE NAPRAVO MX CREATIVE DIALPAD IN JO POVEŽITE
natural_image
Simple line drawing of a laptop connected to a grid device via cable (no text or symbols)6. KORAK: UPORABLJAJTE TIPKOVNICO V RAVNEM ALI NAGNJENEM POLOŽAJU NA STOJALU
flowchart
graph LR
    A["Grid-based device"] --> B["Rectangular electronic device"]
KORAK 7: MOŽNOSTI NAMESTITVE LOGI+
PASUL 1: CUTIA CONTINE
- MX Creative Dialpad
- 2 baterii AAA
- MX Creative Keypad
- Cablu USB-C la C 2.0
- Stand
- Documentatie pentru utilizator
PASUL2:PENTRUA-LCONECTA, PORNIȚI TASTATURA MX CREATIVE DIALPAD
natural_image
Simple line drawing of a laptop connected to a grid device via cable (no text or symbols)PASUL 6: UTILIZATI KEYPAD ÎN POZITIE ORIZONTALĂ SAU ÎNCLINATĂ PE STAND
flowchart
graph LR
    A["Grid-based device"] --> B["Rectangular electronic device"]
PASUL 7: INSTALATI LOGI OPTIONS+
natural_image
Line drawing of a laptop connected to a grid device via cable (no text or symbols)6. ADIM: KEYPAD'İ DÜZ ZEMİNE YATIRIN VEYA STANDINA EĞİMLİ OLARAK YERLEŞTİRİP KULLANIN
flowchart
graph LR
    A["Grid-based device"] --> B["Rectangular electronic device"]
7. ADIM: LOGI OPTIONS+ YÜKLEYİN
natural_image
Pure technical diagram of a rectangular frame with internal components and no text or symbolsمفتاح تشغيل وإيقاف
Easy-switch™ jj
natural_image
Pure mechanical diagram showing a U-shaped component with a central rod and vertical shaft (no text or symbols)USB-C منFD
natural_image
Simple line drawing of a laptop connected to a grid device via cable (no text or symbols)flowchart
graph LR
    A["Grid-based device"] --> B["Rectangular device"]
+LOGI OPTIONS : تثبيت
?תְבָרִיַעֹן:1 בּוֹ
1 .MX Creative Dialpad
AAA niflo x 2
-
thus
-
cygnosztat
natural_image
Line drawing of a laptop connected to a grid device via cable (no text or symbols)flowchart
graph LR
    A["Grid-based device"] --> B["Electronic device"]
+LOGI OPTIONS 17:7
natural_image
Line drawing of a laptop connected to a grid device via cable (no text or symbols)flowchart
graph LR
    A["Grid-based device"] --> B["Rectangular device"]
natural_image
Simple line drawing of a laptop connected to a grid device via cable (no text or symbols)natural_image
Diagram showing a device transitioning from a grid-patterned case to a rectangular case, with no text or symbols present.步驟 7:安裝 LOGI OPTIONS+
natural_image
Simple line drawing of a laptop connected to a grid device via cable (no text or symbols)flowchart
graph LR
    A["Grid-based device"] --> B["Switched device"]
LANGKAH 1: ISI KEMASAN
- MX Creative Dialpad
- 2x Baterai AAA
- MX Creative Keypad
- Kabel USB-C ke C 2.0
- Dudukan
- Dokumentasi pengguna

LANGKAH 2: AKTIFKAN MX CREATIVE DIALPAD UNTUK MENGHUBUNGKANNYA
natural_image
Line drawing of a laptop connected to a grid device via cable (no text or symbols)LANGKAH 6: GUNAKAN KEYPAD PADA POSISI MENDATAR ATAU MIRING PADA DUDUKANNYA
flowchart
graph LR
    A["Grid-based device"] --> B["Rectangular electronic device"]