
SolarCharger DC - Robot mower HUSQVARNA - Free user manual and instructions
Find the device manual for free SolarCharger DC HUSQVARNA in PDF.

| Product type | Solar charging system for robotic lawnmower |
| Brand | Husqvarna |
| Model | SolarCharger DC |
| Control box dimensions | 29 x 16 x 13 cm |
| Battery dimensions | 41 x 18 x 23 cm |
| Solar panel dimensions | 173 x 114 x 3 cm |
| Control box weight | 4 kg |
| Battery weight | 33.5 kg |
| Solar panel weight | 21.5 kg |
| Control box output voltage | 28 V |
| Adjustable output current | 1.3 / 2.2 / 4.2 / 7.0 A |
| Battery type | Pure GEL, deep discharge |
| Battery voltage | 12 V |
| Battery capacity | 100 Ah |
| Control box protection rating | IPX4 |
| Main functions | Direct solar charging of the robot, energy storage in battery, automatic switching based on sunlight |
| Operating temperature | -5°C to 45°C |
| Battery charging temperature | -20°C to 50°C |
| Installable solar panels | 1 or 2 |
| Maintenance and cleaning | Fully charge the battery before storage, clean solar panels with a soft cloth, check connections |
| Safety | Read the manual before use, do not modify the product, use genuine Husqvarna parts, disconnect if cable is damaged |
| Spare parts and repairability | Contact a Husqvarna authorized service workshop for repairs and spare parts |
| General information | Compliant with EU directives, do not dispose of with household waste, recycle through appropriate channels |
Frequently Asked Questions - SolarCharger DC HUSQVARNA
User questions about SolarCharger DC HUSQVARNA
0 question about this device. Answer the ones you know or ask your own.
Ask a new question about this device
Download the instructions for your Robot mower in PDF format for free! Find your manual SolarCharger DC - HUSQVARNA and take your electronic device back in hand. On this page are published all the documents necessary for the use of your device. SolarCharger DC by HUSQVARNA.
USER MANUAL SolarCharger DC HUSQVARNA
EN Operator's manual 2-8
SV Bruksanvisning 9-15
DA Brugsanvisning 16-22
FI Käyttöohje 23-29
NO Bruksanvisning 30-36
1.1 Safety definitions
Warnings, cautions and notes are used to point out specially important parts of the manual.

WARNING: Used if there is a risk of injury or death for the operator or bystanders if the instructions in the manual are not obeyed.

CAUTION: Used if there is a risk of damage to the product, other materials or the adjacent area if the instructions in the manual are not obeyed.
Note: Used to give more information that is necessary in a given situation.
1.2 General safety instructions

WARNING: Read the operator's manual and make sure that you understand the instructions before you use the product.

WARNING: Read the warning instructions that follow before you use the product.
- Only use the product with the equipment that is recommended by Husqvarna.
- Do not put the low-voltage cable in the work area of the robotic lawn mower. This can cause damage to the low-voltage cable.
- Disconnect the low-voltage cable from the product if it is damaged. A damaged low-voltage cable increases the risk of electrical shock.
- Make sure that you understand the instructions for operation before you operate the product.
- Make sure that you understand the instructions for maintenance before you do maintenance on the product.
- Do not make modifications to this product.
- The operating temperature for the product is -5 °C–45 °C / 23 °F–113 °F.
1.3 Battery safety
WARNING: Read the warning instructions that follow before you use the product.
- Do not short-circuit the battery.
- Do not charge the battery in a sealed container.
- The charging temperature is between -20^ / -4 ^ F and 50^ / 122^ . The storage temperature is between -20^ / -4^ and 60^ / 140^ . The discharge temperature is between -40^ / -40^ and 60^ / 140^ .
- The lifetime of the battery decreases if you use the battery in ambient temperatures >45^ / >133^ .
2 Introduction
2.1 Support
For support about the product, speak to your Husqvarna servicing dealer.
2.2 Product description
The product includes 1 or 2 solar panels, a mounting system, a control box and a battery. The control box is connected to the charging station of the robotic lawn mower. The product charges the robotic lawn mower with solar power.
The robotic lawn mower charges directly with solar power from the solar panel when there is sun. If the robotic lawn mower charges directly with solar power it does not charge with the battery. This extends the
life cycle of the battery. When the robotic lawn mower does not charge, the battery stores the solar power. When there is no sun, the robotic lawn mower charges with the battery. The robotic lawn mower can charge with a fully charged battery for 1–2 days. This can be different for different models of robotic lawn mowers, power consumption, operation hours and sunlight.
You can install 1 or 2 solar panels. Install 2 solar panels if you have these conditions for your work area:
- The power supply unit has an output current of 7 A.
• The work area is more than 3500 m².
- If it is necessary that the robotic lawn mower operates for a long season without stops.
2.3 Product overview
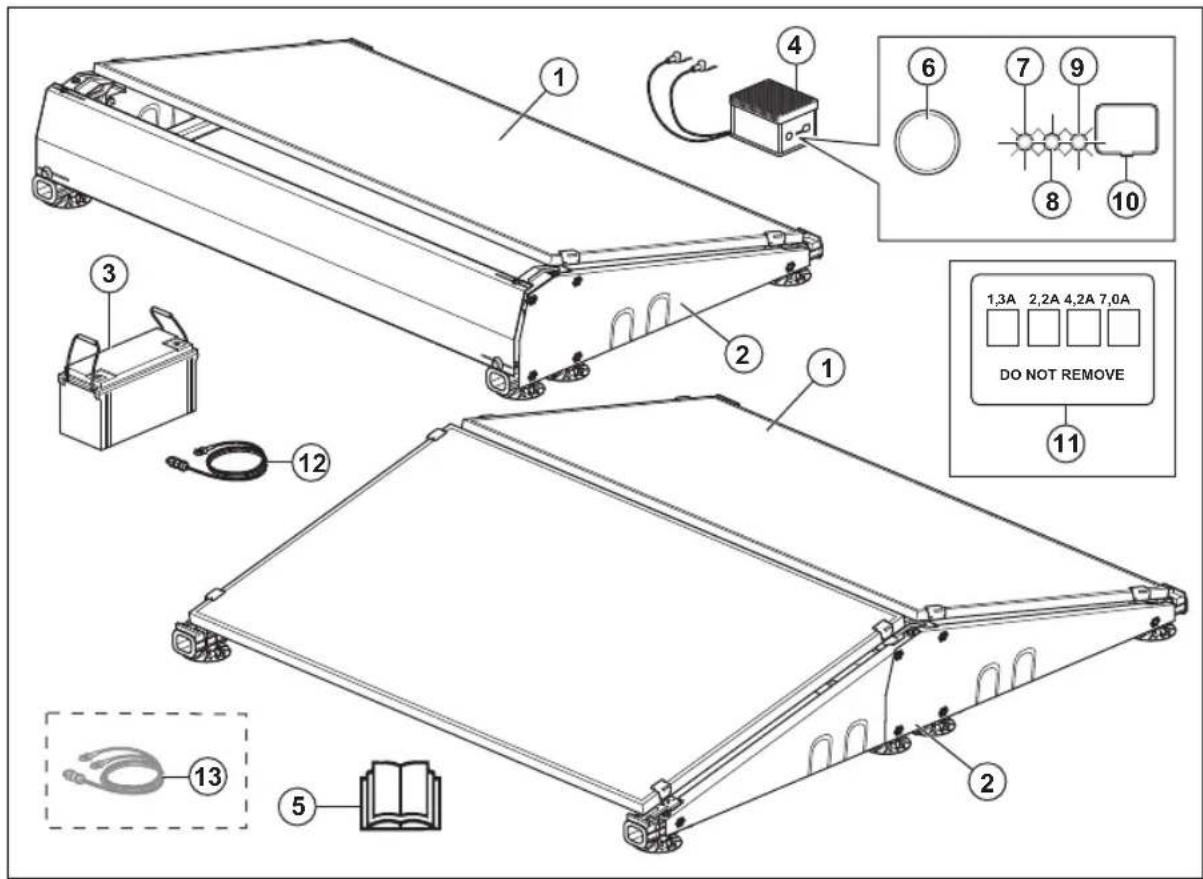
- Solar panel
- Mounting system
- Battery
- Control box
- Operator's manual
- ON/OFF button
- LED indicator for solar charging
- LED indicator for battery level
- LED indicator for output power
- Lid for configuration
- Output current label
- Low-voltage cable
- Split cable 1
2.4 Symbols on the product
These symbols can be found on the product. Make sure that you understand them.
This product complies with the applicable EU Directives. Compliance to applicable EU Directives is declared by the manufacturer Viva Energi A/S.
The product is not domestic waste. Recycle it at an approved disposal location for electrical and electronic equipment.
3 Installation
3.1 Introduction - Installation
WARNING: Read and understand the safety chapter before you install the product.
CAUTION: Use original spare parts and installation material.
Note: Refer to www.husqvarna.com for more information about installation.
3.2 Main components for installation
- Solar panels ^2 .
- Control box.
- Battery.
- Low-voltage cable.
- Charging station ^3 .
3.3 To install the product
You can find more instructions in the manual that is included for the mounting system for the solar panel.
WARNING: Make sure that the plugs of the cables are clean and dry before you connect them.
CAUTION: Put the low-voltage cable in an area where the robotic lawn mower does not cut.
CAUTION: Do not put the low-voltage cable in a coil or below the charging station plate. A coil causes interference with the signal from the charging station.
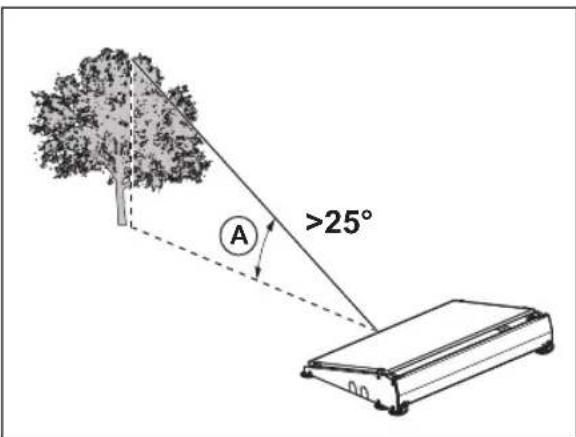
- Put the solar panel in an area that has sunlight during the day.
- Make sure that there are no buildings or trees near the solar panel that can limit the sunlight.
- Put the solar panel in a position where there is >25^ angle (A) from the highest point of an object in a south direction.
- Put the solar panel near the charging station of the robotic lawn mower.

CAUTION: Do not put the solar panel in the work area of the robotic lawn mower.
- You can use the low-voltage cable of the reference station to extend the cable between the control box and the reference station.

CAUTION: Do not use the low-voltage cable of the robotic lawn mower to extend the cable between the control box and the charging station.
- If you use 1 solar panel, make sure that the solar panel points to the south. If you use 2 solar panels, make sure that 1 solar panel points to the west and 1 points to the east.
natural_image
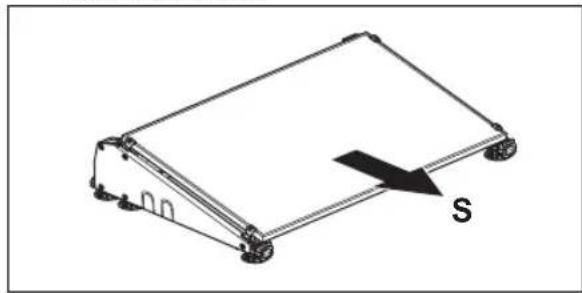
Isometric diagram of a rectangular electronic device with a labeled arrow indicating direction (no text or symbols beyond the label 'S')
- If it is possible, put the solar panel on a hard and level surface with no grass.
• After the installation of the product, Husqvarna recommends to fully charge the battery for the solar panels.
Note: The battery is fully charged after 1–2 days. Husqvarna recommends that the product is fully charged before you start the robotic lawn mower.
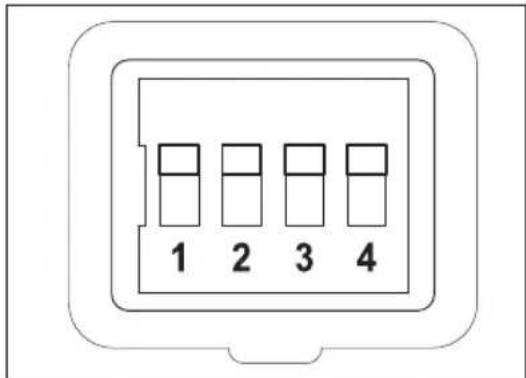
3.4 To set the output current for the control box

CAUTION: The output current must be set correctly for your model of robotic lawn mower. You can find information about the output current on the power supply unit for the robotic lawn mower. For more
information, read the operator's manual for the robotic lawn mower.
-
Remove the lid on the front of the control box with a flat screwdriver.
-
Set the 4 switches to the applicable output current. Refer to the table below.
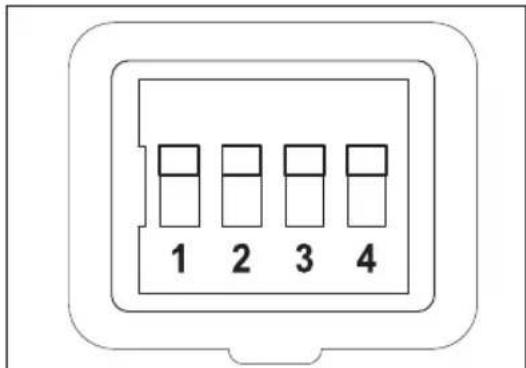
| Output current (A) | Switch 1 | Switch 2 | Switch 3 | Switch 4 |
| 1.3 Down | Up Down | Down | ||
| 2.2 Down | Up Down | Up | ||
| 4.2 Down | Up Up Down | |||
| 7 Down | Up Up Up | |||
-
Install the lid on the front of the control box and make sure that it seals correctly.
-
Attach the output current label on the product and mark which output current that is set.
4 Operation
4.1 To set the product to ON

WARNING: Read and understand the safety chapter before you use the product.
- Push the ON/OFF button to set the product to ON.
Note: The solar charging is on when the SOLAR CHARGING LED indicator flashes slowly.
4.2 To set the product to OFF
- Push the ON/OFF button to set the product to OFF. Make sure that the 3 LED indicators go out.
4.3 LED indicators on the product for operation
The LED indicators specified in the table below show if the product operates correctly. If the product does not operate correctly, refer to LED indicators on the product for troubleshooting on page 6.
| SOLAR CHARGING LED Cause | |
| Flashes slowly The solar panel charges the battery. | |
| BATTERY LEVEL LED Cause | |
| Constant light The battery operates correctly. | |
| OUTPUT ON LED Cause | |
| Constant light The charging station is on and the robotic lawn mower is not in the charging station. | |
| Flashes slowly The solar panel charges the battery of the robotic lawn mower. | |
5 Troubleshooting
5.1 LED indicators on the product for troubleshooting
The LED indicators on the product shows the product status:
| SOLAR CHARGING LED | Cause Solution | |
| Flashes quickly The solar panel is not installed correctly. The cables of the solar panel are not connected correctly to the control box. | Install the solar panel correctly. Make sure that the 2 cables of the solar panel are connected correctly to the control box. | |
| Too high voltage from the solar panels. If you use 2 solar panels, make sure that the solar panels are connected correctly. Make sure that the split cable is correctly installed between the solar panel and the control box. | ||
| LED indicator is off The product does not receive sunlight. Wait until there is sunlight. | ||
| Constant light The product does not receive sufficient sunlight. It is dusk, dawn or the start or end of the season. | Wait until there is more sunlight. | |
| BATTERY LEVEL LED | Cause Solution | |
| Flashes quickly The battery is not installed correctly. Make sure that the battery is installed correctly. Make sure that the cables of the control box are connected correctly to the battery. Connect the red cable to the red (+) terminal and the black cable to black (-) terminal on the battery. | ||
| LED indicator is off The battery is empty. The solar panel is not in the sunlight. | ||
| OUTPUT ON LED Cause Solution | ||
| Flashes quickly The charging station is connected to the control box for the first time. | Wait 30 seconds for the product to start. | |
| LED indicator is off The output is off and the battery is empty. Wait until the battery is charged. | ||
6 Storage and disposal
6.1 To put the product in storage
- Fully charge the battery. Refer to battery on page 8 . To charge the
- Set the product to OFF. Refer to to OFF on page 5. To set the product
- Keep the control box and the battery in a dry, frost-free space.
- If you keep the solar panels and mounting system outdoors, make sure that they are attached tightly and cannot move. Attach the mounting system tightly or put a heavy object in the battery container to prevent movement.
6.2 Disposal

The symbol on the Husqvarna product means that the product is not domestic waste. Use the local recycling system for electronic components and batteries. Remove the battery from the product before you discard the product.
Obey the local recycling requirements and applicable regulations. Speak to local authorities, recycling location or your Husqvarna authorized service technician for more information.
6.3 To charge the battery
Charge the battery before you put it in storage.
- Set the product to ON to let the solar panels charge the battery. Charge the battery fully without
charging the robotic lawn mower in the charging station.
- Charge the battery with a 12 V battery charger with a maximum charging current of 10 A.
Note: The battery is fully charged when the battery voltage is minimum 13.5 V.
7 Technical data
7.1 Technical data
| Control box | |
| Output voltage, V 28 | |
| Output current, A 1.3/2.2/4.2/7.0 | |
| IP-code IPX4 | |
| Length, cm 29 | |
| Width, cm 16 | |
| Height, cm 13 | |
| Weight, kg 4 | |
| Battery | |
| Battery type Pure GEL, deep cycle | |
| Output voltage, V 12 | |
| Capacity, Ah 100 | |
| Length, cm 41 | |
| Width, cm 18 | |
| Height, cm 23 | |
| Weight, kg 33.5 | |
| Solar panel | |
| Length, cm 173 | |
| Width, cm 114 | |
| Height, cm 3 | |
| Weight, kg 21.5 | |
8 Säkerhet
8.1 Säkerhetsdefinitioner
natural_image
Isometric line drawing of a rectangular electronic device with a labeled arrow indicating direction (no text or symbols beyond the label 'S')
natural_image
Isometric line drawing of a rectangular electronic device with wheels and a labeled arrow indicating direction (no text or symbols beyond the label)
natural_image
Diagram of a mechanical or structural component with labeled parts W and E, showing directional arrows indicating movement (no text or symbols beyond labels)natural_image
Isometric line drawing of a rectangular electronic device with a labeled arrow indicating direction (no text or symbols beyond the label)
- Solcellepanel
- Monteringssystem
- Batteri
- Kontrollboks
- Bruksanvisning
- På/av-knapp
- LED-indikator for solcellelading
- LED-indikator for batterinivå
- LED-indikator for utgangseffekt
- Lokk for konfigurasjon
- Etikett for utgangsstrøm
- Lavspenningskabel
- Splittkabel ^13
natural_image
Isometric line drawing of a rectangular electronic device with a labeled arrow indicating direction (no text or symbols beyond the label 'S')
natural_image
Diagram of a mechanical or structural component with labeled parts W and E, showing directional arrows indicating movement (no text or symbols beyond labels)natural_image
Isometric line drawing of a rectangular electronic device with a labeled arrow indicating direction (no text or symbols beyond the label)
natural_image
Diagram of a mechanical or structural component with labeled parts W and E, showing directional arrows indicating movement (no text or symbols beyond labels)natural_image
Isometric line drawing of a rectangular electronic device with a labeled arrow pointing to the side (no text or symbols beyond the label 'S')
natural_image
Isometric line drawing of a rectangular electronic device with wheels and a labeled arrow indicating direction (no text or symbols beyond the label)
natural_image
Isometric line drawing of a rectangular electronic device with a labeled arrow indicating direction (no text or symbols beyond the label 'S')
natural_image
Isometric line drawing of a rectangular electronic device with a labeled arrow indicating direction (no text or symbols beyond the label)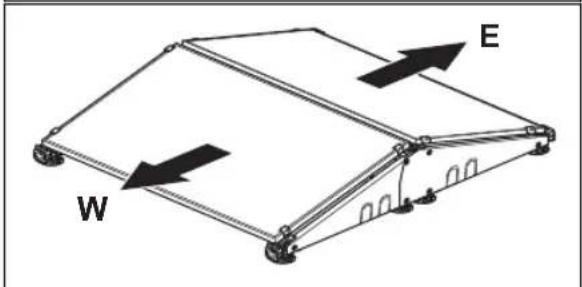
natural_image
Isometric line drawing of a rectangular frame with wheels and a labeled arrow indicating direction (no text or symbols beyond the label)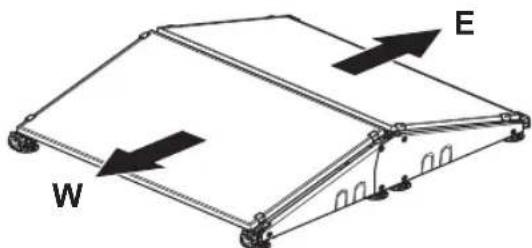
natural_image
Diagram of a mechanical or structural component with labeled parts W and E, showing internal structure and directional arrows (no text or symbols beyond labels)natural_image
Isometric line drawing of a rectangular electronic device with a labeled arrow indicating direction (no text or symbols beyond the label)
natural_image
Isometric line drawing of a rectangular electronic device with a labeled arrow indicating direction (no text or symbols beyond the label)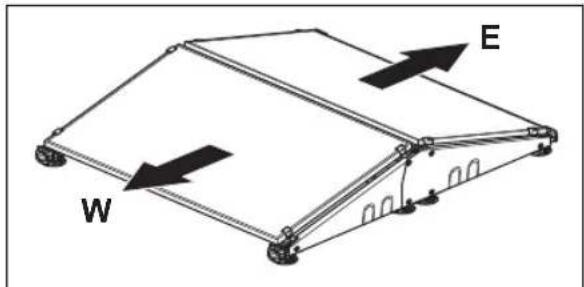
natural_image
Isometric line drawing of a rectangular electronic device with a labeled arrow indicating direction (no text or symbols beyond the label)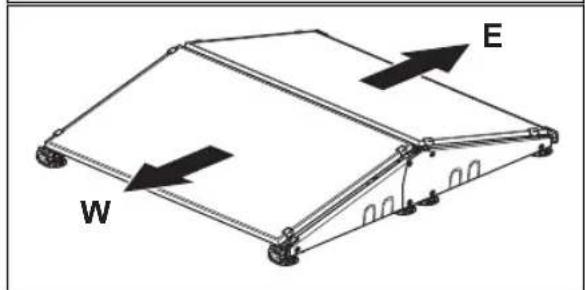
natural_image
Diagram of a mechanical or structural component with labeled parts W and E, showing directional arrows (no text or symbols beyond labels)natural_image
Isometric line drawing of a rectangular electronic device with a labeled arrow indicating direction (no text or symbols beyond the label 'S')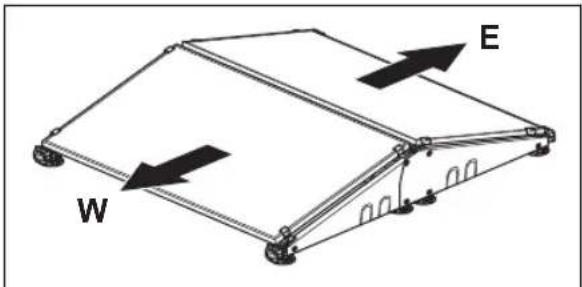
natural_image
Isometric line drawing of a rectangular electronic device with a labeled arrow pointing to the side (no text or symbols beyond the label 'S')
natural_image
Isometric line drawing of a rectangular electronic device with a labeled arrow indicating direction (no text or symbols beyond the label)
natural_image
Isometric line drawing of a rectangular electronic device with wheels and an arrow labeled 'S' indicating direction (no text or symbols beyond label)
natural_image
Diagram of a mechanical or structural component with labeled parts W and E, showing directional arrows indicating movement (no text or symbols beyond labels)natural_image
Isometric line drawing of a rectangular electronic device with a labeled arrow indicating direction (no text or symbols beyond the label 'S')
natural_image
Diagram of a mechanical or structural component with labeled parts W and E, showing directional arrows (no text or symbols beyond labels)natural_image
Isometric line drawing of a rectangular electronic device with a labeled arrow indicating direction (no text or symbols beyond the label 'S')
natural_image
Isometric line drawing of a rectangular electronic device with a labeled arrow 'S' pointing to its side (no text or symbols on the device itself)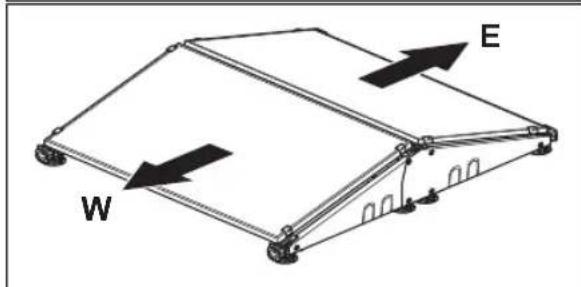
natural_image
Isometric line drawing of a rectangular electronic device with wheels and a labeled arrow indicating direction (no text or symbols beyond the label)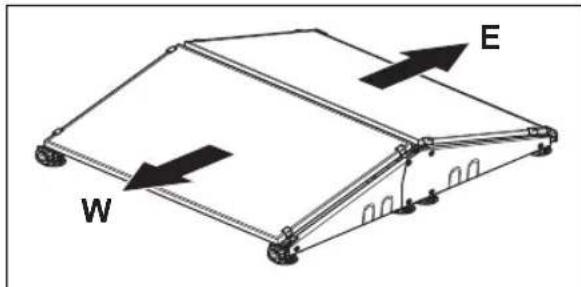
natural_image
Diagram of a mechanical or structural component with labeled parts W and E, showing directional arrows (no text or symbols beyond labels)- Solarna ploča
- Sustav za montažu
- Baterija
- Upravljačka kutija
- Korisnički priručnik
- Gumb za uključivanje/isključivanje (ON/OFF)
- LED indikator solarnog punjenja
- LED indikator razine baterije
- LED indikator izlazne snage
- Poklopac za konfiguraciju
- Oznaka izlazne struje
- Niskonaponski kabel
- Razdjelni kabel 67
156.4 Simboli na proizvodu
Na proizvodu možete pronaći ove simbole. Obavezno ih proučite i usvojite.
natural_image
Isometric line drawing of a rectangular electronic device with wheels and an arrow labeled 'S' indicating direction (no text or symbols beyond label)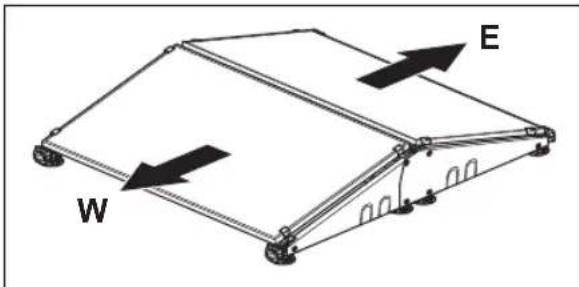
natural_image
Diagram of a mechanical or structural component with labeled parts W and E, showing directional arrows indicating movement (no text or symbols beyond labels)- Ako je moguće, solarnu ploču postavite na tvrdu i ravnu površinu bez trave.
- Husqvarna preporučuje da nakon instalacije proizvoda potpuno napunite bateriju solarnih ploča.
Napomena: Baterija je potpuno napunjena nakon 1 – 2 dana. Husqvarna preporučuje potpuno punjenje proizvoda prije pokretanja robotske kosilice za travu.
157.4 Postavljanje izlazne struje za upravljačku kutiju

OPREZ: Izlazna struja mora biti pravilno postavljena za vaš model robotske kosilice. Informacije o izlaznoj struji možete pronaći na jedinici napajanja robotske kosilice za travu. Više informacija potražite u korisničkom priručniku za robotsku kosilicu.
-
Ravnim odvijačem uklonite poklopac s prednje strane upravljačke kutije.
-
Postavite 4 prekidača za odgovarajuću izlaznu struju. Pogledajte tablicu u nastavku.
| Izlazna struja (A) | Preki-dač 1 | Preki-dač 2 | Preki-dač 3 | Preki-dač 4 |
| 1,3 Dolje | Gore Dolje | Dolje | ||
| 2,2 Dolje | Gore Dolje | Gore | ||
| 4,2 Dolje | Gore Gore | Dolje | ||
| 7 Dolje G | Gore Gore | Gore |
- Postavite poklopac na prednji dio upravljačke kutije i provjerite je li pravilno zabrtvljen.
- Postavite oznaku izlazne struje na uređaj i označite postavljenu izlaznu struju.
158 Rad
- Solarna ploča
- Sistem za montažu
- Baterija
- Upravljačka kutija
- Korisničko uputstvo
- Dugme ON/OFF (Uključivanje/isključivanje)
- LED indikator za solarno punjenje
- LED indikator za nivo napunjenosti baterije
- LED indikator za izlaznu snagu
- Poklopac za konfiguraciju
- Oznaka izlazne struje
- Niskonaponski kabl
- Podeljeni kabl 70

Proizvod je usaglašen sa važećim direktivama EU. Usaglašenost sa važećim direktivama EU je deklarisana od strane proizvođača Viva Energi A/S.
- Postavite solarnu ploču blizu stanice za punjenje robotske kosačice za travu.

OPREZ: Nemojte postavljati solarnu ploču u radnu oblast robotske kosačice za travu.
natural_image
Isometric line drawing of a rectangular electronic device with a labeled arrow indicating direction (no text or symbols beyond the label 'S')
natural_image
Simple line drawing of a rectangular electronic device with wheels and a labeled arrow indicating direction (no text or symbols beyond the label)
- Če je mogoče solarni panel postavite na trdo, ravno površino brez trave.
natural_image
Technical line drawing of a rectangular electronic device with a labeled arrow indicating direction (no text or symbols beyond the label 'S')
- Safety definitions
- General safety instructions
- Battery safety
- Introduction
- Support
- Product description
- Product overview
- Symbols on the product
- Installation
- Introduction - Installation
- Main components for installation
- To install the product
- To set the output current for the control box
- Operation
- To set the product to ON
- To set the product to OFF
- LED indicators on the product for operation
- Troubleshooting
- LED indicators on the product for troubleshooting
- Storage and disposal
- To put the product in storage
- Disposal
- To charge the battery
- Technical data
- Technical data
- Säkerhet
- Säkerhetsdefinitioner
- Simboli na proizvodu
- Postavljanje izlazne struje za upravljačku kutiju
- Rad
Brand : HUSQVARNA
Model : SolarCharger DC
Category : Robot mower