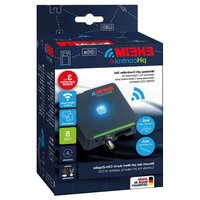
pHcontrol+e - Aquarium accessory EHEIM - Free user manual and instructions
Find the device manual for free pHcontrol+e EHEIM in PDF.


User questions about pHcontrol+e EHEIM
0 question about this device. Answer the ones you know or ask your own.
Ask a new question about this device
Download the instructions for your Aquarium accessory in PDF format for free! Find your manual pHcontrol+e - EHEIM and take your electronic device back in hand. On this page are published all the documents necessary for the use of your device. pHcontrol+e by EHEIM.
USER MANUAL pHcontrol+e EHEIM
natural_image
3D technical illustration of a mechanical or electrical device with coiled cable and connector (no text or symbols)
text_image
QR code image containing encoded data, no visible human-readable text6062

| de | Bedienungsanleitung |
| en | Operating manual |
| fr | Mode d'emploi |
| it | Istruzioni per l'uso |
| es | Manual de instrucciones |
| pt | Manual de instruções |
| nl | Bedieningshandleiding |
| da | Betjeningsvejledning |
| sv | Bruksanvisning |
| no | Bruksanvisning |
| fi | Käyttöohje |
| tr | Kullanma kılavuzu |
| pl | Instrukcja obsługi |
| cs | Návod k obsluze |
| sk | Návod na obsluhu |
| hu | Használati utasítás |
| sl | Navodilo za upravljanje |
| sr | Uputstvo za upotrebu |
| ro | Manual de utilizare |
| bg | Инструкция за експлоатация |
| ru | Руководство по обслуживанию |
| el | Обнгієх хрінс |
| ko | 사용 설명서 |
| zh | 操作说明书 |
de Bedienungsanleitung (Original)
Aquarium wifi-pH-Controller pHcontrol ^+e .....6
en Operating manual (translation)
WiFi-controlled pHcontrol+ ^e pH controller for aquariums....21
fr Mode d'emploi (traduction)
Contrôleur aquarium WiFi-pH pHcontrol+e 31
it Istruzioni per l'uso (traduzione)
Unità di controllo del pH per acquari con connessione WiFi pHcontrol+ ^e 42
es Manual de instrucciones (traducción)
Controlador WiFi de pH para acuarios pHcontrol+e......53
pt Manual de instruções (Tradução)
Controlador pH Wi-Fi para aquário pHcontrol+e....64
nl Gebruiksaanwijzing (vertaling)
Aquarium WiFi-pH-controller pHcontrol+e 75
da Betjeningsvejledning (oversættelse) akvarium wi-fi-pH-controller pHcontrol+e 86
SV Bruksanvisning (översättning)
Akvarium WiFi- pH-kontroller pHcontrol ^+ 96
no Bruksanvisning (oversettelse)
WiFi-pH-Controller pHcontrol+ ^e for akvarium....106
fi Käyttöohje (käännös)
Akvaarion WiFi-pH-ohjain pHcontrol+......116
tr Kullanım kılavuzu (çeviri)
Akvaryum wifi pH-kontrol cihazı pHcontrol+e....126
pl Instrukcja obsługi (tłumaczenie)
Kontroler pH WiFi do akwarium pHcontrol ^+e .....136
cs Návod k obsluze (překlad)
Akvarijní wifi pH regulátor pHcontrol+e......147
sk Návod na obsluhu (preklad)
Akvarijný wifi pH regulátor pHcontrol+e....157
hu Használati utasítás (fordítás)
pHcontrol+e wifis pH-vezérlő akváriumhoz....167
sl Navodila za uporabo (prevod)
Aquarium WiFi krmilnik pH-vrednosti pHcontrol ^+ .....177
sr Uputstvo za upotrebu (prevod)
pH kontrolera pHcontrol+e s WiFi opcijom za upotrebu u akvarijumima....187
ro Manual de utilizare (traducere)
Controler de pH wifi pHcontrol ^4 pentru acvariu ....197
bg Ръководство за експлоатация (превод)
WiFi pH-контролер за аквариум pHcontrol ^4 ......208
ru
Руководство по эксплуатации (перевод)
Аквариумный контроллер pH pHcontrol+ с поддержкой Wi-Fi......219
el
Εγχειρίδιο οδηγιών (μετάφραση)
Ελεγκτής pH με λειτουργία Wi-Fi pHcontrol* για ενυδρεία....230
ko 사용 설명서(번역)
수족관 와이파이 pH 컨트롤러 pHcontrol+° 241
zh 鱼缸 wifi pH 控制器 pHcontrol+操作说明书(翻译件)....250
text_image
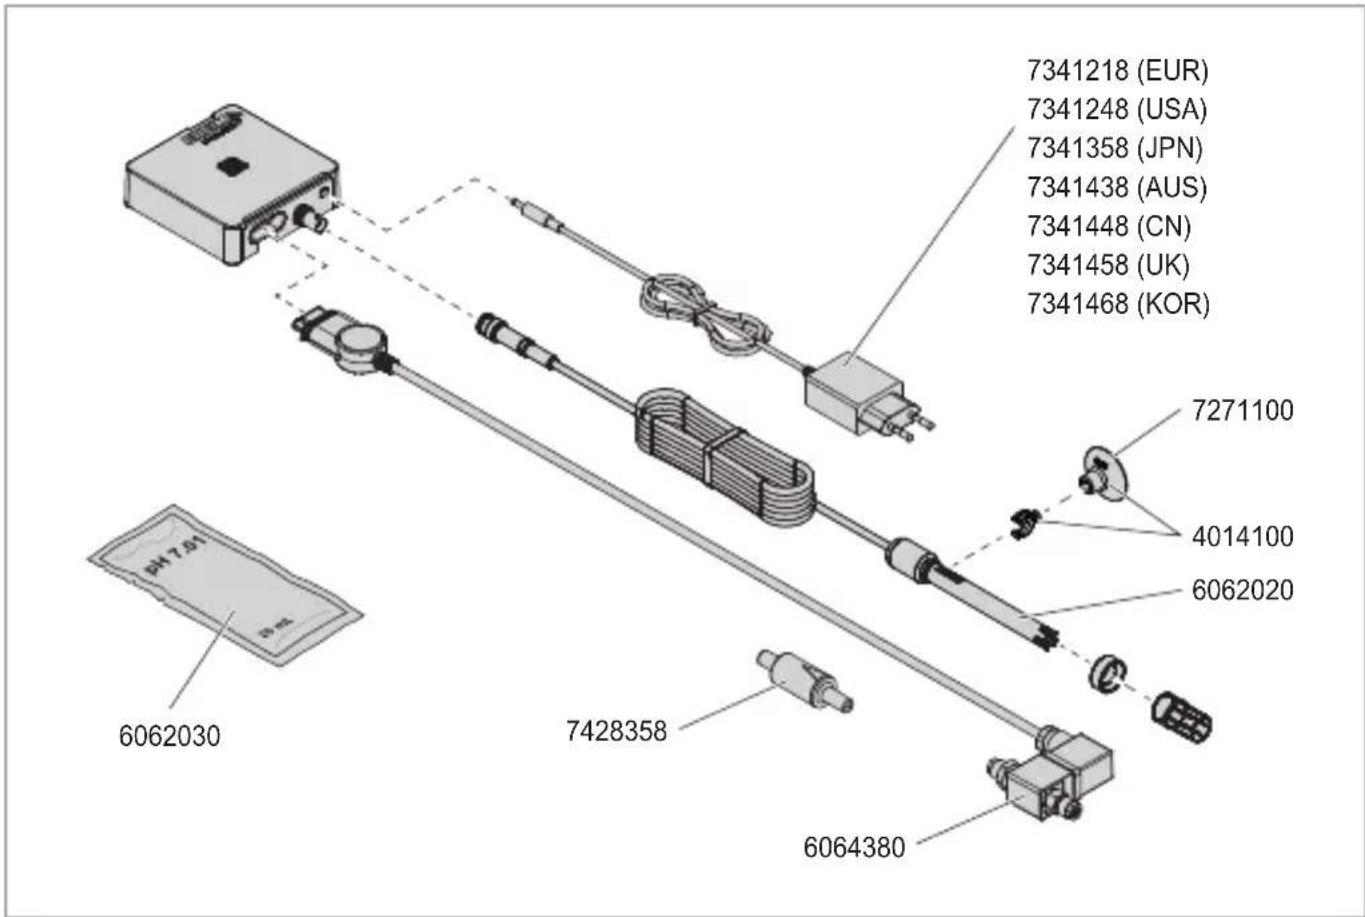
7341218 (EUR) 7341248 (USA) 7341358 (JPN) 7341438 (AUS) 7341448 (CN) 7341458 (UK) 7341468 (KOR) 7271100 4014100 6062020 6062030 7428358 6064380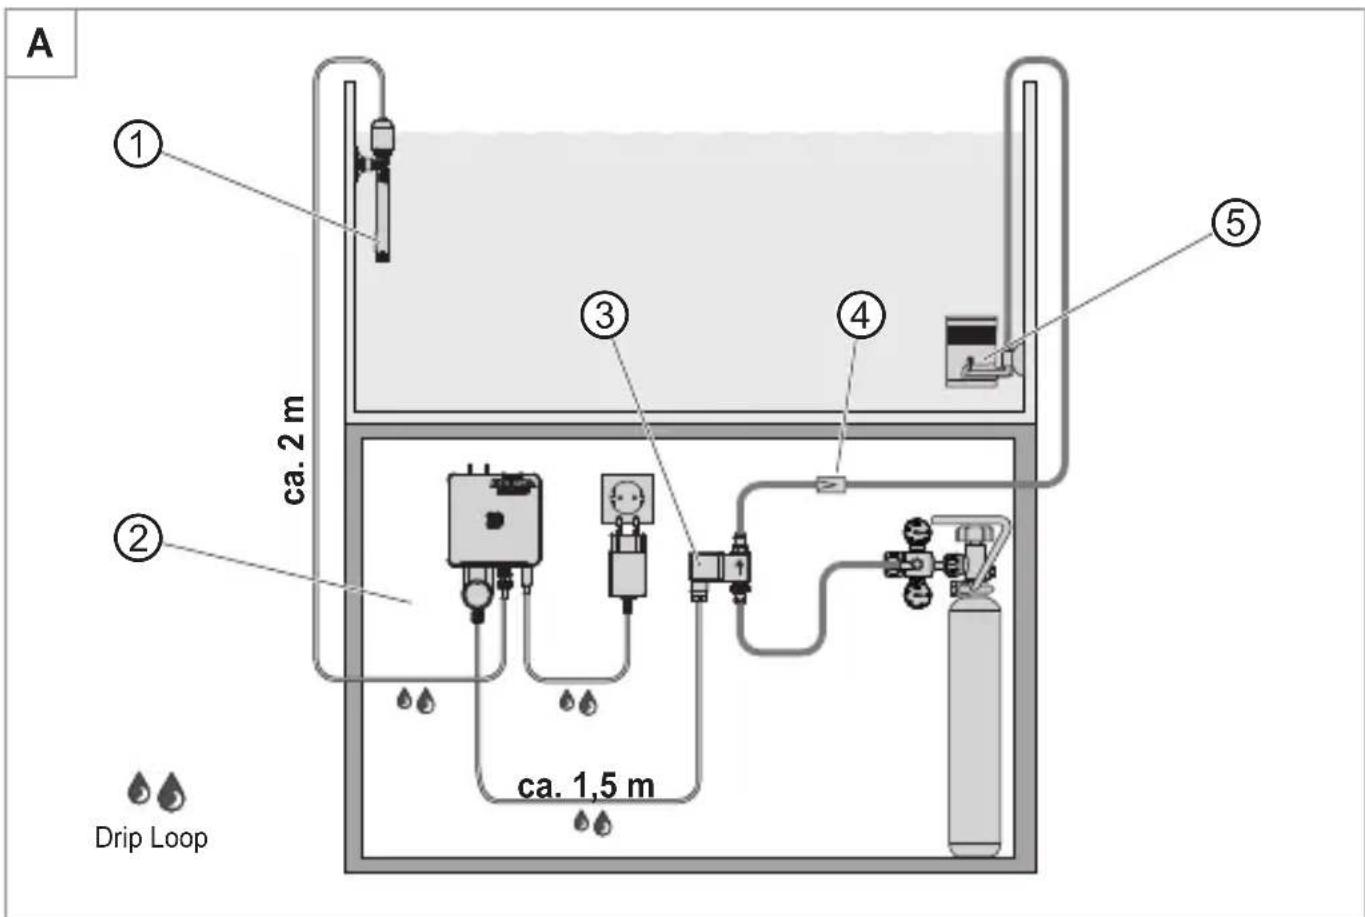
text_image
A ① ca. 2 m ② ca. 1,5 m ③ ④ ⑤ Drip Loop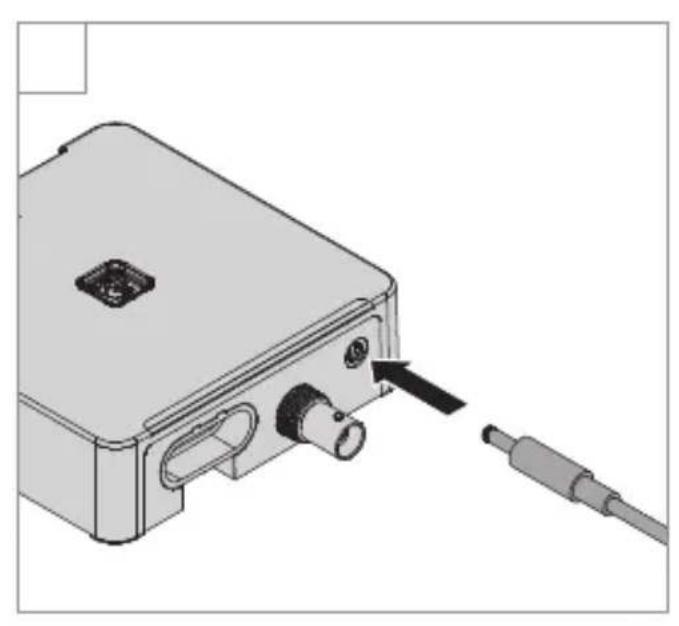
natural_image
Diagram of a device with a cable inserted into a housing, showing ports and an arrow pointing to a component (no text or symbols present)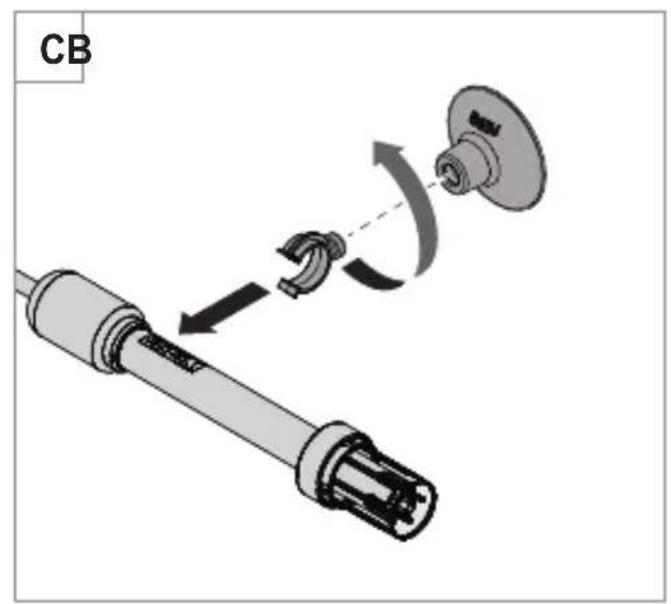
text_image
CB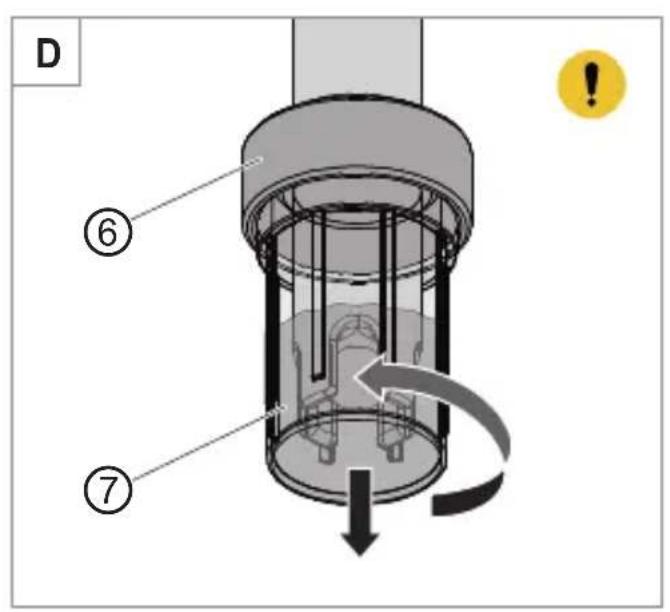
text_image
D ⑥ ⑦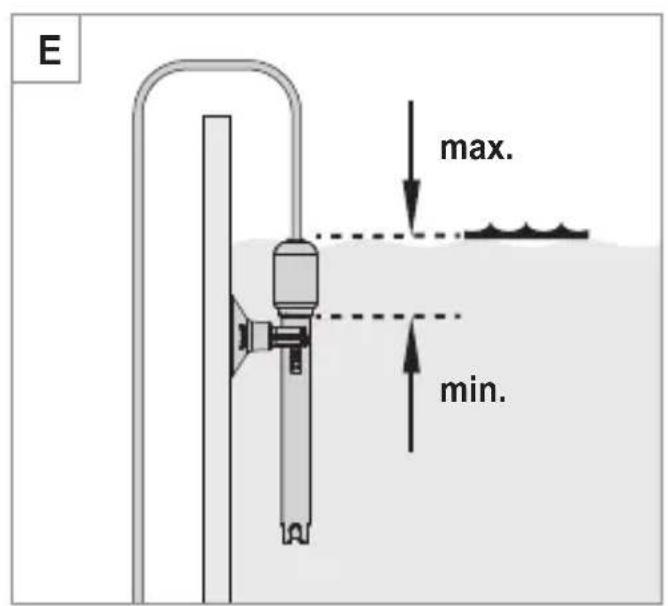
text_image
E max. min.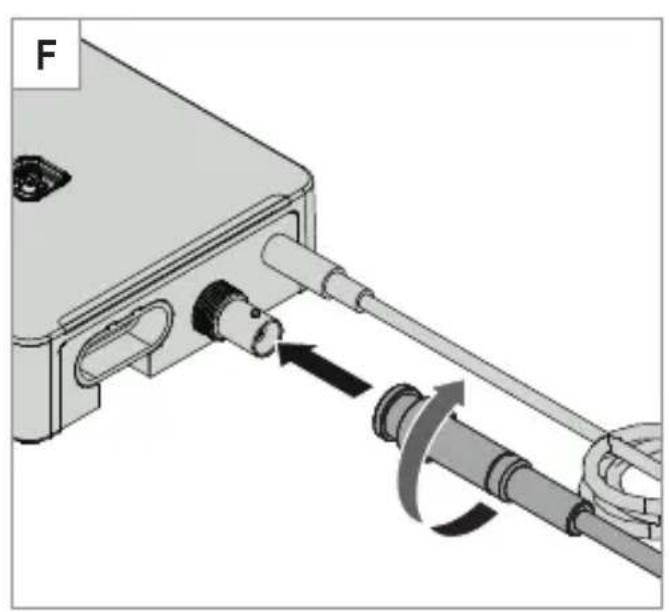
natural_image
Mechanical assembly diagram showing a lever mechanism with rotating components (no text or symbols)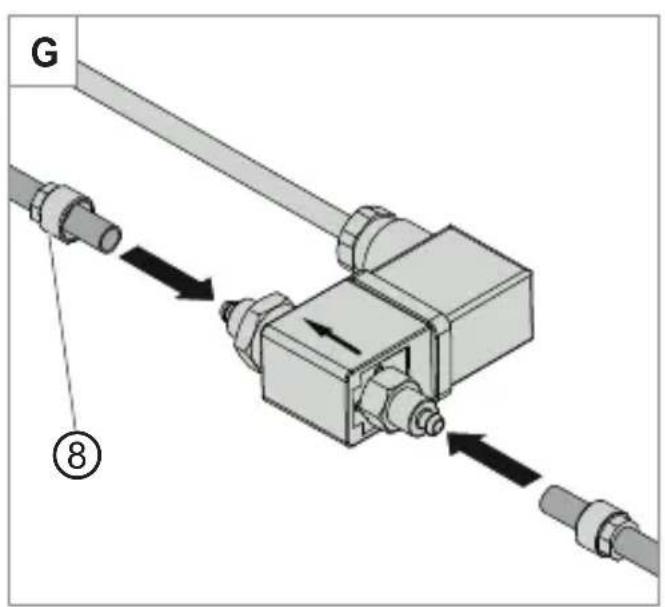
text_image
G ⑧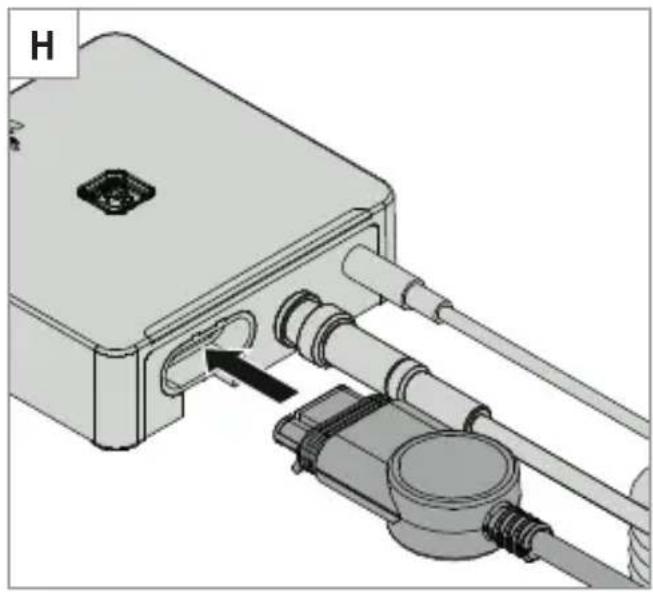
natural_image
Mechanical assembly diagram showing a component with inserted pipe and housing (no text or symbols)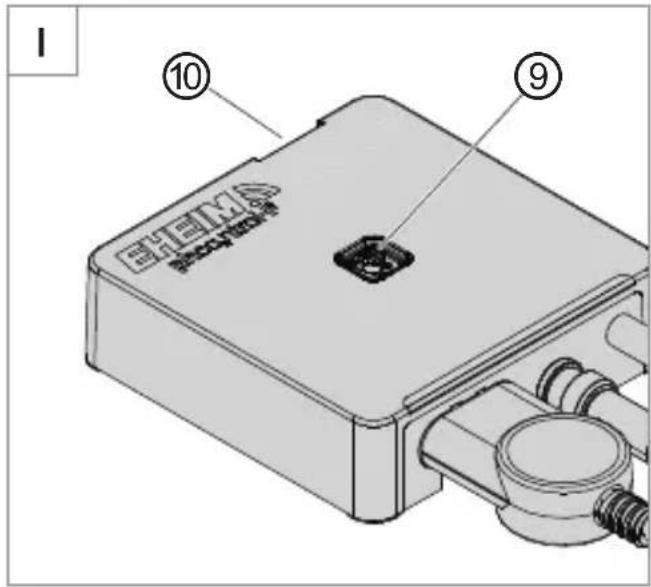
text_image
EHEA ⑩ ⑨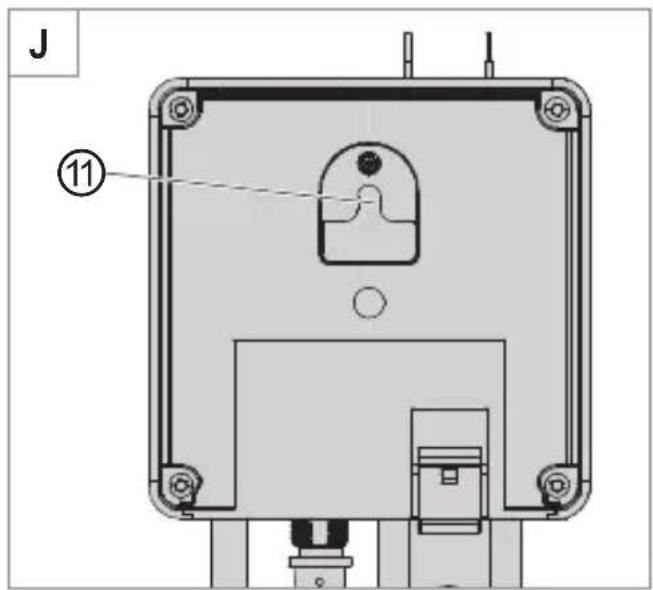
text_image
J ⑪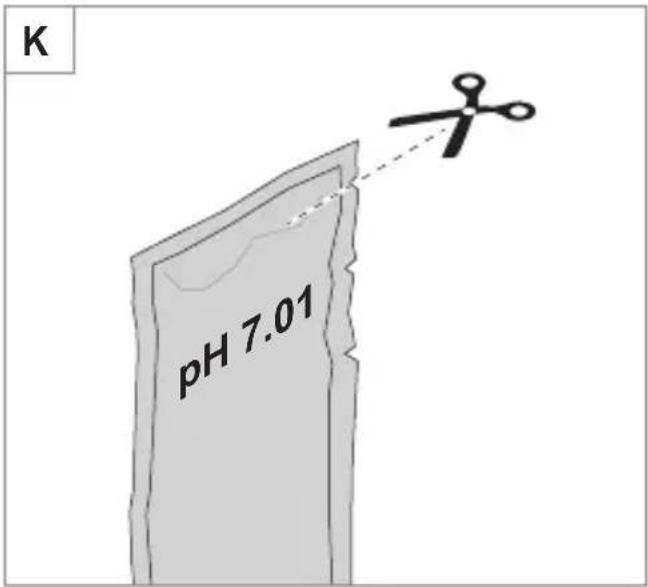
text_image
K pH 7.01IMPORTANT SAFETY INSTRUCTIONS
WARNING- To guard against injury, basic safety precautions should be observed, including the following.
· FOR HOUSEHOLD USE ONLY
· WARNING! RISK OF ELECTRIC SHOCK!
READ AND FOLLOW ALL SAFETY INSTRUCTIONS.
- DANGER – To avoid possible electric shock, special care should be taken since water is employed in the use of aquarium equipment. For each of the following situations, do not attempt repairs by yourself. Return the appliance to an authorized service facility for service or discard the appliance.
- If the appliance falls into the water, DON'T reach for it! First unplug it and then retrieve it. If electrical components of the appliance get wet, unplug the appliance immediately.
- Carefully examine the appliance after installation. It should not be plugged in if there is water on parts not intended to be wet.
- Unplug the appliance from the socket outlet to disable any remote command.
- Do not operate any appliance if it has a damaged cord or plug, or if it is malfunctioning or has been dropped or damaged in any manner.
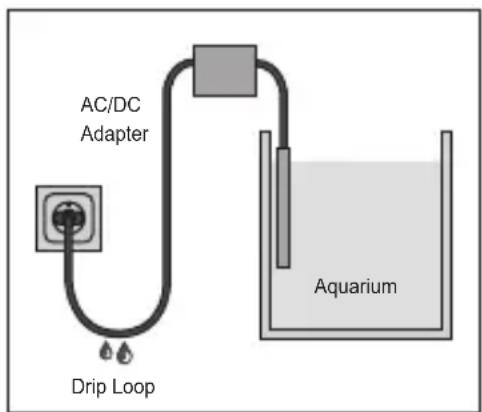
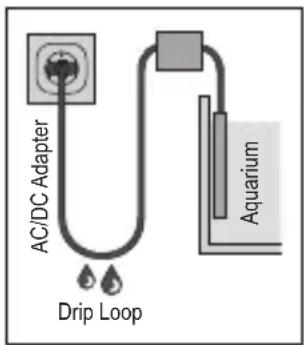
- To avoid the possibility of the appliance plug or receptacle getting wet, position aquarium stand and tank to one side of a wall-mounted receptacle to pre-vent water from dripping onto the receptacle or plug. A "drip loop", shown in the figure, should be arranged by the user for each cord connecting an aquarium appliance to a receptacle. The "drip loop" is that part of
the cord below the level of the receptacle, or the connector if an extension cord is used, to prevent water traveling along the cord and coming in contact with the receptacle. If the plug or socket does get wet, DON'T unplug the cord. Disconnect the fuse or circuit breaker that supplies power to the appliance. Then unplug and examine for presence of water in the receptacle.
text_image
AC/DC Adapter Drip Loop Aquarium- Close supervision is necessary when any appliance is used by or near children.
- To avoid injury, do not touch moving parts or hot parts such as heaters, reflectors, lamp bulbs, and the like.
- Always unplug an appliance from an outlet when not in use, before putting on or taking off parts, and before cleaning. Never yank cord to pull plug from outlet. Grasp the plug and pull to disconnect.
- Do not use an appliance for anything other than its intended use. The use of attachments not recommended or sold by the appliance manufacturer may cause an unsafe condition.
- Do not install or store the appliance where it will be exposed to the weather or to temperatures below freezing.
- Make sure an appliance mounted on a tank is securely in stalled before operating it.
- Read and observe all the important notices on the appliance.
- If an extension cord is necessary, a cord with a proper rating should be used. A cord rated for less amperes or watts than the appliance rating may
overheat. Care should be taken to arrange the cord so that it will not be tripped over or pulled.
- Disconnect all electrical appliances from the mains before placing hands in the water.
- Use only the AD/DC adapter supplied with the automatic feeder. If it is to be used as a spare part, you must specify the EHEIM order number 7341248 for replacement.
SAVE THESE INSTRUCTIONS
FCC WARNING STATEMENT (US only)

FCC CAUTION
- This device complies with part 15 of the FCC Rules. Operation is subject to the following two conditions:
(1) This device may not cause harmful interference, and (2) this device must accept any interference received, including interference that may cause undesired operation.
- Any changes or modifications not expressly approved by the party responsible for compliance could void the user's authority to operate the equipment.
- This equipment complies with FCC radiation exposure limits set forth for an uncontrolled environment. This equipment should be installed and operated with a minimum distance of 20 cm between the radiator and your body.
NOTE:
This equipment has been tested and found to comply with the limits for a Class B digital device, pursuant to Part 15 of the FCC Rules. These limits are designed to provide reasonable protection against harmful interference in a residential installation. This equipment generates, uses and can radiate radio frequency energy and, if not installed and used in accordance with the instructions, may cause harmful interference to radio communications. However, there is no guarantee that interference will not occur in a particular installation. If this equipment does cause harmful interference to radio or television reception, which can be determined by turning the equipment off and on, the user is encouraged to try to correct the interference by one or more of the following measures:
- Reorient or relocate the receiving antenna.
- Increase the separation between the equipment and receiver.
- Connect the equipment into an outlet on a circuit different from that to which the receiver is connected.
- Consult the dealer or an experienced radio/TV technician for help.
Operating manual (translation)
WiFi-controlled pHcontrol+ ^e pH controller for aquariums
General user instructions
Information on using the operating manual
▶ Before using the appliance for the first time, the operating manual must be read fully and understood.
- Consider the operating manual as part of the product and keep in a safe and accessible location.
▶ Enclose this operating manual if passing the appliance on to a third party.
Symbol explanation
The following symbols are used on the appliance.

The appliance must only be used indoors, and exclusively for aquariums.

The appliance is of protection class III.

The appliance is certified according to the relevant national regulations and directives, and conforms to EU standards
The following symbols and signal words are used in this operating manual.

DANGER!
Risk of serious personal injury or death from a general source of danger.
DANGER!
Danger of electric shock with the risk of serious personal injury or death.

WARNING!
Danger of serious personal injury or health hazard.

CAUTION!
Note on the risk of material damage.

Note with useful information and tips.
Typographical conventions:
☒A Reference to a figure, in this case, reference to figure A.
▶ You are prompted for an action.
Application
The EHEIM pHcontrol ^+e is a pH controller for aquariums. It provides a controlled supply of CO_2 that is electronically regulated by a pH sensor. The pH value can be adjusted and monitored via a WLAN-capable terminal device (smartphone, tablet, laptop etc.) connected to a WiFi system.
The appliance and all parts included in the scope of delivery are intended for private use and must only be used:
· for aquarium-related purposes
· indoors
· in compliance with the technical data
The following limitations apply to the appliance:

· do not use for commercial or industrial purposes
- do not use together with caustic, inflammable, aggressive or explosive substances, food or drinking water
Safety
Risks for persons and property can arise from this appliance if the appliance is improperly used or not used as intended or if the safety instructions are not heeded.
For your safety

- Do not let the appliance packaging and small parts get into the hands of children or people who are unaware of how to handle them, as hazards can arise (danger of suffocation!). Keep away from animals.
- This appliance is not intended for use by persons (including children) with reduced physical, sensory or mental capabilities, or lack of experience and knowledge, unless they are under the supervision of someone responsible for their safety or have received instruction on usage of the appliance from said person. Children should be supervised to ensure that they do not play with the appliance.
· Only for European markets:
This appliance can be used by children from the age of 8 and by persons with reduced physical, sensory or mental capabilities or lack of experience and/or knowledge if they are supervised and have been instructed in the safe use of the appliance and have understood the resulting dangers. Children must not play with the appliance. Cleaning and user maintenance must not be carried out by children unless they are supervised.
- The pH sensor storage liquid and the calibration solution must not get into the hands of children or any persons with reduced physical, sensory or mental capabilities, or lack of experience and/or knowledge.
- Before use, carry out a visual inspection to ensure that the appliance, especially the cables, power supply unit and plug, are undamaged.
- Do not use the appliance if it is not working properly or is damaged.
- Never use the appliance with a damaged power supply unit.
- The cable of the power supply unit cannot be replaced. If the cable is damaged, the power supply unit must be scrapped.
- Only carry out the work described in these instructions.
- Protect the cable of the power supply unit against heat, oil and sharp edges.
· Never make technical modifications to the appliance.
· Only use original spare parts and accessories for the appliance.
· Repairs must only be carried out by an EHEIM service centre.
- This product contains a button cell battery that cannot be replaced by the user and must be disposed of correctly.
• We recommend protecting all electrical aquarium appliances via a residual current protective device with a rated residual current of 30 mA maximum.
- If they are not being used, always disconnect all devices in the aquarium from the power supply before you install/remove any parts and before all cleaning and maintenance work.
- Protect the mains socket and power supply unit against moisture and wetness. A drip loop must be formed with the cable of the power supply unit. This prevents any water running along the cable to the mains socket, which would result in a short-circuit.
- The electrical data of the power supply unit must match the data of the power mains. This data is found on the type plate, the packaging and in these instructions.
· This appliance is operated without an earth connection.
- Only use the power supply unit that has been supplied with the appliance. If it needs to be replaced, then an original EHEIM power supply unit has to be used.
text_image
AC/DC Adapter Drip Loop AquariumAssembly and installation
Placing the pH controller

CAUTION! Material damage due to moisture.
▶ The pH controller must not be placed underneath the aquarium cover.
- Choose a suitable place for the pH controller ① (☒A). Observe the following cable lengths: pH controller – magnetic valve approx. 1.5 m pH controller – pH sensor approx. 2 m

A mounting strap ⑪ can be found on the back of the pH controller (☒J).
- Insert the plug of the power supply unit into the socket of the pH controller (☒B).

CAUTION! Material damage.
- Do not insert the plug of the power supply unit into the mains socket. When installing the magnetic valve or pH sensor, there is the danger that a reset may be accidentally triggered via the touch field ⑩. When this happens, a WLAN connection with the specified SSID and network security key, as well as the QR codes, is no longer possible.
Installing the pH sensor
- Connect the suction device to the clamping bracket (☒C).
- Connect the clamping bracket to the pH sensor.

CAUTION! Material damage.
-
The protective cap⑦ of the pH sensor contains a storage solution that protects the sensor against drying out. Do not bring into contact with clothes! The storage solution can be easily disposed of in a drain. Use a lot of water to flush it down the drain.
The sensor's tip is made of glass. Danger of breakage! -
Carefully unscrew the protective cap from the pH sensor (☒D).
-
Remove the sealing nut ⑥ from the pH sensor.

Set the protective cap and sealing nut aside for the later storage of the pH sensor.
- Rinse the sensor tip under cold tap water to remove the storage solution.
- Attach the pH sensor below water level on the inside of your aquarium (☒ E). Take the minimum water level into account.

- Do not place the pH sensor in the immediate vicinity of the CO_2 diffusor or in a low-flow area of the aquarium.
- Choose as dark an area of the aquarium as possible so that the sensor tip is not exposed to algae growth. Algae growth may cause incorrect measurements.
- Insert the BNC plug of the pH sensor into the BNC connector of the pH controller (☒F).
Installing the magnetic valve

DANGER! Suffocation and freezing.
Escaping CO_2 may lead to suffocation and freezing.
- Close the screw-on valve of the CQ cylinder before integrating the magnetic valve into the CO2 system. The CO2 system must be depressurised! The indicator of the manometer (system pressure) must be at 0.
- Sever the hose approx. 10 - 20 cm past the pressure reducer.
- Connect the hose securing nuts ⑧ to the hose ends (☒G).

Note the flow direction! The flow direction is indicated by an arrow on the magnetic valve.
- Connect the hose ends to the connecting pieces of the magnetic valve.
- Secure both hose ends with the hose securing nuts.
- Insert the plug of the magnetic valve into the corresponding connector of the pH controller ( H ).
Installing the check valve

CAUTION! Material damage.
In order to prevent water from entering the cylinder, pressure reducer or the magnetic valve, a suitable check valve must be installed between the CO2 cylinder and CO2 diffusor.
- Sever the hose approx. 10 - 20 cm past the magnetic valve.
- Connect both hose ends to the check valve ④ (☒A).

Note the flow direction! The flow direction is indicated by an arrow on the check valve.
Checking the tightness
- Carefully open the screw-on valve of the CO_2 cylinder.
- Set the system pressure to approx. 1.8 bar.
- Check the tightness (hissing sound) of the CO_2 system's hose connections.
Operation
System requirement
WLAN-enabled terminal device (smartphone, tablet, notebook etc.)
Creating the network
- Insert the switching power supply unit in the mains socket. The status LED ⑨ illuminates (☒I).

- The status LED flashes white: The network is being searched for or created - The status LED illuminates blue: A new network has been created (master mode)
Connecting to the WLAN network
- Open the network settings of your terminal device (smartphone, tablet, notebook etc.).
- Connect the terminal device to the WLAN network (SSID)
- Enter the network security key.

You can find the security key of the network at the back of the pH controller. Alternatively, you can also scan the QR code 1 (see label) to establish the connection for the first time (☒J).
Calling up the website
- Open your web browser and enter the following address: http://192.168.1.1

Alternatively, you can also scan the QR code 2 (see label) to open the software in the browser.
Initial configuration
- Select the desired language from the language selection and follow the instructions for the initial configuration.
Meaning of the status LED
· The status LED flashes white: The network is being searched for or created
· The status LED illuminates blue: pH controller is in master mode
- The status LED illuminates green: pH controller is connected to another EHEIM digital unit
Resetting the pH controller
- Press the touch field ⑩ with your finger for approx. 8 – 10 seconds until the status LED ⑨ illuminates in alternating colours (☒I).

- When the status LED illuminates green, the reset is complete. The pH controller recreates the network.
- The network security key and QR code 1 are invalid. The network can be connected to without the network security key.
Calibrating the pH sensor ( K )

- The calibration solution pH 7 is used to calibrate the pH sensor. The calibration solution should be approx. 25^ in order to facilitate correct calibration.
- Follow the instructions for calibrating the pH sensor listed on the website.
Maintenance
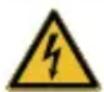
DANGER! Electric shock!
Before all maintenance work, pull the power supply unit of the pH controller out of the mains socket.

CAUTION! Material damage.
- Do not use hard objects or aggressive cleaning agents for cleaning.
The pH sensor and installation material may not be cleaned in the dishwasher.
The pH sensor must not be stored in a dry place (“Storage” chapter, see page 29)!
The tip of the pH sensor is made of glass and must be handled carefully! Do not bring it into contact with hard and/or abrasive surfaces or objects.

- pH sensors are wear parts. Their operational capabilities depend exclusively on how they are cared for and used. Depending on the application, the sensor may have to be changed following a period of several weeks or several months (max. 2 years). As a result, no reliable information regarding the service life can be provided.
- The following sections describe maintenance work necessary for optimum and fault-free operation. Regular maintenance prolongs the service life and assures functionality of the pH controller over a long period.
Cleaning
- Remove the power supply unit from the mains socket.
- Take the pH sensor out of the aquarium.
- Clean the sensor shaft with a soft, damp cloth.
- Clean the sensor tip under cold, running tap water.
- Install the pH sensor in reverse order.
Decommissioning and disposal
Storage
- Take the pH sensor out of the aquarium.
- Clean the pH sensor.
- Remove the pH controller.

CAUTION! Material damage.
The pH sensor must be protected against drying out.
- Store the pH sensor in the storage liquid. Mount the sealing nut and protective cap.

Use a standard storage liquid for the pH sensors.
- Store the pH controller, pH sensor and calibration solution in a dry, frost-proof place.
Disposal
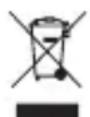
When disposing of the appliance, pay attention to the relevant statutory regulations. Information on the disposal of electrical and electronic appliances in the European Union: Within the European Union, disposal of electrically operated appliances is governed by national regulations that are based on the EU Directive 2012/19/EU on waste electrical and electronic equipment (WEEE). The appliance may no longer be disposed of with the municipal or household waste. The appliance will be accepted free of charge at municipal collection points or recycling centres. The product packaging is made up of recyclable materials. Dispose of them in an environmentally responsible manner and take them for recycling.
Technical data
| pH controller | |
| Type 6062 | |
| Regulating range pH 6 to pH 9 | |
| Wireless data transmission | WiFi 2.4GHz – IEEE802.11 b/g/n |
| Safety key WPA, WPA2, WPA/WPA2 | |||||||
| Emitted transmission power | ≤ 20 dBm | ||||||
| Frequency bands Channel | 1 - 11 / 2412 MHz - 2462 MHz | ||||||
| Dimensions (W × H × D) 98 × 116 × 28 mm | |||||||
| pH sensor 6062020 | |||||||
| Type Gel electrode | |||||||
| Connection BNC | |||||||
| Cable length 2 m | |||||||
| Measurement range pH 0 to pH 14 | |||||||
| Reaction time < 1 minute | |||||||
| Deviation ± pH 0.25 | |||||||
| Dimensions (∅ × H) approx. | 20.5/13.0 × 146 mm | ||||||
| Power supply unit | |||||||
| Type 7341218 7341358 73 | 41438 7341 | 448 734145 | 8 7341468 | 7341248 | |||
| Plug | EUR | JAP | AUS | CN | UK | KOR | USA |
| Input | 100 - 240 V / 50/60 Hz / 0.4 A | 100 - 240 V / 50/60 Hz / 0.5 A | |||||
| Output | 5 V DC / 1 A / 5 W | ||||||
EHEIM GmbH & Co. KG hereby declares that the radio system type EHEIM pHcontrol+ ^e complies with directive 2014/53/EU. The full text of the EU declaration of conformity is available online here: www.eheim.com
Spare parts
See page 3.
Terminal compatible WLAN (smartphone, tablette, notebook, etc.)
Connexion au réseau
Reproduction or copying – even parts thereof – only with the express permission of the producer.