
ALC 3/1-G/R - Laser level Flex - Free user manual and instructions
Find the device manual for free ALC 3/1-G/R Flex in PDF.

| Brand | Flex |
| Model | ALC 3/1-G/R |
| Product type | Cross-line laser level |
| Laser class | 2 (IEC 60825-1:2014) |
| Laser diode | 520–650 nm (visible) |
| Operating range (horizontal/vertical beam) | 50 m |
| Plumb beam range | 5 m |
| Accuracy (horizontal/vertical beam) | ± 0.3 mm/m |
| Accuracy (plumb beam) | ± 0.6 mm/m |
| Self-leveling range | ± 4° |
| Power supply | Li-Polymer battery 2000 mAh / 3.7 V |
| Operating time (all beams on) | 5 h (Indoor mode) / 11 h (Outdoor mode) |
| Projection modes | 6 selectable modes (horizontal, vertical, cross, plumb, etc.) |
| Environment modes | Indoor (continuous) and Outdoor (pulsed) |
| Operating temperature range | -5 °C to +50 °C |
| Storage temperature range | -20 °C to +70 °C |
| Weight | 520 g |
| Tripod thread | 1/4" and 5/8" |
| Supplied accessories | USB cable, USB charger, protective pouch, magnetic wall mount |
| Maintenance and cleaning | Soft dry cloth; store in the pouch after use |
| Safety | Do not look into the beam; laser class 2; do not point at people/animals |
| Repairability | Repair by qualified personnel using original parts |
Frequently Asked Questions - ALC 3/1-G/R Flex
User questions about ALC 3/1-G/R Flex
0 question about this device. Answer the ones you know or ask your own.
Ask a new question about this device
Download the instructions for your Laser level in PDF format for free! Find your manual ALC 3/1-G/R - Flex and take your electronic device back in hand. On this page are published all the documents necessary for the use of your device. ALC 3/1-G/R by Flex.
USER MANUAL ALC 3/1-G/R Flex
natural_image
3D rendered mechanical component with cutouts and mounting holes (no text or symbols visible)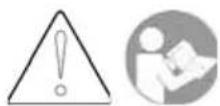
de Originalbetriebsanleitung 3
en Original operating instructions 10
fr Notice d'instructions d'origine 17
it Istruzioni per l'uso originali 24
es Instrucciones de funcionamiento originales 31
pt Instruções de serviço originais 38
nl Originele gebruiksaanwijzing 46
da Originale driftsvejledning 54
no Originale driftsanvisningen 61
sv Originalbruksanvisning 68
fi Alkuperäinen käyttöohjekirja 75
el Auθεντικές οδηγίες χειρισμού 82
pl Instrukcja oryginalna 90
hu Eredeti üzemeltetési útmutató 99
cs Originální návod k obsluze 107
sk Originálny návod na obsluhu 114
et Originaalkasutusjuhend 121
It Originali naudojimo instrukcija 128
Iv Lietošanas pamācības oriģināls 135
ru Оригинальная инструкция по эксплуатации 1 4 2
152
de
1 Taste Betriebsart
Identification on the device

Before switching on the power tool, read the operating manual!
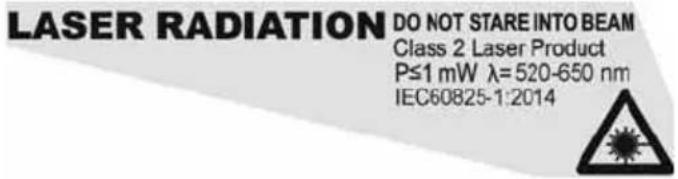
Laser radiation
Do not stare into beam.
Product of laser class 2;
Maximum output power ≤ 1 mW;
Wave length = 520-650 nm;
EN 60825-1:2014
Laser classification
The device complies with laser class 2, based on the standard IEC 60825-1/EN 60825.
The eye is protected by the lid closure reflex if somebody accidentally glances into the laser beam. However, this lid protection reflex may be impaired by medication, alcohol or drugs.
These devices may be used without further protective measures if it can be ensured that no optical instruments reduce the cross-

section of the beam.
Do not aim laser beam at people.
Electromagnetic compatibility
Even though the device satisfies the strict requirements of the relevant directives, the possibility cannot be excluded that the device
- will disrupt other devices (e.g. aircraft navigation systems) or
- will be disrupted by powerful radiation, possibly resulting in a wrong operation.
In these cases or other uncertainties, check measurements should be carried out.
For your safety
Intended use
This line laser is designed for commercial use in industry and trade.
The device is designed to determine, transfer and check horizontal height profiles, vertical lines, building lines, perpendicular points and right angles, e.g.:
- to transfer rule and height marks,
– to mark partitions (vertical and/or at right angles) and
- align equipment and elements in three axes.
en
FLEX ALC 3/1-G/R
Safety instructions

WARNING!
- Do not point the laser beam at people or animals and do not look into the laser beam. This measuring instrument generates laser radiation which may cause blindness.
- Have the measuring instrument repaired by qualified technicians and with original spare parts only. This ensures that the safety of the measuring instrument is maintained.
- Do not let children use the measuring instrument unsupervised. They could accidentally blind people.
- Do not use the measuring instrument in a potentially explosive environment which contains flammable liquids, gases or dust. The measuring instrument may generate sparks which will ignite the dust or the vapours.
-
If devices other than the operating and adjusting devices specified here are used or if different procedures are implemented, this may result in a hazardous exposure to radiation.
-
Do not disable any safety devices and do not remove any information or warning signs.
– Before switching on the device, check for visible damage. Do not switch on damaged devices. - When using the measuring instrument on ladders, avoid an abnormal body posture. Ensure that you have a secure footing and keep your balance at all times.

CAUTION!
- Do not use the device in the rain.
- If the device is brought from a very cold to a warmer environment or vice versa, you should allow the device to acclimatise before using it.
- If using adapters and tripods, ensure that the device is screwed on tightly.
Overview
en
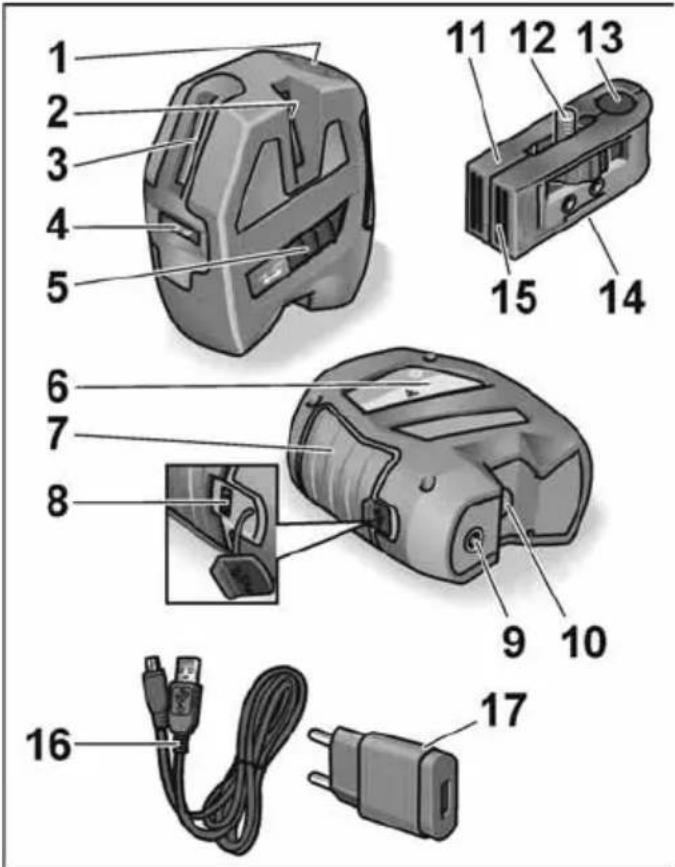
1 Control panel
2 Laser discharge window (side, vertical)
3 Laser discharge window (front, vertical)
4 Laser discharge window (front, horizontal)
5 On/Off button
Switches the power tool on and off. When the device has been switched on, all laser beams are active and indoor mode is active. When the device is switched off, the self-levelling device is blocked.
6 Laser warning sign
7 Rubberised handle area
8 USB charge socket
9 ¼ " t h r e a d
For attachment on a tripod or wall and tripod holder.
10 Laser discharge window (Ground beam)
11 Wall and tripod holder
12 Fastening screw 14 "
For attachment of the device.
13 Through-hole for ground beam
For using the ground beam as a plumb.
14 Tripod thread ( 14 " and 58 ")
For attachment to the tripod.
15 Magnetic wall holder
16 USB charge cable
17 USB charger
18 Protective pouch (not illustrated)
en
Control panel
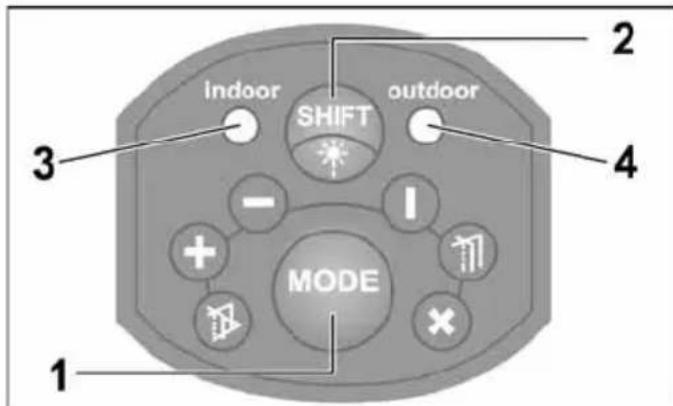
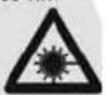
1 Operating mode button
Switches in succession through the 6 different laser projection types.
1x front horizontal + front vertical
2x front horizontal
3x front vertical
4x front vertical + side vertical + ground beam
5x all beams activated + self-levelling device switched off/blocked
6x all beams activated + self-levelling device switched on (standard operating mode when the device has been switched on)
FLEX ALC 3/1-G/R
2 Ambient mode switchover button
Switches the laser beam from indoor to outdoor conditions.
Indoor mode is used for short distances at normal ambient light levels (in closed rooms).
Activate outdoor mode at high ambient light levels or in bright sunlight. In outdoor mode the device operates with a pulsed laser beam.
This is a little darker than the beam for indoor mode.
3 LED Indoor mode
4 LED Outdoor mode
The LED (3 or 4) is lit green when self-levelling is switched on.
The LED (3 or 4) is lit red when the self-levelling range is exceeded ( ± 4^ ) or when self-levelling is switched off/blocked.
The LED (3 or 4) flashes red when the battery capacity is low. Charge the battery!
Technical specifications
| Cross-line laser ALC 3/1-G/R | |
| Visible laser diode | 520–650 nm |
| Laser class | 2 |
| Work area | |
| -Horizontal/vertical beam1) | 50 m |
| -Ground beam (plumb) | 5 m |
| Precision ... | |
| -Horizontal/vertical beam | ± 0.3 mm/m |
| -Ground beam (plumb) | ± 0.6 mm/m |
| Self-levelling range | ± 4° |
| Lithium polymer battery 2000 mAh / 3,7 V | |
| Operating duration2) | 5 h / 11 h |
| Temperature range | |
| -for operation | -5 °C ... 50 °C |
| -for storage | -20 °C ... 70 °C |
| Weight | 520 g |
USB charger
| Input voltage 100-240 V~ | |
| Output voltage 5 V / 1 A | —— |
1) The measurement range may be less under unfavourable conditions (bright sunlight, reflective surfaces).

2) The operating duration was determined with all activated laser beams.
The operating duration can be extended if beams which are not required are switched off by selecting a different operating mode.
Instructions for use

WARNING!
- Do not point the laser beam at people or animals.
- Do not look into the laser beam.
- Do not put any optical instruments in the path of the beam.
This measuring instrument generates laser radiation which may cause blindness.

CAUTION!
- Do not use the measuring instrument in a damp, dusty or sandy environment. Device components may be damaged.
- After using the device, immediately switch it off with the On/Off switch in order to block self-levelling.
- If the device is brought from a very cold to a warmer environment or vice versa, you should allow the device to acclimatise before using it.
en
- If using adapters and tripods, ensure that the device is screwed on tightly.
The most important operating steps are explained at the end of these instructions on the illustrated pages.
See from page 152.
Battery charging with USB cable and USB charger 152
Switching the device on and off 154
Selecting the operating mode 156
Switching over ambient mode 158
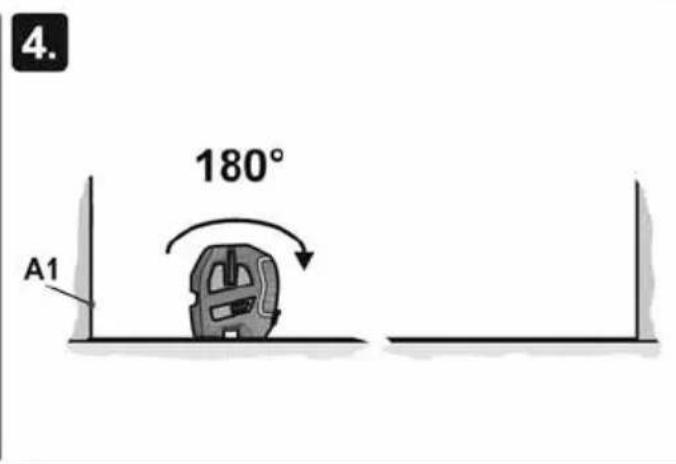
Handling the laser 160
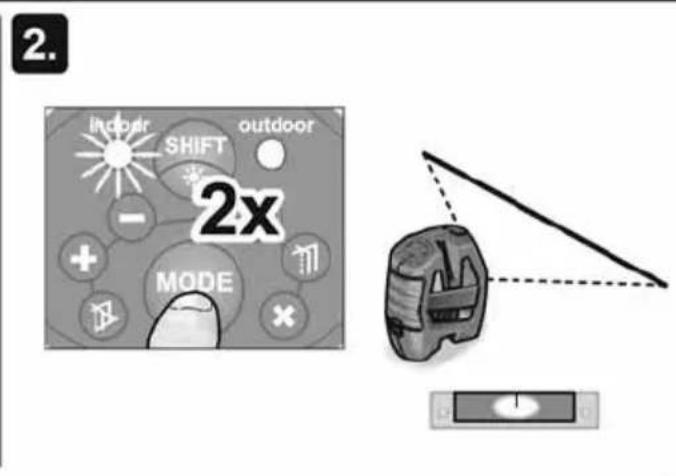
Testing the horizontal beam 162
Testing the vertical beam 166
Checking precision
It is recommended to check the device regularly to ensure that it is always precise. If the precision deviates from the permitted tolerance range, the device must be taken to a customer service workshop authorised by the manufacturer.
Have the device adjusted by authorised technicians only.
FLEX ALC 3/1-G/R
The steps required to check the precision are explained at the end of these instructions on the illustrated pages. See from page 162.
Maintenance and care
Observe the following instructions:
- Handle the device with care and protect it from impacts, vibrations, extreme temperatures.
- When the device is not in use, keep it in the protective pouch.
– Clean the lens with a soft, dry cloth only. - Have the device repaired by qualified technicians and with original spare parts only. This ensures that the safety of the device is maintained.
Disposal information

EU countries only:
Do not throw electric power tools into the household waste!
In accordance with the European Directive 2012/19/EU on Waste Electrical and Electronic Equipment and transposition into national law used electric power tools must be collected separately and recycled in an environmentally friendly manner.
FLEX ALC 3/1-G/R
en

Recycling raw materials instead of waste disposal.
Device, accessories and packaging should be recycled in an environmentally friendly manner. Plastic parts are identified for recycling according to material type.

NOTE
Please ask your dealer about disposal options!
Exemption from liability
The user of this product is obliged to follow the operating instructions exactly.
All devices have been checked meticulously before delivery. However, the user should always verify the precision of the device before using it.
The manufacturer and his representative are not liable for erroneous or wilfully incorrect use or for any consequential damage or loss of profit.
The manufacturer and his representative are not liable for any consequential damage or loss of profit due to natural catastrophes, e.g. earthquakes, storms, floods, etc. or due to fire, accidents, tampering by third parties or use outside the usual application areas.
The manufacturer and his representative are not liable for any damage or loss of profit due to changed or lost data, business interruption, etc. caused by the product or by an unusable product.
The manufacturer and his representative are not liable for any damage or loss of profit due to the device not being operated according to the instructions.
The manufacturer and his representative are not liable for any damage which was caused by improper use of the power tool or by use of the power tool with products from other manufacturers.

Classification laser
1 Touche Mode
Golfengte λ = 520–650 nm;
EN 60825-1:2014
Laserclassificatie
1 Knap driftsmåde
1 Tast for driftstype
1x front horizontal + front vertical
2x front horizontal
3x front vertikal
4x front vertikal + sida vertikal + bottenstråle
Class 2 Laser Product P≤1 mW λ=520-650 nm
IEC60825-1:2014
Laserové záření
1 Töörežiimi nupp
Bangu ilgis λ = 520–650 nm;
EN 60825-1:2014
1 Darbo režimo mygtukas
Vilnu garums λ = 520–650 nm;
EN 60825-1:2014
FLEX ALC 3/1-G/R
en Switching the device on and off
FLEX ALC 3/1-G/R
de Handhabung des Lasers
en Handling the laser
fr Maniement du laser
it Uso del laser
es Manejo del láser
pt Manuseamento do laser
nl Vasthouden van de laser
da Händtering af laseren
no Behandling av laseren
sv Laserns handhavande
fi Laserin käyttö
el Χειρισμός του λέιζερ
pl Posługiwanie się laserem
hu A lézer kezelése
cs Manipulace s laserem
sk Manipulácia s laserom
et Laseri kasutamine
It Kaip elgtis su lazeriu
Iv Lāzera izmantošana
ru Обращение с лазером
FLEX ALC 3/1-G/R


natural_image
Two technical diagrams showing a camera setup with two views and a grid, no text or symbols present.FLEX ALC 3/1-G/R
de Prüfung der Genauigkeit des horizontalen Strahls
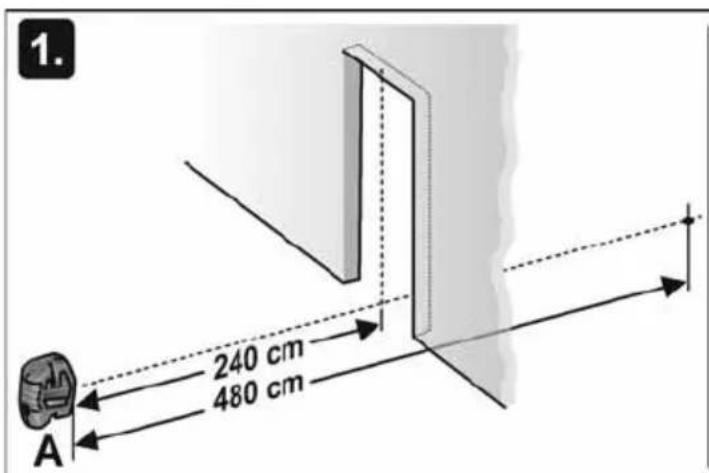
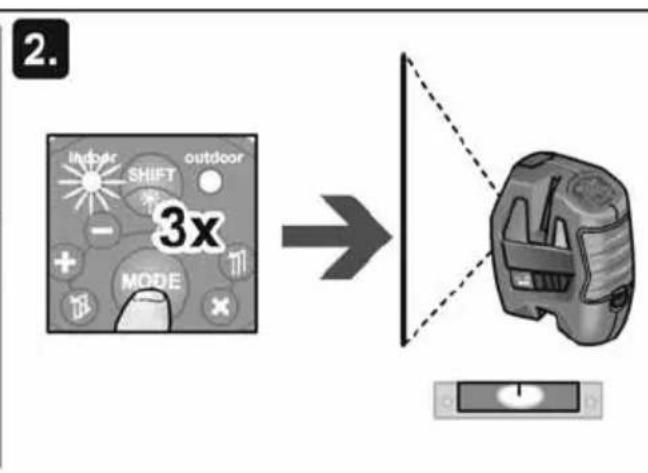
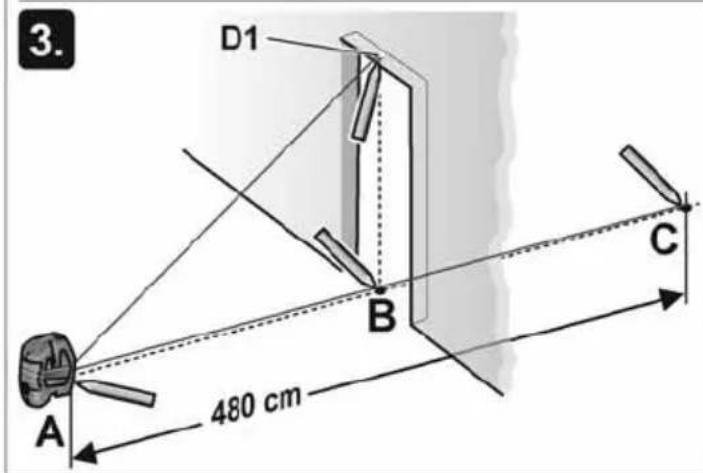
en Checking the accuracy of the horizontal beam
fr Vérification de la précision du rayon horizontal
it Controllo di precisione del raggio orizzontale
es Control de la exactitud del haz horizontal
pt Verificação da precisão do raio horizontal
nl Controle van de nauwkeurigheid van de horizontale straal
da Kontrol af nøjagtigheden horisontal stråle
no Kontroll av nøyaktigheten av den horisontale strålen
sv Kontroll av den horisontala strålens noggrannhet
fi Vaakasäteen tarkkuuden tarkastus
el 'Ελεγχος της ακρίβειας της οριζόντιας ακτίνας
pl Sprawdzanie dokładności pionowego promienia
hu A vízszintes sugár pontosságának ellenőrzése
cs Kontrola přesnosti horizontálního paprsku
sk Kontrola presnosti horizontálneho lúča
et Horisontaalkiire täpsuse kontrollimine
It Horizontalaus spindulio tikslumo tikrinimas
Iv Horizontāla stara precizitātes pārbaude
ru Проверка точности горизонтального луча

FLEX ALC 3/1-G/R
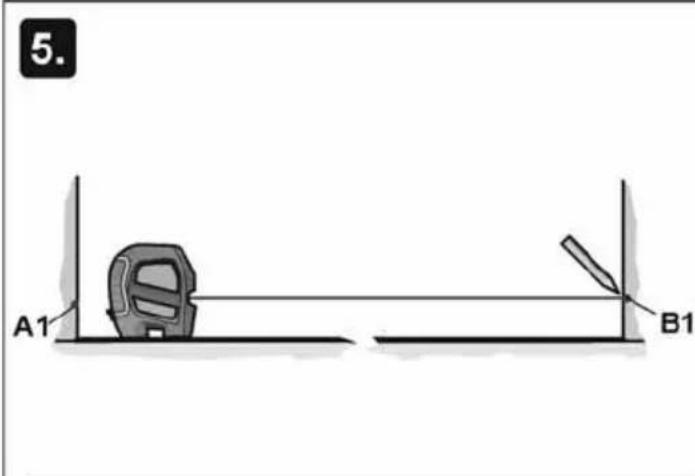
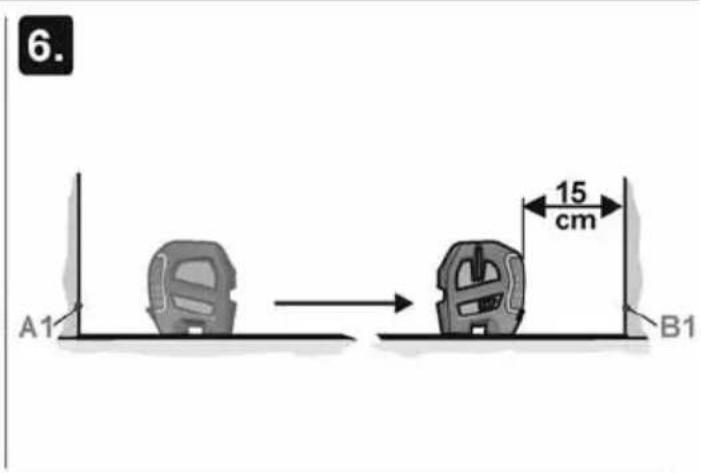
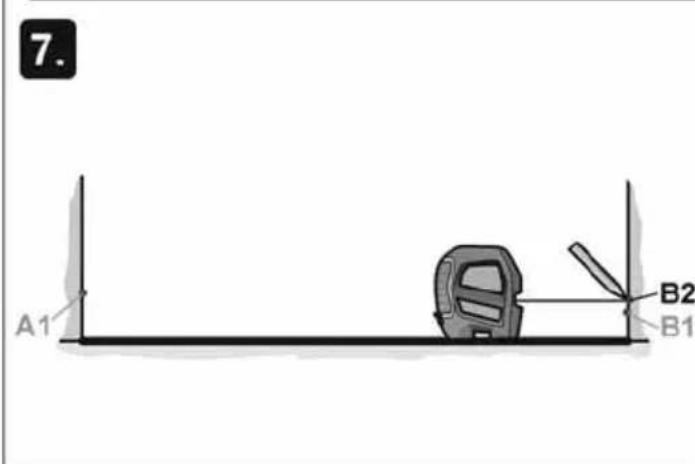

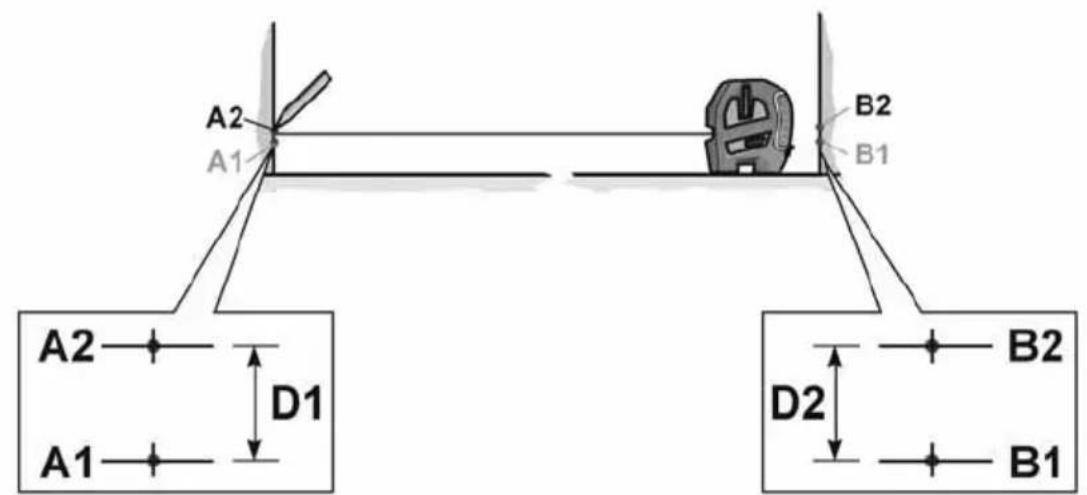
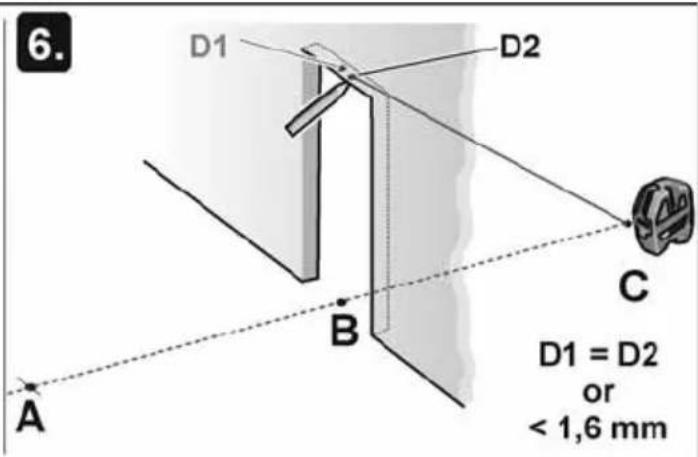
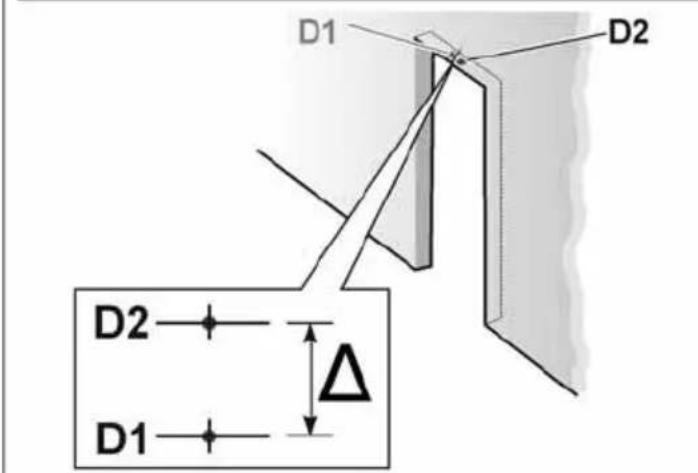
$$ \frac {(D 1 - D 2)}{2} \leq 3 \mathrm{mm} $$

$$ \frac {(D 1 - D 2)}{2} > 3 \mathrm{mm} \rightarrow $$
FLEX ALC 3/1-G/R
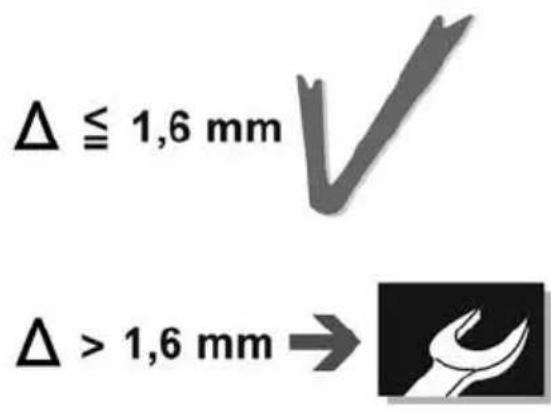
de Prüfung der Genauigkeit des vertikalen Strahls
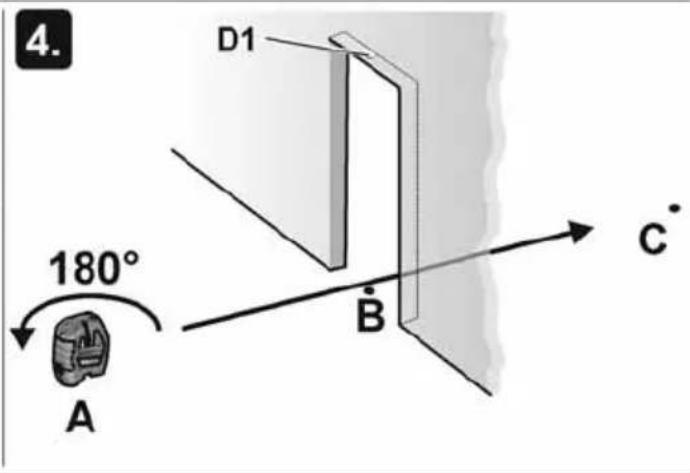
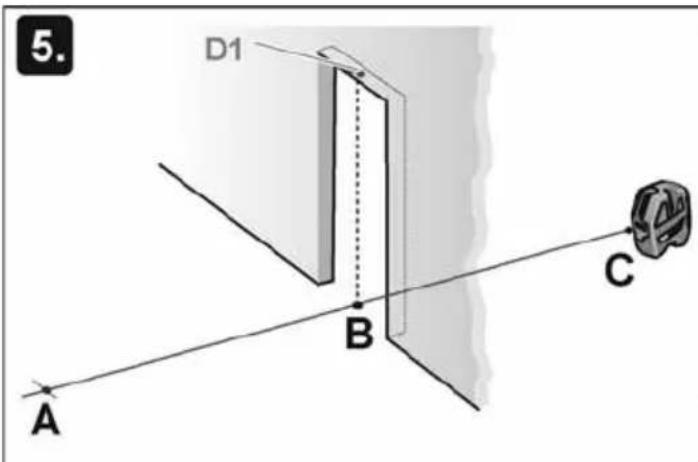
en Checking the accuracy of the vertical beam
fr Vérification de la précision du rayon vertical
it Controllo di precisione del raggio verticale
es Control de la exactitud del haz vertical
pt Verificação da precisão do raio vertical
nl Controle van de nauwkeurigheid van de verticale straal
da Kontrol af nøjagtigheden vertikal stråle
no Kontroll av nøyaktigheten av den vertikale strålen
sv Kontroll av den vertikala strålens noggrannhet
fi Pystysäteen tarkkuuden tarkastus
el 'Ελεγχος της ακρίβειας της κάθετης ακτίνας
pl Sprawdzanie dokładności poziomego promienia
hu A függőleges sugár pontosságának ellenőrzése
cs Kontrola přesnosti vertikálního paprsku
sk Kontrola presnosti vertikálneho lúča
et Vertikaalkiire täpsuse kontrollimine
It Vertikalaus spindulio tikslumo tikrinimas
Iv Vertikāla stara precizitātes pārbaude
ru Проверка точности вертикального луча
FLEX ALC 3/1-G/R
FLEX ALC 3/1-G/R
FLEX
- de
- Taste Betriebsart
- Identification on the device
- Laser radiation
- Laser classification
- Electromagnetic compatibility
- For your safety
- Intended use
- en
- FLEX ALC 3/1-G/R
- Safety instructions
- WARNING!
- CAUTION!
- Overview
- Control panel
- Operating mode button
- Ambient mode switchover button
- LED Indoor mode
- LED Outdoor mode
- Instructions for use
- Checking precision
- Maintenance and care
- Disposal information
- Recycling raw materials instead of waste disposal.
- NOTE
- Exemption from liability
- Classification laser
- Touche Mode
- Laserclassificatie
- Knap driftsmåde
- Tast for driftstype
- Töörežiimi nupp
- Darbo režimo mygtukas
- FLEX
Brand : Flex
Model : ALC 3/1-G/R
Category : Laser level