
micro CA-150 - Measuring equipment RIDGID - Free user manual and instructions
Find the device manual for free micro CA-150 RIDGID in PDF.

| Product Type | Inspection Camera |
| Brand / Model | Ridgid micro CA-150 |
| Screen | 3.5" color LCD monitor (320 x 240 resolution) |
| Lighting | 4 adjustable LEDs |
| Camera head diameter | 17 mm (11/16") |
| Cable length | 1 m (3 ft) - extendable up to 9 m (30 ft) with extensions |
| Waterproof rating (head and cable) | IP67 up to 3 m (10 ft) |
| Power supply | 4 AA batteries (alkaline or rechargeable) |
| Battery life | Auto power off after 30 minutes of inactivity |
| Internal memory | Saves up to 20 images |
| Video output | RCA, PAL/NTSC compatible |
| Weight (with batteries) | 0.77 kg (1.7 lb) |
| Operating temperature | 0 °C to 50 °C |
| Storage temperature | -20 °C to 60 °C |
| Included accessories | Removable hook, magnet, mirror, RCA cable, 4 AA batteries |
| Main features | Image rotation, LED brightness adjustment, image capture and display, internal memory save |
| Care and cleaning | Clean head and cable with mild soap; wipe optics with a dry cloth; use alcohol for connections |
| Safety | Avoid contact with live electrical parts; do not use in explosive atmospheres; wear appropriate PPE |
| Repairability | Have repairs performed by a RIDGID authorized repair center; use only genuine parts |
| Warranty | Lifetime warranty (per manufacturer's conditions) |
Frequently Asked Questions - micro CA-150 RIDGID
User questions about micro CA-150 RIDGID
0 question about this device. Answer the ones you know or ask your own.
Ask a new question about this device
Download the instructions for your Measuring equipment in PDF format for free! Find your manual micro CA-150 - RIDGID and take your electronic device back in hand. On this page are published all the documents necessary for the use of your device. micro CA-150 by RIDGID.
USER MANUAL micro CA-150 RIDGID
natural_image
Ridgid remote endoscope device with black body, red handle, and digital display (no text or symbols visible on device body)RIDGE TOOL COMPANY
Table of Contents
Safety Symbols 2
General Safety Information
Work Area Safety 2
Electrical Safety 2
Personal Safety....2
Equipment Use and Care....2
Service....3
Specific Safety Information
micro CA-150 Inspection Camera Safety ....3
Description, Specifications and Standard Equipment
Description....4
Specifications....4
Standard Equipment 4
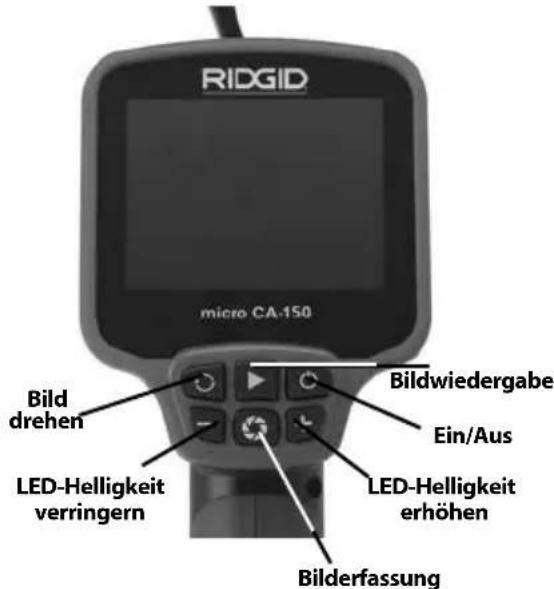
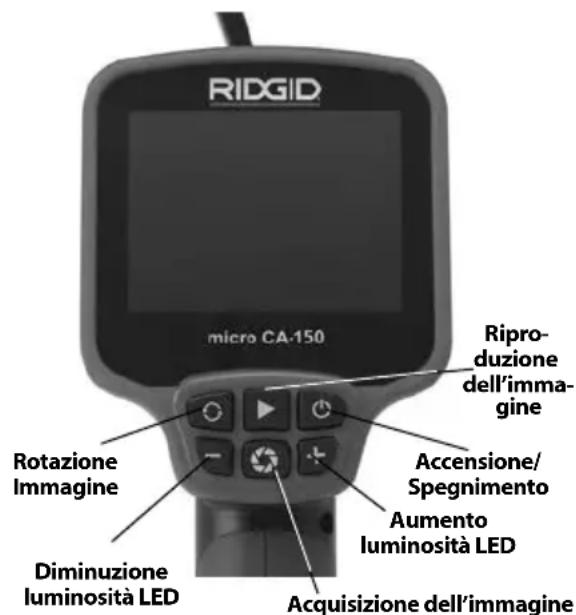
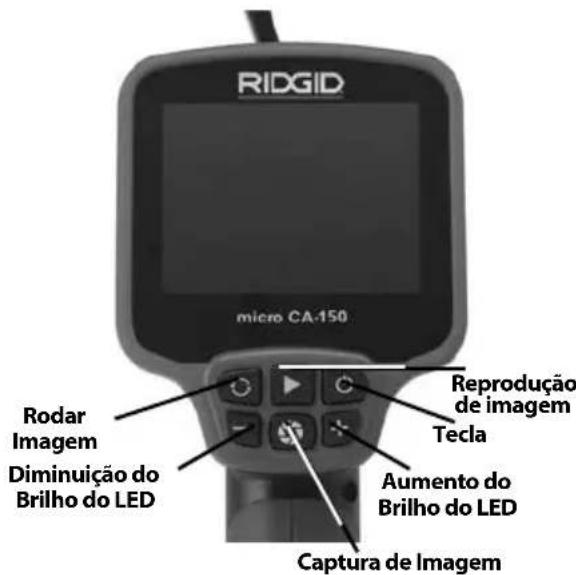
Controls 4
FCC Statement ....5
Electromagnetic Compatibility (EMC)......5
Tool Assembly
Changing/Installing Batteries 5
Installing Imager Head Cable or Extension Cables....5
Installing An Accessory....6
Pre-Operation Inspection 6
Tool and Work Area Set-Up....7
Operating Instructions....8
Viewing 8
Maintenance
Cleaning....9
Reset Function....9
Accessories....9
Storage....9
Service and Repair....9
Disposal 9
Battery Disposal....9
Troubleshooting ....10
Lifetime Warranty ....Back Cover
*Original Instructions - English
micro CA-150 Inspection Camera
natural_image
Ridgid remote endoscope with attached cable and ear components (no visible text or symbols on device body)
WARNING!
Read this Operator's Manual carefully before using this tool. Failure to understand and follow the contents of this manual may result in electrical shock, fire and/or serious personal injury.
micro CA-150 Inspection Camera
| Record Serial Number below and retain product serial number which is located on nameplate. | |
| Serial No. | |
Safety Symbols
In this operator's manual and on the product, safety symbols and signal words are used to communicate important safety information. This section is provided to improve understanding of these signal words and symbols.

This is the safety alert symbol. It is used to alert you to potential personal injury hazards. Obey all safety messages that follow this symbol to avoid possible injury or death.

DANGER indicates a hazardous situation which, if not avoided, will result in death or serious injury.

WARNING indicates a hazardous situation which, if not avoided, could result in death or serious injury.

CAUTION indicates a hazardous situation which, if not avoided, could result in minor or moderate injury.

ICE NOTICE indicates information that relates to the protection of property.

This symbol means read the operator's manual carefully before using the equipment. The operator's manual contains important information on the safe and proper operation of the equipment.

This symbol means always wear safety glasses with side shields or goggles when handling or using this equipment to reduce the risk of eye injury.

This symbol indicates the risk of hands, fingers or other body parts being caught or wrapped in gears or other moving parts.

This symbol indicates the risk of electrical shock.
General Safety Information
WARNING
Read all safety warnings and instructions. Failure to follow the warnings and instructions may result in electric shock, fire and/or serious injury.
SAVE THESE INSTRUCTIONS!
Work Area Safety
- Keep your work area clean and well lit. Cluttered or dark areas invite accidents.
- Do not operate equipment in explosive atmospheres, such as in the presence of flammable liquids, gases or dust. E - equipment can create sparks which may ignite the dust or fumes.
- Keep children and by-standers a way while operating equipment. Distrac tions can cause you to lose control.
Electrical Safety
- Avoid body contact with earthed or grounded surfaces such as pipes, radiators, ranges and refrigerators. There is an increased risk of electrical shock if your body is earthed or grounded.
- Do not expose equipment to rain or wet conditions. Water en tering equipment will increase the risk of electrical shock.
Personal Safety
- Stay alert, watch what you are doing and use common sense when operating equipment. Do not use equipment while you are tired or under the influence of drugs, alcohol or medication. A moment of inattention while operating equipment may result in serious personal injury.
- Do not overreach. Keep proper footing and balance at all times. This enables better control of the power tool in unexpected situations.
- Use personal protective equipment. Always wear eye protection. Protective equipment such as dust mask, non-skid safety shoes, hard hat or hearing protection used for appropriate conditions will reduce personal injuries.
Equipment Use and Care
- Do not force equipment. Use the correct equipment for your application. The correct equipment will do the job better and safer at the rate for which it is designed.
- Do not use equipment if the switch doesera to reduce the risk of electrical shock not turn it ON and OFF. Any tool that can or other serious injury.
not be controlled with the switch is dangerous and must be repaired.
SAVE THESE INSTRUCTIONS!
- Disconnect the batteries from the equipment before making any adjustments, changing accessories, or storing. Such preventive safety measures reduce the risk of injury. A manual holder is supplied in the carrying case of the micro CA-150 Inspection Camera to keep this manual with the tool for use by the operator.
- Store idle equipment out of the reach of micro CA-150 Inspection children and do not allow persons unfa-Camera Safety
miliar with the equipment or these instructions to operate the equipment. Equipment can be dangerous in the hands of untrained users.
- Maintain equipment. Check for misalignment or binding of moving parts, missing parts, breakage of parts and any other condition that may affect the equipment's operation. If damaged, have the equipment repaired before use. Many accidents are caused by poorly maintained equipment.
- Use the equipment and accessories in accordance with these instructions, taking into account the working conditions and the work to be performed. Use of the equipment for operations different from those intended could result in a hazardous situation.
- Use only accessories that are recommended by the manufacturer for your equipment. Accessories that may be suitable for one piece of equipment may become hazardous when used with other equipment.
- Keep handles dry and clean; free from oil and grease. Allows for better control of the equipment.
Service
- Have your equipment serviced by a qual i fied repair person using on ly identical replacement parts. This will ensure that the safety of the tool is maintained.
Specific Safety Information
WARNING
This section contains important safety information that is specific to the inspection camera.
Read these precautions carefully before using the micro CA-150 In spec tion Cam -
- The micro CA-150 imager head and cable are waterproof to 10'. The hand-held display unit is not. Do not expose the display unit to water or rain. This increases the risk of electrical shock.
- Do not place the micro CA-150 Inspection Camera anywhere that may contain a live electrical charge. This increases the risk of electrical shock.
- Do not place the micro CA-150 Inspection Camera anywhere that may contain moving parts. This increases the risk of entanglement injuries.
- Do not use this device for personal inspection or medical use in any way. This is not a medical device. This could cause personal injury.
- Always use appropriate personal protective equipment while handling and using the micro CA-150 Inspection Camera. Drains and other areas may contain chemicals, bacteria and other substances that may be toxic, infectious, cause burns or other issues. Appropriate personal protective equipment always includes safety glasses and gloves, and may include equipment such as latex or rubber gloves, face shields, goggles, protective clothing, respirators and steel-toed footwear.
Practice good hygiene. Use hot, soapy water to wash hands and other exposed body parts exposed to drain contents after handling or using the micro CA-150 inspection Camera to inspect drains and other areas that may contain chemicals or bacteria. Do not eat or smoke while operating or handling the micro CA-150 Inspection Camera. This will help prevent contamination with toxic or infectious material.
- Do not operate the micro CA-150 Inspection Camera if operator or device is standing in water. Operating an electrical
device while in water increases the risk of electrical shock.
The EC Declaration of conformity (890-011-320.10) will accompany this manual as a separate booklet when required.
If you have any question concerning this RIDGID® product:
- Contact your local RIDGID distributor.
- Visit RIDGID.com to find your local RIDGID contact point.
- Contact Ridge Tool Technical Service De part ment at rtctechservices@emerson.com, or in the U.S. and Canada call (800) 519-3456.
Description, Specifications and Standard Equipment
Description
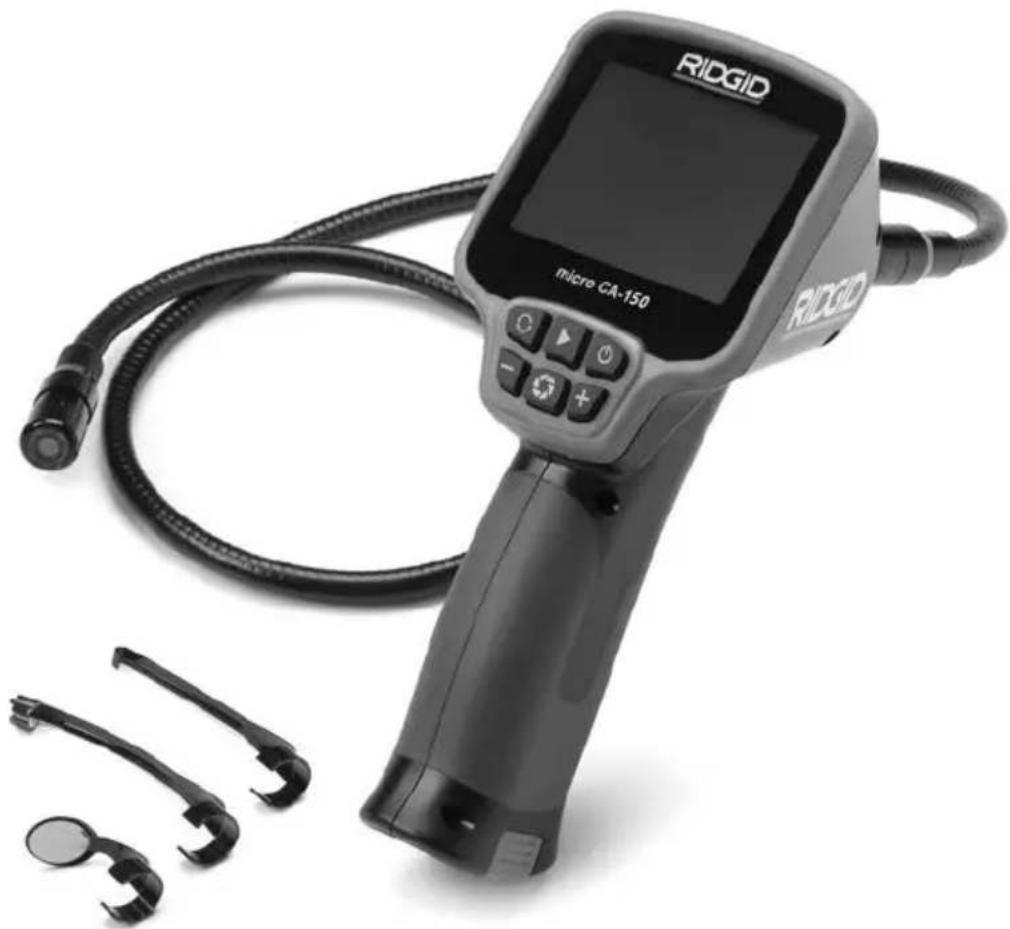
The micro CA-150 Inspection Camera displays live color video from an imaging sensor and light source that's connected to a 3' flexible cable. It can be used to look into tight spots and beam back real-time video to a color LCD. It comes with a 11/16" (17mm) camera head for general use.
Specifications
Display....3.5" Color LCD
(320 × 240
Resolution)
Lighting....4 Adjustable LEDs
Cable Reach....3' (1m) (30' (9m))
with Optional
Extensions)
Waterproof to 10'
(3m) (IP67)
Camera Head .....11/16" (17mm)
Video Output ....RCA (3' Cable Included)
TV-Out PAL/NTSC
Operating Temp ....0°C \~ 50°C
Storage Temp ....-20°C \~ 60°C
Storage Humidity.....15% \~ 85% RH
Depth of Field (DOF) ....10mm \~ • (infinity)
Internal Memory ......Save up to 20 images
Power Source ....4 x "AA", Alkaline or Rechargeable
Attachments....Hook, Magnet, Mirror
Weight
(tool w/ batteries) .....1.7 lbs (0.77 kg)
Standard Equipment
The micro CA-150 Inspection Camera comes with the following items:
- micro CA-150
- 17mm Imager
- 3' RCA Cable
- Hook, Magnet, Mirror Attachments
- 4 x "AA" Batteries
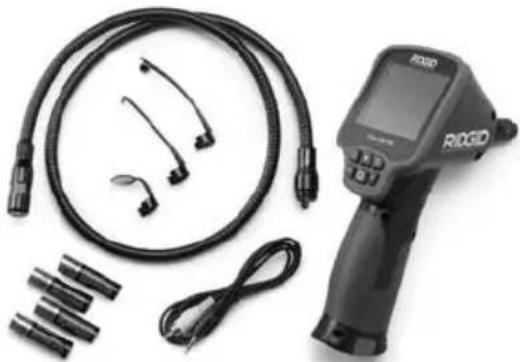
natural_image
Medical device with coiled tubing, connectors, and medical device (no visible text or symbols)Figure 1 – micro CA-150
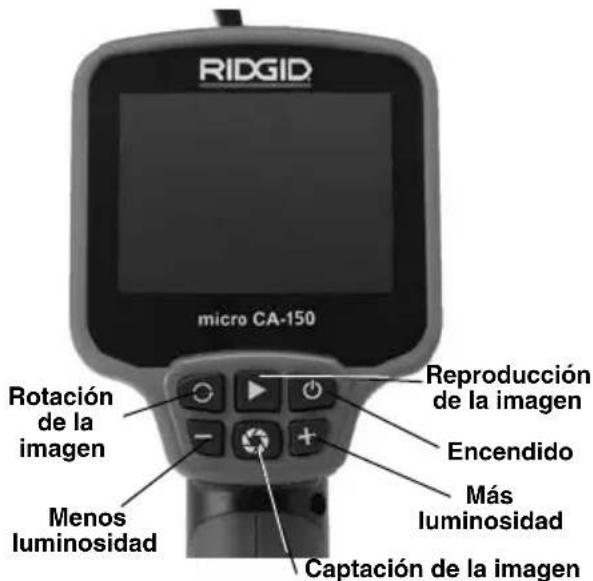
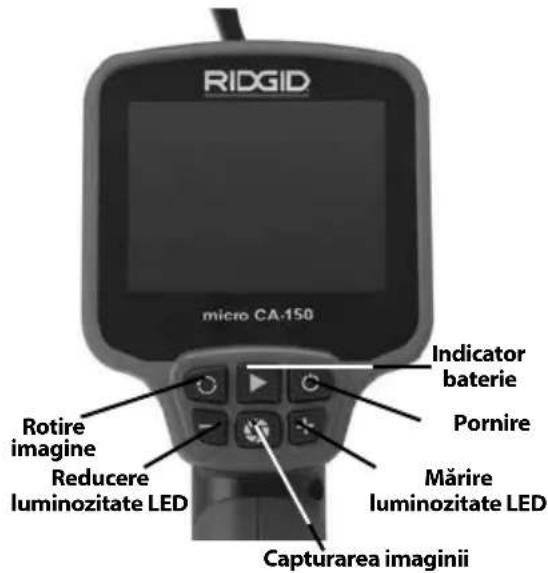
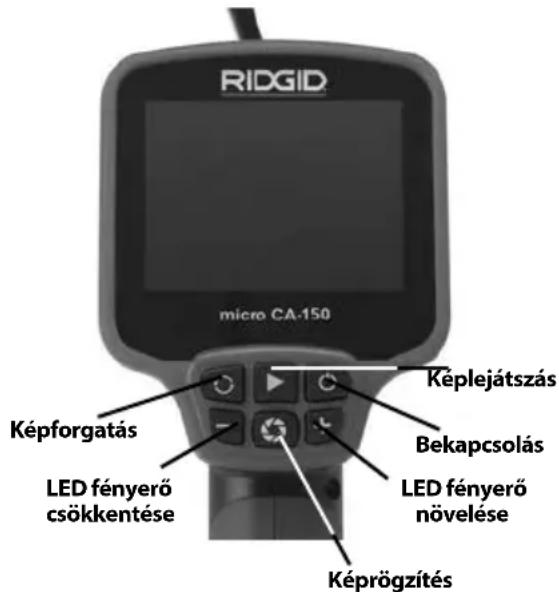
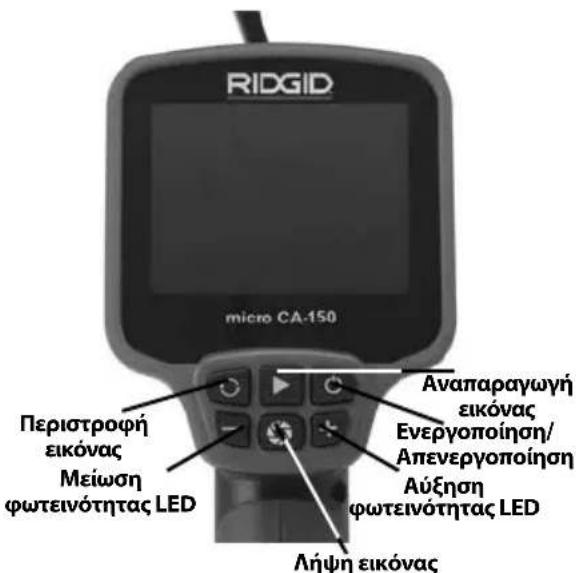
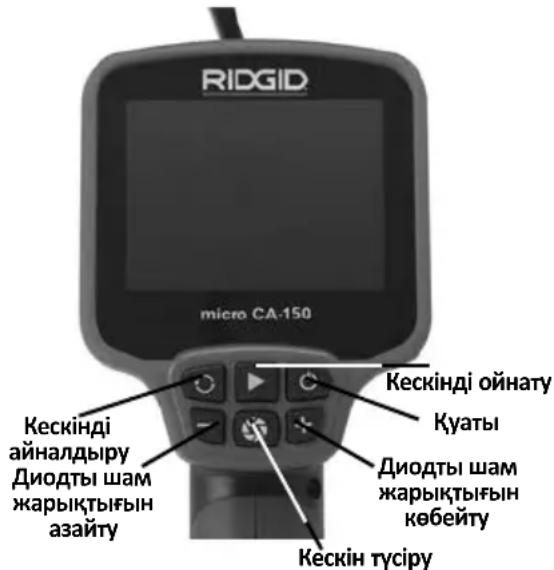
Controls

Figure 2 – Controls
FCC Statement
This equipment has been tested and found to
comply with the limits for a Class B digital device, pursuant to part 15 of the FCC Rules. These limits are designed to provide reasonable protection against harmful interference in a residential installation.
This equipment generates, uses, and can radiate radio frequency energy and, if not installed and used in accordance with the instructions, may cause harmful interference to radio communications.
However, there is no guarantee that interference will not occur in a particular installation.
If this equipment does cause harmful interference to radio or television reception, which can be determined by turning the equipment OFF and ON, the user is encouraged to try to correct the interference by one or more of the following measures:
- Reorient or relocate the receiving antenna.
- Increase the separation between the equipment and receiver.
- Consult the dealer or an experienced radio/ - TV technician for help.
Electromagnetic Compatibility (EMC)
The term electromagnetic compatibility is taken to mean the capability of the product to function smoothly in an environment where electromagnetic radiation and electrostatic discharges are present and without causing electromagnet interference to other equipment.
(See Figure 4). If needed, remove batteries.
natural_image
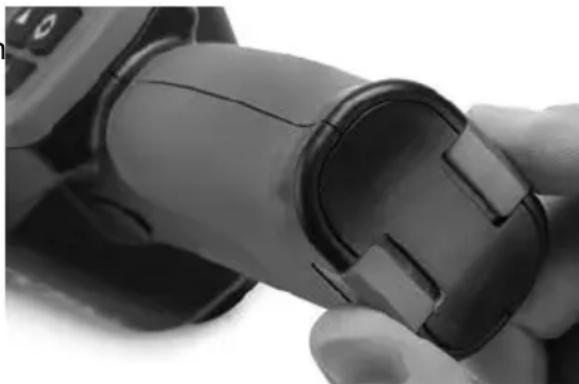
Close-up of a hand holding a black cylindrical device with a small inset slot (no visible text or symbols)Figure 3 – Battery Compartment Cover
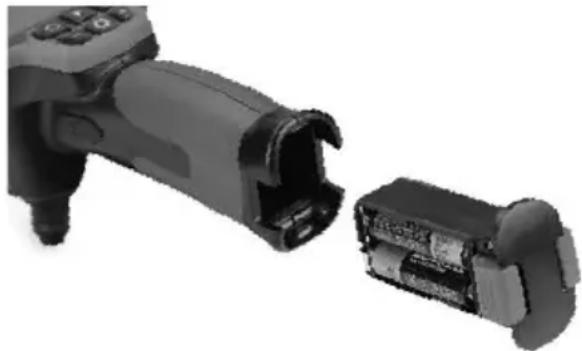
- Install 4 new AA alkaline batteries (LR6), observing the correct polarity as indicated on the battery compartment. Only replace in sets to help prevent battery leakage.
- Squeeze the clips and firmly insert into inspection camera. The holder will only go in one way. Do not force. Confirm securely attached.
natural_image
Close-up of a black mechanical device with internal components, showing a close-up and disassembled part (no text or symbols visible)NOTICE The RIDGID micro CA-150 Inspect - Figure 4 – Battery Compartment
ion Camera conforms to all applicable EMC standards. However, the possibility of it causing interference in other devices cannot be precluded.
Tool Assembly
WARNING
To reduce the risk of serious injury during use, follow these procedures for proper assembly.
Changing/Installing Batteries
The micro CA-150 is supplied without batteries installed. Remove the batteries prior to long term storage to avoid battery leakage.
- Squeeze the battery clips (See Figure 3) and remove battery compartment from the micro CA-150 Inspection Camera
Installing the Imager Head Cable or Extension Cables
To use the micro CA-150 Inspection Cam er a, the imager head cable must be connected to the handheld display unit. To connect the cable to the handheld display unit, make sure the key and slot (Figure 5) are properly aligned. Once they are aligned, finger tighten the knurled knob to hold the connection in place.
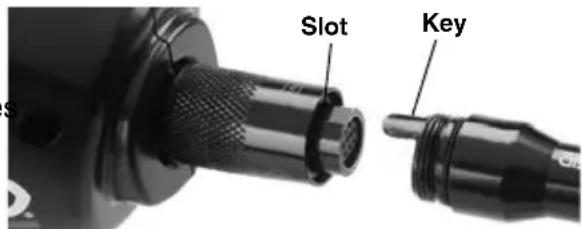
Figure 5 – Cable Connections
3' and 6' cable extensions are available to increase the length of your cable up to 30' in length. To install an extension, first remove the camera head cable from the display unit by loosening the knurled knob. Connect the extension to the handheld as described above (Figure 5). Connect the keyed end of the camera head cable to the slotted end of the extension and finger tighten the knurled knob to hold the connection in place.
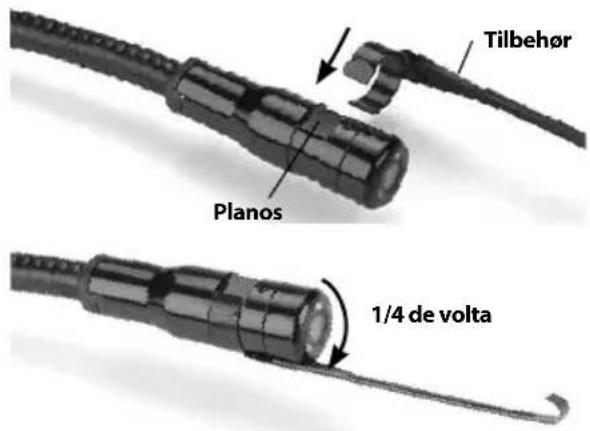
Installing An Accessory
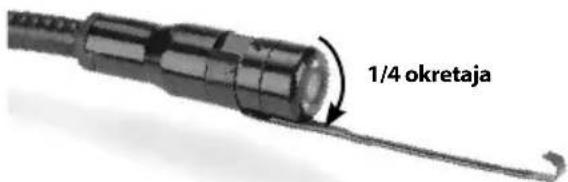
The three included accessories, (mirror, hook and magnet) (Figure 1) all attach to the imager head the same way.
To connect, hold the imager head as shown in Figure 6. Slip the semicircle end of the accessory over the flats of the imager head as shown in Figure 6. Then rotate the accessory a 1/4 turn so the long arm of the accessory is extending out as shown (Figure 6).
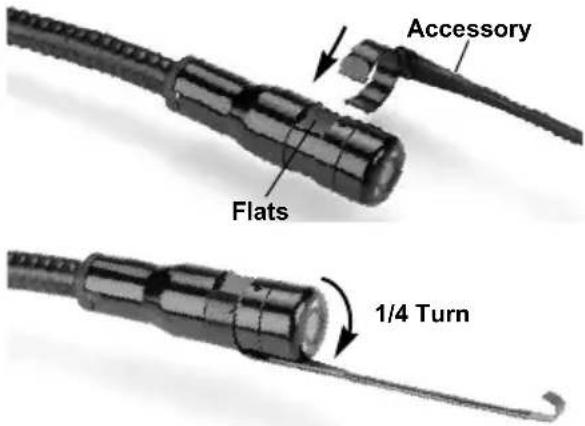
Figure 6 - Installing An Accessory
Pre-Operation Inspection
WARNING
Before each use, inspect your inspection camera and correct any problems to reduce the risk of serious injury from electric shock and other causes and prevent tool damage.
-
Make sure the unit is OFF.
-
Remove the battery holder and inspect it and batteries for signs of dam age. Replace batteries if necessary. Do not use inspection camera if batteries are damaged.
-
Clean any oil, grease or dirt from the e - equipment. This aids inspection and helps prevent the tool from slipping from your grip.
-
Inspect micro CA-150 Inspection Camera for any broken, warn, missing, misaligned or binding parts or any condition which may prevent safe and normal operation.
-
Inspect the camera head lens for condensation. To avoid damaging the unit, do not use the camera if condensation forms inside the lens. Let the water evaporate before using.
-
Inspect the full length of the cable for cracks or damage. A damaged cable could allow water to enter the unit and increase the risk of electrical shock.
-
Check to make sure the connections between the handheld unit, extension cables and imager cable are tight. All connections must be properly assembled for the cable to be water resistant. Con firm unit is properly assembled.
-
Check that the warning label is present, firmly attached and readable.

Figure 7 – Warning Label
- If any issues are found during the inspection, do not use the inspection camera until it has been properly serviced.
- With dry hands, re-install the battery hold - er making sure to fully insert.
- Press and Hold the Power Button for 2 seconds. A splash screen will appear. Once the camera is ready, the live view
will be seen. Con suit the Troubleshooting section of this manual if problems arise.
- Press and Hold the Power Button for 1 second to turn the unit OFF.
Tool and Work Area Set-Up
WARNING


Set up the micro CA-150 In spec tion Camera and work area according to these procedures to reduce the risk of injury from electrical shock, entanglement and other causes and prevent tool and system damage.
-
Check work area for:
-
Adequate lighting
- Flammable liquids, vapors or dust that may ignite. If present, do not work in area until sources have been identified and corrected. The micro CA-150 Inspection Camera is not explosion proof and can cause sparks.
-
Clear, level, stable, dry place for operator. Do not use the inspection camera while standing in water.
-
Examine the area or space that you will be inspecting and determine if the micro CA-150 Inspection Camera is the correct piece of equipment for the job.
- Determine the access points to the space. The minimum opening the camera head can fit through is approximately 3/4'' (19mm) in diameter for the 17mm camera head.
- Determine the distance to the area to be inspected. Extensions can be added to the camera to reach up to 30' (9m).
- Determine if there are any obstacles that would require very tight turns in the cable. The inspection camera ca ble can go down to a 2" (50mm) radius without damage.
- Determine if there is any electrical power supplied to the area to be inspected. If so, the power to the area must be
turned off to reduce the risk of electric shock. Use appropriate lock out procedures to prevent the power from being turned back on during the inspection.
- Determine if any liquids will be encountered during the inspection. The cable and imager head are waterproof to a depth of 10' (3m). Greater depths may cause leakage into the cable and imager and cause electric shock or damage the equipment. The handheld display unit is not water resistant and should not be exposed to wet conditions.
- Determine if any chemicals are present, especially in the case of drains. It is important to understand the specific safety measures required to work around any chemicals present. Contact the chemical manufacturer for required information. Chemicals may damage or degrade the inspection camera.
- Determine the temperature of the area and items in the area. The working temperature of the inspection camera is between 32 and 122 degrees F (0°C - 50°C). Use in areas outside of this range or contact with hotter or colder items could cause camera damage.
- Determine if any moving parts are present in the area to be inspected. If so, these parts must be deactivated to prevent movement during inspection to reduce the risk of entanglement. Use appropriate lock out procedures to prevent the parts from moving during the inspection.
If the micro CA-150 Inspection Camera is not the correct piece of equipment for the job, other inspection equipment is available from RIDGID. For a complete listing of RIDGID products, see the RIDGID catalog, online at www.RIDGID.com.
- Make sure the micro CA-150 Inspection Camera has been properly inspected before each use.
- Install the correct accessories for the application.
Operating Instructions
WARNING


Always wear eye protection to protect your eyes against dirt and other foreign objects.
Follow operating instructions to reduce the risk of injury from electrical shock, entanglement and other causes.
- Make sure that the inspection camera and work area have been properly set up and that the work area is free of bystanders and other distractions.

Figure 8 – Controls
- Power On: Press and Hold the power button for 2 seconds. A splash screen will appear. Once the camera is ready, the live view will be seen.
If the display does not turn ON, the batteries need to be changed or the unit needs service.
-
Pre-Form The Cable: If needed for the area to be inspected, pre-form the cable. Do not try to form bends with a radius of less than 2" (50mm), this can damage the cable.
-
LED Brightness Adjustment: The imager head is equipped with four white LEDs to aid inspection. Use the + and - buttons to turn ON and adjust the brightness of the LEDs.
-
Inspection: Insert the imager head and cable into the space to be inspected. Do not use the imager head or cable for anything other than an inspection device. Do not use the imag er head and cable to clear a path. Do not force the imager head and cable through tight bends or spaces. These uses can damage the unit and the area to be inspected.
-
Image Capture: During inspection, press this button to record an image to internal memory. Up to 20 images can be captured by the CA-150 internal memory. Once 20 images are captured, subsequent image captures will overwrite existing images in memory, starting with the first.
-
Image Playback: Pressing this button will display the most recent image captured in internal memory. Press this button again or the + and - buttons to navigate through saved images. Press Image Capture to return to the live view.
-
Image Delete: To delete the captured image shown on the display, hold the Image Playback button for 3 seconds. Continue to hold the Image Playback button to delete subsequent images, if desired.
-
Image Rotation: If needed, the image seen on the screen can be rotated 180 degrees by pressing the rotate image button.
-
Power Off: When the inspection is complete, carefully withdraw the imager and cable from the inspection area. Press and Hold the power button for 1 second to turn the unit OFF. The unit will automatically turn OFF 30 minutes after the last button press or if the batteries drop too low.
Viewing
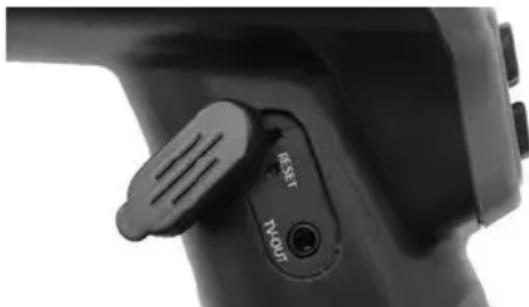
The micro CA-150 Inspection Camera can be connected to a television or other monitor for remote viewing or recording through the included RCA cable. Open the rubber cover on the side of the grip and insert the RCA cable into the TV-OUT jack.
Insert the other end into the Video In jack on the television or monitor. The television or monitor may need to be set to the proper input to allow viewing.
natural_image
Close-up of a black electronic device handle with 'RESET' and 'TV-OUT' labels (no additional text or symbols)Figure 9 – TV-OUT Jack/Reset Button
Maintenance
WARNING
Remove batteries before cleaning.
Cleaning
• Always clean the imager head and cable after use with mild soap or mild detergent.
- Gently clean the LCD with a clean dry cloth. Avoid rubbing too hard on the LCD.
- Use only alcohol swabs to clean the cable connections.
- Wipe the hand held display unit down with a clean, dry cloth.
Reset Function
If the unit stops functioning and does not operate, press the Reset Button. (See Figure 9.) The unit may recover to normal operation when re started.
Accessories
WARNING
To reduce the risk of serious injury, only use accessories specifically designed and recommended for use with the RIDGID micro CA-150 Inspection Camera such as those listed below. Other Accessories suitable for use with other tools may be hazardous when used with the micro CA-150 Inspection Camera.
micro CA-150 Inspection Camera Accessories*
| CatalogNo. | Description |
| 31128 3' | Cable Extension |
| 31133 6' | Cable Extension |
| 37103 Imager Head and Cable - 17mm | |
(*List subject to change.)
Storage
The RIDGID micro CA-150 Inspection Cam era must be stored in a dry secure area between -20^ ( -4^ ) and 60^ ( 140^ ).
Store the tool in a locked area out of the reach of children and people unfamiliar with the micro CA-150 Inspection Cam era.
Remove the batteries before any long period of storage or shipping to avoid battery leakage.
Service and Repair
WARNING
Improper service or repair can make the RIDGID micro CA-150 Inspection Camera unsafe to operate.
Service and repair of the micro CA-150 In-spec tion Camera must be performed by a RIDGID In dependent Authorized Service Center.
For information on your nearest RIDGID In - depen dent Service Center or any service or repair questions:
- Contact your local RIDGID distributor.
- Visit RIDGID.com to find your local RIDGID contact point.
- Contact Ridge Tool Technical Service Department at rtctechservices@emerson.com, or in the U.S. and Canada call (800) 519-3456.
Disposal
Parts of the RIDGID micro CA-150 Inspection Camera contain valuable materials and can be recycled. There are companies that specialize in recycling that may be found locally. Dispose of the com ponents in compliance with all applicable regulations. Contact your local waste management authority for more information.
For EC Countries: Do not dispose of elec trical equipment with household waste!
According to the European Guide - line 2012/ 19/EC for Waste Electrical and Electronic Equipment and its
imple men tation into national legislation, electrical equipment that is no longer usable must be collected separately and disposed of in an environmentally correct manner.
Battery Disposal
For EC countries: Defective or used batteries must be recycled according to the guideline 2012/19/EEC.
Troubleshooting
| SYMPTOM POSSIBLE REASON SOLUTION | ||
| Display turns ON, but does not show image. | Loose cable connections. | Check cable connections, clean if required. Re-attach. |
| Imager is broken. | Replace the Imager. | |
| LEDs on imager head are dim at max brightness, display switches between black and white, color display turns itself OFF after a brief period. | Battery low on power. | Replace batteries. |
| Unit will not turn ON. | Dead batteries. | Replace batteries. |
| Unit needs to be reset. | Reset unit. See “Maintenance” Section. | |
natural_image
Ridgid remote endoscope with attached cable and ear components (no visible text or symbols on device body)
AVERTISSEMENT
natural_image
Product photo of an RIOG device with coiled cable, connectors, and medical tubing (no visible text or symbols)Figure 2 – Commandes
Déclaration FCC
natural_image
Close-up of a hand holding a black cylindrical device with a small inset showing internal components (no visible text or symbols)natural_image
Close-up of a black plastic electrical connector with internal components, showing internal structure and housing (no text or symbols visible)Figure 4 – Logement de piles
natural_image
Three black-and-white icons: a circular target, a stick figure with a tool, and a gear with hands (no text or symbols)natural_image
Three black-and-white icons representing surveillance, a person running with a pen, and a gear (no text or symbols)Figure 8 – Commandes
natural_image
Close-up of a black handheld device with a control knob and indicator lights (no visible text or symbols)natural_image
Ridgid remote endoscope with attached cable and ear components (no visible text or symbols on device body)ADVERTENCIA
natural_image
Product photo of an RIOGID remote control device with coiled cable, connectors, and USB cable (no visible text or symbols)Figura 1 - micro CA-150
Mandos
natural_image
Close-up of a hand holding a black cylindrical device with a handle, showing internal components (no text or symbols visible)natural_image
Close-up of a black mechanical device with internal components, showing a close-up and disassembled part (no text or symbols visible)natural_image
Three black-and-white icons: a circular mask with a visor, a stick figure with a sword, and a gear with gears (no text or symbols)natural_image
Close-up of a black handheld device handle with a 'RESET' button and 'TWOUI' label (no additional text or symbols)Figura 9 – Enchufe hembra TV-OUT y botón de re-alistar
Mantenimiento
ADVERTENCIA
natural_image
Ridgid remote endoscope with attached cable and ear components (no visible text or symbols on device body)! WARNING!
natural_image
Medical endoscopy equipment including a RIOO device, cable, and connector components (no visible text or labels)Abbildung 1 - micro CA-150
Bedienelemente
natural_image
Close-up of a hand holding a black cylindrical device with a handle, showing internal components (no visible text or symbols)natural_image
Close-up of a black handheld device with a close-up of its internal components (no visible text or symbols)natural_image
Close-up of a black handheld device with a 'RESET' button and 'TV-901T' label (no additional text or symbols visible)natural_image
Ridgid remote endoscope with attached cable and ear components (no visible text or symbols on device body)
WAARSCHUWING!
natural_image
Medical endoscopy device with coiled tubing, connectors, and medical monitor (no visible text or symbols)natural_image
Close-up of a hand holding a black cylindrical device with a small rectangular component inserted (no visible text or symbols)natural_image
Close-up of a black handheld device with internal components, showing battery and casing (no text or symbols visible)Figuur 5 – Kabelverbindingen
- Adequate verlichting.
natural_image
Close-up of a black handheld device with a 'TV OUT' button and 'RESET' label (no additional text or symbols visible)Figuur 9 - TV-OUT-bus/resetknop
Onderhoud
WAARSCHUWING
natural_image
Ridgid remote endoscope with attached cable and ear components (no visible text or symbols on device body)AVVERTENZA!
natural_image
Medical device with coiled tubing, connectors, and a digital display (no visible text or symbols)Figura 1 - micro CA-150
Comandi
natural_image
Close-up of a hand holding a black cylindrical device with a handle, no visible text or symbolsFigura 3 – Coperchio del vano batterie
natural_image
Close-up of a black handheld device with internal components, showing internal structure and battery casing (no text or symbols visible)natural_image
Close-up of a black handheld device with a 'TV-OUT' button and 'RESET' label (no additional text or symbols)Figura 9 - Presa TV-OUT/Pulsante RESET
Manutenzione
AVVERTENZA
natural_image
Ridgid remote endoscope device with attached cable and ear components (no visible text or symbols on main body)! AVISO!
natural_image
Medical endoscopy equipment including a radiocod, cable, and connector components (no visible text or labels)Figura 1 - CA-150 micro
Controlos
natural_image
Close-up of a hand holding a black cylindrical device with a handle, showing internal components (no visible text or symbols)natural_image
Close-up of a black handheld device with internal components, showing a close-up of its internal structure (no text or symbols visible)natural_image
Three black-and-white icons representing surveillance, a person running with a megaphone, and a gear (no text or symbols)natural_image
Close-up of a black handheld device with a 'V-OUT' button and 'REST' label (no additional text or symbols visible)natural_image
Ridgid remote endoscope with attached cable and ear components (no visible text or symbols on device body)WARNING!
natural_image
Medical endoscopy equipment including a RICUO device, cable, and connector components (no visible text or symbols)Figur 1 - micro CA-150
Reglage

natural_image
Close-up of a hand holding a black cylindrical device with a visible internal component (no text or symbols)natural_image
Close-up of a black handheld device with internal components, showing internal structure and housing (no text or symbols visible)Figur 4 – Batteriutrymme
natural_image
Three black-and-white icons: a circular mask with a face, a stick figure running with a tool, and a gear with a hand (no text or symbols)natural_image
Close-up of a black handheld device with a 'RESET' and 'TV OUT' button (no readable text beyond labels)natural_image
Ridgid remote endoscope with attached cable and ear components (no visible text or symbols on device body)ADVARSEL!
natural_image
Product photo of an RIOGID remote control device with coiled cable, ear connectors, and USB cable (no text or symbols visible)Figur 1 - micro CA-150
Kontrolanordninger

natural_image
Close-up of a hand holding a black cylindrical device with a handle (no visible text or symbols)Figur 3 – Batterirummets dæksel
natural_image
Close-up of a black handheld device with internal components, showing a close-up of its internal structure (no text or symbols visible)Figur 4 – Batterirum
natural_image
Close-up of a black handheld device with a 'RESET' button and 'TRUUT' label (no additional text or symbols visible)Figur 9 – TV-OUT-stik/Reset-knap
Vedligeholdelse
ADVARSEL
natural_image
Ridgid remote endoscope with attached cable and ear components (no visible text or symbols on device body)ADVARSEL!
natural_image
Product photo of an RQGID remote control device with coiled cable, connectors, and USB cable (no visible text or symbols)Fig. 1 - micro CA-150
Kontrollelementer

Fig. 2 - Kontroller
FCC-erklæring
natural_image
Close-up of a hand holding a black cylindrical device with a visible crack (no text or symbols)Fig. 3 – Batteriskuffens deksel
natural_image
Close-up of a handheld device with a battery pack emerging from its side (no visible text or symbols)Fig. 4 - Batteriskuff
natural_image
Three black-and-white icons: a circular face with a stylized eye, a stick figure holding a tool, and a gear with gears (no text or symbols)natural_image
Close-up of a black handheld device with a 'RESET TV OUT' button (no visible text or symbols beyond the label)Fig. 9 - TV-OUT-kontakt/nullstillingsknapp
Vedlikehold
ADVARSEL
natural_image
Ridgid remote endoscope with visible control panel and earplugs (no text or symbols on main body)
VAROITUS!
natural_image
Product photo of an RQGIO remote control device with coiled cable, connectors, and USB cable (no visible text or symbols)natural_image
Close-up of a hand holding a black cylindrical device with a visible crack, no text or symbols present.natural_image
Close-up of a black handheld device with two open batteries, one showing internal components (no text or symbols visible)natural_image
Close-up of a black handheld device with a 'RESET' button and 'R-VOUT' label (no additional text or symbols visible)natural_image
Ridgid remote endoscope device with attached cable and earplugs (no visible text or symbols on main body)
OSTRZEŻENIE!
natural_image
Product photo of an RICED medical device with coiled tubing, earplugs, and medical monitor (no visible text or symbols)natural_image
Close-up of a hand holding a black cylindrical device with a handle, showing internal components (no text or symbols visible)natural_image
Close-up of a black handheld device with internal components, showing internal structure and battery casing (no text or symbols visible)natural_image
Three black-and-white icons: a circular emblem with a shield, a stylized figure holding a tool, and a gear with a hand (no text or symbols)natural_image
Three black-and-white icons: a circular mask with eyes, a stick figure running with a tool, and a gear with gears (no text or symbols)natural_image
Close-up of a black handheld device with a 'N/OUT' button and 'RESET' label (no additional text or symbols)natural_image
Ridgid remote endoscope with attached cable and earplugs (no visible text or symbols on main body)
UPOZORNĚNÍ!
natural_image
Product photo of an RIOQID remote control device with coiled cable, earments, and connector (no visible text or symbols)natural_image
Close-up of a hand holding a black cylindrical device with a handle, showing internal mechanical components (no text or symbols visible)natural_image
Close-up of a black handheld device with internal components, showing no visible text or symbolsnatural_image
Three black-and-white icons: a circular mask with a face, a stick figure holding a tool, and a gear with gears (no text or symbols)natural_image
Close-up of a black handheld device with a 'N-OUT' button and 'RESET' label (no additional text or symbols)natural_image
Ridgid remote endoscope with attached cable and ear components (no visible text or symbols on device body)VÝSTRAHA!
TIETO POKYNY USCHOVAJTE!
TIETO POKYNY USCHOVAJTE!
natural_image
Medical endoscopy device with coiled tubing, connectors, and medical monitor (no visible text or symbols)natural_image
Close-up of a hand holding a black cylindrical device with a handle, no visible text or symbolsnatural_image
Close-up of a black handheld device with internal components, showing internal structure and battery casing (no text or symbols visible)natural_image
Three black-and-white icons representing surveillance, a person running with a megaphone, and a gear (no text or symbols)natural_image
Close-up of a black handheld device with a 'TV-OLT' button and 'RESET' label (no additional text or symbols)Figúra 9 - Konektor TV-OUT/Tlačidlo Reset
Údržba
VÝSTRAHA
natural_image
Ridgid remote endoscope device with attached cable and earplugs (no visible text or symbols on main body)AVERTIZARE!
natural_image
Medical endoscopy device with coiled tubing, connectors, and medical instrument (no visible text or symbols)Figura 1 - micro CA-150
Comenzi
natural_image
Close-up of a hand holding a black cylindrical device with a handle, showing internal components (no visible text or symbols)natural_image
Close-up of a black handheld device with internal components, showing a close-up of its battery pack (no text or symbols visible)natural_image
Three black-and-white icons: a circular eye with a gear, a stick figure running with a tool, and a gear with gears (no text or symbols)natural_image
Close-up of a black handheld device with a 'V-OUT' button and 'RESET' label (no additional text or symbols)natural_image
Ridgid remote endoscope with attached cable and ear components (no visible text or symbols on device body)! FIGYELMEZTETÉS!
natural_image
Medical endoscopy equipment including a radiologist's monitor, coiled tubing, and connectors (no visible text or symbols)- ábra - micro CA-150
Vezérlők
natural_image
Close-up of a hand holding a black cylindrical device with a handle, no visible text or symbolsnatural_image
Close-up of a black handheld device with internal components, showing internal structure and battery casing (no text or symbols visible)- ábra – Az elemtartó
natural_image
Three black-and-white icons: a circular eye with a photon, a stick figure holding a megaphone, and a gear with a hand (no text or symbols)natural_image
Close-up of a black handheld device with a 'TV-OLT' button and 'RESET' label (no additional text or symbols visible)natural_image
Ridgid remote endoscope with attached cable and earplugs (no visible text or symbols on main body)
ΠΡΟΕΙΔΟΠΟΙΗΣΗ!
natural_image
Product photo of an RIOQD handheld device with coiled cable, ear connectors, and connector spout (no visible text or symbols)Eikóva 1 - micro CA-150
Κουμπιά ελέγχου
natural_image
Close-up of a hand holding a black cylindrical device with a handle (no visible text or symbols)natural_image
Close-up of a black handheld device with internal components, showing internal structure and battery casing (no text or symbols visible)natural_image
Close-up of a black handheld device with a 'NEW REST' and 'NO OUT' button (no additional text or symbols visible)natural_image
Ridgid remote endoscope with attached cable and ear components (no visible text or symbols on device body)UPOZORENJE!
natural_image
Product photo of an RIOG remote control device with coiled cable, connectors, and USB cable (no visible text or symbols)Slika 1 - micro CA-150
Kontrole

natural_image
Close-up of a hand holding a black cylindrical device with a handle (no visible text or symbols)Slika 3 - Poklopac odjeljka za baterije
natural_image
Close-up of a black handheld device with internal components, showing no visible text or symbolsnatural_image
Close-up of a black handheld device with a 'RESET' and 'T-OUT' button (no additional text or symbols visible)Slika 9 - TV-OUT utičnica/Tipka poništavanja (Reset)
Održavanje
UPOZORENJE
Izvadite baterije prije čišćenja.
Čišćenje
- Nakon uporabe uvijek očistite glavu i kabel kamere blagom sapunicom ili blagim deterdžentom.
- Pažljivo prebrišite LCD zaslon suhom, čistom krpom. Nemojte izgrepsti LCD za-slon.
- Kabelske priključke čistite samo vatom namočenom u alkohol.
- Zaslon ručnog uređaja prebrišite čistom i suhom krpom.
natural_image
Ridgid remote endoscope with attached cable and ear components (no visible text or symbols on device body)OPOZORILO!
natural_image
Medical device with coiled tubing, connectors, and a digital display (no visible text or symbols)Slika 1 - micro CA-150
Krmilni elementi

Slika 2 – Elementi za upravljanje
Izjava FCC
natural_image
Close-up of a hand holding a black cylindrical device with a handle (no visible text or symbols)Slika 3 – Pokrov prostora za baterije
natural_image
Two black electronic devices with internal components, one open and one partially filled (no visible text or symbols)Slika 4 – Prostor za baterije
Vgradnja kabla slikovne glave ali podaljškov
natural_image
Three black-and-white icons: a circular mask with a face, a stick figure running with a megaphone, and a gear-like shape (no text or symbols)natural_image
Close-up of a black handheld device with a 'TV-OLT' button and 'REST' label (no additional text or symbols)Slika 9 – Priključek TV-OUT/gumb Reset
Vzdrževanje
OPOZORILO
natural_image
Ridgid remote endoscope with attached cable and earplugs (no visible text or symbols on device body)
UPOZORENJE!
Pažljivo pročitajte uputstva pre korišćenja ovog alata. Nepoznavanje i nepridržavanje uputstava iz ovog priručnika može imati za posledicu strujni udar, požar i/ili teške telesne povrede.
natural_image
Product photo of a RICDD medical device with coiled tubing, connectors, and medical sensors (no visible text or symbols)Slika 1 - micro CA-150
natural_image
Close-up of a hand holding a black cylindrical device with a handle, showing internal components (no text or symbols visible)natural_image
Close-up of a black handheld device with internal components, showing internal structure and battery casing (no text or symbols visible)Slika 4 - Odeljak za baterije
Slika 5 - spajanje kabla
Kablovi nastavaka od 3' i 6' su na raspolaganju da bi se omogućilo povećanje dužine vašeg kabla do 30' u dužinu. Da bi ugradili nastavak, prvo uklonite kabl glave kamere sa displej jedinice tako što ćete otpustiti izbočeno dugme. Spojite nastavak na prenosnu displej jedinicu kao što je opisano iznad (slika 5). Spojite provlakač kabla glave kamere na prorez nastavka i prstom stegnite izbočeno dugme da bi zadržali spoj na svom mestu.
Ugradnja pribora
Sva tri uključena pribora (ogledalo, kukica i magnet) (slika 1) se spajaju na isti način na glavu kamere.
Da bi izvršili spajanje držite glavu kamere kao što je prikazano na slici 6. Kliznite polukružni kraj pribora preko ravnog dela glave kamere kao što je prikazano na slici 6. Zatim okrenite pribor za 1/4 kruga tako da se dugački krak pribora nalazi izvan nastavka kao što je prikazano (slika 6).
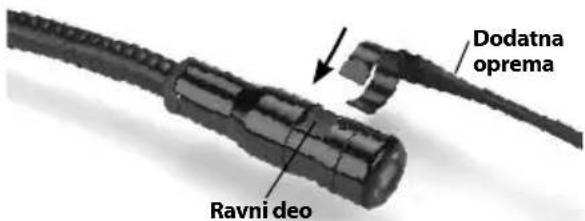
Slika 6 - Montaža dodatne opreme
Provera pre upotrebe
UPOZORENJE

Pre svake upotrebe pregledajte svoju kameru za pregled i otklonite sve probleme da biste smanjili rizik od teške povrede usled strujnog udara i drugih uzroka i sprečili oštećenje alata.
- Vodite računa da je uređaj isključen.
- Uklonite držač baterija i proverite ga, kao i baterije, na znake oštećenja. Zemenite baterije ako je potrebno. Nemojte kori- stiti kameru za pregled ako su baterije oštećene.
- Očistite bilo koje ulje ili prljavštinu sa opreme. Ovo olakšava pregled i pomaže u zaštiti alata od klizanja u vašim rukama.
-
Proverite da li u micro CA-150 kameri za pregled ima napuklih, pohabanih, nedo stajućih, pogrešno nameštenih ili spojenih delova ili drugih stanja koja mogu sprečiti siguran i normalan rad.
-
Proverite da na sočivima glave kamere nema kondenzacije. Da bi sprečili oštećenje uređaja, nemojte koristiti kameru ako sa unutrašnje strane sočiva postoji kondenzat. Omogućite da voda ispari pre korišćenja.
- Proverite kompletnu dužinu kabla na naprsline i oštećenja. Oštećeni kabl može omogućiti prodor vode u uređaj i povećati rizik od električnog udara.
- Proverite i uverite se da su priključci između prenosne jedinice, kablova nastavaka i kabla sa glavom kamere čvrsti. Svi priključci moraju biti propisno sastavljeni da bi kabl bio nepropusan za vodu. Potvrdite da je uređaj ispravno sastavljen.
- Proverite da li je etiketa za upozorenje na mestu, da li je čvrsto pričvršćena i da li je čitka.

natural_image
Three black-and-white icons: a circular target, a stick figure with a tool, and a gear with gears (no text or symbols)Podesite micro CA-150 kameru za pregled i radno područje u skladu sa ovim postupcima da biste smanjili rizik od povreda usled strujnog udara, zaplitanja i drugih uzroka i da biste sprečili oštećenje alata i sistema.
-
U radnom području proverite sledeće:
-
Odgovarajuće osvetljenje.
- Zapaljive fluide, pare ili prašinu koja se može zapaliti. Ako otkrijete nešto od navedenog, nemojte raditi u tom području sve dok ne prepoznate i uklonite problem. micro CA-150 kamera za pre gled nije otporna na eksplozije i može prouzrokovati varnice.
-
Čisto, ravno, stabilno suvo mesto za rukovaoca. Ne upotrebljavajte kameru za pre gled dok stojite u vodi.
-
Ispitajte područje ili mesto koje treba da pregledate i utvrdite da li je na micro CA-150 kameri za pregled odgovarajući deo opreme za taj posao.
-
Utvrdite pristupne tačke mestu kontrole. Minimalan prečnik otvora u koji može da uđe glava kamere iznosi otprilike ^3/4 " (19 mm) za glavu kamere od 17 mm.
- Utvrdite rastojanje do područja koje treba da bude pregledano. Na kameru se mogu dodati produžeci za domašaj do 30' (9 m).
- Utvrdite ima li ikakvih zapreka koje bi zahtevale vrlo tesna skretanja kabla. Kabl kamere za pregled može da se smanji na radijus od 2" (50 mm) bez oštećenja.
-
Utvrdite da li postoji neki objekat koji se napaja električnom energijom u području koje treba da bude pregledano. Ako postoji, napajanje u tom području mora biti isključeno da bi se smanjio rizik od električnog udara. Koristite odgovarajuće postupke za isključivanje da bi sprečili pojavu napona u toku pregleda.
-
Utvrdite da li će doći do "sudara" nekih tečnosti u toku pregleda. Kabl i glava kamere su vodootporne na dubini od 10' (3m). Veće dubine mogu prouzrokovati prodor tečnosti u kabl i glavu kamere i prouzrokovati električni udar ili oštećenje opreme. Prenosna displej jedinica nije vodootporna i ne treba da bude izložena vlažnim uslovima.
- Utvrdite da li su prisutne neke hemikalije, posebno u slučaju odvo da. Kabl i glava kamere su vodootporne na dubini od 10' (3 m). To je važno za razumevanje pose bnih sigurnosnih merenja za rad u blizini prisutnih hemikalija. Potrebne informacije zatražite od proizvođača hemijskog sredstva. Hemikalije mogu oštetiti ili umanjiti učinak kamere za pregled.
- Utvrdite temperaturu područja i objekte u području. Radna temperatura kamere za pregled iznosi između 32 i 122 stepeni F (0°C - 50°C). Korišćenje u područjima čija je temperatura izvan ovog opsega ili kontakt sa toplijim ili hladnijim objektima može prouzrokovati oštećenje kamere.
- Utvrdite da li postoje neki pokretni delovi u području koje treba da bude pregledano. Ako postoje, ti delovi moraju biti deaktivirani da bi se sprečilo pomeranje u toku pregleda i da bi se smanjio rizik od zaplitanja. Koristite odgovarajuće postupke za isključivanje da bi sprečilo pokretanje delova u toku pregleda.
Ako micro CA-150 kamera za pregled nije snabdevena odgovarajućim delom opreme za taj posao, druga oprema za pregled je na raspolaganju kod RIDGID-a. Za kompletan spisak RIDGID proizvoda, pogledajte online RIDGID katalog, na www.RIDGID.com.
natural_image
Close-up of a black handheld device with a 'TV-OUT' button and 'RESET' label (no additional text or symbols visible)Slika 9 - TV-OUT utikač/taster Reset
Održavanje
UPOZORENJE
natural_image
Ridgid remote medical device with attached cable and earplugs (no visible text or symbols on main body)ВНИМАНИЕ!
natural_image
Product photo of an open-ended medical device with coiled tubing, connectors, and medical devices (no visible text or symbols)natural_image
Close-up of a hand holding a black cylindrical device with a handle, no visible text or symbolsnatural_image
Close-up of a black handheld device with internal components, showing internal structure and battery casing (no text or symbols visible)natural_image
Close-up of a black handheld device with a 'RESET' and 'T-1001' button (no visible text or symbols beyond labels)natural_image
Ridgid remote endoscope device with attached cable and ear components (no visible text or symbols on main body)! UYARI!
Elden Çıkarma....265
natural_image
Product photo of an RODIO medical device with coiled tubing, connectors, and a handheld device (no visible text or symbols)natural_image
Close-up of a black mechanical component being held, showing a curved joint and a rectangular opening (no text or symbols visible)natural_image
Close-up of a black mechanical device with internal components, showing a close-up and disassembled part (no text or symbols visible)natural_image
Close-up of a black handheld device with a 'V-OUT' button and 'RESET' label (no additional text or symbols)natural_image
Ridgid remote endoscope device with attached cable and earplugs (no visible text or symbols on main body)
ECKEPTY!
natural_image
Product photo of an RQGID medical device with coiled tubing, connectors, and medical devices (no visible text or symbols)1-cypet - micro CA-150
Басқару тетіктері
natural_image
Close-up of a hand holding a black cylindrical device with a strap (no visible text or symbols)natural_image
Close-up of a black handheld device with a separate battery pack emerging from its side (no text or symbols visible)natural_image
Close-up of a black handheld device with a 'TV-OUT' button and 'REST' label (no additional text or symbols visible)Elyria, Ohio 44035-6001
U.S.A.
Authorized Representative:
RIDGE TOOL EUROPE N.V.
Research Park, Haasrode
B-3001 Leuven
Belgium
CE Conformity
This instrument complies with the European Council Electromagnetic Compatibility Directive 2004/108/EC using the following standards: EN 61326-1:2006, EN 61326-2-1:2006.
Conformité CE
Ridge Tool Europe NV (RIDGID)
Schurhovenveld 4820
3800 Sint-Truiden
Belgium
Printed 7/16 999-995-085 EMerson logo and RIDGID logo are registered trademarks of Emerson Electric Co. or RIDGID, Inc. in the U.S. and other countries. EC42305 REV. B All other trademarks belong to their respective holders.


- Table of Contents
- General Safety Information
- Specific Safety Information
- Description, Specifications and Standard Equipment
- Tool Assembly
- Maintenance
- micro CA-150 Inspection Camera
- WARNING!
- Safety Symbols
- WARNING
- SAVE THESE INSTRUCTIONS!
- Work Area Safety
- Electrical Safety
- Personal Safety
- Equipment Use and Care
- Service
- Description
- Specifications
- Standard Equipment
- Controls
- FCC Statement
- Electromagnetic Compatibility (EMC)
- Changing/Installing Batteries
- Installing the Imager Head Cable or Extension Cables
- Installing An Accessory
- Pre-Operation Inspection
- Tool and Work Area Set-Up
- Operating Instructions
- Viewing
- Cleaning
- Reset Function
- Accessories
- Storage
- Service and Repair
- Disposal
- Battery Disposal
- AVERTISSEMENT
- Déclaration FCC
- ADVERTENCIA
- Mantenimiento
- ! WARNING!
- WAARSCHUWING!
- Onderhoud
- WAARSCHUWING
- AVVERTENZA!
- Manutenzione
- AVVERTENZA
- ! AVISO!
- ADVARSEL!
- Vedligeholdelse
- ADVARSEL
- FCC-erklæring
- Vedlikehold
- VAROITUS!
- OSTRZEŻENIE!
- UPOZORNĚNÍ!
- VÝSTRAHA!
- TIETO POKYNY USCHOVAJTE!
- Údržba
- VÝSTRAHA
- AVERTIZARE!
- ! FIGYELMEZTETÉS!
- ΠΡΟΕΙΔΟΠΟΙΗΣΗ!
- UPOZORENJE!
- Slika 3 - Poklopac odjeljka za baterije
- Održavanje
- UPOZORENJE
- Izvadite baterije prije čišćenja.
- Čišćenje
- OPOZORILO!
- Izjava FCC
- Vgradnja kabla slikovne glave ali podaljškov
- Vzdrževanje
- OPOZORILO
- Ugradnja pribora
- Provera pre upotrebe
- ВНИМАНИЕ!
- ! UYARI!
- ECKEPTY!
- Authorized Representative:
- CE Conformity
- Conformité CE
- Ridge Tool Europe NV (RIDGID)
Brand : RIDGID
Model : micro CA-150
Category : Measuring equipment