PondoVac Premium - Vacuum Cleaner OASE - Free user manual and instructions
Find the device manual for free PondoVac Premium OASE in PDF.
Download the instructions for your Vacuum Cleaner in PDF format for free! Find your manual PondoVac Premium - OASE and take your electronic device back in hand. On this page are published all the documents necessary for the use of your device. PondoVac Premium by OASE.
USER MANUAL PondoVac Premium OASE
3.1 Hazards encountered by the combination of water and electricity ........................................... 20
Translation of the original Operating Instructions
1 Information about these operating instructions Welcome to OASE Living Water. You made a good choice with the purchase of this product PondoVac Premium. Prior to commissioning the unit, please read the instructions of use carefully and fully familiarise yourself with the unit. Ensure that all work on and with this unit is only carried out in accordance with these instructions. Adhere to the safety information for the correct and safe use of the unit. Keep these instructions in a safe place! Please also hand over the instructions when passing the unit on to a new owner.
1.1 Symbols used in these instructions
The symbols used in this operating manual have the following meanings:
Risk of injury to persons due to dangerous electrical voltage This symbol indicates an imminent danger, which can lead to death or severe injuries if the appropriate measures are not taken.
Risk of personal injury caused by a general source of danger This symbol indicates an imminent danger, which can lead to death or severe injuries if the appropriate measures are not taken.
Important information for trouble-free operation.
A Reference to one or more figures. In this example: Reference to Fig. A.
Reference to another section.- EN -
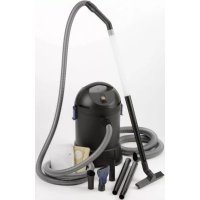
Description 1 Handle 2 Chassis 3 Vacuum head
2 × helix cables with plug connector − The plug connectors are designed to prevent misconnection. − 1 × pump connection line − 1 × control line, water level sensor
2 × casters with parking brake − Prevents unintended movement of the pond vacuum 14 DN 50 connection element with 2 hose clips − Connects the discharge pump to the non-return valve
4 × water level sensors − Automatically switch on the discharge pump. 16 Non-return valve − Prevents water running back from the discharge hose (6) − Generates a vacuum 17 Connection for suction hose − ∅ 50 mm 18 Filter support basket − The integrated float protects the electronics from the ingress of water if the maximum water level is exceeded 19 VA filter screen − Protects the electronics from dirt particles 20 Operating panel 21 Power cable − Cable length approx. 7.50 m 22 Cable clip- EN -
The unit is used for removing sludge from ponds/pools via the suction hose and collecting it in the tank. Sensors in the tank monitor the water level. The discharge pump switches on automatically when a certain level is reached. The dirty water is pumped out of the tank via the discharge hose. The water level is clearly indicated on the operating panel with integrated LED display. The vacuum and discharge pump can also be manually controlled. Vacuumed up solid dirt particles may damage the paintwork of the cast iron housing of the discharge pump. The formation of a thin layer of rust on the housing is normal and does not negatively affect the function of the discharge pump. ► Extensive range of practical accessories available. ► Extremely powerful vacuum with a capacity of up to 333 l/min. ► The robust chassis with solid rubber wheels and parking brake ensures excellent mobility and stability.
PondoVac Premium, referred to in the following as "unit", may only be used as specified in the following: ► For pond sludge removal. ► For cleaning ponds, swimming ponds and pools. ► Operation under observance of the technical data. ► For private or commercial use.
The following restrictions apply to the unit: ► Only operate with water at a water temperature of +4 °C to +35 °C. ► Never use for substances other than water. ► Do not use as a dry vacuum cleaner. ► Never run the unit without water. ► Do not use in conjunction with chemicals, foodstuff, easily flammable or explosive substances.
3 Safety information Hazards to persons and assets may emanate from this unit if it is used in an improper manner or not in accordance with its intended use, or if the safety instructions are ignored. This unit can be used by children from the age of 8 and by persons with physical, sensory or mental impairments or lack of experience and knowledge, as long as they are supervised or instructed on how to use the unit safely and are able to understand the potential hazards. Do not allow children to play with the unit. Do not allow children to clean or maintain the unit without close supervision.
3.1 Hazards encountered by the combination of water and electricity
► The combination of water and electricity can lead to death or severe injury from electrocution, if the unit is incorrectly connected or misused. ► Prior to reaching into the water, always switch off the mains voltage to all units used in the water.- EN -
► Electrical installations must meet the national regulations and may only be carried out by a qualified electrician. ► A person is regarded as a qualified electrician, if, due to his/her vocational education, knowledge and experience, he or she is capable of and authorised to judge and carry out the work commissioned to him/her. This also includes the recognition of possible hazards and the adherence to the pertinent regional and national standards, rules and regulations. ► For your own safety, please consult a qualified electrician. ► The unit may only be connected when the electrical data of the unit and the power supply coincide. The unit data is to be found on the unit type plate or on the packaging, or in this manual. ► Ensure that the unit is fused for a rated fault current of max. 30 mA by means of a fault current protection device. ► Extension cables and power distributors (e. g. outlet strips) must be suitable for outdoor use.
► Only plug the unit into a correctly fitted socket.
► Never operate the unit if either the electrical cables or the housing are defective! ► Do not carry or pull the unit by its electrical cable. ► Route cords/hoses/lines in a way that they are protected against damage, and ensure that they do not present a tripping obstacle. ► Only open the unit housing or its attendant components, when this is explicitly required in the operating instructions. ► Only execute work on the unit that is described in this manual. If problems cannot be overcome, please contact an authorised customer service point or, when in doubt, the manufacturer. ► Only use original spare parts and accessories for the unit. ► Never carry out technical modifications to the unit.
► If the cable becomes damaged, the unit or components must be replaced by an authorised after-sales service centre or the manufacturer. ► Only operate the unit if no persons are in the water! ► Keep the socket and power plug dry. ► Keep the plug connectors dry.- EN -
4 Installation and connection B, C
Attention! Dangerous electrical voltage. Possible consequences: Death or serious injuries due to operation of electrical units or installations in or near ponds/pools. Protective measures: ► Set up the unit at least 2 m away from the pond/pool. ► Ensure that the ground under the unit is firm and horizontal so that the unit cannot tip over. ► Apply the parking brake to prevent the unit from moving during operation. ► Adhere to national and regional regulations.
Only set up and operate the unit in a position that is higher than the level of the water. Possible consequences if the unit is operated in a position that is lower than the level of the water: ► Water will automatically flow into the tank. This will negatively affect the suction mode. ► When the unit is switched off, water will automatically flow through the tank. The pond/pool will be emptied.
Transport and installation of the unit ► Transport the unit on its own wheels. ► Do not lift the unit by its handle. ► The unit weighs more than 40 kg. Use a suitable carrying aid for lifting the unit.
The following conditions must be met: ► Allow the dirty water to drain out into a drain or far enough away from the pond to ensure that it cannot flow back into the pond. ► Completely unwind the power and extension cable. − Ensure that the cables are not bundled together or coiled up. ► Connect the discharge hose and floating suction hose as well as the Oase nozzles. − Recommendation: Use a bend-resistant discharge hose for the first 10 metres. A bend-resistant hose allows unrestricted flow of the dirty water.- EN -
PVC0013 1 Switching on/off off: Unit is switched off on: Unit is switched on − The vacuum starts up. − The discharge pump switches on when the max. water level is reached. (1) 2 Switching on the motor (overload) protection switch The motor (overload) protection switch switches off the discharge pump in the event of a blockage. (→ Remedy of faults) − The unlock button pops out. − To switch the discharge pump on again: Press the unlock button. 3 Pump ON For manually switching on tank emptying, e.g. after operation or to allow the unit to be moved more easily. − Press the button: The discharge pump is switched on (LED is lit). − Release the button: The discharge pump is switched off. 4 Vac OFF For manually switching off the vacuum to briefly reduce the sound emission. − Press the button: The vacuum is switched off (LED is lit). − Release the button: The vacuum switches on 5 LEDs for indicating the water level Green LEDs are lit: ••• maximum water level •• medium water level • low water level Red LED is lit: • minimum water level
Attention! Dangerous electrical voltage! Possible consequences: Death or severe injury. Protective measures: Prior to starting up the unit, switch off the mains voltage of all units located in the water.
Note! The electronics will be destroyed . Never operate the unit without the filter element!
► Plunge the extension wand with floating suction hose and nozzle into the water and vacuum the floor of the pond/pool. ► The green LEDs on the operating panel light up/flicker to indicate the water level in the tank. − • ... ••: The discharge pump switches on automatically and pumps the dirty water out of the tank. − •• … •••: The maximum water level is reached. Excessive dirt has collected at the bottom of the tank, the discharge pump can no longer pump out the dirty water. ► The vacuum can be manually switched off with "Vac OFF" when required. ► The discharge pump can be manually switched on with "Pump ON" when required. − Recommendation: Empty the unit to reduced the weight. This will make it easier to move the unit. − In order to switch off the vacuum during discharge press "Pump ON" and "Vac OFF" simultaneously. ► Empty the tank via the discharge pump before carrying out cleaning and maintenance measures. − Recommendation: Vacuum up clean water and empty the tank again. This will wash out the dirt particles. ► Clean the unit after each use. (→ Cleaning and maintenance)- EN -
6 Remedy of faults Malfunction Cause Remedy The unit does not switch on No mains voltage Switch on mains voltage The vacuum does not start up The carbon brushes are worn Have the carbon brushes replaced (→ Replacing the carbon brushes) The suction power is reduced The telescopic wand with vacuum attachment has been submerged too deep Adhere to max. submersion depth of 2.60 m Suction hose or vacuum attachment is soiled Clean The discharge pump is switched off and the non-return valve is clogged Clean − Vacuum up water with the discharge hose until the valve has been rinsed clean − Clean the non-return valve The vacuum switches on and off This occurs when the tank is empty when it is switched on Normal behaviour − The vacuum and discharge pump have to adjust to each other Max. water level is exceeded − Empty the tank − Clean the discharge pump − Route the discharge hose without kinks Insufficient or no discharge pump delivery. The motor (overload) protection switch has tripped − Empty the tank − Clean the pump − Press the unlock button The pump inlet is clogged Clean The discharge hose is causing water backpressure Route the discharge hose without kinks The discharge pump does not start up automatically. Water level sensors are soiled Clean The plug connectors are not correctly connected Connect, tighten the union nuts
- • … ••• LEDs are lit Water level is too high − Empty the tank. − Clean the discharge pump − Route the discharge hose without kinks Water level sensors are soiled − Clean The discharge pump is clogged − Clean- EN -
7 Maintenance and cleaning
Attention! Dangerous electrical voltage. Possible consequences: Death or severe injury. Protective measures: Isolate the unit prior to reaching into the water and carrying out any work on the unit. Secure the unit from being switched on inadvertantly.
Ger The following conditions must be met: ► The plug connectors of the helix cables are connected on delivery. − The plug connectors do not need to be disconnected for cleaning and maintenance. ► Before opening the unit always switch it off and disconnect the power plug. ► Do not lift the discharge pump out of the tank. The connection cable can be damaged. ► Never deposit the vacuum head on the filter element (in order to avoid damage). Place the vacuum head on its side or with the handle at the bottom.
7.1 Cleaning the tank
1. Undo the locking clips on the adapter ring.
2. Lift the suction head by the handle.
3. Clean the following parts with clean water and a soft brush:
− Water level sensors − Pump inlet − 2" Storz coupling type C − Inside of the tank
4. Reassemble the unit in the reverse order.
7.2 Cleaning the non-return valve
Prerequisite: Vacuum head with adapter ring has been removed.
1. Release the hose clip on the connection element and pull off the pump.
2. Twist off the non-return valve by turning it counter-clockwise.
3. Clean using clean water and a soft brush.
4. Assemble the parts in the reverse order.
7.3 Cleaning the filter element
Prerequisite: Vacuum head with adapter ring has been removed.
1. Turn the filter support base counter-clockwise.
2. Pull off the filter support base and filter, and clean using clean water and a soft brush.
3. Check the floats in the filter support basket. Ensure that they can move freely.
8 Storage/Over-wintering ► Drain the unit as far as possible, clean thoroughly and check for damage. ► Empty all hoses, pipes and connections as far as possible. ► Store the unit in a dry and frost-free place.
9 Wear parts The following components are wear parts and are excluded from the warranty: ► Carbon brushes − If the carbon brushes become worn, please send the unit head to OASE for repair.
Do not dispose of this unit with domestic waste! For disposal purposes, please use the return system provided. Disable the unit beforehand by cutting off the cables.- EN -
11 Technical data PondoVac Premium Rated voltage V AC 230 Mains frequency Hz 50 Power consumption, discharge pump W 800 Power consumption, vacuum W 1500 Max. power consumption W 2300 Safety fuse 5 × 20 mm, 250 V A T8 Length of power cable m 7.50 Permissible water temperature °C +4 … +35 Max. filling volume of tank l 95 Airborne noise emitted dB(A) <60 Dimensions L × W × H mm 580 × 605 × 970 Weight without water kg 44 with water kg 140 Discharge pump Max. delivery rate l/min 450 Maximum head height m 8.3 Max. particle size mm ∅ 50 Vacuum Max. delivery rate l/min 333 Maximum head height (max. submersion depth of suction hose) m 2.60 Dirt outlet Quantity pce. 1 Discharge hose connection 2‘‘ Storz coupling type C Max. discharge hose length m 30
Discharge pump: Dust-tight. Watertight to 1 m depth. Vacuum: Protection against the ingress of splash water. Do not dispose of with household waste. Do not lift unit here! Attention! Read the operating instructions.- FR -