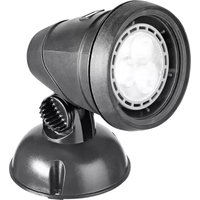
LunAqua Maxi LED Solo - Lighting OASE - Free user manual and instructions
Find the device manual for free LunAqua Maxi LED Solo OASE in PDF.
| Product type | Outdoor LED spotlight |
| Brand | Oase |
| Model | LunAqua Maxi LED Solo |
| Category | Pond and garden lighting |
| Usage | Above and underwater |
| Beam angle | 30° (supplied); 10° lens included |
| Light source type | Integrated non-replaceable LED |
| Supply voltage | 12 V AC (via supplied transformer) |
| Rated power | 10 W (estimated) |
| Protection rating | IP68 (permanent immersion) |
| Transformer safety distance | ≥ 2 m from water |
| Safety distance out of water | ≥ 50 cm from combustible materials |
| Required residual current device | 30 mA max |
| Ambient temperature (transformer) | -10 °C to +40 °C |
| Housing material | Robust plastic, protective glass |
| Color | Black |
| Cable length | 5 m (estimated) |
| Dimensions (spotlight only) | Ø 10 cm × H 20 cm (estimated) |
| Weight (spotlight + transformer) | 1 kg (estimated) |
| Package contents | LED spotlight, transformer, ground stake, mounting kit, 10° lens |
| Maintenance | Clean with clear water and soft brush |
| Storage | Cleaned, dry, out of reach of children |
| Spare parts | Available at www.oase-livingwater.com/spareparts |
| Repairability | Cable and power supply unit non-repairable; replace entire assembly |
Frequently Asked Questions - LunAqua Maxi LED Solo OASE
User questions about LunAqua Maxi LED Solo OASE
0 question about this device. Answer the ones you know or ask your own.
Ask a new question about this device
Download the instructions for your Lighting in PDF format for free! Find your manual LunAqua Maxi LED Solo - OASE and take your electronic device back in hand. On this page are published all the documents necessary for the use of your device. LunAqua Maxi LED Solo by OASE.
USER MANUAL LunAqua Maxi LED Solo OASE
natural_image
Close-up of a metallic mechanical component mounted on a textured surface, no visible text or symbols.LunAquaMaxi LED Set 1 /Set 3 /Solo
EN Operating instructions
FR Notice d'emploi
natural_image
Close-up of a metallic camera lens mounted on a black base (no text or symbols visible)
A
Translation of the original Operating Instructions
Information about these operating instructions
Welcome to OASE Living Water. You made a good choice with the purchase of this product Lunaqua Maxi LED.
Prior to commissioning the unit, please read the instructions of use carefully and fully familiarise yourself with the unit.
Ensure that all work on and with this unit is only carried out in accordance with these instructions.
Adhere to the safety information for the correct and safe use of the unit.
Keep these instructions in a safe place! Please also hand over the instructions when passing the unit on to a new owner.
Symbols used in these instructions
The symbols used in this operating manual have the following meanings:

Risk of injury to persons due to dangerous electrical voltage
This symbol indicates an imminent danger, which can lead to death or severe injuries if the appropriate measures are not taken.

Risk of personal injury caused by a general source of danger
This symbol indicates an imminent danger, which can lead to death or severe injuries if the appropriate measures are not taken.

Important information for trouble-free operation.
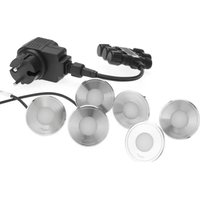
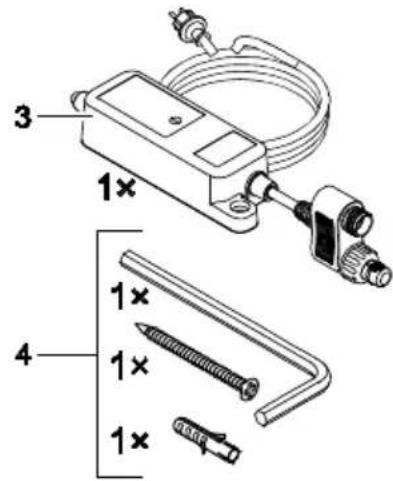
Scope of delivery
| Fig. A | Lunaqua Maxi Quantity | Description | ||
| Set 1 | Set 3 | Solo | ||
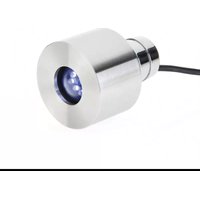
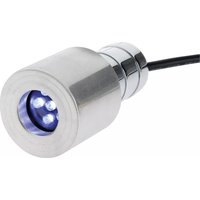
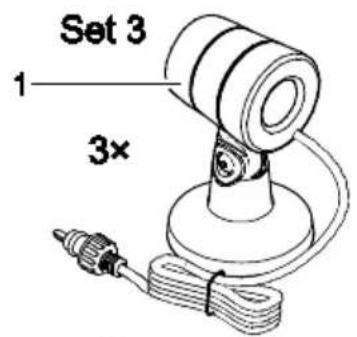
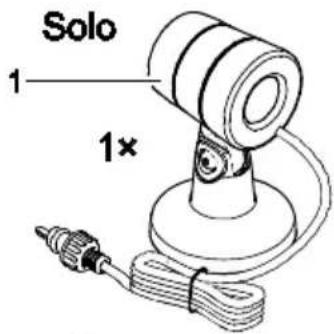
| 1 | 1 | 3 | 1 | LED spot including light bulb and 30^ lens |
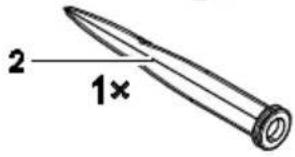
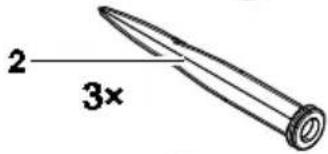
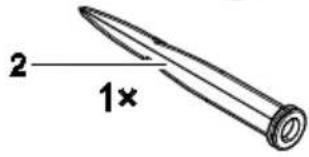
| 2 | 1 | 3 | 1 | Ground stake |
| 3 | 1 | 1 | Transformer with connection cable | |
| 4 | 1 | 3 | 1 | Fastening set |
| 5 | 1 | 3 | 1 | 10^ replacement lens |
Intended use
Lunaqua Maxi LED, referred to as "unit", may only be used as specified in the following:
- For use in water fountain systems and ponds.
- For use above and under water.
• Operation under observance of the technical data.
Ensure that the safety transformer is only operated at ambient temperatures of -10 ^ to +40 C .
• Install the transformer at a minimum safety distance of 2 m from the water.
- EN -
Safety information
Hazards to persons and assets may emanate from this unit if it is used in an improper manner or not in accordance with its intended use, or if the safety instructions are ignored.
- This unit can be used by children aged 8 and above and by persons with reduced physical, sensory or mental capabilities or lack of experience and knowledge if they are supervised or have been instructed on how to use the unit in a safe way and they understand the hazards involved.
- Do not allow children to play with the unit.
- Only allow children to carry out cleaning and user maintenance under supervision.
Hazards encountered by the combination of water and electricity
- The combination of water and electricity can lead to death or severe injury from electrocution, if the unit is incorrectly connected or misused.
- Prior to reaching into the water, always switch off the mains voltage to all units used in the water.
Correct electrical installation
- Electrical installations must meet the national regulations and may only be carried out by a qualified electrician.
- A person is regarded as a qualified electrician if, due to his/her vocational education, knowledge and experience, he or she is capable of and authorised to judge and carry out the work commissioned to him/her. This also includes the recognition of possible hazards and the adherence to the pertinent regional and national standards, rules and regulations.
- For your own safety, please consult a qualified electrician.
- Only connect the unit if the electrical data of the unit and the power supply correspond. The unit data is to be found on the unit type plate, on the packaging or in this manual.
- Ensure that the unit is fused for a rated fault current of max. 30 mA by means of a fault current protection device.
- Extension cables and power distributors (e.g. outlet strips) must be suitable for outdoor use (splash-proof).
• Install the transformer at a minimum safety distance of 2 m from the water. - Protect the plug connection from moisture.
- Only connect the unit to a correctly fitted socket.
Safe operation
- Never operate the unit if either the electrical cables or the housing are defective!
- Do not carry or pull the unit by its electrical cable.
- Route cables/hoses such that they are protected from damage and do not present a tripping hazard.
- Only open the unit housing or its attendant components, when this is explicitly required in the operating instructions.
- Only carry out work on the unit that is described in this manual. If problems cannot be overcome, please contact an authorised customer service point or, when in doubt, the manufacturer.
- Only use original spare parts and accessories for the unit.
- Never carry out technical modifications to the unit.
- Power connection cables cannot be replaced. If the cable is damaged, the unit must be disposed of.
- Only operate the unit with the supplied transformer.
- Keep the socket and power plug dry.
- The power pack and the plug connectors of the power cables supplied are not water-tight, but only rain and splash-proof. Do not route or fit in the water.
- Do not look directly into the light source.
Installation

ATTENTION! Dangerous electrical voltage.
Possible consequences: Death or severe injury.
Protective measures:
- Electrical units and installations with a rated voltage of U > 12 V AC or U > 30 V DC located in the water: Isolate the units and installations (switch off and disconnect from the power supply) before reaching into the water.
- Isolate the unit before starting any work.
- Secure the unit to prevent unintentional switching on.
- When installed above the water level, maintain a safety distance of at least 50 cm from combustible material. Ensure a safe and stable seating. Do not cover the unit. Danger of fire!
- Position the unit in such a way that it does not present a hazard to anybody.
Setting up with the ground stake (B)
- Fully insert the ground stake (2) into the soil.
- Place the unit on the ground stake.
- Adjust the tilt of the light (F).
Installation with bolt attachment (C)
- Undo and remove bolt (11) and nut (8).
• Take out lamp (6). - Wall or floor mounting (D): Bolt the foot (9) to a firm base or load bearing wall. Use the supplied dowel (10) and bolt (7). Drill a 5 mm hole at least 35 mm deep.
- Mounting to ceiling: The supplied dowel (10) is not approved for mounting to ceiling and must not be used for this purpose!
- Place the light on the foot and screw tight. Ensure that the nut (8) is in the small hole and the screw (11) with screw cap (12) is in the large hole of the screw connection (13) and the detent tabs are engaged.
- Adjust the tilt of the light (F).
Connection (E)
- Connect the plug of the spotlight connection cable to the socket on the transformer and tighten the union nut (14) hand-tight.
- To connect the Lunaqua Maxi LED Solo, disconnect the jumper plug (bridging plug) from the transformer and connect the lamp directly.
Commissioning/start-up

NOTE
Sensitive electrical components. Incorrect connection will destroy the unit.
- Do not connect the unit to a dimmable power supply.

ATTENTION! Dangerous electrical voltage.
Possible consequences: Death or severe injury.
Protective measures:
- Electrical units and installations with a rated voltage of U > 12 V AC or U > 30 V DC located in the water: Isolate the units and installations (switch off and disconnect from the power supply) before reaching into the water.
• Isolate the unit before starting any work. - Secure the unit to prevent unintentional switching on.

Note:
The LED light cannot be dimmed. The brightness of an LED reduces as the operating time increases.
Switching on: Insert the power plug of the transformer into the socket.
- Check the function of the spotlights.
Switching off: Disconnect the transformer power plug.
Changing the lens (G)

ATTENTION! Dangerous electrical voltage.
Possible consequences: Death or severe injury.
Protective measures:
- Electrical units and installations with a rated voltage of U > 12 V AC or U > 30 V DC located in the water: Isolate the units and installations (switch off and disconnect from the power supply) before reaching into the water.
• Isolate the unit before starting any work. - Secure the unit to prevent unintentional switching on.
Each lamp is fitted with a 30^ lens. The lens can be replaced by a 10^ lens (part of the scope of delivery).
How to proceed:
- Hold the lamp at its foot (15). Do not hold at the end cap (16), as it would unscrew.
- Hold the front cap (19) using a leather or textile cloth (to enhance the grip!) and unscrew counter-clockwise.
- Slightly tap to remove the protection disk (18) and the lens (17) from the lamp.
- Replace the lens, then reassemble the unit in the reverse order.
Cleaning

ATTENTION! Dangerous electrical voltage.
Possible consequences: Death or severe injury.
Protective measures:
- Electrical units and installations with a rated voltage of U > 12 V AC or U >30 V DC located in the water: Isolate the units and installations (switch off and disconnect from the power supply) before reaching into the water.
- Isolate the unit before starting any work.
- Secure the unit to prevent unintentional switching on.
If necessary, clean the unit with clear water using a soft brush.
- Ensure that no moisture can enter the unit.
Malfunctions
| Malfunction | Cause | Remedy |
| Lamp does not light up | Power supply interrupted | Check power supply |
| Light intensity decreases | Lamp glass soiled | Clean |
Repair
Neither the power pack nor the LED spotlight can be repaired in the event of damage to the cables or the housing and have to be replaced. For your own safety, consult a qualified electrician or your specialist dealer if you have questions or encounter problems!
Spare parts
The use of original parts from OASE ensures continued safe and reliable operation of the unit. Please visit our website for spare parts drawings and spare parts.

www.oase-livingwater.com/spareparts
Storage
Clean the unit and check for damage. Store at a place inaccessible to children.
Disposal

NOTE
Do not dispose of this unit with domestic waste.
- Render the unit unusable beforehand by cutting the cables and dispose of the unit via the return system provided for this purpose.

www.oase-livingwater.com/onderdelen
Opslag

www.oase-livingwater.com/spareparts_INT
Armazenagem

www.oase-livingwater.com/spareparts_INT
Immagazzinamento

www.oase-livingwater.com/spareparts_INT
Opbevaring

www.oase-livingwater.com/spareparts_INT
Oppbevaring

www.oase-livingwater.com/spareparts_INT
Förvaring

www.oase-livingwater.com/spareparts_INT
Varastointi

www.oase-livingwater.com/nahradnidily
Uložení

www.oase-livingwater.com/spareparts_INT
Uloženie

www.oase-livingwater.com/spareparts_INT
Skladiščenje

www.oase-livingwater.com/spareparts_INT
Skladištenje

www.oase-livingwater.com/spareparts_INT
Depozitarea

www.oase-livingwater.com/spareparts_INT
Съхранение

www.oase-livingwater.com/spareparts_INT
Зберігання

www.oase-livingwater.com/spareparts_INT