
221570 - Food Processor Hendi - Free user manual and instructions
Find the device manual for free 221570 Hendi in PDF.
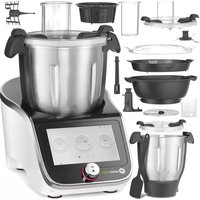
| Product Type | Professional food processor |
| Brand | Hendi |
| Model | 221570 |
| Usage | Commercial and professional (indoor) |
| Power Supply | 230 V / 50 Hz, protection class I, with grounding |
| Functions | Mixing, kneading, whisking, emulsifying |
| Speed Modes | 4 modes: slow mix (1-6), normal (1-8), gentle (1-9), fast (1-11) |
| Number of Speeds | 11 speeds |
| Timer | Built-in, up to 60 minutes with countdown and pause/restart function |
| Included Accessories | Dough hook, beater, egg whisk, mixing bowl, splash guard with chute |
| Bowl Capacity (flour) | Up to 1.5 kg for bread dough; max 2 kg for stiff dough (limited to 1 minute) |
| Bowl Material | Stainless steel |
| Safety | Head lock, automatic stop after 60 min, overload protection (error codes E01, E03, E04) |
| Non-slip Feet | Suction feet for stability |
| Cleaning Bowl and Accessories | Dishwasher safe |
| Cleaning Main Unit | Damp cloth with mild soap; do not immerse |
| Maintenance | Regular check, repair by authorized technician only |
| Warranty | 1 year for functional defects (subject to proper use) |
| Country of Origin | Not specified |
Frequently Asked Questions - 221570 Hendi
User questions about 221570 Hendi
0 question about this device. Answer the ones you know or ask your own.
Ask a new question about this device
Download the instructions for your Food Processor in PDF format for free! Find your manual 221570 - Hendi and take your electronic device back in hand. On this page are published all the documents necessary for the use of your device. 221570 by Hendi.
USER MANUAL 221570 Hendi
GB: Read user manual and keep this with the appliance.
natural_image
Simple house icon with directional arrow inside, labeled 'INDOOR' below (no text or symbols on the house itself)GB: For indoor use only.


1
2
3
natural_image
Mechanical device diagram showing a lever mechanism with blue arrows indicating motion (no text or symbols)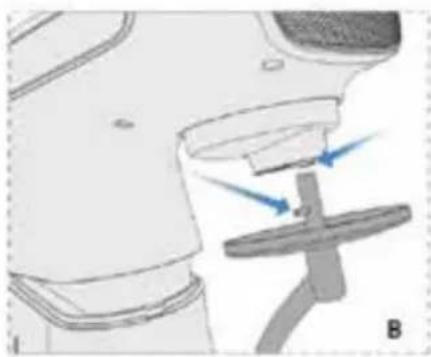
natural_image
Diagram of a robotic arm with a handle and lever, showing motion arrows (no text or symbols)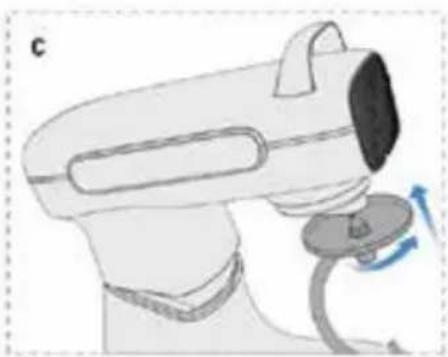
natural_image
Illustration of a hairdryer with a curved handle and blue motion arrows indicating rotation (no text or symbols)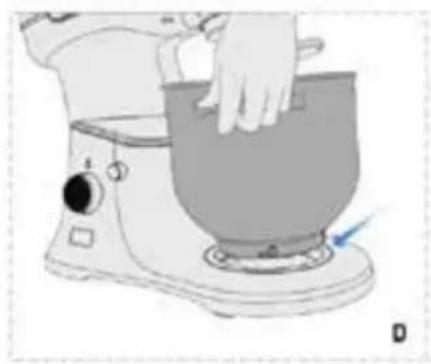
natural_image
Illustration of a hand pressing a cylindrical object on a kitchen mixer (no text or symbols visible)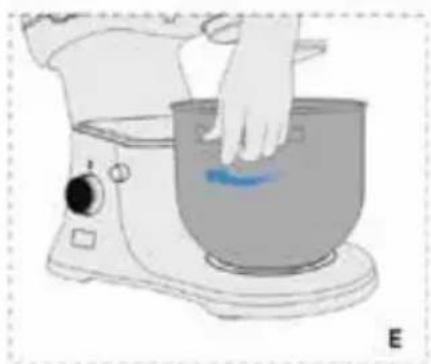
natural_image
Illustration of a hand pressing a blue liquid onto a kitchen mixer (no text or symbols)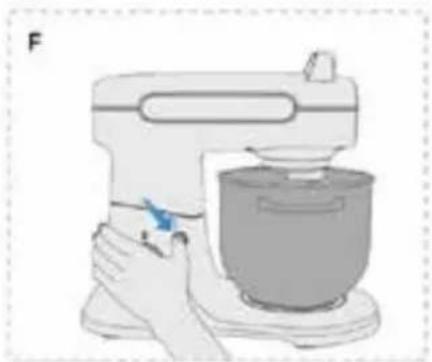
natural_image
Illustration of a hand operating a kitchen mixer with a blue indicator light (no text or symbols)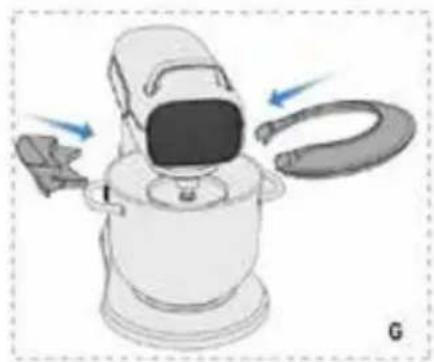
natural_image
Illustration of a robot holding a tool and a curved object with blue arrows indicating motion (no text or symbols)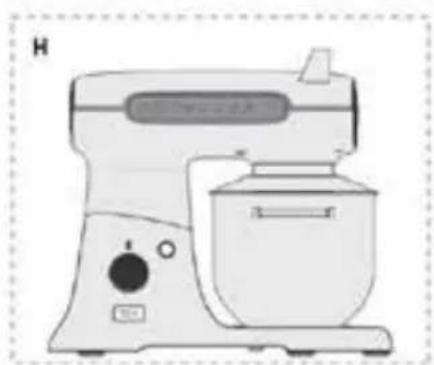
natural_image
Illustration of a kitchen mixer with a side dish (no text or symbols visible)4
natural_image
Line drawing of a kitchen mixer blending bread into a pot (no text or symbols)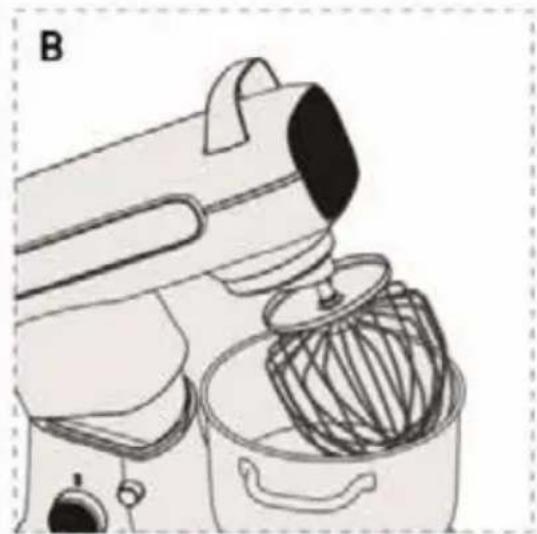
natural_image
Line drawing of a kitchen mixer with a mesh mixer inside a container (no text or symbols)
natural_image
Illustration of a hand using a tool to adjust or install a mechanical component (no text or symbols visible)
natural_image
Illustration of a medical procedure involving a surgical instrument and a patient's chest (no text or symbols present)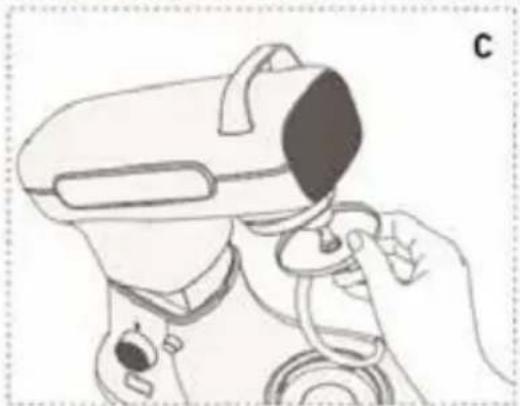
natural_image
Illustration of a hand using a stethoscope to adjust or install a device (no text or symbols visible)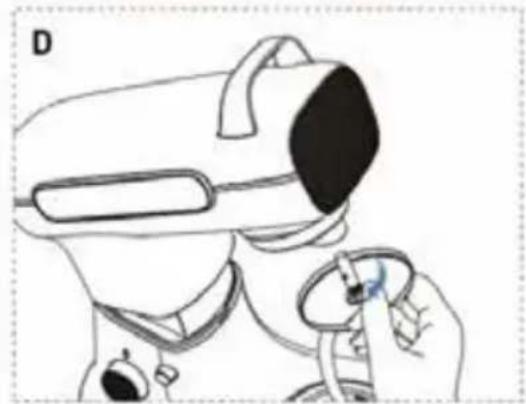
natural_image
Illustration of a person using a stethoscope to examine or inspect the eye area (no text or symbols present)GB: Technical specifications / DE: Technische Angaben / NL: Technische gegevens / PL: Dane techniczne / FR: Données techniques / IT: Parametri di base / RO: Parametrii de bază / GR: Bašukéç paráµetrot / HR: Tehnički podaci / CZ: Technická specifikace / HU: Můszaki adatok / UA: Texníční характеристики / EE: Tehnilised andmed / LV: Tehniskás specifikacijas / LT: Techninès specifikacijos / PT: Especificações técnicas / ES: Especificaciones técnicas / SK: Technické špecifikácie / DK: Technical specifications / FI: Tekniset tiedot / NO: Tekniske spesifikasjoner / SI: Tehnične specifikacije / SE: Tekniska specifikationer / BG: Texнически спецификации / RU: Texнические данные
| A 221570 |
| B 220-240V~50Hz |
| C 1500 W |
| D 200 rpm |
| E I |
| F ≤ 70 dB |
| G 460x310x379 mm |
| H 7 L |
| I 12,4 kg |
A: GB:Item no. / DE:Art.-Nr. / NL:Artikelnr. / PL:Nr pozycji / FR:N° d'article / IT:N. articolo / RO:Nr. articolului/ GR:Ap. εiðouç / HR:Broj stavke / CZ:Položka č. / HU:Cikkszám / UA:Homer elementa / EE:Artikli nr / LV:Vienums Nr. / LT:Prekès Nr. / PT:Item n.o / ES:N.o de artículo / SK:Č. položky / DK:Varenr. / FI:Kohteen nro / NO:Varenr. / SI:Št. izdelka / SE:Art.nr / BG: Homer na element / RU:Homer posizii
B: GB: Rated voltage and frequency / DE: Nennspannung und Frequenz / NL: Nominale spanning en frequentie / PL: Znamionowe napięcie i częstotliwość / FR: Tension et fréquence nominales / IT: Tensione e frequenza nominali / RO: Tensiune nominală și frecvență / GR: Ovojaotikă tăcon koi ouxvotnta / HR: Nazivni napon i frekvencija / CZ: Jmenovité napětí a frekvence / HU: Névleges feszültség és frekvencia / UA: Nominalna napругa ta частota / EE: Nimipinge ja -sagedus / LV: Nominălais spriegums un frekvence / LT: Vardinė jtampa ir dažnis / PT: Tensão e frequência nominais / ES: Tensión y frecuencia nominales / SK: Menovité napătie a frekvencia / DK: Nominel spænding og frekvens / FI: Nimellisjännite ja -taajuus / NO: Nominell spenning og frekvens / SI: Nazivna napetost in frekvenca / SE: Märkspänning och frekvens / BG: Nominalno напрежение и честота / RU: Nominalnohe напряжение и частota
C: GB: Rated input power / DE: Nenneingangsleistung / NL: Nominaal ingangsvermogen / PL: Znamionowa moc wejściowa / FR: Puissance d'entrée nominale / IT: Potenza nominale in ingresso / RO: Putere nominală de intrare / GR: Овомастикі юхієє еюбоду / HR: Nazivna ulazna snaga / CZ: Jmenovitý vstupní výkon / HU: Névleges bemeneti teljesítmény / UA: Номінальна вхідна потужність / EE: Nimisisendvõimsus / LV: Nominālā ieejas jauda / LT: Vardinė jėjimo galia / PT: Potência de entrada nominal / ES: Potencia de entrada nominal / SK: Menovitý vstupný výkon / DK: Nominel indgangseffekt / FI: Nimellistuloteho / NO: Nominell inngangseffekt / SI: Nazivna vhodna moč / SE: Märkineffekt / BG: Номинална входяща мощност / RU: Номинальная входная мощность
D: GB:Speed / DE:Geschwindigkeit / NL:Snelheid / PL:PrędkośćLa rapidité / FR:La rapidité / IT:Velocità / RO:Viteză / GR:Taxùtna / HR:Ubrzati / CZ:Rychlost / HU:Sebesség / UA:Швидкість / EE:Kiirus / LV:Greitis / LT:Ātrums / PT:Velocidade / ES:Kiirus / SK:Rýchlost / DK:Hastighed / FI:Nopeus / NO:Hastighet / SI:Hitrost / SE:Fart / BG:Скорост / RU:Скорость
E: GB: Protection class / DE: Schutzklasse / NL: Beschermingsklasse / PL: Klasa ochrony / FR: Classe de protection / IT: Classe di protezione / RO: Clasă de protecție / GR: Klaon prostaioç / HR: Klasa zaštite / CZ: Trida ochrany / HU: Védelmi osztály / UA: Klac zahesty / EE: Kaitseklass / LV: Aizsardzības klase / LT: Apsaugos klasè / PT: Classe de proteção / ES: Clase de protección / SK: Trieda ochrany / DK: Beskyttelsesklasse / FI: Suojausluokka / NO: Beskyttelsesklasse / SI: Razred zaščite / SE: Skyddsklass / BG: Klas na защитa / RU: Klacc защиты
F: GB:Noise level / DE:Geräuschpegel / NL:Geluidsniveau / PL:Poziom hatasu / FR:Niveau de bruit / IT:Livello di rumore / RO:Nivel de zgomot / GR:Eninéðo θορύßou / HR:Razina buke / CZ:Úrověn hluku / HU:Zajszint / UA:Píběny shymy / EE:Müratase / LV:Skaļuma līmenis / LT:Triukšmo lygis / PT:Nivel de ruído / ES:Nivel de ruido / SK:Úroveň hluku / DK:Stojniveau / FI:Melutaso / NO:Støynivå / SI:Stopnja hrupa / SE:LjudnivåBG:Ниво на шумаRU:Уровень шума
G: GB:Dimensions / DE:Abmessungen / NL:Afmetingen / PL:Wymiary / FR:Dimensions / IT:Dimensioni / RO:Dimensi uni / GR:Διαστάσεις / HR:Dimenzije / CZ:Rozměry / HU:Méretek / UA:Pózmípi / EE:Môtmed / LV:Izmēri / LT:Matmenys / PT:Dimensões / ES:Dimensiones / SK:Rozmery / DK:Mål / FI:Mitat / NO:Mål / SI: Mere / SE:Mått / BG: Размерi / RU:Размеры
H: GB: Capacity / DE: Kapazität / NL: Capaciteit / PL: Pojemność / FR: Capacité / IT: Capacità / RO: Capacitate / GR: Хørptikótna / HR: Kapacitet / CZ: Kapacita / HU: Kapacitás / UA: Mictkість / EE: Mahutavus / LV: Efektivităte / LT: Pajėgumas / PT: Capacidade / ES: Capacidad / SK: Kapacita / DK: Kapacitet / FI: Tilavuus / NO: Kapasitet / SI: Zmogljivost / SE: Kapacitet / BG: Капацитет / RU: Вместимость
I: GB:Net weight / DE:Nettogewicht / NL:Nettogewicht / PL:Waga netto / FR:Poids netto / IT:Peso netto / RO:Greutate netă / GR:Kaθαρό βάρος / HR:Neto težina / CZ:Čistá hmotnost / HU:Nettó tömeg / UA:Bara нетто / EE:Netokaal / LV:Neto svars / LT:Grynasis svoris / PT:Peso líquido / ES:Peso neto / SK:Čistá hmotnosť / DK:Nettovægt / FI: Nettopaino / NO:Nettovekt / SI:Neto teža / SE:Nettovikt / BG: Нетно тегло / RU:Вес нетто
GB: Remark: Technical specification is subjected to change without prior notification.
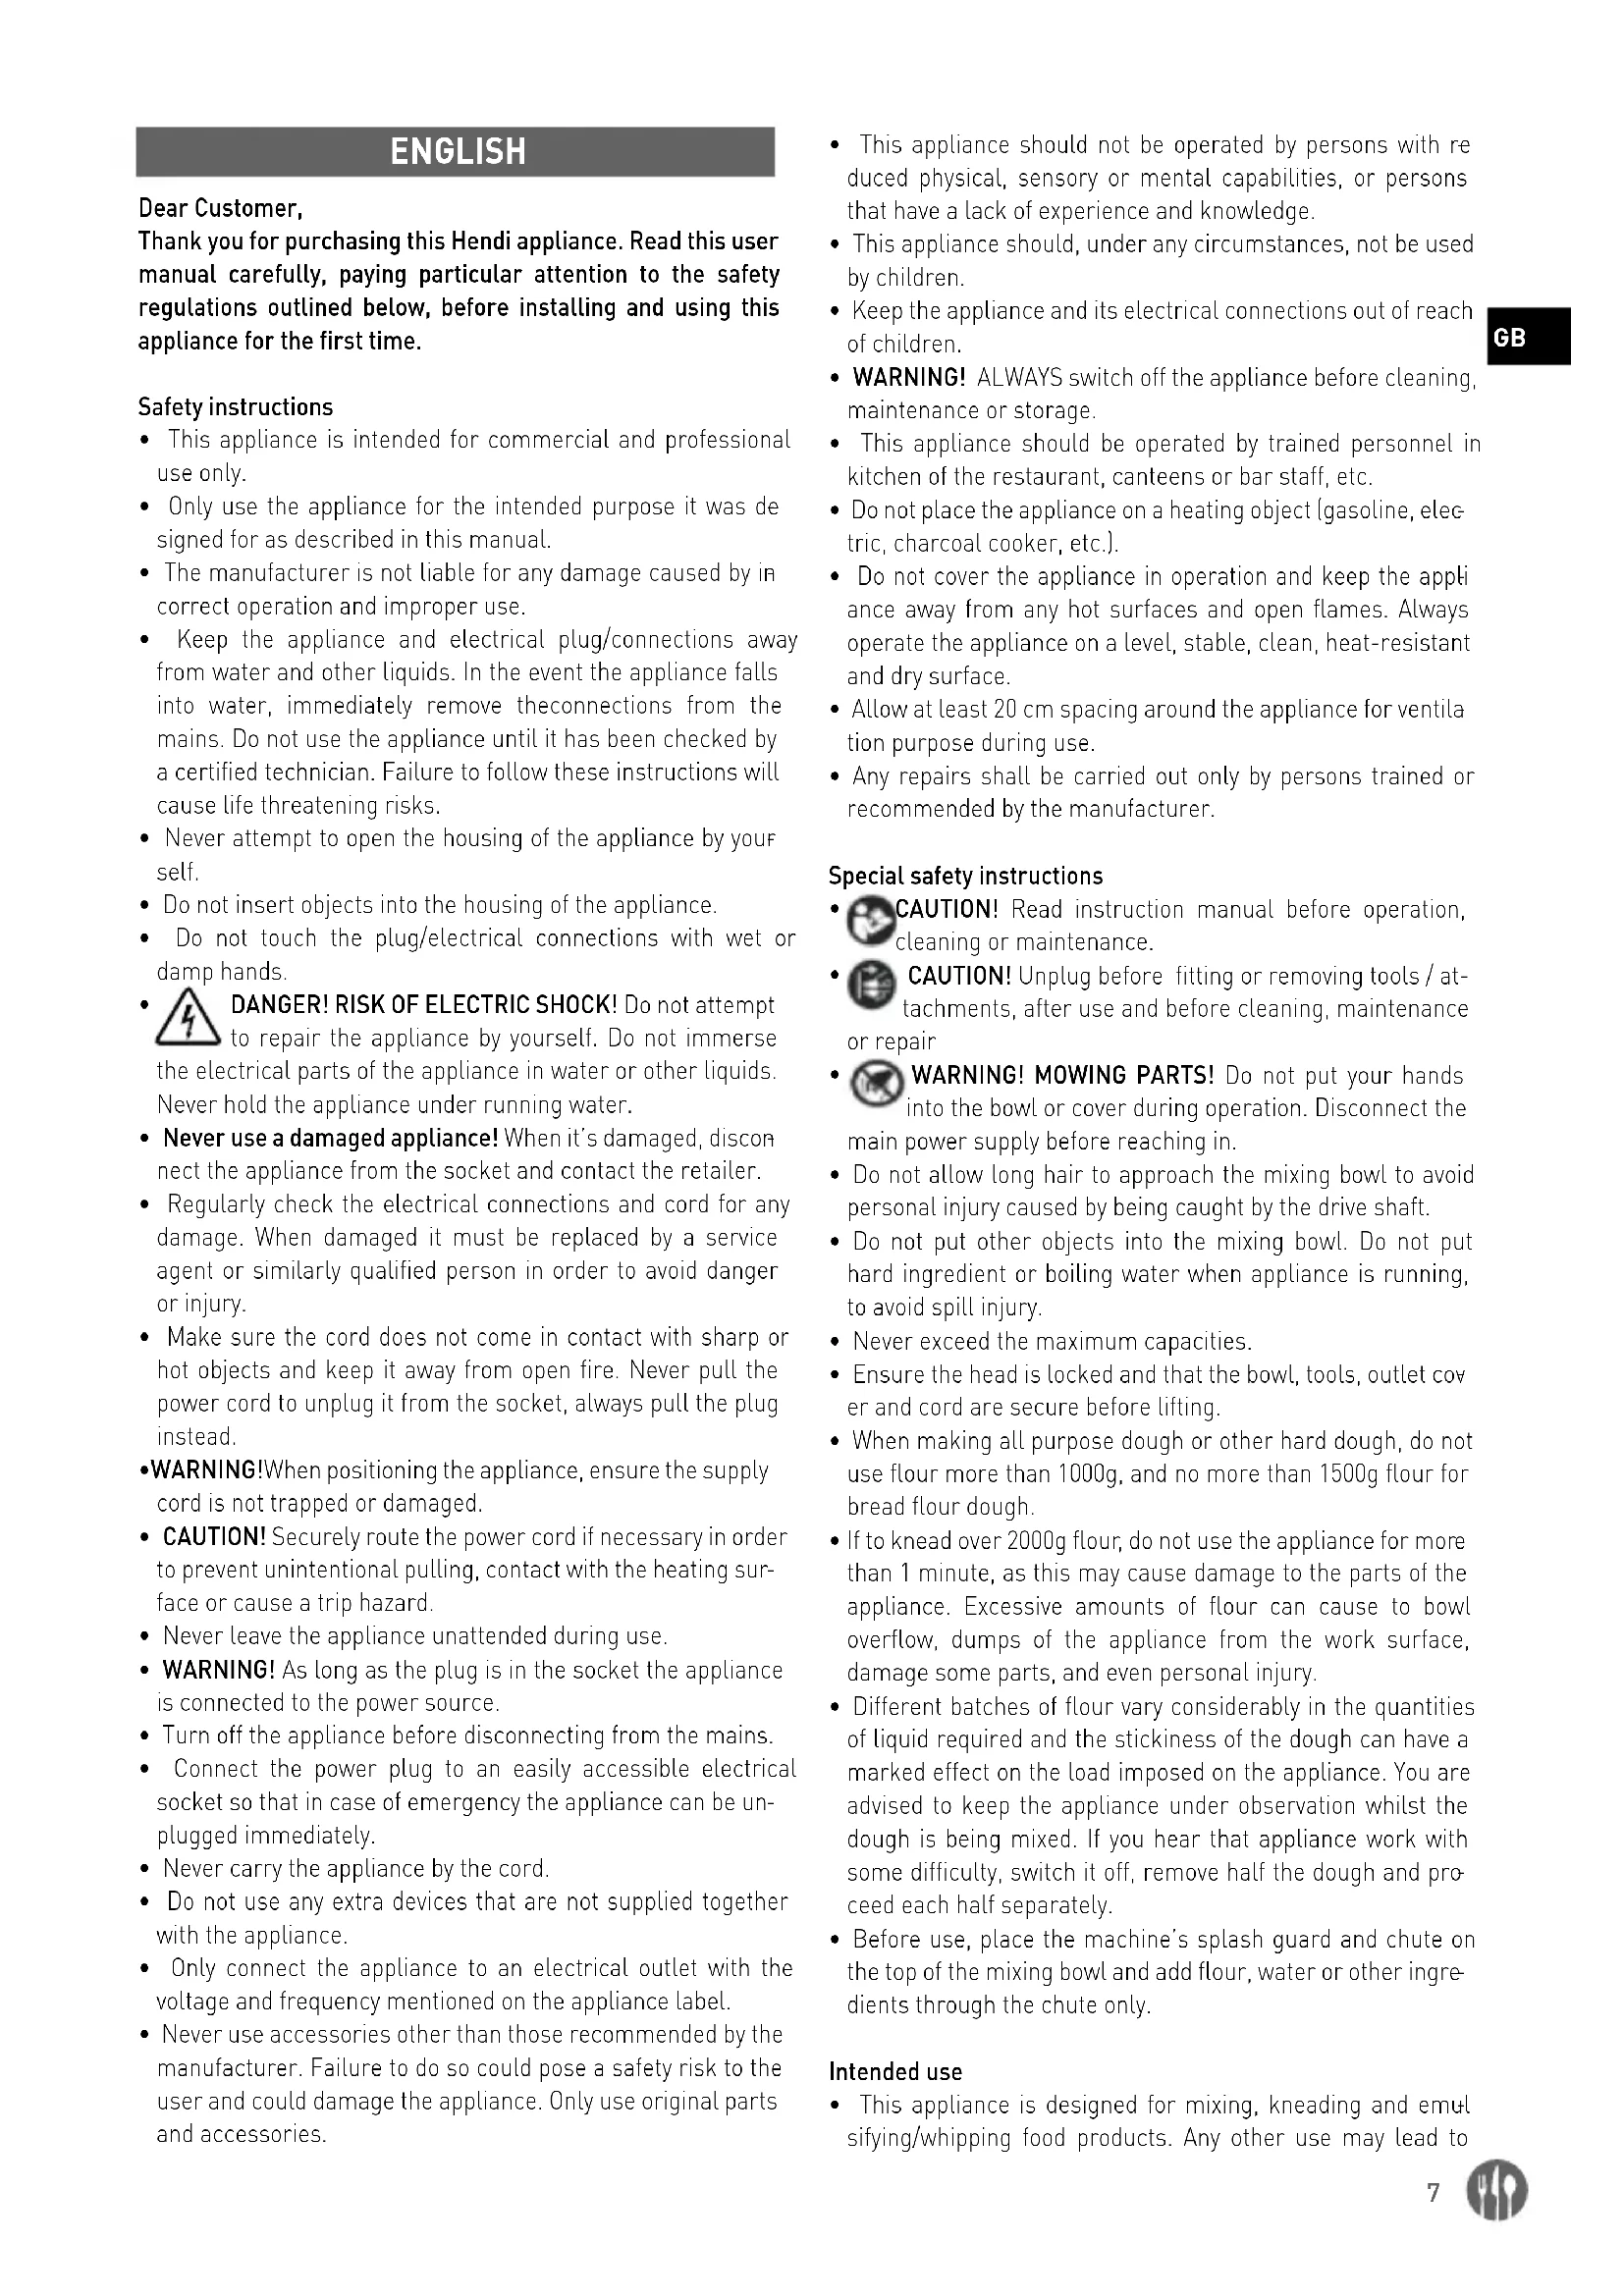
Thank you for purchasing this Hendi appliance. Read this user manual carefully, paying particular attention to the safety regulations outlined below, before installing and using this appliance for the first time.
Safety instructions
- This appliance is intended for commercial and professional use only.
- Only use the appliance for the intended purpose it was designed for as described in this manual.
- The manufacturer is not liable for any damage caused by in correct operation and improper use.
- Keep the appliance and electrical plug/connections away from water and other liquids. In the event the appliance falls into water, immediately remove the connections from the mains. Do not use the appliance until it has been checked by a certified technician. Failure to follow these instructions will cause life threatening risks.
- Never attempt to open the housing of the appliance by your self.
- Do not insert objects into the housing of the appliance.
- Do not touch the plug/electrical connections with wet or damp hands.
• DANGER! RISK OF ELECTRIC SHOCK! Do not attempt to repair the appliance by yourself. Do not immerse the electrical parts of the appliance in water or other liquids. Never hold the appliance under running water.
- Never use a damaged appliance! When it's damaged, disconnect the appliance from the socket and contact the retailer.
- Regularly check the electrical connections and cord for any damage. When damaged it must be replaced by a service agent or similarly qualified person in order to avoid danger or injury.
- Make sure the cord does not come in contact with sharp or hot objects and keep it away from open fire. Never pull the power cord to unplug it from the socket, always pull the plug instead.
- WARNING! When positioning the appliance, ensure the supply cord is not trapped or damaged.
- CAUTION! Securely route the power cord if necessary in order to prevent unintentional pulling, contact with the heating surface or cause a trip hazard.
- Never leave the appliance unattended during use.
- WARNING! As long as the plug is in the socket the appliance is connected to the power source.
- Turn off the appliance before disconnecting from the mains.
- Connect the power plug to an easily accessible electrical socket so that in case of emergency the appliance can be unplugged immediately.
- Never carry the appliance by the cord.
- Do not use any extra devices that are not supplied together with the appliance.
- Only connect the appliance to an electrical outlet with the voltage and frequency mentioned on the appliance label.
- Never use accessories other than those recommended by the manufacturer. Failure to do so could pose a safety risk to the user and could damage the appliance. Only use original parts and accessories.
- This appliance should not be operated by persons with reduced physical, sensory or mental capabilities, or persons that have a lack of experience and knowledge.
- This appliance should, under any circumstances, not be used by children.
- Keep the appliance and its electrical connections out of reach of children.
- WARNING! ALWAYS switch off the appliance before cleaning, maintenance or storage.
- This appliance should be operated by trained personnel in kitchen of the restaurant, canteens or bar staff, etc.
- Do not place the appliance on a heating object (gasoline, electric, charcoal cooker, etc.).
- Do not cover the appliance in operation and keep the appliance away from any hot surfaces and open flames. Always operate the appliance on a level, stable, clean, heat-resistant and dry surface.
- Allow at least 20 cm spacing around the appliance for ventilation purpose during use.
- Any repairs shall be carried out only by persons trained or recommended by the manufacturer.
Special safety instructions
• CAUTION! Read instruction manual before operation, cleaning or maintenance.
• CAUTION! Unplug before fitting or removing tools / attachments, after use and before cleaning, maintenance or repair
- WARNING! MOWING PARTS! Do not put your hands into the bowl or cover during operation. Disconnect the main power supply before reaching in.
- Do not allow long hair to approach the mixing bowl to avoid personal injury caused by being caught by the drive shaft.
- Do not put other objects into the mixing bowl. Do not put hard ingredient or boiling water when appliance is running, to avoid spill injury.
• Never exceed the maximum capacities.
- Ensure the head is locked and that the bowl, tools, outlet cover and cord are secure before lifting.
- When making all purpose dough or other hard dough, do not use flour more than 1000g, and no more than 1500g flour for bread flour dough.
- If to knead over 2000g flour, do not use the appliance for more than 1 minute, as this may cause damage to the parts of the appliance. Excessive amounts of flour can cause to bowl overflow, dumps of the appliance from the work surface, damage some parts, and even personal injury.
- Different batches of flour vary considerably in the quantities of liquid required and the stickiness of the dough can have a marked effect on the load imposed on the appliance. You are advised to keep the appliance under observation whilst the dough is being mixed. If you hear that appliance work with some difficulty, switch it off, remove half the dough and proceed each half separately.
- Before use, place the machine's splash guard and chute on the top of the mixing bowl and add flour, water or other ingredients through the chute only.
Intended use
- This appliance is designed for mixing, kneading and emulsifying/whipping food products. Any other use may lead to
damage of the appliance or personal injury.
- Operating the appliance for any other purpose shall be deemed a misuse of the device. The user shall be solely liable for improper use of the device.
Grounding installation
This appliance is classified as protection class I and must be connected to a protective ground. Grounding reduces the risk of electric shock by providing an escape wire for the electric current.
This appliance is fitted with a power cord with grounding plug or electrical connections with grounding wire. The connections must be properly installed and grounded.
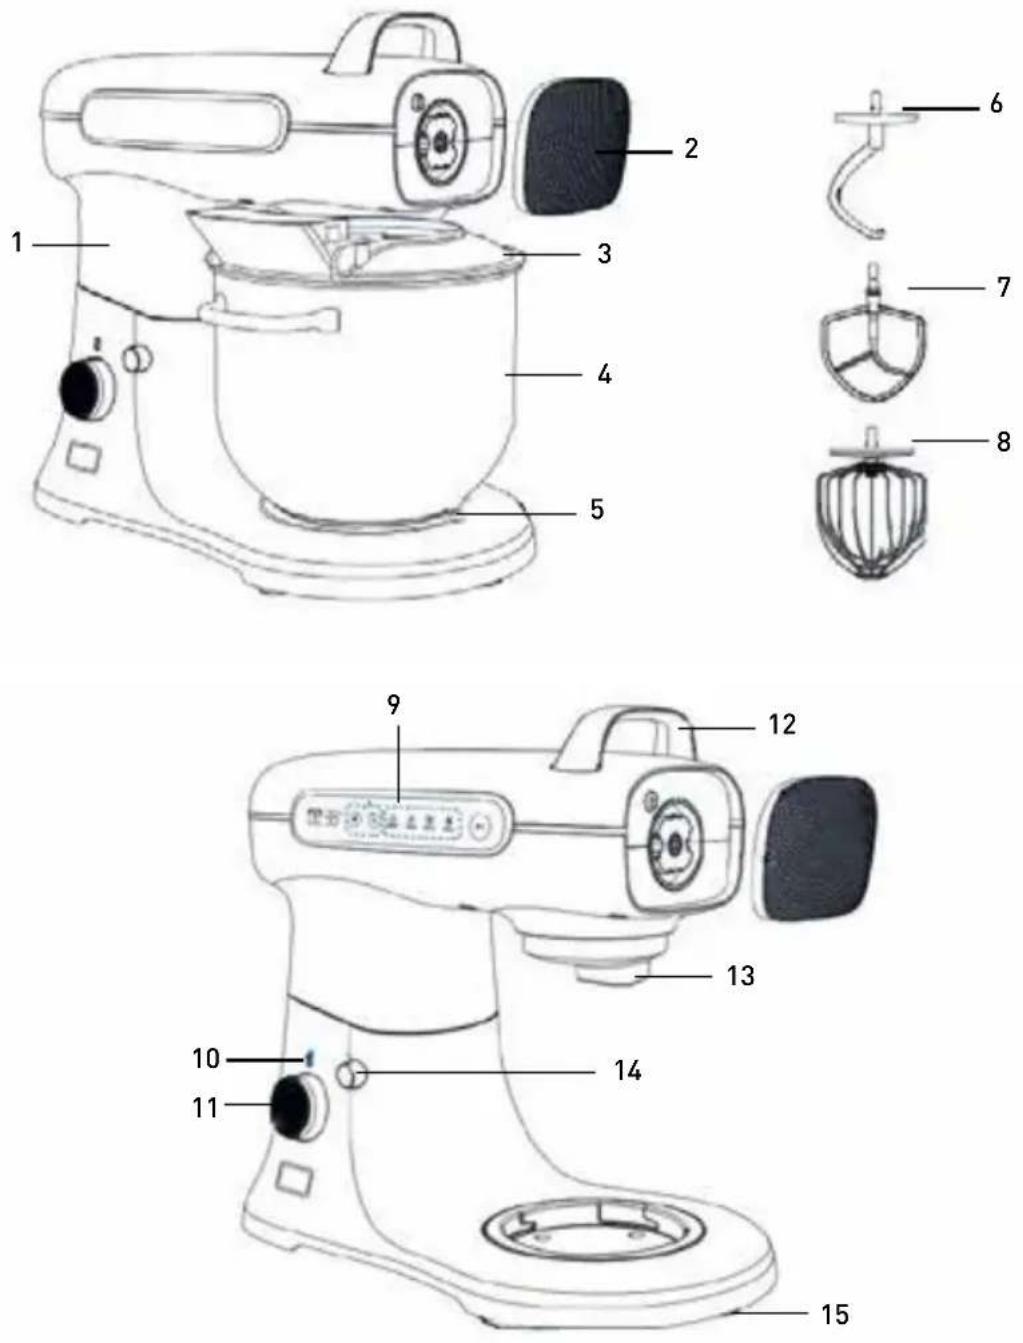
Main parts of the product
(Fig.1 on page 3)
| 1 Housing 9 Function Button | |||
| 2 Front cover 10 Speed indicator | |||
| 3 Bowl's splash cover 11 Knob (Speed control) | |||
| 4 Bowl 12 Handle | |||
| 5 | Bowl seat | 13 | Drive connector |
| 6 | Dough hook with cover | 14 | Head lift button |
| 7 | Beater | 15 | Suction feet |
| 8 | Egg whisk | ||
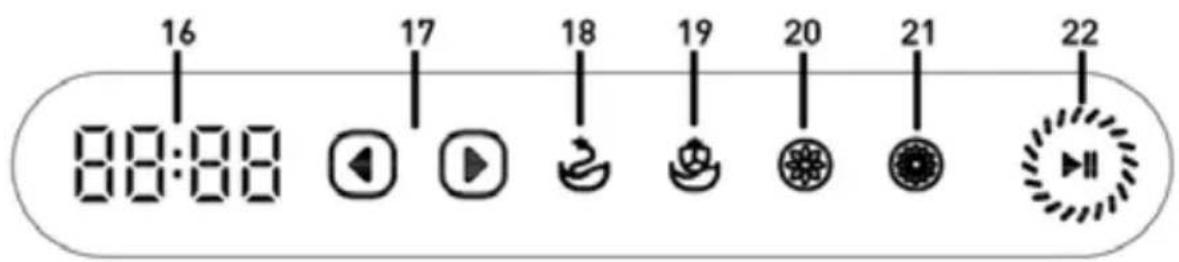
Control panel with display
(Fig. 2 page 3)
| No. | Description |
| 16 | Timer display |
| 17 | Time setting buttons |
| 18 | Slow mixing (Speed 1-6) - when choose speed over speed 6, appliance will run at speed 6 at most:• Speed 1-3 for "All Purpose" Dough or other hard dough making (dough hook)• Speed 1-6 for Bread Flour soft dough (dough hook)• Mix Sticky pasta, syrup, candies (beater)• Mix potato, nuts, vegetables and fruits (beater) |
| 19 | Normal mixing (Speed 1-8) - when choose speed over speed 8, appliance will run at speed 8 at most:• Mix mid-sticky pasta, syrups like cookie (beater)• Mix sugar and butter(beater) |
| 20 | Normal mixing (Speed 1-8) - when choose speed over speed 8, appliance will run at speed 8 at most:• Mix mid-sticky pasta, syrups like cookie (beater)• Mix sugar and butter(beater) |
| 21 | Fast mixing (Speed 1-11):For moderate cream, egg white, butter, etc (whisk) |
| 22 | Pause/Restart Button |
Preparation before use
- Remove all protective packaging and wrapping.
- Check to make sure the appliance is undamaged and with all accessories. In case of incomplete delivery and damages. Please contact supplier immediately. Do not use the appliance.
-
Clean the appliance before use (See == > Cleaning & Maintenance).
-
Make sure the appliance is completely dry.
- Place the appliance on a horizontal, stable and heat resistant surface that is safe against water splashes.
- Keep the packaging if you intend to store your appliance in the future.
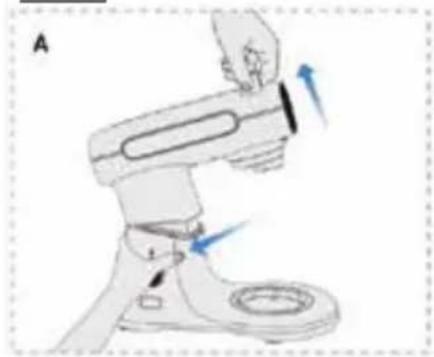
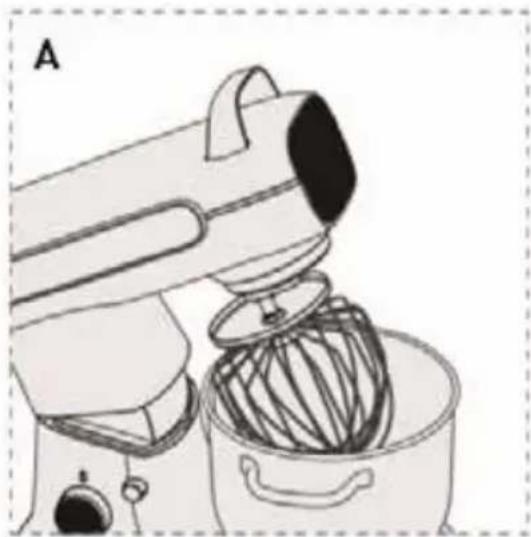
Assembling (Fig. 3 page 4)
A: Press down the head lift button (14) and lift up the head.
B: Put the desired accessory (6-8) in the drive connector (13).
C: Push hard the accessory's shaft upside and turn it counter-clockwise then it is well stalled into the appliance.
D: Put the mixing bowl (4) onto the bowl seat (5) and lock it.
E: Turn the bowl clockwise to lock it tightly.
F: Press down the head lift button and pull down the head.
G: Put the splash guard and chute (3) on the mixing bowl.
H: All is well set. Plug in and start to use the appliance.
NOTE: The height of the hook has been well adjusted and does not require any further human adjustment.
IMPORTANT: Sometimes it is hard to take out the dough or whisk may scratch the mixing bowl (fig. 4A page 4). In that case, please follow as bellow:
- Pull down the head
- Set Speed 1, run the appliance for 2 seconds and have the accessory move to the front - now it easy to take out the dough and/or avoid scratching the bowl (fig. 4B page 4).
NOTE: When pull down the head, make sure the head is well locked before running the appliance (the head lift button is completely protruded, or else, it is concave). If the head is not well locked, the appliance can still work, but there is a safety risk.
Operating instructions
- Press down the head, then press head lift button (14) with one hand and lift the head with the other hand.
- Assemble desired accessory (6-8), bowl (4) and bowl's splash cover (3) (See == > Assembling).
- Press head lift button, pull the lifted head down, then press down the head, when the button is fully ejected outward, then the head is well locked.
- First press the corresponding function button (9; 18-21) needed.
- Rotate the knob (11) to corresponding speed. When the number on the rotary knob is aligned to the speed indicator (10), it indicates the running speed. If the chosen speed is higher than the limit of the function button, the actual operating speed is the highest speed of function button. If you rotate the rotary knob directly without choosing the Function, the appliance defaults to the "Slow Mix" function (18).
- During operating the appliance you can use timer function for recording the working time and for set countdown time.
- After selecting the function and choosing the speed, the timer starts to record time, the appliance automatically stops running after 60 minutes. To start the appliance again, rotate the knob (11) to speed 0 and repeat the process.
- For setting countdown time (maximum 60 min): after selecting the function, press time setting button (17) - time increase/decrease by 30 seconds (pressig without releasing, time will change quicker); then choose the speed by rotating the knob. The appliance automatically stops running when the timer displays 00:00.
- For pause the running process, press Pause/Restart button [22]. For resume operation press the button again for 2 seconds.
NOTE: During the operation of the appliance, if you need to check the situation of dough or other ingredients, before you can reach in for operation, please turn off the appliance, pull out the power cord, and then lift the head.
IMPORTANT:
- Dough Hook: use for kneading dough only.
- Beater: Used to make cakes, biscuits, pastry, icing, fillings, puffs and mashed potatoes.
- Egg Whisk: For eggs, cream, batters, fatless sponges, meringues, cheesecakes, mousses, soufflés.
- At intervals stop the appliance and scrape the mixture off the dough hook.
- The ingredients mix best if you put the liquid in first.
CAUTION! Do not use Egg Whisk for heavy mixtures (e.g. creaming fat and sugar cubes), as this may result in damage to the egg whisk.
Disassembling (Fig. 5 page 5)
A: After use, turn off the power, lift up the chute and remove the splash guard.
B: Hold the handles with hand and turn couter-clockwise and remove the bowl from bowl seat.
C: Hold the cover of the accessory, push it upside and turn it clockwise, then released from the groove.
D: Remove accessory and clean it.
Cleaning & Maintenance
ATTENTION! Always disconnect the appliance from the electrical mains before storage, cleaning & maintenance.
Do not use water jet or steam cleaner for cleaning and do not push the appliance under the water as the parts will get wet and electric shock might be resulted.
Cleaning
- Never immerse the appliance in water or other liquids.
- Clean main unit and accessories by hand with a slightly damp cloth or sponge with some mild soap solution, then dry them thoroughly.
- Mixing Bowl, dough hook, beater or whisk you can wash in the dishwasher. Use vinegar to remove limescale if needed.
- Clean the drive shaft with a damp cloth or tissue paper for next use.
- Never use abrasive sponges or detergents, steel wool or metallic utensils to clean the interior or exterior parts of the appliance.
- Never use aggressive cleaning agents, abrasives or chlorinated cleaners or containing strong acids and alkalis. Do not use any sharp or pointed objects. Do not use petrol or solvents!
- Avoid water contacting the electrical components.
Maintenance
- Check the operation of the appliance regularly to prevent problems that can cause serious accidents.
- As soon as you feel the appliance isn't working correctly or there is a problem, stop using the appliance, shut it off and contact the supplier.
Troubleshooting
If the appliance does not function properly, please check the below table for the solution. If you are still unable to solve the problem, please contact the supplier/service provider.
| Problems | Possible cause Possible solution | |
| Appliance stops during operation | Working accesory is stuck | Unplug appliance and check if any foreign matter and take it out. Then restart the appliance after motor cooling down. |
| Motor or PCBA issue | Send back to supplier or au - thorized service for repair | |
| Appliance cannot start operation | Working accesory is stuck | Unplug appliance and check if working accesory is stuck by heavy dought |
| Appliance is not connected correctly to main power | Re-check the power connection | |
| Motor or PCBA issue | Send back to supplier or au - thorized service for repair | |
| Big noise during operation | Working accesory is not well assembled | Unplug appliance and re-check if working accesory is well assembled |
| Appliance is not place at a flat level work surface | Place the appliance on a flat level work surface | |
| Internal parts broken | Send back to supplier or au - thorized service for repair | |
Errors
| Error code Cause Solution | |
| E01 Motor hall broke Contact supplier to | send back the appliance |
| E03 Motor fan issue | |
| E04 Motor lower than 300 RPM |
Warranty
Any defect affecting the functionality of the appliance which becomes apparent within one year after purchase will be repaired by free repair or replacement provided the appliance has been used and maintained in accordance with the instructions and has not been abused or misused in any way. Your statutory rights are not affected. If the appliance is claimed under warranty, state where and when it was purchased and include proof of purchase (e.g. receipt).
In line with our policy of continuous product development we reserve the right to change the product, packaging and documentation specifications without notice.
Discarding & Environment
When decommissioning the appliance, the product must not be disposed of with other household waste. Instead, it is your responsibility to dispose to your waste equipment by handing it over to a designated collection point. Failure to follow this rule may be penalized in accordance with applicable regulations on waste disposal. The separate collection and recycling of your waste equipment at the time of disposal will help conserve natural resources and ensure that it is recycled in a manner that protects human health and the environment.
For more information about where you can drop off your waste for recycling, please contact your local waste collection company. The manufacturers and importers do not take responsibility for recycling, treatment and ecological disposal, either directly or through a public system.
DEUTSCH
Ohutusalased erijuhised
F Press down the head lift button and pull down the head.
| 2017 | 2016 | |
| Cost of sales | 3.5 | 3.4 |
| Gross margin | 1.9% | 1.8% |
[Non-Text]
[Non-Text]
[Non-Text]
[Non-Text]
[Non-Text]
[Non-Text]
[Non-Text]
[Non-Text]
[Non-Text]
[Non-Text]
[Non-Text]
[Non-Text]
[Non-Text]
[Non-Text]
[Non-Text]
[Non-Text]
PKS Hendi South East Europe SA
5 Metsovou Str.
18346 Moschato, Athens, Greece
Tel: +30 210 4839700
Email: info@pks-hendi.com
Hendi Polska Sp. z o.o.
ul. Firmowa 12
62-023 Robakowo, Poland
Tel: +48 61 658 7000
Email: info@hendi.pl
Hendi Italia S.R.L.
Via Leonardo da Vinci 4
39100 Bolzano (BZ), Italy
Tel: +39 800 727 438
Email: office.italy@hendi.eu
Hendi Food Service Equipment GmbH
Ehring 15
1208, 12/F Exchange Tower
33 Wang Chiu Road, Kowloon Bay, Hong Kong
Tel: +852 2154 2618
Email: info-hk@hendi.eu
Hendi Food Service Equipment Romania S.R.L.
https://www.linkedin.com/company/hendi-tools-for-chefs/
www.youtube.com/HendiEquipment
GB: Changes, printing and typesetting errors reserved.

- Safety instructions
- Special safety instructions
- Intended use
- Grounding installation
- Main parts of the product
- Control panel with display
- Preparation before use
- Assembling (Fig. 3 page 4)
- Operating instructions
- IMPORTANT:
- Disassembling (Fig. 5 page 5)
- Cleaning & Maintenance
- Cleaning
- Maintenance
- Troubleshooting
- Warranty
- Discarding & Environment
- DEUTSCH
- Ohutusalased erijuhised
- PKS Hendi South East Europe SA
- Hendi Polska Sp. z o.o.
- Hendi Italia S.R.L.
- Hendi Food Service Equipment GmbH
- Hendi Food Service Equipment Romania S.R.L.
Brand : Hendi
Model : 221570
Category : Food Processor