USER MANUAL Astrid Lionelo
natural_image
Line drawing of a bicycle seat assembly with levers and seats (no text or symbols)
lionelo
User manual
Instrukcja obstugi
Bedienungsanleitung
natural_image
Line drawing of a baby car seat with straps and a logo (no text or symbols)
text_image
Anatomical diagram of a car's internal structure with numbered labels pointing to specific parts, likely for medical or automotive diagnostic purposes.

text_image
Diagram showing two mechanical or structural states with checkmark and cross symbols, likely indicating correct and incorrect states.

text_image
AIRBAG
0
1
2
3
4
5
6
7
B
text_image
a
b
1
natural_image
Line drawing of a car seatbelt being adjusted for use, showing the seatbelt and seatbelt connector (no text or symbols)
text_image
a
b
c
3
text_image
a
b
c
click!
text_image
Diagram illustrating car seatbelting technique with magnified view showing hand positioning and adjustment arrows
A 40 - 60 ~cm
natural_image
Line drawing of a car seat assembly (no text or symbols)
B 60 - 87cm (≤ 13kg)
natural_image
Line drawing of a car seat assembly (no text or symbols)
6

text_image
Diagram illustrating a car seatbelt usage technique with numbered steps from initial state to final state.
natural_image
Illustration of a car interior being adjusted, showing hand positioning and motion arrows (no text or symbols)
text_image
a
b
9
text_image
Diagram illustrating a sewing machine operation with labeled steps a and b, showing fabric being sewn into a bag.
natural_image
Line drawing of a leaf with a stem and arrow, labeled 'a' and page number 11 (no text or symbols on the diagram itself)
text_image
a
b
b
12
text_image
click
click
13
natural_image
Illustration of a baby car seatbelt being lifted, showing two scenarios (no text or symbols)
text_image
Illustration showing three scenarios of a child car seat with red X marks and green checkmark, indicating correct or incorrect conditions.
text_image
f
a
g
b
d
c
click!
e
16
text_image
a
b
c
d
e
17
text_image
a
b
18
text_image
a
b
c
d
e
19
text_image
Diagram of a stroller with labeled parts and directional arrows, showing internal components and movement paths.
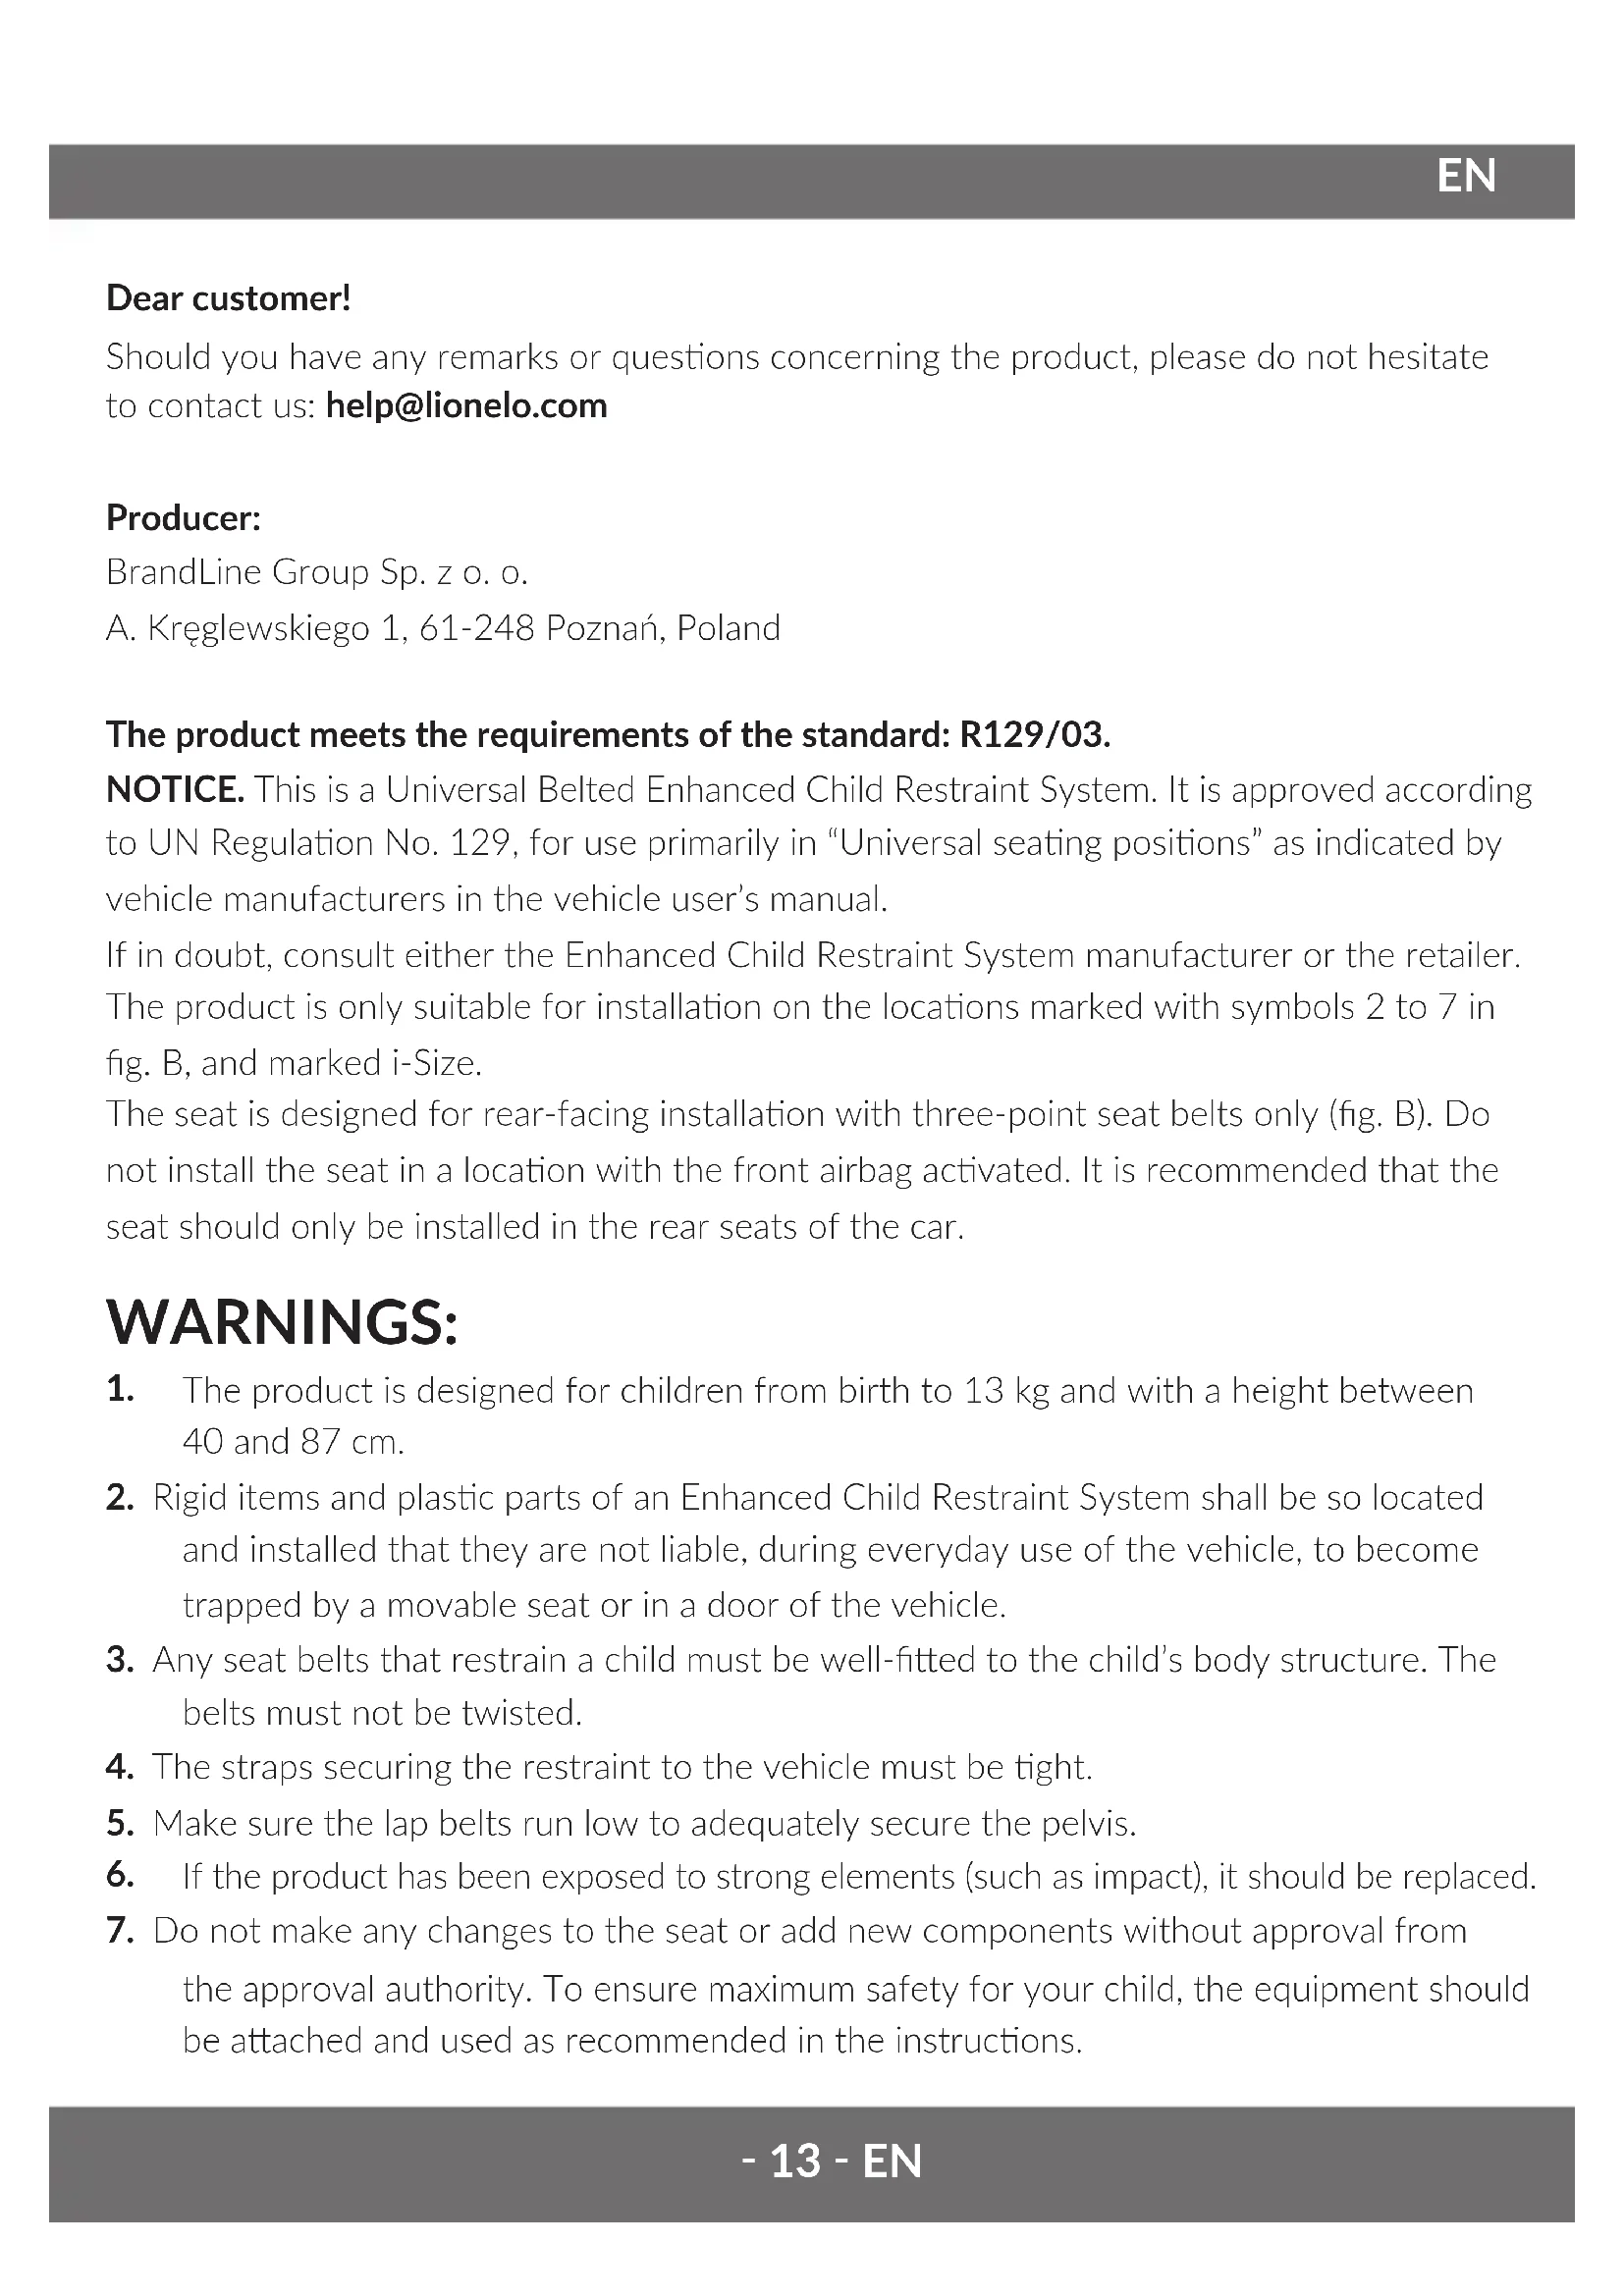
Dear customer!
Should you have any remarks or questions concerning the product, please do not hesitate to contact us: help@lionelo.com
Producer:
BrandLine Group Sp. z o. o.
The product meets the requirements of the standard: R129/03.
NOTICE. This is a Universal Belted Enhanced Child Restraint System. It is approved according to UN Regulation No. 129, for use primarily in “Universal seating positions” as indicated by vehicle manufacturers in the vehicle user’s manual.
If in doubt, consult either the Enhanced Child Restraint System manufacturer or the retailer. The product is only suitable for installation on the locations marked with symbols 2 to 7 in fig. B, and marked i-Size.
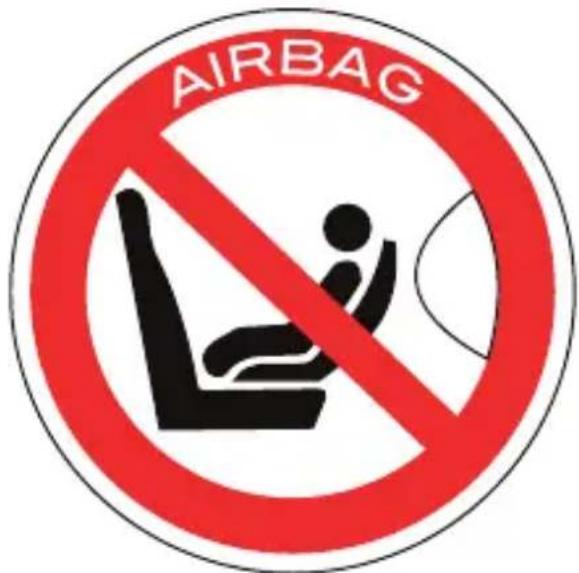
The seat is designed for rear-facing installation with three-point seat belts only (fig. B). Do not install the seat in a location with the front airbag activated. It is recommended that the seat should only be installed in the rear seats of the car.
WARNINGS:
- The product is designed for children from birth to 13 kg and with a height between 40 and 87 cm.
- Rigid items and plastic parts of an Enhanced Child Restraint System shall be so located and installed that they are not liable, during everyday use of the vehicle, to become trapped by a movable seat or in a door of the vehicle.
- Any seat belts that restrain a child must be well-fitted to the child's body structure. The belts must not be twisted.
- The straps securing the restraint to the vehicle must be tight.
- Make sure the lap belts run low to adequately secure the pelvis.
- If the product has been exposed to strong elements (such as impact), it should be replaced.
-
Do not make any changes to the seat or add new components without approval from the approval authority. To ensure maximum safety for your child, the equipment should be attached and used as recommended in the instructions.
-
The plastic parts of this seat can heat up in the sun and cause burns on the child's skin.
- Never leave a child alone in a car seat in a vehicle.
- Luggage and other similar items should be secured so that they will not cause any injury in a collision situation.
- Do not use the seat without its fabric cover.
- The cover cannot be replaced with an item from another set. It is an integral part of the set and affects the operation of the restraint.
- Always carry this instruction manual with you.
- Refer to the vehicle manufacturer's owner's instruction manual.
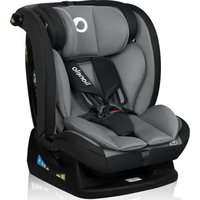
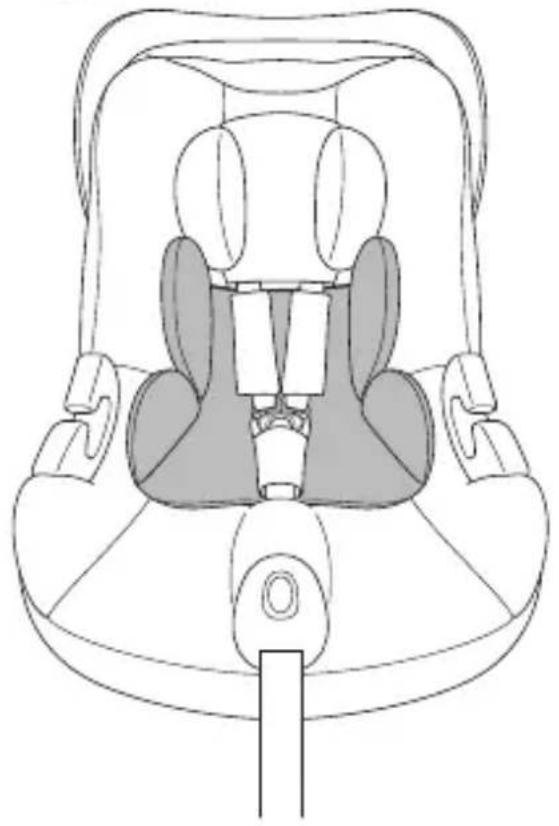
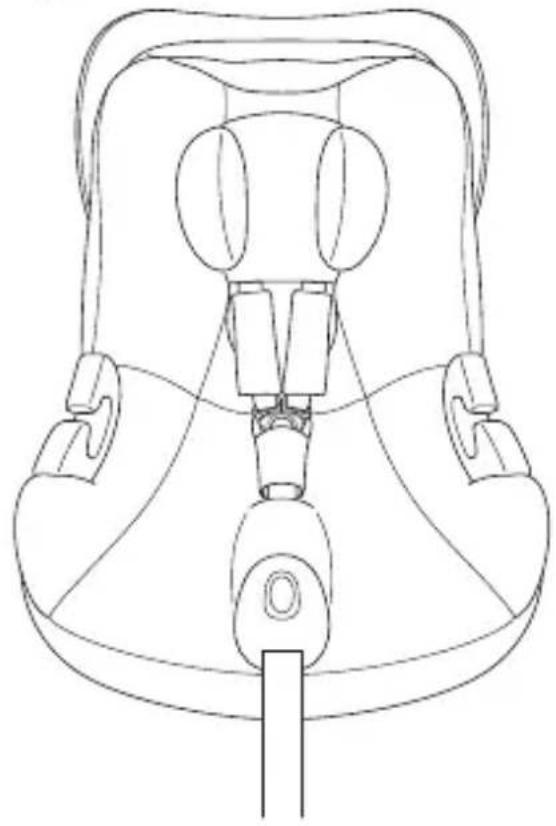
DESCRIPTION OF PARTS (FIG. A)
- Seat
- Headrest
- Canopy
- Protective pads for seat belts
- Seat belts
- Seat belt buckle protector
- Seat belt tension adjustment strap
- Handle adjustment button
- Lap belt guide
- Shoulder belt guide
- Seat belt tension adjustment button
- Reduction insert
- Seat handle
- Headrest adjustment lever
- Adapter release buttons
PRODUCT ADJUSTMENT
Headrest adjustment
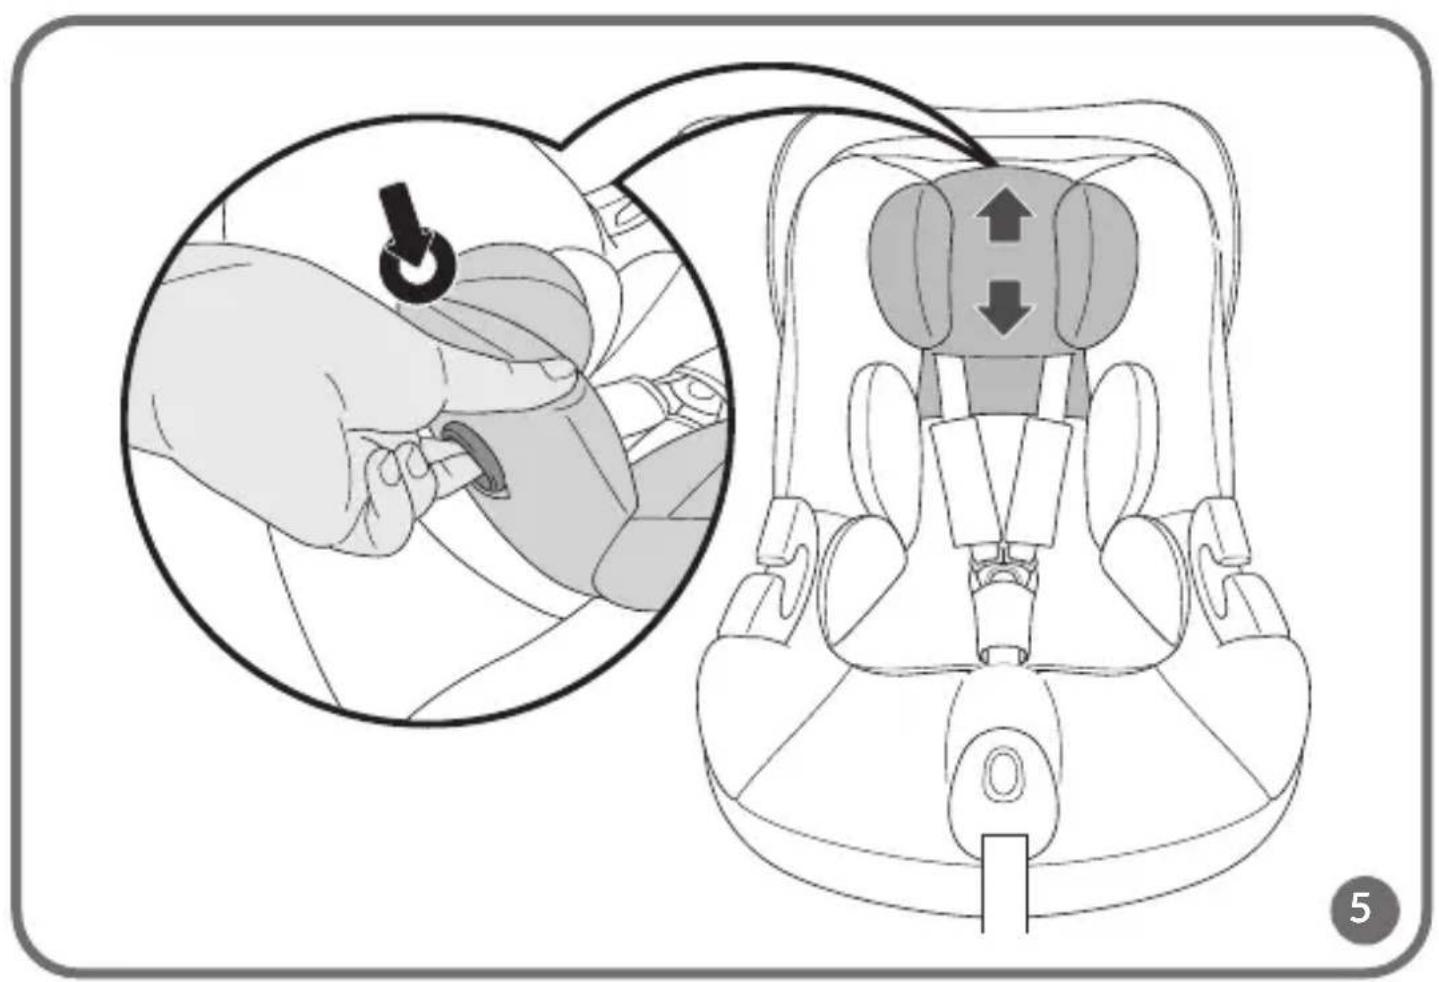
To change the headrest height:
- Loosen the belts (fig. 1). This will allow you to adjust the height of the headrest more freely.
- Pull the headrest adjustment lever and adjust the headrest height (fig. 5). The headrest adjustment range is 7 cm.
Reduction insert
Note! Children with a height of up to 60 cm must use a reduction insert (A, fig. 6).
The reduction insert should be removed when the seat is used by a child over 60 cm tall (B, fig. 6).
Handle adjustment
To change the position of the handle, press the handle adjustment buttons on both sides of the seat (fig. 7) and adjust the handle to the desired position. There are 4 positions available:
- Car position (1, fig. 7)
- For carrying (2, fig. 7)
- For storage (3, fig. 7)
- For placing the seat on a flat surface (4, fig. 7)
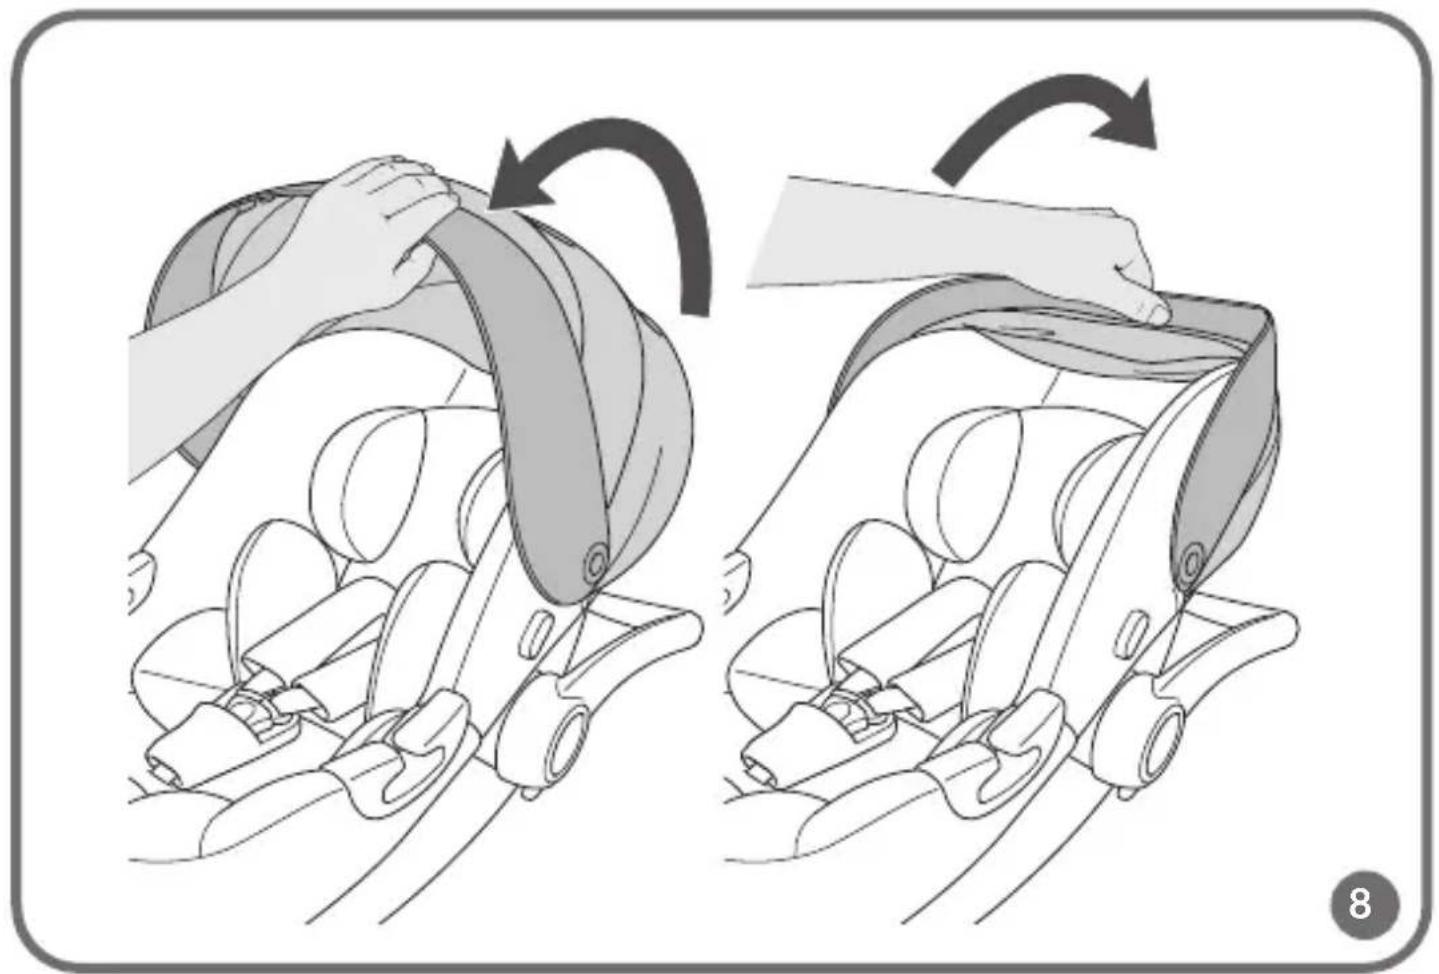
Canopy adjustment
- Adjust the canopy to the desired position by pulling the front of the canopy in the desired direction (fig. 8).
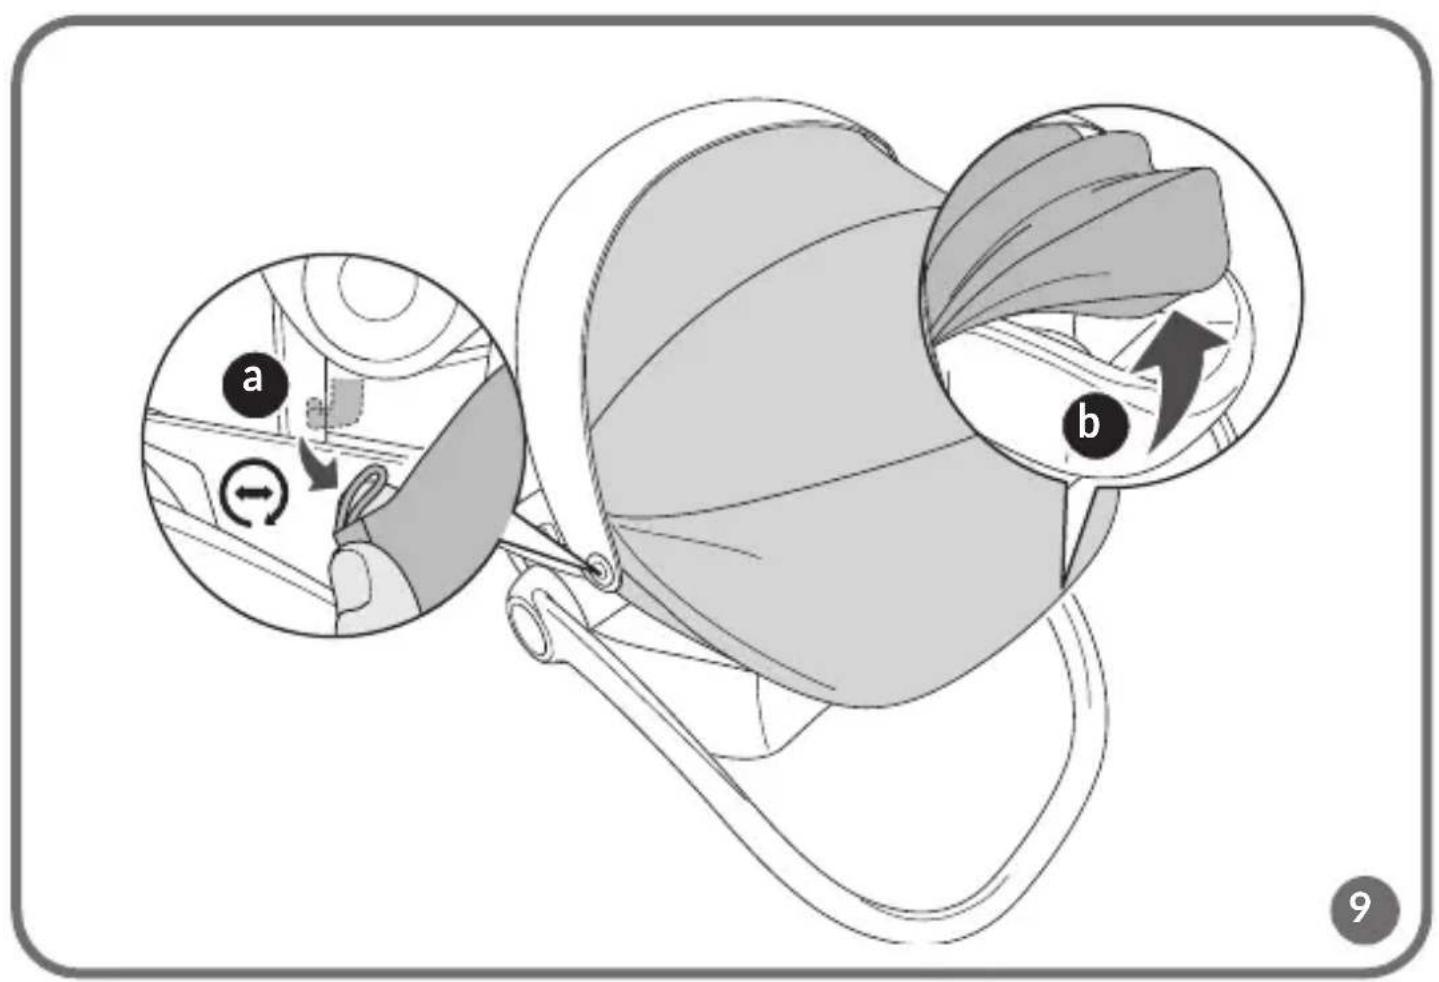
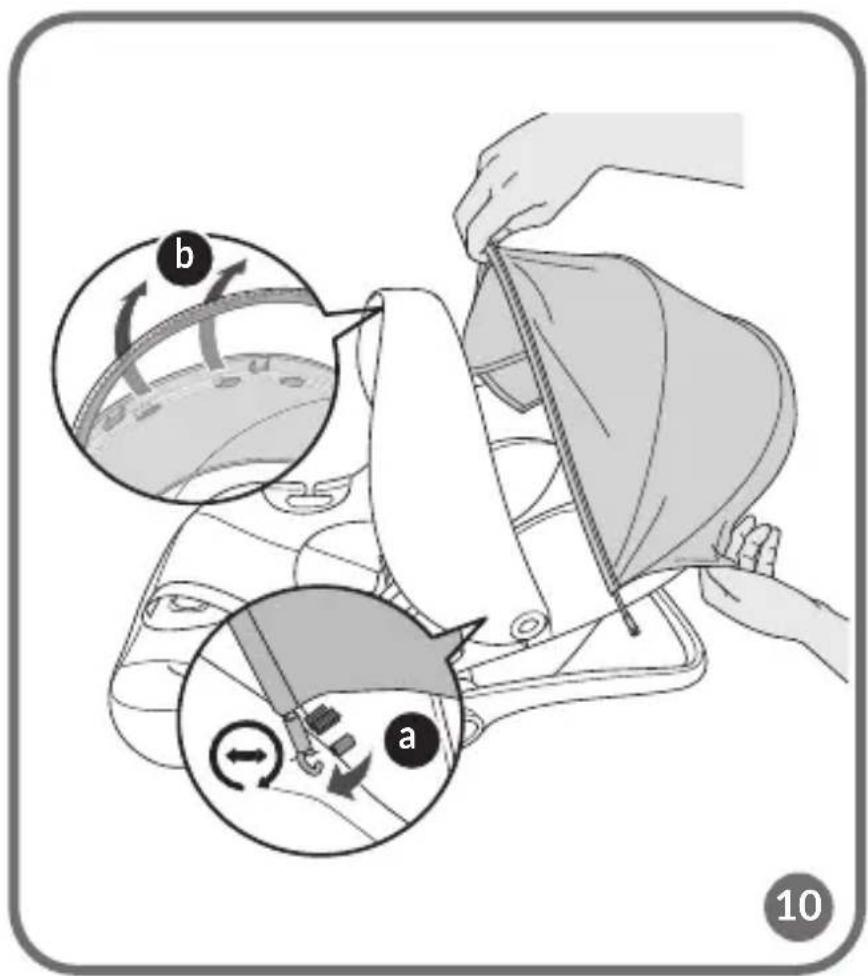
- To remove the canopy cover, remove the rubber clips (A, fig. 9), then slide off the cover (B, fig. 9) and remove the stiffening bar from the attachment points (A, B, fig. 10) located on the seat.
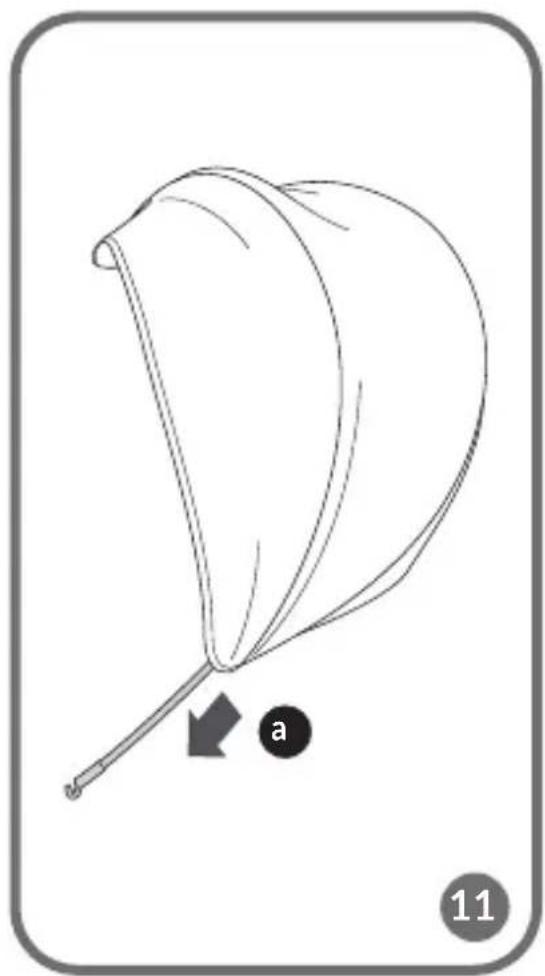
- Remove the stiffening bar from the fabric cover (fig. 11).
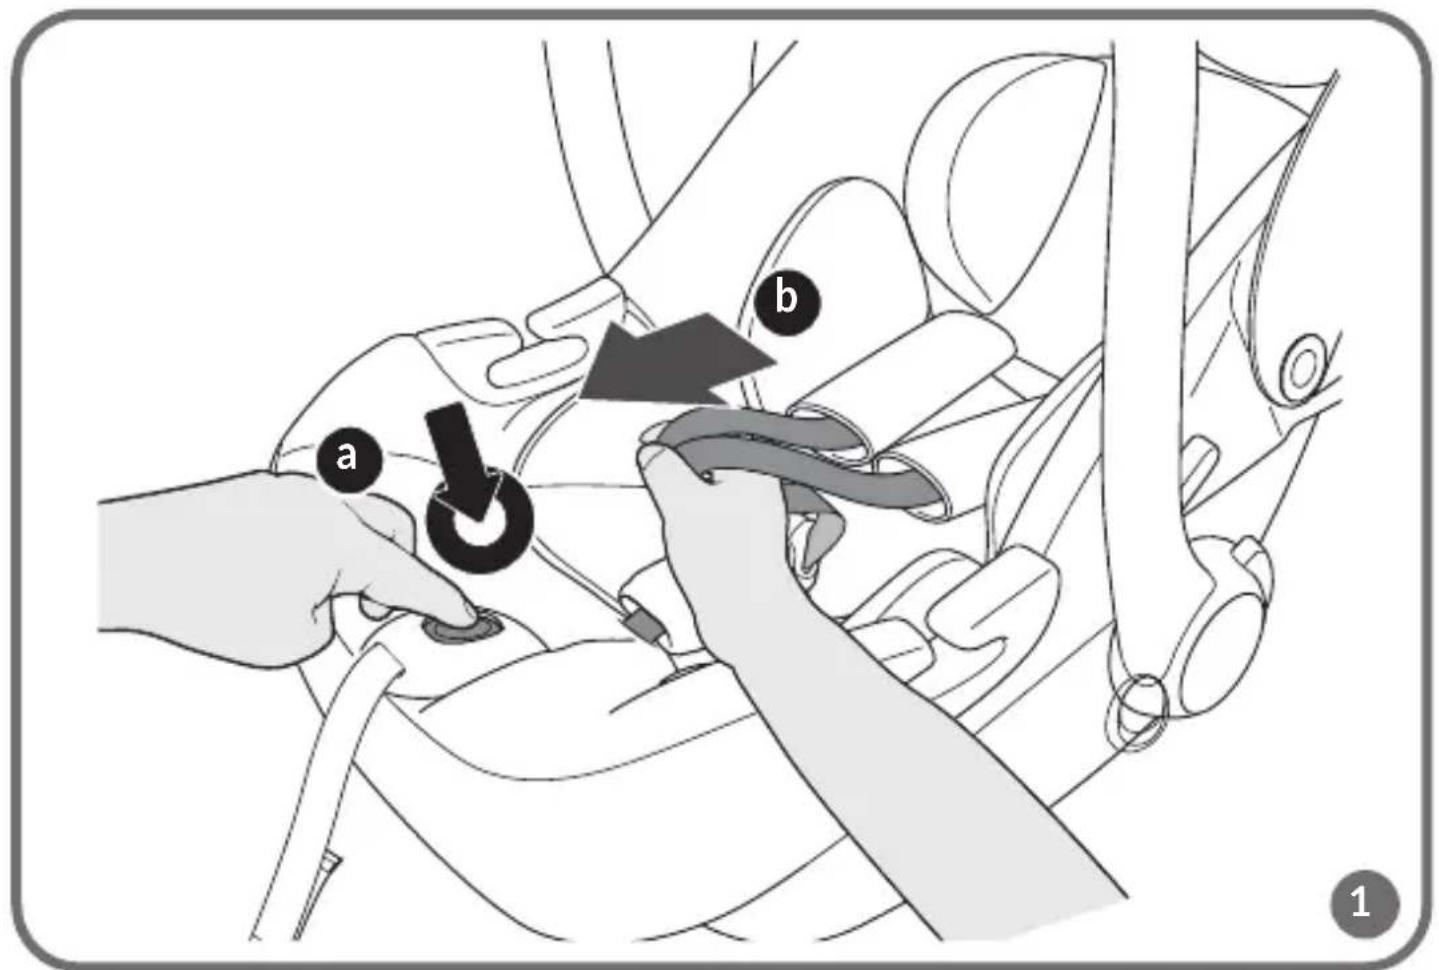
BUCKLING A CHILD IN THE SEAT
- Place the seat on a level surface.
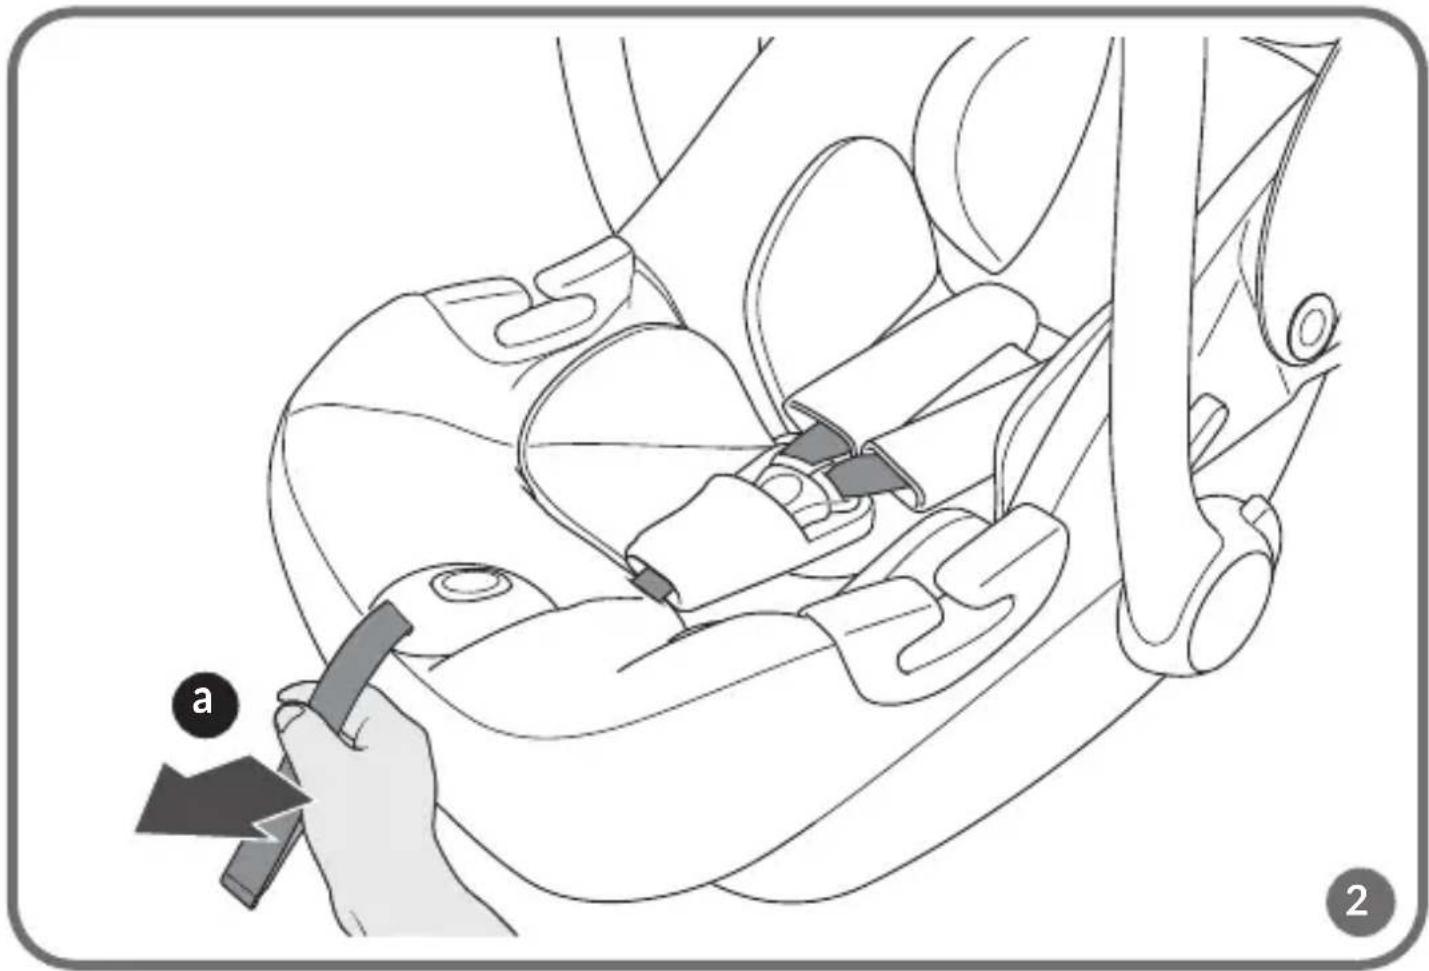
- Loosen the seat belts by pressing the tension adjustment button and pulling on the belts (fig. 1).
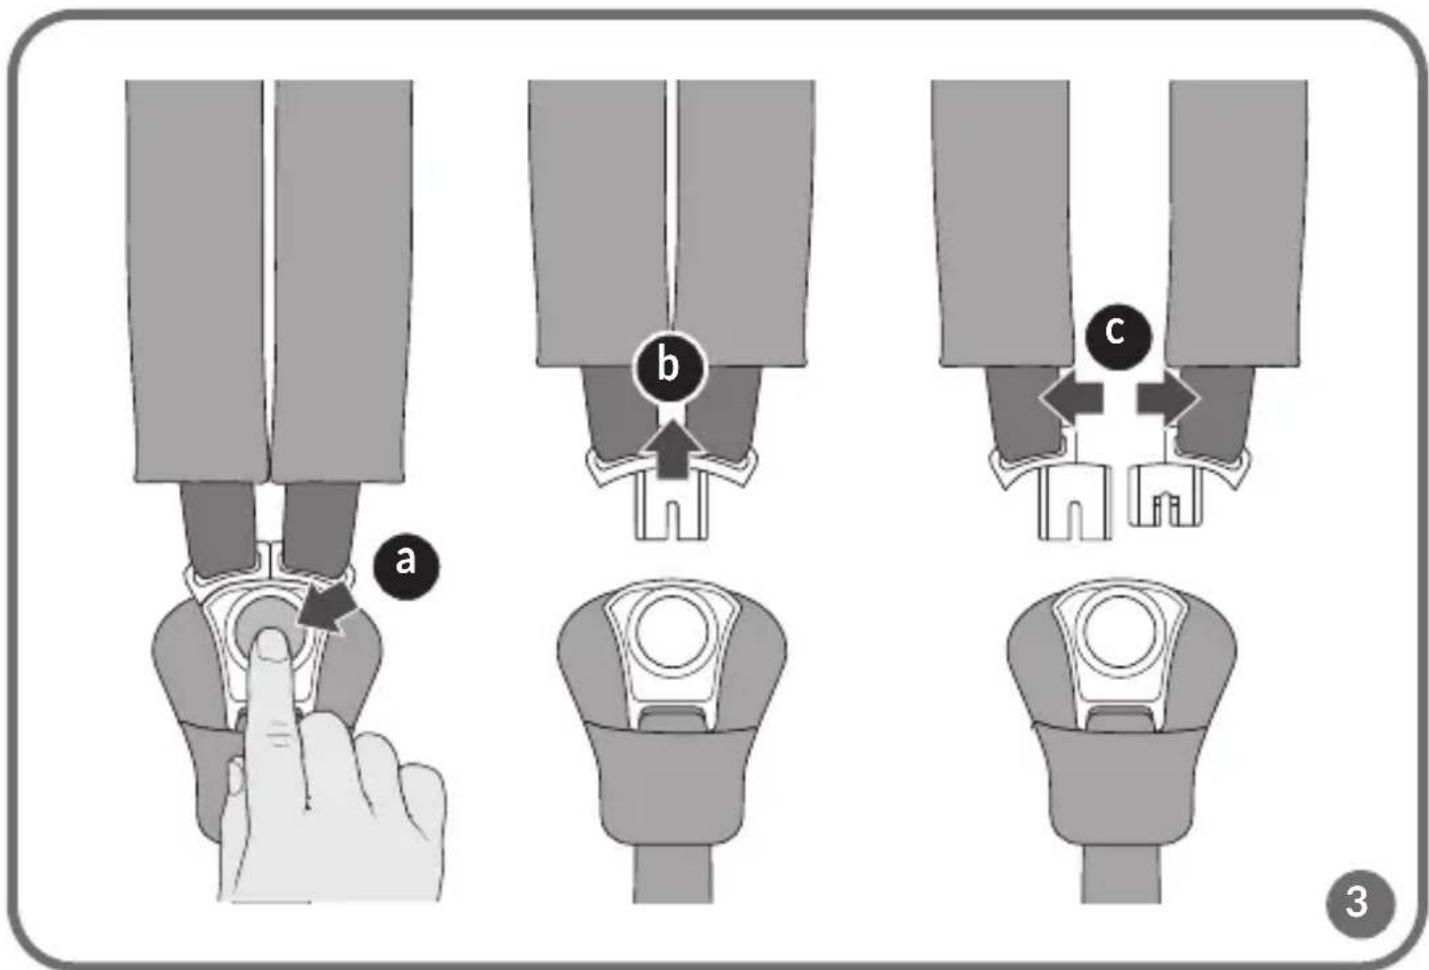
- Unbuckle the seat belts by pressing the red button on the buckle (A, fig. 3) and extending and unbuckling the belt connectors (B, C, fig. 3).
- Place the child in the seat.
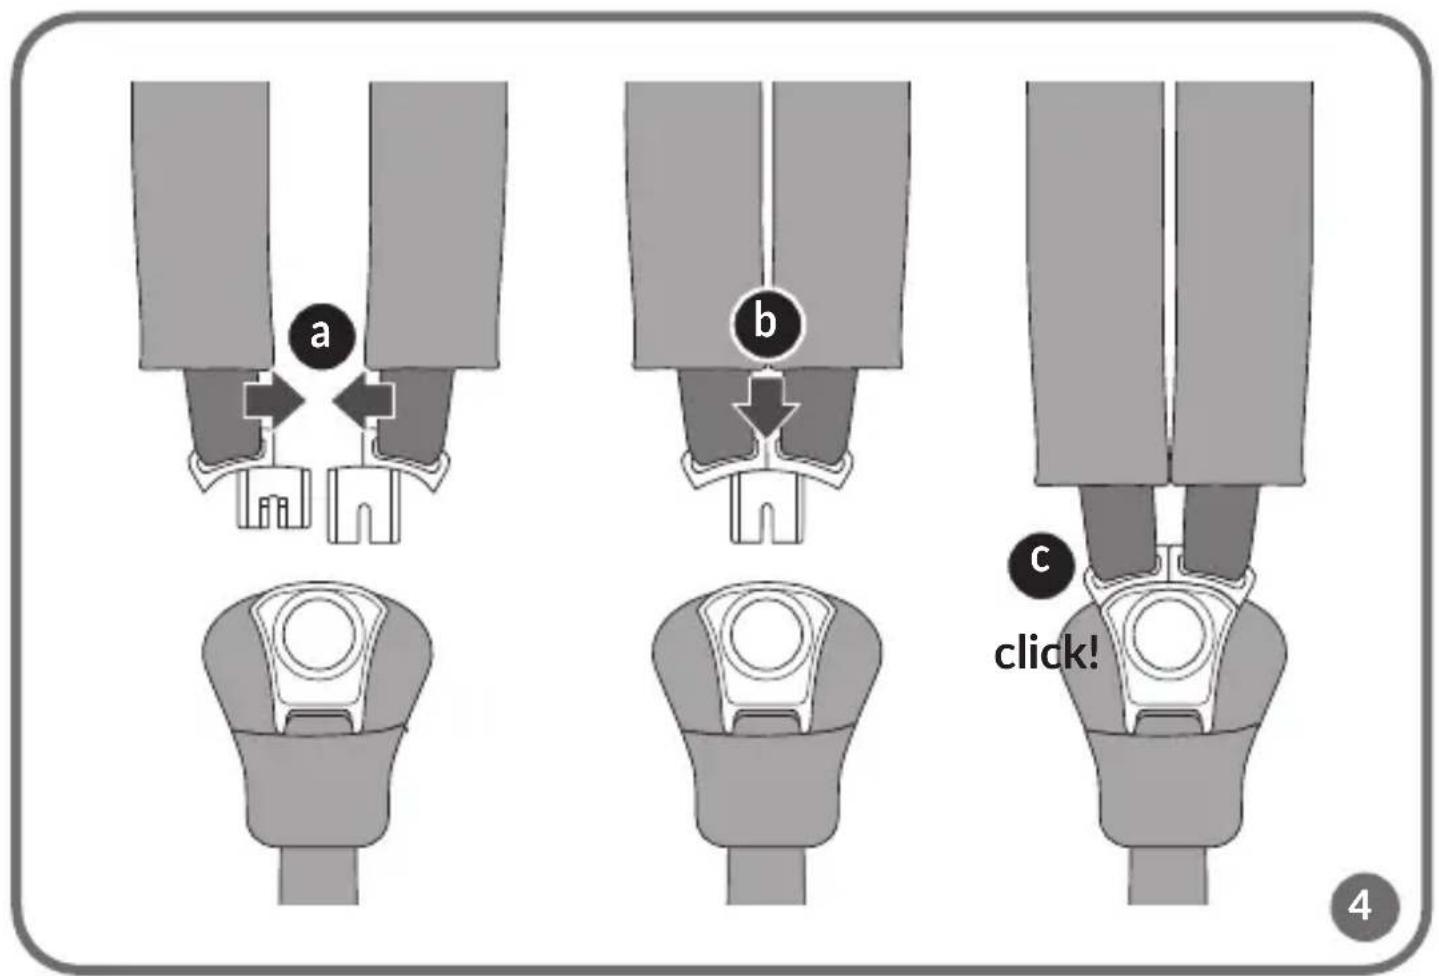
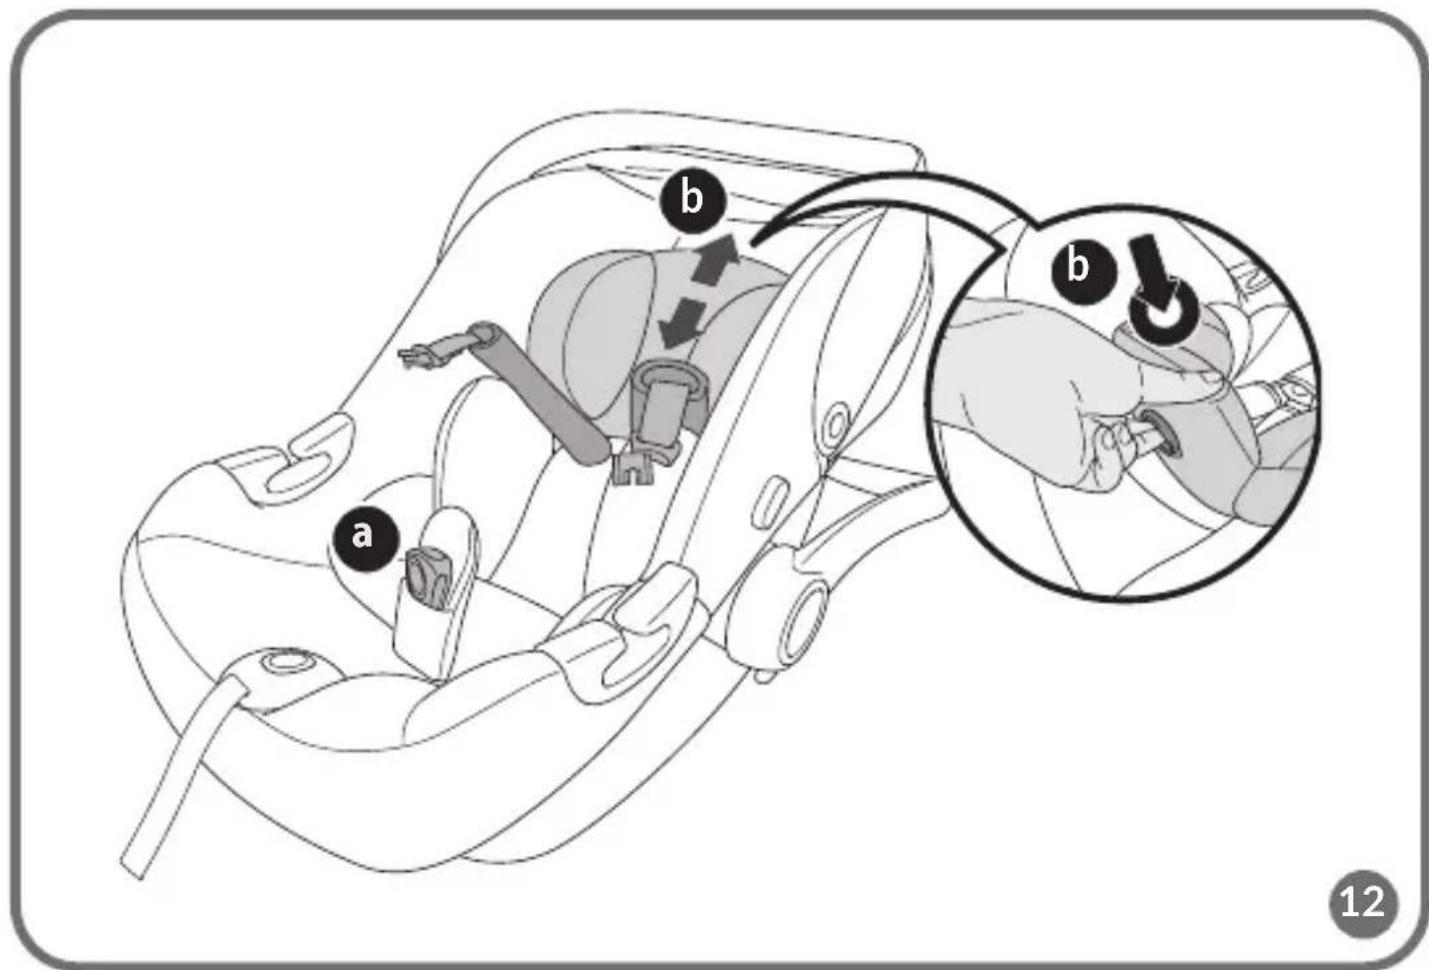
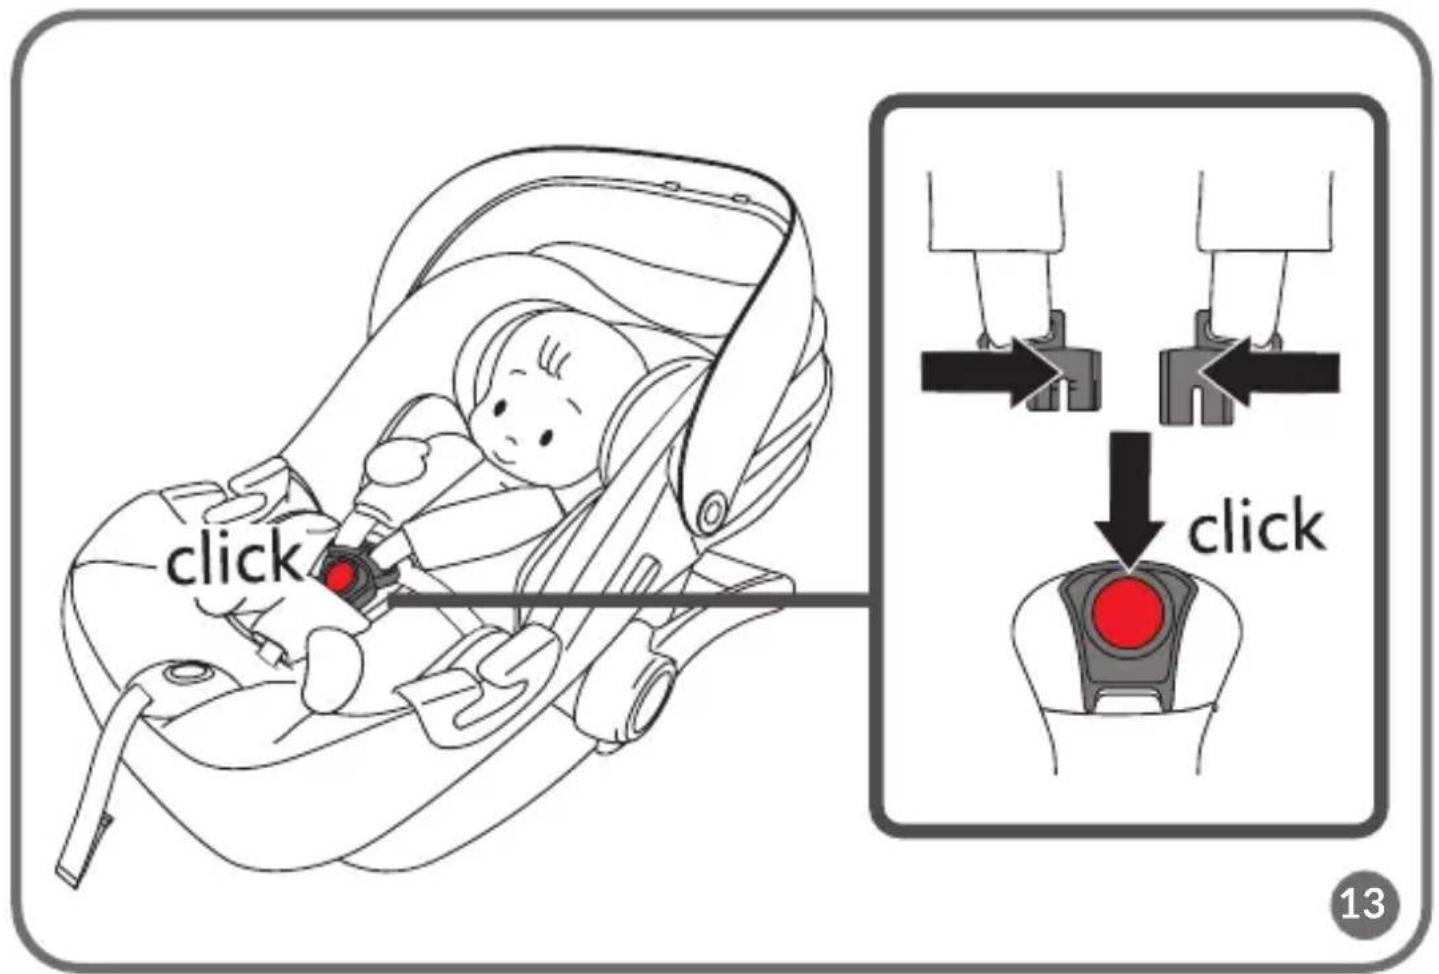
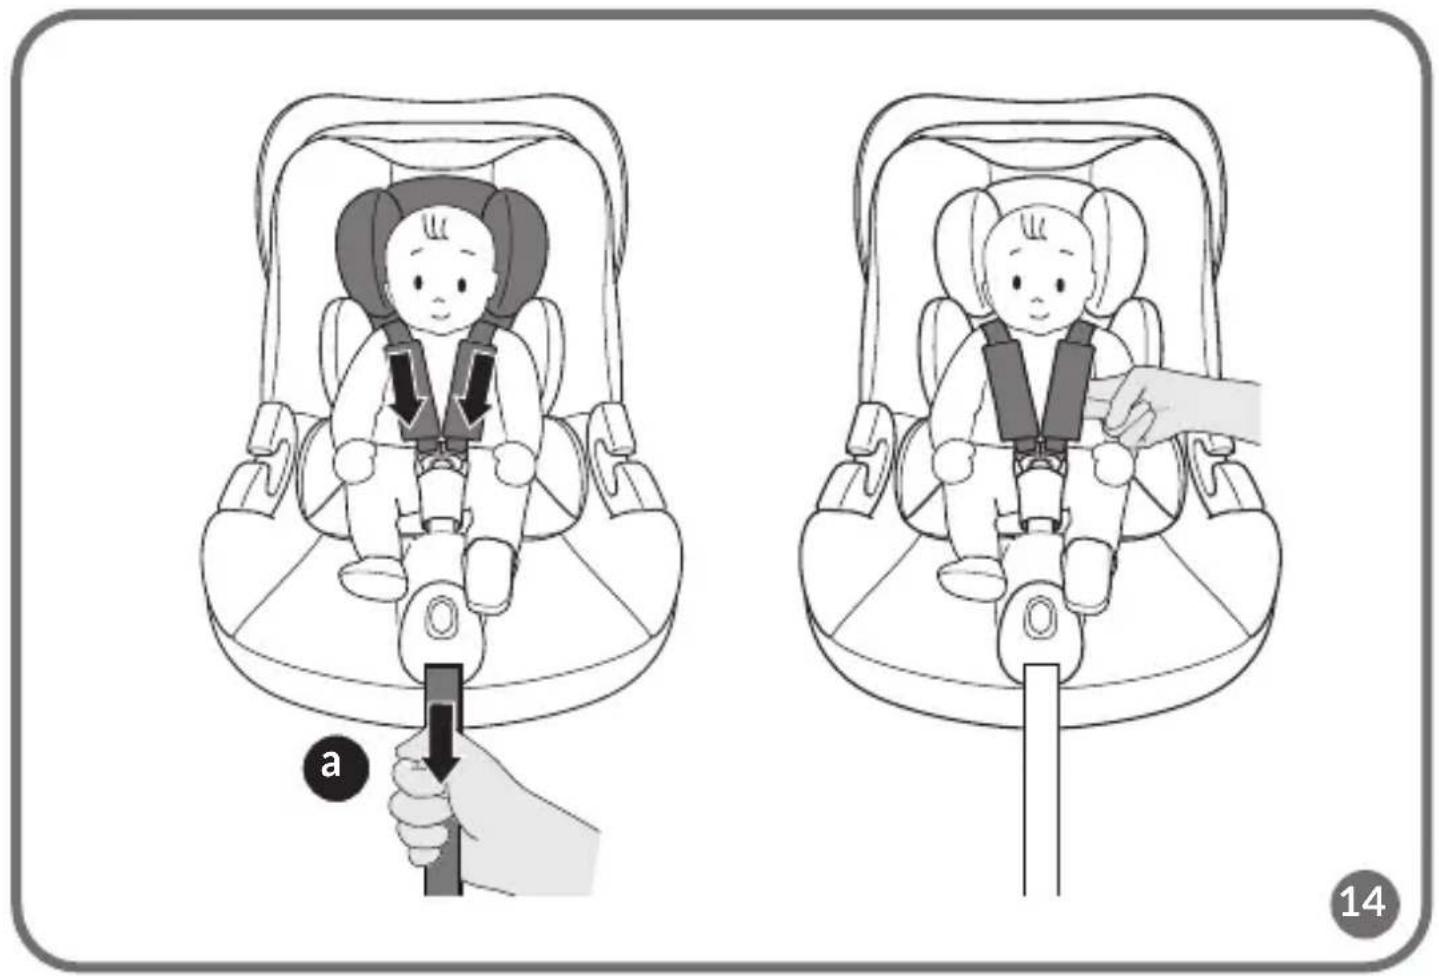
- Fasten the seat belts (fig. 13). To fasten the seat belts, connect the belt connectors (A, fig. 4) and then slide them into the buckle (B, fig. 4). You will hear a characteristic click (C, fig. 4).
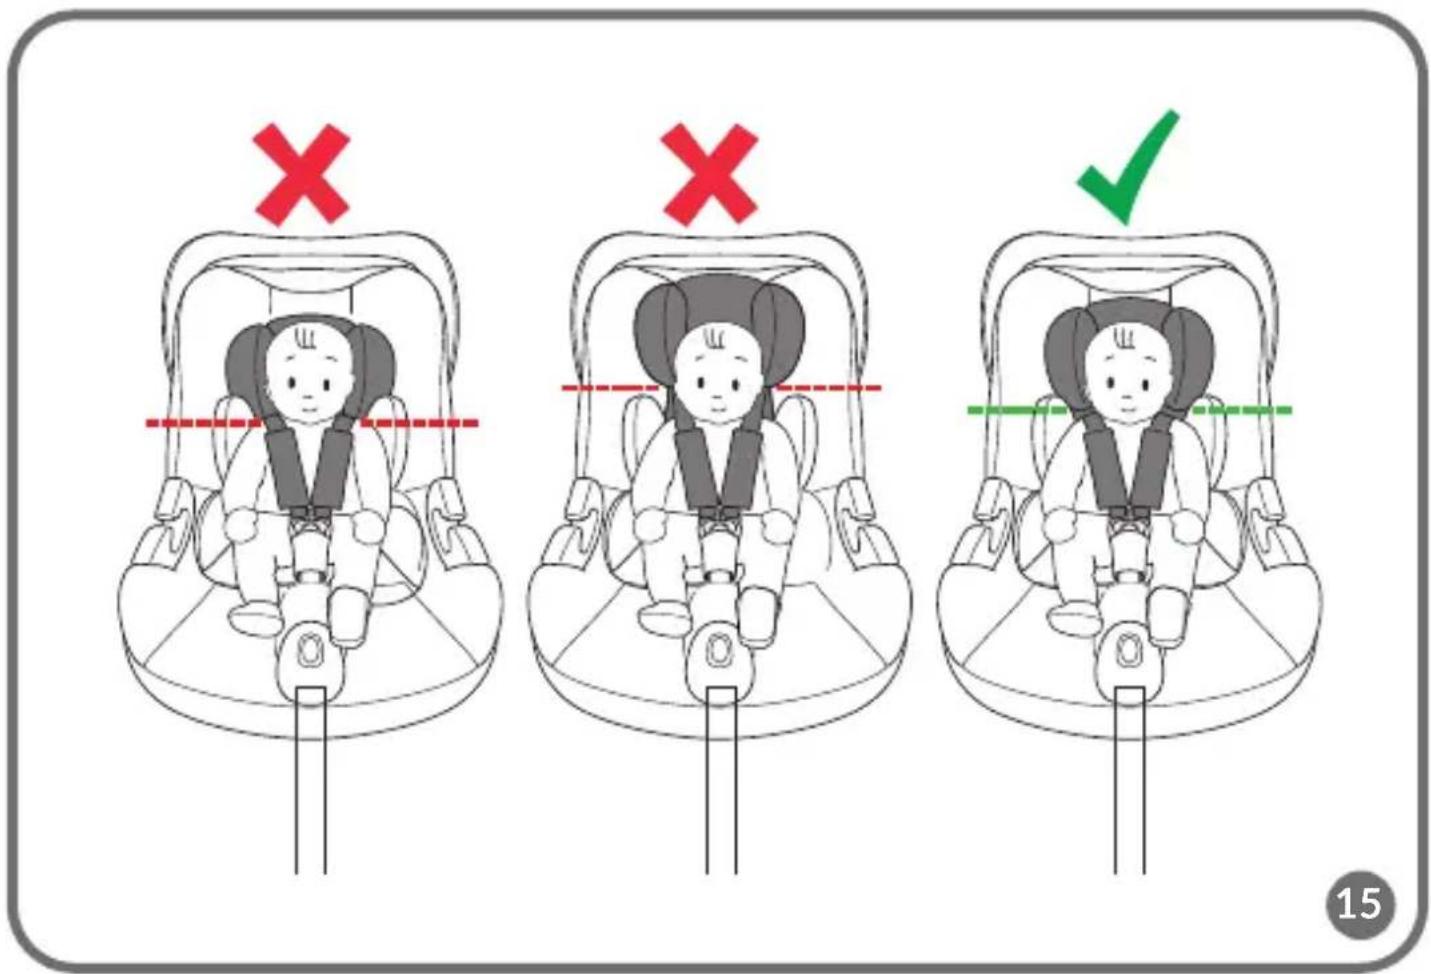
- Adjust the headrest to your child's height (see: Headrest adjustment) (fig. 12). Headrest adjustment is integrated with belt height adjustment.
- To tighten the seat belts, pull the tension adjustment strap in the direction of the arrow (fig. 2).
Note! Ensure that the shoulder belts fit properly around the child's shoulders. Proper tension is ensured if there are two fingers in the space between the shoulder belt and the child's chest (fig. 14). The belts should be tight against the child's body, but should not be too tight and cause discomfort.
Note! Make sure that the seat belts fit tightly on the child's body and that they are not twisted. Make sure the lap belts run low and protect the child's pelvis.
Note! The headrest should be adjusted so that the shoulder straps are not too high, such as at or above the ear line, nor too low, such as behind the child's back (fig. 15).
UNBUCKLING THE SEAT BELTS
Loosen the seat belts by pressing the tension adjustment button and pulling on the belts (fig. 1). Unbuckle the seat belts by pressing the red button on the buckle (A, fig. 3) and extending and unbuckling the belt connectors (B, C, fig. 3).
INSTALLATION IN THE CAR
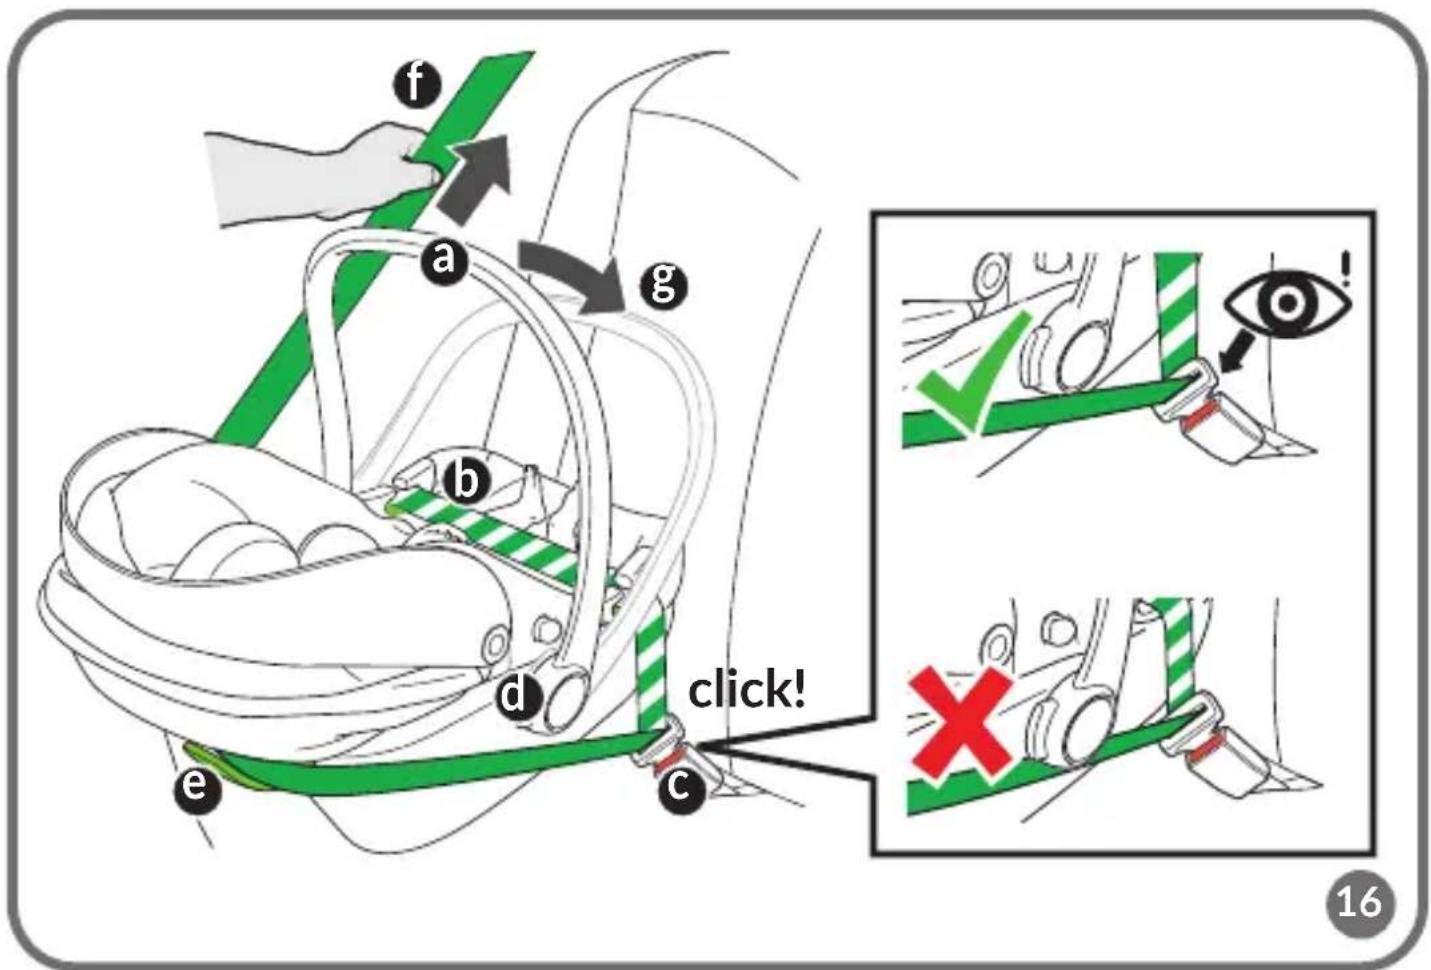
- Move the seat handle to the carrying position (A, fig. 16), then place the seat on the car's seat back in close proximity to the backrest of the rear seat. The seat should be positioned in the opposite direction to the direction of travel.
- Put the car seat belt as far as possible through the green lap belt guides (B, fig. 16) and fasten the belt (C, fig. 16). You will hear a characteristic click.
- Pass a section of the car seat belt under the hinge of the seat holder (D, fig. 16) and through the green shoulder belt guide, located at the back of the seat (E, fig. 16). Make sure the belt is tight.
- Pull the lap belt horizontally to tighten. Next, pull the shoulder belt to tighten the rest of the car seat belt (F, fig. 16).
- Adjust the car seat handle to the car position (G, fig. 16, see: Handle adjustment).
Note! Make sure the belts are not twisted. Make sure that the belts are correctly positioned in the guides.
Note! Pay special attention to the position of the car seat belt buckle. Do not position the car seat too close to the car seat belt buckle. The correct position is indicated by the symbol √ (fig. 16).
SEAT REMOVAL
Unbuckle the car seat belts and remove them from the belt guides. Move the seat handle to the carrying position, then remove the seat from the car.
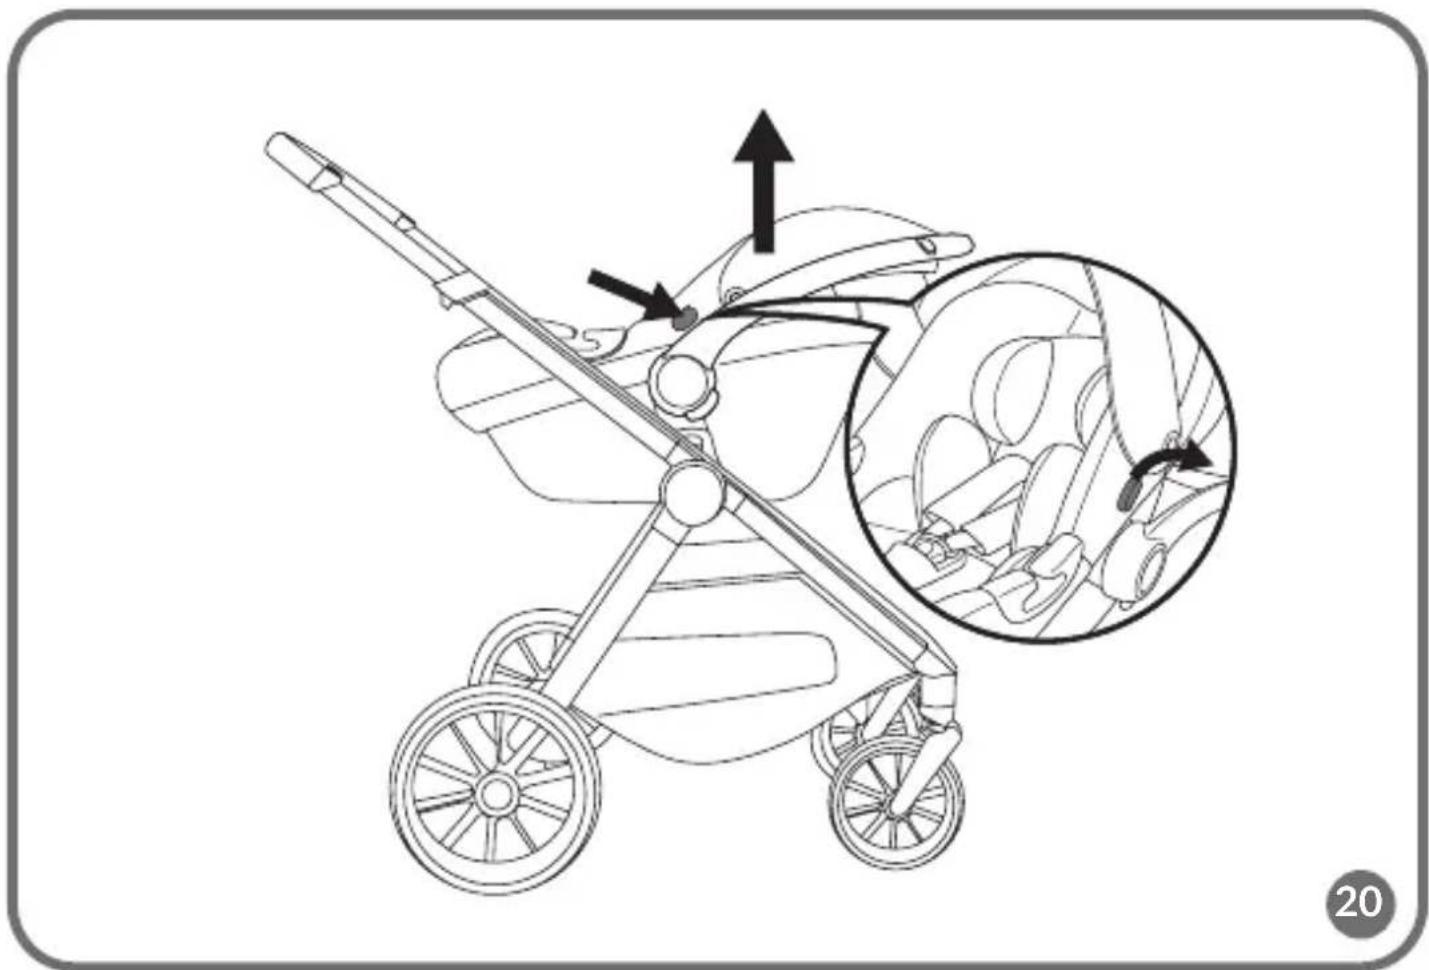
INSTALLATION OF THE SEAT ON THE FRAME OF THE STROLLER
- Insert the adapters into the appropriate place on the frame, following the instruction manual of the stroller. You will hear a characteristic click.
- Insert the seat into the adapters. Make sure the seat is properly locked into the frame of the stroller. Correct installation will signal a click.
- To release the seat from the stroller frame, press the stroller adapter release buttons (fig. 20).
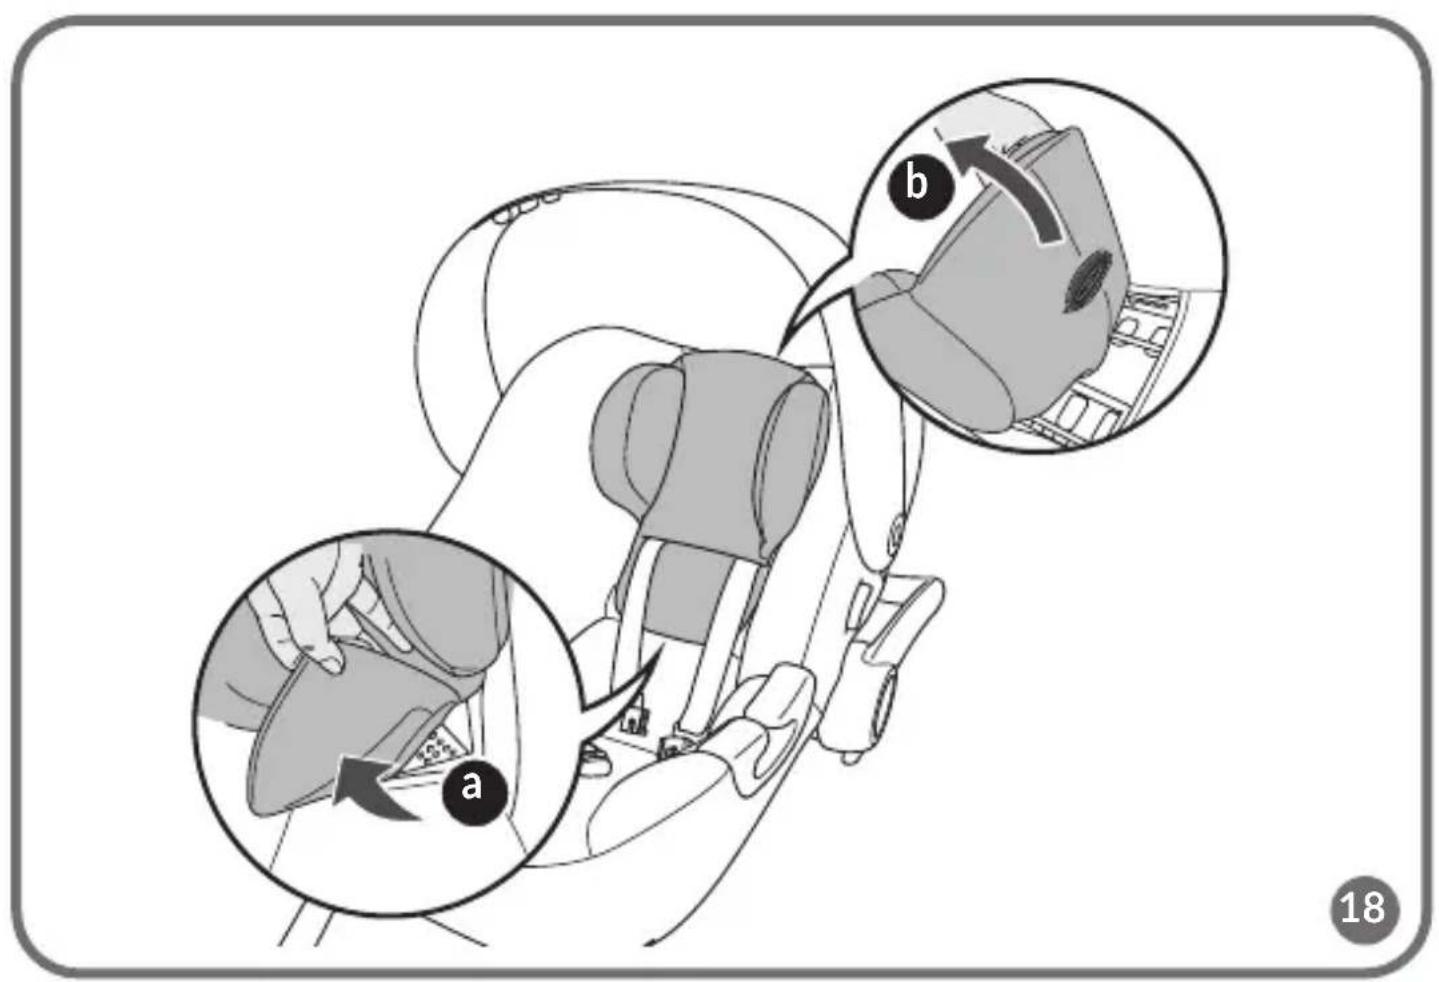
COVER REMOVAL
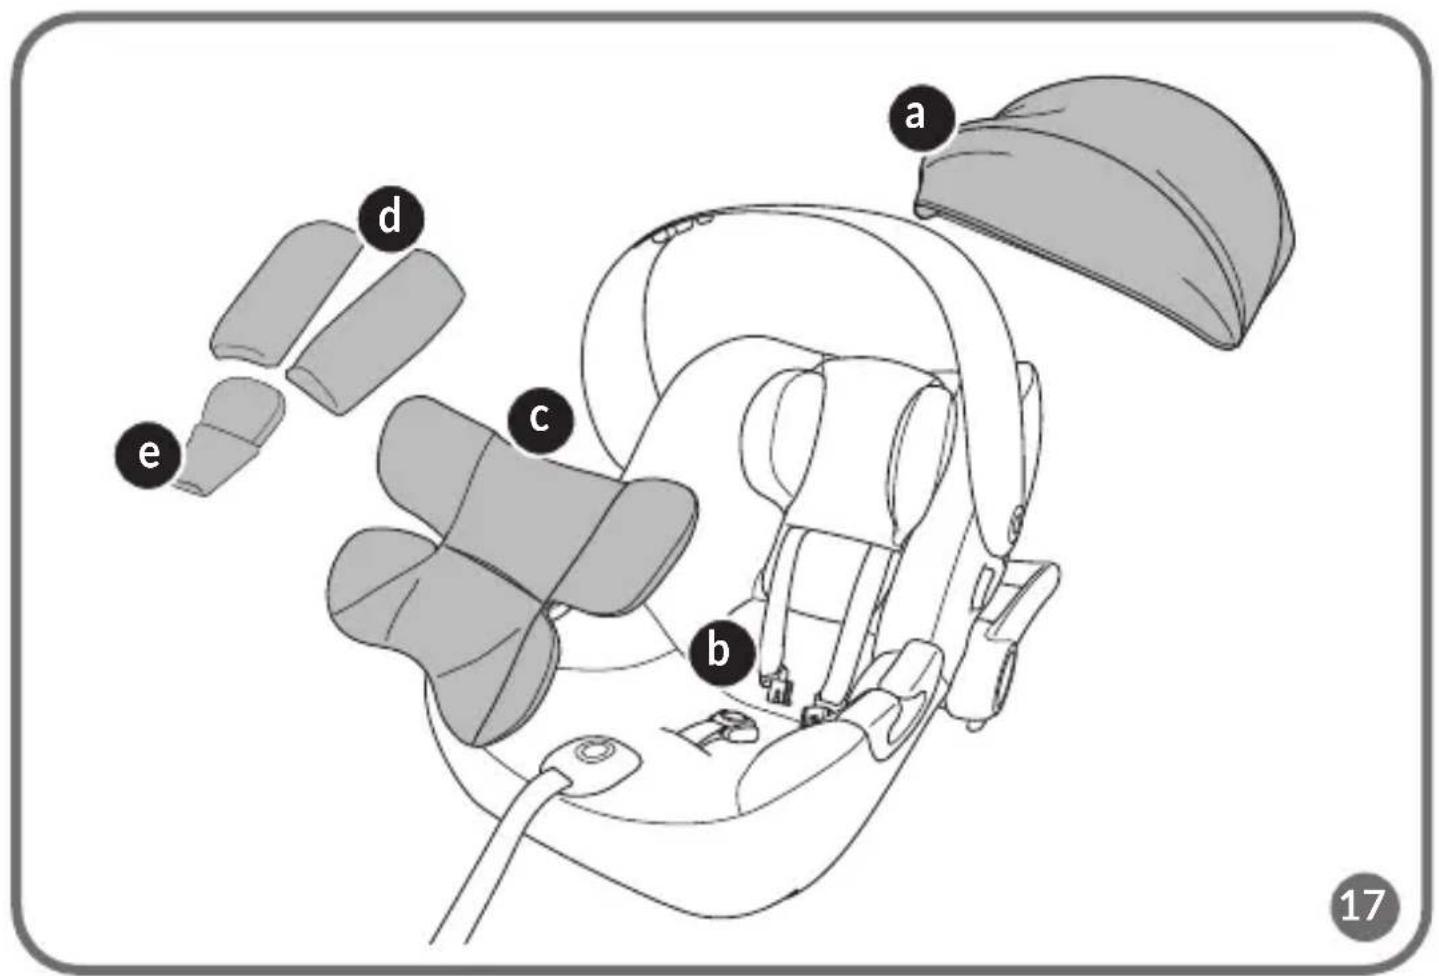
- Remove the canopy cover (A, fig. 17, see: Canopy adjustment).
- Unbuckle the seat belts (B, fig. 17, see: Seat belt adjustment).
- If necessary, remove the reduction insert, (C, fig. 17). Then remove the protective pads (D, fig. 17) and the seat belt protector (E, fig. 17).
- Tilt the lower part of the headrest and slide off the cover (A, fig. 18), then put the headrest adjustment lever through the corresponding hole (B, fig. 18) and remove the headrest cover.
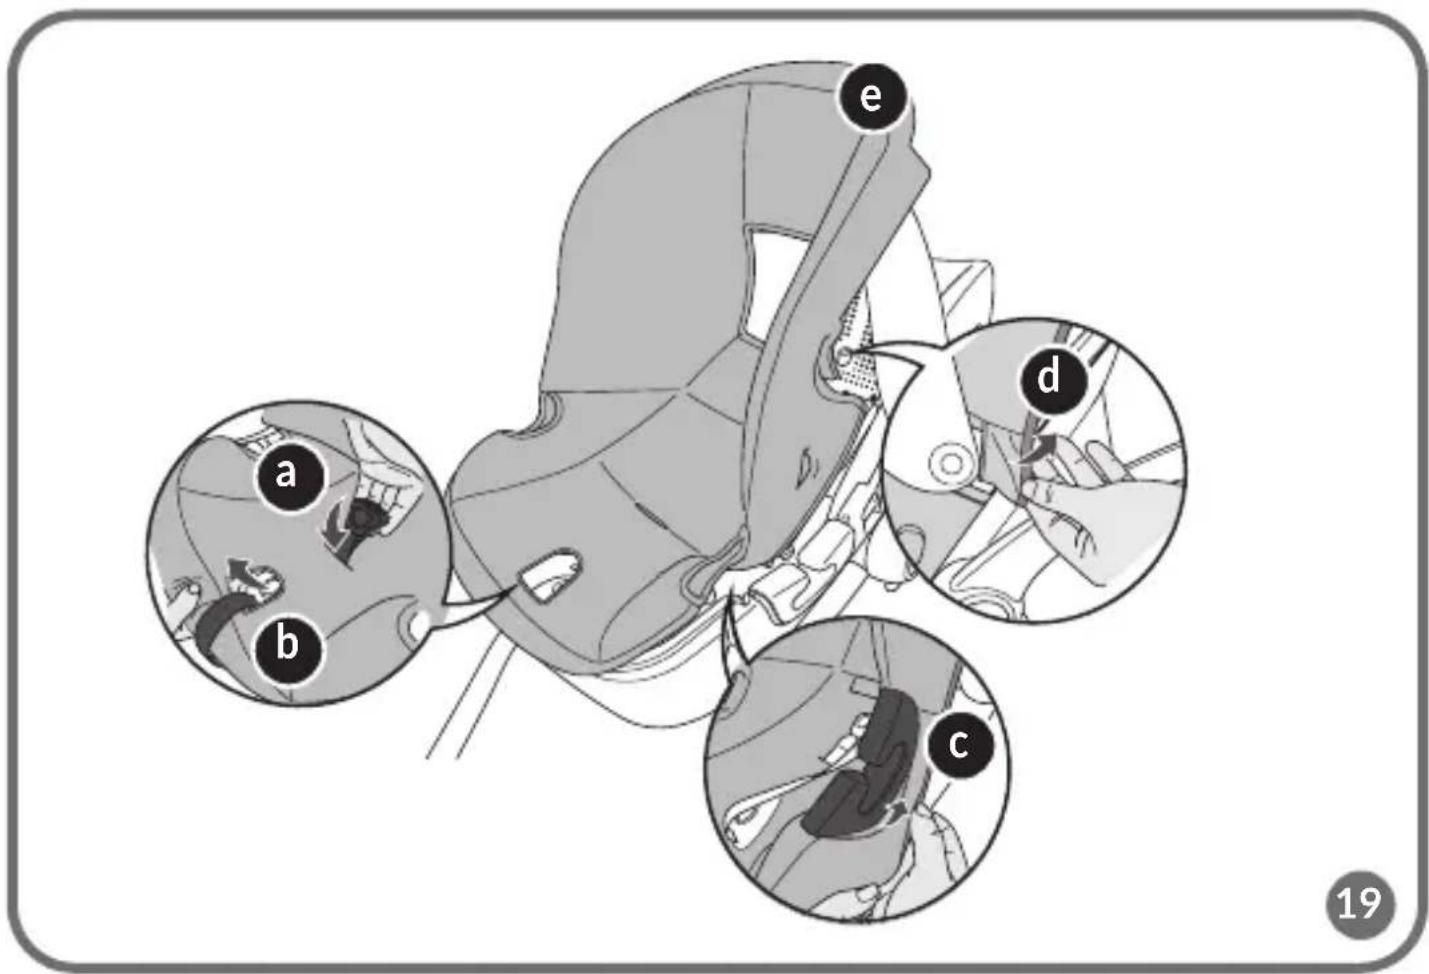
- Pass the seat belt buckle through the corresponding hole in the cover (A, fig. 19), and then remove the entire cover by putting the individual hard parts of the seat through the corresponding holes in the cover (B-E, fig. 19).
- To reattach the cover, follow the above steps in reverse order.
CLEANING AND MAINTENANCE
- Clean minor dirt with a damp sponge and a mild detergent.
- The cover can be washed at a maximum temperature of 30^ C. For this purpose, the cover must be completely removed from the seat (see: Cover manual).
- When drying, do not use dryers. The cover should not be exposed to sunlight for drying. Plastic parts can be cleaned with a damp cloth and mild detergent.
- Note! Do not use strong detergents or bleaching agents.
The photos are for reference only, the actual look of the products may differ from the ones shown in the pictures.
Drogi Kliencie!
JUSTERING AV PRODUKTEN
DALU APRAKSTS (ATT. A)
natural_image
Line drawing of a lionelo bicycle seat with adjustable legs and front panel (no text or symbols)
text_image
AIRBAG
A
text_image
3
3
2
10
5
6
4
8
1
9
7
B
natural_image
Illustration of a car interior with a hand tool and orange arrow indicating motion (no text or symbols)
natural_image
Diagram of a car's seatbelt switch mechanism, showing green and black components with a red arrow indicating the handle (no text or symbols present)
text_image
click
text_image
Diagram showing hand pressing down a car door with directional arrows and a green checkmark indicating action
text_image
A
B
5
text_image
Diagram illustrating car seatbelt usage with labeled parts and directional indicators
text_image
click
Dear customer!
Should you have any remarks or questions concerning the product, please do not hesitate to contact us: help@lionelo.com
Producer:
BrandLine Group Sp. z o. o.
The product meets the requirements of the standard: R129/03.
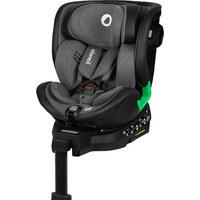
The product is compatible with the ASTRID I-SIZE seat. For information on how to install the ASTRID I-SIZE, please refer to the instruction manual supplied with the seat.
Note! Never install the seat in a location with the front airbag activated (fig. A).
NOTICE
This is an i-Size Enhanced Child Restraint System. It is approved according to UN Regulation No 129, for use in, i-Size compatible vehicle seating positions as indicated by vehicle manufacturers in the vehicle users' manual.
If in doubt, consult either the Enhanced Child Restraint System manufacturer or the retailer.
WARNINGS:
- The product is designed for children from birth to reach a weight of 13 kg and with a height between 40 and 87 cm.
- Rigid items and plastic parts of an Enhanced Child Restraint System shall be so located and installed that they are not liable, during everyday use of the vehicle, to become trapped by a movable seat or in a door of the vehicle.
- Any seat belts that restrain a child must be well-fitted to the child's body structure. The belts must not be twisted.
- The straps securing the restraint to the vehicle must be tight, the stabilization leg must be in contact with the ground of the car.
- Make sure the lap belts run low to adequately secure the pelvis.
- If the product has been exposed to strong elements (such as impact), it should be replaced.
-
Do not make any changes to the seat or add new components without approval from the approval authority. To ensure maximum safety for the child, the equipment should be attached and used as recommended in the instruction manual.
-
The plastic parts of this seat can heat up in the sun and cause burns on the child's skin.
- Never leave a child alone in the car seat in a vehicle.
- Luggage and other similar items should be secured so that they will not cause any injury in a collision situation.
- Do not use the seat without its fabric cover.
- The cover cannot be replaced with an item from another set. It is an integral part of the set and affects the operation of the restraint.
- Always have this instruction manual with you.
- Refer to the vehicle manufacturer's owner's manual.
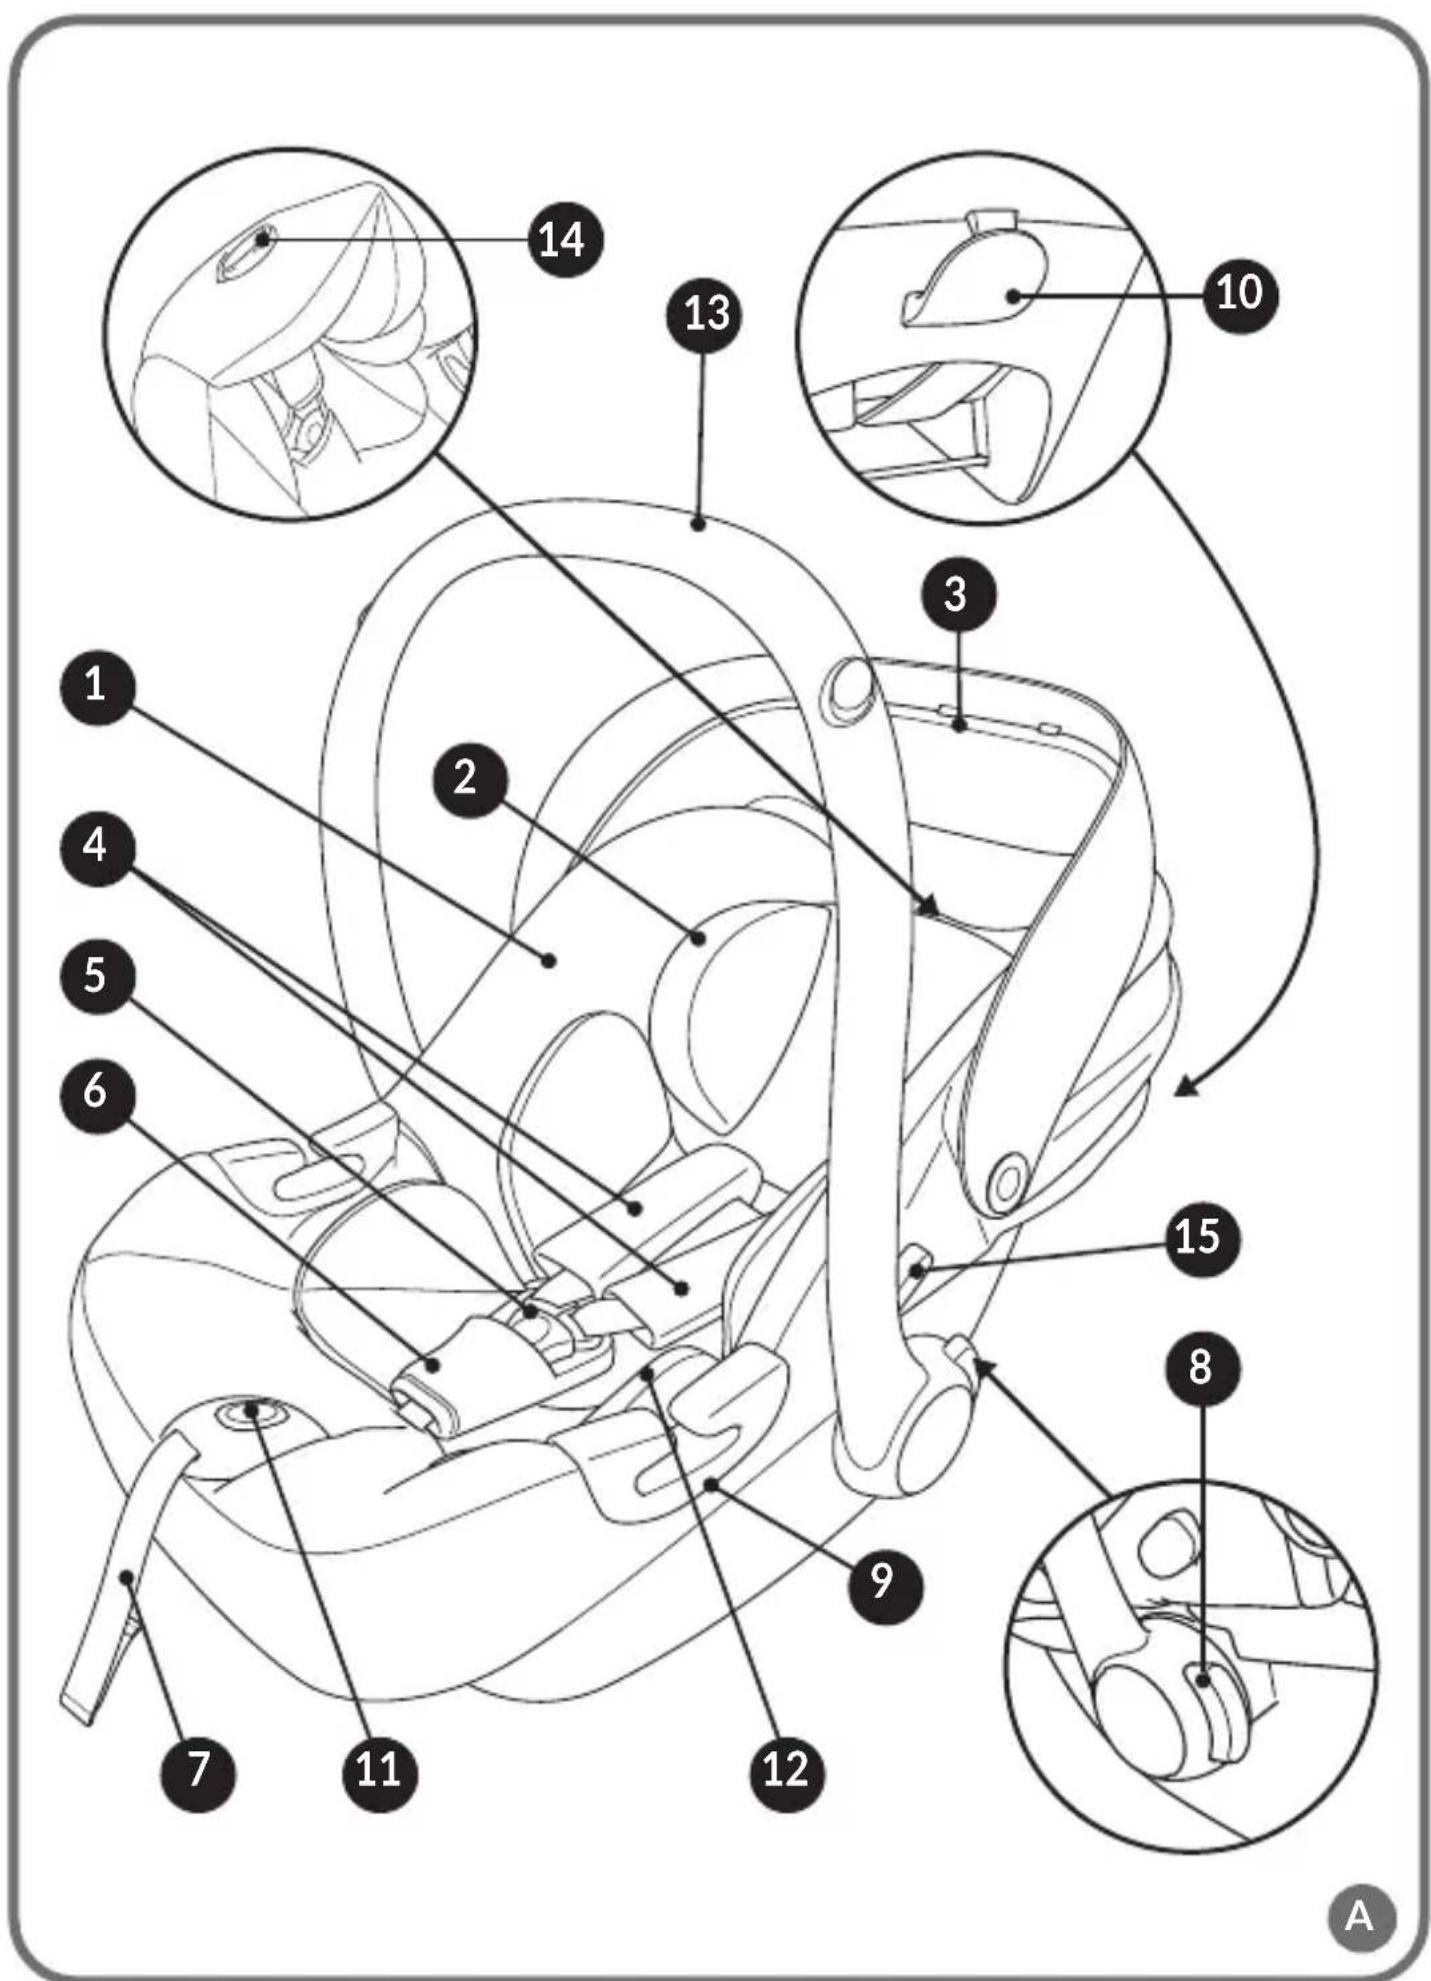
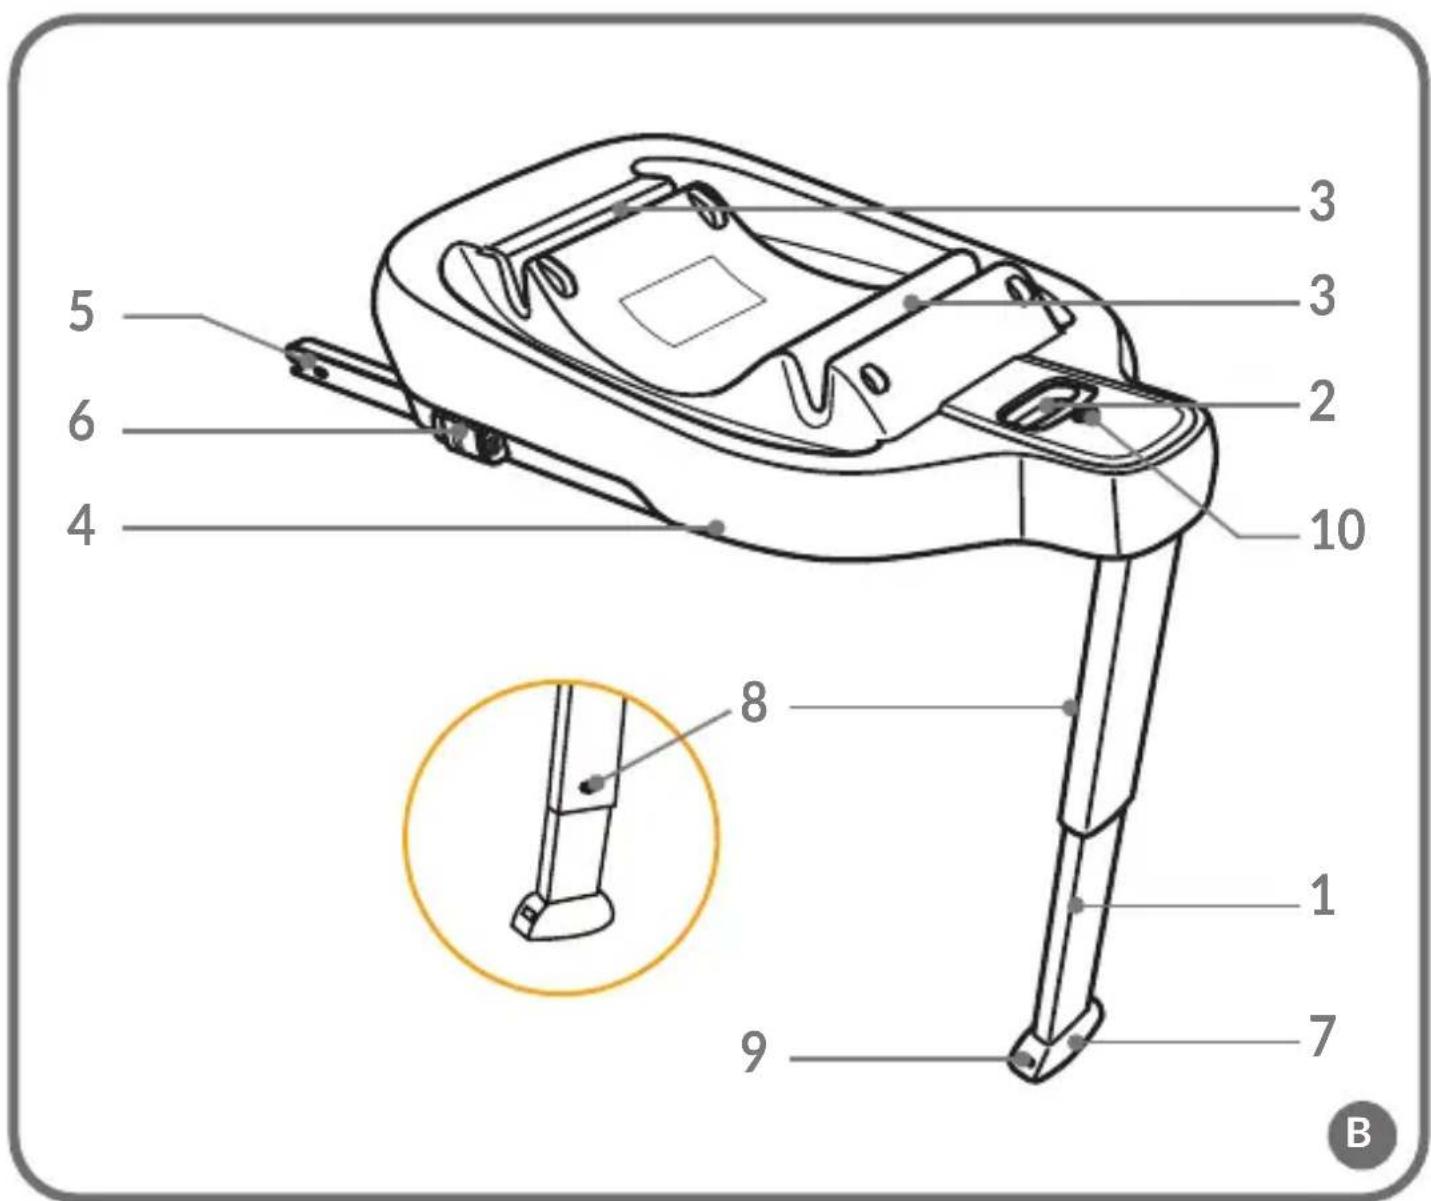
DESCRIPTION OF PARTS (FIG. B)
- Stabilization leg
- Seat release button
- Seat mounting brackets
- Base
- ISOFIX connectors
- ISOFIX connector release button
- Extendable part of the stabilization leg
- Stabilization leg adjustment button
- Ground contact indicator
- Seat installation indicator
INSTALLATION OF THE BASE IN A CAR
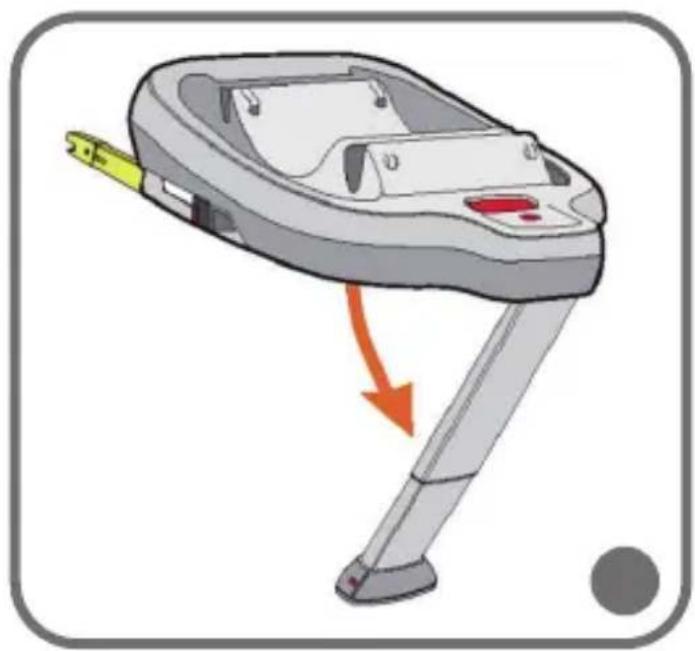
- Extend the stabilization leg (fig. 1).
- Place the base on the couch of the car.
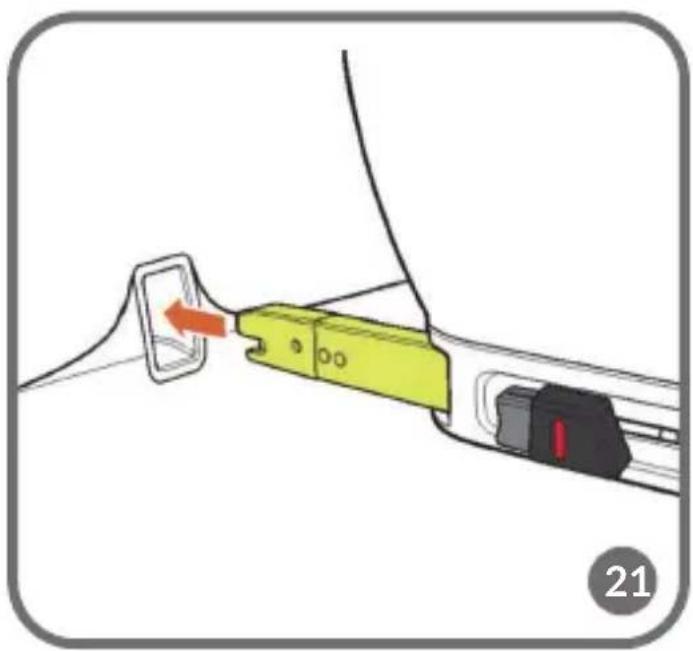
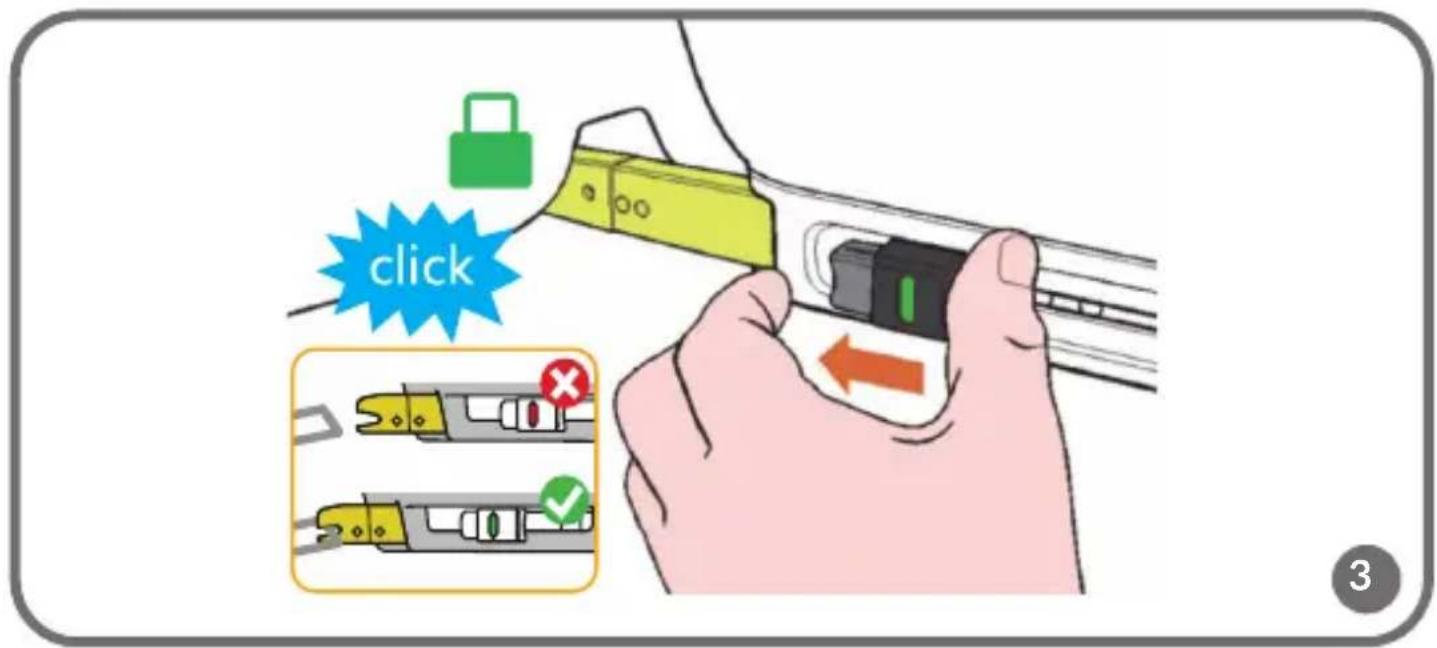
- Push in the sliding lever and slide out the ISOFIX arms (7, fig. B). Anchor the ISOFIX arms to the attachments located in the car's bench seat (fig. 2). The arms will interlock and you will hear a characteristic click. The green indicator on the ISOFIX button must be visible on both sides of the seat (fig. 3).
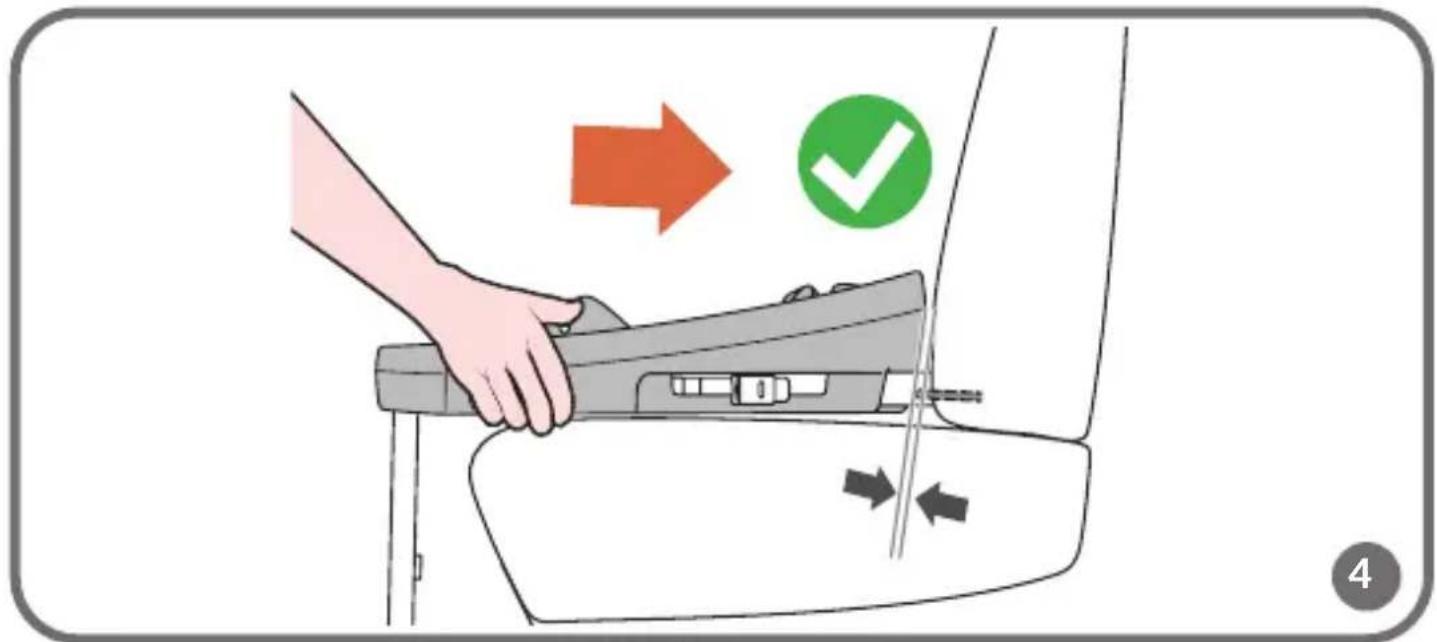
- Make sure the base is pressed firmly against the back of the car's bench seat (fig. 4). Push the base using a left-right motion toward the vehicle seat back until it is completely aligned with the backrest.
-
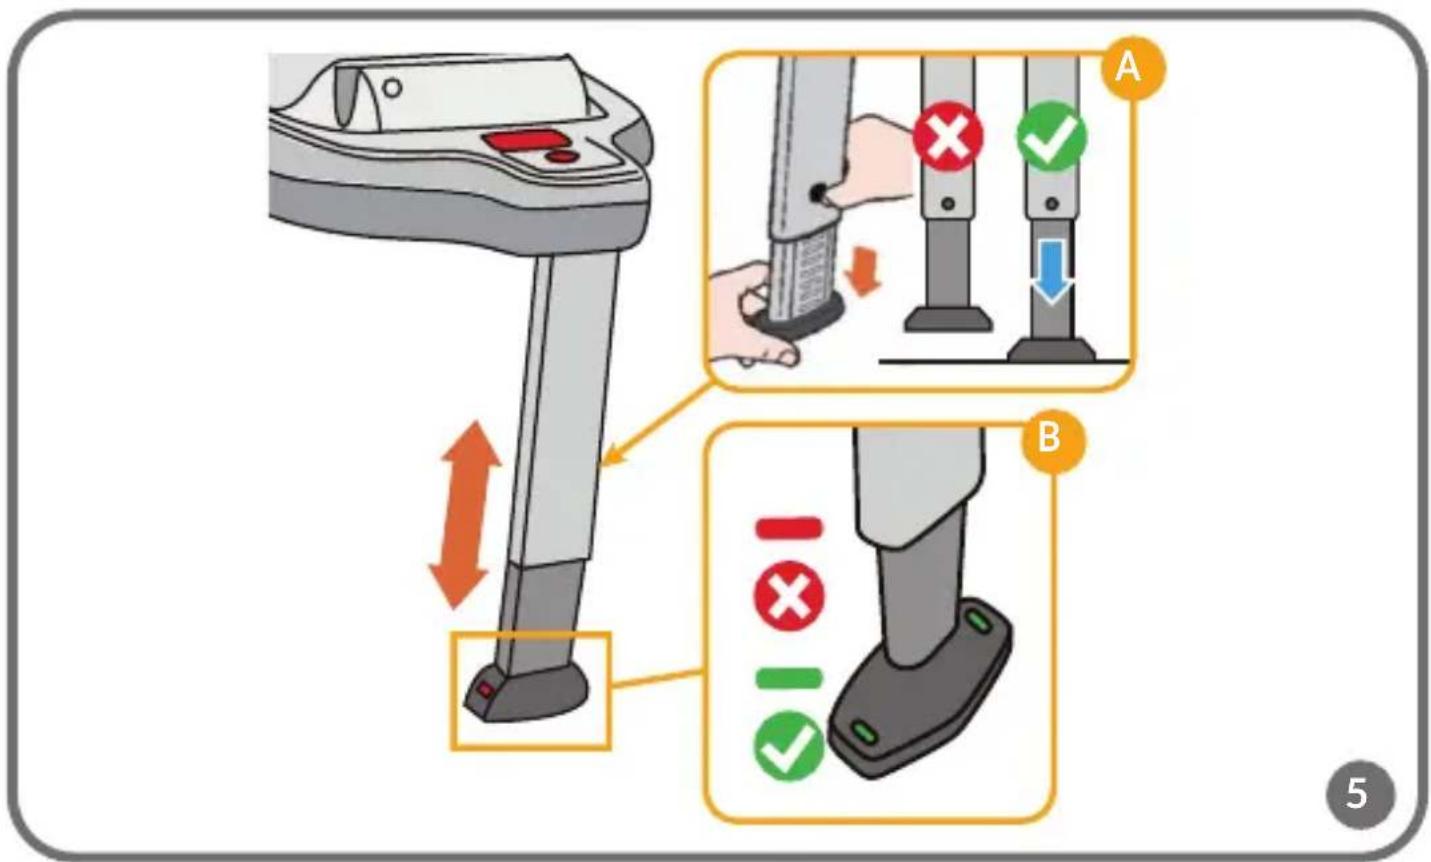
Press the stabilization leg adjustment button. Its pull-out part should slide out automatically (A, fig. 5).
-
Adjust the leg height so that the foot meets resistance from the vehicle floor. Now you can release the button.
- Make sure the ground contact indicators are green (B, fig. 5) and the leg is touching the ground of the car and is not crooked.
NOTE! Never mount the foot from the support leg on the glove box in the floor of the car. If in doubt, consult your vehicle's owner's manual.
NOTE! The stabilization leg must not hang in the air, and no objects should be placed under it.
INSTALLATION OF THE SEAT ON THE BASE
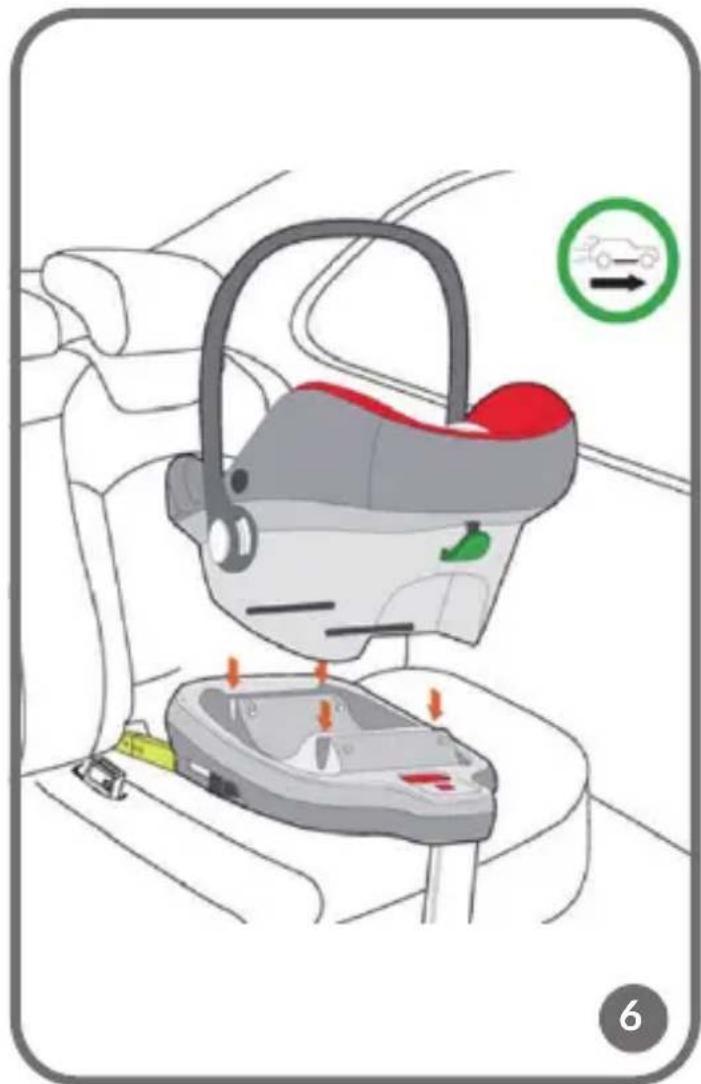
Note! Make sure that there are no objects on the surface of the base and that the base is properly installed on the car's couch.
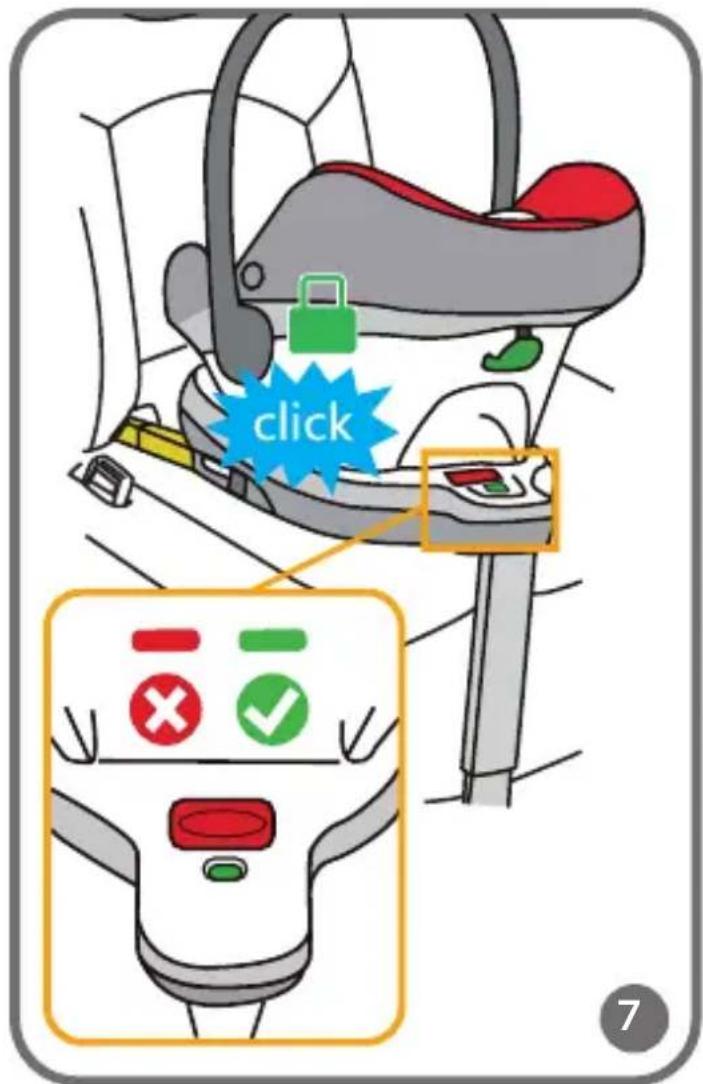
- Place the seat on the base backwards (fig. 6). The correct placement will be signaled by a click and a change in the color of the seat mounting indicator to green (fig. 7).
- Adjust the car seat handle to the car position (see the instruction manual that came with the seat for more information on how to install the seat).
BASE REMOVAL
- Remove the seat from the base by pressing the seat release button (2, fig. B). The seat mounting indicator will turn red.
- Press the stabilization leg adjustment button (9, fig. B), and then slide in its extension.
- Push in the ISOFIX sliding lever (20, fig. B) on both sides and disengage the ISOFIX arms. The attachments will be released and the color of the ISOFIX indicators will change from green to red. Retract the ISOFIX arms into the seat base by pressing the sliding lever.
- Fold the stabilization leg.
CLEANING AND MAINTENANCE
- Clean minor dirt with a damp sponge and a mild detergent.
- Plastic parts can be cleaned with a damp cloth and mild detergent.
- Note! Do not use strong detergents or bleaching agents.
Photos are for reference only, the actual appearance of the products may differ from that shown in the photos.
Drogi Kliencie!