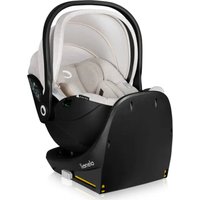
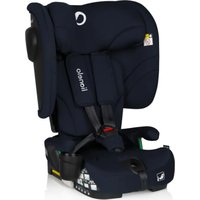
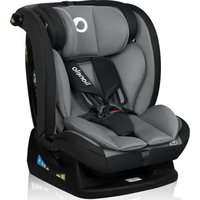
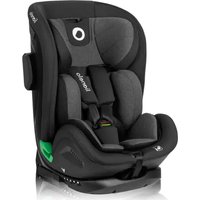
Harmony i-Size - Car seat Lionelo - Free user manual and instructions
Find the device manual for free Harmony i-Size Lionelo in PDF.

| Product type | i-Size child car seat |
| Brand | Lionelo |
| Model | Harmony i-Size |
| Approval standard | UN Regulation No. 129 (i-Size) |
| Size group | 40 to 150 cm |
| Maximum child weight | 18 kg (group 40-105 cm); beyond, booster seat up to 150 cm |
| Power supply | 1 CR1620 3 V button cell battery (for harness alarm) |
| Battery type | CR1620, 3 V, non-rechargeable |
| Fastening system | ISOFIX + support leg (rear and forward facing up to 105 cm); ISOFIX or seat belt (forward facing 100-150 cm) |
| Seat rotation | 360° with 90° locking and rear/forward facing positions |
| Number of recline positions | 5 positions (rear and forward facing) |
| Harness | 5-point, height-adjustable, with audible alarm if unfastened |
| Adjustable headrest | Yes, height-adjustable |
| Advanced side protection | Yes, removable cushion on door side |
| Harness unfasten alarm | Brief audible alarm when harness is unbuckled |
| Cover maintenance | Hand wash at 30 °C max; do not tumble dry or dry in sun |
| Cleaning plastic parts | Damp cloth and mild detergent; avoid strong or bleaching products |
| Mandatory rear-facing use | Up to 15 months or 76 cm (whichever comes first) |
| Manufacturer contact | help@lionelo.com |
Frequently Asked Questions - Harmony i-Size Lionelo
User questions about Harmony i-Size Lionelo
0 question about this device. Answer the ones you know or ask your own.
Ask a new question about this device
Download the instructions for your Car seat in PDF format for free! Find your manual Harmony i-Size - Lionelo and take your electronic device back in hand. On this page are published all the documents necessary for the use of your device. Harmony i-Size by Lionelo.
USER MANUAL Harmony i-Size Lionelo
natural_image
Line drawing of a car seat assembly with lionelo branding (no text or symbols on the diagram itself)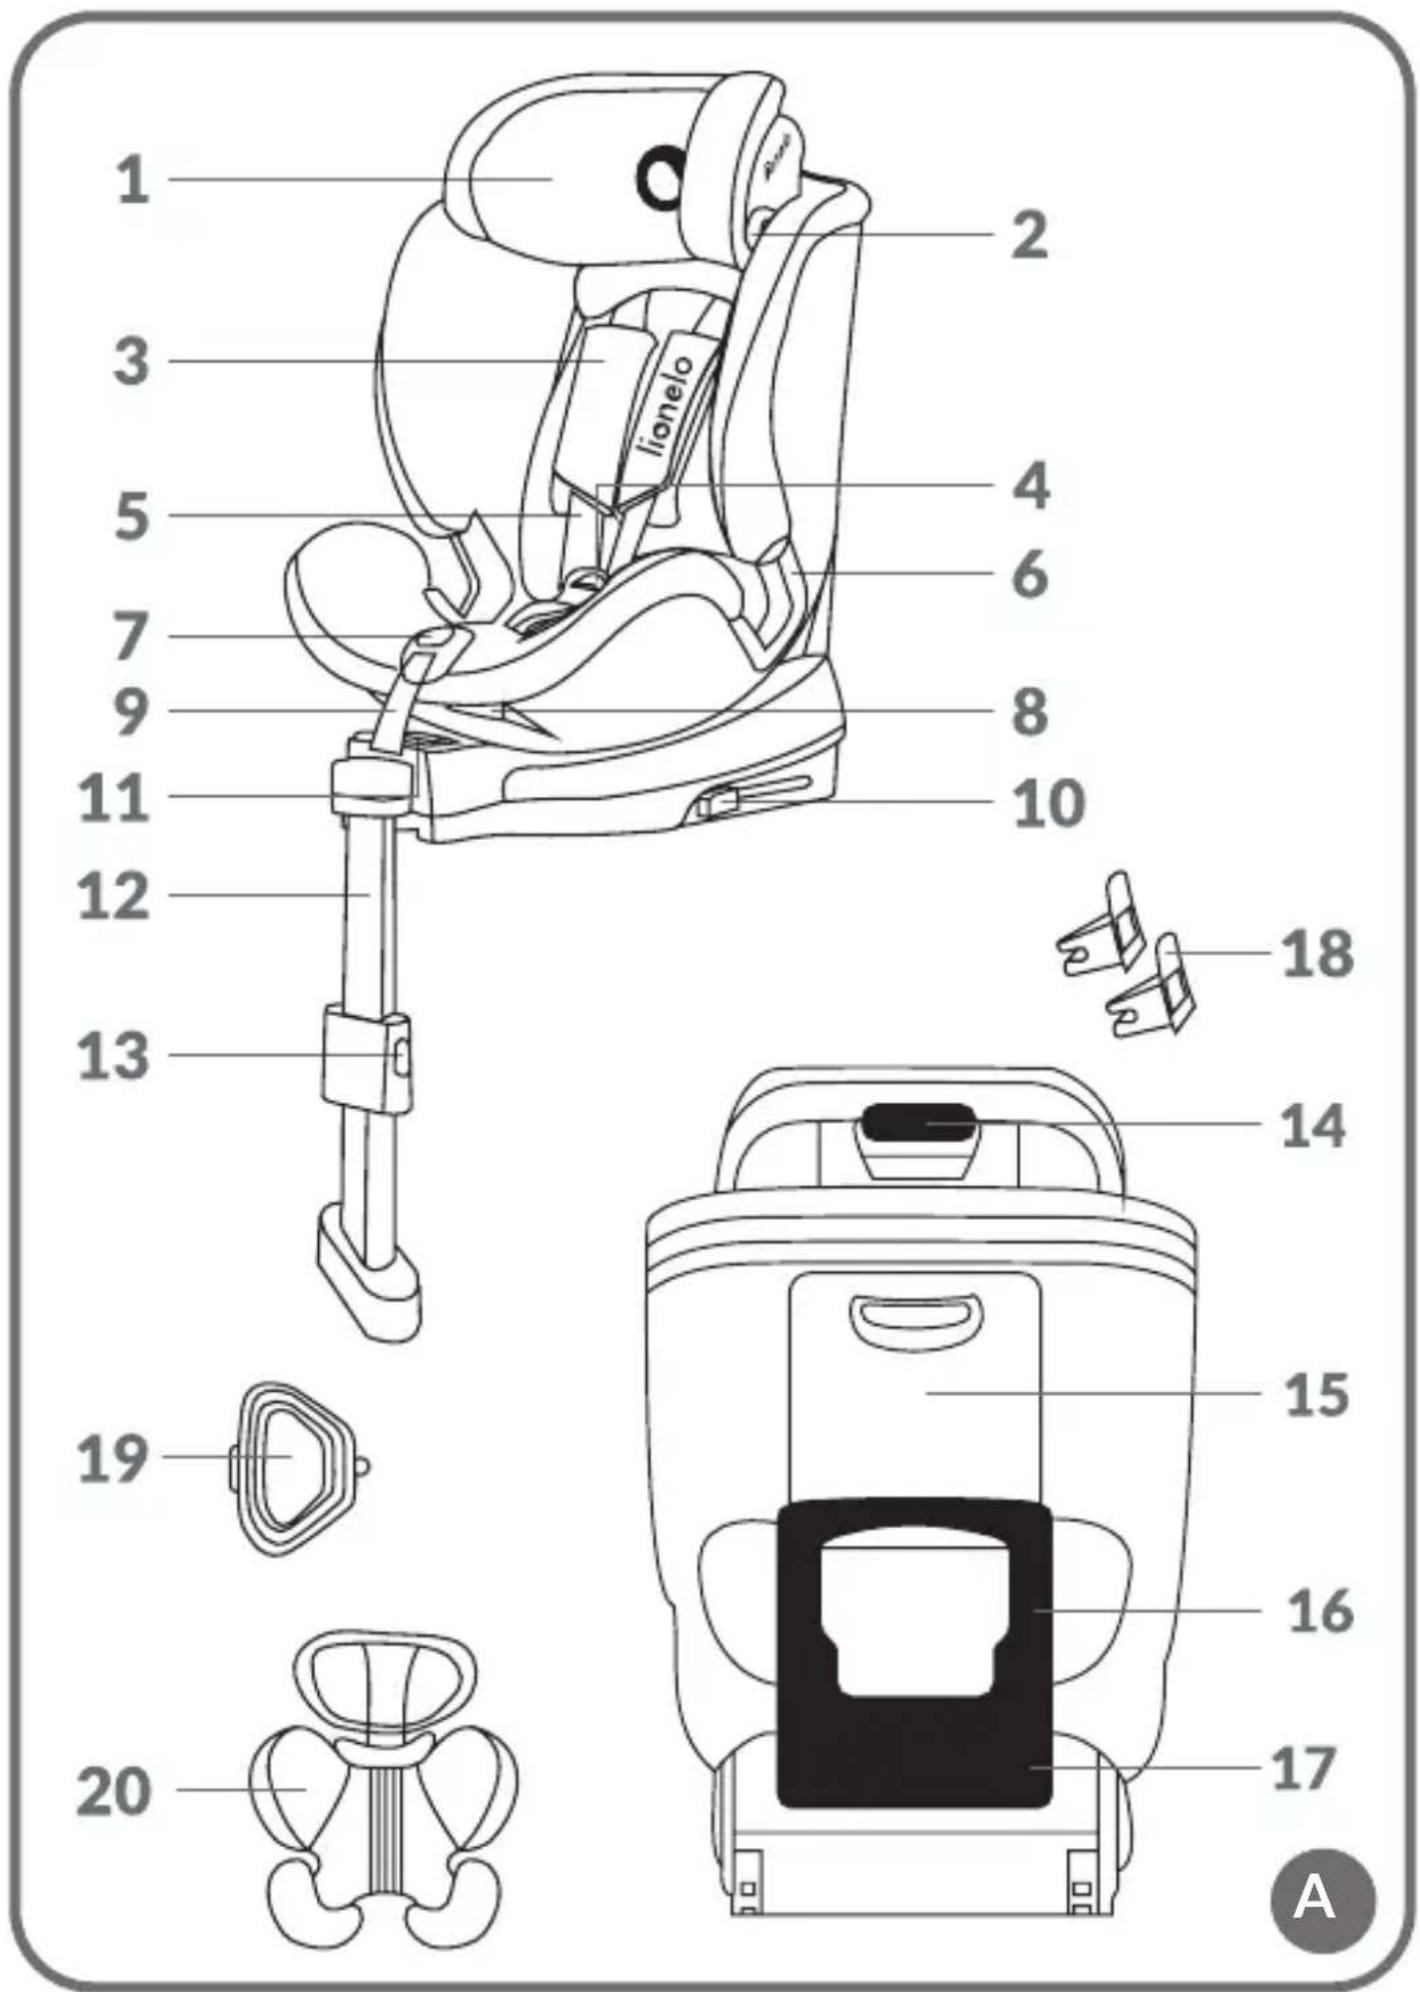
natural_image
Diagram showing a car interior with a highlighted section and directional arrow, no text or symbols present.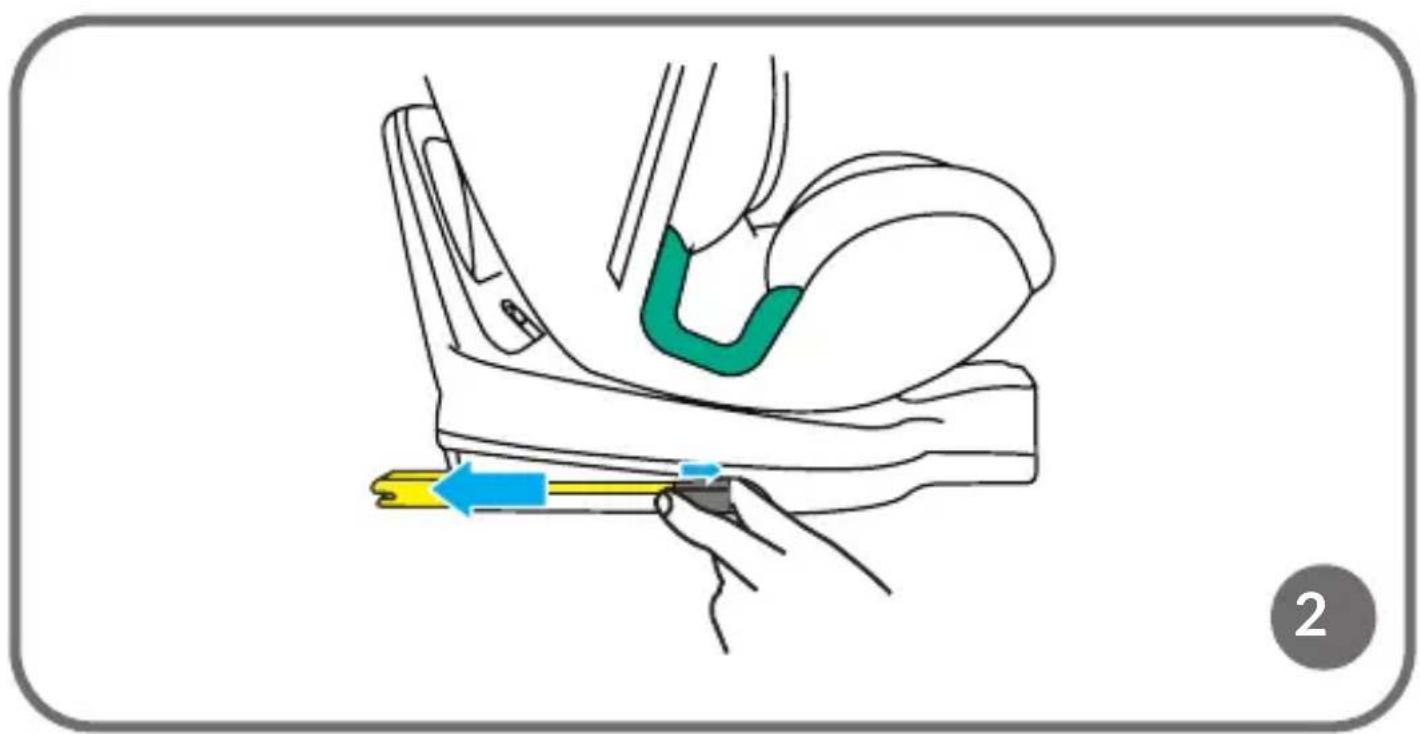
natural_image
Illustration of a hand holding a car seatbelt with a green accent and blue arrow indicating motion (no text or symbols)
3
natural_image
Simple line drawing of a pen or tool with a green checkmark and a square button, no text or symbols present.4
natural_image
Simple curved line drawing without any text, numbers, or symbols
natural_image
Simple line drawing of a stylized object resembling a folded paper or tool, with no text or symbols present.5
natural_image
Line drawing of a car seat with blue arrows indicating movement or force, no text or symbols present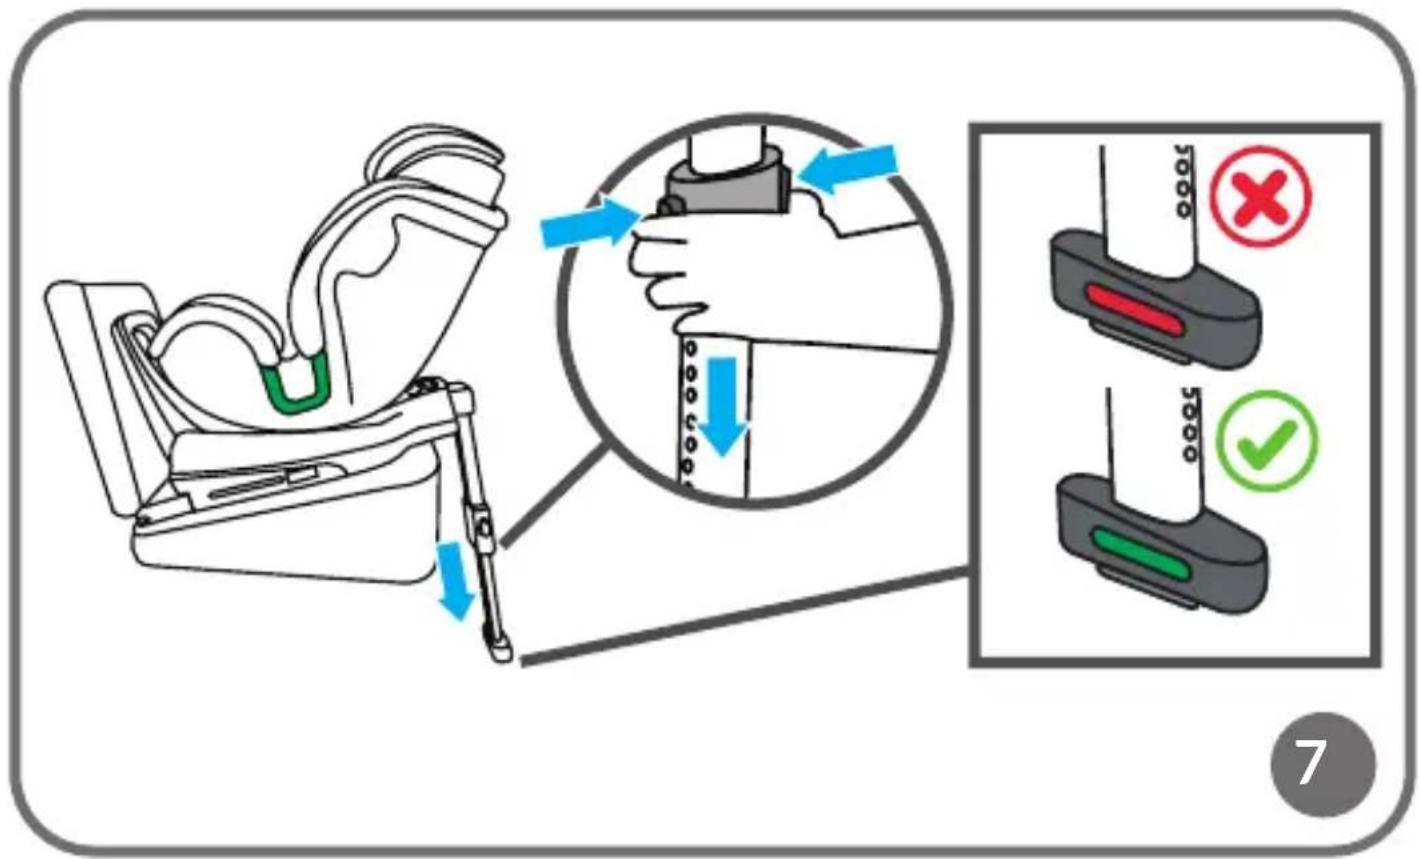
natural_image
Line drawing of a baby car seat with green accent highlights (no text or symbols)8
natural_image
Anatomical illustration of a pelvic region with blue arrows indicating specific areas (no text or labels present)9
natural_image
Diagram of a mechanical device with blue arrows indicating force or movement, showing internal components and a red base (no text or symbols)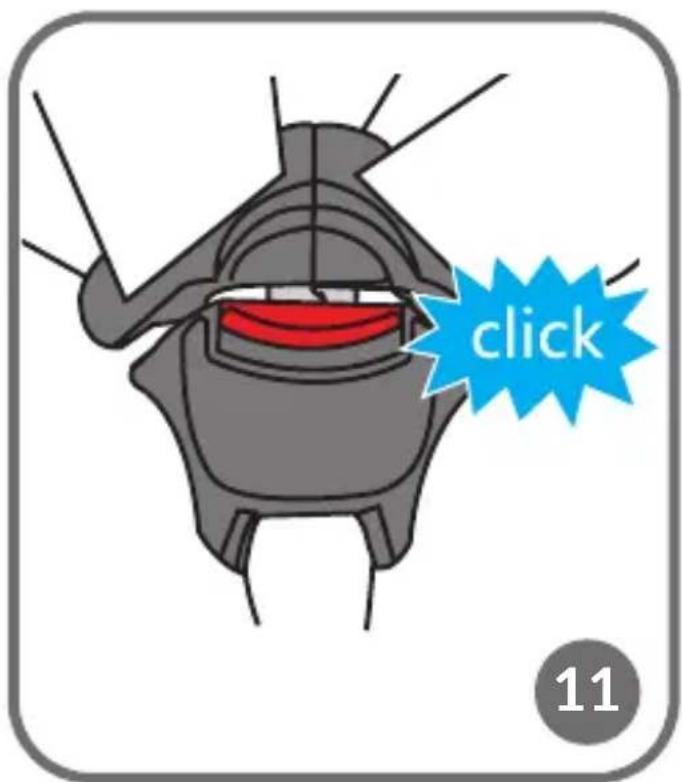
natural_image
Diagram of a mechanical component with a blue arrow indicating a downward force or movement, labeled '12' in the corner (no text or symbols on the diagram itself)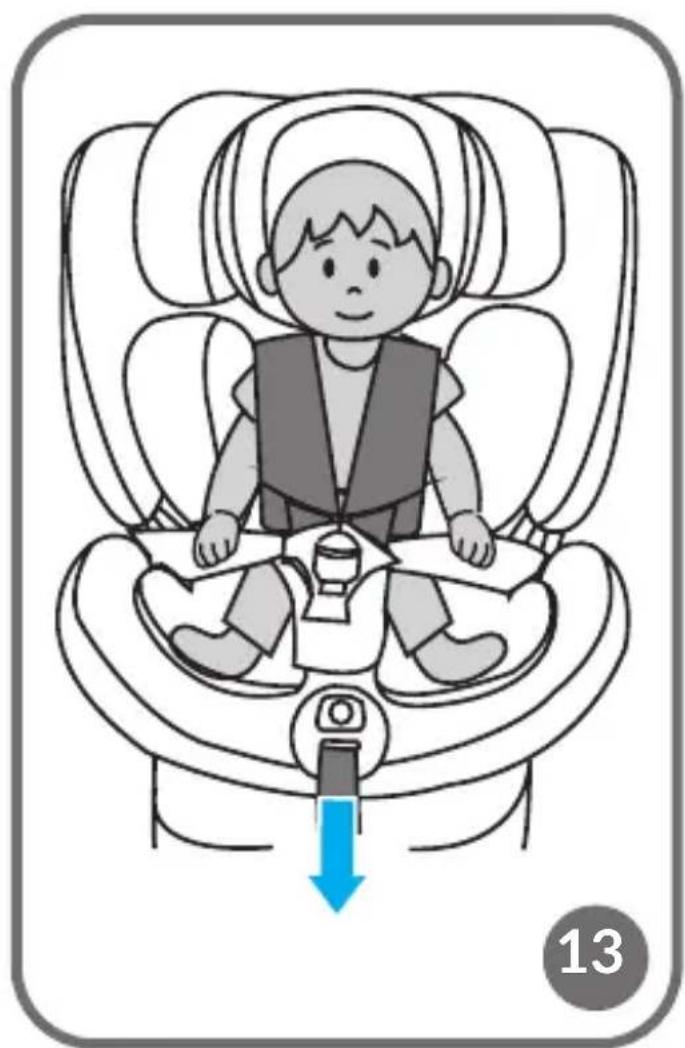
natural_image
Illustration of a child in a car seat with a blue arrow indicating downward pressure, no text or symbols present.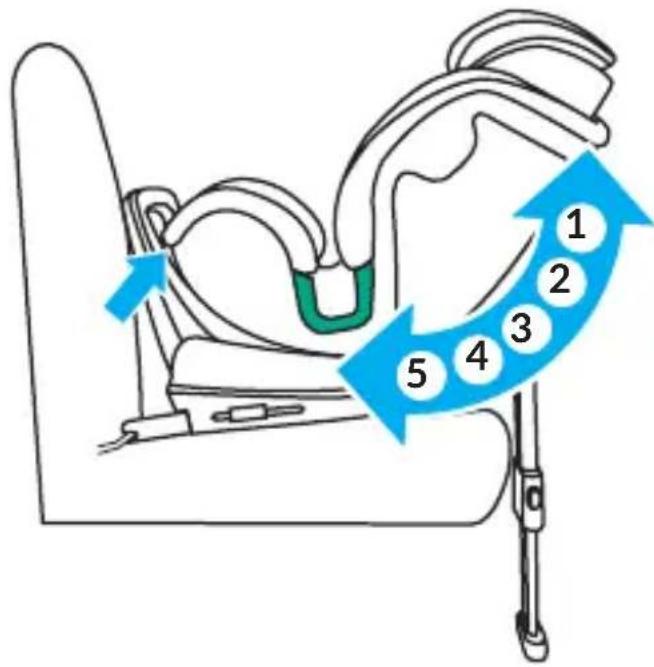
14
15
natural_image
Anatomical illustration of a pelvic region with blue arrows indicating specific areas (no text or labels present)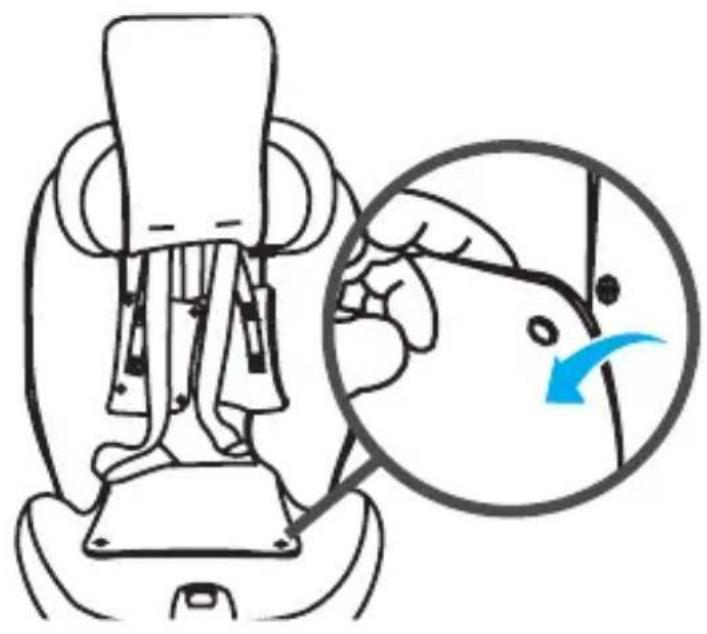
natural_image
Diagram of a car seatbelt mechanism with an inset showing the hand turning a wheel (no text or symbols present)18
flowchart
graph TD
    A["Step 1: Rear"] --> B["Step 2: Rear"]
    B --> C["Step 3: Rear"]
    C --> D["Step 4: Rear"]
    D --> E["Step 5: Rear"]
    style A fill:#f9f,stroke:#333
    style B fill:#bbf,stroke:#333
    style C fill:#bfb,stroke:#333
    style D fill:#ffb,stroke:#333
    style E fill:#fff,stroke:#333
natural_image
Illustration of a baby car seat with blue arrows indicating clockwise motion (no text or symbols)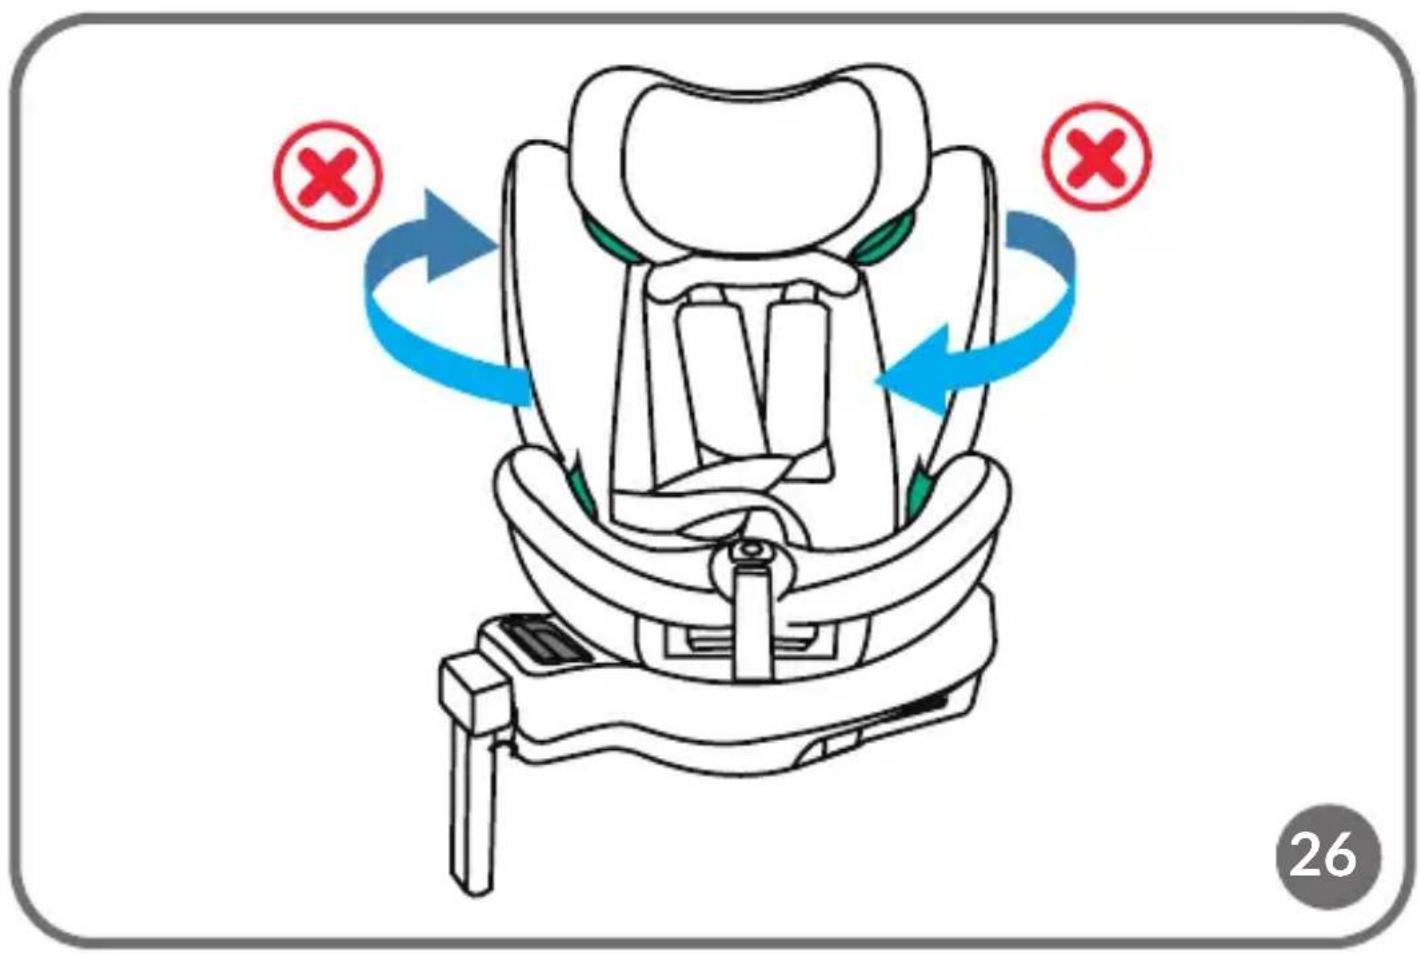
natural_image
Illustration of a car seat with a magnified inset showing the seat being adjusted for a blue arrow (no text or symbols present)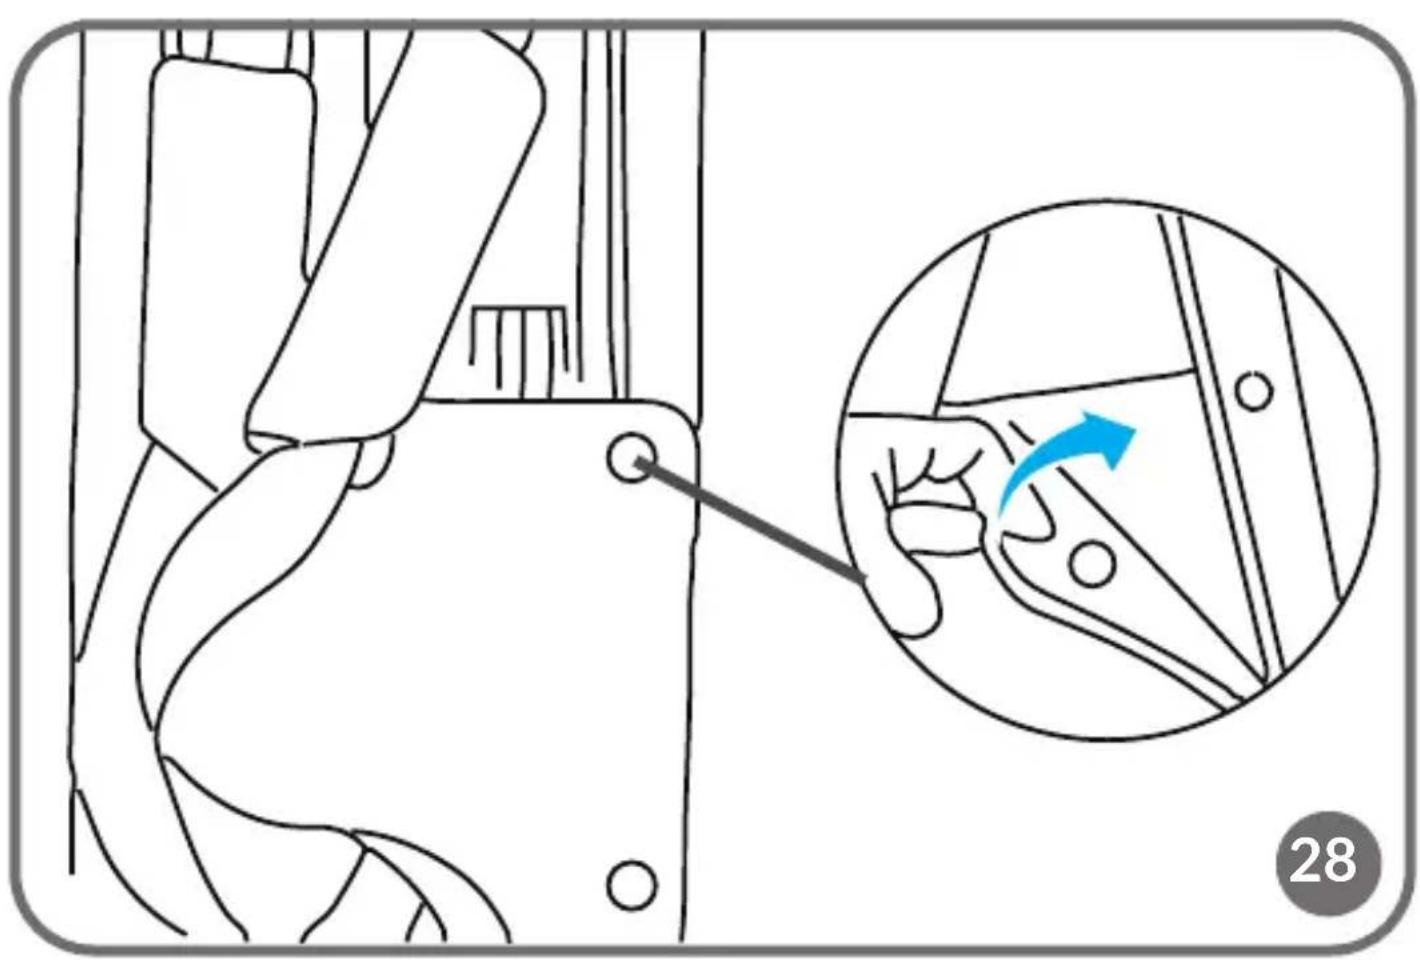
natural_image
Diagram showing a hand operating a car's seatbelt, with an inset close-up highlighting the wheel (no text or symbols)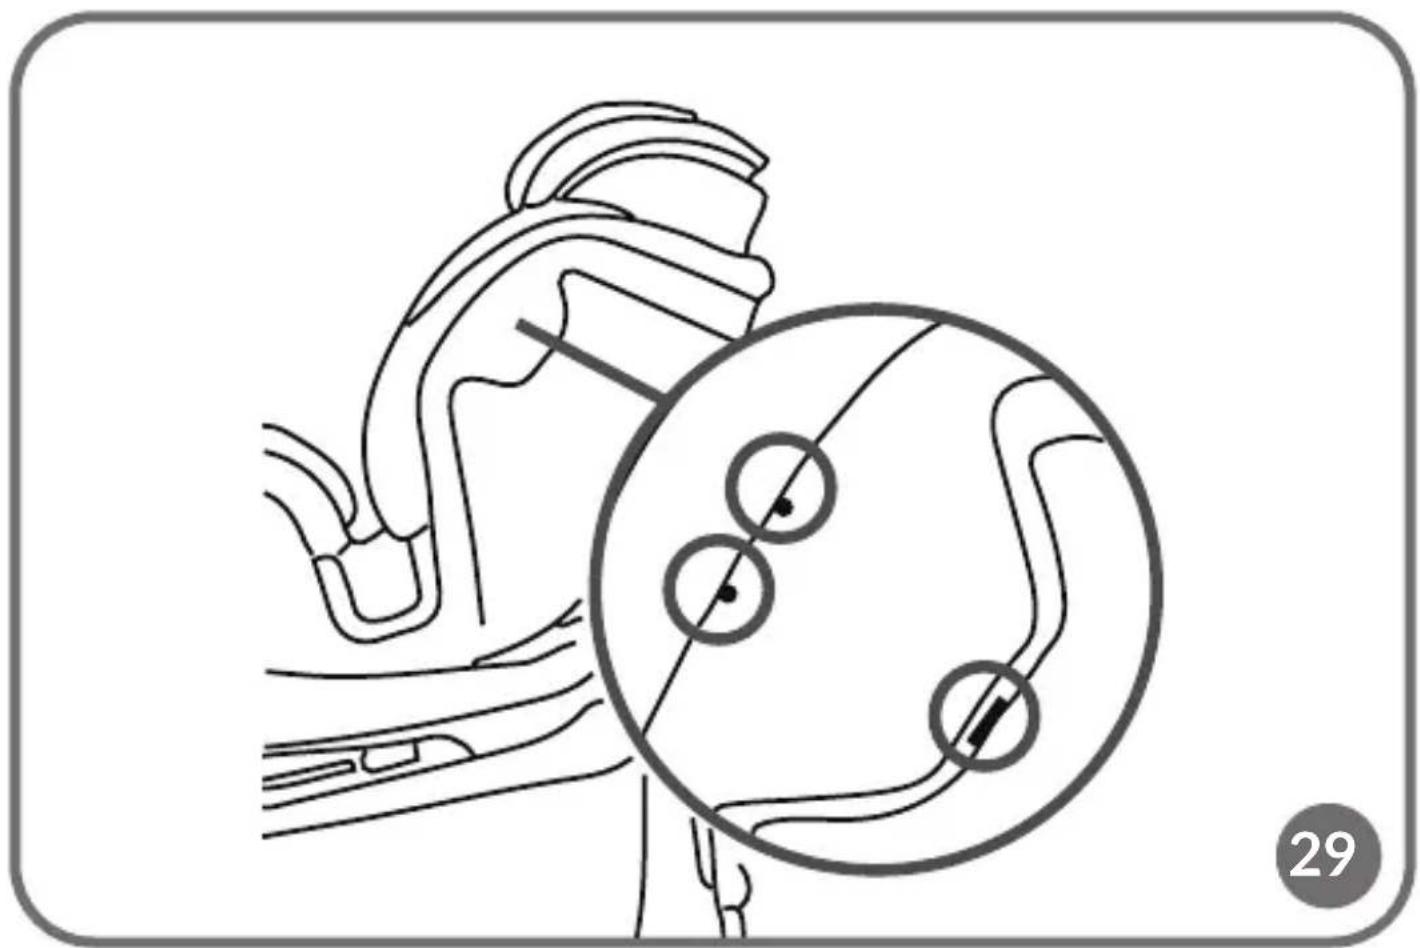
natural_image
Medical illustration showing a hand holding a device with a magnified circular view of internal anatomy (no text or symbols)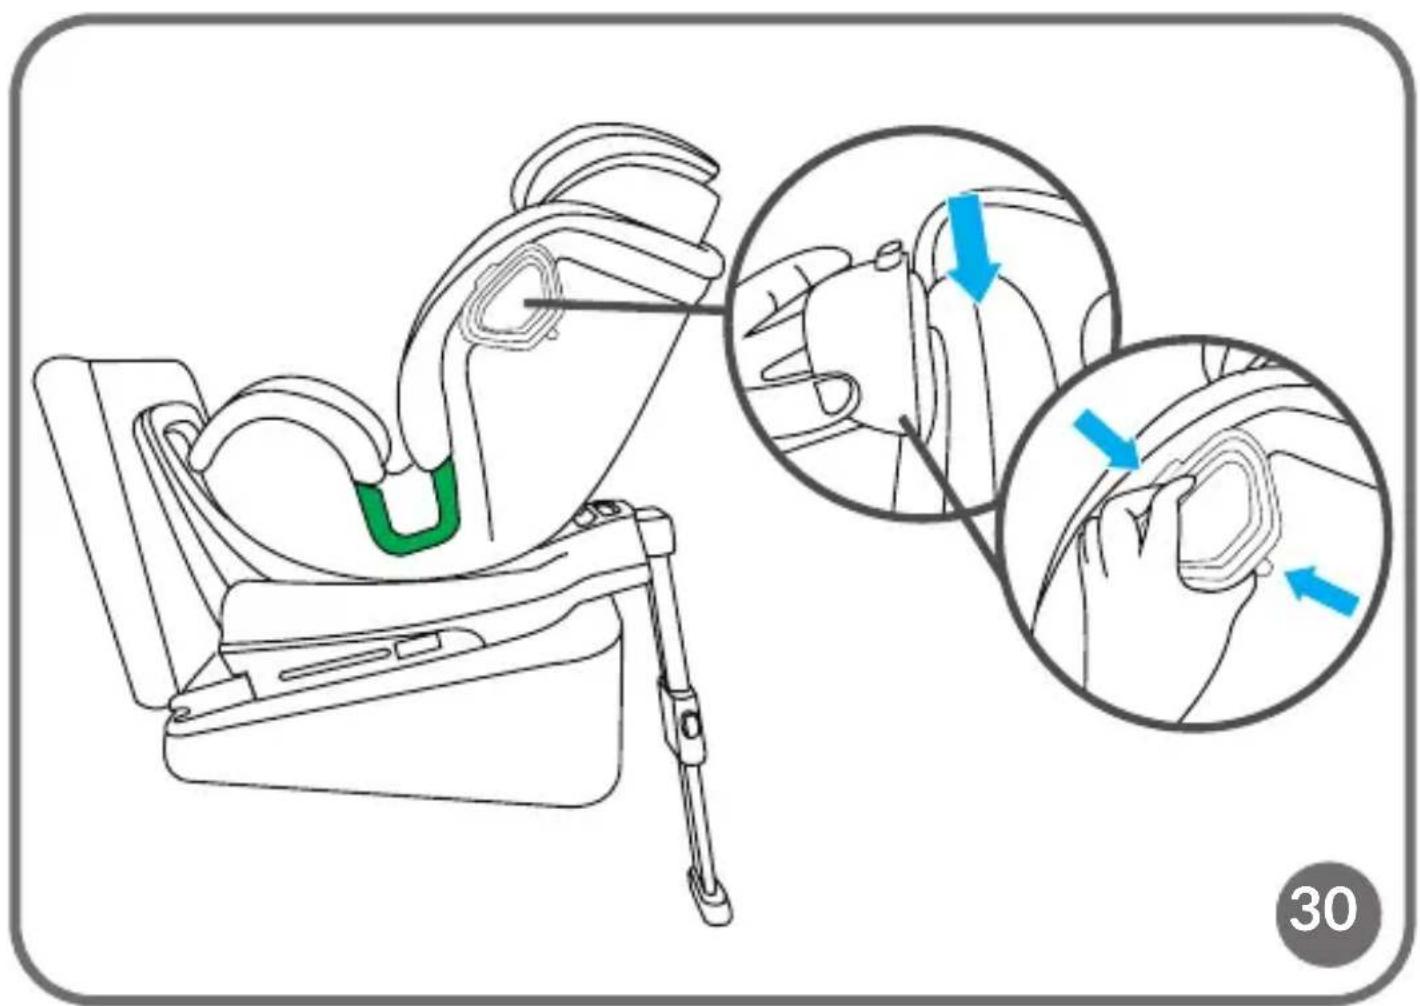
Dear Customer!
If you have any comments or questions about the product you have purchased, please contact us: help@lionelo.com
Manufacturer:
BrandLine Group Sp. z o.o.
Information for the growth group from 40 to 105 cm (maximum weight of the child 18 kg)
NOTICE
This is an i-Size Enhanced Child Restraint System. It is approved according to UN Regulation No 129, for use in, i-Size compatible vehicle seating positions as indicated by vehicle manufacturers in the vehicle users' manual.
If in doubt, consult either the Enhanced Child Restraint System manufacturer or the retailer.
Information for the 100 to 150 cm growth group NOTICE
This is a i-Size booster seat Enhanced Child Restraint System. It is approved according to UN Regulation No 129, for use primarily in "i-Size seating positions" as indicated by vehicle manufacturers in the vehicle user's manual. If in doubt, consult either the Enhanced Child Restraint System manufacturer or the retailer.
The product is only suitable for installation on the locations marked with the symbol in fig. B marked i-Size.
The product is suitable for installation on the seat marked with the symbol ⚠ in fig. B only forward-facing and with the airbag deactivated. It is recommended that the seat should only be installed in the rear seats of the car.
WARNINGS:
- The product is designed for children between 40 and 150 cm tall.
- If your child is less than 15 months old or less than 76 cm tall, do not use a forward-facing seat.
- Hard parts and plastic parts of the child restraint system should be placed and installed in such a way that they cannot be trapped by a sliding seat or vehicle door under normal vehicle operating conditions.
- For rear-facing installation, do not use the seat where the front airbag is active.
- Any seatbelt that restrains the child must be well-fitted to the child's sizes. The belts must not be twisted.
- The straps securing the restraint to the vehicle must be tight, and the stabilizing leg must be in contact with the ground of the car.
- Make sure the lap belts run low to adequately secure the pelvis.
- If the product has been exposed to strong elements (such as impact), it should be replaced.
- Do not make any changes to the seat or add new components without approval from the approval authority. To ensure maximum safety for your child, the equipment should be attached and used as recommended in the instructions.
- The plastic parts of this seat can heat up in the sun and cause burns on the child's skin.
- Never leave a child alone in a car seat in a vehicle.
- Luggage and other similar items should be secured so that they will not cause any injury in a collision situation.
- Do not use the seat without its fabric cover.
- The cover cannot be replaced with an item from another set. It is an integral part of the set and affects the operation of the restraint.
- Always carry this instruction manual with you.
- Refer to the vehicle manufacturer's owner's instruction
manual.
- The device may not fit all approved vehicles when adjusted for a range above 135 cm.
BATTERY SUPPLY INFORMATION
- WARNING: This product contains a button battery. If a button battery is swallowed, there is a risk of serious chemical internal burns.
- WARNING: Dispose of used batteries immediately. Keep new and used batteries out of the reach of children. Seek medical advice immediately if you suspect batteries have been swallowed or inserted into any part of the body.
- Do not recharge disposable batteries.
- Insert the battery into the compartment according to the polarity (+ and -) and the markings inside the compartment.
- Always remove an exhausted battery. A battery left in the product may leak or explode and destroy the product.
- Do not short-circuit the power supply terminals.
- To ensure proper operation of the product, ensure that CR1620 3V type battery is used.
- If the product is not used for a long period of time, remove the battery from the compartment.
- Keep batteries away from children.
- Do not throw batteries into fire. Explosion hazard.
- Dispose of batteries according to regulations by throwing them into specially designated containers.
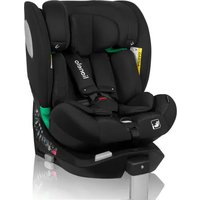
LIST OF PARTS (FIG. A)
- Headrest
- Shoulder belt guide
- Seat belt cover
- Seat belt buckle
- Seat belts
- Lap belt guide
- Seat belt tension adjustment button
- Seat tilt adjustment lever
- Seat belt tension adjustment strap
- ISOFIX sliding button
-
Seat rotation button
-
Stabilizing leg
- Stabilizing leg adjustment button
- Headrest adjustment lever
- Storage compartment for the instruction manual
- Anti-rotation frame
- Anti-rotation frame adjustment button
- ISOFIX guides
- Advanced side protection
- Reduction insert
INSTALLATION IN THE CAR
| Seat installation Seat | orientation | Seat position Ch | d's measurement |
| - Installation with ISOFIX and stabilizing leg- Child fastened with seat beltAdjust the seat to one of the 5 available positions (see: Seat tilt adjustment). | Rearward-facing |  | From 40 to 105 cmChild's weight: maximum 18 kg |
| - Installation with ISOFIX and stabilizing leg- Child fastened with seat beltAdjust the seat to one of the 5 available tilt positions of the backrest (see: Seat tilt adjustment). | Forward-facing | 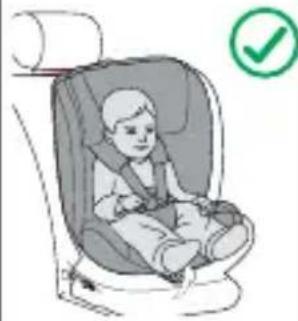 | From 76 to 105 cmChild's weight: maximum 18 kg |
| Seat installation Seat | orientation | Seat position Chi | d's measurement |
| - Installation with ISOFIX and car belts- Installation with car belts aloneAdjust the seat to one of the 5 available tilt positions of the backrest (see: Seat tilt adjustment). | Forward-facing | 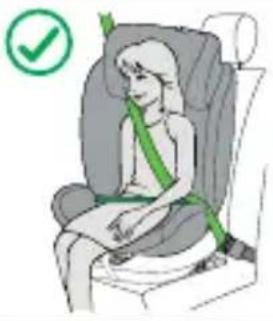 | From 100 to 150 cm |
REARWARD-FACING (40 - 105 CM)
Note! Children under 76 cm in height can use the seat only with a reduction pad.
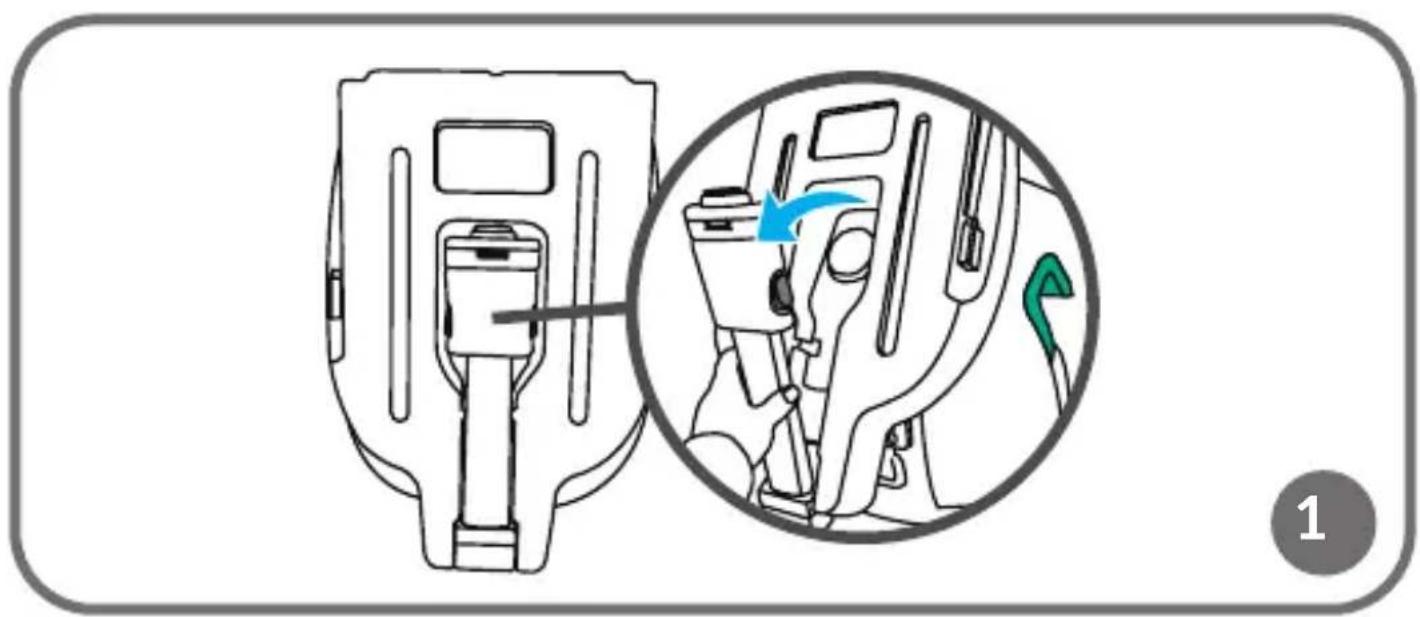
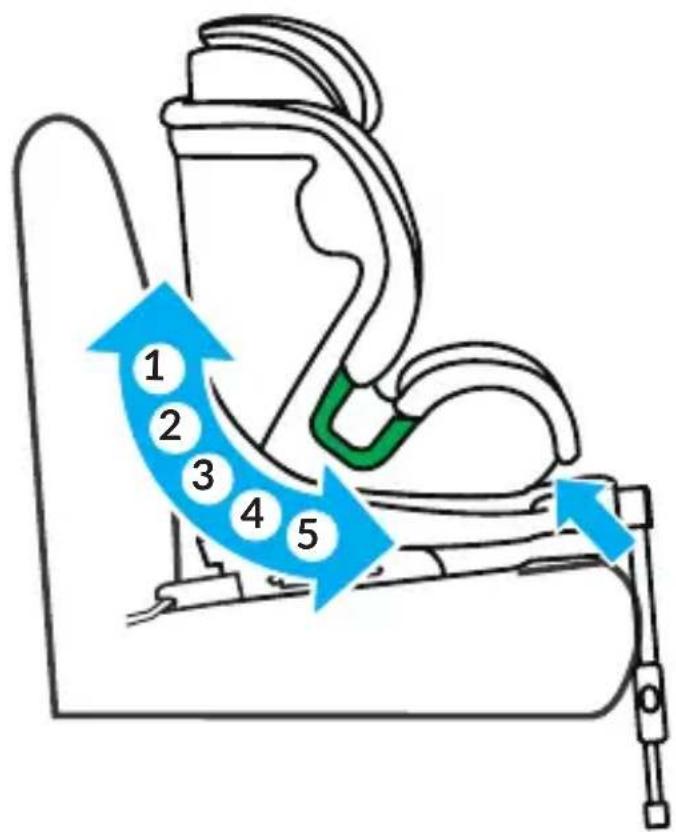
- Extend the stabilizing leg (fig. 1) and adjust the anti-rotation frame to the desired position (see: Anti-rotation frame adjustment).
- Place the car seat on the couch of the car.
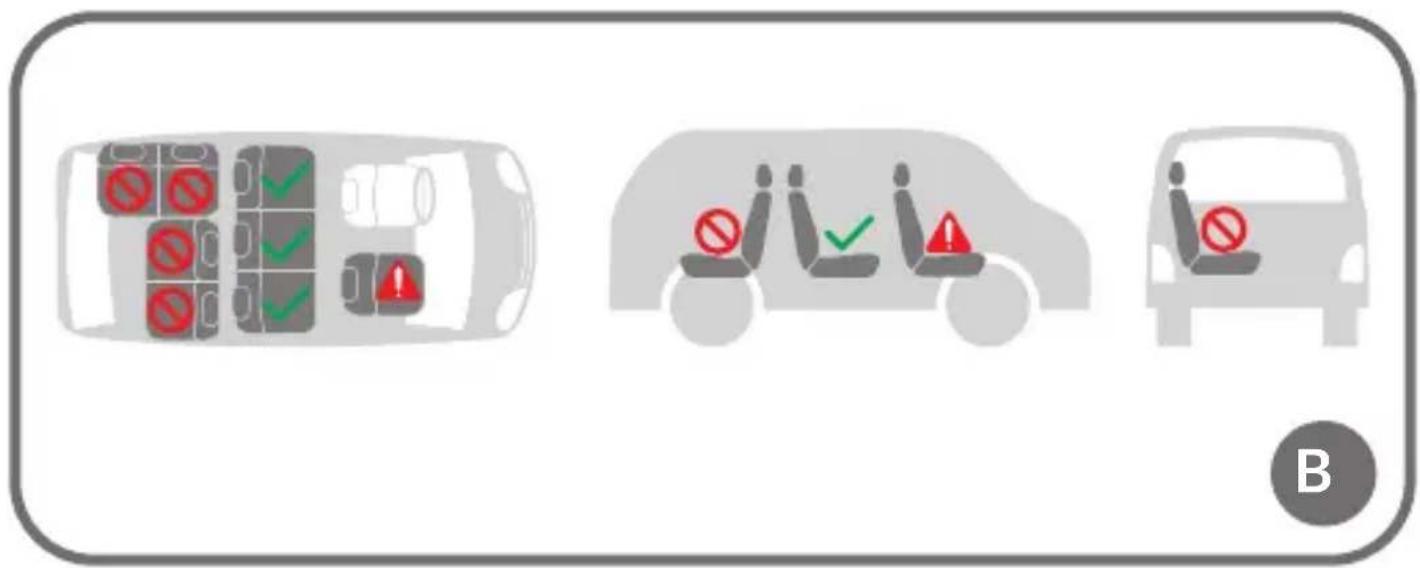
- Push in the sliding button and extend the ISOFIX arms (fig. 1). Anchor the ISOFIX arms into the attachments located in the car's bench seat (fig. 3). The arms will interlock and you will hear a characteristic click. The green indicator on the ISOFIX button must be visible on both sides of the seat (fig. 4).
- If necessary, use the included ISOFIX guides (fig. 5).
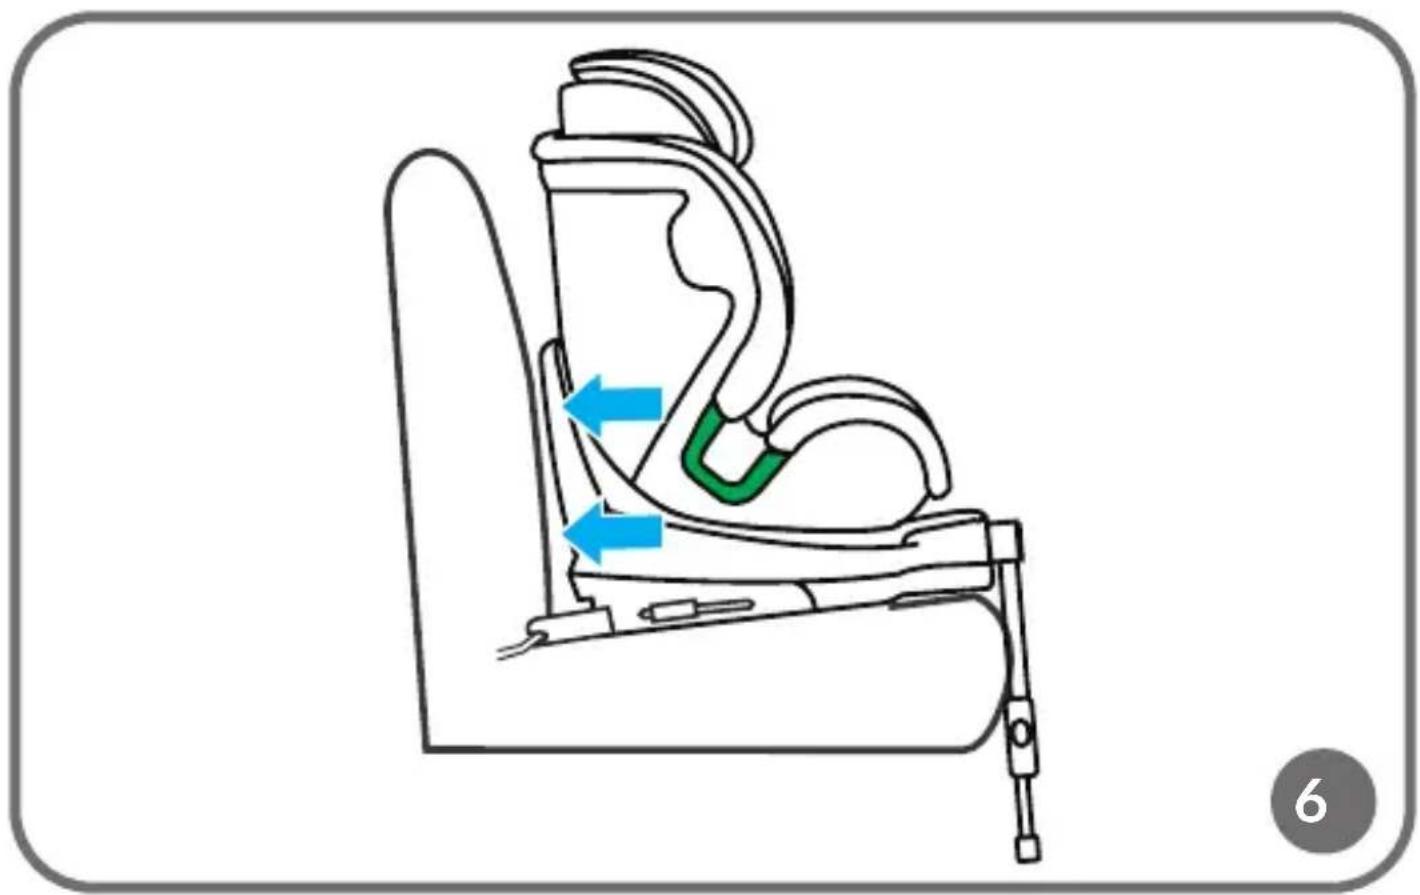
- Press the seat against the backrest of the car's bench seat. Push the base with a left-right movement towards the backrest to make sure it is pressed as tightly as possible against the car bench seat (fig. 6).
- Press the stabilizing leg adjustment button (13, fig. A) and slide out the retracted part of the leg (fig. 7).
- Adjust the height of the leg so that the foot meets resistance from the vehicle floor. Now you can release the button.
- Make sure that the stabilizing leg's unfolding indicator is green and that the leg touches the vehicle's ground and is not crooked (A, fig. 7).
NOTE! Never mount the foot from the support leg on the glove box in the floor of the car. This risks snagging the compartment during an accident. If in doubt, consult your vehicle's owner's manual.
NOTE! The support leg must never hang in the air and no objects may be placed under it.
- Press the seat rotation button (11, fig. A), and then move the seat to
the side position, at a 90-degree angle (fig. 8).
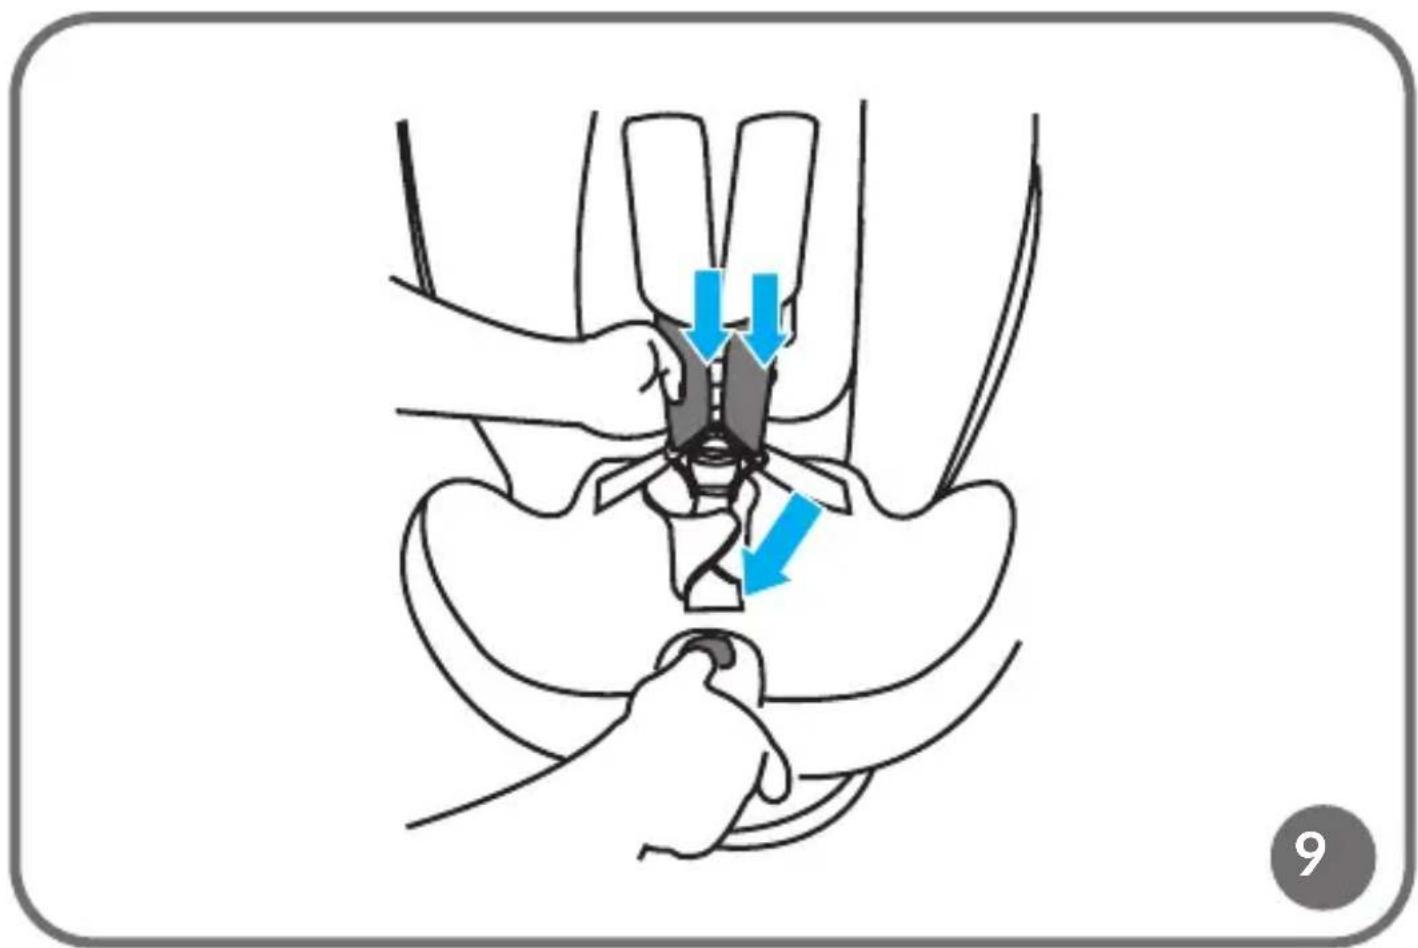
- Loosen the seat belts by pressing the belt adjustment button (7, fig. A) and pulling gently on the shoulder belts (fig. 9).
- Place the child in the seat and adjust the headrest (see: Headrest adjustment).
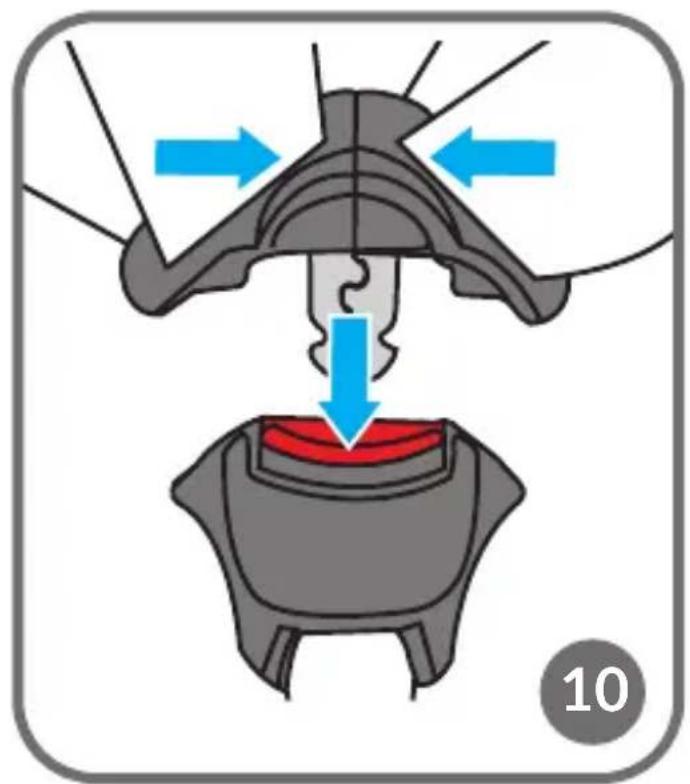
- Connect the belt connectors, and then insert them into the buckle (fig. 10). You will hear a characteristic click (fig. 11).
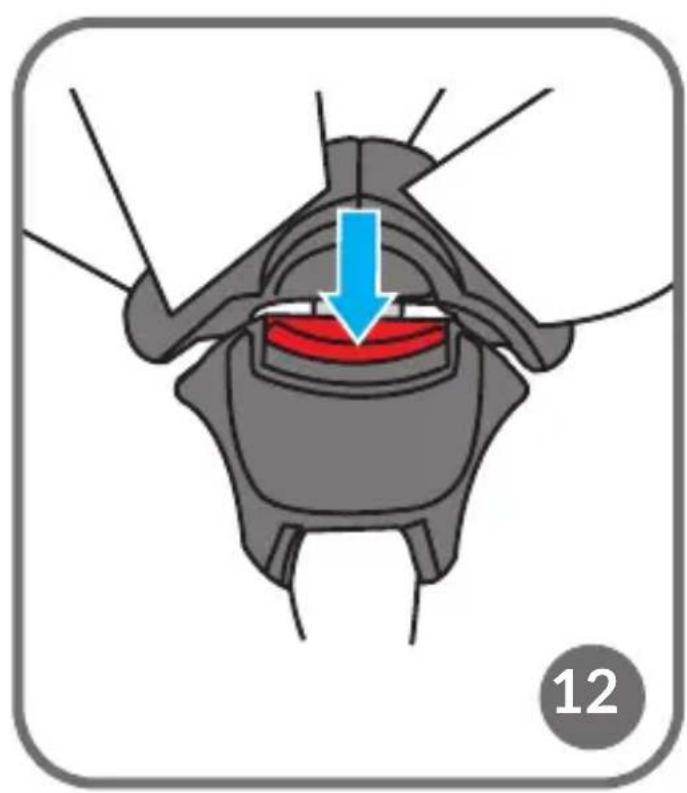
- To undo the 5-point seat belts, press the red button on the buckle (fig. 12).
- Tighten the belts by pulling on the belt adjustment strap (fig. 13).
- Press the seat rotation button (11, fig. A), then move the seat to the rearward-facing position (fig. 14). The correct setting will be signaled by a click.
- Using the tilt adjustment button, adjust the seat to one of the 5 available positions (see: Seat tilt adjustment).
Note! The reduction insert should be removed when the seat is used by a child over 76 cm tall.
Note! Make sure that the seat belts fit tightly on the child's body and that they are not twisted. Make sure the lap belts run low and protect the child's pelvis. The belts should be tight against the child's body, but should not be too tight and cause discomfort.
REARWARD-FACING (76 - 105 CM)
- Extend the stabilizing leg (fig. 1) and adjust the anti-rotation frame to the desired position (see: Anti-rotation frame adjustment).
- Place the car seat on the couch of the car.
- Push in the sliding button and extend the ISOFIX arms (fig. 1). Anchor the ISOFIX arms into the attachments located in the car's bench seat (fig. 3). The arms will interlock and you will hear a characteristic click. The green indicator on the ISOFIX button must be visible on both sides of the seat (fig. 4).
- If necessary, use the included ISOFIX guides (fig. 5).
- Press the seat against the backrest of the car's bench seat. Push the base with a left-right movement towards the backrest to make sure it is pressed as tightly as possible against the car bench seat (fig. 6).
- Press the stabilizing leg adjustment button (13, fig. A) and slide out
the retracted part of the leg (fig. 7).
- Adjust the height of the leg so that the foot meets resistance from the vehicle floor. Now you can release the button.
- Make sure that the stabilizing leg's unfolding indicator is green and that the leg touches the vehicle's ground and is not crooked (A, fig. 7).
NOTE! Never mount the foot from the stabilizing leg on the glove box in the floor of the car. This risks snagging the compartment during an accident. If in doubt, consult your vehicle's owner's manual.
NOTE! The support leg must never hang in the air and no objects may be placed under it.
- Press the seat rotation button (11, fig. A), and then move the seat to the side position, at a 90-degree angle (fig. 8). The correct setting will be signaled by a click.
- Loosen the seat belts by pressing the belt adjustment button (7, fig. A) and pulling gently on the shoulder belts (fig. 9).
- Place the child in the seat and adjust the headrest (see: Headrest adjustment).
- Connect the belt connectors, and then insert them into the buckle (fig. 10). You will hear a characteristic click (fig. 11).
- To undo the 5-point seat belts, press the red button on the buckle (fig. 12).
- Tighten the belts by pulling on the belt adjustment strap (fig. 13).
- Press the seat rotation button (11, fig. A), then move the seat to the forward-facing position (fig. 15). The correct setting will be signaled by a click.
- Using the tilt adjustment button, adjust the seat to one of the 5 available positions (see: Seat tilt adjustment).
Note! Make sure that the seat belts fit tightly on the child's body and that they are not twisted. Make sure the lap belts run low and protect the child's pelvis. The belts should be tight against the child's body, but should not be too tight and cause discomfort.
REARWARD-FACING (100 - 150 CM)
- Fold the stabilizing leg (see: Removal of the seat – stabilizing leg).
- Remove the seat belts (see: Removal of the seat belts).
- Press the seat rotation button (11, fig. A), then move the seat to the
forward-facing position (fig. 15). The correct setting will be signaled by a click.
- Place the seat on the car's bench seat in the installation position.
Note! If installing without ISOFIX, skip steps 5 through 6. - Push in the sliding button and extend the ISOFIX arms (fig. 1). Anchor the ISOFIX arms into the attachments located in the car's bench seat (fig. 3). The arms will interlock and you will hear a characteristic click. The green indicator on the ISOFIX button must be visible on both sides of the seat (fig. 4).
- If necessary, use the included ISOFIX guides (fig. 5).
- Press the seat against the backrest of the car's bench seat. Push the base with a left-right movement towards the backrest to make sure it is pressed as tightly as possible against the car bench seat (fig. 6).
- Place the child in the seat and adjust the headrest (see: Headrest adjustment).
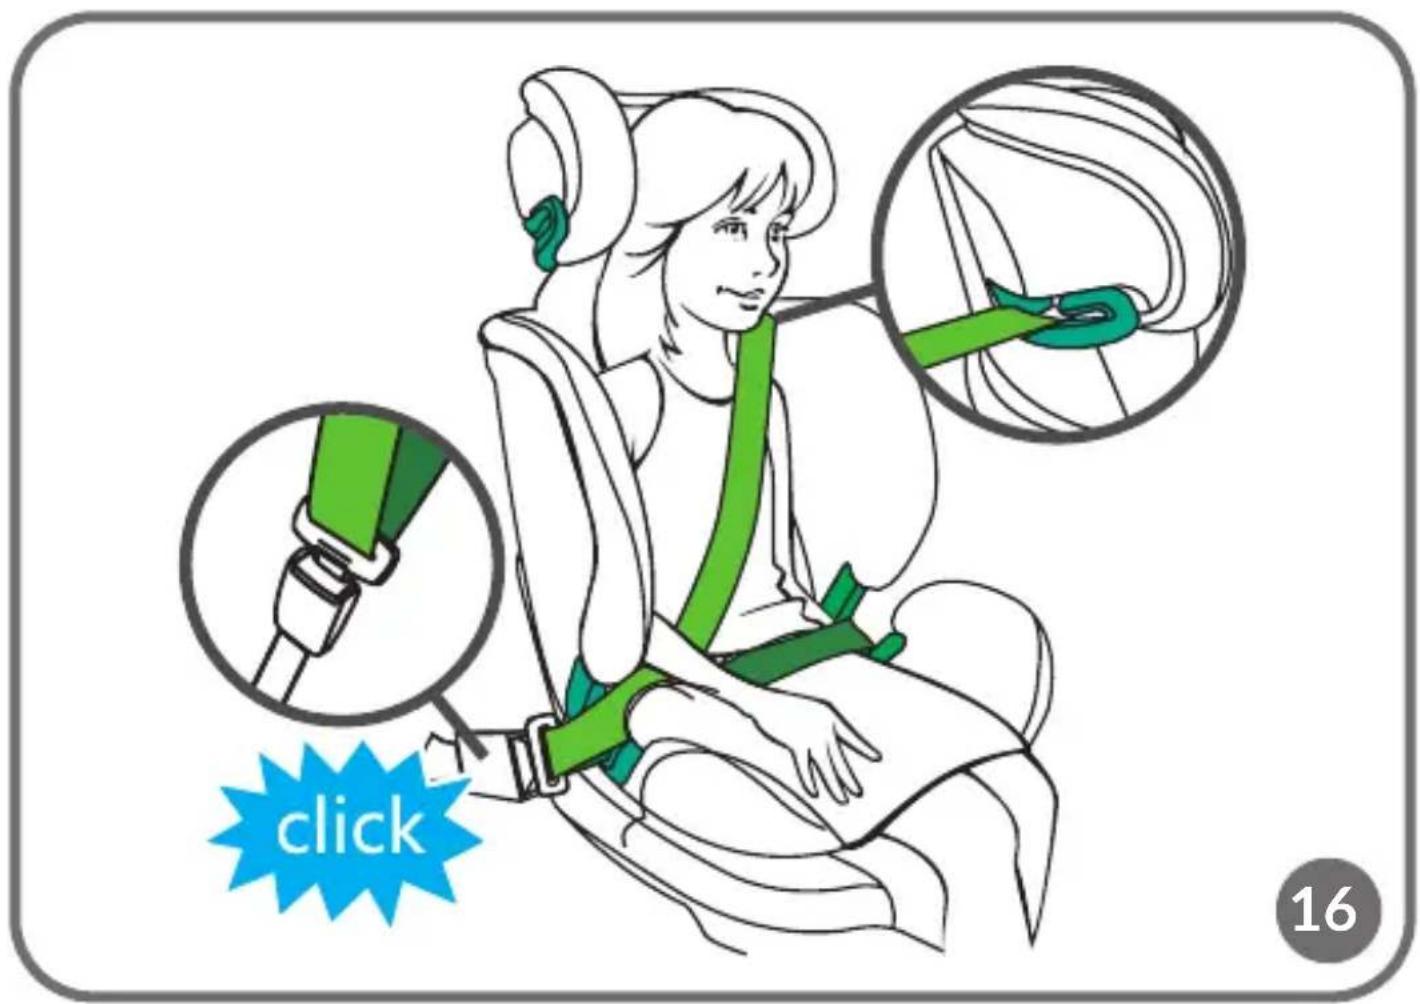
- Pull out the car seat belt.
- Pass the shoulder belt through the shoulder belt guide, which is located at the seat's headrest (2, fig. A). Pass the lap belt through the lap belt guide (6, fig. A).
- Fasten the seat belts (fig. 16). You will hear a characteristic click.
- Make sure the belts are not twisted.
- Make sure that the belts are correctly positioned in the guides and tightened, and that the buckle is not too close to the lap belt guide.
- Using the tilt adjustment button, adjust the seat to one of the 5 available positions (see: Seat tilt adjustment).
BUCKLE ALARM FUNCTION
The belt buckle sounds a short audible alarm when the seat belts are unbuckled, so the parent is alerted if the child unexpectedly unbuckles.
BUTTON BATTERY REPLACEMENT
Unscrew the cover located on the back of the buckle (4, fig. A) with a screwdriver. Replace the battery, then screw the cover back on.
REMOVAL OF THE SEAT - STABILIZING LEG
Press the adjustment button of the stabilizing leg (13, fig. A), and then slide
its extendable part. The stabilizing leg latch indicator will turn red. Fold the stabilizing leg by retracting it into the seat base.
REMOVAL OF THE SEAT - ISOFIX
Press the ISOFIX sliding button (10, fig. A) on both sides and release the ISOFIX arms. The clasps will be released and the color of the ISOFIX indicators will change from green to red. Retract the ISOFIX arms into the seat base by pressing the sliding button.
RETRACTING THE SEAT BELTS
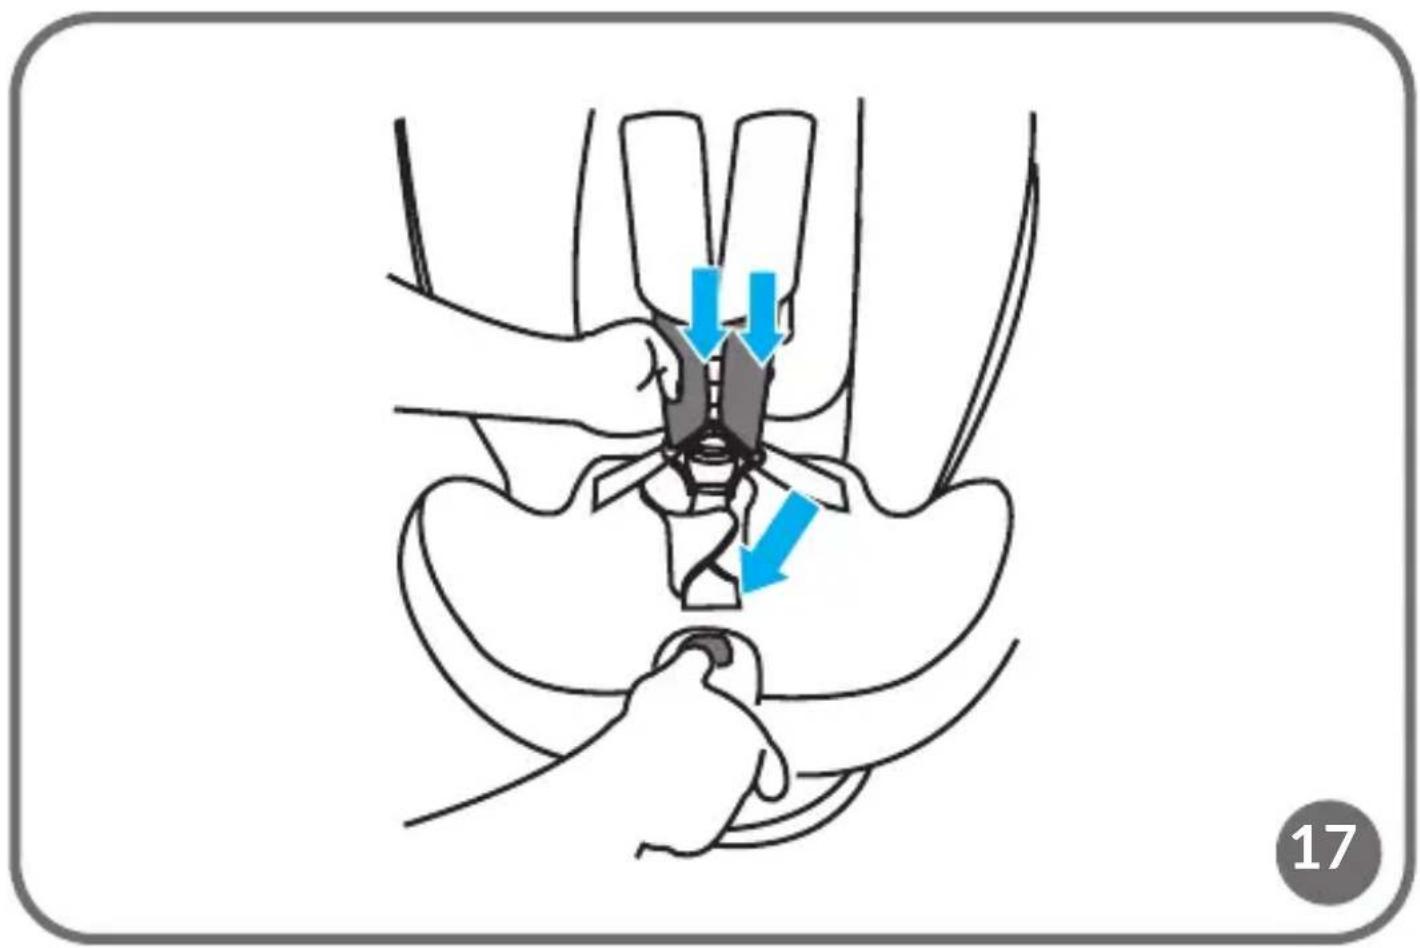
- Loosen the seat belts by pressing the belt adjustment button (7, fig. A) and pulling gently on the shoulder belts (fig. 17). Unbuckle the 5-point seat belts by pressing the middle button on the buckle (4, fig. A).
- Unfasten the metal latches, then lift the upper and lower the lower part of the backrest cover (fig. 18).
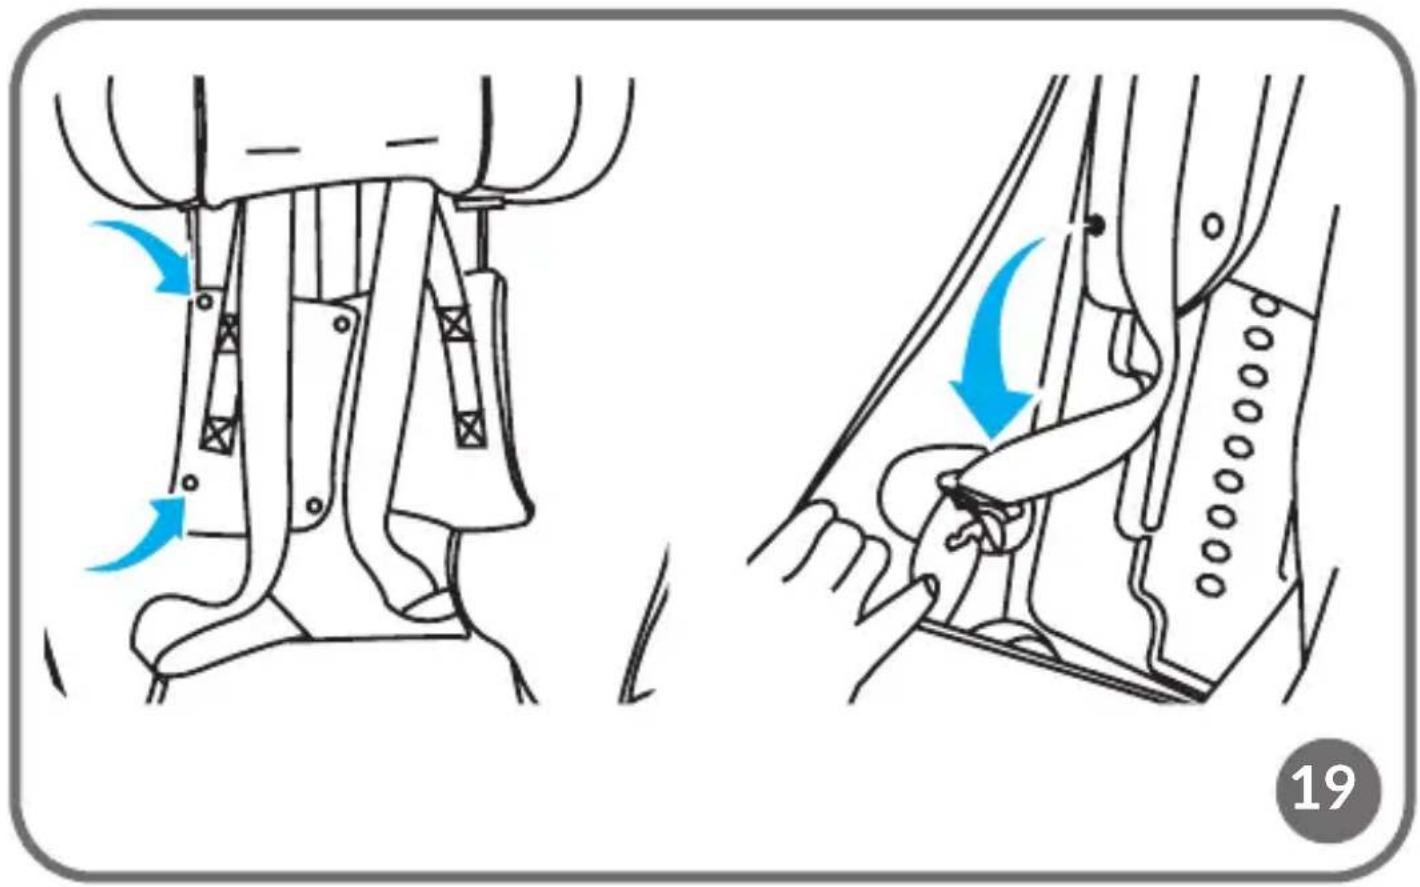
- Unfasten the seat belt covers (3, fig. A) and place this part of the seat belts and the metal connectors under the seat cover (fig. 19).
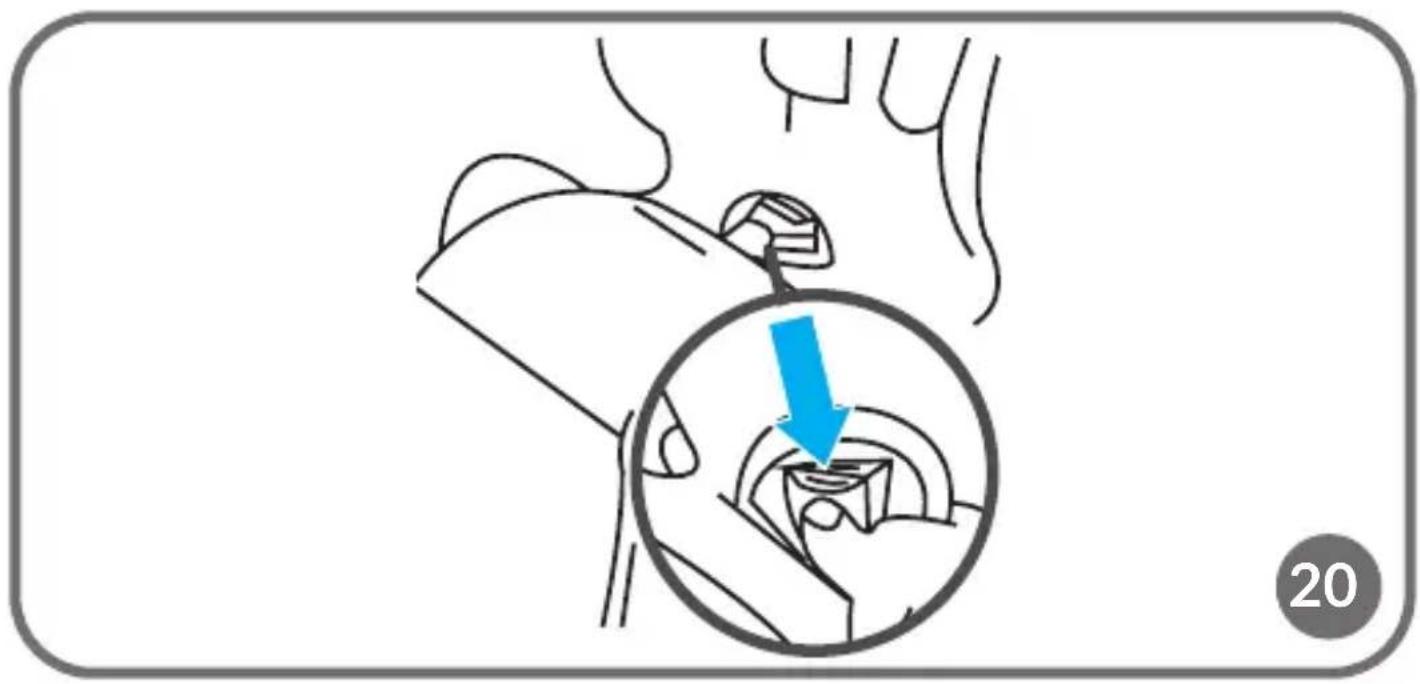
- Remove the 5-point seat belt buckle from the crotch cover. Put the buckle through the hole in the cover, and place it in the compartment located in the seat, under the cover (fig. 20). Close the compartment and reattach the cover.
- Fasten back the lower and upper parts of the seatback cover. To remove the retracted seat belts, follow the above steps in reverse order.
REMOVAL OF THE SEAT BELTS
- Adjust the seat's headrest to the highest possible position (see: Headrest adjustment).
- Loosen the seat belts as much as possible by pressing the belt adjustment button (7, fig. A) and pulling gently on the shoulder belts (fig. 17). Unbuckle the 5-point seat belts by pressing the middle button on the buckle (4, fig. A).
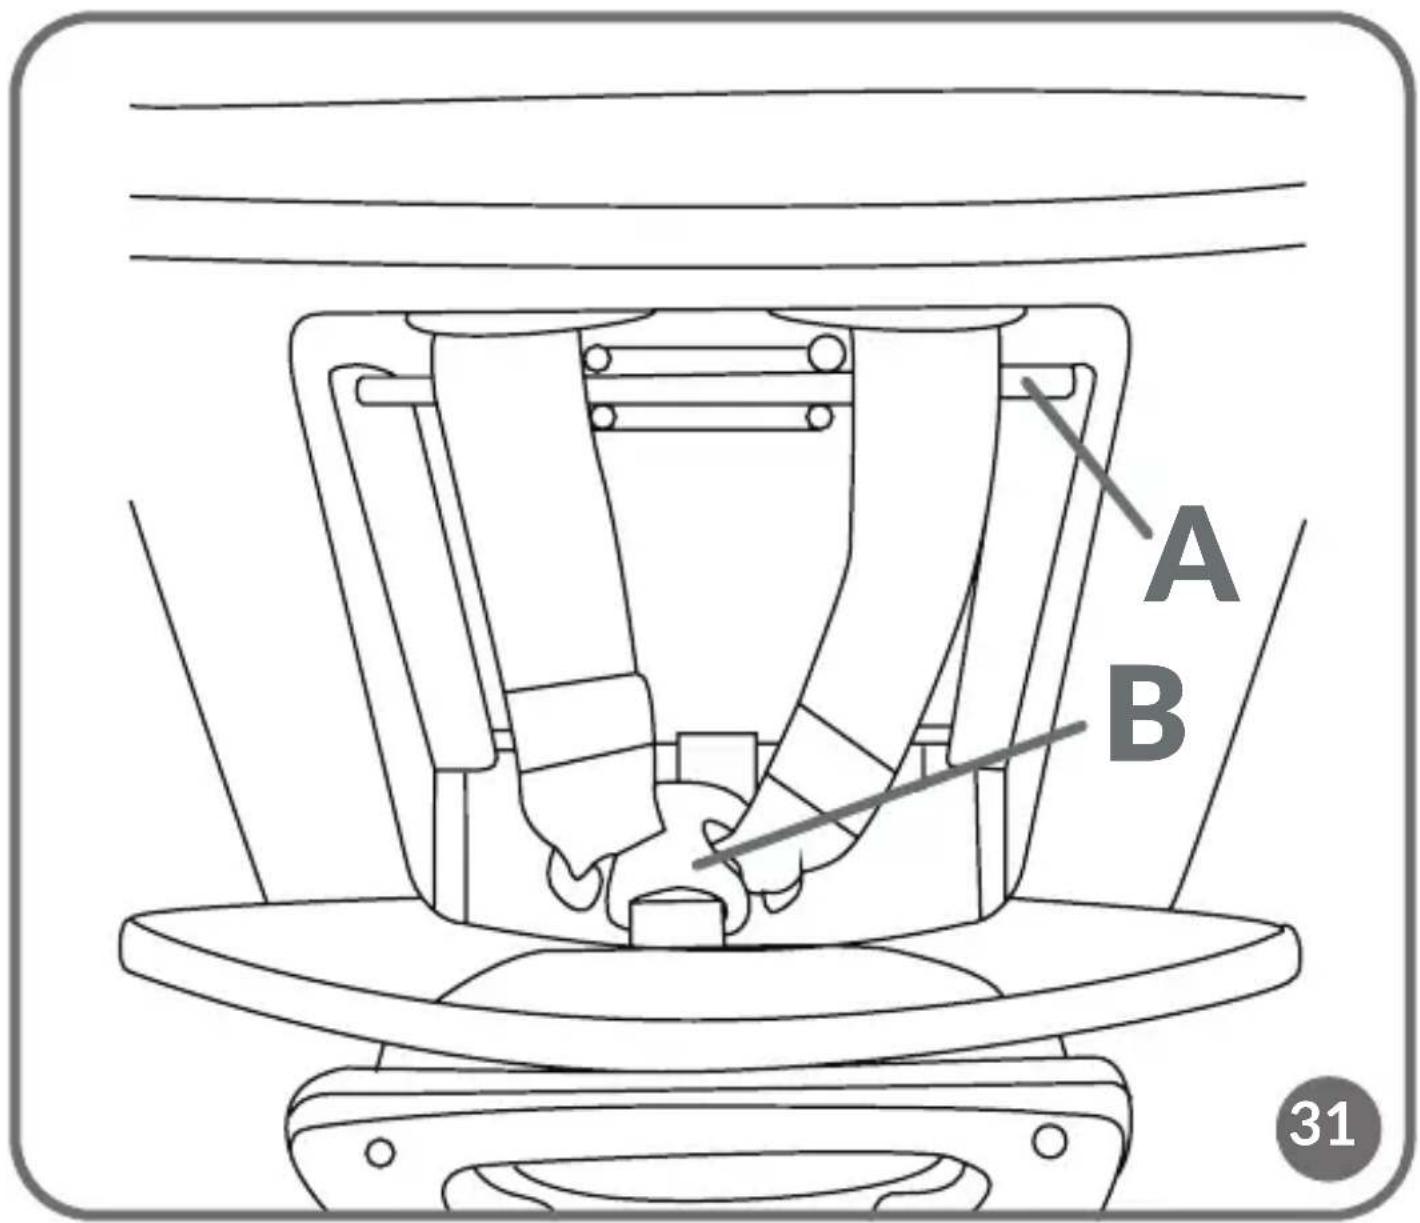
- Open the instruction manual compartment (15, fig. A). Remove the belts from the metal lever inside (A, fig. 31) and then from the metal buckle (B, fig. 31).
-
Unfasten the metal latches, then lift the upper and lower the lower part of the backrest cover (fig. 18).
-
Remove the shoulder belts in the front of the seat. Hide the lap belts under the seat cover, along with the metal connectors.
- Remove the 5-point seat belt buckle from the crotch cover. Put the buckle through the hole in the cover, and place it in the compartment located in the seat, under the cover (fig. 20). Close the compartment and reattach the cover.
- Fasten back the lower and upper parts of the seatback cover.
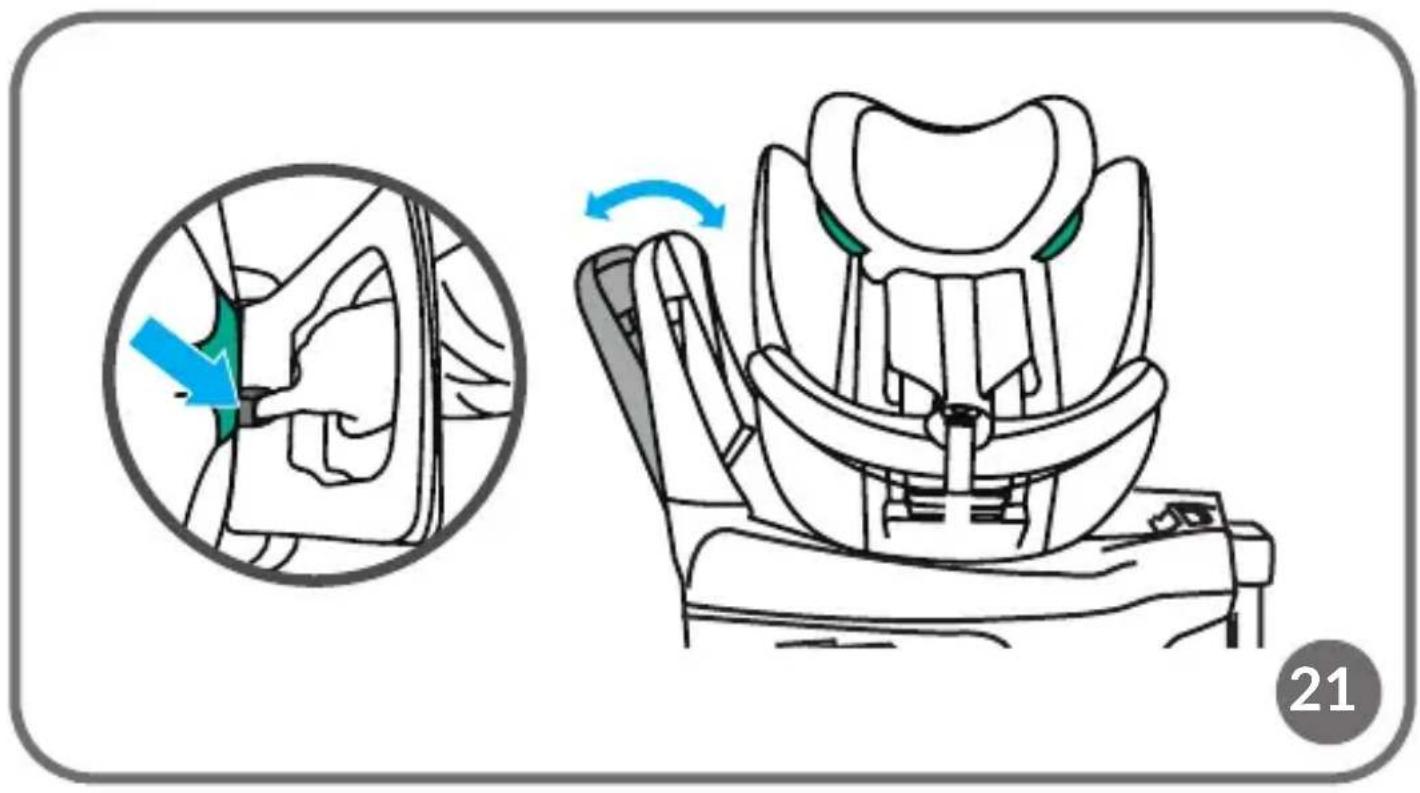
ANTI-ROTATION FRAME ADJUSTMENT
Note! Applies to rearward-facing installation.
To adjust the anti-rotation frame to one of the two available positions, press the frame adjustment button (17, fig. A) and change the setting (fig. 21). Changing the setting helps to better fit the frame to the car seat and to increase legroom in rear-facing installation.
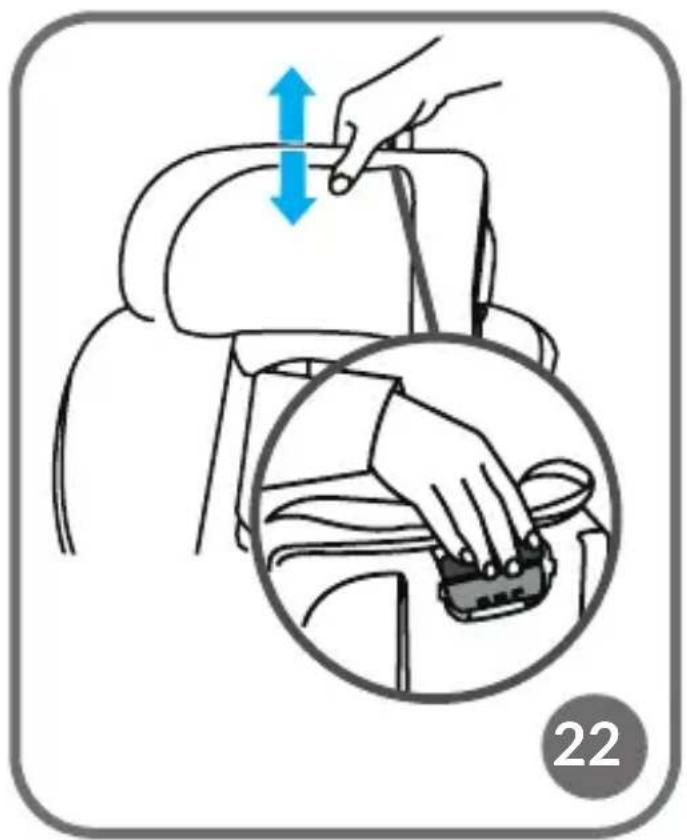
HEADREST ADJUSTMENT
To change the headrest height:
- While holding the seat belt tension adjustment button (7, fig. A), loosen the belts. This will allow you to adjust the height of the headrest more freely.
- Pull the headrest adjustment lever (14, fig. A) and adjust the height of the headrest to the child's shoulder level (fig. 22).
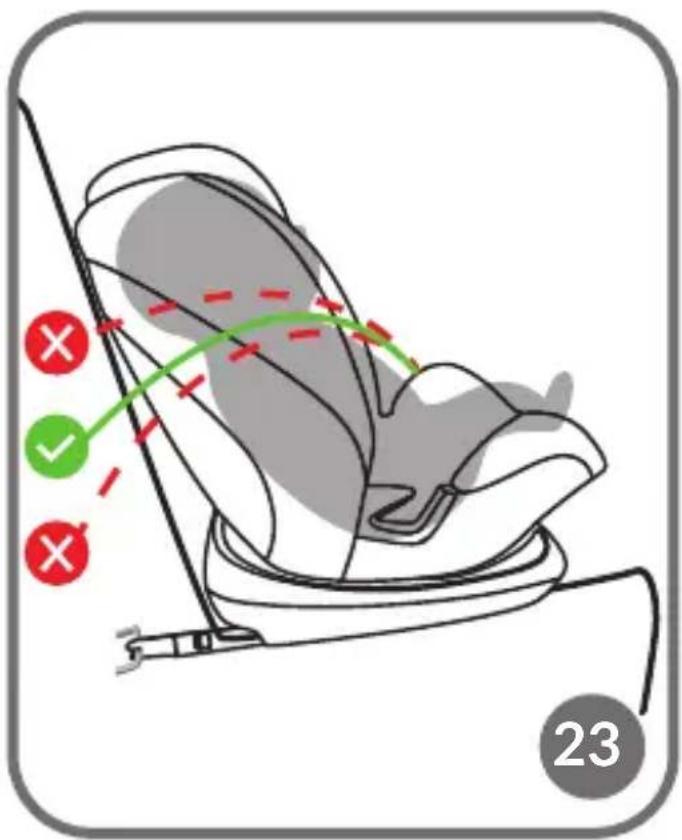
Note! The headrest should be adjusted so that the shoulder belts are not too high, such as at or above the ear line, nor too low, such as behind the child's back (fig. 23).
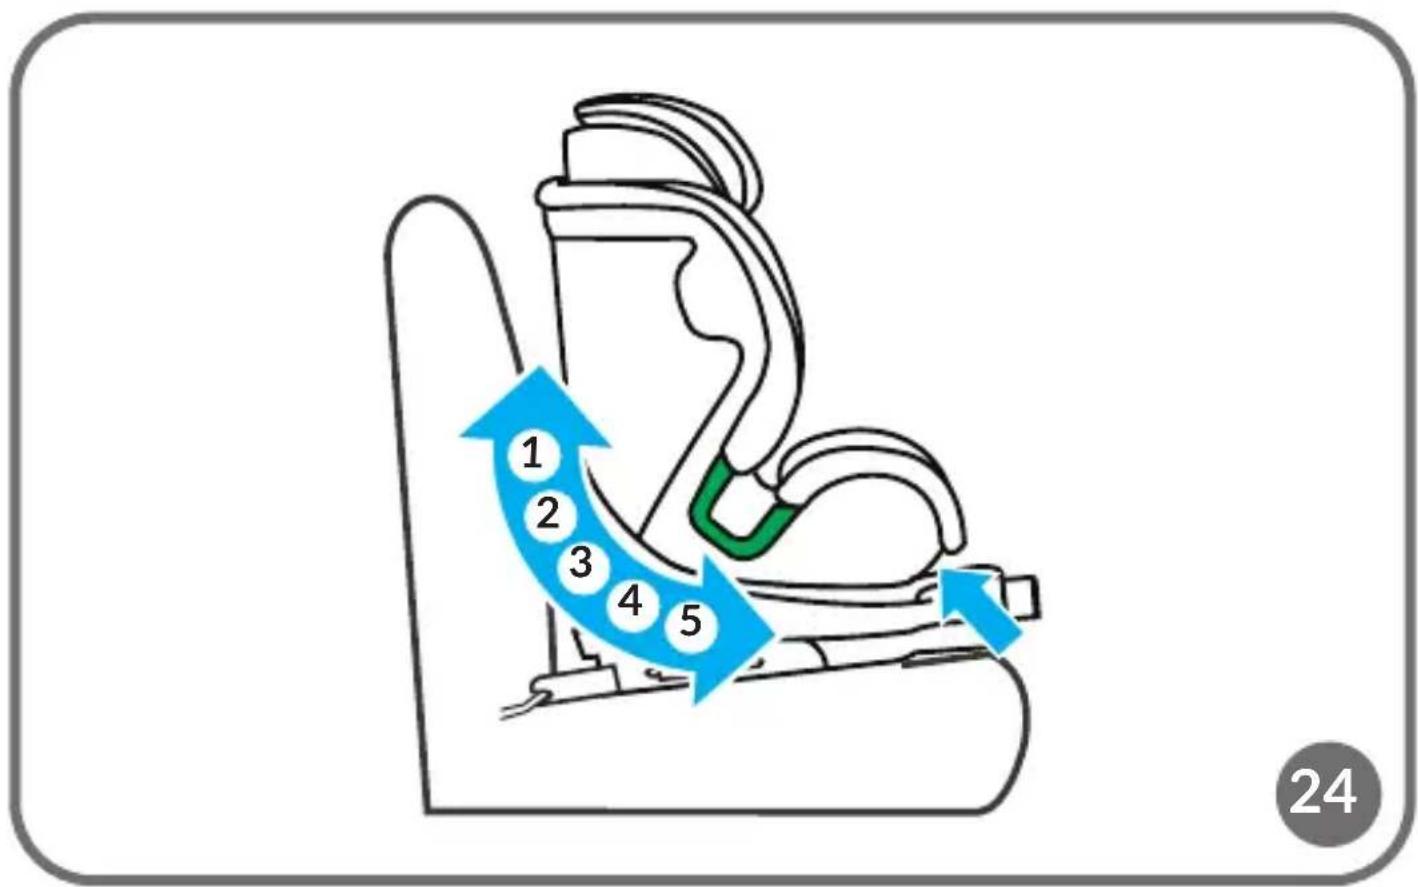
SEAT TILT ADJUSTMENT
To adjust the seat tilt, press the seat tilt adjustment lever (8, fig. A) and move the seat to the desired position (fig. 24). Move the seat slightly until you hear a distinct “click” sound - the seat has been secured in the selected position. The seat has 5 levels of tilt adjustment in rearward and forward facing positions.
Note! In the rearward-facing position, use the seat in the reclining position.
SEAT ROTATION
The seat rotation mechanism is a feature that helps you comfortably position
or remove your child from the seat.
Press the seat rotation button (11, fig. A) and rotate the seat 90 degrees.
With this function, you can easily place and remove your child from the seat.
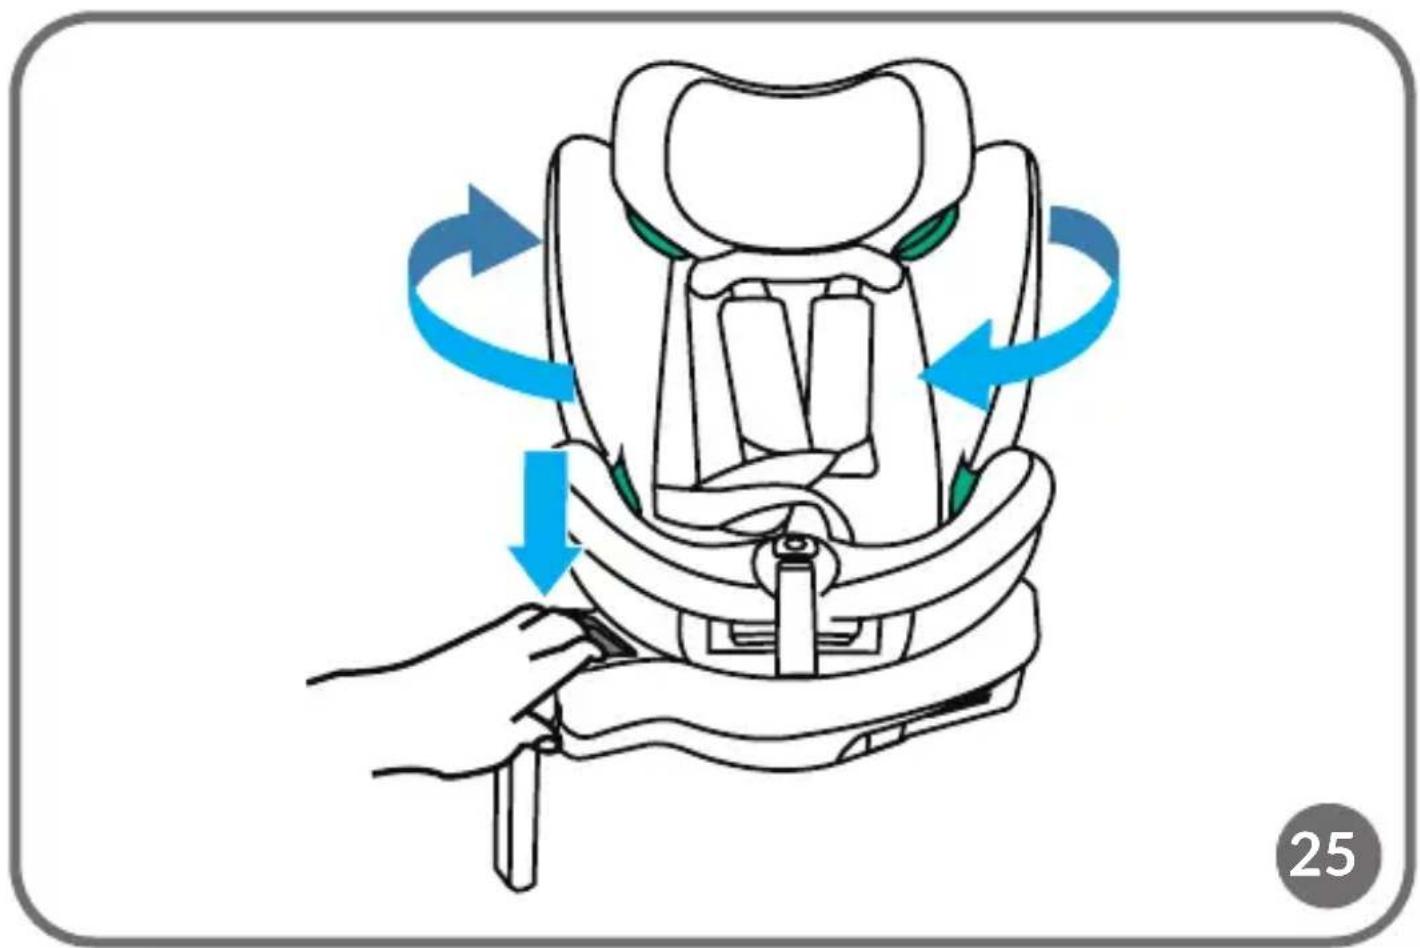
Press the seat rotation button again (11, fig. A) again, and adjust the seat to the rearward or forward facing position (fig. 25). Try to move the seat – properly anchored will not allow you to change position (fig. 26).
REMOVING AND ATTACHING THE COVER
Unzip the cover and slide it completely off the seat body. To do this:
- Adjust the headrest to the highest available position (see: Headrest adjustment).
- Unfasten the seat belts
- Unfasten and remove the protective cushions of the seat belts
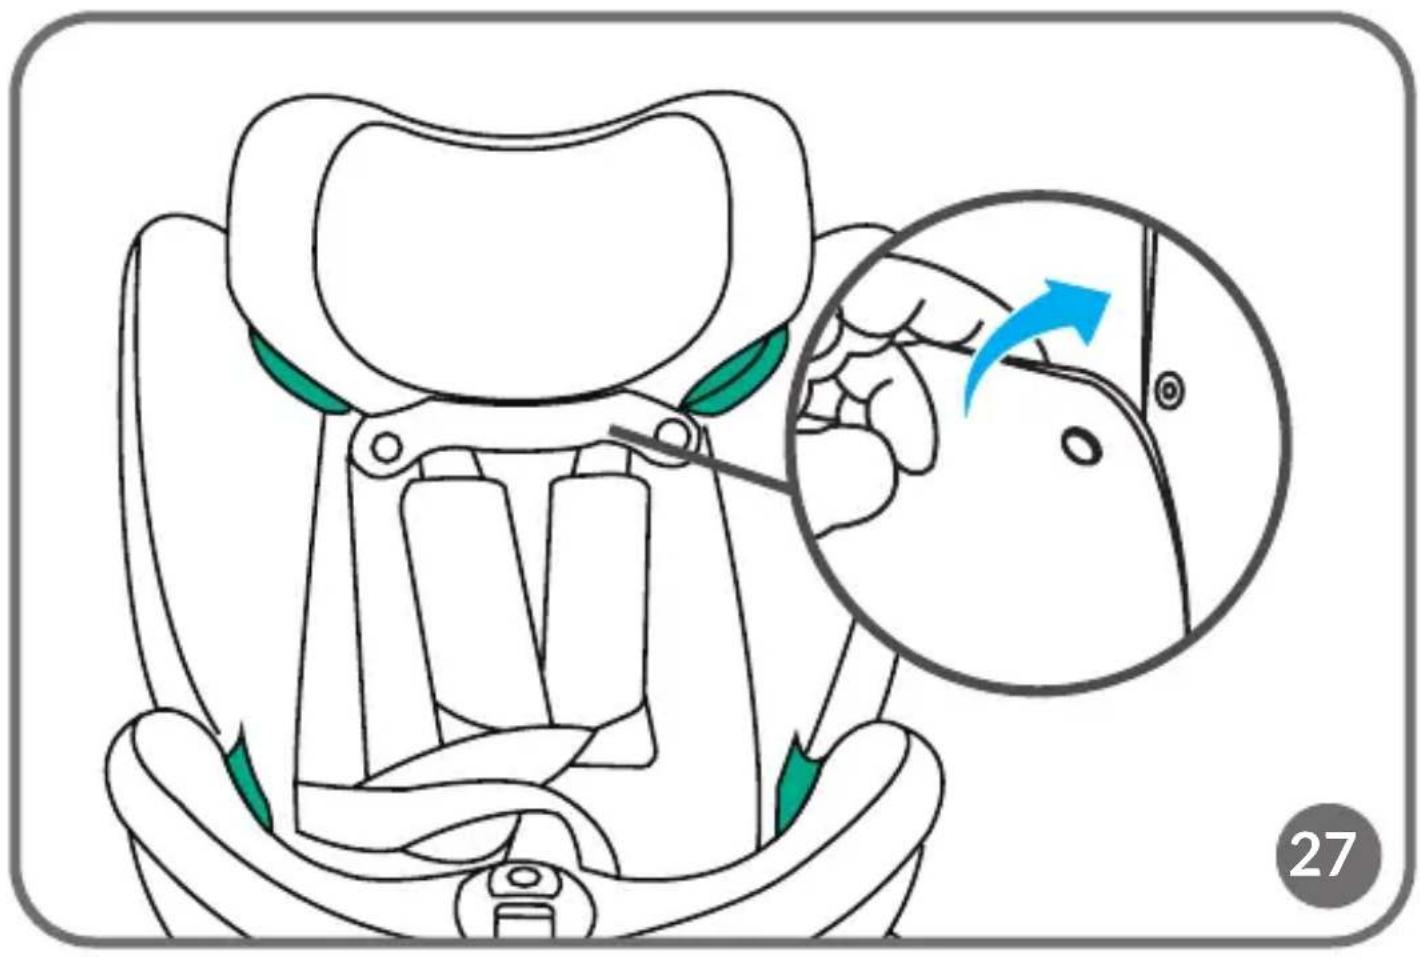
- Start the removal from the cover located on the headrest. First, unfasten the metal snaps (fig. 27).
- Unfasten the the metal clasps, and then remove the rest of the cover (fig. 28).
To reattach the cover to the seat, follow the above steps in reverse order.
INSTALLATION AND REMOVAL OF ADVANCED SIDE PROTECTION
Note! Place the crash pad on the side of the seat facing the car door.
Place the crash pad in the designated place (19, fig. A). To do this, insert its upper and lower installation elements into the corresponding holes (fig. 29).
To remove, press the button located on the crash pad, and then gently remove it (fig. 30)
CLEANING AND MAINTENANCE
The cover can be hand washed at a maximum temperature of 30^ C. When drying, do not use dryers. The cover should not be exposed to sunlight for drying. Plastic parts can be cleaned with a damp cloth and mild detergent.
Note! Do not use strong detergents or bleaching agents.
The photos are for reference only, the actual look of the products may differ from the ones shown in the pictures.
The product complies with the requirements of European Union directives.
In accordance with Directive 2012/19/EU, this product is subject to separate collection. The product should not be disposed of with
municipal waste as it may pose a risk to the environment and human health. Return the used product to the recycling centre for electrical and electronic equipment.
PL
Drogi Kliencie!
BrandLine Group Sp. z o.o.
FUNKCJA BUCKLE ALARM
BrandLine Group Sp. z o.o.
BrandLine Group Sp. z o.o.
BrandLine Group Sp. z o.o.
FONCTION BUCKLE ALARM
BrandLine Group Sp. z o.o.
BrandLine Group Sp. z o.o.
BUCKLE ALARM FUNCTIE
ZIJDELINGSE BESCHERMING MONTEREN EN DEMONTEREN
BrandLine Group Sp. z o.o.
A. Kręglewskiego 1, 61-248 Poznań (Poznanė), Lenkija
Informacija ügio grupei nuo 40 iki 105 cm (maksimalus vaiko svoris 18 kg) DĖMESIO
MONTÁŽ A DEMONTÁŽ POKROČILÉ BOČNÍ OCHRANY
BrandLine Group Sp. z o.o.
BrandLine Group Sp. z o.o.
FUNCTIA BUCKLE ALARM
JUSTERING AV NACKSTÖDET
BrandLine Group Sp. z o.o.
BrandLine Group Sp. z o.o.
BrandLine Group Sp. z o.o.
A. Kręglewskiego 1, 61-248 Poznań, Puola
Detailed warranty conditions are available on the website: