
Moxie i-Size - Car seat Lionelo - Free user manual and instructions
Find the device manual for free Moxie i-Size Lionelo in PDF.

User questions about Moxie i-Size Lionelo
0 question about this device. Answer the ones you know or ask your own.
Ask a new question about this device
Download the instructions for your Car seat in PDF format for free! Find your manual Moxie i-Size - Lionelo and take your electronic device back in hand. On this page are published all the documents necessary for the use of your device. Moxie i-Size by Lionelo.
USER MANUAL Moxie i-Size Lionelo
natural_image
Line drawing of a car comfort seat with straps and seatbelt (no text or symbols)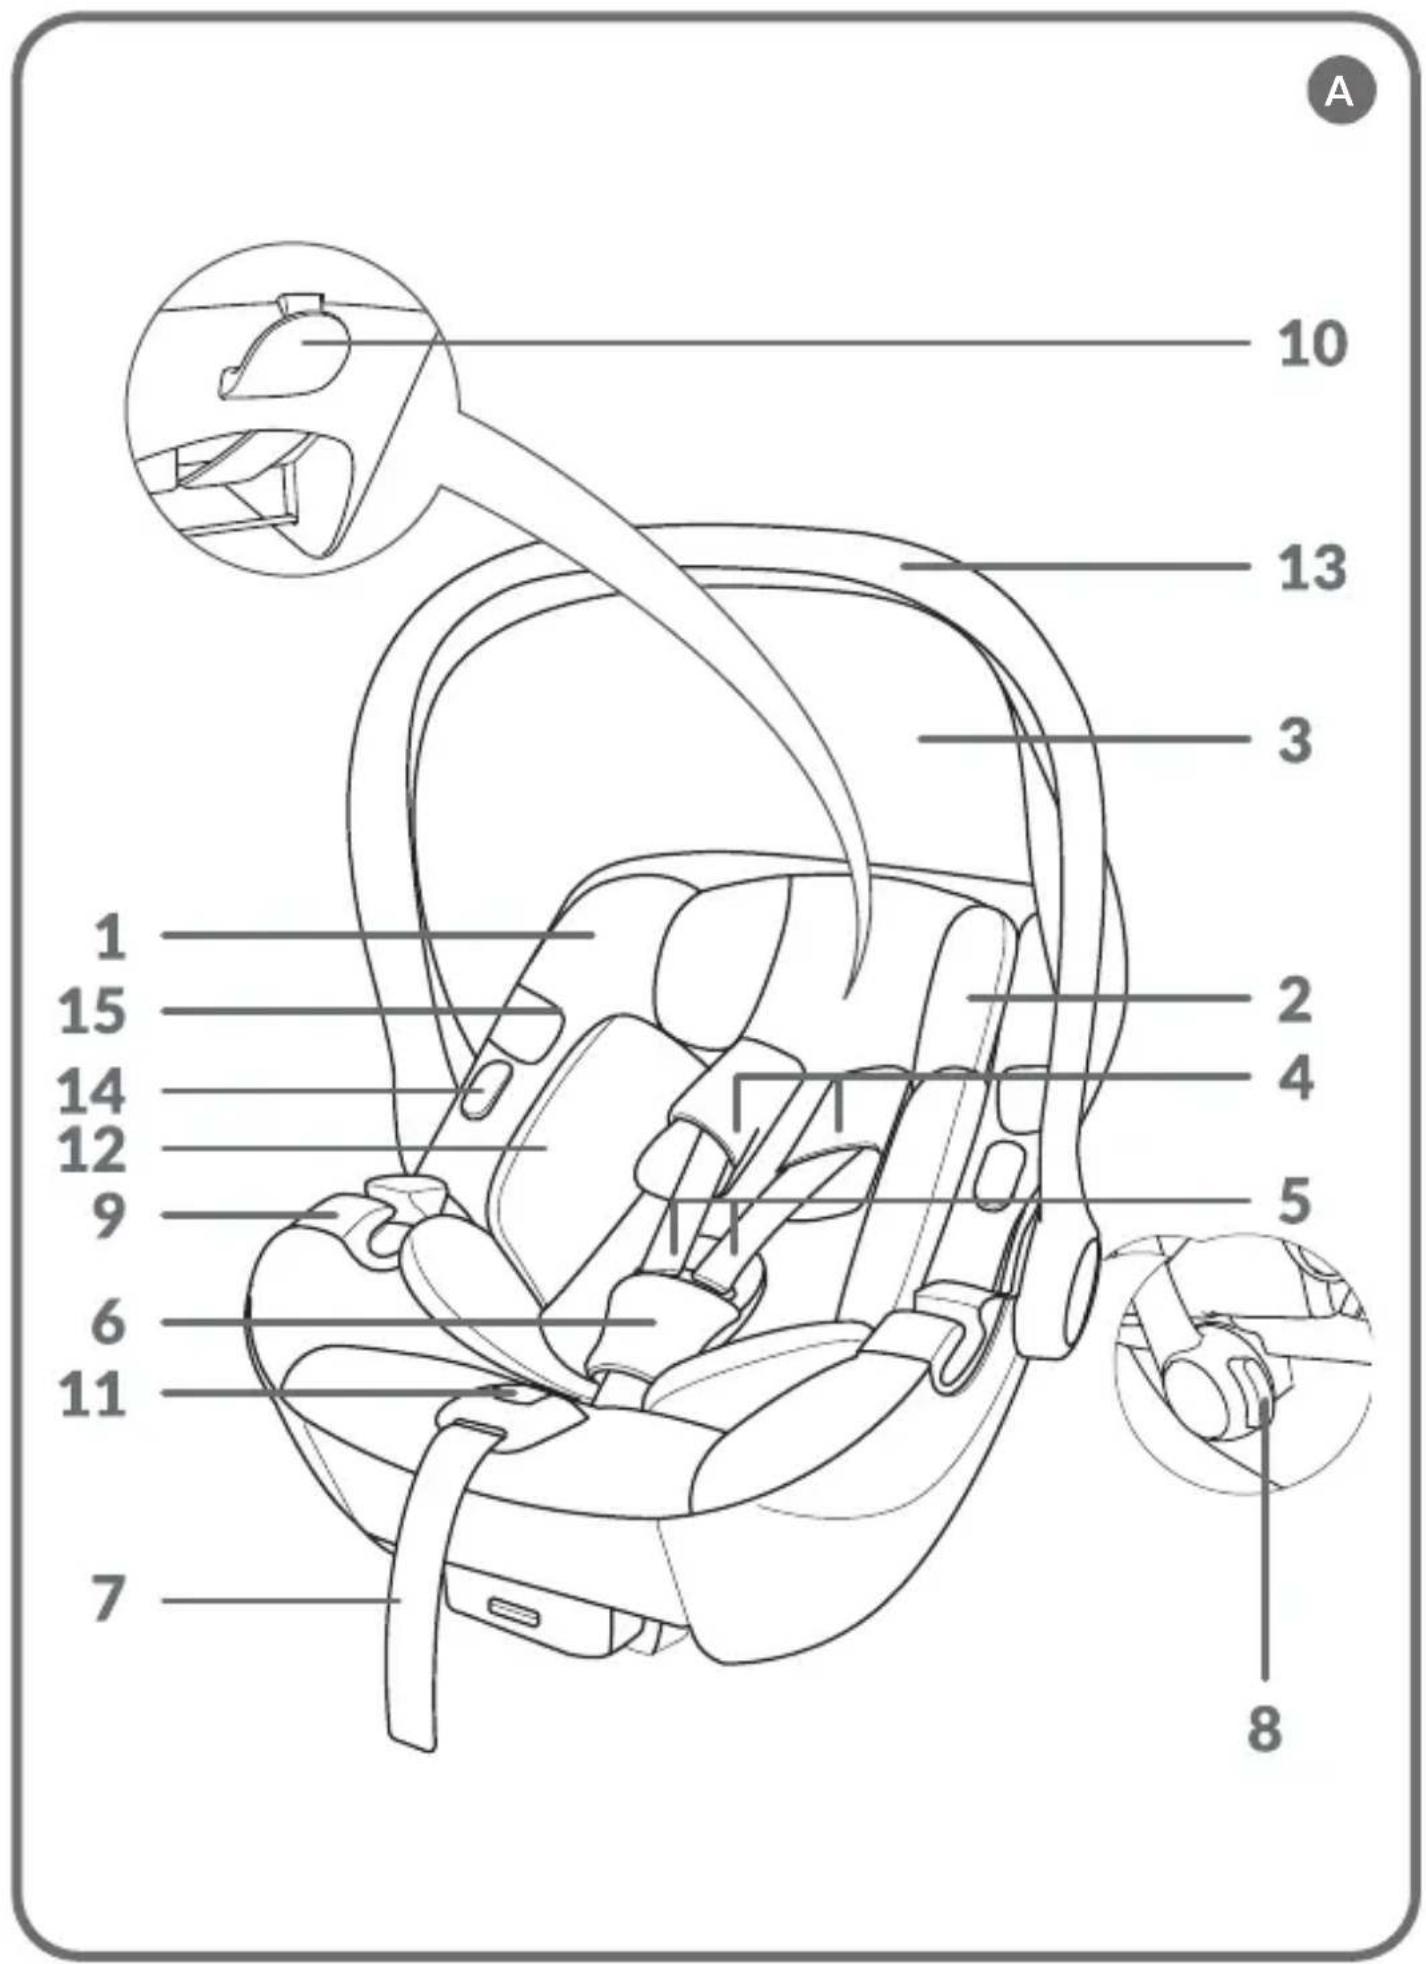
B
natural_image
Illustration of a car seatbelt being adjusted for a hand, showing the seatbelt and seatbelt connector (no text or symbols)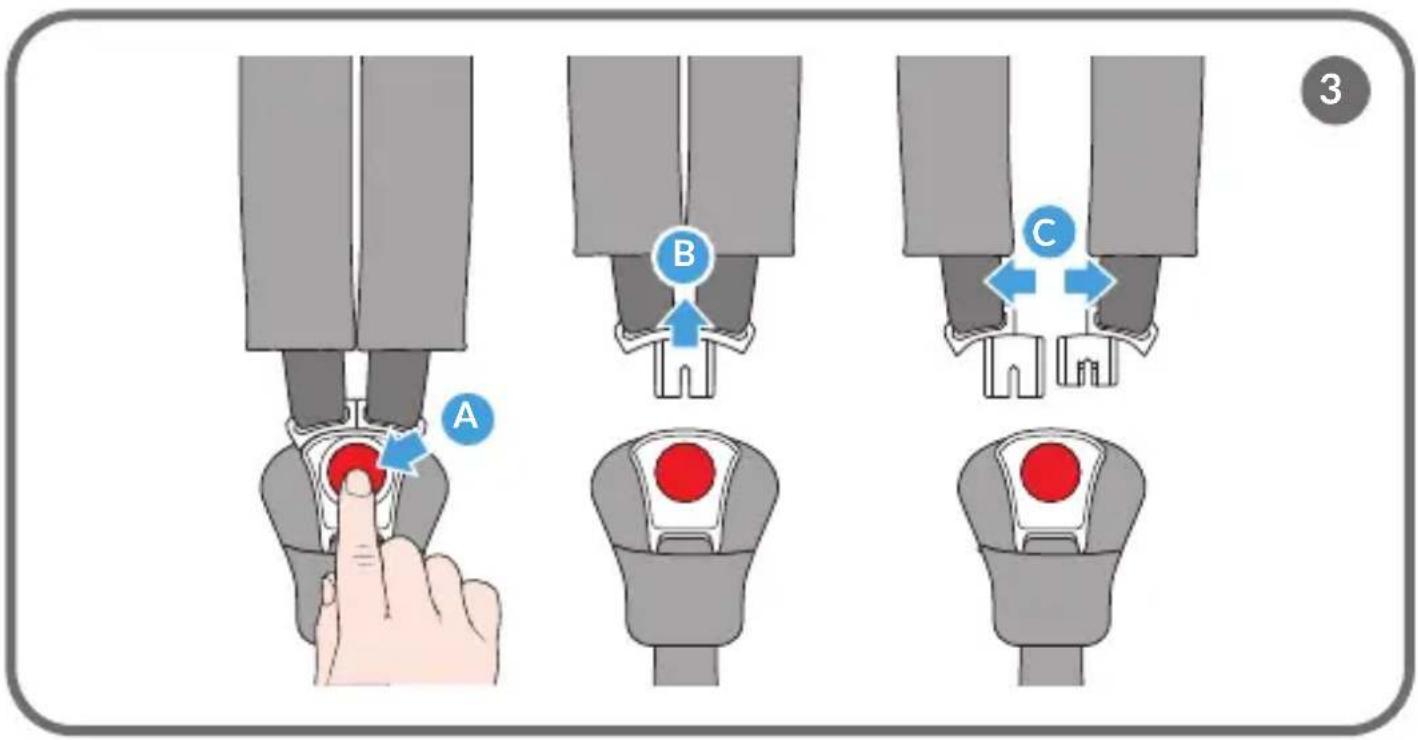
natural_image
Illustration of a car seatbelt device being adjusted for a hand, showing two sequential states (no text or symbols)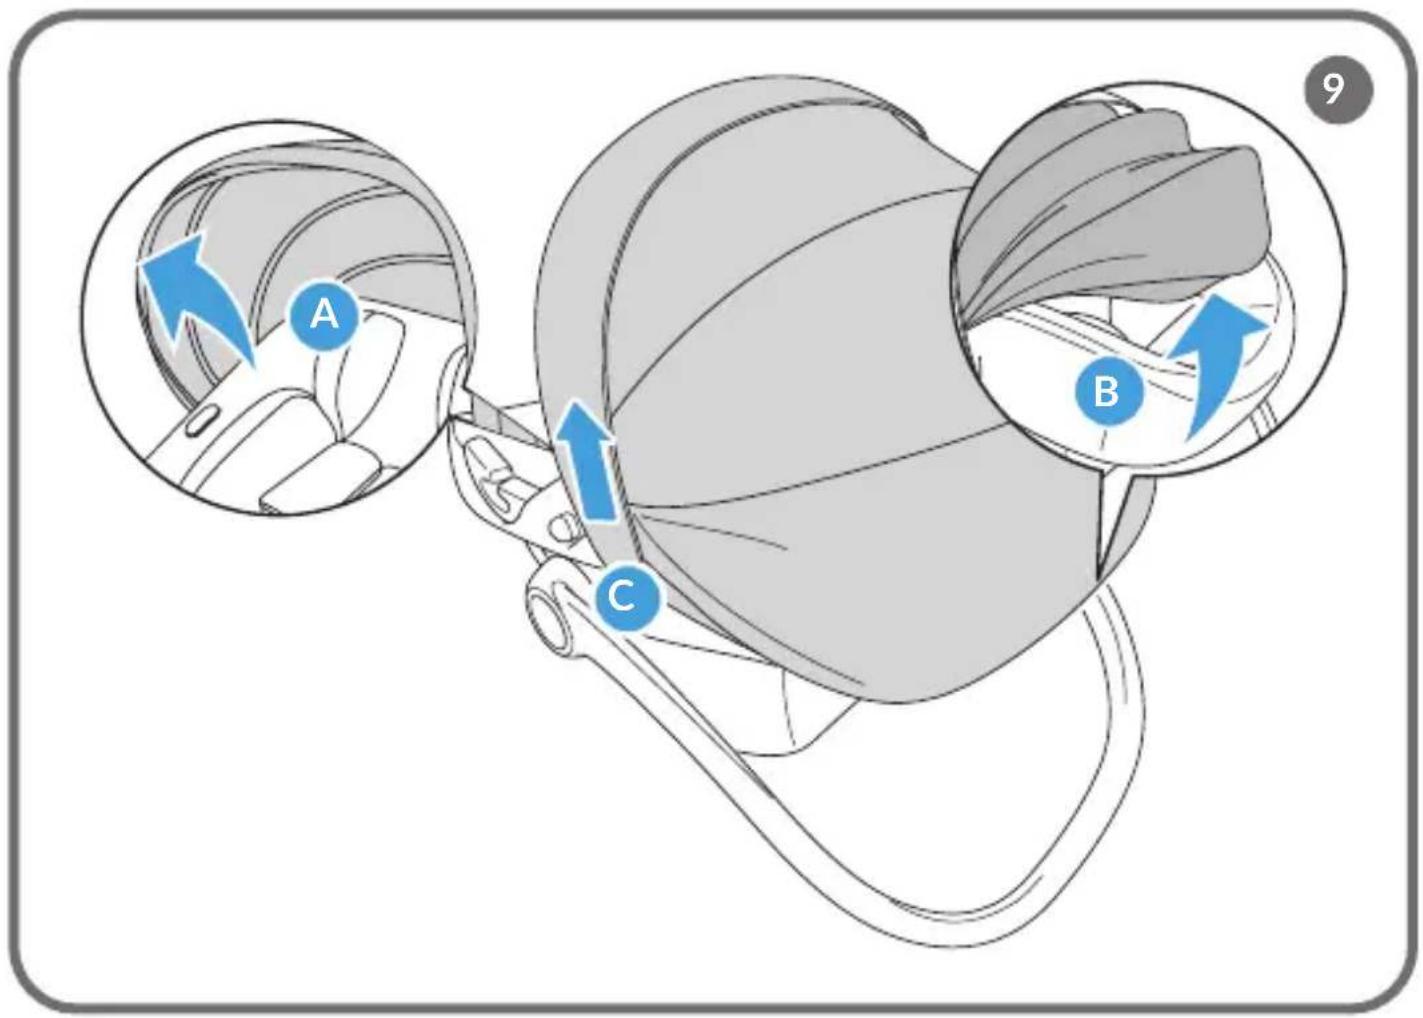
natural_image
Diagram of a curved structural element with layered layers and two rectangular elements, labeled '9A' in the top-right corner (no text or symbols on the diagram itself)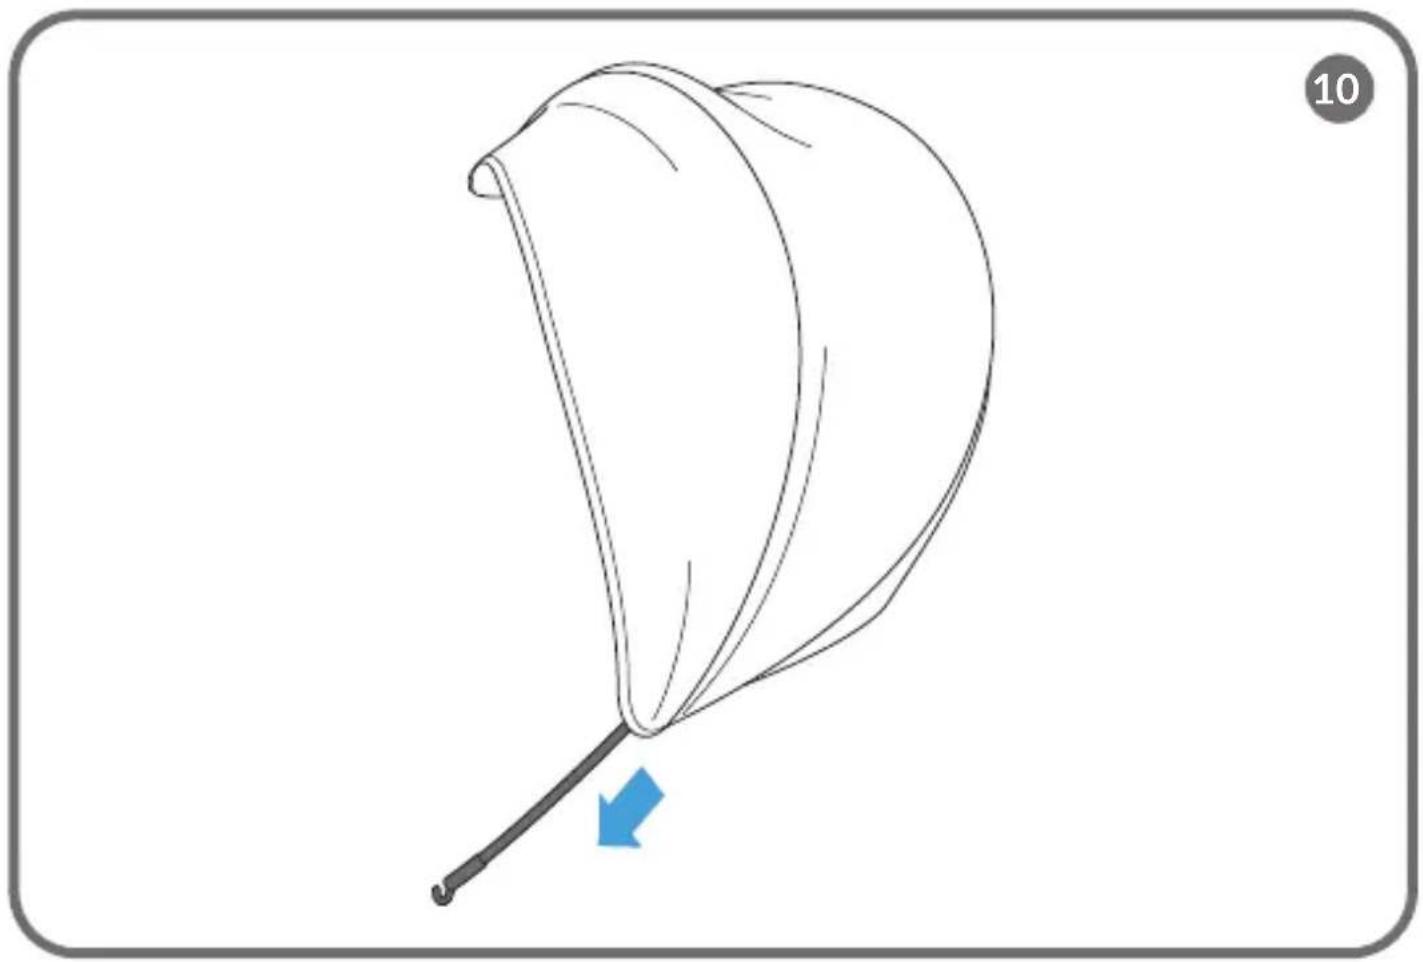
natural_image
Line drawing of a leaf with a blue arrow pointing to it, no text or symbols present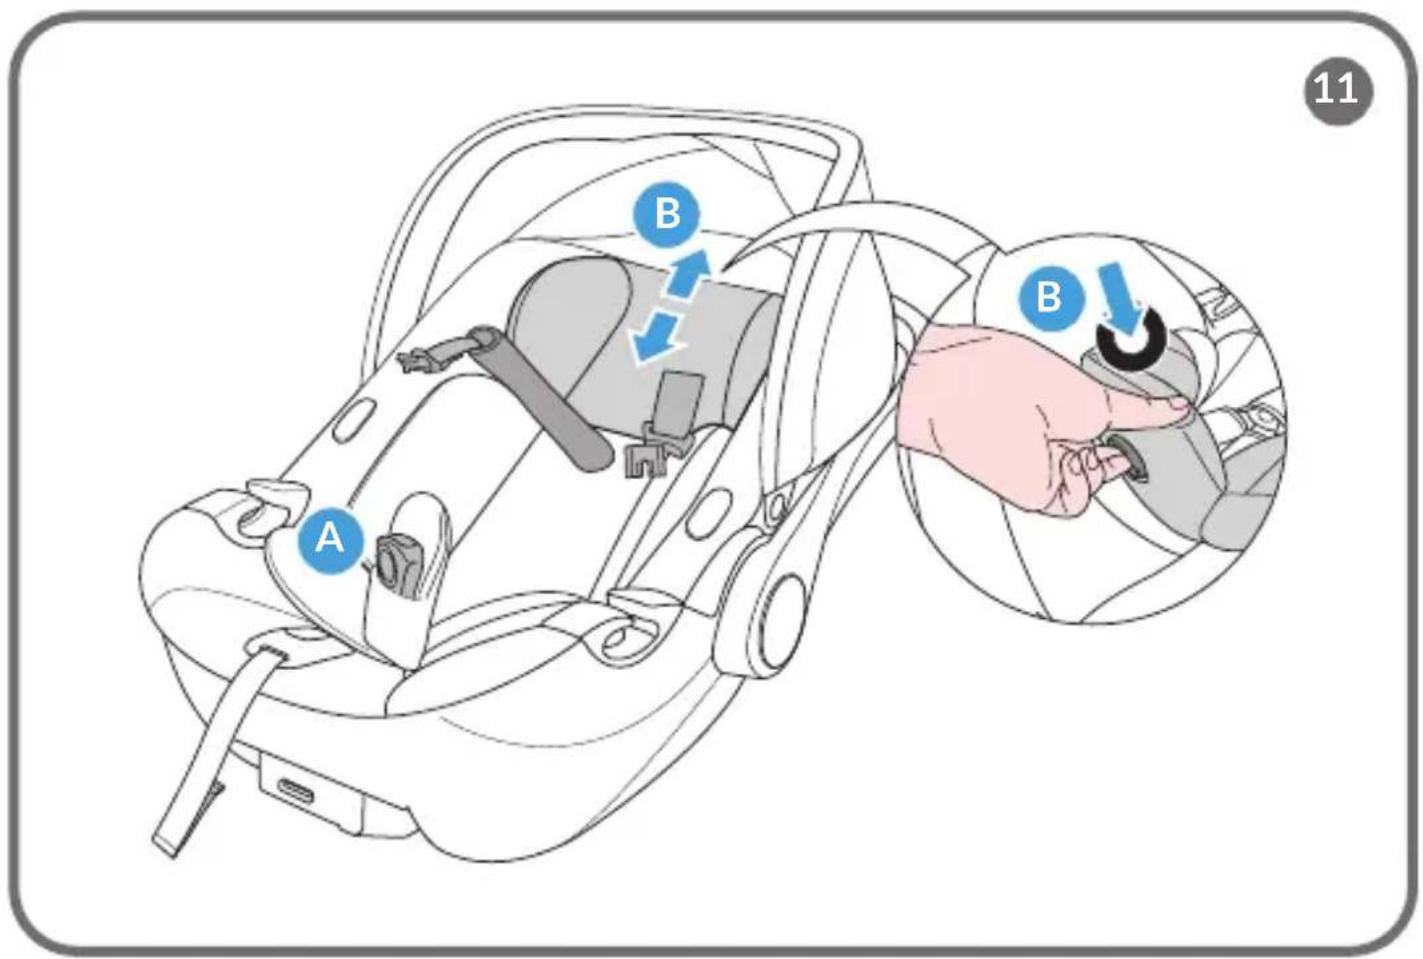
Dear customer!
Should you have any remarks or questions concerning the product, please do not hesitate to contact us: help@lionelo.com
Producer:
BrandLine Group Sp. z o. o.
The product complies with the requirements of the standard: R129/04.
Important:
The product is a Universal Belted Enhanced Child Restraint System. It has been approved according to UN Regulation No. 129 for primary use in universal seating positions, as specified by the vehicle manufacturer in the user manual.
If in doubt, consult the manufacturer of the enhanced child restraint system or the retailer.
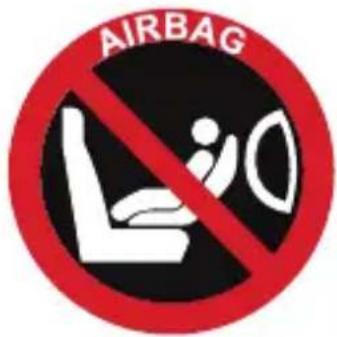
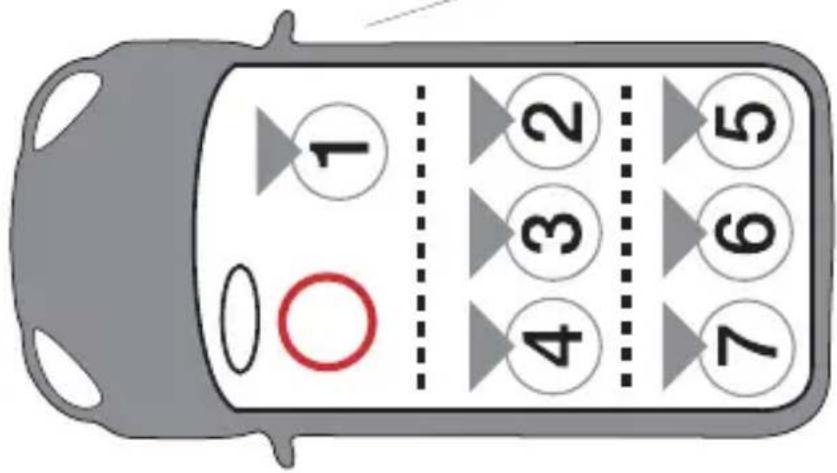
The product is suitable for installation only in positions marked 1 to 7 in fig. B. The seat is designed exclusively for rearward-facing installation using three-point seat belts (fig. B). It is recommended to mount the seat exclusively on the rear seats of the vehicle. Front seat mounting is only possible if the front airbag is deactivated.
WARNINGS
- The product is designed for children between 40 to 87 cm in height and weighing up to 13 kg.
- The hard and plastic components of the enhanced child restraint system must be positioned and installed in a manner that prevents them from being caught by a sliding seat or vehicle door during normal vehicle operation.
-
Do not install the child car seat in a seating position where the front airbag is active.
-
All child restraint systems must be appropriately sized for the child. The straps must not be twisted.
- The belts securing the child restraint system to the vehicle must be tight.
- If the product has been subjected to significant forces, such as impact, it should be replaced.
- Do not modify the seat or add any new components without authorisation of the relevant approval authority. For maximum safety of your child, make sure to attach and use the system in accordance with the instructions in the manual.
- The plastic components of the seat may heat up in the sun and cause burns on the child's skin.
- Never leave a child unattended in the child seat inside a vehicle.
- Luggage and similar items must be properly secured to prevent injuries in case of a collision.
- Do not use the seat without the fabric cover.
- Do not substitute the cover with an item from another set. The cover is an integral component of the set and affects the operation of the restraint system.
- Always keep this user manual with you for future use.
- Consult the user manual provided by the vehicle manufacturer.
DESCRIPTION OF PARTS (FIG. A)
- Seat
- Headrest
- Canopy
- Harness pads
- Seat harness
- Seat harness buckle protector
- Tension adjustment strap
-
Handle adjustment button
-
Lap strap guide
- Shoulder strap guide
- Tension adjustment button
- Reduction insert with lumbar support
- Seat handle
- Button releasing stroller adapters
- Seat harness magnets
PRODUCT ADJUSTMENT
Headrest adjustment
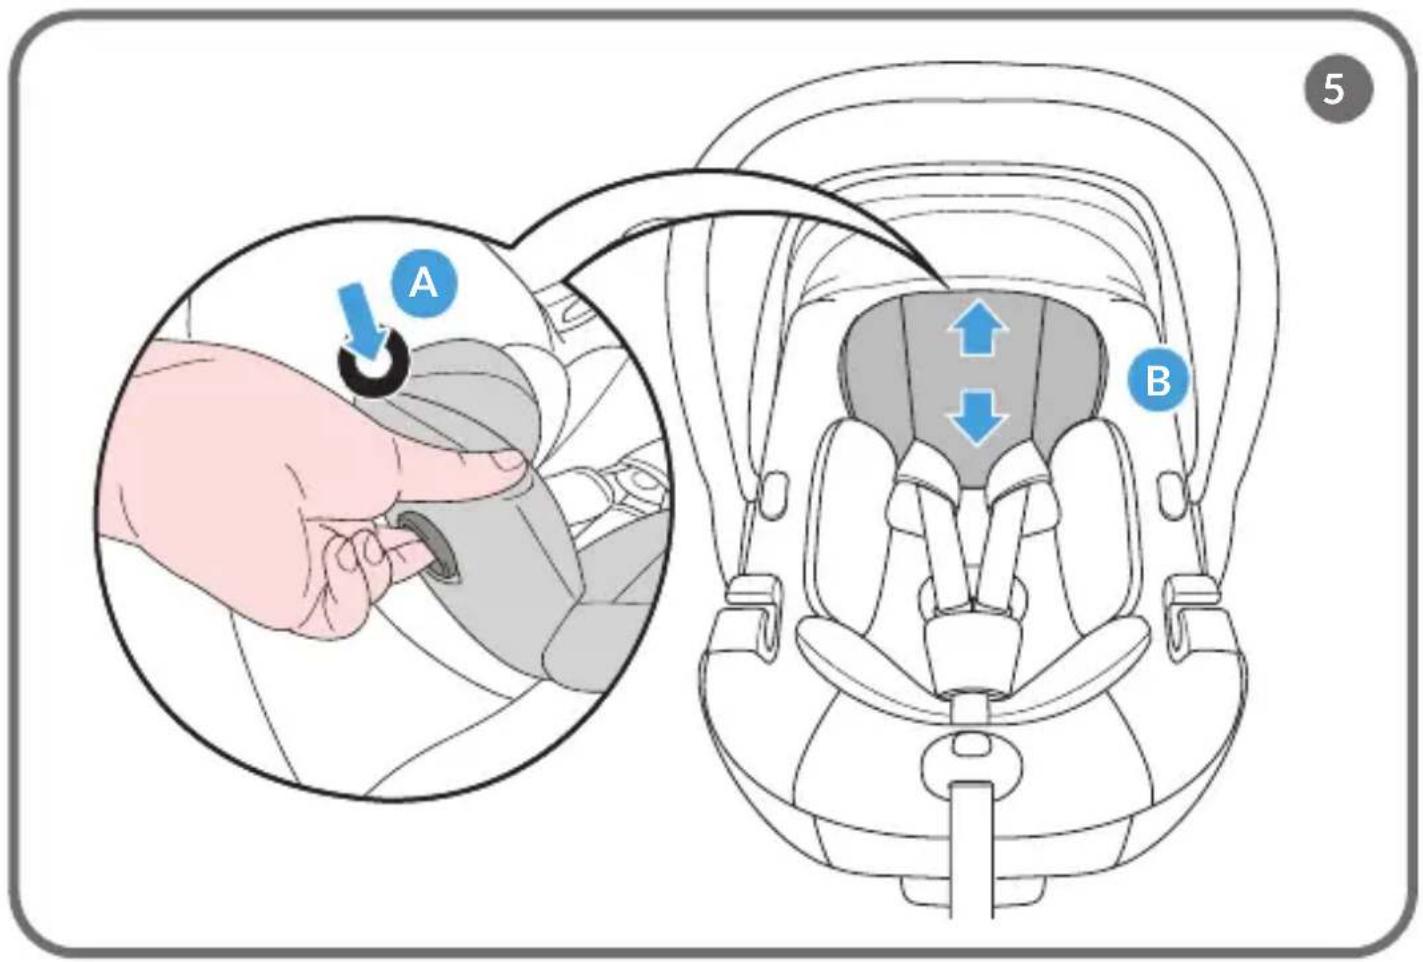
To adjust the height of the headrest:
- Loosen the harness (fig. 1). This will make it easier to adjust the height of the headrest.
- Lift the lever and then adjust the headrest up or down to the desired height. The headrest can be adjusted within a range of 7 cm.
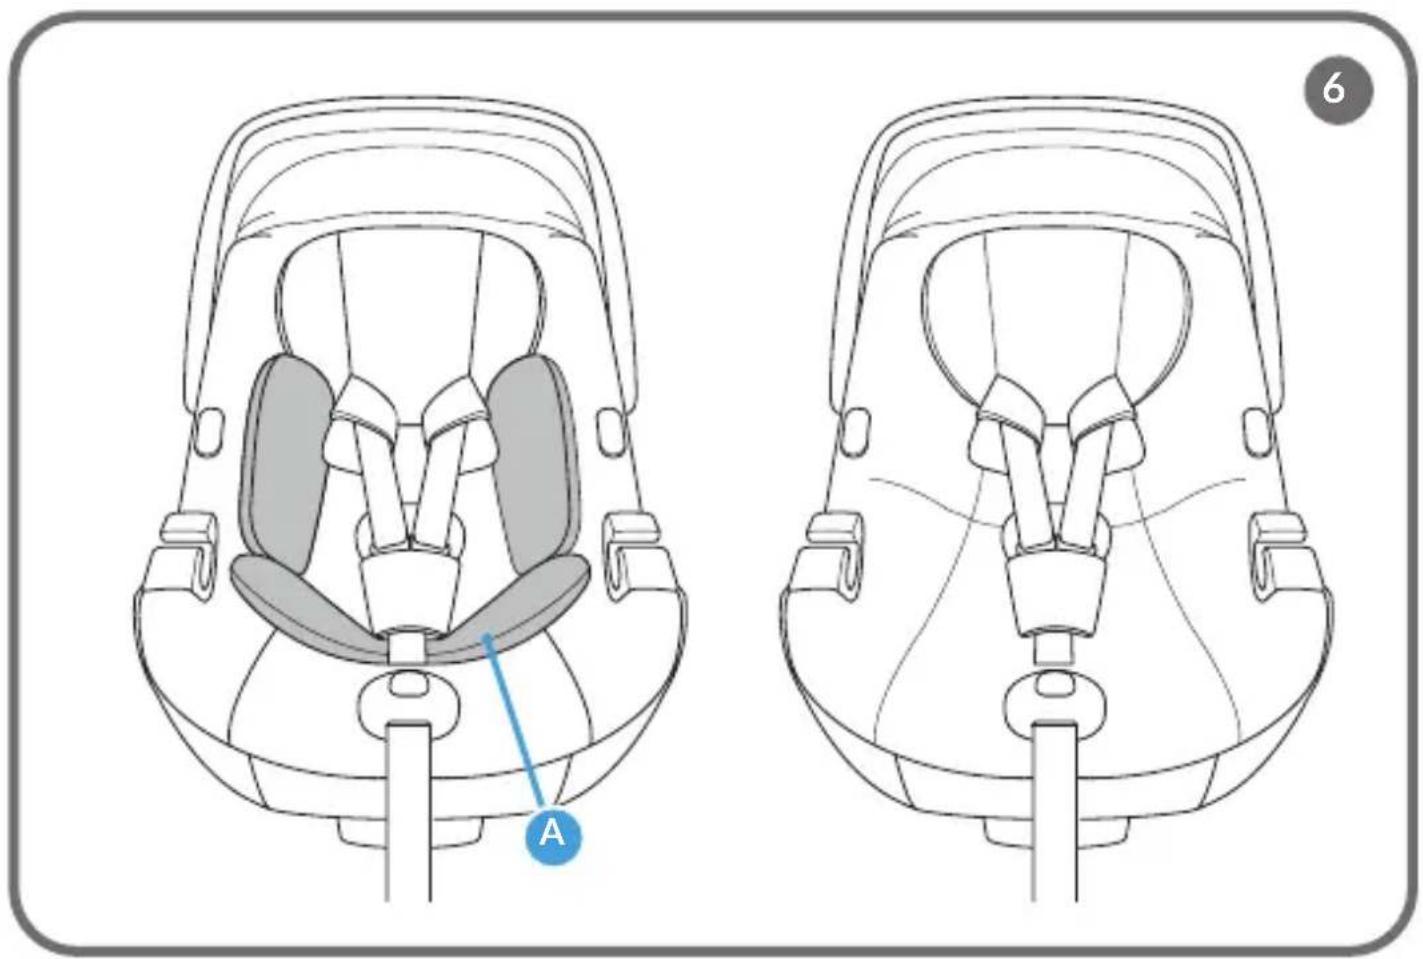
Reduction insert
Important! Children up to 75 cm in height must use a reduction insert (A, fig. 6). The reduction insert also features a lumbar support that provides extra stability for the child. The lumbar support can be removed from the reduction insert as the child grows. Remove the reduction insert when the child exceeds 75 cm in height and continues to use the seat.
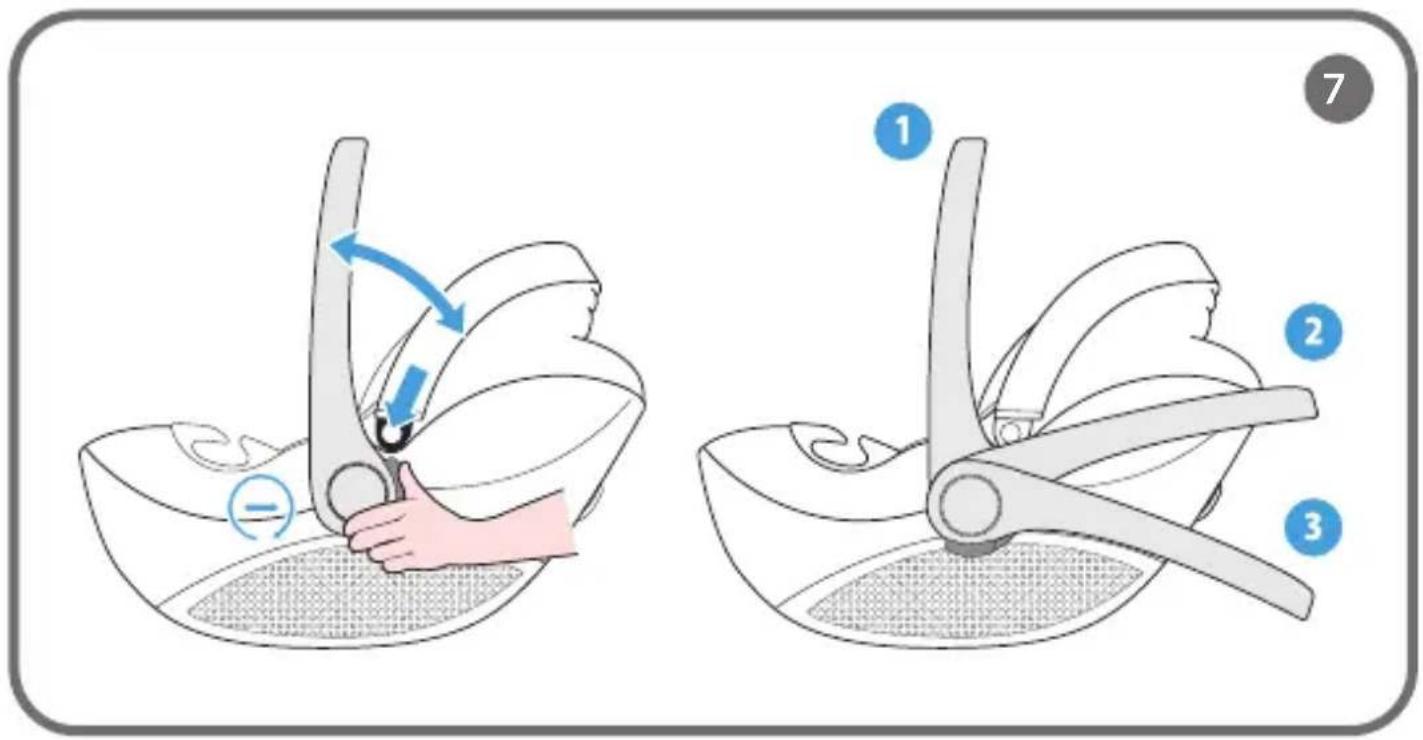
Handle adjustment
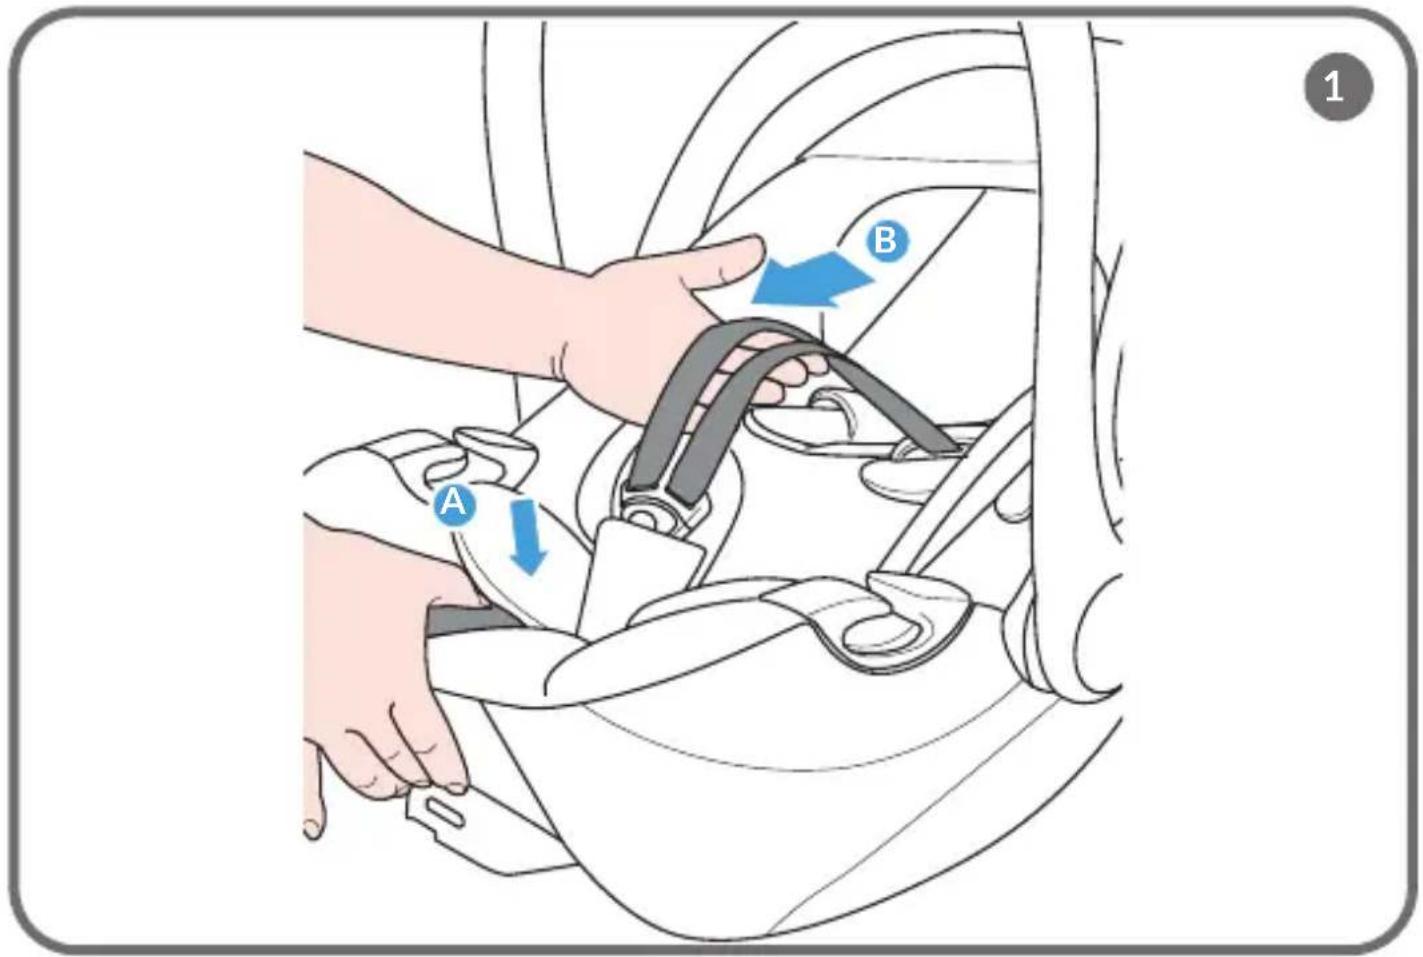
To change the handle position, press the handle adjustment buttons on both sides of the child car seat (fig. 7) and move the handle to the desired position.
Three positions are available:
• Car and carry (1, fig. 7)
- Storage (2, fig. 7)
- Seat positioning on flat surface (3, fig. 7)
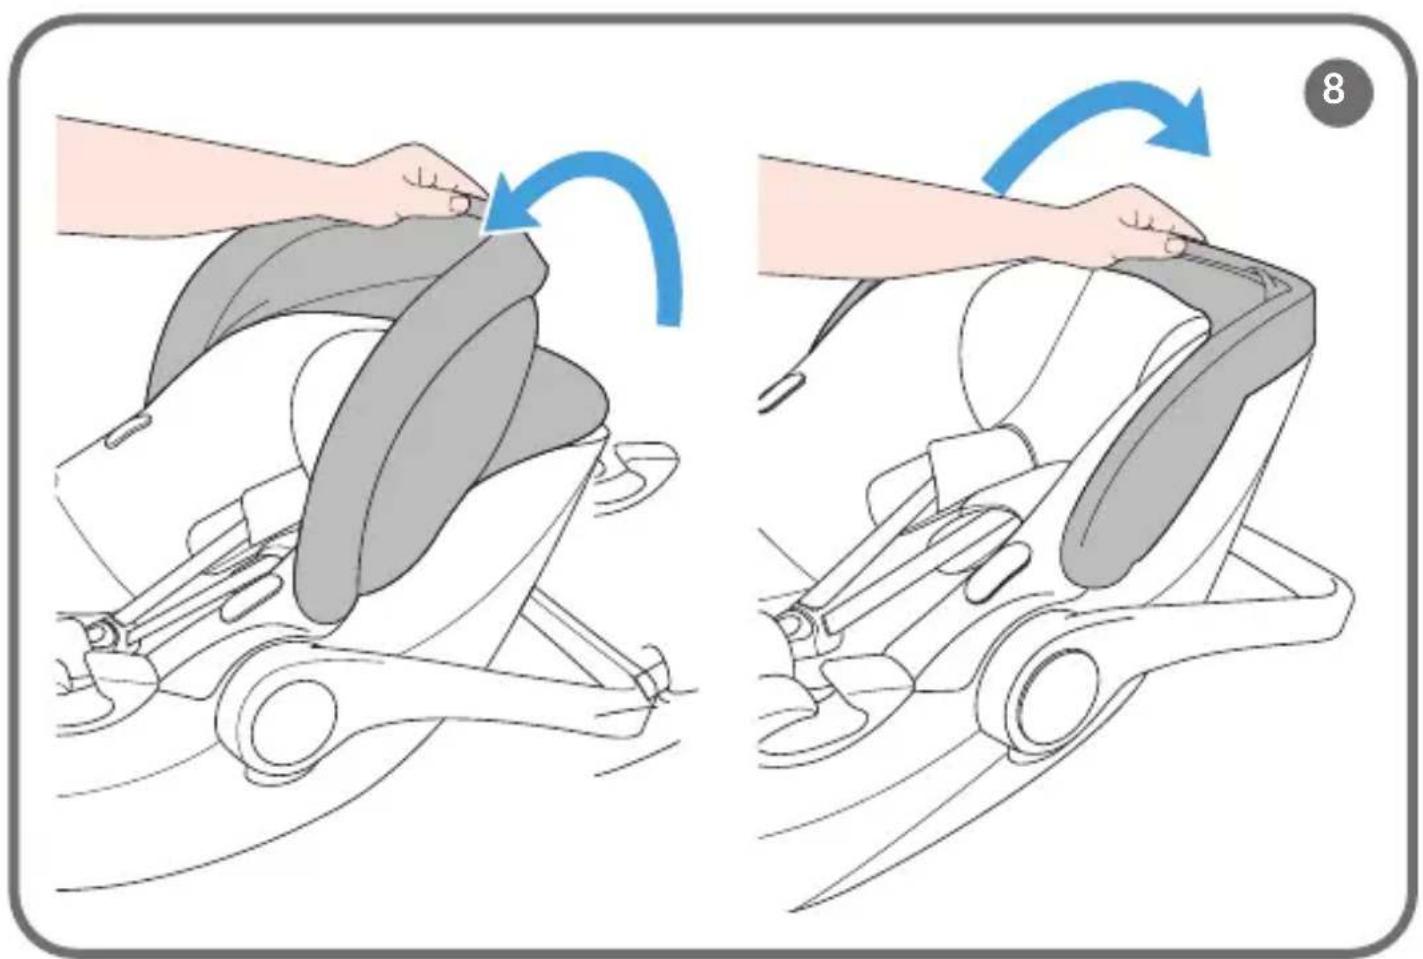
Canopy adjustment
- Adjust the canopy to the desired position by pulling the front of the canopy in the appropriate direction (fig. 8).
- To remove the canopy cover, detach the fastenings (A, fig. 9) and then slide off the cover (B, fig. 9). Remove the stiffening wire from the fabric cover (fig. 10).
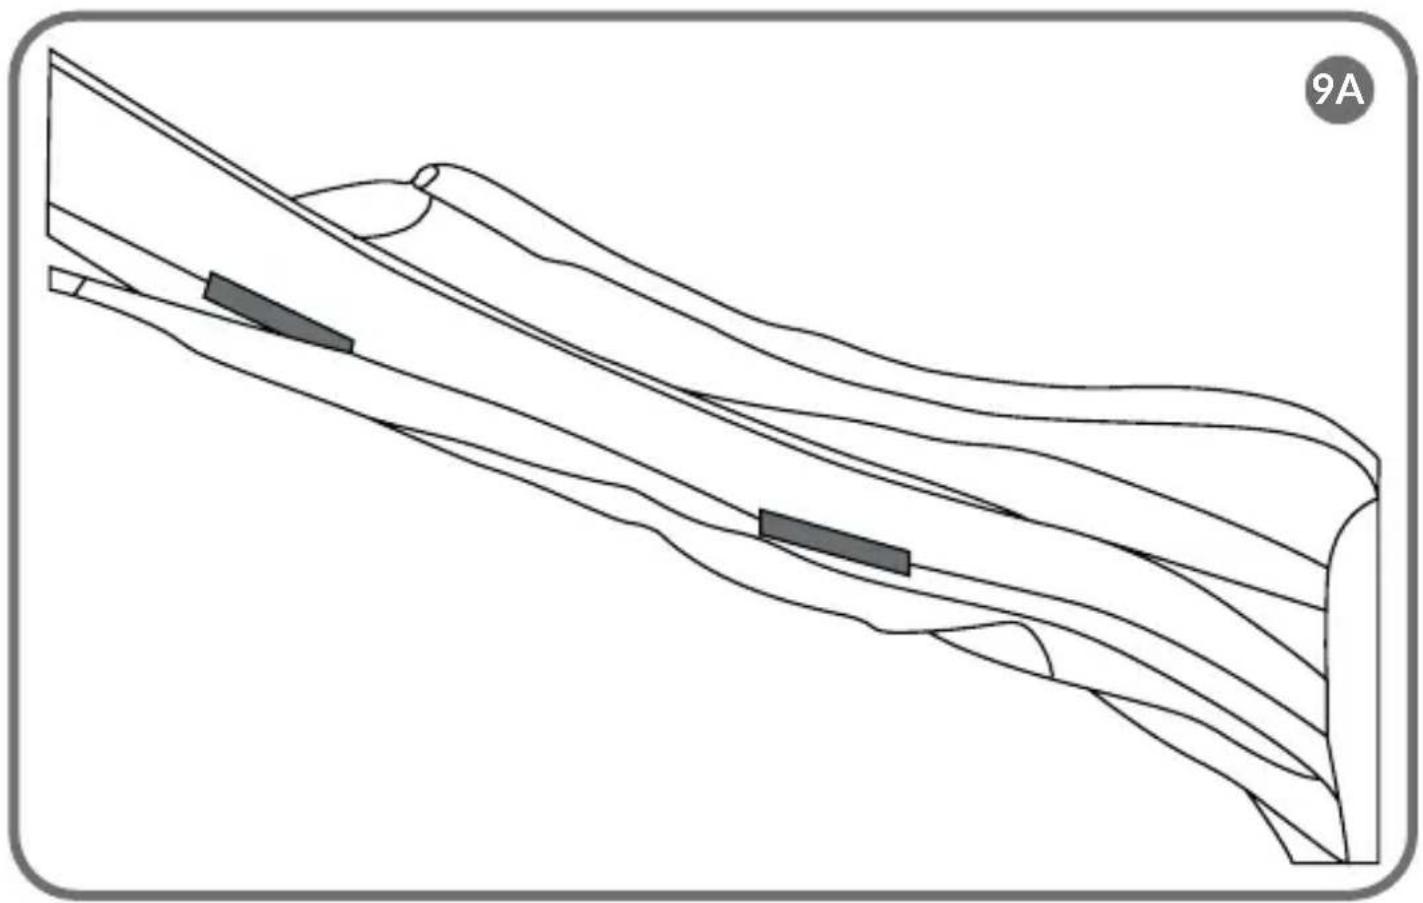
- To reattach the cover, remove the plastic part of the canopy (C, fig. 9). Place the fabric over the plastic part and alternately secure it to the fastenings (fig. 9A). Then, reattach it to the seat and position the fabric on the carrier.
BUCKLING THE CHILD IN THE SEAT
- Place the child car seat on a level surface.
- Loosen the harness by pressing the tension adjustment button and pulling on the straps (fig. 1).
- Unfasten the seat harness by pressing the red button on the buckle (A, fig. 3) and by sliding out and unfastening the harness connectors (B, C, fig. 3). To make it easier to put the child in the car seat, use the shoulder strap magnets and the crotch strap (14, fig. A).
- Place the child in the seat.
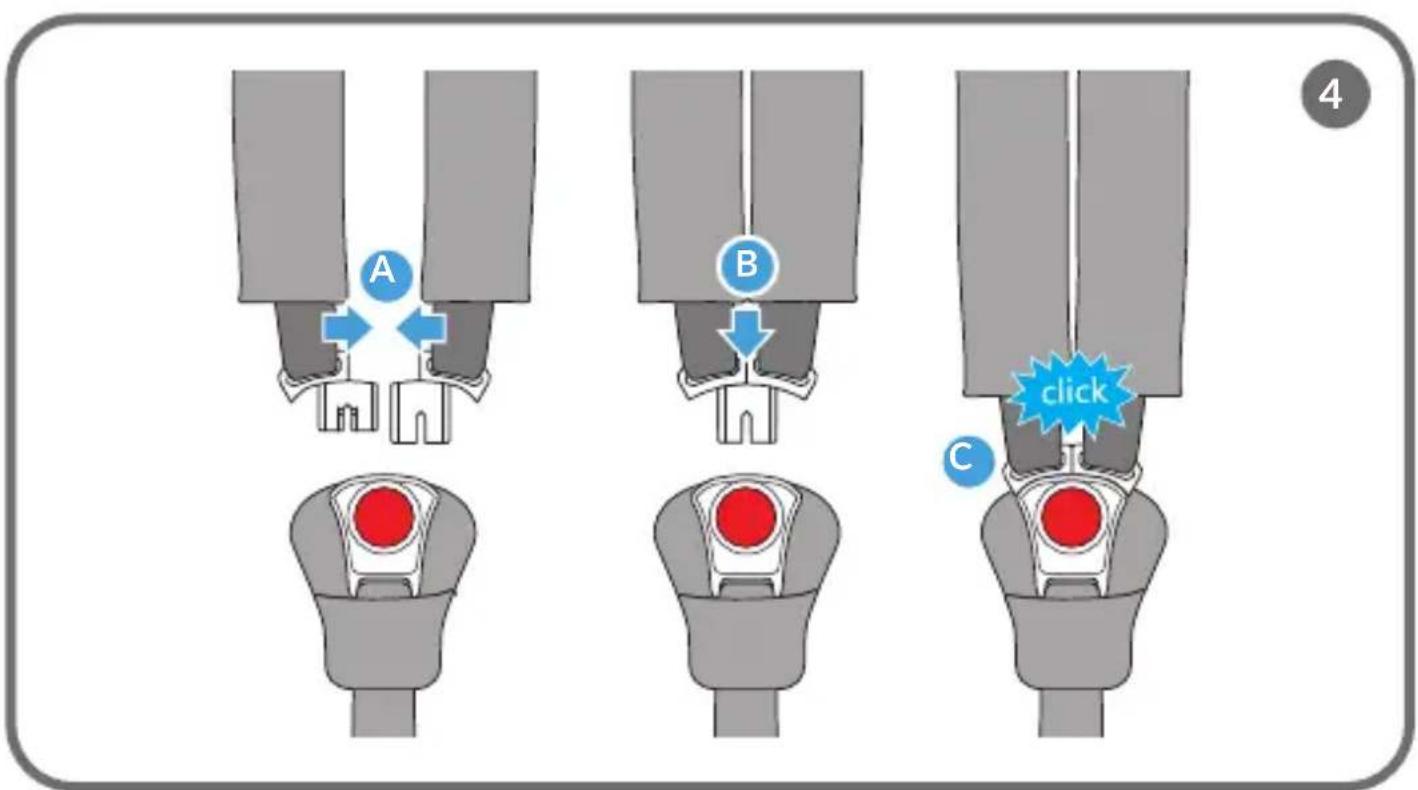
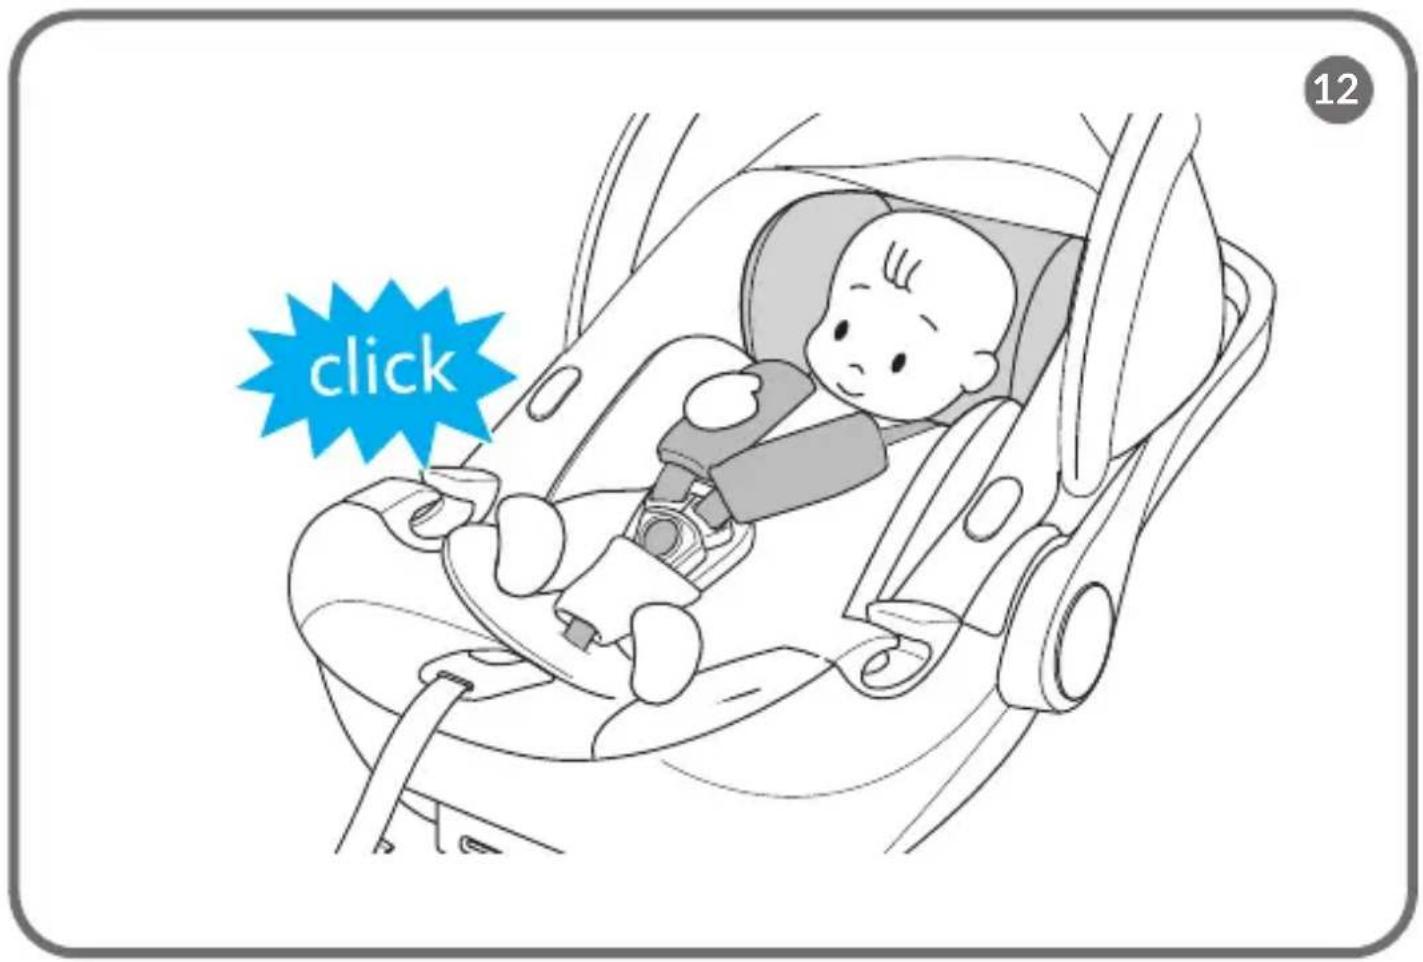
- Fasten the harness (fig. 12). To fasten the seat harness, connect the strap connectors (A, fig. 4) and then slide them into the buckle (B, fig. 4). You will hear a distinct click (C, fig. 4).
- Adjust the headrest to the child's height (fig. 11). The headrest adjustment is integrated with the harness height adjustment.
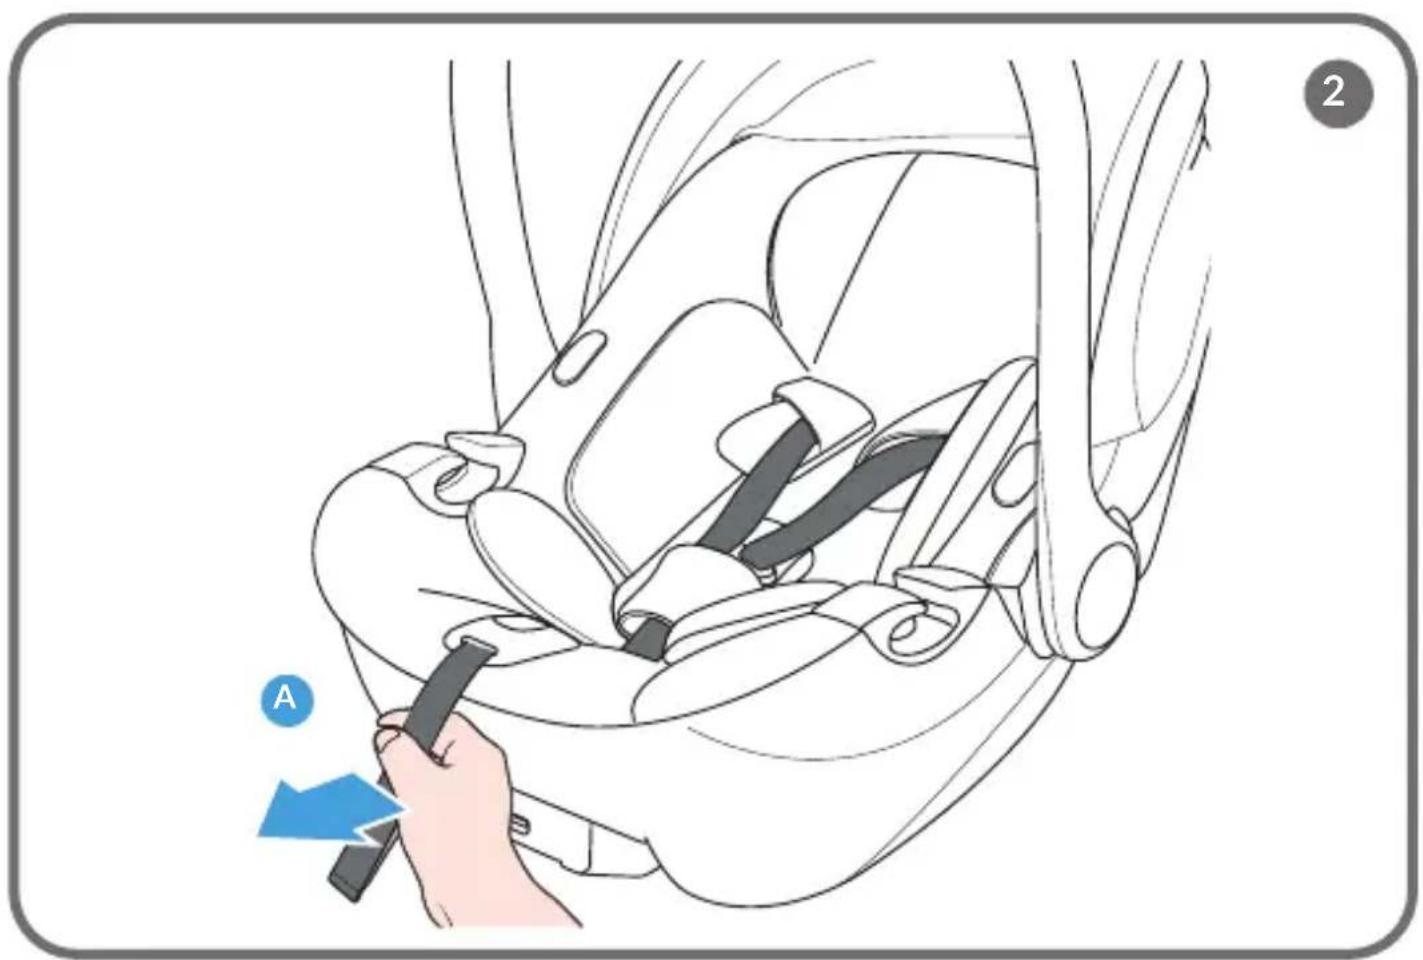
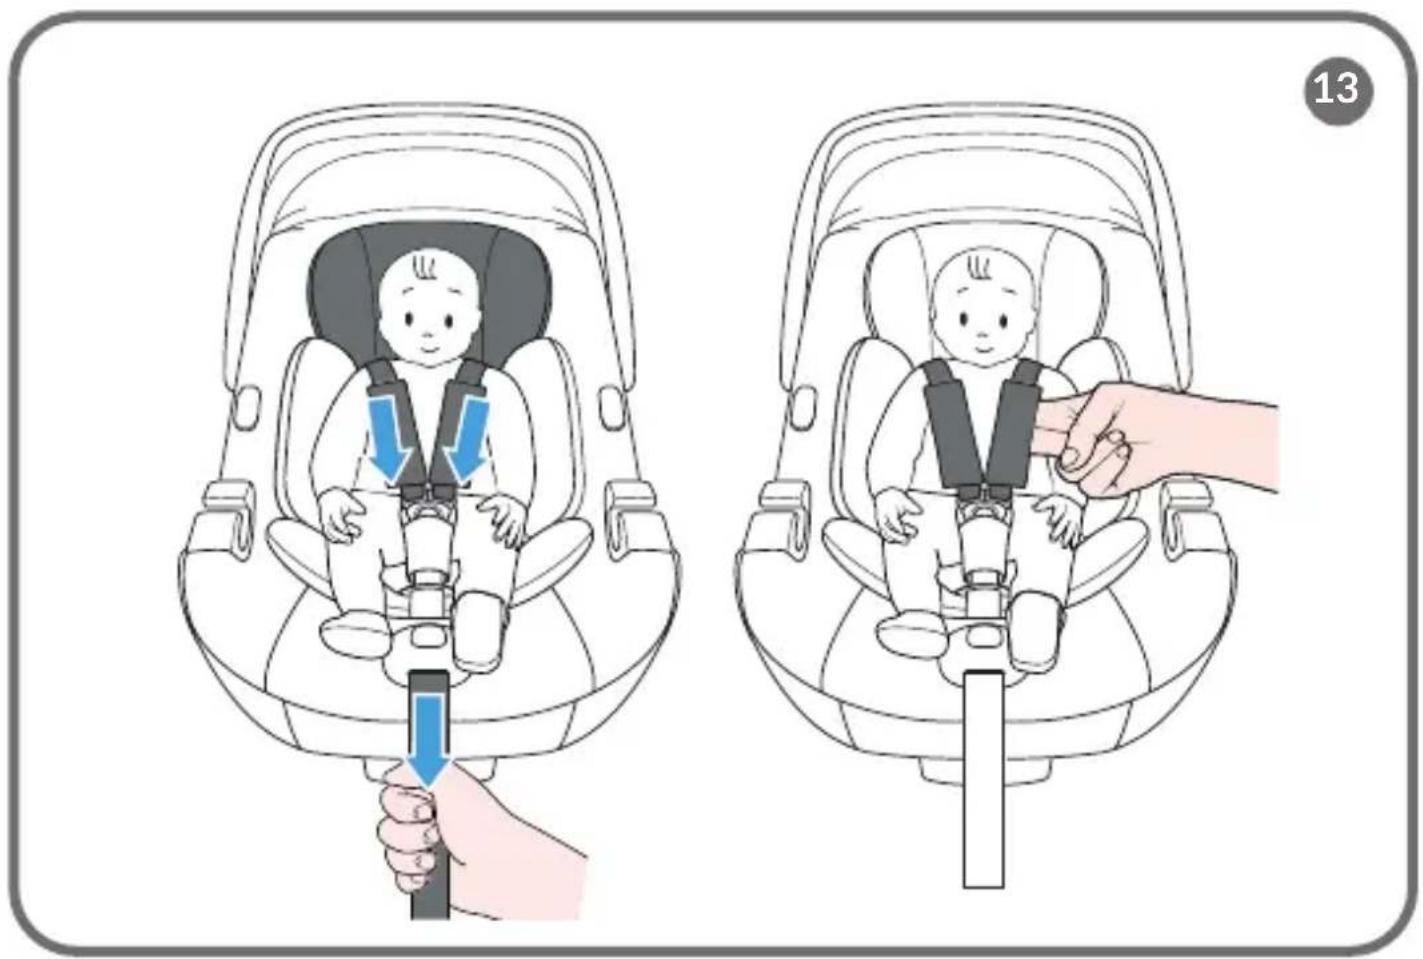
- To tighten the seat harness, pull the strap tension adjustment strap in the direction indicated by the arrow (A, fig. 13).
Important! Ensure that the shoulder straps fit snugly around the child's shoulders.
Correct tension is ensured if there are two fingers in the space between the shoulder strap and the child's chest (fig. 13). The straps should be tight against the child's body, but not too tight and causing discomfort.
Important! Make sure that the harness fits the child's body snugly, and the straps are not twisted.
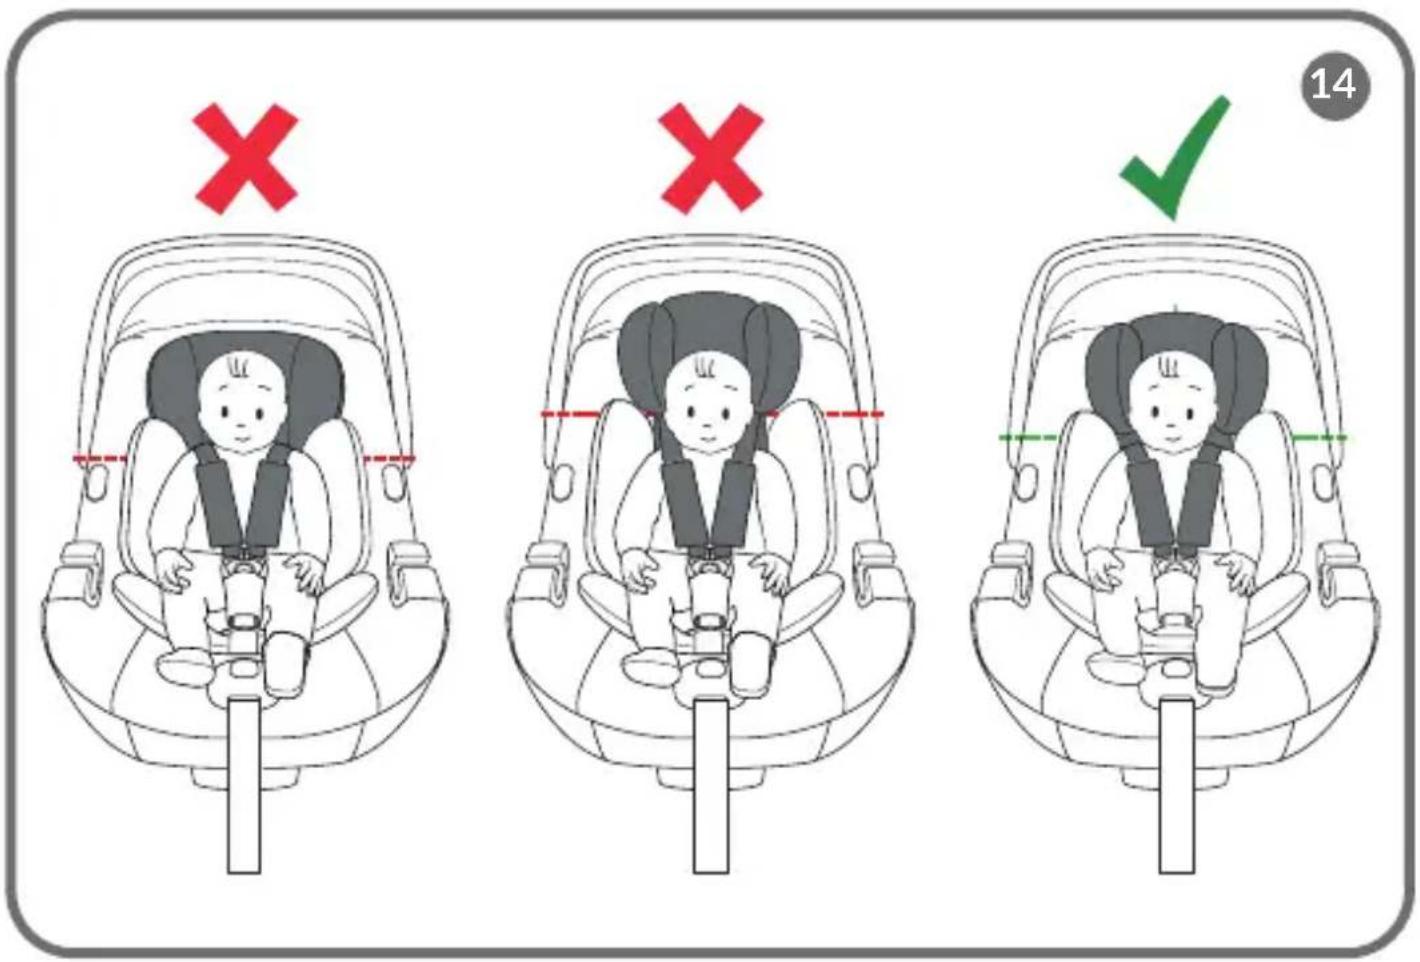
Important! Adjust the headrest so that the shoulder straps are not positioned too high (at or above the ear line) or too low (behind the child's back) (fig. 14). Adjust the shoulder strap height so that it aligns with or is slightly above the child's shoulder level where it enters the seat backrest.
UNBUCKLING THE HARNESS
Loosen the harness by pressing the tension adjustment button and pulling on the straps (fig. 1). Unfasten the seat harness by pressing the red button on the buckle (A, fig. 3) and by sliding out and unfastening the harness connectors (B, C, fig. 3).
INSTALLATION IN THE CAR USING THE CAR'S SAFETY BELT
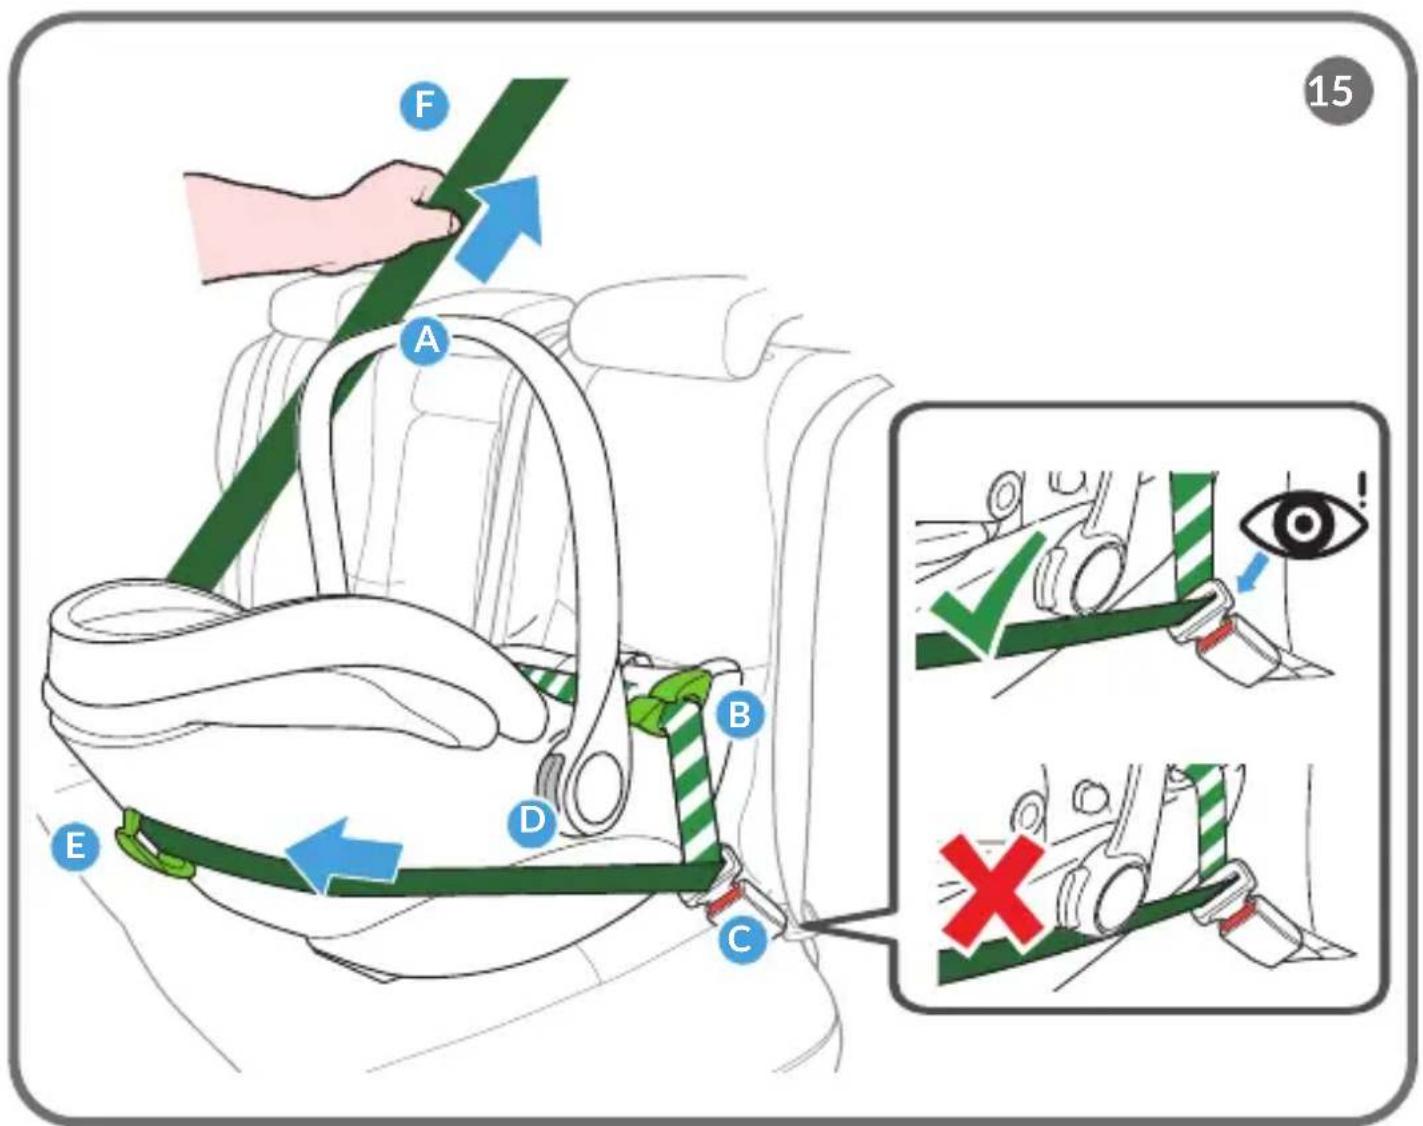
- Set the car seat handle in the car position (for carrying) (A, fig. 15). Then, place the child car seat on the vehicle seat, ensuring it is as close as possible to the backrest of the rear seat. The child car seat must be positioned rearward-facing.
- Thread the fully extended lap section of the car seatbelt through the green lap belt guides (B, fig. 15) and fasten the belt (C, fig. 15). You will hear a clicking sound.
- Route the shoulder section of the car safety belt under the seat handle hinge (D, fig. 15) and through the green shoulder belt guide at the back of the seat (E, fig. 15). Make sure the belt is tight.
- Tighten the lap belt by pulling it horizontally. Next, pull the shoulder belt as far as possible toward the vehicle's belt retractor (F, fig. 15).
Important! Make sure the straps are not twisted. Ensure that the straps are correctly positioned in the guides.
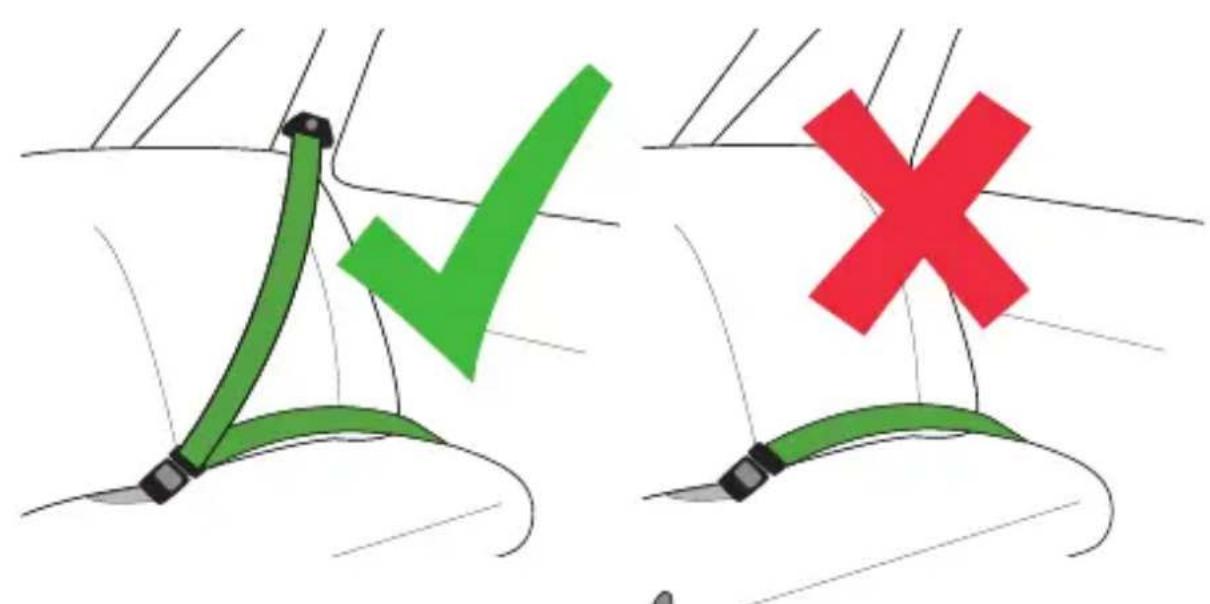
Important! Ensure the car safety belt buckle is positioned correctly. Avoid positioning the child car seat too close to the car safety belt buckle. The correct position is indicated by the symbol V( fig. 15).
Important! The child car seat can also be installed on an ISOFIX base (sold separately). Refer to the base's user manual for detailed instructions.
DISASSEMBLY OF THE SEAT
Unbuckle the car safety belt, remove it from the guides, and then take the child car seat out of the car.
CHILD CAR SEAT INSTALLATION ON THE STROLLER FRAME
- Insert the adapters into the designated slots on the stroller frame, as instructed in the stroller's user manual. You will hear a clicking sound.
- Insert the child car seat into the adapters. Ensure it is securely locked into the stroller frame. A clicking sound indicates that the element is mounted correctly.
- To disengage the child car seat from the stroller frame, press the release buttons on the stroller adaptors (14, fig. A).
REMOVAL OF SEAT COVER
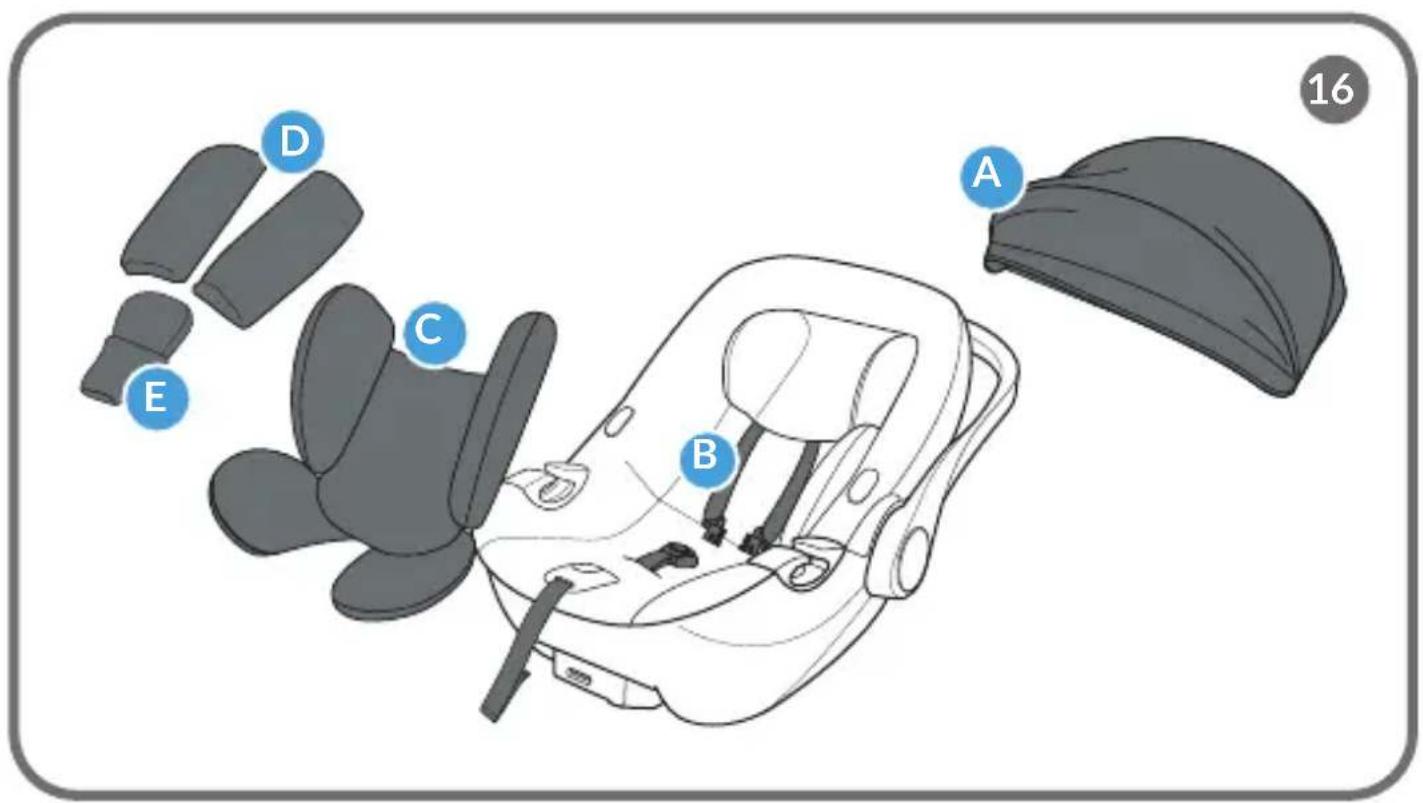
- Remove the canopy cover (A, fig. 16, see: Canopy adjustment).
- Unbuckle the seat harness (B, fig. 16, see: Unbuckling the seat harness).
- Remove the reduction insert (C, fig. 16). Remove the protective pads (D, fig. 16) and the seat harness buckle protector (E, fig. 16).
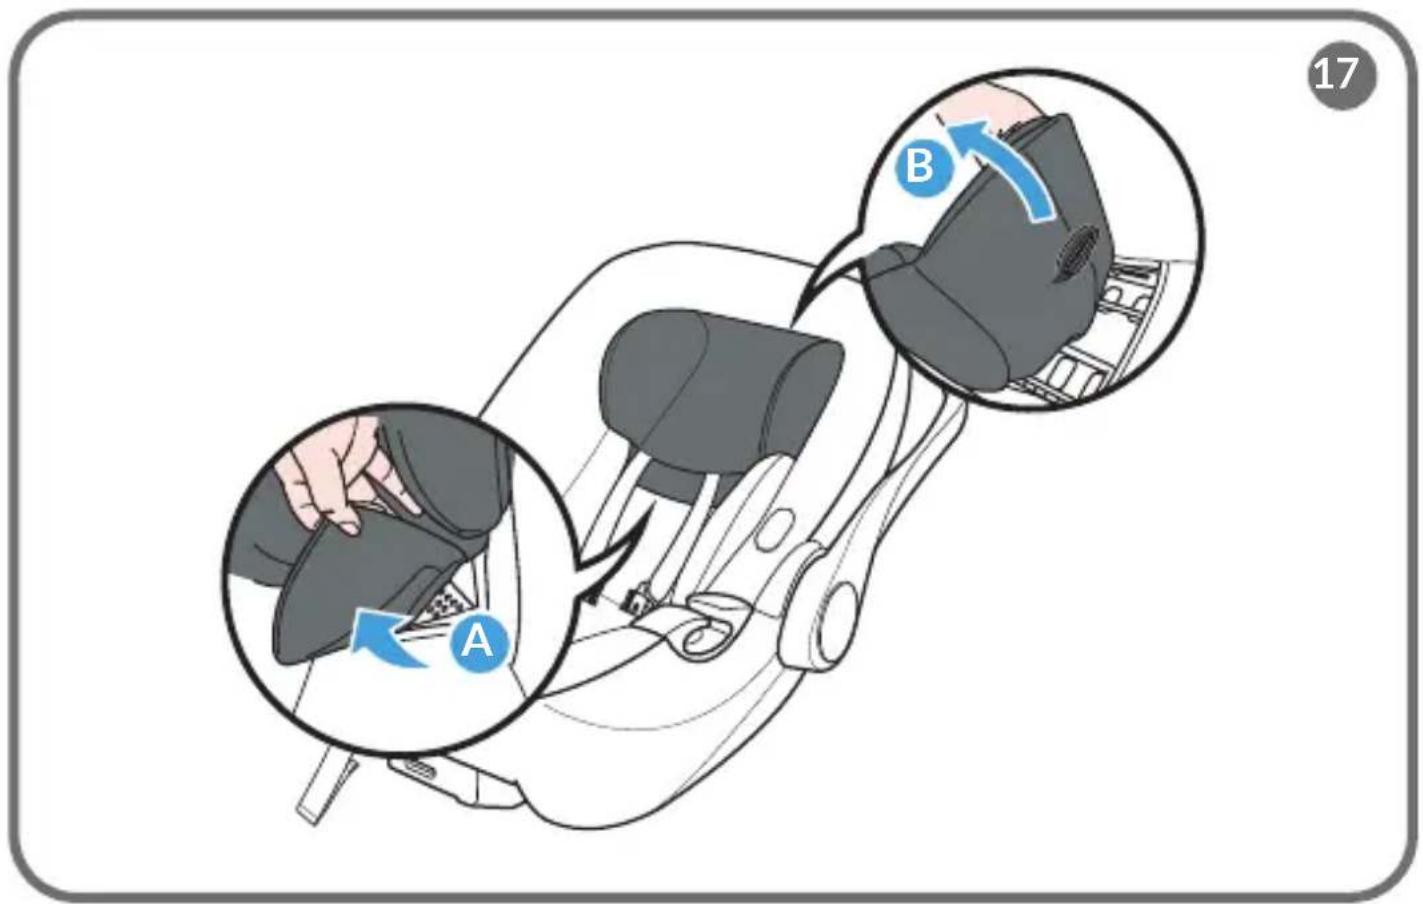
- Tilt the lower part of the headrest and slide the cover off (A, fig. 17). Next, pass the headrest adjustment lever through the corresponding slot (B, fig. 17) and remove the headrest cover.
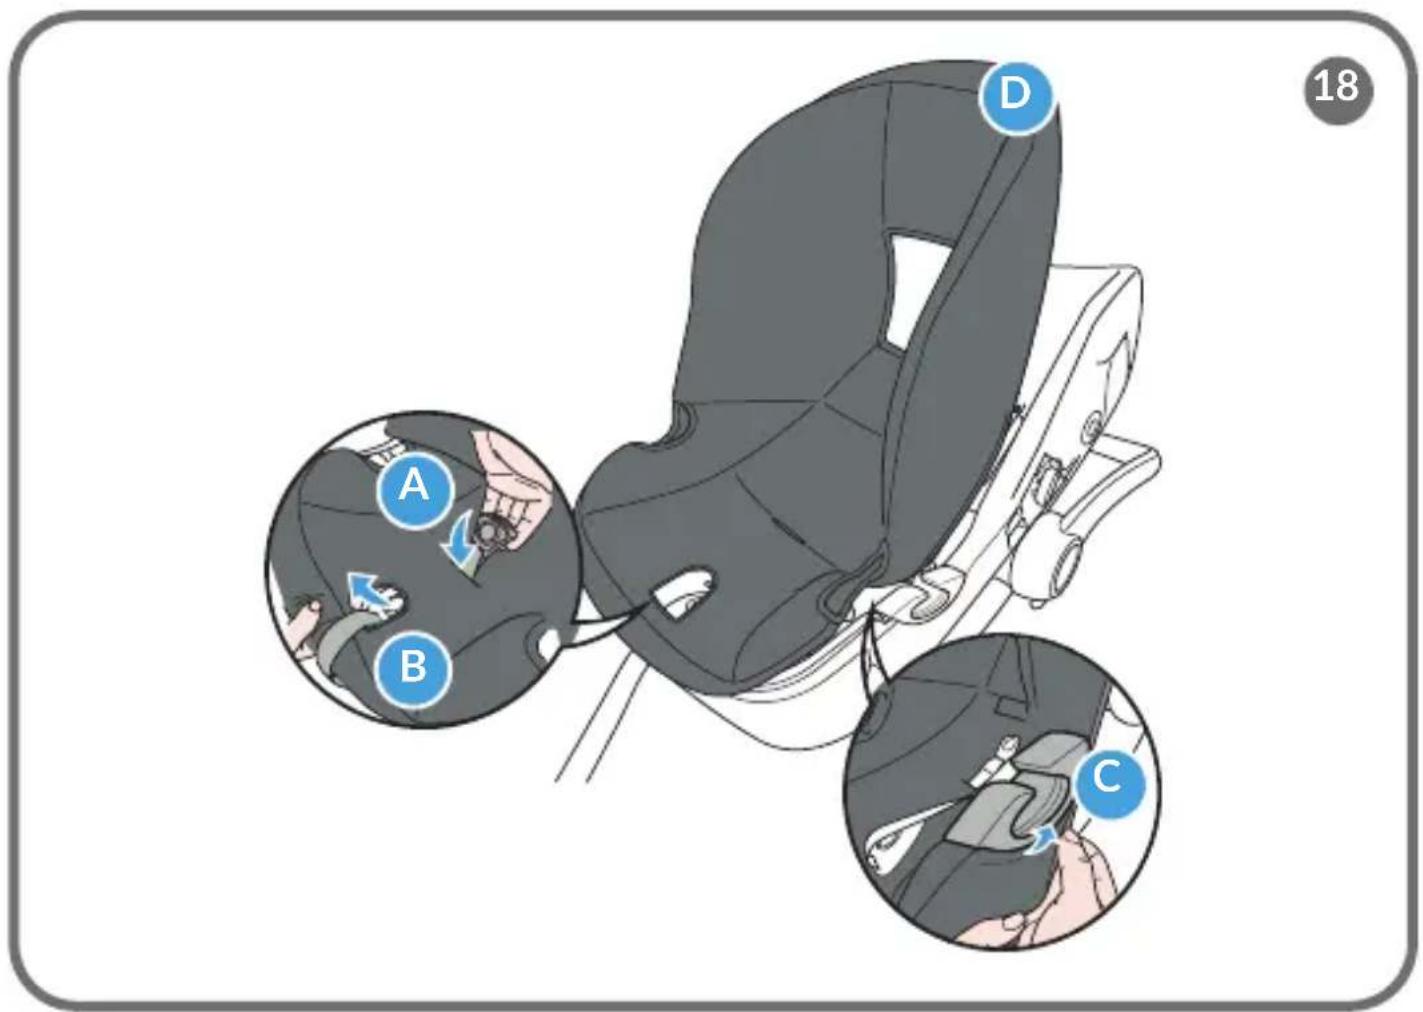
- Route the seat harness buckle through the corresponding slot in the cover (A, fig. 18), then remove the entire cover by passing the individual hard components of the child car seat through the appropriate slots in the cover (B–D, fig. 18).
- To reattach the cover, follow the above steps in reverse order.
CLEANING AND MAINTENANCE
CLEANING OF PLASTIC ELEMENTS
To clean the plastic parts, use a damp cloth and a mild detergent. Avoid using harsh detergents or bleaching agents.
CLEANING OF COVER
To remove minor soiling, use a damp sponge and a mild cleaning agent. Wash the cover at a maximum temperature of 30^ C. To do this, remove the cover entirely from the seat (see: Removal of seat cover). Do not tumble dry. Do not expose the cover to sunlight for drying.
The photos are for reference only, the actual appearance of products may differ from the photos.
Drogi Kliencie!
BrandLine Group Sp. z o.o.
JUSTERING AV PRODUKTEN
BrandLine Group Sp. z o.o.
LAPSE KINNITAMINE ISTMELE
DALU APRAKSTS (ATT. A)
- Dear customer!
- Producer:
- The product complies with the requirements of the standard: R129/04.
- Important:
- WARNINGS
- DESCRIPTION OF PARTS (FIG. A)
- PRODUCT ADJUSTMENT
- Headrest adjustment
- Reduction insert
- Handle adjustment
- Canopy adjustment
- BUCKLING THE CHILD IN THE SEAT
- UNBUCKLING THE HARNESS
- INSTALLATION IN THE CAR USING THE CAR'S SAFETY BELT
- DISASSEMBLY OF THE SEAT
- CHILD CAR SEAT INSTALLATION ON THE STROLLER FRAME
- REMOVAL OF SEAT COVER
- CLEANING AND MAINTENANCE
- CLEANING OF PLASTIC ELEMENTS
- CLEANING OF COVER
- Drogi Kliencie!
- JUSTERING AV PRODUKTEN
- LAPSE KINNITAMINE ISTMELE
- DALU APRAKSTS (ATT. A)
Brand : Lionelo
Model : Moxie i-Size
Category : Car seat